Daylight Design Portfolio
23
ARCH 573 Spring 2012 Daylight in Buildings: Final Portfolio JTTraw
-
Upload
justin-traw -
Category
Documents
-
view
220 -
download
1
description
Day lighting is an important element that should be incorporated in building design wherever possible. If done correctly it creates a dynamic space that occupants enjoy, it can also save over all energy consumption of the building. Understanding the use and principals behind naturally lighting a space is vital, if natural light is not used correctly it can be detrimental to the occupants and users. This portfolio provides exploration into naturally lighting a space.
Transcript of Daylight Design Portfolio

ARCH 573Spring 2012
Daylight in Buildings: Final Portfolio
JTTraw


Table of Contents
Experiment 1: Draw the Light
Experiment 2: Building Day Lighting models
Experiment 3: Build and Analyze a Physical Model of a Masters Space
Experiment 4: Digital Studio Integration
Experiment 5: Visual Comfort Analysis
Experiment 6: Final Digital Studio Integration
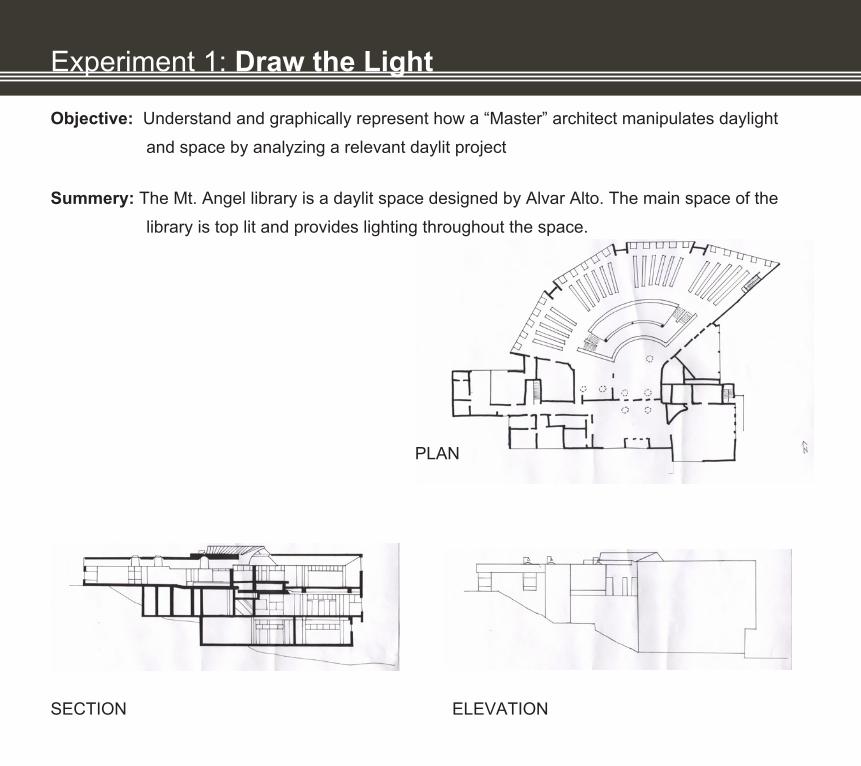
Experiment 1: Draw the Light
Objective: Understand and graphically represent how a “Master” architect manipulates daylight and space by analyzing a relevant daylit project
Summery: The Mt. Angel library is a daylit space designed by Alvar Alto. The main space of the library is top lit and provides lighting throughout the space.
ELEVATIONSECTION
PLAN
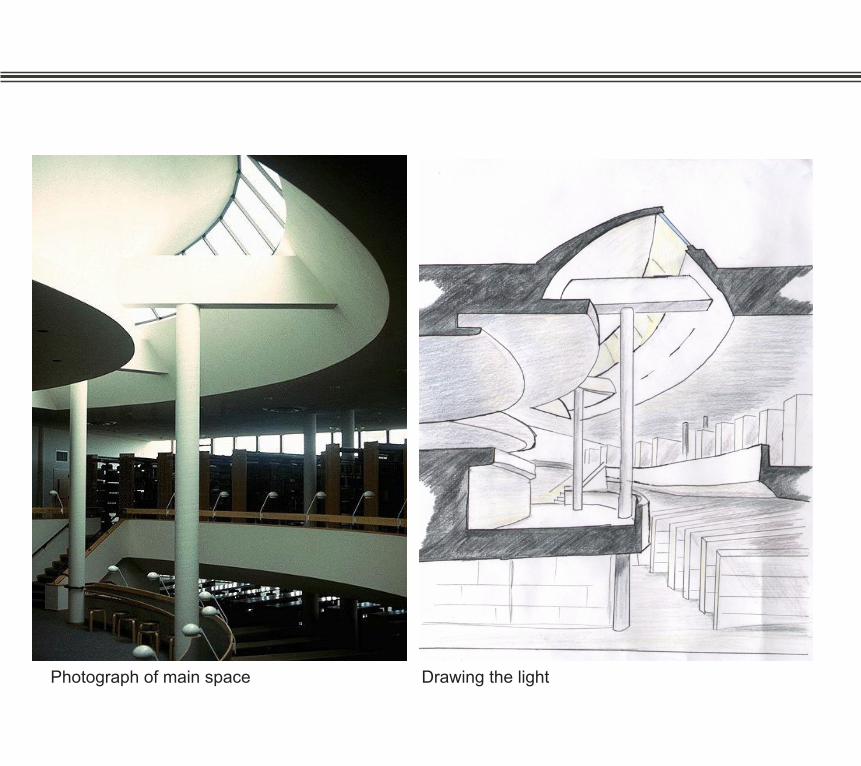
Photograph of main space Drawing the light

Experiment 2: Building Daylighting models
Objective: Build a simple physical model, explore daylight as a light source, begin to understand the relationship between daylight apertures and interior surfaces.
10
16
4
11
17
5
12
18
6

1
13
19
7
2
14
20
8
3
15
21
9
Twenty one different lighting conditions

Project Summery: We first decided on a simple shoebox shape, approximately 18” but 20” and then decided what type of lighting should be illustrated. We wanted to cover side lighting, back lighting, and two forms of top lighting. The side lighting has a filter on it to act like a series of translucent panels. The light tube above also uses the same filter and has a similar translucent. The radiating skylights so not have a filter and serve as a primary light source along the curve wall in the back. The ramp adds a dynamic element to the scene and helps tell a visual story.
Drawing the Light
Digital Model of the Space

Photo Documentation and Process
All Images Taken With: Nikon DC 70- F8

Experiment 3: Build and Analyze a Physical Model of a Masters Space
Objective: Build and analyze an exquisite physical model of a primary space from a famous daylit building.
ORIGINAL
Project Summery: This was a group project consisting of four members. The space that we choose too model was the Mt. Angel Seminary classroom space. This is a fairly standard class room but has a complex lighting distribution installation bellow the ceiling. The acoustic ceiling tiles are slanted to help distribute light, and the suspended device helps minimize direct light on the occupants and helps distribute the light more evenly. The goal of the project was to find a photograph of the space that illustrates the day lighting properties and then attempt to replicate it the best possible, taking into account material, lighting levels, and scene composition.
Original Photo

SUNNY
OVERCAST
OVERCAST HDR
Overcast Sky ConditionsTaken in the IDL sky box
Overcast Sky Conditions (HDR)Taken in the IDL sky box
Sunny Sky ConditionsTaken across from Boise Weekly
All Images Taken With: Nikon DC 70- F8

Experiment 4: Digital Studio Integration
Objective: Build (and analyze) a carefully crafted schematic design model of a main space for your studio project. If you do not have a current studio project, pick a previous studio project or ask permission to use you Exp. 3 (Master’s space) that you studied physically earlier this semester. This process should help you further explore your design problem if you chose your studio project. If you chose the Master’s space, it will allow for detailed comparison of a well know form. By studying static and dynamic aspects of day lighting with more resolution through Ecotect, Radiance, and Daysim you will round out your skill set for designing quality daylit spaces.
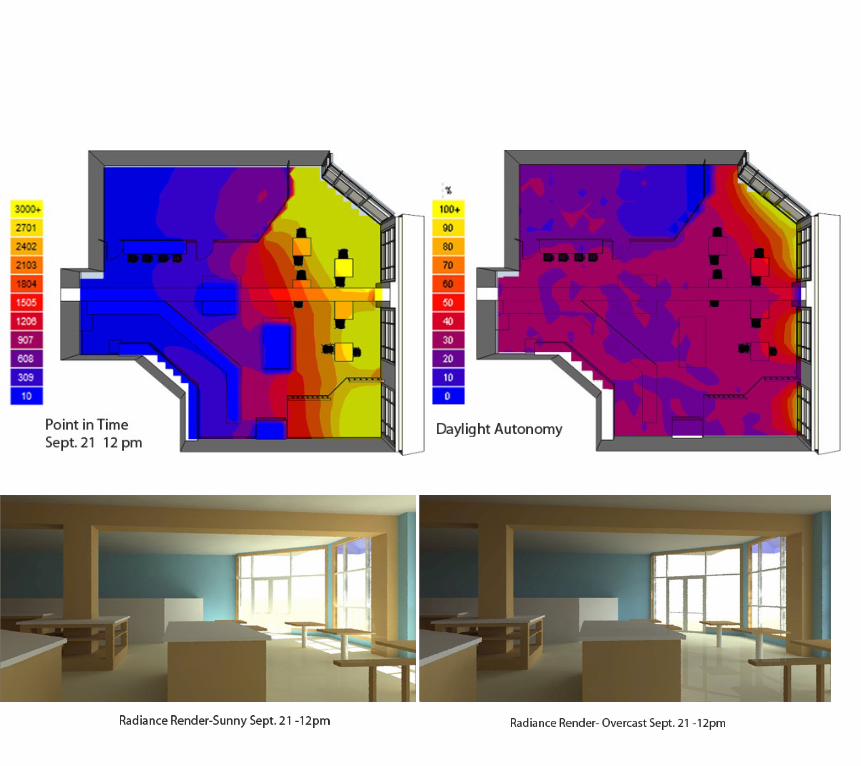
Project Summery: This was a group project consisting of two members. The space that we choose too model and analyze was the Garden City Head Start (Lolly Wyatt Center). This was a three part project where we needed to digitally model the space in sketchup, export it to Ecotect and apply surface material and install a illuminance grid and then export this to Daysim to find both point in time reading (September 21 12:00 pm) and the daylight autonomy (%) of the space. We needed to perform analysis on the current built conditions and then two different iterations on the design.

Experiment 4: Digital Studio Integration Iteration one: As Built
Point in Time (Sept. 21 12:00 pm)
Daylight Autonomy
HDR Analysis

Iteration two: Flat Roof
HDR Analysis
Point in Time (Sept. 21 12:00 pm)
Daylight Autonomy

Iteration two: Flat Roof Iteration three: Deletion of Interior Re-lighting
Point in Time (Sept. 21 12:00 pm)
HDR Analysis
Daylight Autonomy
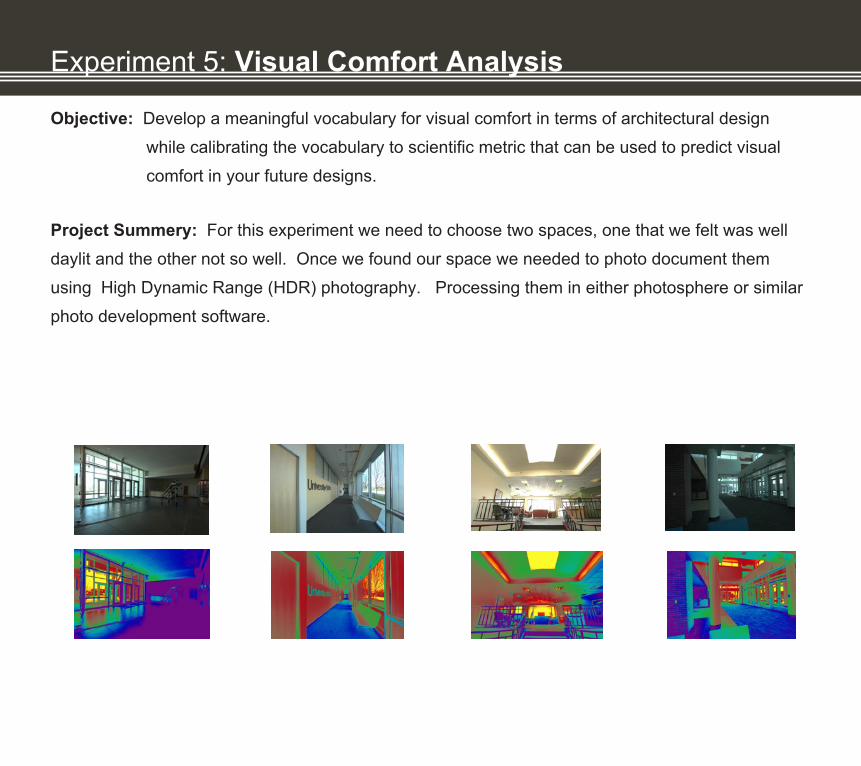
Experiment 5: Visual Comfort Analysis
Objective: Develop a meaningful vocabulary for visual comfort in terms of architectural design while calibrating the vocabulary to scientific metric that can be used to predict visual comfort in your future designs.
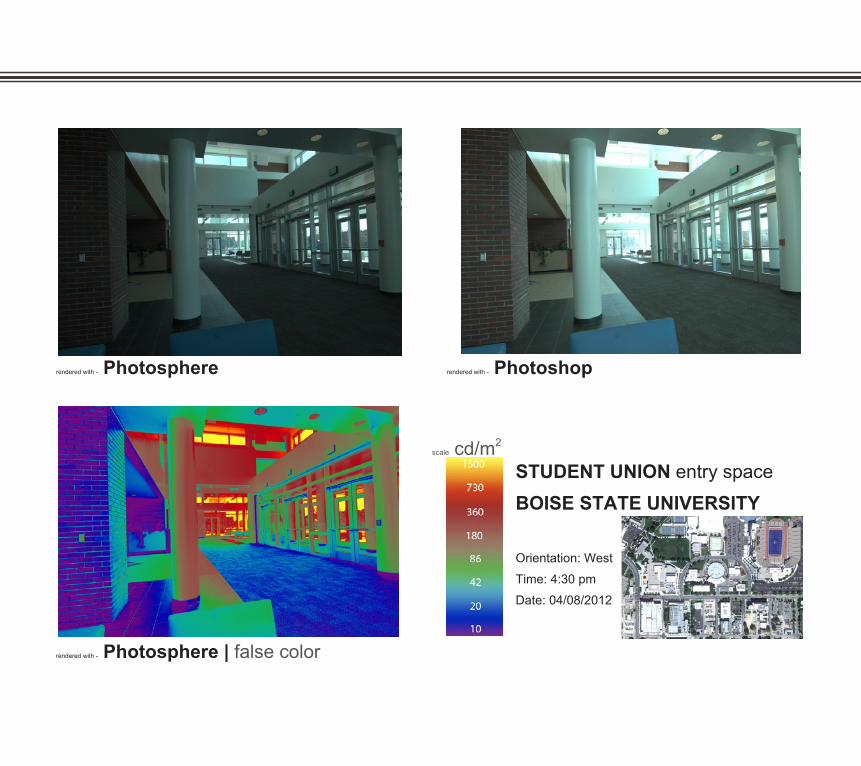
Project Summery: For this experiment we need to choose two spaces, one that we felt was well daylit and the other not so well. Once we found our space we needed to photo document them using High Dynamic Range (HDR) photography. Processing them in either photosphere or similar photo development software.
JTTrawarch. 57304.12.2012
High Dynamic Range photographyVisual Comfort Analysis

Experiment 5: Visual Comfort Analysis
rendered with - Photoshop
IURDC entry spaceUNIVERSITY of IDAHO
Orientation: WestTime: 3:15 pmDate: 04/08/2012
rendered with - Photosphere
rendered with - Photosphere | false color
scale cd/m2
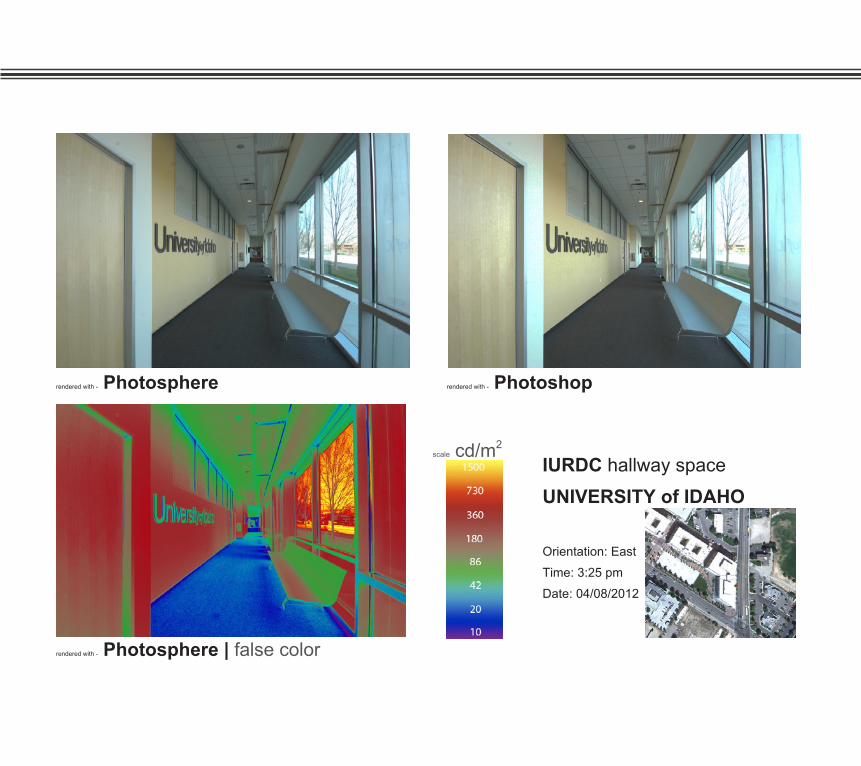
IURDC hallway spaceUNIVERSITY of IDAHO
Orientation: EastTime: 3:25 pmDate: 04/08/2012
rendered with - Photoshop
rendered with - Photosphere | false color
rendered with - Photosphere
scale cd/m2

rendered with - Photoshop rendered with - Photosphere
STUDENT UNION entry spaceBOISE STATE UNIVERSITY
Orientation: SouthwestTime: 4:15 pmDate: 04/08/2012
rendered with - Photosphere | false color
scale cd/m2
STUDENT UNION entry spaceBOISE STATE UNIVERSITY
Orientation: WestTime: 4:30 pmDate: 04/08/2012
rendered with - Photoshoprendered with - Photosphere
rendered with - Photosphere | false color
scale cd/m2

Once we found our two spaces and photographically documented them we needed to conduct a Building Experience Survey for the spaces: It is interesting to see the quality of the space as we experience it and how it actually is. Glare and creep became more evident once we were out of the space and analyzing them amongst each other.

Experiment 6: Final Digital Studio Integration
Objective: Build and analyze a carefully crafted 100% schematic design model of a main space for your studio project. If you do not have a current studio project see blow. This process should help you further explore and document your design in the case of your studio project. By studying static and dynamic aspects of day lighting with more resolution through Ecotect, Radiance, and Daysim you will round out your skill set for designing quality daylit spaces. This is your chance to make high quality renderings with detailed material definitions to bolster your studio presentation and portfolio.
Flying M Coffee500 West Idaho Street Boise, ID
In calculating the different daylight factors and daylight In autonomy it was difficult to establish the file format to work with all the different software. Once the file structure was established and accurate it was a smooth process to move from Sketchup, Ecotect, Radiance, and Daysim. Physical models allow for fast manipulation of space but once the format is correct a digital model can allow just as much flexibility.
Experiment 6: Final Digital Studio Integration