Data Management Guide Release 5.0 January 2006
152
GC3 Data Management Guide Release 5.0 Part No. B25880-01 January 2006
Transcript of Data Management Guide Release 5.0 January 2006

GC3
Data Management Guide Release 5.0 Part No. B25880-01 January 2006

Copyright © 2005-2006 Global Logistics Technologies, Inc. ii
GC3 Data Management Guide, Version 5.0
Part No. B25880-01
© 2005-2006 Global Logistics Technologies, Inc. All Rights Reserved.
GC3, Global Command and Control Center, G-Log, and the G-Log logo are trademarks and "Delivering Intelligent e-Logistics Solutions Worldwide" is a service mark (together, "Marks") of Global Logistics Technologies, Inc. ("G-Log"). Use of the marks are prohibited unless expressly authorized in writing by an authorized officer of G-Log. All other trademarks and service marks, which may be registered in certain jurisdictions, belong to the holder or holders of such marks.
The Materials and Services are protected by copyright and/or other intellectual property laws, and by international treaty provisions. Any unauthorized use of the Materials or Services may violate such laws and shall constitute infringement or misappropriation of G-Log’s intellectual property rights. Except as expressly provided herein, no right or license is granted to any patents, copyrights, Marks, or trade secrets by implication or otherwise.
While reasonable efforts have been made to ensure the accuracy of this document, G-Log assumes no liability resulting from any omission or inaccuracies in this document or from use of the information obtained herein. G-Log reserves the right to make changes to any products described herein to improve reliability, function, or design, and reserves the right to revise this document and to make changes from time to time in content hereof with no obligation to notify any person of revisions or changes. G-Log does not assume any liability arising out of the application or use of any product described herein; neither does it convey license under its patent rights or the rights of others.
Please send your comments about GC3 to:
Global Logistics Technologies, Inc
1016 West Ninth Avenue
King of Prussia, PA 19406
Telephone: (610) 491-9881
FAX: (610) 491-9897
http://www.g-log.com
Computer Software Copyrights: The G-Log software described in this document may not be copied, reproduced, modified, or distributed in any manner without G-Log's express written permission.
Use and Disclosure Restrictions: The software described in this document is the property of G-Log. It is furnished under a license agreement and may be used and/or disclosed only in accordance with the terms of the agreement.
US Government Rights: Use, duplication, or disclosure by the US Government is subject to restrictions set forth in the G-Log license agreement and as provided in DFARS 227.7202-1(a) and 227.7202-3(a) (1995), DFARS 252.227-7013(c)(1)(ii) (OCT 1988), FAR 12.212(a) (1995), FAR 52.227-19, or FAR 52.227-14 (ALT III), as applicable.

Copyright © 2005-2006 Global Logistics Technologies, Inc. iii
Contents
CONTENTS................................................................................................ III
ABOUT THIS MANUAL..................................................................................X
1. INTRODUCTION ................................................................................ 1-1
DB.XML................................................................................................................ 1-1
WHY DO I WANT TO USE DB.XML?................................................................................. 1-1 HOW CAN I USE DB.XML? .......................................................................................... 1-1 CSV ..................................................................................................................... 1-1
A SAMPLE CSV FILE.................................................................................................. 1-2 MULTI-TABLE CSV FILES............................................................................................. 1-2 INTERNATIONAL CHARACTERS .................................................................................... 1-3
IMPORT ................................................................................................................. 1-3 EXPORT................................................................................................................. 1-4
2. UPDATE DB.XML DATA VIA WEB PAGES ............................................ 2-1
EXPORTING DB.XML................................................................................................ 2-1
SAVING DB.XML OUTPUT TO A FILE ON YOUR PC ................................................................. 2-2 IMPORTING DB.XML................................................................................................ 2-2
COPYING DATA BETWEEN DOMAINS............................................................................. 2-7
3. UPDATE DB.XML DATA IN A REMOTE GC3 DATABASE, CLIENTUTIL.PY 3-1
EXPORTING DB.XML................................................................................................ 3-1
USING PRE-DEFINED DATA OBJECTS............................................................................... 3-1 WHAT PRE-DEFINED DATA OBJECTS EXIST? ...................................................................... 3-2 USING A SQLQUERY .................................................................................................. 3-3 IMPORTING DB.XML................................................................................................ 3-4
COPYING DATA BETWEEN DOMAINS............................................................................. 3-4
4. UPDATE DB.XML DATA IN A LOCAL GC3 DATABASE, COMMAND LINE 4-1

Copyright © 2005-2006 Global Logistics Technologies, Inc. iv
EXPORTING DB.XML................................................................................................ 4-1
USING SQL QUERY IN A FILE........................................................................................ 4-1 USING A SQL QUERY ON COMMAND LINE.......................................................................... 4-2 FOR A PRE-DEFINED DATABASE-OBJECT ........................................................................... 4-2 IMPORTING DB.XML................................................................................................ 4-2
5. LOAD CSV DATA VIA THE COMMAND LINE......................................... 5-1
IMPORTING AND EXPORTING ON THE SERVER SIDE.......................................................... 5-1
CLOBS IN CSV FILES................................................................................................. 5-4 EXPORTING WITH PARENT DATA .................................................................................... 5-4 EXPORTING WITH CHILD DATA...................................................................................... 5-5 EXPORTING WITH BOTH PARENT AND CHILD DATA ............................................................... 5-5 GL_USER TABLE ...................................................................................................... 5-5 IMPORTING ON THE CLIENT SIDE ................................................................................ 5-5
EXPORTING ON THE CLIENT SIDE ................................................................................ 5-6
EXPORTING A TABLE .................................................................................................. 5-6 EXPORTING DATA BASED ON ANY QUERY .......................................................................... 5-6
6. LOAD CSV DATA VIA WEB PAGES ...................................................... 6-1
IMPORTING ............................................................................................................ 6-1
7. LOAD CSV DATA VIA INTEGRATION .................................................. 7-1
GLOGXML DOCUMENT HIERARCHY.............................................................................. 7-1
8. LOAD CSV DATA VIA THE APPLICATION SERVER .............................. 8-1
COMMAND-LINE API FOR IMPORTING AND EXPORTING APPSERVER CSV FILES .................... 8-2
WEB INTERFACE FOR IMPORTING AND EXPORTING APPSERVER CSV FILES .......................... 8-2
IMPORTING............................................................................................................. 8-2 EXPORTING ............................................................................................................ 8-4 LOAD CSV FILES IN THE REPORT OWNER DIRECTORY...................................................... 8-5
9. HOW TO LOAD RATE DATA VIA CSV .................................................. 9-1
Copyright © 2005-2006 Global Logistics Technologies, Inc. v
IMPORTING LOCATION INFORMATION .......................................................................... 9-1
IMPORTING SERVICE TIMES ....................................................................................... 9-3
IMPORTING X_LANE DATA FOR RATES ........................................................................ 9-3
IMPORTING LTL RATES............................................................................................. 9-4
SIMPLIFIED ERD FOR LTL RATES ................................................................................... 9-5 SCENARIO–BASED ON SIMPLE WEIGHT BREAKS .................................................................. 9-6 SCENARIO–BASED ON COST PER POUND, SURCHARGE, AND DISCOUNT....................................... 9-7 SCENARIO–BASED ON COST PER POUND, CONDITIONAL SURCHARGE, GLOBAL SURCHARGE, AND DISCOUNT
.......................................................................................................................... 9-8 IMPORTING TL RATES............................................................................................... 9-9
SIMPLIFIED ERD FOR TL RATES .................................................................................. 9-10 SCENARIO–BASED ON DISTANCE BANDS WITH FIXED CHARGES, AND STOP OFFS ......................... 9-11 SCENARIO–BASED ON COST PER MILE, STOP OFFS, AND SURCHARGES..................................... 9-12 SCENARIO–BASED ON COST PER HUNDREDWEIGHT, WEIGHT BREAKS, AND SURCHARGES ............... 9-14 SCENARIO–BASED ON COST PER HUNDREDWEIGHT, WEIGHT BREAKS, MILEAGE BANDS, AND SURCHARGES
........................................................................................................................ 9-15
10. PROCESS RATE FACTORS................................................................10-1
PROCESS RATE FACTORS FROM A CLIENT .................................................................... 10-1
DUPLICATES ......................................................................................................... 10-1 WRITTEN TO DOMAIN............................................................................................... 10-1 NUMBER OF ACCESSORIAL COSTS................................................................................. 10-1 ERROR MESSAGES .................................................................................................. 10-1 UNDO CHANGES..................................................................................................... 10-2
11. MODIFYING RATES USING THE RATEMGMT.PY SCRIPT ..................11-1
CHANGERATEGEOXID ............................................................................................. 11-1
CHANGEALLRATEGEOXID ........................................................................................ 11-2
CHANGERATEOFFERINGXID...................................................................................... 11-2
CHANGEALLRATEOFFERINGXID................................................................................. 11-3
REMOVEEXPIREMARKID .......................................................................................... 11-3
INCRATECOSTBYFACTOR......................................................................................... 11-3
Copyright © 2005-2006 Global Logistics Technologies, Inc. vi
INCRATECOSTBYAMOUNT........................................................................................ 11-4
ADDNEWCOSTRECORD ............................................................................................ 11-5
REMOVEUSERDATEFIELDS........................................................................................ 11-5
REMOVEFIELD ....................................................................................................... 11-5
CHANGEEFFDATE ................................................................................................... 11-5
CHANGEFIELDVALUE............................................................................................... 11-6
12. VOYAGE SCHEDULE DATA...............................................................12-1
VOYAGE DATA....................................................................................................... 12-1
STAGING TABLES ................................................................................................... 12-1
PARTITIONING...................................................................................................... 12-1
PROCEDURES AND VIEWS ........................................................................................ 12-2
STEPS ................................................................................................................. 12-3
13. COPY DOMAINS..............................................................................13-1
EXPORT AND IMPORT.............................................................................................. 13-2
WHAT THE OBJECTS DO ............................................................................................ 13-2 SETUP ................................................................................................................ 13-2 STEPS TO COPY A DOMAIN......................................................................................... 13-3 RESULT ............................................................................................................... 13-3 ERROR MESSAGES .................................................................................................. 13-3 IN SCHEMA COPY................................................................................................... 13-4
WHAT THE OBJECTS DO ............................................................................................ 13-4 SET-UP ............................................................................................................... 13-4 COPY DOMAINS...................................................................................................... 13-4 RESULT OF IN SCHEMA COPY ...................................................................................... 13-5 DATABASE LINK COPY ............................................................................................ 13-5
CREATE LINK FROM TARGET TO SOURCE DATABASE ............................................................ 13-5 GENERATE SCRIPT .................................................................................................. 13-6 COPY DOMAINS...................................................................................................... 13-6 DIFFERENCE BETWEEN DOMAINS.................................................................................. 13-7
Copyright © 2005-2006 Global Logistics Technologies, Inc. vii
RERUN DATABASE LINK COPY ...................................................................................... 13-7
14. JAVA INTEGRATION API ................................................................14-1
EXAMPLE1.JAVA – INSERT ....................................................................................... 14-2
EXAMPLE2.JAVA – UPDATE ...................................................................................... 14-2
EXAMPLE3.JAVA – GETENTITYNAMES ........................................................................ 14-3
EXAMPLE4.JAVA – DESCRIBEENTITY.......................................................................... 14-3
EXAMPLE5.JAVA – DELETE....................................................................................... 14-4
EXAMPLE6.JAVA – FINDBYPRIMARYKEY..................................................................... 14-5
EXAMPLE7.JAVA – EXECMANY .................................................................................. 14-5
EXAMPLE9.JAVA – INSERTUPDATE ............................................................................ 14-7
EXAMPLE10.JAVA – FINDALL ................................................................................... 14-7
EXAMPLE11.JAVA – EXCEPTION HANDLING ................................................................. 14-8
THE CLIENTAPICONNECTION CLASS.......................................................................... 14-8
THE VALUESOBJECT CLASS ...................................................................................... 14-8
HANDLING UNITS OF MEASURE................................................................................. 14-9
ENVIRONMENT ISSUES ............................................................................................ 14-9
15. INTERACTIVE UPLOADING OF ZIP FILE .........................................15-1
16. BAD FILES......................................................................................16-1
17. BACKGROUND ZIP FILE PROCESSING ............................................17-1
18. EXPORTING DATA AS A ZIP FILE....................................................18-1
19. EXPORTING LARGE ZIP FILES IN THE BACKGROUND .....................19-1
20. EXPORTING VIA THE INTERFACE ...................................................20-1
CHANGES IN CSV EXPORT SCREENS........................................................................... 20-1
21. CONFIGURING CHILD TABLES........................................................21-1

Copyright © 2005-2006 Global Logistics Technologies, Inc. viii
22. DETERMINATION OF CHILD TABLES...............................................22-1
CHILDREN OF RATE_GEO......................................................................................... 22-1
TREE STRUCTURE FOR RATE_GEO CHILDREN ............................................................... 22-1
TREE STRUCTURE FOR RATE_OFFERING CHILDREN........................................................ 22-2
23. EXPORTING REFERENCED PUBLIC DATA DURING MULTI-TABLE EXPORTS................................................................................................23-1
24. IGNORING UNDEFINED COLUMNS WHEN IMPORTING ...................24-1
25. MAX ERROR....................................................................................25-1
26. STEPS FOR COPYING RATES BETWEEN DATABASES USING ZIP FILES 26-1
STEP 1 – CREATE A CSVUTIL.CTL FILE (CSVUTIL CONTROL FILE) FOR EXPORTING............... 26-1
STEP 2 – USE THE INTEGRATION UPLOAD SCREEN TO UPLOAD THE ZIP FILE CREATED IN STEP 1.......................................................................................................................... 26-1
STEP 3 – DOWNLOAD THE ZIP FILE CONTAINING THE RATE OFFERING .............................. 26-1
STEP 4 – CREATE A CSVUTIL.CTL FILE FOR IMPORTING................................................... 26-1
STEP 5 – CREATE ANOTHER BACKGROUND ZIP FILE........................................................ 26-2
STEP 6 – UPLOAD THE ZIP FILE FROM STEP 5 TO THE TARGET INSTANCE............................ 26-2
27. RUNNING CSVUTIL IN THE BACKGROUND......................................27-1
28. PIPING CSV OUTPUT TO A REMOTE HOST ......................................28-1
ABILITY TO SYNC DATA BETWEEN DIFFERENT GC3 VERSIONS......................................... 28-2
29. EXPORTING TABLE SETS AND PIPING THE SET TO A REMOTE SYSTEM 29-1
30. ORACLE ADVANCED QUEUING........................................................30-1
STEP 1 – CREATE QUEUE TABLE(S) ........................................................................... 30-1
STEP 2 – SETUP REQUIRED INBOUND QUEUES ............................................................. 30-1

Copyright © 2005-2006 Global Logistics Technologies, Inc. ix
STEP 3 – SETUP DATABASE LISTENERS....................................................................... 30-2
STEP 4 – SETUP APPLICATION SERVER LISTENERS........................................................ 30-3
STEP 5 – CREATE OUTBOUND QUEUES........................................................................ 30-3
STEP 6 – OTHER QUEUE MANAGEMENT UTILITIES......................................................... 30-4
STEP 7 – BACKWARD COMPATIBLE ............................................................................ 30-4
31. SYNC DATA BETWEEN DIFFERENT GC3 VERSIONS .........................31-1
32. CHAPTER 32 DELETING DOMAINS..................................................32-1
33. REFERENCE A TRANSACTION CODES..............................................33-1
34. REFERENCE B EDITING DB.XML FILES............................................34-1
AN EXAMPLE DB.XML FILE ..................................................................................... 34-1
35. REFERENCE C SPECIFYING COMPLEX QUERIES ..............................35-1
EXAMPLE OF A COMPLEX QUERY ................................................................................ 35-1
36. REFERENCE D CSVUTIL RESPONSE MESSAGES ...............................36-1
RESPONSE MESSAGES WITH NO ERRORS..................................................................... 36-1
ERROR MESSAGES.................................................................................................. 36-2
IMPORT ............................................................................................................... 36-2 EXPORT............................................................................................................... 36-5
Copyright © 2005-2006 Global Logistics Technologies, Inc. x
About this Manual This manual is for members of the GC3 implementation team, who are responsible for maintaining and updating data in GC3 at your site. This manual provides step-by-step instructions for importing and exporting data in CSV and db.xml format.
This manual does not cover the installation of any components required to import or export. See the Administration Guide on your GC3 CD for installation and configuration instructions.
Copyright © 2005-2006 Global Logistics Technologies, Inc. 1-1
1. Introduction
DB.XML DB.XML (Database-centric XML) is a file format for importing and exporting GC3 data.
A typical db.xml file contains a set of data objects. An example of a data object is a rate_geo object, which includes its child rate_geo_cost_group, rate_geo_cost, and other child records nested within it. When using the replace-children (RC) transaction code, the rate_geo record is updated, and all of its children are deleted and re-inserted. Transaction codes of I and IU are also supported (see page 33-1).
When you edit a DB.XML file remember that:
• The content of a DB.XML file appears within a set of <TRANSACTION_SET> tags.
• GC3 ignores element names that do not correspond to a database table. This allows you to comment your DB.XML file without affecting what is imported.
• Date columns must use the following format: YYYY-MM-DD HH:MM:SS.
• Element and attribute names must be all uppercase.
A complex, nested SQL query defines each data object. The query indicates which tables and columns comprise the data object.
Why do I want to use DB.XML? Compared to CSV (Comma Separated Values), DB.XML supports manipulation of parent-child records as a unit. This gives DB.XML an advantage compared to CSV when updating for example rate information.
How can I use DB.XML? There are two main python scripts that support db.xml files:
• Sql2xml.py (generates db.xml output from a select statement)
• Xml2sql.py (imports a db.xml file into the database)
These two scripts are located in the glog_deploy.integration.python directory.
There are three ways to use these scripts:
Chapter 2 – via web-based interface is the way most users will use the scripts.
Chapter 3 – via ClientUtil.py supports client-side batch jobs that export and import db.xml from a remote GC3 instance.
Chapter 4 - Directly on the DOS/UNIX command line when a local SQL*net connection to the database is available.
CSV CSVUtil is a utility for importing and exporting data in CSV format in and out of the GC3 database. CSVUtil also exports data as a script of insert statements. This document describes how to use CSVUtil and shows some sample CSV files.
CSV files are compact and enable you to import large amounts of data into GC3. You typically want to use CSVUtil when importing rates into a fresh installation of GC3.

Copyright © 2005-2006 Global Logistics Technologies, Inc. 1-2
There are three ways to use CSVUtil:
• On the DOS/UNIX command line
• Via the GC3 web interface
• Via integration transmissions
A Sample CSV File Below is a sample CSV file:
HTS
HTS_CID,HTS_NAME
EXEC SQL ALTER SESSION SET NLS_DATE_FORMAT = 'YYYY-MM-DD HH24:MI:SS..'
"1","0901.11.0000"
"2","0901.12.0000"
"3306.70.","Nailed wood boxes and shook"
"4736.12.","Nailed or lock-corner wooden b"
Line 1 must be the name of the table.
Line 2 must be a comma-separated list of column names. Only the columns being loaded must be specified.
After line 3 may be one or more optional EXEC SQL lines such as the one shown above to set the date format.
Subsequent lines include the data. The number of columns of data must correspond to the number of columns specified on line 2. The ordering of the data columns must also correspond to line 2.
Character data may be surrounded with double-quotes, as shown above. If you need to include a double-quote character, use " instead. The tools described here to export CSV files automatically convert double-quote characters into ".
Numeric data should not be surrounded with double-quotes.
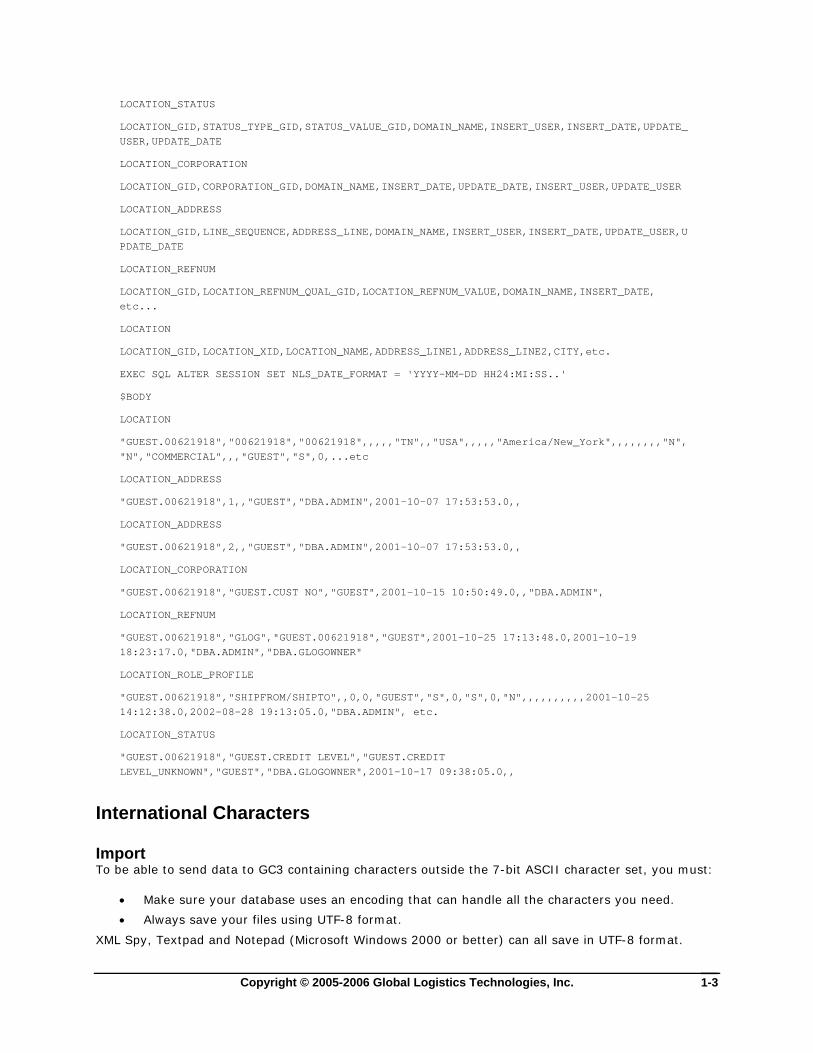
Multi-table CSV Files The output produced by the xcsvw* commands is in multi-table CSV format. The various CSV import commands recognize this format also
The first record in a multi-format file must be "$HEADER".
The header section contains table names and the names of the columns used in that table.
After the header section comes the body, identified by the $BODY keyword.
Each data record in the $BODY must be preceded by its table name on the prior line.
Here is an example:
$HEADER
LOCATION_ROLE_PROFILE
LOCATION_GID,LOCATION_ROLE_GID,CALENDAR_GID,FIXED_STOP_TIME, etc...
Copyright © 2005-2006 Global Logistics Technologies, Inc. 1-3
LOCATION_STATUS
LOCATION_GID,STATUS_TYPE_GID,STATUS_VALUE_GID,DOMAIN_NAME,INSERT_USER,INSERT_DATE,UPDATE_USER,UPDATE_DATE
LOCATION_CORPORATION
LOCATION_GID,CORPORATION_GID,DOMAIN_NAME,INSERT_DATE,UPDATE_DATE,INSERT_USER,UPDATE_USER
LOCATION_ADDRESS
LOCATION_GID,LINE_SEQUENCE,ADDRESS_LINE,DOMAIN_NAME,INSERT_USER,INSERT_DATE,UPDATE_USER,UPDATE_DATE
LOCATION_REFNUM
LOCATION_GID,LOCATION_REFNUM_QUAL_GID,LOCATION_REFNUM_VALUE,DOMAIN_NAME,INSERT_DATE, etc...
LOCATION
LOCATION_GID,LOCATION_XID,LOCATION_NAME,ADDRESS_LINE1,ADDRESS_LINE2,CITY,etc.
EXEC SQL ALTER SESSION SET NLS_DATE_FORMAT = 'YYYY-MM-DD HH24:MI:SS..'
$BODY
LOCATION
"GUEST.00621918","00621918","00621918",,,,,"TN",,"USA",,,,,"America/New_York",,,,,,,,"N","N","COMMERCIAL",,,"GUEST","S",0,...etc
LOCATION_ADDRESS
"GUEST.00621918",1,,"GUEST","DBA.ADMIN",2001-10-07 17:53:53.0,,
LOCATION_ADDRESS
"GUEST.00621918",2,,"GUEST","DBA.ADMIN",2001-10-07 17:53:53.0,,
LOCATION_CORPORATION
"GUEST.00621918","GUEST.CUST NO","GUEST",2001-10-15 10:50:49.0,,"DBA.ADMIN",
LOCATION_REFNUM
"GUEST.00621918","GLOG","GUEST.00621918","GUEST",2001-10-25 17:13:48.0,2001-10-19 18:23:17.0,"DBA.ADMIN","DBA.GLOGOWNER"
LOCATION_ROLE_PROFILE
"GUEST.00621918","SHIPFROM/SHIPTO",,0,0,"GUEST","S",0,"S",0,"N",,,,,,,,,,2001-10-25 14:12:38.0,2002-08-28 19:13:05.0,"DBA.ADMIN", etc.
LOCATION_STATUS
"GUEST.00621918","GUEST.CREDIT LEVEL","GUEST.CREDIT LEVEL_UNKNOWN","GUEST","DBA.GLOGOWNER",2001-10-17 09:38:05.0,,
International Characters
Import To be able to send data to GC3 containing characters outside the 7-bit ASCII character set, you must:
• Make sure your database uses an encoding that can handle all the characters you need.
• Always save your files using UTF-8 format.
XML Spy, Textpad and Notepad (Microsoft Windows 2000 or better) can all save in UTF-8 format.

Copyright © 2005-2006 Global Logistics Technologies, Inc. 1-4
Before you edit your files, you need to ensure that you configure your text editor to use the appropriate font and script (sometimes called subset). A script is a collection of characters such as Western European, Greek or Turkish. For example, if you need to update files containing Czech characters, then you need to select a font that supports an Eastern European script such as Arial or Arial Unicode Ms.
Export When export files, GC3 writes files in UTF-8. Note that when you view data in your browser and then use the view source option to save your data, just save your file without specifying an encoding. Later, when editing your file, use an editor that support UTF-8

Copyright © 2005-2006 Global Logistics Technologies, Inc. 2-1
2. Update DB.XML Data via Web Pages This chapter describes the web-based user interface for exporting and importing db.xml.
Exporting DB.XML This section describes how to export db.xml using the web-based user interface.
1. Log into GC3 as DBA.ADMIN.
2. Choose Business Process Automation>Data Export>DB.XML Export and GC3 displays the DB.XML Export page.
3. Choose a dbObjectName to export the corresponding database table.
4. Enter a whereClause. For example you can enter DOMAIN_NAME=’GUEST’ or rownum<3. You can also combine the two like this DOMAIN_NAME=’GUEST’ and rownum<3. Instead of selecting a dbObjectName and entering a whereClause, it is also possible to enter a sqlQuery (for example, select * from activity) and a rootName (for example, ACTIVITY).
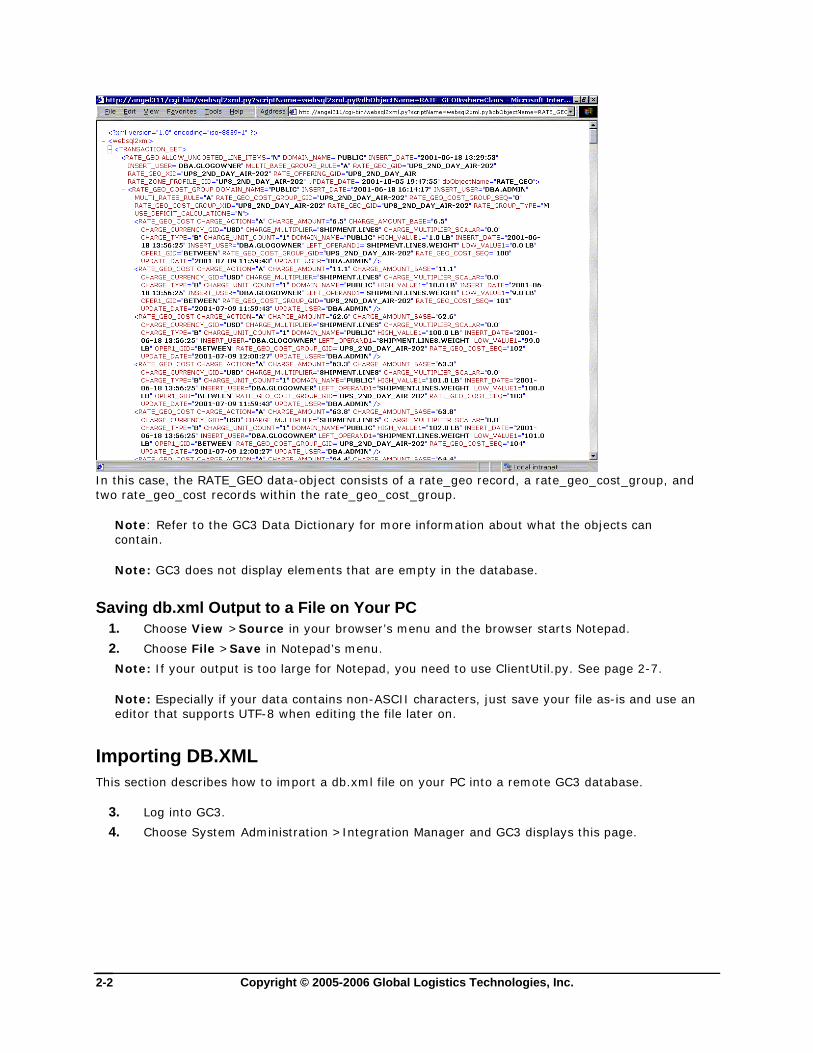
5. Click Run and GC3 displays the results page.
Copyright © 2005-2006 Global Logistics Technologies, Inc. 2-2
In this case, the RATE_GEO data-object consists of a rate_geo record, a rate_geo_cost_group, and two rate_geo_cost records within the rate_geo_cost_group.
Note: Refer to the GC3 Data Dictionary for more information about what the objects can contain.
Note: GC3 does not display elements that are empty in the database.
Saving db.xml Output to a File on Your PC 1. Choose View >Source in your browser’s menu and the browser starts Notepad.
2. Choose File >Save in Notepad’s menu.
Note: If your output is too large for Notepad, you need to use ClientUtil.py. See page 2-7.
Note: Especially if your data contains non-ASCII characters, just save your file as-is and use an editor that supports UTF-8 when editing the file later on.
Importing DB.XML This section describes how to import a db.xml file on your PC into a remote GC3 database.
3. Log into GC3.
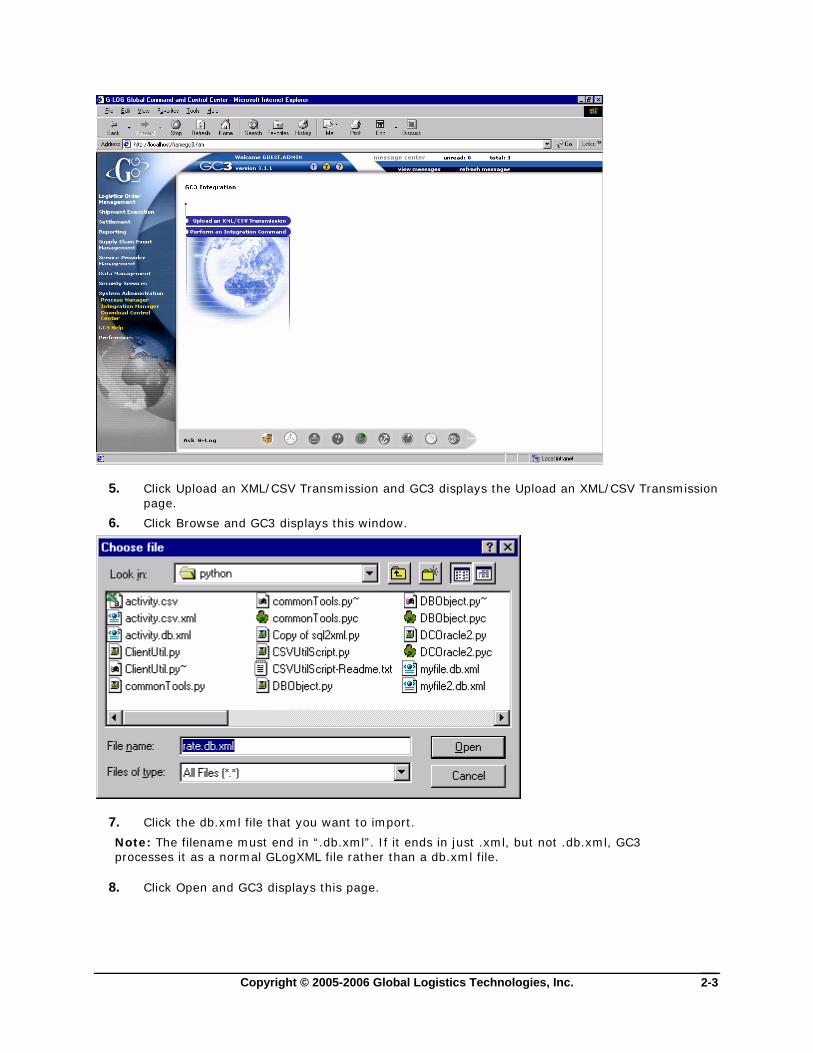
4. Choose System Administration >Integration Manager and GC3 displays this page.
Copyright © 2005-2006 Global Logistics Technologies, Inc. 2-3
5. Click Upload an XML/CSV Transmission and GC3 displays the Upload an XML/CSV Transmission page.
6. Click Browse and GC3 displays this window.
7. Click the db.xml file that you want to import.
Note: The filename must end in “.db.xml”. If it ends in just .xml, but not .db.xml, GC3 processes it as a normal GLogXML file rather than a db.xml file.
8. Click Open and GC3 displays this page.
Copyright © 2005-2006 Global Logistics Technologies, Inc. 2-4
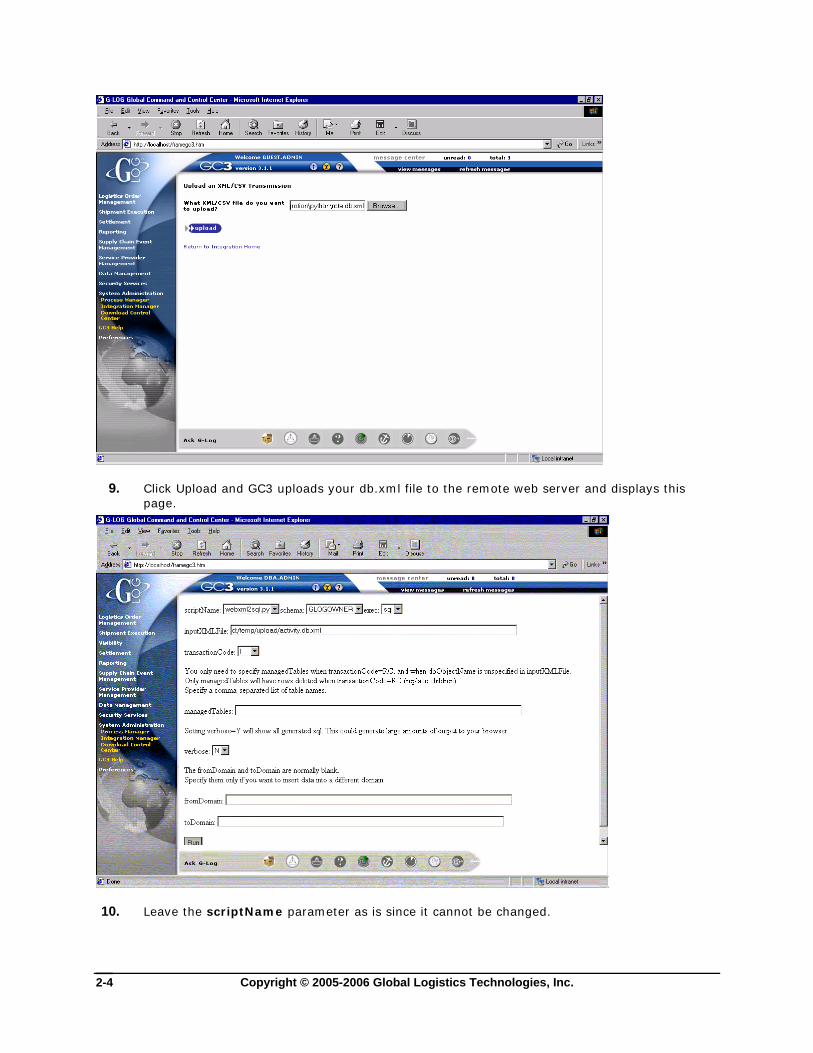
9. Click Upload and GC3 uploads your db.xml file to the remote web server and displays this page.
10. Leave the scriptName parameter as is since it cannot be changed.
Copyright © 2005-2006 Global Logistics Technologies, Inc. 2-5
11. Select the schema that your data belongs to. A database contains a number of tables, indexes, constraints, and so on. Collectively the definition of these items is known as the database's schema.
12. You can set the exec parameter to:
• SQL – GC3 executes SQL directly against the database. This is somewhat faster than running plsql.
• Plsql – GC3 generates plsql instead of SQL, and executes the plsql against the database.
• Nothing - GC3 displays plsql code, but does not execute the code.
13. Do not change the inputXMLFile. In this case, the file has been uploaded to the d:/temp/upload directory on the webserver.
14. The default transactionCode is I (insert). You may change the transactionCode from I to either IU or RC. See page 33-1 for the meaning of the different transactionCodes.
15. You only need to specify managedTables when the transactionCode is RC, and the dbObjectName is unspecified in the inputXMLFile. The dbObjectName is unspecified in your db.xml file, if your file was generated using a sqlQuery. To generate a db.xml file with dbObjectName specified, generate the db.xml file by selecting a dbObjectName. See page 2-1 for a procedure on how to do this.
16. The default verbose setting is “N”. You may change this to “Y”, if you wish to see the generated SQL that is executed to persist the xml into the database.
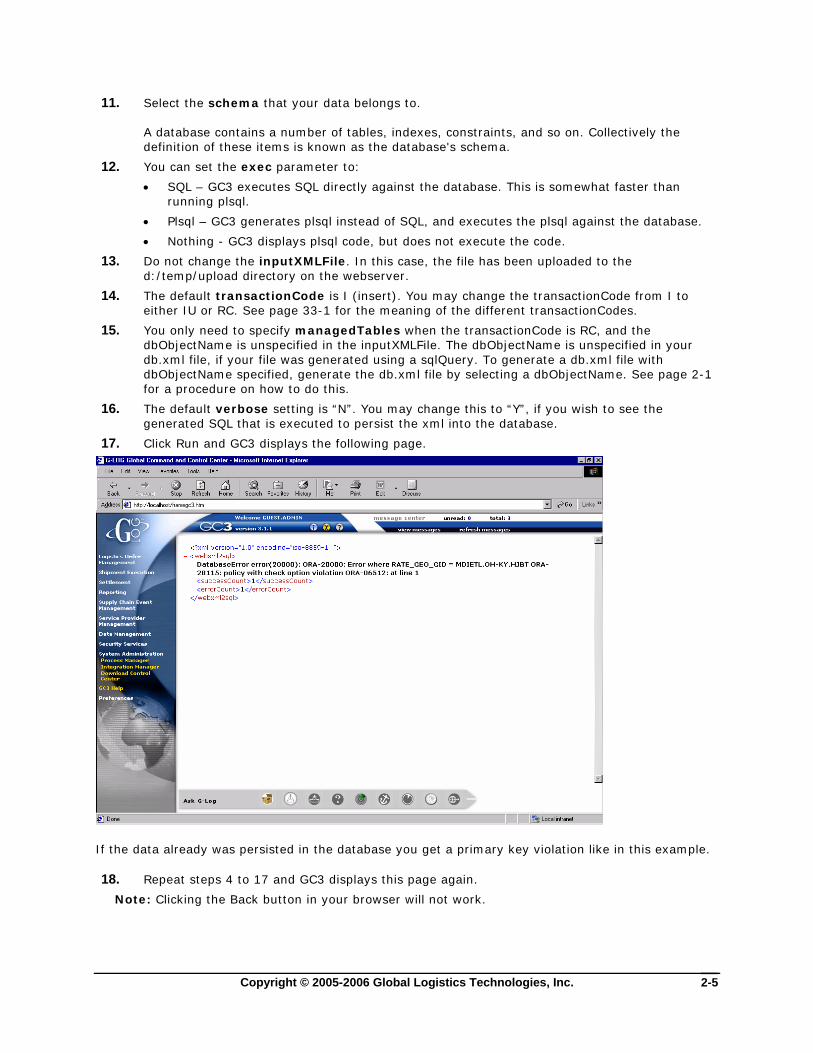
17. Click Run and GC3 displays the following page.
If the data already was persisted in the database you get a primary key violation like in this example.
18. Repeat steps 4 to 17 and GC3 displays this page again.
Note: Clicking the Back button in your browser will not work.

Copyright © 2005-2006 Global Logistics Technologies, Inc. 2-6
19. Select RC in the transactionCode drop-down list.
20. Click Run and GC3 displays this page.
In this case, GC3 displays summary statistics without any error messages. Note that the successCount is 1 greater than the number of data objects. This is correct.

Copyright © 2005-2006 Global Logistics Technologies, Inc. 2-7
Copying Data Between Domains This section describes how to copy data from one domain to another.
1. Export the data as described on page 2-1.
2. Import the data as described on page 2-2, but specify a fromDomain and a toDomain, as shown below.
In this example, you are copying data from the GUEST domain to the VIOLET domain. When copying a table between domains, make sure you copy all dependant tables too. For example, locations might need calendars to work correctly.


Copyright © 2005-2006 Global Logistics Technologies, Inc. 3-1
3. Update DB.XML Data in a Remote GC3 Database, ClientUtil.py This chapter describes how to use the client-side python script ClientUtil.py to export and import db.xml files from a remote GC3 database. This section assumes you have python installed on your PC. If not, see the Administration Guide on your GC3 CD for installation and configuration instructions.
The main advantage of ClientUtil.py compared to the web-based interface is that it allows you to write client side batch jobs, which pull db.xml data from a remote GC3 instance. This data can be modified as desired, and then imported back to the remote GC3 instance (also using ClientUtil.py).
Note: ClientUtil.py can also export and import CSV files.
Exporting DB.XML Similar to how it works via the web screen, there are two methods for exporting:
• By specifying a dbObjectName and whereClause, or
• By specifying a sqlQuery and a rootName
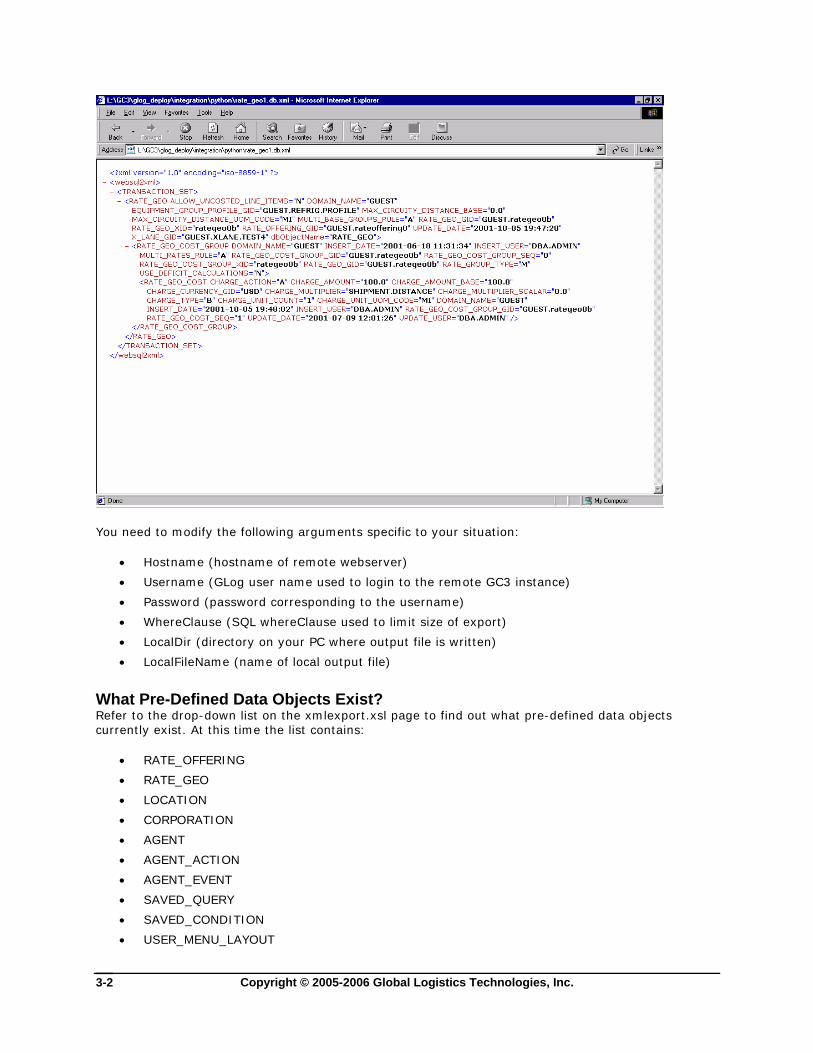
Using Pre-Defined Data Objects Here is the command line for exporting the first RATE_GEO db-object found in the database:
python ClientUtil.py -command xmlExport -hostname localhost -username GUEST.ADMIN -password CHANGEME -dbObjectName RATE_GEO -whereClause "rownum < 2" -localDir ./ -localFileName rate_geo1.db.xml
This example creates the file “rate_geo1.db.xml” in the current working directory. In this case, this file has the following content:
Copyright © 2005-2006 Global Logistics Technologies, Inc. 3-2
You need to modify the following arguments specific to your situation:
• Hostname (hostname of remote webserver)
• Username (GLog user name used to login to the remote GC3 instance)
• Password (password corresponding to the username)
• WhereClause (SQL whereClause used to limit size of export)
• LocalDir (directory on your PC where output file is written)
• LocalFileName (name of local output file)
What Pre-Defined Data Objects Exist? Refer to the drop-down list on the xmlexport.xsl page to find out what pre-defined data objects currently exist. At this time the list contains:
• RATE_OFFERING
• RATE_GEO
• LOCATION
• CORPORATION
• AGENT
• AGENT_ACTION
• AGENT_EVENT
• SAVED_QUERY
• SAVED_CONDITION
• USER_MENU_LAYOUT

Copyright © 2005-2006 Global Logistics Technologies, Inc. 3-3
Note: When exporting the USER_MENU_LAYOUT object you must specify a whereClause, which includes “Parent_menu_gid is Null”. Otherwise, you will get garbage.
Using a SqlQuery Here is an example command line for exporting all the activity records in the database:
python ClientUtil.py -command xmlQuery -hostname localhost -username GUEST.ADMIN -password CHANGEME -sqlQuery "select * from activity"
-rootName ACTIVITY -localDir ./ -localFileName activity.db.xml
The above command creates the activity.db.xml file in the current working directory. In this case, this file has the following content:
You need to modify the following arguments, specific to your situation:
• Hostname
• Username
• Password
• SqlQuery
• RootName
• LocalDir
• LocalFileName

Copyright © 2005-2006 Global Logistics Technologies, Inc. 3-4
Importing DB.XML You can use ClientUtil.py to import a client-side db.xml file into a remote GC3 database instance.
Here is an example command line:
python ClientUtil.py -command xmlImport -hostname localhost -username DBA.ADMIN -password CHANGEME -transactionCode IU -localDir ./ -localFileName rate.db.xml
See page 33-1 for possible transactionCodes.
GC3 ignores element names that do not correspond to a database table. This allows you to comment your DB.XML file without affecting what is imported.
Copying Data Between Domains You can use ClientUtil.py to import a client-side db.xml file into a remote GC3 database instance, inserting the data into a different domain than is specified in the db.xml file. For example, if the contents of the db.xml file has data from the GUEST domain, and you want to insert it into the KMART domain, you would use the following command:
python ClientUtil.py -command xmlImport -hostname localhost -username DBA.ADMIN -password CHANGEME -transactionCode IU -localDir ./ -localFileName rate.db.xml -fromDomain GUEST -toDomain KMART
Copyright © 2005-2006 Global Logistics Technologies, Inc. 4-1
4. Update DB.XML Data in a Local GC3 Database, Command Line If you have a SQL*net connection to your database, you can use the sql2xml.py and xml2sql.py scripts directly from your command line.
Exporting DB.XML There are three methods for exporting db.xml with sql2xml.py.
• Specify SQL query in a file, and provide file name as input argument
• Specify SQL query directly as input argument
• Specify a pre-defined database object name, such as RATE_GEO
sql2xml has the following syntax and arguments.
python sql2xml.py -dbConn <connectString> -sqlFile <sqlFile> -rootName <rootName>
-or-
python sql2xml.py -dbConn <connectString> -rootName <rootName> -sqlQuery <queryStringInDoubleQuotes>
-or-
python sql2xml.py -dbConn <connectString> -dbObjectName <dbObjectNameName> -whereClause <wc>
Xml2sql supports the following commands and arguments:
Commands Arguments
dbConn Connection to database. Username/password@database
sqlFile Name of SQL file to specify what should be exported.
rootName Only used with sqlQuery. Set the XML root element.
sqlQuery SQL query to specify what should be exported. Use double quotes.
dbObjectName See page 3-2 for what objects you can refer to.
whereClause Only used with dbObjectName. SQL where clause to limit what should be exported.
Using SQL Query in a File Here is a sample command line, which exports db.xml using a SQL query specified in a file:
python sql2xml.py -dbConn glogowner/glogowner@localdb -sqlFile myquery.sql -rootName ACTIVITY
The above command writes xml.db output to standard output. You may pipe this output to a file if you like.

Copyright © 2005-2006 Global Logistics Technologies, Inc. 4-2
Using a SQL Query on Command Line Here is a sample command line, which exports db.xml using a SQL query specified on the command line:
python sql2xml.py -dbConn glogowner/glogowner@localdb -sqlQuery "select * from activity" -rootName ACTIVITY
For a Pre-defined Database-Object Here is a sample command line, which exports db.xml for the pre-defined RATE_GEO database object:
python sql2xml.py -dbConn glogowner/glogowner@localdb -dbObjectName RATE_GEO -whereClause "rownum < 2"
Importing DB.XML Xml2sql has the following syntax and arguments.
python xml2sql.py -schema <schema> -dbConn <dbConn> -inputXMLFile <filename> -transactionCode <I|IU|RC> -managedTables <mc> -exec <sql|plsql>
Xml2sql supports the following commands and arguments:
Commands Arguments
schema Only required when database user is not table owner. If entered, this is typically GLOGOWNER OR REPORTOWNER.
dbConn Connection to database. Username/password@database
inputXMLFile Name of DB.XML file to import.
transactionCode See page 33-1 for possible transactionCodes. Default is IU.
managedTables This argument specifies what child elements the script should replace. The remaining elements are processed using the IU transaction code.
You only need to specify managedTables when the transactionCode is RC, and the dbObjectName is unspecified in your inputXMLFile. The dbObjectName is unspecified in your db.xml file, if your file was generated using the sqlQuery or sqlFile arguments. To generate a db.xml file with dbObjectName specified, export the db.xml file using a dbObjectName.
exec SQL - the script executes SQL directly against the database. This is somewhat faster than running plsql.
Plsql - the script generates plsql instead of SQL, and executes the plsql against the database.
If you omit the argument, the script displays plsql code, but does not execute the code.
Here is a sample command line, which imports a file called “rate_geo1.db.xml”
Copyright © 2005-2006 Global Logistics Technologies, Inc. 4-3
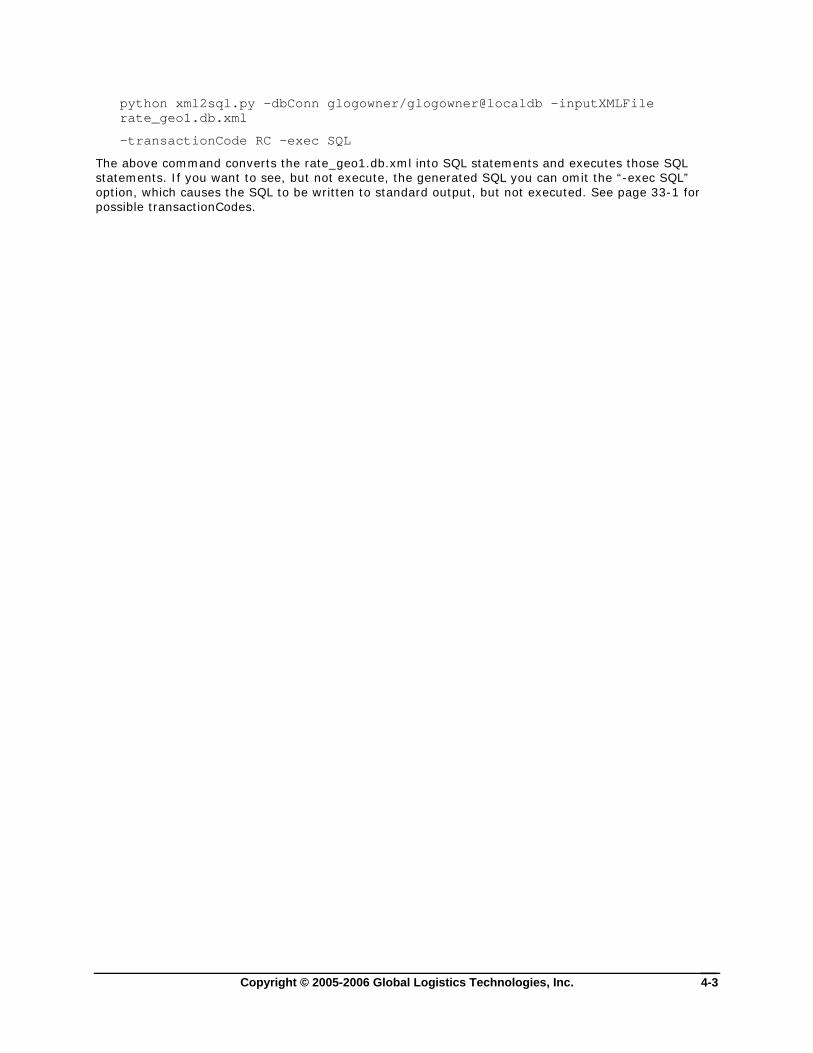
python xml2sql.py -dbConn glogowner/glogowner@localdb -inputXMLFile rate_geo1.db.xml
-transactionCode RC -exec SQL
The above command converts the rate_geo1.db.xml into SQL statements and executes those SQL statements. If you want to see, but not execute, the generated SQL you can omit the “-exec SQL” option, which causes the SQL to be written to standard output, but not executed. See page 33-1 for possible transactionCodes.


Copyright © 2005-2006 Global Logistics Technologies, Inc. 5-1
5. Load CSV Data via the Command Line This chapter describes how to import and export CSV from the command line.
Importing and Exporting on the Server Side This section describes how to use CSVUtil to export and import data from a local GC3 database.
CSVUtil has the following syntax and arguments.
java glog.database.admin.CSVUtil –command <i|ii|iu|u|uu|d|dd|xcsv|xcsvcd|xcsvpcd|xcsvpd|xsql> -connectionId <connectionId> -tableName <tableName> -dataDir <dataDirectory> -dataFileName <dataFileName> -appendFile –runsqlloader -domain_name <domainName> -useT2 <Y|N> -debug -XMLCSVOutput -sqlQuery <queryString> -whereClause <whereClause> -clobDir <clobDirectory> –xvalidate <Y|N> -encoding <encoding>
CSVUtil supports the following commands and arguments:
Commands Arguments
command i - insert CSV data into the database
ii - insert data, while suppressing unique key constraint violations
iu - attempts to insert data. If a primary key violation occurs, it updates the data. No delete statements are generated.
u - update data in the database
uu - update data, while suppressing “no data found” constraint violations
d- delete data from the database
dd- delete data, while suppressing “no data found” constraint violations
xcsv - export a CSV file
xcsvcd - export a multi-table CSV file with all subordinate child tables (e.g. shipment_stop, shipment_stop_d etc. for the shipment table). A table set called C.<table_name> controls which tables are considered to be children of a given table. So for example, the C.SHIPMENT table set contains the following tables: shipment_stop, shipment_refnum, shipment_remark, etc. Similarly, the C.SHIPMENT_STOP table_set contains the shipment_stop_d table.
xcsvpcd - export a multi-table CSV file with both parent and child data.

Copyright © 2005-2006 Global Logistics Technologies, Inc. 5-2
Commands Arguments
xcsvpd - export a multi-table CSV file with all referenced non-public foreign key records (parent data) required to successfully load the record(s) in a foreign database.
xsql - export data as a script of insert statements rather than a CSV file
connectionId The connectionId is a shorthand method for providing an Oracle username, password, and server.
For example, if you specify your connectionId as codegen, you need to add the following properties to your glog.properties file:
glog.database.codegen.schema=glogowner
glog.database.codegen.t2client.driverClassName=oracle.jdbc.driver.OracleDriver
glog.database.codegen.t2client.databaseURL=jdbc:oracle:thin:@localhost:1521
glog.database.codegen.user=glogload
glog.database.codegen.password=glogload
glog.database.codegen.server=dbserver
glog.database.codegen.t2client.pool=
tableName The tableName argument is only specified for the xcsv and xsql commands. This specifies the name of the database table to export. Can be null if sqlQuery is specified. Must be upper case.
dataDir The dataDir argument specifies the location to either read or write the file specified in the –dataFileName argument. The following glog.property file setting controls the default value of the dataDir argument:
glog.database.load.dir=d:\\upload
In this case, the default directory has been set to d:\upload. Note that two backslashes are required in glog.properties.
dataFileName The dataFileName argument specifies the name of the file in the dataDir directory to either read or write. This field is required when importing a file, but is optional when exporting a file. If unspecified for an export, the output is written to System.out.
appendFile The appendFile argument only applies to the export commands (xcsv and xsql). If specified, CSVUtil will append to the file specified by the dataFileName argument instead

Copyright © 2005-2006 Global Logistics Technologies, Inc. 5-3
Commands Arguments
of overwriting it.
runsqlloader The runsqlloader argument only applies to import commands. If specified, the oracle sqlloader program will be used to load the CSV file instead of a java procedure. If you have sqlloader installed on your system the sqlloader is faster than the java procedure.
domain_name The domain_name argument only applies to the export commands (xcsv and xsql). It specifies that only the data in that domain is to be exported.
useT2 Used to avoid using the T2Connection class, which depends on VPD being already setup correctly. When loading certain GC3 "system" tables, it is necessary to avoid the use of the T2 connection class (its a chicken or the egg type situation). For normal data loading, using the T2Connection class is correct and desirable.
debug Used for debugging.
XMLCSVOutput If true, then output looks like this:
<TableName></TableName> or <SqlQuery>...</SqlQuery>
<ColumnList></ColumnList>
<ExecSQL></ExecSQL>
<Row>...</Row>
<Row>...</Row>
sqlQuery If specified, then xcsv command is required and tableName is ignored.
whereClause Only used when tableName is specified and domainName is omitted.
clobDir Directory where external CLob files are read. Only used when importing external CLob files and not using sqlloader.
xvalidate Can be either Y (default) or N. When set to Y, CSVUtil gives you more user-friendly diagnostics messages and hinders missing values in your CSV file to delete an existing value in the database.
If you want CSVUtil to allow data to be nulled out, you should specify xvalidate as N when running CSVUtil.
encoding The encoding of the file you import. Common settings are ISO-8859-1 (default) and UTF-8. You especially need to consider this when you import data containing characters
Copyright © 2005-2006 Global Logistics Technologies, Inc. 5-4
Commands Arguments
outside the 7-bit ASCII set. Also, consider the encoding of your database.
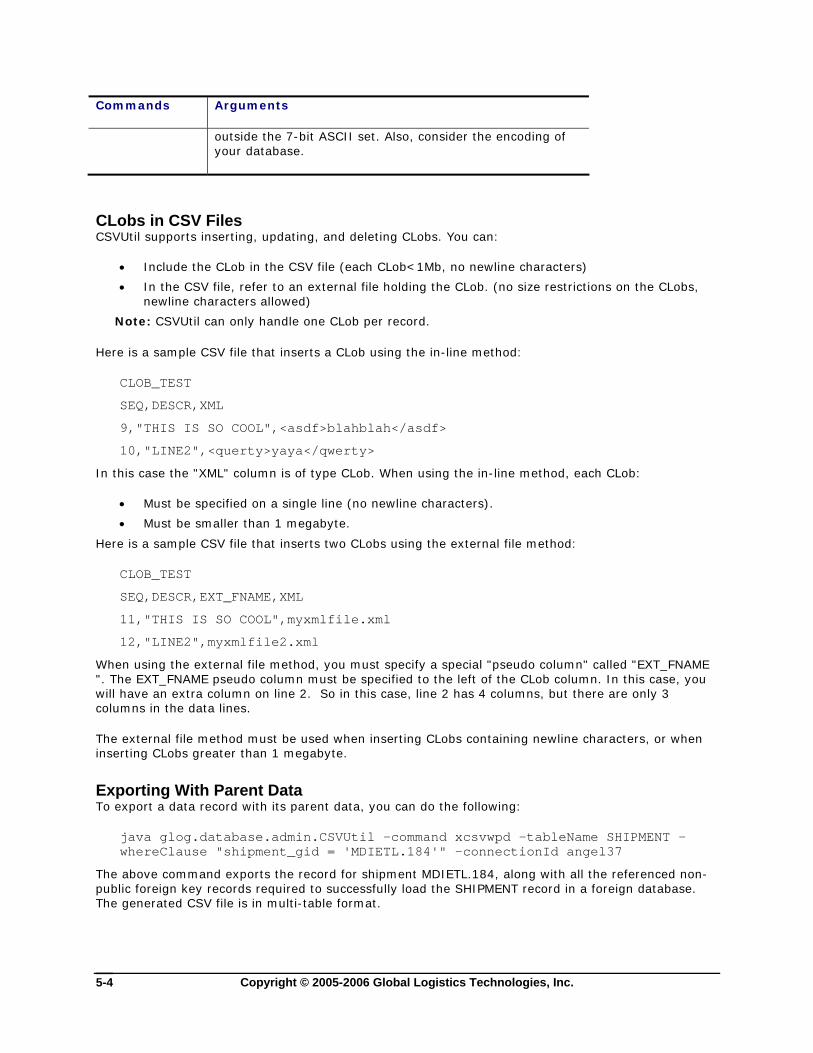
CLobs in CSV Files CSVUtil supports inserting, updating, and deleting CLobs. You can:
• Include the CLob in the CSV file (each CLob<1Mb, no newline characters)
• In the CSV file, refer to an external file holding the CLob. (no size restrictions on the CLobs, newline characters allowed)
Note: CSVUtil can only handle one CLob per record.
Here is a sample CSV file that inserts a CLob using the in-line method:
CLOB_TEST
SEQ,DESCR,XML
9,"THIS IS SO COOL",<asdf>blahblah</asdf>
10,"LINE2",<querty>yaya</qwerty>
In this case the "XML" column is of type CLob. When using the in-line method, each CLob:
• Must be specified on a single line (no newline characters).
• Must be smaller than 1 megabyte.
Here is a sample CSV file that inserts two CLobs using the external file method:
CLOB_TEST
SEQ,DESCR,EXT_FNAME,XML
11,"THIS IS SO COOL",myxmlfile.xml
12,"LINE2",myxmlfile2.xml
When using the external file method, you must specify a special "pseudo column" called "EXT_FNAME ". The EXT_FNAME pseudo column must be specified to the left of the CLob column. In this case, you will have an extra column on line 2. So in this case, line 2 has 4 columns, but there are only 3 columns in the data lines.
The external file method must be used when inserting CLobs containing newline characters, or when inserting CLobs greater than 1 megabyte.
Exporting With Parent Data To export a data record with its parent data, you can do the following:
java glog.database.admin.CSVUtil -command xcsvwpd -tableName SHIPMENT -whereClause "shipment_gid = 'MDIETL.184'" -connectionId angel37
The above command exports the record for shipment MDIETL.184, along with all the referenced non-public foreign key records required to successfully load the SHIPMENT record in a foreign database. The generated CSV file is in multi-table format.

Copyright © 2005-2006 Global Logistics Technologies, Inc. 5-5
Note: All the xcsvw* commands are far more expensive than the plain xcsv command. Using them to export a large data set will take a long time, since many foreign keys must be found. Use the commands with a restrictive where-clause, as shown in the examples to limit the running time.
Exporting With Child Data To export a data record with its child data, you can do the following:
java glog.database.admin.CSVUtil -command xcsvwcd -tableName SHIPMENT -whereClause "shipment_gid = 'MDIETL.184'" -connectionId angel37
The above command exports the record for shipment MDIETL.184, along with all the subordinate child tables such as shipment_stop, shipment_stop_d etc.
Exporting With Both Parent and Child Data To export a data record with both its parent and child data, you can do the following:
java glog.database.admin.CSVUtil -command xcsvwpcd -tableName SHIPMENT -whereClause "shipment_gid = 'MDIETL.184'" -connectionId angel37
This expensive command should be used with care.
GL_User Table CSVUtil supports adding and deleting records in the GL_USER table. This table stores the GC3 users and their passwords.
When the GL_USER table is specified in the header of a CSV file, special processing is done.
If you are an authorized GL_USER, you may add and delete records in the GL_USER table. As an exception for this table, you can only use the commands: i, ii, d, or dd.
Note: The u, uu, and iu commands are not supported when loading the GL_USER table.
Importing on the Client Side This section describes how to use ClientUtil.py to import data into a remote GC3 database.
Note: ClientUtil does not support the multi-table CSV format.
The following example imports data from d:/temp/rate_geo.csv on your PC into a remote GC3 database. Because xvalidate is set to Y, GC3 does not null missing values in the CSV file and GC3 also validates the content of the CSV file. If you need to null certain fields, set xvalidate to N.
python ClientUtil.py -command csvImport -hostname localhost -username GUEST.ADMIN -password CHANGEME -localDir d:/temp -localFileName rate_geo.csv -xvalidate Y
Note: You can skip password and rely on IP authentication instead.

Copyright © 2005-2006 Global Logistics Technologies, Inc. 5-6
Exporting on the Client Side This section describes how to use ClientUtil.py to export data from a remote GC3 database.
Note: ClientUtil does not export child and parent data for the specified records(s).
Exporting a Table The following example exports all the RATE_GEO records in the GUEST domain from the database that is connected to the GC3 instance running on a host called localhost. ClientUtil writes the CSV file to myfile.csv in the d:/temp directory.
python ClientUtil.py -command csvExport -hostname localhost -username GUEST.ADMIN -password CHANGEME -tableName RATE_GEO -whereClause "DOMAIN_NAME=’GUEST’" -localDir d:/temp -localFileName myfile.csv
Note: You can skip password and rely on IP authentication instead.
Exporting Data Based on Any Query The following example exports a CSV file containing just the shipment_gid column from the shipment table for all records in the GUEST domain. ClientUtil writes the CSV file to d:/temp/myfile.csv on your PC.
python ClientUtil.py -command csvQuery -hostname localhost -username GUEST.ADMIN -password CHANGEME -sqlQuery "select shipment_gid from shipment where domain_name = ‘GUEST’" -localDir d:/temp -localFileName myfile.csv
Copyright © 2005-2006 Global Logistics Technologies, Inc. 6-1
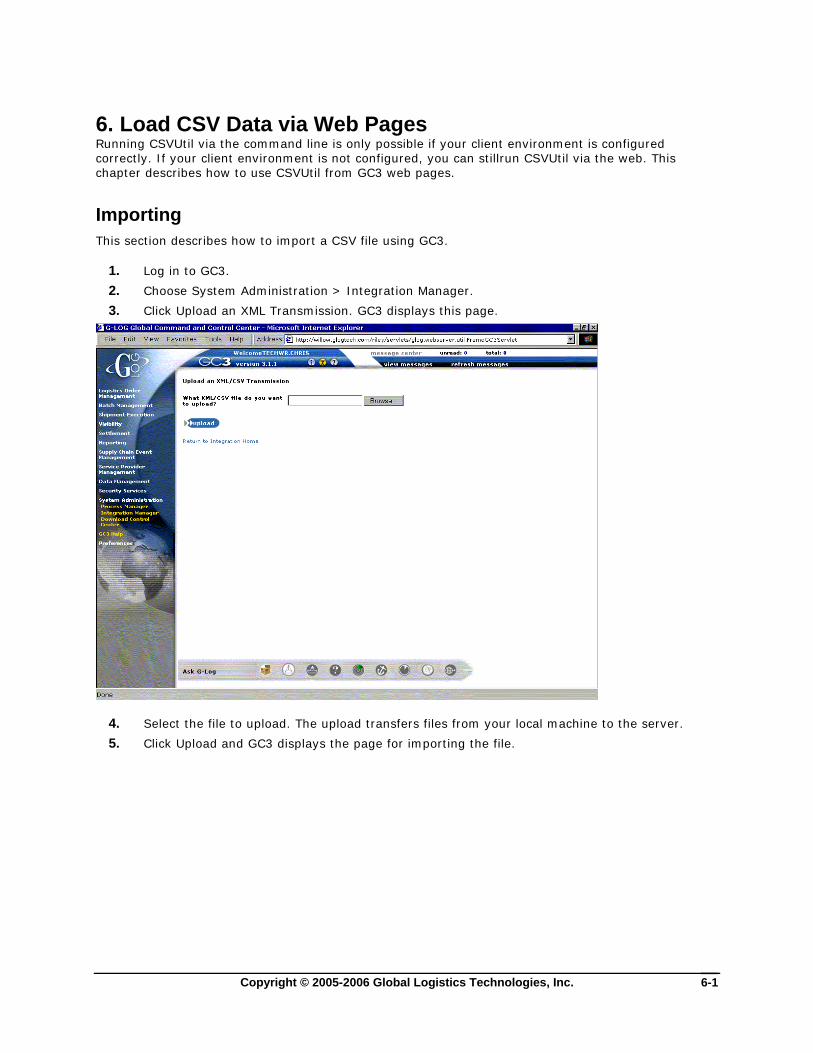
6. Load CSV Data via Web Pages Running CSVUtil via the command line is only possible if your client environment is configured correctly. If your client environment is not configured, you can stillrun CSVUtil via the web. This chapter describes how to use CSVUtil from GC3 web pages.
Importing This section describes how to import a CSV file using GC3.
1. Log in to GC3.
2. Choose System Administration > Integration Manager.
3. Click Upload an XML Transmission. GC3 displays this page.
4. Select the file to upload. The upload transfers files from your local machine to the server.
5. Click Upload and GC3 displays the page for importing the file.
Copyright © 2005-2006 Global Logistics Technologies, Inc. 6-2
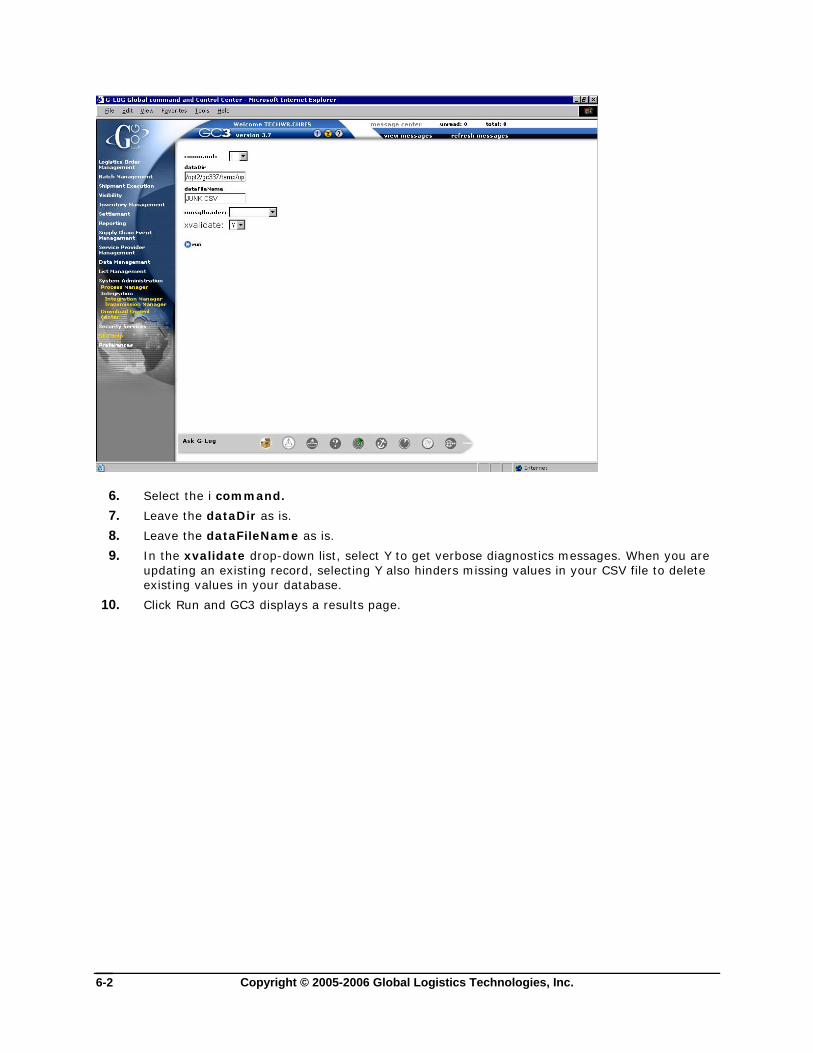
6. Select the i command.
7. Leave the dataDir as is.
8. Leave the dataFileName as is.
9. In the xvalidate drop-down list, select Y to get verbose diagnostics messages. When you are updating an existing record, selecting Y also hinders missing values in your CSV file to delete existing values in your database.
10. Click Run and GC3 displays a results page.

Copyright © 2005-2006 Global Logistics Technologies, Inc. 6-3
In the above case, no rows were inserted because the table specified in the CSV file, called “JUNK”, does not exist in the GC3 database. Read more about how to interpret error messages on page 3-1.
If you are loading a large file, you may specify the runsqlloader option. This will only work if sqlloader is installed on the GC3 web server. The following line must be added to the jserv.properties file to make sqlloader run from the web:
wrapper.path = d:/product/oracle/ora81/bin
Obviously, this entry would be different depending on the location of the Oracle bin directory.


Copyright © 2005-2006 Global Logistics Technologies, Inc. 7-1
7. Load CSV Data via Integration The GLogXML schema lets you embed the contents of multiple CSV files into a Transmission XML document. The contents of the CSV file are contained in the CSVFileContent XML element within the GLogXMLElement. Only one CSV file can be in a single CSVFileContent XML element. Currently, the interface only supports inserts into the database (corresponds to the ‘i’ command). The implementation of updates and deletes will be provided in a future release. This interface should only be used for setup activities, and is not intended for operational activity.
GLogXML Document Hierarchy Below you can see the XML document hierarchy. The elements have been indented to show the hierarchy and relationship.
<Transmission>
<TransmissionHeader> . . .
</TransmissionHeader>
<TransmissionBody>
<GLogXMLElement>
<CSVFileContent>
---CSV File Contents---
</CSVFileContent>
</GLogXMLElement>
<GLogXMLElement>
<CSVFileContent>
---CSV File Contents---
</CSVFileContent>
</GLogXMLElement>
</TransmissionBody>
</Transmission>
Below is a sample document that would be used to insert some data into the rate tables:
<Transmission>
<TransmissionHeader>
<UserName>DBA.ADMIN</UserName>
</TransmissionHeader>
<TransmissionBody>
<GLogXMLElement>
<CSVFileContent>
X_LANE
X_LANE_GID,X_LANE_XID,SOURCE_POSTAL_CODE,SOURCE_COUNTRY_CODE3_GID,SOURCE_GEO_HIERARCHY_GID,DEST_POSTAL_CODE,DEST_COUNTRY_CODE3_GID,DEST_GEO_HIERARCHY_GID,DOMAIN_NAME

Copyright © 2005-2006 Global Logistics Technologies, Inc. 7-2
"MYDOMAIN.194-064","194-064","194","USA","USZIP3","064","USA","USZIP3","MYDOMAIN"
"MYDOMAIN.194-065","194-065","194","USA","USZIP3","065","USA","USZIP3","MYDOMAIN"
</CSVFileContent>
</GLogXMLElement>
</TransmissionBody>
</Transmission>

Copyright © 2005-2006 Global Logistics Technologies, Inc. 8-1
8. Load CSV Data via the Application Server GC3 provides the option to permit CSV files to be imported via the application server. This feature is called “AppServer CSV” or AS.CSV.
If you upload a file whose name ends in “as.csv” instead of just “.CSV”, it will be interpreted as an application server CSV file, as opposed to a database-centric CSV file. AppServer CSV files have the following features:
• The first line must be the name of an Entity such as Location, ObOrderBase, OrderRelease, etc. Refer to Example3.java in the chapter titled “Java Integration API” to see how to get a complete list of supported entity names. Entity names are derived from data base table names, except they omit the underscores and use mixed case. For example the entity name for the ob_order_base table is ObOrderBase.
• The second line must be a comma-separated list of attribute names. Attribute names are like database column names, except they omit the underscores and use mixed case. For example a column called location_gid corresponds to the attribute locationGid. Note that the first character is in lower-case for attribute names, but upper case for entity names.
• The third line may be an optional UOM line, which provides UOM values for any UOM attributes. This line may be provided instead of providing UOM qualifiers every time a UOM value occurs.
• The remaining lines are data lines. Each value in a data line must correspond to an attribute name from line2.
Here is small example file. This example omits the optional UOM line.
Location
locationGid,locationXid,countryCode3Gid,domainName,locationName
"GUEST.MYLOC8","MYLOC8","USA","GUEST","myloc8"
Here is another small example file showing how to specify a UOM line.
SShipUnit
domainName,unitWidth,sShipUnitGid,isSplitable,unitNetVolume,unitNetWeight,shipUnitCount,unitWeight,unitVolume,unitHeight,receivedNetVolume,receivedNetWeight,unitLength,sShipUnitXid
UOM:,,,,CUFT,LB,,LB,,,CUFT,LB,,
GUEST,,GUEST.001,false,0,10,1,10,,,0,0,,001
Here is the same example, but with the UOM line omitted and the units of measure specified with each data attribute instead.
SShipUnit
domainName,unitWidth,sShipUnitGid,isSplitable,unitNetVolume,unitNetWeight,shipUnitCount,unitWeight,unitVolume,unitHeight,receivedNetVolume,receivedNetWeight,unitLength,sShipUnitXid
GUEST,,GUEST.001,false,0 CUFT,10 LB,1,10 LB,,,0 CUFT,0 LB,,001
Here is an example that will result in errors. You cannot specify a UOM line of you also specify UOMs within the data attributes. Please note: This example below represents what not to do. Do not copy the example below. The following example would produce an error because a UOM line was specified, but UOMs were also specified in the data attributes. Doing this would cause the system to think that each UOM field has two UOM qualifiers.
SShipUnit

Copyright © 2005-2006 Global Logistics Technologies, Inc. 8-2
domainName,unitWidth,sShipUnitGid,isSplitable,unitNetVolume,unitNetWeight,shipUnitCount,unitWeight,unitVolume,unitHeight,receivedNetVolume,receivedNetWeight,unitLength,sShipUnitXid
UOM:,,,,CUFT,LB,,LB,,,CUFT,LB,,
GUEST,,GUEST.001,false,0 CUFT,10 LB,1,10 LB,,,0 CUFT,0 LB,,001
Command-Line API for Importing and Exporting AppServer CSV Files Here is a command line example for importing an AppServer CSV file:
java glog.integration.clientapi.CSVHelper
-command ii
-fileName l:/GC3/glog/integration/clientapi/location.as.csv
-glUserGid GUEST.ADMIN
-glPassword CHANGEME
When importing, the valid commands are i, ii, u, uu, d, dd, and iu.
Here is a sample command line for exporting an AppServer CSV file:
java glog.integration.clientapi.CSVHelper
-command as.xcsv
-entityName SShipUnit
-glUserGid GUEST.FEWROWS
-glPassword CHANGEME
When you export an AppServer CSV file, you should use a special user that has VPD configured to limit the number of rows selected. This is because the underlying Java Integration API does not currently provide a method that allows a where-clause to be specified.
Web Interface For Importing and Exporting AppServer CSV Files
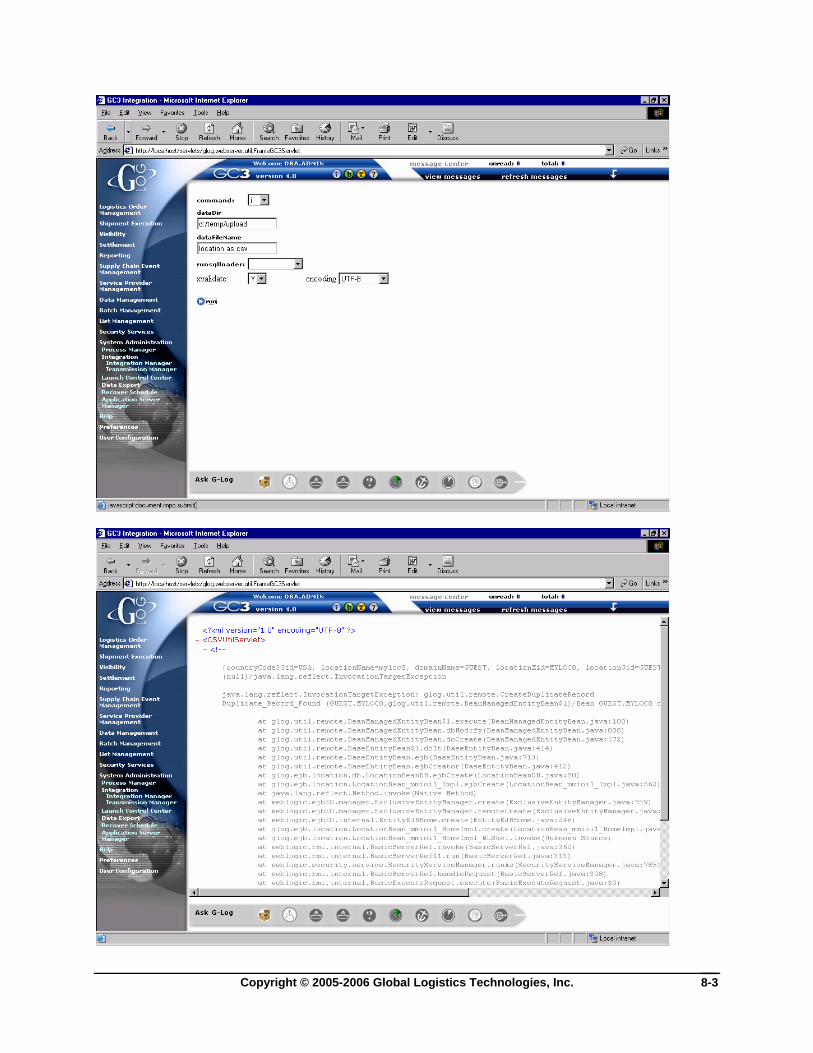
Importing If you use the Integration Manager to upload a CSV file whose name ends in “.as.csv”, GC3 will assume that the content of the file adheres to the rules of AppServer CSV files, and will process it as such. An example file name would be “location.as.csv”, as opposed to “location.csv”.
Each row in the file will be processed via the application server instead of directly against the database. This has the benefit of keeping the application server data-cache in sync with the database.
Errors encountered when importing are reported back to the screen, as shown below:
Copyright © 2005-2006 Global Logistics Technologies, Inc. 8-3

Copyright © 2005-2006 Global Logistics Technologies, Inc. 8-4
In this case, the location.as.csv file was attempted to be imported more than once using the “i” code. This produced the “CreateDuplicateRecord” error, which is the application server’s version of a duplicate key error.
Exporting Care must be taken when exporting an AppServer CSV file due to the lack of support for where-clauses. You should be logged in as a user whose vpd_profile limits the number of rows selected from the entity you plan on exporting. Where-clauses will be supported in future releases. In the example shown below, the user is logged in as “GUEST.FEWROWS”. This user has a vpd_profile which limits the number of rows in the s_ship_unit table.
You can use the following URL to export (if it is not on your user menu):
http://hostname/servlets/glog.integration.servlet.IntegrationMenuServlet?integration_stylesheet=integration/csvexport.xsl
The above example shows how to do an AppServer CSV export:
1. Select the “as.xcsv” command
2. In the “tableName” field, specify an “EntityName” instead of a table name. In this case the entity name is “SShipUnit” which differs from the database table name, which would be “S_SHIP_UNIT”.
3. Press the Run button
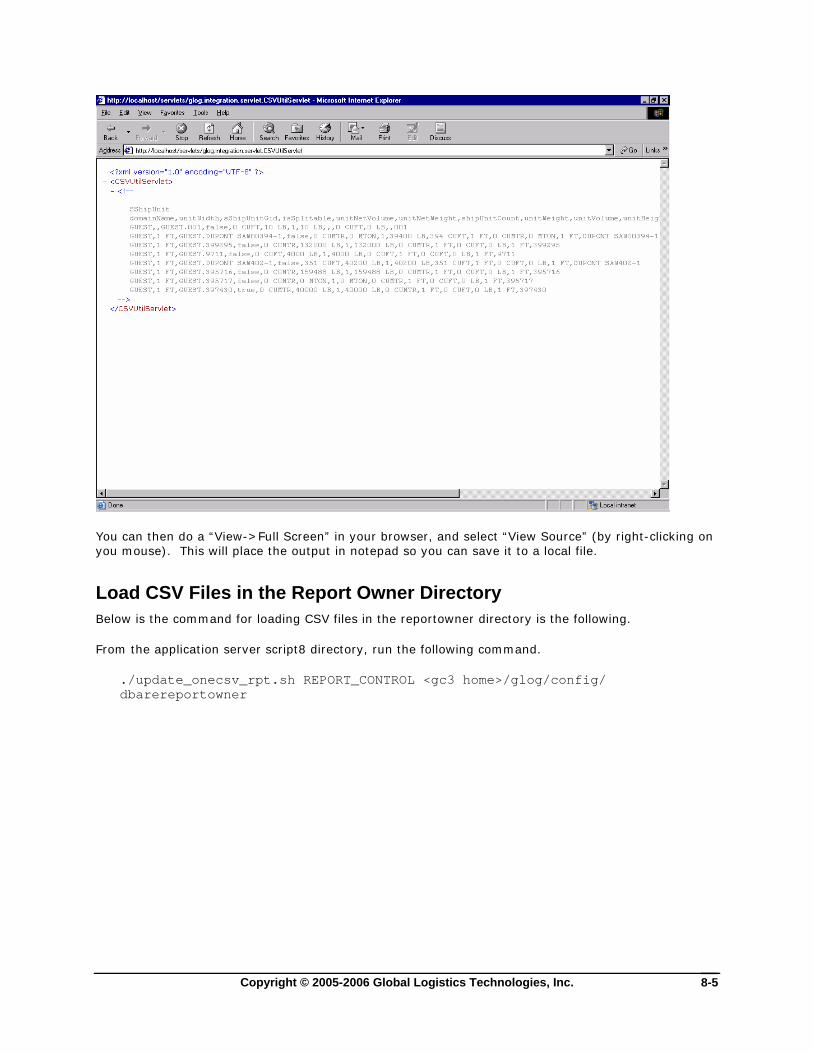
4. Your output will then appear as follows:
Copyright © 2005-2006 Global Logistics Technologies, Inc. 8-5
You can then do a “View->Full Screen” in your browser, and select “View Source” (by right-clicking on you mouse). This will place the output in notepad so you can save it to a local file.
Load CSV Files in the Report Owner Directory Below is the command for loading CSV files in the reportowner directory is the following.
From the application server script8 directory, run the following command.
./update_onecsv_rpt.sh REPORT_CONTROL <gc3 home>/glog/config/ dbarereportowner


Copyright © 2005-2006 Global Logistics Technologies, Inc. 9-1
9. How To Load Rate Data via CSV This chapter gives you examples of:
• The tables you need to import to set up rates in GC3.
• How to format the CSV files.
• The order in which you must import tables.
Refer to the GC3 Data Dictionary to learn what data you need and in what order you need to import it.
Importing Location Information This section describes how to import location information in CSV format. A set of sample CSV files is presented. Tables must be loaded in the order presented in this section. Otherwise, foreign key violations occur.
1. Import the LOCATION Table. The following example illustrates how you specify LOCATION data in CSV format.
LOCATION
LOCATION_GID,LOCATION_XID,LOCATION_NAME,ADDRESS_LINE1,ADDRESS_LINE2,CITY,PROVINCE,PROVINCE_CODE,POSTAL_CODE,COUNTRY_CODE3_GID,ZONE1,ZONE2,ZONE3,ZONE4,TIME_ZONE_GID,LAT,LON,SOURCING_GROUP_NAME,DELIVERY_GROUP_NAME,REGION_GID,SERVPROV_PROFILE_GID,LOCATION_GROUP_GID,IS_TEMPORARY,IS_MAKE_APPT_BEFORE_PLAN,RATE_CLASSIFICATION_GID,MAX_DELIV_WAIT_TIME,MAX_PICKUP_WAIT_TIME,DOMAIN_NAME,MAX_DELIV_WAIT_TIME_UOM_CODE,MAX_DELIV_WAIT_TIME_BASE,MAX_PICKUP_WAIT_TIME_UOM_CODE,MAX_PICKUP_WAIT_TIME_BASE,INSERT_DATE,UPDATE_DATE,INSERT_USER,UPDATE_USER,IS_SHIPPER_KNOWN,XX35_EQUIPMENT_GROUP_PROFILE_G
EXEC SQL ALTER SESSION SET NLS_DATE_FORMAT = 'YYYYMMDDHH24MISS'
"MYDOMAIN.MYCORPORATION","MYCORPORATION","PHILADELPHIA",,,"PHILADELPHIA","PENNSYLVANIA","PA","19001","USA",,,,,"America/New_York",,,,,,,,"N","N","COMMERCIAL",,,"MYDOMAIN",,,,,,,,,"N",
"MYDOMAIN.MYLOCATION","MYLOCATION","PHILADELPHIA",,,"PHILADELPHIA","PENNSYLVANIA","PA","19001","USA",,,,,"America/New_York",,,,,,,,"N","N","COMMERCIAL",,,"MYDOMAIN",,,,,,,,,"N",
"MYDOMAIN.YELLOW","YELLOW","YELLOW LOCATION",,,"PITTSBURGH","PENNSYLVANIA","PA","99999","USA",,,,,"America/New_York",,,,,,,,"N","N","COMMERCIAL",,,"MYDOMAIN",,,,,,,,,"N",
Note: The indented lines represent a continuation from the previous line.
5. Import the LOCATION_ADDRESS table The following example illustrates how you specify LOCATION_ADDRESS data in CSV format.
LOCATION_ADDRESS
LOCATION_GID,LINE_SEQUENCE,ADDRESS_LINE,DOMAIN_NAME,INSERT_USER,INSERT_DATE,UPDATE_USER,UPDATE_DATE
EXEC SQL ALTER SESSION SET NLS_DATE_FORMAT = 'YYYYMMDDHH24MISS'
"MYDOMAIN.MYCORPORATION",1,"11 EMPEROR AVENUE","MYDOMAIN",,,,

Copyright © 2005-2006 Global Logistics Technologies, Inc. 9-2
"MYDOMAIN.YELLOW",1,"432 YELLOW AVENUE","MYDOMAIN",,,,
"MYDOMAIN.MYLOCATION",1,"123 MAPLE STREET","MYDOMAIN",,,,
"MYDOMAIN.MYLOCATION",2,"BUILDING H","MYDOMAIN",,,,
"MYDOMAIN.MYLOCATION",3,"ROOM 100","MYDOMAIN",,,,
6. Import the CORPORATION Table. The following example illustrates how you specify CORPORATION data in CSV format.
Note: Each CORPORATION_GID must correspond to a LOCATION_GID specified in the location table (See example).
CORPORATION
CORPORATION_GID,CORPORATION_XID,CORPORATION_NAME,IS_DOMAIN_MASTER,DOMAIN_NAME
EXEC SQL ALTER SESSION SET NLS_DATE_FORMAT = 'YYYYMMDDHHMMSS'
"MYDOMAIN.MYCORPORATION","MYCORPORATION","MY CORP NAME","N","MYDOMAIN"
7. Import the LOCATION_CORPORATION Table. The following example illustrates how you specify LOCATION_CORPORATION data in CSV format. This links a location to a corporation.
LOCATION_CORPORATION
LOCATION_GID,CORPORATION_GID,DOMAIN_NAME
EXEC SQL ALTER SESSION SET NLS_DATE_FORMAT = 'YYYYMMDDHHMMSS'
"MYDOMAIN.MYLOCATION","MYDOMAIN.MYCORPORATION","MYDOMAIN"
8. Import the SERVPROV Table. The following example illustrates how you specify SERVPROV data in CSV format. Each SERVPROV_GID must correspond to a LOCATION_GID specified in the location table (See example).
SERVPROV
SERVPROV_GID,SERVPROV_XID,TENDER_RESPONSE_TIME,TENDER_RESPONSE_TIME_UOM_CODE,TENDER_RESPONSE_TIME_BASE,MODE_PROFILE_GID,MATCH_RULE_PROFILE_GID,AUTO_PAYMENT_FLAG,AUTO_APPROVE_RULE_PROFILE_GID,ALLOCATION_RULE_PROFILE_GID,DOMAIN_NAME
EXEC SQL ALTER SESSION SET NLS_DATE_FORMAT = 'YYYYMMDDHHMMSS'
"MYDOMAIN.YELLOW","YELLOW",,,,,,"N",,,"MYDOMAIN"
9. Import the LOCATION_ROLE_PROFILE Table. The following example illustrates how you specify LOCATION_ROLE_PROFILE data in CSV format. Each location should have at least one row in this table.
LOCATION_ROLE_PROFILE
LOCATION_GID,LOCATION_ROLE_GID,CALENDAR_GID,FIXED_STOP_TIME,FIXED_STOP_TIME_UOM_CODE,FIXED_STOP_TIME_BASE,VARIABLE_STOP_TIME,VARIABLE_STOP_TIME_UOM_CODE,VARIABLE_STOP_TIME_BASE,DOMAIN_NAME
EXEC SQL ALTER SESSION SET NLS_DATE_FORMAT = 'YYYYMMDDHHMMSS'
"MYDOMAIN.MYLOCATION","SHIPFROM/SHIPTO",,0,"S",0,0,"S",0,"MYDOMAIN"

Copyright © 2005-2006 Global Logistics Technologies, Inc. 9-3
"MYDOMAIN.YELLOW","CARRIER",,0,"S",0,0,"S",0,"MYDOMAIN"
"MYDOMAIN.MYCORPORATION","REMIT TO",,0,"S",0,0,"S",0,"MYDOMAIN"
"MYDOMAIN.MYCORPORATION","BILL TO",,0,"S",0,0,"S",0,"MYDOMAIN"
10. Import the LOCATION_REMARK Table. The following example illustrates how you specify LOCATION_REMARK data in CSV format.
LOCATION_REMARK
LOCATION_GID,REMARK_SEQUENCE,REMARK_QUAL_GID,REMARK_TEXT,DOMAIN_NAME
EXEC SQL ALTER SESSION SET NLS_DATE_FORMAT = 'YYYYMMDDHHMMSS'
"MYDOMAIN.MYLOCATION",1,,"DRIVER CANNOT HAVE A BEARD","MYDOMAIN"
"MYDOMAIN.MYLOCATION",2,,"DRIVER MUST HAVE SAFETY GLASSES","MYDOMAIN"
Importing Service Times The following example illustrates how you specify SERVICE_TIME data in CSV format.
SERVICE_TIME
X_LANE_GID,RATE_SERVICE_GID,SERVICE_TIME_VALUE,SERVICE_TIME_VALUE_UOM_CODE,SERVICE_TIME_VALUE_BASE,SERVICE_DAYS,DOMAIN_NAME
"MYDOMAIN.194-064","VOYAGE-DEFAULT",36000,"S",36000,,"MYDOMAIN"
"MYDOMAIN.194-065","VOYAGE-DEFAULT",72000,"S",72000,,"MYDOMAIN"
In the above example, note that you must specify SERVICE_TIME_VALUE in seconds, and leave the SERVICE_DAYS unspecified. As an alternative, you can specify SERVICE_DAYS, and leave the SERVICE_TIME_VALUE unspecified. You must never specify both a SERVICE_TIME_VALUE and a SERVICE_DAYS value on the same record.
Importing X_LANE Data for Rates This section provides an example for loading X_LANE data in CSV format. Typically, the X_LANE tables are loaded prior to the loading of the RATE_GEO and RATE_GEO_COST tables.

Copyright © 2005-2006 Global Logistics Technologies, Inc. 9-4
X_LANE
PK X_LANE_GID
X_LANE_XIDFK7 SOURCE_LOCATION_GID
SOURCE_CITYSOURCE_PROVINCE_CODESOURCE_POSTAL_CODE
FK5 SOURCE_COUNTRY_CODE3_GIDSOURCE_ZONE4SOURCE_ZONE1SOURCE_ZONE2SOURCE_ZONE3
FK6 SOURCE_GEO_HIERARCHY_GIDFK3 DEST_LOCATION_GID
DEST_CITYDEST_PROVINCE_CODEDEST_POSTAL_CODE
FK1 DEST_COUNTRY_CODE3_GIDDEST_ZONE4DEST_ZONE1DEST_ZONE2DEST_ZONE3
FK2 DEST_GEO_HIERARCHY_GIDFK8 SOURCE_REGION_GIDFK4 DEST_REGION_GID
LOADEDDOMAIN_NAMEINSERT_USERINSERT_DATEUPDATE_USERUPDATE_DATE
The following example illustrates how you specify X_LANE data in CSV format.
X_LANE
X_LANE_GID,X_LANE_XID,SOURCE_POSTAL_CODE,SOURCE_COUNTRY_CODE3_GID,SOURCE_GEO_HIERARCHY_GID,DEST_POSTAL_CODE,DEST_COUNTRY_CODE3_GID,DEST_GEO_HIERARCHY_GID,DOMAIN_NAME
"MYDOMAIN.194-064","194-064","194","USA","USZIP3","064","USA","USZIP3","MYDOMAIN"
"MYDOMAIN.194-065","194-065","194","USA","USZIP3","065","USA","USZIP3","MYDOMAIN"
Importing LTL Rates This section describes how to specify LTL rates and gives sample CSV files for several scenarios.
The following tables must be loaded (in order):
• RATE_OFFERING (setup manually on GC3 web pages)
• X_LANE (see page 9-3)
• RATE_GEO
• RATE_GEO_ACCESSORIAL (*)
• RATE_GEO_COST_GROUP
• RATE_GEO_COST
• RATE_GEO_COST_WEIGHT_BREAK
Note: (*) RATE_GEO_ ACCESSORIAL must come after RATE_GEO, but is not required before the remaining tables.
Assumptions:

Copyright © 2005-2006 Global Logistics Technologies, Inc. 9-5
• You have loaded the rate offering table using GC3 web pages
• You have loaded the X_Lane table as described on page 9-3.
• You have defined accessorial codes using GC3 web pages.
Simplified ERD for LTL Rates RATE_GEO
PK,U1 RATE_GEO_GID
RATE_GEO_XIDFK1,U1 RATE_OFFERING_GIDFK5,I2 X_LANE_GIDFK3 RATE_SERVICE_GID
MIN_COSTMIN_COST_GIDMIN_COST_BASE
FK4,I1 RATE_ZONE_PROFILE_GIDEFFECTIVE_DATEEXPIRATION_DATEALLOW_UNCOSTED_LINE_ITEMSDOMAIN_NAMEINSERT_USERINSERT_DATEUPDATE_USERUPDATE_DATE
RATE_GEO_COST_GROUP
PK RATE_GEO_COST_GROUP_GID
RATE_GEO_COST_GROUP_XIDFK1 RATE_GEO_GID
RATE_GEO_COST_GROUP_SEQGROUP_NAMEUSE_DEFICIT_CALCULATIONSDOMAIN_NAMEINSERT_USERINSERT_DATEUPDATE_USERUPDATE_DATE
RATE_GEO_COST
PK RATE_GEO_COST_SEQPK,FK7 RATE_GEO_COST_GROUP_GID
CHARGE_AMOUNTCHARGE_CURRENCY_GIDCHARGE_AMOUNT_BASECHARGE_UNIT_UOM_CODECHARGE_UNIT_COUNT
FK2 CHARGE_MULTIPLIERCHARGE_MULTIPLIER_SCALARCHARGE_ACTION
FK1 CHARGE_BREAK_COMPARATORDOMAIN_NAMEINSERT_USERINSERT_DATEUPDATE_USERUPDATE_DATE
RATE_GEO_COST_WEIGHT_BREAK
PK,FK1 RATE_GEO_COST_SEQPK,FK2 WEIGHT_BREAK_GIDPK,FK1 RATE_GEO_COST_GROUP_GID
RATE_DISCOUNT_VALUERATE_DISCOUNT_VALUE_GIDRATE_DISCOUNT_VALUE_BASEDOMAIN_NAMEINSERT_USERINSERT_DATEUPDATE_USERUPDATE_DATE
RATE_GEO_ACCESSORIAL
PK,FK1 RATE_GEO_GIDPK RATE_GEO_ACCESSORIAL_SEQ
FK4 ACCESSORIAL_CODE_GIDEFFECTIVE_DATEEXPIRATION_DATE
FK2 REGION_GIDFK3 X_LANE_GID
EQUIPMENT_GROUP_PROFILE_GIDPERCENTAGEPERCENT_OFFIXEDFIXED_GIDFIXED_BASEMINIMUMMINIMUM_GIDMINIMUM_BASEPER_UNIT_SHIP_UNIT_SPEC_GIDCALENDAR_GIDNOTESACTIVITYCOST_QUALVARIABLE_COSTVARIABLE_COST_GIDVARIABLE_COST_BASEDOMAIN_NAMEINSERT_USERINSERT_DATEUPDATE_USERUPDATE_DATE
Table Notes:
• RATE_GEO Table
Allow_uncosted_line_items in Y/N (defaults to “N”)
• RATE_GEO_ACCESSORIAL
Left_Operand1 – Basis options define what variable you want to base your conditional charge on.
Oper1_gid – The operand you compare with.
Low_value1 – Depending on the operand you use, you might need only the low_value1 or additionally the high_value1.

Copyright © 2005-2006 Global Logistics Technologies, Inc. 9-6
• RATE_GEO_COST_GROUP Table
Use_deficit_calculations in Y/N (defaults to “N”)
• RATE_GEO_COST Table
charge_unit_uom_code - unit of measure (e.g. “LB” for pounds, or “MI” for miles)
charge_unit_count - hundredweight, etc.
charge_action – add (A), setmin (M), setmax (X), multiply/discount (D)
charge_break_comparator -identifies data element used to access the break
Scenario–Based on Simple Weight Breaks This scenario assumes that rates are defined as simple weight breaks.
1. Import RATE_GEO table.
RATE_GEO
RATE_GEO_GID,RATE_GEO_XID,RATE_OFFERING_GID,MIN_COST,MIN_COST_GID,MIN_COST_BASE,X_LANE_GID,DOMAIN_NAME
"MYDOMAIN.194-064","194-064","MYDOMAIN.002",1.0,"USD",1.0,"MYDOMAIN.194-064","MYDOMAIN"
"MYDOMAIN.194-065","194-065","MYDOMAIN.002",1.0,"USD",1.0,"MYDOMAIN.194-065","MYDOMAIN"
11. Import RATE_GEO_COST_GROUP table.
RATE_GEO_COST_GROUP
RATE_GEO_COST_GROUP_GID,RATE_GEO_COST_GROUP_XID,RATE_GEO_GID,RATE_GEO_COST_GROUP_SEQ,GROUP_NAME,DOMAIN_NAME
"MYDOMAIN.194-064","194-064","MYDOMAIN.194-064",1,"MY_GROUP_NAME","MYDOMAIN"
"MYDOMAIN.194-065","194-065","MYDOMAIN.194-065",1,"MY_GROUP_NAME","MYDOMAIN"
12. Import RATE_GEO_COST table.
RATE_GEO_COST
RATE_GEO_COST_SEQ,RATE_GEO_COST_GROUP_GID,CHARGE_UNIT_UOM_CODE,CHARGE_UNIT_COUNT,CHARGE_BREAK_COMPARATOR,DOMAIN_NAME
1,"MYDOMAIN.194-064","LB",100,"SHIPMENT.WEIGHT","MYDOMAIN"
1,"MYDOMAIN.194-065","LB",100,"SHIPMENT.WEIGHT","MYDOMAIN"
13. Import RATE_GEO_COST_WEIGHT_BREAK table.
RATE_GEO_COST_WEIGHT_BREAK
RATE_GEO_COST_GROUP_GID,RATE_GEO_COST_SEQ,WEIGHT_BREAK_GID,RATE_DISCOUNT_VALUE,RATE_DISCOUNT_VALUE_GID,RATE_DISCOUNT_VALUE_BASE,DOMAIN_NAME
"MYDOMAIN.194-064",1,"MYDOMAIN.LT 1000",48.53,"USD",48.53,"MYDOMAIN"
"MYDOMAIN.194-065",1,"MYDOMAIN.LT 1000",37.56,"USD",37.56,"MYDOMAIN"

Copyright © 2005-2006 Global Logistics Technologies, Inc. 9-7
Scenario–Based on Cost Per Pound, Surcharge, and Discount This scenario assumes that:
• Freight cost is $0.07 per lb
• Fuel Surcharge is 3% of Total Cost (Accessorial)
• Discount is 65% of Total Cost
• There is a $50 allowance for loading
• The minimum charge is based on 10,000 lb
Summary
• Total Cost = (weight * 0.07 – 50.00) * (65% Discount) * (Accessorial Surcharge of 3%)
• Min Cost = (10,000 * 0.07 – 50.00) * (1 - 0.65) * (1.03) = 234.325
14. Import RATE_GEO table.
RATE_GEO
RATE_GEO_GID,RATE_GEO_XID,RATE_OFFERING_GID,MIN_COST,MIN_COST_GID,MIN_COST_BASE,X_LANE_GID,DOMAIN_NAME
"MYDOMAIN.194-064","194-064","MYDOMAIN.002",234.325,"USD",234.325,"MYDOMAIN.194-064","MYDOMAIN"
15. Import RATE_GEO_ACCESSORIAL table.
RATE_GEO_ACCESSORIAL
RATE_GEO_COST_SEQ,RATE_GEO_GID,RATE_GEO_ACCESSORIAL_SEQ,ACCESSORIAL_CODE_GID,EFFECTIVE_DATE,EXPIRATION_DATE,LEFT_OPERAND1,OPER1_GID,LOW_VALUE1,AND_OR1,LEFT_OPERAND2,OPER2_GID,LOW_VALUE2,CHARGE_MULTIPLIER,CHARGE_MULTIPLIER_SCALAR,CHARGE_AMOUNT,CHARGE_AMOUNT_GID,CHARGE_UNIT_COUNT,DOMAIN_NAME
EXEC SQL ALTER SESSION SET NLS_DATE_FORMAT = 'YYYYMMDDHHMMSS'
1,"MYDOMAIN.194-064",1,"MYDOMAIN.FUEL_SURCHARGE","20010101070000","20101231115959",,,,,,,,"SHIPMENT.COSTS.COST",1.03,,,1,"MYDOMAIN"
16. Import RATE_GEO_COST_GROUP table.
RATE_GEO_COST_GROUP
RATE_GEO_COST_GROUP_GID,RATE_GEO_COST_GROUP_XID,RATE_GEO_GID,RATE_GEO_COST_GROUP_SEQ,GROUP_NAME,DOMAIN_NAME
"MYDOMAIN.194-064","194-064","MYDOMAIN.194-064",1,"MY_GROUP_NAME","MYDOMAIN"
17. Import RATE_GEO_COST table.
RATE_GEO_COST
RATE_GEO_COST_SEQ,RATE_GEO_COST_GROUP_GID,CHARGE_AMOUNT,CHARGE_CURRENCY_GID,CHARGE_AMOUNT_BASE,CHARGE_UNIT_UOM_CODE,CHARGE_UNIT_COUNT,CHARGE_MULTIPLIER,CHARGE_MULTIPLIER_SCALAR,CHARGE_ACTION,DOMAIN_NAME
1,"MYDOMAIN.194-064",0.07,"USD",0.07,"LB",1,"SHIPMENT.WEIGHT",,"A","MYDOMAIN"
2,"MYDOMAIN.194-064",-50.0,"USD",-50.0,,1,,,"A","MYDOMAIN"
3,"MYDOMAIN.194-064",,,,,1,,0.35,"D","MYDOMAIN"
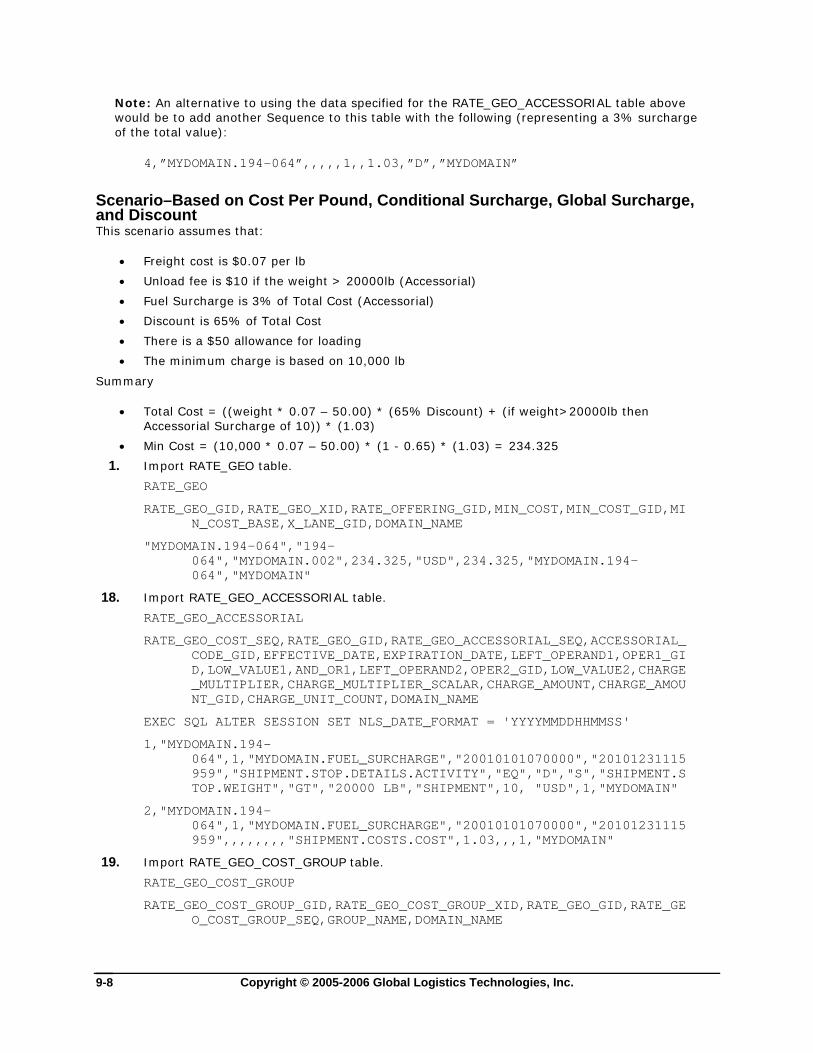
Copyright © 2005-2006 Global Logistics Technologies, Inc. 9-8
Note: An alternative to using the data specified for the RATE_GEO_ACCESSORIAL table above would be to add another Sequence to this table with the following (representing a 3% surcharge of the total value):
4,”MYDOMAIN.194-064”,,,,,1,,1.03,”D”,”MYDOMAIN”
Scenario–Based on Cost Per Pound, Conditional Surcharge, Global Surcharge, and Discount This scenario assumes that:
• Freight cost is $0.07 per lb
• Unload fee is $10 if the weight > 20000lb (Accessorial)
• Fuel Surcharge is 3% of Total Cost (Accessorial)
• Discount is 65% of Total Cost
• There is a $50 allowance for loading
• The minimum charge is based on 10,000 lb
Summary
• Total Cost = ((weight * 0.07 – 50.00) * (65% Discount) + (if weight>20000lb then Accessorial Surcharge of 10)) * (1.03)
• Min Cost = (10,000 * 0.07 – 50.00) * (1 - 0.65) * (1.03) = 234.325
1. Import RATE_GEO table.
RATE_GEO
RATE_GEO_GID,RATE_GEO_XID,RATE_OFFERING_GID,MIN_COST,MIN_COST_GID,MIN_COST_BASE,X_LANE_GID,DOMAIN_NAME
"MYDOMAIN.194-064","194-064","MYDOMAIN.002",234.325,"USD",234.325,"MYDOMAIN.194-064","MYDOMAIN"
18. Import RATE_GEO_ACCESSORIAL table.
RATE_GEO_ACCESSORIAL
RATE_GEO_COST_SEQ,RATE_GEO_GID,RATE_GEO_ACCESSORIAL_SEQ,ACCESSORIAL_CODE_GID,EFFECTIVE_DATE,EXPIRATION_DATE,LEFT_OPERAND1,OPER1_GID,LOW_VALUE1,AND_OR1,LEFT_OPERAND2,OPER2_GID,LOW_VALUE2,CHARGE_MULTIPLIER,CHARGE_MULTIPLIER_SCALAR,CHARGE_AMOUNT,CHARGE_AMOUNT_GID,CHARGE_UNIT_COUNT,DOMAIN_NAME
EXEC SQL ALTER SESSION SET NLS_DATE_FORMAT = 'YYYYMMDDHHMMSS'
1,"MYDOMAIN.194-064",1,"MYDOMAIN.FUEL_SURCHARGE","20010101070000","20101231115959","SHIPMENT.STOP.DETAILS.ACTIVITY","EQ","D","S","SHIPMENT.STOP.WEIGHT","GT","20000 LB","SHIPMENT",10, "USD",1,"MYDOMAIN"
2,"MYDOMAIN.194-064",1,"MYDOMAIN.FUEL_SURCHARGE","20010101070000","20101231115959",,,,,,,,"SHIPMENT.COSTS.COST",1.03,,,1,"MYDOMAIN"
19. Import RATE_GEO_COST_GROUP table.
RATE_GEO_COST_GROUP
RATE_GEO_COST_GROUP_GID,RATE_GEO_COST_GROUP_XID,RATE_GEO_GID,RATE_GEO_COST_GROUP_SEQ,GROUP_NAME,DOMAIN_NAME

Copyright © 2005-2006 Global Logistics Technologies, Inc. 9-9
"MYDOMAIN.194-064","194-064","MYDOMAIN.194-064",1,"MY_GROUP_NAME","MYDOMAIN"
20. Import RATE_GEO_COST table.
RATE_GEO_COST
RATE_GEO_COST_SEQ,RATE_GEO_COST_GROUP_GID,CHARGE_AMOUNT,CHARGE_CURRENCY_GID,CHARGE_AMOUNT_BASE,CHARGE_UNIT_UOM_CODE,CHARGE_UNIT_COUNT,CHARGE_MULTIPLIER,CHARGE_MULTIPLIER_SCALAR,CHARGE_ACTION,DOMAIN_NAME
1,"MYDOMAIN.194-064",0.07,"USD",0.07,"LB",1,"SHIPMENT.WEIGHT",,"A","MYDOMAIN"
2,"MYDOMAIN.194-064",-50.0,"USD",-50.0,,1,,,"A","MYDOMAIN"
3,"MYDOMAIN.194-064",,,,,1,,65,"D","MYDOMAIN"
Importing TL Rates This section describes how to specify TL rates and gives sample CSV files for several scenarios.
The following tables must be loaded (in order):
• RATE_OFFERING (setup manually on GC3 web pages)
• X_LANE (see page 9-3)
• RATE_GEO
• RATE_GEO_ACCESSORIAL (*)
• RATE_GEO_STOPS (*)
• RATE_GEO_COST_GROUP
• RATE_GEO_COST
Note: (*) RATE_GEO_ ACCESSORIAL and RATE_GEO_STOPS must come after RATE_GEO, but are not required before the remaining tables.
Assumptions:
• You have loaded the rate offering table using GC3 web pages
• You have loaded the X_Lane table as described on page 9-3.
• You have defined accessorial codes using GC3 web pages
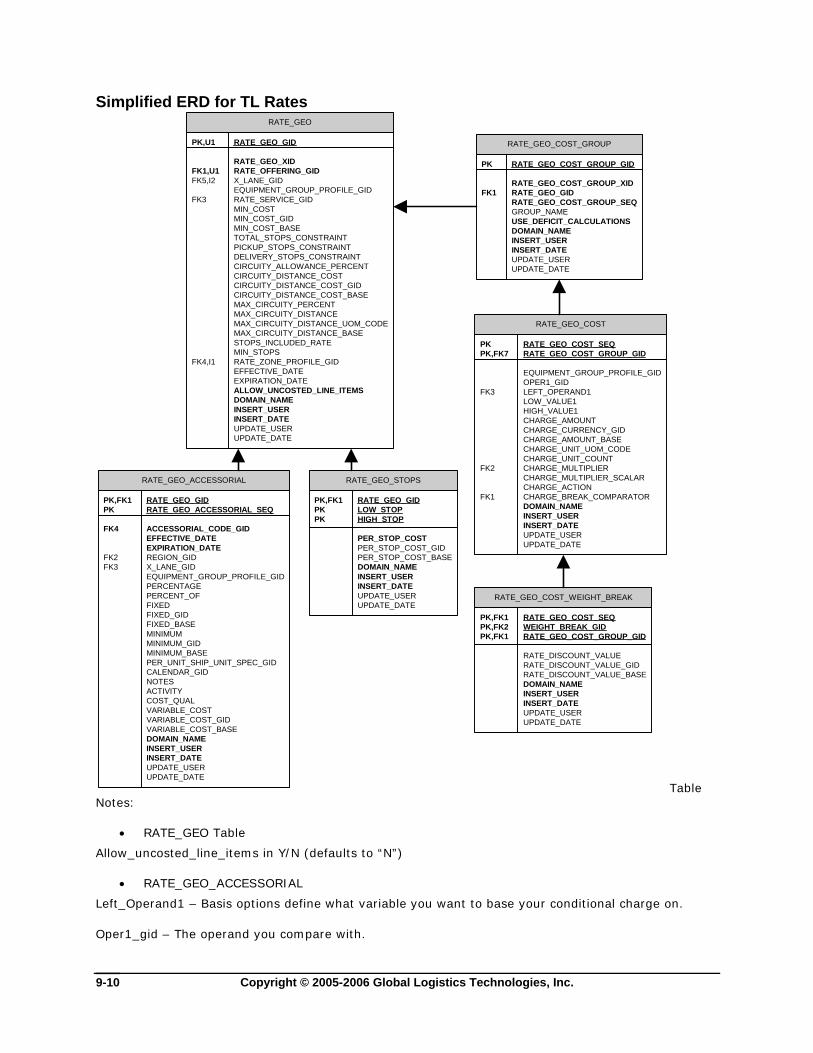
Copyright © 2005-2006 Global Logistics Technologies, Inc. 9-10
Simplified ERD for TL Rates RATE_GEO
PK,U1 RATE_GEO_GID
RATE_GEO_XIDFK1,U1 RATE_OFFERING_GIDFK5,I2 X_LANE_GID
EQUIPMENT_GROUP_PROFILE_GIDFK3 RATE_SERVICE_GID
MIN_COSTMIN_COST_GIDMIN_COST_BASETOTAL_STOPS_CONSTRAINTPICKUP_STOPS_CONSTRAINTDELIVERY_STOPS_CONSTRAINTCIRCUITY_ALLOWANCE_PERCENTCIRCUITY_DISTANCE_COSTCIRCUITY_DISTANCE_COST_GIDCIRCUITY_DISTANCE_COST_BASEMAX_CIRCUITY_PERCENTMAX_CIRCUITY_DISTANCEMAX_CIRCUITY_DISTANCE_UOM_CODEMAX_CIRCUITY_DISTANCE_BASESTOPS_INCLUDED_RATEMIN_STOPS
FK4,I1 RATE_ZONE_PROFILE_GIDEFFECTIVE_DATEEXPIRATION_DATEALLOW_UNCOSTED_LINE_ITEMSDOMAIN_NAMEINSERT_USERINSERT_DATEUPDATE_USERUPDATE_DATE
RATE_GEO_COST_GROUP
PK RATE_GEO_COST_GROUP_GID
RATE_GEO_COST_GROUP_XIDFK1 RATE_GEO_GID
RATE_GEO_COST_GROUP_SEQGROUP_NAMEUSE_DEFICIT_CALCULATIONSDOMAIN_NAMEINSERT_USERINSERT_DATEUPDATE_USERUPDATE_DATE
RATE_GEO_COST
PK RATE_GEO_COST_SEQPK,FK7 RATE_GEO_COST_GROUP_GID
EQUIPMENT_GROUP_PROFILE_GIDOPER1_GID
FK3 LEFT_OPERAND1LOW_VALUE1HIGH_VALUE1CHARGE_AMOUNTCHARGE_CURRENCY_GIDCHARGE_AMOUNT_BASECHARGE_UNIT_UOM_CODECHARGE_UNIT_COUNT
FK2 CHARGE_MULTIPLIERCHARGE_MULTIPLIER_SCALARCHARGE_ACTION
FK1 CHARGE_BREAK_COMPARATORDOMAIN_NAMEINSERT_USERINSERT_DATEUPDATE_USERUPDATE_DATE
RATE_GEO_STOPS
PK,FK1 RATE_GEO_GIDPK LOW_STOPPK HIGH_STOP
PER_STOP_COSTPER_STOP_COST_GIDPER_STOP_COST_BASEDOMAIN_NAMEINSERT_USERINSERT_DATEUPDATE_USERUPDATE_DATE
RATE_GEO_COST_WEIGHT_BREAK
PK,FK1 RATE_GEO_COST_SEQPK,FK2 WEIGHT_BREAK_GIDPK,FK1 RATE_GEO_COST_GROUP_GID
RATE_DISCOUNT_VALUERATE_DISCOUNT_VALUE_GIDRATE_DISCOUNT_VALUE_BASEDOMAIN_NAMEINSERT_USERINSERT_DATEUPDATE_USERUPDATE_DATE
RATE_GEO_ACCESSORIAL
PK,FK1 RATE_GEO_GIDPK RATE_GEO_ACCESSORIAL_SEQ
FK4 ACCESSORIAL_CODE_GIDEFFECTIVE_DATEEXPIRATION_DATE
FK2 REGION_GIDFK3 X_LANE_GID
EQUIPMENT_GROUP_PROFILE_GIDPERCENTAGEPERCENT_OFFIXEDFIXED_GIDFIXED_BASEMINIMUMMINIMUM_GIDMINIMUM_BASEPER_UNIT_SHIP_UNIT_SPEC_GIDCALENDAR_GIDNOTESACTIVITYCOST_QUALVARIABLE_COSTVARIABLE_COST_GIDVARIABLE_COST_BASEDOMAIN_NAMEINSERT_USERINSERT_DATEUPDATE_USERUPDATE_DATE
Table Notes:
• RATE_GEO Table
Allow_uncosted_line_items in Y/N (defaults to “N”)
• RATE_GEO_ACCESSORIAL
Left_Operand1 – Basis options define what variable you want to base your conditional charge on.
Oper1_gid – The operand you compare with.

Copyright © 2005-2006 Global Logistics Technologies, Inc. 9-11
Low_value1 – Depending on the operand you use, you might need only the low_value1 or additionally the high_value1.
• RATE_GEO_COST_GROUP Table
Use_deficit_calculations in Y/N (defaults to “N”)
• RATE_GEO_COST Table
Oper1_gid – field value “BETWEEN” is a shortcut for X > low and X <= high. Other possible values include “<”, “<=”, “>”, “>=”, “=”, and “<>”.
charge_unit_uom_code - unit of measure (e.g. “LB” for pounds, or “MI” for miles)
charge_unit_count - hundredweight, etc.
charge_action – add (A), setmin (M), setmax (X), multiply (D)
charge_break_comparator -identifies data element used to access the break
Scenario–Based on Distance Bands with Fixed Charges, and Stop Offs This scenario assumes that:
• TL rates are defined using distance bands, with a flat charge within each band
• For Rate Geo A
If distance between 10 and 100 miles, charge $50
If distance is between 100 and 200 miles, charge $75
• For Rate Geo B
If distance between 10 and 100 miles, charge $80
1. Import RATE_GEO table.
RATE_GEO
RATE_GEO_GID,RATE_GEO_XID,RATE_OFFERING_GID,MIN_COST,MIN_COST_GID,MIN_COST_BASE,X_LANE_GID,TOTAL_STOPS_CONSTRAINT,STOPS_INCLUDED_RATE,DOMAIN_NAME
"MYDOMAIN.194-064","194-064","MYDOMAIN.002",1.0,"USD",1.0,"MYDOMAIN.194-064",6,2,"MYDOMAIN"
"MYDOMAIN.194-065","194-065","MYDOMAIN.002",1.0,"USD",1.0,"MYDOMAIN.194-065",6,2,"MYDOMAIN"
21. Import RATE_GEO_STOPS table.
RATE_GEO_STOPS
RATE_GEO_GID,LOW_STOP,HIGH_STOP,PER_STOP_COST,PER_STOP_COST_GID,PER_STOP_COST_BASE,DOMAIN_NAME
"MYDOMAIN.194-064",1,2,50.00,"USD",50.00,"MYDOMAIN"
"MYDOMAIN.194-064",3,4,100.00,"USD",100.00,"MYDOMAIN"
"MYDOMAIN.194-065",1,2,25.50,"USD",25.50,"MYDOMAIN"
"MYDOMAIN.194-065",3,4,85.00,"USD",85.00,"MYDOMAIN"
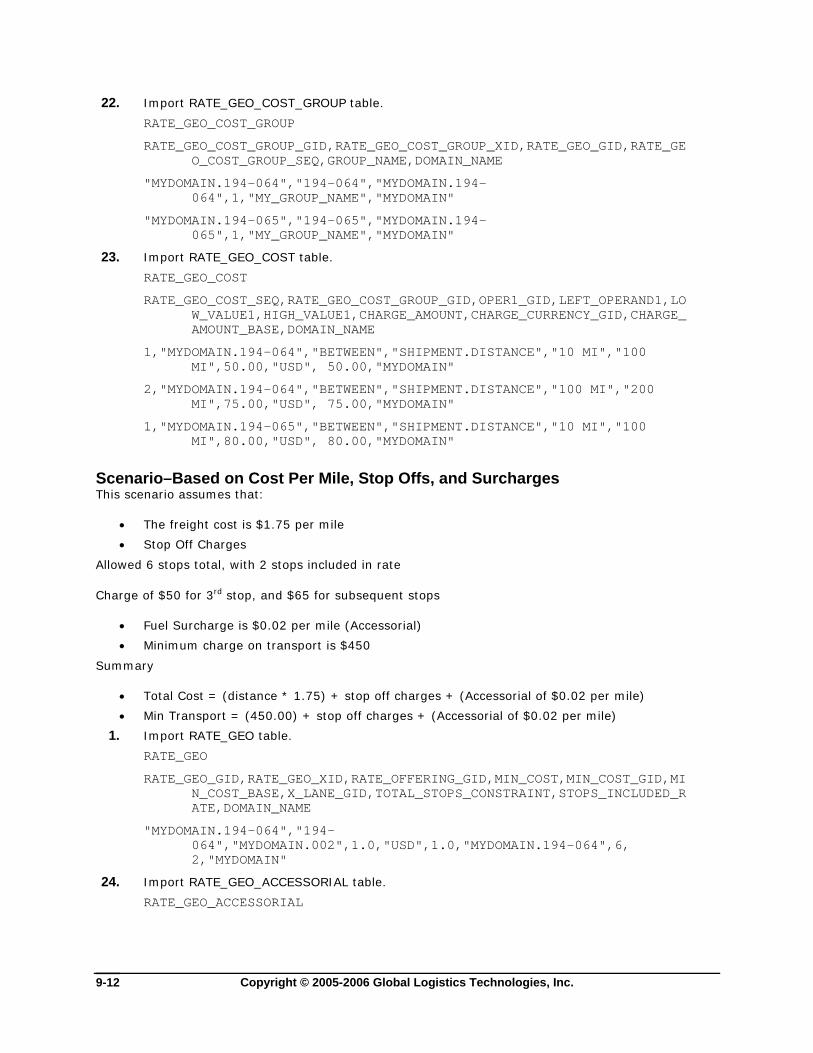
Copyright © 2005-2006 Global Logistics Technologies, Inc. 9-12
22. Import RATE_GEO_COST_GROUP table.
RATE_GEO_COST_GROUP
RATE_GEO_COST_GROUP_GID,RATE_GEO_COST_GROUP_XID,RATE_GEO_GID,RATE_GEO_COST_GROUP_SEQ,GROUP_NAME,DOMAIN_NAME
"MYDOMAIN.194-064","194-064","MYDOMAIN.194-064",1,"MY_GROUP_NAME","MYDOMAIN"
"MYDOMAIN.194-065","194-065","MYDOMAIN.194-065",1,"MY_GROUP_NAME","MYDOMAIN"
23. Import RATE_GEO_COST table.
RATE_GEO_COST
RATE_GEO_COST_SEQ,RATE_GEO_COST_GROUP_GID,OPER1_GID,LEFT_OPERAND1,LOW_VALUE1,HIGH_VALUE1,CHARGE_AMOUNT,CHARGE_CURRENCY_GID,CHARGE_AMOUNT_BASE,DOMAIN_NAME
1,"MYDOMAIN.194-064","BETWEEN","SHIPMENT.DISTANCE","10 MI","100 MI",50.00,"USD", 50.00,"MYDOMAIN"
2,"MYDOMAIN.194-064","BETWEEN","SHIPMENT.DISTANCE","100 MI","200 MI",75.00,"USD", 75.00,"MYDOMAIN"
1,"MYDOMAIN.194-065","BETWEEN","SHIPMENT.DISTANCE","10 MI","100 MI",80.00,"USD", 80.00,"MYDOMAIN"
Scenario–Based on Cost Per Mile, Stop Offs, and Surcharges This scenario assumes that:
• The freight cost is $1.75 per mile
• Stop Off Charges
Allowed 6 stops total, with 2 stops included in rate
Charge of $50 for 3rd stop, and $65 for subsequent stops
• Fuel Surcharge is $0.02 per mile (Accessorial)
• Minimum charge on transport is $450
Summary
• Total Cost = (distance * 1.75) + stop off charges + (Accessorial of $0.02 per mile)
• Min Transport = (450.00) + stop off charges + (Accessorial of $0.02 per mile)
1. Import RATE_GEO table.
RATE_GEO
RATE_GEO_GID,RATE_GEO_XID,RATE_OFFERING_GID,MIN_COST,MIN_COST_GID,MIN_COST_BASE,X_LANE_GID,TOTAL_STOPS_CONSTRAINT,STOPS_INCLUDED_RATE,DOMAIN_NAME
"MYDOMAIN.194-064","194-064","MYDOMAIN.002",1.0,"USD",1.0,"MYDOMAIN.194-064",6, 2,"MYDOMAIN"
24. Import RATE_GEO_ACCESSORIAL table.
RATE_GEO_ACCESSORIAL

Copyright © 2005-2006 Global Logistics Technologies, Inc. 9-13
RATE_GEO_COST_SEQ,RATE_GEO_GID,RATE_GEO_ACCESSORIAL_SEQ,ACCESSORIAL_CODE_GID,EFFECTIVE_DATE,EXPIRATION_DATE,LEFT_OPERAND1,OPER1_GID,LOW_VALUE1,AND_OR1,LEFT_OPERAND2,OPER2_GID,LOW_VALUE2,CHARGE_MULTIPLIER,CHARGE_MULTIPLIER_SCALAR,CHARGE_AMOUNT,CHARGE_AMOUNT_GID,CHARGE_UNIT_COUNT,CHARGE_UNIT_UOM_CODE,DOMAIN_NAME
EXEC SQL ALTER SESSION SET NLS_DATE_FORMAT = 'YYYYMMDDHHMMSS'
1,"MYDOMAIN.194-064",1,"MYDOMAIN.FUEL_SURCHARGE","20010101070000","20101231115959",,,,,,,,"SHIPMENT.DISTANCE",,0.02,"USD",1,"MI","MYDOMAIN"
25. Import RATE_GEO_STOPS table.
RATE_GEO_STOPS
RATE_GEO_GID,LOW_STOP,HIGH_STOP,PER_STOP_COST,PER_STOP_COST_GID,PER_STOP_COST_BASE,DOMAIN_NAME
"MYDOMAIN.194-064",1,1,50.00,"USD",50.00,"MYDOMAIN"
"MYDOMAIN.194-064",2,,65.00,"USD",65.00,"MYDOMAIN"
Note: Leaving the HIGH_STOP value empty indicates that the last charge will be applied to all the stops greater than the LOW_STOP value. (i.e. for stops >= 2, charge $65 per stop).
26. Import RATE_GEO_COST_GROUP table.
RATE_GEO_COST_GROUP
RATE_GEO_COST_GROUP_GID,RATE_GEO_COST_GROUP_XID,RATE_GEO_GID,RATE_GEO_COST_GROUP_SEQ,GROUP_NAME,DOMAIN_NAME
"MYDOMAIN.194-064","194-064","MYDOMAIN.194-064",1,"MY_GROUP_NAME","MYDOMAIN"
27. Import RATE_GEO_COST table.
RATE_GEO_COST
RATE_GEO_COST_SEQ,RATE_GEO_COST_GROUP_GID,CHARGE_AMOUNT,CHARGE_CURRENCY_GID,CHARGE_AMOUNT_BASE,CHARGE_UNIT_UOM_CODE,CHARGE_UNIT_COUNT,CHARGE_MULTIPLIER,CHARGE_MULTIPLIER_SCALAR,CHARGE_ACTION,DOMAIN_NAME
1,"MYDOMAIN.194-064",1.750,"USD",1.750,"MI",1,"SHIPMENT.DISTANCE",,"A","MYDOMAIN"
2,"MYDOMAIN.194-064",450.0,"USD",450.0,,1,,,"M","MYDOMAIN"
Note: Seq#2, with a charge action of “M”, indicates that the minimum of the running calculated cost has to be $450 (i.e. if the calculation from Seq#1 is less than $450, then the new value to be used going forward is $450).
An alternative method of specifying this rate would be to recognize that a minimum of $450 equates to distance of 257.143 miles. A comparison for this distance could be used. This would be the corresponding result.
RATE_GEO_COST
RATE_GEO_COST_SEQ,RATE_GEO_COST_GROUP_GID,OPER1_GID,LEFT_OPERAND1,LOW_VALUE1,CHARGE_AMOUNT,CHARGE_CURRENCY_GID,CHARGE_AMOUNT_BASE,CHARGE_UNIT_UOM_CODE,CHARGE_UNIT_COUNT,CHARGE_MULTIPLIER,CHARGE_MULTIPLIER_SCALAR,CHARGE_ACTION,DOMAIN_NAME

Copyright © 2005-2006 Global Logistics Technologies, Inc. 9-14
1,"MYDOMAIN.194-064",">","SHIPMENT.DISTANCE","237.143 MI",1.750,"USD",1.750,"MI",1, "SHIPMENT.DISTANCE",,"A","MYDOMAIN"
2,"MYDOMAIN.194-064","<=","SHIPMENT.DISTANCE","257.143 MI",450.0,"USD",450.0,,1, ,,"A","MYDOMAIN"
Note: An alternative to using the data specified for the RATE_GEO_ACCESSORIAL table above would be to add another Sequence to the RATE_GEO_COST table with the following (representing a surcharge of $0.02 per mile):
3,"MYDOMAIN.194-064",0.020,"USD",0.020,"MI",1,"SHIPMENT.DISTANCE",,"A","MYDOMAIN"
Scenario–Based on Cost Per Hundredweight, Weight Breaks, and Surcharges This scenario assumes that:
• The freight cost is per hundredweight based on weight breaks
• Fuel Surcharge is $0.02 per mile (Accessorial)
Summary
• Total Cost = ((weight/100) * (weight break charge)) + (Accessorial of $0.02 per mile)
1. Import RATE_GEO table.
RATE_GEO
RATE_GEO_GID,RATE_GEO_XID,RATE_OFFERING_GID,MIN_COST,MIN_COST_GID,MIN_COST_BASE,X_LANE_GID,TOTAL_STOPS_CONSTRAINT,STOPS_INCLUDED_RATE,DOMAIN_NAME
"MYDOMAIN.194-064","194-064","MYDOMAIN.002",1.0,"USD",1.0,"MYDOMAIN.194-064",6, 2,"MYDOMAIN"
28. Import RATE_GEO_ACCESSORIAL table.
RATE_GEO_ACCESSORIAL
RATE_GEO_COST_SEQ,RATE_GEO_GID,RATE_GEO_ACCESSORIAL_SEQ,ACCESSORIAL_CODE_GID,EFFECTIVE_DATE,EXPIRATION_DATE,LEFT_OPERAND1,OPER1_GID,LOW_VALUE1,AND_OR1,LEFT_OPERAND2,OPER2_GID,LOW_VALUE2,CHARGE_MULTIPLIER,CHARGE_MULTIPLIER_SCALAR,CHARGE_AMOUNT,CHARGE_AMOUNT_GID,CHARGE_UNIT_COUNT,CHARGE_UNIT_UOM_CODE,DOMAIN_NAME
EXEC SQL ALTER SESSION SET NLS_DATE_FORMAT = 'YYYYMMDDHHMMSS'
1,"MYDOMAIN.194-064",1,"MYDOMAIN.FUEL_SURCHARGE","20010101070000","20101231115959",,,,,,,,"SHIPMENT.DISTANCE",,0.02,"USD",1,"MI","MYDOMAIN"
29. Import RATE_GEO_COST_GROUP table.
RATE_GEO_COST_GROUP
RATE_GEO_COST_GROUP_GID,RATE_GEO_COST_GROUP_XID,RATE_GEO_GID,RATE_GEO_COST_GROUP_SEQ,GROUP_NAME,DOMAIN_NAME
"MYDOMAIN.194-064","194-064","MYDOMAIN.194-064",1,"MY_GROUP_NAME","MYDOMAIN"
30. Import RATE_GEO_COST table.

Copyright © 2005-2006 Global Logistics Technologies, Inc. 9-15
RATE_GEO_COST
RATE_GEO_COST_SEQ,RATE_GEO_COST_GROUP_GID,CHARGE_AMOUNT,CHARGE_CURRENCY_GID,CHARGE_AMOUNT_BASE,CHARGE_UNIT_UOM_CODE,CHARGE_UNIT_COUNT,CHARGE_MULTIPLIER,CHARGE_MULTIPLIER_SCALAR,CHARGE_ACTION,CHARGE_BREAK_COMPARATOR,DOMAIN_NAME
1,"MYDOMAIN.194-064",,,,"LB",100,"SHIPMENT.WEIGHT",,"A","SHIPMENT.WEIGHT","MYDOMAIN"
Note: An alternative to using the data specified for the RATE_GEO_ACCESSORIAL table above would be to add another Sequence to this table with the following (representing a surcharge of $0.02 per mile):
2,"MYDOMAIN.194-064",0.020,"USD",0.020,"MI",1,"SHIPMENT.DISTANCE",,"A","MYDOMAIN"
31. Import RATE_GEO_COST_WEIGHT_BREAK table.
RATE_GEO_COST_WEIGHT_BREAK
RATE_GEO_COST_GROUP_GID,RATE_GEO_COST_SEQ,WEIGHT_BREAK_GID,RATE_DISCOUNT_VALUE,RATE_DISCOUNT_VALUE_GID,RATE_DISCOUNT_VALUE_BASE,DOMAIN_NAME
"MYDOMAIN.194-064",1,"MYDOMAIN.LT 40000",1.14,"USD",1.14,"MYDOMAIN"
"MYDOMAIN.194-064",1,"MYDOMAIN.LT 45000",1.07,"USD",1.07,"MYDOMAIN"
Scenario–Based on Cost Per Hundredweight, Weight Breaks, Mileage Bands, and Surcharges This scenario assumes that:
• The freight cost is per hundredweight based on weight breaks and mileage bands.
Cost per Weight
Mileage Band 40000 lbs
45000 lbs
0 – 50 0.85 0.50
51 – 55 0.87 0.82
56 - 60 0.88 0.83
• Weighing charge is $20
• Vacuuming fee is $0.25 per CWT with a $115 minimum
Summary
• Total Cost = ((weight/100) * (weight break charge)) + $20 + (Vacuuming Fee of 0.25 per CWT)
• Note: Min $115 for vacuuming is reached when the weight is at 46,000 lbs
1. Import RATE_GEO table.
RATE_GEO
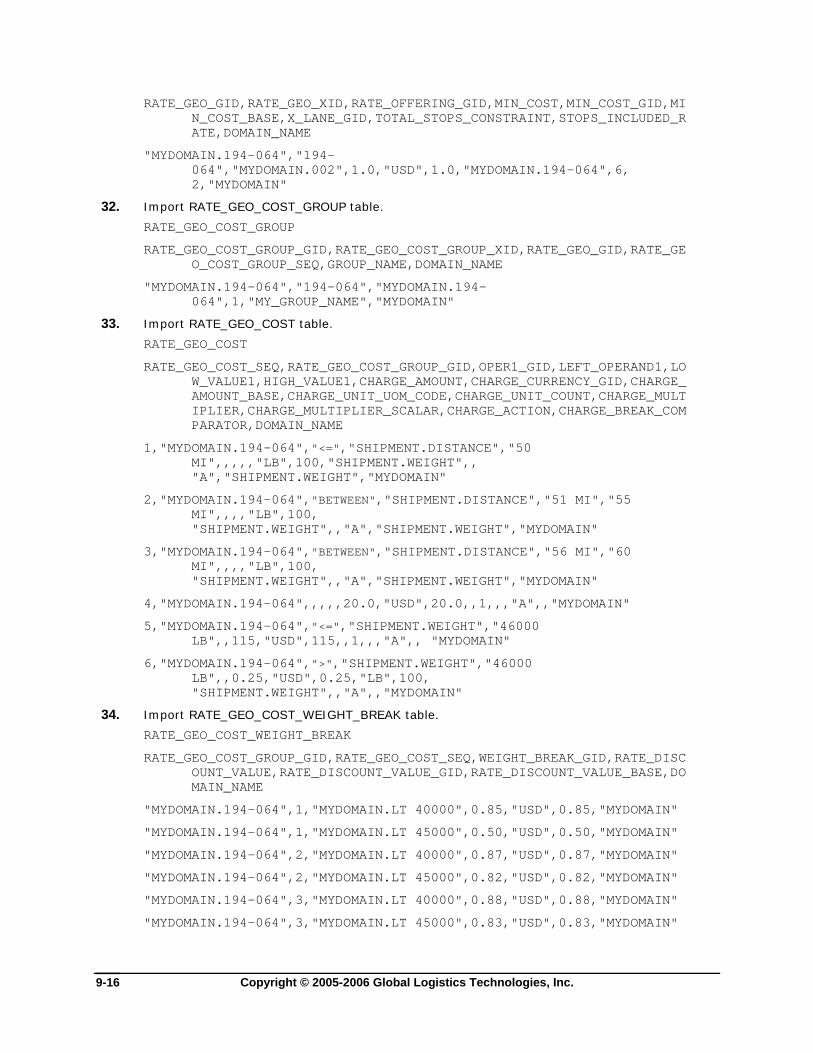
Copyright © 2005-2006 Global Logistics Technologies, Inc. 9-16
RATE_GEO_GID,RATE_GEO_XID,RATE_OFFERING_GID,MIN_COST,MIN_COST_GID,MIN_COST_BASE,X_LANE_GID,TOTAL_STOPS_CONSTRAINT,STOPS_INCLUDED_RATE,DOMAIN_NAME
"MYDOMAIN.194-064","194-064","MYDOMAIN.002",1.0,"USD",1.0,"MYDOMAIN.194-064",6, 2,"MYDOMAIN"
32. Import RATE_GEO_COST_GROUP table.
RATE_GEO_COST_GROUP
RATE_GEO_COST_GROUP_GID,RATE_GEO_COST_GROUP_XID,RATE_GEO_GID,RATE_GEO_COST_GROUP_SEQ,GROUP_NAME,DOMAIN_NAME
"MYDOMAIN.194-064","194-064","MYDOMAIN.194-064",1,"MY_GROUP_NAME","MYDOMAIN"
33. Import RATE_GEO_COST table.
RATE_GEO_COST
RATE_GEO_COST_SEQ,RATE_GEO_COST_GROUP_GID,OPER1_GID,LEFT_OPERAND1,LOW_VALUE1,HIGH_VALUE1,CHARGE_AMOUNT,CHARGE_CURRENCY_GID,CHARGE_AMOUNT_BASE,CHARGE_UNIT_UOM_CODE,CHARGE_UNIT_COUNT,CHARGE_MULTIPLIER,CHARGE_MULTIPLIER_SCALAR,CHARGE_ACTION,CHARGE_BREAK_COMPARATOR,DOMAIN_NAME
1,"MYDOMAIN.194-064","<=","SHIPMENT.DISTANCE","50 MI",,,,,"LB",100,"SHIPMENT.WEIGHT",, "A","SHIPMENT.WEIGHT","MYDOMAIN"
2,"MYDOMAIN.194-064","BETWEEN","SHIPMENT.DISTANCE","51 MI","55 MI",,,,"LB",100, "SHIPMENT.WEIGHT",,"A","SHIPMENT.WEIGHT","MYDOMAIN"
3,"MYDOMAIN.194-064","BETWEEN","SHIPMENT.DISTANCE","56 MI","60 MI",,,,"LB",100, "SHIPMENT.WEIGHT",,"A","SHIPMENT.WEIGHT","MYDOMAIN"
4,"MYDOMAIN.194-064",,,,,20.0,"USD",20.0,,1,,,"A",,"MYDOMAIN"
5,"MYDOMAIN.194-064","<=","SHIPMENT.WEIGHT","46000 LB",,115,"USD",115,,1,,,"A",, "MYDOMAIN"
6,"MYDOMAIN.194-064",">","SHIPMENT.WEIGHT","46000 LB",,0.25,"USD",0.25,"LB",100, "SHIPMENT.WEIGHT",,"A",,"MYDOMAIN"
34. Import RATE_GEO_COST_WEIGHT_BREAK table.
RATE_GEO_COST_WEIGHT_BREAK
RATE_GEO_COST_GROUP_GID,RATE_GEO_COST_SEQ,WEIGHT_BREAK_GID,RATE_DISCOUNT_VALUE,RATE_DISCOUNT_VALUE_GID,RATE_DISCOUNT_VALUE_BASE,DOMAIN_NAME
"MYDOMAIN.194-064",1,"MYDOMAIN.LT 40000",0.85,"USD",0.85,"MYDOMAIN"
"MYDOMAIN.194-064",1,"MYDOMAIN.LT 45000",0.50,"USD",0.50,"MYDOMAIN"
"MYDOMAIN.194-064",2,"MYDOMAIN.LT 40000",0.87,"USD",0.87,"MYDOMAIN"
"MYDOMAIN.194-064",2,"MYDOMAIN.LT 45000",0.82,"USD",0.82,"MYDOMAIN"
"MYDOMAIN.194-064",3,"MYDOMAIN.LT 40000",0.88,"USD",0.88,"MYDOMAIN"
"MYDOMAIN.194-064",3,"MYDOMAIN.LT 45000",0.83,"USD",0.83,"MYDOMAIN"

Copyright © 2005-2006 Global Logistics Technologies, Inc. 10-1
10. Process Rate Factors If you have created rate factors and rate factor rules in GC3, you can generate accessorial costs in a batch mode fashion. The calculated cost value is placed in the CHARGE_MULTIPLIER_SCALAR column of the Accessorial_Cost table (Charge Discount % field on the Accessorial Cost page).
Using ClientUtil you can work from a client and access data on the server.
Process Rate Factors From a Client You can use ClientUtil to process rate factors from a client DOS or UNIX prompt. The following example generates accessorial costs for the specified rate factor source gid.
Command options are:
python ClientUtil.py -command procRateFactor -hostname <hostname> -username <un> -password <pw> -rateFactorGid <rfg> to process the specified rate factor using associated rate factor rules. The command selects all rules that refer to that Factor Source Gid
python ClientUtil.py -command procRateFactorForRule -hostname <hostname> -username <un> -password <pw> -rateFactorGid <rfg> -ruleGid <rG> to process the specified rate factor using the specified rate factor rule. The command will select the latest rule detail to apply.
python ClientUtil.py -command procAllRateFactors -hostname <hostname> -username <un> -password <pw> to process all unprocessed rate factors using their associated rate factor rules.
python ClientUtil.py -command procRateFactorRunGroup -hostname <hostname> -username <un> -password <pw> -runGroup <id> to process all rate factors in the specified run group with their associated rate factor rules.
python ClientUtil.py -command viewRateFactorResults -hostname <hostname> -username <un> -password <pw> to view the results of processing the rate factors.
Duplicates The command cannot create duplicates. A duplicate is an accessorial cost with the same Accessorial Code Gid and overlapping effective/expiration dates. Take care when setting up the effective and expiration date source logic in the rate factor rule.
Written to Domain The command generates the accessorial costs in the domain where the rate factor rule exists.
Number of Accessorial Costs The command generates an accessorial cost for each reference to accessorial default, rate offering, and rate record.
Error Messages Warning and error messages are logged in the ERROR_LOG table. The following generates errors:
• Inability to calculate the accessorial cost effective/expiration date
• Detected duplicate record
• Unable to calculate accessorial cost value

Copyright © 2005-2006 Global Logistics Technologies, Inc. 10-2
Undo Changes There is no specific functionality to undo generated accessorial costs. These tips might help you:
• The way you name your rate factor IDs can help you locate accessorial costs.
• Notes on accessorial costs can help you locate them again. The accessorial cost gets its name according to this template RF_{current date/time}_{first 15 chars of factor source xid}_{effective date of factor value}_{seq num}.
• To delete accessorial costs, you need to first delete them from the Accessorial_Default, Rate_Offering_Accessorial, and Rate_Geo_Accessorial record.

Copyright © 2005-2006 Global Logistics Technologies, Inc. 11-1
11. Modifying Rates Using the RateMgmt.py Script The RateMgmt.py Python script provides functionality to modify rates. More specifically, it makes it extremely easy to modify a large number of rate records simultaneously.
The script requires installation of the following Python modules:
• Python 2.1 or higher
• PyXML 0.6.6
• 4Suite 0.12
The RateMgmt.py script assumes that you have exported the rate records from the database using the currently available db.xml scripts. To do this you will use the ClientUtil.py script to export and import db.xml files from and to the database. For more detailed information on the ClientUtil.py script, please reference page 3-1.
For your convenience, below is an example of a command line for exporting the rate records that have been marked for expiration:
ClientUtil.py -command xmlExport -hostname SERVERONE -username USER.ADMIN -password CHANGEME -dbObjectName RATE_GEO -whereClause "expire_mark_id = 'TEST_MARK_1'" -localDir X:\FOLDER -localFileName MARKRATES.xml
In this example, you are exporting all the rate records from the RATE_GEO table that have an ExpireMarkId equal to TEST_MARK_1. This assumes you have previously set the Expire Mark ID for the appropriate records to TEST_MARK_1 in the user interface. For more details on doing that, please reference the online help for expiring rate offerings and rate records.
Typical things the RateMgmt.py script will be used for include:
• Copy Rate Offerings from AAA to BBB, with a new version for a new, upcoming time period
• Update records as follows:
Add XX% (i.e., add 10%) to a set of Rate Records
Add $XX (i.e., add $50) to a set of Rate Records
Typically you will be adding either a fixed amount or a relative amount, and be able to specify the where clause.
Currently, the RateMgmt.py script supports twelve different commands. You can use the script itself to see the format of each command and to see a brief description of each. To do this use the following command:
python RateMgmt.py -command <command>
For example, to see the format and get information on the changeRateGeoXid command, you would use:
Python RateMgmt.py –command changeRateGeoXid
The following sections describe each of the eight supported RateMgmt.py commands in detail.
changeRateGeoXid This is used to change a RateGeoXid. It also automatically updates the RateGeoCostGroupGid for the child records.
Copyright © 2005-2006 Global Logistics Technologies, Inc. 11-2
The format for the command line is:
python RateMgmt.py -command changeRateGeoXid -oldGid <oldGid> -newXid <xid> -inFile <infile> -outFile <outfile>
Here is an example command line for changing the RateGeoXid:
python RateMgmt.py -command changeRateGeoXid -oldGid GUEST.1234A -newXid 1234B -inFile in.xml -outFile out.xml
In this example, you are changing the RateGeoXid GUEST.1234A in the input xml file in.xml, to GUEST.1234B in the output xml file out.xml.
In practice, this will often be run before rate records are modified. Since you will most likely need to modify the rates before the old ones actually expire, this will create a rate record with a new id. That way the rate modifications can be done to the new rate record ids and the data can be imported back into the database without overriding the current rate records.
changeAllRateGeoXid This is used to change the suffix of all RateGeoXid(s). It also automatically updates the RateGeoCostGroupGid(s) for the child records.
The format for the command line is:
python RateMgmt.py -command changeAllRateGeoXid -numChars <num> -newSuffix <xidSuffix> -inFile <infile> -outFile <outfile>
Here is an example command line for changing all of the RateGeoXids:
python RateMgmt.py -command changeAllRateGeoXid -numChars 5 -newSuffix _2002 -inFile in.xml -outFile out.xml
In this example, you are changing all the rate record ids in the input xml file in.xml, to include _2002 after what they currently are, and posting the results to the output xml file out.xml. The –numChars argument defines the number of characters in new suffix.
In practice, this will be useful for the same reason as explained under changeRateGeoXid.
changeRateOfferingXid This is used to change the RateOfferingXid for a rate offering.
The format of the command line is:
python RateMgmt.py -command changeRateOfferingXid -oldGid <oldGid> -newXid <xid> -inFile <infile> -outFile <outfile>
Here is an example command line for changing the RateOfferingXid:
python RateMgmt.py -command changeRateOfferingXid -oldGid GUEST.1234A -newXid 1234B -inFile in.xml -outFile out.xml
In this example, you are changing the RateOfferingXid GUEST.1234A in the input xml file in.xml to GUEST.1234B in the output xml file out.xml.
In practice, this can be run before rate offerings or records are modified. Since you will most likely need to modify rate offering or records before old ones actually expire, this will create a rate offering

Copyright © 2005-2006 Global Logistics Technologies, Inc. 11-3
with a new id. That way any modifications can be done to the new rate offering ids and the data can be imported back into the database without overriding the current data.
changeAllRateOfferingXid This is used to change the suffix of all RateOfferingXid(s).
The format for the command line is:
python RateMgmt.py -command changeAllRateOfferingXid -numChars <num> -newSuffix <xidSuffix> -inFile <infile> -outFile <outfile>
Here is an example command line for changing all the RateOfferingXids:
python RateMgmt.py -command changeAllRateOfferingXid -numChars 5 -newSuffix _2002 -inFile in.xml -outFile out.xml
In this example, you are changing all the rate offering ids in the input xml file in.xml, to include _2002 after what they currently are, in the output xml file out.xml. The –numChars argument defines the number of characters in the new suffix.
In practice, this will be useful for the same reason as explained under changeRateOfferingXid.
removeExpireMarkId This is used to remove all the data in the EXPIRE_MARK_ID field of the defined records.
The format for the command line is:
python RateMgmt.py -command removeExpireMarkId -inFile <infile> -outFile <outfile>
Here is an example command line for removing the Expire Mark Ids:
python RateMgmt.py -command removeExpireMarkId -inFile in.xml -outFile out.xml
In this example, you are removing all the data in the EXPIRE_MARK_ID field for the records in the input xml file in.xml and posting the results in the output xml file out.xml.
In practice, this is helpful for when you modify rate records. A common approach would be to update your rate records, then modify your rates. Since most of the new records have copied information from the original rate records, the new rate records may have expiration mark ids assigned to them. Since you will not want to have your new, modified rate records marked for expiration, you will use this command to remove their mark ids.
incRateCostByFactor This is used to increase your rates by the factor specified. For example, if you need to increase your rates by 10%, you would use this command.
The format for the command line is:
python RateMgmt.py -command incRateCostByFactor -factor <increase> [-round <digits>] [-excBreak Y] [-basis <basis>] -inFile <infile> -outFile <outfile> [-@table_name.column_name columnValue]
Here is an example command line to increase you rates by 10%:

Copyright © 2005-2006 Global Logistics Technologies, Inc. 11-4
python RateMgmt.py -command incRateCostByFactor -factor 1.10 -inFile in.xml -outFile out.xml
In this example, you are increasing the rates in the input xml file in.xml by 10% and posting the results the xml output file out.xml. Notice that the -factor argument must be typed as 1.10 for a 10% increase.
This command provides additional arguments to:
• Round the number of digits to a specific value. The value must be an integer greater than or equal to zero. The format of this argument is, -round 2 (which round the rate to the nearest cents in USD).
• Exclude the break (weight or unit) records from being changed. The format of the argument is, -excBreak <xxxxx>
• Specify a filter on the cost basis (e.g. SHIPTMENT, EQUIPMENT, SHIPMENT.DISTANCE (from CHARGE_MULTIPLIER column of RATE_GEO_COST table)). The format of the argument is, -basis <xxxxx>
• Filter for more specific fields. The format of the argument is, -@table_name.column_name columnValue
Here is an example command line using the -basis argument, as well as a specific field filter:
python RateMgmt.py -command incRateCostByFactor -factor 1.10 -basis SHIPMENT -inFile in.xml -outFile out.xml -@RATE_GEO.X_LANE_GID GUEST.PHL_NYC
This would only increase the rates for those rate records where the RateGeo Domain Name is equal to GUEST, and the X_LANE is equal to GUEST.PHL.NYC.
incRateCostByAmount This is used to increase your rates by the amount specified. For example, if you needed to increase your rates by $50, then you would use this command.
The format for the command line is:
python RateMgmt.py -command incRateCostByAmount -amount <amount> -inFile <infile> -outFile <outfile>
Here is an example command line to increase all your rates by $50:
python RateMgmt.py -command incRateCostByAmount -amount 50.00 -inFile in.xml -outFile out.xml
In this example, you are increasing all the rates in the input xml file in.xml by $50 and posting the results to the output xml file out.xml. The currency of the cost is not considered in the command.
This command provides additional arguments to:
• Exclude the break (weight or unit) records from being changed. The format of the argument is, -excBreak <xxxxx>
• Specify a filter on the cost basis (e.g. SHIPTMENT, EQUIPMENT, SHIPMENT.DISTANCE (from CHARGE_MULTIPLIER column of RATE_GEO_COST table)). The format of the argument is, -basis <xxxxx>
The format for each of these is the same as described in incRateCostByFactor.

Copyright © 2005-2006 Global Logistics Technologies, Inc. 11-5
addNewCostRecord This is used to add a fixed amount as a new RateGeoCost record. You would use this to create a new rate record with the defined rate cost.
The format for the command line is:
python RateMgmt.py -command addNewCostRecord -amount <amount> [-currency <currencyCode>] -inFile <infile> -outFile <outfile>
Here is an example command line for changing the rate cost:
python RateMgmt.py -command addNewCostRecord -amount 5.00 -currency USD -inFile in.xml -outFile out.xml
In this example, you are adding a new cost record based on everything in the input xml file in.xml, giving it a rate cost of $5.00, and posting the results to the output xml file out.xml.
removeUserDateFields This is used to remove all the INSERT_USER, INSERT_DATE, UPDATE_USER, and UPDATE_DATE fields.
The format for the command line is:
python RateMgmt.py -command removeUserDateFields -inFile <infile> -outFile <outfile>
Here is an example command line:
python RateMgmt.py -command removeUserDateFields -inFile in.xml -outFile out.xml
In this example, you are taking the input xml file in.xml, removing all the data in the fields listed above, and posting the results to the output xml file out.xml.
removeField This is used to remove a specific field.
The format for the command line is:
python RateMgmt.py -command removeField -inFile <infile> -outFile <outfile> -fieldName <fieldName>
Here is an example command line for removing a specific field:
python RateMgmt.py -command removeField -inFile in.xml -outFile out.xml -fieldName EXPIRATION_DATE
In this example, you are taking the input xml file in.xml, removing the field EXPIRATION_DATE and all is contents, and posting the results to the output xml file out.xml.
changeEffDate This is used to change the value in the effective date field. The newDate must be in the format "YYYY-MM-DD HH24:MI:SS" including quotes.
Copyright © 2005-2006 Global Logistics Technologies, Inc. 11-6
The format for the command line is:
python RateMgmt.py -command changeEffDate -inFile <infile> -outFile <outfile> -newDate <newDate>
Here is an example command line for changing the effective date field:
python RateMgmt.py -command changeEffDate -inFile in.xml -outFile out.xml -newDate "2003-09-01 08:00:00"
In this example, the effective date field in the input xml file in.xml will be changed to 2003-09-01 08:00:00. The results will be posted to the output xml file out.xml.
changeFieldValue This is used to change the value of a specified field. If the new value has spaces, then it must be put in quotes.
The format for the command line is:
python RateMgmt.py -command changeFieldValue -inFile <infile> -outFile <outfile> -fieldName <fieldName> -newValue <newValue>
Here is an example command line for changing the value of a specific field:
python RateMgmt.py -command changeFieldValue -inFile in.xml -outFile out.xml -fieldName EXPIRATION_DATE -newValue "2003-09-01 08:00:00"
In this example, the expiration date in the xml input file in.xml will be changed to 2003-09-01 08:00:00. The results will be posted to the output xml file out.xml.

Copyright © 2005-2006 Global Logistics Technologies, Inc. 12-1
12. Voyage Schedule Data GC3 supports a standardized ocean portal interface to accommodate various ocean schedule feeds from a variety of portals. These include, but are not limited to, ESG, CargoSmart, INTTRA, and GGNexus.
There are several steps and assumptions associated with using this functionality. These include acquiring voyage data, partitioning the database, staging the data, and loading the data in the correct tables using automated procedures provided by GLog.
Voyage Data Clients are responsible for acquiring voyage data from data providers. While the data from some providers is available in the correct GC3 format, it is the responsibility of the client to ensure that the format is correct prior to loading it in the staging tables.
Staging Tables A complete set of data must be loaded into the staging tables prior to initiating the process to create the voyage schedules. The following staging tables must be loaded. For specific information on the tables and their fields, please reference the database dictionary:
• X_VOYAGE
Contains voyage header data.
• X_VOYLOC
Contains voyage leg details.
• X_VOY_LOC_MAP
Contains a mapping of data source location IDs to GC3 locations Gids.
• X_VOY_CAR_MAP
Contains a mapping of data source service provider IDs to GC3 Service Provider Gids.
Assuming data from multiple providers is going to be loaded into separate partitions, the data from the first provider should be loaded in the staging tables. Once complete, the data should be moved to the database in the first partition. After the first data set is complete, the data from the second provider should be loaded in the staging tables. After that, the data should be moved to the database in the second partition. This would continue until all the data is loaded.
Partitioning Each provider’s data set should be loaded in a separate partition. There is a maximum of seven partitions available. It is the voyage data tables that get partitioned, not the staging tables.
Using the database partitioning will preserve the separation of data since each provider’s data will be maintained in a separate partition. Please note, however, that it is possible to combine multiple data source providers in a single partition. This would require the data from all the providers in that partition be loaded in the staging tables prior to initiating the loading process.
The VOYAGE and VOYLOC tables are partitioned to support this functionality. The partition key column is DATA_SOURCE_PARTITION_KEY. This column in NOT NULLABLE and can contain a value of 1 through 7.

Copyright © 2005-2006 Global Logistics Technologies, Inc. 12-2
Procedures and Views There are several packaged procedures and views that are provided with GC3 to support the different voyage data related tasks.
There are four procedures that can be run to setup and manipulated voyage data. They are bundled together in the pkg_voyage package, and can be run directly against the database using a SQL editor, such as SQL Plus.
setup_data_source
This is used to create a mapping of a data source to a partition key. It alleviates needing to remember which partition to load a set of data into.
The parameters are:
p_dataSource (VARCHAR2)
p_partkey (PLS_INTEGER)
delete_schedule
This is used to delete all the data in a specified partition.
The parameter is:
p_partkey (PLS_INTEGER)
delete_schedule
This is used to delete all the data from a specified data source. Note that the name of this procedure is the same as the preceding one. The parameter, however, is different.
The parameter is:
p_dataSource (VARCHAR2)
load_schedule
This is used to delete the current voyage schedule data from the VOYAGE and VOYLOC tables, and load the new data from the staging tables. The new data will be taken from the X_VOYAGE and X_VOYLOC tables by cross-referencing service provider IDs with the X_VOY_CAR_MAP table and the location IDs with the X_VOY_LOC_MAP table. Please note that if mapping is not present, then a new location will be created using the location ID as the Gid, and a mapping record will be added to the X_VOY_CAR_MAP or X_VOY_LOC_MAP as needed. The procedure will also check for any shipments which have a voyage ID not currently in the new schedule and log them in the error log.
The parameters are:
p_partkey (PLS_INTEGER := Null)
p_batchSize (PLS_INTEGER := 200)
p_logFlag (VARCHAR2 := ‘Y’)
In addition to the above procedures, there are two packaged view commands provided with GC3 to observe errors and data mappings. Again, they can be run directly against the database using a SQL editor, such as SQL Plus.
voyage_err_view
This is used to view the errors that are that are generated after running the load_schedule procedure.

Copyright © 2005-2006 Global Logistics Technologies, Inc. 12-3
data_source_partition_view
This is used to view the current mappings of data source and partition keys.
Steps This section outlines the steps, both optional and required, for setting up and loading voyage data.
1. Setup Mapping of Data Sources and Partition Keys
This step is optional, but will alleviate having to remember all the partition keys. If used, it should be run prior to loading the vessel data. Using a SQL editor, the command would be
pkg_voyage.setup_data_source (‘MYSOURCE’,1)
where MYSOURCE is the data provider name in the p_dataSource field, and 1 is the partition number in the p_partkey field.
35. Load the Mapping Tables
The X_VOY_LOC_MAP and the X_VOY_CAR_MAP tables must be loaded with the mapping of the data source locations and service provider IDs to the GC3 Gids. This should be complete before the voyage data is loaded into their final tables. Clients are responsible for maintaining this mapping.
36. Load the Staging Tables
The X_VOYAGE and X_VOYLOC tables must be loaded with the appropriate data from the data providers. The data can be loaded using current CSV functionality (see the CSV sections of the document for details). As mentioned earlier in this chapter, clients are ultimately responsible for ensuring the data is in the proper format. The DATA_SOURCE column of the tables should be set to the appropriate data source ID. The data must contain the complete set of voyage data.
37. Initiate the Load Schedule Procedure
This step will delete the current voyage schedule and load the new data set from the staging tables. Using a SQL editor, the command would be
pkg_voyage.load_schedule (null, 200, ‘Y’)
where the first parameter is null because the procedure will look up the partition key using the mapping previously setup, the 200 defines the batch size in terms of the number of records the database should hold in its buffer before it writes them to the database, and the ‘Y’ states that errors will be logged to the log file.
38. View Error Log
If logging was enabled, and there were any problems during the above steps, a message will be posted to the error log. To view the error log, execute the following command using a SQL editor:
select * from voyage_err_view
39. View Data Mappings
If logging was enabled, the current mapping of data source and partition keys can be viewed by executing the following command using a SQL editor:
select * from data_source_partition_view


Copyright © 2005-2006 Global Logistics Technologies, Inc. 13-1
13. Copy Domains Note: While copying domains, make sure no user accesses the database. For example, you can do this by shutting down the application server.
Note: If you want to copy a domain1 that needs data from domain2 and you want domain1 to have access to all data in domain2 in the new target database too, you need to make sure you copy domain2 before domain1.
This chapter describes a set of tools to copy domains. Each of them has its limitations and advantages.
Tool Advantages Limitations Usage
Export/ Import
No physical restrictions on the target and source database servers. For example, they do not need a network link between them.
Tables in your target and source domain must have the same table structure.*
Security related tables are not copied.
Does not allow you to rename the copied domain name.
Only between databases.
In Schema Copy
Data in clob and long columns can be copied.
You must rename the copied domain.
For tables that have a domain_name column and a numeric primary key, the primary key will increment utilizing sequence numbers. However, its copied child fk column data still points to the old from_domain_name parent.
Only within one database.
Database Link Copy
Preferred tool to build a clean database out of an existing database.
Tables in your target and source domain can contain different columns.*
You can rename or keep the copied domain name.
You can run this script multiple times to insert rows that have been added in the source database since the last database link copy.
Requires that a public database link can be created from the target database to the source database.
Allows you to copy clob and long columns. However, the data types in the local and remote domains must be the same.
Within or between databases.
* Tables might contain different columns if you migrated your source database from an earlier database version and you create your target database with the create_all script. In this case, your migrated database contains obsolete columns since the migration scripts do not generally drop obsolete columns.

Copyright © 2005-2006 Global Logistics Technologies, Inc. 13-2
Export and Import This tool exports and imports domain data, child domain data, and referenced domain data. The tool computes the referenced domains from the domain_grant_made table. Furthermore, it copies any table with a domain_name column. You run the domain import/export with two shell scripts.
Note: This tool only works with databases for GC3 version 3.1.1 and later.
Note: Only tables that have a domain_name column can be copied.
Note: It is crucial to create the target domain before copying data into it.
Note: Do not use this tool to copy domains to a production database you plan to go live on. The other tools are better.
What the Objects do This section describes what each object does.
domain_export.sh
• Calls pkg_domain_export
Searches all the grantor domains that grant read or write access of their domain data to the current domain. However, it does not perform the physical check to see if the current domain does actually reference the grantor domain data. The grantor domains does not include the PUBLIC and SERVPROV domains.
Searches for tables with a domain_name column.
Generates parameter files for export and import
• Calls the Oracle export tool to export the domain data to a dump file.
domain_import.sh
• Calls pkg_domain_export.
Disables some triggers during import.
Disables self-referenced foreign keys during import.
• Calls the Oracle import tool to import the domain data
• Calls pkg_domain_export.
Enables the disabled triggers once the import is completed.
Enables the self-referenced foreign keys once the import is completed.
• Calls pkg_purge and fk_trouble_shooter.
pkg_shipment_purge and fk_trouble_shooter form a backup plan. As mentioned above, PUBLIC and SERVPROV data is not exported. Still, the exported domain might reference PUBLIC or SERVPROV data in the source database leading to foreign key violations. These two packages search for those references and remove them from the target database.
Setup Compile the packages.
1. Sqlplus> @pkg_shipment_purge.sql

Copyright © 2005-2006 Global Logistics Technologies, Inc. 13-3
2. Sqlplus> @create_pkg_domain_export.sql
3. Sqlplus> @create_fk_trouble_shooter.sql
Steps to Copy a Domain Export from source database.
1. Os prompt> bash domain_export.sh <oracle_sid> <userid> <password> <domainname> <include_reference_domain> Example: bash domain_export.sh localdb glogowner glogowner guest yes The last command line argument, include_reference_domain, is either “yes” or “no”. When you enter “yes”, the script exports the grantor domain data along with the specified domain data. This is the preferred scenario. However, you can encounter other situations where you export multiple domains and you have already imported the grantor domain data into the target database. If this is the case, enter “no” as the last argument to skip the grantor domains.
2. Review domainexp.log for error messages. You can safely ignore Oracle errors and messages marked EXP-00081.
Import into target database.
3. Create target domain in GC3. If you do not, you will have problems creating the domain in GC3 afterwards. Even if you do create your target domain in GC3 you will see a lot of error code –1, which means primary key violation. This is OK. The error messages occur because GC3 creates some table data automatically and the copy then tries to insert the same data.
4. Transfer the files domainexp.dmp and domainimp.par to the target database.
5. Os prompt> bash domain_import.sh <oracle_sid> <userid> <password>
Result When domain_import.sh is done, it displays the message “ALL FOREIGN KEYS WERE ENABLED SUCCESSFULLY!” on the console. If it does not, examine the error logs in domainimp.log and violated_con.log.
• domainimp.log captures all errors during the import.
• violated_con.log gives you more detailed information about constraints. It summarizes all tables with invalid constraints as well as parent keys missing in the target database.
Error Messages The most common problem encountered while importing is foreign key violations, where a large number of rows are rejected. This can be frustrating since it takes a lot of time to display the error messages on the console. Foreign key violations might occur if you migrated your source database from an earlier database version and you create your target database with the create_all script. In this case, your migrated database contains obsolete columns since the migration scripts do not generally drop obsolete columns. To confirm this, search for ORA-00904 error messages in your domainimp.log file.
Copyright © 2005-2006 Global Logistics Technologies, Inc. 13-4
In Schema Copy This tool allows you to copy domains within one database. You can copy domains with or without their child domains. Child domains keep their original child domain names; only the parent domain name part is replaced.
What the Objects do This tool uses these stored procedures in pkg_novpd_domain_copy:
Procedure Does This
set_copy_parameters Stores what “from_domain” to copy into what “to_domain”. You can enter multiple pairs of domains before executing the actual copying.
print_copy_parameters Displays the list of “from_domain”s and “to_domain”s you have created with set_copy_parameters.
reset_parameters Clears the list of domains to copy. You might want to do this if you notice a spelling error.
Set-up Compile the packages.
1. Log in as glogowner..
2. sqlplus>@create_pkg_novpd_inschema_copy.sql to compile the package.
3. sqlplus>@novpd_domain_copy_script_builder.sql to generate the domain copy script, novpd_load.sql. In novpd_load.sql, there is a procedure for every table. Each procedure is enclosed by "declare" and a "/". You can remove a procedure from the script if you do not want to copy a certain table.
Copy Domains 1. sqlplus>execute pkg_novpd_domain_copy.set_copy_parameters('from_domain', 'to_domain',
copy_child_domains, domain_info) to set your copy parameters.
Note: You need to execute this command for every domain to be copied.
Note: You can copy multiple domains with or without renaming them in a single run.
Note: If domains depend on each other for data and you want to rename at least one of these domains, you must copy all these domains in a single run. This will allow novpd_load.sql to keep all dependencies correct. If you do not, some of the data will be rejected due to foreign key violations.
Parameter Description
from_domain Name of the domain to copy.
to_domain The new name of the domain.
copy_child_domains true - child domains will be copied

Copyright © 2005-2006 Global Logistics Technologies, Inc. 13-5
Parameter Description
false - child domains will not be copied.
domain_info You must enter "false". This retrieves domain information from the local source database instead of a remote target database.
2. sqlplus>set serverout on size 1000000.
3. sqlplus>execute pkg_novpd_domain_copy.print_copy_parameters to display the parameter values entered.
4. If you notice that any of your parameters are wrong, you can reset all parameters with execute pkg_novpd_domain_copy.reset_parameters. If you do execute this statement, you must re-enter all your parameters.
5. sqlplus>@novpd_load.sql to copy all domains you have entered parameters for. There is a log file: inschema_domain_copy.log.
6. sqlplus>execute domainman.reset_sequence to reset the Oracle sequence numbers.
7. You need to restart GC3 running against the target database to be able to log in to your newly copied domain. The restart allows GC3 to refresh its caches.
Result of In Schema Copy After novpd_load.sql has finished it displays the number of data rows that were copied and rejected.
Database Link Copy This is the preferred tool to build a clean database out of an existing database.
Database Link Copy requires the packages pkg_novpd_domain_copy that depends on pkg_domain_export. It copies tables with the domain_name column as well as the security tables
The total number of rows copied or rejected is written in the database_link_domain_copy.log file. If an exception happens, the exception code as well as the primary key is also written to the log file. Furthermore, if the exception is a foreign key violation, the log will include the foreign key.
Create Link from Target to Source Database 1. Log in to the target database with a DBA level account. You must then navigate to the
/glog/oracle/script8/ directory.
2. sqlplus>alter system set global_names=false
3. sqlplus>create public database link "loader.oracle.com" connect to "username_in_source_database" identified by " password_in_source_database" using 'source_database' Example: create public database link "loader.oracle.com" connect to "glogowner" identified by "glogowner" using 'hera35' Use exact double or single quotes as shown above. Later, if you need to change the database link to point to a different database, you must first drop the database link (drop public database link loader.oracle.com ) and then recreate it.

Copyright © 2005-2006 Global Logistics Technologies, Inc. 13-6
4. Sqlplus>select count(1) from [email protected] to confirm that the database link is active.
Generate Script 1. Sqlplus>connect glogowner/password@targetdb
2. Sqlplus>@create_pkg_novpd_inschema_copy.sql
3. Sqlplus>@database_link_domain_copy_script_builder.sql to generate the link_load.sql script. link_load.sql contains a stored procedure for every table it will copy. Each procedure is enclosed by "declare" and a "/".
Note: You can remove a procedure from the link_load.sql script if you do not want to copy a certain table. Note that once you remove a procedure for a table, its child tables are rejected.
Note: Like novpd_load.sql, link_load.sql only contains a stored procedure for tables that the two databases have in common. Furthermore, only data in columns that appear in both the target and source database will be copied. This allows you to copy domains between databases of different releases.
Note: You may encounter some problems 1. When uncopied columns are required and have no default values or triggers. 2. When the same column in both target and source database has different data types such as CLOB and LONG. 3. When data records in your domain point to records in a domain that do not exist in the target domain. You will see error 2291 in your log file (foreign key violation). 4. When the sequence number of your source database is higher than your target database. If any of the records in your copied domain refers to a table with only a sequence number as primary key, the referring record will be rejected.
Copy Domains Note: During the domain copy, only one commit per table and domain is executed. If you want to copy a large amount of data, be sure to allocate enough rollback tablespace and segments.
1. sqlplus>execute pkg_novpd_domain_copy.set_copy_parameters('from_domain', 'to_domain', copy_child_domains, domain_info) to set your copy parameters.
Note: You need to execute this command for every domain to be copied.
Note: You can copy multiple domains with or without renaming them in a single run.
Note: If domains depend on each other for data and you want to rename at least one of these domains, you must copy all these domains in a single run. This will allow link_load.sql to keep all dependencies correct. If you do not, some of the data will be rejected due to foreign key violations.
Parameter Description
from_domain Domain name in source database.
to_domain Domain name in target database. If it is the same as from_domain, then no renaming is performed. Otherwise, from_domain would be renamed to to_domain during the copying.
copy_child_domains true - then child domains will be copied

Copyright © 2005-2006 Global Logistics Technologies, Inc. 13-7
Parameter Description
false - child domains will not be copied.
domain_info You must enter "true". This retrieves domain information from the remote source database instead of the local target database.
2. sqlplus>set serverout on size 1000000.
3. sqlplus>execute pkg_novpd_domain_copy.print_copy_parameters to display the parameter values entered.
4. If you notice that any of your parameters are wrong, you can reset all parameters with execute pkg_novpd_domain_copy.reset_parameters. If you do execute this statement, you must re-enter all your parameters.
5. sqlplus>@link_load.sql to copy all domains you have entered parameters for. There is a log file: database_link_domain_copy.log
6. sqlplus>execute domainman.reset_sequence to reset the Oracle sequence numbers.
7. You need to restart GC3 running against the target database to be able to log in to your newly copied domain. The restart allows GC3 to refresh its caches.
Difference Between Domains You can find the difference between two domains and list the primary keys.
1. Sqlplus>set serverout on size 1000000
2. sqlplus>execute pkg_domain_export.diff_remote(remote_domain, local_domain)
Note: Differences here, most likely depends on static data missing, in your target database, in a domain like PUBLIC. Also, you might have missed to copy dependant domains in one session.
3. sqlplus>execute pkg_domain_export.diff_table_remote(remote_domain, local_domain)
Rerun database link copy As long as the target database schema has not changed, you can run the link_load.sql script again and again to insert rows that have been added to the source database since the last database link copy. This is also useful to keep PUBLIC domains in two databases synchronized. Note that this does not update existing rows in the target database
Note: If the target database schema has changed, you need to run the database_link_domain_copy_script_builder.sql script again to create an updated link_load.sql script.


Copyright © 2005-2006 Global Logistics Technologies, Inc. 14-1
14. Java Integration API GC3 provides a callable Java API to allow external developers to write Java programs that maintain data via the application server. This document describes this API.
This chapter introduces the Java Integration API, taking the perspective of an external developer.
The Java Integration API includes the following methods.
package glog.integration.clientapi;
import java.util.Iterator;
public interface ClientAPI
{
public Iterator getEntityNames () throws ClientAPIException;
public Iterator describeEntity (String entityName) throws ClientAPIException;
public void insert (ValuesObject rowData) throws ClientAPIException;
public void insertUpdate (ValuesObject rowData) throws ClientAPIException;
public void update (ValuesObject rowData) throws ClientAPIException;
public void delete (ValuesObject rowData) throws ClientAPIException;
public ValuesObject[] execMany (ValuesObject[] commandList) throws ClientAPIException;
public ValuesObject findByPrimaryKey (ValuesObject primaryKey) throws ClientAPIException;
public ValuesObject[] findAll (String entityName) throws ClientAPIException;
public void close() throws ClientAPIException;
}
The following table briefly describes the purpose of each method. Code examples are then provided to illustrate the use of each method.
Method Description
GetEntityNames Returns an iteration of all supported entity names, such as Location, ObOrderBase, Shipment, etc. Each entity corresponds to a GC3 table, but the name of the entity uses mixed case instead of underscores. See Example3.java
DescribeEntity Given an entity name, returns an interaction of ValuesObject each of which describes an attribute of the entity. See Example4.java
Insert Inserts a new row via the application server. See Example1.java
InsertUpdate Update a row if it exists, otherwise insert a new row. See Example9.java

Copyright © 2005-2006 Global Logistics Technologies, Inc. 14-2
Method Description
Update Updates a row via the application server. See Example2.java
Delete Deletes a row via the application server. See Example5.java
ExecMany Process a sequence of operations in a single transaction. See Example7.java
FindByPrimaryKey Return a ValuesObject corresponding to a given primary key. See Example6.java
FindAll Return an array of ValuesObjects corresponding to all rows for the given entity. See Example10.java
Close Close a connection
Example1.java – Insert package glog_deploy.integration.clientapi;
import glog.integration.clientapi.ValuesObject;
import glog.integration.clientapi.ClientAPIConnection;
import glog.integration.clientapi.ClientAPI;
public class Example1
{
static public void main(String[] args) throws Exception
{
ClientAPI clientAPI = ClientAPIConnection.connect("GUEST.ADMIN","CHANGEME");
ValuesObject rowData = new ValuesObject("Location");
rowData.put("locationGid","GUEST.MYNEWLOC4");
rowData.put("locationXid","MYNEWLOC4");
rowData.put("countryCode3Gid","USA");
rowData.put("domainName","GUEST");
rowData.put("isTemporary","true");
clientAPI.insert(rowData);
}
}
Example2.java – Update package glog_deploy.integration.clientapi;
import glog.integration.clientapi.ValuesObject;

Copyright © 2005-2006 Global Logistics Technologies, Inc. 14-3
import glog.integration.clientapi.ClientAPIConnection;
import glog.integration.clientapi.ClientAPI;
public class Example2
{
static public void main(String[] args) throws Exception
{
ClientAPI clientAPI = ClientAPIConnection.connect("GUEST.ADMIN","CHANGEME");
ValuesObject rowData = new ValuesObject("Location");
rowData.put("locationGid","GUEST.MYNEWLOC");
rowData.put("locationName","Eric Rosenbloom");
clientAPI.update(rowData);
}
}
Example3.java – GetEntityNames package glog_deploy.integration.clientapi;
import glog.integration.clientapi.ValuesObject;
import glog.integration.clientapi.ClientAPIConnection;
import glog.integration.clientapi.ClientAPI;
import java.util.Iterator;
public class Example3
{
static public void main(String[] args) throws Exception
{
ClientAPI clientAPI = ClientAPIConnection.connect("GUEST.ADMIN","CHANGEME");
Iterator i = clientAPI.getEntityNames();
while (i.hasNext()) {
System.out.println("EntityName = " + (String) i.next());
}
}
}
Example4.java – DescribeEntity package glog_deploy.integration.clientapi;
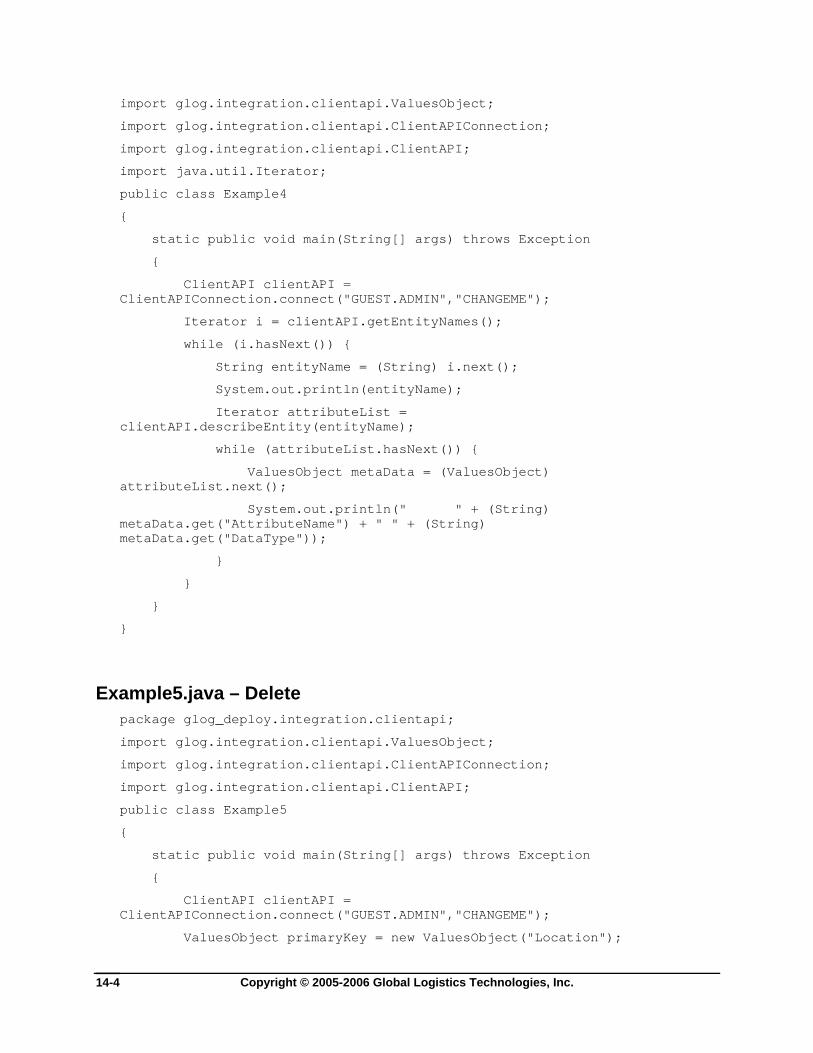
Copyright © 2005-2006 Global Logistics Technologies, Inc. 14-4
import glog.integration.clientapi.ValuesObject;
import glog.integration.clientapi.ClientAPIConnection;
import glog.integration.clientapi.ClientAPI;
import java.util.Iterator;
public class Example4
{
static public void main(String[] args) throws Exception
{
ClientAPI clientAPI = ClientAPIConnection.connect("GUEST.ADMIN","CHANGEME");
Iterator i = clientAPI.getEntityNames();
while (i.hasNext()) {
String entityName = (String) i.next();
System.out.println(entityName);
Iterator attributeList = clientAPI.describeEntity(entityName);
while (attributeList.hasNext()) {
ValuesObject metaData = (ValuesObject) attributeList.next();
System.out.println(" " + (String) metaData.get("AttributeName") + " " + (String) metaData.get("DataType"));
}
}
}
}
Example5.java – Delete package glog_deploy.integration.clientapi;
import glog.integration.clientapi.ValuesObject;
import glog.integration.clientapi.ClientAPIConnection;
import glog.integration.clientapi.ClientAPI;
public class Example5
{
static public void main(String[] args) throws Exception
{
ClientAPI clientAPI = ClientAPIConnection.connect("GUEST.ADMIN","CHANGEME");
ValuesObject primaryKey = new ValuesObject("Location");

Copyright © 2005-2006 Global Logistics Technologies, Inc. 14-5
primaryKey.put("locationGid", "GUEST.MYNEWLOC");
clientAPI.delete(primaryKey);
}
}
Example6.java – FindByPrimaryKey package glog_deploy.integration.clientapi;
import glog.integration.clientapi.ValuesObject;
import glog.integration.clientapi.ClientAPIConnection;
import glog.integration.clientapi.ClientAPI;
public class Example6
{
static public void main(String[] args) throws Exception
{
ClientAPI clientAPI = ClientAPIConnection.connect("MDIETL.ADMIN","CHANGEME");
ValuesObject primaryKey = new ValuesObject("Shipment");
primaryKey.put("shipmentGid", "MDIETL.184");
ValuesObject rowData = clientAPI.findByPrimaryKey(primaryKey);
System.out.println("rowData = " + rowData);
}
}
Example7.java – ExecMany package glog_deploy.integration.clientapi;
import glog.integration.clientapi.ValuesObject;
import glog.integration.clientapi.ClientAPIConnection;
import glog.integration.clientapi.ClientAPI;
public class Example7
{
static public void main(String[] args) throws Exception
{
ClientAPI clientAPI = ClientAPIConnection.connect("GUEST.ADMIN","CHANGEME");
// Construct ValuesObject for first update command
ValuesObject rowData1 = new ValuesObject("Location");
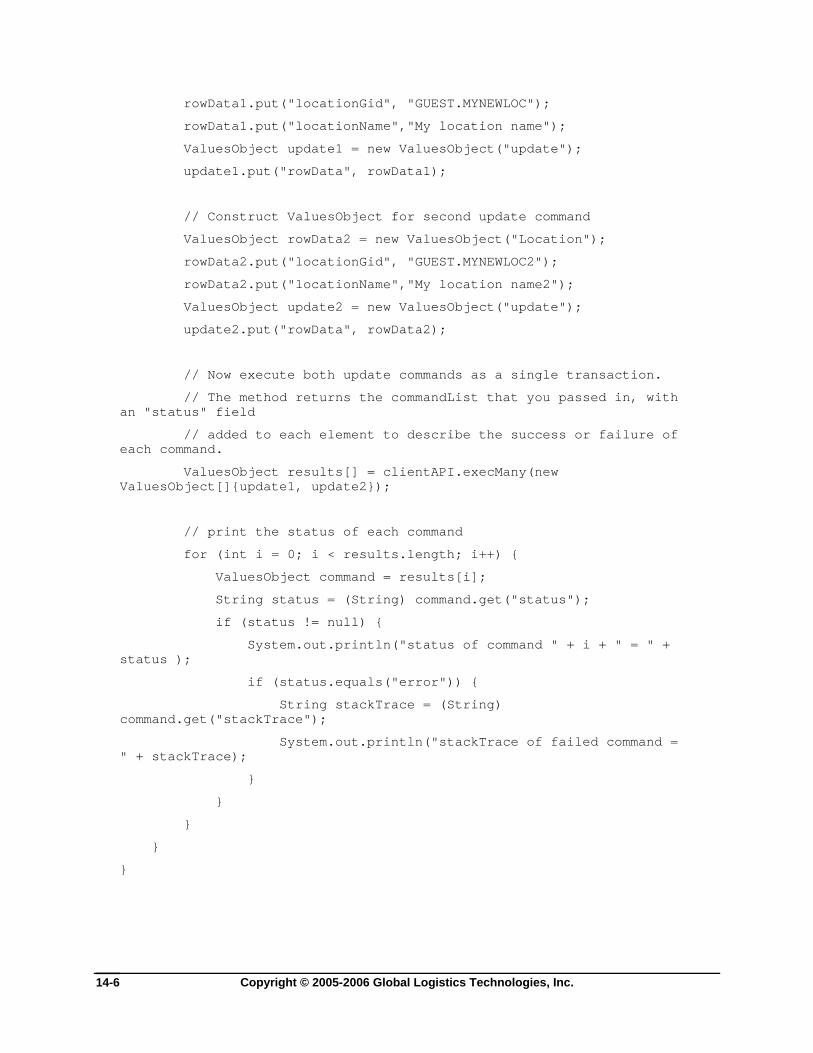
Copyright © 2005-2006 Global Logistics Technologies, Inc. 14-6
rowData1.put("locationGid", "GUEST.MYNEWLOC");
rowData1.put("locationName","My location name");
ValuesObject update1 = new ValuesObject("update");
update1.put("rowData", rowData1);
// Construct ValuesObject for second update command
ValuesObject rowData2 = new ValuesObject("Location");
rowData2.put("locationGid", "GUEST.MYNEWLOC2");
rowData2.put("locationName","My location name2");
ValuesObject update2 = new ValuesObject("update");
update2.put("rowData", rowData2);
// Now execute both update commands as a single transaction.
// The method returns the commandList that you passed in, with an "status" field
// added to each element to describe the success or failure of each command.
ValuesObject results[] = clientAPI.execMany(new ValuesObject[]{update1, update2});
// print the status of each command
for (int i = 0; i < results.length; i++) {
ValuesObject command = results[i];
String status = (String) command.get("status");
if (status != null) {
System.out.println("status of command " + i + " = " + status );
if (status.equals("error")) {
String stackTrace = (String) command.get("stackTrace");
System.out.println("stackTrace of failed command = " + stackTrace);
}
}
}
}
}

Copyright © 2005-2006 Global Logistics Technologies, Inc. 14-7
Example9.java – InsertUpdate package glog_deploy.integration.clientapi;
import glog.integration.clientapi.ValuesObject;
import glog.integration.clientapi.ClientAPIConnection;
import glog.integration.clientapi.ClientAPI;
public class Example9
{
static public void main(String[] args) throws Exception
{
ClientAPI clientAPI = ClientAPIConnection.connect("GUEST.ADMIN","CHANGEME");
ValuesObject rowData = new ValuesObject("Location");
rowData.put("locationGid","GUEST.MYNEWLOC4e");
rowData.put("locationXid","MYNEWLOC4e");
rowData.put("countryCode3Gid","USA");
rowData.put("domainName","GUEST");
rowData.put("isTemporary","true");
clientAPI.insertUpdate(rowData);
}
}
Example10.java – FindAll
package glog_deploy.integration.clientapi;
import glog.integration.clientapi.ValuesObject;
import glog.integration.clientapi.ClientAPIConnection;
import glog.integration.clientapi.ClientAPI;
public class Example10
{
static public void main(String[] args) throws Exception
{
ClientAPI clientAPI = ClientAPIConnection.connect("MDIETL.ADMIN","CHANGEME");
ValuesObject[] set = clientAPI.findAll("Shipment");
for (int i = 0; i < set.length; i++) {
System.out.println(set[i]);
}

Copyright © 2005-2006 Global Logistics Technologies, Inc. 14-8
}
}
Example11.java – Exception Handling
All the ClientAPI methods throw ClientAPIException. This example shows how you may catch a ClientAPIException.
package glog_deploy.integration.clientapi;
import glog.integration.clientapi.ValuesObject;
import glog.integration.clientapi.ClientAPIConnection;
import glog.integration.clientapi.ClientAPI;
import glog.integration.clientapi.ClientAPIException;
public class Example11
{
static public void main(String[] args) throws Exception
{
// Catch a bad password
try {
ClientAPI clientAPI = ClientAPIConnection.connect("GUEST.ADMIN","WRONGPASSWORD");
}
catch (ClientAPIException cae) {
cae.printStackTrace(System.out);
}
}
}
The ClientAPIConnection Class The ClientAPIConnection class provides a connect() method which authenticates the client application and returns an instance of a class which implements the ClientAPI.
The ValuesObject Class The ValuesObject class is a thin wrapper around java.util.HashMap, providing support for a set of attribute/value pairs.

Copyright © 2005-2006 Global Logistics Technologies, Inc. 14-9
Handling Units of Measure The output from Example6.java can be used to understand how units of measure are represented within the ValuesObject.
java glog_deploy.integration.clientapi.Example6
rowData = {isTemperatureControl=false, domainName=MDIETL, checkCapacityConstraint=true, itineraryGid=MDIETL.180, totalActualCost=2880.44 USD, startTime=2002-09-17 17:47:28 UTC, totalVolume=1000 CUFT, isCostFixed=false, plannedCost=2880.44 USD, totalWeight=40000 LB, totalWeightedCost=2880.44 USD, totalNetVolume=1000 CUFT, isServiceTimeFixed=false, rateGeoGid=MDIETL.CA-GA.MSCARRIERS, feasibilityCode=FEASIBLE, rateOfferingGid=MDIETL.MSCARRIERS2000, endTime=2002-09-22 17:47:28 UTC, totalNetWeight=40000 LB, isFixedTenderContact=false, isTemplate=false, shipmentAsWork=false, numStops=2, checkCostConstraint=true, weighCode=A, isRateOfferingFixed=false, shipmentReleased=true, sourceLocationGid=MDIETL.CONTAINER MFG - PLANT 1 - LOS ANGELES, isAutoMergeConsolidate=false, shipmentTypeGid=TRANSPORT, isToBeHeld=false, parentLegGid=MDIETL.1, isPreferredCarrier=false, servprovGid=MDIETL.MSCARRIERS, transportModeGid=TL, destLocationGid=MDIETL.100 INDUSTRIAL ROAD, perspective=B, shipmentGid=MDIETL.184, totalShipUnitCount=1, shipmentXid=184, rule7=false, isServprovFixed=false, shipmentName=erosenbloom, numOrderReleases=1, checkTimeConstraint=true, isPreload=false, isHazardous=false, isRateGeoFixed=false}
The above output illustrates several UOM attributes. For example, the UOM of “totalActualCost” is “USD”, and the UOM of “startTime” is “GMT”. When writing code such as Example1.java, you must specify a unit of measure for any attribute where a unit of measure makes sense. (A Remark would be an example of an attribute where a unit of measure would not make sense).
The valid UOM codes can be determined by querying the UOM table.
Environment Issues The clientAPIConnection class depends on their being a of the glog.properties file in the user.home directory. This property files is required to determine which application server to connect to. (Notice that only the username and password is specified when you make the connect call from your java program).
Here are the minimal entries required in the glog.properties file:
# application server URL and port
appserver=localhost
appserver.port=7001
On an NT machine the above glog.properties file resides in the default user.home directory:
c:/WINNT/Profiles/username/glog.properties
You can specify user.home on the java command line, and then CSVHelper will find the glog.properties file in the directory you specify. For example:
java -Duser.home=l:/gc3/glog_deploy/app/config glog_deploy.integration.clientapi.Example1

Copyright © 2005-2006 Global Logistics Technologies, Inc. 14-10
In the above example, I tell the jvm that the user.home directory is l:/gc3/glog_deploy/app/config instead of the default c:/WINNT/Profiles/username.

Copyright © 2005-2006 Global Logistics Technologies, Inc. 15-1
15. Interactive Uploading of Zip File You can now upload a zip file containing multiple CSV files. In addition to the CSV files, your zip file must include a control file called csvutil.ctl to tell GC3 how to process the files. The control file specifies the sequence in which the CSV files should be processed, and specifies the parameters to use when processing each file.
Here is a sample zip file:
D:\erosenbloom\v45\zip\test1.zip
This sample zip file contains the csvutil.ctl (control) file, and two CSV files.
The csvutil.ctl file contains the following command lines:
The above control file tells to process the file activity.csv using the insert command, then process the file activity2.csv, also using the insert command.
Uploading a zip file is the same as uploading any other file – you use the “Upload an XML/CSV Transmission” button as shown below.

Copyright © 2005-2006 Global Logistics Technologies, Inc. 15-2
After uploading your zip file, you will be prompted to download a “results” zip file as shown below:
You then press the Save button to save the “results” zip file to your local workstation:

Copyright © 2005-2006 Global Logistics Technologies, Inc. 15-3
Here are the contents of the result zip file in this case:
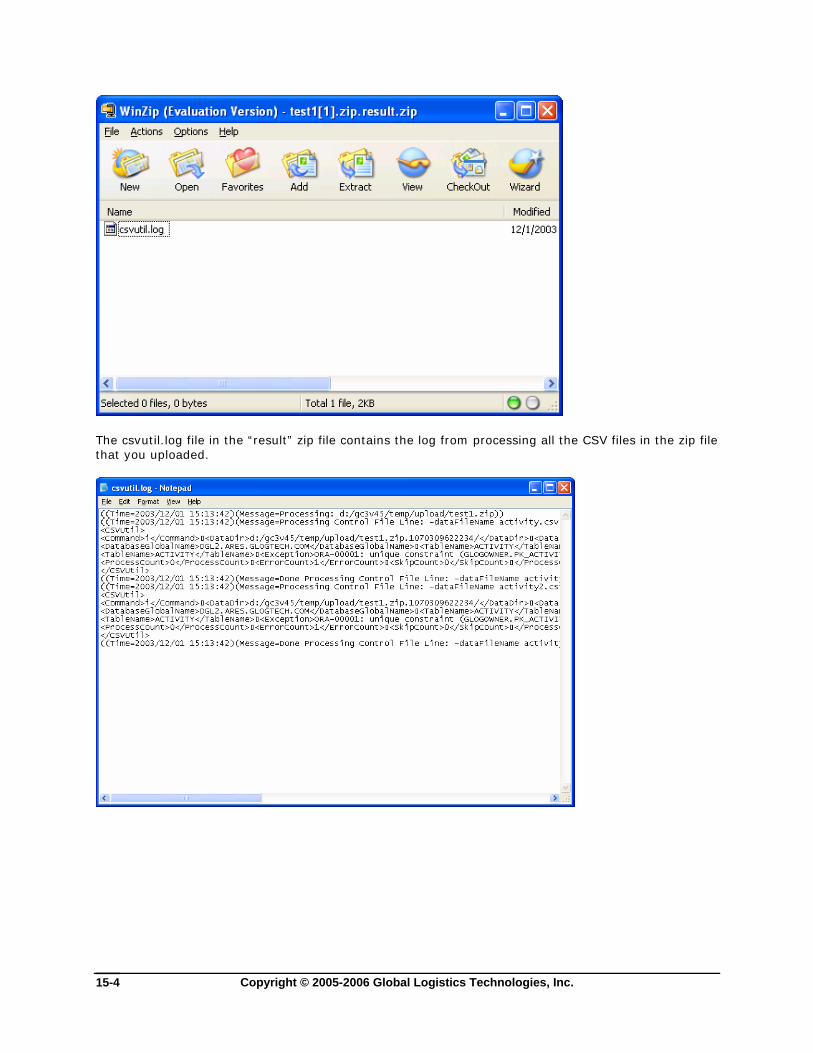
Copyright © 2005-2006 Global Logistics Technologies, Inc. 15-4
The csvutil.log file in the “result” zip file contains the log from processing all the CSV files in the zip file that you uploaded.

Copyright © 2005-2006 Global Logistics Technologies, Inc. 16-1
16. Bad Files If any of the records in any of your CSV files fails to load, then your “results” zip file will contain a corresponding “.bad” file containing those records that failed to load. For example:
In this case, both of my CSV files contained one of more records that failed to load, so there is a corresponding .bad file for each CSV file.


Copyright © 2005-2006 Global Logistics Technologies, Inc. 17-1
17. Background Zip File Processing If you are uploading a large zip file, you may want to have process your zip file in the background and have notify you via email when processing completes. You can then pull your “results” zip file using the “ZipFileDownloadServlet”.
Here is a sample “request” zip file whose name specifies that background processing is desired:
D:\erosenbloom\v45\zip\test1.bg.zip
Notice that the filename ends with “bg.zip” rather than just “.zip”. This naming convention tells that background processing is desired. Here is a sample csvutil.ctl file that illustrates how to have an email send out when processing completes:
The final “mailto” line looks like:
-mailTo [email protected] -mailFrom [email protected] -subject zipFileProcessDone -message hello -smtpHost mail-pa.glog.com
And here is the email you will receive when processing completes:
Clicking on the link in the email takes you to a listing of the zip files on the webserver:
You may click on the desired zip file to download it to your local workstation. The zip files ending in “result.zip” are the “results” or “output” zip files.
Copyright © 2005-2006 Global Logistics Technologies, Inc. 17-2
If things go wrong during background processing, your results zip file will contain a stack trace, which you can read with a text editor rather than WinZip.
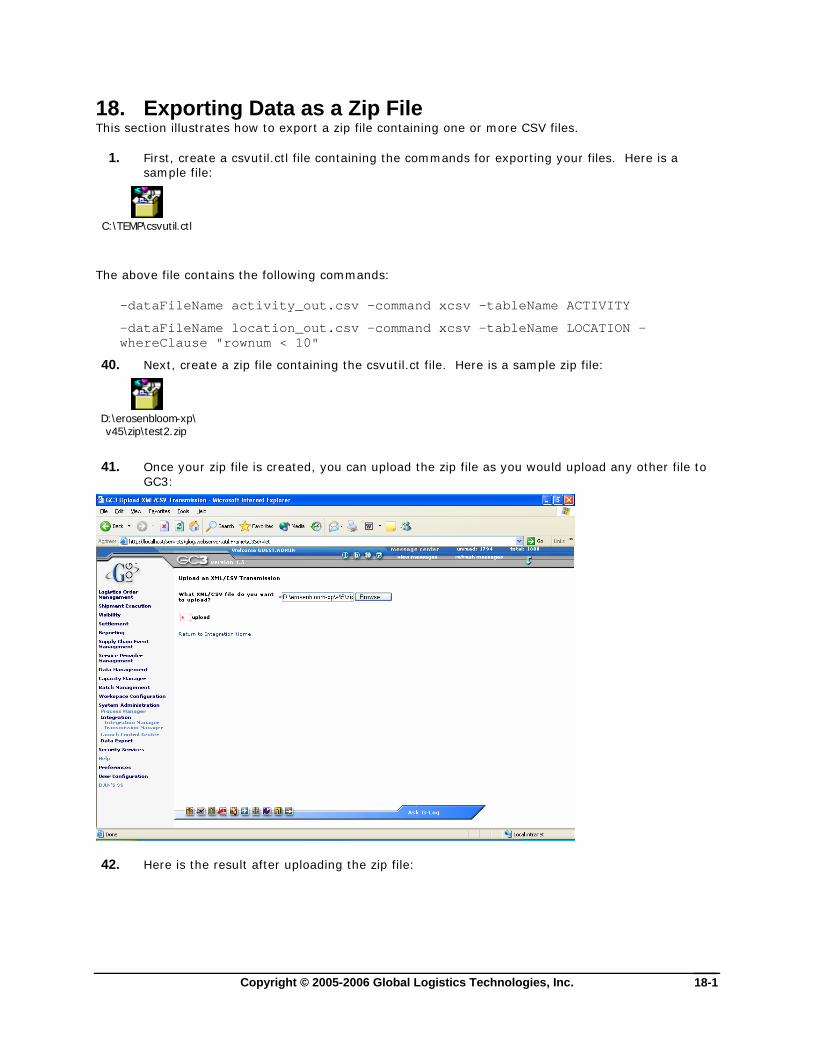
Copyright © 2005-2006 Global Logistics Technologies, Inc. 18-1
18. Exporting Data as a Zip File This section illustrates how to export a zip file containing one or more CSV files.
1. First, create a csvutil.ctl file containing the commands for exporting your files. Here is a sample file:
C:\TEMP\csvutil.ctl
The above file contains the following commands:
-dataFileName activity_out.csv -command xcsv -tableName ACTIVITY
-dataFileName location_out.csv -command xcsv -tableName LOCATION -whereClause "rownum < 10"
40. Next, create a zip file containing the csvutil.ct file. Here is a sample zip file:
D:\erosenbloom-xp\v45\zip\test2.zip
41. Once your zip file is created, you can upload the zip file as you would upload any other file to GC3:
42. Here is the result after uploading the zip file:
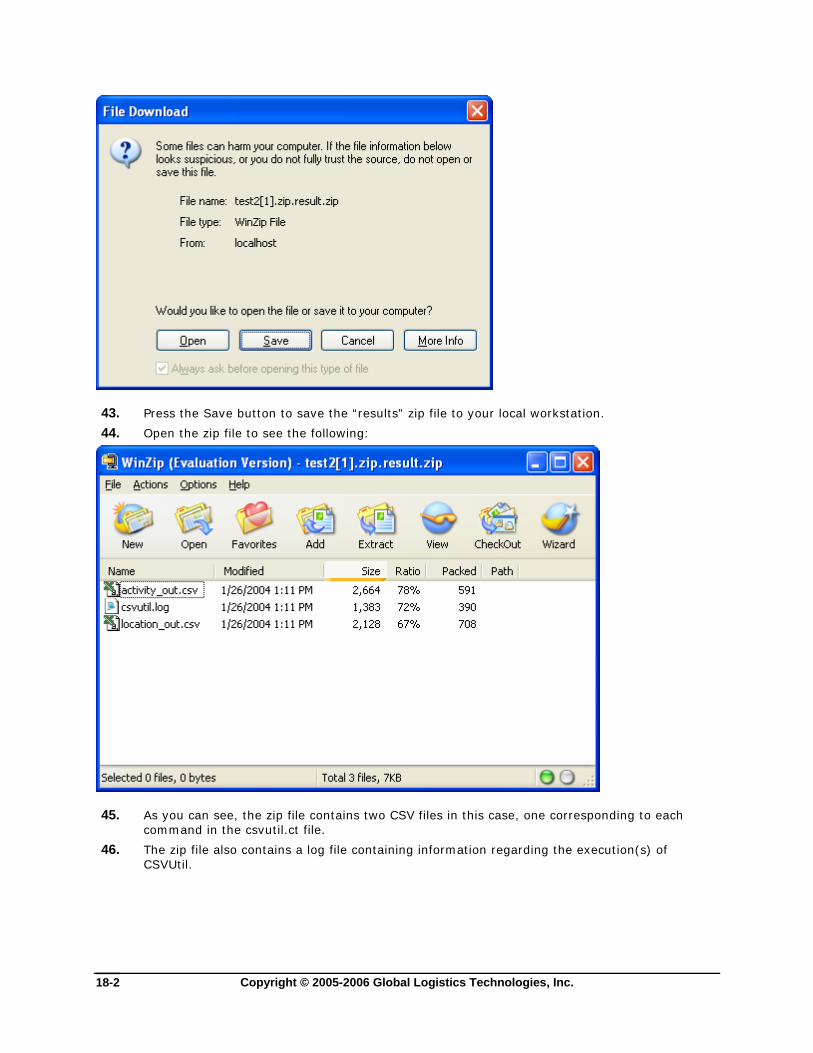
Copyright © 2005-2006 Global Logistics Technologies, Inc. 18-2
43. Press the Save button to save the “results” zip file to your local workstation.
44. Open the zip file to see the following:
45. As you can see, the zip file contains two CSV files in this case, one corresponding to each command in the csvutil.ct file.
46. The zip file also contains a log file containing information regarding the execution(s) of CSVUtil.
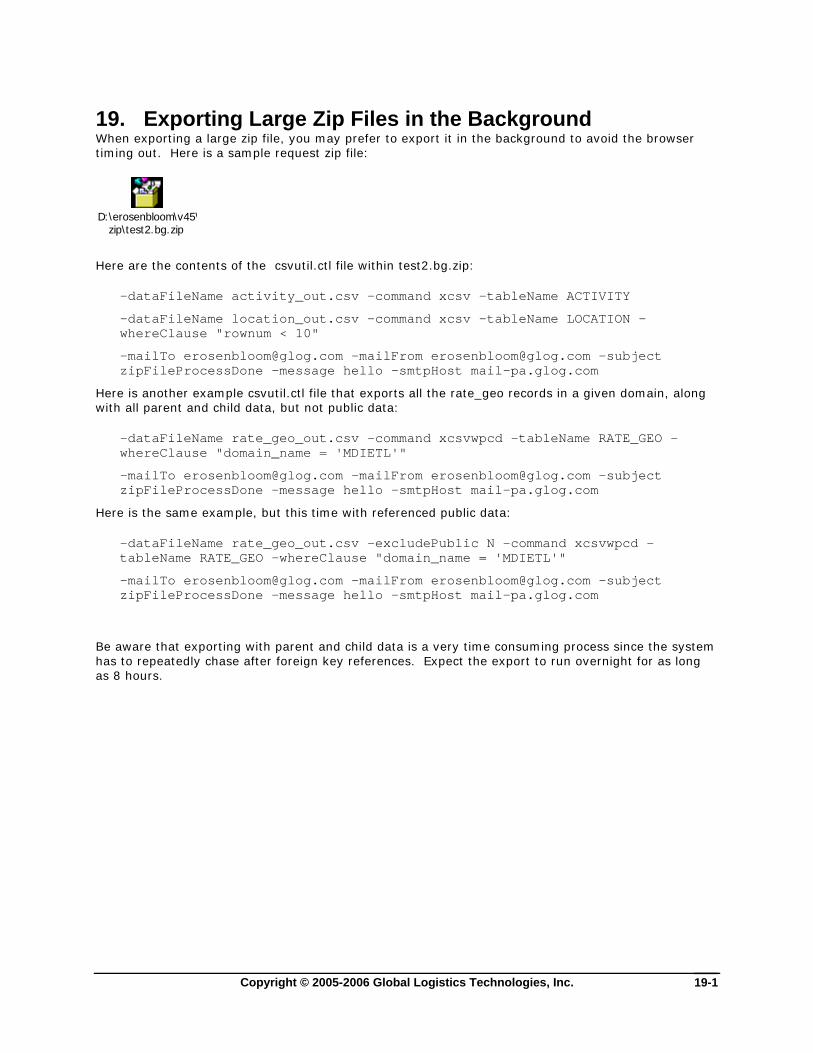
Copyright © 2005-2006 Global Logistics Technologies, Inc. 19-1
19. Exporting Large Zip Files in the Background When exporting a large zip file, you may prefer to export it in the background to avoid the browser timing out. Here is a sample request zip file:
D:\erosenbloom\v45\zip\test2.bg.zip
Here are the contents of the csvutil.ctl file within test2.bg.zip:
-dataFileName activity_out.csv -command xcsv -tableName ACTIVITY
-dataFileName location_out.csv -command xcsv -tableName LOCATION -whereClause "rownum < 10"
-mailTo [email protected] -mailFrom [email protected] -subject zipFileProcessDone -message hello -smtpHost mail-pa.glog.com
Here is another example csvutil.ctl file that exports all the rate_geo records in a given domain, along with all parent and child data, but not public data:
-dataFileName rate_geo_out.csv -command xcsvwpcd -tableName RATE_GEO -whereClause "domain_name = 'MDIETL'"
-mailTo [email protected] -mailFrom [email protected] -subject zipFileProcessDone -message hello -smtpHost mail-pa.glog.com
Here is the same example, but this time with referenced public data:
-dataFileName rate_geo_out.csv –excludePublic N -command xcsvwpcd -tableName RATE_GEO -whereClause "domain_name = 'MDIETL'"
-mailTo [email protected] -mailFrom [email protected] -subject zipFileProcessDone -message hello -smtpHost mail-pa.glog.com
Be aware that exporting with parent and child data is a very time consuming process since the system has to repeatedly chase after foreign key references. Expect the export to run overnight for as long as 8 hours.


Copyright © 2005-2006 Global Logistics Technologies, Inc. 20-1
20. Exporting Via the Interface
Changes in CSV Export Screens The CSV export screens have been modified to make them more user-friendly. An initial screen prompts for certain information so the system can determine what additional information is required from the user on subsequent screens. Previously, the user was presented with a single screen and it wasn’t clear which fields were required to complete a desired task.
Here is an example.
Select Business Process Automation->Data Export->CSV Export
The following screen is now displayed:
In the “exportWhat” field you have a choice of selecting one of exportTable, exportTableSet, or exportQueryResults.
In the outputDestination field you have a choice of selecting one of browser, remoteGC3Instance, or fileOnWebServer
In the runInBackground field you have a choice of selecting either Y or N.
The selections you make on this screen determine the fields that appear on the next screen when you press the Run button. For example, if you select exportTable = browser and runInBackground = N, the following screen is then displayed:

Copyright © 2005-2006 Global Logistics Technologies, Inc. 20-2
However, if you select outputDestination = remoteGC3Instance, the second screen will be:

Copyright © 2005-2006 Global Logistics Technologies, Inc. 20-3
The second screen is different in this case because more information is required to export data to a remote GC3 instance than to the browser, such as the remoteHost, remoteUser, remotePassword, remoteCommand, and remoteHostVersion.


Copyright © 2005-2006 Global Logistics Technologies, Inc. 21-1
21. Configuring Child Tables This section explains how CSVUtil determines which tables are “child” tables when exporting with the xcsvwcd (export CSV with child data) and xcsvwpcd (export CSV with parent and child data) commands.
In the examples in the previous section we used the xcsvwpcd command to export the rate_geo table, and along with all prerequisite rows, as well as all child rows. The perquisite rows are computed using foreign key relationships. CSVUtil says “What rows would need to be imported first in order for the given rate_geo row to load successfully?”. It answers this question by recursively chasing down foreign key references to individual rows in the database. It builds an ordered list of rowids.
Unlike the prerequisite parent data, one cannot use foreign keys to determine the set of tables to consider to be children. For example, the shipment table has a foreign key reference to rate_geo, but that doesn’t mean that the shipment table is a child of rate_geo. If one is attempting to export rates, it would make no sense to export shipments. This is why, we use table sets to indicate which tables are children of a given table. So for example, we have the C.RATE_GEO table set, which contains the following tables:
SQL> select table_name from table_set_detail where table_set = 'C.RATE_GEO';
TABLE_NAME
--------------------------------------------------------
RATE_FACTOR_RULE_JOIN
RATE_GEO_ACCESSORIAL
RATE_GEO_COST_GROUP
RATE_GEO_STOPS
RG_SPECIAL_SERVICE
SECONDARY_CHARGE_RULE
6 rows selected.
This C.RATE_GEO table set indicates that the RATE_GEO table has six tables, which are considered to be direct children of RATE_GEO (listed above). When exporting with the xcsvwcd or xcsvwpcd, CSVUtil will also export child rows from the above six tables. It then recursively looks for other table sets using the same naming convention.
SQL> select table_name from table_set_detail where table_set = 'C.RATE_GEO_COST_GROUP';
TABLE_NAME
--------------------------------------------------------
RATE_GEO_COST
So, after exporting RATE_GEO_COST_GROUP, child rows from the RATE_GEO_COST table will be exported.
You can use the table set manger in to modify the contents of the various C.* table sets in order to control which tables are considered to be child tables of a given table.

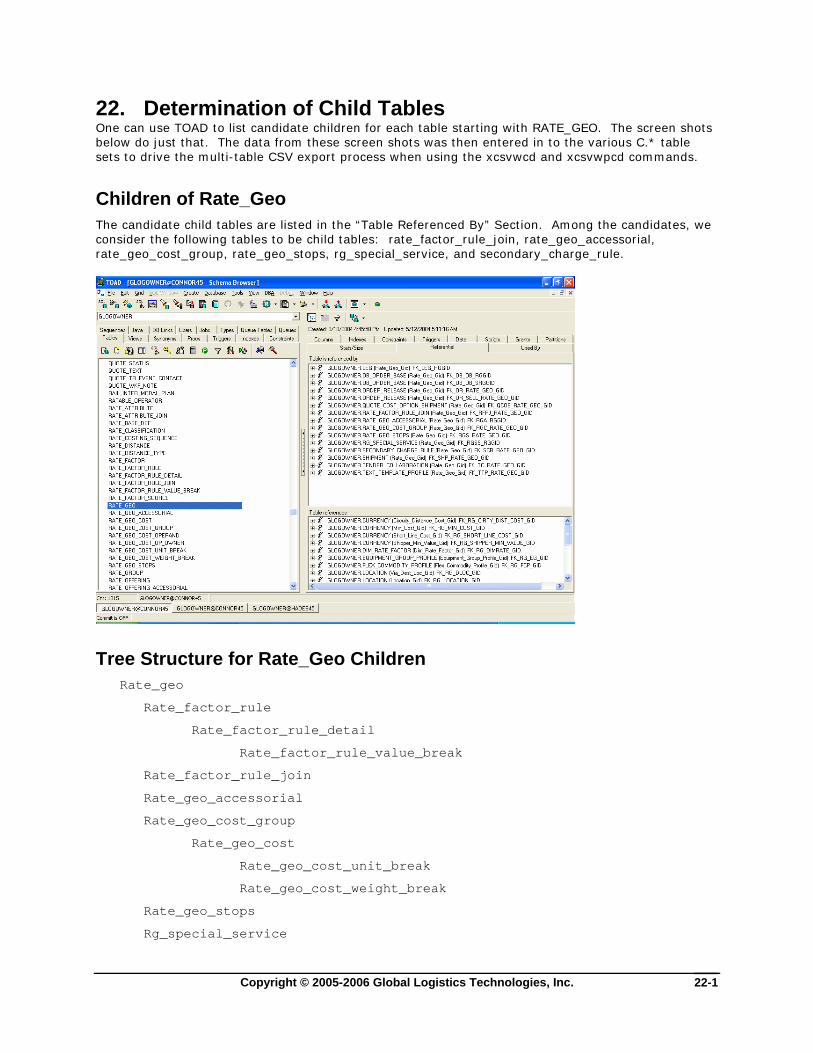
Copyright © 2005-2006 Global Logistics Technologies, Inc. 22-1
22. Determination of Child Tables One can use TOAD to list candidate children for each table starting with RATE_GEO. The screen shots below do just that. The data from these screen shots was then entered in to the various C.* table sets to drive the multi-table CSV export process when using the xcsvwcd and xcsvwpcd commands.
Children of Rate_Geo The candidate child tables are listed in the “Table Referenced By” Section. Among the candidates, we consider the following tables to be child tables: rate_factor_rule_join, rate_geo_accessorial, rate_geo_cost_group, rate_geo_stops, rg_special_service, and secondary_charge_rule.
Tree Structure for Rate_Geo Children Rate_geo
Rate_factor_rule
Rate_factor_rule_detail
Rate_factor_rule_value_break
Rate_factor_rule_join
Rate_geo_accessorial
Rate_geo_cost_group
Rate_geo_cost
Rate_geo_cost_unit_break
Rate_geo_cost_weight_break
Rate_geo_stops
Rg_special_service

Copyright © 2005-2006 Global Logistics Technologies, Inc. 22-2
Secondary_charge_rule
Tree Structure for Rate_Offering Children Rate_offering
Rate_base_def
Rate_offering_accessorial
Rate_offering_comment
Rate_offering_inv_party
Rate_offering_stops
Rate_preference_detail
Rate_rules_and_terms
Ro_lane_special_service
Ro_nmfc_code_subst
Ro_special_service
Ro_special_service_accessorial
Secondary_charge_rule
Smc_discount

Copyright © 2005-2006 Global Logistics Technologies, Inc. 23-1
23. Exporting Referenced PUBLIC Data During Multi-Table Exports CSVUtil provides the ability to export referenced PUBLIC data during the multi-table export operations (xcsvwcd, xcsvwpd, xcsvwpcd). This feature is especially important when exporting data from a source database where the PUBLIC data has been modified.
Here is a sample CSVUtil command line for exporting referenced public data:
java glog.database.admin.CSVUtil -excludePublic N -command xcsvwpcd -connectionId localdb4 -dataDir . -dataFileName whatever.csv -tableName RATE_GEO -whereClause "domain_name = 'DGANO'"
Notice the –excludePublic option is set to N, meaning that public data should not be excluded (it should be exported, in other words).
And here is a sample ClientUtil command line:
python ClientUtil.py -command csvExport -hostname localhost -username DGANO.ADMIN -password CHANGEME -tableName RATE_GEO -localDir . -localFileName myfile.csv -excludePublic N -csvUtilCommand xcsvwpd -whereClause "domain_name = 'DGANO'"
And here is a sample screen shot of the web-screen when exporting:


Copyright © 2005-2006 Global Logistics Technologies, Inc. 24-1
24. Ignoring Undefined Columns When Importing Prior to v4.5, when moving data between GC3 databases using CSV files, if the source database had a column that the destination database did not, the import would fail. CSVUtil supports, by default, the ability to ignore columns that are not defined in the target table. This is especially useful when exporting from a migrated database with deprecated columns, into a newly created database that doesn’t have the deprecated columns.
There is some performance impact for this feature. To deactivate the feature, use the following command line option:
-removeUndefinedColumns N
This option is only available when running CSVUtil directly on the command line. It is not available using either the web or ClientUtil.

Copyright © 2005-2006 Global Logistics Technologies, Inc. 25-1
25. Max Error By default in CSVUtil after 50 errors occur, processing stops. You can change this default value to make it higher or lower using the –maxError command line argument.
For example:
-maxError 20
This parameter is currently only available when running CSVUtil as a java application on the command line.


Copyright © 2005-2006 Global Logistics Technologies, Inc. 26-1
26. Steps for Copying Rates Between Databases Using Zip Files CSVUtil can be used to copy a rate_offering, along with all of its prerequisite parent and child data from one database to another. This email explains how to do it.
Step 1 – Create a csvutil.ctl file (CSVUtil Control File) for Exporting You create a CSVUtil control file containing commands, and then place it is zip file whose name ends with .bg.zip. For example, exp_rate_offering.bg.zip. When the zip file name ends with “bg.zip”, knows to run the export job in the background. Here are the contents of the csvutil.ctl file to export an entire rate offering:
-dataFileName rate_geo_out.csv -command xcsvwpcd -tableName RATE_GEO -whereClause "rate_offering_gid = 'MDIETL.ASDF'" –excludePublic N
-mailTo [email protected] -mailFrom [email protected] -subject zipFileProcessDone -message hello -smtpHost mail-pa.glog.com
Note: there must be only two lines of text in the above example.
Place the csvutil.ctl file in a zip file called name.bg.zip, where name can be anything.
The xcsvwpcd (export CSV with parent and child data) command will export the rate_geo records, and will recursively export all parent and child records. This can take a while (up to 8 hours). Don’t hold your breath.
The –excludePublic N option means that referenced PUBLIC data will also be exported. If you are sure your target database has all the required public data, then you can change this to Y, which will save some time on the export.
Step 2 – Use the Integration Upload Screen to Upload the Zip File created in step 1 Use the Integration Upload Screen to upload the exp_rate_offering.bg.zip file. In response to your upload, you will immediately receive a message indicating that your export job has been submitted to run in the background, and you’ll receive an email when the job completes. The email includes an html link to allow you to download the resultant zip file containing your multi-table export.
Step 3 – Download the Zip File Containing the Rate Offering When you receive the email, download the zip file containing the rate offering, and extract the rate_geo_out.csv file.
Step 4 – Create a csvutil.ctl file for Importing Similar to step 1, you create another csvutil.ctl file for importing in the background. For example:
-dataFileName rate_geo_out.csv -command ii
-mailTo [email protected] -mailFrom [email protected] -subject zipFileProcessDone -message hello -smtpHost mail-pa.glog.com
Copyright © 2005-2006 Global Logistics Technologies, Inc. 26-2
Step 5 – Create another background zip file Now create another zip file which will contain the csvutil.ctl file from the previous step, as well as the rate_geo_out.csv file which was exported during step 2. The zip file should again end with “bg.zip”.
Step 6 – Upload the zip file from Step 5 to the target instance To import to the target instance, again use the integration upload screen to upload the background zip file to target instance. You will again receive a response indicating that you will get an email when the job completes. The email will again contain a link to allow you to download a results zip file which contains a log file. You’ll need to examine the log file to see how the import did.
Hint: If you are exporting from a migrated database to a fresh database, use the –removeUndefinedColumns option.
This will tell CSVUtil to ignore deprecated columns.

Copyright © 2005-2006 Global Logistics Technologies, Inc. 27-1
27. Running CSVUtil in the Background CSVUtil supports running in the background. The following screen shot shows you how:
As shown above, simply specify your email address and a smtpHost to run in the background. The results will be emailed to you when the background job completes (instead of returning the results to the screen).

Copyright © 2005-2006 Global Logistics Technologies, Inc. 27-2
In this example, the following content was emailed to me:
<CSVUtil>
<Command>xcsv</Command>
<DataDir>/</DataDir>
<DataFileName>null</DataFileName>
<ExcludePublic>true</ExcludePublic>
<Write>
<DatabaseGlobalName>QGC317.HARMONY.GLOGTECH.COM</DatabaseGlobalName>
<Table>ACTIVITY</Table>
<WhereClause>null</WhereClause>
<DomainName>null</DomainName>
<Sql>null</Sql>
<!--
ACTIVITY
ACTIVITY_GID,ACTIVITY_XID,ACTIVITY_NAME,DOMAIN_NAME,INSERT_DATE,UPDATE_DATE,INSERT_USER,UPDATE_USER
EXEC SQL ALTER SESSION SET NLS_DATE_FORMAT = 'YYYYMMDDHH24MISS'
"RECEIVE","RECEIVE","RECEIVING FREIGHT","PUBLIC","20011005190259","20021008201735","DBA.ADMIN","DBA.GLOGLOAD"
"LOAD","LOAD","LOADING FREIGHT","PUBLIC","20011005190259","20021008201735","DBA.ADMIN","DBA.GLOGLOAD"
"LIVELOAD","LIVELOAD","LIVE TRAILER LOADING","PUBLIC","20011005190259","20021008201735","DBA.ADMIN","DBA.GLOGLOAD"
"DISPATCH","DISPATCH","DRIVER DISPATCHING","PUBLIC","20011005190259","20021008201735","DBA.ADMIN","DBA.GLOGLOAD"
"ACTIVATE","ACTIVATE","ITINERARY ACTIVATED","PUBLIC","20011005190259","20021008201735","DBA.ADMIN","DBA.GLOGLOAD"
"PICKUP","PICKUP","WAREHOUSE PICKING","PUBLIC","20011005190259","20021008201735","DBA.ADMIN","DBA.GLOGLOAD"
"CLOSED","CLOSED","WAREHOUSE CLOSED DOOR","PUBLIC","20011005190259","20021008201735","DBA.ADMIN","DBA.GLOGLOAD"
"OFFICEHOURS","OFFICEHOURS","OFFICE HOURS","PUBLIC","20011005190259","20021008201735","DBA.ADMIN","DBA.GLOGLOAD"
"BATCH SORT","BATCH SORT","SORTATION AT DC","PUBLIC","20020125162107","20021008201735","DBA.GLOGLOAD","DBA.GLOGLOAD"

Copyright © 2005-2006 Global Logistics Technologies, Inc. 27-3
"BATCH DOCK LOAD","BATCH DOCK LOAD","DOCK LOAD AT DC","PUBLIC","20020125162107","20040308170536","DBA.GLOGLOAD","DBA.ADMIN"
"GUEST.BLAH","BLAH",,"GUEST","20030425012307","20031104125706","DBA.GLOGOWNER","DBA.ADMIN"
"RUSHHOURS","RUSHHOURS","RUSH HOURS","PUBLIC","20030717003037","20040308170536","DBA.ADMIN","DBA.ADMIN"
"GUEST.DLI1","DLI1","DLI1","GUEST","20030717144513",,"GUEST.DLI",
"GUEST.DLI2","DLI2","DLI2","GUEST","20030717144528",,"GUEST.DLI",
"GUEST.TEST","TEST","1","GUEST","20030728200219",,"GUEST.ADMIN",
"GUEST.ABCD","ABCD","VDSFDS","GUEST","20040605190045",,"GUEST.ADMIN",
"GUEST.DTB_SECOND_ACTIVITY","DTB_SECOND_ACTIVITY","DAWN'S SECOND ACTIVITY","GUEST","20040611120516",,"GUEST.ADMIN",
"GUEST.DTB_FIRST_ACTIVITY","DTB_FIRST_ACTIVITY","DAWN'S FIRST ACTIVITY","GUEST","20040611120313",,"GUEST.ADMIN",
"GUEST.DTB_NUMBER_3","DTB_NUMBER_3","NUMBER 3","GUEST","20040611121927",,"GUEST.ADMIN",
"ALL","ALL","ALL ACTIVITIES","PUBLIC","20040910173537","20041213180312","DBA.ADMIN","DBA.ADMIN"
"DEPOT","DEPOT","DEPOT","PUBLIC","20040910173537","20041213180312","DBA.ADMIN","DBA.ADMIN"
"OTHER","OTHER","OTHER ACTIVITIES","PUBLIC","20040921094353","20041213180312","DBA.ADMIN","DBA.ADMIN"
-->
</Write>
</CSVUtil>
Normally, you use background processing when initiating lengthy jobs, such as piping a large table set to a RemoteHost (described below).


Copyright © 2005-2006 Global Logistics Technologies, Inc. 28-1
28. Piping CSV Output to a Remote Host CSVUtil supports piping CSV Output to a Remote Host. Refer to the screenshots below:
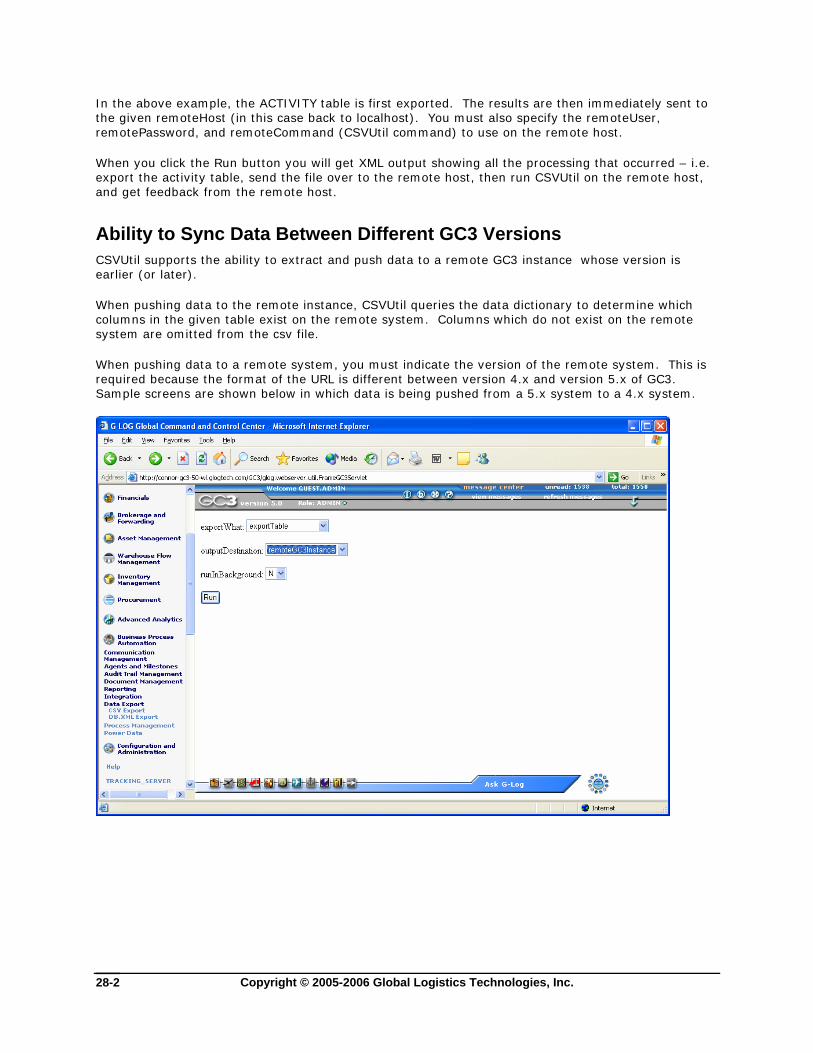
Copyright © 2005-2006 Global Logistics Technologies, Inc. 28-2
In the above example, the ACTIVITY table is first exported. The results are then immediately sent to the given remoteHost (in this case back to localhost). You must also specify the remoteUser, remotePassword, and remoteCommand (CSVUtil command) to use on the remote host.
When you click the Run button you will get XML output showing all the processing that occurred – i.e. export the activity table, send the file over to the remote host, then run CSVUtil on the remote host, and get feedback from the remote host.
Ability to Sync Data Between Different GC3 Versions CSVUtil supports the ability to extract and push data to a remote GC3 instance whose version is earlier (or later).
When pushing data to the remote instance, CSVUtil queries the data dictionary to determine which columns in the given table exist on the remote system. Columns which do not exist on the remote system are omitted from the csv file.
When pushing data to a remote system, you must indicate the version of the remote system. This is required because the format of the URL is different between version 4.x and version 5.x of GC3. Sample screens are shown below in which data is being pushed from a 5.x system to a 4.x system.

Copyright © 2005-2006 Global Logistics Technologies, Inc. 28-3

Copyright © 2005-2006 Global Logistics Technologies, Inc. 29-1
29. Exporting Table Sets and Piping the Set to a Remote System CSVUtil supports exporting ordered table sets. An example of an ordered table set is the EXPORT table set, which lists several hundred tables sorted in foreign key sequence (top-down). Tables in the table_set_detail table may be prefixed by NNNNNNN. for the purpose of sequencing the tables. For example:
SQL> select table_name from table_set_detail where table_set = 'EXPORT' order by table_name;
TABLE_NAME
--------------------------------------------------------
0000000.RATE_OPERAND
0001000.ACCESSORIAL_BASIS_PRECEDENCE
0002000.ACCESSORIAL_CODE
0003000.RATABLE_OPERATOR
0004000.RATE_GEO_COST_OPERAND
0005000.COUNTRY_ZONE
0006000.COUNTRY_CODE
0007000.CURRENCY
0008000.DIM_RATE_FACTOR
0009000.ACCESSORIAL_COST
0010000.RATE_UNIT_BREAK_PROFILE
As you can see, the tables are prefixed by NNNNNNN in order to ensure they are sequenced within the table set. When you export a table set, you normally pipe it to a remote system. If you do not pipe it to a remote system, it will generate a bunch of temporary files on the source system and leave them there.
Here is a sample screen shot showing how you would normally export the EXPORT table set and pipe it to a remote system.
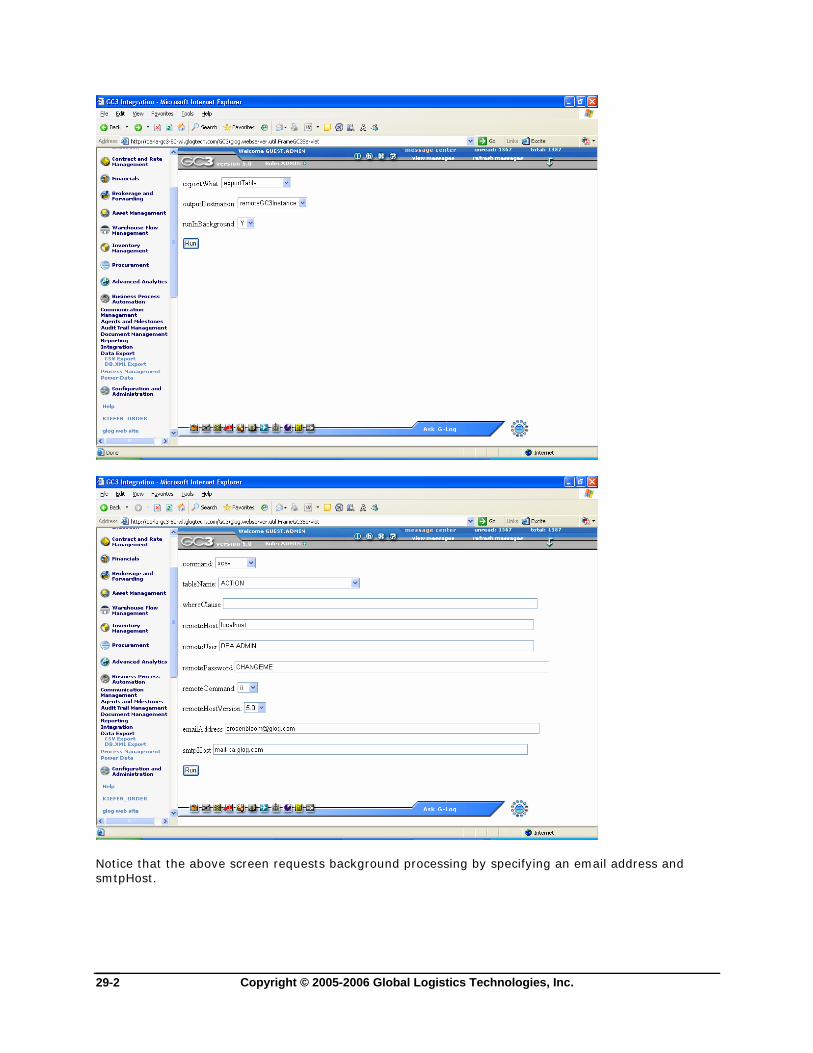
Copyright © 2005-2006 Global Logistics Technologies, Inc. 29-2
Notice that the above screen requests background processing by specifying an email address and smtpHost.

Copyright © 2005-2006 Global Logistics Technologies, Inc. 30-1
30. Oracle Advanced Queuing The Oracle Advanced Queuing (OAQ) functionality in GC3 is no longer restricted to a single queue table (intg_queue). The OAQ functionality can now create any queue table, as long as it has the identical structure to the previous queue table, and add queue listeners in both the database and application server.
Currently, there is no user interface to manage the queue and queue table. However, the user is able to manage the queue objects through a database package pkg_queue_management after logging in as glogowner from Sqlplus.
Step 1 – Create Queue Table(s) A new procedure has been added to create queue table that supports multi-consumer:
procedure create_int_queue_table(p_table_name varchar2,
p_comment varchar2,
p_table_space varchar2 default 'data',
p_multiple_consumers boolean Default false );
Example:
Sqlplus> execute pkg_queue_management.create_int_queue_table(‘queue_test_table’, ‘This is for test only’);
Or for the multi-consumer:
Sqlplus> execute pkg_queue_management.create_int_queue_table(‘queue_test_table’, ‘This is for test only’, ‘data’, true);
When p_multiple_consumers is set to true, procedure will create the multi-consumer queue in the table. User should only create multiconsumer queue table for outbound only. For inbound, this value must be set to “false”.
Step 2 – Setup Required Inbound Queues For inbound processing of the XML, a set of four queues are required to be created. The four queues are:
Inbound Queue (originally defined as inbound_aq in release 4.0)
XML Topic Queue (originally defined as xml_stage_aq in release 4.0)
Ack Queue (originally defined as ack_aq in release 4.0)
Exception Queue (originally defined as exception_aq in release 4.0)
The client first sends the XML to the Inbound Queue. The database listener reads from the “Inbound Queue” and stages the data to the i_transmission/i_transaction tables. If staging is successful, the database listener puts the TransmissionAck message in the “Ack Queue” and stages a message to the application server in the “XML Topic Queue” so that the app server can proceed with processing the message. If an error occurred in the staging, the database listener puts an exception message in the “Exception Queue”. The configuration of the application server listener is discussed later. All the
Copyright © 2005-2006 Global Logistics Technologies, Inc. 30-2
queues may or may not be on the same queue table. However, the “Inbound Queue” and “XML Topic Queue” must not be multi-consumer queues. Furthermore, user is allowed to add multiple sets of inbound and outbound queues in the same queue table.
To create all four queues on the same queue table, use the following procedure:
procedure setup_inbound_queue_system(p_queue_table_name varchar2,
p_inbound_queue_name varchar2,
p_xmltopic_queue_name varchar2,
p_ack_queue varchar2,
p_exception_queue varchar2)
Example:
Sqlplus> execute pkg_queue_management.setup_inbound_queue_system (‘queue_test_table’,
‘another_inbound_aq’,
‘raise_xml_topic’,
‘acknowledgement’,
‘notify_exception’);
To create the queues on different queue table(s), use the following procedure:
procedure start_queue(p_queue_name varchar2, p_queue_table_name varchar2)
Example - to create all the queues in example A above, use the following commands:
Sqlplus> execute pkg_queue_management.start_queue (‘another_inbound_aq’, ‘queue_test_table’);
Sqlplus> execute pkg_queue_management.start_queue( ‘raise_xml_topic’, ‘queue_test_table’);
Sqlplus> execute pkg_queue_management.start_queue ( ‘acknowledgement’, ‘queue_test_table’);
Sqlplus> execute pkg_queue_management.start_queue ( ‘notify_exception’, ‘queue_test_table’);
Step 3 – Setup Database Listeners For each inbound set of queues created above, a database listener should be created in order for the XML to be processed. The following procedure is used to setup the listener:
procedure install_queue_listener(p_inbound_queue_name varchar2 ,
p_xmltopic_queue_name varchar2 ,
p_ack_queue varchar2 ,
p_exception_queue varchar2)
Example:

Copyright © 2005-2006 Global Logistics Technologies, Inc. 30-3
Sqlplus> execute pkg_queue_management.install_queue_listener ( ‘another_inbound_aq’, ‘raise_xml_topic’, ‘acknowledgement’, ‘notify_exception’);
In this case, the client first sends the XML to the ‘another_inbound_aq’ queue defined in the first parameter. The database listener reads from this queue and stages the data. If staging is successful, the database listener puts the TransmissionAck message in the ‘acknowledgement’ queue defined in the third parameter, and stages a message to the application server in the ‘raise_xml_topic’ defined in the second parameter. If an error occurred in the staging, the database listener puts an exception message in the‘notify_exception’ defined in the fourth parameter.
To stop the database listener, execute the following procedure on the “Inbound Queue”:
Sqlplus> execute pkg_queue_management.stop_queue_listener(‘another_inbound_aq’);
Step 4 – Setup Application Server Listeners After the database listener successfully stages the XML, it submits a message to the “XML Topic Queue” for the app server to process. The app server requires a listener to be enabled to process the messages in the “XML Topic Queue”. The app server listener is set up through properties. The format of property entry is (note the difference in glog.integration.oaq vs. glog.oaq.integration):
glog.oaq.integration.{the_topic_queue_name}=1
For example, the property entry corresponding to the database listener created in (3) should be:
glog.oaq.integration.raise_xml_topic=1
The value for the property must be a non-zero integer. The integer value determines the total number of threads for the listener. Since the app server listener is very lightweight, one thread should be enough to process the messages. If user desires to set up the value greater than one, a performance test should be done to determine the effects. To turn off the listener, set the value to “0” or remove the property entry. The property only takes effect during the startup.
Step 5 – Create Outbound Queues Clients specify the queue to use for sending outbound XML from GC3 in the External System Manager in the UI. There are two approaches for creating the outbound queue which is then used in the External System Manager. The first approach is to create the queue using the stored procedure – this enables the client to specify the queue table to be used for the queue. After the queue is created, the external system can then reference the queue. The second approach is to specify the queue in the external system manager without first creating the queue. If the queue does not exist, the GC3 application would create the queue with the queue table defined in the property entry glog.integration.oaq.outbound.queuetable. By default, the queue table is intg_queue.
Example to create queue from procedure:
Sqlplus> execute pkg_queue_management.start_queue (‘outbound_example_queue’, ‘outbound_queue_table’);
If the queue table is a multi-consumer queue table, the corresponding queue on the table is multi-consumer. At least one subscriber must be created for the queue. Otherwise, GC3 will throw an exception during the enqueue process. It is recommended that the user only create the multi-consumer queue for queue propagation.
The following procedure will add a subscriber to the multi-consumer queue:

Copyright © 2005-2006 Global Logistics Technologies, Inc. 30-4
Sqlplus> Pkg_queue_util.add_subscriber(‘mutlti_consumer_queue’, subscriber_name);
Step 6 – Other Queue Management Utilities To drop a queue:
execute pkg_queue_management.drop_queue ('your queue_name');
To delete all queue entries for a given queue:
execute pkg_queue_management.delete_queue_entries('your queue_name');
To remove every entry for all the queues in a given non multi-consumer queue table:
execute pkg_queue_management.empty_queue_table(‘queue table name’);
To drop all queues in a given table:
execute pkg_queue_management.drop_all_queues(‘queue table name’);
To drop a queue table as well as the corresponding queues:
execute pkg_queue_management.drop_queue_table(‘queue table name’);
To stop all database listeners:
execute pkg_queue_management.stop_all_queue_listeners;
To stop a specific database listener:
execute pkg_queue_management.stop_queue_listener(‘inbound queue’);
** The “inbound queue” is the first parameter in install_queue_listener
To remove database listeners:
execute pkg_queue_management.remove_all_queue_listeners;
To remove a specific database listeners:
execute pkg_queue_management.remove_queue_listener(‘inbound queue’);
Step 7 – Backward Compatible The above OAQ functionality was introduced in the GC3 Version 4.5 and is backward compatible. Users can revert back to the OAQ functionality prior to this by setting the property glog.integration.oaq=true. Please note that this property is deprecated. The suggested property is “glog.oaq.integration.xml_stage_aq=1”.
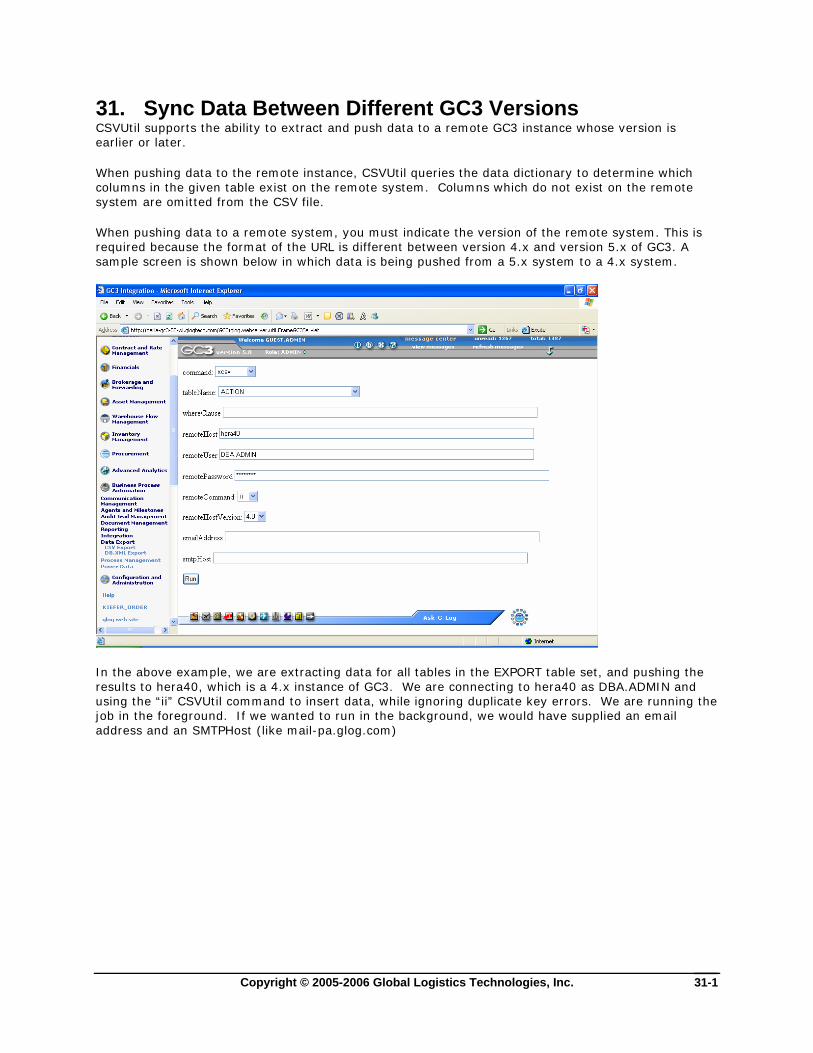
Copyright © 2005-2006 Global Logistics Technologies, Inc. 31-1
31. Sync Data Between Different GC3 Versions CSVUtil supports the ability to extract and push data to a remote GC3 instance whose version is earlier or later.
When pushing data to the remote instance, CSVUtil queries the data dictionary to determine which columns in the given table exist on the remote system. Columns which do not exist on the remote system are omitted from the CSV file.
When pushing data to a remote system, you must indicate the version of the remote system. This is required because the format of the URL is different between version 4.x and version 5.x of GC3. A sample screen is shown below in which data is being pushed from a 5.x system to a 4.x system.
In the above example, we are extracting data for all tables in the EXPORT table set, and pushing the results to hera40, which is a 4.x instance of GC3. We are connecting to hera40 as DBA.ADMIN and using the “ii” CSVUtil command to insert data, while ignoring duplicate key errors. We are running the job in the foreground. If we wanted to run in the background, we would have supplied an email address and an SMTPHost (like mail-pa.glog.com)

Copyright © 2005-2006 Global Logistics Technologies, Inc. 32-1
32. Chapter 32 Deleting Domains This chapter describes the steps to take to delete domains in GC3.
Shutdown the GC3 application. This includes Weblogic, Tomcat, Apache, etc.
Login directly to the database using a database management utility such as SQLPLUS. Login to the database as glogowner.
Enter the following command at the SQLPLUS prompt:
Exec domainman.delete_domain(‘DOMAIN’);
NOTE: Substitute the domain name that you want to delete for DOMAIN. Since this does a cascade delete, this may take a significant amount of time. If there is any data cross-referenced between domains, the data in the other domain will not be deleted. For example, if Shipment is in DomainA and rates are in DomainB, then if you do a delete of DomainB, it will not remove related data in DomainA.


Copyright © 2005-2006 Global Logistics Technologies, Inc. 33-1
33. Reference A Transaction Codes When importing db.xml with any of the methods described in this document there are three transaction codes currently available:
• I - Insert Mode: Only inserts are performed. If the data already exists in the database, you will get primary key errors.
• IU - Insert/Update Mode: Attempts to insert data. If a primary key violation occurs, it updates the data. No delete statements are generated.
• RC - Replace Children Mode: Deletes all child data corresponding to the top level parent, updates the top level parent, and reinserts the child data. This mode allows for a complete replacement of a data object.


Copyright © 2005-2006 Global Logistics Technologies, Inc. 34-1
34. Reference B Editing DB.XML Files This section describes how you edit an exported DB.XML file before importing it again.
An Example DB.XML File An exported DB.XML file might look like this. Note that the content is wrapped in a pair of <TRANSACTION_SET> tags.
<?xml version="1.0" encoding="iso-8859-1" ?>
<websql2xml>
<TRANSACTION_SET>
<CORPORATION CORPORATION_GID="ACL" CORPORATION_XID="ACL" DOMAIN_NAME="PUBLIC" INSERT_DATE="2001-10-05 19:03:37" INSERT_USER="DBA.ADMIN" IS_DOMAIN_MASTER="N" UPDATE_DATE="2001-10-06 12:43:46" UPDATE_USER="DBA.GLOGLOAD" dbObjectName="CORPORATION" />
</TRANSACTION_SET>
</websql2xml>
You can edit the values and add new objects.
When editing date and time values be sure to keep the following format: YYYY-MM-DD HH:MM:SS.
If you miss an element in the exported file this is probably because GC3 do not export elements that are empty in the database. This means that you will have to add the tag to the DB.XML file yourself. Refer to the GC3 Data Dictionary for more information about what objects and tables exist.
GC3 ignores element names that do not correspond to the database table. This allows you to comment your DB.XML file without affecting what is imported.
As you edit the file keep all element and attribute names in uppercase.


Copyright © 2005-2006 Global Logistics Technologies, Inc. 35-1
35. Reference C Specifying Complex Queries This section shows the SQL query corresponding to the predefined rate_geo database object.
Example of a Complex Query Use this example to build your own complex queries when no predefined database object exists for the data you want to export.
select rate_geo.*, \
cursor (select rate_geo_stops.* from rate_geo_stops where rate_geo_stops.rate_geo_gid = rate_geo.rate_geo_gid) as rate_geo_stops, \
cursor (select rate_geo_accessorial.* from rate_geo_accessorial where rate_geo_accessorial.rate_geo_gid = rate_geo.rate_geo_gid) as rate_geo_accessorial, \
cursor (select rg_special_service.* from rg_special_service where rg_special_service.rate_geo_gid = rate_geo.rate_geo_gid) as rg_special_service, \
cursor (select rg_special_service_accessorial.* from rg_special_service_accessorial where rg_special_service_accessorial.rate_geo_gid = rate_geo.rate_geo_gid) as rg_special_service_accessorial, \
cursor (select rate_geo_cost_group.*, \
cursor (select rate_geo_cost.* , \
cursor (select rate_geo_cost_weight_break.* \
from rate_geo_cost_weight_break \
where rate_geo_cost_weight_break.rate_geo_cost_seq = rate_geo_cost.rate_geo_cost_seq and rate_geo_cost_weight_break.rate_geo_cost_group_gid = rate_geo_cost.rate_geo_cost_group_gid) as rate_geo_cost_weight_break \
from rate_geo_cost \
where rate_geo_cost.rate_geo_cost_group_gid = rate_geo_cost_group.rate_geo_cost_group_gid ) as rate_geo_cost \
from rate_geo_cost_group \
where rate_geo.rate_geo_gid = rate_geo_cost_group.rate_geo_gid) as rate_geo_cost_group \
from rate_geo "
The main thing to notice is the use of nested cursors to specify a hierarchical query.


Copyright © 2005-2006 Global Logistics Technologies, Inc. 36-1
36. Reference D CSVUtil Response Messages At the completion of processing the command, CSVUtil responds in the form of an XML message. The XML message may contain the following elements:
• Information passed in as input parameters such as the Command, DataDir, and DataFileName
• Information about the contents of the input file such as the TableName and ColumnList
• An Error element identifying the error that was detected. (See page 3-1)
• Statistics on the success of the message as follows:
ProcessCount – The number of rows that were successfully processed
ErrorCount – The number of rows where an error was detected
Skipcount – The number of rows that were skipped as a result of duplicate or missing keys. This is only valid when using the ii command which suppresses unique key constraint violations when inserting data, or the uu and dd commands which suppress "no data found" constraint violations when updating/deleting data.
Response Messages with No Errors Here is an example of a response indicating no errors. In this case, three data rows (based on the ProcessCount element) of the weight_break.csv file were successfully inserted.
<CSVUtil>
<Command>i</Command>
<DataDir>.\</DataDir>
<DataFileName>weight_break.csv</DataFileName>
<ProcessCSV>
<TableName>WEIGHT_BREAK</TableName>
<ColumnList>WEIGHT_BREAK_GID,WEIGHT_BREAK_XID,WEIGHT_BREAK_PROFILE_GID,WEIGHT_BREAK_MAX,WEIGHT_BREAK_MAX_UOM_CODE,WEIGHT_BREAK_MAX_BASE,DOMAIN_NAME</ColumnList>
<ProcessCount>3</ProcessCount>
<ErrorCount>0</ErrorCount>
<SkipCount>0</SkipCount>
</ProcessCSV>
</CSVUtil>
The following is an example of the response message typically received when exporting data using the xcsv command.
<CSVUtil>
<Command>xcsv</Command>
<DataDir>.\</DataDir>
<DataFileName>weight_break.csv</DataFileName>
<Write>
<TableName>WEIGHT_BREAK</TableName>

Copyright © 2005-2006 Global Logistics Technologies, Inc. 36-2
</Write>
</CSVUtil>
Error Messages After processing a command, CSVUtil displays a response in the form of an XML message (see page 8-1). When an error is detected in the processing, the XML message will contain an Error element with the details. The Error XML element indicates the table name, indicates the type of error detected, and lists the data (or row in file) that was being processed when the error occurred.
Below is the error message that GC3 displayed in the procedure beginning on page 6-1. The TableName element indicates the table being processed, the Exception element provides the error message, and the Data element indicates the row being processed. In this case, it indicates that the JUNK table does not exist in the database.
<Error>
<TableName>JUNK</TableName>
<Exception>ORA-00942: table or view does not exist
</Exception>
<Data>"Data1","Data2","Data3"</Data>
</Error>
Import This topic describes some common error messages while importing. For each error there is an explanation of when the message occurs and the action needed to correct the error.
Heading Data
Message: <Exception> ORA-00942: table or view does not exist
Occurs When:
Table name improperly specified (misspelled or invalid table) on the first line of the CSV file.
Corrective Action:
Verify that the table exists and that the CSV file contains the correct table name.
Heading Data
Message: <Exception> ORA-00001: unique constraint (GLOGOWNER.PK_WEIGHT_BREAK) violated
Occurs When:
Inserting data with primary keys that are already in the database.
Corrective Action:
Depending on the action desired, one of the following can be used:
• If the data should be skipped or ignored, use the ii command to suppress the message.
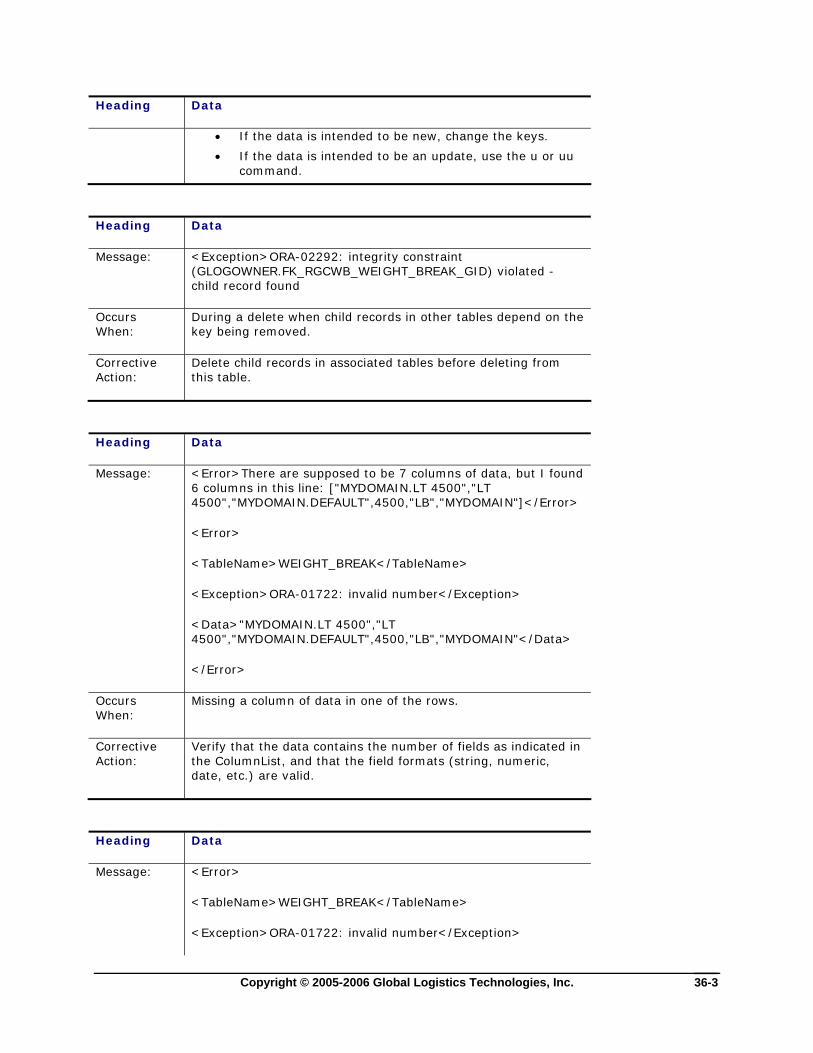
Copyright © 2005-2006 Global Logistics Technologies, Inc. 36-3
Heading Data
• If the data is intended to be new, change the keys.
• If the data is intended to be an update, use the u or uu command.
Heading Data
Message: <Exception>ORA-02292: integrity constraint (GLOGOWNER.FK_RGCWB_WEIGHT_BREAK_GID) violated - child record found
Occurs When:
During a delete when child records in other tables depend on the key being removed.
Corrective Action:
Delete child records in associated tables before deleting from this table.
Heading Data
Message: <Error>There are supposed to be 7 columns of data, but I found 6 columns in this line: ["MYDOMAIN.LT 4500","LT 4500","MYDOMAIN.DEFAULT",4500,"LB","MYDOMAIN"]</Error>
<Error>
<TableName>WEIGHT_BREAK</TableName>
<Exception>ORA-01722: invalid number</Exception>
<Data>"MYDOMAIN.LT 4500","LT 4500","MYDOMAIN.DEFAULT",4500,"LB","MYDOMAIN"</Data>
</Error>
Occurs When:
Missing a column of data in one of the rows.
Corrective Action:
Verify that the data contains the number of fields as indicated in the ColumnList, and that the field formats (string, numeric, date, etc.) are valid.
Heading Data
Message: <Error>
<TableName>WEIGHT_BREAK</TableName>
<Exception>ORA-01722: invalid number</Exception>

Copyright © 2005-2006 Global Logistics Technologies, Inc. 36-4
Heading Data
<Data>"MYDOMAIN.LT 4500","LT 4500","MYDOMAIN.DEFAULT",4500,"LB","gung ho","MYDOMAIN"</Data>
</Error>
Occurs When:
Trying to insert a string in a numeric field.
Corrective Action:
Verify that the data contains the number of fields as indicated in the ColumnList, and that the field formats (string, numeric, date, etc.) are valid.
Heading Data
Message: <Error>There are supposed to be 7 columns of data, but I found 1 columns in this line: []</Error>
<Error>
<TableName>WEIGHT_BREAK</TableName>
<Exception>ORA-01400: cannot insert NULL into ("GLOGOWNER"."WEIGHT_BREAK"."WEIGHT_BREAK_GID")
</Exception>
<Data></Data>
</Error>
Occurs When:
The CSV file contains extra blank lines at the end. GC3 considers each blank line to represent a row of data.
Corrective Action:
Remove any extra blank lines at the end of the file.
Heading Data
Message: <Error>
<TableName>WEIGHT_BREAK</TableName>
<Exception>ORA-01401: inserted value too large for column</Exception>
<Data>"MYDOMAIN.LT 4500","LT 4500","MYDOMAIN.DEFAULT",4500,"LB",4500,"MYDOMAIN1234567890123456789012345678901234567890123456789012345

Copyright © 2005-2006 Global Logistics Technologies, Inc. 36-5
Heading Data
6789012345678901234567890"</Data>
</Error>
Occurs When:
Field length for one of the columns has been exceeded.
Corrective Action:
Limit the length of the input data field value to the appropriate size.
Heading Data
Message: <Error>
<TableName>WEIGHT_BREAK</TableName>
<RowsProcssed>0</RowsProcssed>
<Data>"MYDOMAIN.LT 4500","LT 4500","MYDOMAIN.DEFAULT",4500,"LB",4500,"MYDOMAIN"</Data>
</Error>
Occurs When:
Attempted to delete data where the data does not exist in the table.
Corrective Action:
Validate that the keys being used to delete the data are correct. Could use the dd command to suppress the error message.
Export This topic describes some common error messages while exporting. For each error there is an explanation of when the message occurs and the action needed to correct the error.
Heading Data
Message: <CSVUtil>
<Command>xcsv</Command>
<DataDir>.\</DataDir>
<DataFileName>weight_break.csv</DataFileName>
<Write>
<TableName>WEIGHT_BREAK2</TableName>

Copyright © 2005-2006 Global Logistics Technologies, Inc. 36-6
Heading Data
</Write>
</CSVUtil>
Caught exception: CSVUtil.SQLException: /CSVUtil.SQLException:
(null)/java.sql.SQLException: ORA-00936: missing expression
…
Occurs When:
Attempting to export data from a table that does not exist.
Corrective Action:
Verify table exists and that the CSV file contains the correct table name.