Data Links Manager Quick Beginnings - SDSC Staff Home …users.sdsc.edu/~jrowley/db2/Data Links...
157
IBM ® DB2 Universal Database ™ Quick Beginnings for DB2 Data Links Manager Version 8 GC09-4829-00
-
Upload
nguyendien -
Category
Documents
-
view
215 -
download
0
Transcript of Data Links Manager Quick Beginnings - SDSC Staff Home …users.sdsc.edu/~jrowley/db2/Data Links...

IBM®
DB2 Universal Database™
Quick Beginnings for DB2 Data LinksManager
Version 8
GC09-4829-00
���


IBM®
DB2 Universal Database™
Quick Beginnings for DB2 Data LinksManager
Version 8
GC09-4829-00
���

Before using this information and the product it supports, be sure to read the general information under Notices.
This document contains proprietary information of IBM. It is provided under a license agreement and is protected bycopyright law. The information contained in this publication does not include any product warranties, and anystatements provided in this manual should not be interpreted as such.
You can order IBM publications online or through your local IBM representative.v To order publications online, go to the IBM Publications Center at www.ibm.com/shop/publications/order
v To find your local IBM representative, go to the IBM Directory of Worldwide Contacts atwww.ibm.com/planetwide
To order DB2 publications from DB2 Marketing and Sales in the United States or Canada, call 1-800-IBM-4YOU(426-4968).
When you send information to IBM, you grant IBM a nonexclusive right to use or distribute the information in anyway it believes appropriate without incurring any obligation to you.
© Copyright International Business Machines Corporation 1998-2002. All rights reserved.US Government Users Restricted Rights – Use, duplication or disclosure restricted by GSA ADP Schedule Contractwith IBM Corp.

Contents
About this book . . . . . . . . . . viiRelated documentation . . . . . . . . viiWho should read this book . . . . . . . viiConventions . . . . . . . . . . . . vii
Chapter 1. Introduction to DB2 Data LinksManager . . . . . . . . . . . . . 1What’s new in DB2 Data Links ManagerVersion 8 . . . . . . . . . . . . . 1DB2 Data Links Manager . . . . . . . . 2DB2 Data Links environment. . . . . . . 3Data Links server components . . . . . . 4DB2 clients in the Data Links Managerenvironment . . . . . . . . . . . . 6DB2 servers in the Data Links Managerenvironment . . . . . . . . . . . . 6File system paradigm . . . . . . . . . 7DB2 Data Links Manager and yourapplications . . . . . . . . . . . . 9DATALINK data type . . . . . . . . . 10DB2 Data Links Manager typical setups. . . 13
Chapter 2. Installing Data Links Manageron Windows . . . . . . . . . . . 17Before you install DB2 Data Links Manager(Windows) . . . . . . . . . . . . 17Installing DB2 Data Links Manager(Windows) . . . . . . . . . . . . 23Actions performed by the DB2 Setup wizard(Windows) . . . . . . . . . . . . 24Verifying the DLFM_DB was successfullycreated and catalogued (Windows) . . . . 26Verifying the DB2 Data Links Managerinstallation (Windows) . . . . . . . . 27Installation verification tasks . . . . . . 27
Creating a test environment on the DB2server (Windows) . . . . . . . . . 27Creating a test environment on the DB2Data Links server (Windows) . . . . . 29Registering the drive with the Data LinksFilesystem Filter (Windows). . . . . . 30Registering the DB2 database with theData Links File Manager (Windows) . . . 31Authorizing a DB2 user account to link afile (Windows) . . . . . . . . . . 32
Creating a sample file for DB2 Data LinksManager (Windows) . . . . . . . . 33Registering the Data Links server with theDB2 database (Windows). . . . . . . 35Verifying the sample file is controlled byDLFF (Windows) . . . . . . . . . 36Verifying the sample file is accessible(Windows) . . . . . . . . . . . 37Viewing the sample file (Windows) . . . 39
Chapter 3. Installing Data Links Manageron AIX . . . . . . . . . . . . . 41Before you install DB2 Data Links Manager(AIX) . . . . . . . . . . . . . . 41Installation considerations in JFSenvironments (AIX) . . . . . . . . . 47Installation considerations in DCE-DFSenvironments (AIX) . . . . . . . . . 47Tivoli Space Manager Hierarchical StorageManager (AIX) . . . . . . . . . . . 50Installing DB2 Data Links manually using thedb2_install command (AIX) . . . . . . . 51Installing DB2 Data Links Manager using theDB2 Setup wizard (AIX) . . . . . . . . 52Actions performed by the DB2 Setup wizard(AIX) . . . . . . . . . . . . . . 53Verifying the DLFM_DB was successfullycreated and catalogued (AIX) . . . . . . 56Manual post-installation tasks (AIX) . . . . 57Workarounds in NFS environments (AIX) . . 61Setting up the DFS disk archive directoryafter DCE-DFS installation (AIX) . . . . . 61Creating a keytab file (AIX) . . . . . . . 62Verifying the installation of DB2 Data LinksManager (AIX) . . . . . . . . . . . 63Installation verification tasks . . . . . . 64
Creating a test environment on the DB2server (AIX) . . . . . . . . . . . 64Creating a test environment on the DB2Data Links server (AIX) . . . . . . . 66Preparing your file system for DB2 DataLinks Manager (AIX) . . . . . . . . 66Registering the file system with the DataLinks Filesystem Filter (AIX) . . . . . 69
© Copyright IBM Corp. 1998-2002 iii

Registering the DB2 database with theData Links File Manager (AIX) . . . . . 71Authorizing a DB2 user ID to link a file(AIX) . . . . . . . . . . . . . 72Creating a sample file for DB2 Data LinksManager (AIX) . . . . . . . . . . 73Registering the Data Links Server with theDB2 database (AIX) . . . . . . . . 74Verifying the sample file is controlled byDLFF (AIX) . . . . . . . . . . . 75Verifying the sample file is accessible (AIX) 76Viewing the sample file (AIX) . . . . . 78
DFS Client Enabler. . . . . . . . . . 79DFS Client Enabler installationprerequisites (AIX) . . . . . . . . . 79Installing DFS Client Enablers (AIX) . . . 80Configuring DFS Client Enablers (AIX) . . 81
Chapter 4. Installing Data Links Manageron the Solaris Operating Environment . . 83Before you install DB2 Data Links Manager(Solaris Operating Environment) . . . . . 83Installing DB2 Data Links Manager using theDB2 Setup wizard (Solaris OperatingEnvironment) . . . . . . . . . . . 90Installing DB2 Data Links Manager manuallyusing the db2_install command (SolarisOperating Environment) . . . . . . . . 91Actions performed by the DB2 Setup wizard(Solaris Operating Environment) . . . . . 93Verifying the DLFM_DB was successfullycreated and catalogued (Solaris OperatingEnvironment) . . . . . . . . . . . 95Verifying the installation (Solaris OperatingEnvironment) . . . . . . . . . . . 96Installation verification tasks . . . . . . 97
Creating a test environment on the DB2server (Solaris Operating Environment) . . 97Creating a test environment on the DB2Data Links server (Solaris OperatingEnvironment) . . . . . . . . . . 99Preparing your file system for Data LinksManager (Solaris Operating Environment) . 99Registering the file system with the DLFF(Solaris Operating Environment) . . . . 100Registering the DB2 database with theData Links File Manager (SolarisOperating Environment) . . . . . . 102Authorizing a DB2 user ID to link a file(Solaris Operating Environment) . . . . 103
Creating the sample file for DB2 DataLinks Manager (Solaris OperatingEnvironment) . . . . . . . . . . 104Registering the Data Links server withthe DB2 database (Solaris OperatingEnvironment) . . . . . . . . . . 105Verifying the sample file is controlled byDLFF (Solaris Operating Environment). . 107Verifying the sample file is accessible(Solaris Operating Environment) . . . . 108Viewing the sample file (SolarisOperating Environment) . . . . . . 109
Appendix A. DB2 Universal Databasetechnical information . . . . . . . . 111Overview of DB2 Universal Databasetechnical information. . . . . . . . . 111
Categories of DB2 technical information 111Printing DB2 books from PDF files . . . . 119Ordering printed DB2 books . . . . . . 120Accessing online help . . . . . . . . 120Finding topics by accessing the DB2Information Center from a browser . . . . 122Finding product information by accessingthe DB2 Information Center from theadministration tools . . . . . . . . . 124Viewing technical documentation onlinedirectly from the DB2 HTML DocumentationCD. . . . . . . . . . . . . . . 125Updating the HTML documentation installedon your machine . . . . . . . . . . 126Copying files from the DB2 HTMLDocumentation CD to a Web Server. . . . 128Troubleshooting DB2 documentation searchwith Netscape 4.x . . . . . . . . . . 128Searching the DB2 documentation . . . . 129Online DB2 troubleshooting information . . 130Accessibility . . . . . . . . . . . 131
Keyboard Input and Navigation . . . . 131Accessible Display . . . . . . . . 132Alternative Alert Cues . . . . . . . 132Compatibility with Assistive Technologies 132Accessible Documentation . . . . . . 132
DB2 tutorials . . . . . . . . . . . 132DB2 Information Center for topics . . . . 133
Appendix B. Notices . . . . . . . . 135Trademarks . . . . . . . . . . . . 138
Index . . . . . . . . . . . . . 141
iv Data Links Manager Quick Beginnings

Contacting IBM . . . . . . . . . . 145 Product information . . . . . . . . . 145
Contents v

vi Data Links Manager Quick Beginnings

About this book
This book will guide you through the planning, installation, and configurationof DB2 Data Links Manager on Windows NT, Windows 2000, AIX, and theSolaris Operating Environment.
Related documentation
Once your DB2 Data Links Manager is installed and configured, you willvalidate the installation through a test scenario.
After you have installed, validated, and tested your Data Links Managersetup, you should refer to the DB2 Data Links Manager Administration Guideand Reference.
For more information on how to define a DATALINK type column using theCREATE TABLE command, see the DB2 SQL Reference.
For information on DB2 Data Links replication, see the DB2 Data LinksManager Administration Guide and Reference and the DB2 Replication Guide andReference.
For more Data Links Manager information, including redbooks andwhitepapers, see the http://www.ibm.com/software/data/db2/datalinks/website.
Who should read this book
This book is intended for anyone who needs to install and configure DB2Data Links Manager for Windows NT, Windows 2000, AIX, or Solarisoperating environment. You do not need any previous experience with DB2Data Links Manager to complete the procedures described in this book.
Conventions
This book uses these highlighting conventions:v Boldface indicates commands or graphical user interface (GUI) controls
such as names of fields, folders, icons, or menu choices.v Italics indicate variables that you should replace with your own value. They
are also used to indicate book titles and to emphasize words.v Monospace indicates file names, directory paths, commands, and examples
of text you enter exactly as shown.
© Copyright IBM Corp. 1998-2002 vii

The term Windows refers to Windows NT or Windows 2000.
viii Data Links Manager Quick Beginnings

Chapter 1. Introduction to DB2 Data Links Manager
What’s new in DB2 Data Links Manager Version 8
Version 8 includes the following enhancements:v The new DB2 Data Links Manager Administration Guide and Reference is a
reference for system administrators, database administrators, andapplication programmers. Its contents include:– Link and unlink files– Update linked files– Replicate linked files with DB2 DataPropagator– Administer and secure both data and access on a Data Links server– Recover a Data Links server– Tune your Data Links Manager configuration– Troubleshoot Data Links Manager– Integrate various file systems to work with Data Links Manager
v DB2 Data Links Manager is now available on the Windows 2000 operatingsystem, in addition to Windows NT, AIX, and the Solaris OperatingEnvironment.
v DB2 Data Links Manager now supports both the Version 8 and Version 7Solaris Operating Environments.
v You can now update files while they remain under the control of DB2 DataLinks Manager. ″Linked files″ are files under the control of the Data LinksManager. Before DB2 Version 8, you had to unlink a file, make changes tothe file, then relink the file.
v Performance improvements have been made for archive, data recovery, andreplication operations on linked files. These improvements:– Reduce the time for beginning backups involving linked files– Reduce the time for running the Reconcile utility– Improve the throughput on replication of linked files using DB2
DataPropagatorv Improved security features for restricting the linking of files to authorized
users.
© Copyright IBM Corp. 1998-2002 1
DB2 Data Links Manager
Working with DB2, Data Links Manager provides four key elements ofexternal data control:v Referential integrityv Access controlv Recovery capabilitiesv Transaction consistency
Data Links Manager allows you to take advantage of the data storage featuresof both a Relational Database Management System (RDBMS) and a filesystem. You can continue to store unstructured data, such as images,engineering drawings, and x-rays, in a file system and also use an RDBMS tomanage data stored within a database.
Data Links Manager offers a unique opportunity for e-commerce and internetapplications, which are based on a file system paradigm, to be managed alongwith RDBMS data from a single point of administration. Other benefits ofData Links Manager include:v Minimal or no changes to existing applicationsv Maximize application performance and reduced network traffic by
strategically putting external files close to applicationsv Direct access to linked files through native filesystem APIsv Works with UNIX® and Windows® file systems and takes advantage of the
inherent benefits of the file system
Data Links Manager product extends the relational DBMS capabilities ofreferential integrity, value-based security, transactional consistency andcoordinated backup and recovery to files that exist outside of your database.Data Links Manager manages these files as though they are logically withinthe database by extending database functionality to external file systems.
Data Links Manager simplifies and reduces system administration costs andcomplexities by providing a single administration point for file and databasedata. Data Links Manager guarantees:v Referential integrity to external filesv RDBMS data value based access control to external files as an optionv Automatic and coordinated backup-and-restore capability within
transactional environments
Related concepts:
v “File system paradigm” on page 7
2 Data Links Manager Quick Beginnings

v “DB2 Data Links Manager and your applications” on page 9v “DATALINK data type” on page 10v “DB2 Data Links environment” on page 3v “DB2 Data Links Manager typical setups” on page 13v “Data Links server components” on page 4v “DB2 clients in the Data Links Manager environment” on page 6v “DB2 servers in the Data Links Manager environment” on page 6
Related tasks:
v “Installing DB2 Data Links manually using the db2_install command (AIX)”on page 51
v “Installing DB2 Data Links Manager using the DB2 Setup wizard (AIX)” onpage 52
v “Installing DB2 Data Links Manager using the DB2 Setup wizard (SolarisOperating Environment)” on page 90
v “Installing DB2 Data Links Manager (Windows)” on page 23v “Installing DB2 Data Links Manager manually using the db2_install
command (Solaris Operating Environment)” on page 91
DB2 Data Links environment
A DB2® Data Links environment is composed of:v A Data Links server, running DB2 Data Links Managerv A DB2 Universal Database™ serverv A DB2 clientv (Optional) File archive server — Tivoli® Storage Manager or any product
supporting the XBSA standard interface.
You can install DB2 Data Links Manager on:v AIX® systems to manage files stored in a Journaled File System (JFS) or
Transarc’s DCE Distributed File Service (DCE-DFS).v Solaris Operating Environments to manage files stored in a UNIX® File
System (UFS).v Windows® NT or Windows 2000 systems with an NTFS-formatted drive.v Tivoli Space Manager managed file system on AIX.
Related concepts:
v “DB2 Data Links Manager typical setups” on page 13v “Data Links server components” on page 4v “DB2 clients in the Data Links Manager environment” on page 6
Chapter 1. Introduction to DB2 Data Links Manager 3
v “DB2 servers in the Data Links Manager environment” on page 6
Data Links server components
A Data Links server has the following components:v Data Links File Manager (DLFM)v Data Links Filesystem Filter (DLFF) controlling a Data Links File System
(DLFS)v DB2® (Logging Manager)
Data Links File Manager (DLFM)The DLFM tracks all the files on a Data Links server, or all the files ina DCE cell, that are linked to one or more DB2 databases. The DLFMreceives and processes link-file and unlink-file messages arising fromSQL INSERT, UPDATE, and DELETE statements that reference aDATALINK column. For each linked file, the DLFM logically tracksthe database instance, the fully qualified table name, and the columnname referred to in the SQL statement in which the file is referenced.
The DLFM also tracks previously linked files, if they were linked to aDATALINK column for which the RECOVERY YES option wasspecified. This option allows DB2 to provide point-in-timeroll-forward recovery for any file that is specified by a DATALINKcolumn.
Data Links Filesystem Filter (DLFF)The DLFF filters operations to ensure that linked files are not deletedor renamed, and that the file’s attributes are not changed. Optionally,it also filters commands to ensure that proper access authority existsfor READ PERMISSION DB and WRITE PERMISSION ADMIN files.AIX and Solaris operating environment file systems under the controlof a DLFF can be NFS exported. Windows NT® and Windows 2000file systems under DLFF control can be net shared.
A file system under the control of DLFF is called a DLFS file system.
Data Links File System (DLFS) DMAPP (Data Manager Application)DLFS file systems include FSM (File System Migrator; the filter filesystem component of Tivoli® Space Manager), JFS, NTFS, or UFSenvironments; or a Data Links Filesystem Filter (DLFF) DMAPP (DataManager Application) in DCE-DFS environments.
In DCE-DFS environments, the DMAPP component filters commandsto ensure that linked files are not deleted, or renamed, or that thefile’s attributes are not changed. The DMAPP component monitorsfilesets residing in DMLFS aggregates that are Data Links Managerenabled. Once an aggregate has been Data Links Manager enabled, it
4 Data Links Manager Quick Beginnings

can contain filesets that may be brought under Data Links control.The DMAPP can then manage the data within these filesets after theaggregate is exported into the namespace. Data Links Managerenabling an LFS aggregate is part of the Storage Management Toolkit(SMT) provided by Transarc.
DB2 (Logging Manager)A DB2 database, called DLFM_DB, acts as a logging manager for theData Links server. This database contains registration informationabout databases that can connect to a Data Links server. It alsocontains information about the mount points of the file systems onAIX® or Solaris operating environment, or the sharename of the driveson Windows NT or Windows 2000, that are managed by a DLFF.
Note: It is recommended that you do not interact directly with theDLFM_DB database (for example, connecting to it directly, andeither querying or especially updating any information) exceptto take backups and perform restore and rollforward operationsas necessary for recovery purposes, or to set certain databaseconfiguration parameters to ensure adequate space for logging,etc.
The contents of this database are not documented, and thisproduct is not supported if the user has performedundocumented actions against the DLFM_DB, since thecontents of this database are considered a product internal.
The DLFM_DB database also contains information about files that havebeen linked, unlinked, or backed up on a Data Links server or in aDCE cell. The DB2 Data Links Manager installation program createsthis database during the installation.
DB2 can provide point-in-time rollforward recovery on the Data Linksserver for any linked file that is specified by a DATALINK columnwith RECOVERY YES. You can backup these files on disk, using TivoliStorage Manager, or using an XBSA-conformant backup and archiveutility.
The database backup makes sure that all the files on the file serverthat are linked to this database using a DATALINK column are alsobacked up. File backup is asynchronous.
To minimize tuning for log file capacity issues in the future, it isrecommended that you ensure that there is sufficient disk spaceavailable for the following database configuration variables forDLFM_DB: LOGFILSIZ, LOGPRIMARY, and LOGSECOND.
Chapter 1. Introduction to DB2 Data Links Manager 5

Related concepts:
v “DB2 Data Links environment” on page 3v “DB2 Data Links Manager typical setups” on page 13v “DB2 clients in the Data Links Manager environment” on page 6v “DB2 servers in the Data Links Manager environment” on page 6
Related reference:
v “Configuration Parameters for Database Logging” in the Data Recovery andHigh Availability Guide and Reference
DB2 clients in the Data Links Manager environment
A DB2® client will connect as usual to a remote DB2 server and access thedatabase.
The remote client can NFS mount a file system on AIX® or Solaris operatingenvironment, or share a drive on Windows, under the control of a Data LinksFilesystem Filter that is installed on a Data Links server. This way, the clientcan access the files on the Data Links server directly.
In DCE-DFS environments on AIX systems, the client uses the DFS™ client. ADB2 Data Links DFS Client Enabler, also known as the DLFS cache manageror DLFS-CM, is also required to access linked files in DATALINK columnscreated with READ PERMISSION DB specified.
Related concepts:
v “DB2 Data Links environment” on page 3v “DB2 Data Links Manager typical setups” on page 13v “Data Links server components” on page 4v “DB2 servers in the Data Links Manager environment” on page 6
DB2 servers in the Data Links Manager environment
The Data Links Manager can be registered on a DB2® database running on aDB2 UDB server. For Data Links servers using FSM, NTFS, JFS, and UFS filesystems, you can register more than one Data Links Manager with a givenDB2 database.
Note: Data Links Manager does not support a partitioned DB2 EnterpriseServer Edition database.
6 Data Links Manager Quick Beginnings

The database, with tables that include DATALINK columns referencing filesstored in a DFS™ filesystem, must register the DCE cell using the ADDDATALINKS MANAGER command. In DCE-DFS environments, the DB2server can register only one DCE cell. Also, you must install the DFS client onthe DB2 server to allow access to configuration information which is stored inDFS.
The AIX® and Solaris operating environments do not require DLFS to bemounted on the DB2 server, and the Windows® environment does not requireDLFS to be net shared on the DB2 server. In each of these environments, theDB2 server communicates with the Data Links File Manager using a reservedTCP/IP port on the file server.
Related concepts:
v “DB2 Data Links environment” on page 3v “DB2 Data Links Manager typical setups” on page 13v “Data Links server components” on page 4v “DB2 clients in the Data Links Manager environment” on page 6
File system paradigm
Current e-business trends, such as e-commerce, supply chain management,and customer relationship management require applications that can integratestructured data from various DBMS and unstructured data that reside on filesystems. Examples of such unstructured data are audio, video, and imagestraditionally stored in an assortment of file formats.
DB2® Data Links Manager allows you to use your existing and emerging filesystem based applications by leaving them untouched. DB2 Data LinksManager enables these same files to be integrated with database systems tomeet the rigorous integrity, security, and transactional demands of e-business.
This advantage allows you the freedom to decide what setup best fits yourorganization. You do not have to disrupt your business or your customers’access to critical data in order to move it all over to an RDBMS. Moving thisdata away from the file system paradigm would also require an extensiverewrite of the application you use to access this data.
With Data Links Manager, you can continue using a file paradigm to store,access, and modify files instead of moving these files into a traditionaldatabase repository. Continuing to use a file system as a data storage optioncan provide many benefits.
PerformanceThe store and forward model of data is unacceptable for performance
Chapter 1. Introduction to DB2 Data Links Manager 7

reasons. For example, it may be unacceptable for the databasemanager to materialize a Binary Large Object (BLOB) into a file, andthe converse, each time the data needs to be accessed as a file. Also,data may be captured in high volumes, and you may not want tostore this data in the database.
Data Links Manager does not add any overhead to the file READ andWRITE operations. Data Links ensures referential integrity of filereferences from the database by intercepting file operations such asOPEN, DELETE and RENAME that could compromise the integrity ofthe file reference. File READ and WRITE operations do notcompromise referential integrity and are not part of the Data Links’scope of operations. Also, given that the number of file READ andWRITE operations generally outnumber the occurrences of OPEN,DELETE or RENAME on a file, the performance degradation, if any, ismarginal.
Network considerationsYou may be accessing data directly from a file server that is physicallyclose to a workstation. For example, you can configure the file serverso that the network distance is much shorter to the user, compared tothe database where all the BLOBs are stored. The number of bytesthat flow for a large object are much larger than the number of bytesfor an answer from a typical SQL query. Network distance betweenresources is therefore a significant consideration.
Isochronous deliveryYou may be using an application that uses a stream server because ithas real-time requirements for delivery and capture. This is known asisochronous delivery. An example of isochronous delivery might be avideo server that delivers high-quality (or ″jitter-free″) video to aclient workstation in real time. In these kinds of applications, it islikely that such data will not be moved into or out of the database asa BLOB, but rather stay on the file server for immediate access.
Cost If you are considering using a database as a repository, you shouldconsider first the expense of rewriting applications that currently usestandard file I/O semantics. Your applications may use existing toolsthat work with the file paradigm. Replacing these tools can also beexpensive. Using Data Links Manager requires little if anymodification of existing file system applications.
The cost of administration of a database is reduced as the large objectsare outside the database and the size of the database is moremanageable. As the database contains only pointers to files (asDATALINK column values) it takes less time to backup the database.During the backup, DB2 checks with DLFM to ensure that the files
8 Data Links Manager Quick Beginnings

linked to this database are backed up. The DLFM starts asynchronousbackup of the files after they are linked to the database.
Related concepts:
v “DB2 Data Links Manager” on page 2v “DB2 Data Links Manager and your applications” on page 9
DB2 Data Links Manager and your applications
DB2® Data Links Manager is a candidate for any application that involvesprocessing information from multiple heterogeneous sources that includedatabases and file systems, where it is required that this information beconsistent between the different sources, secure, accurate, and timely.
In addition to e-commerce, customer relationship management, and supplychain management e-business, Data Links Manager can be used effectively in:v Medical applications, in which a file server stores X-rays and a database
stores their attributes.v Entertainment industry applications that perform asset management of
video clips. A file server stores video clips, but a database stores the clips’attributes. Access control is required for accessing the video clips based ondatabase privileges for accessing the meta-information.
v World Wide Web applications that manage millions of files, and allowaccess control that is based on database privileges.
v Financial applications, which require distributed capture of check imagesand a central location for those images.
v CAD applications, where engineering drawings are kept as files and adatabase stores their attributes. Queries can be run against the drawingattributes.
Many of these applications need search capabilities to find the data in thefiles. These search capabilities, however, do not require physically bringing thedata into the database system because their raw content is not needed for thequery. Typically, you would extract features of an image or a video and storethem in the database for performing a search on the extracted features. Theability to store a reference to such files and parametric data that describes theircontents is the approach these applications use to combine the searchcapabilities of SQL with direct manipulation of raw data.
The DB2 relational extenders for text, voice, image and so on provide thisfunctionality. The extenders allow you to create special indexes on the dataand to search this data. This data can be stored either in DB2 or through DB2Data Links in a file system.
Chapter 1. Introduction to DB2 Data Links Manager 9

Data Links Manager can provide all these capabilities even if the data is notin a database, and it can be used in conjunction with the DB2 relationalextenders’ search features to search on this data as well as perform parametricsearches. Additionally, the data and the indexes created by the DB2 extenderscan be kept synchronized.
Central administration point:
Data Links Manager simplifies many of the tasks associated with managingexternal files that are logically integrated with database information. Forinstance, Data Links Manager ensures that a backup of a database iscoordinated with a backup of all the files referenced in that database, such asa point-in-time image which can be captured for the combination of databaseand file data.
Also, restoring the database from a backup results in Data Links Managerautomatically restoring the corresponding content of the files, therebyguaranteeing consistency. Contrast this with other systems where the onus ofkeeping the database and file systems synchronized is left to the databaseadministrator and can be error prone. That setup has a potential ofjeopardizing the integrity of the information and the application.
Related concepts:
v “DB2 Data Links Manager” on page 2v “File system paradigm” on page 7
DATALINK data type
Data Links technology uses the DATALINK data type, implemented as anSQL data type in DB2® Universal Database, which references an object storedexternal to a database. You can use the DATALINK data type just like anyother SQL data type to define columns in tables. The DATALINK type is partof the SQL standard and is applicable across standard-conformant databaseproducts.
In File System Migrator (FSM), NT File System (NTFS), Journaled File System(JFS) and UNIX® File System (UFS) environments the DATALINK valuesencode the name of a Data Links Manager server containing the file and thefilename in terms of a Uniform Resource Locator (URL).
A URL is a text string of the general format:http://www.ibm.com/datalinks/datalinks.txt
DB2 validates the DATALINK value (file reference), just as it does for anySQL data value stored in the database. You register a set of known Data Links
10 Data Links Manager Quick Beginnings

Manager servers. The only Data Links Manager server names that you canspecify in a DATALINK value are those that have been registered to a DB2database. Although Data Links uses a URL syntax to reference a file, it doesnot mean that the Data Links Manager server also functions automatically asa web server.
In DCE-DFS environments, the Data Links Manager is registered for the entirecell. Linked files are referred to in terms of a URL with scheme, ″dfs″, and theDFS™ path name of the file.
Even though the DATALINK value represents an object that is stored outsidethe database system, you can use SQL queries to search parametric data toobtain the file name that corresponds to the query result. You can storeattributes in tables, such as indexes on files containing video, image, text, orother media formats, along with the DATALINK value. With a centralrepository of files on a file server and DATALINK data types in a database,you can obtain an inventory of its contents and devise strategies to get at theinformation you need.
An application designer can use Data Links to maintain a reference to anexisting operating system file in a column of a DB2 table. This reference isstored through a the DATALINK data type using a URL syntax. Othercolumns of this table would generally maintain meta data about the linkedfiles.
Typically, the application programmer would insert rows in this table withmeta data about the file, and its file reference (URL syntax) in the DATALINKcolumn. The application would then typically use an SQL query against thistable on the meta data columns to locate the files of interest, retrieve the filereference in the DATALINK column, and then use that URL to directly accessthe file using the native APIs of the file system or through a browser.
For the application to update or delete a linked file, it must first unlink thefile from the DB2 UDB table in which it is referenced, but only if you are notusing the update-in-place methodology to perform the file update. You canchoose a variety of methodologies for updating linked files: theunlink/update/relink, the update in place, or the replacement method.
For the application to update or delete a linked file, it must first unlink,assuming you have used the method to link a file that requires you to unlinkit, the file from the DB2 UDB table before the operation is allowed to proceed.Multiple DATALINK columns can be defined for a single DB2 UDB table.
Data Links Manager treats information residing in file systems as though itwas logically within the database, so you are not required to make anychanges to existing applications. DB2 UDB’s object-relational capabilities allow
Chapter 1. Introduction to DB2 Data Links Manager 11

an application designer to write UDFs that process files that are either storedwithin BLOBs, stored as a reference in a DATALINK column, or stored as areference in a UDT which is a Distinct Type mapping to the DATALINK type.
If files are stored within BLOBs and are currently used in existingapplications, then the potential exists for synchronization problems betweenthe BLOB and native file information if the BLOB is simultaneously updatedby different users outside of the database when the BLOB is materialized as anexternal file, and updated through some application which only operates onfiles. When objects are updated outside of the database not part of a singledatabase unit of work, there is always the potential for one update overlayinganother. With some of the serialization techniques built into Data Links (forexample, using the update in place feature), this problem is avoided.
Therefore, while both the BLOB and DATALINK types support file processingthrough the database, they address different application requirements, and arecomplementary in nature. DB2 UDB is unique in the industry in offering thecustomer these two choices to best serve the custom demands of theirapplication.
Data Links Manager has been designed to support a distributed computingenvironment, with capabilities that include the following:v A DATALINK column in a DB2 UDB table can reference one or more file
systems spread over one or more file system servers associated withdifferent operating systems such as AIX® and Windows® 2000.
v A single Data Links Manager can be associated with DATALINK columnsin one or more DB2 UDB databases.
v A DATALINK column can reference files residing in Transarc’s distributedfile system DCE-DFS.
v Uni-directional and bi-directional replication of linked files is supported inan atomic, automatic, and consistent way in conjunction with DB2 UDB’sdatabase replication capabilities through DB2 DataPropagator.
Related concepts:
v “DB2 Data Links Manager” on page 2v “File system paradigm” on page 7v “DB2 Data Links Manager and your applications” on page 9v “Updating approaches overview” in the DB2 Data Links Manager
Administration Guide and Reference
Related reference:
v “Updating approaches summary” in the DB2 Data Links ManagerAdministration Guide and Reference
12 Data Links Manager Quick Beginnings

DB2 Data Links Manager typical setups
Figure 1 shows an overview of the interaction between a DB2® server, the DB2Data Links Manager components, the backup media, and a remote clientapplication in FSM on AIX, NTFS, JFS, and UFS environments.
In this example, a client application connects to a database with a DATALINKdata type, selects a DATALINK value from this database, and updates thedata file as follows:1. The client application issues a CONNECT statement to connect to a
database on a DB2 server.2. The application then issues a SELECT statement that contains a
DATALINK column. For example:select dlurlpath(dl1) into :var_dl1 from EMPLOYEE
Data LinksFile Manager(DLFM)
DB2DLFM_DB
Data LinksFilesystemFilter (DLFF)
File System**
Dat
aLin
k D
ata
Type
EMPLOYEE
*Single-partitioned database system
**NTFS on Windows, JFS on AIX or UFS on Solaris
DB2 Server*
Data LinksServer
File
DB2 Client
(4)
(2)
(1)
(3)
SharedDirectoryor NFS mount
Backup Media
Figure 1. Overview of Data Links Manager Processing (FSM on AIX, NTFS, JFS, or UFS environments)
Chapter 1. Introduction to DB2 Data Links Manager 13

3. The application then copies the :var_dl1 file to the new_version file over ashared drive on Windows® or an NFS mount on AIX® or Solaris operatingenvironment.
4. Then the application edits the new_version file. To save the changes in thedatabase, the application would issue an UPDATE statement. For example:
update EMPLOYEE set dl1=dlvalue(:new_version)commit
The following diagram shows a Data Links Manager implementation in aDCE-DFS environment on AIX. The numbers in the diagram correspond tothe previous steps.
14 Data Links Manager Quick Beginnings

Related concepts:
v “DB2 Data Links Manager” on page 2
Data LinksFile Manager(DLFM)
Data LinksFile Manager(DLFM)
DB2 Client toDLFM_DB
DB2 Server toDLFM_DB
DLFFDMAPP
DLFFDMAPP
DMLFS
DMLFS
Data Links Server(DFS File Server)
Data Links Server(DFS File Server)
File
File
DB2 ClientApplication
DFS Client
DB2 DFSClient Enabler
(3)
(3)
Dat
aLin
k D
ata
Type
EMPLOYEE
DB2 Server*
(4)
(2)
(1)
Backup Media
Backup Media
Figure 2. Overview of Data Links Manager Processing (DCE-DFS environments)
Chapter 1. Introduction to DB2 Data Links Manager 15

v “DB2 Data Links environment” on page 3
16 Data Links Manager Quick Beginnings

Chapter 2. Installing Data Links Manager on Windows
Before you install DB2 Data Links Manager (Windows)
Read this information before installing DB2® Data Links Manager.
System requirements
v Windows® NT. You must be running Windows NT® Version 4.0with Service Pack 6 or later.
v Windows 2000. You must be running Windows 2000 (5.00.2195)with Service Pack 1 or later, RC 1.1.
To check the level of the operating system, click on My Computer andselect Help —> About Windows from the menu bar.
NTFS formatted driveYou must have at least one Windows File System (NTFS) formatteddrive that will be controlled by a Data Links Filesystem Filter (DLFF).Any drive that a DLFF will control must be an NTFS formatted drive.During the installation, you can select the drives that you want to becontrolled by a DLFF. If you do not have a drive that was formattedfor NTFS, you will not be able to perform the installation.
A separate NTFS drive is also required if you want to store backupsof linked files on a local file system.
To view a list of the NTFS formatted drives on your system:
Windows NTClick Start and select Programs —> Administration Tools(Common)—> Disk Administrator.
Windows 2000Click Start and select Settings —> Control Panel. ClickAdministrative Tools. Click Computer Management and thenselect Disk Management.
You can either convert an existing file system to NTFS, or create one.To convert an existing file system to NTFS, enter the followingcommand:
convert x: /fs:ntfs
where x: represents the drive that you want to convert to NTFS.
© Copyright IBM Corp. 1998-2002 17

Run this command from a command prompt window on a drive otherthan the one that you are converting to NTFS.
You can create an NTFS partition using the Windows NT DiskAdministrator tool or Windows 2000 Disk Management.
Migrating from previous versionsIf you have a pre-Version 8.1 Data Links instance on your system, youmust migrate the instance to the Version 8.1 format using thedb2imigr command.
Registry variables offer more function and flexibility thanenvironment variables. However, because of this, it is possible thatmigration will not be performed exactly as expected. The registryvariables should be checked using the db2set command aftermigration.
Data Links server securityIn releases prior to DB2 Data Links Version 8.1, there were no securitycontrols on linking a file. If you migrated from a previous release, youwill be given the option at DLFM migration time to enable thesesecurity controls on your existing DLFM server(s).
Migrating from DB2 Data Links Version 6.1, 7.1, or 7.2 to DB2 Data LinksManager Version 8
To migrate from DB2 Data Links Version 6.1, 7.1, or 7.2 to DB2 DataLinks Manager Version 8.1:1. Prepare your DB2 and DLFM databases for migration. For
example, you may wish to backup your existing databases.2. Install DB2 Version 8 on your DB2 server and Data Links Manager
server machines.3. As the Data Links Manager Administrator, run the db2dlmmg
command to migrate the existing dlfm_db database schema to thenew version.
When you migrate to DB2 Data Links Manager Version 8, thefollowing environment variables will be converted to DB2 registryvariables:
DLFM_INSTALL_PATHDLFM_PORTDLFM_LOG_LEVELDB2_RR_TO_RSDLFM_BACKUP_DIR_NAME (1)
DLFM_BACKUP_TARGET (2)
DLFM_BACKUP_TARGET_LIBRARY (3)
18 Data Links Manager Quick Beginnings

Notes:
1. This variable is used only if a local file system is the backuptarget.
2. Used to indicate the type of backup target used. Possible valuesfor this variable are LOCAL, TSM, or XBSA.
3. Used to indicate the XBSA support code library only if theDLFM_BACKUP_TARGET is set to XBSA. The support codelibrary must be fully qualified and must include the shared objectname. The name of the shared object is available from the vendorsuppling the XBSA compliant shared library.
Enable drive sharingEach drive that you plan to be controlled by a Data Links FilesystemFilter (DLFF) must be enabled for sharing.
To enable a drive for sharing:1. Click Start and select Programs —> Windows Explorer.2. Right-click on the drive that you want to share and select Sharing.
If you are already sharing the drive that you want to be controlledby a DLFF, skip to step 5.
3. Select Shared As.4. Click New Share.5. Enter a share name for this drive in the Share Name field and
click OK.6. Click Permissions.7. Select the Everyone option.8. Click Type of Access and select the Full Control Option.9. Click OK to register the new share name.
Memory requirementsThere must be at least 64 MB of RAM available to your system. Tocheck the amount of memory available to your system, select MyComputer, click the right mouse button, and select the Propertiesoption.
Synchronize system clocksThe system clocks on the Data Links server and the DB2 server mustbe, and remain, synchronized for linked files in the DATALINKScolumns with the READ PERMISSION DB option. Synchronization ofclocks is essential for the Data Links token expiry interval to workcorrectly. The token expiry interval is a database configurationparameter that controls how long a selected DATALINK value(consisting of a URL with an embedded file authorization token) maybe used.
Chapter 2. Installing Data Links Manager on Windows 19

To set the time for a machine’s system clock:1. Click Start and select Settings —> Control Panel.2. Double-click the Date/Time icon.3. Set the local system time using the spin buttons in the Time box.
Remember to set this time equal to the local system time on theDB2 server.
4. Click the Time Zone tab and select the appropriate time zone fromthe drop down box. Remember to use the same time zone settingon all servers.
5. Click OK.
Version levels of DB2 Data Links and DB2 UDBVersion levels of DB2 Data Links and DB2 Universal Database™ canbe any combination of Version 6.1, 7.1, 7.2 and 8.1. For example, DB2can be at Version 6.1 and Data Links Manager can be at Version 8.1.
To check the version of DB2 that resides on a workstation, enter thedb2level command.
If DB2 is at the higher version, such as Version 8.1, the Data LinksManager features introduced in Version 8.1 will not be available whenyou connect to a Data Links Manager at Version 6 or 7. You willreceive an SQL error if you attempt to use the Version 8 features.
User account rightsTo perform the installation of Data Links File Manager, you need tologin as a user with following privileges:1. Defined on the local machine2. Belongs to the Local Administrators group3. Has the following advanced user rights:
v Act as part of the operating systemv Increase quotasv Replace a process level tokenv Create a token objectv Log on as a service
For more information on Windows user rights, refer to the Windowsonline help.
dlmadmin usernameDuring the installation, you will be asked to provide a user accountthat will be used as the DB2 Data Links Manager Administrator.
By default, the setup program will set up a user account with theusername dlmadmin and password dlmadmin. You can accept thesedefault values, specify an existing account, or create a different user
20 Data Links Manager Quick Beginnings

account by changing the default values. This user account is also usedto run the DLFM as a Windows service.
If you accept the default dlmadmin user account, you should ensurethat you change the Password and Confirm Password fields. Thedlmadmin user account’s password is dlmadmin for any DB2 Data LinksManager installation and is therefore well-known. Using the defaultsetting for this user account could pose a security risk to yournetwork.
If the dlmadmin user account already exists on your system, you mustuse the password that was previously set for this user account.
If you want to specify an existing user account, the account youspecify must:v Be defined on the local machine.v Belong to the Local Administrators group.v Have the ″Back up files and directories″ and the ″Restore files and
directories″ user rights.v Have the following advanced user rights:
– Act as part of the operating system.– Increase quotas.– Replace a process level token.– Create a token object.– Log on as a service.
v Have a username that is 30 characters or less.
If you want to create a new user account using the setup program,you must ensure that the username you specify is 30 characters orless.
Administrator group privilegesOn Windows, the dlmadmin user account has the same privilegeswith regard to files linked using Data Links as a root user does onUNIX® for most functions.
Rename Access filewithout token
Delete Update
UNIX (root) Yes Yes Yes Yes
Windows(dlmadmin)
Yes Yes No* No*
Note: * The NTFS does not allow these operations for a read-only file. The dlmadminuser account can make these operations successful by enabling the write permissionfor the file.
Chapter 2. Installing Data Links Manager on Windows 21

DLFM user accountIn addition to the DB2 Data Links Manager Administrator useraccount (dlmadmin), the DLFM user account is also created duringinstallation for use by the Data Links File Manager. The DLFM useraccount is the owner of all READ PERMISSION DB files.
The DLFMXGRP group is created for use with the update in placefunctionality for any file linked to a DATALINK column defined withWRITE PERMISSION ADMIN. You should not add any other users tothese groups; the DLFM user should be the only user account in thesegroups. The DLFM user account should never be used to create a filein a DLFF controlled file system, as this can be misinterpreted as alinked file for a READ PERMISSION DB column reference
TCP/IP port numberData Links File Manager needs a TCP/IP port to communicate withDB2 servers. By default, the setup program will generate a value foryou. You can use this value or provide your own. You will need toknow this port number to verify the installation.
To review the TCP/IP ports that are in use on a machine, open theservices file. The services file is located in thex:\winnt\system32\drivers\etc directory (where x: represents thedrive where you installed Windows).
Determine hostnameYou must determine the names of each of your DB2 servers and DataLinks servers. You will need to know these hostnames to verify theinstallation. When connecting to a Data Links File Manager (DLFM),the DB2 UDB server internally sends the following information to theDLFM:v Database namev Instance namev Hostname
The DLFM then compares this information with its internal tables todetermine whether the connection should be allowed. It will allow theconnection only if this combination of database name, instance name,and hostname has been registered with it, using the dlfm add_dbcommand. The hostname that is used in the dlfm add_db commandmust exactly match the hostname that is internally sent by the DB2UDB server.
To obtain these hostnames, enter the hostname command on yourDB2 Data Links and DB2 UDB servers. For example, this commandmight return dlmserver on your Data Links server.
22 Data Links Manager Quick Beginnings

Now enter the nslookup dlmserver command, where dlmserverrepresents your hostname. This command should return outputsimilar to the following:
Server: dnsserv.ibm.comAddress: 9.21.14.135Name: dlmserver.ibm.comAddress: 9.21.51.178
The Name: dlmserver.ibm.com entry is your hostname name.
Repeat these steps on each Data Links Manager and DB2 UDB server.
Data Links replicationData Links Manager Version 8.1 introduces two new registryvariables, DLFM_START_ASNCOPYD and DLFM_ASNCOPYD_PORT.During installation, you will be prompted to enable the Data LinksManager Replication daemon. If you plan to use Data LinksReplication, you should enable the Replication daemon during theinstallation. You can also enable it after installation by setting theregistry variables (DLFM_START_ASNCOPYD andDLFM_ASNCOPYD_PORT) and restarting the DLFM.
Related concepts:
v “DB2 Data Links Manager” on page 2v “Actions performed by the DB2 Setup wizard (Windows)” on page 24v “Installation overview for DB2 servers (Windows)” in the Quick Beginnings
for DB2 Servers
v “Introduction to Data Links Manager security” in the DB2 Data LinksManager Administration Guide and Reference
Related tasks:
v “Installing DB2 Data Links Manager (Windows)” on page 23v “Migrating databases” in the Quick Beginnings for DB2 Servers
v “Migrating DB2 (Windows)” in the Quick Beginnings for DB2 Servers
v “Enabling the Data Links Manager Replication Daemon” in the Post V8 GA
Installing DB2 Data Links Manager (Windows)
You can install DB2 Data Links Manager on Windows.
Prerequisites:
Before you install DB2 Data Links Manager, you mustv Read ″Before you install DB2 Data Links Manager for Windows″.
Chapter 2. Installing Data Links Manager on Windows 23

v Log on to the system with a user account that belongs to the LocalAdministrators group.
v Shut down any other programs that are currently running.
Procedure:
To install DB2 Data Links Manager:1. Insert the CD-ROM into the drive. The auto-run feature will automatically
start the setup program. If not, run setup.exe from the root directory ofthe CD-ROM.
2. The Launchpad window opens.3. Click Install and respond to the setup program’s prompts. Online help is
available to guide you through the remaining steps. You can invoke theonline help by clicking Help or pressing F1 at any time.You can click Cancel at any time to stop the setup program.
Related concepts:
v “DB2 Data Links Manager” on page 2v “Before you install DB2 Data Links Manager (Windows)” on page 17v “Actions performed by the DB2 Setup wizard (Windows)” on page 24
Related tasks:
v “Verifying the DB2 Data Links Manager installation (Windows)” on page 27
Actions performed by the DB2 Setup wizard (Windows)
The setup program performs the following actions:1. Creates DB2 Data Links Manager program groups and items (or
shortcuts).2. Updates the DB2 registry variables with the following entries (only the
most significant variables set during install are listed here):v DLFM_START_ASNCOPYD=NO // or YES if you enable the Data
Links Manager Replication Daemonv DLFM_ASNCOPYD_PORT=port_number, where port_number represents
the port number specified during the install process.v DLFM_BACKUP_TARGET=LOCAL // Can also be TSM or XBSAv DLFM_PORT=port_number, where port_number represents the port
number reserved for the Data Links File Manager.v DLFM_LOG_LEVEL=LOG_ERRv DB2_RR_TO_RS=ONv DB2_HASH_JOIN=ON
24 Data Links Manager Quick Beginnings

v DLFM_INSTALL_PATH=x:\sqllib\bin, where x: represents the DataLinks Manager installation drive.
v DB2INSTANCE=DLFMv DLFM_BACKUP_DIR_NAME=x:\dlfmbackup, where x: represents the
Data Links Manager backup installation drive.
You can use the db2set –all command to view all of the variables.3. Creates and registered various services.4. Sets up the Data Links Filesystem Filter driver.5. Creates a DB2 (or database) instance called DLFM.6. Creates a user account for the DB2 Data Links Manager Administrator, if
specified account does not exist already. If the specified account alreadyexists, then the setup program checks if it has the appropriate privileges.
7. Creates a user account for use by the Data Links File Manager. Bydefault, this user account is created with the username DLFM and you willbe prompted for a password. It is recommended that you change thisdefault password after installing DB2 Data Links Manager.
8. Updates the registry with the DLFM user account password that youwere prompted for during the installation. However, if you change thepassword for the default DLFM user account or change the default useraccount name DLFM, you must update the registry with the newpassword:
dlff set dlfmaccount DLFM
Once you perform actions with the DLFM user account or whatever youchanged the user account to, you cannot change the username that has todo with this account. You can use this command to periodically changethe password for this user account.
9. Creates the special write group, dlfmxgrp and updates the registry withthis group information. Once any file is linked to this group, you cannotchange the group name. You can manually create this new group (andupdate the registry):
dlff set dlfm_write_group newgroup
10. Reserves the port number you specified for use by the Data Links FileManager and added an entry to the services file that is similar to thefollowing:
db2cDLFM 50100/tcp
11. Creates a DB2 database, called DLFM_DB. This database is used by the DataLinks File Manager, which keeps track of all the files linked from the hostDB2 database(s). This database was automatically backed up after it wascreated.
Chapter 2. Installing Data Links Manager on Windows 25
12. By default, sets link security controls to ENABLED. Use the dlfm set linksecurity off command to disable this feature and the dlfm set linksecurity on command to re-enable it.
Related tasks:
v “Installing DB2 Data Links Manager (Windows)” on page 23
Verifying the DLFM_DB was successfully created and catalogued (Windows)
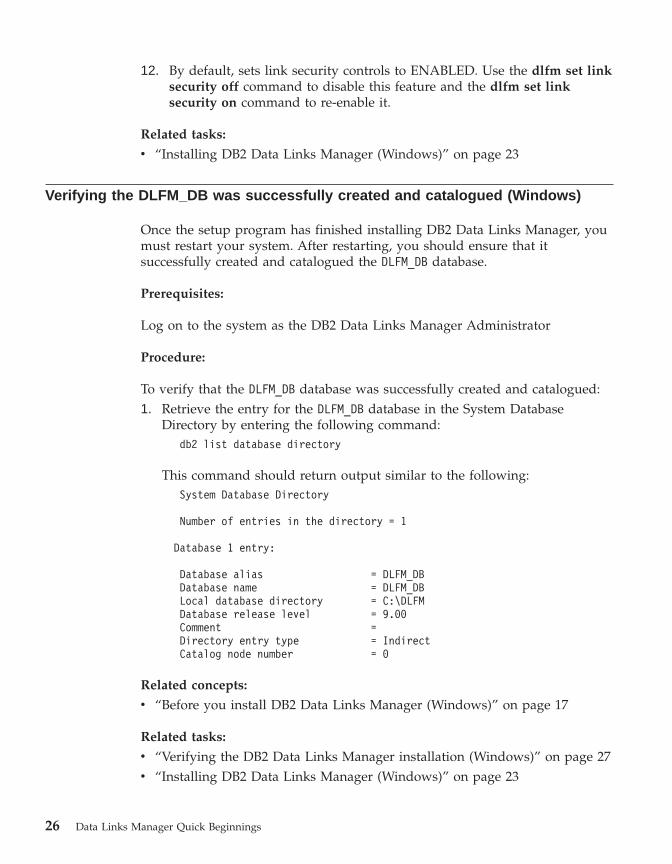
Once the setup program has finished installing DB2 Data Links Manager, youmust restart your system. After restarting, you should ensure that itsuccessfully created and catalogued the DLFM_DB database.
Prerequisites:
Log on to the system as the DB2 Data Links Manager Administrator
Procedure:
To verify that the DLFM_DB database was successfully created and catalogued:1. Retrieve the entry for the DLFM_DB database in the System Database
Directory by entering the following command:db2 list database directory
This command should return output similar to the following:System Database Directory
Number of entries in the directory = 1
Database 1 entry:
Database alias = DLFM_DBDatabase name = DLFM_DBLocal database directory = C:\DLFMDatabase release level = 9.00Comment =Directory entry type = IndirectCatalog node number = 0
Related concepts:
v “Before you install DB2 Data Links Manager (Windows)” on page 17
Related tasks:
v “Verifying the DB2 Data Links Manager installation (Windows)” on page 27v “Installing DB2 Data Links Manager (Windows)” on page 23
26 Data Links Manager Quick Beginnings

Verifying the DB2 Data Links Manager installation (Windows)
You will configure a DB2 Data Links Manager environment to control filesthat are linked to DATALINK columns in a table of a database on a DB2Universal Database server.
Procedure:
To verify the installation of Data Links Manager on Windows:1. Create a test environment on the DB2 server.2. Create a test environment on the DB2 Data Links server.3. Register the Data Links Server with the DB2 database.4. Verify the sample file is controlled by DLFF.5. Verify the sample file is accessible.6. View the sample file.
Related tasks:
v “Creating a test environment on the DB2 server (Windows)” on page 27v “Creating a test environment on the DB2 Data Links server (Windows)” on
page 29v “Registering the Data Links server with the DB2 database (Windows)” on
page 35v “Verifying the sample file is controlled by DLFF (Windows)” on page 36v “Verifying the sample file is accessible (Windows)” on page 37v “Viewing the sample file (Windows)” on page 39v “Installing DB2 Data Links Manager (Windows)” on page 23
Installation verification tasks
Creating a test environment on the DB2 server (Windows)Creating a test environment on the DB2 server is part of the larger task ofVerifying the DB2 Data Links Manager installation.
Prerequisites:
v A valid DB2 user account that has System Administrative (SYSADM)authority on the VALIDATE instance that you will create. By default, any useraccount that belongs to the Local Administrators group has SYSADMauthority on an instance.
Procedure:
To create a test environment on the DB2 UDB server:
Chapter 2. Installing Data Links Manager on Windows 27

1. Log on to the system with a user account that belongs to the LocalAdministrators group.
2. Create an instance on the DB2 server using the db2icrt command. Thisinstance will contain a database, which you will create, where tablescontaining columns of the DATALINK data type will reside.In our example, we will create an instance called VALIDATE by enteringthe following command:
db2icrt validate
3. Ensure that the VALIDATE instance is the current instance by entering thefollowing command:
db2 get instance
This command should return the following output:The current database manager instance is: VALIDATE
If you do not receive this output, enter the following commands:set DB2INSTANCE=VALIDATEdb2 get instance
4. Set the DATALINKS database manager configuration parameter to YES inthe VALIDATE instance’s configuration file by entering the followingcommand:
db2 update dbm cfg using datalinks yes
In the event that you want to disable the DB2 Data Links Managerfunctionality on your DB2 server, you set the DATALINKS databasemanager configuration parameter to no.
5. Start the VALIDATE instance by entering the db2start command.
Note: If you change a setting in an instance’s database managerconfiguration file, you must ensure that you stop and restart theinstance (using the db2stop and db2start commands) for thechanges to take effect. In our example, we did not start theVALIDATE instance, so we only issued the db2start command.
6. Create a database using the db2 create database command. This databasewill contain a table using the DATALINK data type.For the example, create a database called STAFF by entering the followingcommand:
db2 create database staff
7. Connect to the STAFF database by entering the following command:db2 connect to staff
8. Create a table called EMPLOYEE, in the STAFF database that you justcreated, that has a column defined with a DATALINK data type by enteringthe following command:
28 Data Links Manager Quick Beginnings

db2 "create table employee (id int, fname varchar(30),lname varchar(30), picture datalink linktype url filelink control integrity all read permission db writepermission blocked recovery yes on unlink restore)"
9. Terminate all connections to this database by entering the followingcommand:
db2 connect reset
10. Log out.
Now you can create a test environment on the DB2 Data Links server.
Related tasks:
v “Creating a test environment on the DB2 Data Links server (Windows)” onpage 29
Related reference:
v “CREATE DATABASE” in the Command Reference
v “db2icrt - Create Instance” in the Command Reference
Creating a test environment on the DB2 Data Links server (Windows)
Creating a test environment on the DB2 Data Links server is part of the larger taskof Verifying the DB2 Data Links Manager installation. After creating a testenvironment on the DB2 server, you must create a test environment on theDB2 Data Links server.
Procedure:
To create a test environment on the Data Links server:1. Register the drive with the Data Links File Filter2. Register the DB2 database with the Data Links File Manager.3. Authorize a DB2 user account to link a file.4. Create a sample file for Data Links File Manager.
Related tasks:
v “Registering the drive with the Data Links Filesystem Filter (Windows)” onpage 30
v “Registering the DB2 database with the Data Links File Manager(Windows)” on page 31
v “Authorizing a DB2 user account to link a file (Windows)” on page 32v “Creating a sample file for DB2 Data Links Manager (Windows)” on page
33v “Creating a test environment on the DB2 server (Windows)” on page 27
Chapter 2. Installing Data Links Manager on Windows 29

Registering the drive with the Data Links Filesystem Filter (Windows)Registering the drive with the Data Links Filesystem Filter is part of the larger taskof Creating a test environment on the DB2 Data Links server.
A Data Links Filesystem Filter (DLFF) is created by the setup program on theNTFS formatted drives that you selected during the installation.
Prerequisites:
Log on to the system as the DB2 Data Links Manager Administrator.
Procedure:
To register a drive with the DLFF:1. Ensure that the Data Links File Manager started successfully as follows:
a. Click Start and select Settings —> Control Panel.b. On Windows NT, click Services. On Windows 2000, click
Administrative Tools and then click Services. The Services windowopens.
c. Ensure that the status for the DB2 Data Links File Manager service isset to Started.
d. Open the Windows Task Manager and verify that the following dlfmprocesses are running:
dlfm_ar_ag.exedlfm_ar_ag.exedlfm_archived.exedlfm_cmgrd.exedlfm_delgrpd.exedlfm_gcd.exedlfm_mon_wd.exedlfm_upcalld.exedlfm_wd.exe
2. Ensure that the drive you reserved for the Data Links server is under thecontrol of a DLFF by entering the dlff list command. This command willlist all the drives that are under the control of a DLFF.For our example, this command should return the following output:
LogicalDrives = D:
If there are no drives listed by the dlff list command, the DLFF will takeover the control of the drive by entering the following command:
dlff add drivename
3. Register the share name of a drive that is under the control of a DLFF byentering the following command:
dlff add d:dlfm add_prefix \sharename
30 Data Links Manager Quick Beginnings

where sharename represents the shared name of the drive that is under thecontrol of a DLFF, and d: represents the drive that is under the control ofthe DLFF.
For example, register the Data Links server to use the DLFF on the ddrive(which is the share name of the d:\ drive) by entering the followingcommand:
dlfm add_prefix \ddrive
4. Log out.
Now you can register the DB2 database with the Data Links File Manager.
Related tasks:
v “Verifying the DB2 Data Links Manager installation (Windows)” on page 27v “Registering the Data Links server with the DB2 database (Windows)” on
page 35v “Registering the DB2 database with the Data Links File Manager
(Windows)” on page 31v “Creating a sample file for DB2 Data Links Manager (Windows)” on page
33
Related reference:
v “dlfm add_prefix command” in the DB2 Data Links Manager AdministrationGuide and Reference
v “dlff add command (Windows operating system)” in the DB2 Data LinksManager Administration Guide and Reference
v “dlff list command (Windows operating system)” in the DB2 Data LinksManager Administration Guide and Reference
Registering the DB2 database with the Data Links File Manager(Windows)
Registering the DB2 database with the Data Links File Manager is part of thelarger task of Creating a test environment on the DB2 Data Links server.
Prerequisites:
Log on to the system as the DB2 Data Links Manager Administrator.
Procedure:
To register a new database with the Data Links File Manager:1. Register the remote DB2 UDB database where the DATALINK type
column was defined by entering the following command:dlfm add_db database instance hostname
Chapter 2. Installing Data Links Manager on Windows 31

where:v database represents the database alias name of the remote database.v instance represents the instance where database resides.v hostname represents the hostname of the DB2 UDB server where database
resides.
The following command will register a database called STAFF, whichresides in the VALIDATE instance on a DB2 UDB server with a hostname ofdb2server.services.com:
dlfm add_db staff validate db2server.services.com
Do not register the DLFM_DB when you run this command. The DLFM_DBis a local database that is used to keep track of files that are under thecontrol of the Data Links File Manager.
To list the registered database:dlfm list registered databases
2. Log out.
Now you can authorize a DB2 user account to link a file .
Related concepts:
v “Before you install DB2 Data Links Manager (Windows)” on page 17
Related tasks:
v “Verifying the DB2 Data Links Manager installation (Windows)” on page 27v “Creating a sample file for DB2 Data Links Manager (Windows)” on page
33v “Authorizing a DB2 user account to link a file (Windows)” on page 32
Related reference:
v “dlfm add_db command” in the DB2 Data Links Manager AdministrationGuide and Reference
v “dlfm list registered databases command” in the DB2 Data Links ManagerAdministration Guide and Reference
Authorizing a DB2 user account to link a file (Windows)Authorizing a DB2 user account to link a file is part of the larger task of Creatinga test environment on the DB2 Data Links server.
Prerequisites:
Log on to the system as the DB2 Data Links Manager Administrator.
32 Data Links Manager Quick Beginnings

Procedure:
To authorize a DB2 user account to link a file in the example \ddrive\picturesdirectory:1. Run
dlfm grant link privilege on dir \ddrive\pictures touser db2-username for db staff inst validatenode db2server.services.com
where db2-username must be the user account with which you log on whenyou perform the link operation (for example, using the SQL INSERTstatement) on DB2.
2. To verify that your dlfm grant command was correctly specified:dlfm list registered users for directory \ddrive\pictures on
db staff inst validate node db2server.services.com
This command should return the db2-username that was specified above.3. Log out.
By default, link security controls are ENABLED during installation. Use thedlfm set link security off command to disable this feature and the dlfm setlink security on command to re-enable it.
Your next step is to create a sample file.
Related tasks:
v “Registering the DB2 database with the Data Links File Manager(Windows)” on page 31
v “Creating a sample file for DB2 Data Links Manager (Windows)” on page33
Related reference:
v “dlfm grant command” in the DB2 Data Links Manager Administration Guideand Reference
v “dlfm set link security command” in the DB2 Data Links ManagerAdministration Guide and Reference
Creating a sample file for DB2 Data Links Manager (Windows)Creating a sample file for DB2 Data Links Manager is part of the larger task ofCreating a test environment on the DB2 Data Links server.
Prerequisites:
Log on to the system with any user account who is neither a DB2 Data LinksManager Administrator nor the DLFM user account created during
Chapter 2. Installing Data Links Manager on Windows 33

installation for use by the Data Links File Manager. The DLFM user account isdifferent from the DB2 Data Links Manager Administrator user account.
Procedure:
To create a sample file:1. Create a directory on the drive that is under the control of a Data Links
Filesystem Filter, to store files to be controlled by a DB2 server, by enteringthe following command:
md x:\directory_name
wherev x: represents the shared drive that is under the control of a DLFF.v directory_name represents the name of the directory that you want to
create.
The DLFM user account should never be the owner of any files ordirectories in a shared drive under the control of a DLFF. Linking READPERMISSION DB files involves changing the ownership of such files to theDLFM user account. As such, the DLFM user account should not be usedto manually create files in a shared drive under the control of a DLFF. Inour example, we will create a directory called pictures on the d: drive byentering the following commands:
d:cd \md pictures
The directory you create must have the Access Type set to Full Control.This is the default for any new directory that you create on Windows.
If the directory that you have created does not grant all members of theEVERYONE group Full Control, enter the following command:
cacls d:\pictures /p everyone:f
2. Create a sample file called psmith.bmp in the d:\pictures directory, to bemanaged by the Data Links File Manager, by entering the followingcommand:
echo "This is a picture of Paul Smith" > d:\pictures\psmith.bmp
3. Log out.
The sample file psmith.bmp is a text file, not a bitmap as the .bmp extensionimplies. For the purpose of verifying your installation, this file represents anemployee’s picture that will be inserted into a table that was defined with theDATALINKS data type.
34 Data Links Manager Quick Beginnings

Now you can register the Data Links server with the DB2 database.
Related tasks:
v “Verifying the sample file is accessible (Windows)” on page 37v “Registering the DB2 database with the Data Links File Manager
(Windows)” on page 31v “Registering the drive with the Data Links Filesystem Filter (Windows)” on
page 30
Registering the Data Links server with the DB2 database (Windows)Registering the Data Links server with the DB2 database is part of the larger taskof Verifying the DB2 Data Links Manager installation.
Prerequisites:
Log on to the DB2 server with a valid DB2 user account that has SystemAdministrative (SYSADM) authority on the VALIDATE instance that youcreated. By default, any user account that belongs to the Local Administratorsgroup has SYSADM authority on an instance.
Procedure:
To register the Data Links server with the remote DB2 UDB database wherethe DATALINK type column was defined earlier:1. Enter the following command:
db2 get instance
This command should return the following output:The current database manager instance is: VALIDATE
If you do not receive this output, enter the following commands:set DB2INSTANCE=VALIDATEdb2 get instance
2. Start the VALIDATE instance by entering the db2start command.3. Register a Data Links server that will control the files that are linked by a
DATALINK type column:db2 "add datalinks manager for database database_alias
using node hostname port port_number"
where:v database_alias represents the database alias name of the databasev hostname represents the fully qualified hostname of the Data Links
server
Chapter 2. Installing Data Links Manager on Windows 35

v port_number represents the port number that you have reserved forcommunications between the Data Links server and the DB2 server. Youspecified this port number during the installation of DB2 Data LinksManager.
You should have already registered the database on the DLFM side as wellas having started up the DLFM service. Otherwise, this command will fail.
For our example, enter the following command:db2 "add datalinks manager for database staff using node dlmserver.services.com port 50100"
4. Connect to the STAFF database by entering the following command:db2 connect to staff
5. Insert an entry into the EMPLOYEE table that you created by entering thefollowing command:
db2 "insert into employee values (001,’Paul’,’Smith’,dlvalue(’unc:\\unc_name\controlled_file’))"
where:v unc_name represents the fully qualified location of the file that is under
the control of a Data Links Filesystem Filter on the Data Links server.v controlled_file represents the filename of the file that you want to control
on the Data Links server.
For our example, enter the following commanddb2 "insert into employee values (001,’Paul’,’Smith’,==>
dlvalue(’unc:\\dlmserver.services.com\ddrive\pictures\psmith.bmp’))"
6. Log out.
Now you can verify the sample file is controlled by the DLFF.
Related tasks:
v “Verifying the sample file is controlled by DLFF (Windows)” on page 36v “Registering the drive with the Data Links Filesystem Filter (Windows)” on
page 30
Verifying the sample file is controlled by DLFF (Windows)Verifying the sample file is controlled by DLFF is part of the larger task ofVerifying the DB2 Data Links Manager installation.
Prerequisites:
Log on to the system using any user account other than the DB2 Data LinksManager Administrator or the Data Links File Manager (DLFM) user account.
Procedure:
36 Data Links Manager Quick Beginnings

To verify that the psmith.bmp sample file we created earlier is under thecontrol of the Data Links Filesystem Filter (DLFF):1. Enter the following command:
type \\unc_name\controlled_file
where:v unc_name represents the fully qualified location of the file that is under
the control of a DLFF on the Data Links Manager server.v controlled_file represents the filename of the file that that is under the
control of a DLFF on the Data Links Manager server.
For our example, enter the following command:type \\dlmserver\ddrive\pictures\psmith.bmp
If the file is being controlled by the DLFM, you will see output similar tothe following:
\\dlmserver\ddrive\pictures\psmith.bmpAccess is denied.
2. Log out.
Now you can verify the sample file is accessible.
Related tasks:
v “Registering the Data Links server with the DB2 database (Windows)” onpage 35
v “Verifying the sample file is accessible (Windows)” on page 37
Verifying the sample file is accessible (Windows)
Verifying the sample file is accessible is part of the larger task of Verifying the DB2Data Links Manager installation on Windows. You will now verify that thepsmith.bmp sample file can be accessed while it is under the control of theData Links File Manager.
Prerequisites:
Log on to the system with a valid DB2 user account that has SystemAdministrative (SYSADM) authority on the VALIDATE instance that youcreated. By default, any user account that belongs to the Local Administratorsgroup has SYSADM authority on an instance.
Procedure:
To verify the sample file is accessible:
Chapter 2. Installing Data Links Manager on Windows 37

1. Ensure that the VALIDATE instance is the current instance by entering thefollowing command:
db2 get instance
This command should return the following output:The current database manager instance is: VALIDATE
If you do not receive this output, enter the following commands:set DB2INSTANCE=VALIDATEdb2 get instance
2. Start the VALIDATE instance by entering the db2start command.3. Connect to the STAFF database by entering the following command:
db2 connect to staff
4. Select the controlled file by issuing an SQL SELECT statement.For our example, enter the following command:
db2 "select dlurlpath(picture) from employee where lname = ’Smith’"
This command will return the full pathname with an access token of theform:
unc_name\access_token;controlled_filename
where:v unc_name represents the fully qualified location of the file that is under
the control of a Data Links Filesystem Filter on the Data Links server.v access_token represents a message authentication code (MAC) and is
required in order to read the file. The access token is generated by thedatabase manager and is valid for a limited amount of time determinedby the dl_expint database configuration parameter.
v controlled_filename represents the name of the file that is under thecontrol of a Data Links Filesystem Filter.
For our example, the access token that you receive will be similar to thefollowing:
\ddrive\pictures\HVJ5NXGC0WQ.I5KKB6;psmith.bmp
A valid access token is required to read this file on the Data Links server.
Note: By default, this access token is only valid for 60 seconds. Thismeans that once you enter this command, you have only 60 secondsto complete the remaining steps in this section. You can increase theaccess token expiry time by updating the dl_expint databaseconfiguration parameter.
38 Data Links Manager Quick Beginnings

To change the default expiration time for an access token to 10minutes (the value is entered in seconds), enter the followingcommands:
db2 update db cfg for staff using dl_expint 600db2 terminatedb2 connect to staff
If you change a setting for any database configuration parameter,you must always reconnect to the database for the changes to takeeffect.
5. Log out.
Now you can view the sample file.
Related tasks:
v “Verifying the sample file is controlled by DLFF (Windows)” on page 36v “Viewing the sample file (Windows)” on page 39
Related reference:
v “Configuration parameters summary” in the Administration Guide:Performance
Viewing the sample file (Windows)Viewing the sample file is part of the larger task of Verifying the DB2 Data LinksManager installation on Windows.
Prerequisites:
Log on to the system using any user account other than the DB2 Data LinksManager Administrator or the DLFM user account.
Procedure:
To view the sample file:1. Verify that you can access the file that is under the control of the Data
Links File Manager.For our example, enter the following command:
type "\\dlmserver\ddrive\pictures\access_token;psmith.bmp"
where access_token represents the encrypted key.
You should receive the following output from this command:"This is a picture of Paul Smith."
Chapter 2. Installing Data Links Manager on Windows 39

If you did not receive an error, you have access to this file and you haveinstalled and configured DB2 Data Links Manager correctly.
Related tasks:
v “Verifying the sample file is accessible (Windows)” on page 37
40 Data Links Manager Quick Beginnings

Chapter 3. Installing Data Links Manager on AIX
Before you install DB2 Data Links Manager (AIX)
Read this information before installing DB2® Data Links Manager. Theinformation is common to installations in both JFS and DCE-DFSenvironments, including the Tivoli® Space Manager FSM extension to JFS.Specific JFS and DCE-DFS information have their own topics.
Installing DB2 Data Links using the DB2 Setup wizard or SMITIt is strongly recommended that you use the DB2 Setup wizard if youare installing DB2 Data Links Manager in JFS or DCE-DFSenvironments. The DB2 Setup wizard performs almost all Data LinksManager setup and configuration tasks for you. If you want to installDB2 Data Links Manager using SMIT or db2_install, you will have toset up and configure your Data Links Manager system manually.
AIX® 5L Version 5.1 supportThe Data Links File Manager (DLFM) and Data Links Filesystem Filter(DLFF) components are now fully supported on AIX 5L™ Version 5.1.All tools and instructions associated with Data Links Manager andpreviously supported on prior releases of AIX are fully supported andapplicable on AIX 5L Version 5.1.
Disk space requirementsEnsure that there is at least 85 MB of free disk space in the /usr/optdirectory. To check available free disk space, enter the df -k /usr/optcommand.
Memory requirementsEnsure that there is at least 256 MB of memory available to yoursystem. To check available memory, enter the lsattr -l sys0 -E -arealmem command.
Migrating from previous versionsDifferent levels of DB2 Data Links Manager instances cannot exist onthe same machine. If you have a pre-Version 8.1 Data Links instanceon your system, you must migrate the instance to the Version 8.1format using the db2imigr command.
Registry variables offer more function and flexibility thanenvironment variables. However, because of this, it is possible thatmigration will not be performed exactly as expected. The registryvariables can be checked using the db2set command after migration.
© Copyright IBM Corp. 1998-2002 41

Data Links server securityIn releases prior to DB2 Data Links Version 8.1, there were no securitycontrols on linking a file. If you migrated from a previous release, youwill be given the option at DLFM migration time to enable thesesecurity controls on their existing DLFM Server(s).
Migrating from DB2 Data Links Version 6.1, 7.1, or 7.2 to DB2 Data LinksManager Version 8
If you are migrating from DB2 Data Links Manager Version 6.1, 7.1, or7.2 to DB2 Data Links Manager Version 8.1, you should perform thefollowing steps:1. Prepare your DB2 and DLFM databases for migration. For
example, you may wish to backup your existing databases.2. Install DB2 Version 8 on your DB2 server and Data Links Manager
server machines.3. As DLFM, run the /usr/opt/db2_08_01/adm/db2dlmmg command.
When you migrate to DB2 Data Links Manager Version 8, thefollowing environment variables will be converted to DB2 registryvariables:
DLFM_INSTALL_PATHDLFM_PORTDLFM_LOG_LEVELDB2_RR_TO_RSDLFM_BACKUP_DIR_NAME (1)
DLFM_BACKUP_TARGET (2)
DLFM_BACKUP_TARGET_LIBRARY (3)
Notes:
1. This variable is used only if a local file system is the backuptarget.
2. Used to indicate the type of backup target used. Possible valuesfor this variable are LOCAL, TSM, or XBSA.
3. Used to indicate the XBSA support code library only if theDLFM_BACKUP_TARGET is set to XBSA. The support codelibrary must be fully qualified and must include the shared objectname, for example /usr/lpp/Legato/libxdb2.a(bsashr10.o). Thename of the shared object, in this case bsashr10.o, is availablefrom the vendor suppling the XBSA compliant shared library.
TCP/IP port numberYou must have a TCP/IP port available for use by the Data Links FileManager. By default, the DB2 Setup wizard will generate a value foryou. You can use this value or provide your own. You will need toknow this port number to verify the installation.
42 Data Links Manager Quick Beginnings

If you want to specify your own port number, review the TCP/IPports that are already in use on a machine by opening the/etc/services file. You will need to specify this port during theinstallation.
Once you have selected a TCP/IP port number for use by the DLFM,the value should not be changed.
Synchronize system clocksEnsure that the system clocks on the Data Links server and the remoteDB2 server are synchronized and remain synchronized for linked filesin the DATALINKS columns with the READ PERMISSION DB option.Synchronization of clocks is essential for the Data Links token expiryinterval to work correctly. The token expiry interval is a databaseconfiguration parameter that controls how long a selected DATALINKvalue (consisting of a URL with an embedded file authorization token)may be used.
To check the system time and date, enter the date -u command.
For more information on synchronizing system clocks, refer to yourAIX Administration Guide.
Data Links Manager Administrator user IDDuring installation, you are given the option to create the owner ofthe DB2 Data Links instance in the Set user information for the DataLinks installation panel. These installation instructions assume thatyou selected this option and now want to replace it with an existinguser ID.
If you want to specify your own existing user ID, the account youspecify:v Must not have its home directory reside on a file system that is
using a Data Links Filesystem Filter.v Must have a username that is eight characters or less.v Must not be a user ID with root authority.
To create a user ID for use as the DB2 Data Links ManagerAdministrator:1. Log in as a user ID with root authority.2. Create the group for the DB2 Data Links Administrator (for
example, dlfmgrp):mkgroup dlfmgrp
3. Create the write group (for example, dlfmxgrp):mkgroup dlfmxgrp
Chapter 3. Installing Data Links Manager on AIX 43

When a file is linked to a DATALINK column defined with WRITEPERMISSION ADMIN, the file will be changed to be owned bythis group.
The DLFMXGRP group is created for use with the update in placefunctionality for any file linked to a DATALINK column definedwith WRITE PERMISSION ADMIN. The DLFMGRP group is alsocreated. You should not add any user IDs to these groups; DLFMshould be the only user ID to create a file that’s owned by theDLFM.
4. Create the username for the DB2 Data Links Administrator (forexample, dlfm), using the /home/dlfm directory as the homedirectory of the Data Links Administrator:
mkuser pgrp=’dlfmgrp’ groups=’dlfmgrp dlfmxgrp’ home=’/home/dlfm’ dlfm
5. Assign a password to this username by entering the passwd usercommand, where user is the username that you created.
The DB2 Data Links Manager Administrator user ID is not only forthe purpose of administrating the Data Links File Manager, but also toown the DLFM_DB and files that are in a linked state. The DB2 DataLinks Manager Administrator user ID should never own directorieson a file system that is under the control of a Data Links FilesystemFilter (DLFF). The DB2 Data Links Manager Administrator user IDshould only be used to administer the Data Links File Manager(DLFM). You can have the DB2 Data Links Manager Administratoruser ID as the owner of files, but only READ PERMISSION DB linkedfiles. You should not manually create files with the DB2 Data LinksManager Administrator user ID as the owner.
If you create a different username by changing the default values, youmust ensure that the username you specify is eight characters or less.
Determine hostnameYou must determine the names of each of your DB2 and Data Linksservers. You will need to know these hostnames to verify theinstallation. When connecting to a Data Links File Manager (DLFM),the DB2 UDB server internally sends the following information to theDLFM:v Database namev Instance namev Hostname
The DLFM then compares this information with its internal tables todetermine whether the connection should be allowed. It will allow theconnection only if this combination of database name, instance name,and hostname has been registered with it, using the dlfm add_db
44 Data Links Manager Quick Beginnings

command. The hostname that is used in the dlfm add_db commandmust exactly match the hostname that is internally sent by the DB2UDB server.
Use the exact hostname that is obtained as follows:1. Enter the hostname command on your DB2 server. For example,
this command might return db2server.2. Enter the host db2server command, where db2server represents the
name obtained in the previous step. This command should returnoutput similar to the following:
db2server.services.com is 9.11.302.341, Aliases: db2server
Use db2server.services.com for the hostname when registering a DB2UDB database using the dlfm add_db command. The DB2 server’sinternal connections to the DLFM will fail if any other aliases are usedin the dlfm add_db command.
A Data Links server is registered to a DB2 database using the DB2add datalinks manager for database database_alias using nodehostname port port_number command.
The hostname is the name of the Data Links server. Any valid alias ofthe Data Links server can be used in this command. DATALINKvalues that are references to this Data Links server must specify thehostname in the URL value; that is, the exact name that was used inthe add datalinks manager command must be used when assigningURL values to DATALINK columns. Using a different alias will causethe SQL statement to fail.
Tivoli Space Manager integration with Data LinksDB2 Data Links Manager allows you to take advantage of thefunctionality of Tivoli Space Manager. The Tivoli Space ManagerHierarchical Storage Manager (HSM) client program automaticallymigrates eligible files to secondary storage to maintain specific levelsof free space on local file systems. It automatically recalls migratedfiles when they are accessed, and it permits user IDs to migrate andrecall specific files.
The prerequisite for this functionality is Tivoli Space Manager Version4.2.
This feature benefits customers who have file systems with large filesthat are required to be moved to secondary storage periodically, andin which the space of the file system needs to be managed on aregular basis. For many customers, Tivoli Space Manager provides themeans to manage their secondary storage. DB2 Data Links Manager’ssupport of Tivoli Space Manager provides flexibility in managing the
Chapter 3. Installing Data Links Manager on AIX 45

space for DATALINK files. Rather than pre-allocating enough storagein the DB2 Data Links Manager file system for all files that may bestored there, Tivoli Space Manager allows allocations of the DataLinks-managed file system to be adjusted over a period of timewithout the risk of inadvertently filling up the file system duringnormal use.
Data Links replicationData Links Manager Version 8.1 introduces two new registryvariables, DLFM_START_ASNCOPYD and DLFM_ASNCOPYD_PORT.During installation, you will be prompted to enable the Data LinksManager Replication daemon. If you plan to use Data LinksReplication, you should enable the Replication daemon during theinstallation. You can also enable it after installation by setting theregistry variables (DLFM_START_ASNCOPYD andDLFM_ASNCOPYD_PORT) and restarting the DLFM.
Depending on the file system (JFS or DCE-DFS) you plan to use with yourDB2 Data Links Manager solution, there are additional installationconsiderations you should take into account before you begin installing DB2Data Links Manager on your AIX system.
Related concepts:
v “Actions performed by the DB2 Setup wizard (AIX)” on page 53v “Installation considerations in DCE-DFS environments (AIX)” on page 47v “Installation considerations in JFS environments (AIX)” on page 47v “Installation overview for DB2 servers (Windows)” in the Quick Beginnings
for DB2 Servers
v “Introduction to Data Links Manager security” in the DB2 Data LinksManager Administration Guide and Reference
Related tasks:
v “Verifying the installation of DB2 Data Links Manager (AIX)” on page 63v “Installing DB2 Data Links manually using the db2_install command (AIX)”
on page 51v “Installing DB2 Data Links Manager using the DB2 Setup wizard (AIX)” on
page 52v “Migrating databases” in the Quick Beginnings for DB2 Servers
v “Migrating DB2 (UNIX)” in the Quick Beginnings for DB2 Servers
v “Enabling the Data Links Manager Replication Daemon” in the Post V8 GA
46 Data Links Manager Quick Beginnings

Installation considerations in JFS environments (AIX)
If you plan to deploy DB2® Data Links Manager in a Journaled File System(JFS) environment, you should also take the following information intoconsideration:
Operating system levelEnsure that you are running AIX® Version 4.3.3 or later. To check thelevel of the operating system, enter the oslevel command.
Version levels of DB2 Data Links and DB2 Universal Database™
DB2 Universal Database and DB2 Data Links Manager can be anycombination of Version 6.1, 7.1, 7.2, and 8.1. For example, DB2 can beat Version 6.1 and Data Links Manager can be at Version 8.1. To checkthe version of DB2 that resides on a workstation, enter the db2levelcommand.
If DB2 is at the higher version, such as Version 8.1, the Data LinksManager features introduced in Version 8.1 will not be available whenyou connect to a Data Links Manager at Version 6 or 7. You willreceive an SQL error if you attempt to use the Version 8 features.
Disk space requirements for DB2 Data Links Manager AdministratorEnsure that there is at least 70 MB of free disk space in the homedirectory where the DB2 Data Links Manager Administrator’s homedirectory will reside. To check available free disk space, enter the df-k INSTHOME command, where INSTHOME represents the homedirectory of the DB2 Data Links Manager Administrator user ID.
Related concepts:
v “Before you install DB2 Data Links Manager (AIX)” on page 41
Related tasks:
v “Installing DB2 Data Links manually using the db2_install command (AIX)”on page 51
v “Installing DB2 Data Links Manager using the DB2 Setup wizard (AIX)” onpage 52
Installation considerations in DCE-DFS environments (AIX)
DB2® Data Links Manager supports linked files stored using Transarc’s DCEDistributed File System (DCE-DFS) file server Version 3.1.
If you plan to deploy DB2 Data Links Manager in a DCE-DFS environment,you should also take the following information into consideration:
Chapter 3. Installing Data Links Manager on AIX 47

Installation prerequisitesDCE-DFS Version 3.1 must be installed on your system before youinstall DB2 Data Links Manager. DCE-DFS Version 3.1 requires AIX®
4.3.3 or later. Also, ensure that the DFS™ Storage ManagementRuntime (dfs.sm.rte) is installed.
A DFS Client Version 3.1 must be installed on any DB2 server whichalso uses ADD DATALINKS MANAGER to register a DCE-DFS cell.Use of the DCE slim client is not supported on the DB2 server. TheDFS Client must be running before you install the Data LinksManager.
You must also install either an e-fix for DFS 3.1, or PTF set 1 when itbecomes available. The e-fix is available from:http://www.transarc.com/Support/dfs/
DCE identityRequest that your cell administrator create a new DCE identity whichwill be used by the Data Links Manager Administrator. Do not use anexisting identity. This identity, which involves creating a new DCEgroup and new DCE user ID, will also own any READ PERMISSIONDB files on the DFS nodes. This group ID and user ID should not beused for any other purpose. Also, you should ask your celladministrator to create /:/DataLinks.
Operating system levelEnsure that you are running AIX Version 4.3.3 or later. To check thelevel of the operating system, enter the oslevel command.
Version levels of DB2 Data Links and DB2 Universal Database™
If DB2 Universal Database is already installed on any machine thatwill participate in your Data Links environment, ensure that theversion is DB2 Universal Database Version 7.1, Version 7.2, or Version8.1. For DCE-DFS environments, you can combine DB2 Version 7.1,Version 7.2, or Version 8.1 with Data Links Version 7.1, Version 7.2, orVersion 8.1.
DCE-DFS functional restrictions
v DB2 Universal Database is restricted to linking to files stored in oneDCE cell.
v DCE-DFS and JFS Data Links Managers cannot coexist on the samesystem.
v Files on a DCE-DFS file server must be stored in a DMLFS, whichis an LFS that has been DM-enabled using the dmaggr command.
v A DB2 Data Links Manager must be installed at each node onwhich a DMLFS fileset that you want to monitor physically resides.
v Fileset move and replication are not currently supported.
48 Data Links Manager Quick Beginnings

v In the DCE cell, the junction to the DFS filespace must be/.../cellname/fs .
Database registration of Data Links serversA DB2 database on an AIX platform can also register Data Linksservers running in the DCE-DFS environment. However, this databasecannot, at the same time, register Data Links servers running in nativeJFS or NTFS environments. For example, if the Data Links server isrunning on Windows® NT, the DB2 client that accesses the files mustbe running on Windows NT® as well. If the Data Links server isrunning on AIX, the DB2 client that accesses the files must be runningon AIX.
Data Links File Manager ″servers″ and ″clients″In DCE-DFS environments, two separate Data Links components canbe installed: the Data Links Manager and the DB2 Data Links DFSClient Enabler. The Data Links server must be installed before any ofthe Data Links clients.
The Data Links Manager can be set up as a server or a client. In aDCE cell, one node will contain the DLFM_DB and is known as theDLFM server node. All other nodes on which Data Links Manager isinstalled must be configured as DLFM client nodes.
The DB2 Data Links DFS Client Enabler, also known as the DLFMCache Manager or DLFM-CM, is installed on DB2 Universal Databaseclients and is needed for any DB2 client using a DATALINK data typethat has been set up as READ PERMISSION DB. The DFS ClientEnabler should not be installed as part of the Data Links Manager.
Backup directoryIf the backup method is to a local file system, the directory must be aDFS file set. Ensure that this DFS file set has been created by a DFSadministrator. This should not be a DMLFS file set.
Additional documentationAdditional documentation is available on the Transarc web sitehttp://www.transarc.ibm.com/Library/documentation/ for DFS 3.1.
Related concepts:
v “DFS Client Enabler installation prerequisites (AIX)” on page 79
Related tasks:
v “Configuring DFS Client Enablers (AIX)” on page 81v “Setting up the DFS disk archive directory after DCE-DFS installation
(AIX)” on page 61v “Installing DFS Client Enablers (AIX)” on page 80
Chapter 3. Installing Data Links Manager on AIX 49

Tivoli Space Manager Hierarchical Storage Manager (AIX)
Adding both Data Links and HSM support to a file system
When registering a file system with Hierarchical Storage Management(HSM), register it with HSM first and then with the Data Links FileManager.1. Ensure that the file system is already mounted as JFS.2. Register with HSM, using the command dsmmigfs add /fs.3. Register with DLM, using the command dlfmfsmd /fs.
Data Links support for a file system is reflected in the stanza in/etc/filesystems for an HSM file system via the following entries:
vfs = dlfsmount = falseoptions = rw,Basefs=fsmnodename = -
Adding Data Links support to an existing HSM file systemRegister with DLM, using the command dlfmfsmd /fs.
Adding HSM support to an existing Data Links file system
1. Data Links support, using the command dlfmfsmd -j /fs.2. Register with HSM, using the command dsmmigfs add /fs.3. Register with DLM, using the command dlfmfsmd /fs.
Removing Data Links support from a Data Links-HSM file systemRemove Data Links support, using the command dlfmfsmd -j /fs.
Removing HSM support from a Data Links-HSM file system
1. Remove HSM support, using the command dsmmigfs remove /fs.2. Remove Data Links support, dlfmfsmd -j /fs.3. Register with DLM, using the command dlfmfsmd /fs.
Removing both Data Links and HSM support from a Data Links-HSM filesystem
1. Remove HSM support, using the command dsmmigfs remove /fs.2. Remove Data Links support, using the command dlfmfsmd -j /fs.
Restrictions and limitations
v This functionality is currently supported on AIX® only.v Selective migration (dsmmigrate) and recall of a READ
PERMISSION DB linked file should only be done by a user ID withroot authority. Selective migration can be performed only by the fileowner which in the case of READ PERMISSION DB files is theData Links Manager Administrator (dlfm, by default).
50 Data Links Manager Quick Beginnings

To access such files a token is required from the host database side.The only user ID who does not require a token is the root user ID.It will be easier for a root user ID to perform the selective migrateand recall on READ PERMISSION DB files. The dlfm user ID canmigrate a READ PERMISSION DB file using a valid token only thefirst time.The second time migration is attempted (after a recall), theoperation will fail with error message ″ANS1028S Internal programerror. Please see your service representative.″ Running dsmmigrateon a READ PERMISSION DB file by a non-root user ID will notsucceed. This limitation is minor as it is typically the administratorswho will access the files on the file server.
v stat and statfs system calls will show VFS-type as fsm rather thandlfs, although dlfs is mounted over fsm. The above behavior is forthe normal functionality of dsmrecalld daemons, which performsstatfs on the file system to check if its VFS-type is fsm or not. Youcan also use the lsfs command to view the filesystem
v Command ″dsmls″ does not show any output if a file having theminimum inode number is READ PERMISSION DB linked. Thedsmls command is similar to the ls command and lists the filesbeing administered by TSM. No user action is required.
Related concepts:
v “Before you install DB2 Data Links Manager (AIX)” on page 41
Related reference:
v “Tivoli Storage Manager” in the Data Recovery and High Availability Guideand Reference
Installing DB2 Data Links manually using the db2_install command (AIX)
The DB2 Setup wizard is the recommended method for installing all DB2products on UNIX-based operating systems. This wizard can perform all ofthe tasks required to install DB2 Data Links Manager. However, if you wantmore control of the installation process, you can manually install DB2 DataLinks Manager using the db2_install command.
Prerequisites:
Log in as a user ID with root authority.
Procedure:
To install DB2 Data Links Manager for AIX using the db2_install command:
Chapter 3. Installing Data Links Manager on AIX 51
1. Insert and mount the appropriate CD-ROM.
Note: If you are mounting the CD-ROM drive from a remote system usingNFS, the CD-ROM file system on the remote machine must beexported with root access. You must also mount that file systemwith root access on the local machine.
2. Run the db2_install command from the directory where the CD-ROM ismounted.The db2_install command prompts for the following to be installed, andfor the base directory where the product files are to be installed:
DB2.DLMDB2 Data Links Manager for AIX
The command displays the following prompt: Specify one or more ofthe keywords separated by spaces.
3. Type the keyword of the product to be installed when prompted.4. The files will be installed in the /usr/opt/db2_08_01/ directory.5. Enter Yes to start the product installation.
Related concepts:
v “Actions performed by the DB2 Setup wizard (AIX)” on page 53v “Before you install DB2 Data Links Manager (AIX)” on page 41
Related tasks:
v “Verifying the installation of DB2 Data Links Manager (AIX)” on page 63v “Installing DB2 Data Links Manager using the DB2 Setup wizard (AIX)” on
page 52v “Manual post-installation tasks (AIX)” on page 57
Installing DB2 Data Links Manager using the DB2 Setup wizard (AIX)
The DB2 Setup wizard is the recommended method for installing all DB2products on UNIX-based operating systems. This utility can perform all of thetasks required to install DB2 Data Links Manager. However, if you want morecontrol of the install process, you can manually install DB2 Data LinksManager using the db2_install command.
Prerequisites:
Log in as a user ID with root authority. In DCE-DFS environments, you willalso need to dce_login as the Data Links Manager Administrator user ID.
52 Data Links Manager Quick Beginnings

Procedure:
To install and configure DB2 Data Links Manager using the DB2 Setupwizard:1. Insert and mount your product CD-ROM.2. Change to the directory where the CD-ROM is mounted by entering the
cd /cdrom command where cdrom is the mount point of your productCD-ROM.
3. Ensure that your X display works.4. Enter the ./db2setup command. The Launchpad opens.5. Select Install Products.6. Select the product you want to and are licensed to install. Click Next.7. Follow the on-screen instructions to begin the installation process.
The DB2 Setup wizard automatically generates an installation log in/tmp/db2setup.log. If you want to generate a trace file to record anyinstallation errors in greater detail, enter the./db2setup -t /tmp/trace.outcommand. This generates a trace file in /tmp/trace.out.
If you are installing in a DCE-DFS environment, one DFS file server node willcontain the DLFM_DB and must be set up as the DB2 server for that database.All other nodes on which Data Links Manager is installed must be set up asDB2 clients for the DLFM_DB.
Related concepts:
v “Actions performed by the DB2 Setup wizard (AIX)” on page 53v “Before you install DB2 Data Links Manager (AIX)” on page 41
Related tasks:
v “Verifying the installation of DB2 Data Links Manager (AIX)” on page 63v “Installing DB2 Data Links manually using the db2_install command (AIX)”
on page 51
Actions performed by the DB2 Setup wizard (AIX)
After installation is complete and before you exit the DB2 Setup wizard, youcan select View Log to review the installation process. You can also review the/tmp/db2setup.log file for more detailed information. If you ran the./db2setup -t /tmp/trace.out command to capture any installation errors, youcan review the trace log in /tmp/trace.out.
The following actions are performed by the DB2 Setup wizard:
Chapter 3. Installing Data Links Manager on AIX 53

Installation directoryDB2 Data Links Manager and DB2® Universal Database are installedin the /usr/opt/db2_08_01 directory. DB2 Data Links Manager usesDB2 UDB to maintain logged information for the linked files.
Group and user IDsA group ID (gid) and user ID (uid) are created for the DB2 Data LinksManager Administrator, if you selected to do so during installation. Inthe DCE-DFS environment, ensure that the uid, user name, gid, andgroup name match the DCE identity which was created for DataLinks Manager Administrator.
Instance creationAn instance for the Data Link File Manager is created. The name ofthe instance is the same as the user name for the instance owninguser. By default a new user named dlfm will be created to use as theinstance-owning user for the Data Links instance.
Registry variablesThe following registry variables are set (only the most significantvariables set during install are listed here):
DLFM_PORT=port_numberDLFM_LOG_LEVEL=LOG_ERRDB2_RR_TO_RS=ONDB2_HASH_JOIN=ONDLFM_INSTALL_PATH=/home/instance/sqllib/bin
//where instance is the Data Links Administrator IDDLFM_INSTANCE_NAME=instance_nameDB2INSTANCE=instance_nameDLFM_BACKUP_DIR_NAME=$HOME/dlfmbackup //JFS onlyDLFM_BACKUP_DIR_NAME=/:/dlfmbackup //DCE-DFS onlyDLFM_BACKUP_TARGET=LOCAL
//You have three choices: LOCAL, TSM, and XBSADLFM_FS_ENVIRONMENT=file_system
//choices are: NATIVE and DFS™
DLFM_START_ASNCOPYD=NO //or YES if you enablethe Data Links Manager Replication Daemon
DLFM_ASNCOPYD_PORT=port_number //specified during the installDLFM_NUM_ARCHIVE_SUBSYSTEMS=2
where:v port_number represents the port number reserved for the Data Links
File Manager.v instance_name represents the name of the Data Links File Manager
instance.v file_system represents NATIVE in JFS environments or DFS in
DCE-DFS environments. The default setting is NATIVE.
You can use the db2set –all command to view all of the set variables.
54 Data Links Manager Quick Beginnings
PATH variablesThe following variables are set in the DB2 Data Links ManagerAdministrator’s db2profile or db2cshrc script file:
(for bash, Bourne, or Korn shell)export PATH=$PATH:$HOME/sqllib/bin:$HOME/sqllib/adm:$HOME/sqllib/misc(for C shell)setenv PATH=${PATH}:${HOME}/sqllib/bin:${HOME}/sqllib/adm:${HOME}/sqllib/misc
To run the DB2 Data Links Manager Administrator’s db2profile ordb2cshrc script file each time this user ID logs on to the system, addthe following entry to the DB2 Data Links Manager Administrator’s.profile script file:
. INSTHOME/sqllib/db2profile (for bash, Bourne, or Korn shell)source INSTHOME/sqllib db2cshrc (for C shell)
where INSTHOME represents the home directory of the DB2 DataLinks Manager Administrator.
Virtual File System numberIn JFS environments, the following entry is added to the /etc/vfs file:
dlfs 12 /usr/opt/db2_08_01/bin/dlfs_mnthlp /usr/opt/db2_08_01/bin/dlfs_fshelper
If the vfs number 12 is already in use, the DB2 Setup wizard willspecify a different number between 8-15 for use by the Virtual FileSystem (VFS).
DB2 database DLFM_DB createdIn DCE-DFS environments, a DLFM_DB database is not created on theDLFM server node and must be created as a post-installation step. Onthe DLFM client nodes, a remote database catalog entry to theDLFM_DB is created.
In JFS environments, a DLFM_DB database is created on the nodecontaining DB2 Data Links Manager.
DCE-DFS pre-start registration for DMAPPIn a DCE-DFS environment, a data manager application (DMAPP) isinstalled. This DMAPP prevents file renaming and deletion in theDLFS file system. DB2 Data Links Manager can start only if theDMAPP is up and running, and the DMAPP has to be started as partof DFS startup. This is accomplished by installing a DFS prestartscript.
The DB2 Setup wizard:1. Checks if /opt/dcelocal/tcl/user_cmd.tcl exists. If it does not
exist, the DB2 Setup wizard creates it.2. Adds commands to /opt/dcelocal/tcl/user_cmd.tcl to ensure
that the DMAPP is started when DFS is started.
Chapter 3. Installing Data Links Manager on AIX 55
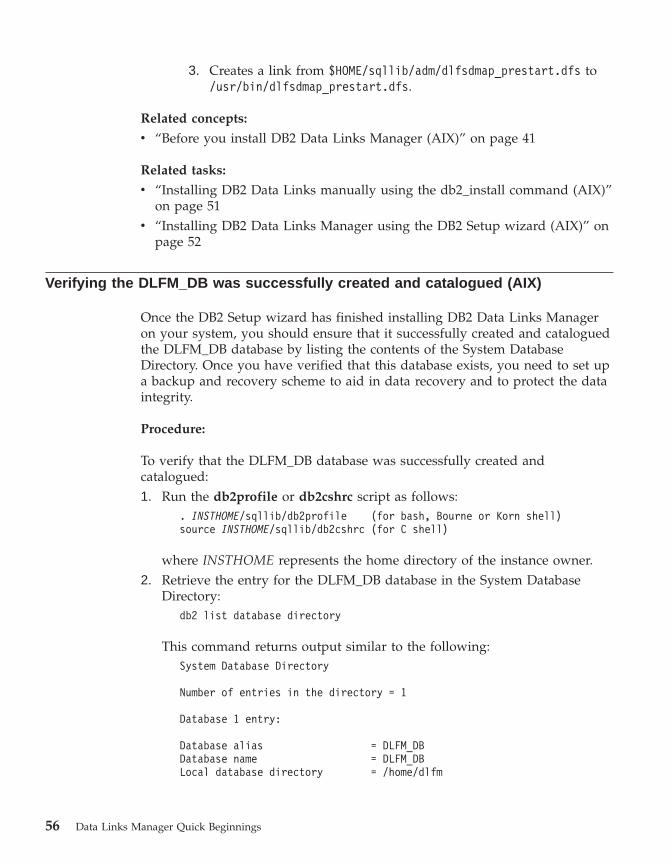
3. Creates a link from $HOME/sqllib/adm/dlfsdmap_prestart.dfs to/usr/bin/dlfsdmap_prestart.dfs.
Related concepts:
v “Before you install DB2 Data Links Manager (AIX)” on page 41
Related tasks:
v “Installing DB2 Data Links manually using the db2_install command (AIX)”on page 51
v “Installing DB2 Data Links Manager using the DB2 Setup wizard (AIX)” onpage 52
Verifying the DLFM_DB was successfully created and catalogued (AIX)
Once the DB2 Setup wizard has finished installing DB2 Data Links Manageron your system, you should ensure that it successfully created and cataloguedthe DLFM_DB database by listing the contents of the System DatabaseDirectory. Once you have verified that this database exists, you need to set upa backup and recovery scheme to aid in data recovery and to protect the dataintegrity.
Procedure:
To verify that the DLFM_DB database was successfully created andcatalogued:1. Run the db2profile or db2cshrc script as follows:
. INSTHOME/sqllib/db2profile (for bash, Bourne or Korn shell)source INSTHOME/sqllib/db2cshrc (for C shell)
where INSTHOME represents the home directory of the instance owner.2. Retrieve the entry for the DLFM_DB database in the System Database
Directory:db2 list database directory
This command returns output similar to the following:System Database Directory
Number of entries in the directory = 1
Database 1 entry:
Database alias = DLFM_DBDatabase name = DLFM_DBLocal database directory = /home/dlfm
56 Data Links Manager Quick Beginnings

Database release level = 9.00Comment =Directory entry type = Indirect (1)Catalog node number = 0
On the DLFM server node in a DCE-DFS environment, the db2 list databasedirectory command returns output similar to the above example. On DLFMclient nodes, this command returns output similar to the above exampleexcept that Directory entry type is Remote.
Related concepts:
v “Space requirements for log files” in the Administration Guide: Planning
Related tasks:
v “Creating a keytab file (AIX)” on page 62
Manual post-installation tasks (AIX)
After manually installing Data Links Manager, you must perform severaladditional configuration tasks.
Restrictions:
Unless otherwise noted, these tasks apply to Data Links Manager installationsin native JFS and DCE-DFS environments.
Note: In DCE-DFS environments, the following tasks assume you havealready created a DCE identity for use by the Data Links File Manager.The examples below assume that the DLFM username you created isdlfmuser.
Prerequisites:
A user ID with root authority on the DLFM server
Procedure:
To complete your manual DB2 Data Links Manager installation:
For JFS:
1. Run the /usr/opt/db2_08_01/instance/dlfmcrt command to create aDLFM instance.
2. Set the DLFM_PORT registry variable to an unused port numberby entering the following command:
db2set DLFM_PORT=port_number
Chapter 3. Installing Data Links Manager on AIX 57

where port_number is any unused communications port number. Itis recommended that you add this entry to your /etc/services fileso that no other services use this port.
3. Use the dlfmfsmd command to convert your JFS or TSM partitionto DLFS.
For DCE-DFS:
1. Run the /usr/opt/db2_08_01/instance/dlfmcrt command to createa DLFM instance.
2. On the DLFM server and each DLFM client, as the instanceowner, set the DLFM_FS_ENVIRONMENT registry variable toDFS as follows:
db2set DLFM_FS_ENVIRONMENT=DFS
3. On the DLFM server and each DLFM client, set up the diskarchive directory.Consider the following scenario:v Your DCE cellname is dln1.almaden.ibm.com.v You have two nodes in the cell: node1.almaden.ibm.com
(known as node1), and node2.almaden.ibm.com (known asnode2).
v There are two prefixes registered with the DFS File Manager:– /.../dln1.almaden.ibm.com/fs/prfx1. This prefix is native
to node1. The prefix is prfx1. The fileset name is fileset1.– /.../dln1.almaden.ibm.com/fs/prfx2. This prefix is native
to node2. The prefix is prfx2. The fileset name is fileset2.
The archive directory must be a DFS fileset. For example, youmay use /.../dln1.almaden.ibm.com/fs/dlfm_backup/ as yourarchive directory.
In this scenario, you would set the DLFM_BACKUP_DIR_NAMEregistry variable on the DLFM server and each DLFM client asfollows:
db2set DLFM_BACKUP_DIR_NAME=/.../dln1.almaden.ibm.com/fs/dlfm_backup
For files that reside in prfx1, the copy daemon running on node1will make an archive to the/.../dln1.almaden.ibm.com/fs/dlfm_backup/node1/_prfx1/directory. For files in prfx2, the archive will be made to the/.../dln1.almaden.ibm.com/fs/dlfm_backup/node2/_prfx2/directory.
The directories/.../dln1.almaden.ibm.com/fs/dlfm_backup/node* and
58 Data Links Manager Quick Beginnings

/.../dln1.almaden.ibm.com/fs/dlfm_backup/node*/_prfx1/ willbe created when you issue the dlfm start command, below.
4. If you are installing a DLFM server or client, edit the/etc/services files at each node. Add two consecutive portnumbers for the service name, srv_dlfm. For example, if theservice name is datalsrv, you would add datalsrv anddatalsrv_i to /etc/services.
5. Set the DLFM_PORT registry variable to an unused port numberby entering the following command:
db2set DLFM_PORT=port_number
where port_number is any unused communications port number.It is recommended that you add this entry to your /etc/servicesfile so that no other services use this port.
6. If you are installing a DLFM server, dce_login as the Data LinksManager Administrator user ID and run the dlfm server_confsrv_dlfm command, where srv_dlfm is the service name of theData Links Manager server. This will create the dlmnodes.cfg anddlfs.cfg files automatically.The dlmnodes.cfg file contains a header and entries for each node.The header contains the name of the file, version number,number of nodes, entry number of the Data Links Managerserver node, and a checksum. The node entries each contain thenode name, port number, and node type (either server or client).The dlfs.cfg file contains configuration information about the DataLinks Manager Administrator user ID and the DCE cell.
7. Run the dce_login_root command. Then run the dlfm setupcommand. The dce_login_root must be issued before the dlfmsetup command. Run this command on the DLFM server only.
8. If you are installing a DLFM client on a DCE-DFS node, dce_loginas the Data Links Manager Administrator user ID and run thedlfm client_conf srv_dlfm node_alias remote_server command,where:v srv_dlfm represents the service name of the Data Links
Manager client on this node.v node_alias represents the alias to be used for this node.v remote_server represents the name of the Data Links Manager
server node in this DCE cell.
This will automatically add an entry for this node in thedlmnodes.cfg file on the server.
9. If you are installing DLFM clients, edit each client’s/etc/services file. Add two consecutive port numbers for theservice name, srv_dlfm, you specified in the previous step. For
Chapter 3. Installing Data Links Manager on AIX 59

example, if the service name is datalclt, you would adddatalclt and datalclt_i to /etc/services.
10. On the DLFM server, back up all files under /:/Datalinks.11. Register the data manager application (DMAPP) in the DFS
pre-start script as follows:a. Check if /opt/dcelocal/tcl/user_cmd.tcl exists. If it does not
exist, create it.b. Append the following line to /opt/dcelocal/user_cmd.tcl:
set pre_start_dfs "/usr/bin/dlfsdmap_prestart.dfs"
c. Create a link from $HOME/sqllib/adm/dlfsdmap_prestart.dfsto /usr/bin/dlfsdmap_prestart.dfs.
12. Run the dlfm start command on each server. In DCE-DFSenvironments, run this command on each client node as well.
13. Create a keytab file.14. As root, enter the following commands to start the DMAPP:
stop.dfs allstart.dfs all
For more information on creating and administering DCE identities, refer toyour Transarc DCE-DFS product documentation.
To run the DB2 Data Links Manager Administrator’s db2profile or db2cshrcscript file each time this user ID logs on to the system, add the followingentry to the DB2 Data Links Manager Administrator’s .profile script file:
. INSTHOME/sqllib/db2profile (for bash, Bourne, or Korn shell)source INSTHOME/sqllib db2cshrc (for C shell)
where INSTHOME represents the home directory of the DB2 Data LinksManager Administrator.
When you install DB2 Data Links File Manager using the software bundlefeature, the DB2 Product Library (HTML) filesets are not installedautomatically. Also, the DB2 Product Messages, other than in English, are notinstalled. You must install these filesets separately.
Related tasks:
v “Installing DB2 Data Links manually using the db2_install command (AIX)”on page 51
60 Data Links Manager Quick Beginnings

Workarounds in NFS environments (AIX)
This topic describes workarounds to known problems when running DB2®
Data Links Manager for AIX® in NFS environments. These problems areNFS-specific and have nothing to do with DB2 Data Links Manager or DB2Universal Database.
Additional NFS caching issuesTwo different caches are maintained on the NFS client for AIX. TheNFS client maintains a cache with attributes of recently accessed filesand directories. The client also optionally supports a data cache forcaching the content of files on the client.
The attribute caching process sometimes produces an unusualcondition on an NFS client after a READ PERMISSION DB file islinked. User IDs are sometimes able to access a READ PERMISSIONDB file without an access control token if these user IDs are connectedto the machine before the file was linked. Use one of these methods toreduce the likelihood of unauthorized file access:v Use the touch command on the file before executing the SQL
INSERT statement to set the link.v Use the touch command on the directory containing the file.v Use the mount command with one of the five attribute cache
configuration parameters (actimeo, acregmin, acregmax,acdirmin, acdirmax) to minimize the time that cached attributesare retained after a file or a directory is modified.
You are most likely to observe unauthorized access of READPERMISSION DB files during Data Links function testing since onlyone file is linked and there is little NFS activity. You are less likely toencounter this scenario in a production environment since NFSactivity is heavy and the NFS attribute cache usually does not retainthe attributes for all linked files.
Related concepts:
v “Before you install DB2 Data Links Manager (AIX)” on page 41
Setting up the DFS disk archive directory after DCE-DFS installation (AIX)
The DB2 Setup wizard performs almost every required setup andconfiguration task needed to get your Data Links Manager system up andrunning. The only additional task you must perform in DCE-DFSenvironments is setting up the DFS disk archive directory.
Prerequisites:
Chapter 3. Installing Data Links Manager on AIX 61

A user ID with root authority.
Procedure:
To complete the installation on the Data Links Manager server:1. Create the keytab file.2. Enter the following commands to start the DMAPP:
stop.dfs allstart.dfs all
3. Run ″dlfm setup″ using dce root credentials as follows:a. Login as the Data Links Manager administrator.b. As root, issue dce_login.c. Enter the command: dlfm setup.
To complete the installation on the Data Links Manager client:1. Create the keytab file.2. As root, enter the following commands to start the DMAPP:
stop.dfs allstart.dfs all
Related tasks:
v “Installing DB2 Data Links manually using the db2_install command (AIX)”on page 51
v “Installing DB2 Data Links Manager using the DB2 Setup wizard (AIX)” onpage 52
v “Creating a keytab file (AIX)” on page 62
Creating a keytab file (AIX)
DLFM daemons must become DCE network root to access the DFS™ filesets.To be able to do this the DCE network root has to create a DCE keytab file sothat the daemons can take on network root privileges and refresh theircredentials periodically.
This keytab file, which contains the principal and password information,should be called datalink.ktb and should be stored under the$INSTHOME/sqllib/security/ directory, where $INSTHOME represents thehome directory of the Data Links Manager Administrator. This file shouldhave its permissions set to read only by the local root user ID and should becreated on the DLFM server node and all DLFM client nodes.
Prerequisites:
62 Data Links Manager Quick Beginnings

A user ID with root authority.
Procedure:
To create a keytab file:1. Enter the rgy_edit command. A rgy_edit prompt similar to the following
should appear:rgy_edit==>
2. Enter the kta command as follows:
kta[dd] -p principal [-r[egistry]][-a | -pw password][-f keyfile]
For example, you might enter a command similar to the following:kta -p root -f /u/dlfm/sqllib/security/datalink.ktb
If you enter the kta command without the -pw password option, you willbe prompted to enter a password.
Related tasks:
v “Setting up the DFS disk archive directory after DCE-DFS installation(AIX)” on page 61
Verifying the installation of DB2 Data Links Manager (AIX)
This topic describes how to verify your installation on AIX by configuring aDB2 Data Links Manager environment to control files that are linked toDATALINK columns on a DB2 Universal Database server.
Procedure:
To verify the installation of Data Links Manager on AIX:v Create a test environment on the DB2 server.v Create a test environment on the DB2 Data Links server.v Register the Data Links Server with the DB2 database.v Verify the sample file is controlled by DLFF.v Verify the sample file is accessible.v View the sample file.
Related concepts:
v “Before you install DB2 Data Links Manager (AIX)” on page 41
Related tasks:
Chapter 3. Installing Data Links Manager on AIX 63

v “Creating a test environment on the DB2 server (AIX)” on page 64v “Creating a test environment on the DB2 Data Links server (AIX)” on page
66v “Registering the Data Links server with the DB2 database (Windows)” on
page 35v “Verifying the sample file is controlled by DLFF (AIX)” on page 75v “Verifying the sample file is accessible (AIX)” on page 76v “Viewing the sample file (AIX)” on page 78v “Installing DB2 Data Links manually using the db2_install command (AIX)”
on page 51v “Installing DB2 Data Links Manager using the DB2 Setup wizard (AIX)” on
page 52
Installation verification tasks
Creating a test environment on the DB2 server (AIX)Creating a test environment on the DB2 server is part of the larger task ofVerifying the installation of DB2 Data Links Manager.
Prerequisites:
v A user ID with root authorityv A valid DB2 user ID that has System Administrative (SYSADM) authority
on the VALIDATE instance that you created. By default, any user ID thatbelongs to the primary group of the instance owner has SYSADM authorityon an instance.
Procedure:
To create a test environment on the DB2 UDB server:1. Log on to the system as a user ID with root authority.2. Create an instance on the DB2 server using the db2icrt command. This
instance will contain a database in which tables containing columns ofthe DATALINK data type will reside.In our example, we will create an instance called VALIDATE by enteringthe following commands:
mkgroup testersmkuser pgrp=’testers’ groups=’testers’ home=’/home/validate’ validate
/usr/opt/db2_08_01/instance/db2icrt -u validate validate
3. Log out.4. Log on to the system with a valid DB2 user ID that has System
Administrative (SYSADM) authority on the VALIDATE instance that you
64 Data Links Manager Quick Beginnings

created. By default, any user ID that belongs to the primary group of theinstance owner has SYSADM authority on an instance.
5. Ensure that the VALIDATE instance is the current instance by entering thefollowing command:
db2 get instance
This command should return the following output:The current database manager instance is: VALIDATE
If you do not receive this output, enter the following commands:set DB2INSTANCE=VALIDATEdb2 get instance
6. Set the DATALINKS database manager configuration parameter to YES inthe VALIDATE instance’s configuration file by entering the followingcommand:
db2 update dbm cfg using datalinks yes
To disable DB2 Data Links Manager functionality on your DB2 server,you would set the DATALINKS database manager configurationparameter to no.
7. Start the VALIDATE instance by entering the db2start command.
Note: If you change a setting in an instance’s database managerconfiguration file, you must ensure that you stop and restart theinstance (using the db2stop and db2start commands) for thechanges to take effect. In our example, we did not start theVALIDATE instance, so we only issued the db2start command.
8. Create a database using the db2 create database command. This databasewill contain a table using the DATALINK data type.For the example, create a database called STAFF by entering the followingcommand:
db2 create database staff
9. Connect to the STAFF database by entering the following command:db2 connect to staff
10. Create a table called EMPLOYEE, in the STAFF database that you justcreated, that has a column defined with a DATALINK data type by enteringthe following command:
db2 "create table employee (id int, fname varchar(30),lname varchar(30), picture datalink linktype urlfile link control integrity all read permissiondb write permission blocked recovery yes on unlinkrestore)"
11. Terminate all connections to this database by entering the followingcommand:
Chapter 3. Installing Data Links Manager on AIX 65

db2 connect reset
12. Log out.
Now you can create a test environment on the DB2 Data Links server.
Related tasks:
v “UNIX Details When Creating Instances” in the Administration Guide:Implementation
v “Creating a test environment on the DB2 Data Links server (AIX)” on page66
Related reference:
v “CREATE DATABASE” in the Command Reference
v “db2icrt - Create Instance” in the Command Reference
Creating a test environment on the DB2 Data Links server (AIX)
After creating a test environment on the DB2 UDB server, we must create atest environment on the DB2 Data Links server.
Procedure:
To create a test environment on the DB2 Data Links server:1. Prepare your file system for Data Links Manager2. Register the file system with the Data Links Filesystem Filter3. Register the DB2 database4. Authorize a DB2 user ID to link a file5. Create a sample file for DB2 Data Links Manager
Related tasks:
v “Preparing your file system for DB2 Data Links Manager (AIX)” on page 66v “Registering the file system with the Data Links Filesystem Filter (AIX)” on
page 69v “Registering the DB2 database with the Data Links File Manager (AIX)” on
page 71v “Authorizing a DB2 user ID to link a file (AIX)” on page 72v “Creating a sample file for DB2 Data Links Manager (AIX)” on page 73
Preparing your file system for DB2 Data Links Manager (AIX)Preparing your file system for DB2 Data Links Manager is part of the larger taskof Creating a test environment on the DB2 Data Links server.
Prerequisites:
66 Data Links Manager Quick Beginnings

A user with root authority.
Procedure:
You can choose to create a Journaled File System (JFS) or a DCE-DFS filesystem to test your Data Links Manager installation.
Creating a Journaled File System (JFS) on the DB2 Data Links serverTo create a JFS on the Data Links server:1. Log in as a user with root authority.2. Prepare a JFS to use a Data Links Filesystem Filter (DLFF).
Create a Journaled File System (JFS) using the smit manfscommand and set the Mount AUTOMATICALLY at systemrestart? option to no. You can also use an existing JFS file system.
3. Modify the properties of a file system so that it comes under thecontrol of the DLFF, and mount it by entering the followingcommand:
/usr/opt/db2_08_01/instance/dlfmfsmd dlfm_mountpoint
where dlfm_mountpoint represents the mount point of the JFS filesystem you are using.
To continue with the example, enter the following command:/usr/opt/db2_08_01/instance/dlfmfsmd /test
4. Log out.
Creating a DCE-DFS file system on the Data Links serverTo create a DCE-DFS file system on the Data Links server:1. Log in as root and dce_login as a DFS administrator.2. Create a logical volume by entering the following command:
mklv -y aggregate_name -t aggregate_type lfs rootvg 1
wherev aggregate_name represents the name of the logical volumev aggregate_type represents the aggregate typev rootvg represents the logical volume type, and 1 represents the
number of logical partitions.3. Create an aggregate in the logical volume by entering the
following command:newaggr -aggregate /dev/dmtest -block 8192 -frag 1024 -overwrite
where /dev/dmtest represents the aggregate name, given as adevice file. If this aggregate name already exists, the -overwriteoption will delete all data in the aggregate.
Chapter 3. Installing Data Links Manager on AIX 67

4. Initialize and export the aggregate by entering the followingcommand:
mkdfslfs -d /dev/dmtest -n dmtest
where /dev/dmtest represents the device name for the aggregate.5. Create the filesets in the aggregate by entering the following
command:mkdfslfs -f dmtest1.ft -m /:/dmtest/dmtest1 -n dmtest
where /:/dmtest/dmtest1 represents the mount point in the DFSnamespace and dmtest represents the name of the aggregate.
Note: You must have a valid dce_login and the authority tocreate directories in the DFS namespace.
6. Edit the /opt/dcelocal/var/dfs/dfstab file and change the entryfor the aggregate you just created from lfs to dmlfs. Forexample, this file will have entries for each aggregate similar tothe following:
# blkdev aggname aggtype aggid [UFS fsid]/dev/aggrdev1 aggrname1 lfs 1/dev/aggrdev2 aggrname2 lfs 2
Change aggtype to dmlfs for all aggregates that are to be broughtunder Data Links control. Save and close the file.
Notes:
a. When you create an aggregate using SMIT, you can alsospecify an aggregate id. However, the default id is the nextavailable higher integer value.
b. If the aggregate has already been exported, you mustunexport it before performing this step and step 7.
7. Enable DFS SMT on the aggregate by running the followingcommand:
dmaggr -aggregate name [{-on | -off}] [{-needapp | -noneedapp}] [-help]
It is recommended you always use the -needapp option whenrunning this command.
8. Export the aggregate so that it can be controlled by the DLFF.9. Register a file system that is under the control of a DLFF by
entering the following command:dlfm add_prefix prefix_path
where prefix_path represents the location of the file system that isunder the control of a DLFF.
68 Data Links Manager Quick Beginnings

10. To register a DCE-DFS fileset, you can either use the dlfmadd_prefix /test command or you can use one of the followingvariations:
dlfm add_prefix for dfs rwpath prefix_path
This command specifies a read-only path for DCE-DFS.dlfm add_prefix for dfs rwpath prefix_path localpath local_mount_point
where local_mount_point represents the native file system mountpoint of the prefix. The native file system mount point can beused to improve the performance of the archival and retrieval offiles.
Note: Issue all dlfm add_prefix commands from the node onwhich the DFS fileset resides. Then issue a dlfm startcommand on the same node.
For more information, refer to your AIX Administration Guide.
Now you can register the file system with the Data Links Filesystem Filter.
Related tasks:
v “Registering the file system with the Data Links Filesystem Filter (AIX)” onpage 69
Related reference:
v “dlfm add_prefix command” in the DB2 Data Links Manager AdministrationGuide and Reference
Registering the file system with the Data Links Filesystem Filter (AIX)Registering the file system with the Data Links Filesystem Filter is part of thelarger task of Creating a test environment on the DB2 Data Links server.
Prerequisites:
Log on to the system as the DB2 Data Links Manager Administrator.
Procedure:
To register the /test file system with the DLFF:1. Run the db2profile or db2cshrc script as follows:
. INSTHOME/sqllib/db2profile (for bash, Bourne or Korn shell)source INSTHOME/sqllib/db2cshrc (for C shell)
where INSTHOME represents the home directory of the instance owner.
Chapter 3. Installing Data Links Manager on AIX 69

2. Start the Data Links File Manager by entering the dlfm start command.3. Ensure that the Data Links File Manager started successfully by entering
the dlfm see command.If the Data Links File Manager back-end processes started successfully andare running, you will receive output similar to the following:
PID PPID PGID RUNAME UNAME ETIME DAEMON NAME71326 185894 119252 root dlfm 00:07 dlfm_gcd_(dlfm)75788 185894 119252 root dlfm 00:07 dlfm_delgrpd_(dlfm)100280 185894 119252 root dlfm 00:07 dlfm_cmgrd_(dlfm)154834 234604 119252 root dlfm 00:05 dlfm_ar_ag_(dlfm)185894 1 119252 root dlfm 00:08 dlfm_wd_(dlfm)210534 234604 119252 root dlfm 00:05 dlfm_ar_ag_(dlfm)226860 185894 119252 root dlfm 00:07 dlfm_upcalld_(dlfm)234604 185894 119252 root dlfm 00:07 dlfm_archived_(dlfm)250654 185894 119252 root dlfm 00:07 dlfm_mon_wd_(dlfm)
4. To ensure that you successfully mounted and configured the file systemthat is under the control of a DLFF:a. Enter the lsfs -v dlfs command to list the defined DLFS file systems.
For the example, this command returns output similar to the following:Name Nodename Mount Pt VFS Size Options/dev/dllv - /test dlfs -- rw,Basefs=jfs/dev/lv04 - /dlinks2 dlfs -- rw,Basefs=jfs
b. Enter the /etc/mount -v vfs | awk ’$3 == ″dlfs″’ command to list theDLFS file systems for which the DLFF is loaded.For the example, this command returns output similar to the following:node mounted mounted over vfs date options-------- --------------- --------------- ------ ------------ ---------------
/dev/dllv /test dlfs Jan 08 16:23 rw,log=/dev/loglv00/dev/lv04 /dlinks2 dlfs Jan 08 16:23 rw,log=/dev/loglv00
To verify that a DFS file server is under the control of a DLFF, enter thefollowing command:
dfsexport | grep dmlfs
The output from this command should be similar to the following:/dev/dlfs_test dlfs_test dmlfs 4
5. Register a file system that is under the control of a Data Links FilesystemFilter by entering the following command:
dlfm add_prefix prefix_path
where prefix_path represents the location of the file system that is underthe control of a DLFF.
For example, register the Data Links server to use the Data LinksFilesystem Filter on the test file system by entering the followingcommand:
70 Data Links Manager Quick Beginnings

dlfm add_prefix /test
To update an existing prefix on DFS:dlfm update_prefix prefix_path for dfs localpath local_mount_point
Now you can register the DB2 database.
Related tasks:
v “Registering the DB2 database with the Data Links File Manager (AIX)” onpage 71
Related reference:
v “dlfm add_prefix command” in the DB2 Data Links Manager AdministrationGuide and Reference
v “dlfm update_prefix command (DCE-DFS)” in the DB2 Data Links ManagerAdministration Guide and Reference
Registering the DB2 database with the Data Links File Manager (AIX)Registering the DB2 database with the Data Links File Manager is part of thelarger task of Creating a test environment on the DB2 Data Links server.
Prerequisites:
Log on to the system as the DB2 Data Links Manager Administrator.
Procedure:
To register a new database with the Data Links File Manager:1. Register the remote DB2 UDB database where the DATALINK type
column was defined by entering the following command:dlfm add_db database instance hostname
where:v database represents the database alias name of the remote database.v instance represents the instance where database resides. If you are
registering a Windows instance on an AIX Data Links Manager, instancemust be in uppercase.
v hostname represents the hostname of the DB2 UDB server where databaseresides.
The following command will register a database called STAFF, whichresides in the VALIDATE instance on a DB2 UDB server with a hostname ofdb2server.services.com:
dlfm add_db staff validate db2server.services.com
Chapter 3. Installing Data Links Manager on AIX 71

Do not specify the DLFM_DB when you run this command. The DLFM_DB isa local database that is used to keep track of files that are under thecontrol of the Data Links File Manager.
To list the registered database, enter the following command:dlfm list registered databases
2. Log out.
Now you can authorize a DB2 user ID to link a file.
Related tasks:
v “Authorizing a DB2 user ID to link a file (AIX)” on page 72
Related reference:
v “dlfm add_db command” in the DB2 Data Links Manager AdministrationGuide and Reference
v “dlfm list registered databases command” in the DB2 Data Links ManagerAdministration Guide and Reference
Authorizing a DB2 user ID to link a file (AIX)You can authorize a DB2 user ID to link a file. Authorizing a DB2 user ID tolink a file is part of the larger task of Creating a test environment on the DB2Data Links server.
Prerequisites:
Log on to the system as the DB2 Data Links Manager Administrator.
Procedure:
To authorize a DB2 user ID to link a file in the example /test/pictures directory:1. Run:
dlfm grant link privilege on dir /test/pictures/ touser db2-username for db staff inst validatenode db2server.services.com
where db2-username must be the user ID with which you log on when youperform the link operation (for example, using the SQL INSERT statement)on DB2.
2. To verify that your dlfm grant command was correctly specified:dlfm list registered users for directory /test/pictures/ on
db staff inst validate node db2server.services.com
This command should return the db2-username that was specified above.
72 Data Links Manager Quick Beginnings

3. Log out.
By default, link security controls are set to ENABLED during the installation.Use the dlfm set link security off command to disable this feature and thedlfm set link security on command to re-enable it.
Your next step is to create a sample file.
Related tasks:
v “Creating a sample file for DB2 Data Links Manager (AIX)” on page 73
Related reference:
v “dlfm grant command” in the DB2 Data Links Manager Administration Guideand Reference
v “dlfm set link security command” in the DB2 Data Links ManagerAdministration Guide and Reference
Creating a sample file for DB2 Data Links Manager (AIX)Creating a sample file for DB2 Data Links Manager is part of the larger task ofCreating a test environment on the DB2 Data Links server.
Prerequisites:
v Log on to the system with any user ID that is not a DB2 Data LinksManager Administrator. In DCE-DFS environments, use your dce_login.
v Ensure that the Data Links File Manager (DLFM) is running.
Procedure:
To create a sample file:1. Create a directory on the file system that is under the control of a Data
Links Filesystem Filter (DLFF), to store files to be controlled by a DB2server, by entering the following command:
mkdir filesystem_name/directory_name
where:v filesystem_name represents the name of the file system that is under the
control of a DLFF.v directory_name represents the name of the directory that you want to
create.
The DB2 Data Links Manager Administrator should never be the owner ofany files or directories which are in a file system under the control of aData Links Filesystem Filter. For example, the following command willcreate the directory called pictures on the file system /test:
Chapter 3. Installing Data Links Manager on AIX 73

mkdir /test/pictures
2. Change the permissions for the pictures directory that you just created sothat any user ID can create a file in it by entering the following command:
chmod 777 /test/pictures
3. Create a file called psmith.bmp in the /test/pictures directory, to bemanaged by the Data Links File Manager, by entering the followingcommand:
echo "This is a picture of Paul Smith." > /test/pictures/psmith.bmp
4. Log out.
The sample file psmith.bmp is a text file, not a bitmap as the .bmp extensionimplies. For the purpose of verifying your installation, this file represents anemployee’s picture that will be inserted into a table that was defined with theDATALINKS data type.
Now you can register the Data Links server with the DB2 database.
Related tasks:
v “Registering the Data Links Server with the DB2 database (AIX)” on page74
Registering the Data Links Server with the DB2 database (AIX)Registering the Data Links Server with the DB2 database is part of the larger taskof Verifying the installation of DB2 Data Links Manager.
Prerequisites:
Log on to the DB2 server with a valid DB2 user ID that has SystemAdministrative (SYSADM) authority on the VALIDATE instance that youcreated. By default, any user ID that belongs to the Local Administrators grouphas SYSADM authority on an instance.
Procedure:
To register the Data Links server with the remote DB2 UDB database wherethe DATALINK type column was defined earlier:1. Enter the following command:
db2 get instance
This command should return the following output:The current database manager instance is: VALIDATE
If you do not receive this output, enter the following commands:
74 Data Links Manager Quick Beginnings

set DB2INSTANCE=VALIDATEdb2 get instance
2. Start the VALIDATE instance by entering the db2start command.3. Register a Data Links server that will control the files that are linked by a
DATALINK type column by entering the following command:db2 "add datalinks manager for database database_alias
using node hostname port port_number"
where:v database_alias represents the database alias name of the database.v hostname represents the fully qualified hostname of the Data Links
server.v port_number represents the port number that you have reserved for
communications between the Data Links server and the DB2 server. Youspecified this port number during the installation of DB2 Data LinksManager.
For our example, enter the following command:db2 "add datalinks manager for database staff using node dlmserver.services.com port 50100"
4. Connect to the STAFF database by entering the following command:db2 connect to staff
5. Insert an entry into the EMPLOYEE table that you created by entering thefollowing command:
db2 "insert into employee values (001,’Paul’,’Smith’,dlvalue(’http://file_location/controlled_file’))"
where:v file_location represents the fully qualified location of the file that is under
the control of a Data Links Filesystem Filter on the Data Links server.v controlled_file represents the filename of the file that you want to control
on the Data Links server.
For our example, enter the following commanddb2 "insert into employee values (001,’Paul’,’Smith’,
dlvalue(’http://dlmserver.services.com/test/pictures/psmith.bmp’))"
6. Log out.
Now you can verify the sample file is controlled by the DLFF.
Related tasks:
v “Verifying the sample file is controlled by DLFF (AIX)” on page 75
Verifying the sample file is controlled by DLFF (AIX)Verifying the sample file is controlled by DLFF is part of the larger task ofVerifying the installation of DB2 Data Links Manager.
Chapter 3. Installing Data Links Manager on AIX 75

Prerequisites:
Log on to the system as any user ID except as a user ID with root authority oras the DB2 Data Links Manager Administrator. In DCE-DFS environments, login with your DCE user ID.
Procedure:
To verify that the psmith.bmp sample file we created earlier is under thecontrol of the Data Links File Filter (in DCE-DFS environments, perform thesesteps from a client node):1. Verify that the psmith.bmp file is now controlled by the Data Links File
Manager by entering the following command:cat controlled_file
where controlled_file represents the full pathname of the file that iscontrolled by the Data Links server.
For the example, enter the following command:cat /test/pictures/psmith.bmp
Note: We are using the cat command here because psmith.bmp is really atext file. Running the cat command on a true binary file wouldreturn unreadable output.
If this file is being controlled by the Data Links File Manager, you willreceive the following error:
Cannot open /test/pictures/psmith.bmp
2. Log out.
Now you can verify the sample file is accessbile.
Related tasks:
v “Verifying the sample file is accessible (AIX)” on page 76
Verifying the sample file is accessible (AIX)
You need to verify that the psmith.bmp sample file can be accessed while it isunder the control of the Data Links File Manager. Verifying the sample file isaccessible is part of the larger task of Verifying the installation of DB2 Data LinksManager.
Procedure:
76 Data Links Manager Quick Beginnings

To verify the sample files is accessible, you first need to generate an accesstoken on the DB2 Universal Database server.
In DCE-DFS environments, you should perform these steps from a machinewhere the DFS Client Enabler is installed.1. Log on to the system with a valid DB2 user ID that has System
Administrative (SYSADM) authority on the VALIDATE instance that youcreated. By default, any user that belongs to the primary group of theinstance owner has SYSADM authority on an instance.
2. Run the db2profile or db2cshrc script as follows:. INSTHOME/sqllib/db2profile (for bash, Bourne or Korn shell)source INSTHOME/sqllib/db2cshrc (for C shell)
where INSTHOME represents the home directory of the instance owner.3. Start the VALIDATE instance by entering the db2start command.4. Connect to the STAFF database by entering the following command:
db2 connect to staff
5. Select the controlled file by issuing an SQL SELECT statement.For our example, enter the following command:
db2 "select dlurlpath(picture) from employee where lname = ’Smith’"
This command returns the full pathname with an access token of the form:controlled_filepath/access_token;controlled_filename
where:v controlled_filepath represents the fully qualified path of the controlled filev access_token represents an encrypted key assigned by the database
manager.v controlled_filename represents the name of the file that is under the
control of a Data Links Filesystem Filter.
For example, you will receive an access token that is similar to thefollowing:
/test/pictures/HVJ5NXGC0WQ.I5KKB6;psmith.bmp
This access token will be used to read this file on the Data Links server.
Note: By default, this access token is only valid for 60 seconds. Thismeans that once you enter this command, you have only 60 secondsto complete the remaining steps in this section. You can increase theaccess token expiry time by updating the dl_expint databaseconfiguration parameter.
Chapter 3. Installing Data Links Manager on AIX 77

To change the default expiration time for an access token to 10minutes (the value is entered in seconds), enter the followingcommands:
db2 update db cfg for staff using dl_expint 600db2 terminatedb2 connect to staff
If you change a setting for any database configuration parameter,you must always reconnect to the database for the changes to takeeffect.
6. Log out.
Now you can view the sample file.
Related concepts:
v “Configuration parameters” in the Administration Guide: Planning
Related tasks:
v “Viewing the sample file (AIX)” on page 78
Viewing the sample file (AIX)
You can use the access token to view the psmith.bmp file. Viewing the samplefile is part of the larger task of Verifying the installation of DB2 Data LinksManager.
Prerequisites:
v In DCE-DFS environments, you should perform these steps from a machinewhere the DFS Client Enabler is installed.
v Log on to the system as any user ID except as a user ID with root authorityor as the DB2 Data Links Manager Administrator. In DCE-DFSenvironments, log in with your DCE user ID.
Procedure:
To view the sample file:1. Verify that you can access the file that is under the control of the Data
Links File Manager.Enter the following command:
cat "/test/pictures/access_token;psmith.bmp"
where access_token represents the encrypted key that you received in theprevious step.
You should receive the following output from this command:
78 Data Links Manager Quick Beginnings

"This is a picture of Paul Smith."
If you did not receive an error, you have access to this file and you haveinstalled and configured DB2 Data Links Manager correctly.
Related tasks:
v “Verifying the sample file is accessible (AIX)” on page 76
DFS Client Enabler
DFS Client Enabler installation prerequisites (AIX)
DCE-DFS Client Version 3.1You must install a DCE-DFS Client Version 3.1 on any machine thatwill run a DFS™ Client Enabler. Use of the DCE slim client is notsupported.
Should I use the DB2 Setup wizard or SMIT?We strongly recommend that you use the DB2 Setup wizard you areinstalling a DFS Client Enabler. The DB2 Setup wizard performsalmost all setup and configuration tasks for you. If you want to installthe DFS Client Enabler fileset using SMIT, you will have to set up andconfigure your system manually.
Operating system levelDCE-DFS 3.1 will work with AIX® Version 4.2.1, Version 4.3.1, Version4.3.2, or Version 4.3.3. However, DB2® Version 8 requires AIX Version4.3.3. To check the level of the operating system, enter the oslevelcommand.
Disk space requirementsEnsure that there is at least 2 MB of free disk space in the /usr/optdirectory. To check available free disk space, enter the df -k /usr/optcommand.
The DFS Client Enabler is an optional component that you can selectduring DB2 Universal Database™ client or server installation. Youcannot install a DFS Client Enabler without installing a DB2 UniversalDatabase client or server product.
The DFS Client Enabler requires 2 MB of disk space and an additional40 MB if you are installing the DFS Client Enabler as part of a DB2Run-Time Client installation. You will need more disk space if youinstall the DFS Client Enabler as part of a DB2 Administration Clientor DB2 server installation.
Synchronize system clocksEnsure that your system clocks are synchronized and remainsynchronized. Synchronization of clocks is essential for the Data Links
Chapter 3. Installing Data Links Manager on AIX 79

token expiry interval to work correctly. The token expiry interval is adatabase configuration parameter that controls how long a selectedDATALINK value (consisting of a URL with an embedded fileauthorization token) may be used. To check the system time and date,enter the date command. For more information on synchronizingsystem clocks, refer to your AIX Administration Guide.
Related concepts:
v “Before you install DB2 Data Links Manager (AIX)” on page 41v “Installation considerations in DCE-DFS environments (AIX)” on page 47
Installing DFS Client Enablers (AIX)
A DFS Client Enabler can be installed using the DB2 Setup wizard, which isthe recommended installation method, or it can be installed manually usingSMIT. After you have installed a DFS Client Enabler, you need to configurethe DFS Client Enabler.
Prerequisites:
v Log in as a user ID with root authority.
Procedure:
v To install a DFS Client Enabler using the DB2 Setup wizard:1. Insert and mount the appropriate CD-ROM.2. When the DB2 Launchpad appears, select Install to launch the DB2
Setup Wizard.3. Select the Customize install option.4. Select DFS Client Enabler from the list of components.
v To install a DFS Client Enabler manually using SMIT:1. Insert and mount the appropriate CD-ROM.2. Enter the smit command.3. Select Software Installation and Maintenance —> Install and Update
Software —> Install and Update from LATEST Available Software.4. Specify the input device or directory for the installation media, or click
List to display all input devices or directories.5. Click LIST next to the SOFTWARE to install field to display a list of
filesets. The Multi-select List window opens.6. Select the DFS Client Enabler fileset (db2_08_01.dfsc) and click OK.7. Click OK again to begin the installation process.
After installation finishes, you must run the following command:/usr/opt/db2_08_01/bin/dlfscm_setup
80 Data Links Manager Quick Beginnings

You do not have to run this command if you used the DB2 Setup wizard toinstall your DFS Client Enabler.
Now you can configure your DFS Client Enabler.
Related concepts:
v “DFS Client Enabler installation prerequisites (AIX)” on page 79v “Installation considerations in DCE-DFS environments (AIX)” on page 47
Related tasks:
v “Configuring DFS Client Enablers (AIX)” on page 81v “Setting up the DFS disk archive directory after DCE-DFS installation
(AIX)” on page 61
Configuring DFS Client Enablers (AIX)
Configuring DFS™ Client Enablers is part of the larger task of installing DFSClient Enablers. After installing a DFS Client Enabler, you must configure it.
Procedure:
To configure your DFS Client Enabler:1. Inform your DCE administrator that the self DCE identity for the DFS
Client Enabler machine needs to be added to the DCE DLMADMINgroup.
2. Log in as a user ID with root authority on the machine where the DFSClient Enabler is installed and enter the following commands:
dcecp -c secval deactivate
dcecp -c secval activate
To verify that self is now in the DLMADMIN DCE group issue the klistDCE command. The DLMADMIN group should be listed under LocalGroups.
Note: Running the secval commands will usually complete theconfiguration. It may be necessary to reboot the machine as well. Ifproblems are encountered in accessing READ PERMISSION DBfiles, reboot the machine where the DB2® DFS Client Enabler hasjust been installed.
Related concepts:
v “DFS Client Enabler installation prerequisites (AIX)” on page 79v “Installation considerations in DCE-DFS environments (AIX)” on page 47
Chapter 3. Installing Data Links Manager on AIX 81

Related tasks:
v “Setting up the DFS disk archive directory after DCE-DFS installation(AIX)” on page 61
v “Installing DFS Client Enablers (AIX)” on page 80
82 Data Links Manager Quick Beginnings

Chapter 4. Installing Data Links Manager on the SolarisOperating Environment
Before you install DB2 Data Links Manager (Solaris Operating Environment)
Read this information carefully before installing DB2® Data Links Manager.
Supported operating systems, kernel levels and kernel architecturesEnsure that you are running one of the following versions with a32-bit kernel:v Solaris Version 7v Solaris Version 8
Kernel architectures sun4d and sun4m are not supported.
To check the operating system level, enter the uname -r command.This command is only valid for Solaris Version 7 and later. To checkthe kernel level, enter the isainfo -v command. The isainfo commandshould return 32-bit sparc applications.
To start your system with a 32-bit kernel, enter the setenv boot-filekernel/unix command at the OK prompt. Then, enter the bootcommand to start the boot process.
Disk space requirementsEnsure that there is at least 85 MB of free disk space in the/opt/IBM/db2 directory. To check available free disk space, enter the df-k /opt/IBM/db2 command.
Data Links Manager Administrator user IDDuring installation, you are given the option to create the owner ofthe DB2 Data Links instance in the Set user information for the DataLinks installation panel. These installation instructions assume thatyou selected this option.
When you create the Data Links Manager Administrator user ID, theDB2 Setup wizard adds this user with the username dlfm and thepassword ibmdb2. You can accept these default values, specify anexisting username, or create a different username by changing thedefault values. For security reasons, we recommend that you specifyyour own username and password because the default values areused in every DB2 Data Links installation and therefore arewell-known. The Data Links Manager Administrator user ID is alsoused for the Data Links Manager instance.
© Copyright IBM Corp. 1998-2002 83

If your machine is an NIS client, you will need to specify your ownexisting username. The existing username you specify:v Must not have its home directory reside on a file system that uses a
Data Links Filesystem Filter.v Must have a username that is eight characters or less.v Must not be a user with root authority.
To create a user ID for the DB2 Data Links Manager Administrator:1. Log in as a user with root authority.2. Create the group for the DB2 Data Links Administrator (for
example, dlfmgrp) :groupadd dlfmgrp
3. Create the write group (for example, dlfmxgrp):groupadd dlfmxgrp
When a file is linked to a DATALINK column defined with WRITEPERMISSION ADMIN, the file will be changed to be owned bythis group.
The DLFMXGRP group is created for use with the update in placefunctionality for any file linked to a DATALINK column definedwith WRITE PERMISSION ADMIN. The DLFMGRP group is alsocreated. You should not add any user IDs to these groups; DLFMshould be the only user ID to create a file that’s owned by theDLFM.
4. Create the user ID for the DB2 Data Links Administrator (forexample, dlfm), using the /home/dlfm directory as the homedirectory of the Data Links Administrator:
useradd -g dlfmgrp -G dlfmxgrp -d /home/dlfm dlfm
5. Assign a password to this username by entering the passwd usercommand, where user represents the account that you created.
The DB2 Data Links Manager Administrator user ID is not only forthe purpose of administrating the Data Links File Manager, but also toown the DLFM_DB and files that are in a linked state. The DB2 DataLinks Manager Administrator should never own directories on a filesystem that is under the control of a Data Links Filesystem Filter(DLFF). The DB2 Data Links Manager Administrator user ID shouldonly be used to administer the Data Links File Manager (DLFM). Youcan have the DB2 Data Links Manager Administrator user ID as theowner of files, but only READ PERMISSION DB linked files. Youshould not manually create files with the DB2 Data Links ManagerAdministrator as the owner.
84 Data Links Manager Quick Beginnings

If you create a different username by changing the default values, youmust ensure that the username you specify is eight characters or less.
Disk space requirements for DB2 Data Links Manager Administrator userID Ensure that there is at least 70 MB of free disk space in the home
directory where the DB2 Data Links Manager Administrator’s homedirectory will reside. To check available free disk space, enter the df-k INSTHOME command, where INSTHOME represents the homedirectory of the Data Links Administrator user ID.
Memory requirementsEnsure that there is at least 256 MB of memory available to yoursystem. To check available memory, enter the /usr/bin/dmesg | grep -i″avail mem″ command.
Updating kernel parametersBefore installing your DB2 for Solaris product using the DB2 Setupwizard or the db2_install and pkgadd commands, you may need toupdate your system’s kernel configuration parameters. The values inTable 1 are the recommended Solaris kernel configuration parameters.
Note: You must restart your machine after updating any kernelconfiguration parameters.
Table 1. Recommended Solaris Version 7 kernel configuration parameters values
Kernel Parameter
Physical Memory
64MB - 128MB 128MB -256MB
256MB -512MB
512MB+
msgsys:msginfo_msgmaxmsgsys:msginfo_msgmnbmsgsys:msginfo_msgmapmsgsys:msginfo_msgmnimsgsys:msginfo_msgsszmsgsys:msginfo_msgtqlmsgsys:msginfo_msgseg
65535(1)65535(1)130128162568192
65535(1)65535(1)2582561651216384
65535(1)65535(1)25825616102432767(2)
65535(1)65535(1)25825616102432767(2)
shmsys:shminfo_shmmaxshmsys:shminfo_shmsegshmsys:shminfo_shmmni
6710886450300
134217728(2)50300
268435456(3)50300
536870912(3)50300
semsys:seminfo_semmnisemsys:seminfo_semmapsemsys:seminfo_semmnssemsys:seminfo_semmnusemsys:seminfo_semume
12813025625650
25625851251250
5125141024102450
102410262048204850
dlfsdrv:glob_mod_pri1
dlfsdrv:glob_mesg_pri1
dlfsdrv:ConfigDlfsUid1
dlfsdrv:ConfigDlfsGid1
0x1008000xffUID2
GID3
0x1008000xffUID2
GID3
0x1008000xffUID2
GID3
0x1008000xffUID2
GID3
Chapter 4. Installing Data Links Manager on the Solaris Operating Environment 85

Table 1. Recommended Solaris Version 7 kernel configuration parametersvalues (continued)
Kernel Parameter
Physical Memory
64MB - 128MB 128MB -256MB
256MB -512MB
512MB+
1 These values are mandatory.2 UID represents the user ID of the of the Data Links Manager Administrator.3 GID represents the group id of the write group.See the Data Links Manager Administrator user ID section.
Table 2. Recommended Solaris version 8 kernel configuration parameters values
Kernel ParameterPhysical Memory
512MB+
msgsys:msginfo_msgmaxmsgsys:msginfo_msgmnbmsgsys:msginfo_msgmapmsgsys:msginfo_msgmnimsgsys:msginfo_msgsszmsgsys:msginfo_msgtqlmsgsys:msginfo_msgseg
65535655351026102432204832767(2)
shmsys:shminfo_shmmaxshmsys:shminfo_shmsegshmsys:shminfo_shmmni
0xe00000005001024
semsys:seminfo_semmnisemsys:seminfo_semmapsemsys:seminfo_semmnssemsys:seminfo_semmnusemsys:seminfo_semume
102410262048204850
dlfsdrv:glob_mod_pri1
dlfsdrv:glob_mesg_pri1
dlfsdrv:ConfigDlfsUid1
dlfsdrv:ConfigDlfsGid1
0x1008000xffUID2
GID3
1 These values are mandatory.2 UID represents the user ID of the of the Data Links Manager Administrator.3 GID represents the group id of the write group.See the Data Links Manager Administrator user ID section.
Version levels of DB2 Data Links and DB2 Universal Database™
DB2 Universal Database can be any of Version 6.1, 7.1, 7.2, and 8.1.Data Links Manager can be any of Version 7.1, 7.2, and 8.1. Forexample, DB2 UDB can be at Version 7.1 or Version 8.1 and DataLinks Manager can be at Version 8.1. To check the version of DB2 thatresides on a workstation, enter the db2level command. These versionsof DB2 UDB and Data Links Manager can be used in anycombination.
86 Data Links Manager Quick Beginnings

If DB2 is at the higher version, such as Version 8.1, the Data LinksManager features introduced in Version 8.1 will not be available whenyou connect to a Data Links Manager at Version 7. You will receive anSQL error if you attempt to use the Version 8 features.
Migrating from previous versionsDifferent levels of DB2 Data Links Manager instances cannot exist onthe same machine. If you have a pre-Version 8.1 Data Links instanceon your system, you must migrate the instance to the Version 8.1format using the db2imigr command.
Registry variables offer more function and flexibility thanenvironment variables. However, because of this, it is possible thatmigration will not be performed exactly as expected. The registryvariables should be checked using the db2set command aftermigration.
Data Links server securityIn releases prior to DB2 Data Links Version 8.1, there were no securitycontrols on linking a file. If you migrated from a previous release, youwill be given the option at DLFM migration time to enable thesesecurity controls on your existing DLFM server(s).
Migrating from DB2 Data Links Version 7.1 or 7.2 to DB2 Data LinksManager Version 8
To migrate from DB2 Data Links Manager Version 7.1 or 7.2 to DB2Data Links Manager Version 8.1:1. Prepare your DB2 and DLFM databases for migration. For
example, you may wish to backup your existing databases.2. Install DB2 Version 8 on your DB2 server and Data Links Manager
server machines. These tasks are detailed below.3. As DLFM, run the /opt/IBM/db2/V8.1/adm/db2dlmmg command.
When you migrate to DB2 Data Links Manager Version 8, thefollowing environment variables will be converted to DB2 registryvariables:
DLFM_INSTALL_PATHDLFM_PORTDLFM_LOG_LEVELDB2_RR_TO_RSDLFM_BACKUP_DIR_NAME (1)
DLFM_BACKUP_TARGET (2)
DLFM_BACKUP_TARGET_LIBRARY (3)
Notes:
1. This variable is only used if a local file system is the backuptarget.
Chapter 4. Installing Data Links Manager on the Solaris Operating Environment 87

2. Used to indicate the type of backup target used. Possible valuesfor this variable are LOCAL, TSM, or XBSA.
3. Used to indicate the XBSA support code library only if theDLFM_BACKUP_TARGET is set to XBSA. The support codelibrary must be fully qualified and must include the shared objectname, for example/opt/IBM/db2/v8.1/Legato/libxdb2.so(bsashr10.o). The name ofthe shared object, in this case bsashr10.o, is available from thevendor suppling the XBSA compliant shared library.
DLFM user accountIn addition to the DB2 Data Links Manager Administrator useraccount, the DLFM user account is also created during installation foruse by the Data Links File Manager. The DLFM user account is theowner of all READ PERMISSION DB files.
TCP/IP port numberYou must have a TCP/IP port available for use by the Data Links FileManager. By default, the DB2 Setup wizard generates a value for you.You can use this value or provide your own. You will need to knowthis port number to verify the installation.
If you want to specify your own port number, review the TCP/IPports that are already in use on a machine by opening the/etc/services file. You will need to specify this port during theinstallation.
Once you have selected a TCP/IP port number for use by the DLFM,the value should not be changed.
Determining hostnamesYou must determine the names of each of your DB2 servers and DataLinks servers. You will need to know these hostnames to verify theinstallation. When connecting to a DB2 Data Links File Manager, theDB2 UDB server internally sends the following information to theDLFM:v Database namev Instance namev Hostname
The DLFM then compares this information with its internal tables todetermine whether the connection should be allowed. It will allow theconnection only if this combination of database name, instance name,and hostname has been registered with it, using the dlfm add_dbcommand. The hostname that is used in the dlfm add_db commandmust exactly match the hostname that is internally sent by the DB2UDB server.
88 Data Links Manager Quick Beginnings
The DLFM then verifies this information to decide if a connectionfrom this particular DB2 server should be allowed. The subroutinethat obtains hostname information on the DB2 server, gethostbyname,looks for /etc/resolv.conf. If this file exists, the subroutine queriesthe domain name server. If the request to the DNS times out, thegethostbyname routine checks the local /etc/hosts file. To connectsuccessfully to the DLFM, the name registered on the DLFM must bethe one which is obtained by the gethostbyname routine on the DB2UDB server.
Use the output of the uname -n command for the hostname whenregistering a DB2 UDB database using the dlfm add_db command.The DB2 server’s internal connections to the DLFM will fail if anyother aliases are used in the dlfm add_db command.
Repeat this on each DB2 Data Links and DB2 UDB server.
A Data Links server is registered to a DB2 database using the DB2add datalinks manager for database database_alias using nodehostname port port_number command.
The hostname is the name of the Data Links server. Any valid alias ofthe Data Links server can be used in this command. DATALINKvalues that are references to this Data Links server must specify thehostname in the URL value; that is, the exact name that was used inthe add datalinks manager command must be used when assigningURL values to DATALINK columns. Using a different alias will causethe SQL statement to fail.
Synchronize system clocksEnsure that the system clocks on the Data Links server and the remoteDB2 server are synchronized and remain synchronized for linked filesin the DATALINKS columns with the READ PERMISSION DB option.Synchronization of clocks is essential for the Data Links token expiryinterval to work correctly. The token expiry interval is a databaseconfiguration parameter that controls how long a selected DATALINKvalue (consisting of a URL with an embedded file authorization token)may be used. To check the system time and date, enter the datecommand.
For more information on synchronizing system clocks, refer to theSolaris Administration Guide.
Data Links replicationData Links Manager Version 8.1 introduces two new registryvariables, DLFM_START_ASNCOPYD and DLFM_ASNCOPYD_PORT.During installation, you will be prompted to enable the Data Links
Chapter 4. Installing Data Links Manager on the Solaris Operating Environment 89

Manager Replication daemon. If you plan to use Data LinksReplication, you should enable the Replication daemon during theinstallation. You can also enable it after installation by setting theregistry variables (DLFM_START_ASNCOPYD andDLFM_ASNCOPYD_PORT) and restarting the DLFM.
Related concepts:
v “DB2 Data Links Manager” on page 2v “Installation overview for DB2 servers (Windows)” in the Quick Beginnings
for DB2 Servers
v “Introduction to Data Links Manager security” in the DB2 Data LinksManager Administration Guide and Reference
Related tasks:
v “Installing DB2 Data Links Manager using the DB2 Setup wizard (SolarisOperating Environment)” on page 90
v “Installing DB2 Data Links Manager manually using the db2_installcommand (Solaris Operating Environment)” on page 91
v “Migrating databases” in the Quick Beginnings for DB2 Servers
v “Migrating DB2 (UNIX)” in the Quick Beginnings for DB2 Servers
v “Enabling the Data Links Manager Replication Daemon” in the Post V8 GA
Installing DB2 Data Links Manager using the DB2 Setup wizard (SolarisOperating Environment)
After updating your Solaris Operating Environment kernel configurationparameters, you can begin installing DB2 Data Links Manager. The DB2 Setupwizard is the recommended method for installing DB2 Data Links Managerfor Solaris Operating Environment.
Prerequisites:
Log in as a user ID with root authority.
Procedure:
To install the DB2 Data Links Manager for Solaris using the DB2 Setupwizard:1. Insert and mount your DB2 product CD-ROM.2. Change to the directory where the CD-ROM is mounted by entering the
cd /cdrom command where cdrom is the mount point of your productCD-ROM.
90 Data Links Manager Quick Beginnings

3. Enter the ./db2setup command. The Launchpad opens.4. Select Install Products.5. Select the products you want and are licensed to install. Click Next to
launch the DB2 Setup wizard.You can choose the product’s Customize option to view and change thecomponents that will be installed.Select Next to continue the installation process or Cancel to go back to aprevious window. Select Help for more information or assistance duringthe installation of any DB2 product.
When installation is complete, DB2 Data Links Manager will be installed inthe /opt/IBM/db2/V8.1/ directory.
You can use the DB2 Setup wizard at any time to create another instance orinstall additional DB2 products or components. Log in as a user ID with rootauthority and run the ./db2setup command from your DB2 product CD-ROM.
Related concepts:
v “DB2 Data Links Manager” on page 2v “Before you install DB2 Data Links Manager (Solaris Operating
Environment)” on page 83
Related tasks:
v “Verifying the installation (Solaris Operating Environment)” on page 96v “Installing DB2 Data Links Manager manually using the db2_install
command (Solaris Operating Environment)” on page 91
Installing DB2 Data Links Manager manually using the db2_install command(Solaris Operating Environment)
The DB2 Setup wizard is the recommended method for installing all DB2products on UNIX-based operating systems. This wizard can perform all ofthe tasks required to install DB2 Data Links Manager. However, if you wantmore control of the install process, you can manually install DB2 Data LinksManager using the db2_install command.
Prerequisites:
Log in as a user ID with root authority.
Procedure:
Chapter 4. Installing Data Links Manager on the Solaris Operating Environment 91

To install DB2 Data Links Manager for Solaris using the db2_installcommand:1. Insert and mount the appropriate CD-ROM.2. If the Volume Manager is not running on your system, enter the following
commands to mount the CD-ROM:mkdir -p /cdrom/unnamed_cdrommount -F hsfs -o ro /dev/dsk/c0t6d0s2 /cdrom/unnamed_cdrom
where /cdrom/unnamed_cdrom represents the CD-ROM mount directory and/dev/dsk/c0t6d0s2 represents the CD-ROM drive device.
Note: If you are mounting the CD-ROM drive from a remote system usingNFS, the CD-ROM file system on the remote machine must beexported with root access. You must also mount that file systemwith root access on the local machine.
If the Volume Manager (vold) is running on your system, the CD-ROM isautomatically mounted as:
/cdrom/unnamed_cdrom
3. Run the db2_install command as follows:/cdrom/unnamed_cdrom/db2_install
The db2_install command prompts for one or more of the following to beinstalled, and for the base directory where the product files are to beinstalled. The products are listed by keyword and product description.
DB2.DLMDB2 Data Links Manager for Solaris
The command displays the following prompt: Specify one or more ofthe keywords separated by spaces.
4. Type the keyword of the product to be installed when prompted.5. Type the name of the base directory when prompted. The default base
directory is /opt.If the default base directory is used, all files will be installed in the/opt/IBM/db2/V8.1 directory.
6. Enter Yes to start the product installation.
Related concepts:
v “DB2 Data Links Manager” on page 2v “Before you install DB2 Data Links Manager (Solaris Operating
Environment)” on page 83
Related tasks:
92 Data Links Manager Quick Beginnings

v “Verifying the installation (Solaris Operating Environment)” on page 96v “Installing DB2 Data Links Manager using the DB2 Setup wizard (Solaris
Operating Environment)” on page 90
Actions performed by the DB2 Setup wizard (Solaris Operating Environment)
After installation is complete and before you exit the DB2 Setup wizard, youcan select View Log to review the installation process. You can also review the/tmp/db2setup.log file for more detailed information. If you ran the./db2setup -t /tmp/trace.out command to capture any installation errors, youcan review the trace log in /tmp/trace.out.
The following actions are performed by the DB2 Setup wizard:
Installation directoryDB2 Data Links Manager and DB2® Universal Database are installedin the /opt/IBM/db2/V8.1/ directory. DB2 Data Links Manager usesDB2 UDB to maintain logged information for the linked files.
Group and user IDsA group ID (gid) and user ID (uid) are created for the DB2 Data LinksManager Administrator, if you selected to do so during installation.
Instance creationAn instance for the Data Links File Manager is created. The defaultinstance, associated with the default group and user ID, is called DLFM.
Registry variablesThe following registry variables are set:
DLFM_PORT=port_numberDLFM_LOG_LEVEL=LOG_ERRDB2_RR_TO_RS=ONDB2_HASH_JOIN=ONDLFM_INSTALL_PATH=/home/instance/sqllib/bin
//where instance is the Data Links Administrator IDDLFM_INSTANCE_NAME=instance_nameDB2INSTANCE=instance_nameDLFM_BACKUP_DIR_NAME=$HOME/dlfmbackup //UFS onlyDLFM_BACKUP_TARGET=LOCAL
//You have three choices: LOCAL, TSM, and XBSADLFM_FS_ENVIRONMENT=NATIVE //the only value available on SolarisDLFM_START_ASNCOPYD=NO //or YES if you have enabled itDLFM_ASNCOPYD_PORT=65535DLFM_NUM_ARCHIVE_SUBSYSTEMS=2
where:v port_number represents the port number reserved for the Data Links
File Manager.
Chapter 4. Installing Data Links Manager on the Solaris Operating Environment 93
v instance_name represents the name of the Data Links File Managerinstance.
PATH variablesThe following variables are set in the DB2 Data Links ManagerAdministrator’s db2profile or db2cshrc script file:
(for bash, Bourne, or Korn shell)export PATH=$PATH:$HOME/sqllib/bin:$HOME/sqllib/adm:$HOME/sqllib/misc(for C shell)setenv PATH=${PATH}:${HOME}/sqllib/bin:${HOME}/sqllib/adm:${HOME}/sqllib/misc
To run the DB2 Data Links Manager Administrator’s db2profile ordb2cshrc script file each time this user ID logs on to the system, addthe following entry to the DB2 Data Links Manager Administrator’s.profile script file:
. INSTHOME/sqllib/db2profile (for bash, Bourne, or Korn shell)source INSTHOME/sqllib db2cshrc (for C shell)
where INSTHOME represents the home directory of the DB2 DataLinks Manager Administrator.
Virtual File System setupThe directory dlfs is created under /usr/lib/fs/. The directory/usr/lib/fs/dlfs would contain the dlfs helpers.
DB2 database DLFM_DB createdA DLFM_DB database is created on the node containing DB2 DataLinks Manager.
Related concepts:
v “Before you install DB2 Data Links Manager (Solaris OperatingEnvironment)” on page 83
Related tasks:
v “Installing DB2 Data Links Manager using the DB2 Setup wizard (SolarisOperating Environment)” on page 90
v “Installing DB2 Data Links Manager manually using the db2_installcommand (Solaris Operating Environment)” on page 91
94 Data Links Manager Quick Beginnings
Verifying the DLFM_DB was successfully created and catalogued (SolarisOperating Environment)
Once the DB2 Setup wizard has finished installing DB2® Data Links Manageron your system, you should ensure that it successfully created and cataloguedthe DLFM_DB database by listing the contents of the System DatabaseDirectory. Once you have verified that this database exists, you need to set upa backup and recovery scheme to aid in crash recovery and protect theintegrity of your data.
Procedure:
To verify that the DLFM_DB database was successfully created andcatalogued:1. Run the db2profile or db2cshrc script as follows:
. INSTHOME/sqllib/db2profile (for bash, Bourne or Korn shell)source INSTHOME/sqllib/db2cshrc (for C shell)
where INSTHOME represents the home directory of the instance owner.2. Retrieve the entry for the DLFM_DB database in the System Database
Directory:db2 list database directory
This command returns output similar to the following:System Database Directory
Number of entries in the directory = 1
Database 1 entry:
Database alias = DLFM_DBDatabase name = DLFM_DBLocal database directory = /home/dlfm
Database release level = 9.00Comment =Directory entry type = Indirect (1)Catalog node number = 0
Related concepts:
v “Before you install DB2 Data Links Manager (Solaris OperatingEnvironment)” on page 83
Related tasks:
v “Installing DB2 Data Links Manager using the DB2 Setup wizard (SolarisOperating Environment)” on page 90
Chapter 4. Installing Data Links Manager on the Solaris Operating Environment 95

Verifying the installation (Solaris Operating Environment)
This topic describes how to verify your installation on Solaris OperatingEnvironment. It helps you configure a DB2 Data Links Manager environmentto control files that are linked to DATALINK columns on a DB2 UniversalDatabase server.
Procedure:
To verify the installation of Data Links Manage:1. Create a test environment on the DB2 server.2. Create a test environment on the DB2 Data Links server.3. Register the Data Links Server with the DB2 database.4. Verify the sample file is controlled by DLFF.5. Verify the sample file is accessible.6. View the sample file.
Related concepts:
v “Before you install DB2 Data Links Manager (Solaris OperatingEnvironment)” on page 83
Related tasks:
v “Creating a test environment on the DB2 server (Solaris OperatingEnvironment)” on page 97
v “Creating a test environment on the DB2 Data Links server (SolarisOperating Environment)” on page 99
v “Registering the Data Links server with the DB2 database (Windows)” onpage 35
v “Verifying the sample file is controlled by DLFF (Solaris OperatingEnvironment)” on page 107
v “Verifying the sample file is accessible (Solaris Operating Environment)” onpage 108
v “Viewing the sample file (Solaris Operating Environment)” on page 109v “Installing DB2 Data Links Manager using the DB2 Setup wizard (Solaris
Operating Environment)” on page 90v “Installing DB2 Data Links Manager manually using the db2_install
command (Solaris Operating Environment)” on page 91
96 Data Links Manager Quick Beginnings

Installation verification tasks
Creating a test environment on the DB2 server (Solaris OperatingEnvironment)
Creating a test environment on the DB2 server is part of the larger task ofVerifying the Data Links Manager installation.
Prerequisites:
v Log on to the system with a valid DB2 user ID that has root authority.v A valid DB2 user ID that has System Administrative (SYSADM) authority
on the VALIDATE instance that you will create. By default, any user ID thatbelongs to the primary group of the instance owner has SYSADM authorityon an instance.
Procedure:
To create a test environment on the DB2 server:1. Create an instance on the DB2 server using the db2icrt command. This
instance will contain a database where tables containing columns of theDATALINK data type will reside.In our example, we will create an instance called VALIDATE by enteringthe following commands:
groupadd testersuseradd pgrp=’testers’ groups=’testers’ home=’/home/validate’ validate/opt/IBMdb2/V8.1/instance/db2icrt -u validate validate
2. Log out.3. Log on to the system with a valid DB2 user ID that has System
Administrative (SYSADM) authority on the VALIDATE instance that youcreated. By default, any user ID that belongs to the primary group of theinstance owner has SYSADM authority on an instance.
4. Ensure that the VALIDATE instance is the current instance by entering thefollowing command:
db2 get instance
This command should return the following output:The current database manager instance is: VALIDATE
If you do not receive this output, enter the following commands:set DB2INSTANCE=VALIDATEdb2 get instance
5. Set the DATALINKS database manager configuration parameter to YES inthe VALIDATE instance’s configuration file by entering the followingcommand:
Chapter 4. Installing Data Links Manager on the Solaris Operating Environment 97

db2 update dbm cfg using datalinks yes
To disable DB2 Data Links Manager functionality on your DB2 server,you would set the DATALINKS database manager configurationparameter to no.
6. Start the VALIDATE instance by entering the db2start command.
Note: If you change a setting in an instance’s database managerconfiguration file, you must ensure that you stop and restart theinstance (using the db2stop and db2start commands) for thechanges to take effect. In our example, we did not start theVALIDATE instance, so we only issued the db2start command.
7. Create a database using the db2 create database command. This databasewill contain a table using the DATALINK data type.For the example, create a database called STAFF by entering the followingcommand:
db2 create database staff
8. Connect to the STAFF database by entering the following command:db2 connect to staff
9. Create a table called EMPLOYEE, in the STAFF database that you justcreated, that has a column defined with a DATALINK data type by enteringthe following command:
db2 "create table employee (id int, fname varchar(30),lname varchar(30), picture datalink linktype url filelink control integrity all read permission db writepermission blocked recovery yes on unlink restore)"
10. Terminate all connections to this database by entering the followingcommand:
db2 connect reset
11. Log out.
Now you can create a test environment on the DB2 Data Links server.
Related tasks:
v “UNIX Details When Creating Instances” in the Administration Guide:Implementation
v “Creating a test environment on the DB2 Data Links server (SolarisOperating Environment)” on page 99
Related reference:
v “CREATE DATABASE” in the Command Reference
v “db2icrt - Create Instance” in the Command Reference
98 Data Links Manager Quick Beginnings

Creating a test environment on the DB2 Data Links server (SolarisOperating Environment)
Creating a test environment on the DB2 Data Links server is part of the larger taskof Verifying the installation of DB2 Data Links Manager. After creating a testenvironment on the DB2 UDB server, you must now create a test environmenton the DB2 Data Links server.
Procedure:
To create the test environment on the Data Links server:1. Prepare your file system for Data Links Manager.2. Register the file system with the Data Links File Filter.3. Register the DB2 database.4. Authorize a DB2 user ID to link a file.5. Create a sample file.
Related tasks:
v “Preparing your file system for Data Links Manager (Solaris OperatingEnvironment)” on page 99
v “Registering the file system with the DLFF (Solaris OperatingEnvironment)” on page 100
v “Registering the DB2 database with the Data Links File Manager (SolarisOperating Environment)” on page 102
v “Authorizing a DB2 user ID to link a file (Solaris Operating Environment)”on page 103
v “Creating the sample file for DB2 Data Links Manager (Solaris OperatingEnvironment)” on page 104
v “Creating a test environment on the DB2 server (Solaris OperatingEnvironment)” on page 97
Preparing your file system for Data Links Manager (Solaris OperatingEnvironment)
Preparing your file system for Data Links Manager is part of the larger task ofCreating a test environment on the DB2 Data Links server.
You can use an existing file system or create a UNIX File System (UFS) to testyour Data Links Manager installation. You can use an existing UFS file systemas long as there is no conflict with having it controlled by DLFF.
Prerequisites:
Log in as a user ID with root authority.
Chapter 4. Installing Data Links Manager on the Solaris Operating Environment 99

Procedure:
To prepare a UFS to use a Data Links Filesystem Filter (DLFF):1. (Optional) Create a UFS file system using the newfs command. You can
also use an existing UFS file system. For more information on the optionsfor creating a new file system, refer to your Solaris productdocumentation.
2. Open the /etc/vfstab file, record the entries as:/dev/dsk/c0t0d0s6 /dev/rdsk/c0t0d0s6 /dlfs dlfs - yes Basefs=ufs
where c0t0d0s6 represents a sample value for this example.3. (Optional) If you have not set up your file system using the DB2 Setup
wizard during installation, you can modify the properties of a file systemso that it comes under the control of the DLFF, and mount it by enteringthe following commands:
/opt/IBM/db2/V8.1/instance/dlfmfsmd dlfm_mountpoint
where dlfm_mountpoint represent the mount point of the UFS you areusing.
For our example, enter the following command:/opt/IBM/db2/V8.1/instance/dlfmfsmd /test
4. Log out.
Now you can register the file system with the DLFF.
Related tasks:
v “Registering the file system with the DLFF (Solaris OperatingEnvironment)” on page 100
Registering the file system with the DLFF (Solaris Operating Environment)Registering the file system with the DLFF is part of the larger task of Creating atest environment on the DB2 Data Links server.
Prerequisites:
Log on to the system as the DB2 Data Links Manager Administrator.
Procedure:
To register the /test file system with the Data Links Filesystem Filter:1. Run the db2profile or db2cshrc script as follows:
. INSTHOME/sqllib/db2profile (for bash, Bourne or Korn shell)source INSTHOME/sqllib/db2cshrc (for C shell)
100 Data Links Manager Quick Beginnings
where INSTHOME represents the home directory of the instance owner.2. Start the Data Links File Manager by entering the dlfm start command.3. Ensure that the Data Links File Manager started successfully by entering
the dlfm see command.If the Data Links File Manager back-end processes started successfully andare running, you will receive output similar to the following:PID PPID PGID RUNAME UNAME ETIME DAEMON NAME1661 1653 1652 root dlfm 20:40:15 dlfm_mon_wd_(dlfm)1665 1653 1652 root dlfm 20:40:15 dlfm_upcalld_(dlfm)1666 1653 1652 root dlfm 20:40:15 dlfm_delgrpd_(dlfm)1674 1663 1652 root dlfm 20:40:13 dlfm_ar_ag_(dlfm)1675 1663 1652 root dlfm 20:40:13 dlfm_ar_ag_(dlfm)1663 1653 1652 root dlfm 20:40:15 dlfm_archived_(dlfm)1653 1 1652 root dlfm 20:40:18 dlfm_wd_(dlfm)1662 1653 1652 root dlfm 20:40:15 dlfm_cmgrd_(dlfm)1664 1653 1652 root dlfm 20:40:15 dlfm_gcd_(dlfm)
4. Ensure that you successfully mounted and configured the UFS that isunder the control of a DLFF:
/usr/sbin/mount -v | awk ’$5 == "dlfs"’
For our example, this command, on Solaris Version 7 should return outputsimilar to the following:
/dev/dsk/c0t1d0s0 on /dlfstest type dlfs rw/suid/Basefs=ufs on Wed Jan 9 08:39:53 2002/dev/dsk/c0t2d0s0 on /dlfstest type dlfs rw/suid/Basefs=ufs on Wed Jan 9 08:39:53 2002
For our example, this command, on Solaris Version 8 should return outputsimilar to the following:
/dev/dsk/c1t1d0s3 on /dlfstest type dlfs read/write/setuid/intr/largefiles/onerror=panic/dev=800043 on Wed Jan 9 08:40:28 2002
5. Register a file system that is under the control of a Data Links FilesystemFilter by entering the following command:
dlfm add_prefix prefix_path
where prefix_path represents the location of the filesystem that is under thecontrol of a DLFF.
The following command registers the Data Links server to use the DataLinks Filesystem Filter on the test file system:
dlfm add_prefix /test
To list the registered prefixes, enter the following command:dlfm list registered prefixes
Now you can register the DB2 database with the Data Links File Manager.
Related tasks:
Chapter 4. Installing Data Links Manager on the Solaris Operating Environment 101

v “Registering the DB2 database with the Data Links File Manager (SolarisOperating Environment)” on page 102
Related reference:
v “dlfm add_prefix command” in the DB2 Data Links Manager AdministrationGuide and Reference
v “dlfm list registered prefixes command” in the DB2 Data Links ManagerAdministration Guide and Reference
Registering the DB2 database with the Data Links File Manager (SolarisOperating Environment)
Registering the DB2 database with the Data Links File Manager is part of thelarger task of Creating a test environment on the DB2 Data Links server.
Prerequisites:
Log on to the system as the DB2 Data Links Manager Administrator.
Procedure:
To register a new database with the Data Links File Manager:1. Register the remote DB2 UDB database where the DATALINK type
column was defined by entering the following command:dlfm add_db database instance hostname
wherev database represents the database alias name of the remote database.v instance represents the instance where database resides. If you are
registering a Windows instance on a Solaris Data Links Manager,instance must be in uppercase.
v hostname represents the hostname of the DB2 UDB server where databaseresides.
The following command will register a database called STAFF, whichresides in the VALIDATE instance on a DB2 UDB server with a hostname ofdb2server.services.com:
dlfm add_db staff validate db2server.services.com
Do not specify the DLFM_DB when you run this command. The DLFM_DB isa local database that is used to keep track of files that are under thecontrol of the Data Links File Manager.
To list the registered database, enter the following command:dlfm list registered databases
102 Data Links Manager Quick Beginnings

2. Log out.
Now you can authorize a DB2 user ID to link a file.
Related tasks:
v “Registering the file system with the DLFF (Solaris OperatingEnvironment)” on page 100
v “Creating the sample file for DB2 Data Links Manager (Solaris OperatingEnvironment)” on page 104
v “Authorizing a DB2 user ID to link a file (Solaris Operating Environment)”on page 103
Related reference:
v “dlfm add_db command” in the DB2 Data Links Manager AdministrationGuide and Reference
v “dlfm list registered databases command” in the DB2 Data Links ManagerAdministration Guide and Reference
Authorizing a DB2 user ID to link a file (Solaris Operating Environment)You can authorize a DB2 user ID to link a file. Authorizing a DB2 user ID tolink a file is part of the larger task of Creating a test environment on the DB2Data Links server.
Prerequisites:
Log on to the system as the DB2 Data Links Manager Administrator.
Procedure:
To authorize a DB2 user ID to link a file in the example /test/picturesdirectory:1. Run:
dlfm grant link privilege on dir /test/pictures/ touser db2-username for db staff inst validatenode db2server.services.com
where db2-username must be the user ID with which you log on when youperform the link operation (for example, using the SQL INSERT statement)on DB2.
2. To verify that your dlfm grant command was correctly specified:dlfm list registered users for directory "/test/pictures/ on
db staff inst validate node db2server.services.com
This command should return the db2-username that was specified above.
Chapter 4. Installing Data Links Manager on the Solaris Operating Environment 103

3. Log out.
By default, link security controls are set to ENABLED during the installation.Use the dlfm set link security off command to disable this feature and thedlfm set link security on command to re-enable it.
Now you can create a sample file.
Related tasks:
v “Creating the sample file for DB2 Data Links Manager (Solaris OperatingEnvironment)” on page 104
Related reference:
v “dlfm grant command” in the DB2 Data Links Manager Administration Guideand Reference
v “dlfm set link security command” in the DB2 Data Links ManagerAdministration Guide and Reference
Creating the sample file for DB2 Data Links Manager (Solaris OperatingEnvironment)
You can create a sample file for DB2 Data Links Manager. Creating the samplefile for DB2 Data Links Manager is part of the larger task of Creating a testenvironment on the DB2 Data Links server.
Prerequisites:
Log on to the system as any user ID that is not a DB2 Data Links ManagerAdministrator.
Procedure:
To create a sample file:1. Create a directory on the file system that is under the control of a Data
Links Filesystem Filter (DLFF), to store files to be controlled by a DB2server, by entering the following command:
mkdir filesystem_name/directory_name
where:v filesystem_name represents the name of the file system that is under the
control of a DLFF.v directory_name represents the name of the directory that you want to
create.
104 Data Links Manager Quick Beginnings

The DB2 Data Links Manager Administrator should never be the owner ofany files or directories that are in a file system under the control of a DataLinks Filesystem Filter. Enter the following command to create thedirectory called pictures on the file system /test:
mkdir /test/pictures
2. Change the permissions for the pictures directory that you just created sothat any user ID can create a file in it by entering the following command:
chmod 777 /test/pictures
3. Create a file called psmith.bmp in the /test/pictures directory, to bemanaged by the Data Links File Manager:
echo "This is a picture of Paul Smith." > /test/pictures/psmith.bmp
4. Log out.
The sample file psmith.bmp is a text file, not a bitmap as the .bmp extensionimplies. For the purpose of verifying your installation, this file represents anemployee’s picture that will be inserted into a table that was defined with theDATALINKS data type.
You can now registering the Data Links server with the DB2 database.
Related tasks:
v “Registering the Data Links server with the DB2 database (SolarisOperating Environment)” on page 105
Registering the Data Links server with the DB2 database (SolarisOperating Environment)
You can register the Data Links server with a DB2 database. Registering theData Links server with the DB2 database is part of the larger task of Verifying theinstallation of DB2 Data Links Manager.
Prerequisites:
Log on to the DB2 server with a valid DB2 user ID that has SystemAdministrative (SYSADM) authority on the VALIDATE instance that youcreated. By default, any user ID that belongs to the Local Administrators grouphas SYSADM authority on an instance.
Procedure:
To register the Data Links server with the remote DB2 UDB database wherethe DATALINK type column was defined earlier:1. Enter the following command:
db2 get instance
Chapter 4. Installing Data Links Manager on the Solaris Operating Environment 105
This command should return the following output:The current database manager instance is: VALIDATE
If you do not receive this output, enter the following commands:set DB2INSTANCE=VALIDATEdb2 get instance
2. Start the VALIDATE instance by entering the db2start command.3. Register a Data Links server that will control the files that are linked by a
DATALINK type column by entering the following command:db2 "add datalinks manager for database database_alias
using node hostname port port_number"
where:v database_alias represents the database alias name of the database.v hostname represents the fully qualified hostname of the Data Links
server.v port_number represents the port number that you have reserved for
communications between the Data Links server and the DB2 server. Youspecified this port number during the installation of DB2 Data LinksManager.
For our example, enter the following command:db2 "add datalinks manager for database staff using node dlmserver.services.com port 50100"
4. Connect to the STAFF database by entering the following command:db2 connect to staff
5. Insert an entry into the EMPLOYEE table that you created by entering thefollowing command:
db2 "insert into employee values (001,’Paul’,’Smith’,dlvalue(’http://file_location/controlled_file’))"
where:v file_location represents the fully qualified location of the file that is under
the control of a Data Links Filesystem Filter on the Data Links server.v controlled_file represents the filename of the file that you want to control
on the Data Links server.
For our example, enter the following commanddb2 "insert into employee values (001,’Paul’,’Smith’,
dlvalue(’http://dlmserver.services.com/test/pictures/psmith.bmp’))"
6. Log out.
Now you can verify the sample file is controlled by DLFF.
Related tasks:
106 Data Links Manager Quick Beginnings

v “Verifying the sample file is controlled by DLFF (Solaris OperatingEnvironment)” on page 107
Verifying the sample file is controlled by DLFF (Solaris OperatingEnvironment)
Verifying the sample file is controlled by DLFF is part of the larger task ofVerifying the installation of DB2 Data Links Manager.
Prerequisites:
Log on to the system as any user ID except as a user ID with root authority,or as the DB2 Data Links Manager Administrator.
Procedure:
To verify that the psmith.bmp sample file is under the control of the DataLinks Filesystem Filter:1. Enter:
cat controlled_file
where controlled_file represents the full pathname of the file that iscontrolled by the Data Links server.
For our example, enter the following command:cat /test/pictures/psmith.bmp
Note: We are using the cat command here because psmith.bmp is really atext file. Running the cat command on a true binary file wouldreturn unreadable output.
If this file is being controlled by the Data Links File Manager, you willreceive the following error:
Cannot open /test/pictures/psmith.bmp
2. Log out.
Now you can verify the sample file is accessible.
Related tasks:
v “Creating a test environment on the DB2 Data Links server (SolarisOperating Environment)” on page 99
v “Verifying the sample file is accessible (Solaris Operating Environment)” onpage 108
Chapter 4. Installing Data Links Manager on the Solaris Operating Environment 107

Verifying the sample file is accessible (Solaris Operating Environment)
Verifying the sample file is accessible is part of the larger task of Verifying theinstallation of DB2 Data Links Manager
Prerequisites:
Log on to the system with a valid DB2 user ID that has SystemAdministrative (SYSADM) authority on the VALIDATE instance that youcreated. By default, any user ID that belongs to the primary group of theinstance owner has SYSADM authority on an instance.
Procedure:
To verify that the psmith.bmp sample file can be accessed while it is under thecontrol of the Data Links File Manager:1. Run the db2profile or db2cshrc script as follows:
. INSTHOME/sqllib/db2profile (for bash, Bourne or Korn shell)source INSTHOME/sqllib/db2cshrc (for C shell)
where INSTHOME represents the home directory of the instance owner.2. Start the VALIDATE instance by entering the db2start command.3. Connect to the STAFF database by entering the following command:
db2 connect to staff
4. Select the controlled file by issuing an SQL SELECT statement.For our example, enter the following command:
db2 "select dlurlpath(picture) from employee where lname = ’Smith’"
This command returns the full pathname with an access token of the form:controlled_filepath/access_token;controlled_filename
where:v controlled_filepath represents the fully qualified path of the controlled file.v access_token represents an encrypted key assigned by the database
manager.v controlled_filename represents the name of the file that is under the
control of a Data Links Filesystem Filter.
For example, you will receive an access token that is similar to thefollowing:
/test/pictures/HVJ5NXGC0WQ.I5KKB6;psmith.bmp
This access token will be used to read this file on the Data Links server.
108 Data Links Manager Quick Beginnings

Note: By default, this access token is only valid for 60 seconds. Thismeans that once you enter this command, you have only 60 secondsto complete the remaining steps in this section. You can increase theaccess token expiry time by updating the dl_expint databaseconfiguration parameter.
To change the default expiration time for an access token to 10minutes (the value is entered in seconds), enter the followingcommands:
db2 update db cfg for staff using dl_expint 600db2 terminatedb2 connect to staff
If you change a setting for any database configuration parameter,you must always reconnect to the database for the changes to takeeffect.
5. Log out.
Now you can view the sample file.
Related tasks:
v “Verifying the sample file is controlled by DLFF (Solaris OperatingEnvironment)” on page 107
v “Viewing the sample file (Solaris Operating Environment)” on page 109
Viewing the sample file (Solaris Operating Environment)
Viewing the sample file is part of the larger task of Verifying the installation ofDB2 Data Links Manager. You will use the access token obtained in theprevious step to view the psmith.bmp file.
Prerequisites:
Log on to the system as any user ID except as a user ID with root authority,or as the DB2 Data Links Manager Administrator.
Procedure:
To verify that you can access the file that is under the control of the DataLinks File Manager:1. Enter the following command:
cat "/test/pictures/access_token;psmith.bmp"
where access_token represents the encrypted key that you received in theprevious step.
Chapter 4. Installing Data Links Manager on the Solaris Operating Environment 109

You should receive the following output from this command:"This is a picture of Paul Smith."
If you did not receive an error, you have access to this file and you haveinstalled and configured DB2 Data Links Manager correctly.
Related tasks:
v “Verifying the sample file is controlled by DLFF (Solaris OperatingEnvironment)” on page 107
v “Verifying the sample file is accessible (Solaris Operating Environment)” onpage 108
110 Data Links Manager Quick Beginnings

Appendix A. DB2 Universal Database technical information
Overview of DB2 Universal Database technical information
DB2 Universal Database technical information can be obtained in thefollowing formats:v Books (PDF and hard-copy formats)v A topic tree (HTML format)v Help for DB2 tools (HTML format)v Sample programs (HTML format)v Command line helpv Tutorials
This section is an overview of the technical information that is provided andhow you can access it.
Categories of DB2 technical informationThe DB2 technical information is categorized by the following headings:v Core DB2 informationv Administration informationv Application development informationv Business intelligence informationv DB2 Connect informationv Getting started informationv Tutorial informationv Optional component informationv Release notes
The following tables describe, for each book in the DB2 library, theinformation needed to order the hard copy, print or view the PDF, or locatethe HTML directory for that book. A full description of each of the books inthe DB2 library is available from the IBM Publications Center atwww.ibm.com/shop/publications/order
The installation directory for the HTML documentation CD differs for eachcategory of information:htmlcdpath/doc/htmlcd/%L/category
where:
© Copyright IBM Corp. 1998-2002 111

v htmlcdpath is the directory where the HTML CD is installed.v %L is the language identifier. For example, en_US.v category is the category identifier. For example, core for the core DB2
information.
In the PDF file name column in the following tables, the character in the sixthposition of the file name indicates the language version of a book. Forexample, the file name db2d1e80 identifies the English version of theAdministration Guide: Planning and the file name db2d1g80 identifies theGerman version of the same book. The following letters are used in the sixthposition of the file name to indicate the language version:
Language IdentifierArabic wBrazilian Portuguese bBulgarian uCroatian 9Czech xDanish dDutch qEnglish eFinnish yFrench fGerman gGreek aHungarian hItalian iJapanese jKorean kNorwegian nPolish pPortuguese vRomanian 8Russian rSimp. Chinese cSlovakian 7Slovenian lSpanish zSwedish sTrad. Chinese tTurkish m
No form number indicates that the book is only available online and does nothave a printed version.
112 Data Links Manager Quick Beginnings

Core DB2 informationThe information in this category cover DB2 topics that are fundamental to allDB2 users. You will find the information in this category useful whether youare a programmer, a database administrator, or you work with DB2 Connect,DB2 Warehouse Manager, or other DB2 products.
The installation directory for this category is doc/htmlcd/%L/core.
Table 3. Core DB2 information
Name Form Number PDF File Name
IBM DB2 Universal DatabaseCommand Reference
SC09-4828 db2n0x80
IBM DB2 Universal DatabaseGlossary
No form number db2t0x80
IBM DB2 Universal DatabaseMaster Index
SC09-4839 db2w0x80
IBM DB2 Universal DatabaseMessage Reference, Volume 1
GC09-4840 db2m1x80
IBM DB2 Universal DatabaseMessage Reference, Volume 2
GC09-4841 db2m2x80
IBM DB2 Universal DatabaseWhat’s New
SC09-4848 db2q0x80
Administration informationThe information in this category covers those topics required to effectivelydesign, implement, and maintain DB2 databases, data warehouses, andfederated systems.
The installation directory for this category is doc/htmlcd/%L/admin.
Table 4. Administration information
Name Form number PDF file name
IBM DB2 Universal DatabaseAdministration Guide:Planning
SC09-4822 db2d1x80
IBM DB2 Universal DatabaseAdministration Guide:Implementation
SC09-4820 db2d2x80
IBM DB2 Universal DatabaseAdministration Guide:Performance
SC09-4821 db2d3x80
IBM DB2 Universal DatabaseAdministrative API Reference
SC09-4824 db2b0x80
Appendix A. DB2 Universal Database technical information 113

Table 4. Administration information (continued)
Name Form number PDF file name
IBM DB2 Universal DatabaseData Movement Utilities Guideand Reference
SC09-4830 db2dmx80
IBM DB2 Universal DatabaseData Recovery and HighAvailability Guide andReference
SC09-4831 db2hax80
IBM DB2 Universal DatabaseData Warehouse CenterAdministration Guide
SC27-1123 db2ddx80
IBM DB2 Universal DatabaseFederated Systems Guide
GC27-1224 db2fpx80
IBM DB2 Universal DatabaseGuide to GUI Tools forAdministration andDevelopment
SC09-4851 db2atx80
IBM DB2 Universal DatabaseReplication Guide and Reference
SC27-1121 db2e0x80
IBM DB2 Installing andAdministering a SatelliteEnvironment
GC09-4823 db2dsx80
IBM DB2 Universal DatabaseSQL Reference, Volume 1
SC09-4844 db2s1x80
IBM DB2 Universal DatabaseSQL Reference, Volume 2
SC09-4845 db2s2x80
IBM DB2 Universal DatabaseSystem Monitor Guide andReference
SC09-4847 db2f0x80
Application development informationThe information in this category is of special interest to application developersor programmers working with DB2. You will find information aboutsupported languages and compilers, as well as the documentation required toaccess DB2 using the various supported programming interfaces, such asembedded SQL, ODBC, JDBC, SQLj, and CLI. If you view this informationonline in HTML you can also access a set of DB2 sample programs in HTML.
114 Data Links Manager Quick Beginnings

The installation directory for this category is doc/htmlcd/%L/ad.
Table 5. Application development information
Name Form number PDF file name
IBM DB2 Universal DatabaseApplication DevelopmentGuide: Building and RunningApplications
SC09-4825 db2axx80
IBM DB2 Universal DatabaseApplication DevelopmentGuide: Programming ClientApplications
SC09-4826 db2a1x80
IBM DB2 Universal DatabaseApplication DevelopmentGuide: Programming ServerApplications
SC09-4827 db2a2x80
IBM DB2 Universal DatabaseCall Level Interface Guide andReference, Volume 1
SC09-4849 db2l1x80
IBM DB2 Universal DatabaseCall Level Interface Guide andReference, Volume 2
SC09-4850 db2l2x80
IBM DB2 Universal DatabaseData Warehouse CenterApplication Integration Guide
SC27-1124 db2adx80
IBM DB2 XML ExtenderAdministration andProgramming
SC27-1234 db2sxx80
Business intelligence informationThe information in this category describes how to use components thatenhance the data warehousing and analytical capabilities of DB2 UniversalDatabase.
The installation directory for this category is doc/htmlcd/%L/wareh.
Table 6. Business intelligence information
Name Form number PDF file name
IBM DB2 Warehouse ManagerInformation Catalog CenterAdministration Guide
SC27-1125 db2dix80
IBM DB2 Warehouse ManagerInstallation Guide
GC27-1122 db2idx80
Appendix A. DB2 Universal Database technical information 115

DB2 Connect informationThe information in this category describes how to access host or iSeries datausing DB2 Connect Enterprise Edition or DB2 Connect Personal Edition.
The installation directory for this category is doc/htmlcd/%L/conn.
Table 7. DB2 Connect information
Name Form number PDF file name
APPC, CPI-C, and SNA SenseCodes
No form number db2apx80
IBM Connectivity Supplement No form number db2h1x80
IBM DB2 Connect QuickBeginnings for DB2 ConnectEnterprise Edition
GC09-4833 db2c6x80
IBM DB2 Connect QuickBeginnings for DB2 ConnectPersonal Edition
GC09-4834 db2c1x80
IBM DB2 Connect User’sGuide
SC09-4835 db2c0x80
Getting started informationThe information in this category is useful when you are installing andconfiguring servers, clients, and other DB2 products.
The installation directory for this category is doc/htmlcd/%L/start.
Table 8. Getting started information
Name Form number PDF file name
IBM DB2 Universal DatabaseQuick Beginnings for DB2Clients
GC09-4832 db2itx80
IBM DB2 Universal DatabaseQuick Beginnings for DB2Servers
GC09-4836 db2isx80
IBM DB2 Universal DatabaseQuick Beginnings for DB2Personal Edition
GC09-4838 db2i1x80
IBM DB2 Universal DatabaseInstallation and ConfigurationSupplement
GC09-4837 db2iyx80
IBM DB2 Universal DatabaseQuick Beginnings for DB2Data Links Manager
GC09-4829 db2z6x80
116 Data Links Manager Quick Beginnings

Tutorial informationTutorial information introduces DB2 features and teaches how to performvarious tasks.
The installation directory for this category is doc/htmlcd/%L/tutr.
Table 9. Tutorial information
Name Form number PDF file name
Business Intelligence Tutorial:Introduction to the DataWarehouse
No form number db2tux80
Business Intelligence Tutorial:Extended Lessons in DataWarehousing
No form number db2tax80
Development Center Tutorialfor Video Online usingMicrosoft Visual Basic
No form number db2tdx80
Information Catalog CenterTutorial
No form number db2aix80
Video Central for e-businessTutorial
No form number db2twx80
Visual Explain Tutorial No form number db2tvx80
Optional component informationThe information in this category describes how to work with optional DB2components.
The installation directory for this category is doc/htmlcd/%L/opt.
Table 10. Optional component information
Name Form number PDF file name
IBM DB2 Life Sciences DataConnect Planning, Installation,and Configuration Guide
GC27-1235 db2lsx80
IBM DB2 Spatial ExtenderUser’s Guide and Reference
SC27-1226 db2sbx80
IBM DB2 Universal DatabaseData Links ManagerAdministration Guide andReference
SC27-1221 db2z0x80
Appendix A. DB2 Universal Database technical information 117

Table 10. Optional component information (continued)
Name Form number PDF file name
IBM DB2 Universal DatabaseNet Search ExtenderAdministration andProgramming GuideNote: HTML for thisdocument is not installedfrom the HTMLdocumentation CD.
SH12-6740 N/A
Release notesThe release notes provide additional information specific to your product’srelease and FixPak level. They also provides summaries of the documentationupdates incorporated in each release and FixPak.
Table 11. Release notes
Name Form number PDF file name HTML directory
DB2 Release Notes See note. See note. doc/prodcd/%L/db2ir
where %L is thelanguage identifier.
DB2 Connect ReleaseNotes
See note. See note. doc/prodcd/%L/db2cr
where %L is thelanguage identifier.
DB2 Installation Notes Available onproduct CD-ROMonly.
Available onproduct CD-ROMonly.
Note: The HTML version of the release notes is available from theInformation Center and on the product CD-ROMs. To view the ASCIIfile:v On UNIX-based platforms, see the Release.Notes file. This file is
located in the DB2DIR/Readme/%L directory, where %L represents thelocale name and DB2DIR represents:– /usr/opt/db2_08_01 on AIX– /opt/IBM/db2/V8.1 on all other UNIX operating systems
v On other platforms, see the RELEASE.TXT file. This file is located inthe directory where the product is installed.
Related tasks:
v “Printing DB2 books from PDF files” on page 119
118 Data Links Manager Quick Beginnings

v “Ordering printed DB2 books” on page 120v “Accessing online help” on page 120v “Finding product information by accessing the DB2 Information Center
from the administration tools” on page 124v “Viewing technical documentation online directly from the DB2 HTML
Documentation CD” on page 125
Printing DB2 books from PDF files
You can print DB2 books from the PDF files on the DB2 PDF DocumentationCD. Using Adobe Acrobat Reader, you can print either the entire book or aspecific range of pages.
Prerequisites:
Ensure that you have Adobe Acrobat Reader. It is available from the AdobeWeb site at www.adobe.com
Procedure:
To print a DB2 book from a PDF file:1. Insert the DB2 PDF Documentation CD. On UNIX operating systems,
mount the DB2 PDF Documentation CD. Refer to your Quick Beginningsbook for details on how to mount a CD on UNIX operating systems.
2. Start Adobe Acrobat Reader.3. Open the PDF file from one of the following locations:
v On Windows operating systems:x:\doc\language directory, where x represents the CD-ROM drive letterand language represents the two-character territory code that representsyour language (for example, EN for English).
v On UNIX operating systems:/cdrom/doc/%L directory on the CD-ROM, where /cdrom represents themount point of the CD-ROM and %L represents the name of the desiredlocale.
Related tasks:
v “Ordering printed DB2 books” on page 120v “Finding product information by accessing the DB2 Information Center
from the administration tools” on page 124v “Viewing technical documentation online directly from the DB2 HTML
Documentation CD” on page 125
Related reference:
Appendix A. DB2 Universal Database technical information 119

v “Overview of DB2 Universal Database technical information” on page 111
Ordering printed DB2 books
Procedure:
To order printed books:v Contact your IBM authorized dealer or marketing representative. To find a
local IBM representative, check the IBM Worldwide Directory of Contacts atwww.ibm.com/shop/planetwide
v Phone 1-800-879-2755 in the United States or 1-800-IBM-4YOU in Canada.v Visit the IBM Publications Center at
www.ibm.com/shop/publications/order
Related tasks:
v “Printing DB2 books from PDF files” on page 119v “Finding topics by accessing the DB2 Information Center from a browser”
on page 122v “Viewing technical documentation online directly from the DB2 HTML
Documentation CD” on page 125
Related reference:
v “Overview of DB2 Universal Database technical information” on page 111
Accessing online help
The online help that comes with all DB2 components is available in threetypes:v Window and notebook helpv Command line helpv SQL statement help
Window and notebook help explain the tasks that you can perform in awindow or notebook and describe the controls. This help has two types:v Help accessible from the Help buttonv Infopops
The Help button gives you access to overview and prerequisite information.The infopops describe the controls in the window or notebook. Window andnotebook help are available from DB2 centers and components that have userinterfaces.
120 Data Links Manager Quick Beginnings

Command line help includes Command help and Message help. Commandhelp explains the syntax of commands in the command line processor.Message help describes the cause of an error message and describes anyaction you should take in response to the error.
SQL statement help includes SQL help and SQLSTATE help. DB2 returns anSQLSTATE value for conditions that could be the result of an SQL statement.SQLSTATE help explains the syntax of SQL statements (SQL states and classcodes).
Note: SQL help is not available for UNIX operating systems.
Procedure:
To access online help:v For window and notebook help, click Help or click that control, then click
F1. If the Automatically display infopops check box on the General pageof the Tool Settings notebook is selected, you can also see the infopop for aparticular control by holding the mouse cursor over the control.
v For command line help, open the command line processor and enter:– For Command help:
? command
where command represents a keyword or the entire command.
For example, ? catalog displays help for all the CATALOG commands,while ? catalog database displays help for the CATALOG DATABASEcommand.
v For Message help:? XXXnnnnn
where XXXnnnnn represents a valid message identifier.
For example, ? SQL30081 displays help about the SQL30081 message.v For SQL statement help, open the command line processor and enter:
– For SQL help:? sqlstate or ? class code
where sqlstate represents a valid five-digit SQL state and class coderepresents the first two digits of the SQL state.
For example, ? 08003 displays help for the 08003 SQL state, while ? 08displays help for the 08 class code.
– For SQLSTATE help:
Appendix A. DB2 Universal Database technical information 121
help statement
where statement represents an SQL statement.
For example, help SELECT displays help about the SELECT statement.
Related tasks:
v “Finding topics by accessing the DB2 Information Center from a browser”on page 122
v “Viewing technical documentation online directly from the DB2 HTMLDocumentation CD” on page 125
Finding topics by accessing the DB2 Information Center from a browser
The DB2 Information Center accessed from a browser enables you to accessthe information you need to take full advantage of DB2 Universal Databaseand DB2 Connect. The DB2 Information Center also documents major DB2features and components including replication, data warehousing, metadata,Life Sciences Data Connect, and DB2 extenders.
The DB2 Information Center accessed from a browser is composed of thefollowing major elements:
Navigation treeThe navigation tree is located in the left frame of the browser window.The tree expands and collapses to show and hide topics, the glossary,and the master index in the DB2 Information Center.
Navigation toolbarThe navigation toolbar is located in the top right frame of the browserwindow. The navigation toolbar contains buttons that enable you tosearch the DB2 Information Center, hide the navigation tree, and findthe currently displayed topic in the navigation tree.
Content frameThe content frame is located in the bottom right frame of the browserwindow. The content frame displays topics from the DB2 InformationCenter when you click on a link in the navigation tree, click on asearch result, or follow a link from another topic or from the masterindex.
Prerequisites:
To access the DB2 Information Center from a browser, you must use one ofthe following browsers:v Microsoft Explorer, version 5 or laterv Netscape Navigator, version 6.1 or later
122 Data Links Manager Quick Beginnings

Restrictions:
The DB2 Information Center contains only those sets of topics that you choseto install from the DB2 HTML Documentation CD. If your Web browser returnsa File not found error when you try to follow a link to a topic, you mustinstall one or more additional sets of topics DB2 HTML Documentation CD.
Procedure:
To find a topic by searching with keywords:1. In the navigation toolbar, click Search.2. In the top text entry field of the Search window, enter two or more terms
related to your area of interest and click Search. A list of topics ranked byaccuracy displays in the Results field.Entering more terms increases the precision of your query while reducingthe number of topics returned from your query.
3. In the Results field, click the title of the topic you want to read. The topicdisplays in the content frame.
To find a topic in the navigation tree:1. In the navigation tree, click the book icon of the category of topics related
to your area of interest. A list of subcategories displays underneath theicon.
2. Continue to click the book icons until you find the category containingthe topics in which you are interested. Categories that link to topicsdisplay the category title as an underscored link when you move thecursor over the category title. The navigation tree identifies topics with apage icon.
3. Click the topic link. The topic displays in the content frame.
To find a topic or term in the master index:1. In the navigation tree, click the “Index” category. The category expands to
display a list of links arranged in alphabetical order in the navigation tree.2. In the navigation tree, click the link corresponding to the first character of
the term relating to the topic in which you are interested. A list of termswith that initial character displays in the content frame. Terms that havemultiple index entries are identified by a book icon.
3. Click the book icon corresponding to the term in which you areinterested. A list of subterms and topics displays below the term youclicked. Topics are identified by page icons with an underscored title.
4. Click on the title of the topic that meets your needs. The topic displays inthe content frame.
Appendix A. DB2 Universal Database technical information 123

Related concepts:
v “Accessibility” on page 131v “DB2 Information Center for topics” on page 133
Related tasks:
v “Finding product information by accessing the DB2 Information Centerfrom the administration tools” on page 124
v “Updating the HTML documentation installed on your machine” on page126
v “Troubleshooting DB2 documentation search with Netscape 4.x” on page128
v “Searching the DB2 documentation” on page 129
Related reference:
v “Overview of DB2 Universal Database technical information” on page 111
Finding product information by accessing the DB2 Information Center from theadministration tools
The DB2 Information Center provides quick access to DB2 productinformation and is available on all operating systems for which the DB2administration tools are available.
The DB2 Information Center accessed from the tools provides six types ofinformation.
Tasks Key tasks you can perform using DB2.
ConceptsKey concepts for DB2.
ReferenceDB2 reference information, such as keywords, commands, and APIs.
TroubleshootingError messages and information to help you with common DB2problems.
SamplesLinks to HTML listings of the sample programs provided with DB2.
TutorialsInstructional aid designed to help you learn a DB2 feature.
Prerequisites:
124 Data Links Manager Quick Beginnings

Some links in the DB2 Information Center point to Web sites on the Internet.To display the content for these links, you will first have to connect to theInternet.
Procedure:
To find product information by accessing the DB2 Information Center fromthe tools:1. Start the DB2 Information Center in one of the following ways:
v From the graphical administration tools, click on the InformationCenter icon in the toolbar. You can also select it from the Help menu.
v At the command line, enter db2ic.2. Click the tab of the information type related to the information you are
attempting to find.3. Navigate through the tree and click on the topic in which you are
interested. The Information Center will then launch a Web browser todisplay the information.
4. To find information without browsing the lists, click the Search icon to theright of the list.Once the Information Center has launched a browser to display theinformation, you can perform a full-text search by clicking the Search iconin the navigation toolbar.
Related concepts:
v “Accessibility” on page 131v “DB2 Information Center for topics” on page 133
Related tasks:
v “Finding topics by accessing the DB2 Information Center from a browser”on page 122
v “Searching the DB2 documentation” on page 129
Viewing technical documentation online directly from the DB2 HTMLDocumentation CD
All of the HTML topics that you can install from the DB2 HTMLDocumentation CD can also be read directly from the CD. Therefore, you canview the documentation without having to install it.
Restrictions:
Appendix A. DB2 Universal Database technical information 125

Because the following items are installed from the DB2 product CD and notthe DB2 HTML Documentation CD, you must install the DB2 product to viewthese items:v Tools helpv DB2 Quick Tourv Release notes
Procedure:
1. Insert the DB2 HTML Documentation CD. On UNIX operating systems,mount the DB2 HTML Documentation CD. Refer to your Quick Beginningsbook for details on how to mount a CD on UNIX operating systems.
2. Start your HTML browser and open the appropriate file:v For Windows operating systems:
e:\Program Files\sqllib\doc\htmlcd\%L\index.htm
where e represents the CD-ROM drive, and %L is the locale of thedocumentation that you wish to use, for example, en_US for English.
v For UNIX operating systems:/cdrom/Program Files/sqllib/doc/htmlcd/%L/index.htm
where /cdrom/ represents where the CD is mounted, and %L is the localeof the documentation that you wish to use, for example, en_US forEnglish.
Related tasks:
v “Finding topics by accessing the DB2 Information Center from a browser”on page 122
v “Copying files from the DB2 HTML Documentation CD to a Web Server”on page 128
Related reference:
v “Overview of DB2 Universal Database technical information” on page 111
Updating the HTML documentation installed on your machine
It is now possible to update the HTML installed from the DB2 HTMLDocumentation CD when updates are made available from IBM. This can bedone in one of two ways:v Using the Information Center (if you have the DB2 administration GUI
tools installed).v By downloading and applying a DB2 HTML documentation FixPak .
126 Data Links Manager Quick Beginnings

Note: This will NOT update the DB2 code; it will only update the HTMLdocumentation installed from the DB2 HTML Documentation CD.
Procedure:
To use the Information Center to update your local documentation:1. Start the DB2 Information Center in one of the following ways:
v From the graphical administration tools, click on the InformationCenter icon in the toolbar. You can also select it from the Help menu.
v At the command line, enter db2ic.2. Ensure your machine has access to the external Internet; the updater will
download the latest documentation FixPak from the IBM server ifrequired.
3. Select Information Center —> Update Local Documentation from themenu to start the update.
4. Supply your proxy information (if required) to connect to the externalInternet.
The Information Center will download and apply the latest documentationFixPak, if one is available.
To manually download and apply the documentation FixPak :1. Ensure your machine is connected to the Internet.2. Open the DB2 support page in your Web browser at:
www.ibm.com/software/data/db2/udb/winos2unix/support3. Follow the link for version 8 and look for the ″Documentation FixPaks″
link.4. Determine if the version of your local documentation is out of date by
comparing the documentation FixPak level to the documentation level youhave installed. This current documentation on your machine is at thefollowing level: DB2 v8.1 GA.
5. If there is a more recent version of the documentation available thendownload the FixPak applicable to your operating system. There is oneFixPak for all Windows platforms, and one FixPak for all UNIX platforms.
6. Apply the FixPak:v For Windows operating systems: The documentation FixPak is a self
extracting zip file. Place the downloaded documentation FixPak in anempty directory, and run it. It will create a setup command which youcan run to install the documentation FixPak.
v For UNIX operating systems: The documentation FixPak is acompressed tar.Z file. Uncompress and untar the file. It will create adirectory named delta_install with a script called installdocfix. Runthis script to install the documentation FixPak.
Appendix A. DB2 Universal Database technical information 127

Related tasks:
v “Copying files from the DB2 HTML Documentation CD to a Web Server”on page 128
Related reference:
v “Overview of DB2 Universal Database technical information” on page 111
Copying files from the DB2 HTML Documentation CD to a Web Server
The entire DB2 information library is delivered to you on the DB2 HTMLDocumentation CD, so you can install the library on a Web server for easieraccess. Simply copy to your Web server the documentation for the languagesthat you want.
Procedure:
To copy files from the DB2 HTML Documentation CD to a Web server, use theappropriate path:v For Windows operating systems:
E:\Program Files\sqllib\doc\htmlcd\%L\*.*
where E represents the CD-ROM drive and %L represents the languageidentifier.
v For UNIX operating systems:/cdrom:Program Files/sqllib/doc/htmlcd/%L/*.*
where cdrom represents the CD-ROM drive and %L represents the languageidentifier.
Related tasks:
v “Searching the DB2 documentation” on page 129
Related reference:
v “Supported DB2 interface languages, locales, and code pages” in the QuickBeginnings for DB2 Servers
v “Overview of DB2 Universal Database technical information” on page 111
Troubleshooting DB2 documentation search with Netscape 4.x
Most search problems are related to the Java support provided by webbrowsers. This task describes possible workarounds.
Procedure:
128 Data Links Manager Quick Beginnings

A common problem with Netscape 4.x involves a missing or misplacedsecurity class. Try the following workaround, especially if you see thefollowing line in the browser Java console:Cannot find class java/security/InvalidParameterException
v On Windows operating systems:From the DB2 HTML Documentation CD, copy the supplied x:ProgramFiles\sqllib\doc\htmlcd\locale\InvalidParameterException.class file tothe java\classes\java\security\ directory relative to your Netscapebrowser installation, where x represents the CD-ROM drive letter and localerepresents the name of the desired locale.
Note: You may have to create the java\security\ subdirectory structure.v On UNIX operating systems:
From the DB2 HTML Documentation CD, copy the supplied /cdrom/ProgramFiles/sqllib/doc/htmlcd/locale/InvalidParameterException.class file tothe java/classes/java/security/ directory relative to your Netscapebrowser installation, where cdrom represents the mount point of theCD-ROM and locale represents the name of the desired locale.
Note: You may have to create the java/security/ subdirectory structure.
If your Netscape browser still fails to display the search input window, try thefollowing:v Stop all instances of Netscape browsers to ensure that there is no Netscape
code running on the machine. Then open a new instance of the Netscapebrowser and try to start the search again.
v Purge the browser’s cache.v Try a different version of Netscape, or a different browser.
Related tasks:
v “Searching the DB2 documentation” on page 129
Searching the DB2 documentation
To search DB2’s documentation, you need Netscape 6.1 or higher, orMicrosoft’s Internet Explorer 5 or higher. Ensure that your browser’s Javasupport is enabled.
A pop-up search window opens when you click the search icon in thenavigation toolbar of the Information Center accessed from a browser. If youare using the search for the first time it may take a minute or so to load intothe search window.
Restrictions:
Appendix A. DB2 Universal Database technical information 129

The following restrictions apply when you use the documentation search:v Boolean searches are not supported. The boolean search qualifiers and and
or will be ignored in a search. For example, the following searches wouldproduce the same results:– servlets and beans– servlets or beans
v Wildcard searches are not supported. A search on java* will only look forthe literal string java* and would not, for example, find javadoc.
In general, you will get better search results if you search for phrases insteadof single words.
Procedure:
To search the DB2 documentation:1. In the navigation toolbar, click Search.2. In the top text entry field of the Search window, enter two or more terms
related to your area of interest and click Search. A list of topics ranked byaccuracy displays in the Results field.Entering more terms increases the precision of your query while reducingthe number of topics returned from your query.
3. In the Results field, click the title of the topic you want to read. The topicdisplays in the content frame.
Note: When you perform a search, the first result is automatically loaded intoyour browser frame. To view the contents of other search results, clickon the result in results lists.
Related tasks:
v “Troubleshooting DB2 documentation search with Netscape 4.x” on page128
Online DB2 troubleshooting information
With the release of DB2® UDB Version 8, there will no longer be aTroubleshooting Guide. The troubleshooting information once contained in thisguide has been integrated into the DB2 publications. By doing this, we areable to deliver the most up-to-date information possible. To find informationon the troubleshooting utilities and functions of DB2, access the DB2Information Center from any of the tools.
Refer to the DB2 Online Support site if you are experiencing problems andwant help finding possible causes and solutions. The support site contains a
130 Data Links Manager Quick Beginnings

large, constantly updated database of DB2 publications, TechNotes, APAR(product problem) records, FixPaks, and other resources. You can use thesupport site to search through this knowledge base and find possible solutionsto your problems.
Access the Online Support site atwww.ibm.com/software/data/db2/udb/winos2unix/support, or by clickingthe Online Support button in the DB2 Information Center. Frequentlychanging information, such as the listing of internal DB2 error codes, is nowalso available from this site.
Related concepts:
v “DB2 Information Center for topics” on page 133
Related tasks:
v “Finding product information by accessing the DB2 Information Centerfrom the administration tools” on page 124
Accessibility
Accessibility features help users with physical disabilities, such as restrictedmobility or limited vision, to use software products successfully. These are themajor accessibility features in DB2® Universal Database Version 8:v DB2 allows you to operate all features using the keyboard instead of the
mouse. See “Keyboard Input and Navigation”.v DB2 enables you customize the size and color of your fonts. See “Accessible
Display” on page 132.v DB2 allows you to receive either visual or audio alert cues. See “Alternative
Alert Cues” on page 132.v DB2 supports accessibility applications that use the Java™ Accessibility API.
See “Compatibility with Assistive Technologies” on page 132.v DB2 comes with documentation that is provided in an accessible format.
See “Accessible Documentation” on page 132.
Keyboard Input and Navigation
Keyboard InputYou can operate the DB2 Tools using only the keyboard. You can use keys orkey combinations to perform most operations that can also be done using amouse.
Appendix A. DB2 Universal Database technical information 131

Keyboard FocusIn UNIX-based systems, the position of the keyboard focus is highlighted,indicating which area of the window is active and where your keystrokes willhave an effect.
Accessible DisplayThe DB2 Tools have features that enhance the user interface and improveaccessibility for users with low vision. These accessibility enhancementsinclude support for customizable font properties.
Font SettingsThe DB2 Tools allow you to select the color, size, and font for the text inmenus and dialog windows, using the Tools Settings notebook.
Non-dependence on ColorYou do not need to distinguish between colors in order to use any of thefunctions in this product.
Alternative Alert CuesYou can specify whether you want to receive alerts through audio or visualcues, using the Tools Settings notebook.
Compatibility with Assistive TechnologiesThe DB2 Tools interface supports the Java Accessibility API enabling use byscreen readers and other assistive technologies used by people withdisabilities.
Accessible DocumentationDocumentation for the DB2 family of products is available in HTML format.This allows you to view documentation according to the display preferencesset in your browser. It also allows you to use screen readers and otherassistive technologies.
DB2 tutorials
The DB2® tutorials help you learn about various aspects of DB2 UniversalDatabase. The tutorials provide lessons with step-by-step instructions in theareas of developing applications, tuning SQL query performance, workingwith data warehouses, managing metadata, and developing Web servicesusing DB2.
Before you begin:
Before you can access these tutorials using the links below, you must installthe tutorials from the DB2 HTML Documentation CD-ROM.
132 Data Links Manager Quick Beginnings

If you do not want to install the tutorials, you can view the HTML versions ofthe tutorials directly from the DB2 HTML Documentation CD. PDF versions ofthese tutorials are also available on the DB2 PDF Documentation CD.
Some tutorial lessons use sample data or code. See each individual tutorial fora description of any prerequisites for its specific tasks.
DB2 Universal Database tutorials:
If you installed the tutorials from the DB2 HTML Documentation CD-ROM,you can click on a tutorial title in the following list to view that tutorial.
Business Intelligence Tutorial: Introduction to the Data Warehouse CenterPerform introductory data warehousing tasks using the DataWarehouse Center.
Business Intelligence Tutorial: Extended Lessons in Data WarehousingPerform advanced data warehousing tasks using the Data WarehouseCenter. (Not provided on CD. You can download this tutorial from theDownloads section of the Business Intelligence Solutions Web site athttp://www.ibm.com/software/data/bi/.)
Development Center Tutorial for Video Online using Microsoft® Visual BasicBuild various components of an application using the DevelopmentCenter Add-in for Microsoft Visual Basic.
Information Catalog Center TutorialCreate and manage an information catalog to locate and use metadatausing the Information Catalog Center.
Video Central for e-business TutorialDevelop and deploy an advanced DB2 Web Services application usingWebSphere® products.
Visual Explain TutorialAnalyze, optimize, and tune SQL statements for better performanceusing Visual Explain.
DB2 Information Center for topics
The DB2® Information Center gives you access to all of the information youneed to take full advantage of DB2 Universal Database™ and DB2 Connect™
in your business. The DB2 Information Center also documents major DB2features and components including replication, data warehousing, theInformation Catalog Center, Life Sciences Data Connect, and DB2 extenders.
The DB2 Information Center accessed from a browser has the followingfeatures:
Appendix A. DB2 Universal Database technical information 133

Regularly updated documentationKeep your topics up-to-date by downloading updated HTML.
SearchSearch all of the topics installed on your workstation by clickingSearch in the navigation toolbar.
Integrated navigation treeLocate any topic in the DB2 library from a single navigation tree. Thenavigation tree is organized by information type as follows:v Tasks provide step-by-step instructions on how to complete a goal.v Concepts provide an overview of a subject.v Reference topics provide detailed information about a subject,
including statement and command syntax, message help,requirements.
Master indexAccess the information in topics and tools help from one masterindex. The index is organized in alphabetical order by index term.
Master glossaryThe master glossary defines terms used in the DB2 InformationCenter. The glossary is organized in alphabetical order by glossaryterm.
Related tasks:
v “Finding topics by accessing the DB2 Information Center from a browser”on page 122
v “Finding product information by accessing the DB2 Information Centerfrom the administration tools” on page 124
v “Updating the HTML documentation installed on your machine” on page126
134 Data Links Manager Quick Beginnings

Appendix B. Notices
IBM may not offer the products, services, or features discussed in thisdocument in all countries. Consult your local IBM representative forinformation on the products and services currently available in your area. Anyreference to an IBM product, program, or service is not intended to state orimply that only that IBM product, program, or service may be used. Anyfunctionally equivalent product, program, or service that does not infringeany IBM intellectual property right may be used instead. However, it is theuser’s responsibility to evaluate and verify the operation of any non-IBMproduct, program, or service.
IBM may have patents or pending patent applications covering subject matterdescribed in this document. The furnishing of this document does not giveyou any license to these patents. You can send license inquiries, in writing, to:
IBM Director of LicensingIBM CorporationNorth Castle DriveArmonk, NY 10504-1785U.S.A.
For license inquiries regarding double-byte (DBCS) information, contact theIBM Intellectual Property Department in your country/region or sendinquiries, in writing, to:
IBM World Trade Asia CorporationLicensing2-31 Roppongi 3-chome, Minato-kuTokyo 106, Japan
The following paragraph does not apply to the United Kingdom or anyother country/region where such provisions are inconsistent with local law:INTERNATIONAL BUSINESS MACHINES CORPORATION PROVIDES THISPUBLICATION “AS IS” WITHOUT WARRANTY OF ANY KIND, EITHEREXPRESS OR IMPLIED, INCLUDING, BUT NOT LIMITED TO, THEIMPLIED WARRANTIES OF NON-INFRINGEMENT, MERCHANTABILITY,OR FITNESS FOR A PARTICULAR PURPOSE. Some states do not allowdisclaimer of express or implied warranties in certain transactions; therefore,this statement may not apply to you.
This information could include technical inaccuracies or typographical errors.Changes are periodically made to the information herein; these changes willbe incorporated in new editions of the publication. IBM may make
© Copyright IBM Corp. 1998-2002 135

improvements and/or changes in the product(s) and/or the program(s)described in this publication at any time without notice.
Any references in this information to non-IBM Web sites are provided forconvenience only and do not in any manner serve as an endorsement of thoseWeb sites. The materials at those Web sites are not part of the materials forthis IBM product, and use of those Web sites is at your own risk.
IBM may use or distribute any of the information you supply in any way itbelieves appropriate without incurring any obligation to you.
Licensees of this program who wish to have information about it for thepurpose of enabling: (i) the exchange of information between independentlycreated programs and other programs (including this one) and (ii) the mutualuse of the information that has been exchanged, should contact:
IBM Canada LimitedOffice of the Lab Director8200 Warden AvenueMarkham, OntarioL6G 1C7CANADA
Such information may be available, subject to appropriate terms andconditions, including in some cases payment of a fee.
The licensed program described in this document and all licensed materialavailable for it are provided by IBM under terms of the IBM CustomerAgreement, IBM International Program License Agreement, or any equivalentagreement between us.
Any performance data contained herein was determined in a controlledenvironment. Therefore, the results obtained in other operating environmentsmay vary significantly. Some measurements may have been made ondevelopment-level systems, and there is no guarantee that thesemeasurements will be the same on generally available systems. Furthermore,some measurements may have been estimated through extrapolation. Actualresults may vary. Users of this document should verify the applicable data fortheir specific environment.
Information concerning non-IBM products was obtained from the suppliers ofthose products, their published announcements, or other publicly availablesources. IBM has not tested those products and cannot confirm the accuracyof performance, compatibility, or any other claims related to non-IBMproducts. Questions on the capabilities of non-IBM products should beaddressed to the suppliers of those products.
136 Data Links Manager Quick Beginnings
All statements regarding IBM’s future direction or intent are subject to changeor withdrawal without notice, and represent goals and objectives only.
This information may contain examples of data and reports used in dailybusiness operations. To illustrate them as completely as possible, the examplesinclude the names of individuals, companies, brands, and products. All ofthese names are fictitious, and any similarity to the names and addresses usedby an actual business enterprise is entirely coincidental.
COPYRIGHT LICENSE:
This information may contain sample application programs, in sourcelanguage, which illustrate programming techniques on various operatingplatforms. You may copy, modify, and distribute these sample programs inany form without payment to IBM for the purposes of developing, using,marketing, or distributing application programs conforming to the applicationprogramming interface for the operating platform for which the sampleprograms are written. These examples have not been thoroughly tested underall conditions. IBM, therefore, cannot guarantee or imply reliability,serviceability, or function of these programs.
Each copy or any portion of these sample programs or any derivative workmust include a copyright notice as follows:
© (your company name) (year). Portions of this code are derived from IBMCorp. Sample Programs. © Copyright IBM Corp. _enter the year or years_. Allrights reserved.
Appendix B. Notices 137
Trademarks
The following terms are trademarks of International Business MachinesCorporation in the United States, other countries, or both, and have been usedin at least one of the documents in the DB2 UDB documentation library.
ACF/VTAMAISPOAIXAIXwindowsAnyNetAPPNAS/400BookManagerC Set++C/370CICSDatabase 2DataHubDataJoinerDataPropagatorDataRefresherDB2DB2 ConnectDB2 ExtendersDB2 OLAP ServerDB2 Universal DatabaseDistributed Relational
Database ArchitectureDRDAeServerExtended ServicesFFSTFirst Failure Support TechnologyIBMIMSIMS/ESAiSeries
LAN DistanceMVSMVS/ESAMVS/XANet.DataNetViewOS/390OS/400PowerPCpSeriesQBICQMFRACFRISC System/6000RS/6000S/370SPSQL/400SQL/DSSystem/370System/390SystemViewTivoliVisualAgeVM/ESAVSE/ESAVTAMWebExplorerWebSphereWIN-OS/2z/OSzSeries
The following terms are trademarks or registered trademarks of othercompanies and have been used in at least one of the documents in the DB2UDB documentation library:
Microsoft, Windows, Windows NT, and the Windows logo are trademarks ofMicrosoft Corporation in the United States, other countries, or both.
Intel and Pentium are trademarks of Intel Corporation in the United States,other countries, or both.
138 Data Links Manager Quick Beginnings
Java and all Java-based trademarks are trademarks of Sun Microsystems, Inc.in the United States, other countries, or both.
UNIX is a registered trademark of The Open Group in the United States andother countries.
Other company, product, or service names may be trademarks or servicemarks of others.
Appendix B. Notices 139

140 Data Links Manager Quick Beginnings

Index
Aaccess tokens on Windows 37accessibility 131AIX
db2setup versus SMIT 41disk space requirements 41Hierarchical Storage Manager
(HSM) 50installation considerations 41installing DB2 Data Links
Manager 52verifying the DLFM_DB 56
installing DFS ClientEnablers 80
JFS installationconsiderations 47
manually installing Data LinksManager 51
memory requirements 41NFS environment
troubleshooting 61post-installation tasks 56, 57, 76,
78preparing your file system for
DB2 Data Links Manager 66product version levels for
JFS 47registering the Data Links
Server 74registering the DB2 database 72registering the file system 71sample file
viewing 78setting up the DFS disk archive
directory 61system clocks 41TCP/IP port number 41verifying the installation 63verifying the sample file 76
authorizinglinking
Windows 32, 72, 103
Ccommands
cacls 33db2 list database directory 26db2_install 51, 91db2dlmmg 17, 41, 83
commands (continued)db2icrt 27db2imigr 17, 41, 83db2set 17, 41, 83db2setup 52, 53, 90, 93dlff list 30dlfm client_conf 57dlfm server_conf 57dlfm setup 57dlfmcrt 57dmaggr 47hostname 17kta 62nslookup 17pkgadd 51, 91rgy_edit 62
DData Links File Manager (DLFM) 4Data Links Filesystem Filter
(DLFF) 4Data Links Manager
memory requirementsAIX 41Solaris Operating
Environment 83Windows 17
supported systems 3system requirements
AIX 41Solaris Operating
Environment 83Windows 17
version levels with DB2 server onWindows 17
Data Links Manager administratoruser ID
AIX 41Solaris Operating
Environment 83data manager application
(DMAPP) 53DATALINK data type
overview 10DB2 books
ordering 120DB2 client
use with Data Links Manager 6DB2 Data Links Manager
component descriptions 3
DB2 Data Links Manager (continued)DB2 server, use of 6file system paradigm 7overview 2typical setups 13working with applications 9
DB2 documentation searchusing Netscape 4.x 128
DB2 Information Center 133DB2 Product Library and Messages
AIX, installing manually 57DB2 tutorials 132DB2 Universal Database servers
use by DB2 Data LinksManager 6
db2cshrc script 57db2profile script 57db2setup command
AIX 52installing DB2 Data Links
ManagerAIX 51Solaris Operating
Environment 90, 91DCE identity 47DCE-DFS
Data Links DFS ClientEnabler 47
Data Links Manager 47installation 47keytab file 62operating system levels 47post-installation tasks 61restrictions 47setting the disk archive
directory 57version levels supported 47
DFS Clientoverview 6
DFS Client Enablerconfiguring 81db2setup versus SMIT 79disk space requirements 79installing using SMIT 80installing using the DB2 Setup
wizard 80operating system levels 79overview 6system clocks 79
© Copyright IBM Corp. 1998-2002 141

disability 131DLFM user account 17, 41, 83DLFM_DB
verifyingWindows NT 26
DLFS-DMAPPoverview 4
dlmadmin usernameWindows 17
DMAPPpre-start registration 53registering in the DFS pre-start
script 57
Ffile systems
AIX 66DCE-DFS 66JFS 66registering with DLFF on Solaris
Operating Environment 100UFS, preparing on Solaris
Operating Environment 99
HHierarchical Storage Manager
(HSM) 50host names 17
Iinstalling
additional products andcomponents on Solaris 90
AIX, directory 53Data Links Manager
AIX 52Solaris Operating
Environment 90Windows 23
Solaris, directory 93verifying
AIX 63Solaris Operating
Environment 96Windows 27
isochronous delivery 7
JJFS
installation considerations 47Journaled File System (JFS)
DLFM considerations 47
LLogging Manager (DLM) 4
Mmemory requirements
Data Links ManagerAIX 41Solaris Operating
Environment 83Windows 17
migrationDB2 File Manager for Solaris 83DB2 File Manager for
Windows 17from DB2 Data Links for AIX
Version 6.1 41from DB2 Data Links for AIX
Version 7.1 41from DB2 Data Links for AIX
Version 7.2 41on AIX 41on Solaris 83on Windows 17
mounting CD-ROM 51, 91
NNFS environments,
troubleshooting 61NTFS
drive sharing 17formatted drive 17
Oonline
help, accessing 120ordering DB2 books 120
Pport numbers
TCP/IPDLFM on AIX 41DLFM on Solaris Operating
Environment 83DLFM on Windows 17
post-installation tasksAIX using SMIT 57Windows NT 26
printed books, ordering 120privileges
administrator group,Windows 17
Rregistration
Data Links server with DB2AIX 47Windows 35, 74, 105
registration (continued)DB2 database
AIX 72Solaris Operating
Environment 102Windows 31
file system with DLFFAIX 71Solaris Operating
Environment 100NTFS drive with DLFF 30
registryAIX, variables 41, 53, 93Solaris, variables 83Windows, entries 24Windows, variables 17
Ssamples
creatingAIX 73Solaris Operating
Environment 104Windows 33
verifyingAIX 76Solaris Operating
Environment 107Windows 36, 37
viewingAIX 78Solaris Operating
Environment 109Windows NT 39
setup programAIX, actions performed 53, 93Windows, actions performed 24
Solaris Operating Environmentdisk space requirements 83installation considerations 83installation using db2setup 90installing additional products and
components usingdb2setup 90
installing DB2 Data LinksManager
verifying the DLFM_DB 95kernel configuration
parameters 83manually installing Data Links
Manager 91memory requirements 83post-installation tasks 107, 108preparing your file system for
Data Links Manager 99
142 Data Links Manager Quick Beginnings

Solaris Operating Environment(continued)
product version levels forUFS 83
registering the Data Linksserver 105
registering the DB2database 102
registering the file system 100sample file
viewing 109system clocks 83TCP/IP port number 83verifying the installation 96verifying the sample file 107,
108Volume Manager 91
supported systemsData Links Manager 3
system clocksAIX, synchronizing 41Solaris, synchronizing 83Windows, synchronizing 17
system requirementsData Links Manager
AIX 41Solaris Operating
Environment 83Windows 17
TTCP/IP
AIX 41Solaris Operating
Environment 83Windows 17
test environmentsDB2 Data Links server
AIX 66Solaris Operating
Environment 99Windows 29
DB2 serverAIX 66Solaris Operating
Environment 97Windows NT 27
Transarc Distributed ComputingEnvironment (DCE) 47
troubleshootingDB2 documentation search 128online information 130
tutorials 132
UUFS
file system, preparing on SolarisOperating System 99
user accountsrights, on Windows 17
Vverifying
DLM sample fileAIX 76Solaris Operating
Environment 107Windows NT 36
version levelsData Links Manager and DB2
server 17Virtual File System (VFS) 53, 93
WWindows
creating test environments 30installing
DB2 Data Links Manager 23post-installation tasks 27, 36, 37registering
Data Links server 35DB2 database 31
sample fileverifying 36viewing 39
verifyingsample file 37
Index 143

144 Data Links Manager Quick Beginnings

Contacting IBM
In the United States, call one of the following numbers to contact IBM:v 1-800-237-5511 for customer servicev 1-888-426-4343 to learn about available service optionsv 1-800-IBM-4YOU (426-4968) for DB2 marketing and sales
In Canada, call one of the following numbers to contact IBM:v 1-800-IBM-SERV (1-800-426-7378) for customer servicev 1-800-465-9600 to learn about available service optionsv 1-800-IBM-4YOU (1-800-426-4968) for DB2 marketing and sales
To locate an IBM office in your country or region, check IBM’s Directory ofWorldwide Contacts on the web at www.ibm.com/planetwide
Product information
Information regarding DB2 Universal Database products is available bytelephone or by the World Wide Web atwww.ibm.com/software/data/db2/udb
This site contains the latest information on the technical library, orderingbooks, client downloads, newsgroups, FixPaks, news, and links to webresources.
If you live in the U.S.A., then you can call one of the following numbers:v 1-800-IBM-CALL (1-800-426-2255) to order products or to obtain general
information.v 1-800-879-2755 to order publications.
For information on how to contact IBM outside of the United States, go to theIBM Worldwide page at www.ibm.com/planetwide
© Copyright IBM Corp. 1998-2002 145

����
Part Number: CT16CNA
Printed in the United States of Americaon recycled paper containing 10%recovered post-consumer fiber.
GC09-4829-00
(1P)
P/N:
CT16
CNA

Spin
ein
form
atio
n:
��
�IB
M®
DB
2U
nive
rsal
Dat
abas
e™
Dat
aL
inks
Man
ager
Qui
ckBe
ginn
ings
Vers
ion
8