D300S Quick User Guide
65
1
-
Upload
bestbest07 -
Category
Documents
-
view
228 -
download
0
Transcript of D300S Quick User Guide

7/22/2019 D300S Quick User Guide
http://slidepdf.com/reader/full/d300s-quick-user-guide 1/64
1

7/22/2019 D300S Quick User Guide
http://slidepdf.com/reader/full/d300s-quick-user-guide 2/64
2
Table of Contents
Buttons and Dials .......................................... 3
Quick Start Guide .......................................... 6
Memory Card Slots ..................................... 13The Information Display ............................ 16
The Command Dials ................................... 18
Release Mode.............................................. 23
Using the Flash ........................................... 24
Live View ..................................................... 27Recording and Viewing Movies................. 28
Picture Controls.......................................... 32
The Fn Button ............................................. 36
Guides and Tips .......................................... 37Help............................................................................ 37
Two-Button Reset:Restoring Default Settings............................ 37
Connecting a Printer .................................. 38
Copying Pictures to a Computer ............... 41
ViewNX........................................................ 46
Menu Guide................................................. 48D PLAYBACK MENU ............................................ 48
C SHOOTING MENU............................................ 49
A CUSTOM SETTING MENU.............................. 52
B SETUP MENU ...................................................... 60
N RETOUCH MENU .............................................. 63
O MY MENU ............................................................ 64

7/22/2019 D300S Quick User Guide
http://slidepdf.com/reader/full/d300s-quick-user-guide 3/64
3
Buttons and Dials
Depth-of-field preview button
Preview depth of field.
Focus-mode selectorModes S and C (autofocus)
The camera focuses using autofocus (AF) when the shutter-release
button is pressed halfway. In mode S (single-servo AF), focus locks
when the camera focuses. In mode C (continuous-servo AF), the
camera continues to adjust focus until the shutter is released
(0 53).
Mode M (manual)
Focus is adjusted manually using the lens focusing ring.

7/22/2019 D300S Quick User Guide
http://slidepdf.com/reader/full/d300s-quick-user-guide 4/64
4
Buttons and Dials
K (playback) button
View photographs in the
monitor (0 12).
R (info) button
Press once to view the focus point, shutterspeed, aperture, and other shooting
information in the monitor; press again to make
changes to selected settings (0 16, 56).
X (playback zoom in)/
W (thumbnail/playback zoom out) buttonDuring playback, press the X button to zoom in.
When the image is zoomed in, press theW button
to zoom out.
Diopter adjustment control
Rotate until the display in the
viewfinder is in focus (0 9).
O (delete) button(0 12)

7/22/2019 D300S Quick User Guide
http://slidepdf.com/reader/full/d300s-quick-user-guide 5/64
5
AF-area mode selector
Choose how the camera selects the focus point for
autofocus.
H Auto-area AF
The camera automatically detects the subject and selects the
focus point.
I Dynamic-area AF
The user selects the focus point with the multi selector (if
focus selection is locked, rotate the focus selector lock toI).
If the subject briefly leaves the selected focus point in focus
mode C (0 3), the camera will focus based on information
from surrounding focus points (0 53).
K Single-point AF The user selects the focus point with the multi selector (if focus
selection is locked, rotate the focus selector lock to I); the
camera focuses on the subject in the selected focus point only.
Focus point
Metering selector
Rotate the metering selector to choose a metering method.
Z Center-weighted (0 54)
Assigns the greatest weight to the center of the frame.
a Matrix
Meters most of the frame.
b Spot
Meters the selected focus point.
g (Live view) button
Press thea button to frame pictures in the monitor (0 27).

7/22/2019 D300S Quick User Guide
http://slidepdf.com/reader/full/d300s-quick-user-guide 6/64
6
Quick Start Guide
Follow these steps for a quick start with your camera.
1 Attach the strap.
2 Charge the battery.
3 Insert the battery.

7/22/2019 D300S Quick User Guide
http://slidepdf.com/reader/full/d300s-quick-user-guide 7/64
7
4 Attach a lens.
Rotate the lens until it clicks
into place.
5 Insert a memory card.
CompactFlash memory cards:Insert the card into the
CompactFlash card slot with
the front label toward the
monitor (q). When the
memory card is fully
inserted, the eject buttonwill pop up (w) and the
green access lamp will light
briefly.
4 G B
Access lamp
CompactFlash card slot
Eject button
Front

7/22/2019 D300S Quick User Guide
http://slidepdf.com/reader/full/d300s-quick-user-guide 8/64
8
Quick Start Guide
Secure Digital (SD) memory cards:
Holding the card as shown,
slide it into the SD card slot
until it clicks into place. The
green access lamp will light
briefly.
The Write Protect Switch
SD memory cards are equipped with a write protect
switch to prevent accidental loss of data. When this
switch is in the “lock” position, photos can not be
recorded or deleted and the memory card can not be
formatted. To unlock the memory card, slide the
switch to the “write” position.
2 G B
Access lamp
Front
SD card slot
Write-protect switch

7/22/2019 D300S Quick User Guide
http://slidepdf.com/reader/full/d300s-quick-user-guide 9/64
9
6 Turn the camera on.
See page 28 of the User’s
Manual for information on
choosing a language and
setting the time and date.
7 Adjust viewfinder focus.Rotate the diopter control
until the viewfinder display
and focus points are in sharp
focus. When operating the
diopter control with your
eye to the viewfinder, becareful not to put your fingers or fingernails in your eye.
Adjusting Viewfinder Focus
If you are unable to focus the viewfinder as described
above, rotate the AF-area mode selector toK and the
focus mode selector to S (0 11), then frame a high-contrast subject in the center focus point and focus
using autofocus. With the camera in focus, rotate the
diopter control until the subject is clearly focused in
the viewfinder. If necessary, viewfinder focus can be
further adjusted using optional corrective lenses.
7/22/2019 D300S Quick User Guide
http://slidepdf.com/reader/full/d300s-quick-user-guide 10/64
10
Quick Start Guide
8 Choose exposure mode e.
Press theI button and
rotate the main command
dial to select exposure mode
e (programmed auto).
9 Choose single frame release mode.
Hold the releasemode dial lock
release down
and turn the
release mode
dial to S (single
frame).
Main command dial
I button
Release mode dial lockrelease
Release mode dial

7/22/2019 D300S Quick User Guide
http://slidepdf.com/reader/full/d300s-quick-user-guide 11/64
11
10 Rotate the AF-area mode selector toK (single-point AF).
This allows the
focus point to be
selected
manually.
11 Rotate the focus-mode selector to S (single-
servo AF).
The camerafocuses when the
shutter-release
button is pressed
halfway, and
focus locks while
the shutter-
release button is
held in this
postion.
AF-area mode selector
Focus-mode selector
7/22/2019 D300S Quick User Guide
http://slidepdf.com/reader/full/d300s-quick-user-guide 12/64
Quick Start Guide
12
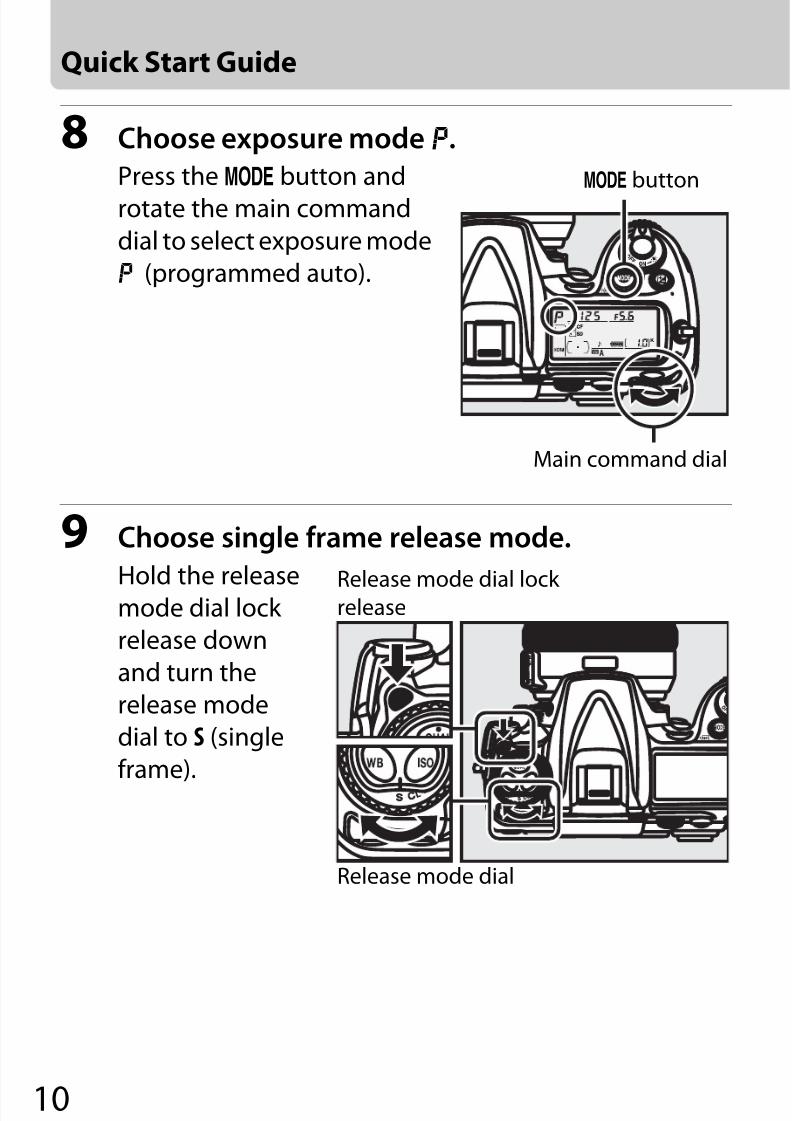
12 Press the shutter-release button halfway tofocus, then press it the rest of the way down to
take the photograph.
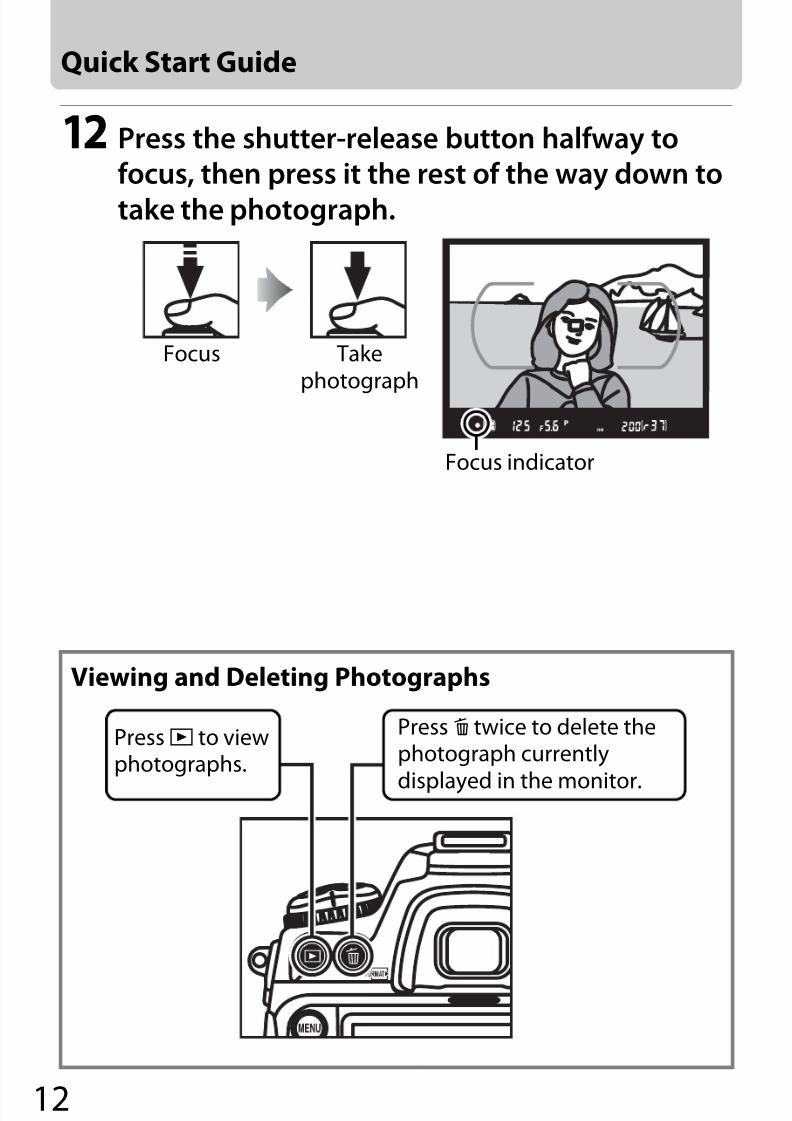
Viewing and Deleting Photographs
Focus indicator
Focus Take
photograph
Press O twice to delete thephotograph currently
displayed in the monitor.
PressK to viewphotographs.
7/22/2019 D300S Quick User Guide
http://slidepdf.com/reader/full/d300s-quick-user-guide 13/64
13
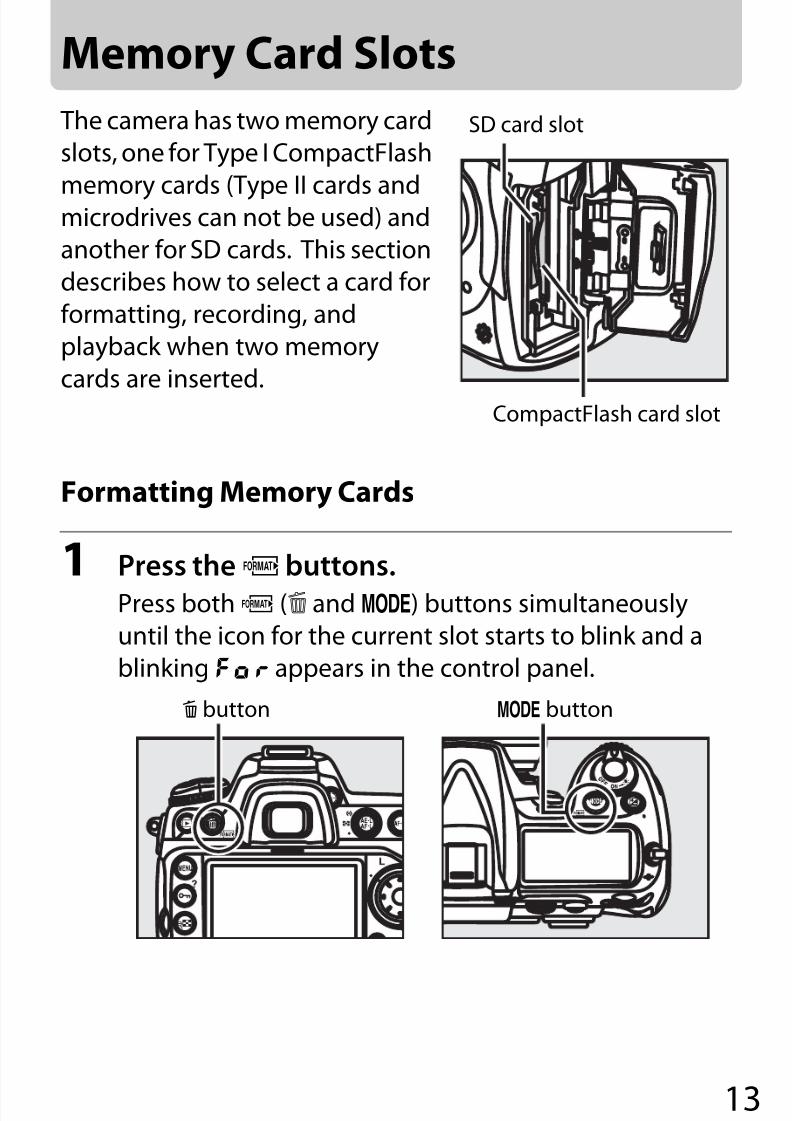
Memory Card Slots
The camera has two memory card
slots, one for Type I CompactFlash
memory cards (Type II cards andmicrodrives can not be used) and
another for SD cards. This section
describes how to select a card for
formatting, recording, and
playback when two memory
cards are inserted.
Formatting Memory Cards
1 Press theQ buttons.
Press bothQ (O andI) buttons simultaneously
until the icon for the current slot starts to blink and a
blinkingC appears in the control panel.
SD card slot
CompactFlash card slot
O button I button

7/22/2019 D300S Quick User Guide
http://slidepdf.com/reader/full/d300s-quick-user-guide 14/64
14
Memory Card Slots
2 Select a memory card.
Rotate the main command dial to choose the memory
card that will be formatted.
3 Format the selected card.
Press bothQ buttons again whileC is blinking toformat the selected memory card.
Using Two Memory Cards
When two memory cards are inserted, use the Primary slot
selection item in the shooting menu to choose one as the
primary card for storing photographs and use Secondary
slot function to choose the role played by each card.
Formatting Memory Cards
Memory cards can also be formatted in the setup menu
(0 60).
Main command dial

7/22/2019 D300S Quick User Guide
http://slidepdf.com/reader/full/d300s-quick-user-guide 15/64
15
Primary Slot SelectionSelectJ CF card slot to designate the card in the CompactFlashcard slot as the primary card,K SD card slot to choose the SD
memory card.
Secondary Slot FunctionChoose the roles played by the primary and secondary cards.
Choosing a Memory CardIf two memory cards are inserted,
you can select a memory card for
playback by pressing theW
button until the dialog shown at
right is displayed. Highlight the
desired memory card slot and
press2 to display a list of folders,
then highlight a folder and press
J to view the pictures in the selected folder.
P Overflow The secondary card is used only when theprimary card is full.
Q Backup Each new picture is recorded to both cards.
R RAW primary, JPEG secondary
As for Backup, except that the NEF/RAWcopies of photos recorded at settings ofNEF/RAW+JPEG are recorded only to theprimary card and JPEG copies only to thesecondary card.

7/22/2019 D300S Quick User Guide
http://slidepdf.com/reader/full/d300s-quick-user-guide 16/64
16
The Information Display
Shooting information, including the focus point, shutter
speed, and aperture, is displayed in the monitor when theR
button is pressed. To change settings for the items listedbelow, press theR button again. Highlight items using the
multi selector and pressJ to view the menu for the selected
item.
1 Shooting menu bank: Choose a shooting menu bank.
2 High ISO noise reduction: Reduce noise at high sensitivities.
3 Active D-Lighting: Prevent loss of detail in highlights and
shadows.4 Color space: Choose from sRGB and Adobe RGB.
5 Depth-of-field preview button assignment: Choose the function
performed by the depth-of-field preview button either
by itself or in combination with the command dials
(0 36).
789 6
3
4
5
2
1
10

7/22/2019 D300S Quick User Guide
http://slidepdf.com/reader/full/d300s-quick-user-guide 17/64
17
6 Fn (Function) button assignment: Choose the function
performed by the Fn button either by itself or in
combination with the command dials (0 36).
7 AE-L/AF-L button assignment: Choose the function performed
by the AE-L/AF-L button either by itself or in combination
with the command dials (0 36).
8 Picture Control: Choose how photographs are processed
after shooting.
9 Long exposure noise reduction: Reduce noise at slow shutterspeeds.
10 Custom Settings bank: Choose a Custom Settings bank.
Tool Tips
A tool tip giving the name of the
selected items appears in the
information display.
Viewing Button Assignments0,2, and4 icons indicate the “button press” function
(0 36) performed respectively by the depth-of-field
preview button, Fn button, and AE-L/AF-L button. The
“button+dials” functions (0 36) are indicated by1,3, and
5 icons. If separate functions have been assigned to
“button press” and “button + dials,” the latter assignmentcan be viewed by pressing theW button.

7/22/2019 D300S Quick User Guide
http://slidepdf.com/reader/full/d300s-quick-user-guide 18/64
18
The Command Dials
The settings that can be adjusted by pressing a button and
rotating a command dial are listed below.
Main command
dial
Sub-command
dial
Control panel

7/22/2019 D300S Quick User Guide
http://slidepdf.com/reader/full/d300s-quick-user-guide 19/64
19
Adjust flash
compensation
Choose flash mode
Select bracketing
increment
Activate or cancel
bracketing/selectnumber of shots in
bracketing sequence

7/22/2019 D300S Quick User Guide
http://slidepdf.com/reader/full/d300s-quick-user-guide 20/64
20
The Command Dials
Choose an image size*
Set image quality*
Fine-tune white
balance*/set color
temperature*/choose
a white balancepreset*
Choose a white
balance setting*
Set ISO sensitivity*
7/22/2019 D300S Quick User Guide
http://slidepdf.com/reader/full/d300s-quick-user-guide 21/64
21
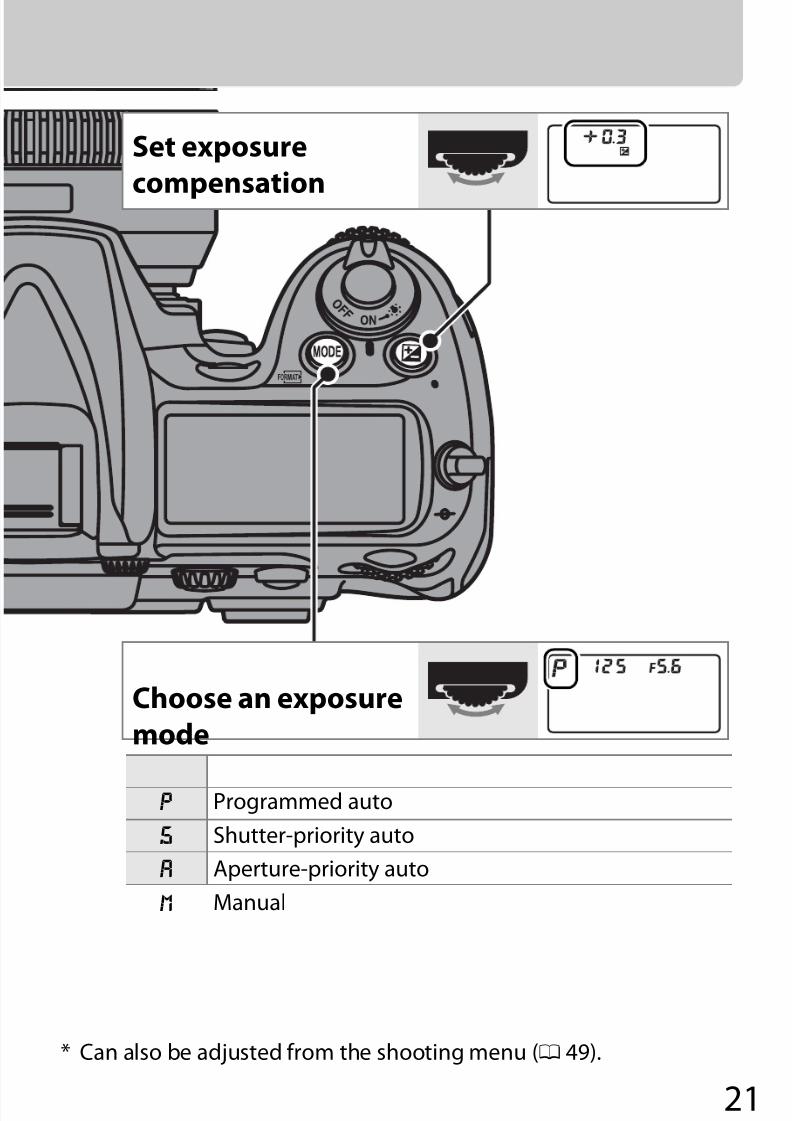
* Can also be adjusted from the shooting menu (0 49).
Choose an exposure
mode
e Programmed auto
f Shutter-priority auto
g Aperture-priority auto
h Manual
Set exposure
compensation

7/22/2019 D300S Quick User Guide
http://slidepdf.com/reader/full/d300s-quick-user-guide 22/64
The Command Dials
22
Once the exposure mode has been selected, the following
settings can be adjusted by rotating the command dials.
e
Choose a
combination of
aperture and
shutter speed
fChoose a shutter
speed
g Choose an aperture
h Choose an aperture
h
Choose a shutter
speed

7/22/2019 D300S Quick User Guide
http://slidepdf.com/reader/full/d300s-quick-user-guide 23/64
23
Release Mode
Choose from the following six release
modes. To choose a release mode, press
the release mode dial lock release (q
) androtate the release mode dial (w).
Mode Description
Single frameOne photograph is taken each timethe shutter-release button ispressed.
Continuouslow speed
The camera takes photographs at aslow rate while the shutter-releasebutton is pressed.
Continuoushigh speed
The camera takes photographs at afast rate while the shutter-releasebutton is pressed.
Quietshutter-release
As for single-frame, except that anynoise made after shooting is kept toa minimum until you remove yourfinger from the shutter-releasebutton, making this mode less noisythan single-frame.
Self-timer Take pictures with the self-timer.
Mirror upRaise the mirror before takingphotographs.
7/22/2019 D300S Quick User Guide
http://slidepdf.com/reader/full/d300s-quick-user-guide 24/64
24
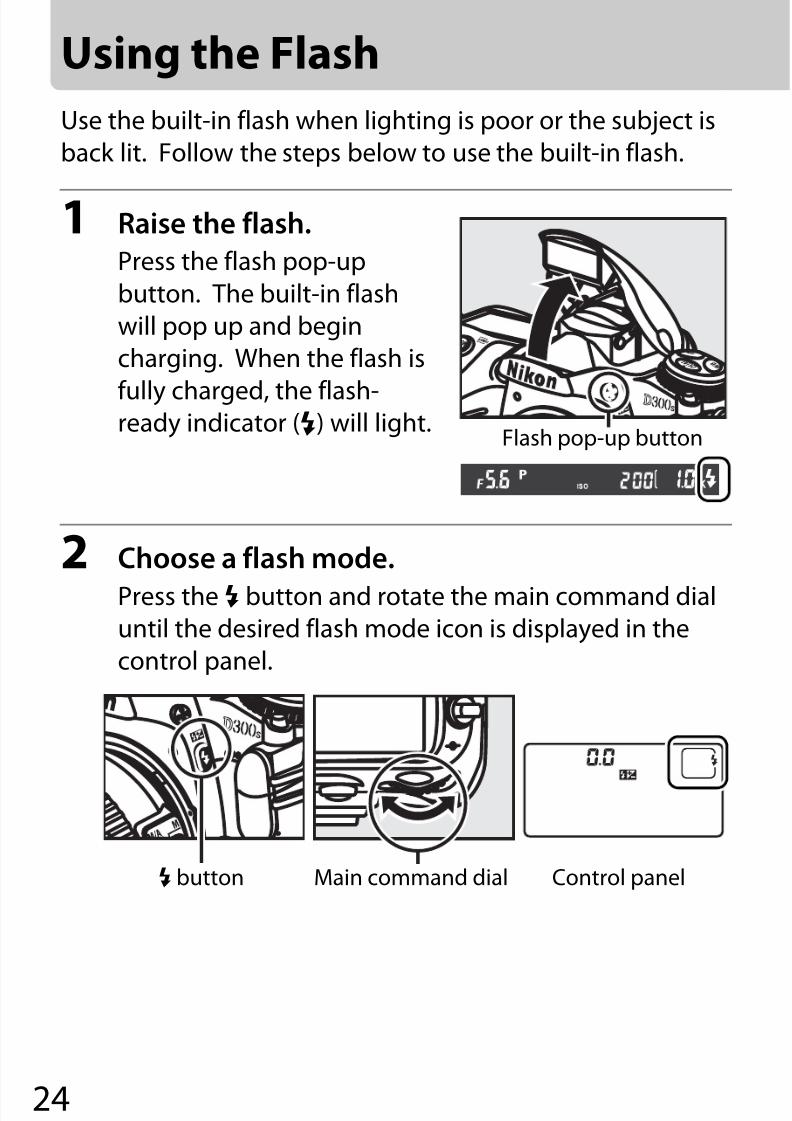
Using the Flash
Use the built-in flash when lighting is poor or the subject is
back lit. Follow the steps below to use the built-in flash.
1 Raise the flash.
Press the flash pop-up
button. The built-in flash
will pop up and begin
charging. When the flash is
fully charged, the flash-ready indicator (c) will light.
2 Choose a flash mode.
Press the M button and rotate the main command dialuntil the desired flash mode icon is displayed in the
control panel.
Flash pop-up button
Control panelMain command dialM button

7/22/2019 D300S Quick User Guide
http://slidepdf.com/reader/full/d300s-quick-user-guide 25/64
25
3 Take pictures.
The built-in flash has a minimum range of 0.6 m (2 ft.). Ifthe flash is raised in continuous low speed (CL) or
continuous high speed (CH) release modes, only onephotograph will be taken each time the shutter-release
button is pressed.
To preview the effects of the flash,
press the depth-of-field preview
button. The camera will emit amodeling preflash (0 58).
Display Mode Display Mode
Front-curtain sync Slow sync
Red-eye reduction Rear-curtain sync
Red-eye reductionwith slow sync

7/22/2019 D300S Quick User Guide
http://slidepdf.com/reader/full/d300s-quick-user-guide 26/64
Using the Flash
26
4 Lower the flash.
Press the flash gently
downward until it clicks into
place.
Flash Sync SpeedIf 1/320 s (Auto FP) is selected for Custom Setting e1 (Flashsync speed,0 57), the built-in flash and optional SB-900,SB-800, SB-600, and SB-R200 flash units can be used at shutterspeeds as fast as 1 /320 s.
Shutter speed
Flash sync speed set to1/320 s (Auto FP)
Built-in flash Optional flash unit1 /8,000–1 /320 s — Auto FP
1 /320–30 s Flash sync

7/22/2019 D300S Quick User Guide
http://slidepdf.com/reader/full/d300s-quick-user-guide 27/64
27
Live View
Follow the steps below to frame pictures in the monitor
using live view.
1 Press thea button.
The mirror will be raised and
the view through the lens
will be displayed in the
camera monitor.
2 Focus.
The camera will focus while
theB button is pressed.
The view in the monitor can
be magnified to check focus
by pressing the X button.
PressJ to exit zoom.
3Check the composition and shoot.
After checking framing and focus, press the shutter-
release button all the way down to shoot. You will hear
two clicks as the mirror drops into place and the shutter
is released.
“Tripod” and “Hand-Held”
Use Live view mode option in the shooting menu tochoose between tripod and hand-held modes (0 52).
[ 20 m 00s s]
AUTONORM
A [120m 00s]
a button
B button

7/22/2019 D300S Quick User Guide
http://slidepdf.com/reader/full/d300s-quick-user-guide 28/64
28
Recording and Viewing Movies
Recording Movies
Movies can be recorded at 24 fps in live view mode.
1 Press thea button.
The mirror will be raised and
the view through the lens
will be displayed in thecamera monitor.
2 Focus. The camera will focus while
theB button is pressed.
Using an External Microphone
Instead of the built-in microphone, commercially-available
external microphones can be used to avoid picking up
sounds produced by the lens during focusing or vibration
reduction. Stereo recording is available with any
microphone that has a stereo mini-pin jack (3.5mm
diameter).
[ 20 m 00s s]
AUTONORM
A [120m 00s]
a button
B button

7/22/2019 D300S Quick User Guide
http://slidepdf.com/reader/full/d300s-quick-user-guide 29/64
29
3 Start recording.
Press the center of the multi
selector to start recording.
Both video and sound are
recorded; do not cover the
microphone during
recording (the built-in
microphone is located on
the front of the camera). Arecording indicator and the
time available are displayed
in the monitor. The camera
can be focused by pressing
theB button.
4 End recording.
Press the center of the multi selector again to end
recording.
Recording indicator
Time remaining

7/22/2019 D300S Quick User Guide
http://slidepdf.com/reader/full/d300s-quick-user-guide 30/64
30
Recording and Viewing Movies
Viewing Movies
Movies are indicated by a1 icon in full-frame playback.
The following operations can be performed while a movie is
displayed:
1 icon Recording time
To Use Description
PlayPlay movie or resume playback whenmovie is paused or during rewind/advance.
Pause or Pause playback.

7/22/2019 D300S Quick User Guide
http://slidepdf.com/reader/full/d300s-quick-user-guide 31/64
31
Rewind/advance
While playback is in progress, speeddoubles with each press; keep pressed to
skip to beginning or end of movie. While playback is paused, movie rewindsor advances one frame at a time; keeppressed for continuous rewind oradvance.
Adjustvolume X or
Press X to increase volume,W todecrease.
Trimmovie
PressJ when movie is paused to createa trimmed copy.
Resumeshooting
Monitor turns off. Photographs can betaken immediately.
Display
menus G Display menus.
Exit or Exit to full-frame playback.
To Use Description

7/22/2019 D300S Quick User Guide
http://slidepdf.com/reader/full/d300s-quick-user-guide 32/64
32
Picture Controls
Quickly select the final look for your photographs by
choosing a pre-existing Picture Control from the Picture
Control menu, or make separate detailed adjustments toindividual Picture Control settings.
Preset Picture Controls
Q Standard Standard processing for balanced results.
R Neutral Minimal processing for natural results.
S VividPictures are enhanced for a vivid, photoprinteffect.
T Monochrome Take monochrome photographs.
7/22/2019 D300S Quick User Guide
http://slidepdf.com/reader/full/d300s-quick-user-guide 33/64
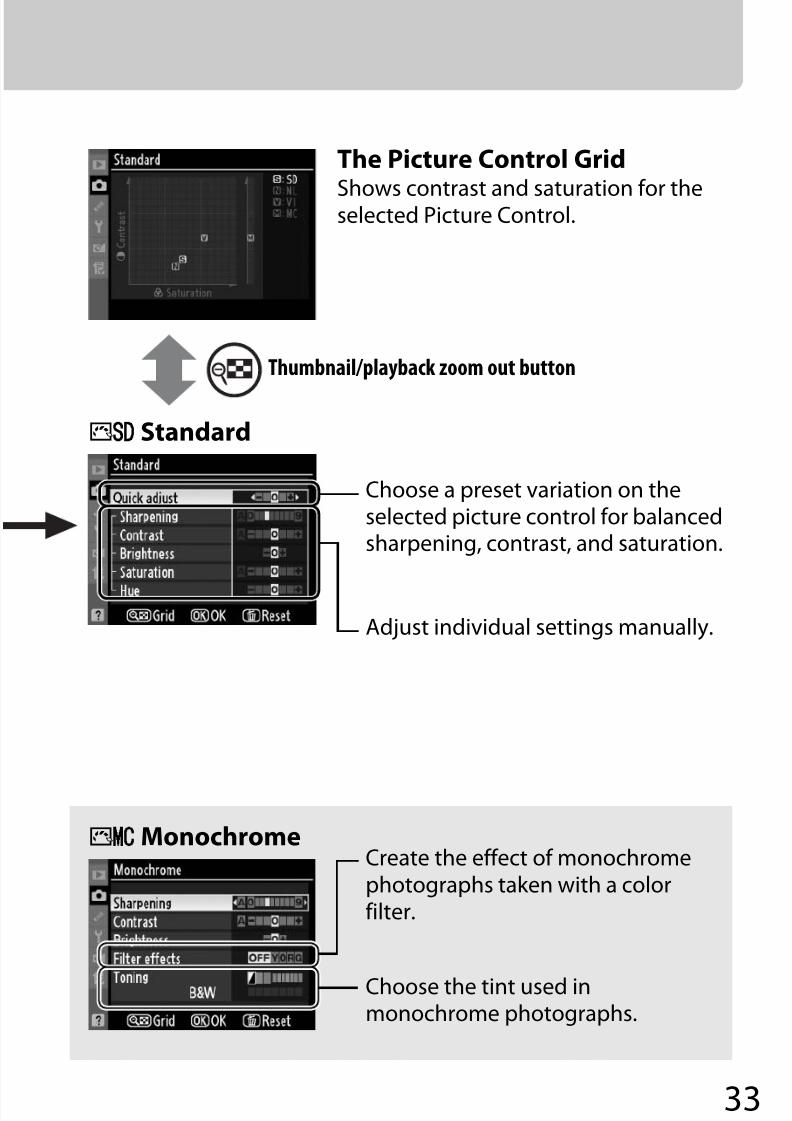
33
Q Standard
Choose a preset variation on theselected picture control for balancedsharpening, contrast, and saturation.
T Monochrome
Choose the tint used inmonochrome photographs.
Create the effect of monochromephotographs taken with a colorfilter.
The Picture Control Grid
Shows contrast and saturation for theselected Picture Control.
Adjust individual settings manually.
Thumbnail/playback zoom out button

7/22/2019 D300S Quick User Guide
http://slidepdf.com/reader/full/d300s-quick-user-guide 34/64
34
Picture Controls
Custom Picture Controls
RenameRename existing custom Picture Controls.
Load/saveSave custom Picture Controls to the memory card, orload custom Picture Controls created with ViewNX(supplied) or optional software such as Capture NX 2.
DeleteDelete custom Picture Controls.
Save/editEdit an existing Picture Control and save it as a new,custom Picture Control.

7/22/2019 D300S Quick User Guide
http://slidepdf.com/reader/full/d300s-quick-user-guide 35/64
35
Adjust Picture
Control settings.
Choose an existing
Picture Control.
Choose a destinationfor the customPicture Control.
Enter a name. The new PictureControl appears in thePicture Control list.

7/22/2019 D300S Quick User Guide
http://slidepdf.com/reader/full/d300s-quick-user-guide 36/64
36
The Fn Button
Custom Setting f5 (Assign Fn button,
0 59) controls the function performed by
the Fn button, either by itself or incombination with the command dials.*
* Most functions can also be performed using either the depth-of-field preview or AE-L/AF-L button (0 60).
q Preview
e FV lock
B AE/AF lock
C AE lock only
D AE lock (Reset on release)
E AE lock (Hold)
F AF lock only
s Flash off
t Bracketing burst
L Matrix metering
M Center-weighted metering
N Spot metering
K Playback
f Access top item in MYMENU
e + NEF (RAW)
None (default)
v 1 step spd/aperture
w Choose non-CPU lens
number
t Auto bracketing (default)
I Dynamic AF area
None

7/22/2019 D300S Quick User Guide
http://slidepdf.com/reader/full/d300s-quick-user-guide 37/64
37
Guides and Tips
Help
If ad icon is displayed at the bottom left
corner of the monitor, help can bedisplayed by pressing theL (Q) button.
Two-Button Reset: Restoring Default Settings
Camera settings can be restored
to default values by holding the
QUAL andE buttons down
together for more than two
seconds (these buttons aremarked by a green dot). Custom
Settings are not affected.QUAL button E button

7/22/2019 D300S Quick User Guide
http://slidepdf.com/reader/full/d300s-quick-user-guide 38/64
38
Connecting a Printer
The camera can be connected to a PictBridge-compatible
printer and JPEG images printed directly from the camera.
Follow the steps below to print selected pictures one at atime. For more information, see page 228 of User’s Manual .
1 Turn the camera off.
2 Connect the USB cable.
Turn the printer on and connect the USB cable as
shown. Do not use force or attempt to insert the
connectors at an angle.
Printing Via Direct USB Connection
Be sure the EN-EL3e battery is fully charged or use anoptional EH-5a or EH-5 AC adapter.

7/22/2019 D300S Quick User Guide
http://slidepdf.com/reader/full/d300s-quick-user-guide 39/64
39
3 Turn the camera on.
A welcome screen will be displayed in the monitor,
followed by a PictBridge playback display.
4 Select a picture.
Press4 or2 to view
additional pictures, or press
the X button to zoom in onthe current frame (pressK
to exit zoom). To view six
pictures at a time, press the
W button. Use the multi selector to highlight pictures,
or press X to display the highlighted picture full frame.

7/22/2019 D300S Quick User Guide
http://slidepdf.com/reader/full/d300s-quick-user-guide 40/64
Connecting a Printer
40
5 PressJ.
PictBridge printing options
will be displayed. Press1 or
3 to highlight an item and
press2 to display options
for the selected item.
Highlight an option and
pressJ to select and return to previous menu.
6 Start printing.
Select Start printing and
pressJ to start printing. The
PictBridge playback screen
shown in Step 4 will bedisplayed when printing is
complete. To cancel before
all copies have been printed,
pressJ.
J button

7/22/2019 D300S Quick User Guide
http://slidepdf.com/reader/full/d300s-quick-user-guide 41/64
41
Copying Pictures to a Computer
This section describes how to use the supplied UC-E4 USB
cable to connect the camera to a computer.
Before Connecting the CameraBefore connecting the camera, install the software on the
supplied Software Suite CD (see the Install Guide for more
information).
Supplied Software
Nikon Transfer is used to copy photographs from the camerato the computer, where they can be viewed using ViewNX
(Nikon Transfer can also be used to back up photographs
and embed information in photographs as they are
transferred, while ViewNX can be used to sort photographs,
convert images to different file formats, process NEF/RAW
photographs, and modify RAW, TIFF, and JPEG images).
Supported Operating Systems The supplied software can be used on computers running
the following operating systems:
• Windows: Windows Vista Service Pack 1 (32-bit Home
Basic/Home Premium/Business/Enterprise/Ultimate)
and Windows XP Service Pack 3 (Home Edition/
Professional)• Macintosh: Mac OS X (version 10.3.9, 10.4.11, or 10.5.6)

7/22/2019 D300S Quick User Guide
http://slidepdf.com/reader/full/d300s-quick-user-guide 42/64
42
Copying Pictures to a Computer
1 Turn the camera off.
Turn the camera off and confirm that a memory card is
inserted.
2 Turn the computer on and connect thesupplied UC-E4 USB cable as shown below.
Do not use force or attempt to insert the connectors at
an angle. Connect the camera directly to the computer;
do not connect the cable via a USB hub or keyboard.
Copying Pictures to a ComputerBe sure the EN-EL3e battery is fully charged or use an
optional EH-5a or EH-5 AC adapter.

7/22/2019 D300S Quick User Guide
http://slidepdf.com/reader/full/d300s-quick-user-guide 43/64
43
3 Turn the camera on.
Windows Vista: If an AutoPlay dialog is displayed, click
Copy pictures to a folder on my computer using
Nikon Transfer to start Nikon Transfer. To skip the
AutoPlay dialog in future, select Always do this for this
device before clicking the “copy pictures…” option.
Windows XP: If an AutoPlay dialog is displayed, select
Nikon Transfer Copy pictures to a folder on mycomputer and click OK to start Nikon Transfer. To skip
the AutoPlay dialog in future, select Always use this
program for this action before clicking OK.
Macintosh: Nikon Transfer will start automatically if Yes
was selected in the Auto-Launch setting dialog when
Nikon Transfer was first installed.
7/22/2019 D300S Quick User Guide
http://slidepdf.com/reader/full/d300s-quick-user-guide 44/64
44
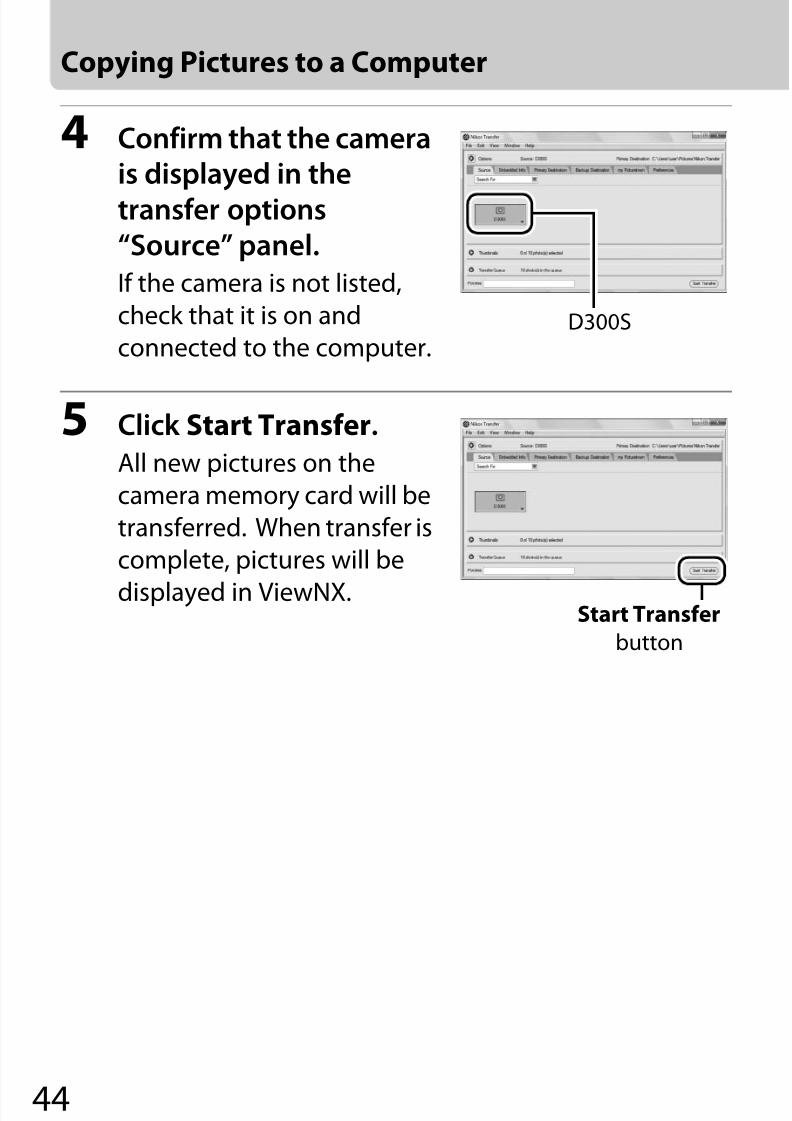
Copying Pictures to a Computer
4 Confirm that the camerais displayed in the
transfer options
“Source” panel.
If the camera is not listed,
check that it is on and
connected to the computer.
5 Click Start Transfer.
All new pictures on the
camera memory card will be
transferred. When transfer is
complete, pictures will be
displayed in ViewNX.
D300S
Start Transfer button

7/22/2019 D300S Quick User Guide
http://slidepdf.com/reader/full/d300s-quick-user-guide 45/64
45
6 Turn the camera off and disconnect the USB
cable.
ViewNX
ViewNX is used to view photographs after they have
been transferred to the computer. ViewNX can alsobe started by:
• Windows: Double-clicking the ViewNX shortcut on
the desktop.
• Macintosh: Clicking the ViewNX icon in the Dock.
Online Help To view online help, start Nikon Transfer or ViewNX
and select the appropriate option from the Help
menu.
7/22/2019 D300S Quick User Guide
http://slidepdf.com/reader/full/d300s-quick-user-guide 46/64
46
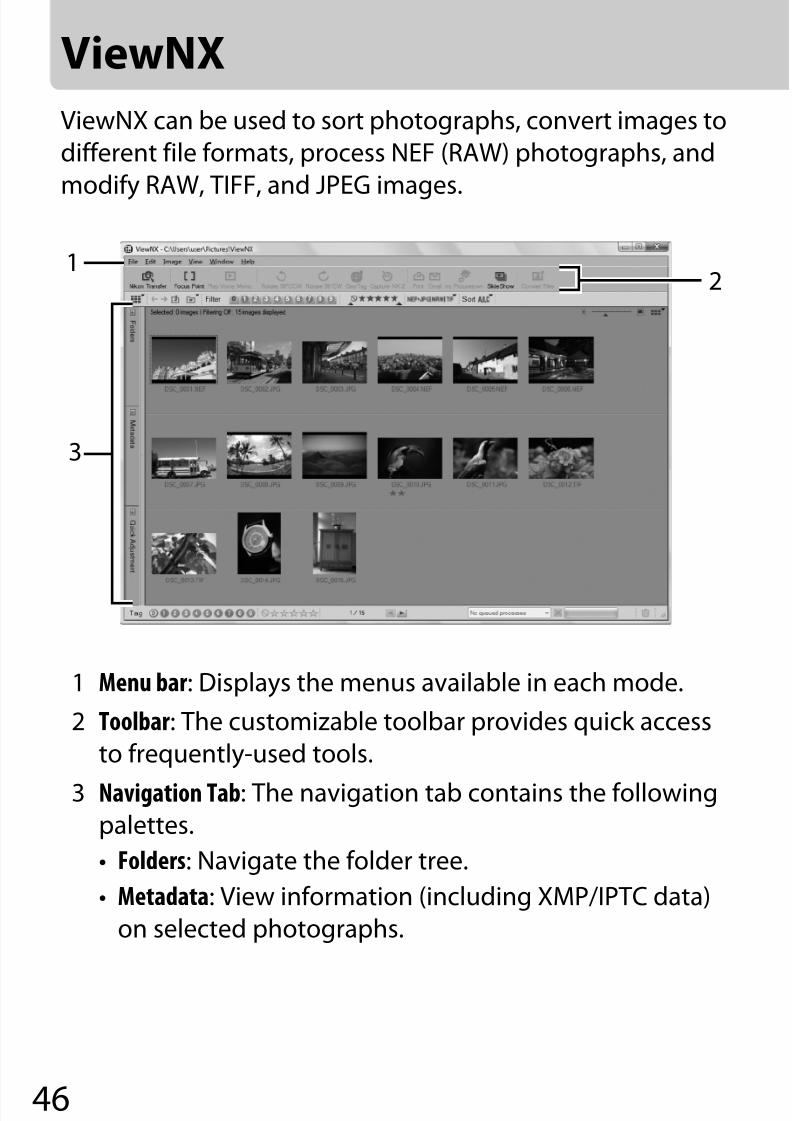
ViewNX
ViewNX can be used to sort photographs, convert images to
different file formats, process NEF (RAW) photographs, and
modify RAW, TIFF, and JPEG images.
1 Menu bar: Displays the menus available in each mode.
2 Toolbar: The customizable toolbar provides quick access
to frequently-used tools.
3 Navigation Tab: The navigation tab contains the followingpalettes.
• Folders: Navigate the folder tree.
• Metadata: View information (including XMP/IPTC data)
on selected photographs.
1
3
2
7/22/2019 D300S Quick User Guide
http://slidepdf.com/reader/full/d300s-quick-user-guide 47/64
47
• Quick Adjustment: Modify images. Adjustments that can
be made to NEF (RAW) images include exposure
compensation, white balance, and Picture Control
settings. Sharpening, contrast, brightness, color
booster, and axial color aberration options are available
with NEF (RAW), TIFF, and JPEG images. NEF (RAW),
TIFF, and JPEG images can also be modified using
D-Lighting HS to enhance contrast while preserving
detail in highlights and shadows.
To view online help, select Help > ViewNX Help from the
menu bar.
7/22/2019 D300S Quick User Guide
http://slidepdf.com/reader/full/d300s-quick-user-guide 48/64
48 D PLAYBACK MENU
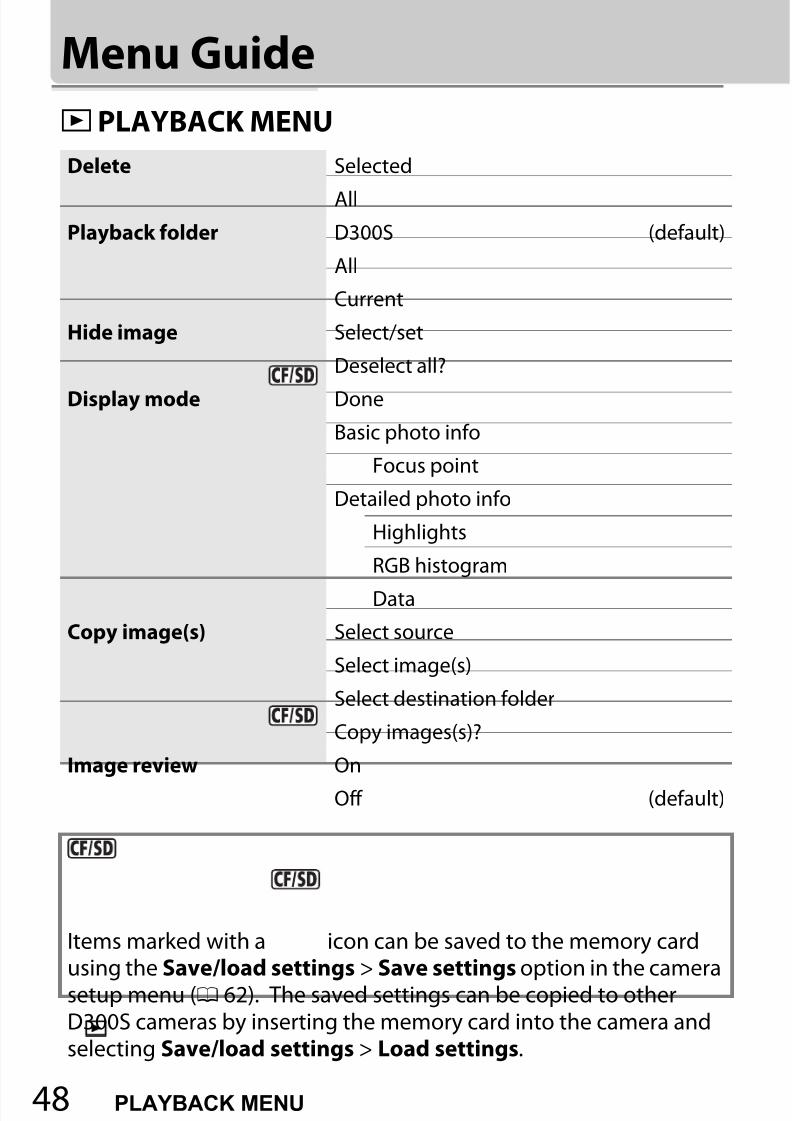
Menu Guide
D PLAYBACK MENU
Delete Selected
All
Playback folder D300S (default)
All
Current
Hide image Select/set
Deselect all?
Display mode Done
Basic photo info
Focus point
Detailed photo info
Highlights
RGB histogram
Data
Copy image(s) Select source
Select image(s)
Select destination folder
Copy images(s)?
Image review On
Off (default)
Items marked with a icon can be saved to the memory cardusing the Save/load settings > Save settings option in the camerasetup menu (0 62). The saved settings can be copied to otherD300S cameras by inserting the memory card into the camera andselecting Save/load settings > Load settings.

7/22/2019 D300S Quick User Guide
http://slidepdf.com/reader/full/d300s-quick-user-guide 49/64
C SHOOTING MENU 49
C SHOOTING MENU
After delete Show next (default)
Show previous
Continue as beforeRotate tall On
Off (default)
Slide show Start
Frame interval
Print set (DPOF) Select/set
Deselect all?
Shooting menu bank A (default)
B
C
D
Rename
Reset shooting menu Yes
No
Active folder New folder number
Select folder
File naming File naming
Primary slot selection CF card slot (default)
SD card slot
Secondary slot function Overflow (default)
Backup
RAW primary, JPEG secondary
The Menu Guide lists the options inthe top two levels of the menus.

7/22/2019 D300S Quick User Guide
http://slidepdf.com/reader/full/d300s-quick-user-guide 50/64
50 C SHOOTING MENU
Menu Guide
Image quality NEF (RAW)+JPEG fine
NEF (RAW)+JPEG normal
NEF (RAW)+JPEG basicNEF (RAW)
TIFF (RGB)
JPEG fine
JPEG normal (default)
JPEG basic
Image size Large (default)
Medium
Small
JPEG compression Size priority (default)
Optimal quality
NEF (RAW) recording Type
NEF (RAW) bit depth
White balance Auto (default)
Incandescent
Fluorescent
Direct sunlight
Flash
Cloudy
Shade
Choose color temp.
Preset manual
(0 20)
(0 20)
(0 20)

7/22/2019 D300S Quick User Guide
http://slidepdf.com/reader/full/d300s-quick-user-guide 51/64
C SHOOTING MENU 51
Set Picture Control Standard (default)
Neutral
VividMonochrome
Manage Picture Control Save/edit
Rename*
Delete*
Load/save
Color space sRGB (default)Adobe RGB
Active D-Lighting Auto
Extra high
High
Normal
LowOff (default)
Long exp. NR On
Off (default)
High ISO NR High
Normal (default)
LowOff
ISO sensitivity settings ISO sensitivity
ISO sensitivity auto control
* Not available if no custom Picture Controls are present.
(0 20)

7/22/2019 D300S Quick User Guide
http://slidepdf.com/reader/full/d300s-quick-user-guide 52/64
52 CUSTOM SETTING MENU
Menu Guide
A CUSTOM SETTING MENU
Live view mode(0 27)
Hand-held
Tripod (default)
Multiple exposure DoneNumber of shots
Auto gain
Movie settings Quality
Microphone
Destination
Interval timer shooting Choose start timeNow
Start time
Interval
Select intvls× no. of shots
Start
Custom setting bank
A (default)
B
C
D
Rename
Reset custom settings
Yes
No

7/22/2019 D300S Quick User Guide
http://slidepdf.com/reader/full/d300s-quick-user-guide 53/64
CUSTOM SETTING MENU 53
a Autofocus
a1 AF-C priority selection Release (default)
Release + focusFocus
a2 AF-S priority selection Release
Focus (default)
a3 Dynamic AF area* 9 points (default)
21 points
51 points51 points (3D-tracking)
a4 Focus tracking withlock-on
Long
Normal (default)
Short
Off
a5 AF activation Shutter/AF-ON (default)AF-ON only
a6 AF point illumination Auto (default)
On
Off
a7 Focus point
wrap-around
Wrap
No wrap (default)a8 AF point selection 51 points (default)
11 points
a9 Built-in AF-assistilluminator
On (default)
Off
* Only applies when focus mode selector is rotated to mode C.

7/22/2019 D300S Quick User Guide
http://slidepdf.com/reader/full/d300s-quick-user-guide 54/64
54 CUSTOM SETTING MENU
Menu Guide
a10 AF-ON for MB-D10 AF-ON (default)
AE/AF lock AE lock only
AE lock (Reset on release)
AE lock (Hold)
AF lock only
Same as Fn button
b Metering/exposure
b1 ISO sensitivity stepvalue
1/3 step (default)
1/2 step
1 step
b2 EV steps for exposurecntrl.
1/3 step (default)
1/2 step
1 step
b3 Exp comp/fine tune 1/3 step (default)
1/2 step
1 step
b4 Easy exposurecompensation
On (Auto reset)
On
Off (default)
b5 Center-weighted area φ 6 mm
φ 8 mm (default)
φ10 mm
φ13 mm
Average
a Autofocus

7/22/2019 D300S Quick User Guide
http://slidepdf.com/reader/full/d300s-quick-user-guide 55/64
CUSTOM SETTING MENU 55
b6 Fine tune optimalexposure
Yes
No (default)
c Timers/AE lock
c1 Shutter-release buttonAE-L
On
Off (default)
c2 Auto meter-off delay 4 s
6 s (default)
8 s
16 s
30 s
1 min
5 min
10 min
30 min
No limit
c3 Self-timer 2 s
5 s
10 s (default)
20 s
c4 Monitor off delay Playback
Menus
Information display
Image review
d Shooting/display
d1 Beep High (default)
Low
Off
b Metering/exposure

7/22/2019 D300S Quick User Guide
http://slidepdf.com/reader/full/d300s-quick-user-guide 56/64
56 CUSTOM SETTING MENU
Menu Guide
d2 Viewfinder grid display On
Off (default)d3 Viewfinder warning
displayOn (default)
Off
d4 Screen tips On (default)
Off
d5 CL mode shootingspeed
7 fps
6 fps5 fps
4 fps
3 fps (default)
2 fps
1 fps
d6 Max. continuousrelease
1–100
d7 File number sequence On (default)
Off
Reset
d8 Information display Auto (default)
Manuald9 LCD illumination On
Off (default)
d10 Exposure delay mode On
Off (default)
d Shooting/display

7/22/2019 D300S Quick User Guide
http://slidepdf.com/reader/full/d300s-quick-user-guide 57/64
CUSTOM SETTING MENU 57
d11 MB-D10 battery type LR6 (AA alkaline) (default)
HR6 (AA Ni-MH)FR6 (AA lithium)
ZR6 (AA Ni-Mn)
d12 Battery order Use MB-D10 batteries first (default)
Use camera battery first
e Bracketing/flash
e1 Flash sync speed 1/320 s (Auto FP)
1/250 s (Auto FP)
1/250 s (default)
1/200 s
1/160 s
1/125 s
1/100 s
1/80 s
1/60 s
d Shooting/display

7/22/2019 D300S Quick User Guide
http://slidepdf.com/reader/full/d300s-quick-user-guide 58/64
58 CUSTOM SETTING MENU
Menu Guide
e2 Flash shutter speed 1/60 s (default)
1/30 s1/15 s
1/8 s
1/4 s
1/2 s
1 s
2 s 4 s
8 s
15 s
30 s
e3 Flash cntrl for built-inflash
TTL (default)
ManualRepeating flash
Commander mode
e3 Optional flash* TTL (default)
Manual
Repeating flash
Commander modee4 Modeling flash On (default)
Off
* Changes to Optional flash when an optional SB-400 flash unit isattached and turned on.
e Bracketing/flash

7/22/2019 D300S Quick User Guide
http://slidepdf.com/reader/full/d300s-quick-user-guide 59/64
CUSTOM SETTING MENU 59
e5 Auto bracketing set AE & flash (default)
AE onlyFlash only
WB bracketing
ADL bracketing
e6 Auto bracketing(Mode M)
Flash/speed (default)
Flash/speed/aperture
Flash/apertureFlash only
e7 Bracketing order MTR > under > over (default)
Under > MTR > over
f Controls
f1 D switch LCD backlight (D) (default)
D and information display
f2 Multi selector centerbutton*
Shooting mode
Playback mode
f3 Multi selector Reset meter-off delay
Do nothing (default)
f4 Photo info/playback InfoC /PlaybackD
InfoD /PlaybackC (default)
f5 Assign Fn button (0 36) Fn button press
Fn button+dials
* The default for Shooting mode is Select center focus point. Thedefault for Playback mode is Thumbnail on/off .
e Bracketing/flash

7/22/2019 D300S Quick User Guide
http://slidepdf.com/reader/full/d300s-quick-user-guide 60/64
60 SETUP MENU
Menu Guide
B SETUP MENU
f6 Assign preview button Preview button press
Preview+command dialsf7 Assign AE-L/AF-L
buttonAE-L/AF-L button press
AE-L/AF-L+command dials
f8 Customize commanddials
Reverse rotation
Change main/sub
Aperture setting
Menus and playback f9 Release button to use
dialYes
No (default)
f10 No memory card? Release locked
Enable release (default)
f11 Reverse indicators (default)
Format memory card CF card slot
SD card slot
LCD brightness –3 – +3
Clean image sensor Clean now
Clean at startup/shutdown
Lock mirror up forcleaning
Start
Video mode NTSC
PAL
f Controls

7/22/2019 D300S Quick User Guide
http://slidepdf.com/reader/full/d300s-quick-user-guide 61/64
SETUP MENU 61
HDMI Auto (default)
480p (progressive)
576p (progressive) 720p (progressive)
1080i (interlaced)
Time zone and date Time zone
Date and time
Date format
Daylight saving timeLanguage

7/22/2019 D300S Quick User Guide
http://slidepdf.com/reader/full/d300s-quick-user-guide 62/64
62 SETUP MENU
Menu Guide
Image comment Done
Input comment
Attach commentAuto image rotation On (default)
Off
Image Dust Off ref photo Start
Clean sensor and then start
Battery info –
Wireless transmitter Mode Transfer settings
Device info
Device settings
Image authentication On
Off (default)Copyright information Done
Artist
Copyright
Attach copyright information
Save/load settings Save settings
Load settingsGPS Auto meter off
Position
Virtual horizon –

7/22/2019 D300S Quick User Guide
http://slidepdf.com/reader/full/d300s-quick-user-guide 63/64
N RETOUCH MENU 63
N RETOUCH MENU
Non-CPU lens data Done
Lens number
Focal length (mm)Maximum aperture
AF fine tune AF fine tune (On/Off)
Saved value
Default
List saved values
Eye-Fi upload*
Enable (default)Disable
Firmware version –
* Only available when compatible Eye-Fi memory card is inserted.
D-Lighting –
Red-eye correction –
Trim –
Monochrome Black-and-white
Sepia
Cyanotype
Filter effects Skylight
Warm filter
Color balance –
Image overlay –
NEF (RAW) processing –

7/22/2019 D300S Quick User Guide
http://slidepdf.com/reader/full/d300s-quick-user-guide 64/64
Menu Guide
O MY MENU
Resize Select image
Choose destination
Choose sizeEdit movie Choose start point
Choose end point
Side-by-side comparison* –
* Available only if theJ button is pressed to display the retouchmenu during full-frame playback.
Add items Playback menu
Shooting menu
Custom setting menu
Setup menu
Retouch menuRemove items* –
Rank items –
Choose tab My menu
Recent settings
* Items can also be deleted by highlighting them in MY MENU and
pressing the O button twice.