D2 Acoustical Measurement System Quick Start Guide · Acoustical Measurement System (D2 Plexer and...
11
D2 Acoustical Measurement System Quick Start Guide Version 1.6 AcoustX LLC 122 Calistoga Road #318 Santa Rosa, CA 95409 Tel: 707-537-1310 Fax: 707-537-1320 www.acoustx.us www.acoustxllc.com
Transcript of D2 Acoustical Measurement System Quick Start Guide · Acoustical Measurement System (D2 Plexer and...

D2 Acoustical Measurement SystemQuick Start Guide
Version 1.6
AcoustX LLC122 Calistoga Road #318
Santa Rosa, CA 95409Tel: 707-537-1310
Fax: 707-537-1320www.acoustx.us
www.acoustxllc.com

Welcome to the AcoustX D2 AcousticalMeasurement System and win|RTA software. This guide will provide you with an overview ofsetting up and connecting the hardware, andinstalling and running the software. The QuickStart Guide serves as basic reference for the D2 system, but is not intended as a detailedguide to operation of the system. More detailedreference information regarding system operationand the performance of acoustical tests is providedonline and through separately offered trainingseminars. Contact AcoustX regarding availabilityof training seminars.
The Quick Start Guide is organized as follows:
System Diagram (p.3)
This diagram provides a general overview of all the elements of the D2 AcousticalMeasurement System, including a descriptionof their function, and their relation to other system components.
Connection Diagram (p.4)
The connection diagram depicts in detailthe physical connections necessary to operate the D2 as described in this and other documents. Included are connector and cable types, and special notes regardingconditions that must be met for proper system operation.
D2 Plexer Panel Diagrams (p.5)
These diagrams describe in detail the locationand function of all connectors, controls, and indicators on the D2 Plexer.
D2 Controller Panel Diagrams (p.5)
These diagrams describe in detail the location and function of all connectors, controls, and indicators on the D2 Controller.
USBPre Panel Diagrams (p.6)
These diagrams describe in detail the location and function of all connectors, controls, and indicators on the USBPre Digital Audio Interface.
Software Installation and Startup (p.7)
This section describes the steps necessaryto successfully install the win|RTA software from the distribution disk, and run the installed software.
win|RTA Software Screen (p.8)
This diagram provides an overview of the mainsoftware window of the win|RTA operating software, with labels indicating the function and usage of all user-interface elements.
win|RTA Config Screen (p.9)
win|RTA X-Y Scope Screen (p.10)
win|RTA Dual Trace Scope (p.11)
D2 Acoustical Measurement System: Quick Start Guide
page 2

page 3
Audio
Audio and Control
Microphones The D2 utilizes rugged, low diffraction, electretcondenser microphones for accurate repeatable measurements. Each microphone is calibratedagainst a Bruel & Kjaer® 1/4 inch laboratory micro-phone and matched to a specific input (1, 2, 3, or 4)of the D2 Plexer. Microphones include an thin 40'cable for attachment to the D2 Plexer.
D2 Plexer The D2 Plexer is a compact, 4-channel microphonepreamp that provides remotely-controllable micro-phone selection. The selected microphone signal isrelayed to the D2 Controller via a lightweight, 75'interconnect cable. Remote control is via win|RTASoftware and the D2 Controller.
D2 Controller The D2 Controller is a USB device that remotely con-trols microphone selection on the D2 Plexer, and thatprovides a relay closure to control pink noise for reverberation measurements. The audio signal fromthe selected Plexer channel is amplified and sent tothe USBPre Digital Audio Interface.
USBPre Digital Audio InterfaceThe Sound Devices USBPre Digital Audio Interface isrecognized throughout the industry for its quality andreliability. It is used to convert audio signals from theD2 Plexer to digital signals that are relayed to a remote computer via the Universal Serial Bus (USB).
Host Computer with win|RTA Software
The win|RTA software provides high resolution audiomeasurements of frequency response (1/1, 1/3, 1/6,1/12 octave), background noise (NC), and reverbera-tion time (RT60). It includes the ComprehensiveTheatre Test, which organizes all necessary tests inan easy-to-follow sequence. win|RTA requires aMicrosoft® Windows XP computer with 2 USB ports(USB hubs are not acceptable).
D2 Acoustical Measurement System: System Diagram
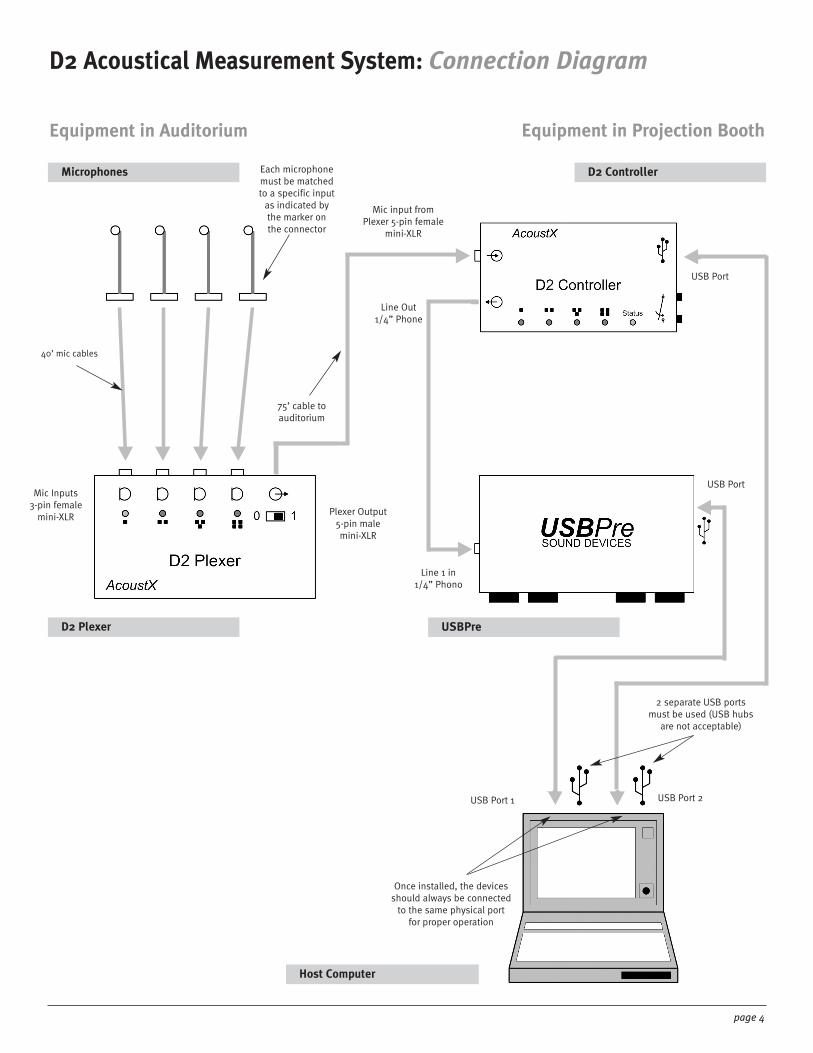
D2 Controller
USB Port
Microphones
D2 Plexer
Each microphonemust be matched to a specific input
as indicated bythe marker on the connector
Plexer Output5-pin malemini-XLR
Mic Inputs3-pin female
mini-XLR
75’ cable to auditorium
40’ mic cables
Equipment in Auditorium
Host Computer
Equipment in Projection Booth
USB Port 2
Once installed, the devicesshould always be connected
to the same physical portfor proper operation
2 separate USB portsmust be used (USB hubs
are not acceptable)
D2 Acoustical Measurement System: Connection Diagram
Mic input fromPlexer 5-pin female
mini-XLR
Line Out1/4” Phone
USB Port
Line 1 in1/4” Phono
USB Port 1
page 4
USBPre

Top Panel View
Rear Panel View
Microphoneselection
indicator LEDsOn-Off Switch
If the microphone selection remains unchanged for 10 minutes, LED 4 flashes to indicate power-save
mode. Normal operation resumes when the micro-phone selection is changed
Microphone Inputs 1-4(3-pin female mini-XLR)
Plexer Output to D2 Controller (5-pin male mini-XLR)
D2 Acoustical Measurement System: D2 Plexer Panel Diagrams
D2 Acoustical Measurement System: D2 Controller Panel Diagrams
page 5
Top Panel View Left Panel View
Right Panel View
Microphoneselection
indicator LEDs
Microphone input from D2Plexer (5-pin female mini-XLR)
line out audio toUSB Pre Digital Audio Interface
Pin-jack connectors for pink-noise relay switch closure point. Used to
trigger Cinema Processor pink noise
USB type-B connector for USB cable to host PC
(should always be connectedto the same physical input
on the host PC)
Status LED indicates an errorwhen lit (USB cable must
be re-inserted to resetthe controller)
Front Panel
Input Gain Controlsfor channels 1 & 2
For calibrated measure-ments in scope mode,
turn this knob to MINIMUM or FULLY
COUNTERCLOCKWISE
Input selectionindicators for
channels 1 and 2
Input level indicatorsfor channels 1 and 2
Power On LED
Line level input forchannel 1 is preset to
MINIMUM or FULLYCOUNTERCLOCKWISE.
Aluminum cap prevents accidental
movement ofinput control.
Line input must bemanually selected forboth channels using
input selector buttons.
Input selector buttons for
channels 1 and 2
Headphone mono selector
Headphone mix control
Headphone level control
NOTE: Grayed-out areas of the drawings representcontrols and inputs/outputs that are not used by
the D2 Acoustical Measurement System
Input (Left) Panel
Line input for channel 1 must be connected to theline out connector of the D2 Controller. This input
is also used for A-chain measurements.
XLR micinputs
Only Channel 1input is active inRTA mode. Use
both channels inX-Y mode
Tape inputs
Output (Right) Panel
SPDIF inputsand outputs
Headphone outputs
PC audiooutputs
USB type-B connector for USB cable to host PC
(must always be connectedto the same physicalinput on the host PC)
D2 Acoustical Measurement System: USBPre Panel Diagrams
page 6
Pink noise output. Note: The Windows volume controlaffects the level of this output. To be sure of the pink
noise level, loop PC audio output to Line 1 input.

1. Install the USBPre Digital Audio Interface first.Please refer to the documentation accompanying the USBPre Digital Audio Interface for completeinstallation and operating instructions. Select“Preferred Installation” after inserting the USBPresoftware CD. Refer to the connection diagram onpage 4, and to the USBPre panel diagrams on page 6for information on proper connection of the device.(Note: The USBPre device must be connected directly toa USB input on the computer instead of through a hub).
2.Connect the D2 Controller as shown in the connection diagram on page 4. The Controller mustbe connected directly to a USB port on the computer,instead of through an external hub. When theController is connected, the computer shouldprompt for drivers for the device. The necessarydrivers are found on the win|RTA CD.
3.Insert the win|RTA software CD into an available driveon the host computer. Open the CD and double clickon “Setup”. Follow the instructions and prompts ofthe installation procedure to install the win|RTAoperating software onto a disk drive of the hostcomputer. A short-cut icon for the win|RTA softwarewill be placed on the desktop of the host computerduring the installation procedure.
4.Connect the remaining components of the D2Acoustical Measurement System (D2 Plexer andmicrophones) as shown in the connection diagramon pages 4 and the panel diagrams on pages 5-6.
5.Install the 9V alkaline battery in the Plexer byopening battery cover on the back panel. If you want to use a rechargeable battery, a NiMH batterywith 9V battery with 250 mAh or greater rating isrecommended.
6.Double-click the short-cut icon placed on the desktop in step (3) to start the win|RTA software.Note that a default configuration (preferences) filewill be created the first time the program is executed.The user should customize this information asappropriate to the location or facility where the software is installed (see the “CONFIG” button onthe win|RTA software screen diagram on page 8).
7. After installation,enable microphone calibration byselecting mic cal numbers in the config menu. (seethe “CONFIG” diagram on page 9) The mic serialnumbers are assigned with Mic 1 as the lowest serialnumber through Mic 4 as the highest serial number.Then click on “Mic Cal ” in the Config menu. Finally,click “Save Configuration” to store the configuration.
N O T I C E
© Copyright 2006 AcoustX LLC. All rights reserved.
This manual contains confidential and proprietary information protected by copyright laws. No part
of this publication may be reproduced, transmitted, transcribed, stored in a retrieval system, or
translated into any language, in any form or by any means, electronic, mechanical, photocopying,
recording, or otherwise, without the prior written permission of AcoustX.
The information furnished herein is believed to be accurate and reliable. However, AcoustX
assumes no responsibility for its use, or for any infringements of patents or other rights of third
parties resulting from its use.
AcoustX reserves the right to modify at any time the product functionality and features where
appropriate, without notice.
Version 1.6
L i m i t e d W a r r a n t y
AcoustX LLC warrants the D2 Acoustical Measurement System hardware and its parts against defects
in materials or workmanship for a period of one (1) year from the original date of purchase. During this
period, AcoustX will repair or replace a defective product or part without charge to the customer. The
customer is responsible for delivering the defective component (or the entire D2 Acoustical Measurement
System, if requested) to AcoustX. The customer must pay for all shipping and insurance charges for
transportation of the defective component(s) to AcoustX for repair. AcoustX will assume responsibility
for shipping and insurance charges involved in returning the component(s) to the customer.
The win|RTA software is distributed on an “as is” basis, without warranty. AcoustX makes no
representation or warranty, either expressed or implied, with respect to the software programs,
their accuracy, quality, or fitness for a specific purpose. AcoustX shall have no liability to the
purchaser, or to any other person or entity with respect to any liability, loss, or damage caused,
or alleged to have been caused either directly or indirectly by the software contained on the
distribution disk. This includes, but is not limited to, interruption of service, loss of data, time,
or profits, or consequential damages resulting from the use of the software. If the distribution
medium is defective, you may return it for a replacement within the warranty period.
D2 Acoustical Measurement System: Installation and Startup
page 7

page 8
Exits the program
Current SPLreading
Time remaining in average
Selects screenresponse
(Fast, Slow, S5, S10)
Reference line
Selects frequency resolution(1/1, 1/3, 1/6, 1/12)
Selects file view mode (A, B, A-B, B-A, A&B)
Selects screen offset(Flat, X, User)
Turns on analyzer
Stops allprocesses
Starts theselected test
Turnspink noiseON or OFF
Vertical scaledecibel
reference values
Selects singlemic input mode
for mics 1-4 Selects mic plexinput mode
Clears thescreen
Prints thescreen
Saves the currentmeasurement (shift-click
to export as text)
Displaysinformation
for file B
Selects analyzerfunction (RTA,
NC, REV, CTT, X-Y)
Selects SPL windowunits/weighting
(dBA, dBC, Flat, mV,dBu, dBFS)
Select length of timed average
(20, 30, 60 seconds)
Moves referenceline up or down
selects verticalresolution (1, 2, 5, 10)
Opens the win|RTAsoftware configuration
screen
Selects test to display asfile B (right bar when
A and B selected)
Horizontal scale frequency reference values. The number of displayed values depends on
the frequency resolution setting (1/1, 1/3, 1/6, 1/12)
User definable Function Key shortcuts.Shift key enables new row of function keys.
Click on F-key number to display function choices.
D2 Acoustical Measurement System: Main Software Screen
SPECIAL KEYS AND FUNCTIONS
– ESC key kills all processes– PgUp/PgDn or mouse wheel moves reference line– Shift shows new row of function keys– Shift-click on Save button to export a test as text (.TXT)– Click and drag mouse on display to zoom view
in RTA mode– Shift-click on display to un-zoom– Right-click displays edit menu when in comment field
CTT MODE KEYS
– Up/Down arrow moves among menu selections– Left/Right arrow moves in or out of current menu– Alt-Left Arrow moves up one level when in a data entry field– Return executes selected test– Shift-click on Home CTT Coverage test button to rename– Tab or Enter completes button edit, ESC leaves unchanged
X-Y– Shift-click-drag moves both channel gains together
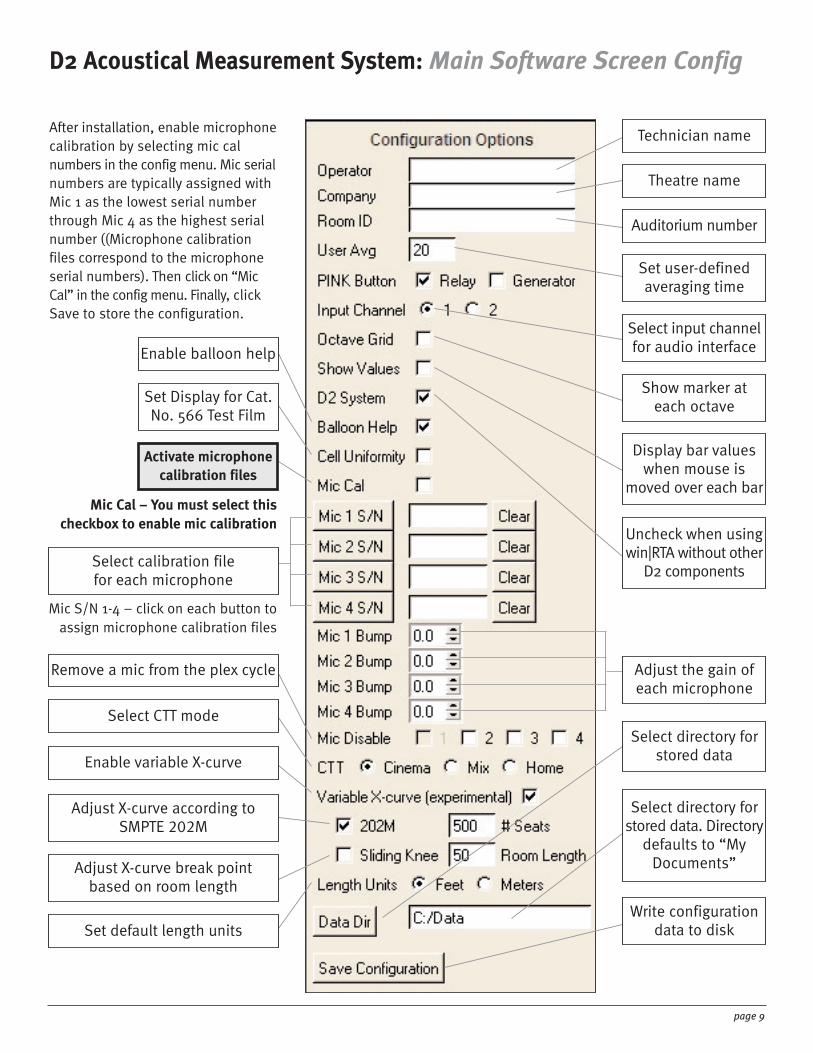
Mic S/N 1-4 – click on each button toassign microphone calibration files
D2 Acoustical Measurement System: Main Software Screen Config
Technician name
Adjust the gain ofeach microphone
Remove a mic from the plex cycle
Select directory forstored data
Select CTT mode
Set default length units
Enable variable X-curve
Adjust X-curve according to SMPTE 202M
Adjust X-curve break pointbased on room length
Theatre name
Auditorium number
Set user-definedaveraging time
Show marker ateach octave
Select input channelfor audio interface
Display bar valueswhen mouse is
moved over each bar
Uncheck when usingwin|RTA without other
D2 components
Mic Cal – You must select thischeckbox to enable mic calibration
Activate microphone calibration files
Select directory forstored data. Directory
defaults to “MyDocuments”
Write configurationdata to disk
Select calibration file for each microphone
page 9
After installation, enable microphonecalibration by selecting mic calnumbers in the config menu. Mic serialnumbers are typically assigned withMic 1 as the lowest serial numberthrough Mic 4 as the highest serialnumber ((Microphone calibrationfiles correspond to the microphoneserial numbers). Then click on “MicCal” in the config menu. Finally, clickSave to store the configuration.
Enable balloon help
Set Display for Cat.No. 566 Test Film

D2 Acoustical Measurement System: X-Y Scope
Mode Select
Set channelto display
on RTA
Setmeasure-
ment units
Adjust Xgain
Move x-ydisplay
horizontally
Move x-ydisplayvertically
Adjust Ygain
page 10

D2 Acoustical Measurement System: Dual Trace Scope
ModeSelect
Adjust Ch.1verticalposition
Adjust Ch.2verticalposition
Select channelfor triggering
Setvertical gain
Selectmeasurement
units
Adjustrefresh
rate
Adjusttimebase
Adjusttrigger level
page 11