CvpFileEditor - Sony Creative...
87
4-128-549-04 (1) CvpFileEditor User’s Guide Version 4.30 © 2008 Sony Corporation
Transcript of CvpFileEditor - Sony Creative...
4-128-549-04 (1)
CvpFileEditorUser’s Guide Version 4.30
© 2008 Sony Corporation

NOTICE TO USERSDocumentation © 2008 Sony CorporationAll rights reserved.This manual or the software described herein, in whole or in part, may not be reproduced, translated or reduced to any machine readable form without prior written approval from Sony Corporation.
SONY CORPORATION PROVIDES NO WARRANTY WITH REGARD TO THIS MANUAL, THE SOFTWARE OR OTHER INFORMATION CONTAINED HEREIN AND HEREBY EXPRESSLY DISCLAIMS ANY IMPLIED WARRANTIES OF MERCHANTABILITY OR FITNESS FOR ANY PARTICULAR PURPOSE WITH REGARD TO THIS MANUAL, THE SOFTWARE OR SUCH OTHER INFORMATION. IN NO EVENT SHALL SONY CORPORATION BE LIABLE FOR ANY INCIDENTAL, CONSEQUENTIAL OR SPECIAL DAMAGES, WHETHER BASED ON TORT, CONTRACT, OR OTHERWISE, ARISING OUT OF OR IN CONNECTION WITH THIS MANUAL, THE SOFTWARE OR OTHER INFORMATION CONTAINED HEREIN OR THE USE THEREOF.
Sony Corporation reserves the right to make any modification to this manual or the information contained herein at any time without notice.The software described herein may also be governed by the terms of a separate user license agreement.
Use of this software with cameras other than those manufactured by Sony is prohibited. Refer to the “END USER LICENSE AGREEMENT” that appears during installation for details.

Table of Contents
Overview...........................................................................................7Gamma Compensation Functions ......................................................... 7Major Gamma Control Functions of CvpFileEditor ............................. 7System Configuration............................................................................ 9
For WindowsInstallation/Uninstallation of the Program ..................................11
Operational Environment for CvpFileEditor V4.3.............................. 11To Install.............................................................................................. 11To Uninstall ......................................................................................... 13
Basic Operation Flow ....................................................................13Starting operation ................................................................................ 13Switching between Gamma and MLUT operation windows .............. 13Creating gamma data........................................................................... 13Creating MLUT data ........................................................................... 14Installing the created data in a camera ................................................ 14
Functions and Operations of the Gamma Windows ..................15Window Layout ................................................................................... 15CE File Operation Buttons .................................................................. 16Gamma/MLUT select tabs .................................................................. 16Gamma Data Window ......................................................................... 16
To import library data...................................................................... 17User Gamma Window ......................................................................... 18
To install user gamma via a Memory Stick into a camera .............. 19Graph View/Edit Window................................................................... 20
To start editing in Parameter Edit mode.......................................... 21Graph View/Edit window in Parameter Edit mode......................... 22Operations in the draw zone in Parameter Edit mode ..................... 24To switch to Custom Edit mode ...................................................... 26Graph View/Edit window in Custom Edit mode............................. 26To adjust the white level and dynamic range .................................. 27To adjust the black (Scale Linear mode only)................................. 27To adjust the middle tone ................................................................ 27To adjust the minus data.................................................................. 28To perform 3-point adjustment........................................................ 28To move the curve holistically in vertical directions ...................... 28
Zoom Manager Window ..................................................................... 29Camera Gamma Select Window and Gamma Send Operation Bar .... 29
Camera Gamma Select window ...................................................... 29Gamma send operation bar.............................................................. 29To connect a camera ........................................................................ 30To transmit the data to the connected camera ................................. 30
Importing and Exporting Gamma Data Files of Other Types ....31
Table of Contents 3

4
Files of gdd.......................................................................................... 31Files of csv........................................................................................... 31Files of lut............................................................................................ 32
Export options for a lut file ............................................................. 32Exporting the Inverse Characteristics.................................................. 32
Functions and Shortcuts Operations of Gamma Operation Menus.......................................................................................33File menu............................................................................................. 33Data menu............................................................................................ 33Edit menu ............................................................................................ 33User Gamma menu.............................................................................. 34View menu .......................................................................................... 34Mode menu.......................................................................................... 34Help menu ........................................................................................... 34
Functions and Operations of the MLUT Windows......................35Window Layout ................................................................................... 35MLUT Data Window .......................................................................... 36MLUT Group Window........................................................................ 37
To install an MLUT group via a Memory Stick into a camera ....... 38MLUT Adjust Window ....................................................................... 39
CDL OFF Mode .............................................................................. 40CDL Edit Mode ............................................................................... 41
CDL Edit Windows ............................................................................. 42Camera MLUT Select Window and MLUT Send Operation Bar....... 44
Camera MLUT Select window........................................................ 44MLUT send operation bar ............................................................... 45To connect a camera ........................................................................ 45To transmit the data to the connected camera ................................. 45
File Types for MLUT ......................................................................46Files of lut............................................................................................ 46Files of cdl ........................................................................................... 46
Functions and Shortcuts Operations of MLUT Operation Menus.......................................................................................47File menu............................................................................................. 47Data menu............................................................................................ 47Edit menu ............................................................................................ 47Group menu......................................................................................... 47View menu .......................................................................................... 47Mode menu.......................................................................................... 48Help menu ........................................................................................... 48
For Mac OSInstallation of the Program ...........................................................50
Operational Environment for CvpFileEditor....................................... 50To Install.............................................................................................. 50To Uninstall ......................................................................................... 51
Table of Contents
Basic Operation Flow ....................................................................52Starting operation ................................................................................ 52Switching between Gamma and MLUT operation windows .............. 52Creating gamma data........................................................................... 52Creating MLUT data ........................................................................... 52Installing the gamma data in a camera ................................................ 52
Functions and Operations of the Gamma Windows ..................53Window Layout ................................................................................... 53CE File Operation Buttons .................................................................. 54Gamma/MLUT select tabs .................................................................. 54Gamma Data Window ......................................................................... 54
To import library data...................................................................... 55User Gamma Window ......................................................................... 56
To install user gamma via a Memory Stick into a camera .............. 57Graph View/Edit Window................................................................... 58
To start editing in Parameter Edit mode.......................................... 59Graph View/Edit window in Parameter Edit mode......................... 60Operations in the draw zone in Parameter Edit mode ..................... 62To switch to Custom Edit mode ...................................................... 64Graph View/Edit window in Custom Edit mode............................. 64To adjust the white level and dynamic range .................................. 65To adjust the black (Scale Linear mode only)................................. 65To adjust the middle tone ................................................................ 65To adjust the minus data.................................................................. 66To perform 3-point adjustment........................................................ 66To move the curve holistically in vertical directions ...................... 66
Zoom Manager Window ..................................................................... 67Camera Gamma Select Window and Gamma Send Operation Bar .... 67
Camera Gamma Select window ...................................................... 67Gamma send operation bar.............................................................. 67To connect a camera ........................................................................ 68To transmit the data to the connected camera ................................. 68
Importing and Exporting Gamma Data Files of Other Types........................................................................................69Files of gdd.......................................................................................... 69Files of csv........................................................................................... 69Files of lut............................................................................................ 70
Export options for a lut file ............................................................. 70Exporting the Inverse Characteristics.................................................. 70
Functions and Shortcuts Operations of Gamma Operation Menus.......................................................................................71CvpFileEditor menu ............................................................................ 71File menu............................................................................................. 71Data menu............................................................................................ 71Edit menu ............................................................................................ 71User Gamma menu.............................................................................. 72View menu .......................................................................................... 72
Table of Contents 5

6
Window menu ..................................................................................... 72Mode menu.......................................................................................... 72
Functions and Operations of the MLUT Windows......................73Window Layout ................................................................................... 73MLUT Data Window .......................................................................... 74MLUT Group Window........................................................................ 75
To install MLUT group via a Memory Stick into a camera ............ 76MLUT Adjust Window ....................................................................... 77
CDL OFF Mode .............................................................................. 78CDL Edit Mode ............................................................................... 79
CDL Edit Windows ............................................................................. 80Camera MLUT Select Window and MLUT Send Operation Bar....... 82
Camera MLUT Select window........................................................ 82MLUT send operation bar ............................................................... 83To connect a camera ........................................................................ 83To transmit the data to the connected camera ................................. 83
File Types for MLUT ......................................................................84Files of lut............................................................................................ 84Files of cdl ........................................................................................... 84
Functions and Shortcuts Operations of MLUT Operation Menus.......................................................................................85CvpFileEditor menu ............................................................................ 85File menu............................................................................................. 85Data menu............................................................................................ 85Edit menu ............................................................................................ 85Group menu......................................................................................... 85View menu .......................................................................................... 86Window menu ..................................................................................... 86Mode menu.......................................................................................... 86
Table of Contents

Overview
Some Sony camera models are equipped with a User Gamma function that allows users to set desired tone curves at will by editing gamma data.CvpFileEditor is an application for freely editing the gamma data that can be used with these cameras.
A function for creating MLUT (Monitor Look-Up Table) data for recordings that use S-Log is also available, allowing you to obtain images suited to on-screen monitoring of the camera’s monitor and viewfinder outputs.ASC CDL (American Society of Cinematographer Color Decision List) data that was created in a postproduction studio can be loaded while preparing to shoot to apply the studio’s image on-location. Conversely, settings can be changed on-location, and those changes can be applied to the postproduction studio’s settings.Created MLUT data can be loaded into a camera via a Memory Stick or LAN in the same manner as with gamma data.
Cameras on which gammas created by CvpFileEditor can be used• HDC-900 series (AT Ver. 1.3 or later)• HDC-F950• HDW-F900 (AT Ver. 2.xx or later)• HDW-F900R• F23• F35• HDC-1000/1500/1000R/1500R series (optional HZC-
UG444 required)• HDC-2000 series• SRW-9000• PMW-F55
Cameras on which MLUT/ASC CDL created by CvpFileEditor can be used• F23 (MAIN/NET V1.5 or later)• F35 (MAIN/NET V1.5 or later)• SRW-9000
VTR on which MLUT created by CvpFileEditor can be used• SRPC-1• SRW-5000 series
Gamma Compensation Functions
Smooth contrast characterizing that surpasses knee compensationKnee compensation is a function that compresses the contrast for high luminance by a polygonal curve from about 90% to 100% video output. As the contrast characteristics change sharply at the point of the curve, the turnoff of the curve may be visible on a subject that has smooth gradation. In addition, skin color of high luminance is prone to coming out yellow. By configuring the user gamma settings, smooth gradation can be reproduced without the sharp turnoff that may be seen with knee compensation, while maintaining high-luminance contrast.
Optimum characterizing according to the dynamic range of each cameraEditing via CvpFileEditor enables gamma curve editing to obtain the optimum dynamic range performance of each camera at ranges of up to 1000%.
Optimum characterizing for postproductionWith a curve set for usual video materials to mainly compress high-luminance contrast, color grading processing for high luminance is not sufficiently allowed.User gamma data permits you to decrease total contrast for easy postproduction processes.
Image creation by directly adjusting camera outputsIf direct outputs from the camera are used without assuming postproduction, user gamma can be used as a function for real-time tone control.
Major Gamma Control Functions of CvpFileEditor
Management of gamma data and user gamma filesYou can manage created gamma data with a list. As the data can be grouped as a user gamma file to install in a camera, it is easy to replace gammas in a camera, depending on shooting scenes and conditions.A title and various comments can accompany your gamma data, which can be used as a reminder of the recording condition or tips when editing other gamma data.
Strongly enhanced curve editing functionsParameter Edit mode allows you to arbitrarily specify elemental parameters that determine gamma, such as dynamic range, white limit, 18% gray (middle tone), black level, and initial gain, to automatically create an optimum gamma curve. You can also intuitively change these parameters by operating a graphic display with your mouse.
Overview 7
8
Custom Edit mode is also available for more detailed gamma data editing, permitting you to freely edit without parameter setting.
Hyper Gamma selectableAs a function for parameter editing, hyper gamma can be selected. Hyper gamma is a gamma curve based on an algorithm unique to Sony. It reproduces natural contrast and colors from middle tone to high luminance on a monitor screen. It features convenient adjustability to record images to be used as-is for video materials or as raw materials to be processed in postproduction.
Image confirmation by immediate transmission of gamma dataIn addition to the conventional installation method that uses a “Memory Stick,” edited data can be sent in a few seconds to a camera (if it is F23 or F35) via LAN for checking the characteristics of the curve on the spot. This may be especially convenient for real-time process of the tone curve according to actual images.
Consolidated operation screenManagement and editing operations for gamma data, as well as transmission to a camera can be performed from a single window. Window tools, such as Zoom Manager for easy graph scaling, are also included.
Mutual data conversion with other color grading tools1D LUT data, often used in postproduction, can be imported and converted to a user gamma for your camera. Conversely, user gamma you create can be exported as 1D LUT data for other systems.Defining the bit length and output of inverse gamma data are also enabled.
Smooth transition from previous versionsApplication files (*.cfe files) created with a previous version (V2.2 or V3.0) of CvpFileEditor can be directly read and converted for usage. Data created with previous versions can be read and converted for usage.
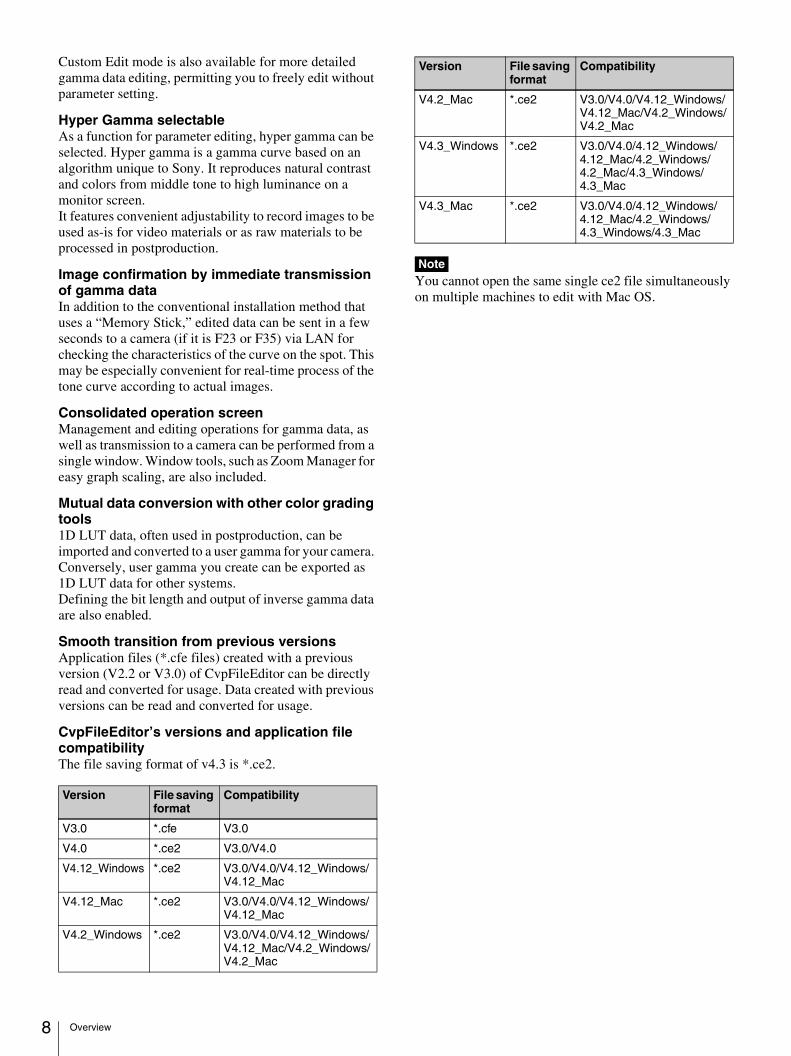
CvpFileEditor’s versions and application file compatibilityThe file saving format of v4.3 is *.ce2.
You cannot open the same single ce2 file simultaneously on multiple machines to edit with Mac OS.
Version File saving format
Compatibility
V3.0 *.cfe V3.0
V4.0 *.ce2 V3.0/V4.0
V4.12_Windows *.ce2 V3.0/V4.0/V4.12_Windows/V4.12_Mac
V4.12_Mac *.ce2 V3.0/V4.0/V4.12_Windows/V4.12_Mac
V4.2_Windows *.ce2 V3.0/V4.0/V4.12_Windows/V4.12_Mac/V4.2_Windows/V4.2_Mac
V4.2_Mac *.ce2 V3.0/V4.0/V4.12_Windows/V4.12_Mac/V4.2_Windows/V4.2_Mac
V4.3_Windows *.ce2 V3.0/V4.0/4.12_Windows/4.12_Mac/4.2_Windows/4.2_Mac/4.3_Windows/4.3_Mac
V4.3_Mac *.ce2 V3.0/V4.0/4.12_Windows/4.12_Mac/4.2_Windows/4.3_Windows/4.3_Mac
Note
Version File saving format
Compatibility
Overview

System Configuration
You can create gamma data using those of other systems, the built-in library, or the parameter edit function. MLUT data which contain ASC CDL information can also be
created. The created data can be installed in a camera via a “Memory Stick” or LAN.
Data of other systems*.gdd, *.lut, *.csv, *.cdl, *.txt
CvpFileEditor v4.3
Direct gamma/MLUT data transmission via LAN
F23/F35
HDW-F900/F900R, HDC-950/F950,HDC-1000/1500/1000R/1500R Series,SRW-9000,HDC-2000 Series
Installation of a user gamma file via a “Memory Stick”
Hub
“Memory Stick”
Installation of a user gamma file/MLUT group via a “Memory Stick”
Operation via LAN connection is not supported in Mac OS 10.9.3 Mavericks. When using this software in a Mac OS 10.9.3 Mavericks environment, install data to cameras via a “Memory Stick.”
Note
Overview 9

For WindowsHow to use the application on Windows

For W
indows
Installation/Uninstallation of the Program
Operational Environment for CvpFileEditor V4.3
A computer that meets the following:
CPUIntel Pentium III 1GHz equivalent or higher (Intel Pentium D 3GHz or higher recommended)
Memory2 GB or more (4 GB or more recommended)
DisplayScreen resolution 1280×800 or more
OS (verified editions)• Microsoft Windows 7 Home Premium (64-bit version)• Microsoft Windows 7 Ultimate (64-bit version)• Microsoft Windows 8.1 (64-bit version)• Microsoft Windows 8.1 Pro (64-bit version)• Microsoft Windows 8.1 Update (64-bit version)
If CvpFileEditor of an earlier version has been installed, first uninstall it then install CvpFileEditor V4.3.
To Install
1 Start up the installation program.
The Welcome window of the Setup Wizard opens.
If .NET Framework 4.5 has not been installed on your computer, the following window opens to request installation of .NET Framework 4.5. Install it by following the displayed messages.
Note
Installation/Uninstallation of the Program 11

12
For W
indows
2 Click on the Next button in the Welcome window.
The License Agreement window opens.
3 Select “I Agree” and click on the Next button.
The Customer Information window opens.
4 Enter your name and organization then click on the Next button.
The path to the installation folder is displayed. (The folder can be changed if required.)
5 Confirm the folder in which to install the program and click on the Next button.
A confirmation message is displayed.
6 Click on the Next button.
Installation begins.When installation is completed, a completion window opens.
7 Click on the Close button to close the completion window.
Installation/Uninstallation of the Program

For W
indows
To Uninstall
CvpFileEditor can be uninstalled with either of the following procedures:
Uninstallation of CvpFileEditor V4.3 from Control Panel
1 Open the Control Panel and select “Add/Remove Programs.”
2 Select “CvpFileEditor V4.3” from the list, and click on the Uninstall button.
CvpFileEditor will be uninstalled by your following the displayed messages.
Uninstallation of CvpFileEditor V4.3 from the Start menu
1 Select “Uninstall.exe” of CvpFileEditor from the Start menu.
A confirmation dialog box appears.
2 Click on the Yes button.
The following window opens in its place, to indicate the progress of uninstallation.
To cancel uninstallationIf you click on the Cancel button during uninstallation, a confirmation message is displayed.Clicking on the Yes button aborts uninstallation.When you open an existing ce2 file, CvpFileEditor will be automatically reinstalled.
Basic Operation Flow
The flow of gamma and MLUT creation is roughly indicated below.
Starting operation
Start up CvpFileEditor and open the sample file or an existing ce2 file by selecting “Open” or “New” from the File menu or using the CE file operation button (page 16).The Gamma operation windows (page 15) will be displayed.
Switching between Gamma and MLUT operation windows
The Gamma and MLUT select tabs (page 16) located on the left of the operation windows permit you to switch between Gamma operation windows (page 15) and MLUT operation windows (page 35).Switching is also possible using Mode menu on the menu bar.
You cannot switch between Gamma and MLUT when the camera is connected via LAN. An error message appears if you click on the Gamma or MLUT tab.
Creating gamma data
There are three methods for creating gamma data.
1. Newly creating gamma data (using Parameter Edit mode)Select “New” from the Data menu for the Gamma operation windows (page 15) to create new gamma data. Parameter Edit mode is selected to permit you to enter the characteristics required for gamma.
For details, see “To start editing in Parameter Edit mode” (page 21).
2. Loading library data and edit them in Custom Edit modeYou can select fundamental characteristics, such as ITU-R709, Hyper Gamma, or S-LOG, from the library and finely adjust them in Custom Edit mode.To load the library data, select “Library” from the Data menu for the Gamma operation windows (page 15) then start editing.
Note
Basic Operation Flow 13
14
For W
indows
For details, see “To import library data” (page 17) and “To switch to Custom Edit mode” (page 26).
3. Importing data of different systemsWhen you wish to install data created with another grading tool, use the import function. Select “Import File” from the Data menu for the Gamma operation windows (page 15).
For details, see “Importing and Exporting Gamma Data Files of Other Types” (page 31).
Creating MLUT data
Select “New” from the Data menu for the MLUT operation windows (page 35) to create new MLUT data.You can add CDL information to the created MLUT by using the ASC CDL adjustment function.
Installing the created data in a camera
The data can be installed in the camera via a Memory Stick or LAN.
1. Via a Memory StickGamma or MLUT data (five sets at maximum) are installed as a file. The user gamma or MLUT data in the camera are overwritten.
For details, see “To install user gamma via a Memory Stick into a camera” (page 19) or “To install an MLUT group via a Memory Stick into a camera” (page 38).
2. Via LANThis is valid only for an F23/F35 having LAN control capability. You can directly transmit data being edited to the camera.
For details, see “Camera Gamma Select Window and Gamma Send Operation Bar” (page 29) or “Camera MLUT Select Window and MLUT Send Operation Bar” (page 44).
Basic Operation Flow

For W
indows
Functions and Operations of the Gamma Windows
Window Layout
The following windows are used for gamma operations:
User Gamma window (page 18)Used for user gamma file management for grouping gamma data to install them in a camera.
Select Camera Gamma window (page 29)Used to transmit gamma data via LAN or to change the gamma selection on the camera.
Gamma Data window (page 16)Used for gamma data management.
Graph View/Edit window (page 20)Displays gamma curves and various gamma data.You can edit the data by entering parameters or operating the mouse.
Zoom manager window (page 29)Used to expand/reduce the size of the graph or change the display area.
Menu bar (page 33)
Gamma/MLUT select tabs
Connect buttonClick on the button to connect or disconnect communication with a camera. When connection is established, the indicator changes color from red to green.For details, see “To connect a camera” (page 30).
CE file operation buttons (page 33)
Functions and Operations of the Gamma Windows 15

16
For W
indows
CE File Operation Buttons
Operate CE2 files.
Gamma/MLUT select tabs
Select the operation mode.
Gamma Data Window
Manage gamma data in the Gamma Data window.
a Gamma Data tool bar b Gamma Data list
Icon Designation Function
Open CE2 file To open an existing ce2 file.
Save CE2 file To save the ce2 file.
Save As CE2 file To the ce2 file with another filename.
Icon Designation Function
Gamma To select Gamma operation mode.
MLUT To select MLUT operation mode.
aGamma Data tool bar
bGamma Data list User Gamma window (page 18)
Icon Designation Function
New To newly create gamma data. Parameter Edit mode is automatically activated.
Import File To import a file (gdd, csv, or lut file) and convert it to gamma data.For details, see “Importing and Exporting Gamma Data Files of Other Types” (page 31).
Import Library To import gamma data from the internal libraries of CvpFileEditor.
File Delete To delete the specified gamma data.
Designation Contents
Name Designation of the gamma data, which is displayed on the camera menu screen when being installed in a camera.
Type Type of gamma data. Note that the type of gamma depends on the camera model.3.0: F23, F35, HDC-1000/1500 series
cameras, SRW-9000, HDC-2000 series, PMW-F55
2.0: HDC-950, HDW-F900/F900R, etc.The type can be changed in the Graph View/Edit window when editing the gamma data.
Comment1 A short comment to be displayed on the camera menu screen.You can enter up to 12 alphanumeric characters.
Comment2 A comment to be recorded inside CvpFileEditor.Up to 1000 characters can be entered.
Functions and Operations o
f the Gamma Win dows
For W
indows
Clicking on the title of each column changes the displayorder on the list.Right-clicking on a gamma data line permits you to enter comments, rename, copy, or delete the data.
To import library dataClicking on the (Import Library) icon on the tool bar or selecting “Library” from the Data menu opens the Import Library window, which permits you to select internal library data.
Move the Library data to be imported to the Import list by clicking on the Add button.Use the Delete button to remove it from the Import list.When you specify the gamma data in the Library list, the comment 1 and comment 2 for the selected data are displayed in the respective columns.
If there is a gamma having the same name as a library to be imported in the Gamma Data window, the name of the imported file will be automatically changed by adding a number (1, 2, etc. in ascending order) to the end of the original name. If the name exceeds 12 characters when a number is added, the last character will be replaced with the number so that the name will not exceed 12 characters.
Base Information on the original data of the gamma. If one of the libraries was used, the name of the library is displayed. For a newly created gamma, “Param” (abbreviation for Parameter Edit mode) is displayed.
Update The year, month, day, and time of updating are displayed.
Note
Designation Contents
Functions and Operations of the Gamma Windows 17

18
For W
indows
User Gamma Window
The User Gamma window is used to group created gamma data as a user gamma to install the data in a camera. Five sets of gamma data at maximum can be
grouped as a user gamma. The user gamma that groups gamma data can be installed via a Memory Stick or LAN.
a User Gamma listThe list shows the information on the user gamma.Operations as those for gamma data can be made by right-clicking on the list.
In the same manner as gamma data, a user gamma has a type attribute, either Type 2.0 or Type 3.0. Gamma data of different types cannot be included in a single user gamma.The type of user gamma is determined by the type of the first registered gamma data.
b User Gamma tool bar
c User gamma entry buttonTo enter the gamma data selected in the left Gamma Data window in the user gamma file selected on the User Gamma list.
d Selected Gamma areaInformation on the gamma data registered in a user gamma file is displayed. Clicking on the gamma data line permits you to preview the form of the gamma curve.
cUser gamma entry button
aUser Gamma list
bUser Gamma tool bar
dSelected Gamma area
Gamma Data window (page 16)
Note
Icon Designation Function
New To create a new user gamma file.
Delete User Gamma To delete the selected user gamma file from the list.The registered gamma data are not erased (remaining in the Gamma Data window).
Export to Memory Stick
To export the selected user gamma file to a Memory Stick.
NoteExport is not executed if no gamma data are registered in the user gamma file.
To send the selected user gamma curve to a camera.
Send to Camera
Icon Designation Function
Delete Selected Gamma Data from User Gamma
To delete the selected gamma data from the file.The gamma data are not erased (remaining in the Gamma Data window).
Up To move the order of gamma data up on the registration list.
Down To move the order of the gamma data down on the registration list.
Functions and Operations of the Gamma Windows

For W
indows
To install user gamma via a Memory Stick into a camera
1 Create a user gamma file.
1 Click on the (New) icon to display the New User Gamma dialog box.
2 Enter a filename for the user gamma file.
2 Register gamma data to the user gamma file.
Select the gamma data to be registered in the Gamma Data window and click on the user gamma entry button. Up to five gammas can be registered. The order of the registered gammas can be changed, using the up/down buttons.
3 Export the user gamma file to a Memory Stick.
Click on the (Export to Memory Stick) icon and specify the target Memory Stick on the directory.
4 Using the camera’s menu, load the user gamma from the Memory Stick into the camera.
For details on menu operations on the camera, refer to the operation manual of the camera.
For operations to export the data via LAN, see “Camera Gamma Select Window and Gamma Send Operation Bar” (page 29).New icon
User gamma entry button
Up/down buttons
Gamma Data window , Selected Gamma area
Export to Memory Stick icon
Functions and Operations of the Gamma Windows 19

20
For W
indows
Graph View/Edit Window
The window displays the characteristics of the gamma data with a graph. Editing the comments is also possible.
The window has a view mode and two edit modes (Parameter Edit mode and Custom Edit mode).
a Window mode select buttonsTo switch between View mode for displaying the detailed information on the selected gamma data and the edit modes for editing the selected gamma data.
b Window mode indication
c Tool barValid only in edit modes.
bWindow mode indication
cTool bar
dGamma Data Information area eGraph Information area
aWindow mode select buttons
Gamma send operation bar(page 29)
“Choose camera type” box (page 22)
Button Function
To use edit modes for editing the curve and information of gamma.
To select View mode for display only without editing.
Indication Mode description
Graph View View mode for confirming the characteristics or information on gamma data without editing
Parameter Edit Parameter Edit mode for editing gamma data by specifying several parameters (function added to CvpFileEditor V4.0 and later)
Custom Edit Custom Edit mode for editing gamma data by setting three points on the graph and moving the center point (function available since CvpFileEditor V3.0 and earlier)
Icon Designation Function
Undo To undo the last graph operation (invalid for the comment areas).
Redo To redo the last undone operation (invalid for the comment areas).
Restore the curve
To restore the original status of the curve before editing (invalid for the comment areas).
Allow tool To set the edit points in Custom Edit mode.
Zoom out To reduce the gamma graph. (Clicking on the icon initiates Expand/Reduce mode, and editing is disabled. To exit Expand/Reduce mode, press the ESC key or click on the Allow tool.)
Zoom in To expand the gamma graph. (Clicking on the icon initiates Expand/Reduce mode, and editing is disabled. To exit Expand/Reduce mode, press the ESC key or click on the Allow tool.)
Functions and Op
erations of th e Gamma Windows
For W
indows
d Gamma Data Information areaThe gamma data name, comment 1, and comment 2 are displayed.Entering/editing of comment 1 and comment 2 is enabled when you double-click on the respective text boxes in an edit mode.
e Graph Information areaThe characteristics of gamma data are displayed in Graph View mode. In edit modes, operations are different between Parameter Edit mode and Custom Edit mode.Clicking on the Edit mode switch button at the left end of the title bar switches the modes.
To start editing in Parameter Edit modeParameter Edit mode permits you to easily create a gamma curve by specifying some values (parameters) that determine the gamma.Parameter editing can be started with either of the following two methods:
1. Newly creating gamma dataSelect “New Gamma Data” from the Data menu to open the New User Gamma dialog box.Specify Name for the gamma and press the Enter key (or click on OK) to start editing in Parameter Edit mode.
2. Double-clicking on the gamma data on the list whose Base is “Param”Parameter editing is enabled for a curve for which Parameter editing once has been done as long as the curve has not been edited thereafter in Custom Edit mode.The gamma data whose Base column of the list shows “Param” can be edited in Parameter Edit mode. Double-click on the gamma data on the list to start editing in Parameter Edit mode.
Delete all points Valid in Custom Edit mode. Clicking on the icon removes all the edit points specified on the graph.
Auto add points Valid in Custom Edit mode, where three adjustment points are normally specified, using the mouse.Clicking on this icon after specifying the following values automatically adds three edit points on the graph.Input Point [%]: Enter the
value for the center point to be edited on the graph (in %).
Width [%]: Enter the value of the width between two points to be edited (in %).
Move curve holistically
To holistically move the curve in vertical directions in Custom Edit mode. If you enter a value (%) in the text box, the curve moves as far as specified.
Edit mode switch button Function
(Displayed in Parameter Edit mode)
To select Custom Edit mode for editing with three points you specified with the Allow tool.
(Displayed in Custom Edit mode)
To select Parameter Edit mode for editing gamma data with parameters.
NoteOnce data are edited in Custom Edit mode, the data can no longer edited in Parameter Edit mode.
Icon Designation Function
Base column
“Param” indication
Functions and Operations of the Gamma Windows 21

22
For W
indows
Graph View/Edit window in Parameter Edit mode
a Switch to Custom Edit buttonClick on the button to switch from Parameter Edit mode to Custom Edit mode. Note that if data have been edited in Custom Edit mode, they cannot be returned to Parameter Edit mode.
b “Choose camera type” boxThe gamma data type depends on the camera model. Select the type according to your camera.For Type 2.0, additionally select from among Table 0 to 2.
If you wish to create gamma data of both Type 2.0 and Type 3.0Select the gamma data on the gamma data list and make a duplication by right-clicking on it and selecting “Copy” from the context menu. Then change the Type setting.
Gamma data of different types cannot be included in the same user gamma file.
c Parameter input areaYou can specify a value for each parameter as follows:
aSwitch to Custom Edit button
b “Choose camera type” box
Parameter Edit mode indication
cParameter input area
dOption selection check boxes
eDraw zone
Note
Icon Designation Function
_ Sample Curve Select the basic characteristics of the curve.Hyper Gamma: To use hyper
gamma as the base, which provides the middle tone with characteristics close to ITU-R709 optimum for video monitoring and whose high luminance area is naturally compressed, achieving superior gradation expression and color reproduction. This setting is also used for shooting that assumes color grading processing in postproduction.
Log: To set characteristics close to the sensitometric characteristics of negative film. This setting is used for digital processing in postproduction equivalent to digital image scanning for film.
Power: To set the characteristics close to those of the luminance reproduction of a CRT. Characteristics near the built-in ITU-R709 or INITIAL 5.0 characteristics are provided.
Functions and Operations of the Gamma Windo
ws
For W
indows
d Option selection check boxes
Black Clip OffTo turn off the Black Clip function that limits video characteristics on the minus side. Checking the box opts for the characteristics on the minus side to be output. Use the output of characteristics on the minus side to maintain the characteristics for noises. When you use this option, note that proper display may not be obtained on other monitors. Normally it is recommended to set the black to 3 to 5% and not use this option.
Gamma FixTo inhibit the gamma gain and step gain functions of cameras. Sony cameras are equipped with these functions for fine adjustments of gamma, mainly ITU-R709-based gammas.As these functions may not operate as precisely as you intend when using hyper gamma or Log-based gamma having a wide dynamic range, it is recommended to check this box to turn the option ON.
Knee OffThe Knee Off function forcibly turns off the Knee function of a camera. The purpose of this option slightly differs between the types of gamma data.Type 3.0: It is recommended to turn this option ON to
prevent the Knee function from inadvertently being turned on when you have created a gamma curve for usage that does not require the Knee function.
Type 2.0: As a camera of this data type has a limitation in creating a high-luminance gamma curve, use this option to create the curve with the Knee function activated (see the figures shown on the next page). It is recommended to turn this option ON when creating a gamma curve having a wide dynamic range.If the Gamma Fix option is turned ON for a Type 2.0 curve, the Knee Off option will also be automatically turned ON.
D-Range To specify how much of the input light intensity (dynamic range) of a subject to be used for output. To use a wide range, set it to 600–800%. When a large value is specified, the middle luminance (18% Gray) is decreased. To increase the middle luminance, set the dynamic range to 400% or less or increase the 18% Gray setting.The dynamic range of HDW- and HDC-series cameras is 460% at maximum. That of F23/F35 is 800% at maximum.
White Limit To set the upper limit of the high-luminance output. The setting must be the output level corresponding to the White Limit setting in postproduction or a camera system.
NoteThis adjustment determines the white clip of the gamma curve. To use the value you set here, turn the white clip of the camera off.
18% Gray To change the luminance of middle tone. Set the output level with respect to the input level of a test chart of 18% reflection.
NoteIf Hyper Gamma is selected for Sample Curve, you cannot specify it by a numeric value. Move the icon on the graph, using the mouse or arrow keys.
Black Set this item to include the master black level of a subject in the gamma. Normally set to 3%. You can achieve the same adjustment using the built-in master black function of a camera.
NoteThis item cannot be adjusted in Scale Log mode.
Initial Gain To specify the gradation expression for black parts. Normally set to 4.5- to 5-times gain.To improve the S/N at black parts or emphasize the middle tone, select a small value.
_ Gain To decrease the total level while maintaining the characteristics. You can select among from four values; 0 dB, –6 dB (–1 f-stop), –12 dB (–2 f-stops), and –18 dB (–3 f-stops).
Icon Designation Function
_ Smoothing To smoothly connect the initial gain and the curve of the base characteristics. You can select from among four types: off, narrow, medium, and wide. Selecting “narrow” affects a narrow range, and selecting “wide” affects a wide range.
Icon Designation Function
Functions and Operations of the Gamma Windows 23

24
For W
indows
Camera Black 0 (zero)When the black level is set for the gamma, the master black value of the camera must be set to 0. By turning this option ON, the camera’s master black is fixed to 0.Turn this option OFF if you set the master black on the camera.
The maximum point cannot be edited for a gamma file of Type 2.0.
e Draw zoneYou can change the setting by directly dragging the icon on the graph with the mouse or moving it with the arrow keys on the keyboard.Using the View menu on the menu bar, either Scale Linear mode or Scale Log mode can be selected for the draw zone.Scale Linear mode: To draw the graph by linear scaling.Scale Log mode: To draw the graph by log scaling of the
X axis.
Operations in the draw zone in Parameter Edit mode
Scale Linear mode
Knee Off unchecked
Knee Off checked
Note
Sample Curve: Select the basic characteristics for the sample curve.
Set the white clip level to determine the upper limit of the white level.
You can directly enter numeric values.
Gain: You can create a curve by decreasing the total gain from the sample curve.
Adjust the black level.
Adjust the middle tone. Clicking on a point near the maximum point displays the adjustment buttons at the left and right of the icon, permitting you to adjust the dynamic range.
Adjust the initial gain (slant) that determines the characteristics of black parts.
To decrease the dynamic range value.
To increase the dynamic range value.
Functions and Operations of the Gamma Windows

For W
indows
Scale Log mode
SmoothingThe smoothing function is to smoothly connect the slope of the initial gain and the base curve.You can select from among four types: off, narrow, medium, and wide.
if the setting cannot be changed, owing to the limits of the camera settings, an exclamation symbol, as shown below, appears on the graph.
Sample Curve: Select the basic characteristics for the sample curve.
Set the white clip level to determine the upper limit of the white level.
You can directly enter numeric values. (The black level cannot be adjusted.)
Gain: You can create a curve by decreasing the total gain from the sample curve.
Adjust the middle tone.
Adjust the initial gain (slant) that determines the characteristics of black parts.
Clicking on a point near the maximum point displays the adjustment buttons at the left and right of the icon, permitting you to adjust the dynamic range.
To decrease the dynamic range value.
To increase the dynamic range value.
Linear curve of the initial gain
Sample curve (black)
Select the effective range of smoothing.
Curve after smoothing (red)
Sample curve (black)
Note
Functions and Operations of the Gamma Windows 25

26
For W
indows
To switch to Custom Edit modeCustom Edit mode is used for fine editing that cannot be done in Parameter Edit mode.Double-clicking on a gamma data on the list whose Base column does not show “Param” activates Custom Edit mode.
The following adjustments can be made in Custom Edit mode:• White level/dynamic range adjustment
See “To adjust the white level and dynamic range” (page 27).
• Black adjustmentSee “To adjust the black (Scale Linear mode only)” (page 27).
• Middle tone adjustmentSee “To adjust the middle tone” (page 27).
• Minus data adjustmentSee “To adjust the minus data” (page 28).
• Three-point adjustmentSee “To perform 3-point adjustment” (page 28).
• Vertical shift of the curveSee “To move the curve holistically in vertical directions” (page 28).
Graph View/Edit window in Custom Edit mode
Base column
Custom Edit mode indication
Option check boxes are active.The parameter input area becomes invalid.
Editing is done in the draw zone.For the draw zone, you can select Scale Linear mode or Scale Log mode with the View menu. (The figure shows the draw zone in Scale Linear mode.)
Functions and Operations of the Gamma Windows

For W
indows
To adjust the white level and dynamic rangeThe maximum point of the curve can be adjusted by dragging it with the mouse, without moving the zero point.You can also move it by directly entering a value in the Set Point Y box.
Moving the mouse to the left changes the dynamic range.You can also move it by directly entering a value in the D-Range box.
To use the D-Range boxThe D-Range box shows the abscissa value for the point of ordinate 109. The point of ordinate 109 is changed according to the entered abscissa value.If a value over 9999 is entered, it is regarded as invalid, and the curve is not modified.
To adjust the black (Scale Linear mode only)The black can be adjusted by dragging the origin point on the X axis with the mouse.You can also move it by directly entering a value in the Set Point Y box.
To adjust the middle toneWhen you click on the curve, an adjustment point is added. You can change the shape of the curve by dragging the point with the mouse.
Set Point Y box
D-Range box
Set Point Y box
Functions and Operations of the Gamma Windows 27

28
For W
indows
To adjust the minus dataYou can adjust the data in the minus area.You can also move it by directly entering a value in the Set Point Y box.
To perform 3-point adjustmentPerform three-point adjustment when you wish to restrict the change area.Specify three points on the graph, using the mouse. You can change the curve by moving the center point. The curve will not change in the areas outside the side two points.The side points can be moved along the curve.The center point can also be moved by entering a value in the Set Point Y box.
To move the curve holistically in vertical directionsClicking on the (Move curve holistically) icon on the tool bar activates Vertical move mode. You can move the curve by dragging it with the mouse in this mode.You can also move the curve by entering a value (in %) in the box to the right of the icon then pressing the Enter key.
Set Point Y box
Set Point Y box
“Move curve holistically” icon and value input box
Functions and Operations of the Gamma Windows

For W
indows
Zoom Manager Window
The Zoom manager window permits you to expand/reduce the graph in the draw zone.
a Graph view areaThe purple area indicates the area displayed in the draw zone. The mouse pointer changes to the hand icon in this area. Dragging it moves the view area.
b Zoom In buttonClick on it to expand the graph in the draw zone.
c Slide barDragging the pointer to the right with the mouse expands the graph in the draw zone, and dragging it to the left reduces it.
d Zoom Out buttonClick on it to reduce the graph in the draw zone.
You can move the Zoom manager window to anywhere over other windows.
Camera Gamma Select Window and Gamma Send Operation Bar
You can transmit a gamma to a camera connected via LAN or a group of gammas as a user gamma file.The names of the gammas loaded in a camera are displayed, permitting you to change the current gamma selection on the camera.
Camera Gamma Select window
a Camera gamma display areaThe names of the user gammas installed in the connected camera are displayed.
b Radio buttons for selecting gamma number on camera
You can switch the user gamma on the camera by using the radio buttons.
Gamma send operation bar
a Send to Gamma (number select) boxSelect the destination user gamma of the camera.
b Auto Send check boxCheck this box to automatically send the data to a camera each time you edit the graph. This is convenient to immediately confirm the results of editing.
aGraph view area
dZoom Out button
bZoom In button
cSlide bar
aCamera gamma display area
bRadio buttons for selecting gamma number on camera
aSend to Gamma (number select) box
bAuto Send check box
cSend to Camera button
Functions an
d Operations of the Gamma Windows 29
30
For W
indows
Responses to graph operations may become slower, as data are transmitted each time you change the graph.
c Send to Camera buttonTo send the gamma selected in the User Gamma window (page 18) to a camera as the user gamma of the number specified in the Send to Gamma (number select) box.
To connect a camera
1 Connect the CvpFileEditor-installed computer to the camera via a hub or directly via a cross cable.
When connecting the computer to a camera directly, always use a cross cable. When using a straight cable, connect via a hub. Communication may not be possible using other connection methods.
2 Select “Camera Setting” from the User Gamma menu to open the Camera NetworkSetting window.
3 Enter the IP address of the camera then click on OK to close the Camera NetworkSetting window.
4 Click on the Connect button at the right end of the tool bar (page 15).
The connection to the camera is established, and the indicator of the button changes color to green.
To transmit the data to the connected camera
1 Specify the target user gamma number with the Send to Gamma (number select) box on the Gamma send operation bar.
2 Click on the Send to Camera button on the Gamma send operation bar.
The display is automatically updated when transmission is completed.
Note
Note
Enter the IP address of the camera.
Connect button
Functions and Operations of the Gamma Windows

For W
indows
Importing and Exporting Gamma Data Files of Other Types
In addition to ce2, the following three file types are supported.
Files of gdd
Input and output data in pairs are displayed in %.
The data area described in the following format:
Files of csv
The format is almost the same as a gdd file except commas after data values only.
Character Meaning
// Comment description
NAME Gamma name to be displayed in the Gamma Data list.
COMMENT1 Comment 1 information
COMMENT2 Comment 2 information
XMAP Multiplying factor for input values. Set to 100 to indicate in %.
YMAP Multiplying factor for output values. Set to 100 to indicate in %.
DATE Date of creation
BEGIN DATA Beginning of data
Numerical values Input and output values are described separated with a comma and space.
END DATA End of data
Character Meaning
Importing and Exporting Gamma Data Files of Other Types 31

32
For W
indows
Files of lut
Data are described with digital codes of the specified bit length.
Export options for a lut fileWhen exporting, the Lut Mapping window opens, permitting you to change the lut file format.
a Bit Depth buttonsTo specify the bit length.
b Mapping buttonsTo determine whether to output the data in digital codes or in % values.
c Code input boxesWhen you select “Code” for Mapping, enter the codes for 100% White and 0% Black.The codes can be specified independently for Input and Output.
d Value input boxesWhen you select “Value(%)” for Mapping, specify the percentages of the maximum values of input codes.The X and Y values vary depending on the Bit Depth selections.
Exporting the Inverse Characteristics
The Inverse ability of the program enables conversion of camera output to a linear curve to which no gamma is applied.You can output the characteristics of the inverse function of gamma data as an inverse file.Select Export Inverse File from the Data menu.
A curve of inverse characteristics cannot be imported.
Character Meaning
# Comment description
LUT: 3 X Always enter “3” at the beginning, as data are composed of three channels (R, G, and B).Enter a value of the bit length for X (e.g. 1024 for 10 bits).
Numeric values
Enter the digital codes for output data as much as the required number for the specified bit length (e.g. 1024 values of 0 to 1024 for 10-bit data).The same numeric value string must be repeated three times, as they are required for each of the R, G, and B channels.
Note
cCode input boxes
aBit Depth buttons
bMapping buttons
dValue input boxes
Importing and Exporting Gamma Data Files of Other Types

For W
indows
Functions and Shortcuts Operations of Gamma Operation Menus
File menu
Data menu
Edit menu
In Parameter Edit mode
In Custom Edit mode
Command Shortcut Function
Open Alt + F + Oor Ctrl + O
To open an application file (*.ce2)
New Alt + F + Nor Ctrl + N
To create a new application file
Close Alt + F + C To close the current application file
Save Alt + F + S or Ctrl + S
To save the current application file
Save As Alt + F + A To save the current application file under another filename
Print Setup Alt + F + U To set up screen printing
Print Preview
Alt + F + V To preview screen printing
Print Alt + F + P or Ctrl + P
To print the screen
Recent CE2 Files
Alt + F + R + Number
To open a recent application file
Exit Alt + F + E To exit the application
Command Shortcut Function
New Alt + D + N To create new gamma data in Parameter Edit mode
Library Alt + D + L To read gamma data from a library
Import Alt + D + I To read a file of another format as gamma data
Export Alt + D + E To export the current gamma data to a file of another format.
Export Inverse File
Alt + D + V To export inverse characteristics as an inverse file
Command Shortcut Function
Undo Alt + E + U or Ctrl + Z
To cancel the previous curve adjustment operation
Redo Alt + E + R or Ctrl + Y
To execute the undone curve adjustment operation again
Restore Alt + E + S To restore the curve to its original status before editing
Zoom In Alt + E + I or the mouse wheel (+)
To expand the graph
Zoom Out Alt + E + O or the mouse wheel (–)
To reduce the graph
Custom Edit
Alt + E + C To shift to Custom Edit mode
Command Shortcut Function
Undo Alt + E + U or Ctrl + Z
To cancel the previous curve adjustment operation
Redo Alt + E + R or Ctrl + Y
To execute the undone curve adjustment operation again
Restore Alt + E + S To restore the curve to its original status before editing
Zoom In Alt + E + I or the mouse wheel (+)
To expand the graph
Zoom Out Alt + E + O or the mouse wheel (–)
To reduce the graph
Auto Add Points
Alt + E + A To automatically add three edit points for the curve
Delete All Points
Alt + E + D To delete all the edit points on the curve
Move Alt + E + M To turn Vertical Move mode on or off
Functions and Shortcuts Operations of Gamma Operation Menus 33

34
For W
indows
User Gamma menu
View menu
Mode menu
Help menu
Command Shortcut Function
New Alt + U + N To create a new user gamma file
Export Alt + U + E To export the selected user gamma to a Memory Stick
Camera Setting
Alt + U + S To set the IP address of the camera
Command Shortcut Function
Data List Alt + V + D To turn the Gamma Data and User Gamma windows on or off
Camera Gamma Select
Alt + V + C To turn the Camera Control window on or off
Graph Alt + V + G To turn the Graph View/Edit window on or off
Zoom Manager
Alt + V + Z To turn the Zoom manager window on or off
Scale Linear
Alt + V + N To draw the graph by linear scaling
Scale Log Alt + V + L To draw the graph by log scaling of the X axis
Command Shortcut Function
Gamma Alt + M + G To select Gamma operation mode
MLUT Alt + M + M To select MLUT operation mode
Command Shortcut Function
About Alt + H + A To display the software version
Functions and Shortcuts Operations of Gamma Operation Menus
For W
indows
Functions and Operations of the MLUT Windows
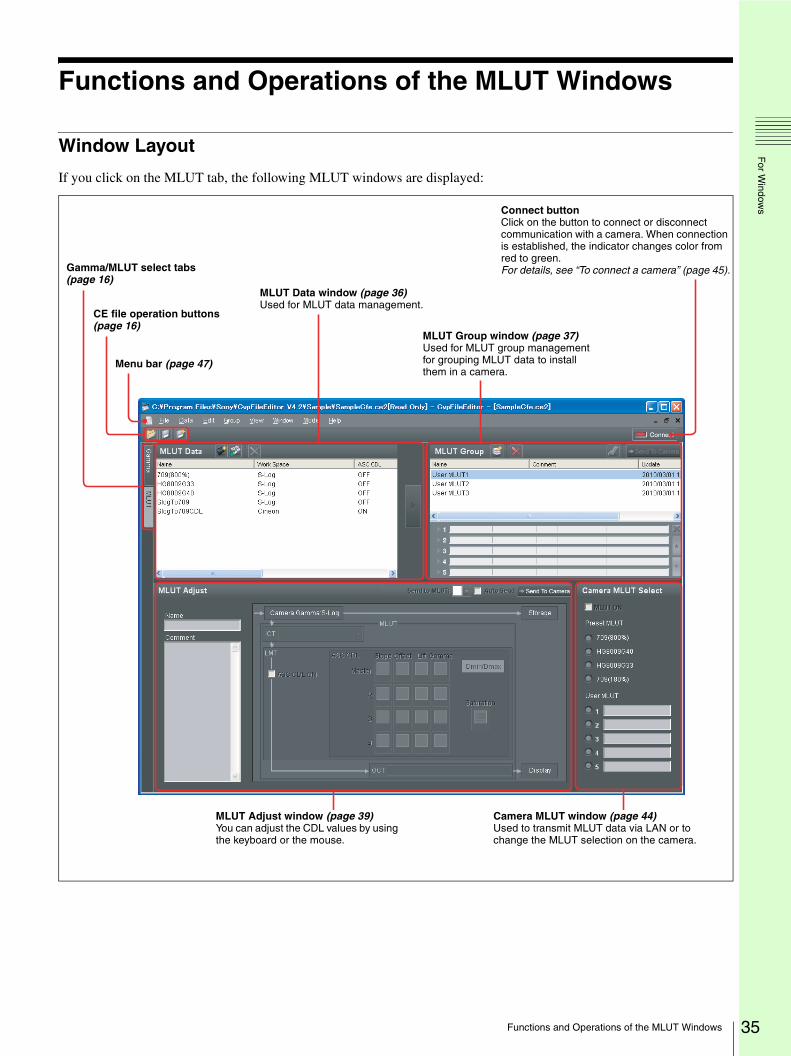
Window Layout
If you click on the MLUT tab, the following MLUT windows are displayed:
MLUT Group window (page 37)Used for MLUT group management for grouping MLUT data to install them in a camera.
Camera MLUT window (page 44)Used to transmit MLUT data via LAN or to change the MLUT selection on the camera.
MLUT Data window (page 36)Used for MLUT data management.
MLUT Adjust window (page 39)You can adjust the CDL values by using the keyboard or the mouse.
Menu bar (page 47)
CE file operation buttons (page 16)
Connect buttonClick on the button to connect or disconnect communication with a camera. When connection is established, the indicator changes color from red to green.For details, see “To connect a camera” (page 45).Gamma/MLUT select tabs
(page 16)
Functions and Operations of the MLUT Windows 35

36
For W
indows
MLUT Data Window
Manage MLUT data in the MLUT Data window.
a MLUT Data tool bar
b MLUT Data list
Clicking on the title of each column changes the display order on the list.Right-clicking on an MLUT data line permits you to import or export an MLUT or ASC CDL, create another MLUT, delete or rename the data, or edit the comment.
aMLUT Data tool bar
bMLUT Data list MLUT Group window (page 37)
Icon Designation Function
New To create a new MLUT.
Import To import an ASC CDL file.For details, see “File Types for MLUT” (page 46).
Delete To delete the specified MLUT data.
Designation Contents
Name Designation of the MLUT data, which is displayed on the camera menu screen when the data are installed in a camera.
Work Space Type of gamma (S-Log A, Cineon, etc.) converted in ICT (input conversion transform).Select the same Gamma setting to be used for grading in postproduction.
ASC CDL Whether any ASC CDL adjustment value is included in the MLUT dataON: IncludedOFF: Not included
Display Gamma setting for display outputs(Default: ITU-R709)
Comment Additional information on the MLUT.Up to 1000 characters can be entered.The information is not added in data exporting.
Update The year, month, day, and time of updating are displayed.
Functions and Operations
of the MLUT W indows
For W
indows
MLUT Group Window
The MLUT Group window is used to group created MLUT data as user MLUTs to install the data in a camera
via a Memory Stick or a LAN. Five sets of MLUT data at maximum can be grouped as an MLUT group.
a MLUT Group listThe list shows the information on the MLUT group.Operations as those for MLUT data can be made by right-clicking on the list.
b MLUT Group tool bar
c MLUT Group entry buttonTo enter the MLUT data selected in the left MLUT Data window in the MLUT group selected on the MLUT Group list.
d Selected MLUT areaInformation on the MLUT data registered for an MLUT group is displayed.
cMLUT Group entry button
aMLUT Group list
bMLUT Group tool bar
dSelected MLUT area
MLUT Data window (page 36)
Icon Designation Function
New To create a new MLUT group.
Delete To delete the selected MLUT group from the list.The registered MLUT data are not erased (remaining in the MLUT Data window).
Export To export the selected MLUT group as a file of lut type to a Memory Stick.
NoteExport is not executed if no MLUT data are registered in the MLUT group.
To send the selected MLUT group to a camera.
Send to camera
Icon Designation Function
Delete MLUT To delete the selected MLUT data from the group.The MLUT data are not erased (remaining in the MLUT Data window).
Up To move the order of MLUT data up on the registration list.
Down To move the order of the MLUT data down on the registration list.
Functions and Operations of the MLUT Windows 37

38
For W
indows
To install an MLUT group via a Memory Stick into a camera
1 Create an MLUT group.
1 Click on the (New) icon to display the New MLUT Group dialog box.
2 Enter a filename for the MLUT group.
2 Register MLUT data for the MLUT group.
Select the MLUT data to be registered in the MLUT Data window and click on the MLUT Group entry button.Up to five MLUTs can be registered. The order of the registered MLUTs can be changed, using the up/down buttons.
3 Export the MLUT group to a Memory Stick.
Click on the (Export) icon and specify the target Memory Stick on the directory.
4 Open the USER GAMMA page of the camera’s FILE menu, load the MLUT group from the Memory Stick into the camera with the MONI LUT READ function.
5 Set MLUT/PB MIX to MLUT and select the type for MLUT SEL on the PB/MONI LUT page of the camera’s OPERATION menu.
For details on menu operations on the camera, refer to the operation manual of the camera.
For operations to export the data via LAN, see “Camera MLUT Select Window and MLUT Send Operation Bar” (page 44).
New icon
MLUT Group entry button
Up/down buttons
MLUT Data window , Selected MLUT area
Export icon
Functions and Operations of the MLUT Windows

For W
indows
MLUT Adjust Window
The MLUT Adjust window permits you to adjust the CDL information of the selected MLUT.
a MLUT information area The MLUT data name and any comment are displayed.Entering/editing of the comment is enabled when you double-click on the text box.
b CDL graph information areaThe CDL-related information is displayed.This area enables you to select the ICT (input conversion transform) and OCT (output conversion transform) types and adjust the CDL values.The area is grayed and inoperative when no MLUT is selected in the MLUT Data window (page 36) or an MLUT group is selected in the MLUT Group window (page 37).It has multiple operation modes, CDL OFF, CDL Edit, and Sub Edit, and operable items are different among the modes.
Operation is enabled only when the camera gamma is S-Log A with V4.3.
aMLUT information area
MLUT send operation bar (page 44)
bCDL graph information area
Note
Functions and Operations of the MLUT Windows 39

40
For W
indows
CDL OFF ModeWhen you select an MLUT whose CDL attribute is OFF in the MLUT Data window (page 36), the CDL graph information area enters CDL OFF mode, activating the
ICT selection box, ASC CDL ON checkbox, and OCT indication/Display Gamma selection button.
a ICT (Input Conversion Transform) selection boxWhen using ASC CDL, set it according to the Work Space to be used in postproduction. When ASC CDL is not used, this setting is invalid, as conversion to the gamma set in OCT (output conversion transform) is made.
b ASC CDL ON checkboxWhen you check this box, the CDL graph information area switches to CDL Edit mode (page 41), activating the CDL edit area. The ASC CDL attribute of the selected MLUT becomes ON when the box is checked. It returns to OFF when the box is unchecked.If you select ASC CDL ON for an MLUT whose Display Gamma is other than ITU-R709, an alarm message is displayed and Display Gamma is forcibly changed to ITU-R709.
c OCT (Output Conversion Transform) indication/Display Gamma select button
The gamma for output to displays can be selected. When ASC CDL is ON, it is forcibly set to ITU-R709. When ASC CDL is OFF, user gamma selection is enabled. When you click on the button, the Display Gamma selection dialog opens, permitting you to select the user gamma to be applied to displays.
This setting converts S-Log A of the main line to the selected gamma.There are two types of data included on the Gamma list with V4.3 MLUT data; Library data and gamma data of Type 3.0.Selecting a gamma of Type 3.0 here disables operations, such as deletion, renaming, and editing of the gamma in Gamma Operation mode.
CDL edit area (page 41)a ICT selection box
bASC CDL ON checkbox cOCT indication/Display Gamma select button
Designation Contents
S-Log to Scene Linear
To convert S-Log A to Scene Linear.The OCT indication shows “Scene Linear to xxx.”
S-Log to Cineon
To convert S-Log A to Cineon.The OCT indication shows “Cineon to xxx.”
OFF No conversion is made. S-Log A is used without conversion.
Note
Functions and Op
erations of the MLUT Windows
For W
indows
CDL Edit ModeWhen you check the ASC CDL ON checkbox or select an MLUT whose CDL attribute is ON, the CDL graph information area enters CDL Edit mode.
The Dmin/Dmax button and the CDL edit area become operable and the default values and thumbnail images of 17 CDL items are displayed.The Display Gamma select button (page 40) is disabled in this mode.
a CDL edit areaThe default values and thumbnail images of the ASC CDL adjustment items (Slop, Offset, Lift, Gamma, and Saturation) are displayed. For Slop, Offset, Lift, and Gamma, the master, R, G, and B values are displayed.Clicking on a thumbnail image opens the edit window (see page 42) for the corresponding item.
b Dmin/Dmax buttonClicking on this button opens the Dmin/Dmax window, enabling the adjustments.
ASC CDL ON checkbox (page 40) aCDL edit area
bDmin/Dmax button
Functions and
Operations of the MLUT Windows 41
42
For W
indows
CDL Edit Windows
Clicking on a thumbnail image in the CDL edit area in CDL Edit mode opens the edit window for the
corresponding item. This permits you to adjust the CDL value, using the mouse or keyboard.
a CDL value input boxAdjustment is achieved by entering a value.The range of adjustment values differ among the items. If you enter a value out of the range, an error message is displayed.
b CDL Sub Edit Tool barFor edit reoperation or switching M, R, G, and B edit windows for Slope, Offset, Lift or Gamma.
aCDL value input box bCDL Sub edit tool bar
cGuide for CDL value fine-adjustment dCDL Sub edit zone eClose button
Example: Slope R
Icon Designation Function
Slope M 0 to 99.990
Offset M -1 to 1
Lift M 0 to 99.990
Gamma M 0 to 140
Slope R 0 to 99.990
Offset R -1 to 1
Lift R 0 to 99.990
Gamma R 0 to 140
Slope G 0 to 99.990
Offset G -1 to 1
Lift G 0 to 99.990
Gamma G 0 to 140
Slope B 0 to 99.990
Offset B -1 to 1
Lift B 0 to 99.990
Gamma B 0 to 140
Saturation 0 to 2
Icon Designation Function
Undo To undo the last operation.
Redo To redo the last undone operation.
Restore To restore the original status of the item.
Master To switch to the edit window of the master value of the same item.
Red To switch to the edit window of the R value of the same item.
Green To switch to the edit window of the G value of the same item.
Blue To switch to the edit window of the B value of the same item.
Functions and O
perations of the MLUT Windows
For W
indows
c Guides for CDL value fine-adjustmentOperation guides for fine-adjustment from the keyboard are displayed.
Example: Shift + r R T t ±0.1Pressing an arrow key with the Shift key held pressed moves the adjustment point (icon) by 0.1 on the graph in the direction of the arrow.
d CDL Sub edit zoneYou can edit Slope, Offset, Lift, Gamma, and Saturation.Slope: For an effect equivalent to ISO sensitivity
adjustment of the camera or the f-stop adjustment of the lens.
Offset: For black level adjustment without changing the overall contrast.
Lift: For black level adjustment while maintaining high-luminance areas.
Gamma: To change the brightness at middle luminance.Saturation: To adjust vividness of colors.
• Adjustments are performed in the sequence of Slope, Offset, then Gamma. Lift is adjusted internally, using Slope and Offset.
• The saturation function for ASC CDL is applied for monitor images only. It is different from “Saturation” of the MAINTENANCE menu of cameras.
In the edit zone for Slope, Offset, Lift, and Gamma, you can change the value by directly dragging the icon (common to that for the CDL value input box) displayed on the graph with the mouse or moving it with arrow keys on the keyboard (see “Guides for CDL value fine-adjustment” above). The gray line indicates the default setting.In the edit zone for Saturation, you can change the value by directly dragging the slide bar with the mouse or moving it with arrow keys.
Slope adjustment (example: R)
Offset adjustment (example: R)
Lift adjustment (example: R)
Gamma adjustment (example: R)
Notes
Functions and Operations of the MLUT Windows 43
44
For W
indows
Saturation adjustment
d Close buttonClicking on the button closes the edit window, returning to CDL Edit mode. (You can also close the edit window by pressing the space bar.)
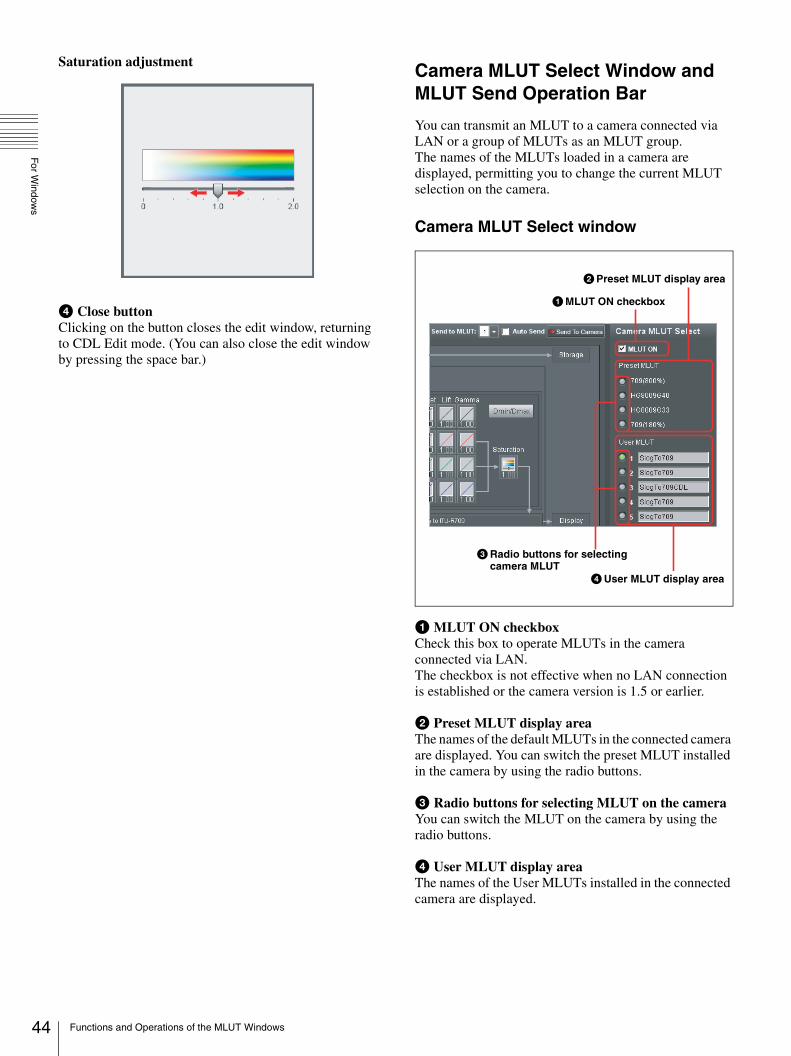
Camera MLUT Select Window and MLUT Send Operation Bar
You can transmit an MLUT to a camera connected via LAN or a group of MLUTs as an MLUT group.The names of the MLUTs loaded in a camera are displayed, permitting you to change the current MLUT selection on the camera.
Camera MLUT Select window
a MLUT ON checkboxCheck this box to operate MLUTs in the camera connected via LAN.The checkbox is not effective when no LAN connection is established or the camera version is 1.5 or earlier.
b Preset MLUT display areaThe names of the default MLUTs in the connected camera are displayed. You can switch the preset MLUT installed in the camera by using the radio buttons.
c Radio buttons for selecting MLUT on the cameraYou can switch the MLUT on the camera by using the radio buttons.
d User MLUT display areaThe names of the User MLUTs installed in the connected camera are displayed.
aMLUT ON checkbox
dUser MLUT display area
bPreset MLUT display area
cRadio buttons for selecting camera MLUT
Functions and Operations of the MLUT Windows
For W
indows
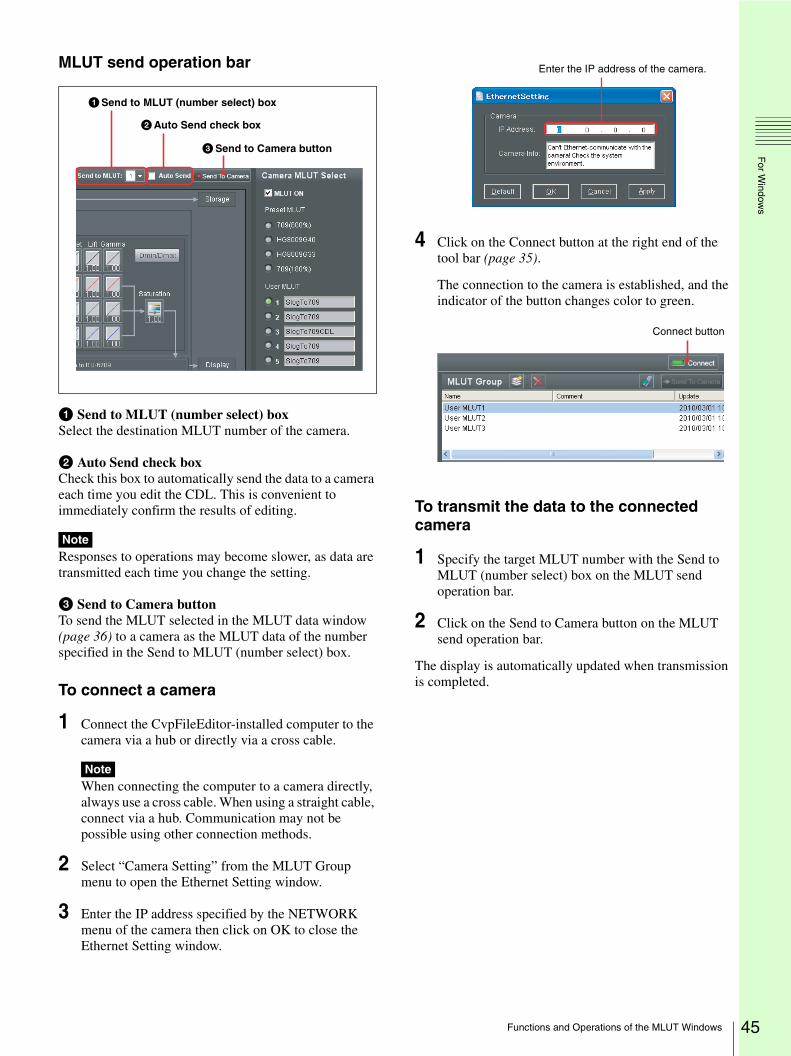
MLUT send operation bar
a Send to MLUT (number select) boxSelect the destination MLUT number of the camera.
b Auto Send check boxCheck this box to automatically send the data to a camera each time you edit the CDL. This is convenient to immediately confirm the results of editing.
Responses to operations may become slower, as data are transmitted each time you change the setting.
c Send to Camera buttonTo send the MLUT selected in the MLUT data window (page 36) to a camera as the MLUT data of the number specified in the Send to MLUT (number select) box.
To connect a camera
1 Connect the CvpFileEditor-installed computer to the camera via a hub or directly via a cross cable.
When connecting the computer to a camera directly, always use a cross cable. When using a straight cable, connect via a hub. Communication may not be possible using other connection methods.
2 Select “Camera Setting” from the MLUT Group menu to open the Ethernet Setting window.
3 Enter the IP address specified by the NETWORK menu of the camera then click on OK to close the Ethernet Setting window.
4 Click on the Connect button at the right end of the tool bar (page 35).
The connection to the camera is established, and the indicator of the button changes color to green.
To transmit the data to the connected camera
1 Specify the target MLUT number with the Send to MLUT (number select) box on the MLUT send operation bar.
2 Click on the Send to Camera button on the MLUT send operation bar.
The display is automatically updated when transmission is completed.
Note
Note
aSend to MLUT (number select) box
bAuto Send check box
cSend to Camera button
Enter the IP address of the camera.
Connect button
Functions and Operations of the MLUT Windows 45

46
For W
indows
File Types for MLUT
Files of lut type is used when exporting MLUTs to a Memory Stick.To exchange ASC CDL with another system, use files of cdl type.
Files of lut
Data are described with digital codes of the specified bit length. Files of cdl
The data area described in the following format:
Character Meaning
# Comment description
#$ Name of the gamma used in the MLUT
#% Name of the display gamma
#? CDL information
LUT: 3 Always enter “3” at the beginning, as data are composed of three channels (R, G, and B).Enter a value of the bit length for X (e.g. 1024 for 10 bits).
Numeric values
Enter the digital codes for output data as much as the required number for the specified bit length (e.g. 1024 values of 0 to 1024 for 10-bit data).The same numeric value string must be repeated three times, as they are required for each of the R, G, and B channels.
Character Meaning
Input Description Name of the gamma used in the MLUT
Viewing Description
Name of the display gamma
Slope Values for R, G and B channels of the slope
Offset Values for R, G and B channels of the offset
Gamma Values for R, G and B channels of the gamma
Character Meaning
File Types for MLUT

For W
indows
Functions and Shortcuts Operations of MLUT Operation Menus
File menu
Data menu
Edit menu
Group menu
View menu
Command Shortcut Function
Open Alt + F + O or Ctrl + O
To open an application file (*.ce2)
New Alt + F + N or Ctrl + N
To create a new application file
Close Alt + F + C To close the current application file
Save Alt + F + S or Ctrl + S
To save the current application file
Save As Alt + F + A To save the current application file under another filename
Print Setup Alt + F + U To set up screen printing
Print Preview
Alt + F + V To preview screen printing
Print Alt + F + P or Ctrl + P
To print the screen
Recent CE2 Files
Alt + F + R + Number
To open a recent application file
Exit Alt + F + E To exit the application
Command Shortcut Function
New Alt + D + G To create new MLUT data
Import Alt + D + I To read a file of another format as MLUT data
Export MLUT
Alt + D + E To export the current MLUT data to a file of another format.
Export ASC CDL
Alt + D + V To export the current ASC CDL data to a file of another format.
Command Shortcut Function
Undo Alt + E + U or Ctrl + Z
To cancel the previous CDL adjustment operation
Redo Alt + E + R or Ctrl + Y
To execute the undone CDL adjustment operation again
Restore Alt + E + T To restore the CDL to its original status before editing
Slope Alt + E + S To open the CDL Slope adjustment window
Offset Alt + E + O To open the CDL Offset adjustment window
Lift Alt + E + L To open the CDL Lift adjustment window
Gamma Alt + E + G To open the CDL Gamma adjustment window
Saturation Alt + E + A To open the CDL Saturation adjustment window
Dmin/Dmax Alt + E + D To open the Dmin/Dmax adjustment window
Command Shortcut Function
New Alt + G + N To create a new MLUT group
Export Alt + G + E To export the selected MLUT group to a Memory Stick
Camera Setting
Alt + G + C To set the IP address of the camera
Command Shortcut Function
Data List Alt + V + D To turn the MLUT Data and MLUT Group windows on or off
Camera MLUT Select
Alt + V + C To turn the Camera MLUT Select window on or off
MLUT Adjust
Alt + V + M To turn the MLUT Adjust window on or off
Command Shortcut Function
Functions and Shortcuts Operations of MLUT Operation Menus 47

48
For W
indows
Mode menu
Help menu
Command Shortcut Function
Gamma Alt + M + G To activate Gamma Operation mode
MLUT Alt + M + M To activate MLUT Operation mode
Command Shortcut Function
About Alt + H + A To display the software version
Functions and Shortcuts Operations of MLUT Operation Menus

For Mac OSHow to use the application on Mac OS

50
For M
ac OS
Installation of the Program
Operational Environment for CvpFileEditor
A computer that meets the following:
CPU2.0GHz Intel Core 2 Duo equivalent or higher
Memory2 GB or more (4 GB or more recommended)
DisplayScreen resolution 1280×800 or more
OS• Mac OS X 10.8 Mountain Lion (64-bit version)• Mac OS X 10.9.3 Mavericks (64-bit version)
When using this software in a Mac OS 10.9.3 Mavericks environment, operation with cameras connected via LAN is not supported. Perform operations usng a Memory Stick. Delayed refreshing of displays may occur during editing operations when cameras are connected via LAN.
To Install
1 Start up the installation program.
The Welcome window of the Setup Wizard opens.
2 Click on the Continue button in the Welcome window.
The License Agreement window opens.
3 Click on the Continue button.
The Confirmation window pops up.
Note
Installation of the Program

For M
ac OS
4 Click on the Agree button.
The Standard Install window opens.
To change the disk to install the CvpFileEditor, click on the Change Install Location button to change it on the Destination Select window. Clicking on the Continue button restores the Standard Install window.
5 Click on the Install button.
The Password input window opens.
6 Enter the Name and Password specified for the computer and click on the OK button.
Installation begins.When installation is completed, a completion window opens.
7 Click on the Close button to close the completion window.
To Uninstall
Move the CvpFileEditor Folder (Default; /Application/CvpFileEditor) to the Trash.
Installation of the Program 51

52
For M
ac OS
Basic Operation Flow
The flow of gamma and MLUT creation is roughly indicated below.
Starting operation
Start up CvpFileEditor and open the sample file or an existing ce2 file by selecting “Open” or “New” from the File menu or using the CE file operation button (page 54).The Gamma operation windows (page 53) will be displayed.
Switching between Gamma and MLUT operation windows
The Gamma and MLUT select tabs (page 54) located on the left of the operation windows permit you to switch between Gamma operation windows (page 53) and MLUT operation windows (page 73).Switching is also possible using Mode menu on the menu bar.
You cannot switch between Gamma and MLUT when the camera is connected via LAN. An error message appears if you click on the Gamma or MLUT tab.
Creating gamma data
There are three methods for creating gamma data.
1. Newly creating gamma data (using Parameter Edit mode)Select “New” from the Data menu for the Gamma operation windows (page 53) to create new gamma data. Parameter Edit mode is selected to permit you to enter the characteristics required for gamma.
For details, see “To start editing in Parameter Edit mode” (page 59).
2. Loading library data and edit them in Custom Edit modeYou can select fundamental characteristics, such as ITU-R709, Hyper Gamma, or S-LOG, from the library and finely adjust them in Custom Edit mode.To load the library data, select “Library” from the Data menu for the Gamma operation windows (page 53) then start editing.
For details, see “To import library data” (page 55) and “To switch to Custom Edit mode” (page 64).
3. Importing data of different systemsWhen you wish to install data created with another grading tool, use the import function. Select “Import File” from the Data menu for the Gamma operation windows (page 53).
For details, see “Importing and Exporting Gamma Data Files of Other Types” (page 69).
Creating MLUT data
Select “New” from the Data menu for the MLUT operation windows (page 73) to create new MLUT data.You can add CDL information to the created MLUT by using the ASC CDL adjustment function.
Installing the gamma data in a camera
The data can be installed in the camera via a Memory Stick or LAN.
1. Via a Memory StickGamma or MLUT data (five sets at maximum) are installed as a file. The user gamma or MLUT data in the camera are overwritten.
For details, see “To install user gamma via a Memory Stick into a camera” (page 57) or “To install MLUT group via a Memory Stick into a camera” (page 76).
2. Via LANThis is valid only for an F23/F35 having LAN control capability. You can directly transmit data being edited to the camera.
Installation via LAN is only supported in Mac OS X 10.8 Mountain Lion. In a Mac OS X 10.9.3 Mavericks environment, do not connect via LAN and perform installation via a Memory Stick.
For details, see “Camera Gamma Select Window and Gamma Send Operation Bar” (page 67) or “Camera MLUT Select Window and MLUT Send Operation Bar” (page 82).
Note
Note
Basic Operation Flow

For M
ac OS
Functions and Operations of the Gamma Windows
Window Layout
The following windows are used for gamma operations:
User Gamma window (page 56)Used for user gamma file management for grouping gamma data to install them in a camera.
Select Camera Gamma window (page 67)Used to transmit gamma data via LAN or to change the gamma selection on the camera.
Gamma Data window (page 54)Used for gamma data management.
Graph View/Edit window (page 58)Displays gamma curves and various gamma data.You can edit the data by entering parameters or operating the mouse.
Zoom manager window (page 67)Used to expand/reduce the size of the graph or change the display area.
Menu bar (page 71)
CE file operation buttons (page 54)
Connect buttonClick on the button to connect or disconnect communication with a camera. When connection is established, the indicator changes color from red to green.For details, see “To connect a camera” (page 68).
Gamma/MLUT buttons
Functions and Operations of the Gamma Windows 53

54
For M
ac OS
CE File Operation Buttons
Operate CE2 files.
Gamma/MLUT select tabs
Select the operation mode.
Gamma Data Window
Manage gamma data in the Gamma Data window.
a Gamma Data tool bar b Gamma Data list
Icon Designation Function
Open CE2 file To open an existing ce2 file.
Save CE2 file To save the ce2 file.
Save As CE2 file To the ce2 file with another filename.
Icon Designation Function
Gamma To select Gamma operation mode.
MLUT To select MLUT operation mode.
aGamma Data tool bar
bGamma Data list User Gamma window (page 56)
Icon Designation Function
New To newly create gamma data. Parameter Edit mode is automatically activated.
Import File To import a file (gdd, csv, or lut file) and convert it to gamma data.For details, see “Importing and Exporting Gamma Data Files of Other Types” (page 69).
Import Library To import gamma data from the internal libraries of CvpFileEditor.
File Delete To delete the specified gamma data.
Designation Contents
Name Designation of the gamma data, which is displayed on the camera menu screen when being installed in a camera.
Type Type of gamma data. Note that the type of gamma depends on the camera model.3.0: F23, F35, HDC-1000/1500 series
cameras, SRW-9000, HDC-2000 series, PMW-F55
2.0: HDC-950, HDW-F900/F900R, etc.The type can be changed in the Graph View/Edit window when editing the gamma data.
Comment1 A short comment to be displayed on the camera menu screen.You can enter up to 12 alphanumeric characters.
Functions and Operations
of the Gamma Wind ows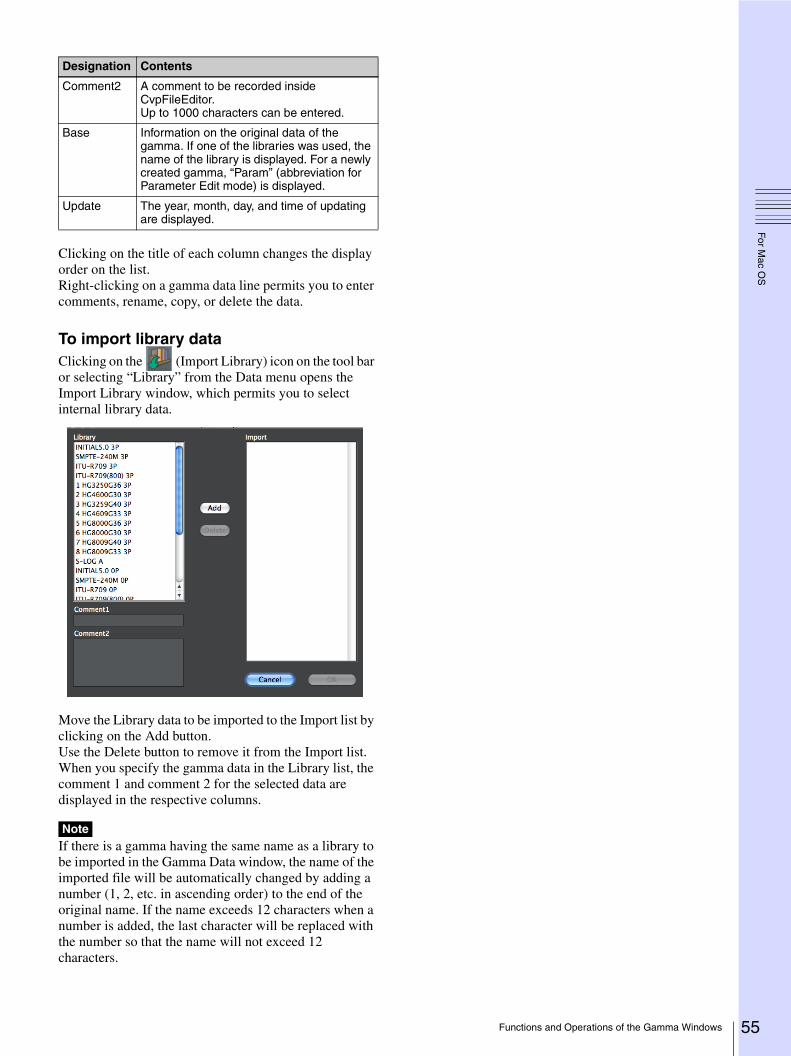
For M
ac OS
Clicking on the title of each column changes the display order on the list.Right-clicking on a gamma data line permits you to enter comments, rename, copy, or delete the data.
To import library dataClicking on the (Import Library) icon on the tool bar or selecting “Library” from the Data menu opens the Import Library window, which permits you to select internal library data.
Move the Library data to be imported to the Import list by clicking on the Add button.Use the Delete button to remove it from the Import list.When you specify the gamma data in the Library list, the comment 1 and comment 2 for the selected data are displayed in the respective columns.
If there is a gamma having the same name as a library to be imported in the Gamma Data window, the name of the imported file will be automatically changed by adding a number (1, 2, etc. in ascending order) to the end of the original name. If the name exceeds 12 characters when a number is added, the last character will be replaced with the number so that the name will not exceed 12 characters.
Comment2 A comment to be recorded inside CvpFileEditor.Up to 1000 characters can be entered.
Base Information on the original data of the gamma. If one of the libraries was used, the name of the library is displayed. For a newly created gamma, “Param” (abbreviation for Parameter Edit mode) is displayed.
Update The year, month, day, and time of updating are displayed.
Note
Designation Contents
Functions and Operations of the Gamma Windows 55

56
For M
ac OS
User Gamma Window
The User Gamma window is used to group created gamma data as a user gamma to install the data in a camera. Five sets of gamma data at maximum can be
grouped as a user gamma. The user gamma that groups gamma data can be installed via a Memory Stick or LAN.
a User Gamma listThe list shows the information on the user gamma.Operations as those for gamma data can be made by right-clicking on the list.
In the same manner as gamma data, a user gamma has a type attribute, either Type 2.0 or Type 3.0. Gamma data of different types cannot be included in a single user gamma.The type of user gamma is determined by the type of the first registered gamma data.
b User Gamma tool bar
c User gamma entry buttonTo enter the gamma data selected in the left Gamma Data window in the user gamma file selected on the User Gamma list.
d Selected Gamma areaInformation on the gamma data registered in a user gamma file is displayed. Clicking on the gamma data line permits you to preview the form of the gamma curve.
cUser gamma entry button
aUser Gamma list
bUser Gamma tool bar
dSelected Gamma area
Gamma Data window (page 54)
Note
Icon Designation Function
New To create a new user gamma file.
Delete User Gamma To delete the selected user gamma file from the list.The registered gamma data are not erased (remaining in the Gamma Data window).
Export to Memory Stick
To export the selected user gamma file to a Memory Stick.
NoteExport is not executed if no gamma data are registered in the user gamma file.
To send the selected user gamma curve to a camera.
Send to camera
Icon Designation Function
Delete Selected Gamma Data from User Gamma
To delete the selected gamma data from the file.The gamma data are not erased (remaining in the Gamma Data window).
Up To move the order of gamma data up on the registration list.
Down To move the order of the gamma data down on the registration list.
Icon Designation Function
Functions and Operations of the Gamma Windows

For M
ac OS
To install user gamma via a Memory Stick into a camera
1 Create a user gamma file.
1 Click on the (New) icon to display the New User Gamma dialog box.
2 Enter a filename for the user gamma file.
2 Register gamma data to the user gamma file.
Select the gamma data to be registered in the Gamma Data window and click on the user gamma entry button. Up to five gammas can be registered. The order of the registered gammas can be changed, using the up/down buttons.
3 Export the user gamma file to a Memory Stick.
Click on the (Export to Memory Stick) icon and specify the target Memory Stick on the directory.
4 Using the camera’s menu, load the user gamma from the Memory Stick into the camera.
For details on menu operations on the camera, refer to the operation manual of the camera.
For operations to export the data via LAN, see “Camera Gamma Select Window and Gamma Send Operation Bar” (page 67).New icon
User gamma entry button
Up/down buttons
Gamma Data window , Selected Gamma area
Export to Memory Stick icon
Functions and Operations of the Gamma Windows 57

58
For M
ac OS
Graph View/Edit Window
The window displays the characteristics of the gamma data with a graph. Editing the comments is also possible.
The window has a view mode and two edit modes (Parameter Edit mode and Custom Edit mode).
a Window mode select buttonsTo switch between View mode for displaying the detailed information on the selected gamma data and the edit modes for editing the selected gamma data.
b Window mode indication
c Tool barValid only in edit modes.
bWindow mode indication
cTool bar
dGamma Data Information area eGraph Information area
aWindow mode select buttons
Gamma send operation bar(page 67)
“Choose camera type” box(page 60)
Button Function
To use edit modes for editing the curve and information of gamma.
To select View mode for display only without editing.
Indication Mode description
Graph View View mode for confirming the characteristics or information on gamma data without editing
Parameter Edit Parameter Edit mode for editing gamma data by specifying several parameters (function added to CvpFileEditor V4.0 and later)
Custom Edit Custom Edit mode for editing gamma data by setting three points on the graph and moving the center point (function available since CvpFileEditor V3.0 and earlier)
Icon Designation Function
Undo To undo the last graph operation (invalid for the comment areas)
Redo To redo the last undone operation (invalid for the comment areas)
Restore the curve
To restore the original status of the curve before editing (invalid for the comment areas).
Allow tool To set the edit points in Custom Edit mode.
Zoom out To reduce the gamma graph. (Clicking on the icon initiates Expand/Reduce mode, and editing is disabled. To exit Expand/Reduce mode, press the ESC key or click on the Allow tool.)
Zoom in To expand the gamma graph. (Clicking on the icon initiates Expand/Reduce mode, and editing is disabled. To exit Expand/Reduce mode, press the ESC key or click on the Allow tool.)
Functions a
nd Operations o f the Gamma Windows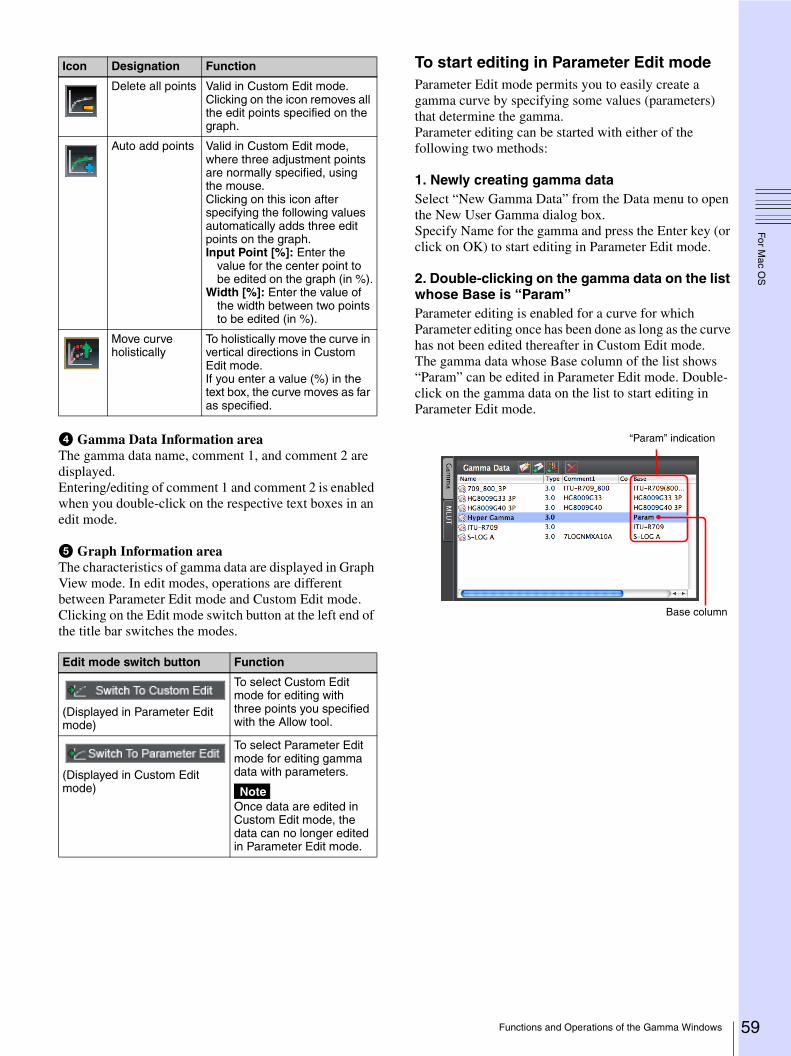
For M
ac OS
d Gamma Data Information areaThe gamma data name, comment 1, and comment 2 are displayed.Entering/editing of comment 1 and comment 2 is enabled when you double-click on the respective text boxes in an edit mode.
e Graph Information areaThe characteristics of gamma data are displayed in Graph View mode. In edit modes, operations are different between Parameter Edit mode and Custom Edit mode.Clicking on the Edit mode switch button at the left end of the title bar switches the modes.
To start editing in Parameter Edit modeParameter Edit mode permits you to easily create a gamma curve by specifying some values (parameters) that determine the gamma.Parameter editing can be started with either of the following two methods:
1. Newly creating gamma dataSelect “New Gamma Data” from the Data menu to open the New User Gamma dialog box.Specify Name for the gamma and press the Enter key (or click on OK) to start editing in Parameter Edit mode.
2. Double-clicking on the gamma data on the list whose Base is “Param”Parameter editing is enabled for a curve for which Parameter editing once has been done as long as the curve has not been edited thereafter in Custom Edit mode.The gamma data whose Base column of the list shows “Param” can be edited in Parameter Edit mode. Double-click on the gamma data on the list to start editing in Parameter Edit mode.
Delete all points Valid in Custom Edit mode. Clicking on the icon removes all the edit points specified on the graph.
Auto add points Valid in Custom Edit mode, where three adjustment points are normally specified, using the mouse.Clicking on this icon after specifying the following values automatically adds three edit points on the graph.Input Point [%]: Enter the
value for the center point to be edited on the graph (in %).
Width [%]: Enter the value of the width between two points to be edited (in %).
Move curve holistically
To holistically move the curve in vertical directions in Custom Edit mode.If you enter a value (%) in the text box, the curve moves as far as specified.
Edit mode switch button Function
(Displayed in Parameter Edit mode)
To select Custom Edit mode for editing with three points you specified with the Allow tool.
(Displayed in Custom Edit mode)
To select Parameter Edit mode for editing gamma data with parameters.
NoteOnce data are edited in Custom Edit mode, the data can no longer edited in Parameter Edit mode.
Icon Designation Function
Base column
“Param” indication
Functions and Operations of the Gamma Windows 59

60
For M
ac OS
Graph View/Edit window in Parameter Edit mode
a Switch to Custom Edit buttonClick on the button to switch from Parameter Edit mode to Custom Edit mode. Note that if data have been edited in Custom Edit mode, they cannot be returned to Parameter Edit mode.
b “Choose camera type” boxThe gamma data type depends on the camera model. Select the type according to your camera.For Type 2.0, additionally select from among Table 0 to 2.
If you wish to create gamma data of both Type 2.0 and Type 3.0Select the gamma data on the gamma data list and make a duplication by right-clicking on it and selecting “Copy” from the context menu. Then change the Type setting.
Gamma data of different types cannot be included in the same user gamma file.
c Parameter input areaYou can specify a value for each parameter as follows:
aSwitch to Custom Edit button
b “Choose camera type” box
Parameter Edit mode indication
cParameter input area dOption check boxes
eDraw zone
Note
Icon Designation Function
_ Sample Curve Select the basic characteristics of the curve.Hyper Gamma: To use hyper
gamma as the base, which provides the middle tone with characteristics close to ITU-R709 optimum for video monitoring and whose high luminance area is naturally compressed, achieving superior gradation expression and color reproduction. This setting is also used for shooting that assumes color grading processing in postproduction.
Log: To set characteristics close to the sensitometric characteristics of negative film. This setting is used for digital processing in postproduction equivalent to digital image scanning for film.
Power: To set the characteristics close to those of the luminance reproduction of a CRT. Characteristics near the built-in ITU-R709 or INITIAL 5.0 characteristics are provided.
Functions and Operations of the Gamma Wi
ndows
For M
ac OS
d Option selection check boxes
Black Clip OffTo turn off the Black Clip function that limits video characteristics on the minus side. Checking the box opts for the characteristics on the minus side to be output. Use the output of characteristics on the minus side to maintain the characteristics for noises. When you use this option, note that proper display may not be obtained on other monitors. Normally it is recommended to set the black to 3 to 5% and not use this option.
Gamma FixTo inhibit the gamma gain and step gain functions of cameras. Sony cameras are equipped with these functions for fine adjustments of gamma, mainly ITU-R709-based gammas.As these functions may not operate as precisely as you intend when using hyper gamma or Log-based gamma having a wide dynamic range, it is recommended to check this box to turn the option ON.
Knee OffThe Knee Off function forcibly turns off the Knee function of a camera. The purpose of this option slightly differs between the types of gamma data.Type 3.0: It is recommended to turn this option ON to
prevent the Knee function from inadvertently being turned on when you have created a gamma curve for usage that does not require the Knee function.
Type 2.0: As a camera of this data type has a limitation in creating a high-luminance gamma curve, use this option to create the curve with the Knee function activated (see the figures shown on the next page). It is recommended to turn this option ON when creating a gamma curve having a wide dynamic range.If the Gamma Fix option is turned ON for a Type 2.0 curve, the Knee Off option will also be automatically turned ON.
D-Range To specify how much of the input light intensity (dynamic range) of a subject to be used for output. To use a wide range, set it to 600–800%. When a large value is specified, the middle luminance (18% Gray) is decreased. To increase the middle luminance, set the dynamic range to 400% or less or increase the 18% Gray setting.The dynamic range of HDW- and HDC-series cameras is 460% at maximum. That of F23/F35 is 800% at maximum.
White Limit To set the upper limit of the high-luminance output. The setting must be the output level corresponding to the White Limit setting in postproduction or a camera system.
NoteThis adjustment determines the white clip of the gamma curve. To use the value you set here, turn the white clip of the camera off.
18% Gray To change the luminance of middle tone. Set the output level with respect to the input level of a test chart of 18% reflection.
NoteIf Hyper Gamma is selected for Sample Curve, you cannot specify it by a numeric value. Move the icon on the graph, using the mouse or arrow keys.
Black Set this item to include the master black level of a subject in the gamma. Normally set to 3%. You can achieve the same adjustment using the built-in master black function of a camera.
NoteThis item cannot be adjusted in Scale Log mode.
Initial Gain To specify the gradation expression for black parts. Normally set to 4.5- to 5-times gain.To improve the S/N at black parts or emphasize the middle tone, select a small value.
_ Gain To decrease the total level while maintaining the characteristics. You can select among from four values; 0 dB, –6 dB (–1 f-stop), –12 dB (–2 f-stops), and –18 dB (–3 f-stops).
Icon Designation Function
_ Smoothing To smoothly connect the initial gain and the curve of the base characteristics. You can select from among four types: off, narrow, medium, and wide. Selecting “narrow” affects a narrow range, and selecting “wide” affects a wide range.
Icon Designation Function
Functions and Operations of the Gamma Windows 61

62
For M
ac OS
Camera Black 0 (zero)When the black level is set for the gamma, the master black value of the camera must be set to 0. By turning this option ON, the camera’s master black is fixed to 0.Turn this option OFF if you set the master black on the camera.
The maximum point cannot be edited for a gamma file of Type 2.0.
e Draw zoneYou can change the setting by directly dragging the icon on the graph with the mouse or moving it with the arrow keys on the keyboard.Using the View menu on the menu bar, either Scale Linear mode or Scale Log mode can be selected for the draw zone.Scale Linear mode: To draw the graph by linear scaling.Scale Log mode: To draw the graph by log scaling of the
X axis.
Operations in the draw zone in Parameter Edit mode
Scale Linear mode
Knee Off unchecked
Knee Off checked
Note
Sample Curve: Select the basic characteristics for the sample curve.
Set the white clip level to determine the upper limit of the white level.
You can directly enter numeric values.
Gain: You can create a curve by decreasing the total gain from the sample curve.
Adjust the black level.
Adjust the middle tone. Clicking on a point near the maximum point displays the adjustment buttons at the left and right of the icon, permitting you to adjust the dynamic range.
Adjust the initial gain (slant) that determines the characteristics of black parts.
To decrease the dynamic range value.
To increase the dynamic range value.
Functions and Operations of the Gamma Windows

For M
ac OS
Scale Log mode
SmoothingThe smoothing function is to smoothly connect the slope of the initial gain and the base curve.You can select from among four types: off, narrow, medium, and wide.
if the setting cannot be changed, owing to the limits of the camera settings, an exclamation symbol, as shown below, appears on the graph.
Sample Curve: Select the basic characteristics for the sample curve.
Set the white clip level to determine the upper limit of the white level.
You can directly enter numeric values. (The black level cannot be adjusted.)
Gain: You can create a curve by decreasing the total gain from the sample curve.
Adjust the middle tone.
Adjust the initial gain (slant) that determines the characteristics of black parts.
Clicking on a point near the maximum point displays the adjustment buttons at the left and right of the icon, permitting you to adjust the dynamic range.
To decrease the dynamic range value.
To increase the dynamic range value.
Linear curve of the initial gain
Sample curve (black)
Select the effective range of smoothing.
Curve after smoothing (red)
Note
Functions and Operations of the Gamma Windows 63

64
For M
ac OS
To switch to Custom Edit modeCustom Edit mode is used for fine editing that cannot be done in Parameter Edit mode.Double-clicking on a gamma data on the list whose Base column does not show “Param” activates Custom Edit mode.
The following adjustments can be made in Custom Edit mode:• White level/dynamic range adjustment
See “To adjust the white level and dynamic range” (page 65).
• Black adjustmentSee “To adjust the black (Scale Linear mode only)” (page 65).
• Middle tone adjustmentSee “To adjust the middle tone” (page 65).
• Minus data adjustmentSee “To adjust the minus data” (page 66).
• Three-point adjustmentSee “To perform 3-point adjustment” (page 66).
• Vertical shift of the curveSee “To move the curve holistically in vertical directions” (page 66).
Graph View/Edit window in Custom Edit mode
Base column
Custom Edit mode indication
Editing is done in the draw zone.For the draw zone, you can select Scale Linear mode or Scale Log mode with the View menu. (The figure shows the draw zone in Scale Linear mode.)
Option check boxes are active.The parameter input area becomes invalid.
Functions and Operations of the Gamma Windows

For M
ac OS
To adjust the white level and dynamic rangeThe maximum point of the curve can be adjusted by dragging it with the mouse, without moving the zero point.You can also move it by directly entering a value in the Set Point Y box.
Moving the mouse to the left changes the dynamic range.You can also move it by directly entering a value in the D-Range box.
To use the D-Range boxThe D-Range box shows the abscissa value for the point of ordinate 109. The point of ordinate 109 is changed according to the entered abscissa value.If a value over 9999 is entered, it is regarded as invalid, and the curve is not modified.
To adjust the black (Scale Linear mode only)The black can be adjusted by dragging the origin point on the X axis with the mouse.You can also move it by directly entering a value in the Set Point Y box.
To adjust the middle toneWhen you click on the curve, an adjustment point is added. You can change the shape of the curve by dragging the point with the mouse.
Set Point Y box
D-Range box
Set Point Y box
Functions and Operations of the Gamma Windows 65

66
For M
ac OS
To adjust the minus dataYou can adjust the data in the minus area.You can also move it by directly entering a value in the Set Point Y box.
To perform 3-point adjustmentPerform three-point adjustment when you wish to restrict the change area.Specify three points on the graph, using the mouse. You can change the curve by moving the center point. The curve will not change in the areas outside the side two points.The side points can be moved along the curve.The center point can also be moved by entering a value in the Set Point Y box.
To move the curve holistically in vertical directionsClicking on the (Move curve holistically) icon on the tool bar activates Vertical move mode. You can move the curve by dragging it with the mouse in this mode.You can also move the curve by entering a value (in %) in the box to the right of the icon then pressing the Enter key.
Set Point Y box
Set Point Y box
“Move curve holistically” icon and value input box
Functions and Operations of the Gamma Windows

For M
ac OS
Zoom Manager Window
The Zoom manager window permits you to expand/reduce the graph in the draw zone.
a Graph view areaThe purple area indicates the area displayed in the draw zone. The mouse pointer changes to the hand icon in this area. Dragging it moves the view area.
b Zoom In buttonClick on it to expand the graph in the draw zone.
c Slide barDragging the pointer to the right with the mouse expands the graph in the draw zone, and dragging it to the left reduces it.
d Zoom Out buttonClick on it to reduce the graph in the draw zone.
You can move the Zoom manager window to anywhere over other windows.
Camera Gamma Select Window and Gamma Send Operation Bar
You can transmit a gamma to a camera connected via LAN or a group of gammas as a user gamma file.The names of the gammas loaded in a camera are displayed, permitting you to change the current gamma selection on the camera.
Camera Gamma Select window
a Camera gamma display areaThe names of the user gammas installed in the connected camera are displayed.
b Radio buttons for selecting gamma number on camera
You can switch the user gamma on the camera by using the radio buttons.
Gamma send operation bar
a Send to Gamma (number select) boxSelect the destination user gamma of the camera.
b Auto Send check boxCheck this box to automatically send the data to a camera each time you edit the graph. This is convenient to immediately confirm the results of editing.
aGraph view area
dZoom Out button
bZoom In button
cSlide bar aCamera gamma display area
bRadio buttons for selecting gamma number on camera
aSend to Gamma (number select) box
bAuto Send check box
cSend to Camera button
Functions and
Operations of the Gamma Windows 67
68
For M
ac OS
Responses to graph operations may become slower, as data are transmitted each time you change the graph.
c Send to Camera buttonTo send the gamma selected in the User Gamma window (page 56) to a camera as the user gamma of the number specified in the Send to Gamma (number select) box.
To connect a camera
1 Connect the CvpFileEditor-installed computer to the camera via a hub or directly via a cross cable.
When connecting the computer to a camera directly, always use a cross cable. When using a straight cable, connect via a hub. Communication may not be possible using other connection methods.
2 Select “Camera Setting” from the User Gamma menu to open the Camera NetworkSetting window.
3 Enter the IP address of the camera then click on OK to close the Camera NetworkSetting window.
4 Click on the Connect button at the right end of the tool bar.
The connection to the camera is established, and the indicator of the button changes color to green.
To transmit the data to the connected camera
1 Specify the target user gamma number with the Send to Gamma (number select) box on the Gamma send operation bar.
2 Click on the Send to Camera button on the Gamma send operation bar.
The display is automatically updated when transmission is completed.
Note
Note
Enter the IP address of the camera.
Connect button
Functions and Operations of the Gamma Windows

For M
ac OS
Importing and Exporting Gamma Data Files of Other Types
In addition to ce2, the following three file types are supported.
Files of gdd
Input and output data in pairs are displayed in %.
The data area described in the following format:
Files of csv
The format is almost the same as a gdd file except commas after data values only.
Character Meaning
// Comment description
NAME Gamma name to be displayed in the Gamma Data list.
COMMENT1 Comment 1 information
COMMENT2 Comment 2 information
XMAP Multiplying factor for input values. Set to 100 to indicate in %.
YMAP Multiplying factor for output values. Set to 100 to indicate in %.
DATE Date of creation
BEGIN DATA Beginning of data
Numerical values Input and output values are described separated with a comma and space.
END DATA End of data
Importing and Exporting Gamma Data Files of Other Types 69

70
For M
ac OS
Files of lut
Data are described with digital codes of the specified bit length.
Export options for a lut fileWhen exporting, the Lut Mapping window opens, permitting you to change the lut file format.
a Bit Depth buttonsTo specify the bit length.
b Mapping buttonsTo determine whether to output the data in digital codes or in % values.
c Code input boxesWhen you select “Code” for Mapping, enter the codes for 100% White and 0% Black.The codes can be specified independently for Input and Output.
d Value input boxesWhen you select “Value(%)” for Mapping, specify the percentages of the maximum values of input codes.The X and Y values vary depending on the Bit Depth selections.
Exporting the Inverse Characteristics
The Inverse ability of the program enables conversion of camera output to a linear curve to which no gamma is applied.You can output the characteristics of the inverse function of gamma data as an inverse file.Select Export Inverse File from the Data menu.
A curve of inverse characteristics cannot be imported.
Character Meaning
# Comment description
LUT: 3 X Always enter “3” at the beginning, as data are composed of three channels (R, G, and B).Enter a value of the bit length for X. (e.g. 1024 for 10 bits)
Numeric values
Enter the digital codes for output data as much as the required number for the specified bit length (e.g. 1024 values of 0 to 1024 for 10-bit data).The same numeric value string must be repeated three times, as they are required for each of the R, G, and B channels.
Note
cCode input boxes
aBit Depth buttons
bMapping buttons
dValue input boxes
Importing and Exporting Gamma Data Files of Other Types

For M
ac OS
Functions and Shortcuts Operations of Gamma Operation Menus
CvpFileEditor menu
File menu
Data menu
Edit menu
In Parameter Edit mode
In Custom Edit mode
Command Shortcut Function
About CvpFileEditor
Shift + Command + A
To display the CvpFileEditor version
Preference To open the Preference window
Services To display service information
Hide CvpFileEditor
Command + H To hide CvpFileEditor
Hide Others Option + Command + H
To hide other applications
Show All To display all applications
Quit CvpFileEditor
Command + Q To quit CvpFileEditor.
Command Shortcut Function
Open Command + O To open an application file (*.ce2)
New Command + N To create a new application file
Close Command + W To close the current application file
Save Command + S To save the current application file
Save As Shift + Command + S
To save the current application file under another filename
Print Setup Command + U To set up screen printing
Print Command + P To print the screen
Recent CE2 Files
To open a recent application file
Command Shortcut Function
New Command + G To create new gamma data in Parameter Edit mode
Library Command + L To read gamma data from a library
Import Command + I To read a file of another format as gamma data
Export Shift + Command + G
To export the current gamma data to a gdd file
Shift + Command + C
To export the current gamma data to a csv file
Shift + Control + L
To export the current gamma data to a lut file
Export Inverse File
Option + Command + G
To export inverse characteristics as an inverse file of the gdd format
Option + Command + C
To export inverse characteristics as an inverse file of the csv format
Option + Command + L
To export inverse characteristics as an inverse file of the lut format
Command Shortcut Function
Undo Command + Z To cancel the previous curve adjustment operation
Redo Command + Y To execute the undone curve adjustment operation again
Restore Command + R To restore the curve to its original status before editing
Zoom In Command + = To expand the graph
Zoom Out Command + - To reduce the graph
Custom Edit
Shift + Command + E
To shift to Custom Edit mode
Command Shortcut Function
Undo Command + Z To cancel the previous curve adjustment operation
Redo Command + Y To execute the undone curve adjustment operation again
Restore Command + R To restore the curve to its original status before editing
Zoom In Command + = To expand the graph
Zoom Out Command + - To reduce the graph
Command Shortcut Function
Functions and Shortcuts Operations of Gamma Operation Menus 71

72
For M
ac OS
User Gamma menu
View menu
Window menu
Mode menuAuto Add Points
Command + A To automatically add three edit points for the curve
Delete All Points
Command + D To delete all the edit points on the curve
Move Shift + Command + M
To turn Vertical Move mode on or off
Command Shortcut Function
New Shift + Command + U
To create a new user gamma file
Export Command + E To export the selected user gamma to a Memory Stick
Camera Setting
Shift + Command + T
To set the IP address of the camera
Command Shortcut Function
Data List Option + D To turn the Gamma Data and User Gamma windows on or off
Camera Gamma Select
Option + C To turn the Camera Control window on or off
Graph Option + G To turn the Graph View/Edit window on or off
Zoom Manager
Option + Z To turn the Zoom manager window on or off
Scale Linear
Option +V To draw the graph by linear scaling
Scale Log Option + L To draw the graph by log scaling of the X axis
Command Shortcut Function
Minimize Command + M To minimize the CE2 window
Zoom To zoom in the CE2 window
Bring All to Front
To bring all windows to the front
Command Shortcut Function
Command Shortcut Function
Gamma Option + Command + A
To select Gamma operation mode
MLUT Option + Command + M
To select MLUT operation mode
Functions and Shortcuts Operations of Gamma Operation Menus

For M
ac OS
Functions and Operations of the MLUT Windows
Window Layout
If you click on the MLUT tab, the following MLUT windows are displayed:
MLUT Group window (page 75)Used for MLUT group management for grouping MLUT data to install them in a camera.
Camera MLUT window (page 82)Used to transmit MLUT data via LAN or to change the MLUT selection on the camera.
MLUT Data window (page 74)Used for MLUT data management.
MLUT Adjust window (page 77)You can adjust the CDL values by using the keyboard or the mouse.
Menu bar (page 85)
CE file operation buttons (page 16)
Connect buttonClick on the button to connect or disconnect communication with a camera. When connection is established, the indicator changes color from red to green.For details, see “To connect a camera” (page 83).
Gamma/MLUT select tabs (page 16)
Functions and Operations of the MLUT Windows 73

74
For M
ac OS
MLUT Data Window
Manage MLUT data in the MLUT Data window.
a MLUT Data tool bar
b MLUT Data list
Clicking on the title of each column changes the display order on the list.Right-clicking on an MLUT data line permits you to import or export an MLUT or ASC CDL, create another MLUT, delete or rename the data, or edit the comment.
aMLUT Data tool bar
bMLUT Data list MLUT Group window (page 75)
Icon Designation Function
New To create a new MLUT.
Import To import an ASC CDL file.For details, see “File Types for MLUT” (page 84).
Delete To delete the specified MLUT data.
Designation Contents
Name Designation of the MLUT data, which is displayed on the camera menu screen when the data are installed in a camera.
Work Space Type of gamma (S-Log A, Cineon, etc.) converted in ICT (input conversion transform).Select the same Gamma setting to be used for grading in postproduction.
ASC CDL Whether any ASC CDL adjustment value is included in the MLUT dataON: IncludedOFF: Not included
Display Gamma setting for display outputs(Default: ITU-R709)
Comment Additional information on the MLUT.Up to 1000 characters can be entered.The information is not added in data exporting.
Update The year, month, day, and time of updating are displayed.
Functions and Operations
of the MLUT W indows
For M
ac OS
MLUT Group Window
The MLUT Group window is used to group created MLUT data as user MLUTs to install the data in a camera
via a Memory Stick or a LAN. Five sets of MLUT data at maximum can be grouped as an MLUT group.
a MLUT Group listThe list shows the information on the MLUT group.Operations as those for MLUT data can be made by right-clicking on the list.
b MLUT Group tool bar
c MLUT Group entry buttonTo enter the MLUT data selected in the left MLUT Data window in the MLUT group selected on the MLUT Group list.
d Selected MLUT areaInformation on the MLUT data registered for an MLUT group is displayed.
cMLUT Group entry button
aMLUT Group list bMLUT Group tool bar
dSelected MLUT area
MLUT Data window (page 74)
Icon Designation Function
New To create a new MLUT group.
Delete To delete the selected MLUT group from the list.The registered MLUT data are not erased (remaining in the MLUT Data window).
Export To export the selected MLUT group to a Memory Stick.
NoteExport is not executed if no MLUT data are registered in the MLUT group.
To send the selected MLUT group to a camera.
Send to camera
Icon Designation Function
Delete MLUT To delete the selected MLUT data from the group.The MLUT data are not erased (remaining in the MLUT Data window).
Up To move the order of MLUT data up on the registration list.
Down To move the order of the MLUT data down on the registration list.
Functions and Operations of the MLUT Windows 75

76
For M
ac OS
To install MLUT group via a Memory Stick into a camera
1 Create an MLUT group.
1 Click on the (New) icon to display the New MLUT Group dialog box.
2 Enter a filename for the MLUT group.
2 Register MLUT data for the MLUT group.
Select the MLUT data to be registered in the MLUT Data window and click on the MLUT Group entry button.Up to five MLUTs can be registered. The order of the registered MLUTs can be changed, using the up/down buttons.
3 Export the MLUT group to a Memory Stick.
Click on the (Export) icon and specify the target Memory Stick on the directory.
4 Open the USER GAMMA page of the camera’s FILE menu, load the MLUT group from the Memory Stick into the camera with the MONI LUT READ function.
5 Set MLUT/PB MIX to MLUT and select the type for MLUT SEL on the PB/MONI LUT page of the camera’s OPERATION menu.
For details on menu operations on the camera, refer to the operation manual of the camera.
For operations to export the data via LAN, see “Camera MLUT Select Window and MLUT Send Operation Bar” (page 82).
New icon
MLUT Group entry button
Up/down buttons
MLUT Data window , Selected MLUT area
Export icon
Functions and Operations of the MLUT Windows

For M
ac OS
MLUT Adjust Window
The MLUT Adjust window permits you to adjust the CDL information of the selected MLUT.
a MLUT information area The MLUT data name and any comment are displayed.Entering/editing of the comment is enabled when you double-click on the text box.
b CDL graph information areaThe CDL-related information is displayed.This area enables you to select the ICT (input conversion transform) and OCT (output conversion transform) types and adjust the CDL values.The area is grayed and inoperative when no MLUT is selected in the MLUT Data window (page 74) or an MLUT group is selected in the MLUT Group window (page 75).It has multiple operation modes, CDL OFF, CDL Edit, and Sub Edit, and operable items are different among the modes.
Operation is enabled only when the camera gamma is S-Log A with V4.3.
aMLUT information area
MLUT send operation bar (page 82)
bCDL graph information area
Note
Functions and Operations of the MLUT Windows 77

78
For M
ac OS
CDL OFF ModeWhen you select an MLUT whose CDL attribute is OFF in the MLUT Data window (page 74), the CDL graph information area enters CDL OFF mode, activating the
ICT selection box, ASC CDL ON checkbox, and OCT indication/Display Gamma selection button.
a ICT (Input Conversion Transform) selection boxWhen using ASC CDL, set it according to the Work Space to be used in postproduction. When ASC CDL is not used, this setting is invalid, as conversion to the gamma set in OCT (output conversion transform) is made.
b ASC CDL ON checkboxWhen you check this box, the CDL graph information area switches to CDL Edit mode (page 79), activating the CDL edit area. The ASC CDL attribute of the selected MLUT becomes ON when the box is checked. It returns to OFF when the box is unchecked.If you select ASC CDL ON for an MLUT whose Display Gamma is other than ITU-R709, an alarm message is displayed and Display Gamma is forcibly changed to ITU-R709.
c OCT (Output Conversion Transform) indication/Display Gamma select button
The gamma for output to displays can be selected. When ASC CDL is ON, it is forcibly set to ITU-R709. When ASC CDL is OFF, user gamma selection is enabled. When you click on the button, the Display Gamma selection dialog opens, permitting you to select the user gamma to be applied to displays.
This setting converts S-Log A of the main line to the selected gamma.There are two types of data included on the Gamma list with V4.3 MLUT data; Library data and gamma data of Type 3.0.Selecting a gamma of Type 3.0 here disables operations, such as deletion, renaming, and editing of the gamma in Gamma Operation mode.
CDL edit area (page 79)a ICT selection box
bASC CDL ON checkbox cOCT indication/Display Gamma select button
Designation Contents
S-Log to Scene Linear
To convert S-Log A to Scene Linear.The OCT indication shows “Scene Linear to xxx.”
S-Log to Cineon
To convert S-Log A to Cineon.The OCT indication shows “Cineon to xxx.”
OFF No conversion is made. S-Log A is used without conversion.
Note
Functions and Op
erations of the MLUT Windows
For M
ac OS
CDL Edit ModeWhen you check the ASC CDL ON checkbox or select an MLUT whose CDL attribute is ON, the CDL graph information area enters CDL Edit mode.
The Dmin/Dmax button and the CDL edit area become operable and the default values and thumbnail images of 17 CDL items are displayed.The Display Gamma select button (page 78) is disabled in this mode.
a CDL edit areaThe default values and thumbnail images of the ASC CDL adjustment items (Slop, Offset, Lift, Gamma, and Saturation) are displayed. For Slop, Offset, Lift, and Gamma, the master, R, G, and B values are displayed.Clicking on a thumbnail image opens the edit window (see page 80) for the corresponding item.
b Dmin/Dmax buttonClicking on this button opens the Dmin/Dmax window, enabling the adjustments.
ASC CDL ON checkbox (page 78) aCDL edit area
bDmin/Dmax button
Functions and O
perations of the MLUT Windows 79
80
For M
ac OS
CDL Edit Windows
Clicking on a thumbnail image in the CDL edit area in CDL Edit mode opens the edit window for the
corresponding item. This permits you to adjust the CDL value, using the mouse or keyboard.
a CDL value input boxAdjustment is achieved by entering a value.The range of adjustment values differ among the items. If you enter a value out of the range, an error message is displayed.
b CDL Sub Edit Tool barFor edit reoperation or switching M, R, G, and B edit windows for Slope, Offset, Lift or Gamma.
aCDL value input box bCDL Sub edit tool bar
cGuide for CDL value fine-adjustment dCDL Sub edit zone eClose button
Example: Slope R
Icon Designation Function
Slope M 0 to 99.990
Offset M -1 to 1
Lift M 0 to 99.990
Gamma M 0 to 140
Slope R 0 to 99.990
Offset R -1 to 1
Lift R 0 to 99.990
Gamma R 0 to 140
Slope G 0 to 99.990
Offset G -1 to 1
Lift G 0 to 99.990
Gamma G 0 to 140
Slope B 0 to 99.990
Offset B -1 to 1
Lift B 0 to 99.990
Gamma B 0 to 140
Saturation 0 to 2
Icon Designation Function
Undo To undo the last operation.
Redo To redo the last undone operation.
Restore To restore the original status of the item.
Master To switch to the edit window of the master value of the same item.
Red To switch to the edit window of the R value of the same item.
Green To switch to the edit window of the G value of the same item.
Blue To switch to the edit window of the B value of the same item.
Functions and
Operations of the MLUT Window s
For M
ac OS
c Guides for CDL value fine-adjustmentOperation guides for fine-adjustment from the keyboard are displayed.
Example: Shift + r R T t ±0.1Pressing an arrow key with the Shift key held pressed moves the adjustment point (icon) by 0.1 on the graph in the direction of the arrow.
d CDL Sub edit zoneYou can edit Slope, Offset, Lift, Gamma, and Saturation.Slope: For an effect equivalent to ISO sensitivity
adjustment of the camera or the f-stop adjustment of the lens.
Offset: For black level adjustment without changing the overall contrast.
Lift: For black level adjustment while maintaining high-luminance areas.
Gamma: To change the brightness at middle luminance.Saturation: To adjust vividness of colors.
• Adjustments are performed in the sequence of Slope, Offset, then Gamma. Lift is adjusted internally, using Slope and Offset.
• The saturation function for ASC CDL is applied for monitor images only. It is different from “Saturation” of the MAINTENANCE menu of cameras.
In the edit zone for Slope, Offset, Lift, and Gamma, you can change the value by directly dragging the icon (common to that for the CDL value input box) displayed on the graph with the mouse or moving it with arrow keys on the keyboard (see “Guides for CDL value fine-adjustment” above). The gray line indicates the default setting.In the edit zone for Saturation, you can change the value by directly dragging the slide bar with the mouse or moving it with arrow keys.
Slope adjustment (example: R)
Offset adjustment (example: R)
Lift adjustment (example: R)
Gamma adjustment (example: R)
Notes
Functions and Operations of the MLUT Windows 81

82
For M
ac OS
Saturation adjustment
d Close buttonClicking on the button closes the edit window, returning to CDL Edit mode. (You can also close the edit window by pressing the space bar.)
Camera MLUT Select Window and MLUT Send Operation Bar
You can transmit an MLUT to a camera connected via LAN or a group of MLUTs as an MLUT group.The names of the MLUTs loaded in a camera are displayed, permitting you to change the current MLUT selection on the camera.
Camera MLUT Select window
a MLUT ON checkboxCheck this box to operate MLUTs in the camera connected via LAN.The checkbox is not effective when no LAN connection is established or the camera version is 1.5 or earlier.
b Preset MLUT display areaThe names of the default MLUTs in the connected camera are displayed. You can switch the preset MLUT installed in the camera by using the radio buttons.
c Radio buttons for selecting MLUT on the cameraYou can switch the MLUT on the camera by using the radio buttons.
d User MLUT display areaThe names of the User MLUTs installed in the connected camera are displayed.
aMLUT ON checkbox
dUser MLUT display area
bPreset MLUT display area
cRadio buttons for selecting camera MLUT
Functions and Operations of the MLUT Windows

For M
ac OS
MLUT send operation bar
a Send to MLUT (number select) boxSelect the destination MLUT number of the camera.
b Auto Send check boxCheck this box to automatically send the data to a camera each time you edit the CDL. This is convenient to immediately confirm the results of editing.
Responses to operations may become slower, as data are transmitted each time you change the setting.
c Send to Camera buttonTo send the MLUT selected in the MLUT data window (page 74) to a camera as the MLUT data of the number specified in the Send to MLUT (number select) box.
To connect a camera
1 Connect the CvpFileEditor-installed computer to the camera via a hub or directly via a cross cable.
When connecting the computer to a camera directly, always use a cross cable. When using a straight cable, connect via a hub. Communication may not be possible using other connection methods.
2 Select “Camera Setting” from the MLUT Group menu to open the Ethernet Setting window.
3 Enter the IP address specified by the NETWORK menu of the camera then click on OK to close the Ethernet Setting window.
4 Click on the Connect button at the right end of the tool bar (page 73).
The connection to the camera is established, and the indicator of the button changes color to green.
To transmit the data to the connected camera
1 Specify the target MLUT number with the Send to MLUT (number select) box on the MLUT send operation bar.
2 Click on the Send to Camera button on the MLUT send operation bar.
The display is automatically updated when transmission is completed.
Note
Note
aSend to MLUT (number select) box
bAuto Send check box
cSend to Camera button
Enter the IP address of the camera.
Connect button
Functions and Operations of the MLUT Windows 83

84
For M
ac OS
File Types for MLUT
Files of lut type is used when exporting MLUTs to a Memory Stick.To exchange ASC CDL with another system, use files of cdl type.
Files of lut
Data are described with digital codes of the specified bit length. Files of cdl
Character Meaning
# Comment description
#$ Name of the gamma used in the MLUT
#% Name of the display gamma
#? CDL information
LUT: 3 Always enter “3” at the beginning, as data are composed of three channels (R, G, and B).Enter a value of the bit length for X (e.g. 1024 for 10 bits).
Numeric values
Enter the digital codes for output data as much as the required number for the specified bit length (e.g. 1024 values of 0 to 1024 for 10-bit data).The same numeric value string must be repeated three times, as they are required for each of the R, G, and B channels.
Character Meaning
Input Description Name of the gamma used in the MLUT
Viewing Description
Name of the display gamma
Slope Values for R, G and B channels of the slope
Offset Values for R, G and B channels of the offset
Gamma Values for R, G and B channels of the gamma
Character Meaning
File Types for MLUT

For M
ac OS
Functions and Shortcuts Operations of MLUT Operation Menus
CvpFileEditor menu
File menu
Data menu
Edit menu
Group menu
Command Shortcut Function
About CvpFileEditor
Shift + Command + A
To display the CvpFileEditor version
Preference To open the Preference window
Services To display service information
Hide CvpFileEditor
Command + H To hide CvpFileEditor
Hide Others Option + Command + H
To hide other applications
Show All To display all applications
Quit CvpFileEditor
Command + Q To quit CvpFileEditor.
Command Shortcut Function
Open Command + O To open an application file (*.ce2)
New Command + N To create a new application file
Close Command + W To close the current application file
Save Command + S To save the current application file
Save As Shift + Command + S
To save the current application file under another filename
Print Setup Command + U To set up screen printing
Print Command + P To print the screen
Recent CE2 Files
To open a recent application file
Command Shortcut Function
New Command + M
To create new MLUT data
Import Command + I To read a file of another format as MLUT data
Export MLUT
Option + U To export the current MLUT data to a file of another format.
Export ASC CDL
Option + A To export the current ASC CDL data to a file of another format.
Command Shortcut Function
Undo Command + Z To cancel the previous CDL adjustment operation
Redo Command + Y To execute the undone CDL adjustment operation again
Restore Command + R To restore the CDL to its original status before editing
Slope To open the CDL Slope adjustment window
Offset To open the CDL Offset adjustment window
Lift To open the CDL Lift adjustment window
Gamma To open the CDL Gamma adjustment window
Saturation Option + R To open the CDL Saturation adjustment window
Dmin/Dmax Option + I To open the Dmin/Dmax adjustment window
Command
Shortcut Function
New Shift + Command + G
To create a new MLUT group
Export Shift + Command + P
To export the selected MLUT group to a Memory Stick
Camera Setting
Shift + Command + N
To set the IP address of the camera
Command Shortcut Function
Functions and Shortcuts Operations of MLUT Operation Menus 85

86
For M
ac OS
View menu
Window menu
Mode menu
Command Shortcut Function
Data List Control + Shift + D
To turn the MLUT Data and MLUT Group windows on or off
Camera MLUT Select
Control + Shift + E
To turn the Camera MLUT Select window on or off
MLUT Adjust
Control + Shift + J
To turn the MLUT Adjust window on or off
Command Shortcut Function
Minimize Command + M To minimize the CE2 window
Zoom To zoom in the CE2 window
Bring All to Front
To bring all windows to the front
Command Shortcut Function
Gamma Option + Command + A
To select Gamma operation mode
MLUT Option + Command + M
To select MLUT operation mode
Functions and Shortcuts Operations of MLUT Operation Menus