Customer Insight -...
51
Customer Insight INTERNAL 2017-09-07 Huawei confidential. No spreading without permission. Page 1 of 51 Customer Insight Quick Start Creating a Tag A tag can precisely define a group of target customers. You can use existing tags and attributes to create tags based on preconfigured rules or by importing customer numbers in batches. Prerequisites A customer classification and customer attribute classification have been created. An attribute has been created. Context Two segments creation methods are supported. By rules: Configure rules to create tags. Attributes and existing tags can be used as rules, the rule description refer to Logic Rules and Calculation Rules. By importing a file: Create tags by importing files in TXT or CSV format on the local host or a remote server. The files imported at a time cannot be larger than 100 MB. If the files are greater than 100 MB, import them by batch. The address of the remote server can be set under Customer Insight > Configuration > Service Configuration > Parameter Management. The remote server supports the following import periods: − Non-periodic import: Import files from the remote server by one time. − Daily: Import files once a day. By default, the file import is performed at 00:00:00. − Monthly: Import files once a month. By default, the file import is performed at 00:00:00 on the first day of a month. During tag configuration, multiple customer models are supported. An operator can create customer segment for a specific model. Data can be imported both locally and remotely. The file name extensions of the imported files are .txt and .csv. The maximum allowed file size in a batch is 100 MB. If the file size exceeds 100 MB, import the data in two or more batches. The address of a remote server is configured under Customer Insight > Configuration > Service Configuration > Parameter Management. The following import cycles are provided for remote data import: Non-cyclic: Data is imported from a remote server at a time. Daily: Data is imported once a day. By default, data import is triggered at 00:00 every day.
Transcript of Customer Insight -...
Customer Insight INTERNAL
2017-09-07 Huawei confidential. No spreading without permission. Page 1 of 51
Customer Insight
Quick Start
Creating a Tag
A tag can precisely define a group of target customers. You can use existing tags and attributes to create
tags based on preconfigured rules or by importing customer numbers in batches.
Prerequisites A customer classification and customer attribute classification have been created.
An attribute has been created.
Context
Two segments creation methods are supported.
By rules: Configure rules to create tags. Attributes and existing tags can be used as rules, the rule description refer to Logic Rules and Calculation Rules.
By importing a file: Create tags by importing files in TXT or CSV format on the local host or a remote
server. The files imported at a time cannot be larger than 100 MB. If the files are greater than 100 MB,
import them by batch. The address of the remote server can be set under Customer Insight >
Configuration > Service Configuration > Parameter Management. The remote server supports the
following import periods:
− Non-periodic import: Import files from the remote server by one time.
− Daily: Import files once a day. By default, the file import is performed at 00:00:00.
− Monthly: Import files once a month. By default, the file import is performed at 00:00:00 on the
first day of a month.
During tag configuration, multiple customer models are supported. An operator can create customer
segment for a specific model.
Data can be imported both locally and remotely. The file name extensions of the imported files are .txt
and .csv. The maximum allowed file size in a batch is 100 MB. If the file size exceeds 100 MB, import the
data in two or more batches. The address of a remote server is configured under Customer Insight >
Configuration > Service Configuration > Parameter Management. The following import cycles are
provided for remote data import:
Non-cyclic: Data is imported from a remote server at a time.
Daily: Data is imported once a day. By default, data import is triggered at 00:00 every day.
Customer Insight INTERNAL
2017-09-07 Huawei confidential. No spreading without permission. Page 2 of 51
Monthly: Data is imported once a month. By default, data import is triggered at 00:00 on the first day
of every month.
Creating a customer segment using rules
Choose Customer Insight > Tag Store.
Click +Create by Rule.
Select the model for tag.
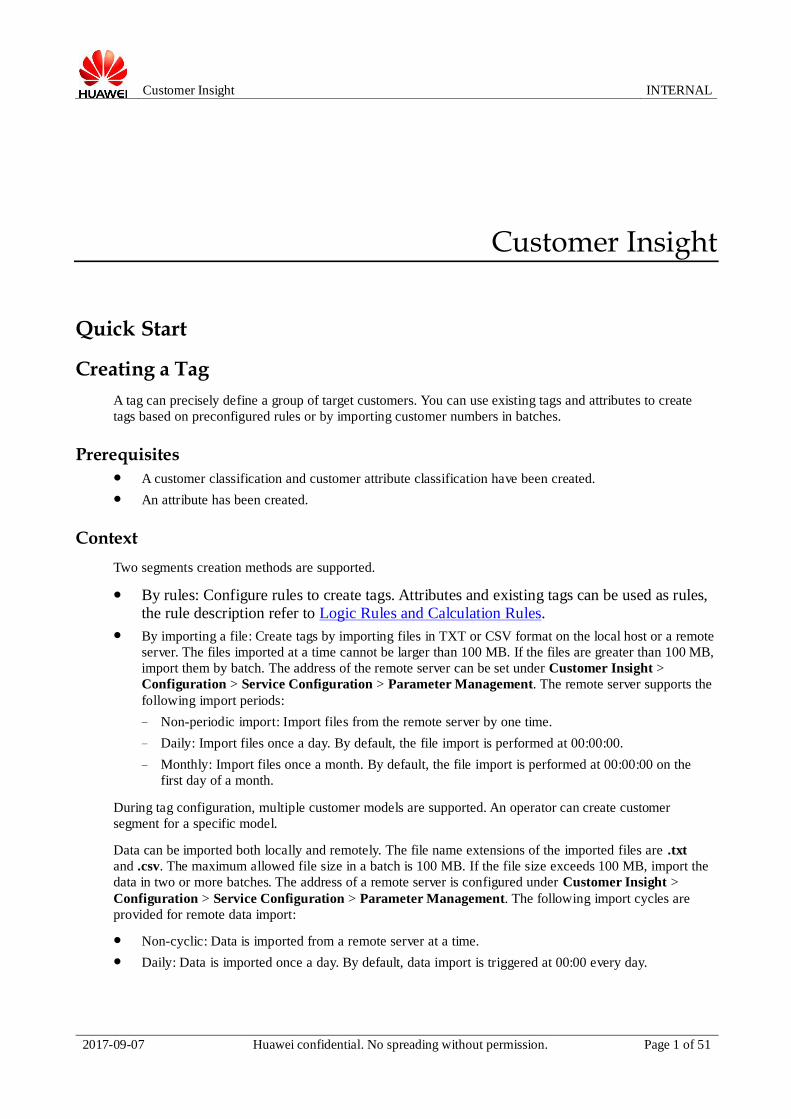
Drag the attribute or tag to the rule area and configure filtering rules on the Create by Rule page, as shown in 0.
For tags, include and exclude conditions can be configured. Attribute parameters can be of the numeric,
character, time, and dimension types. Rules can be configured by parameter type.
NOTE On the Rule Information page:
To delete all selected rules, click Delete All Rules.
To delete all pictures in tag analysis, click Delete All Charts.
To group two or more rules, click Group and use the logic operators AND and OR to group them.
Before selecting an attribute, you can analyze the attribute by dragging it to the Analysis area. Only
dimension and numeric attributes can be analyzed. For details about how to analyze attributes, see
Reference.
Creating a tag using rules
1. Click OK.
The page for setting the basic tag information is displayed.
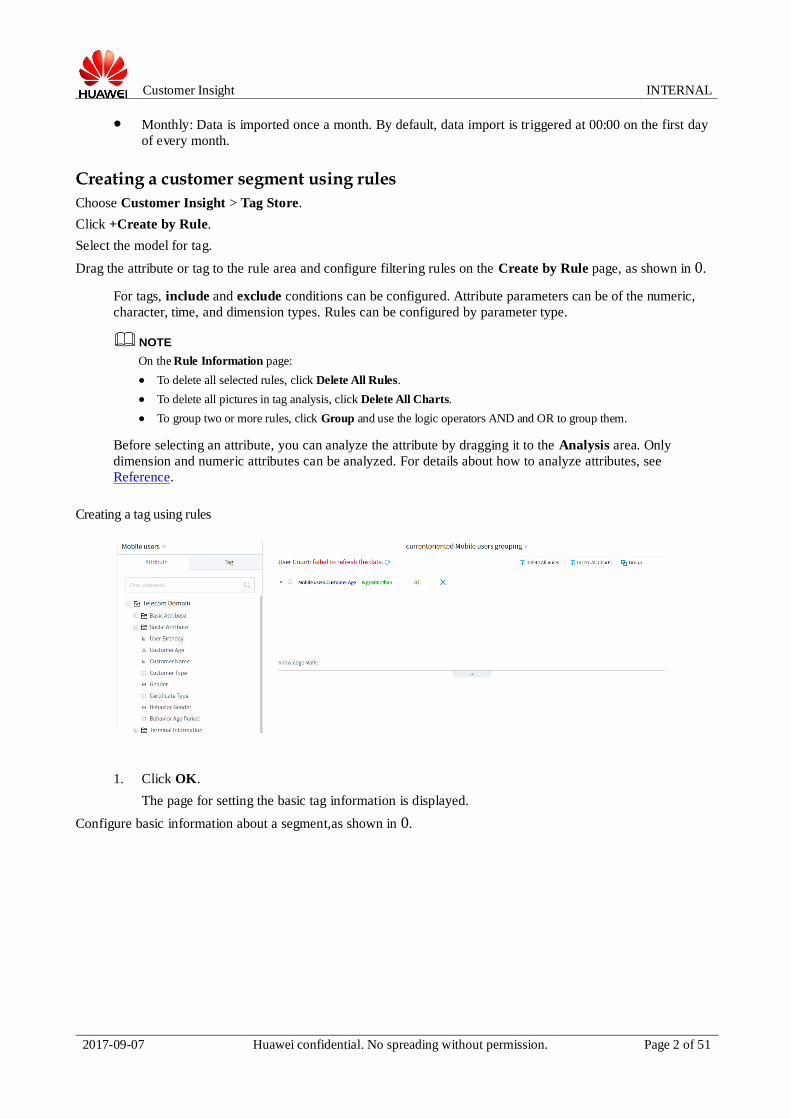
Configure basic information about a segment,as shown in 0.

Customer Insight INTERNAL
2017-09-07 Huawei confidential. No spreading without permission. Page 3 of 51
Tag basic information
0 describes the tag parameters.

Customer Insight INTERNAL
2017-09-07 Huawei confidential. No spreading without permission. Page 4 of 51
Tag parameters
Parameter Description
Tag Type Tag type. The options are as follows:
● Visible to area: indicates that the tag is available to users in the local area.
● Visible to all: indicates that the tag is available to all users.
Service Description
Describes the tag function and feature from the service perspective. For example,
label is used to analyze customers who subscribe to a specific package of the
GoTone brand.
Technical Description
Describes tag rules technically. For example, users who frequently use Fetion:
login_num is greater than 200.
Click Save as Tag.
user of the service review role and a user of the technical review role respectively, and review tag
creation requests under My Space. Approved tags are displayed on the Customer Insight > Tag Store
Importing Created Tags
Choose Customer Insight > Tag Store.
Select a customer model using the search box, as shown in 0.
Selecting a customer model
1. Click v next to +Create by Rule and select +Create by Import.
Select an import mode.
− Local import: Download a customer segment template, add customer numbers to the template, and
upload the template.
It takes a while to upload the file. Currently, uploading a file containing 10,000,000 customer
numbers takes about half an hour.
NOTE
A customer segment created through local import contains a fixed customer list. A customer segment created using rules, however, contains a customer list that is updated cyclically.

Customer Insight INTERNAL
2017-09-07 Huawei confidential. No spreading without permission. Page 5 of 51
Remote import: Set the file server address, file path, and import cycle. The address of the remote server can be set under Customer Insight > Configuration > Service Configuration > Parameter Management.
Click OK.
The page for setting the basic customer segment information is displayed.
Set the basic customer segment information.
Click Save as Tag.
user of the service review role and a user of the technical review role respectively, and review tag
creation requests under My Space. Approved tags are displayed on the Customer Insight > Tag Store
Reference Drag an attribute to the Analysis area.
Click and set Data range,as shown in 0.
Customer age attribute chart
Creating a Customer Segment by Rule
You can use existing tags and attributes to create tags based on preconfigured rules.
Prerequisite Customer segment categories have been created.
An attribute or a tag have been created.
Procedure
Choose Customer Insight > Segment > Segment Management.

Customer Insight INTERNAL
2017-09-07 Huawei confidential. No spreading without permission. Page 6 of 51
Click +Create by Rule.
Select the model for segment.
NOTE During customer segment configuration, multiple customer models are supported. An operator can create customer segment for a specific model.
Drag the attribute or tag to the rule area and configure filtering rules on the Create by Rule page, as shown in 0.
For segments, include and exclude conditions can be configured. Attribute parameters can be of the
numeric, character, time, and dimension types. Rules can be configured by parameter type. Rules
description refer to Logic Rules and Calculation Rules.
NOTE On the Rule Information page:
To delete all selected rules, click Delete All Rules.
To delete all pictures in tag analysis, click Delete All Charts.
To group two or more rules, click Group and use the logic operators AND and OR to group them.
Before selecting an attribute, you can analyze the attribute by dragging it to the Analysis area. Only
dimension and numeric attributes can be analyzed. For details about how to analyze attributes, see
Reference.
Creating a customer segment using rules
1. Click OK.
The page for setting the basic customer segment information is displayed.
Configure basic information about a segment,as shown in 0.
Customer Insight INTERNAL
2017-09-07 Huawei confidential. No spreading without permission. Page 7 of 51
Segment basic information
0 describes the tag parameters.
Customer segment parameters
Parameter Description
Segment Type Customer segment type. The options are as follows:
● Visible to area: indicates that the tag is available to users in the local area.
● Visible to all: indicates that the tag is available to all users.
Create Category By Customer segment creation mode. The options are as follows:
● Rule: Configure tag and attribute calculation rules to filter customer lists.
● File: Import customer lists from a TXT or CSV file without configuring
rules.
Expiration Time Time when a customer segment expires.

Customer Insight INTERNAL
2017-09-07 Huawei confidential. No spreading without permission. Page 8 of 51
Parameter Description
Service Description Describes the function and feature of a customer segment from the service
perspective. For example, Group is used to analyze customer segments who
subscribe to a specific package of the GoTone brand.
Technical Description Describes customer segment filtering rules technically. For example, users who
frequently use Fetion: login_num is greater than 200.
Click Save as Segment.
Reference
Drag an attribute to the Analysis area.
Click and set Data range,as shown in 0.
Customer age attribute chart
Service Application
Customer Knowledge Management
Preparing Service Data
Setting Role Permission
System Configuration

Customer Insight INTERNAL
2017-09-07 Huawei confidential. No spreading without permission. Page 9 of 51
The system-level configuration in the knowledge management system includes the catalogs, tag and
customer segment categories, images, and descriptions. The system preconfigures the initial data, you can
modify them based on the site requirements.
Basic Operations
System Configuration
The system-level configuration in the knowledge management system includes the catalogs, tag and
customer segment categories, images, and descriptions. The system preconfigures the initial data, you can
modify them based on the site requirements.
Managing Catalogs
The operator can customize catalogs to manage frequently-used tags, attributes, and customer segments.
User-defined catalogs facilitate unified management and maintenance, and centralization and sharing of tag
library resources.
Prerequisites
The operator have the Tag category management permission.
Context
Catalogs feature in the following:
The system has the default catalog Default, and this catalog contains all attributes,tags and customer
segments in the system.
A catalog contains attribute categories, tag categories and customer segment categories. The operator
can manage the category structure of a catalog, and create, modify, and delete tags and customer
segments under a catalog. A user-defined catalog can contain all or some tags and customer segments.
When you select Tag Category on the tag creation page under a user-defined catalog, the tag is
synchronized to the Unclassified category under catalog Default. The Unclassified category under
catalog Default cannot be modified and deleted.
You can select tags and customer segments only from the default catalog when managing a
user-defined catalog. (In other words, tags and customer segments under user-defined catalog A cannot
be moved to user-defined catalog B).
Before deleting a user-defined catalog, you must delete all categories under the catalog. If a category
to be deleted is referenced from the default catalog, delete all tags from this category.
Scenario
User 10001 wants to define catalog CatalogA, create attribute category AttributeA and customer segment
category SegmentA, and reference attribute Customer Gender in the default catalog.
Procedure
Log in to the Universe Portal as the 10001 user.
Choose Customer Insight > Configuration > Service Configuration > Catalog Management.
Click New Catalog and create catalog CatalogA.
Click Use to set catalog CatalogA as the default catalog.
Customer Insight INTERNAL
2017-09-07 Huawei confidential. No spreading without permission. Page 10 of 51
Choose Customer Insight > Configuration > Service Configuration > Attribute Category and configure
attribute categories under catalog CatalogA.
If catalog CatalogA needs to be use category structure of default category default, click Quote
default institution.
a. Click Create. On the Add sub category page that is displayed, set Title to AttributeA.
b. Click Manage next to AttributeA. On the Category Management page that is displayed, select
Customer Gender.
c. Click OK.
Choose Customer Insight > Configuration > Service Configuration > Segment Category and configure
customer segment category SegmentA under catalog CatalogA.
Creating an Attribute and a Segment Category
You can create a tag category on the customer model management page.
Prerequisites A customer type has been defined and released.
The operator has the Tag category management permission.
Context If the Default catalog is used, attribute and tag categories cannot be created, and only customer
segment categories can be created.
If a user-defined catalog is used, attribute and customer segment categories can be created, and
attributes and tags cannot be configured for these tag and customer segment categories.
The system supports synchronous configuration of attribute and tag categories. In the
$HOME/conf/ckm.properties file on the Persona server, UNIFY_TAG_AND_ATTR_CATEGORY
indicates whether to enable synchronous configuration of attribute and tag categories. The value Y
indicates yes. In the scenario where the value Y is used, you can configured attribute categories, choose
Tag Category, and click Refresh to make the attribute and tag categories consistent through
synchronization.
The method for creating a customer segment category is similar to that for creating an attribute category.
This topic describes how to create an attribute category.
Procedure
Log in to the Persona as a user of the category management role.
Choose Customer Insight > Configuration > Service Configuration.
Choose Attribute Category in the navigation tree on the left.
Click Create.
The Add sub category page is displayed.
NOTE
If the Default catalog is used, the attribute category cannot be created.
Set the parameters for creating a tag category.
0 describes the parameters.

Customer Insight INTERNAL
2017-09-07 Huawei confidential. No spreading without permission. Page 11 of 51
Parameters for creating a tag category
Parameter Description
Name Name of a tag category, for example, Basic service.
Customer type Customer type to which a tag category belongs. This parameter is set in the
customer model. For details, see Preparing Service Data.
Description Description of a tag category.
Click Confirm.
Create a subcategory.
NOTE Only three-level categories can be properly displayed in the tag store.
a. Click next to a tag category.
The Add sub category page is displayed.
b. Set the parameters for creating a subcategory.
c. Click Confirm.
The created subcategory is displayed in the lower level of its parent category.
Manage tag categories.
0 describes the involved operations.
Operations involved in tag category management
Icon Description
Creates a category
Modifies the name and description of a category.
Deletes a category.
Moves a category up.
Moves a category down.
Selects tags and attributes for a category. This icon is displayed only
when a user-defined catalog is used.
Configuring a Customer Profile
Functioning as a development service, the customer profile system provides the query function for
third-party target systems. Customer profiles can be configured based on target systems. A customer profile
can contain multiple categories and each category can contain a group of attributes and tags. Customer
profile content must be configured before customer profiles are queried.

Customer Insight INTERNAL
2017-09-07 Huawei confidential. No spreading without permission. Page 12 of 51
Prerequisites A customer model has been defined and released.
The operator have the Customer profile configuration permission permission.
Procedure
Log in to the Persona client as the user of the customer profile configuration role.
Create a customer profile.
a. Choose Customer Insight > Configuration > Service Configuration. On the page that is
displayed, choose Profile Configuration in the navigation tree on the left.
b. Click Create.
c. Set the parameters for creating a customer profile.
0 describes the parameters.
Parameters for creating a customer profile
Parameter Description
Customer Profile Name Name of a customer profile.
Customer Type Type of the customer to which a customer profile belongs, for
example, Fixed network. This parameter is set in the customer
model.
Target System Third-party system that uses a customer profile category. A
third-party system can configure customer profiles based on the
requirements and define the target system name. After the
configuration, customer profiles can be queried in the third-party
system.
d. Click OK.
The created customer profile is displayed in the customer profile list.
Create a tag category for the customer profile.
a. Click the created customer profile in the customer profile list.
b. Click Create Profile Group.
NOTE You can create multiple profile groups.
a. Set the tag category name.
b. Select attributes and tags for query from the attribute list.
NOTE
You can click the tabs in the navigation tree on the left to switch between attributes and tags.
c. Click OK.
You can click a customer profile to view the newly created profile group and group ID, as shown in 0.

Customer Insight INTERNAL
2017-09-07 Huawei confidential. No spreading without permission. Page 13 of 51
Customer profile category
Managing Images
During tag or customer segment creation, you can use images as tag or customer segment icons. The
system has preconfigured some images, and you can define image categories to manage the images.
Procedure
Choose Customer Insight > Configuration > Service Configuration > Image Category.
Click Create and enter a category name to create an image category.
Choose Customer Insight > Configuration > Service Configuration > Image Management.
Click Create and configure image information. The value of Mark Image must be unique.
Basic Operation
Creating a Tag
A tag can precisely define a group of target customers. You can use existing tags and attributes to create
tags based on preconfigured rules or by importing customer numbers in batches.
Prerequisites
A customer classification and customer attribute classification have been created.
An attribute has been created.
Context
Two segments creation methods are supported.
By rules: Configure rules to create tags. Attributes and existing tags can be used as rules,
the rule description refer to Logic Rules and Calculation Rules.
By importing a file: Create tags by importing files in TXT or CSV format on the local host or a remote
server. The files imported at a time cannot be larger than 100 MB. If the files are greater than 100 MB,
import them by batch. The address of the remote server can be set under Customer Insight >
Configuration > Service Configuration > Parameter Management. The remote server supports the
following import periods:
− Non-periodic import: Import files from the remote server by one time.
− Daily: Import files once a day. By default, the file import is performed at 00:00:00.
− Monthly: Import files once a month. By default, the file import is performed at 00:00:00 on the
first day of a month.
During tag configuration, multiple customer models are supported. An operator can create customer
segment for a specific model.
Data can be imported both locally and remotely. The file name extensions of the imported files are .txt
and .csv. The maximum allowed file size in a batch is 100 MB. If the file size exceeds 100 MB, import the
data in two or more batches. The address of a remote server is configured under Customer Insight >

Customer Insight INTERNAL
2017-09-07 Huawei confidential. No spreading without permission. Page 14 of 51
Configuration > Service Configuration > Parameter Management. The following import cycles are
provided for remote data import:
Non-cyclic: Data is imported from a remote server at a time.
Daily: Data is imported once a day. By default, data import is triggered at 00:00 every day.
Monthly: Data is imported once a month. By default, data import is triggered at 00:00 on the first day
of every month.
Creating a customer segment using rules
1. Choose Customer Insight > Tag Store.
Click +Create by Rule.
Select the model for tag.
Drag the attribute or tag to the rule area and configure filtering rules on the Create by Rule page, as shown in 0.
For tags, include and exclude conditions can be configured. Attribute parameters can be of the numeric,
character, time, and dimension types. Rules can be configured by parameter type.
NOTE
On the Rule Information page:
To delete all selected rules, click Delete All Rules.
To delete all pictures in tag analysis, click Delete All Charts.
To group two or more rules, click Group and use the logic operators AND and OR to group them.
Before selecting an attribute, you can analyze the attribute by dragging it to the Analysis area. Only
dimension and numeric attributes can be analyzed. For details about how to analyze attributes, see
Reference.
Creating a tag using rules
Click OK.
The page for setting the basic tag information is displayed.
Configure basic information about a segment,as shown in 0.

Customer Insight INTERNAL
2017-09-07 Huawei confidential. No spreading without permission. Page 15 of 51
Tag basic information
0 describes the tag parameters.
Tag parameters
Parameter Description
Tag Type Tag type. The options are as follows:
● Visible to area: indicates that the tag is available to users in the local
area.
● Visible to all: indicates that the tag is available to all users.

Customer Insight INTERNAL
2017-09-07 Huawei confidential. No spreading without permission. Page 16 of 51
Parameter Description
Service Description Describes the tag function and feature from the service perspective. For
example, label is used to analyze customers who subscribe to a specific
package of the GoTone brand.
Technical Description Describes tag rules technically. For example, users who frequently use
Fetion: login_num is greater than 200.
Click Save as Tag.
user of the service review role and a user of the technical review role respectively, and review tag
creation requests under My Space. Approved tags are displayed on the Customer Insight > Tag Store
Importing Created Tags
1. Choose Customer Insight > Tag Store.
Select a customer model using the search box, as shown in 0.
Selecting a customer model
Click v next to +Create by Rule and select +Create by Import.
Select an import mode.
− Local import: Download a customer segment template, add customer numbers to the template, and
upload the template.
It takes a while to upload the file. Currently, uploading a file containing 10,000,000 customer
numbers takes about half an hour.
NOTE A customer segment created through local import contains a fixed customer list. A customer segment created using rules, however, contains a customer list that is updated cyclically.
− Remote import: Set the file server address, file path, and import cycle. The address of the remote
server can be set under Customer Insight > Configuration > Service Configuration >
Parameter Management.
Click OK.
The page for setting the basic customer segment information is displayed.
Customer Insight INTERNAL
2017-09-07 Huawei confidential. No spreading without permission. Page 17 of 51
Set the basic customer segment information.
Click Save as Tag.
user of the service review role and a user of the technical review role respectively, and review tag
creation requests under My Space. Approved tags are displayed on the Customer Insight > Tag Store
Reference
Drag an attribute to the Analysis area.
Click and set Data range,as shown in 0.
Figure 4 Customer age attribute chart
Managing the Life Cycle of Tags
Carriers' tag operations personnel manage the life cycle of tags based on the service period
Prerequisites
An tag has been created.
Context
In the life cycle of a tag, after the Create, Refresh, Reuse, Disable, Modify, or Offline operation, the tag
may enter any of the following states: Draft, Add Approval, Applied, Expired, Modifying, Modify
Approval, Offline Approval, and Offline, as shown in 0.

Customer Insight INTERNAL
2017-09-07 Huawei confidential. No spreading without permission. Page 18 of 51
Tag life cycle
Create: Configure basic information and rules of a tag and submit the tag for review. An operator who
has the review permission reviews the created tag to ensure tag quality. The tag enters the Applied
state after being approved.
Refresh: Tag refresh can be automatically scheduled and manually triggered. After a tag is refreshed,
the latest customer list is generated.
Reuse: Rules of expired, disabled, and offline tags can be reused for quick tag creation. For tags
created by importing a file, the Reuse button is unavailable.
Disable: Tags that are outdated or inefficient can be disabled. Then the generation rules or related
analysis models of the tags can be optimized. Disabled tags are not displayed on the Customer
Insight > Tag Store page. Users who have the restart permission or tag creators can check disabled
tags under Personal Center > To-Do > Disabled list
Modify: Disabled tags can be modified. Some basic information cannot be modified, for example, the
tag name and type.
Offline: Tags that are outdated, incorrect, or inefficient can be brought offline. Offline tags cannot be
reused, but their rules can. Offline tags can be viewed only by their creators under Personal Center >
My Founded.
NOTE
Whether to bring a tag offline or to disable a tag depends on whether the tag has value. You can disable a tag only when some conditions in its generation rules need to be optimized, and bring a tag offline if the tag is no longer valuable.
A referenced tag cannot be disabled, modified, or brought offline.
Both technical and service reviews are required when you create, modify, or bring a tag offline.
Customer Insight INTERNAL
2017-09-07 Huawei confidential. No spreading without permission. Page 19 of 51
The system supports the following operations on tags: add to Favorites, claim, score, subscribe, and
download list.
Add to favorites: Valuable tags can be added to favorites. The number of times that a tag is added to
favorites is a KPI for calculating the comprehensive score of the tag.
Claim: If an error occurs when a tag is used to analyze and process customer time, you can optimize
the tag through claiming. Tag claiming information can be sent to corresponding roles through SMS
messages.
Score: Users can score and comment on tags based on the effect. The score is a KPI for calculating the
comprehensive score of the tag.
Subscribe: After a tag is subscribed, customers and attribute values covered by the tag will be sent to
the subscription system. For details, see Subscribing to Tags or Customer Segments.
Download list: You can download the list of the customers covered by a tag. For details, see Extracting a Customer List.
Procedure
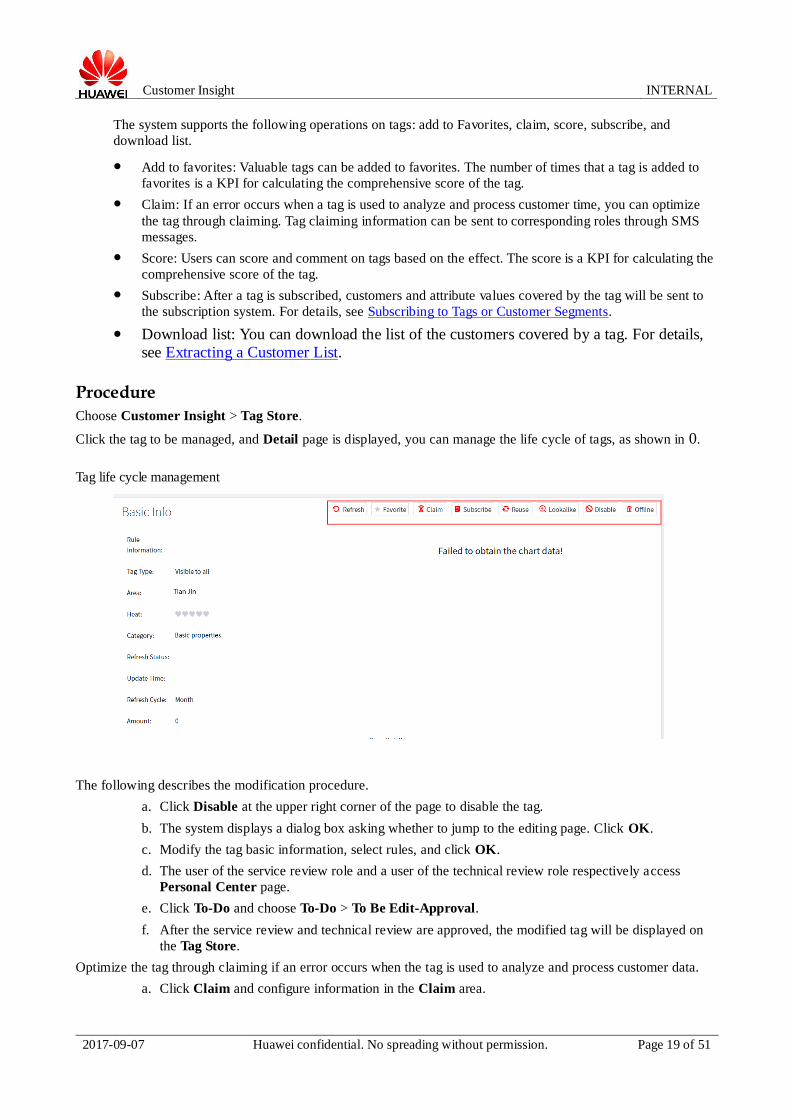
Choose Customer Insight > Tag Store.
Click the tag to be managed, and Detail page is displayed, you can manage the life cycle of tags, as shown in 0.
Tag life cycle management
The following describes the modification procedure.
a. Click Disable at the upper right corner of the page to disable the tag.
b. The system displays a dialog box asking whether to jump to the editing page. Click OK.
c. Modify the tag basic information, select rules, and click OK.
d. The user of the service review role and a user of the technical review role respectively access
Personal Center page.
e. Click To-Do and choose To-Do > To Be Edit-Approval.
f. After the service review and technical review are approved, the modified tag will be displayed on
the Tag Store.
Optimize the tag through claiming if an error occurs when the tag is used to analyze and process customer data.
a. Click Claim and configure information in the Claim area.

Customer Insight INTERNAL
2017-09-07 Huawei confidential. No spreading without permission. Page 20 of 51
b. Click OK.
c. After the tag is optimized, choose Personal Center.
Follow-up Procedure
After a tag created, you can comment on the tag and view historical versions of the tag.
Click the tag to be modified on Customer Insight > Tag Store. The Detail page is displayed.
In the Others area, click Comments Scores to score a tag.
Click Version History and view historical version of the tag.
You can click Hide Same Items to display differences of two versions.
Create Segments
A customer segment is a set of customers who have the same features in some dimensions. Three tag
creation methods are supported: by rules, by importing a file and Lookalike.
Creating a Customer Segment by Rule
You can use existing tags and attributes to create tags based on preconfigured rules.
Prerequisite Customer segment categories have been created.
An attribute or a tag have been created.
Procedure
Choose Customer Insight > Segment > Segment Management.
Click +Create by Rule.
Select the model for segment.
NOTE During customer segment configuration, multiple customer models are supported. An operator can create customer segment for a specific model.
Drag the attribute or tag to the rule area and configure filtering rules on the Create by Rule page, as shown in 0.
For segments, include and exclude conditions can be configured. Attribute parameters can be of the
numeric, character, time, and dimension types. Rules can be configured by parameter type. Rules
description refer to Logic Rules and Calculation Rules.
NOTE
On the Rule Information page:
To delete all selected rules, click Delete All Rules.
To delete all pictures in tag analysis, click Delete All Charts.
To group two or more rules, click Group and use the logic operators AND and OR to group them.
Before selecting an attribute, you can analyze the attribute by dragging it to the Analysis area. Only
dimension and numeric attributes can be analyzed. For details about how to analyze attributes, see
Reference.

Customer Insight INTERNAL
2017-09-07 Huawei confidential. No spreading without permission. Page 21 of 51
Creating a customer segment using rules
Click OK.
The page for setting the basic customer segment information is displayed.
Configure basic information about a segment,as shown in 0.

Customer Insight INTERNAL
2017-09-07 Huawei confidential. No spreading without permission. Page 22 of 51
Segment basic information
0 describes the tag parameters.
Customer segment parameters
Parameter Description
Segment Type Customer segment type. The options are as follows:
● Visible to area: indicates that the tag is available to users in the local area.
● Visible to all: indicates that the tag is available to all users.
Create Category By Customer segment creation mode. The options are as follows:
● Rule: Configure tag and attribute calculation rules to filter customer lists.
● File: Import customer lists from a TXT or CSV file without configuring
rules.
Expiration Time Time when a customer segment expires.

Customer Insight INTERNAL
2017-09-07 Huawei confidential. No spreading without permission. Page 23 of 51
Parameter Description
Service Description Describes the function and feature of a customer segment from the service
perspective. For example, Group is used to analyze customer segments who
subscribe to a specific package of the GoTone brand.
Technical Description Describes customer segment filtering rules technically. For example, users who
frequently use Fetion: login_num is greater than 200.
Click Save as Segment.
Reference
Drag an attribute to the Analysis area.
Click and set Data range,as shown in 0.
Customer age attribute chart
Creating a Customer Segment Through Data Import
You can create a customer segment by importing customer numbers in batches.
Prerequisites Customer types and customer segment categories have been created.
Attributes, tags, or customer segments have been created.

Customer Insight INTERNAL
2017-09-07 Huawei confidential. No spreading without permission. Page 24 of 51
Context
Data can be imported both locally and remotely. The file name extensions of the imported files are .txt
and .csv. The maximum allowed file size in a batch is 100 MB. If the file size exceeds 100 MB, import the
data in two or more batches. The address of a remote server is configured under Customer Insight >
Configuration > Service Configuration > Parameter Management. The following import cycles are
provided for remote data import:
Non-cyclic: Data is imported from a remote server at a time.
Daily: Data is imported once a day. By default, data import is triggered at 00:00 every day.
Monthly: Data is imported once a month. By default, data import is triggered at 00:00 on the first day
of every month.
Procedure
Choose Customer Insight > Segment > Segment Management.
Select a customer model using the search box, as shown in 0.
Selecting a customer model
Click v next to +Create by Rule and select +Create by Import.
Select an import mode.
− Local import: Download a customer segment template, add customer numbers to the template, and
upload the template.
It takes a while to upload the file. Currently, uploading a file containing 10,000,000 customer
numbers takes about half an hour.
NOTE A customer segment created through local import contains a fixed customer list. A customer segment created using rules, however, contains a customer list that is updated cyclically.
− Remote import: Set the file server address, file path, and import cycle. The address of the remote
server can be set under Customer Insight > Configuration > Service Configuration >
Parameter Management.
Click OK.
The page for setting the basic customer segment information is displayed.
Set the basic customer segment information.
Customer Insight INTERNAL
2017-09-07 Huawei confidential. No spreading without permission. Page 25 of 51
Click Save as Segment.
Creating a Lookalike Customer Segment
You can create a customer segment based on rules, by importing data, or in Lookalike mode.
Prerequisite
Customer segments or tags exist in the system.
Scenario Description
A carrier plans to retain customers predicted to churn. The carrier uses the Upgrade package to send
phone segment as the seed customer segment, and selects top 10% customers who are similar to customers
in the seed customer segment from the Forecast offline segment as the target customer segment.
Procedure
Choose Customer Insight > Segment > Segment Management.
Select +Lookalike.
You can perform either of the following operations to access the Create Lookalike Segment page:
− Select a customer segment as the seed customer segment and click in the operation column.
− Click a customer segment. On the details page that is displayed, click .
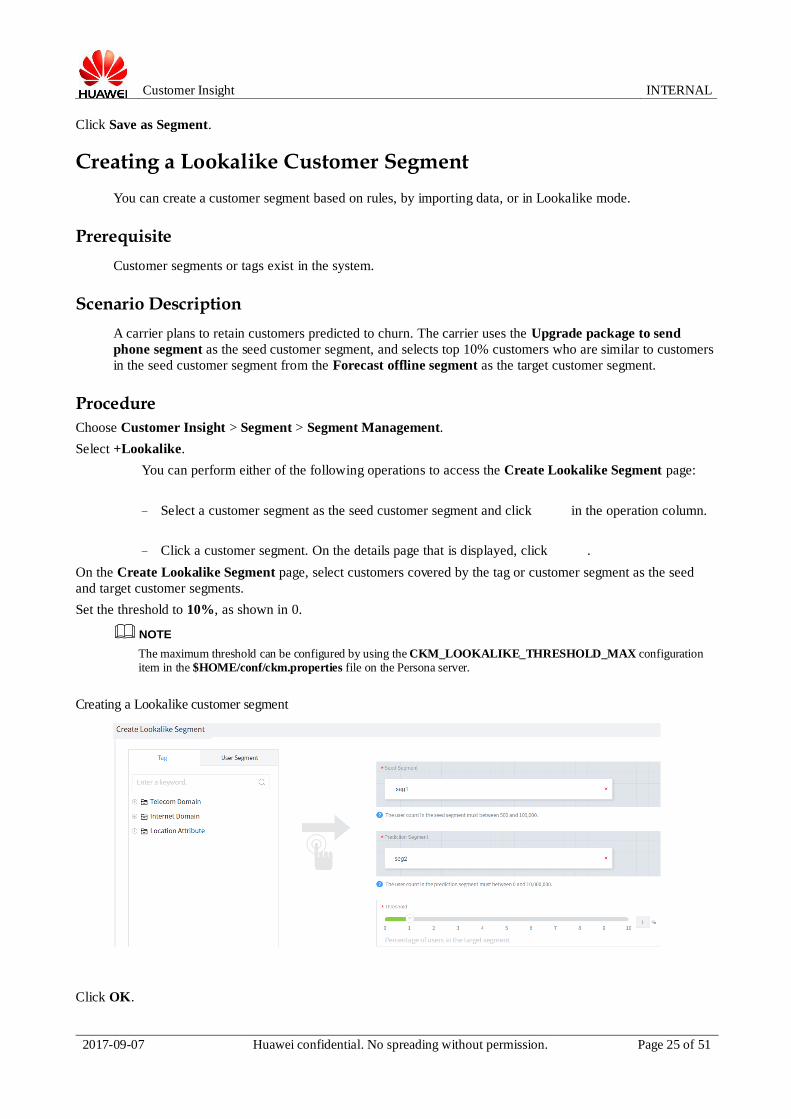
On the Create Lookalike Segment page, select customers covered by the tag or customer segment as the seed
and target customer segments.
Set the threshold to 10%, as shown in 0.
NOTE The maximum threshold can be configured by using the CKM_LOOKALIKE_THRESHOLD_MAX configuration item in the $HOME/conf/ckm.properties file on the Persona server.
Creating a Lookalike customer segment
Click OK.

Customer Insight INTERNAL
2017-09-07 Huawei confidential. No spreading without permission. Page 26 of 51
The basic customer segment information page is displayed.
Configure basic customer segment information, as shown in 0.
Configuring basic customer segment information
Click Save as Segment.
Creating a Location-based Customer Segment
You can select location attributes for specifying time segments and location information during customer
segmentation rule configuration.
Prerequisites
Customer segment categories, location attributes, or tags exist.

Customer Insight INTERNAL
2017-09-07 Huawei confidential. No spreading without permission. Page 27 of 51
Scenario
A carrier plans to conduct a marketing activity for customers who stay in business district A for over 30
minutes around 12:00 at weekends.
Procedure
Choose Intelligent Analysis > Customer Insight > Targeting.
Click Create.
Configure basic information about a segment.
Set Create Category By to Rule.
Click Next.
In the navigation tree on the left of the Rule Information page, select the Stay Duration location attribute, drag
it to the rule information area, and set filter criteria, as shown in 0.
A location attribute has the following restrictions:
− Time type: The options include Weekend, Workday, and Holiday.
− Time segment: The value ranges from 0 to 24. For example, the value 17 indicates that the time
segment ranges from 17:00 to 18:00.
− Location: Baidu Map is displayed when Location is clicked. You can click Select on the map,
select the rectangle area where business district ion A is located, and click OK.
− Stay Duration: duration during which customers stay in an area. The unit is second. For example,
the value 1800 indicates that customers stay for more than 30 minutes.
− Stay Count: number of times that customers enter an area in a specified period.
NOTE The center point and zoom level of the map are specified by MAP_CENTER_POINT and MAP_DEFAULT_ZOOM in the $HOME/conf/ckm.properties file on the Persona server.
− MAP_CENTER_POINT: longitude and latitude of the center point, which are separated by \,.
Example: 119.041638\,31.948253
− MAP_DEFAULT_ZOOM: default zoom level. You can scroll the mouse to adjust the zoom level.
Value range: 3-19
Configuring a location rule
Click OK.
Customer Insight INTERNAL
2017-09-07 Huawei confidential. No spreading without permission. Page 28 of 51
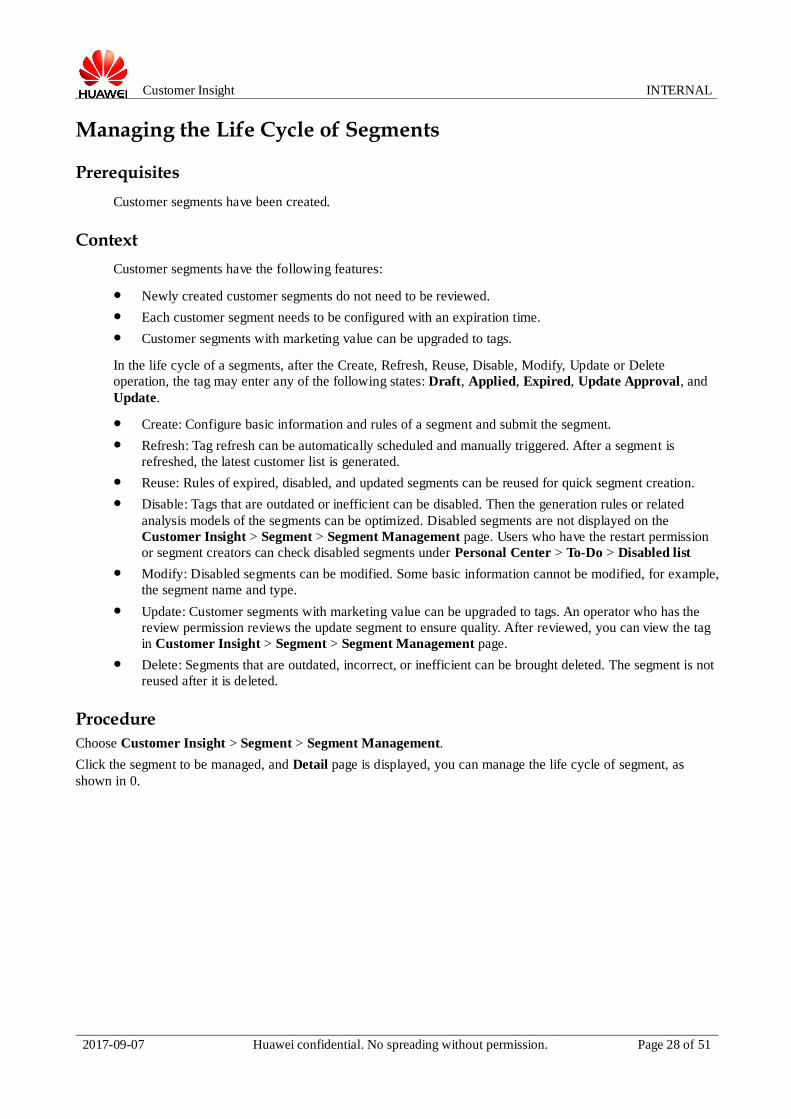
Managing the Life Cycle of Segments
Prerequisites
Customer segments have been created.
Context
Customer segments have the following features:
Newly created customer segments do not need to be reviewed.
Each customer segment needs to be configured with an expiration time.
Customer segments with marketing value can be upgraded to tags.
In the life cycle of a segments, after the Create, Refresh, Reuse, Disable, Modify, Update or Delete
operation, the tag may enter any of the following states: Draft, Applied, Expired, Update Approval, and
Update.
Create: Configure basic information and rules of a segment and submit the segment.
Refresh: Tag refresh can be automatically scheduled and manually triggered. After a segment is
refreshed, the latest customer list is generated.
Reuse: Rules of expired, disabled, and updated segments can be reused for quick segment creation.
Disable: Tags that are outdated or inefficient can be disabled. Then the generation rules or related
analysis models of the segments can be optimized. Disabled segments are not displayed on the
Customer Insight > Segment > Segment Management page. Users who have the restart permission
or segment creators can check disabled segments under Personal Center > To-Do > Disabled list
Modify: Disabled segments can be modified. Some basic information cannot be modified, for example,
the segment name and type.
Update: Customer segments with marketing value can be upgraded to tags. An operator who has the
review permission reviews the update segment to ensure quality. After reviewed, you can view the tag
in Customer Insight > Segment > Segment Management page.
Delete: Segments that are outdated, incorrect, or inefficient can be brought deleted. The segment is not
reused after it is deleted.
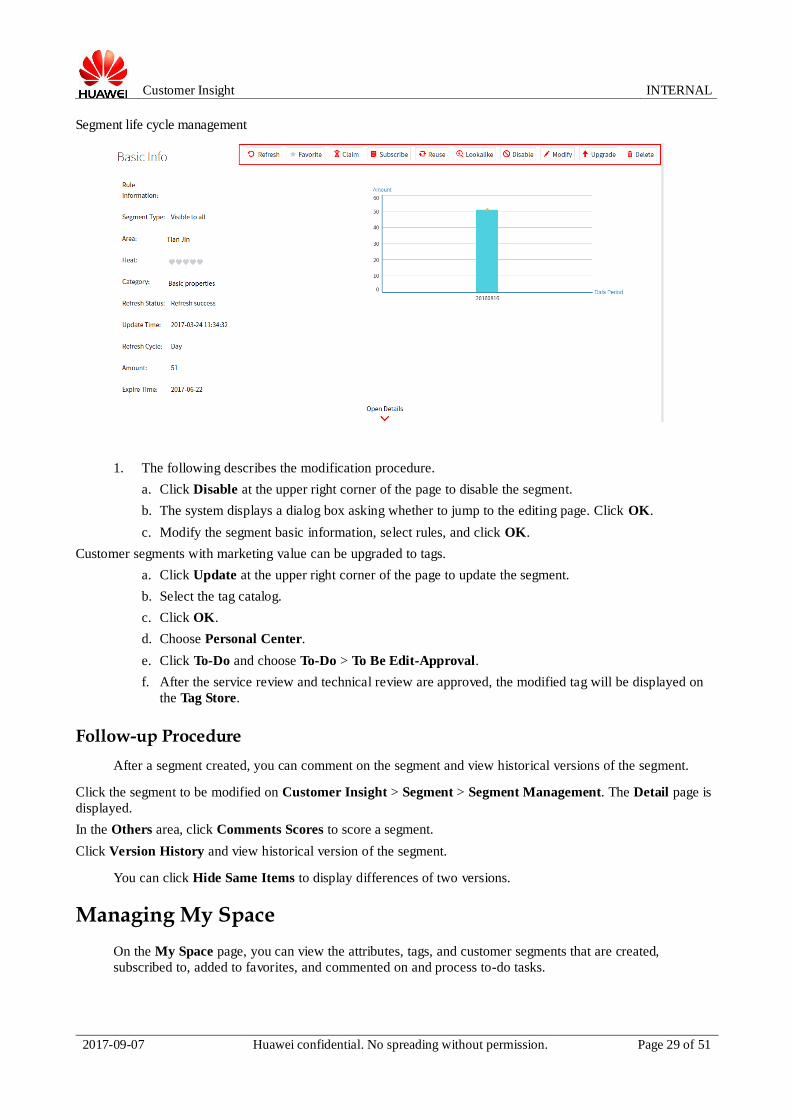
Procedure
Choose Customer Insight > Segment > Segment Management.
Click the segment to be managed, and Detail page is displayed, you can manage the life cycle of segment, as
shown in 0.
Customer Insight INTERNAL
2017-09-07 Huawei confidential. No spreading without permission. Page 29 of 51
Segment life cycle management
1. The following describes the modification procedure.
a. Click Disable at the upper right corner of the page to disable the segment.
b. The system displays a dialog box asking whether to jump to the editing page. Click OK.
c. Modify the segment basic information, select rules, and click OK.
Customer segments with marketing value can be upgraded to tags.
a. Click Update at the upper right corner of the page to update the segment.
b. Select the tag catalog.
c. Click OK.
d. Choose Personal Center.
e. Click To-Do and choose To-Do > To Be Edit-Approval.
f. After the service review and technical review are approved, the modified tag will be displayed on
the Tag Store.
Follow-up Procedure
After a segment created, you can comment on the segment and view historical versions of the segment.
Click the segment to be modified on Customer Insight > Segment > Segment Management. The Detail page is
displayed.
In the Others area, click Comments Scores to score a segment.
Click Version History and view historical version of the segment.
You can click Hide Same Items to display differences of two versions.
Managing My Space
On the My Space page, you can view the attributes, tags, and customer segments that are created,
subscribed to, added to favorites, and commented on and process to-do tasks.

Customer Insight INTERNAL
2017-09-07 Huawei confidential. No spreading without permission. Page 30 of 51
Context
On the My Space page, you can view the following information:
Numbers of attributes, tags, and customer segments that are monthly created and accumulatively
created
Warning: tags that have no customer and tags that are not used or seldom used in a specified period.
Refresh: tags and customer segments that fail to be refreshed.
To-do: reviews and claims to be processed by login users. You can view the processed task and list of
disabled attributes, tags, and customer segments and directly enable attributes, tags, and customer
segments.
Application: processing status of applications submitted by login users.
Claim: basic information about claims submitted by login users.
My creation: tags, attributes, and customer segments in all states created by login users. Deleted
customer segment information cannot be deleted.
My subscription: all tags and customer segments subscribed by login users.
My favorites: all tags, attributes, and customer segments subscribed by login users.
My comments: comments on all tags, attributes, and customer segments submitted by login users.
Prcedure
Choose Customer Insight > Personal Center.
Click To-Do.
− On the Review tab page, click Approve to process service reviews and technical reviews for tags
and customer segments.
− On the Claiming tab page, click Process to terminate the claiming process.
− On the Disabled list tab page, click Enable to enable tags, attributes, and customer segments.
Click Applications.
View the application processes of To be reviewed and Approval and processed. Choose Approval and
not processed and click Not Dealed to move the application to Approval and processed.
Click Claimings to view processed claiming processes.
You can click View to submit claims.
Configuring Tag Calculation
You can add required attributes, tags, or customer segments to the tag calculator and configure visualization
rules in the tag calculator quickly and conveniently.
Prerequisites The tag calculation function has been enabled. To enable the function, set
CKM_TAG_CALCULATOR_FLAG to Y in the $HOME/conf/ckm.properties file on the Persona
server.
Attributes, tags, and customer segments to be added to the tag calculator have been created.
Procedure
Choose Customer Insight > Tag Store.
Select the required tag and click .

Customer Insight INTERNAL
2017-09-07 Huawei confidential. No spreading without permission. Page 31 of 51
When the icon of the calculator changes to , the tag is successfully added to the calculator.
Choose Customer Insight > Attribute Exploration and Customer Insight > Segment > Segment Management
and add required attributes and customer segments to the calculator respectively, by referring to 1 through 2.
Click Calculate at the bottom of the page. The Tag Calculator page is displayed, as shown in 0.
Tag Calculator
Configure tag calculation, as shown in 0.
You can select a tag on the left of the page. After the tag turns to green, click a position on the canvas
on the right of the page place the tag. On the canvas, you can drag a node (tag, attribute, or customer
segment) to another node. In this case, Select Logic Relation is displayed. You can configure the
logical relationship (Intersect Set, Union Set, or Difference Set) between the two nodes on Select
Logic Relation.
NOTE The intersect set and union set of any two nodes (tag, attribute, or customer segment) can be calculated.
If the selected nodes (in orange) are attribute nodes or intermediate nodes, the difference set cannot be calculated.
Configuring tag calculation
Click Export to segment or Export to tag.
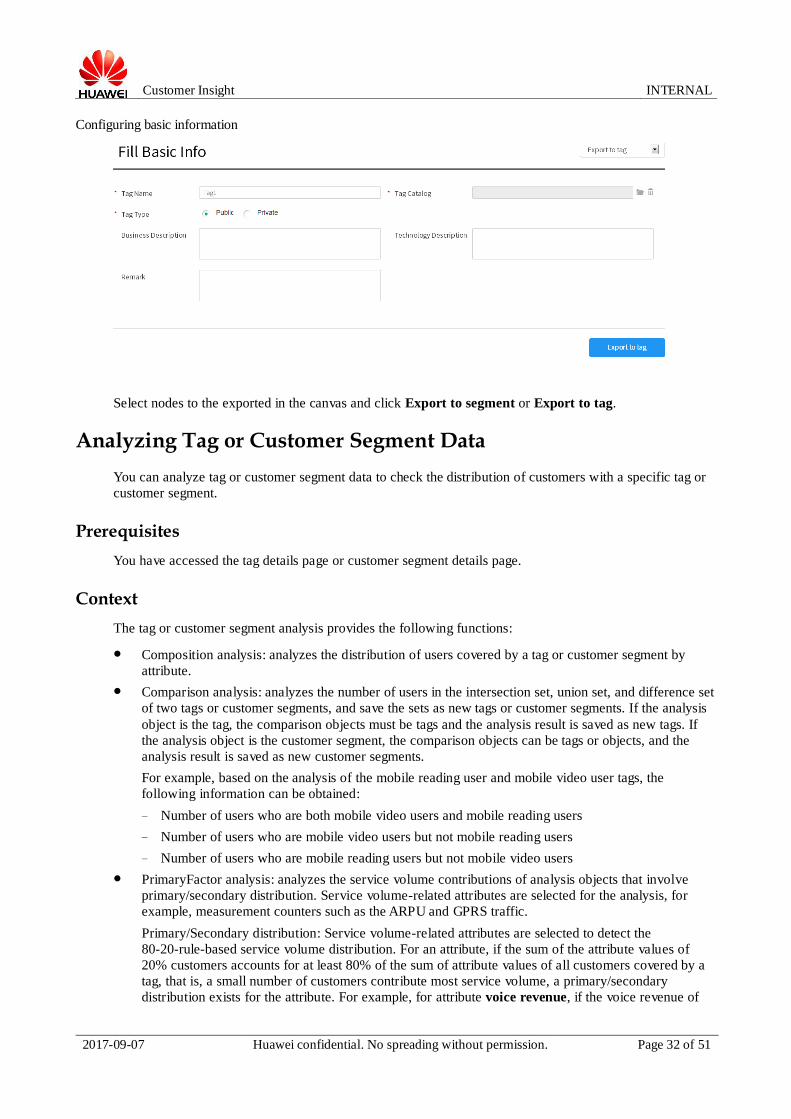
Configure basic customer segment or tag information in the Fill Basic Info area, as shown in 0.
Customer Insight INTERNAL
2017-09-07 Huawei confidential. No spreading without permission. Page 32 of 51
Configuring basic information
Select nodes to the exported in the canvas and click Export to segment or Export to tag.
Analyzing Tag or Customer Segment Data
You can analyze tag or customer segment data to check the distribution of customers with a specific tag or
customer segment.
Prerequisites
You have accessed the tag details page or customer segment details page.
Context
The tag or customer segment analysis provides the following functions:
Composition analysis: analyzes the distribution of users covered by a tag or customer segment by
attribute.
Comparison analysis: analyzes the number of users in the intersection set, union set, and difference set
of two tags or customer segments, and save the sets as new tags or customer segments. If the analysis
object is the tag, the comparison objects must be tags and the analysis result is saved as new tags. If
the analysis object is the customer segment, the comparison objects can be tags or objects, and the
analysis result is saved as new customer segments.
For example, based on the analysis of the mobile reading user and mobile video user tags, the
following information can be obtained:
− Number of users who are both mobile video users and mobile reading users
− Number of users who are mobile video users but not mobile reading users
− Number of users who are mobile reading users but not mobile video users
PrimaryFactor analysis: analyzes the service volume contributions of analysis objects that involve
primary/secondary distribution. Service volume-related attributes are selected for the analysis, for
example, measurement counters such as the ARPU and GPRS traffic.
Primary/Secondary distribution: Service volume-related attributes are selected to detect the
80-20-rule-based service volume distribution. For an attribute, if the sum of the attribute values of
20% customers accounts for at least 80% of the sum of attribute values of all customers covered by a
tag, that is, a small number of customers contribute most service volume, a primary/secondary
distribution exists for the attribute. For example, for attribute voice revenue, if the voice revenue of
Customer Insight INTERNAL
2017-09-07 Huawei confidential. No spreading without permission. Page 33 of 51
20% customer accounts for 83% of the voice revenue of all customers, a primary/secondary
distribution exists for this attribute.
The PrimaryFactor analysis is used to analyze whether a customer attribute has the 80-20-rule-based
distribution (20% customers contributes at least 80% service volume). If yes, the 20% customers can
be maintained as VIP customers to ensure high service volume.
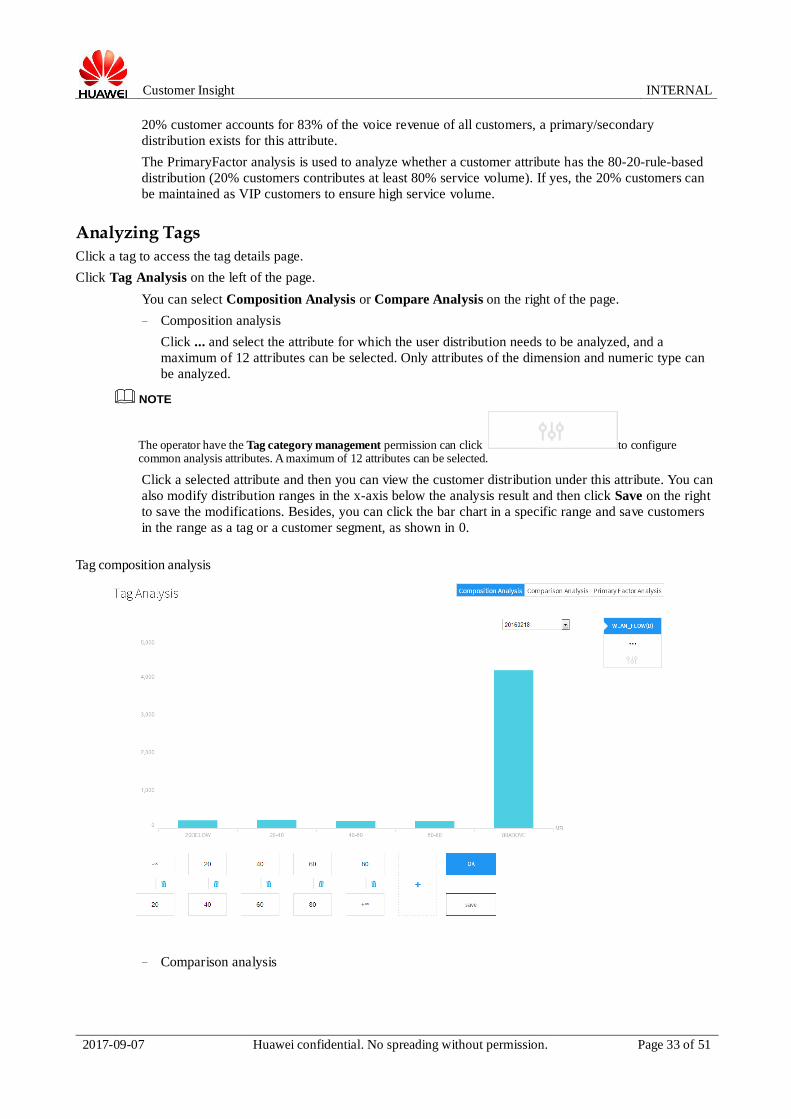
Analyzing Tags
Click a tag to access the tag details page.
Click Tag Analysis on the left of the page.
You can select Composition Analysis or Compare Analysis on the right of the page.
− Composition analysis
Click ... and select the attribute for which the user distribution needs to be analyzed, and a
maximum of 12 attributes can be selected. Only attributes of the dimension and numeric type can
be analyzed.
NOTE
The operator have the Tag category management permission can click to configure common analysis attributes. A maximum of 12 attributes can be selected.
Click a selected attribute and then you can view the customer distribution under this attribute. You can
also modify distribution ranges in the x-axis below the analysis result and then click Save on the right
to save the modifications. Besides, you can click the bar chart in a specific range and save customers
in the range as a tag or a customer segment, as shown in 0.
Tag composition analysis
− Comparison analysis
Customer Insight INTERNAL
2017-09-07 Huawei confidential. No spreading without permission. Page 34 of 51
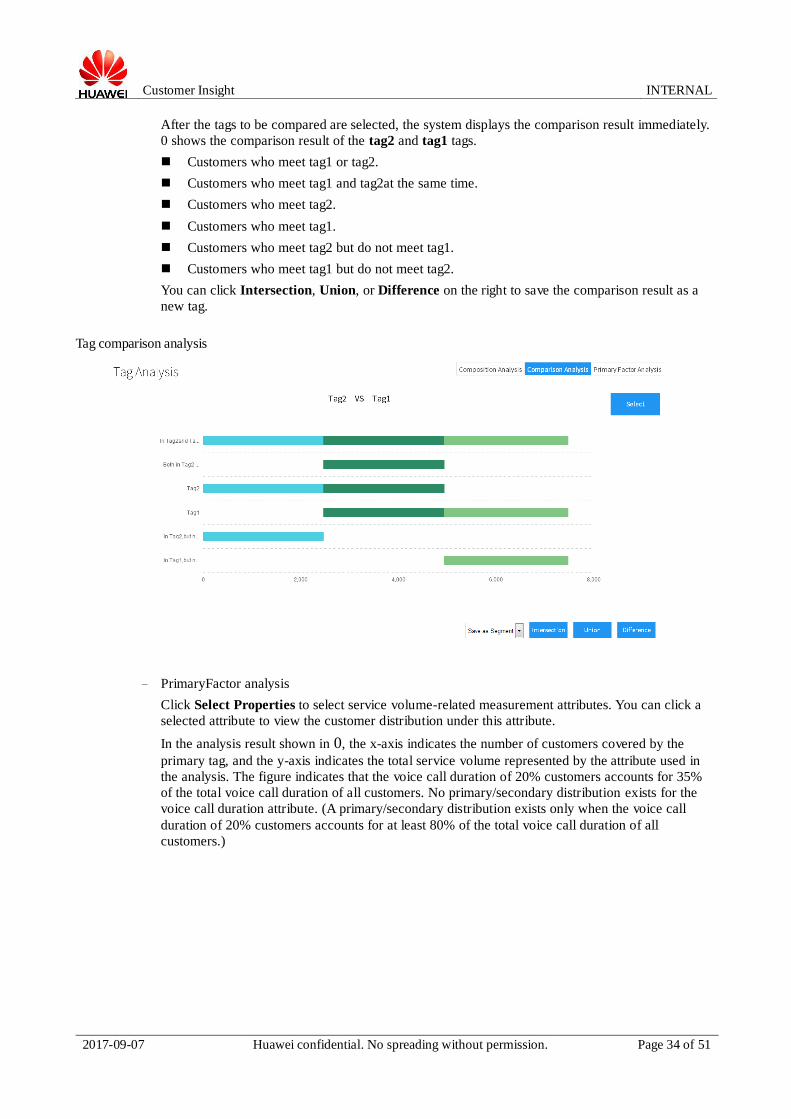
After the tags to be compared are selected, the system displays the comparison result immediately.
0 shows the comparison result of the tag2 and tag1 tags.
Customers who meet tag1 or tag2.
Customers who meet tag1 and tag2at the same time.
Customers who meet tag2.
Customers who meet tag1.
Customers who meet tag2 but do not meet tag1.
Customers who meet tag1 but do not meet tag2.
You can click Intersection, Union, or Difference on the right to save the comparison result as a
new tag.
Tag comparison analysis
− PrimaryFactor analysis
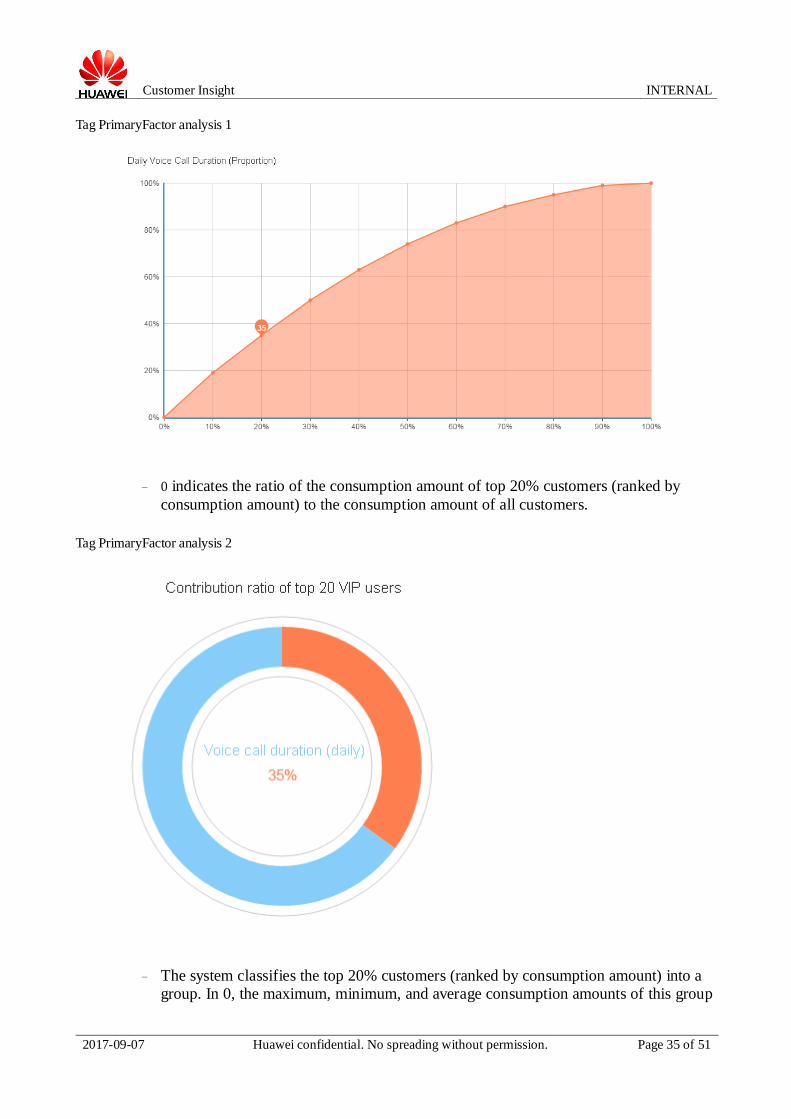
Click Select Properties to select service volume-related measurement attributes. You can click a
selected attribute to view the customer distribution under this attribute.
In the analysis result shown in 0, the x-axis indicates the number of customers covered by the
primary tag, and the y-axis indicates the total service volume represented by the attribute used in
the analysis. The figure indicates that the voice call duration of 20% customers accounts for 35%
of the total voice call duration of all customers. No primary/secondary distribution exists for the
voice call duration attribute. (A primary/secondary distribution exists only when the voice call
duration of 20% customers accounts for at least 80% of the total voice call duration of all
customers.)
Customer Insight INTERNAL
2017-09-07 Huawei confidential. No spreading without permission. Page 35 of 51
Tag PrimaryFactor analysis 1
− 0 indicates the ratio of the consumption amount of top 20% customers (ranked by
consumption amount) to the consumption amount of all customers.
Tag PrimaryFactor analysis 2
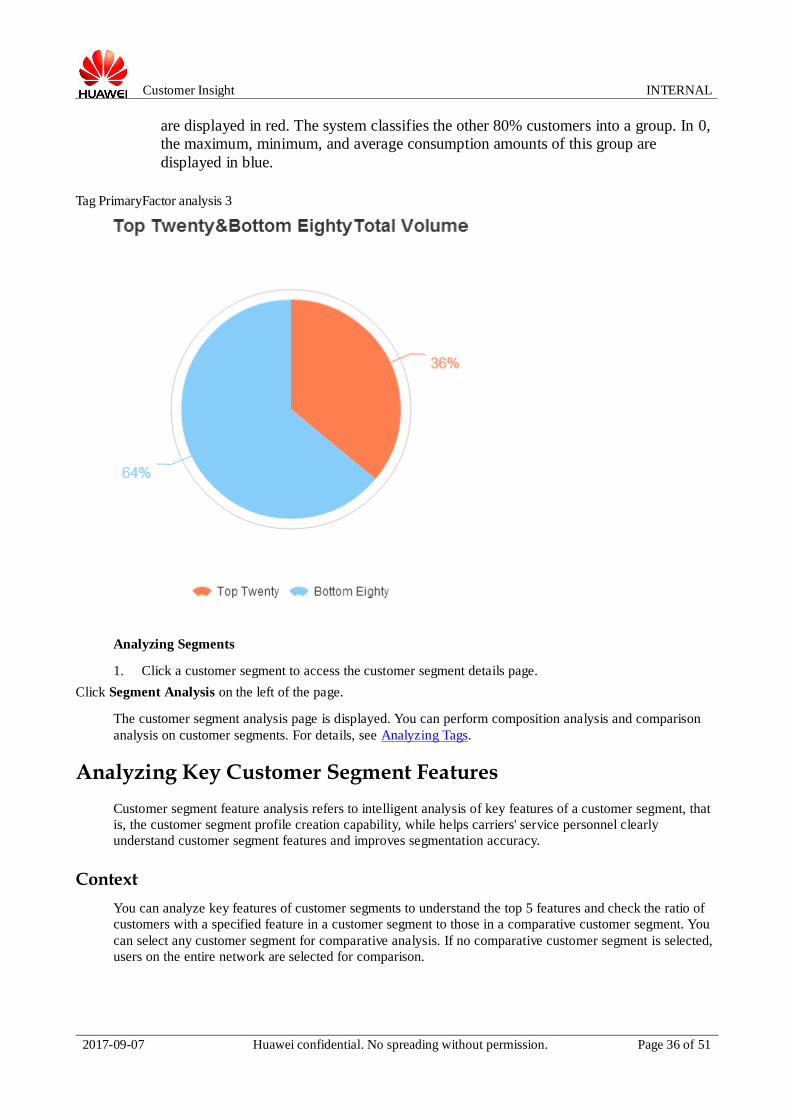
− The system classifies the top 20% customers (ranked by consumption amount) into a group. In 0, the maximum, minimum, and average consumption amounts of this group
Customer Insight INTERNAL
2017-09-07 Huawei confidential. No spreading without permission. Page 36 of 51
are displayed in red. The system classifies the other 80% customers into a group. In 0, the maximum, minimum, and average consumption amounts of this group are
displayed in blue.
Tag PrimaryFactor analysis 3
Analyzing Segments
1. Click a customer segment to access the customer segment details page.
Click Segment Analysis on the left of the page.
The customer segment analysis page is displayed. You can perform composition analysis and comparison
analysis on customer segments. For details, see Analyzing Tags.
Analyzing Key Customer Segment Features
Customer segment feature analysis refers to intelligent analysis of key features of a customer segment, that
is, the customer segment profile creation capability, while helps carriers' service personnel clearly
understand customer segment features and improves segmentation accuracy.
Context
You can analyze key features of customer segments to understand the top 5 features and check the ratio of
customers with a specified feature in a customer segment to those in a comparative customer segment. You
can select any customer segment for comparative analysis. If no comparative customer segment is selected,
users on the entire network are selected for comparison.
Customer Insight INTERNAL
2017-09-07 Huawei confidential. No spreading without permission. Page 37 of 51
Customer segment key feature analysis can be performed only when the feature database contains monthly
feature data with the 1:1 attribute.
Procedure
Choose Customer Insight > Segment > Segment Management.
Click the customer segment to be analyzed. The customer segment details page is displayed.
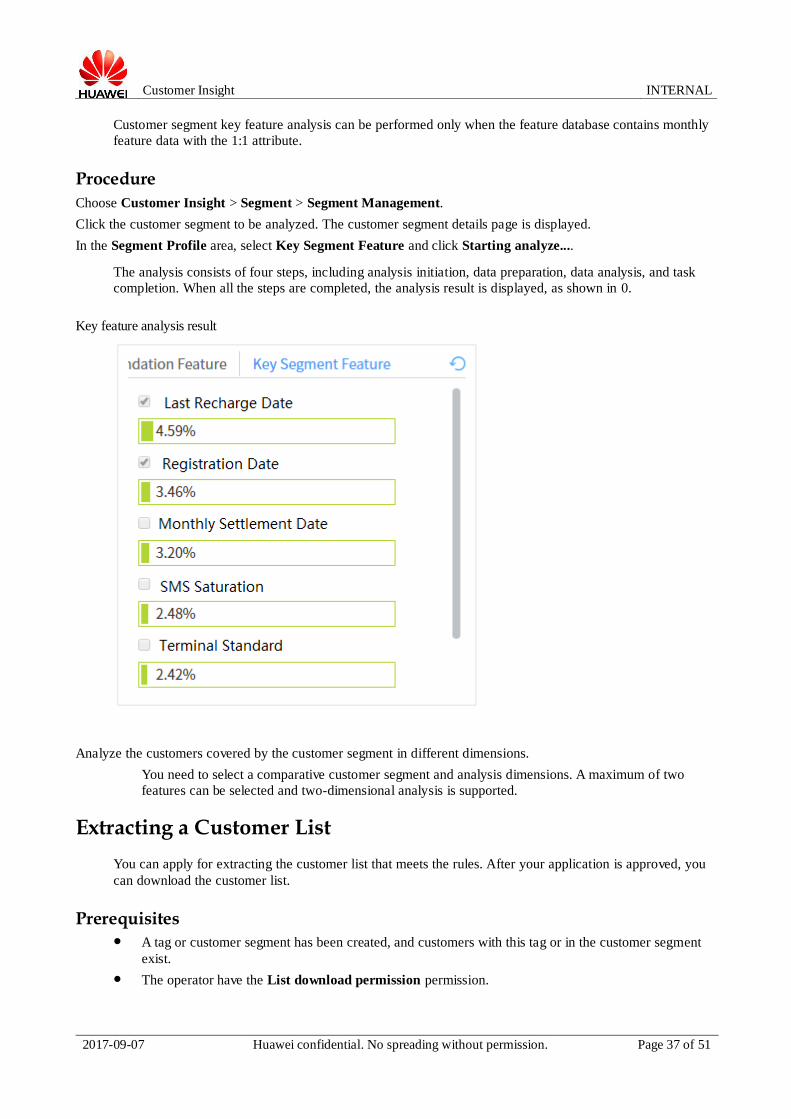
In the Segment Profile area, select Key Segment Feature and click Starting analyze....
The analysis consists of four steps, including analysis initiation, data preparation, data analysis, and task
completion. When all the steps are completed, the analysis result is displayed, as shown in 0.
Key feature analysis result
Analyze the customers covered by the customer segment in different dimensions.
You need to select a comparative customer segment and analysis dimensions. A maximum of two
features can be selected and two-dimensional analysis is supported.
Extracting a Customer List
You can apply for extracting the customer list that meets the rules. After your application is approved, you
can download the customer list.
Prerequisites A tag or customer segment has been created, and customers with this tag or in the customer segment
exist.
The operator have the List download permission permission.

Customer Insight INTERNAL
2017-09-07 Huawei confidential. No spreading without permission. Page 38 of 51
Context
The method for extracting the customer list of a customer segment is similar to that for extracting the
customer list of a tag. This topic describes how to extract the customer list of a tag.
Configure the value of DOWNLOAD_FILE_COLUMN_SEPARATOR in the
$HOME/conf/ckm.properties file if the separator of customer list need to modified.
Procedure
Log in to the Persona client as the user of the list download role.
Click the tag in the tag list.
The tag details page is displayed.
Click Customer List.
Mobile numbers of customers to be extracted are listed.
NOTE You can view a maximum of 500 customers with this tag.
Click Download List in the List Preview page.
Enter the value of Temp Password, and the system then downloads customers with the selected attributes.
Knowledge Discovery Management
The KD processes users' Internet access logs, and marks users Internet behavior, visited website, app
information, time, and location information. The marking results can be combined by dimension to obtain
composite tags, supporting customer segmentation.
Configuring Composite Rules
Offline-marked detailed data of different dimensions can be combined to generate composite rules. Tags of
specific composite scenarios can be obtained through composite rules.
Searching the Tag Library
After composite rules are configured, the system automatically generates detailed tag information based on
the composite rules. You can search the tag library for detailed composite tag information.
Managing the Feature Library
The feature library management function provides unified management of feature files and feature fields.
Managing Multiple Models
You can manage model information and define the relationship between models on the Feature Library
Management page.
Configuring Composite Rules
Offline-marked detailed data of different dimensions can be combined to generate composite rules. Tags of
specific composite scenarios can be obtained through composite rules.
Prerequisites Rules of the system have been configured Updating the Rule Knowledge Base File.
Customer Insight INTERNAL
2017-09-07 Huawei confidential. No spreading without permission. Page 39 of 51
Choose System > System Maintenance > Multi-tenant, click the Staff Info tab, and add employee
bdi4ci to tenant hwcdm.
Choose System > Role and Permission > Role, click BDI4CI in the navigation tree on the left, and
configure data permissions for BDI4CI. On the Data Permission tab page, set Data Permission to
MetaData Package, select CombinationTag, and configure the View, Edit, and Release operation
permissions.
Context
Composite rules can be defined by time, location, app, web page, Internet behavior, and behavior object
based on the site requirements. For example, the Users watching American TV at midnight rule is a
composite rule configured based on the time and behavior objects.
The following describes how to configure the Users watching American TV at midnight rule.
Procedure
Log in to the Portal as the administrator.
Click Intelligent Analysis and choose Customer Insight > Knowledge Discovery Management > Composite
Rule Configuration to access the composite rule configuration page.
Create a composite rule and configure the rule information.
a. Click Add.
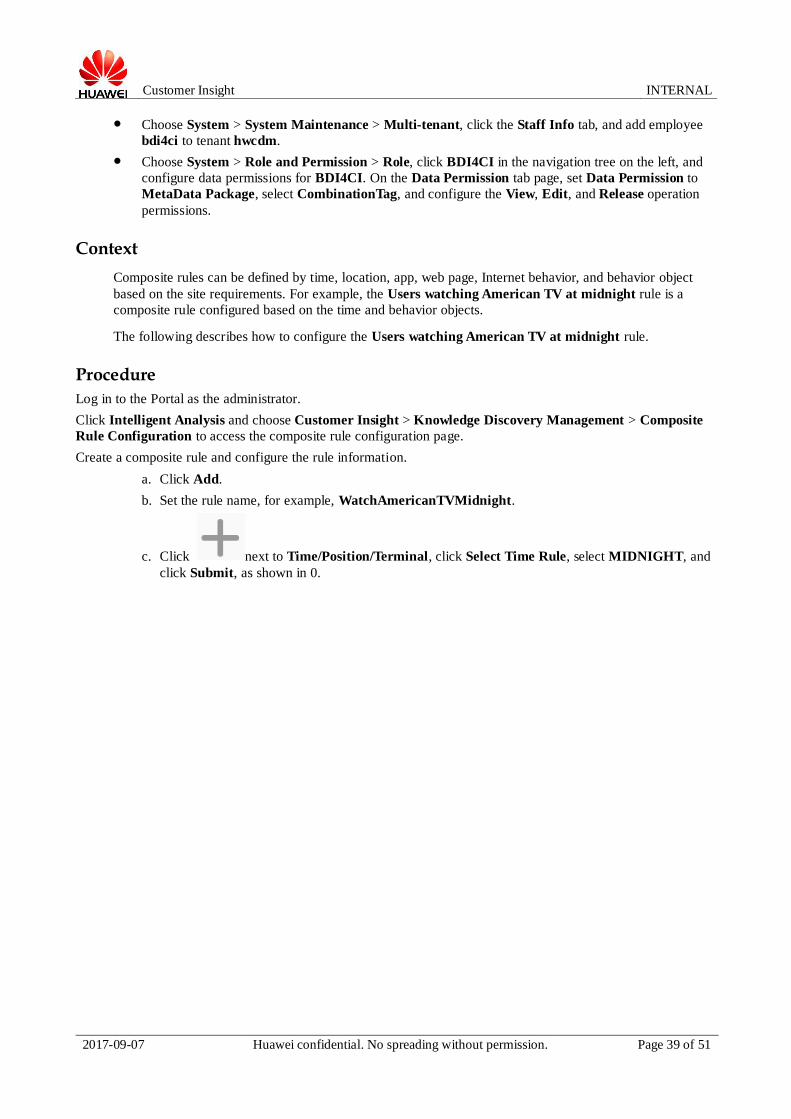
b. Set the rule name, for example, WatchAmericanTVMidnight.
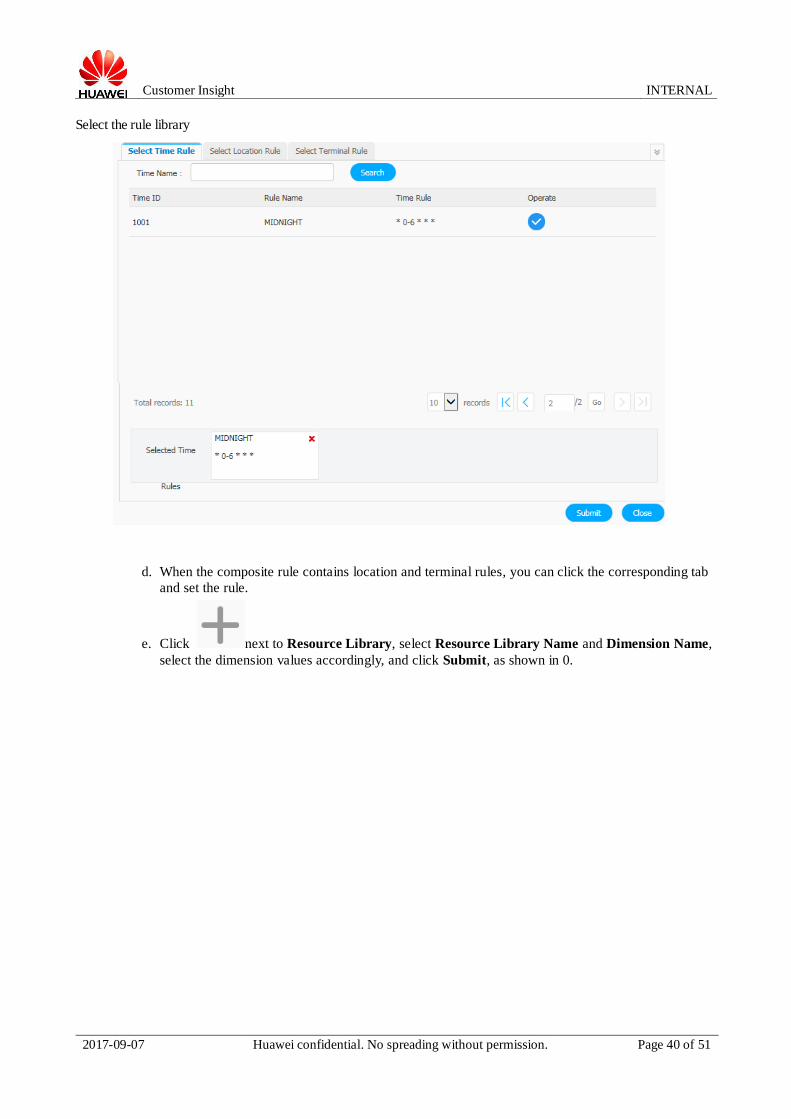
c. Click next to Time/Position/Terminal, click Select Time Rule, select MIDNIGHT, and
click Submit, as shown in 0.
Customer Insight INTERNAL
2017-09-07 Huawei confidential. No spreading without permission. Page 40 of 51
Select the rule library
d. When the composite rule contains location and terminal rules, you can click the corresponding tab
and set the rule.
e. Click next to Resource Library, select Resource Library Name and Dimension Name,
select the dimension values accordingly, and click Submit, as shown in 0.

Customer Insight INTERNAL
2017-09-07 Huawei confidential. No spreading without permission. Page 41 of 51
Selecting the resource library
f. You can click cat hot to filter areas and obtain hot areas.
When the composite rule contains app and website rules, you can click the corresponding
and set the rule.
g. Click Submit and save the composite rule information.
The composite rule is displayed on the page after being successfully created.
You can click Data Governance on the Portal, choose Data Integration > Data Integration
Flow > Flow Configuration, and view the control flow for the newly created composite flow
under Flow Package > combination Tag.
Configure the flow scheduling time and data start time of the flow, and then release and execute the
flow.
a. Click next to the newly created composite rule.

Customer Insight INTERNAL
2017-09-07 Huawei confidential. No spreading without permission. Page 42 of 51
b. Configure the scheduling time and data start time and click Release, as shown in 0.
Selecting the resource library
c. In the preceding figure:
Scheduling Time: next execution time and expiration time.
Data Start Time: data time for next execution. For hourly scheduling, set it to a time 2 hours later
than the next execution time.
After the rule is released, the composite rule configuration page is displayed.
You can click to view the composite rule details or click to delete the composite rule.
Customer Segment Analysis
In a specified service scenario, the system analyzes the target customer segment, extracts key
characteristics, and selects an existing customer segment or creates a customer segment for marketing. The
configuration process is as follows:
Add a service scenario.
Analyze the customer segment characteristics.
Extract key characteristics of the target customer segment and the customer segment to be analyzed.
Plan a marketing activity.
Select a proper customer segment or create a customer segment based on the key characteristics,
configure the marketing policy, and optimize the marketing policy by evaluating the marketing effect.
Evaluate the model effect.
Evaluate the effect of the service scenario model in different periods.
Adding a Service Scenario
Analyzing Customer Segment Characteristics
After a service scenario is created and analyzed, you can view the impact factors and their percentages of
Customer Segment to Analyze. You can also add some rule conditions to analyze Converted Customer
Segment.
Planning a Marketing Activity

Customer Insight INTERNAL
2017-09-07 Huawei confidential. No spreading without permission. Page 43 of 51
After key customer segment characteristics are analyzed, you can select a proper customer segment or
create customer segment to configure the marketing policy and evaluate the marketing effect.
Evaluating the Model Effect
You can evaluate the model prediction effect to check whether the model optimization effect is gradually
improved and compare the model effects in different periods and different probabilities.
Adding a Service Scenario
Prerequisites
A proper customer segment exists.
Procedure
Choose Customer Insight > Segment > Segment Analysis.
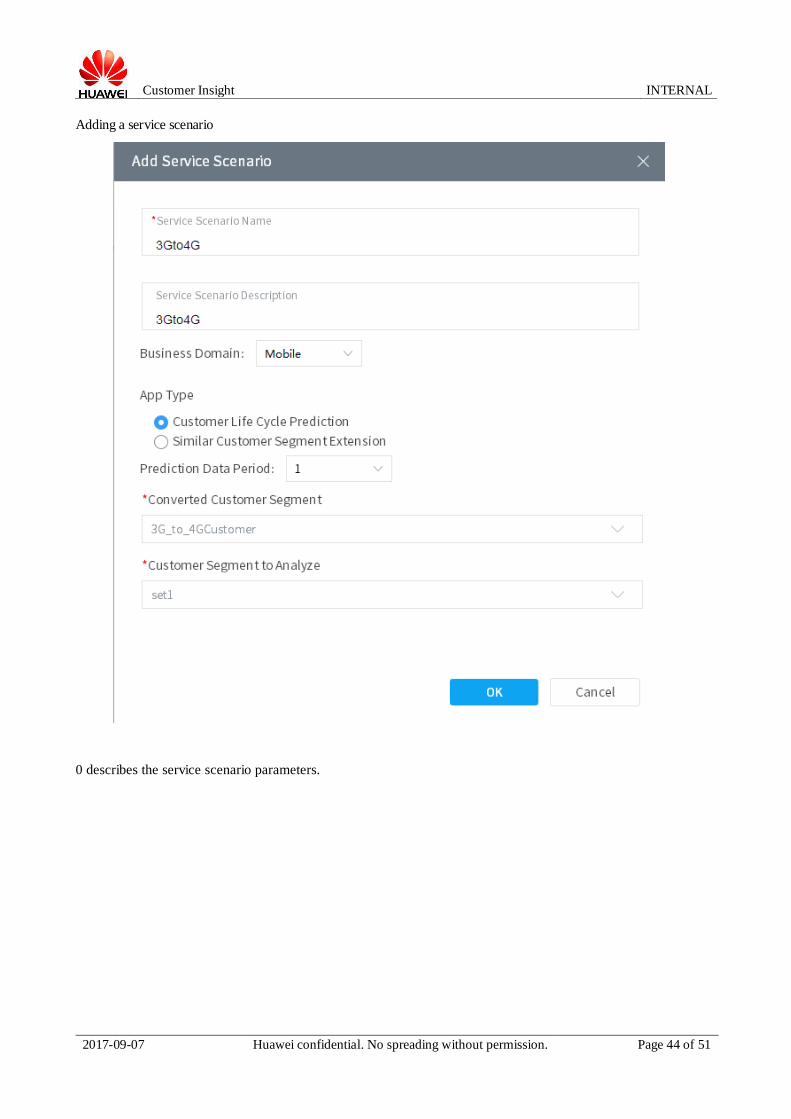
Click Add Service Scenario and set related parameters, as shown in 0.
Customer Insight INTERNAL
2017-09-07 Huawei confidential. No spreading without permission. Page 44 of 51
Adding a service scenario
0 describes the service scenario parameters.

Customer Insight INTERNAL
2017-09-07 Huawei confidential. No spreading without permission. Page 45 of 51
Service scenario parameters
Parameter Setting
App Type Scenario type. The options are as follows:
● Customer Life Cycle Prediction: The Converted Customer Segment is
used as a positive example and Customer Segment Not Converted is used as
a negative example. The factors that affect the conversion result are analyzed
to predict the conversion tendency of Customer Segment to Analyze and
perform corresponding marketing.
● Similar Customer Segment Extension: The Converted Customer Segment
is used as an example to analyze similar factors of Customer Segment to
Analyze, find the factors that affect the conversion result, and perform
corresponding marketing.
Prediction Data
Period
Interval for performing prediction analysis or similarity analysis for Customer
Segment to Analyze. The unit is the same as the data period unit of Customer
Segment to Analyze.
Click OK.
After the service scenario is added, the system automatically starts analysis. If Finished is displayed
in the service scenario, the analysis is successfully completed.
Analyzing Customer Segment Characteristics
After a service scenario is created and analyzed, you can view the impact factors and their percentages of
Customer Segment to Analyze. You can also add some rule conditions to analyze Converted Customer
Segment.
Prerequisites
The service scenario has been analyzed.
Procedure
Choose Customer Insight > Segment > Segment Analysis.
Click the service scenario. The Service Monitoring and Problem Analysis page is displayed.
In the Impact Factor Analysis area, select the data period and view the impact factors and their percentages for
Customer Segment to Analyze.
You can click a key characteristic sorted in the figure in Impact Factor Analysis to view the its
distribution, as shown in 0.

Customer Insight INTERNAL
2017-09-07 Huawei confidential. No spreading without permission. Page 46 of 51
Analysis result figure of Customer Segment to Analyze
In the Select User Range to Analyze area, click , select an analysis attribute and set rule conditions to analyze
Customer Segment to Analyze, as shown in 0.
Setting rule conditions
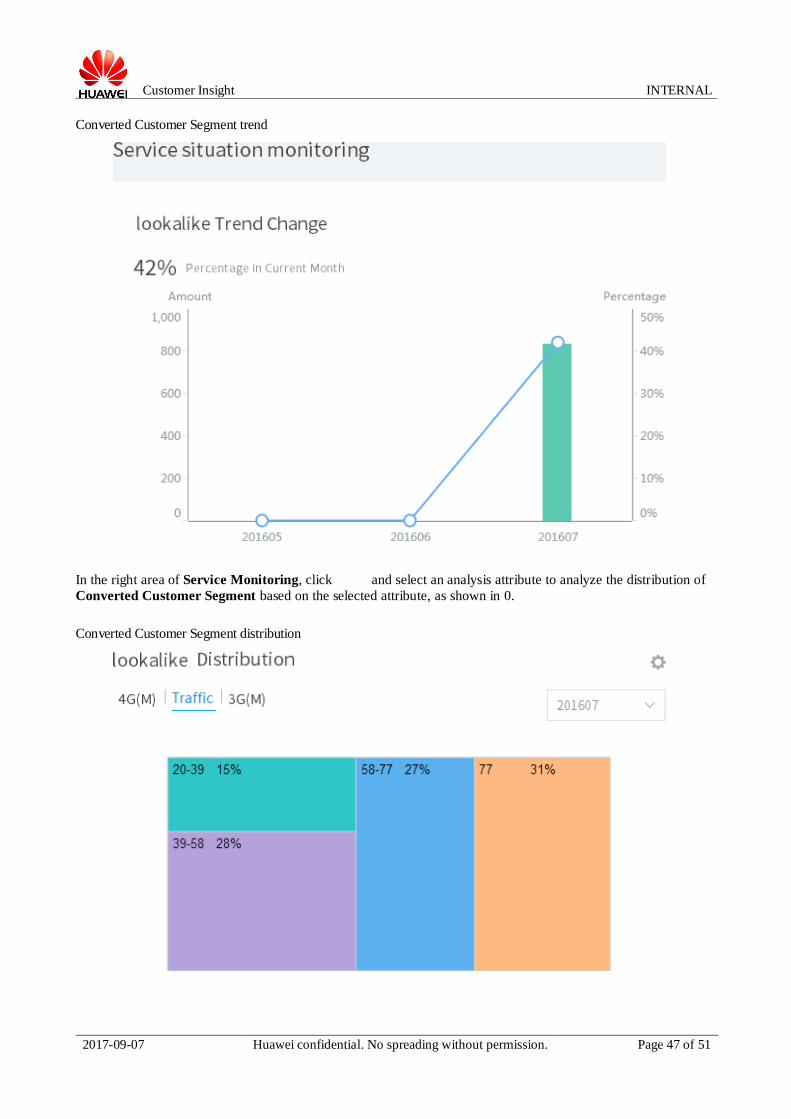
Click Analyze and view the customer quantity change trend of Converted Customer Segment in the Service
Monitoring and Problem Analysis area, as shown in 0.
Customer Insight INTERNAL
2017-09-07 Huawei confidential. No spreading without permission. Page 47 of 51
Converted Customer Segment trend
In the right area of Service Monitoring, click and select an analysis attribute to analyze the distribution of
Converted Customer Segment based on the selected attribute, as shown in 0.
Converted Customer Segment distribution

Customer Insight INTERNAL
2017-09-07 Huawei confidential. No spreading without permission. Page 48 of 51
Evaluating the Model Effect
You can evaluate the model prediction effect to check whether the model optimization effect is gradually
improved and compare the model effects in different periods and different probabilities.
Context Precision rate: prediction precision rate, that is, the rate of actually converted customers in predicted
customers to be converted to the predicted customers to be converted.
Calculation formula: [Predicted customers to be converted - (Customers in the target customer
segment - Customers in the control group)] ∩ Actually converted customers/[Predicted customers to
be converted - (Customers in the target customer segment - Customers in the control group)]
Recall rate: prediction range precision rate, that is, the rate of actually converted customers in
predicted customers to be converted to the actually converted customers.
Calculation formula: [Predicted customers to be converted - (Customers in the target customer
segment - Customers in the control group)] ∩ Actually converted customers/[Actually converted
customers - (Customers in the target customer segment - Customers in the control group)]
Customer segment concepts
Procedure
1. Choose Customer Insight > Segment > Segment Analysis.
Click the service scenario. The Service Monitoring and Problem Analysis page is displayed.
Click Model Effect Evaluation in the upper-right corner.
Adjust the probability in Model Effect Trend Analysis to view the precision rate and recall rate in different
periods and different probabilities.
In the Model Effect Comparative Analysis area, select a data period and view the comparison result in different
probabilities, as shown in 0.
If the predicted conversion probability change trend is in direct proportion to the actual conversion
probability change trend, the model is normal. You can determine the probability range where the
customers can be selected for creating a target customer segment based on the model effect in different
probability ranges.

Customer Insight INTERNAL
2017-09-07 Huawei confidential. No spreading without permission. Page 49 of 51
Evaluating the marketing effect
Reference
Logic Rules and Calculation Rules
Logic rules and calculation rules of tags or attributes need to be selected during tag or customer segment
rule creation. The calculation rule of a tag or attribute is related to the type of the tag or attribute. Therefore,
when defining a customer model, you need to check whether the calculation rule matches the current
attribute type.
Logic Rules
When creating a tag or customer segment rule, you can select two or more rules and set the relationship
between them to And or Or.
And: All selected rules need to be met.
Or: Only one of the selected rules needs to be met.
Logic rules

Customer Insight INTERNAL
2017-09-07 Huawei confidential. No spreading without permission. Page 50 of 51
1. Select two more rules and click Group. The logic rule relationships are displayed.
Click And(Meet all the conditions) and select logic rules.
Calculation Rules
0 describes the relationships between tag or attribute calculation rules and attribute types.
Calculation rules
NOTE For a 1:N attribute, the statistics types are as follows: (The 1:1 attribute indicates that a customer can have only one record in one statistical period, and the 1:N attribute indicates that a customer can have multiple records in one statistical period.)
Measurement attributes: None, historical cycle
Dimension attributes: None, historical cycle
Common attributes(Date): None, historical cycle
Common attributes(Text): None
In the figure, the LIKE operator indicates fuzzy search by specified characters. The attribute value
next to LIKE contains characters and wildcards.
Customer Insight INTERNAL
2017-09-07 Huawei confidential. No spreading without permission. Page 51 of 51
− If the attribute value next to LIKE contains only characters and does not contain the wildcard (%),
LIKE %Character string% is used during execution.
− If the attribute value next to LIKE contains characters and the wildcard (%), the attribute value is
used during execution.
For example, if Terminal model (month) (201510) LIKE MH is configured, the system executes
Terminal model (month) (201510) LIKE %MH%, and this command queries customers whose terminal
model name contains the MH characters. For example, if Terminal model (month) (201510) LIKE
MH% is configured, the system executes Terminal model (month) (201510) LIKE MH%, and this
command queries customers whose terminal model name starts with the MH characters.
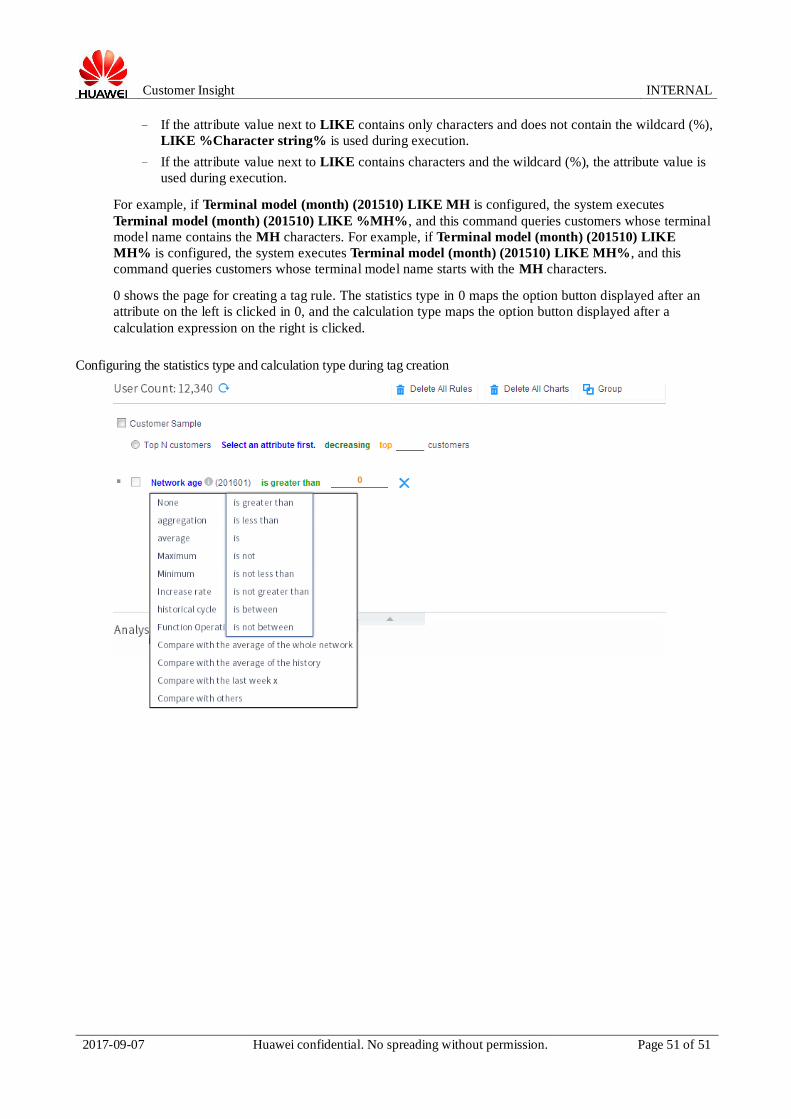
0 shows the page for creating a tag rule. The statistics type in 0 maps the option button displayed after an
attribute on the left is clicked in 0, and the calculation type maps the option button displayed after a
calculation expression on the right is clicked.
Configuring the statistics type and calculation type during tag creation