
Curriculum resource module Pre-primary Water flow
46
Curriculum resource module Pre-primary Water flow
Transcript of Curriculum resource module Pre-primary Water flow

Curriculum resource module
Pre-primary
Water flow

Acknowledgements The STEM Learning Project is funded by the Western Australian Department of Education (the
Department) and implemented by a consortium in STEM education comprising the
Educational Computing Association of Western Australia, the Mathematical Association of
Western Australia, the Science Teachers Association of Western Australia and Scitech.
We acknowledge and thank the teachers and schools who are the co-creators of these
resources.
Copyright and intellectual property The copyright and intellectual property of this module remain the property of the
Department.
Any Western Australian Curriculum content in this resource is used with the permission of the
School Curriculum and Standards Authority (the Authority); this permission does not constitute
Authority endorsement of the resource. The Authority accepts no liability for any errors or
damages arising from reliance on its content.
The Western Australian Curriculum content may be freely copied, or communicated on an
intranet, for non-commercial purposes in educational institutions, provided that the Authority
is acknowledged as the copyright owner. Copying or communication for any other purpose
can be done only within the terms of the Copyright Act 1968 or with prior written permission
of the Authority. Any Australian Curriculum content in the Western Australian Curriculum is
used by the Authority under the terms of the Creative Commons Attribution NonCommercial
3.0 Australia licence.
Any content on the www.scsa.wa.edu.au domain that has been derived from the Australian
Curriculum may be used under the terms of Creative Commons Attribution-NonCommercial
3.0 Australia licence.
Appendix 2: General capabilities continuums are adapted from ACARA, © Australian
Curriculum, Assessment and Reporting Authority (ACARA) 2009 to present, unless otherwise
indicated. This material was downloaded from the ACARA website (www.acara.edu.au)
(accessed December 2015) and was not modified. The material is licensed under CC BY
4.0 (https://creativecommons.org/licenses/by/4.0/). ACARA does not endorse any product
that uses ACARA material or make any representations as to the quality of such products.
Any product that uses material published on this website should not be taken to be affiliated
with ACARA or have the sponsorship or approval of ACARA. It is up to each person to make
their own assessment of the product.
This resource includes references and examples of iOS, Android and other apps. The
Department does not endorse or recommend any commercial products and simply provides
these as examples for teachers.
The Department is committed to providing quality information to its customers. Whilst every
effort has been made to ensure accuracy, currency and reliability of the information within
these documents, the Department accepts no responsibility for errors, omissions or
amendments made since the time of publishing. Confirmation of information may be sought
from the Department or the originating bodies providing the information. The Department
has no control over the content of material published on websites to which users are referred
in this resource. It is the responsibility of the internet user to make their own decision as to the
relevancy, accuracy, currency and reliability of information found on those sites.
Attributions: Microsoft Word, Google, Google Earth

P a g e | 1
© Department of Education Western Australia 2018: Version 1.0 – October 2018
Table of contents
The STEM Learning Project ...................................................................................................... 2
Overview ................................................................................................................................... 3
Activity sequence and purpose ............................................................................................ 6
Background .............................................................................................................................. 7
Activity 1: Water transport race............................................................................................. 9
Activity 2: Slopes and angles ............................................................................................... 14
Activity 3: Marble fun run ...................................................................................................... 19
Activity 4: Sharing our findings ............................................................................................. 24
Appendix 1: Links to the Western Australian Curriculum ....Error! Bookmark not defined.
Appendix 2: General capabilities continuum ................................................................... 29
Appendix 3: Materials list ...................................................................................................... 31
Appendix 4: Design process guide ..................................................................................... 32
Appendix 5: Reflective journal ............................................................................................ 33
Appendix 6: Teacher resource sheet 1.1: Cooperative learning – Roles ...................... 34
Appendix 7: Teacher resource sheet 1.2: Cooperative learning – Think, Pair, Share .. 35
Appendix 8: Teacher resource sheet 1.3: Sample parent letter ..................................... 36
Appendix 9: Teacher resource sheet 3.1: Prototype troubleshooting ........................... 37
Appendix 10: Teacher resource sheet 4.1: 3 – 2 – 1 – Reflection .................................... 38
Appendix 11: Teacher resource sheet 4.2: Construction skills ......................................... 39

P a g e | 2
© Department of Education Western Australia 2018: Version 1.0 – October 2018
The STEM Learning Project
The aim of the STEM Learning Project is to generate students’ interest, enjoyment
and engagement with STEM (Science, Technology, Engineering and Mathematics)
and to encourage their ongoing participation in STEM both at school and in
subsequent careers. The curriculum resources will support teachers to implement
and extend the Western Australian Curriculum and develop the general capabilities
across Kindergarten to Year 12.
Why STEM?
A quality STEM education will develop the knowledge and intellectual skills to drive
the innovation required to address global economic, social and environmental
challenges.
STEM capability is the key to navigating the employment landscape changed by
globalisation and digital disruption. Routine manual and cognitive jobs are in
decline whilst non-routine cognitive jobs are growing strongly in Australia. Seventy-
five per cent of the jobs in the emerging economy will require critical and creative
thinking and problem solving, supported by skills of collaboration, teamwork and
literacy in mathematics, science and technology. This is what we call STEM
capability. The vision is to respond to the challenges of today and tomorrow by
preparing students for a world that requires multidisciplinary STEM thinking and
capability.
The approach
STEM capabilities are developed when students are challenged to solve open-
ended, real-world problems that engage students in the processes of the STEM
disciplines.

P a g e | 3
© Department of Education Western Australia 2018: Version 1.0 – October 2018
Pre-primary – Water flow
Overview
In this module, students discuss the importance of water and discover effective
ways of transporting it to meet personal and community needs.
What is the context?
Access to water is vital for sustaining life. All humans, plants and animals need
water, however, people may live long distances from water sources.
What is the problem?
How can we effectively transport water from a source to where it is needed?
How does this module support integration of the STEM disciplines?
Science
Science learning is addressed in Activities 1 and 2. Students describe water
sources, uses for water and ways in which water can be transported. They
investigate, observe and describe how and why a marble will roll downwards
(ACSSU005, ACSSU002).
Mathematics
Mathematics is addressed in Activities 1 and 3. Students compare volumes, speeds
and distances, and use mathematical language to describe these differences
(ACMMG006, ACMMG010).
Technology
The Technologies curriculum is addressed in Activities 1, 3 and 4. Students analyse
and annotate digital images to identify dams or other water sources in Activity
1and design, construct and evaluate a structure that can carry water over a
distance in Activities 3 and 4.
The Design process guide is included as a resource to provide assistance to
teachers in understanding the complete design process as developed in the
technologies syllabus.
P a g e | 4
© Department of Education Western Australia 2018: Version 1.0 – October 2018
General capabilities
There are opportunities for the development of general capabilities and cross-
curriculum priorities as students engage with Water flow. In this module, students:
Develop problem solving skills as they research the problem and its context
(Activity1); investigate parameters impacting on the problem (Activity 2);
imagine and develop solutions (Activity 3); and evaluate and communicate
their solutions to an audience (Activity 4).
Utilise creative thinking as they generate possible design solutions; and critical
thinking, numeracy skills and ethical understanding as they choose between
alternative approaches to solving the problem.
Utilise personal and social capability throughout the module as they
collaborate in generating solutions; adopt group roles; and reflect on their
group work capabilities.
Utilise a range of literacies and information and communication technologies
(ICT) capabilities as they make records of their work; and represent and
communicate their solutions to an audience using digital technologies in
Activity 4.
What are the pedagogical principles of the STEM learning modules?
The STEM Learning Project modules develop STEM capabilities by challenging
students to solve real-world problems set in authentic contexts. The problems
engage students in the STEM disciplines and provide opportunities for developing
higher order thinking and reasoning, and the general capabilities of creativity,
critical thinking, communication and collaboration.
The design of the modules is based on four pedagogical principles:
Problem-based learning
This is an underlying part of all modules with every module based around
solving an initial problem. It is supported through a four-phase instructional
model: research the problem and its context; investigate the parameters
impacting on the problem; design and develop solutions to the problem; and
evaluate and communicate solutions to an authentic audience.
Developing higher order thinking
Opportunities are created for higher order thinking and reasoning
through questioning and discourse that elicits students' thinking,
prompts and scaffolds explanations and requires students to justify
their claims. Opportunities for making reasoning visible through discourse are
highlighted in the modules with the icon shown here.

P a g e | 5
© Department of Education Western Australia 2018: Version 1.0 – October 2018
Collaborative learning
This provides opportunities for students to develop teamwork and leadership
skills, challenge each other’s ideas, and co-construct explanations and
solutions. Information that can support teachers with aspects of collaborative
learning is included in the resource sheets.
Reflective practice
Recording observations, ideas and one’s reflections on the learning
experiences in some form of journal fosters deeper engagement and
metacognitive awareness of what is being learned. Information that can
support teachers with journalling is included in the resource sheets.
These pedagogical principles can be explored further in the STEM Learning Project
online professional learning modules located in Connect Resources.

P a g e | 6
© Department of Education Western Australia 2018: Version 1.0 – October 2018
Activity sequence and purpose
Water transport race
Students discuss the importance of water and
consider how it might be transported from a
source to where it is needed.
Slopes and angles
Students are challenged to move a marble
as far as possible using ramps, exploring how
angles and speed impact the distance a
marble will travel.
Marble fun run
Students create a marble run as a model for
a water channel.
Students design, construct, test and improve
their models.
Sharing findings
Students critique their designs, reflect on what
they have learnt and communicate their
findings to an audience.
RESEARCH
Activity 1
INVESTIGATE
Activity 2
IMAGINE & CREATE
Activity 3
EVALUATE & COMMUNICATE
Activity 4

P a g e | 7
© Department of Education Western Australia 2018: Version 1.0 – October 2018
Background
Expected learning At the completion of this module, students will be able
to:
1. Describe some water sources and the uses for
water. Identify some ways in which water is
transported from sources to homes.
2. Investigate, observe and describe how a marble will
roll downwards.
3. Use mathematical language to describe
differences in volumes, speeds and distances.
4. Analyse Google Earth maps to identify features
such as dams and towns.
5. Design, construct and test a structure to carry
marbles from one point (the source of water) to
another (where the water will be used) and explain
how it could carry water.
6. Work efficiently in collaborative learning situations
to generate a solution.
Vocabulary There are opportunities during the module to develop
the following vocabulary: around, behind, between,
channel, curves, dam, design, down, far, farther,
farthest, force, forward, in front, long, longer, longest,
narrower, next to, on top, ramp, roll, shape, size, slope,
smooth, steep, steeper, steepest, straight, taller,
underneath,
A free positional language word wall can be
downloaded at www.twinkl.co.uk/resource/t-l-096-
positional-language-word-cards (Twinkl, 2017)
Timing There is no prescribed duration for this module. The
module is designed to be flexible enough for teachers
to adapt. Activities do not equate to lessons; one
activity may require more than one lesson to implement.
Consumable
materials
A Materials list is provided for this module. The list outlines
materials outside of normal classroom equipment that
will be needed to complete the activities.

P a g e | 8
© Department of Education Western Australia 2018: Version 1.0 – October 2018
Safety notes There are potential hazards inherent in these activities
and with the equipment being used, and a plan to
mitigate any risks will be required.
Potential hazards specific to this module include but are
not limited to:
cyber bullying and online privacy and protection.
Assessment The STEM modules have been developed to provide
students with learning experiences to solve authentic
real-world problems using science, technology,
engineering and mathematics capabilities. Appendix 1
indicates how the activities are linked to the Western
Australian Curriculum.
Evidence of learning from journalling, presentations and
anecdotal notes from this module can contribute
towards the larger body of evidence gathered
throughout a teaching period and can be used to
make on-balance judgements about the learning
demonstrated by the students in the science,
technologies and mathematics learning areas.
Students can further develop the general capability of
Personal and social capability. A General capabilities
continuum is included but is not intended for assessment
purposes.
P a g e | 9
© Department of Education Western Australia 2018: Version 1.0 – October 2018
Activity 1: Water transport race
Activity focus Students discuss the importance of water and consider how
it might be transported from a source to where it is needed.
Students are introduced to the importance of transporting
water in our everyday lives and the lives of others (eg
farmers, people in developing countries).
To experience how water transportation by hand leads to
the loss of water, time and human energy. Students take
part in a water race.
Background
information
Humans have basic needs including shelter, food and
water. Water is needed for drinking, cooking, washing and
for animals and plants. The ultimate source of water is
rainfall which can be collected in dams or water tanks or
flow into rivers.
In developed countries like Australia, it is common for water
to be gravity fed in pipes from dams or tanks to houses. In
many developing countries access to water is limited. It is
often the responsibility of women and children to walk long
distances to collect water and carry it to their homes each
day. Sometimes children cannot go to school because they
have to fetch water for the family. The World Vision video
Walking in Sabina’s Shoes illustrates the impact of water
carrying on women’s lives.
Instructional
procedures
Information on the significance of Western Australian water
ways and Aboriginal culture.
www.water.wa.gov.au/__data/assets/pdf_file/0007/3211/85
861.pdf
Expected learning Students will be able to:
1. Describe some sources and uses for water and ways in
which water is transported (Science).
2. Analyse Google Earth maps to identify features such as
dams and towns (Mathematics).
3. Compare volumes and use mathematical language to
describe differences (Mathematics).
P a g e | 10
© Department of Education Western Australia 2018: Version 1.0 – October 2018
Equipment required For the class:
Class reflective journal
Interactive whiteboard
Google Earth
Map of the school
Digital camera
Masking tape
Water
For the students:
Buckets or large plastic containers of equal size
Smaller containers for carrying water (eg yoghurt
containers)
Preparation To engage students in the concept of water, The Wonder
Thing (Libby Hathorn, 1995) could be read prior to the
lesson.
Preview the Walking in Sabina’s Shoes video and determine
how much of the video to share with students. The video is
thirteen minutes long, however many ideas are presented in
the first seven minutes.
Load Google Earth and locate local dams.
Collect and prefill containers for the water race and identify
a suitable location for the race.
It is suggested to send a parent letter informing them about
the STEM activity students will be undertaking. Explain the
duration of the activities, the resources and materials that
will be required as donations, and the times when parent
help will be required. See Teacher resource sheet 1.3:
Sample parent letter.
Create a space accessible to students in the classroom for
a word wall. Add new science, mathematics, and
technology and context specific language as it is
encountered.
Students will need scaffolding around how to interpret
maps.
Storage will be needed to be provided for collected
materials.

P a g e | 11
© Department of Education Western Australia 2018: Version 1.0 – October 2018
Activity parts Part 1: Investigating water sources
As a class, discuss the importance of water. Brainstorm and
create a class mind map.
Questions could include:
Why is water important?
How do we use water?
Take the students on a tour of the school to locate various
water points. Encourage students to take photos of water
points. Print and display photos or plot them on a map of
the school.
Examine Google Earth. Begin at the school and zoom out to
find the nearest dam.
Ask students to predict how the water supplies are
connected:
How does water travel from its source to our taps?
Explain that some places do not have water pipes. Discuss
how people get their water if there are no pipes.
As a class, watch the World Vision video Walking in Sabina’s
Shoes to illustrate how a woman in a developing country
travels each day to collect and carry water for her family.
Part 2: Water race
Explain to the students that they are going to have a water
race. Organise students into relay teams. Each team will
need one full bucket of water at one end of the race and
an empty bucket on the opposite end. They will also need
small containers to transport the water.
Mark the water level of the full bucket with masking tape to
demonstrate how full it is at the beginning of the race.
Each team will compete to transfer the water from their full
bucket to the empty bucket using the small containers.
Taking turns, team members will run to fill the empty
container and return to tag the next student in their team.
The race will continue until each bucket that was originally
full of water is empty. Students will need to consider speed
versus care, an open or closed container etc. The race may
be run a second time after discussion of these
considerations. Students will also need to determine the
criteria for a winning team, would it be time or efficiency?

P a g e | 12
© Department of Education Western Australia 2018: Version 1.0 – October 2018
Part 3: Water levels
At the end of the race, pour each team’s water back into
the original buckets and mark the new water level.
Compare the original and final water levels to determine
how much water was lost.
How has the water level changed?
Is there more water or less water after the race?
Where has the water gone?
Describe how the water levels are different between
the teams? Why are the water levels different?
Part 4: Class discussion
Back in the classroom, discuss what happened in the water
race.
Which team was the fastest? Why were they so fast?
Which team saved the most water? How do you know?
Why is wasting water a problem?
Was it a fair race?
Why would Sabina need to save water?
Do you think carrying water by hand works well? Why
and why not?
If we had to collect water by hand would we have time to
come to school or do other activities? How would this
impact us?
Part 5: Journalling
An A3 class floor book could be created to record student
learning and act as the first steps towards journalling. This
would be created by the teacher or teacher assistant and
look like photos of students working together on the
activities, along with annotations to capture thinking. Refer
to Reflective journal for elaborations.
A digital alternative is to use an app to create a journal (eg
Kidblog, Explain everything, Keynote, iBook). The digital
version could be uploaded to an app of choice, such as
Seesaw or Connect to share learning with the parent
community.
P a g e | 13
© Department of Education Western Australia 2018: Version 1.0 – October 2018
Digital resources Walking in Sabina’s Shoes (World Vision, 2010)
www.youtube.com/watch?v=-bEtqZoD4V4
Seesaw
web.seesaw.me
Connect – the DoE portal for teachers
connect.det.wa.edu.au
Kidblog
kidblog.org/home
Explain everything
explaineverything.com
Keynote
www.apple.com/au/keynote/
Resource sheets Teacher resource sheet 1.3: Sample parent letter
Literary resources The Wonder Thing (Libby Hathorn, 1995)

P a g e | 14
© Department of Education Western Australia 2018: Version 1.0 – October 2018
Activity 2: Slopes and angles
Activity focus Students are challenged to move a marble as far as
possible using ramps, exploring how angles, slope and
speed impact the distance a marble will travel.
This exercise connects how water travels from dams to our
houses.
Background
information
Scientists often use models to investigate phenomena as
this can be more efficient and convenient than testing in
the real world. In this activity, students work with marbles to
model the movement of water.
On a level surface a marble must be pushed in order to
move; the push force overcomes the inertia of the marble.
When a marble is placed on a slope, the Earth’s
gravitational pull causes the marble to roll in the same way
that water flows downhill. The gradient of a slope impacts
the movement of a marble. The steeper the slope, the
faster a marble will roll downward. If the slope is too steep,
the marble will fall and may not travel far once it hits the
ground. The key variables which affect the roll of a marble
are its shape, the texture of its surface, and the angle and
friction between the marble and the slope.
Instructional
procedures
Students will work in small groups and may respond well to
assigned team roles within their groups (see Teacher
resource sheet 1.1: Cooperative learning – Roles).
As students build ramp structures there will be many
opportunities to integrate vocabulary.
Students may use positional language as they negotiate
the use of materials with team members (on top of,
underneath, in front of, behind, next to, between).
They may use movement vocabulary to explain to a peer
how their marble travels on their design (roll, down,
forwards, around, curves, straight).
Students can use measurement vocabulary to describe
how far their marble travelled in comparison to other teams
(far, farther). They may connect the distance travelled by
the marble to the length and gradient of a slope (long,
longer, longest, steep, steeper, and steepest).

P a g e | 15
© Department of Education Western Australia 2018: Version 1.0 – October 2018
Questioning can be used to guide students as they predict,
test, measure and then communicate their findings.
Example questions include:
Predict: What do you think will happen if you make the
slope steeper, narrower or taller?
Test: What happened after you made changes? Did it
improve your marble run to make your marble go further?
Why or why not?
Measure: How far did your marble run? How can you
measure this?
Expected learning Students will be able to:
1. Investigate, observe and describe the conditions under
which a marble will roll over a long distance (Science).
2. Use every day language to describe the differences in
speeds and distances rolled by marbles under different
conditions (Mathematics).
Equipment required For the class:
Class reflective journal
Interactive whiteboard and internet access
Coloured string or streamers
Large sticky notes
For the students:
A marble
A variety of materials such as wooden blocks, planks, card,
cardboard tubes, paper streamers.
Preparation In the weeks leading up to this activity, collect materials for
students to create their designs.
Prepare the classroom by arranging furniture to create
appropriate space for students to build their marble runs.
Students may wish to attach their marble runs to furniture.
Activity parts Part 1: Investigating materials and angles
Through whole class discussion, review learning from
Activity 1 about the need to move water from a source to
people’s homes.

P a g e | 16
© Department of Education Western Australia 2018: Version 1.0 – October 2018
Explain to the students that they will investigate and model
the movement of water by designing and building
structures to move a marble as far as they can without
pushing it. Discuss why marbles will be used instead of
water.
Show students the materials available and allow time for
them to design, build, share and test their ideas. After the
groups have explored how to maximise the roll of their
marble, each team will use a streamer to measure how far
their marble travelled. This does not include the ramp. Cut
the streamer to the correct length representing the
distance travelled. Label streamers with each group’s
name and measure lengths in centimetres.
Lay the streamers on the floor to make a ‘column’ graph
and ask the students to compare the lengths.
Which streamer is the longest?
Why did this marble travel so far?
Which streamer is the shortest?
Why did this marble not travel far?
Ask the students:
What do you need to do to make the marble roll the
furthest? Why?
Explore reasoning with the prompt: Because…
Part 2: Ramps
Use a search engine to search for ‘ramps’ and click on
some images to observe, analyse and discuss. Involve the
students in the searching process to build student capacity.
Through a think, pair, share activity students discuss the
following questions (Teacher resource sheet 1.2:
Cooperative learning – Think, Pair, Share).
Why do we use ramps?
What are some different ramps you have seen? (eg
rollercoaster, skate park, wheelchair ramps, stream
flowing downhill)
Model a ramp using a piece of card and a marble.
Demonstrate by lifting one side of the card to make the
marble move. Discuss how the spherical shape of the
marble enables it to roll. Model positional language to
describe how the card and marble are moving. Prompt
students to recognise that things roll or slide downwards on
ramps.

P a g e | 17
© Department of Education Western Australia 2018: Version 1.0 – October 2018
Questions could include:
How do all of these ramps work?
Which way do things move on these ramps? Why?
Could we use a ramp to transport water to our homes?
Why?
Record students' answers in the class reflective journal.
Additional learning experiences: Marble painting
This activity could be undertaken to further develop the
mathematic concept of angles and slopes. Students could
predict patterns based on how they think the marbles will
roll.
Materials:
Marbles
Activity paint
Muffin tin, egg carton or small bowls to hold paint
Spoons
Paper
Shallow cardboard box (A4 photocopy paper box lid) or a
baking dish lined with white paper
Steps:
1. Drop the marbles in the paint colour of choice.
2. Mix them around to coat them with paint then transfer
them to the cardboard box.
3. Lift and tilt the cardboard box to move the marbles
around, leaving paint trails behind.
Alternatively, squeeze the paint directly into the
cardboard box lid.
Part 3: Journalling
With assistance, students draw and label their marble run
on a sticky note to go into the class reflective journal.
Record each team’s distance next to the sticky notes.
Add digital photos to the class reflective journal and scribe
students' comments to record the thinking process behind
their designs.

P a g e | 18
© Department of Education Western Australia 2018: Version 1.0 – October 2018
Resource sheets Teacher resource sheet 1.1: Cooperative learning – Roles
Teacher resource sheet 1.2: Cooperative learning – Think,
Pair, Share
Digital resources Positional language word wall
www.twinkl.co.uk/resource/t-l-096-positional-language-
word-cards (Twinkl, 2017)

P a g e | 19
© Department of Education Western Australia 2018: Version 1.0 – October 2018
Activity 3: Marble fun run
Activity focus Students create a marble run as a model for a water
channel. Students design, construct, test and improve their
models.
Background
information
This activity engages students in an engineering design
process to develop, produce and evaluate a model of a
structure that could be used to transport water.
Marbles are used to model the flow of water in the same
way that engineers use models in designing and testing
structures. Engineers must first analyse and understand the
problem, imagine possible approaches, plan what will be
done, design the structure, test and improve the structure,
and then document and communicate their solution to the
client.
The key principle that should inform the design is that water
will naturally flow downwards under its own weight. The
structure should therefore have a continuous downward
slope from source to home. Given that it is often not
possible to build a water channel in a straight line, the
design needs to allow for the water to flow around bends
without spilling from the channel.
Instructional
procedures
Students will need assistance with cutting and joining skills.
Parent help or buddy class support will need to be
arranged. See Teacher resource sheet 4.2: Construction
skills.
Decide how materials will be shared and distributed among
students and if each team will receive the same materials.
Alternatively, allow each team to have a certain number of
materials that they can choose.
Expected learning Students will be able to:
1. Design, construct and test a structure to carry marbles
from one point (the source of water) to another (where
the water will be used) (Technologies).

P a g e | 20
© Department of Education Western Australia 2018: Version 1.0 – October 2018
Equipment required For the class:
Class reflective journal
Interactive whiteboard with internet
Variety of recycled materials of different shapes, colours,
sizes and textures
Construction materials as outlined in Appendix 3
For the students:
Variety of cardboard tubing
Masking tape
Scissors
Egg cartons
Shoe boxes
Pre-cut paper plates (these need to have a curved edge
that a marble can roll in)
Plastic straws
Paper cups
Hollow pool noodles cut lengthwise
Moulding and tubing
Construction paper for securing towers
Preparation Decide on the scale of the structures the students will build
and the distances over which the marbles will run as this will
determine the types and quantity of materials required. The
marble runs could be one to two metres long or as short as
a track glued onto the back of a shoebox lid.
Organise work spaces for students to create solutions,
ensuring easy access of construction materials. Small group
rotation activities may be the best way to accommodate
for this, with one adult at each table of three to four
students.
Teacher resource sheet 4.2: Construction skills provides a
scaffold for developing construction skills and is suggested
to be displayed in an area accessible to students.
Additional learning experience:
Students could use plasticine to create water channels on a
water play table and use watering cans to observe water
flow.

P a g e | 21
© Department of Education Western Australia 2018: Version 1.0 – October 2018
Activity parts Part 1: Researching water transportation
Review the variables (eg gradient, material, length) that
influenced the distance moved by the marbles in Activity 2.
Discuss how these apply to the transport of water.
Watch videos showing examples of how we transport water
in Western Australia (Mundaring Weir and the Golden
Pipeline), and the video showing how an ancient civilisation
(Machu Picchu) transported and controlled the flow of
water using water channels.
Discuss the importance of sustainability and conserving
water.
Part 2: Design
Explain to students that they are going to design, construct
and test a model of a structure that could be used to
transport water. Marbles will be used to model the flow of
water. The model must safely transport a marble over a
stated distance to a destination (paper bowl or cup) and
have at least one bend in the path.
Ask students how they will work as a team and how they will
choose ideas.
Provide students with time to discuss designs, how they
would make the model and the materials they will use. As a
class, share ideas in a brainstorming session before groups
finalise their plans and start construction work.
Part 3: Construct
Students begin constructing their marble runs. Teacher
resource sheet 4.2: Construction skills is a useful resource for
this activity.
As students are completing their design, ask them to explain
their ideas:
Where will it start and finish?
Why is this end higher?
How do you plan to make a bend in the marble run?
How will you join your materials?
How will you stop your marble falling out of your marble
run?

P a g e | 22
© Department of Education Western Australia 2018: Version 1.0 – October 2018
If a group is experiencing difficulty, ask:
What is not working? Why?
How can you fix it?
Encourage teamwork and persistence.
Take digital photos to document the students’ work.
Students are encouraged to follow the Design process
guide throughout their work, seeking and applying
feedback at any stage to enhance their solution. These
refinements should be captured on camera along with
student thinking and justifications. Anecdotal notes can be
recorded using Teacher resource sheet 3.1: Prototype
troubleshooting.
Part 4: Test
Test each marble run to see if it delivers a marble safely to a
destination. Talk about each test being fair by using the
same marble and releasing it at the top, not pushing it.
After each attempt guide student thinking through
questioning to evaluate the success of their solution.
Practice wait time and encourage deeper thinking, using
because and why as prompts:
Did your solution deliver the marble to the
destination? Why or why not?
Is there anything you would change? Because…
What worked well on your design? Because…
Asking these questions will give students an opportunity to
critically analyse their work, further engaging them with the
design process.
Students take turns to show their work and describe the
thinking behind their design. Encourage the development
of cooperative skills such as listening and taking turns to talk
when sharing. Discuss whole body listening and how it is
important to show respect when others are talking.
After each presentation ask students to give verbal
feedback on what they found interesting about each
team’s design. Record the experiences in the class
reflective journal or on sticky notes.
Note: Students do not have to apply the change but should
be given the opportunity for feedback and making
informed decisions. This will encourage teamwork and
interaction.

P a g e | 23
© Department of Education Western Australia 2018: Version 1.0 – October 2018
Resource sheets Teacher resource sheet 3.1: Prototype troubleshooting
Teacher resource sheet 4.2: Construction skills
Digital resources Marble run (STEM Projects, 2014)
www.youtube.com/watch?v=fDiIfPD52QQ
Mundaring Weir Western Australia (Andy Ballard, 2016)
www.youtube.com/watch?v=5Qfqq_GRHG0
Golden Pipeline Trail (theatretwitt, 2011)
www.youtube.com/watch?v=SAGsPOSGMpA
Machu Picchu Water Management System (Randy A, 2014)
www.youtube.com/watch?v=9hlg2sYN0yY
Please note the dialogue in this video will be difficult for the
students to understand. It is suggested that the teacher
commentates while watching the video on mute.

P a g e | 24
© Department of Education Western Australia 2018: Version 1.0 – October 2018
Activity 4: Sharing our findings
Activity focus Students critique their designs, reflect on their learning and
communicate their findings to an audience.
Instructional
procedures
Students engage in reflection, evaluation and
communication of their thinking about how their model
works. Students think about how the design was changed
for improvements and the scientific basis of the design (ie
that the channel has to have a downward slope to allow
the marble or water to roll down under the influence of
gravity).
Expected learning Students will be able to:
1. Explain how marbles roll and water will flow down a
slope from the source to where it can be used
(Science).
2. Evaluate a structure designed to carry water over a
distance (Technologies).
Equipment required For the class:
Class reflective journal
For the students:
Pencils
Photo of their group’s model and design solutions from
Activity 3
Preparation For each student, print out a picture of their group’s model,
ensuring there is enough white space to annotate the
photo.
Alternatively, provide materials for students to draw and
label their design, identifying the slope and channels.
Invite a suitable audience such as a plumber or a Water
Corporation representative, to listen to the students'
evaluation.

P a g e | 25
© Department of Education Western Australia 2018: Version 1.0 – October 2018
Activity parts Part 1: Class reflection
Through whole class discussion, reflect on Activity 3. Discuss
problems groups encountered and how students solved
these problems.
Did they follow the design process by testing and making
modifications?
Revisit vocabulary students developed from Activity 1 (eg
channel, pipe and slope). Is there any new vocabulary to
add?
Part 2: Group reflection
Provide each student with a photo of their model.
Encourage students to draw a face to indicate how they
felt about the design (eg happy, unsure or sad). This is an
opportunity to assess each student’s ability to engage in the
design process and to evaluate the success of their design.
Ask the students if they had any problems with their design
and ask them to explain the solution they found. Record
answers in the class reflective journal or use a digital device.
Suggested questioning prompts:
Why did the marble roll along your model?
What part of your model worked?
What part of your model didn’t work? Why? How was it
fixed?
Which group’s design worked best? How do you know?
Collate group’s data using an app of choice to show the
learning journey the children have experienced. This can be
shared with the parent community using a digital platform
such as Connect.
Reflect on student learning using Teacher resource sheet
4.1: 3 – 2 – 1 – Reflection.
Part 3: Journalling
Review the module using the class reflective journal to
promote discussions. Begin by asking the class what they
learnt and add these answers to the class’s brainstorm from
Activity 1.

P a g e | 26
© Department of Education Western Australia 2018: Version 1.0 – October 2018
Use a different coloured pen or different coloured sticky
notes to distinguish what they have learnt from prior
knowledge.
Ask the students what they have enjoyed about the
activities. Ask the students to reflect on how well they have
worked in groups.
Encourage students to:
Explain their learning journey.
Explain the IT tools used.
Explain thinking and demonstrate solution.
Part 4: Take it outside
Students could take their model water channels outside
and pour water down them to see how they work. Note
that this may damage their structures if not made with
waterproof materials.
Additional learning
experience
Excursion or incursion related to the work of the Water
Corporation or Mundaring Weir.
Resource sheets Teacher resource sheet 4.1: 3 – 2 – 1 – Reflection

P a g e | 27
© Department of Education Western Australia 2018: Version 1.0 – October 2018
Appendix 1A: Links to the Western Australian Curriculum
The Water flow module provides opportunities for developing students’ knowledge
and understandings in science, technologies and mathematics. The table below
shows how this module aligns to the content of the Western Australian Curriculum
and can be used by teachers for planning and monitoring.
WATER FLOW
Links to the Western Australian Curriculum
ACTIVITY
1 2 3 4
SCIENCE
SCIENCE UNDERSTANDING
Physical sciences: The way objects move depends on a
variety of factors, including their size and shape
(ACSSU005)
Biological sciences: Living things have basic needs,
including food and water (ACSSU002)
DESIGN AND TECHNOLOGIES
PROCESS AND PRODUCTION SKILLS
Designing: Generate and record design ideas through
describing, drawing, modelling and/or a sequence of
written or spoken steps.
Producing and implementing: Use given components and
equipment to safely make simple solutions.
Collaborating and managing: Work independently, or with
others when required, for solutions.
MATHEMATICS
MEASUREMENT AND GEOMETRY
Using units of measurement: Use direct and indirect
comparisons to decide which is longer, heavier or holds
more, and explain reasoning in everyday language
(ACMMG006)
Further information about assessment and reporting in the Western Australian
Curriculum can be found at: https://k10outline.scsa.wa.edu.au/home

P a g e | 28
© Department of Education Western Australia 2018: Version 1.0 – October 2018
Appendix 1B: Mathematics proficiency strands
Source:
www.australiancurriculum.edu.au/f-10-curriculum/mathematics/key-
ideas/?searchTerm=key+ideas#dimension-content
Key ideas
In Mathematics, the key ideas are the proficiency strands of understanding, fluency,
problem-solving and reasoning. The proficiency strands describe the actions in which
students can engage when learning and using the content. While not all proficiency strands
apply to every content description, they indicate the breadth of mathematical actions that
teachers can emphasise.
Understanding
Students build a robust knowledge of adaptable and transferable mathematical concepts.
They make connections between related concepts and progressively apply the familiar to
develop new ideas. They develop an understanding of the relationship between the ‘why’
and the ‘how’ of mathematics. Students build understanding when they connect related
ideas, when they represent concepts in different ways, when they identify commonalities
and differences between aspects of content, when they describe their thinking
mathematically and when they interpret mathematical information.
Fluency
Students develop skills in choosing appropriate procedures; carrying out procedures flexibly,
accurately, efficiently and appropriately; and recalling factual knowledge and concepts
readily. Students are fluent when they calculate answers efficiently, when they recognise
robust ways of answering questions, when they choose appropriate methods and
approximations, when they recall definitions and regularly use facts, and when they can
manipulate expressions and equations to find solutions.
Problem-solving
Students develop the ability to make choices, interpret, formulate, model and investigate
problem situations, and communicate solutions effectively. Students formulate and solve
problems when they use mathematics to represent unfamiliar or meaningful situations, when
they design investigations and plan their approaches, when they apply their existing
strategies to seek solutions, and when they verify that their answers are reasonable.
Reasoning
Students develop an increasingly sophisticated capacity for logical thought and actions,
such as analysing, proving, evaluating, explaining, inferring, justifying and generalising.
Students are reasoning mathematically when they explain their thinking, when they deduce
and justify strategies used and conclusions reached, when they adapt the known to the
unknown, when they transfer learning from one context to another, when they prove that
something is true or false, and when they compare and contrast related ideas and explain
their choices.
P a g e | 29
© Department of Education Western Australia 2018: Version 1.0 – October 2018
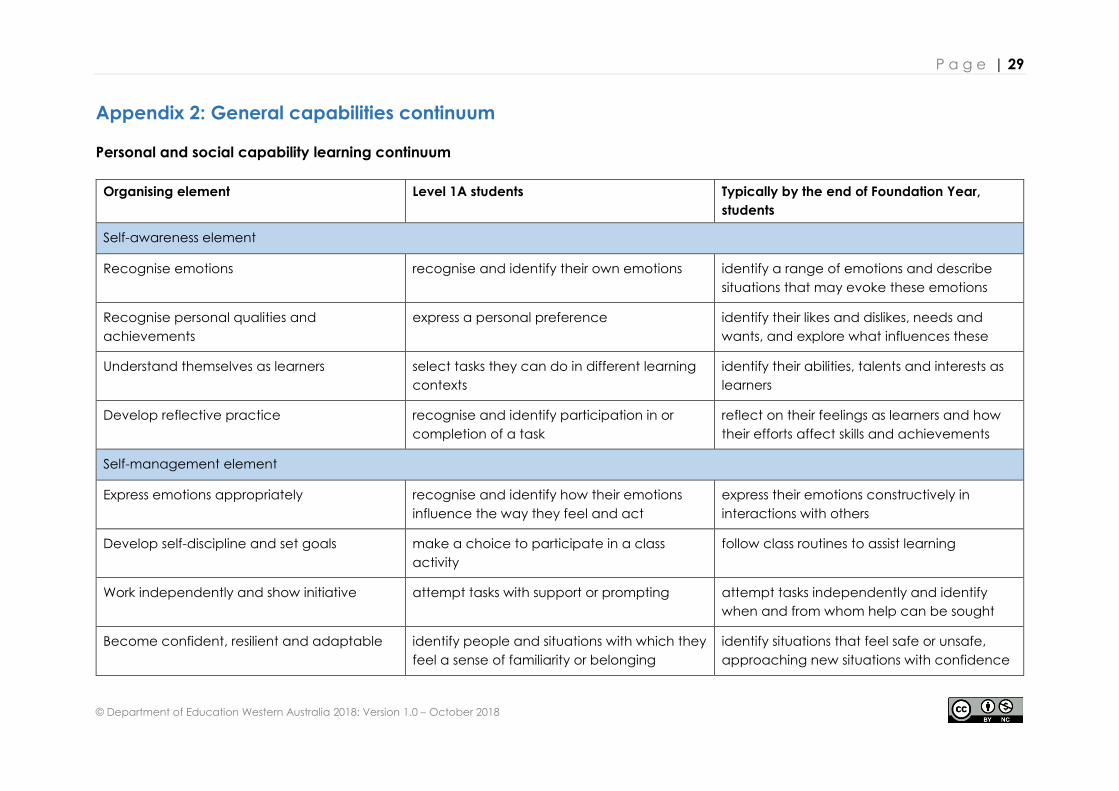
Appendix 2: General capabilities continuum
Personal and social capability learning continuum
Organising element Level 1A students Typically by the end of Foundation Year,
students
Self-awareness element
Recognise emotions recognise and identify their own emotions identify a range of emotions and describe
situations that may evoke these emotions
Recognise personal qualities and
achievements
express a personal preference identify their likes and dislikes, needs and
wants, and explore what influences these
Understand themselves as learners select tasks they can do in different learning
contexts
identify their abilities, talents and interests as
learners
Develop reflective practice recognise and identify participation in or
completion of a task
reflect on their feelings as learners and how
their efforts affect skills and achievements
Self-management element
Express emotions appropriately recognise and identify how their emotions
influence the way they feel and act
express their emotions constructively in
interactions with others
Develop self-discipline and set goals make a choice to participate in a class
activity
follow class routines to assist learning
Work independently and show initiative attempt tasks with support or prompting attempt tasks independently and identify
when and from whom help can be sought
Become confident, resilient and adaptable identify people and situations with which they
feel a sense of familiarity or belonging
identify situations that feel safe or unsafe,
approaching new situations with confidence

P a g e | 30
© Department of Education Western Australia 2018: Version 1.0 – October 2018
Social awareness element
Appreciate diverse perspectives show an awareness for the feelings, needs
and interests of others
acknowledge that people hold many points
of view
Contribute to civil society describe ways they can help at home and
school
Understand relationships explore relationships through play and group
experiences
Communicate effectively respond to the feelings, needs and interests
of others
identify positive ways to initiate, join and
interrupt conversations with adults and peers
Work collaboratively share experiences of cooperation in play and
group activities
Make decisions identify options when making decisions to
meet their needs and the needs of others
Negotiate and resolve conflict listen to others’ ideas, and recognise that
others may see things differently from them
Further information about general capabilities is available at:
k10outline.scsa.wa.edu.au/home/p-10-curriculum/general-capabilities-over/general-capabilities-overview/general-capabilities-in-
the-australian-curriculum

P a g e | 31
© Department of Education Western Australia 2018: Version 1.0 – October 2018
Appendix 3: Materials list
Materials needed for this module:
class reflective journal
interactive whiteboard with access to Google Earth or similar
masking tape
access to water
six buckets or large plastic containers of equal size
three smaller containers for carrying water (eg yoghurt containers)
lengths of coloured streamers
a variety of loose parts such as wooden blocks, pre-cut pool noodles, moulding
and tubing
a variety of cardboard tubing, scissors, egg cartons, shoe boxes, pre-cut paper
plates (these need to have a curved edge that a marble can roll in), plastic
straws, paper cups and construction paper
marbles.
An example of materials students may use to create their models

P a g e | 32
© Department of Education Western Australia 2018: Version 1.0 – October 2018
Appendix 4: Design process guide
Development
Ideation
Analysis
Finding useful and helpful information about the design problem.
Gathering information, conducting surveys, finding examples of
existing solutions, testing properties of materials, practical testing.
Understanding the meaning of the research findings.
Analysing what the information means, summarising the surveys,
judging the value of existing solutions, understanding test results.
Idea generation – turning ideas into tangible forms so they can be
organised, ordered and communicated to others.
Activities such as brainstorming, mind mapping, sketching, drawing
diagrams and plans, collecting colour samples and/or material samples
and talking through these ideas can help to generate more creative
ideas.
Using the SCAMPER model can assist with this:
www.mindtools.com/pages/article/newCT_02.htm
www.designorate.com/a-guide-to-the-scamper-technique-for-
creative-thinking
Development of the design ideas. Improvements, refinements, adding
detail, making it better.
Activities such as detailed drawings, modelling, prototyping, market
research, gaining feedback from intended user, further research – if
needed – to solve an issue with the design, testing different tools or
equipment, trialling production processes, measuring or working out
dimensions, testing of prototypes and further refinement.
Safe production of the final design or multiple copies of the final design.
Fine tuning the production process, such as division of labour for
batch or mass production.
Use of intended materials and appropriate tools to safely make the
solution to the design problem.
Reflection on the process taken and the success of the design.
Evaluation can lead to further development or improvement of the
design and can be a final stage of the design process before a
conclusion is reached.
Could be formal or informal and verbal or written.
Research
Production
Evaluation

P a g e | 33
© Department of Education Western Australia 2018: Version 1.0 – October 2018
Appendix 5: Reflective journal
When students reflect on learning and analyse
their own ideas and feelings, they self-evaluate,
thereby improving their metacognitive skills. When
students self-monitor or reflect, the most powerful
learning happens.
Journalling may take the form of a written or digital
journal, a portfolio or a digital portfolio. Early
childhood classrooms may use a class reflective floor book with pictures of the
learning experience and scribed conversations.
Teachers can model the journalling process by thinking aloud and showing students
how they can express learning and thoughts in a variety of ways including diagrams,
pictures and writing.
Journals are a useful tool that gives teachers additional insight into how students
value their own learning and progress, as well as demonstrating their individual
achievements.
The following links provide background information and useful apps for journalling.
Kidblog – digital portfolios and blogging
kidblog.org/home
Edmodo – for consolidating and storing class notes and learning materials
www.edmodo.com/
Explain Everything™ – a screen casting, video and presentation tool all in one
explaineverything.com
Popplet – allows you to jot down your ideas and then sort them visually
Popplet.com
Seesaw – for capturing work completed by students in class, using a device’s
camera function
web.seesaw.me
Connect – the DoE portal for teachers
connect.det.wa.edu.au
Evernote (a digital portfolio app)
evernote.com
Digital portfolios for students (Cool tools for school)
cooltoolsforschool.wordpress.com/digital-student-portfolios

P a g e | 34
© Department of Education Western Australia 2018: Version 1.0 – October 2018
Appendix 6: Teacher resource sheet 1.1: Cooperative learning –
Roles
Cooperative learning frameworks create
opportunities for groups of students to work
together, generally to a single purpose.
As well as having the potential to increase
learning for all students involved, using
these frameworks can help students
develop personal and social capability.
When students are working in groups,
positive interdependence can be fostered
by assigning roles to group members.
These roles could include:
working roles such as Reader, Writer, Summariser, Time-keeper.
social roles such as Encourager, Observer, Noise monitor, Energiser.
Teachers using the Primary Connections roles of Director, Manager and Speaker for
their science teaching may find it effective to also use these roles for STEM learning.
Further to this, specific roles can be delineated for specific activities that the group is
completing.
It can help students if some background to the purpose of group roles is made clear
to them before they start, but at no time should the roles get in the way of the
learning. Teachers should decide when or where roles are appropriate to given
tasks.

P a g e | 35
© Department of Education Western Australia 2018: Version 1.0 – October 2018
Appendix 7: Teacher resource sheet 1.2: Cooperative learning –
Think, Pair, Share
This resource sheet provides a brief outline
of a cooperative learning strategy known
as 'think – pair – share'.
Cooperative learning frameworks create
opportunities for groups of students to work
together, generally to a single purpose.
As well as having the potential to increase
learning for all students involved, using
these frameworks can help students
develop personal and social capability.
In the 'think' stage, each student thinks silently about a question asked by the
teacher.
In the 'pair' stage, students discuss their thoughts and answers to the question in
pairs.
In the 'share' stage, the students share their answer, their partners answer or what
they decided together. This sharing may be with other pairs or with the whole class. It
is important also to let students 'pass'. This is a key element of making the strategy
safe for students.
Think – pair – share increases student participation and provides an environment for
higher levels of thinking and questioning.

P a g e | 36
© Department of Education Western Australia 2018: Version 1.0 – October 2018
Appendix 8: Teacher resource sheet 1.3: Sample parent letter
(School details and letterhead)
(Date)
Dear parents/caregivers,
RE: COLLECTION OF RECYCLABLE ITEMS FOR OUR WATER FLOW STEM PROJECT
This term, our class is undertaking a STEM (Science, Technology, Engineering and
Mathematics) project called Water flow. This project will involve students in our class
discussing the importance of water and discovering effective ways of transporting it
to meet personal and community needs.
This project focuses on repurposing recyclable items in an effort to give students
opportunities to consider sustainability and the impact of our lifestyles on our
environment, whilst developing their ability to design, create and problem-solve. To
enable us to create Water flow solutions, we would appreciate if you could please
collect clean recyclable items from your house and send them to school with your
child. Please do not include any glass or toilet rolls.
We will be starting the project on (date), and would like the recyclable items to be
delivered to the classroom before this.
We will be discussing the shape and material properties of the recyclable items
before using them to create our solutions. We may require adult assistance during
the construction phase so please let me know if you are available to help.
Thank you in advance,
(Classroom teacher)

P a g e | 37
© Department of Education Western Australia 2018: Version 1.0 – October 2018
Appendix 9: Teacher resource sheet 3.1: Prototype troubleshooting
Student’s name Problem Reason for the problem
Possible changes to your design
to solve the problem
Ariana The marble falls out on the bends
The sides aren’t high enough Increase the size of ramp sides

P a g e | 38
© Department of Education Western Australia 2018: Version 1.0 – October 2018
Appendix 10: Teacher resource sheet 4.1: 3 – 2 – 1 – Reflection
3 – 2 – 1 – Reflection
Name 3 things they learnt 2 things they found interesting 1 thing they found difficult

P a g e | 39
© Department of Education Western Australia 2018: Version 1.0 – October 2018
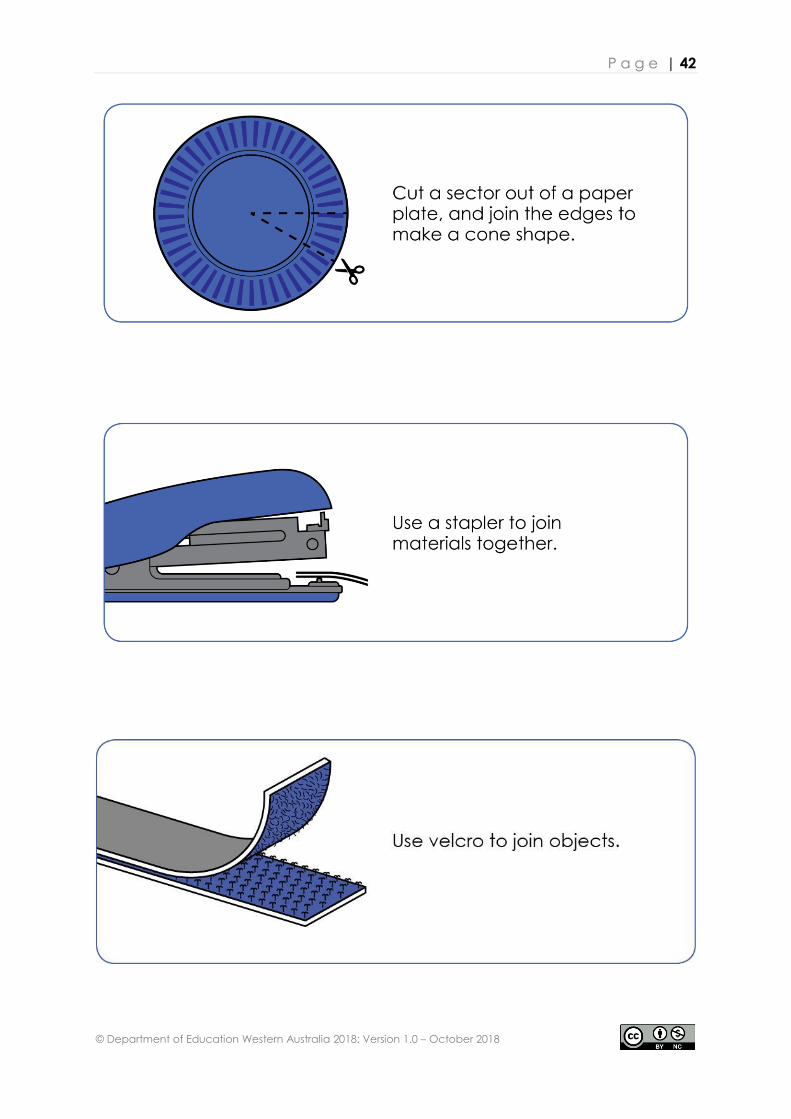
Appendix 11: Teacher resource sheet 4.2: Construction skills
Construction skills help students to generate and produce solutions for real-world
problems. This resource develops students' skills in design and technologies.
This resource can be used as a visual stimulus to prompt students to develop
solutions to design problems. The cards can be printed out to create stations.

P a g e | 40
© Department of Education Western Australia 2018: Version 1.0 – October 2018

P a g e | 41
© Department of Education Western Australia 2018: Version 1.0 – October 2018
P a g e | 42
© Department of Education Western Australia 2018: Version 1.0 – October 2018
Notes
________________________________________________________
________________________________________________________
________________________________________________________
________________________________________________________
________________________________________________________
________________________________________________________
________________________________________________________
________________________________________________________
________________________________________________________
________________________________________________________
________________________________________________________
________________________________________________________
________________________________________________________
________________________________________________________
________________________________________________________
________________________________________________________
________________________________________________________
________________________________________________________
________________________________________________________
________________________________________________________
________________________________________________________
________________________________________________________
________________________________________________________
________________________________________________________
________________________________________________________
________________________________________________________
________________________________________________________
_______________________________________________________


