CS21178-L Introduction to Navisworks
21
Page 1 CS21178-L Introduction to Navisworks Lee Mullin Autodesk Twitter: @leeroyb LinkedIn: https://uk.linkedin.com/in/lrmullin See below for more links! Description This session will cover the basics of Navisworks software, why it's an important piece of software for every construction company, and many design disciplines from one of the original Navisworks Ltd Teams. You'll be given a high-level overview of what each of the key tools does and how you could use the tools in your firm. This session features Navisworks Manage and BIM 360 Glue. AIA Approved Your AU Expert(s) Lee Mullin is the construction technical specialist for Autodesk, Inc., in Northern Europe and he leads the European Construction Virtual Team. Mullin looks after Navisworks software, BIM 360 Glue software, BIM 360 Layout app, BIM 360 Field software, Point Layout software, and workflows extending from Revit software, AutoCAD Civil 3D software, InfraWorks software, and ReCap software. With over 10 years’ experience in BIM and preconstruction workflows, Mullin’s current role is multifaceted, with public speaking engagements, product testing, development, and workflow investigation, which requires understanding of interoperability workflows across the Autodesk portfolio. Mullin also helps to build up the Autodesk construction user community through the Beyond Design Blog and various social media. Learning Objectives You will learn what is Autodesk Navisworks You will learn methods to navigate around a model You will learn about what each key tool does You will learn some of the principle of how to use Navisworks well
Transcript of CS21178-L Introduction to Navisworks
Page 1
CS21178-L
Introduction to Navisworks Lee Mullin Autodesk Twitter: @leeroyb LinkedIn: https://uk.linkedin.com/in/lrmullin See below for more links!
Description
This session will cover the basics of Navisworks software, why it's an important piece of software for every construction company, and many design disciplines from one of the original Navisworks Ltd Teams. You'll be given a high-level overview of what each of the key tools does and how you could use the tools in your firm. This session features Navisworks Manage and BIM 360 Glue. AIA Approved
Your AU Expert(s)
Lee Mullin is the construction technical specialist for Autodesk, Inc., in Northern Europe and he leads the European Construction Virtual Team. Mullin looks after Navisworks software, BIM 360 Glue software, BIM 360 Layout app, BIM 360 Field software, Point Layout software, and workflows extending from Revit software, AutoCAD Civil 3D software, InfraWorks software, and ReCap software. With over 10 years’ experience in BIM and preconstruction workflows, Mullin’s current role is multifaceted, with public speaking engagements, product testing, development, and workflow investigation, which requires understanding of interoperability workflows across the Autodesk portfolio. Mullin also helps to build up the Autodesk construction user community through the Beyond Design Blog and various social media.
Learning Objectives
You will learn what is Autodesk Navisworks
You will learn methods to navigate around a model
You will learn about what each key tool does
You will learn some of the principle of how to use Navisworks well
Page 2
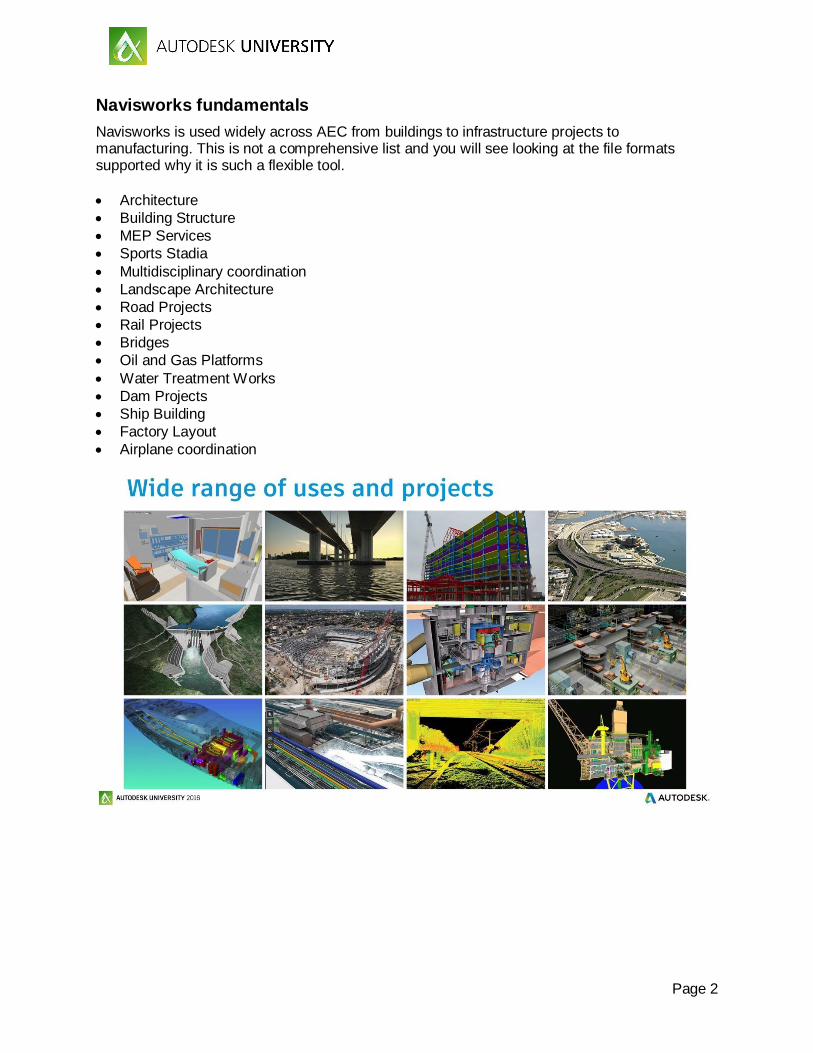
Navisworks fundamentals
Navisworks is used widely across AEC from buildings to infrastructure projects to manufacturing. This is not a comprehensive list and you will see looking at the file formats supported why it is such a flexible tool.
Architecture
Building Structure
MEP Services
Sports Stadia
Multidisciplinary coordination
Landscape Architecture
Road Projects
Rail Projects
Bridges
Oil and Gas Platforms
Water Treatment Works
Dam Projects
Ship Building
Factory Layout
Airplane coordination
Page 3
Key Functionality The main functions Navisworks is used for includes but not limited to: -
Design Review
Clash detection
Construction Simulation
Quantification
Rendering
Animations
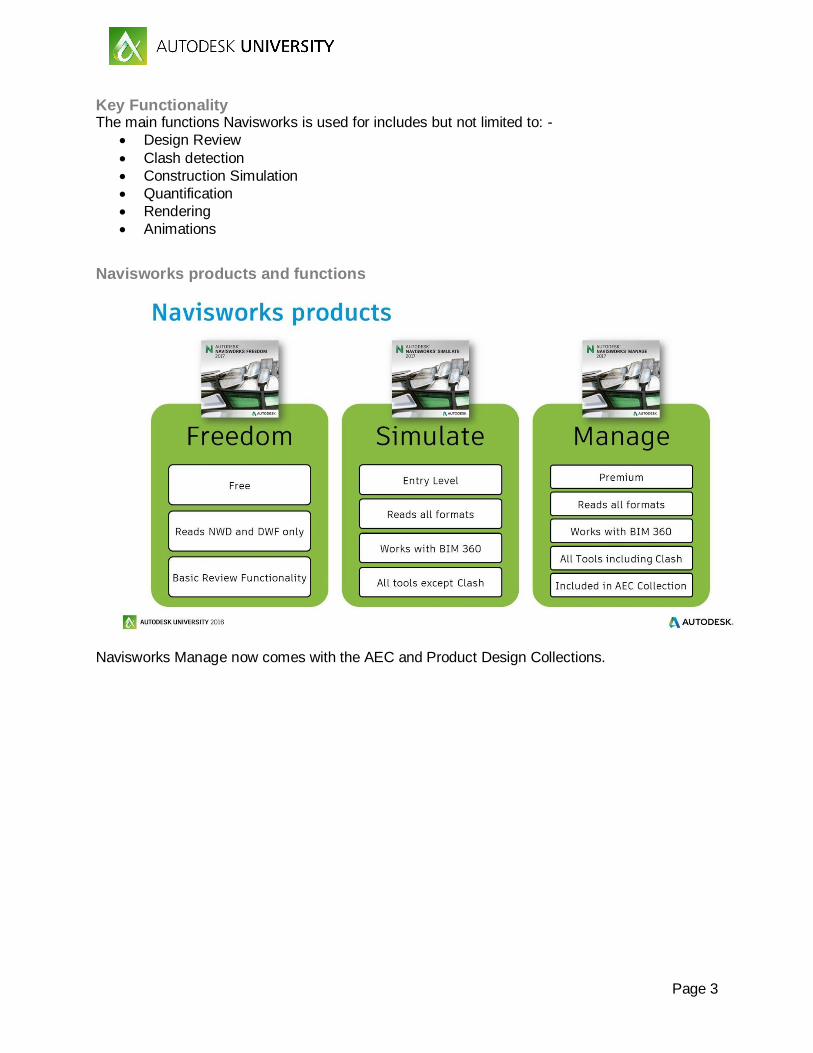
Navisworks products and functions
Navisworks Manage now comes with the AEC and Product Design Collections.
Page 4
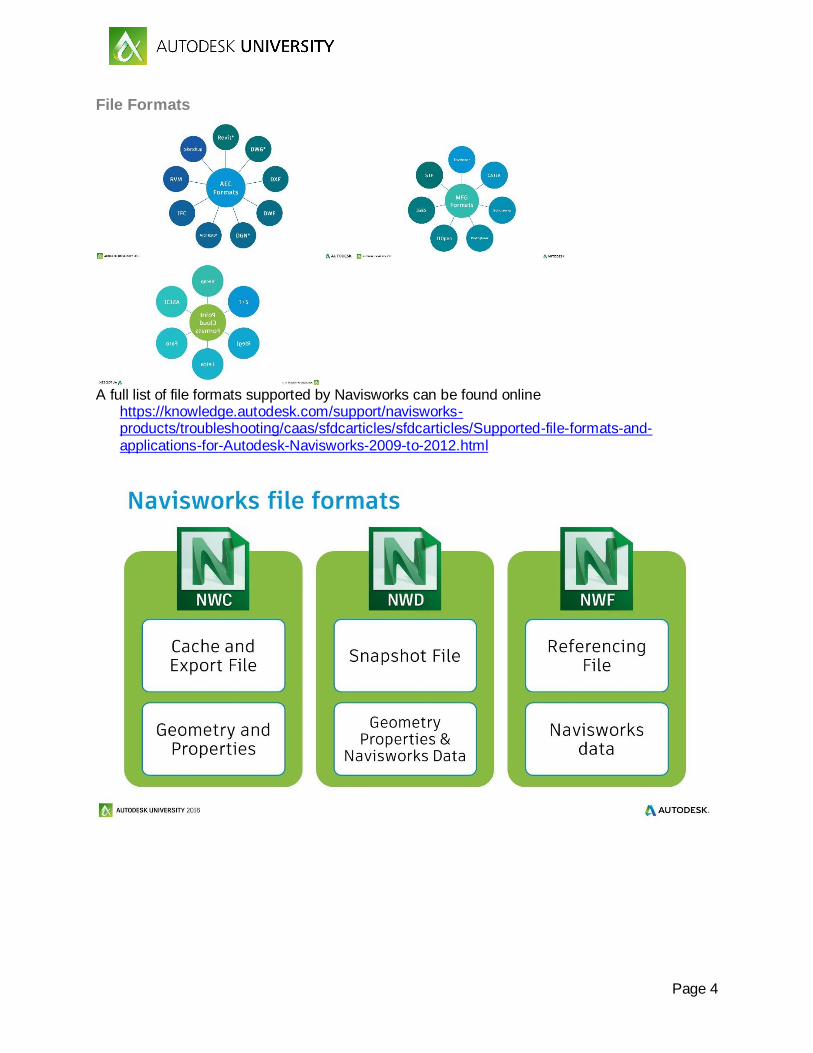
File Formats
A full list of file formats supported by Navisworks can be found online
https://knowledge.autodesk.com/support/navisworks-products/troubleshooting/caas/sfdcarticles/sfdcarticles/Supported-file-formats-and-applications-for-Autodesk-Navisworks-2009-to-2012.html
Page 5
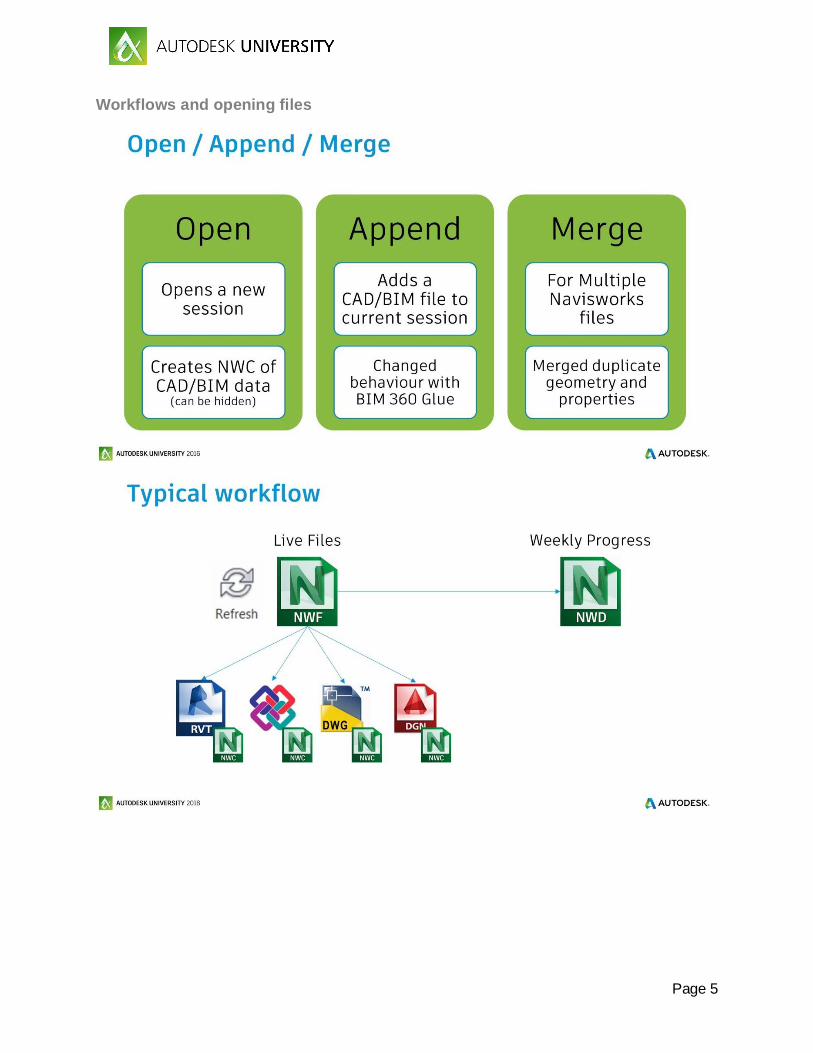
Workflows and opening files
Page 6
Class Instructions
Use standard Settings
Select the N in the top left corner and then Options.
In Options find Import on the bottom right corner
Browse to the datasets folder, Settings and select AU_Settings.xml
This should give you the standard settings for this session.
Workspaces
Select the View tab in the ribbon
Select Load Workspace > More Workspaces
Browse to the datasets folder, Workspaces and select Minimal.xml
This will load a minimal workspace with no extra toolbars
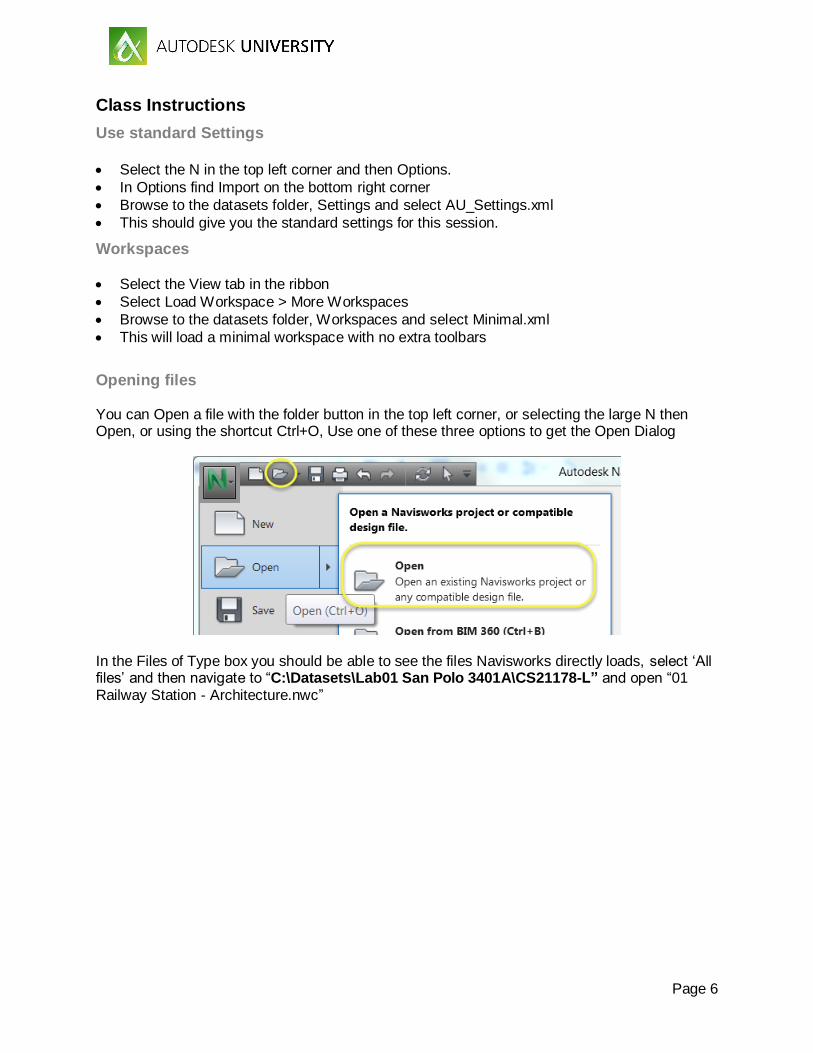
Opening files You can Open a file with the folder button in the top left corner, or selecting the large N then Open, or using the shortcut Ctrl+O, Use one of these three options to get the Open Dialog
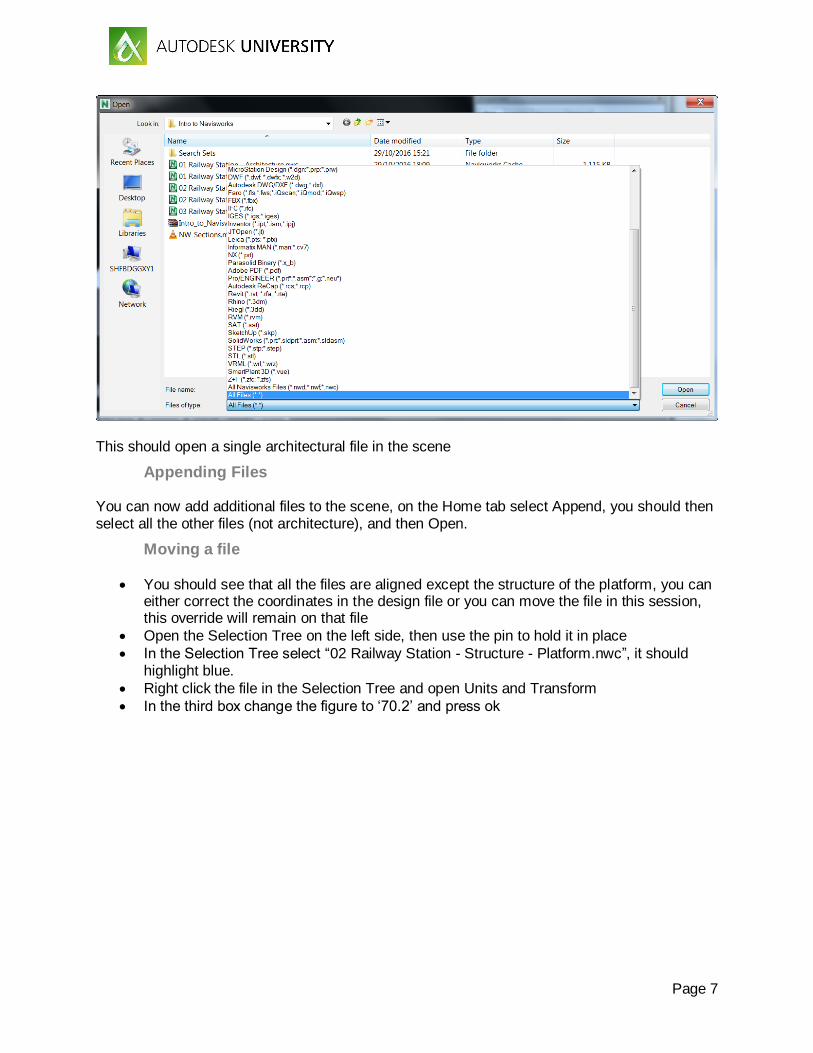
In the Files of Type box you should be able to see the files Navisworks directly loads, select ‘All files’ and then navigate to “C:\Datasets\Lab01 San Polo 3401A\CS21178-L” and open “01 Railway Station - Architecture.nwc”
Page 7
This should open a single architectural file in the scene
Appending Files You can now add additional files to the scene, on the Home tab select Append, you should then select all the other files (not architecture), and then Open.
Moving a file
You should see that all the files are aligned except the structure of the platform, you can either correct the coordinates in the design file or you can move the file in this session, this override will remain on that file
Open the Selection Tree on the left side, then use the pin to hold it in place
In the Selection Tree select “02 Railway Station - Structure - Platform.nwc”, it should highlight blue.
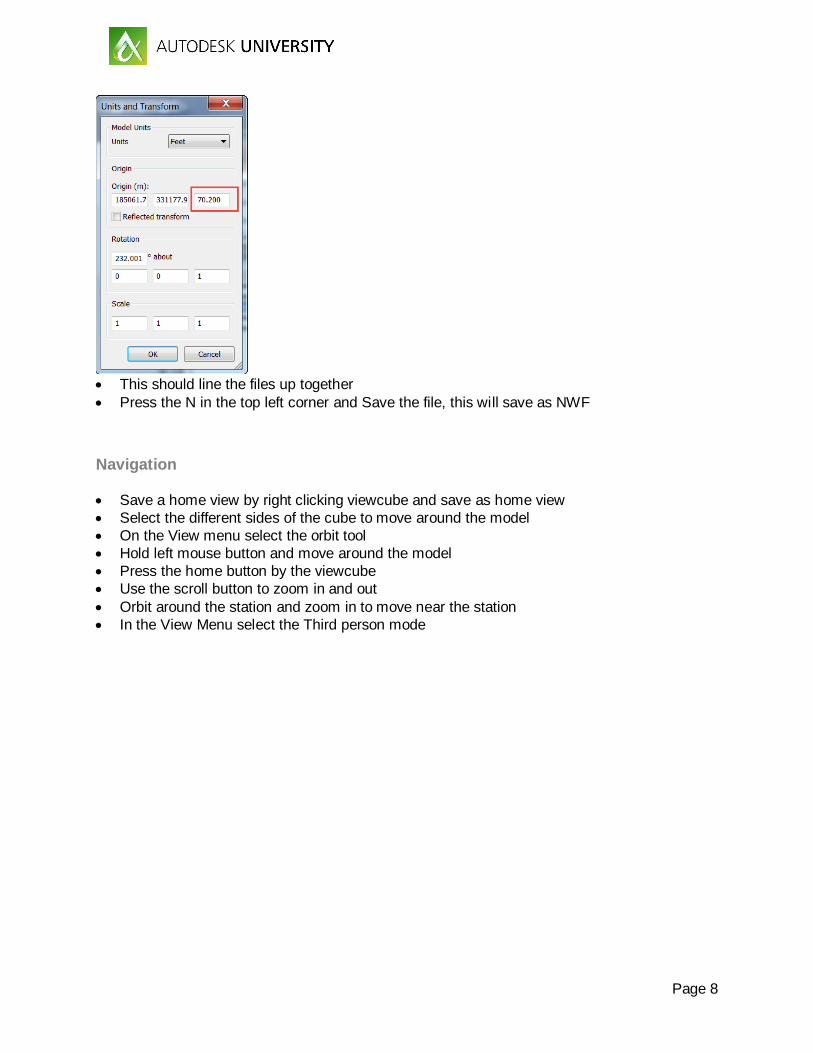
Right click the file in the Selection Tree and open Units and Transform
In the third box change the figure to ‘70.2’ and press ok
Page 8
This should line the files up together
Press the N in the top left corner and Save the file, this will save as NWF
Navigation
Save a home view by right clicking viewcube and save as home view
Select the different sides of the cube to move around the model
On the View menu select the orbit tool
Hold left mouse button and move around the model
Press the home button by the viewcube
Use the scroll button to zoom in and out
Orbit around the station and zoom in to move near the station
In the View Menu select the Third person mode
Page 9
Sets Sets are groups of items, think of them as favorites in the model. You have Selection Sets which are static and need to be manually updated if you want to add or remove anything, and Search Sets which are dynamic and do not need to be updated. I strongly recommend you use Search Sets as often as possible
To create a search set, look for something in Find Items, and in the Sets dialogue select the binoculars, you can then rename this set (F2 can be used to rename a selected item)
To create a selection set, select a number of items in the scene or selection tree (use
Shift to select multiple items), and select the first button in the Sets dialogue
Import sets
You can import and export sets by selecting the Import button on the Sets dialog
Select the Datasets > Search Sets > and select “Revit Categories in Folders.xml”
This will import a number of standard Revit Category Sets, there are also some IFC sets in this same folder
Expand the Revit Architecture folder and select Doors
When you select Hide Unselected on the Home tab you should only see the doors in model, press Hide Unselected again to show the rest of the model
Viewpoints
Create some viewpoints
Go to the View tab > Load Workspace and select Navisworks Standard
On the right side select the Saved Viewpoints dialog and pin it
Using Navigation move to in front of the building
In the Viewpoints tab Select Save Viewpoint, you can now rename this ‘Front’
Move around the model to another location
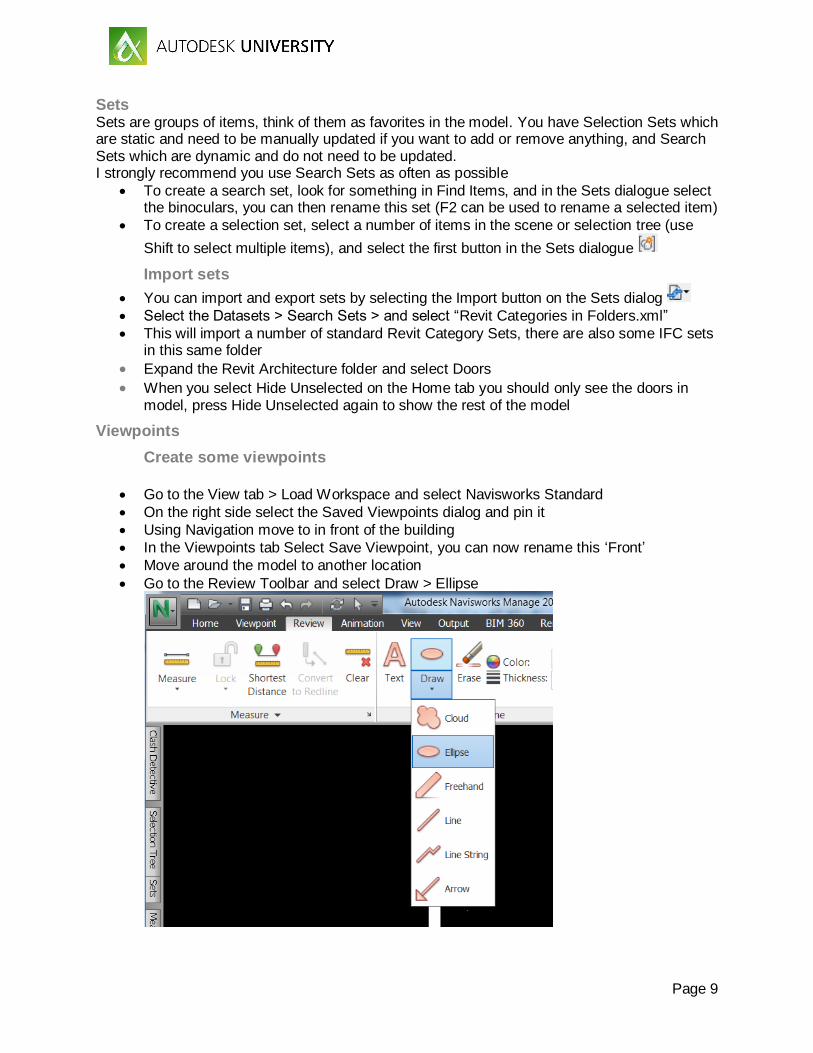
Go to the Review Toolbar and select Draw > Ellipse
Page 10
You can now draw an Ellipse and this will save as a Viewpoint (select it and F2 to rename)
Right Click the second Viewpoint and select ‘Add Comment’
Make a comment about the area you circled and press OK
Add a section Press PageUp show the whole model
Go to the Viewpoints window and select Enable Sectioning, this should open the Sectioning Tools tab
You can add section planes or boxes, we will add a box
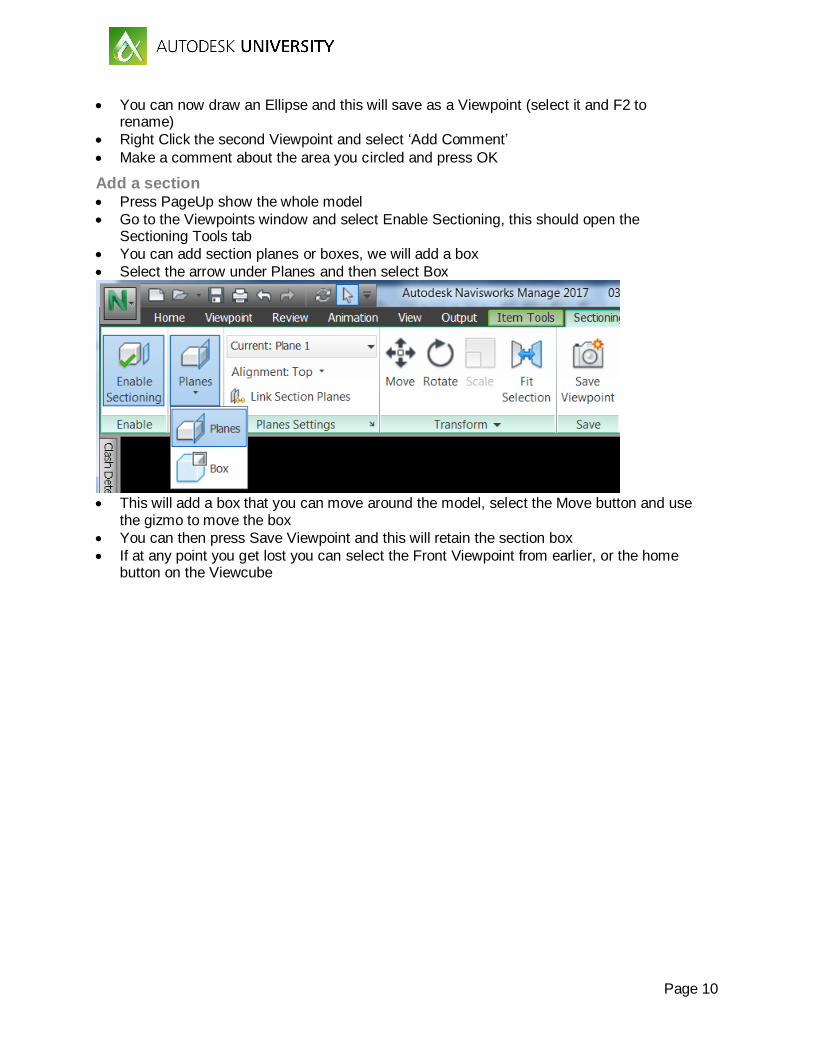
Select the arrow under Planes and then select Box
This will add a box that you can move around the model, select the Move button and use
the gizmo to move the box
You can then press Save Viewpoint and this will retain the section box
If at any point you get lost you can select the Front Viewpoint from earlier, or the home button on the Viewcube
Page 11
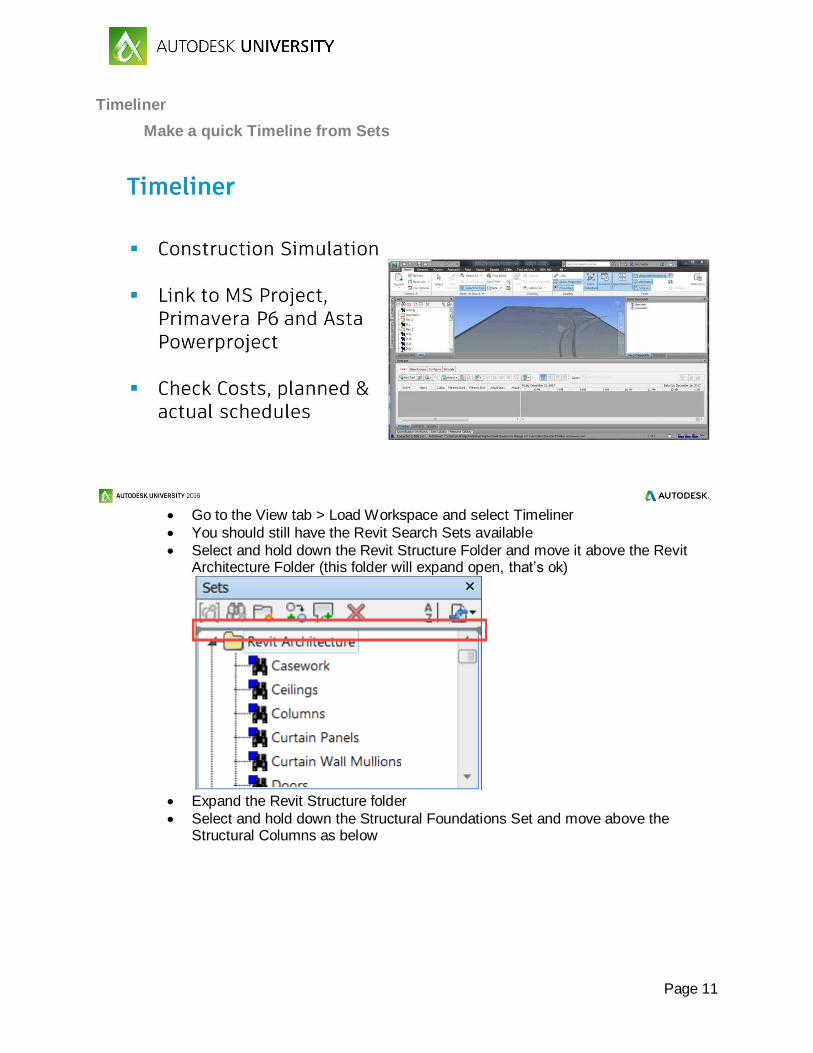
Timeliner
Make a quick Timeline from Sets
Go to the View tab > Load Workspace and select Timeliner
You should still have the Revit Search Sets available
Select and hold down the Revit Structure Folder and move it above the Revit Architecture Folder (this folder will expand open, that’s ok)
Expand the Revit Structure folder
Select and hold down the Structural Foundations Set and move above the Structural Columns as below
Page 12
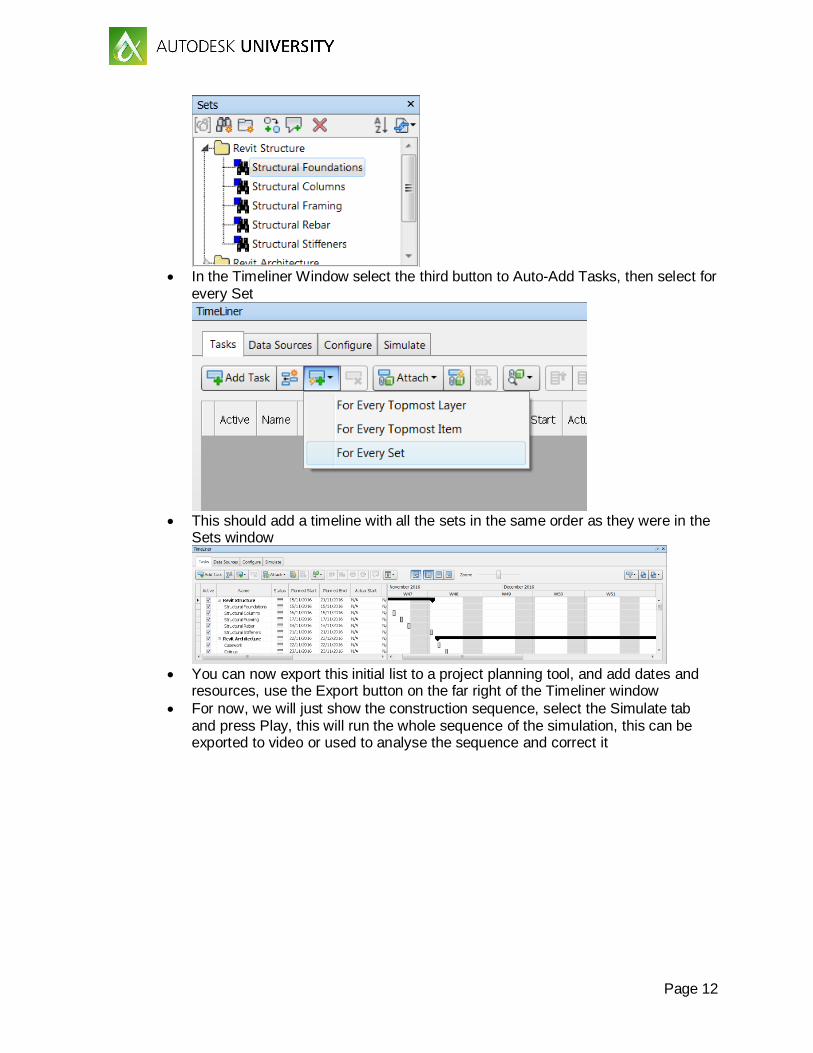
In the Timeliner Window select the third button to Auto-Add Tasks, then select for
every Set
This should add a timeline with all the sets in the same order as they were in the
Sets window
You can now export this initial list to a project planning tool, and add dates and
resources, use the Export button on the far right of the Timeliner window
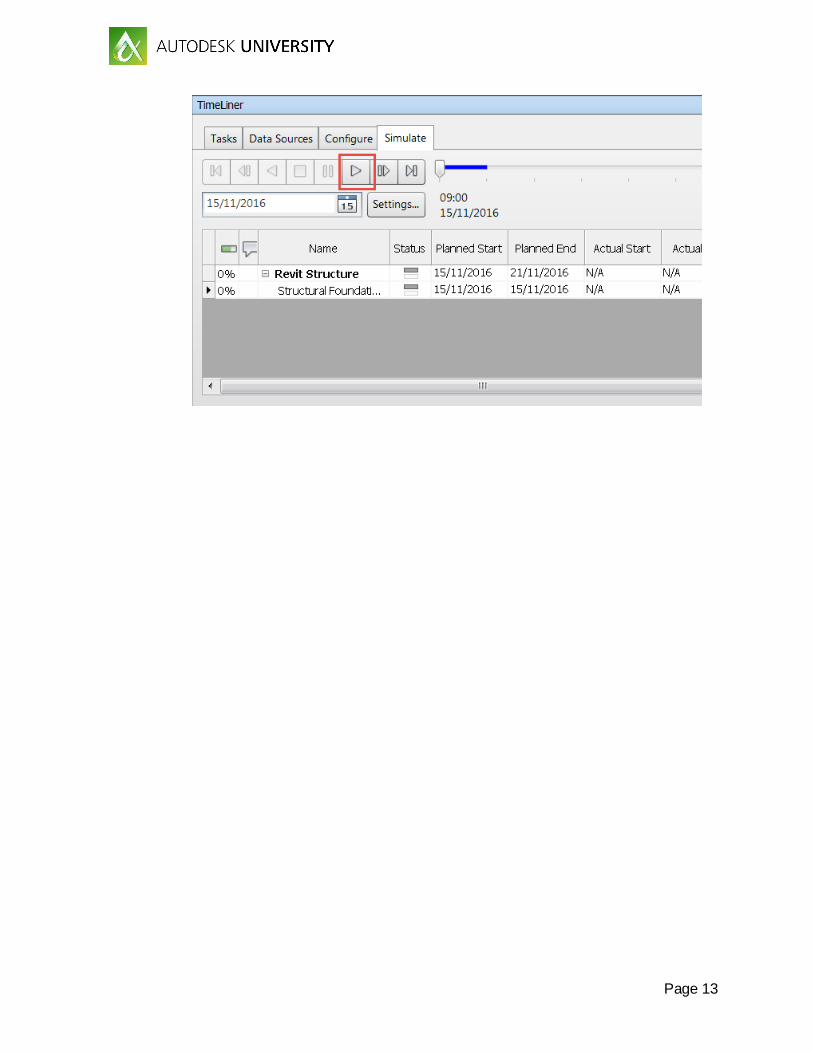
For now, we will just show the construction sequence, select the Simulate tab and press Play, this will run the whole sequence of the simulation, this can be exported to video or used to analyse the sequence and correct it
Page 13
Page 14
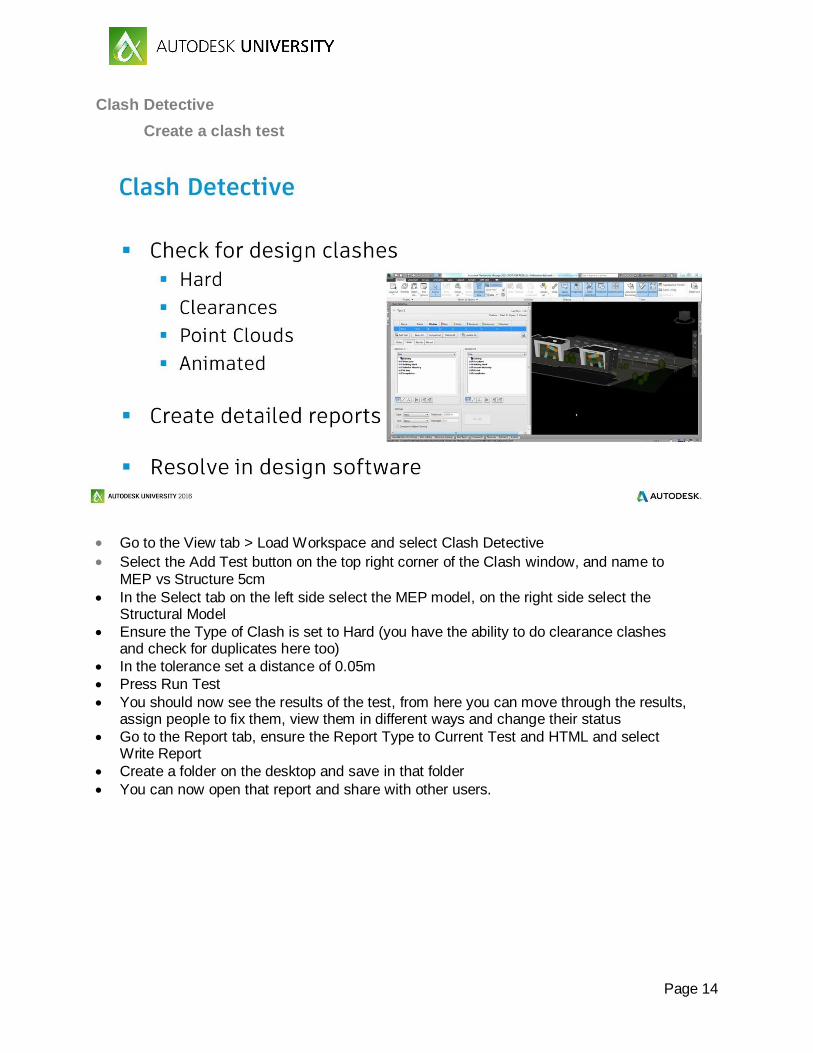
Clash Detective
Create a clash test
Go to the View tab > Load Workspace and select Clash Detective
Select the Add Test button on the top right corner of the Clash window, and name to MEP vs Structure 5cm
In the Select tab on the left side select the MEP model, on the right side select the Structural Model
Ensure the Type of Clash is set to Hard (you have the ability to do clearance clashes and check for duplicates here too)
In the tolerance set a distance of 0.05m
Press Run Test
You should now see the results of the test, from here you can move through the results, assign people to fix them, view them in different ways and change their status
Go to the Report tab, ensure the Report Type to Current Test and HTML and select Write Report
Create a folder on the desktop and save in that folder
You can now open that report and share with other users.
Page 15
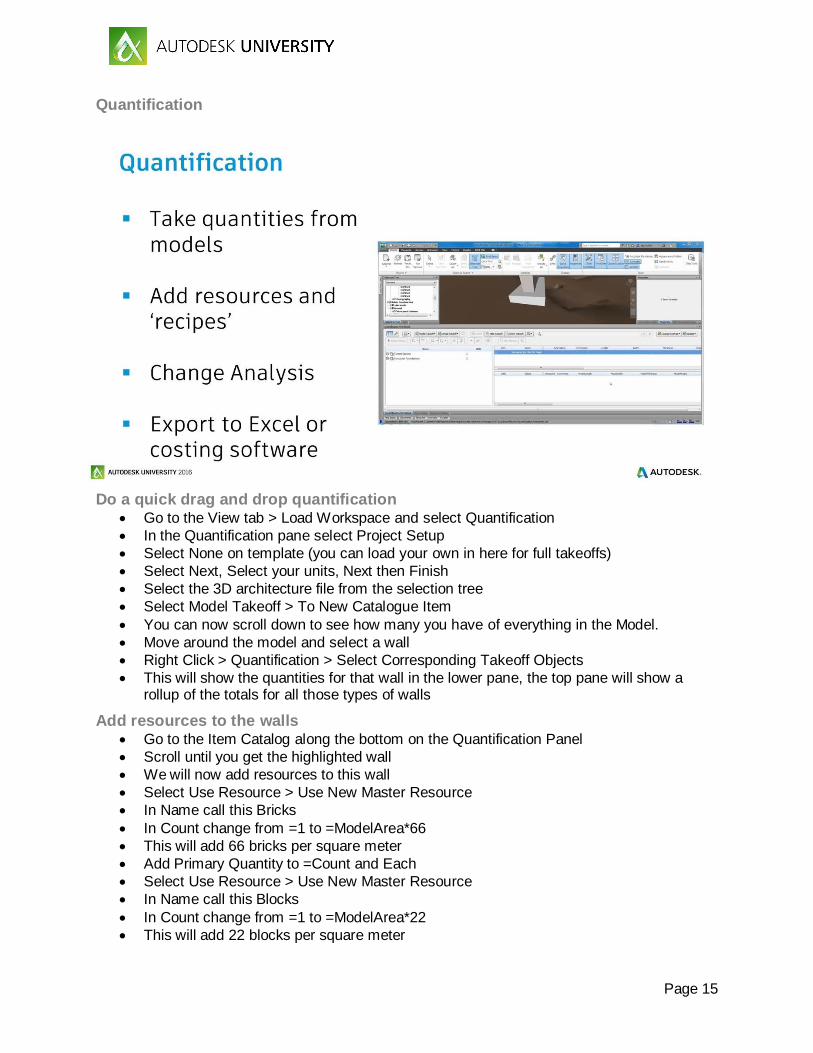
Quantification
Do a quick drag and drop quantification Go to the View tab > Load Workspace and select Quantification
In the Quantification pane select Project Setup
Select None on template (you can load your own in here for full takeoffs)
Select Next, Select your units, Next then Finish
Select the 3D architecture file from the selection tree
Select Model Takeoff > To New Catalogue Item
You can now scroll down to see how many you have of everything in the Model.
Move around the model and select a wall
Right Click > Quantification > Select Corresponding Takeoff Objects
This will show the quantities for that wall in the lower pane, the top pane will show a rollup of the totals for all those types of walls
Add resources to the walls Go to the Item Catalog along the bottom on the Quantification Panel
Scroll until you get the highlighted wall
We will now add resources to this wall
Select Use Resource > Use New Master Resource
In Name call this Bricks
In Count change from =1 to =ModelArea*66
This will add 66 bricks per square meter
Add Primary Quantity to =Count and Each
Select Use Resource > Use New Master Resource
In Name call this Blocks
In Count change from =1 to =ModelArea*22
This will add 22 blocks per square meter

Page 16
Add Primary Quantity to =Count and Each
Select Use Resource > Use New Master Resource
In Name call this Insulation
In Area change from =ModelArea to =ModelArea*1.05
This will add 5% waste to the insulation per square meter
Add Primary Quantity to =Area and square meters
Page 17
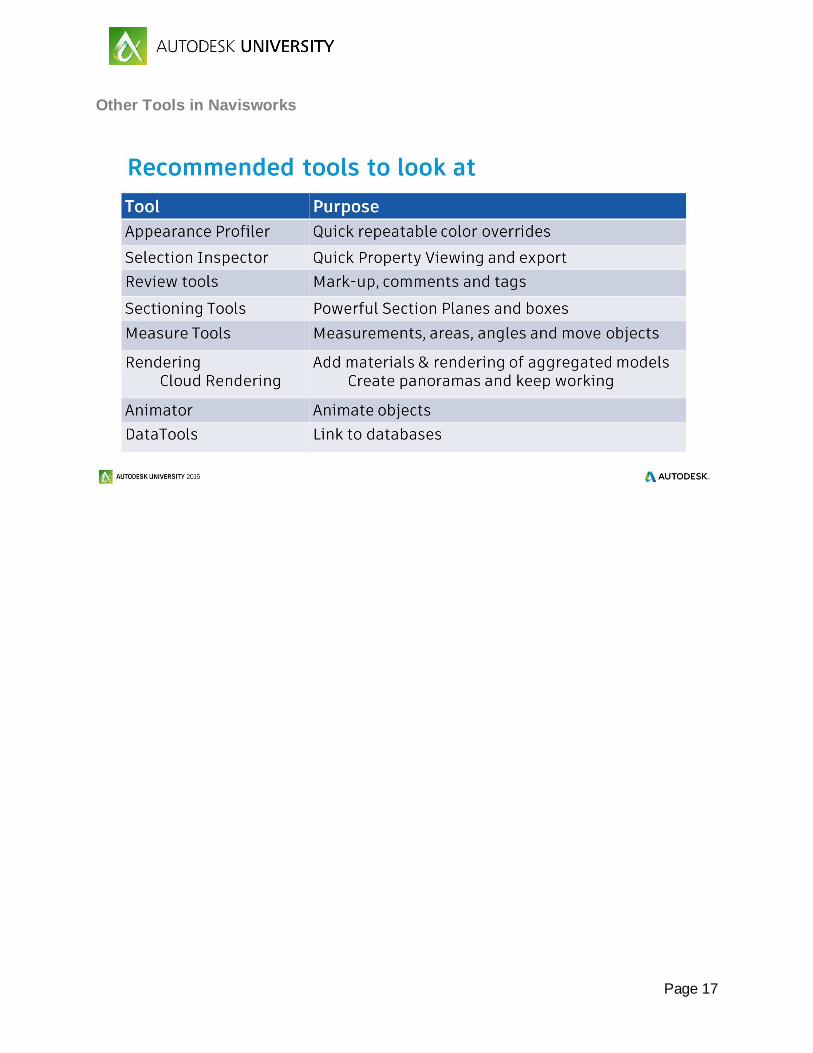
Other Tools in Navisworks
Page 18
Tips and tricks
Shortcuts https://knowledge.autodesk.com/support/navisworks-products/learn-explore/caas/CloudHelp/cloudhelp/2017/ENU/Navisworks-Manage/files/GUID-E5041421-ADEA-4FB8-88FF-D59860A8E826-htm.html
Easy Search Sets https://www.youtube.com/watch?v=6429c0BOn7o
Compare 2D and 3D https://www.youtube.com/watch?v=ORruUE1nYxA
Quick Quantification, resources and Change Analysis
https://www.youtube.com/watch?v=0FFi6LLHdLA

Page 19
BIM 360
Page 20
What next?
Autodesk Knowledge Network Fantastic starting point pulling together help guides, blogs, online videos, Screencast
training (advanced videos showing the exact processes) https://knowledge.autodesk.com/support/navisworks-products
Beyond Design Blog This is my blog that I’ve been running with colleagues for over 5 years, there’s a lot of
useful information, workflows and tips and tricks there. Use the search tools to see if we’ve already covered it! http://beyonddesign.typepad.com/
YouTube You know where YouTube is!! Here’s a playlist I have of Construction Videos from Autodesk Products with useful tips and tricks https://www.youtube.com/playlist?list=PLmnt1sWPHsAs_SDmgnaj0Qu7FXAgm8heI
Autodesk University Online
Autodesk University Online is a great place to watch classes from previous years going
back to AU 2012 http://au.autodesk.com/au-online/classes-on-demand/search?full-text=navisworks
My three previous classes are all online and 2 have a fun Star Wars theme, well worth an afternoon of your time
o CR2165-P: Building The Death Star The Autodesk Way o MSF7155-L: Utilizing the Cloud o CO6968: The #EmpireBIMcrew Strikes Back
I’d also recommend these classes around workflows although there’s many many more discipline specific ones: -
o CO5945: Introduction to Project Reviews Using Navisworks o CS9905-L: Takeoff to the Next Level with Navisworks 2D and 3D Quantification o CO5249: Building Information Modeling on a Smaller Scale
Books
This Mastering book may be from the 2013 release but is still very relevant and explains key concepts really well. Very good too for looking at concepts like linking databases, color overrides and more. https://www.amazon.co.uk/Mastering-Autodesk-Navisworks-Official-Training/dp/1118281713/ref=pd_ybh_a_3?ie=UTF8&psc=1&refRID=3YKB9V4TAESP21NXWHJV This book is updated to 2017 releases so explains concepts around BIM 360 integration and the use of Quantification pretty well
Page 21
https://www.amazon.co.uk/Autodesk-Navisworks-2017-Essentials-Authorized/dp/1943184844/ref=pd_ybh_a_2?ie=UTF8&psc=1&refRID=3YKB9V4TAESP21NXWHJV I personally haven’t seen this book but Ascent are very professional with all their materials https://www.amazon.co.uk/Up-Running-Autodesk-Navisworks-2017/dp/1532815107/ref=pd_ybh_a_1?ie=UTF8&psc=1&refRID=3YKB9V4TAESP21NXWHJV
Formal Training If you can spare the time and money then formal training is a great way to get up to speed quickly on a product as well as ask those ‘how do I’ type questions
Resellers Find a reseller http://www.autodesk.com/resellers/locate-a-reseller
Certification http://www.autodesk.com/training-and-certification/overview
Online Training
Lynda - https://www.lynda.com/Navisworks-tutorials/Navisworks-Essential-
Training/154421-2.html
uDemy https://www.udemy.com/autodesk-navisworks/
Global eTraining http://www.globaletraining.ca/etraining-courses/product/autodesk-navisworks-manage-2017/


![Folleto 3 - NAVISWORKS [.LAB]](https://static.fdocuments.us/doc/165x107/62bac4625828452c5a0346f8/folleto-3-navisworks-lab.jpg)