Crystallization · Crystallization Chemistry, Physics Target age group: Elementary school students...
32
Crystallization Chemistry, Physics Target age group: Elementary school students (12-16 yo) Description: This learning module exposes students to the concept of crystallization and some methods to get crystallization to occur. Students will be able to visualize 3D chemical structures and how they pack together in repeating patterns to form crystals. These activities can be run in series as part of a science learning day event or can be incorporated into classroom practical activities. Expected Outcomes • Familiarity with the prevalence of and different types of crystal structures • Ability to set up a crystallization experiment • Understanding of the concepts of nucleation and crystallization • Understanding of some properties of crystals • Awareness of different methods of crystallization Materials Required • Printed hand-outs (common crystals, methods of crystallization, nucleation, step by step practical guides) • Examples of different crystals o quartz, bismuth, sodium chloride, sugar, geodes, amethyst, fluorite • Computer with internet access • Deionised water • Either copper(II) sulfate pentahydrate or sodium acetate Optional • 3D printed models of compounds • VR Googles with ability to connect to internet content Unit Outline 1. Investigate crystalline samples 2. Nucleation practical experiment / demonstration 3. Visualise 3D representation of the structure on the computer and via VR headset if available. 4. Crystallization of copper(II) sulfate crystallization (either practical options or video) 5. Different methods of crystallization
Transcript of Crystallization · Crystallization Chemistry, Physics Target age group: Elementary school students...

Crystallization Chemistry, Physics Target age group: Elementary school students (12-16 yo) Description: This learning module exposes students to the concept of crystallization and some methods to get crystallization to occur. Students will be able to visualize 3D chemical structures and how they pack together in repeating patterns to form crystals. These activities can be run in series as part of a science learning day event or can be incorporated into classroom practical activities.
Expected Outcomes • Familiarity with the prevalence of and different types of crystal structures
• Ability to set up a crystallization experiment
• Understanding of the concepts of nucleation and crystallization
• Understanding of some properties of crystals
• Awareness of different methods of crystallization
Materials
Required • Printed hand-outs (common crystals, methods of crystallization, nucleation, step by step
practical guides)
• Examples of different crystals o quartz, bismuth, sodium chloride, sugar, geodes, amethyst, fluorite
• Computer with internet access
• Deionised water
• Either copper(II) sulfate pentahydrate or sodium acetate
Optional • 3D printed models of compounds
• VR Googles with ability to connect to internet content
Unit Outline 1. Investigate crystalline samples 2. Nucleation practical experiment / demonstration 3. Visualise 3D representation of the structure on the computer and via VR headset if available. 4. Crystallization of copper(II) sulfate crystallization (either practical options or video) 5. Different methods of crystallization

Section descriptions
Section 1 – Investigate crystalline samples Instructor activities
• Present a variety of crystalline objects (e.g. sodium chloride, sugar, amethyst, fluorite, quartz, bismuth, copper(II) sulfate crystallization) and an information sheet on each object (including chemical name, chemical formula, maybe crystal habit or how it is formed in nature, or where it is found on the Earth)
o Common crystals like sodium chloride (salt) and sugar can be easily obtained. If you have access to a rock or gem shop you can often find interesting crystalline samples there.
o Make a card for each sample with the formula, where it is found and other interesting facts you may know.
• Discuss each molecule’s interesting features, highlighting properties common to crystals o Sharp edges, well defined faces, shiny, transparent, etc.
Student activities
• Inspect each crystalline object and for each write down: a short description of how it looks/feels, chemical name and formula and any other facts of interest.
• Discuss what you think the properties common to all crystals are
Section 2 – Nucleation/Crystallization practical experiment or demonstration (note: sections 1 & 4 could be incorporated into this section, while the solution is cooling) Instructor activities:
• Explain steps of practical activity
• Explain what a super saturated solution is
• Explain what happens to the atoms when the sodium acetate is dissolved (bond breaking, endothermic)
• Explain what happens when it crystallises (bond making, exothermic)
• Encourage students to carefully feel for temperature changes
• Discuss practical applications (e.g. hand warmers)
• Prepare equipment for student practical or demonstration: o 160 g of sodium acetate trihydrate o scale o Spoon / spatula o beaker o 30 mL deionised water o Measuring cylinder o Hot plate & oven gloves o Stirring rod o Wire o Plate
Student activities:
• Weigh 160 g of sodium acetate trihydrate into a beaker
• Measure 30 mL deionised water
• Pour the water into the beaker with the sodium acetate
• Place the beaker on a hot plate and gently heat with stirring until all the sodium acetate is dissolved and you have a clear solution. Note any observations.
• Gently remove the beaker from the hot place and leave to cool without disturbing the beaker
• Either: pick up a few sodium acetate crystals using a thin piece of wire and place into the center of your cooled solution. Watch the crystallization take place. Note any observations.
• Or: put a few sodium acetate crystals on a plate and pour your cooled solution onto the crystals, keeping the stream of the solution as continuous as possible. Note any observations.
Section 3 - Visualize 3D representation of the molecule Instructor activities
• Assist students with 3D visualization; manipulating the molecule on the screen
• Provide VR headset for further exploration Student activities
• Navigate to https://www.ccdc.cam.ac.uk/structures
• Search for “sodium acetate trihydrate” in the “Compound name” search box
• Note the chemical formula and the 2D representation
• Manipulate the visualisation in the 3D viewer and investigate the different packing options to understand how the atoms and molecules are organised inside the 3D space of the crystal
Section 4 – Crystallization of copper(II) sulfate – view video OR practical with copper(II) sulfate solution OR practical with copper oxide and sulfuric acid reaction. Instructor activities EITHER
• Prepare equipment for video viewing (https://youtu.be/FFR4nei9qv8) OR
• Prepare equipment for reaction of copper oxide and sulfuric acid to make copper(II) sulfate and subsequently copper(II) sulfate crystals (http://www.rsc.org/learn-chemistry/resource/res00001917/reacting-copper-ii-oxide-with-sulfuric-acid)
OR
• Equipment for crystals from solution o Weighing scales o Beaker o Spatula o Measuring cylinder o Stirring rod o Hot plate o Wire/thread o Copper(II) sulfate pentahydrate (70 g) o Deionised water (100 mL)
Student activities

EITHER
• Watch video viewing (https://youtu.be/FFR4nei9qv8) OR
• Follow steps to react copper oxide and sulfuric acid to make copper(II) sulfate and subsequently copper(II) sulfate crystals (http://www.rsc.org/learn-chemistry/resource/res00001917/reacting-copper-ii-oxide-with-sulfuric-acid)
OR
• Using the weighing scales, beaker and spatula, weigh 70 g of copper(II) sulfate pentahydrate into your beaker
• Measure out 100 mL of deionised water into your measuring cylinder
• Pour the 100 mL of deionised water into your beaker with the copper(II) sulfate
• Stir the contents of the beaker while heating on the hot plate until all the copper(II) sulfate has dissolved. You are making a saturated solution of copper(II) sulfate.
• Find a location where your beaker can be left undisturbed for 24 h and cover the top loosely with some foil to avoid any contamination. This is for the solution to cool.
• On returning to your cooled solution, you will find some copper(II) sulfate has precipitated out of the solution. You have made crystals!
EXTENSION
• Pour off the solution into a clean beaker
• Choose a crystal from the precipitate that has smooth surfaces and is without cracks or defects
• Tie one end of the thread to this crystal and the other end of the thread to a pencil/rod
• Carefully submerge your crystal into the remaining solution and leave to grow for as long as you like!
• You can repeat this process with new saturated solutions of copper(II) sulfate to make your crystal as big as you like (beaker size limiting)!
Section 5 – different methods of crystallization Instructor activities
• For information about different methods of crystallization, see here: https://web.mit.edu/x-ray/cystallize.html
• Explanations of different crystallization techniques o Solvent evaporation o Slow cooling o Solvent diffusion o Vapour diffusion o Vacuum sublimation
Student activities
• Awareness of different crystallization techniques
Using these activities in the classroom: This activity was originally designed as part of The Cambridge University Science Festival. If you are interested in using this as part of your course curriculum, please see below for some places where this might fit into your classroom.
Guide to Science Curriculum from Ontario, Canada: http://www.edu.gov.on.ca/eng/curriculum/secondary/2009science11_12.pdf
Areas where this activity might fit in your courses: Grade six (12 year old) science students address issues like the following: http://www.edu.gov.on.ca/eng/curriculum/elementary/scientec18currb.pdf 1.2 evaluate the social and environmental costs and benefits of space exploration, taking different points of view into account (e.g., the point of view of health care workers and workers in other agencies that compete with space programs for public money; astronauts and their families; the general public; scientists) Sample issue: Space exploration has brought many benefits to society. High-quality radio and television signals are now relayed around the globe by satellite. Biological experiments in space, such as the growing of insulin crystals, are contributing to our ability to fight disease. The technology used for space shuttle fuel pumps is now being used to make better artificial hearts. Geographical data obtained by satellites have improved the quality of maps and made navigation safer. But space exploration is also very expensive, involves risks to the lives of astronauts and others, produces pollution, and creates space junk that may eventually fall back to Earth. Are the benefits worth the costs and risks? (pg. 122) Grade 7 (12/13 year olds) science students address issues like the following: 2.4 use scientific inquiry/experimentation skills (see page 12) to investigate the properties of mixtures and solutions (e.g., the amount of solute required to form a saturated solution; differences between pure substances and mixtures) Sample guiding questions: How does changing the amount of solute or solvent affect the solution? What factors affect the amount of solute that can dissolve in a solvent? What factors affect the speed at which a solute dissolves? 2.5 use appropriate science and technology vocabulary, including mechanical mixture, solution, solute, insoluble, saturated, unsaturated, and dilute, in oral and written communication (pg. 133) From the Ontario curriculum guide, SCH3U (Grade 11) Chemistry: http://www.edu.gov.on.ca/eng/curriculum/secondary/2009science11_12.pdf B2.6 build molecular models, and write structural formulae, for molecular compounds containing single and multiple bonds (e.g., CO2 , H2 O, C2 H4 ), and for ionic crystalline structures (e.g., NaCl) (pg. 95) From the Ontario curriculum guide, SCH4U (Grade 12) Chemistry: C1.1 assess the benefits to society of technologies that are based on the principles of atomic and molecular structures (e.g., magnetic resonance imaging [MRI], infrared spectroscopy, X-ray crystallography, nuclear energy, medical applications of spectroscopy and mass spectrometry) (pg. 110) From the Ontario curriculum guide, SES4U (Grade 12) Space and Earth Sciences: E2.6 investigate metamorphic rocks (e.g., slate, phyllite, schist, gneiss, quartzite, marble), using a hand lens, and classify them on the basis of their characteristics (e.g., foliation, crystallinity) in order to identify their parent rock and the temperature, pressure, and chemical conditions at their formation [PR, AI]

E2.8 plan and conduct an inquiry to investigate the factors that determine the size and form of mineral crystals (e.g., the temperature of the solution, the type of salt, the level of saturation, the temperature of slides containing melted salol) [IP, PR]
Get your students involved outside the classroom: There are multiple crystal-growing competitions including: https://uwaterloo.ca/chem13-news-magazine/september-2018/feature/canadian-crystal-growing-competition https://www.uscrystalgrowingcompetition.org/
https://www.iucr.org/outreach/crystal-growing-competition-2019 View the video “Mystery of the Giant Crystals” here: http://www.trianatech.com/index.php?option=com_content&view=article&id=148&Itemid=131&lang=en
Share crystallization experiences with younger students Use the pamphlet developed by Prof. Robert Pike at The College of William and Mary included in this packet to share more crystallization activities with younger students.
Keep in touch: We’d love to learn more about your experiences using this activity in your classroom or science festival. Please share your feedback with us at [email protected]
Thanks! - The CCDC Education Team

Crystallisation
• Crystallisation is a separation technique that is
used to separate a solid that has dissolved in a
liquid.
• Solid (e.g. salt, the solute) is dissolved in a
liquid (e.g. water, the solvent) making a
solution.
• Solute is added to the solvent until no more
will dissolve. This makes the solution
saturated.
• As the solvent evaporates from the saturated
solution, the solid will come out of the
solution and crystals will start to grow. The
crystals can then be collected and allowed to
dry.

Nucleation
Nucleation is the initial process that occurs in the formation of
a crystal from a solution, a liquid, or a vapour, in which a small
number of ions, atoms, or molecules become arranged in a
pattern characteristic of a crystalline solid, forming a site upon
which additional particles are deposited as the crystal grows.
• A solution is made supersaturated by dissolving more
solute as the solution is heated. Solute is added to the
hot solution until no more will dissolve. When this
solution cools to room temperature, it is called
supersaturated.
• Introducing a single crystal of the solute to this
supersaturated solution will act as a nucleation point.

Crystals!
A Booklet for Elementary Students
by Robert D. Pike, Ph.D. and Robin M. Carey
College of William & Mary
Department of Chemistry
Williamsburg, VA
Table of Contents
Vocabulary 2
Word Search 6
What is a Crystal? 7
Atoms, Ions, Molecules
and the Unit Cell 13
Crystal Shapes 15
X-Ray Crystallography 17
Recipes for Making
Your Own Crystals 19
Make Your Own Models 22,
Back Cover

Crystal Vocabulary
Atom – the smallest particle of an element
that can exist. An ion is a charged atom. A
molecule is the smallest particle of a
compound that can exist.
Bonds – the forces that hold atoms together
Crystal – a solid material with a defined
geometric shape, straight edges, and
smooth faces. Crystals are made up of
atoms, ions or molecules arranged in a
regular, orderly way.
Crystallography – the study of crystals
Evaporation – the process through which a
liquid such as water changes into a gas,
such as water vapor (steam).
Optical property – the ability of matter to
interact with light to give visible color,
interference
(rainbows),
birefringence
(double vision)
and/or
fluorescence (glows-in-the-dark)
Saturated solution – a solution containing
the maximum amount of solute dissolved in
a certain amount (volume) of solvent at a
given temperature.
Solute – the substance that is dissolved in a
solution
Solution – a uniform liquid mixture of two
substances, a solute and solvent
Solvent – the liquid that is used to dissolve a
solute to form a solution

A crystal of Rochelle salt
made from a
supersaturated solution of
Rochelle salt (potassium
sodium tartrate) and
water.
Supersaturated solution – a solution where
more than the maximum amount of solute is
temporarily dissolved in a certain amount of
solvent at a given temperature
Symmetry – when a shape looks the same if
you flip, slide, invert or turn it. For example, a
square looks the same after you rotate it by
a quarter turn.
Unit cell – the smallest building block of a
crystal whose atoms, ions, or molecules
form a geometric pattern that is repeated
throughout the substance. This repetition
forms the crystal lattice.
X-ray crystallography – the visualization of
the molecular structure of crystals using X-
rays.
Chrome Alum Copper(II) sulfate
Fluorite Mica

Vocabulary Word Search
c r y s t a l q w e t y u i k o g h i s
s e b a t o m y r c s i u t l u b g f c
c y r t a s s l v c d s s o l u t i o n
u t r u c r o d f e v a o r a g s o l s
e n s r k y g l e b c v l v r e c a u a
d e i a l t d s v s c a u a m n a p r w
c f s t i d d v d e a r t m e i e c e o
y c y e c v e v c f n u e v y r r e y g
b s a d i e c a s s a t d v s r e k j c
r g s s m v l g h d r a s a k e y i e m
c e x o y a c l e y g s t v a h k m a k
r v h l y p c s y f s d c e t t o y n n
s g r u u o p t i c a l p r o p e r t y
a h e t n r r t c r a m c c e a r e y a
y s d i f a r s y d s e a n s k i r e r
l s f o s t d c e y c n c i l y s a t f
s b o n d i s e c h d t e b y e e c t d
e t f d s o s r u s e d c o n r t f e n
m r b b s n c r w r e v a r c a e n e a
x r a y c r y s t a l l o g r a p h y s
atom, bond, crystal, crystallography, evaporation,
optical property, solution, saturated solution,
solvent, solute, symmetry, unit cell,
x-ray crystallography
What is a Crystal?
If you were asked to name a crystal, what
would you choose? Would it be the
“crystal” chandelier in a fancy hotel or your
grandmother’s good glassware that she
calls her good “crystal”?
In fact neither of those
things is crystal. They are
made of cut glass. A
crystal is a solid substance made of atoms,
molecules or ions that form regular
repeating patterns called a crystal lattice.
The regular patterns of atoms in
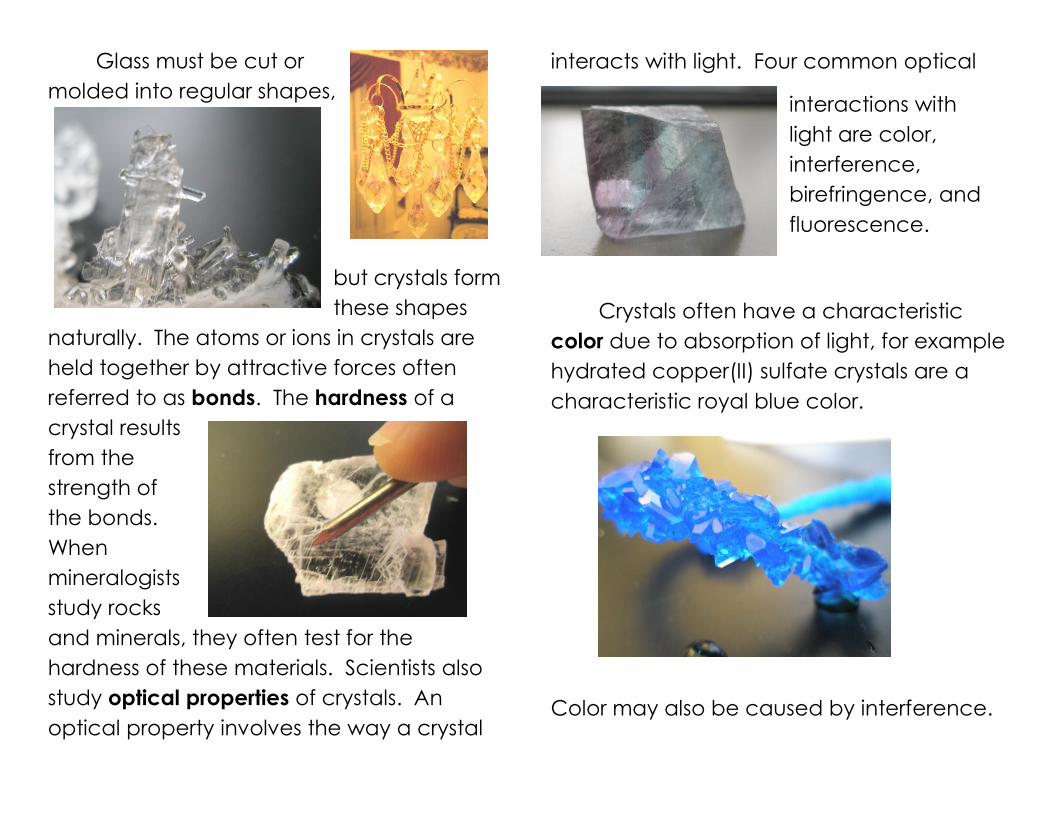
Glass must be cut or
molded into regular shapes,
but crystals form
these shapes
naturally. The atoms or ions in crystals are
held together by attractive forces often
referred to as bonds. The hardness of a
crystal results
from the
strength of
the bonds.
When
mineralogists
study rocks
and minerals, they often test for the
hardness of these materials. Scientists also
study optical properties of crystals. An
optical property involves the way a crystal
interacts with light. Four common optical
interactions with
light are color,
interference,
birefringence, and
fluorescence.
Crystals often have a characteristic
color due to absorption of light, for example
hydrated copper(II) sulfate crystals are a
characteristic royal blue color.
Color may also be caused by interference.

Interference often produces rainbows due
to the differences in the time that it takes for
different colors of
light to pass
through a material.
Look at the crystal
of bismuth to the
right. Bismuth’s
rainbow colors are
due to the varying
thickness of an
oxide coating. Interference causes CDs
and DVDs to show rainbow colors.
Birefringence is the splitting of light inside a
crystal, causing double vision when looking
through the
crystal.
Fluorescence is happening when a crystal
glows when exposed to ultraviolet light.
Crystals exposed to white light.
Crystals exposed to ultraviolet light.

So what are some crystals that you can find
around you?
Table salt, which has the chemical name of
sodium chloride, is
a white crystal with
a cubic shape. It is
made of sodium
(Na+) and chloride
(Cl–) ions.
Sugar, ice and diamonds are all crystals.
Each has their own
shape. Other crystals
can be formed from
powders that you may
have around the
house. For example,
the detergent booster, borax, contains
sodium borate which makes crystals easily.
Later in this booklet, you will find a recipes
for making sodium borate, sodium chloride
and Epsom salt crystals.
ATOMS, IONS AND THE UNIT CELL
The Crystal Lattice of Sodium Chloride
(teal balls = Cl–, red balls = Na+)
Crystals form as a result of bonds
(attractions) between atoms, ions and/or
molecules. The particles align themselves
to maximize the number of attractions. For
example, the Cl– and Na+ ions in sodium
chloride attract each other. Look at the
picture above. Can you see how each Cl-
touches only Na+ and each Na+ touches
only Cl-? The unit cell is the smallest
repeating portion of the crystal. The unit
cell is like a brick and the entire crystal is like
a brick wall.

Crystal of Sodium Chloride, also called Halite and its ball
and stick model.
Diamond and graphite (pencil “lead”)
are forms of carbon. They are very
different. Diamond is colorless and very
hard. Graphite is black and very soft.
These differences come from the different
arrangement of atoms in diamond and
graphite.
Graphite
Diamond
Crystal Shapes
Crystals form in seven different shapes
called crystal systems. The crystal systems
are named cubic, tetragonal,
orthorhombic, monoclinic, triclinic,
hexagonal, and rhombohedral. Each
crystal system has a unique shape
(symmetry). For example all edges (red,
green, and blue) in a cubic crystal have the
same length. But in a tetragonal crystal one
of these lengths (blue) is different than the
other two. And in orthorhombic crystals all
three are different from one another.
Cubic Tetragonal Orthorhombic

crystals cause crystals to grow or cleave in
geometric shapes. The atoms in glass are
not arranged in regular patterns.
Monoclinic Triclinic Hexagonal
Rhombohedral
Can you guess what
shape this crystal of
pyrite is?
X-Ray Crystallography
Picture of an X-ray diffractometer
Crystallography is the study of the
molecular structure of crystals. One way
that scientists study crystals is through X-ray
crystallography. X-rays make up a part of
the light spectrum. X-rays are not visible to
the human eye, but they can be “seen”
using special equipment for instance in a
medical X-ray. Since X-ray beams carry
high energy (“ionizing”) radiation, they must
be handled with great care and only by
trained specialists. In X-ray crystallography,
X-rays are used to “look inside” the crystal.
The X- rays diffract (bounce off of) the layers

of atoms that make up the crystal lattice.
The diffracted X-rays were once detected
using photographic film, but now special
imaging plates are used. The collection of
diffracted X-rays can be turned into a map
of the crystal’s structure. This map shows
the locations of atoms in the unit cell. By
“looking” at the crystal in this way, a
scientist can tell a great deal about the
crystal’s structure.
X-ray structure of a molecule containing many atoms
Recipes for Making Your Own
Crystals
Salt Crystals:
Materials:
table salt, NaCl
pie pan or glass plate
water (distilled is best)
stove or microwave oven
measuring cup
teaspoon
Procedure:
1. Measure out ½ cup of distilled water
and heat to nearly boiling.
2. Stir in 3 teaspoons of salt and stir until
dissolved.
3. Pour into a pie pan or glass plate
and allow water to evaporate.
4. Observe the crystals.

Sodium Borate Crystals:
Materials:
borax
clear glass or cup, a pint jar will also
work
water (distilled is best)
stove or microwave oven
measuring cup
teaspoon
string and pencil
Procedure:
1. Measure out ½ cup of distilled water that
has been warmed to nearly boiling.
2. Stir in 2 teaspoons of borax and stir until
dissolved.
3. Tie a piece of string to a pencil, place the
string in the liquid and set the pencil
across the top of the glass. Let stand for
several days and observe crystals.
Epsom Salt Crystals
Materials:
Epsom salt
clear glass or cup
water (distilled is best)
stove or microwave oven
measuring cup
teaspoon
string and pencil
Procedure:
1. Measure out ½ cup of distilled water
that has been warned to nearly
boiling.
2. Stir in 7 teaspoons of Epsom salt and
stir until dissolved.
3. Tie a piece of string to a pencil,
place the string in the liquid and set
the pencil across the top of the
glass. Let stand for at least two
weeks and observe crystals.

Make Your Own Models
Trace the pattern below on a separate
sheet of paper, cut it out and form
your own cubic paper “crystal”.
Octahedron
Trace the pattern onto another piece of
paper, cut along the bolded lines, taking
care to not cut tabs. Fold along the
dashed lines and tape structure.

Lab Procedure Sodium Borate Crystals
Materials:
Plastic cup, marked for 50 mL
Styrofoam cup
50 mL of deionized water
2 teaspoons of sodium borate
String
Plastic spoon
Scissors
Procedure:
1. Label a styrofoam cup, Sodium Borate solution.
2. Place 2 teaspoons of sodium borate in the
Styrofoam cup.
3. Place 50 mL of water that has been warmed
into the cup as well.
4. Using a plastic spoon, stir solution until all of the
sodium borate is dissolved.
5. Using scissors, cut a piece of string slightly
longer than the height of the cup and tie to
the plastic spoon.
6. Place the string into the mixture and rest the
plastic spoon across the top of the cup.
7. Place a piece of paper over the cup and let it
sit undisturbed overnight to one week.

Lab Procedure Nickel Sulfate Crystals:
Materials:
6 teaspoons of nickel sulfate hydrate
Plastic cup, marked for 50 mL
Styrofoam cup
50 mL of deionized water
Plastic spoon
String
Scissors
Procedure:
1. Label a Styrofoam cup, “Nickel Sulfate solution.
2. Place 6 teaspoons of nickel sulfate hydrate in
a Styrofoam cup.
3. Place 50 mL of deionized water, which has
been warmed, into the Styrofoam cup.
4. Using scissors cut a length of string slightly
longer than the height of the cup.
5. Place the string into the mixture, resting the
spoon across the top of the cup.
6. Place a piece of paper over the cup and let it
sit undisturbed overnight to one week.

Lab Procedure Chrome Alum Crystals
Materials:
Solution of alum
Solution of potassium chromium sulfate
Graduated cylinder
Plastic cup, marked for 50 mL
Styrofoam cup
String
Spoon
Scissors
Procedure:
1. Label the Styrofoam cup with the percentage
of potassium chromium sulfate solution to be
added.
2. Based on the percentage that your group is
assigned, measure out the amount of
potassium chromium sulfate solution needed in
a graduated cylinder.
0% - 0 mL potassium chromium sulfate
5% - 2.5 mL potassium chromium sulfate
10% - 5 mL potassium chromium sulfate

Lab Procedure 25% - 12.5 mL potassium chromium sulfate
50% - 25 mL potassium chromium sulfate
3. Pour the potassium chromium sulfate solution
into the plastic cup.
4. Add potassium aluminum sulfate solution to the
cup, filling to the 50 mL mark
5. Stir the solution well and pour it into the labeled
Styrofoam cup.
6. Cut a piece of string slightly longer than the
height of the Styrofoam cup and tie to the
spoon.
7. Lay the spoon across the cup allowing the
string to dangle into the solution.
8. Place a piece of paper over the cup and let it
sit undisturbed overnight to one week.

Lab Procedure Copper Sulfate Crystals
Materials:
4 teaspoons of copper sulfate hydrate
Plastic cup, marked for 50 mL
50 mL of deionized water
Styrofoam cup
Plastic spoon
String
Scissors
Procedure:
1. Label a Styrofoam cup, “Copper Sulfate solution”.
2. Place 4 teaspoons of copper sulfate into a
Styrofoam cup.
3. Obtain 50 mL of warmed deionized water from
the lab station, using your marked plastic cup.
4. Pour the warm water into the Styrofoam cup and
stir with the plastic spoon until all solid is dissolved.
5. Cut a piece of string slightly longer than the
height of the Styrofoam cup and tie it to the
spoon.
6. Lay the spoon across the cup allowing the string
to dangle into the solution.
7. Cover and let stand overnight to one week.

Lab Procedure Ferrous Ammonium Sulfate Crystals
Materials:
3 teaspoons of ferrous ammonium sulfate
Plastic cup, marked for 50 mL
Styrofoam cup
Plastic spoon
50 mL of deionized water
Procedure:
1. Label a Styrofoam cup, “Ferrous Ammonium
Sulfate solution”.
2. Place three teaspoons of ferrous ammonium
sulfate in the Styrofoam cup.
3. Place warmed water in the plastic cup to the
mark.
4. Place the warmed water from the plastic cup
into the Styrofoam cup.
5. Using the plastic spoon stir until the ferrous
ammonium sulfate is dissolved.
6. Using scissors, cut a length of string slightly
higher than the cup.
7. Tie the string to the plastic spoon.
8. Lay the spoon across the cup allowing the
string to dangle into the solution.
9. Cover and let stand overnight to one week.

Lab Procedure Rochelle Salt Crystals
Materials:
10 teaspoons of Rochelle Salt (potassium
sodium tartrate)
50 mL of deionized water
Plastic cup, marked for 50 mL
Styrofoam cup
Plastic spoon
String
Scissors
Procedure:
1. Label a Styrofoam cup, “Rochelle Salt solution”.
2. Place 10 teaspoons of Rochelle Salt in a Styrofoam
cup.
3. Measure out 50 mL of warmed water in the marked
cup and pour into the Styrofoam cup.
4. Stir the salt until dissolved in water.
5. Using scissors, cut a length of string slightly longer
than the height of the Styrofoam cup.
6. Tie one end of the string to the plastic spoon.
7. Place the other end of the string into the solution and
rest the spoon on top of the cup.
8. Cover the cup with a piece of paper and let stand
undisturbed overnight to one week.

Lab Procedure Mineral Hardness Test
Materials:
Nail
Copper penny
Mineral sample
Finger nail
Magnifying glass
Procedure:
1. Using the nail, attempt to scratch the mineral, by
dragging the nail across the mineral. Observe the
mineral using a magnifying glass if necessary.
2. If the mineral was scratched, repeat the
procedure for number 1, using the copper penny
instead of the nail.
3. If the mineral is scratched again, repeat with your
finger nail.
4. Make a statement about the hardness of your
mineral. For example, a nail has the hardness of 5,
if it scratched the mineral then the mineral’s
hardness is less than 5, however a copper penny
has a hardness of 3. If the mineral was not
scratched by the copper penny, then the
hardness of the mineral was 3.5 to 4.5. A finger nail
has the hardness of 2.5.
5. Repeat with several other minerals.

Lab Procedure Making a Ball and Stick Crystal Model
Materials:
Toothpicks
Bamboo skewers (cut in two equal lengths)
Small Styrofoam balls
Protractor
Procedure:
Cubic Crystal:
1. Obtain eight (8) small Styrofoam balls and
twelve (12) toothpicks.
2. Connect four Styrofoam balls to form a square
shape using four toothpicks. Use a protractor to
make the angles in the square exactly 900.
Repeat this for the other 4 Styrofoam balls.
3. Using four more toothpicks,
connect your two squares to
form a cube. Use a protractor
to make all the angles
between the squares exactly
900.
4. Your structure should look similar to the drawing
below.

Lab Procedure
Procedure: Hexagonal Crystal
1. Obtain eight (8) small Styrofoam balls, eight (8)
toothpicks, and four (4) bamboo skewers that
have been cut into two equal pieces.
2. Connect four Styrofoam balls to form a
parallelogram with two angles of 600 and two
angles of 1200. Use a protractor to make the
angles in the parallelogram exactly 600 and
1200. Repeat this for the other 4 Styrofoam
balls.
3. Using four more toothpicks,
connect your two squares
as you did with the cube.
Use a protractor to make
all the angles between the
parallelograms exactly 900.
4. Your structure should look
similar to the drawing below.
Lab Procedure Examining Crystals Part One
Materials:
crystal growing experiments from Day 1
stirring rod
waste container
magnifying glasses
Paper towels
Procedure:
1. Obtain crystal growing experiments from Day 1.
2. Lift the string from the cup and lay spoon, string and
crystals on paper towel.
3. Take cup to the waste container and decant the
liquid from the cup by pouring the liquid from the
cup into a funnel attached to the waste container.
4. Examine crystals on the string as well as in the cup.
Look at the crystals and make observations. Then
take a magnifying glass and make observations of
what you see through the magnifying glass.
5. Clean up according to your instructor’s directions.
Lab Procedure Examining Crystals Part Two
Materials:
collection of crystals
magnifying glass
data sheet
Procedure:
1. Obtain materials.
2. Make observations of each of the crystals and
try to determine which optical property the
crystal has. Do this by:
a. placing the crystal on a white sheet of
paper.
b. placing the crystal on the print of this
paper or you data sheet.
c. holding the crystal toward a light and
looking through the crystal.
3. Make all written observations on your data
sheet.