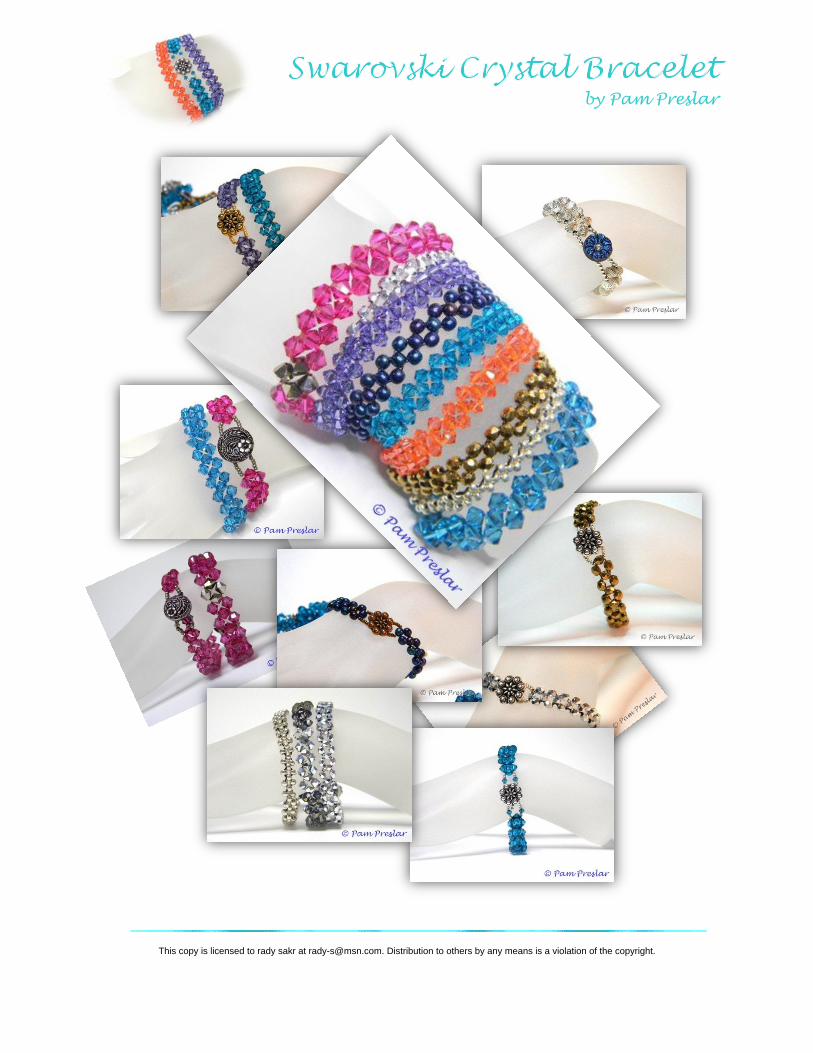
crystal bracelet
38
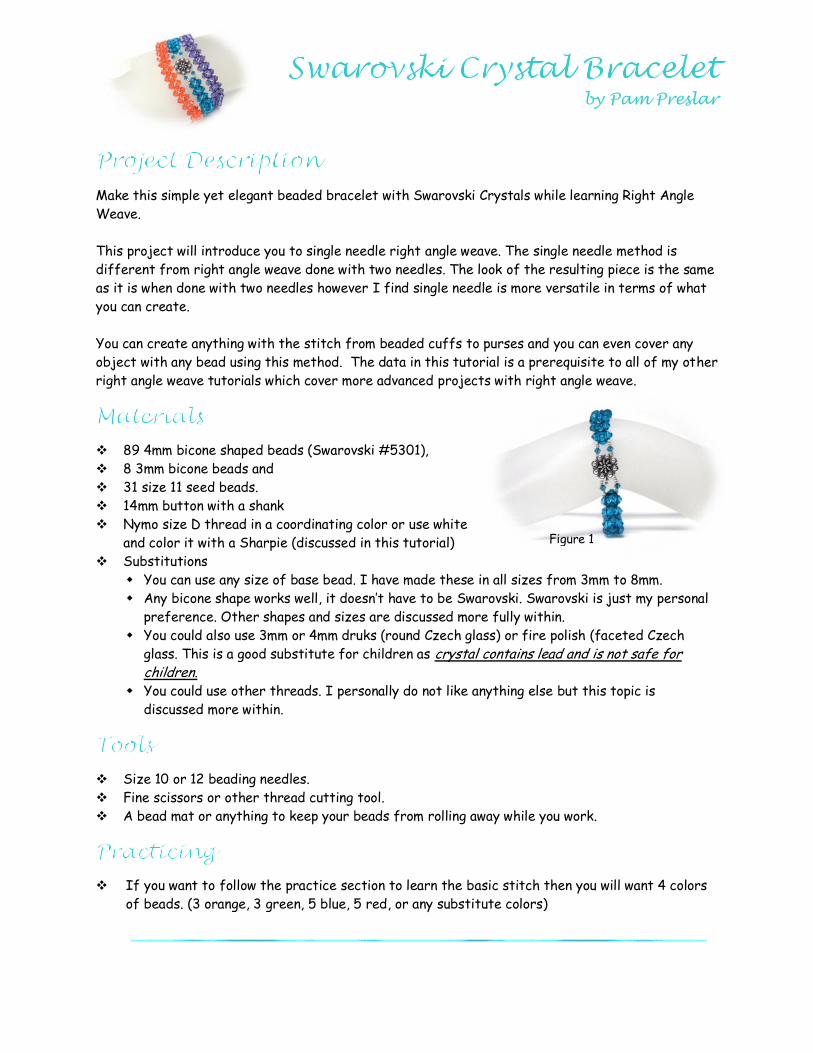
by Pam Preslar Make this simple yet elegant beaded bracelet with Swarovski Crystals while learning Right Angle Weave. This project will introduce you to single needle right angle weave. The single needle method is different from right angle weave done with two needles. The look of the resulting piece is the same as it is when done with two needles however I find single needle is more versatile in terms of what you can create. You can create anything with the stitch from beaded cuffs to purses and you can even cover any object with any bead using this method. The data in this tutorial is a prerequisite to all of my other right angle weave tutorials which cover more advanced projects with right angle weave. 89 4mm bicone shaped beads (Swarovski #5301), 8 3mm bicone beads and 31 size 11 seed beads. 14mm button with a shank Nymo size D thread in a coordinating color or use white and color it with a Sharpie (discussed in this tutorial) Substitutions You can use any size of base bead. I have made these in all sizes from 3mm to 8mm. Any bicone shape works well, it doesn’t have to be Swarovski. Swarovski is just my personal preference. Other shapes and sizes are discussed more fully within. You could also use 3mm or 4mm druks (round Czech glass) or fire polish (faceted Czech glass. This is a good substitute for children as crystal contains lead and is not safe for children. You could use other threads. I personally do not like anything else but this topic is discussed more within. Size 10 or 12 beading needles. Fine scissors or other thread cutting tool. A bead mat or anything to keep your beads from rolling away while you work. If you want to follow the practice section to learn the basic stitch then you will want 4 colors of beads. (3 orange, 3 green, 5 blue, 5 red, or any substitute colors) Figure 1
-
Upload
mohamed-ramadan -
Category
Documents
-
view
232 -
download
2
description
Crystal Bracelet
Transcript of crystal bracelet
by Pam Preslar
Make this simple yet elegant beaded bracelet with Swarovski Crystals while learning Right Angle
Weave.
This project will introduce you to single needle right angle weave. The single needle method is
different from right angle weave done with two needles. The look of the resulting piece is the same
as it is when done with two needles however I find single needle is more versatile in terms of what
you can create.
You can create anything with the stitch from beaded cuffs to purses and you can even cover any
object with any bead using this method. The data in this tutorial is a prerequisite to all of my other
right angle weave tutorials which cover more advanced projects with right angle weave.
89 4mm bicone shaped beads (Swarovski #5301),
8 3mm bicone beads and
31 size 11 seed beads.
14mm button with a shank
Nymo size D thread in a coordinating color or use white
and color it with a Sharpie (discussed in this tutorial)
Substitutions
You can use any size of base bead. I have made these in all sizes from 3mm to 8mm.
Any bicone shape works well, it doesn’t have to be Swarovski. Swarovski is just my personal
preference. Other shapes and sizes are discussed more fully within.
You could also use 3mm or 4mm druks (round Czech glass) or fire polish (faceted Czech
glass. This is a good substitute for children as crystal contains lead and is not safe for children.
You could use other threads. I personally do not like anything else but this topic is
discussed more within.
Size 10 or 12 beading needles.
Fine scissors or other thread cutting tool.
A bead mat or anything to keep your beads from rolling away while you work.
If you want to follow the practice section to learn the basic stitch then you will want 4 colors
of beads. (3 orange, 3 green, 5 blue, 5 red, or any substitute colors)
Figure 1

Swarovski Crystal Bracelet
© 2011 Pam Preslar Page 2 of 38 www.booksbypam.com
12.7.2011
Project Description ..................................................................................................................... 1
Materials ..................................................................................................................................... 1
Tools ............................................................................................................................................. 1
Practicing .................................................................................................................................... 1
Introduction to Right Angle Weave ...................................................................................... 3
Why use Right Angle Weave? ............................................................................................. 4
Terms Used ............................................................................................................................... 4
Basic Supplies ........................................................................................................................... 4
Thread ............................................................................................................................................ 5
Preparing Your Thread .......................................................................................................... 5
Dying Your Thread .................................................................................................................. 6
Cutting Your Thread .............................................................................................................. 6
Needles ........................................................................................................................................... 8
Threading Your Needle ......................................................................................................... 8
Substitutions ................................................................................................................................ 8
Weaving the Bracelet ................................................................................................................ 9
Finishing the Woven Section ............................................................................................. 16
Common Mistakes ...................................................................................................................... 18
Breaking Thread .................................................................................................................... 18
Always Turn Corners, Do Not Cross Them ........................................................................ 19
Maintaining Tension .................................................................................................................. 21
Creating a Custom Clasp Mechanism ................................................................................... 28
Secure Your Thread ............................................................................................................. 29
Tying a Knot ................................................................................................................................ 30
Alternatives ................................................................................................................................ 35
Starting with the Clasp ....................................................................................................... 35
Other Clasp Designs ................................................................................................................. 35
Smaller Seed Beads ............................................................................................................. 35
Simple Loop Clasp .................................................................................................................. 36
Note this table is clickable. When viewing on computer just click on the item to go there.
This copy is licensed to rady sakr at [email protected]. Distribution to others by any means is a violation of the copyright.
Swarovski Crystal Bracelet
© 2011 Pam Preslar Page 3 of 38 www.booksbypam.com
12.7.2011
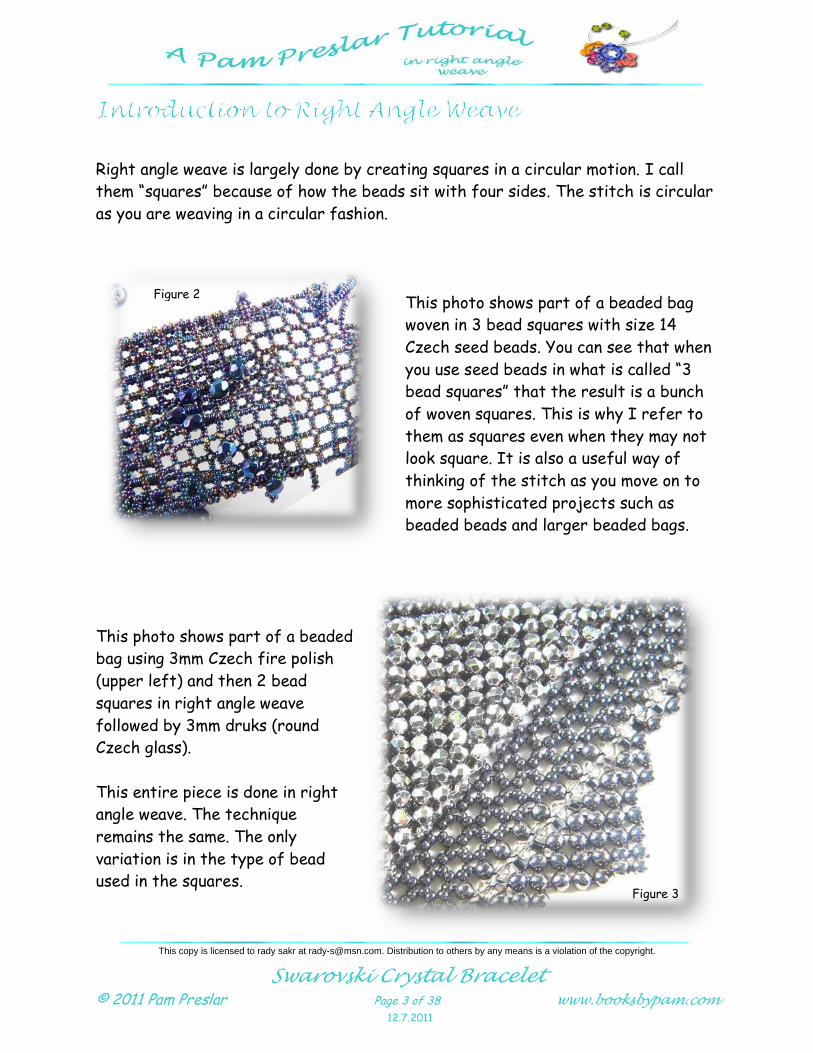
Right angle weave is largely done by creating squares in a circular motion. I call
them “squares” because of how the beads sit with four sides. The stitch is circular
as you are weaving in a circular fashion.
This photo shows part of a beaded bag
woven in 3 bead squares with size 14
Czech seed beads. You can see that when
you use seed beads in what is called “3
bead squares” that the result is a bunch
of woven squares. This is why I refer to
them as squares even when they may not
look square. It is also a useful way of
thinking of the stitch as you move on to
more sophisticated projects such as
beaded beads and larger beaded bags.
This photo shows part of a beaded
bag using 3mm Czech fire polish
(upper left) and then 2 bead
squares in right angle weave
followed by 3mm druks (round
Czech glass).
This entire piece is done in right
angle weave. The technique
remains the same. The only
variation is in the type of bead
used in the squares.
Figure 2
Figure 3
This copy is licensed to rady sakr at [email protected]. Distribution to others by any means is a violation of the copyright.
Swarovski Crystal Bracelet
© 2011 Pam Preslar Page 4 of 38 www.booksbypam.com
12.7.2011
I used right angle weave for many reasons. Here a couple of those reasons.
Right angle weave is a very secure stitch. Once a piece is woven it will take
scissors to take it apart. It is not going to fall apart while being worn or used.
The finished beadwork has a silken feel when you weave in this stitch.
You can use just about any size and shape of bead. Some look great while
others do not. Bicone and round shapes work really well.
You can easily combine shapes and sizes all in one piece and you can make just
about anything with this stitch.
Needling – This refers to weaving through beads without adding any additional
beads. You will “needle around” or “needle through” in order to get your thread in
the right position for the following step.
Square – This refers to one group of four beads woven together forming a square.
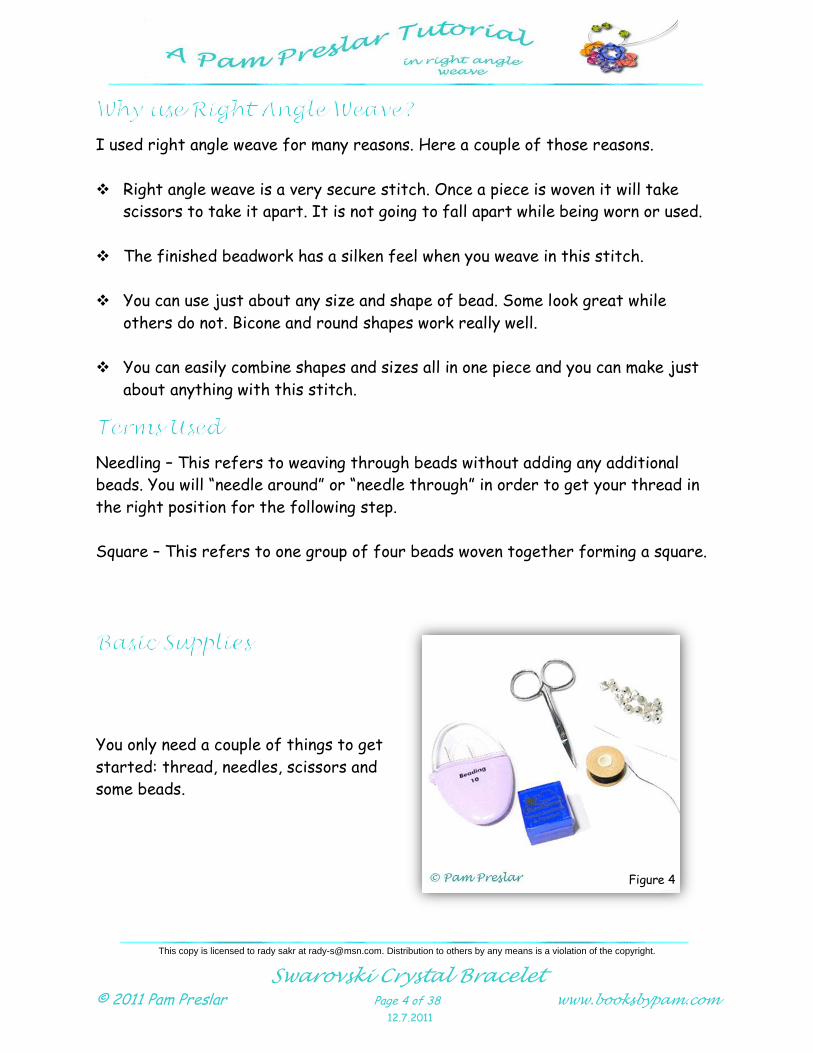
You only need a couple of things to get
started: thread, needles, scissors and
some beads.
Figure 4
This copy is licensed to rady sakr at [email protected]. Distribution to others by any means is a violation of the copyright.
Swarovski Crystal Bracelet
© 2011 Pam Preslar Page 5 of 38 www.booksbypam.com
12.7.2011
I use Nymo (originally created for the shoe industry) brand for all weaving no
matter the bead type. I think the name Nymo is for Nylon Monofilament. Over the
years I have tried it all. When I started weaving with Swarovski crystals I thought
I would need something more robust. Everything I tried ended up cut or frayed
(including Kevlar thread, which is, or was, used in bullet-proof vests).
Nymo comes on large spools or little bobbins in a variety of sizes from OOO to D,
with D being the thickest. I have only seen OOO, OO, O, A, B, and D. I use D for
beads that are 3mm and larger. For tiny (size 13 and smaller) seed beads I use B.
For beads with smaller holes I go down to an O. I personally have never had to use
something finer than O.
Nymo comes in a variety of colors but you can also dye it. This is covered later in
this section. You can click on any blue underlined text in this tutorial.
FireLine, SoftFlex and other fine wires are stiffer than I like. Nymo leaves the
piece with a silken feel rather than the stiff feel which results with fine wire.
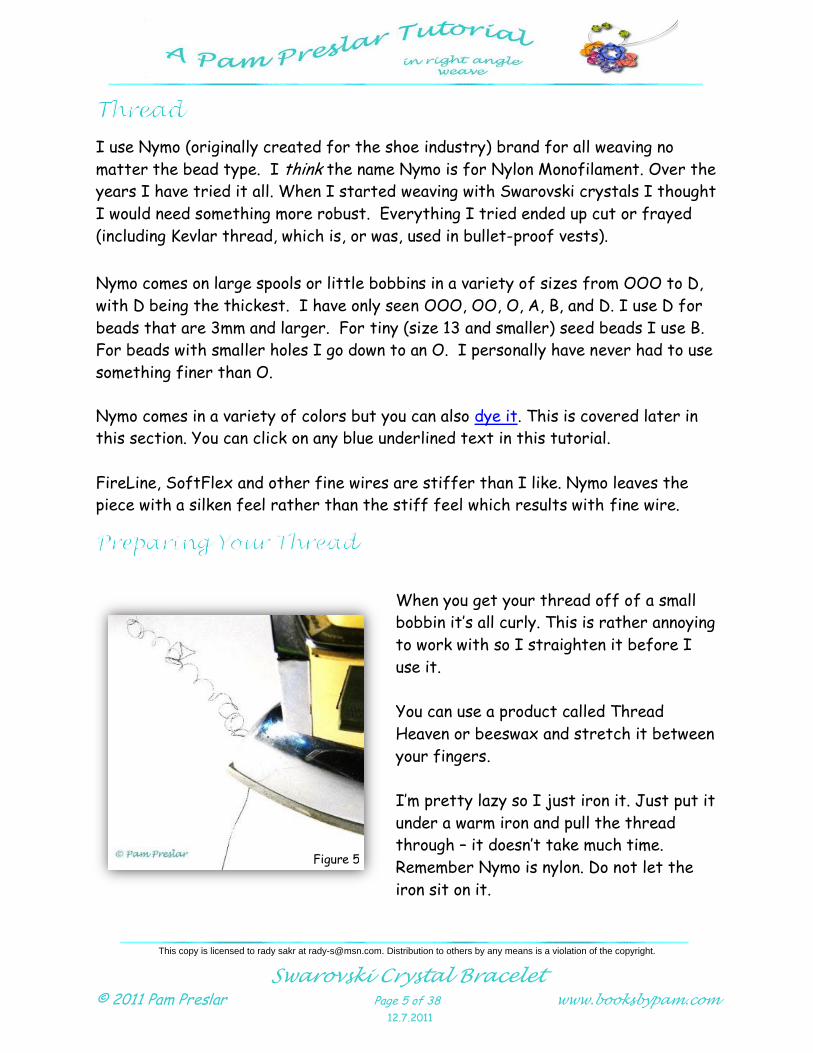
When you get your thread off of a small
bobbin it’s all curly. This is rather annoying
to work with so I straighten it before I
use it.
You can use a product called Thread
Heaven or beeswax and stretch it between
your fingers.
I’m pretty lazy so I just iron it. Just put it
under a warm iron and pull the thread
through – it doesn’t take much time.
Remember Nymo is nylon. Do not let the
iron sit on it.
Figure 5
This copy is licensed to rady sakr at [email protected]. Distribution to others by any means is a violation of the copyright.
Swarovski Crystal Bracelet
© 2011 Pam Preslar Page 6 of 38 www.booksbypam.com
12.7.2011
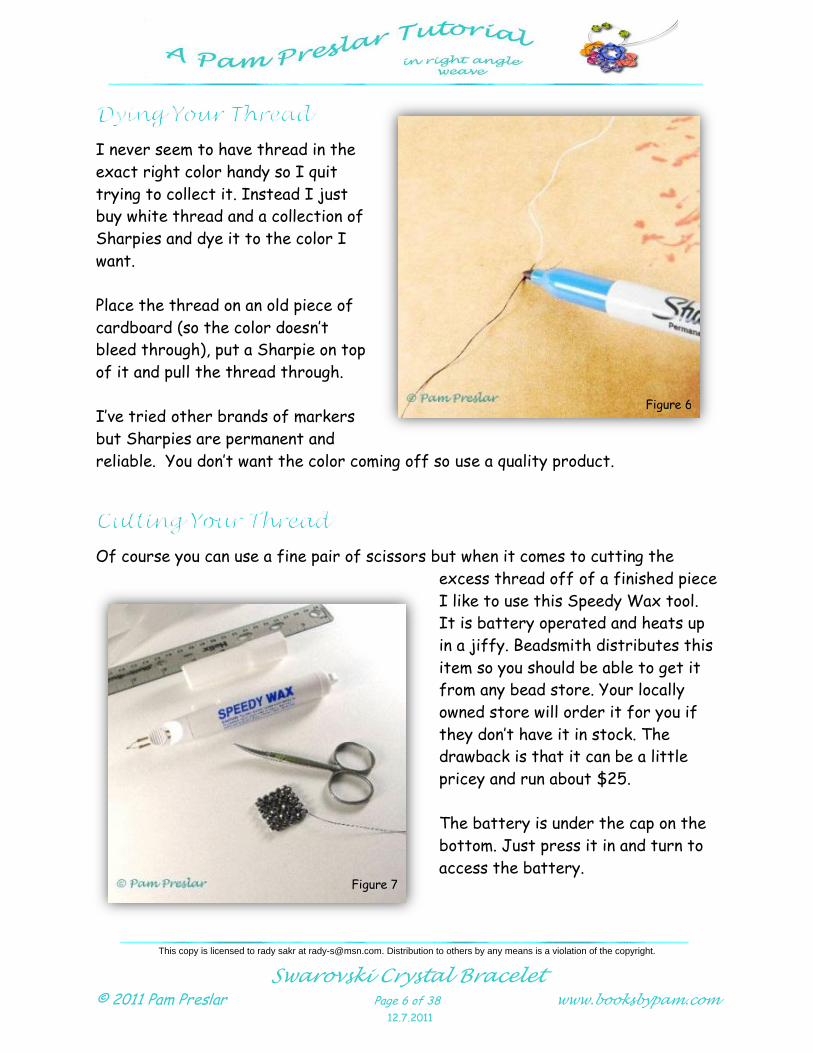
I never seem to have thread in the
exact right color handy so I quit
trying to collect it. Instead I just
buy white thread and a collection of
Sharpies and dye it to the color I
want.
Place the thread on an old piece of
cardboard (so the color doesn’t
bleed through), put a Sharpie on top
of it and pull the thread through.
I’ve tried other brands of markers
but Sharpies are permanent and
reliable. You don’t want the color coming off so use a quality product.
Of course you can use a fine pair of scissors but when it comes to cutting the
excess thread off of a finished piece
I like to use this Speedy Wax tool.
It is battery operated and heats up
in a jiffy. Beadsmith distributes this
item so you should be able to get it
from any bead store. Your locally
owned store will order it for you if
they don’t have it in stock. The
drawback is that it can be a little
pricey and run about $25.
The battery is under the cap on the
bottom. Just press it in and turn to
access the battery.
Figure 6
Figure 7
This copy is licensed to rady sakr at [email protected]. Distribution to others by any means is a violation of the copyright.
Swarovski Crystal Bracelet
© 2011 Pam Preslar Page 7 of 38 www.booksbypam.com
12.7.2011
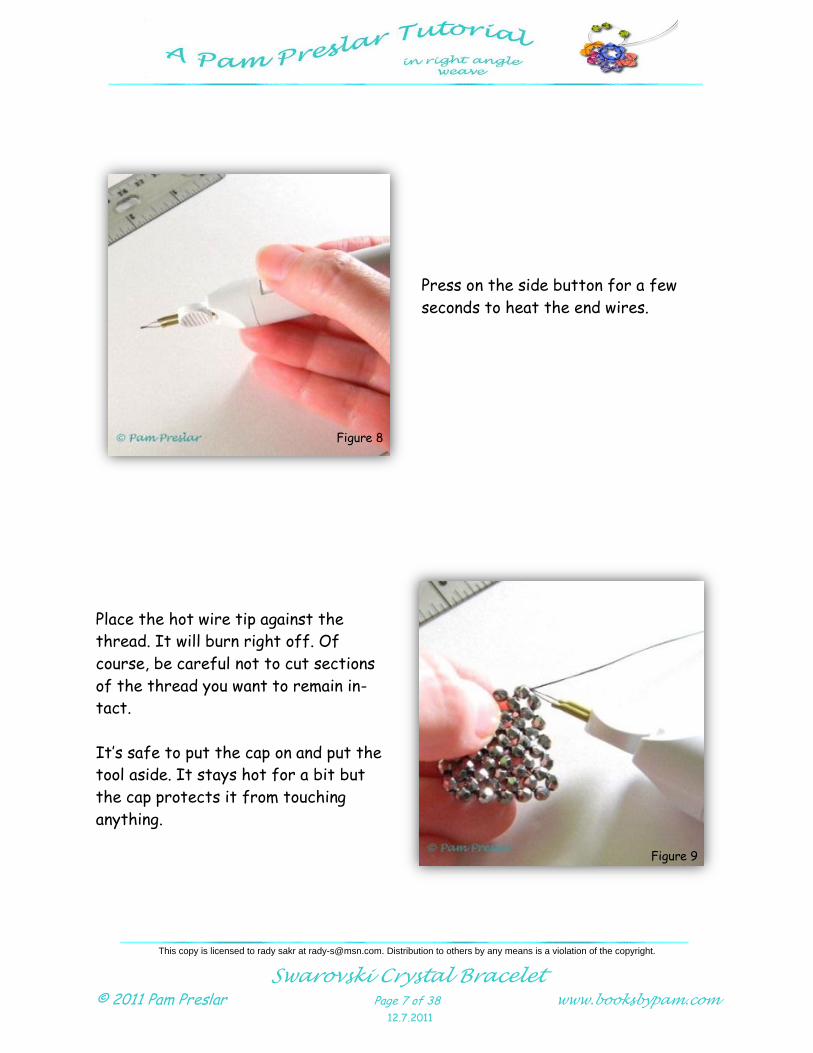
Press on the side button for a few
seconds to heat the end wires.
Place the hot wire tip against the
thread. It will burn right off. Of
course, be careful not to cut sections
of the thread you want to remain in-
tact.
It’s safe to put the cap on and put the
tool aside. It stays hot for a bit but
the cap protects it from touching
anything.
Figure 8
Figure 9
This copy is licensed to rady sakr at [email protected]. Distribution to others by any means is a violation of the copyright.
Swarovski Crystal Bracelet
© 2011 Pam Preslar Page 8 of 38 www.booksbypam.com
12.7.2011
I use English beading needles in a size appropriate to match the project. Usually
size 10 will do until you get into smaller seed bead sizes.
I find that Big Eye needles tear up my thread but some of my students like them.
The amount of thread you start with is a personal decision. If it’s too short then
you have to start a new thread more often. If it’s too long then you get more
tangles and lasso stuff on your table; the corner of the table, the wheels under
your chair, the dog, etc., I use about two arms lengths, from my right fingertips to
my left fingertips.
DO NOT DOUBLE YOUR THREAD. Just thread the needle and pull it through
leaving a tail. The length of the tail can vary as you work. Be sure you don’t weave
the tail along with the main thread into your work.
I have never made a piece without having to correct an error at least once. If you
have doubled thread you will not be able to simply remove the needle and undo
previous weaving. You will have to start over (argh! I dislike re-do’s).
Nonetheless, if you do have to backtrack it may still take some patience. Right
angle weave is very secure and does not come apart easily. Even taking a piece
apart with scissors takes extra patience! It is actually a key advantage to right
angle weave. You know it is not going to fall apart when worn!
You can use larger bicone beads. I have used 6mm and 8mm bicone beads in lots of
right angle weave projects. Of course, you would then use fewer beads. You can
also go smaller and then use more beads.
This also looks great in 3 or 4mm druks (round Czech glass beads) and Czech fire
polished beads (basically faceted glass smoothed a bit by fire). Larger than 4mm in
these other shapes is not desirable to me for many projects as it leaves more
empty space than I like.
This copy is licensed to rady sakr at [email protected]. Distribution to others by any means is a violation of the copyright.
Swarovski Crystal Bracelet
© 2011 Pam Preslar Page 9 of 38 www.booksbypam.com
12.7.2011
If this is your first project I would stick to the same size and shape beads
throughout the project. Once you are familiar you can try all kinds of things
including mixing a variety of bead sizes and shapes. The variations and possibilities
are endless once you understand the stitch. See “Finishing the Woven Section” for
information on how to measure the bracelet and adjusting for your bead size and
wrist size.
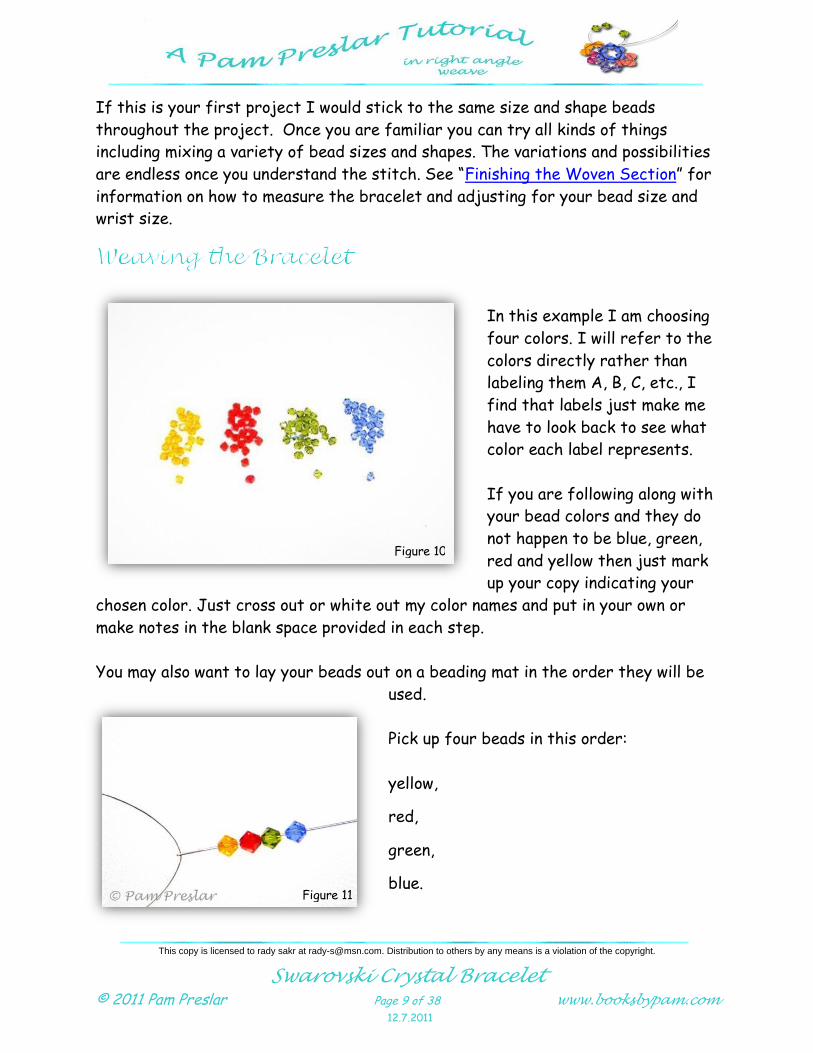
In this example I am choosing
four colors. I will refer to the
colors directly rather than
labeling them A, B, C, etc., I
find that labels just make me
have to look back to see what
color each label represents.
If you are following along with
your bead colors and they do
not happen to be blue, green,
red and yellow then just mark
up your copy indicating your
chosen color. Just cross out or white out my color names and put in your own or
make notes in the blank space provided in each step.
You may also want to lay your beads out on a beading mat in the order they will be
used.
Pick up four beads in this order:
yellow,
red,
green,
blue.
Figure 10
Figure 11
This copy is licensed to rady sakr at [email protected]. Distribution to others by any means is a violation of the copyright.
Swarovski Crystal Bracelet
© 2011 Pam Preslar Page 10 of 38 www.booksbypam.com
12.7.2011
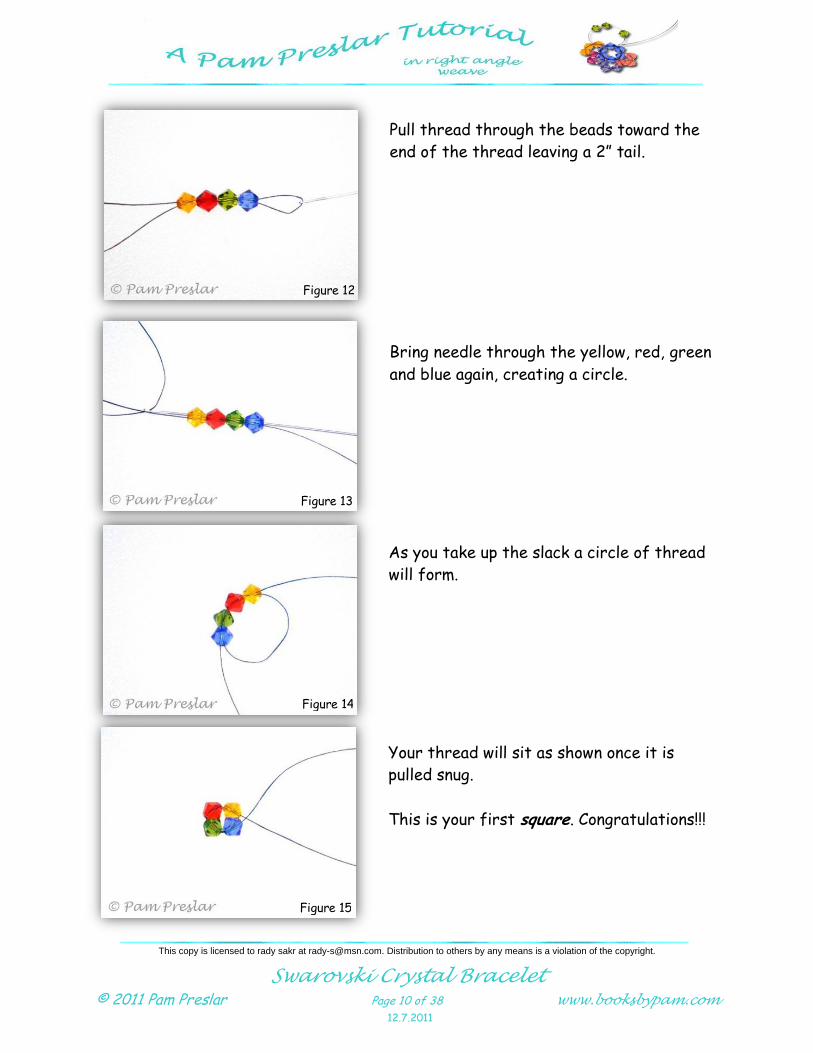
Pull thread through the beads toward the
end of the thread leaving a 2” tail.
Bring needle through the yellow, red, green
and blue again, creating a circle.
As you take up the slack a circle of thread
will form.
Your thread will sit as shown once it is
pulled snug.
This is your first square. Congratulations!!!
Figure 12
Figure 13
Figure 14
Figure 15
This copy is licensed to rady sakr at [email protected]. Distribution to others by any means is a violation of the copyright.
Swarovski Crystal Bracelet
© 2011 Pam Preslar Page 11 of 38 www.booksbypam.com
12.7.2011
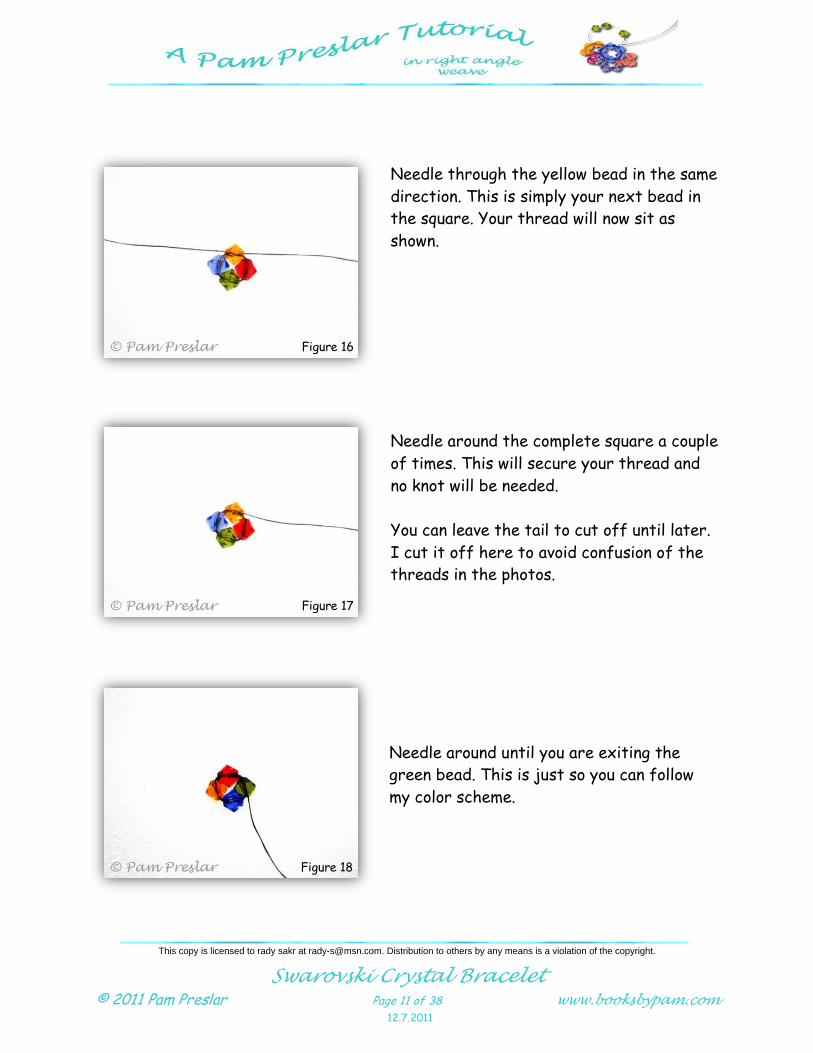
Needle through the yellow bead in the same
direction. This is simply your next bead in
the square. Your thread will now sit as
shown.
Needle around the complete square a couple
of times. This will secure your thread and
no knot will be needed.
You can leave the tail to cut off until later.
I cut it off here to avoid confusion of the
threads in the photos.
Needle around until you are exiting the
green bead. This is just so you can follow
my color scheme.
Figure 16
Figure 17
Figure 18
This copy is licensed to rady sakr at [email protected]. Distribution to others by any means is a violation of the copyright.
Swarovski Crystal Bracelet
© 2011 Pam Preslar Page 12 of 38 www.booksbypam.com
12.7.2011
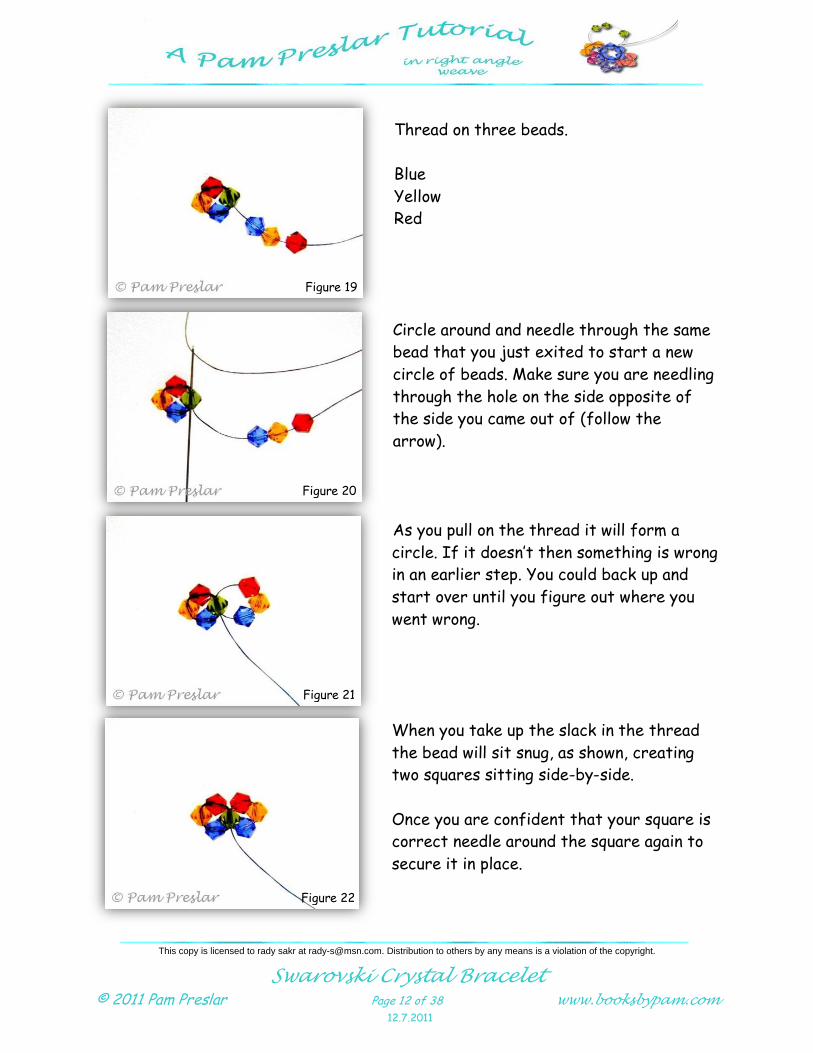
Thread on three beads.
Blue
Yellow
Red
Circle around and needle through the same
bead that you just exited to start a new
circle of beads. Make sure you are needling
through the hole on the side opposite of
the side you came out of (follow the
arrow).
As you pull on the thread it will form a
circle. If it doesn’t then something is wrong
in an earlier step. You could back up and
start over until you figure out where you
went wrong.
When you take up the slack in the thread
the bead will sit snug, as shown, creating
two squares sitting side-by-side.
Once you are confident that your square is
correct needle around the square again to
secure it in place.
Figure 19
Figure 20
Figure 21
Figure 22
This copy is licensed to rady sakr at [email protected]. Distribution to others by any means is a violation of the copyright.
Swarovski Crystal Bracelet
© 2011 Pam Preslar Page 13 of 38 www.booksbypam.com
12.7.2011
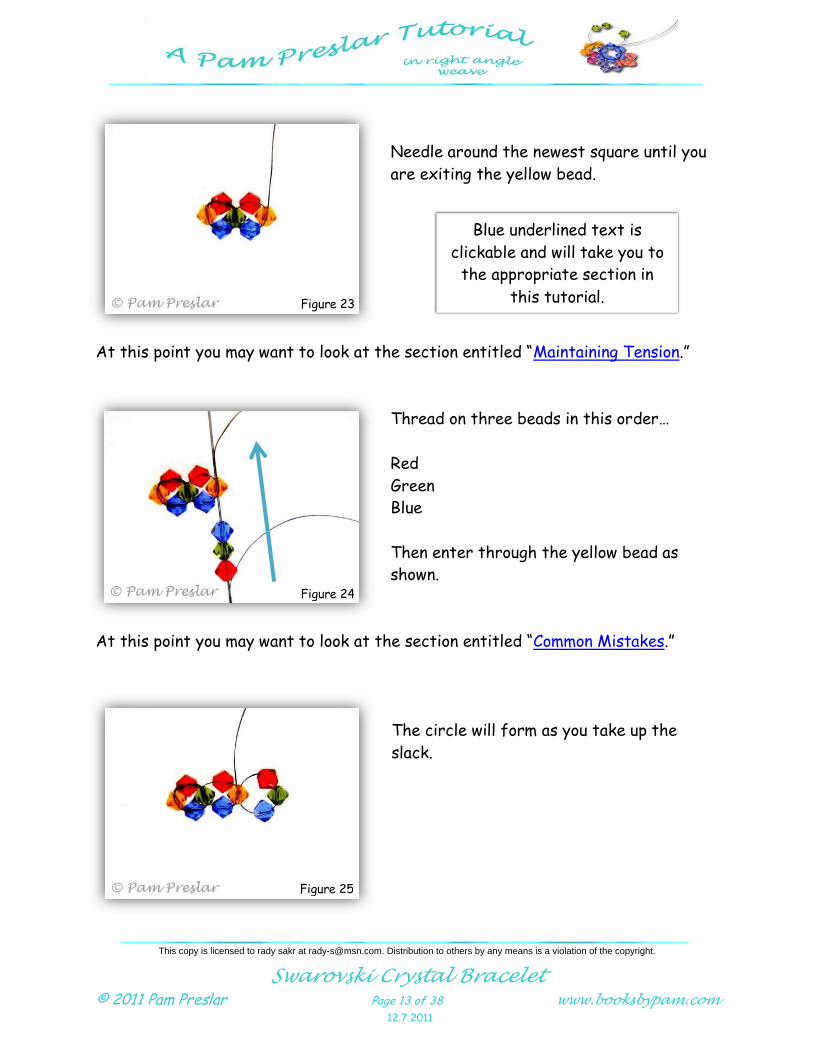
Needle around the newest square until you
are exiting the yellow bead.
At this point you may want to look at the section entitled “Maintaining Tension.”
Thread on three beads in this order…
Red
Green
Blue
Then enter through the yellow bead as
shown.
At this point you may want to look at the section entitled “Common Mistakes.”
The circle will form as you take up the
slack.
Figure 23
Figure 25
Figure 24
Blue underlined text is
clickable and will take you to
the appropriate section in
this tutorial.
This copy is licensed to rady sakr at [email protected]. Distribution to others by any means is a violation of the copyright.
Swarovski Crystal Bracelet
© 2011 Pam Preslar Page 14 of 38 www.booksbypam.com
12.7.2011
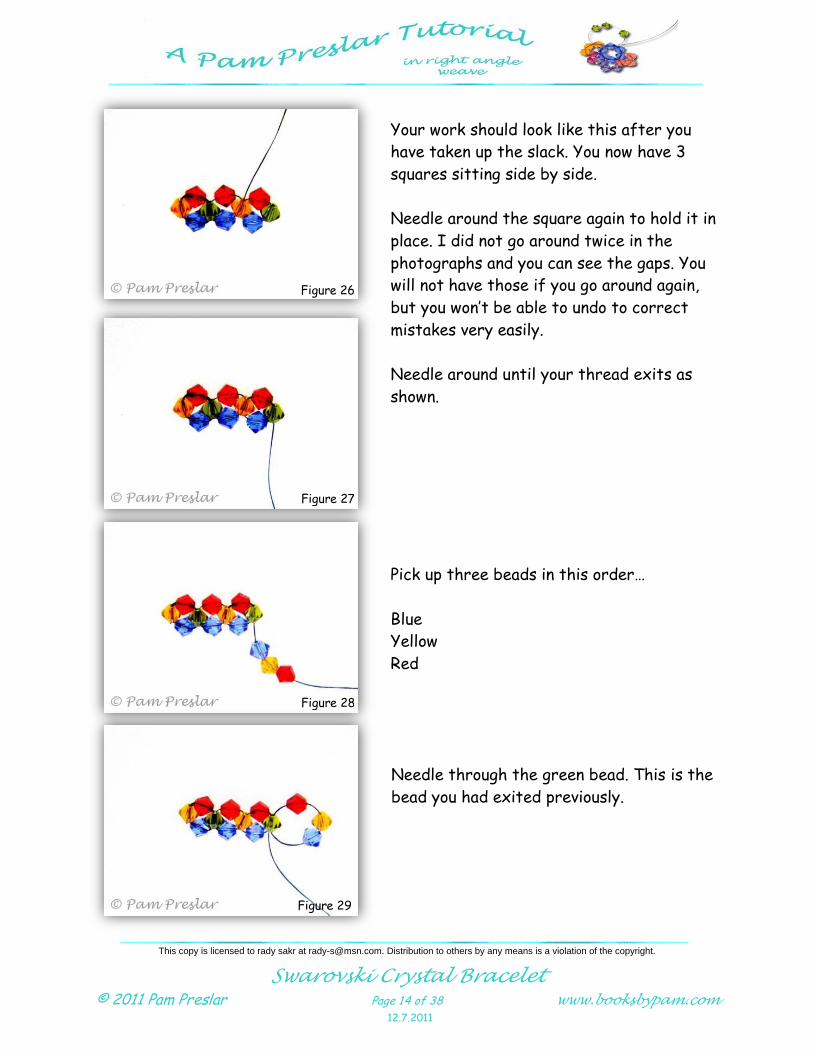
Your work should look like this after you
have taken up the slack. You now have 3
squares sitting side by side.
Needle around the square again to hold it in
place. I did not go around twice in the
photographs and you can see the gaps. You
will not have those if you go around again,
but you won’t be able to undo to correct
mistakes very easily.
Needle around until your thread exits as
shown.
Pick up three beads in this order…
Blue
Yellow
Red
Needle through the green bead. This is the
bead you had exited previously.
Figure 26
Figure 27
Figure 28
Figure 29
This copy is licensed to rady sakr at [email protected]. Distribution to others by any means is a violation of the copyright.
Swarovski Crystal Bracelet
© 2011 Pam Preslar Page 15 of 38 www.booksbypam.com
12.7.2011
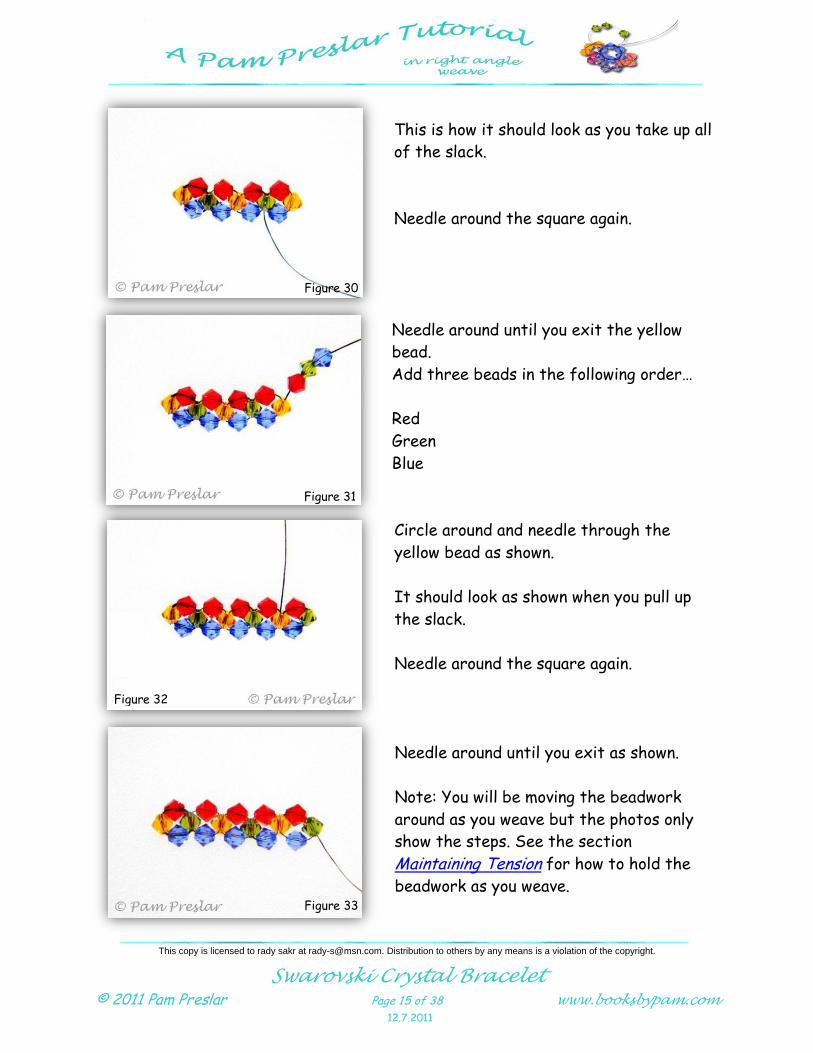
This is how it should look as you take up all
of the slack.
Needle around the square again.
Needle around until you exit the yellow
bead.
Add three beads in the following order…
Red
Green
Blue
Circle around and needle through the
yellow bead as shown.
It should look as shown when you pull up
the slack.
Needle around the square again.
Needle around until you exit as shown.
Note: You will be moving the beadwork
around as you weave but the photos only
show the steps. See the section
Maintaining Tension for how to hold the
beadwork as you weave.
Figure 30
Figure 31
Figure 33
Figure 32
This copy is licensed to rady sakr at [email protected]. Distribution to others by any means is a violation of the copyright.
Swarovski Crystal Bracelet
© 2011 Pam Preslar Page 16 of 38 www.booksbypam.com
12.7.2011
Weave as in the previous section with your chosen bead colors and sizes.
Continue until you have enough woven section to fit your wrist. Make adjustments
in the woven section to fit the desired size.
The clasp mechanism in the sample takes up 7/8”. Each square takes 3/8”.
My sample bracelet measures 7 7/8” when laid flat. The woven section measures 6
1/4” laid flat. I used 29 squares for the base woven section.
I try to make the woven section in an odd number of squares. This is useful for
embellishment later, if desired (see the Embellished Swarovski Crystal Bracelet
tutorial wherever you purchased this tutorial).
Of course, all of this can be adjusted to suit what beads you are using and what
clasp mechanism you have chosen to use.
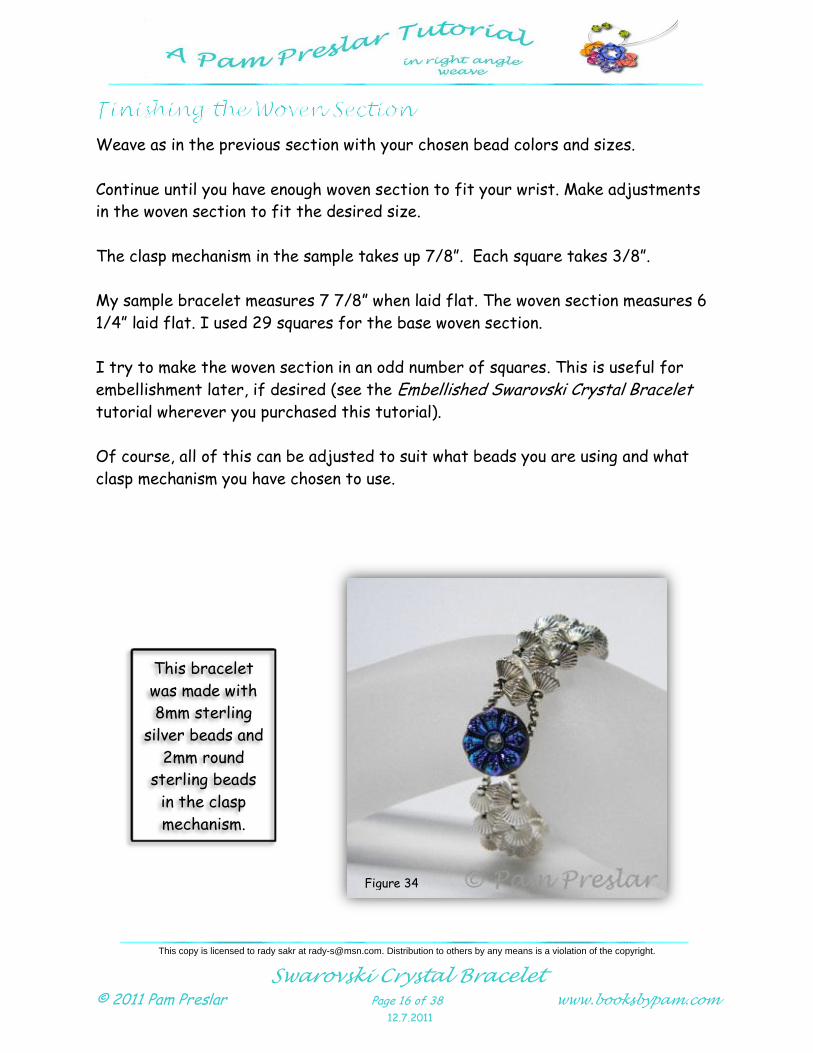
This bracelet
was made with
8mm sterling
silver beads and
2mm round
sterling beads
in the clasp
mechanism.
Figure 34
This copy is licensed to rady sakr at [email protected]. Distribution to others by any means is a violation of the copyright.

Swarovski Crystal Bracelet
© 2011 Pam Preslar Page 17 of 38 www.booksbypam.com
12.7.2011
Here is another way to look at right angle weave it. This is a page from a book I
published back in the 90’s (ISBN #978-0-9650282-0-2). The diagrams are with
seed bead shapes. Seed beads also make a charming little strand.
Figure 35
This copy is licensed to rady sakr at [email protected]. Distribution to others by any means is a violation of the copyright.
Swarovski Crystal Bracelet
© 2011 Pam Preslar Page 18 of 38 www.booksbypam.com
12.7.2011
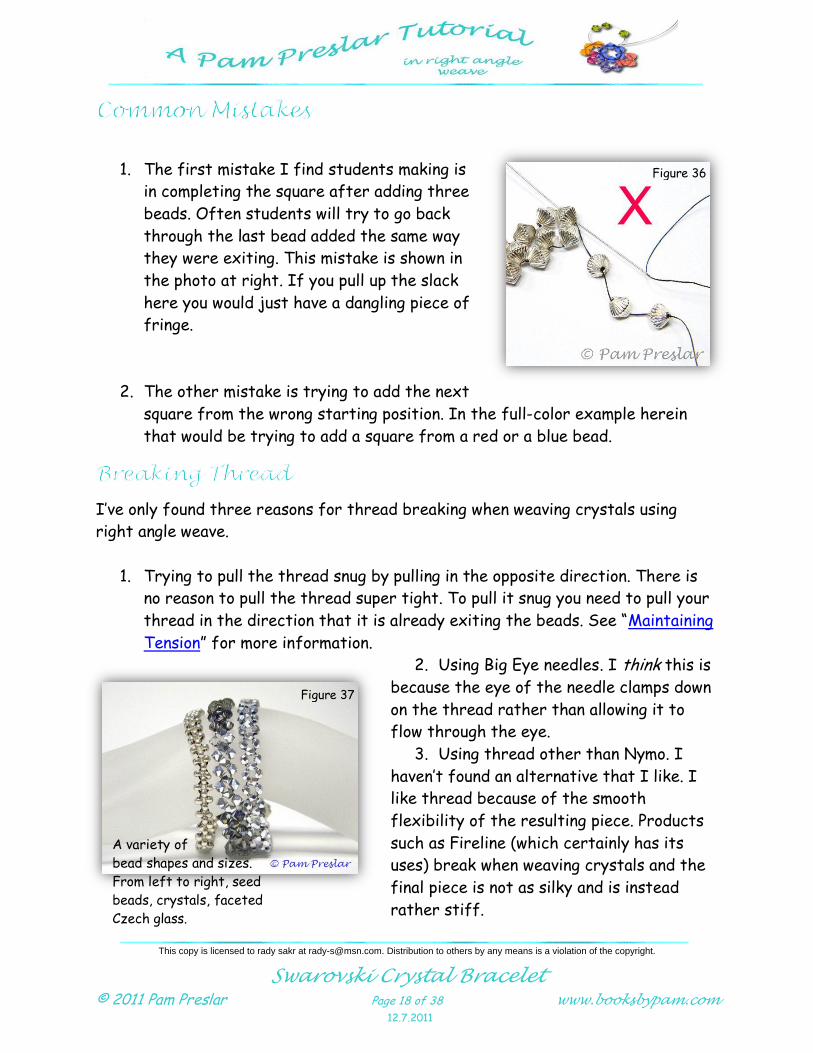
1. The first mistake I find students making is
in completing the square after adding three
beads. Often students will try to go back
through the last bead added the same way
they were exiting. This mistake is shown in
the photo at right. If you pull up the slack
here you would just have a dangling piece of
fringe.
2. The other mistake is trying to add the next
square from the wrong starting position. In the full-color example herein
that would be trying to add a square from a red or a blue bead.
I’ve only found three reasons for thread breaking when weaving crystals using
right angle weave.
1. Trying to pull the thread snug by pulling in the opposite direction. There is
no reason to pull the thread super tight. To pull it snug you need to pull your
thread in the direction that it is already exiting the beads. See “Maintaining
Tension” for more information.
2. Using Big Eye needles. I think this is
because the eye of the needle clamps down
on the thread rather than allowing it to
flow through the eye.
3. Using thread other than Nymo. I
haven’t found an alternative that I like. I
like thread because of the smooth
flexibility of the resulting piece. Products
such as Fireline (which certainly has its
uses) break when weaving crystals and the
final piece is not as silky and is instead
rather stiff.
Figure 36
A variety of
bead shapes and sizes.
From left to right, seed
beads, crystals, faceted
Czech glass.
Figure 37
This copy is licensed to rady sakr at [email protected]. Distribution to others by any means is a violation of the copyright.
Swarovski Crystal Bracelet
© 2011 Pam Preslar Page 19 of 38 www.booksbypam.com
12.7.2011
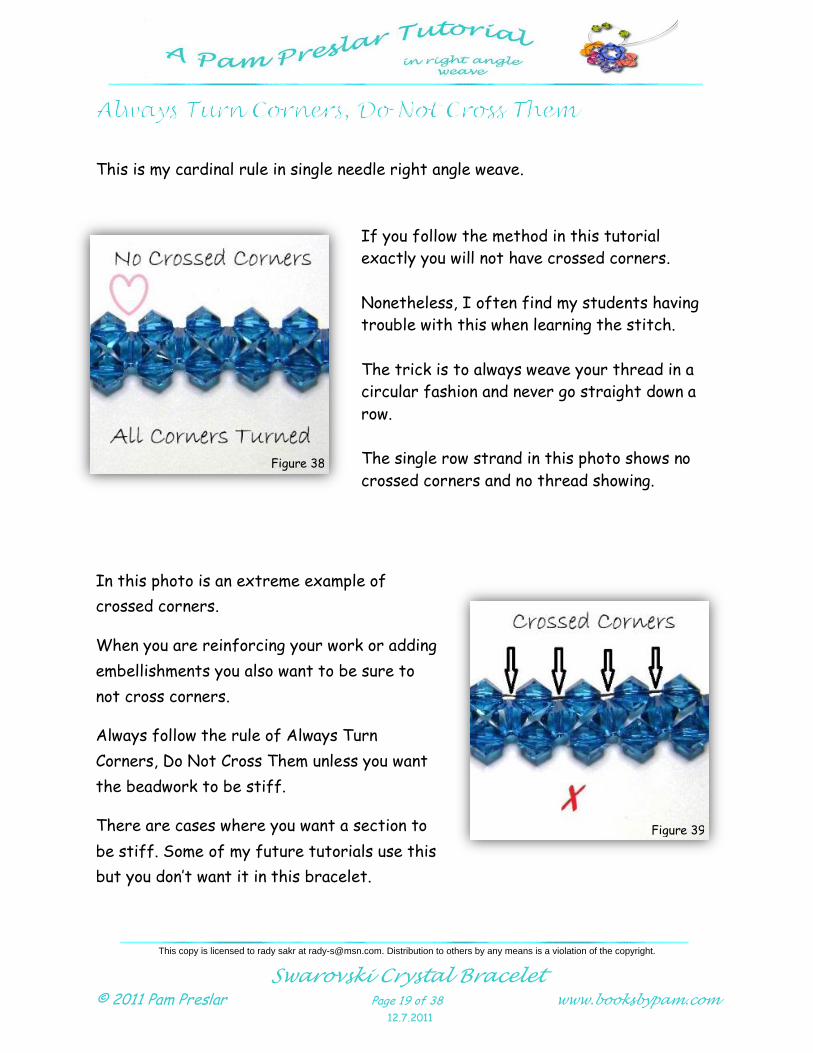
This is my cardinal rule in single needle right angle weave.
If you follow the method in this tutorial
exactly you will not have crossed corners.
Nonetheless, I often find my students having
trouble with this when learning the stitch.
The trick is to always weave your thread in a
circular fashion and never go straight down a
row.
The single row strand in this photo shows no
crossed corners and no thread showing.
In this photo is an extreme example of
crossed corners.
When you are reinforcing your work or adding
embellishments you also want to be sure to
not cross corners.
Always follow the rule of Always Turn
Corners, Do Not Cross Them unless you want
the beadwork to be stiff.
There are cases where you want a section to
be stiff. Some of my future tutorials use this
but you don’t want it in this bracelet.
Figure 38
Figure 39
This copy is licensed to rady sakr at [email protected]. Distribution to others by any means is a violation of the copyright.
Swarovski Crystal Bracelet
© 2011 Pam Preslar Page 20 of 38 www.booksbypam.com
12.7.2011
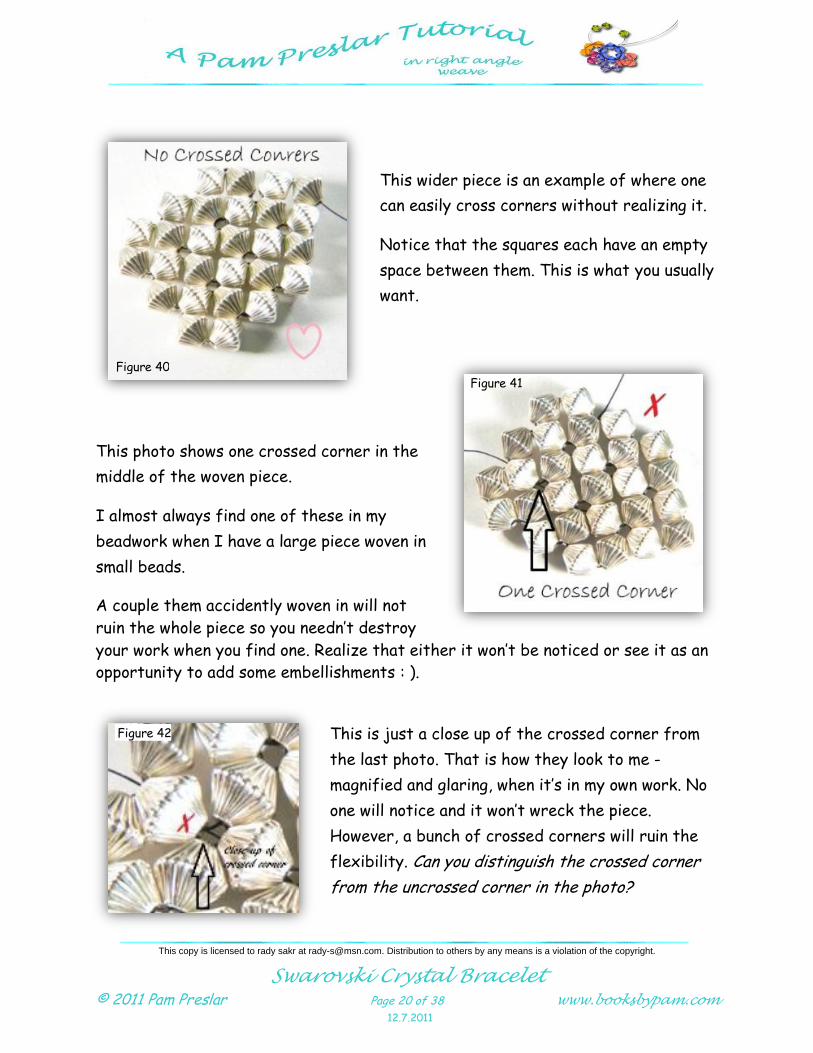
This wider piece is an example of where one
can easily cross corners without realizing it.
Notice that the squares each have an empty
space between them. This is what you usually
want.
This photo shows one crossed corner in the
middle of the woven piece.
I almost always find one of these in my
beadwork when I have a large piece woven in
small beads.
A couple them accidently woven in will not
ruin the whole piece so you needn’t destroy
your work when you find one. Realize that either it won’t be noticed or see it as an
opportunity to add some embellishments : ).
This is just a close up of the crossed corner from
the last photo. That is how they look to me -
magnified and glaring, when it’s in my own work. No
one will notice and it won’t wreck the piece.
However, a bunch of crossed corners will ruin the
flexibility. Can you distinguish the crossed corner
from the uncrossed corner in the photo?
Figure 40Figure 41
Figure 42
This copy is licensed to rady sakr at [email protected]. Distribution to others by any means is a violation of the copyright.

Swarovski Crystal Bracelet
© 2011 Pam Preslar Page 21 of 38 www.booksbypam.com
12.7.2011
A key trick to making a right angle weave piece look uniform is maintaining an even
tension. The pictures presented so far do not show how I hold the piece while
weaving. Of course you are not going to weave your piece while it sits flat on your
table. Here is how I hold the piece and how I maintain even tension at the same
time.
Hold the piece in your non-dominant hand as
shown. (Left-handers will probably be
opposite of the photo.)
Note: These are larger 6mm beads and I am
using only three colors in this example.
Grasp it with your thumb as shown.
Pull the thread over your index finger and
hold it in place between your index finger
and second finger.
Notice in the photo that it is wrapped
tightly around my finger.
Figure 43
Figure 44
Figure 45
This copy is licensed to rady sakr at [email protected]. Distribution to others by any means is a violation of the copyright.
Swarovski Crystal Bracelet
© 2011 Pam Preslar Page 22 of 38 www.booksbypam.com
12.7.2011
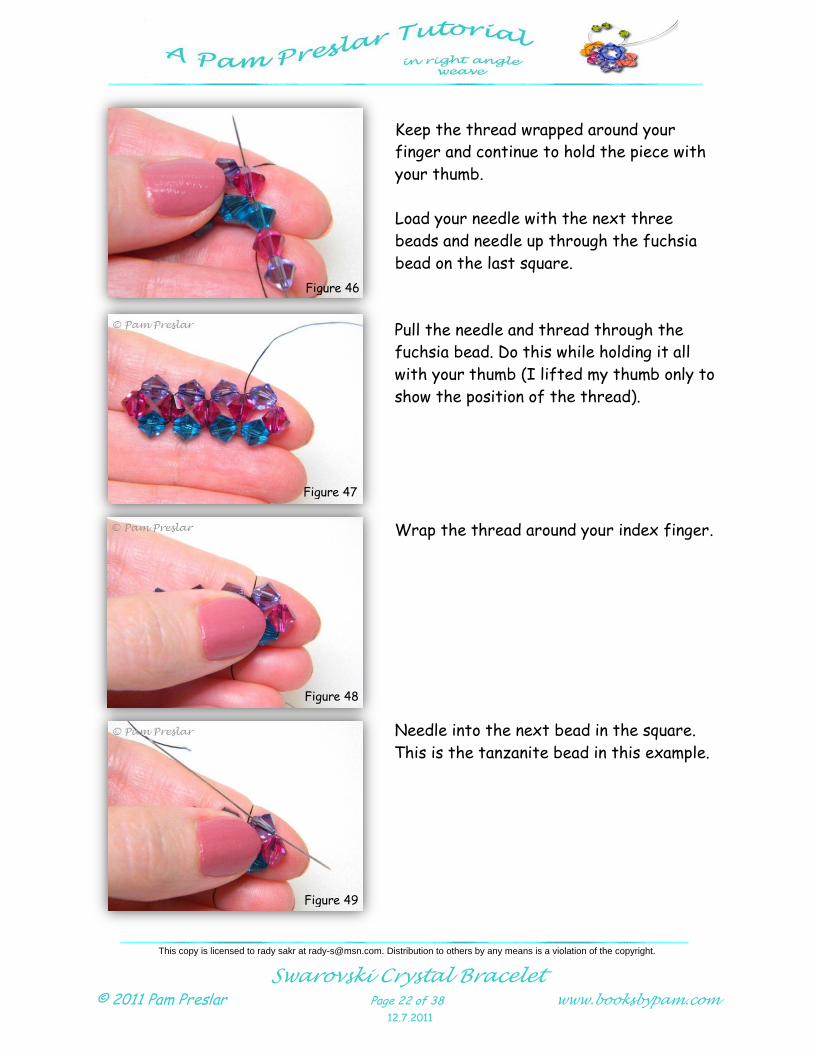
Keep the thread wrapped around your
finger and continue to hold the piece with
your thumb.
Load your needle with the next three
beads and needle up through the fuchsia
bead on the last square.
Pull the needle and thread through the
fuchsia bead. Do this while holding it all
with your thumb (I lifted my thumb only to
show the position of the thread).
Wrap the thread around your index finger.
Needle into the next bead in the square.
This is the tanzanite bead in this example.
Figure 46
Figure 47
Figure 48
Figure 49
This copy is licensed to rady sakr at [email protected]. Distribution to others by any means is a violation of the copyright.
Swarovski Crystal Bracelet
© 2011 Pam Preslar Page 23 of 38 www.booksbypam.com
12.7.2011
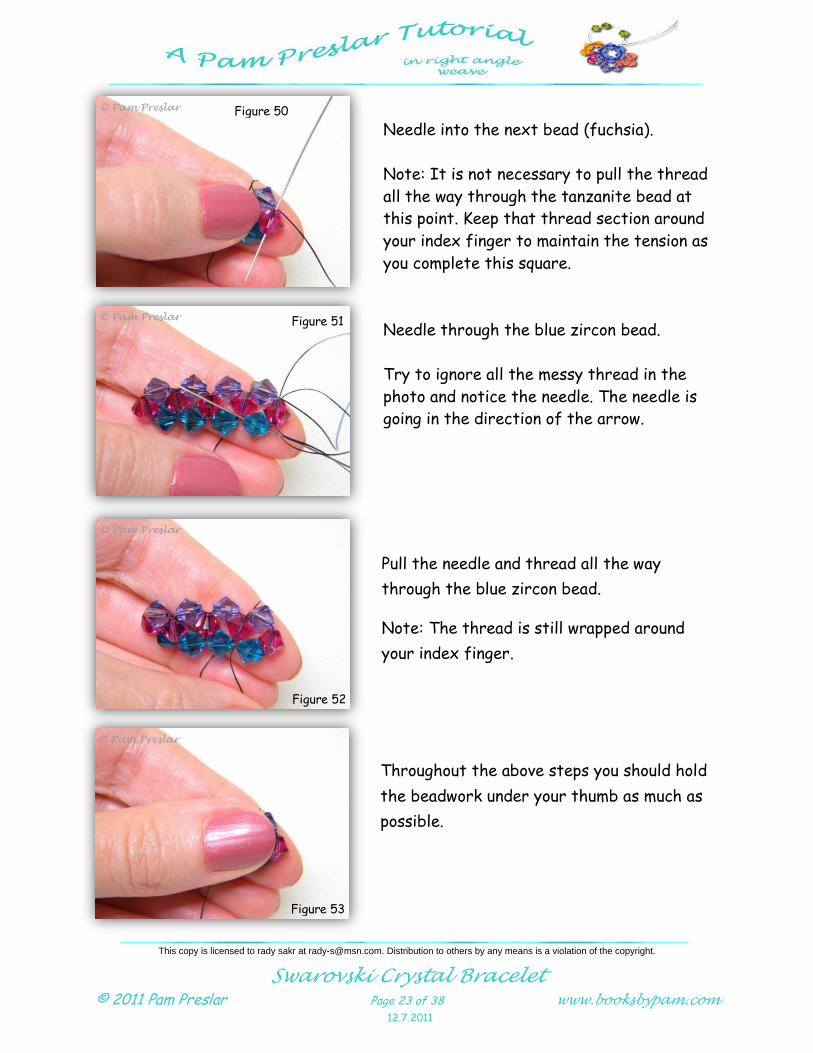
Needle into the next bead (fuchsia).
Note: It is not necessary to pull the thread
all the way through the tanzanite bead at
this point. Keep that thread section around
your index finger to maintain the tension as
you complete this square.
Needle through the blue zircon bead.
Try to ignore all the messy thread in the
photo and notice the needle. The needle is
going in the direction of the arrow.
Pull the needle and thread all the way
through the blue zircon bead.
Note: The thread is still wrapped around
your index finger.
Throughout the above steps you should hold
the beadwork under your thumb as much as
possible.
You should be
exiting from the
Blue Zircon bead.
Figure 50
Figure 51
Figure 52
Figure 53
This copy is licensed to rady sakr at [email protected]. Distribution to others by any means is a violation of the copyright.
Swarovski Crystal Bracelet
© 2011 Pam Preslar Page 24 of 38 www.booksbypam.com
12.7.2011
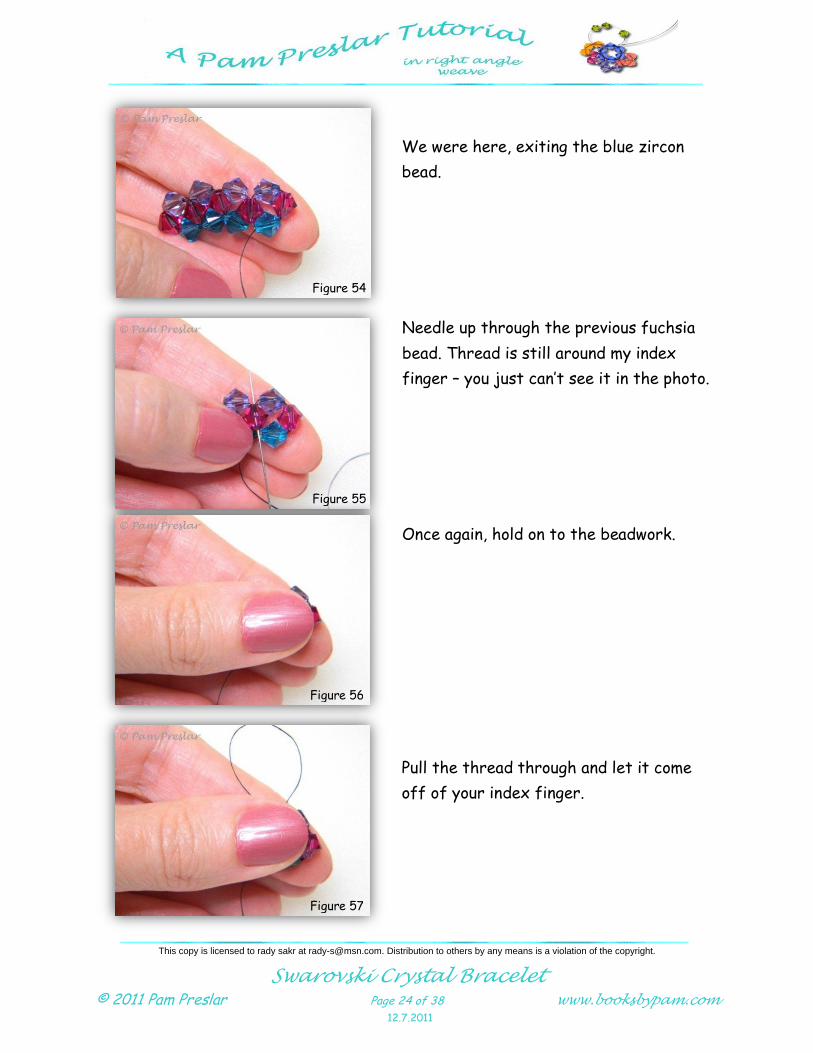
We were here, exiting the blue zircon
bead.
Needle up through the previous fuchsia
bead. Thread is still around my index
finger – you just can’t see it in the photo.
Once again, hold on to the beadwork.
Pull the thread through and let it come
off of your index finger.
Figure 54
Figure 55
Figure 56
Figure 57
This copy is licensed to rady sakr at [email protected]. Distribution to others by any means is a violation of the copyright.
Swarovski Crystal Bracelet
© 2011 Pam Preslar Page 25 of 38 www.booksbypam.com
12.7.2011
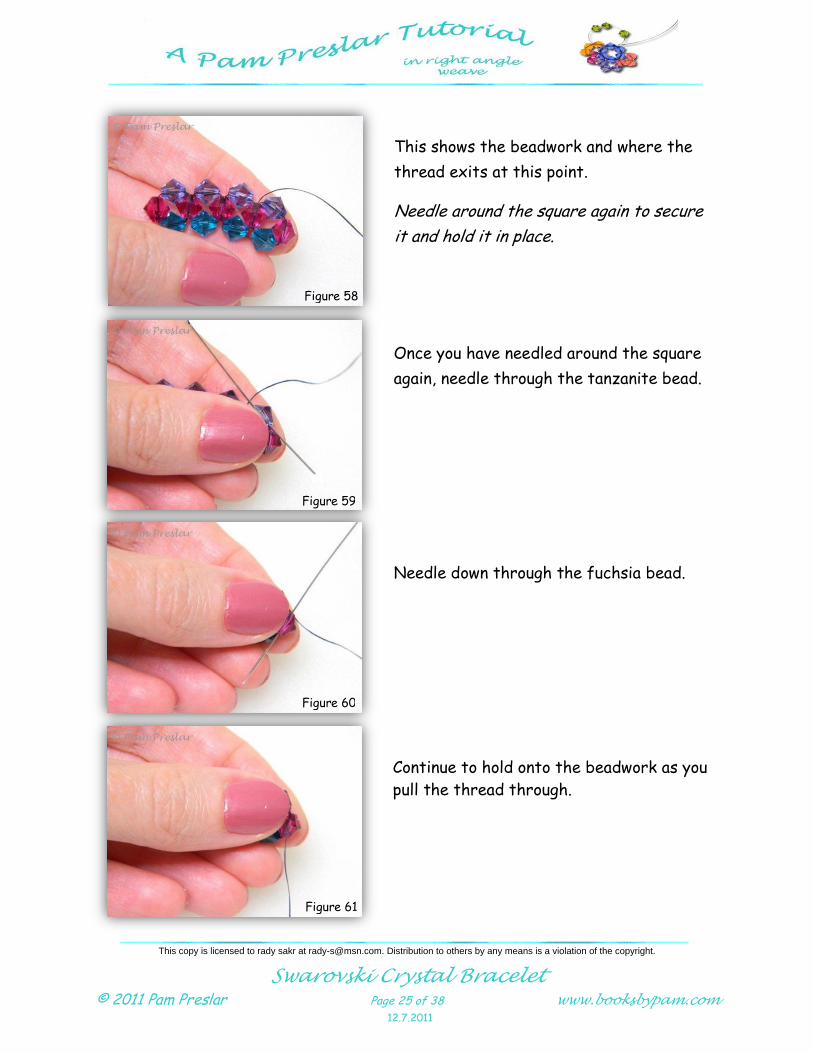
This shows the beadwork and where the
thread exits at this point.
Needle around the square again to secure
it and hold it in place.
Once you have needled around the square
again, needle through the tanzanite bead.
Needle down through the fuchsia bead.
Continue to hold onto the beadwork as you
pull the thread through.
Figure 58
Figure 59
Figure 60
Figure 61
This copy is licensed to rady sakr at [email protected]. Distribution to others by any means is a violation of the copyright.
Swarovski Crystal Bracelet
© 2011 Pam Preslar Page 26 of 38 www.booksbypam.com
12.7.2011
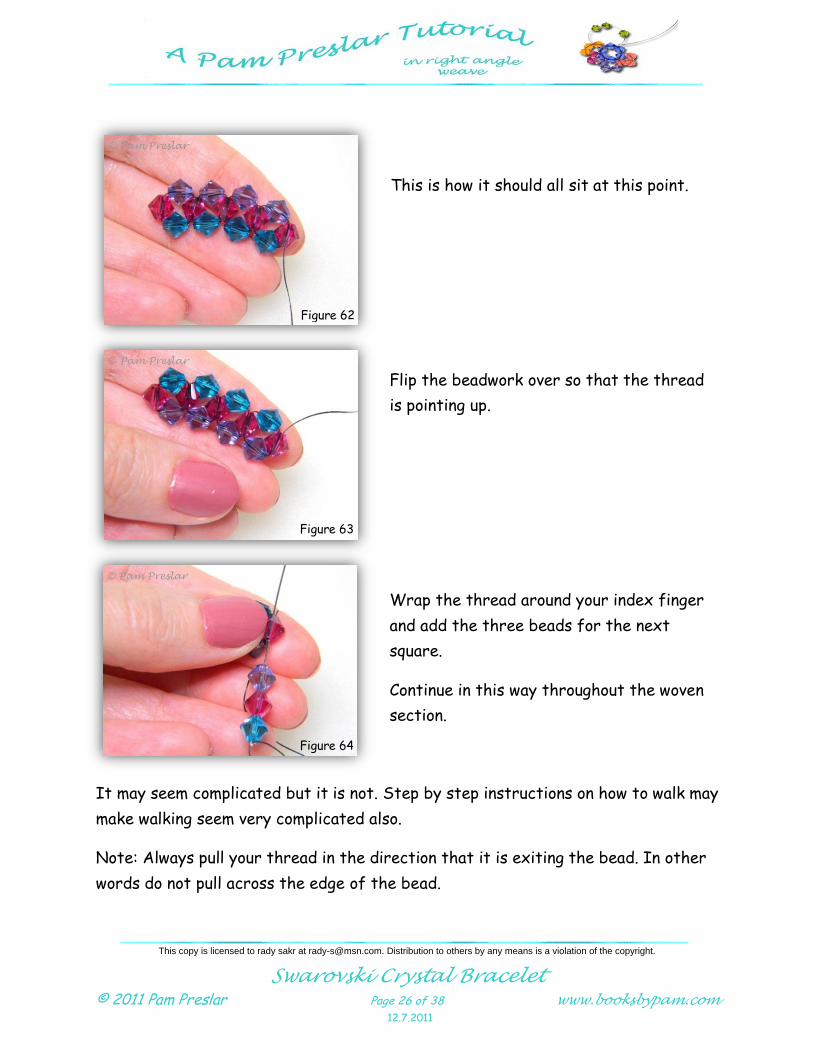
This is how it should all sit at this point.
Flip the beadwork over so that the thread
is pointing up.
Wrap the thread around your index finger
and add the three beads for the next
square.
Continue in this way throughout the woven
section.
It may seem complicated but it is not. Step by step instructions on how to walk may
make walking seem very complicated also.
Note: Always pull your thread in the direction that it is exiting the bead. In other
words do not pull across the edge of the bead.
Figure 62
Figure 63
Figure 64
This copy is licensed to rady sakr at [email protected]. Distribution to others by any means is a violation of the copyright.
Swarovski Crystal Bracelet
© 2011 Pam Preslar Page 27 of 38 www.booksbypam.com
12.7.2011
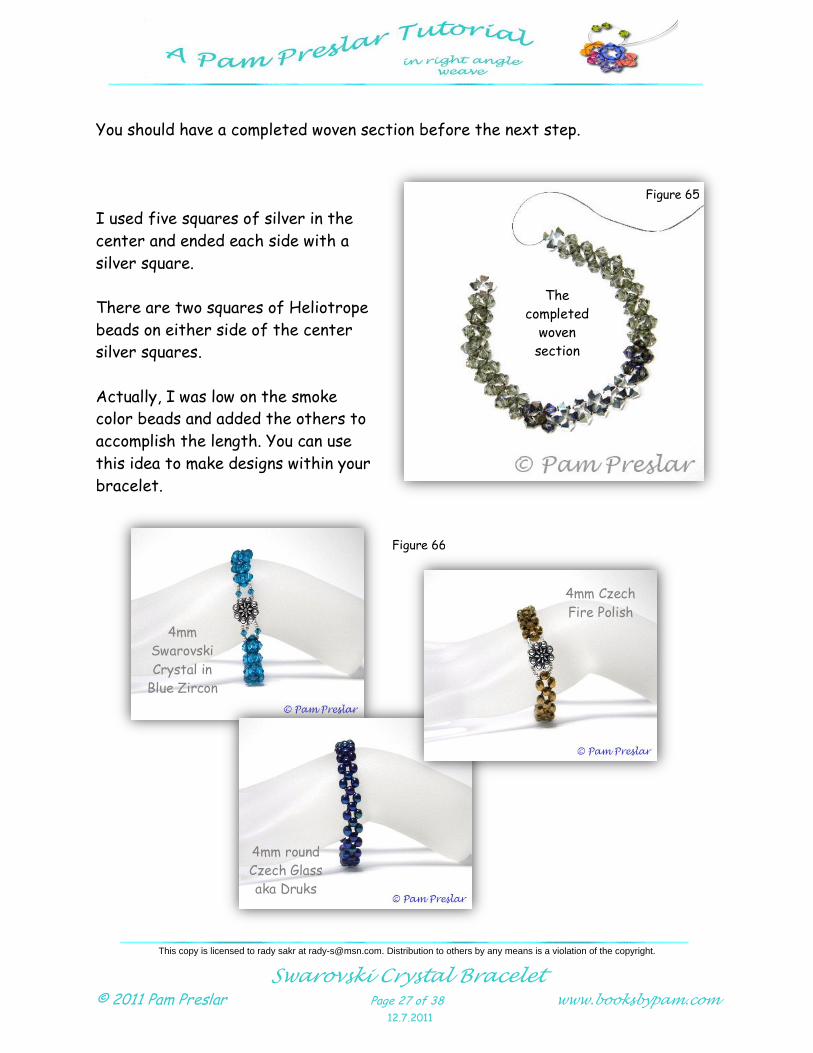
You should have a completed woven section before the next step.
I used five squares of silver in the
center and ended each side with a
silver square.
There are two squares of Heliotrope
beads on either side of the center
silver squares.
Actually, I was low on the smoke
color beads and added the others to
accomplish the length. You can use
this idea to make designs within your
bracelet.
The
completed
woven
section
Figure 65
4mm Czech
Fire Polish
4mm round
Czech Glass
aka Druks
4mm
Swarovski
Crystal in
Blue Zircon
Figure 66
This copy is licensed to rady sakr at [email protected]. Distribution to others by any means is a violation of the copyright.
Swarovski Crystal Bracelet
© 2011 Pam Preslar Page 28 of 38 www.booksbypam.com
12.7.2011
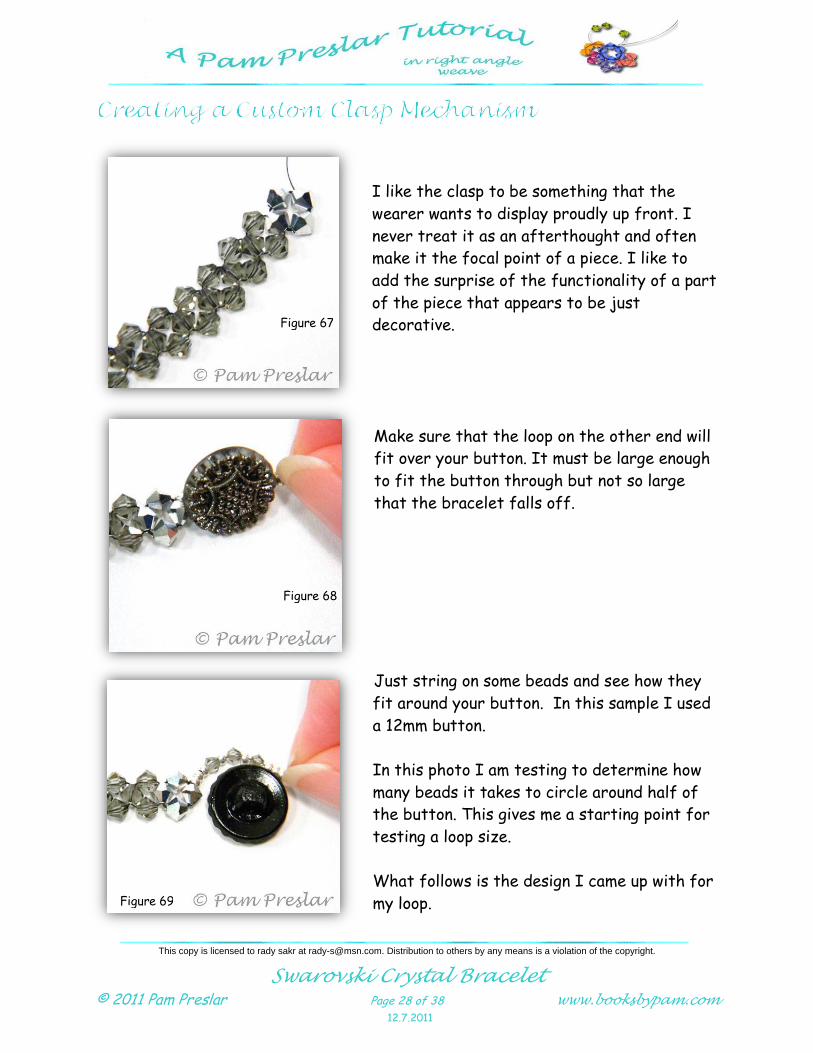
I like the clasp to be something that the
wearer wants to display proudly up front. I
never treat it as an afterthought and often
make it the focal point of a piece. I like to
add the surprise of the functionality of a part
of the piece that appears to be just
decorative.
Make sure that the loop on the other end will
fit over your button. It must be large enough
to fit the button through but not so large
that the bracelet falls off.
Just string on some beads and see how they
fit around your button. In this sample I used
a 12mm button.
In this photo I am testing to determine how
many beads it takes to circle around half of
the button. This gives me a starting point for
testing a loop size.
What follows is the design I came up with for
my loop.
Close up
of the end
of the
woven
section
Figure 67
Figure 68
Figure 69
This copy is licensed to rady sakr at [email protected]. Distribution to others by any means is a violation of the copyright.
Swarovski Crystal Bracelet
© 2011 Pam Preslar Page 29 of 38 www.booksbypam.com
12.7.2011
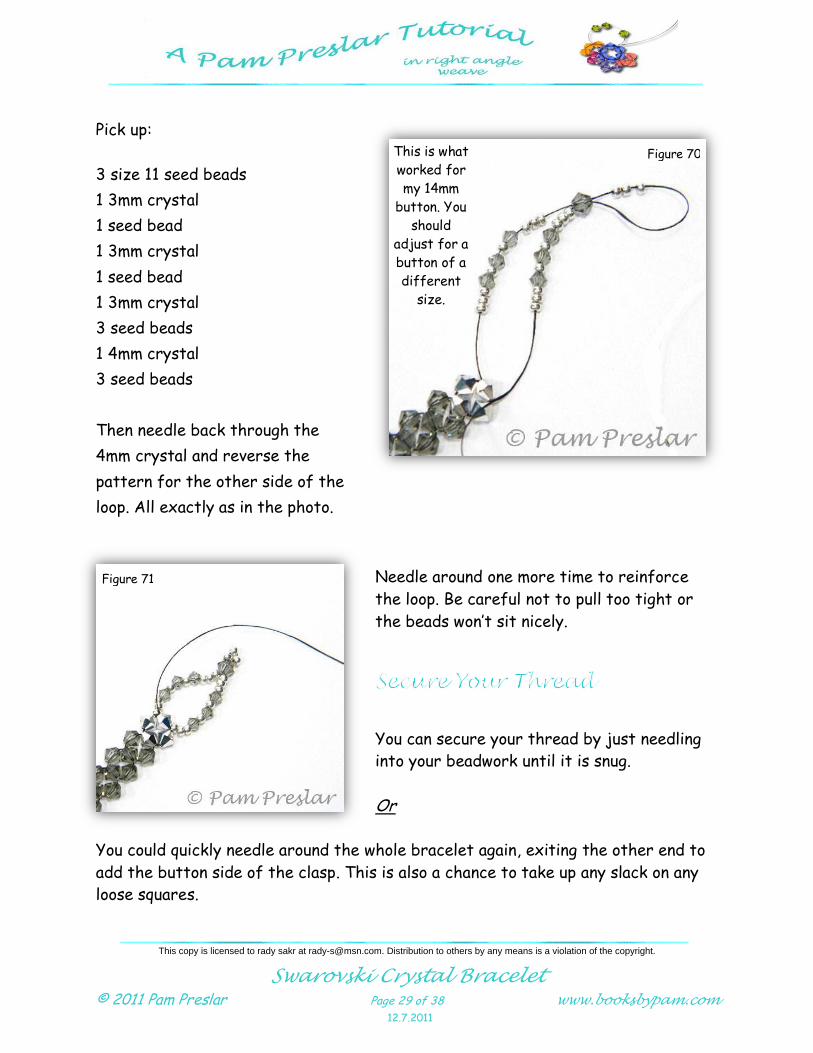
Pick up:
3 size 11 seed beads
1 3mm crystal
1 seed bead
1 3mm crystal
1 seed bead
1 3mm crystal
3 seed beads
1 4mm crystal
3 seed beads
Then needle back through the
4mm crystal and reverse the
pattern for the other side of the
loop. All exactly as in the photo.
Needle around one more time to reinforce
the loop. Be careful not to pull too tight or
the beads won’t sit nicely.
You can secure your thread by just needling
into your beadwork until it is snug.
Or
You could quickly needle around the whole bracelet again, exiting the other end to
add the button side of the clasp. This is also a chance to take up any slack on any
loose squares.
This is what
worked for
my 14mm
button. You
should
adjust for a
button of a
different
size.
Figure 70
Figure 71
This copy is licensed to rady sakr at [email protected]. Distribution to others by any means is a violation of the copyright.
Swarovski Crystal Bracelet
© 2011 Pam Preslar Page 30 of 38 www.booksbypam.com
12.7.2011
Or
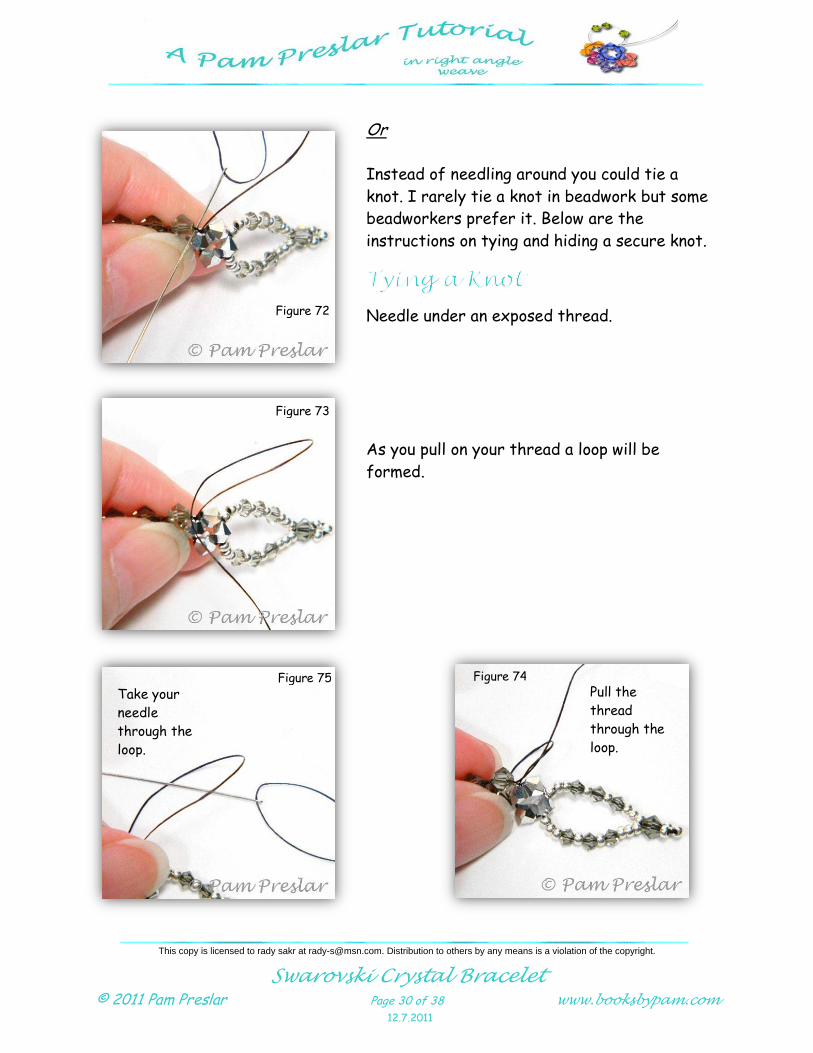
Instead of needling around you could tie a
knot. I rarely tie a knot in beadwork but some
beadworkers prefer it. Below are the
instructions on tying and hiding a secure knot.
Needle under an exposed thread.
As you pull on your thread a loop will be
formed.
Figure 72
Figure 73
Take your
needle
through the
loop.
Figure 75 Pull the
thread
through the
loop.
Figure 74
This copy is licensed to rady sakr at [email protected]. Distribution to others by any means is a violation of the copyright.
Swarovski Crystal Bracelet
© 2011 Pam Preslar Page 31 of 38 www.booksbypam.com
12.7.2011
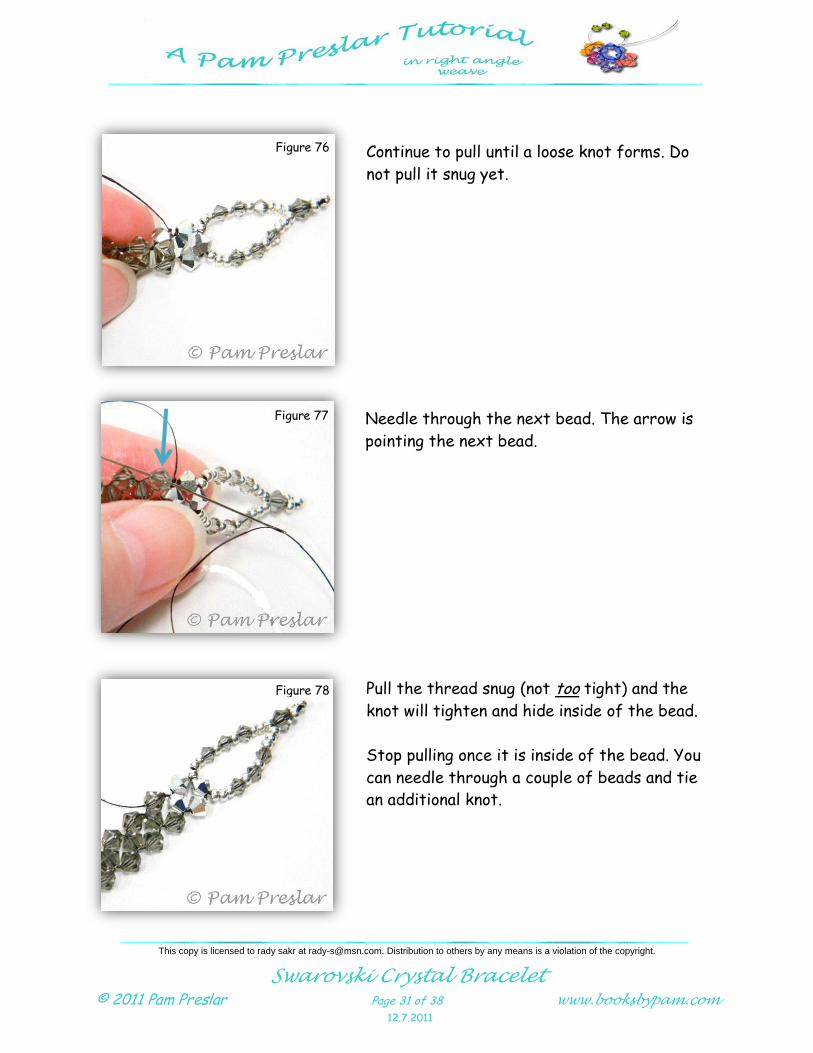
Continue to pull until a loose knot forms. Do
not pull it snug yet.
Needle through the next bead. The arrow is
pointing the next bead.
Pull the thread snug (not too tight) and the
knot will tighten and hide inside of the bead.
Stop pulling once it is inside of the bead. You
can needle through a couple of beads and tie
an additional knot.
Figure 76
Figure 77
Figure 78
This copy is licensed to rady sakr at [email protected]. Distribution to others by any means is a violation of the copyright.
Swarovski Crystal Bracelet
© 2011 Pam Preslar Page 32 of 38 www.booksbypam.com
12.7.2011
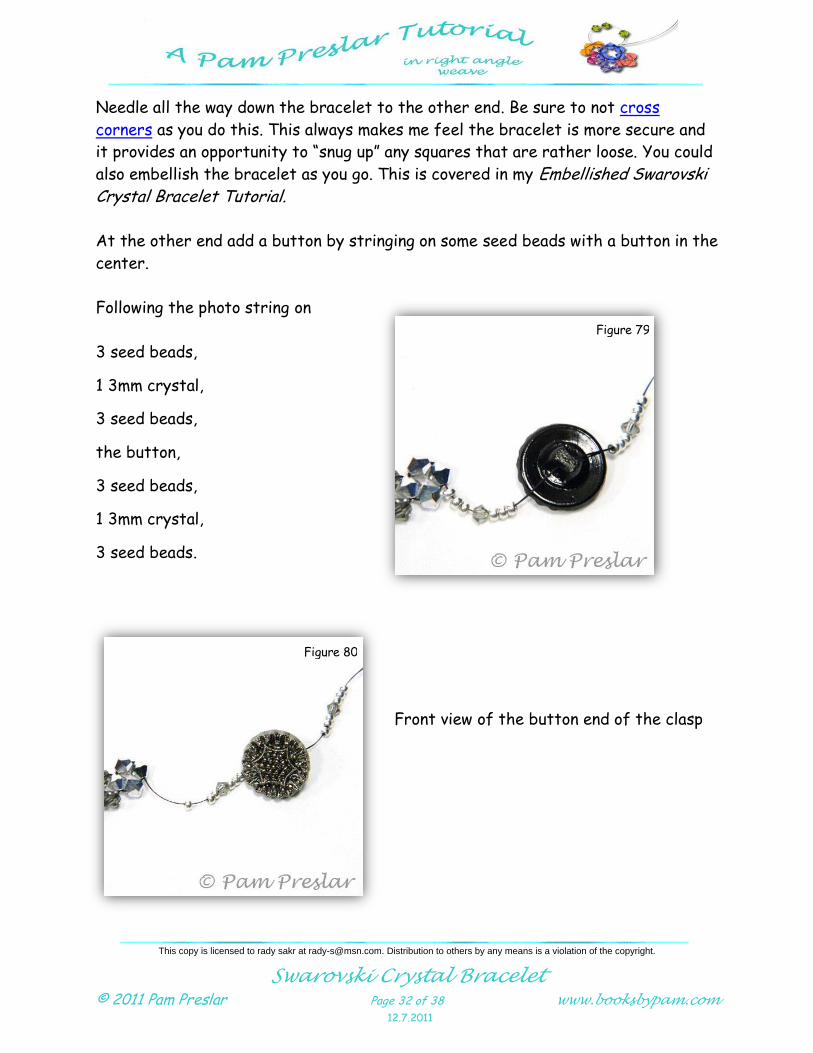
Needle all the way down the bracelet to the other end. Be sure to not cross
corners as you do this. This always makes me feel the bracelet is more secure and
it provides an opportunity to “snug up” any squares that are rather loose. You could
also embellish the bracelet as you go. This is covered in my Embellished Swarovski Crystal Bracelet Tutorial.
At the other end add a button by stringing on some seed beads with a button in the
center.
Following the photo string on
3 seed beads,
1 3mm crystal,
3 seed beads,
the button,
3 seed beads,
1 3mm crystal,
3 seed beads.
Front view of the button end of the clasp
Figure 79
Figure 80
This copy is licensed to rady sakr at [email protected]. Distribution to others by any means is a violation of the copyright.
Swarovski Crystal Bracelet
© 2011 Pam Preslar Page 33 of 38 www.booksbypam.com
12.7.2011
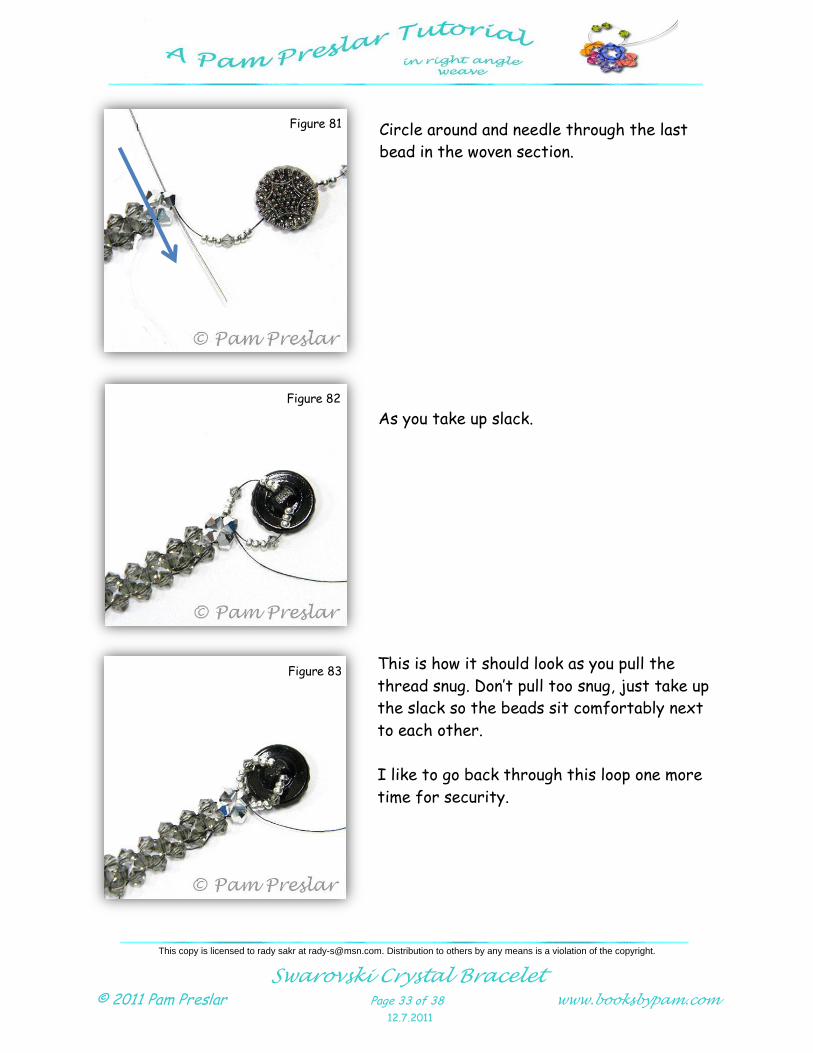
Circle around and needle through the last
bead in the woven section.
As you take up slack.
This is how it should look as you pull the
thread snug. Don’t pull too snug, just take up
the slack so the beads sit comfortably next
to each other.
I like to go back through this loop one more
time for security.
Figure 81
Figure 82
Figure 83
This copy is licensed to rady sakr at [email protected]. Distribution to others by any means is a violation of the copyright.
Swarovski Crystal Bracelet
© 2011 Pam Preslar Page 34 of 38 www.booksbypam.com
12.7.2011
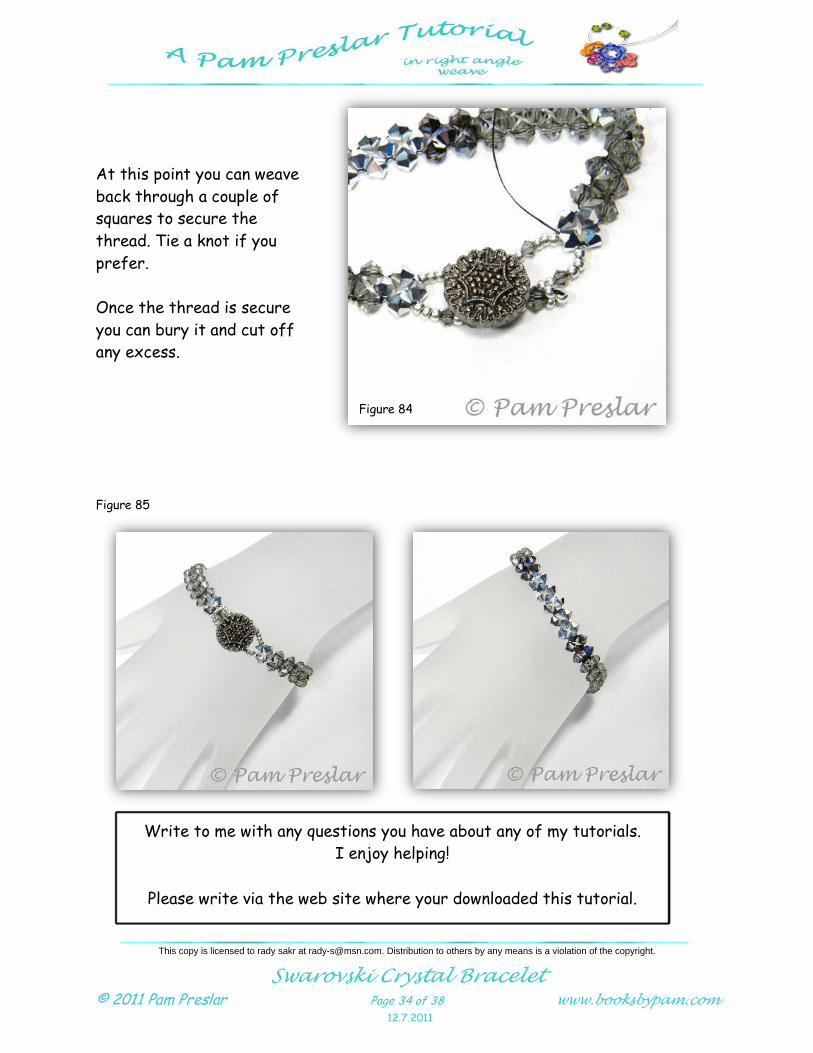
At this point you can weave
back through a couple of
squares to secure the
thread. Tie a knot if you
prefer.
Once the thread is secure
you can bury it and cut off
any excess.
Figure 85
Figure 84
Write to me with any questions you have about any of my tutorials.
I enjoy helping!
Please write via the web site where your downloaded this tutorial.
This copy is licensed to rady sakr at [email protected]. Distribution to others by any means is a violation of the copyright.
Swarovski Crystal Bracelet
© 2011 Pam Preslar Page 35 of 38 www.booksbypam.com
12.7.2011
Of course you can come up with your own variations but here are a couple of ideas.
I do not usually have a concrete plan when I start weaving but if you know what you
want to use as a clasp you can:
1. Weave one square.
2. Attach the button end of the clasp to that one square
as shown in earlier pages.
3. Weave the length of the bracelet.
a. Needle through each square an extra time as you go along.
4. Create a loop on the other end.
This speeds up the process tremendously if you want to create a bunch of
bracelets.
I used size 15 seed beads on this one. You can do all kinds of designs and any size
seed bead but just make sure to test the size of your loop before you commit to it.
2 seed beads,
3mm crystal,
10 seed beads,
12mm button,
10 seed beads,
3mm crystal,
2mm seed beads.
Figure 86
Figure 88
2 seed beads,
3mm crystal,
10 seed beads,
3mm crystal,
3 seed beads,
needle through crystal,
repeat to match the other side.
Figure 87
This copy is licensed to rady sakr at [email protected]. Distribution to others by any means is a violation of the copyright.
Swarovski Crystal Bracelet
© 2011 Pam Preslar Page 36 of 38 www.booksbypam.com
12.7.2011
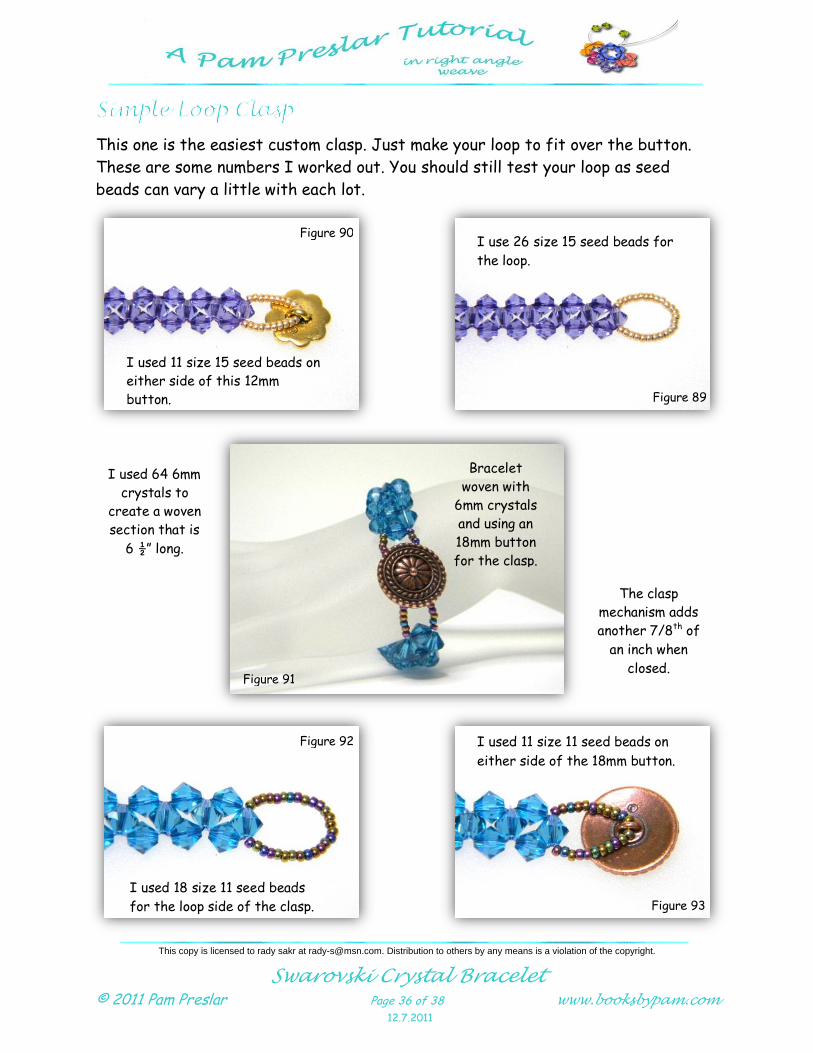
This one is the easiest custom clasp. Just make your loop to fit over the button.
These are some numbers I worked out. You should still test your loop as seed
beads can vary a little with each lot.
I used 64 6mm
crystals to
create a woven
section that is
6 ½” long.
The clasp
mechanism adds
another 7/8th of
an inch when
closed.
I used 11 size 15 seed beads on
either side of this 12mm
button.
Figure 90 I use 26 size 15 seed beads for
the loop.
Figure 89
Bracelet
woven with
6mm crystals
and using an
18mm button
for the clasp.
Figure 91
I used 18 size 11 seed beads
for the loop side of the clasp.
Figure 92 I used 11 size 11 seed beads on
either side of the 18mm button.
Figure 93
This copy is licensed to rady sakr at [email protected]. Distribution to others by any means is a violation of the copyright.
Swarovski Crystal Bracelet
© 2011 Pam Preslar Page 37 of 38 www.booksbypam.com
12.7.2011
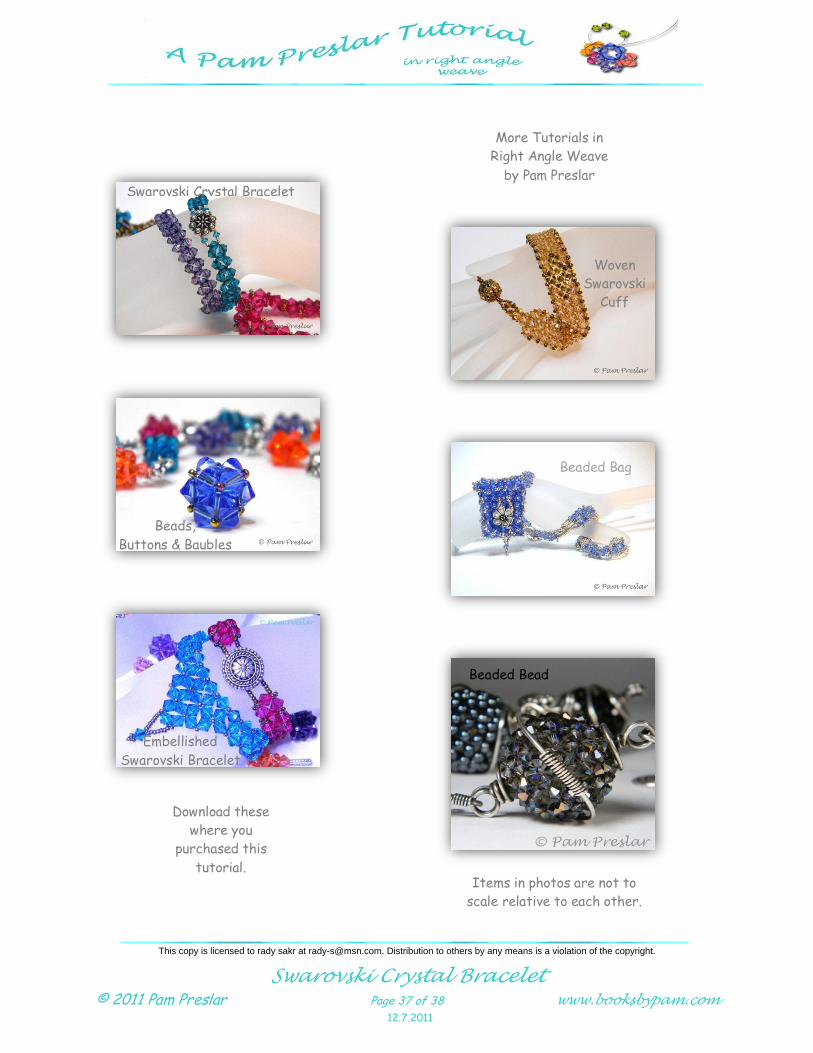
More Tutorials in
Right Angle Weave
by Pam Preslar
Download these
where you
purchased this
tutorial.
Swarovski Crystal Bracelet
Woven
Swarovski
Cuff
Embellished
Swarovski Bracelet
Beaded Bag
Beads,
Buttons & Baubles
Beaded Bead
Items in photos are not to
scale relative to each other.
This copy is licensed to rady sakr at [email protected]. Distribution to others by any means is a violation of the copyright.
by Pam Preslar
This copy is licensed to rady sakr at [email protected]. Distribution to others by any means is a violation of the copyright.