Crosshatching a Value Map
7
CROSSHATCHING A Brenda Hoddinott L03 INTERMEDIATE: CROSSHATCHING Before attempting this lesson please complete L01 Crosshatching Values and L02 Graduations with Crosshatching. In this project, you first create a value map by lightly outlining random shapes and identifying each as a specific value. You then use crosshatching graduations and various grades of pencils to add shading. This lesson is divided into the following three sections: INTRODUCTION: A value map works by first identifying highlights (highlights usually stay the white of your paper), and then adding shading to light, medium and dark values. OUTLINING A MAP: You outline shapes within a drawing space. The drawing in this project is of nothing in particular. However, it presents several shading challenges you may encounter when adding shading to a drawing. CROSSHATCHING VALUES: You add shading to the various shapes with crosshatching graduations. You begin with the lightest values and graduate them toward the middle values. Middle values are added and graduated into dark. Finally, you add medium values to a tiny section of reflected light. Supplies include 2H, HB, 2B, and 4B graphite pencils, erasers, good quality drawing paper, pencil sharpener, and sandpaper block. 7 PAGES – 7 ILLUSTRATIONS This lesson is recommended for artists with strong crosshatching skills, as well as students of home schooling, academic and recreational fine art educators. Published by Hoddinott Publishing for Drawspace.com, Halifax, NS, Canada – 2008
description
Drawing tips
Transcript of Crosshatching a Value Map

CROSSHATCHING A
Brenda Hoddinott
L03 INTERMEDIATE: CROSSHATCHING Before attempting this lesson please complete L01 Crosshatching Values and L02 Graduations with Crosshatching.
In this project, you first create a value map by lightly outlining random shapes and identifying each as a specific value. You then use crosshatching graduations and various grades of pencils to add shading.
This lesson is divided into the following three sections:
INTRODUCTION: A value map works by first identifying highlights (highlights usually stay the white of your paper), and then adding shading to light, medium and dark values.
OUTLINING A MAP: You outline shapes within a drawing space. The drawing in this project is of nothing in particular. However, it presents several shading challenges you may encounter when adding shading to a drawing.
CROSSHATCHING VALUES: You add shading to the various shapes with crosshatching graduations. You begin with the lightest values and graduate them toward the middle values. Middle values are added and graduated into dark. Finally, you add medium values to a tiny section of reflected light.
Supplies include 2H, HB, 2B, and 4B graphite pencils, erasers, good quality drawing paper, pencil sharpener, and sandpaper block.
7 PAGES – 7 ILLUSTRATIONS This lesson is recommended for artists with strong crosshatching skills, as well as students of
home schooling, academic and recreational fine art educators.
Published by Hoddinott Publishing for Drawspace.com, Halifax, NS, Canada – 2008

Copyright to all articles, images, text, projects, lessons and exercises within this drawing class belong to Brenda Hoddinott and may not be reproduced or used for any commercial purposes whatsoever without the written permission of Brenda Hoddinott. E-mail [email protected] Web sites http://www.finearteducation.com and http://www.drawspace.com
- 2 -
INTRODUCTION A shading map (often called a value map) takes the guesswork out of where you have to put different values in a drawing.
Light and shadows assume various shapes. For example, a highlight can be a circle and a shadow can be a crescent shape.
A value map works by first identifying, each of the following:
Highlights tend to be easy to find because they are the lightest and brightest sections.
Light values are closest to the light source, often adjacent to or surrounding highlights.
Dark values are in the shadow sections of the subject and/or in various cast shadows.
Medium values tend to fall in between the light and dark values.
You then outline the various shapes of each, and add shading to the various values.
OUTLINING A MAP The drawing in this exercise is of nothing in particular. However, it presents several shading challenges you may encounter when adding shading to a drawing.
1) Set up a vertical drawing space approximately 4 by 5 inches (Figure 301).
2) Use a curved line to outline a highlight in the upper right, and mark it H.
Shading map (also called a value map) is a plan (or blueprint) for adding shading to a drawing. The locations and sizes of the shapes of various values are identified and lightly outlined. Shading (noun) refers to the various values in a drawing that make images appear three-dimensional; (verb) the process of adding values to a drawing so as to create the illusion of texture, form and/or three-dimensional space. Values are the different shades of gray created when you draw by varying both the density of the shading lines, and the pressure used in holding various pencils. Shape refers to the outward outline of a form. Basic shapes include circles, squares and triangles. Graduation (also called graduated shading or graduated values) is a continuous progression of values, from dark to light or light to dark. Hatching is a series of lines (called a set) drawn closely together to give the illusion of values. Crosshatching, a classical shading technique, is comprised of sets of lines drawn closely together, in which one set of lines crosses over (overlaps) another set. Shadows are the sections of objects or living beings that receive little or no light. Forms are the three-dimensional structures of shapes. In drawings, shading and perspective are used to transform a shape into a three-dimensional structure, such as a circle becoming a sphere or a square becoming a cube. Perspective is a visual illusion in a drawing in which objects appear to become smaller, and recede into distant space, the farther away they are from the viewer. Cast shadow is a dark section on an adjacent surface of an object that receives little or no light. The values of a cast shadow are darkest next to the object and become gradually lighter farther away. Reflected light is a faint light reflected or bounced back on an object from those surfaces that are close to and around it. Highlight identifies the brightest area of a form where light bounces off its surface; usually the section closest to the light source. Light source is the direction from which a dominant light originates. Some subjects have two or more light sources. A light source identifies the light and shadow areas of a drawing subject.

Copyright to all articles, images, text, projects, lessons and exercises within this drawing class belong to Brenda Hoddinott and may not be reproduced or used for any commercial purposes whatsoever without the written permission of Brenda Hoddinott. E-mail [email protected] Web sites http://www.finearteducation.com and http://www.drawspace.com
- 3 -
When developing a shading map from either life or a photo, remember to keep the shapes very basic. The more shapes you draw, the more complicated the shading becomes.
3) Outline two shapes as light values and mark them L (Figure 302).
4) Outline the dark values and mark them D (Figure 303).
The unmarked areas that are left over are middle values. You can mark them M if you wish.
I don’t bother marking medium values; their shapes and locations automatically become obvious when all others are identified and marked.
CROSSHATCHING VALUES In this section, you add shading to various shapes with crosshatching graduations.
You begin with the lightest values and graduate them toward the middle values. Middle values are added and graduated into dark. Finally, you add medium values to a tiny section of reflected light. Most of the highlight stays the white of your paper.
FIGURE 301
FIGURE 303
FIGURE 302

Copyright to all articles, images, text, projects, lessons and exercises within this drawing class belong to Brenda Hoddinott and may not be reproduced or used for any commercial purposes whatsoever without the written permission of Brenda Hoddinott. E-mail [email protected] Web sites http://www.finearteducation.com and http://www.drawspace.com
- 4 -
Before you begin shading each section of the map, remember to erase the letters and lighten the outlines until you can barely see them.
If you wish, you can begin your shading with hatching lines. Then, draw a second set of hatching lines that cross over the first (crosshatching), to create darker values.
5) Use a 2H pencil and crosshatching to add light graduations from the highlight into the L shapes.
Refer to Figure 304. Make the shading lines different lengths, and extend them unevenly into the adjourning spaces.
6) Add graduations to the sections in your map needing medium values.
Use an HB pencil and follow the contours of the surrounding shapes.
Continuously adjust your lines so the graduations flow smoothly into one another.
Make your values gradually darker as you approach the dark areas (D).
You can easily fix areas of shading you don't like. Pat the shading with your kneaded eraser to make lighter values. Add more shading lines in between others to make sections darker.
FIGURE 304
FIGURE 305

Copyright to all articles, images, text, projects, lessons and exercises within this drawing class belong to Brenda Hoddinott and may not be reproduced or used for any commercial purposes whatsoever without the written permission of Brenda Hoddinott. E-mail [email protected] Web sites http://www.finearteducation.com and http://www.drawspace.com
- 5 -
7) Shade the dark values with HB and 2B pencils.
Refer to Figure 306, which is shown larger than my actual drawing so you can clearly see the crosshatching lines.
Lighten the dark values as you approach medium or light values. Darken your shading as you move toward the darkest shadow sections.
8) Shade the darkest value with a freshly sharpened 4B pencil.
Take note of where the darkest shading ends abruptly, at the edge of the left side of the boomerang shape, marked D.
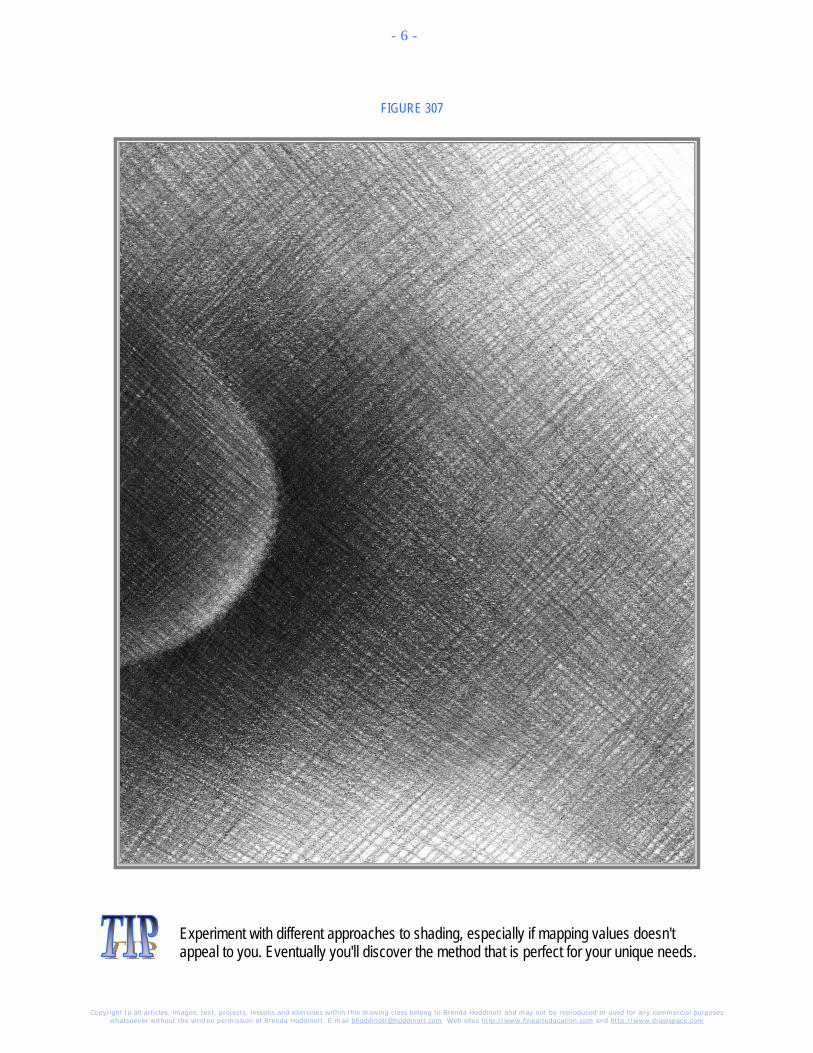
9) Add medium shading to the small crescent shape left of the abrupt stop.
Refer to the illustration in Figure 307.
This light shading represents a tiny section of reflected light.
At this point, you can see a three-dimensional form begin to emerge from the shading map.
FIGURE 306
Copyright to all articles, images, text, projects, lessons and exercises within this drawing class belong to Brenda Hoddinott and may not be reproduced or used for any commercial purposes whatsoever without the written permission of Brenda Hoddinott. E-mail [email protected] Web sites http://www.finearteducation.com and http://www.drawspace.com
- 6 -
Experiment with different approaches to shading, especially if mapping values doesn't appeal to you. Eventually you'll discover the method that is perfect for your unique needs.
FIGURE 307

Copyright to all articles, images, text, projects, lessons and exercises within this drawing class belong to Brenda Hoddinott and may not be reproduced or used for any commercial purposes whatsoever without the written permission of Brenda Hoddinott. E-mail [email protected] Web sites http://www.finearteducation.com and http://www.drawspace.com
- 7 -
BRENDA HODDINOTT - BIOGRAPHY As a self-educated teacher, visual artist, portraitist, forensic artist, and illustrator, Brenda Hoddinott utilizes diverse art media including graphite, technical pen, colored pencil, chalk pastel, charcoal, conté crayon, and oil paints.
My philosophy on teaching art is to focus primarily on the enjoyment aspects while gently introducing the technical and
academic. Hence, in creating a passion for the subject matter, the quest for knowledge also becomes enjoyable.
>Brenda Hoddinott<
Born in St. John’s, Newfoundland, Brenda grew up in the small town of Corner Brook. She developed strong technical competencies with a personal commitment to self directed learning, and the aid of assorted “Learn to Draw” books. During Brenda’s twenty-five year career as a self-educated civilian forensic artist, numerous criminal investigation departments have employed Brenda’s skills, including Royal Canadian Mounted Police and municipal police departments. In 1992, Brenda was honored with a commendation from the Royal Canadian Mounted Police, and in 1994, she was awarded a Certificate of Membership from “Forensic Artists International”.
Her home-based art career included graphic design, and teaching recreational drawing and painting classes. As supervisor of her community’s recreational art department, Brenda hired and trained teachers, and designed curriculum for several children’s art programs. In 1998, Brenda chose to end her eighteen-year career as an art educator in order to devote more time to writing, drawing, painting, and developing her websites.
Drawspace http://www.drawspace.com incorporates her unique style and innovative approach to curriculum development. This site offers downloadable and printable drawing classes for students of all abilities from the age of eight through adult. Students of all ages, levels and abilities have praised the simple step-by-step instructional approach. This site is respected as a resource for fine art educators, home schooling programs, and educational facilities throughout the world.
LEARN-TO-DRAW BOOKS BY BRENDA HODDINOTT
Drawing for Dummies: Wiley Publishing, Inc., New, York, NY, this 336 page book is available on various websites and in major bookstores internationally.
The Complete Idiot’s Guide to Drawing People: Winner of the Alpha-Penguin Book of the Year Award 2004, Alpha - Pearson Education – Macmillan, Indianapolis, IN, this 360 page book is available on various websites and in major bookstores internationally.