Credit Calculator for Major Projects and BioBanking ... · Operational Manual for the Credit...
45
Credit Calculator for Major Projects and BioBanking Operational manual
Transcript of Credit Calculator for Major Projects and BioBanking ... · Operational Manual for the Credit...
Credit Calculator for Major Projects and BioBanking
Operational manual

© 2016 State of NSW and Office of Environment and Heritage
The Office of Environment and Heritage (OEH) has compiled this manual in good faith, exercising all due care and attention. No representation is made about the accuracy, completeness or suitability of the information in this publication for any particular purpose. OEH shall not be liable for any damage which may occur to any person or organisation taking action or not on the basis of this publication. Readers should seek appropriate advice when applying the information to their specific needs This document may be subject to revision without notice and readers should ensure they are using the latest version.
All content in this publication is owned by OEH and is protected by Crown Copyright, unless credited otherwise. It is licensed under the Creative Commons Attribution 4.0 International (CC BY 4.0) , subject to the exemptions contained in the licence. The legal code for the licence is available at Creative Commons . OEH asserts the right to be attributed as author of the original material in the following manner: © State of New South Wales and Office of Environment and Heritage 2016.
Published by: Office of Environment and Heritage 59 Goulburn Street, Sydney NSW 2000 PO Box A290, Sydney South NSW 1232 Phone: +61 2 9995 5000 (switchboard) Phone: 131 555 (environment information and publications requests) Phone: 1300 361 967 (national parks, general environmental enquiries, and publications requests) Fax: +61 2 9995 5999 TTY users: phone 133 677, then ask for 131 555 Speak and listen users: phone 1300 555 727, then ask for 131 555 Email: [email protected] Website: www.environment.nsw.gov.au Report pollution and environmental incidents Environment Line: 131 555 (NSW only) or [email protected] See also www.environment.nsw.gov.au ISBN 978-1-76039-278-9 OEH 2016/0096 February 2016
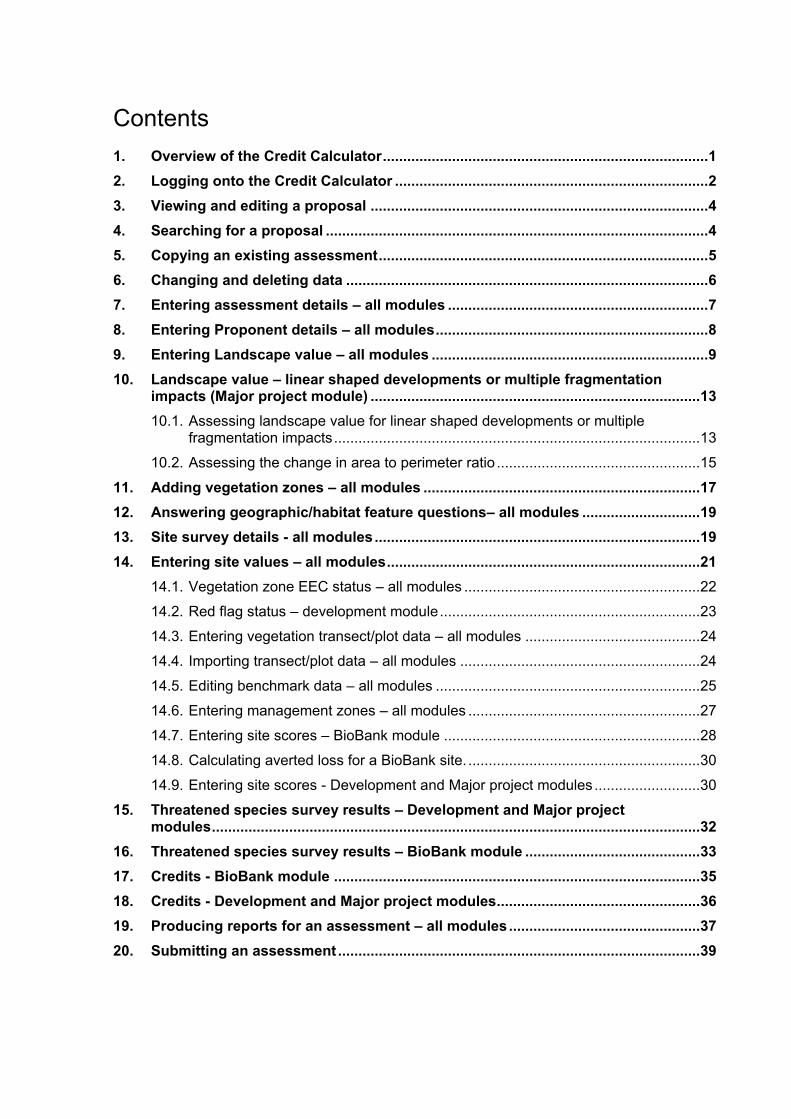
Contents 1. Overview of the Credit Calculator ................................................................................ 1
2. Logging onto the Credit Calculator ............................................................................. 2
3. Viewing and editing a proposal ................................................................................... 4
4. Searching for a proposal .............................................................................................. 4
5. Copying an existing assessment ................................................................................. 5
6. Changing and deleting data ......................................................................................... 6
7. Entering assessment details – all modules ................................................................ 7
8. Entering Proponent details – all modules ................................................................... 8
9. Entering Landscape value – all modules .................................................................... 9
10. Landscape value – linear shaped developments or multiple fragmentation impacts (Major project module) ................................................................................. 13
10.1. Assessing landscape value for linear shaped developments or multiple fragmentation impacts .......................................................................................... 13
10.2. Assessing the change in area to perimeter ratio .................................................. 15
11. Adding vegetation zones – all modules .................................................................... 17
12. Answering geographic/habitat feature questions– all modules ............................. 19
13. Site survey details - all modules ................................................................................ 19
14. Entering site values – all modules ............................................................................. 21
14.1. Vegetation zone EEC status – all modules .......................................................... 22
14.2. Red flag status – development module ................................................................ 23
14.3. Entering vegetation transect/plot data – all modules ........................................... 24
14.4. Importing transect/plot data – all modules ........................................................... 24
14.5. Editing benchmark data – all modules ................................................................. 25
14.6. Entering management zones – all modules ......................................................... 27
14.7. Entering site scores – BioBank module ............................................................... 28
14.8. Calculating averted loss for a BioBank site. ......................................................... 30
14.9. Entering site scores - Development and Major project modules .......................... 30
15. Threatened species survey results – Development and Major project modules ........................................................................................................................ 32
16. Threatened species survey results – BioBank module ........................................... 33
17. Credits - BioBank module .......................................................................................... 35
18. Credits - Development and Major project modules .................................................. 36
19. Producing reports for an assessment – all modules ............................................... 37
20. Submitting an assessment ......................................................................................... 39

About this operational manual
This document is the operational manual for the Credit Calculator for Major Projects and BioBanking (the Credit Calculator). Accredited assessors should use this manual as a guide when entering data into the Credit Calculator. The manual should be used in consultation with the BioBanking Assessment Methodology 2014 (BBAM) (OEH 2014a) and the Framework for Biodiversity Assessment 2014 (FBA) (OEH 2014b).
Updates to the Credit Calculator and databases
An assessor must use the Credit Calculator to assess the impacts of the development on biodiversity values and prepare a Biodiversity Assessment Report (BAR). An assessor must use the Credit Calculator when assessing the biodiversity values of a development site or a BioBank site.
The databases listed in Subsection 2.2.2 of the BBAM and FBA are used in the Credit Calculator. These are updated periodically in response to increased knowledge about biodiversity values and relevant biodiversity data. Changes to the databases may require an updated version of the Credit Calculator to be issued by the Office of Environment and Heritage (OEH). OEH will notify assessors when an updated version of the Credit Calculator becomes operational to warn assessors of the implications for current assessments being undertaken. The most recent version of the Credit Calculator must be used when using the BBAM or FBA to assess a development site or a BioBank site, unless OEH has provided approval in writing for a previous version of the Credit Calculator to be used.
Operational Manual for the Credit Calculator 1
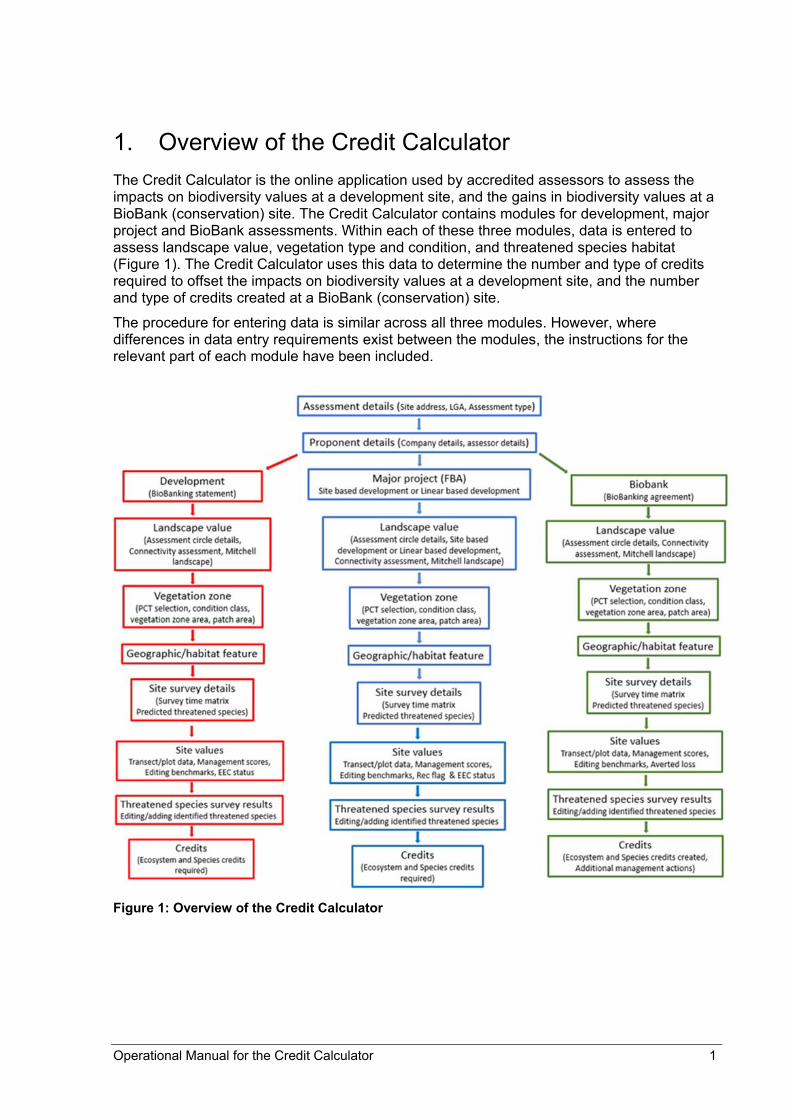
1. Overview of the Credit Calculator The Credit Calculator is the online application used by accredited assessors to assess the impacts on biodiversity values at a development site, and the gains in biodiversity values at a BioBank (conservation) site. The Credit Calculator contains modules for development, major project and BioBank assessments. Within each of these three modules, data is entered to assess landscape value, vegetation type and condition, and threatened species habitat (Figure 1). The Credit Calculator uses this data to determine the number and type of credits required to offset the impacts on biodiversity values at a development site, and the number and type of credits created at a BioBank (conservation) site.
The procedure for entering data is similar across all three modules. However, where differences in data entry requirements exist between the modules, the instructions for the relevant part of each module have been included.
Figure 1: Overview of the Credit Calculator
2 Operational Manual for the Credit Calculator
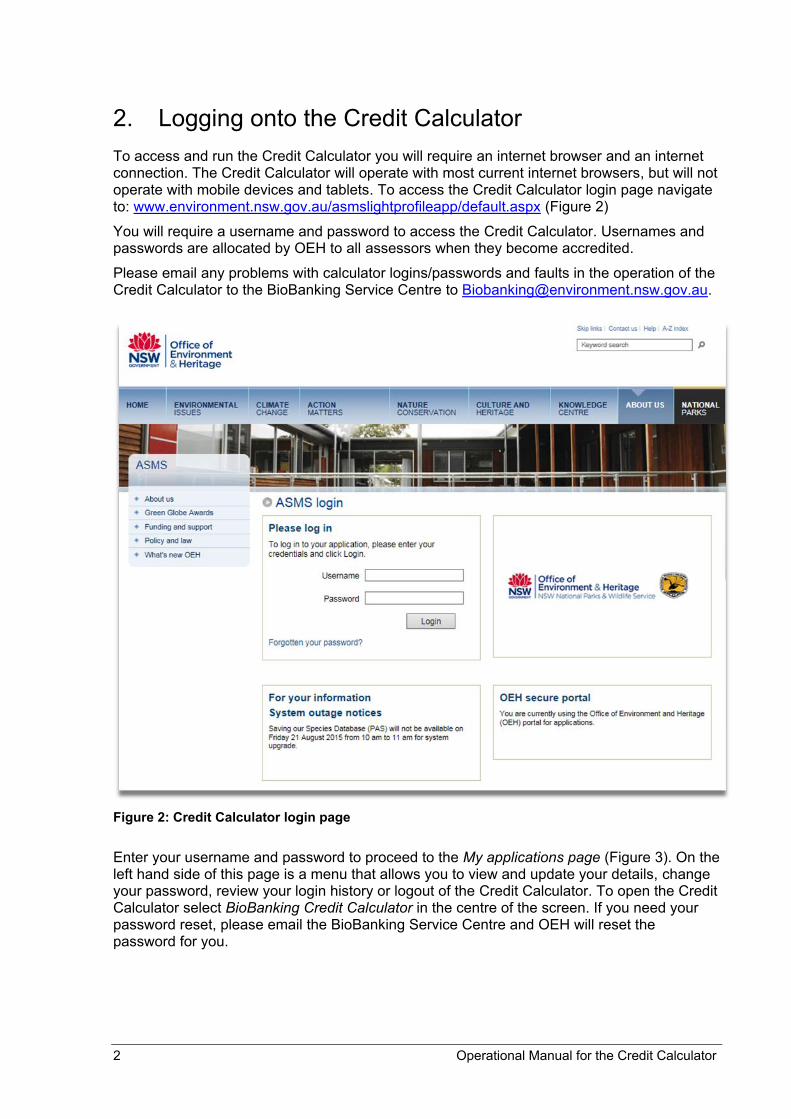
2. Logging onto the Credit Calculator To access and run the Credit Calculator you will require an internet browser and an internet connection. The Credit Calculator will operate with most current internet browsers, but will not operate with mobile devices and tablets. To access the Credit Calculator login page navigate to: www.environment.nsw.gov.au/asmslightprofileapp/default.aspx (Figure 2)
You will require a username and password to access the Credit Calculator. Usernames and passwords are allocated by OEH to all assessors when they become accredited.
Please email any problems with calculator logins/passwords and faults in the operation of the Credit Calculator to the BioBanking Service Centre to [email protected].
Figure 2: Credit Calculator login page
Enter your username and password to proceed to the My applications page (Figure 3). On the left hand side of this page is a menu that allows you to view and update your details, change your password, review your login history or logout of the Credit Calculator. To open the Credit Calculator select BioBanking Credit Calculator in the centre of the screen. If you need your password reset, please email the BioBanking Service Centre and OEH will reset the password for you.

Operational Manual for the Credit Calculator 3
Figure 3: My applications page
The top of the screen within the Credit Calculator contains four navigation items: Proposals, Administration, Help and Logout. To begin a new assessment, select Proposals – Create New. This will open a blank Assessment details page to begin an assessment (Figure 4).
Figure 4: Creating a new proposal
4 Operational Manual for the Credit Calculator
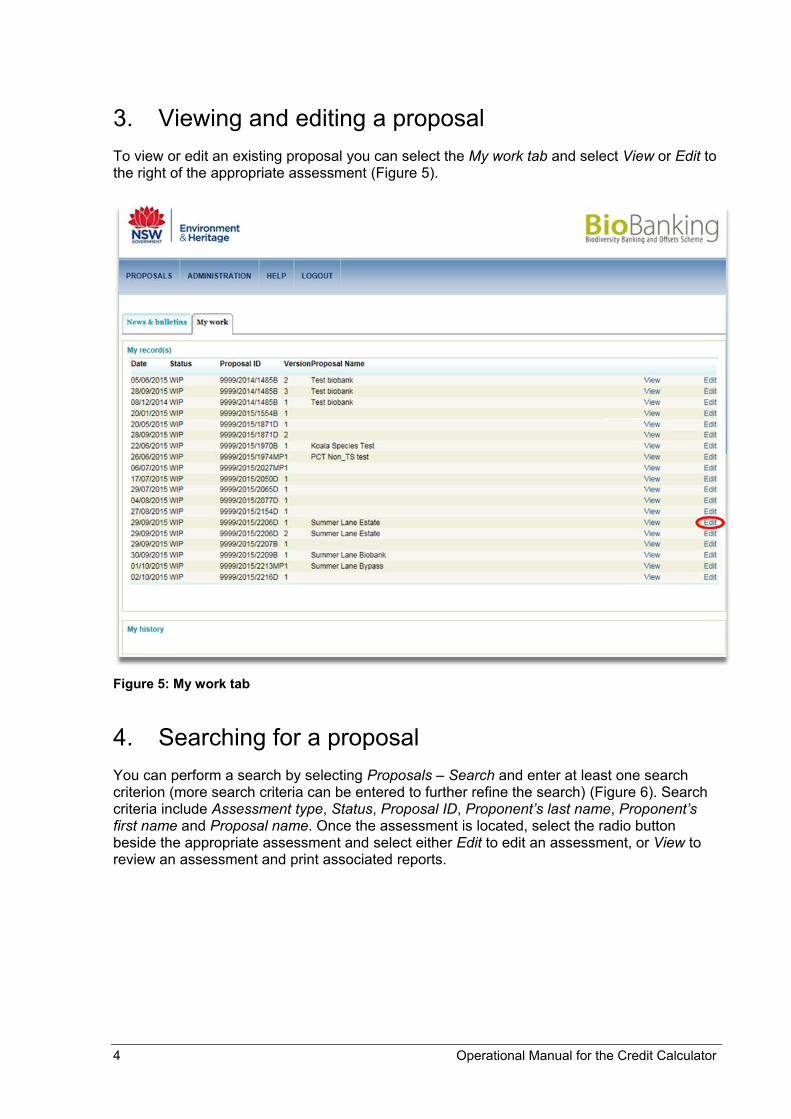
3. Viewing and editing a proposal To view or edit an existing proposal you can select the My work tab and select View or Edit to the right of the appropriate assessment (Figure 5).
Figure 5: My work tab
4. Searching for a proposal You can perform a search by selecting Proposals – Search and enter at least one search criterion (more search criteria can be entered to further refine the search) (Figure 6). Search criteria include Assessment type, Status, Proposal ID, Proponent’s last name, Proponent’s first name and Proposal name. Once the assessment is located, select the radio button beside the appropriate assessment and select either Edit to edit an assessment, or View to review an assessment and print associated reports.

Operational Manual for the Credit Calculator 5
Figure 6: Searching for an assessment
5. Copying an existing assessment In addition to editing or viewing an existing assessment, you can also copy it to run an alternative scenario, thus reducing data entry time (Figure 7). To copy an assessment select the radio button beside the appropriate assessment and select Copy. A new version of the assessment (Version 2) will be created and will open automatically (Figure 8). An assessment can be copied up to four times. Select Save & Close to save the new version of the assessment, or Cancel to discard the new version.
Figure 7: Copying an existing assessment
6 Operational Manual for the Credit Calculator
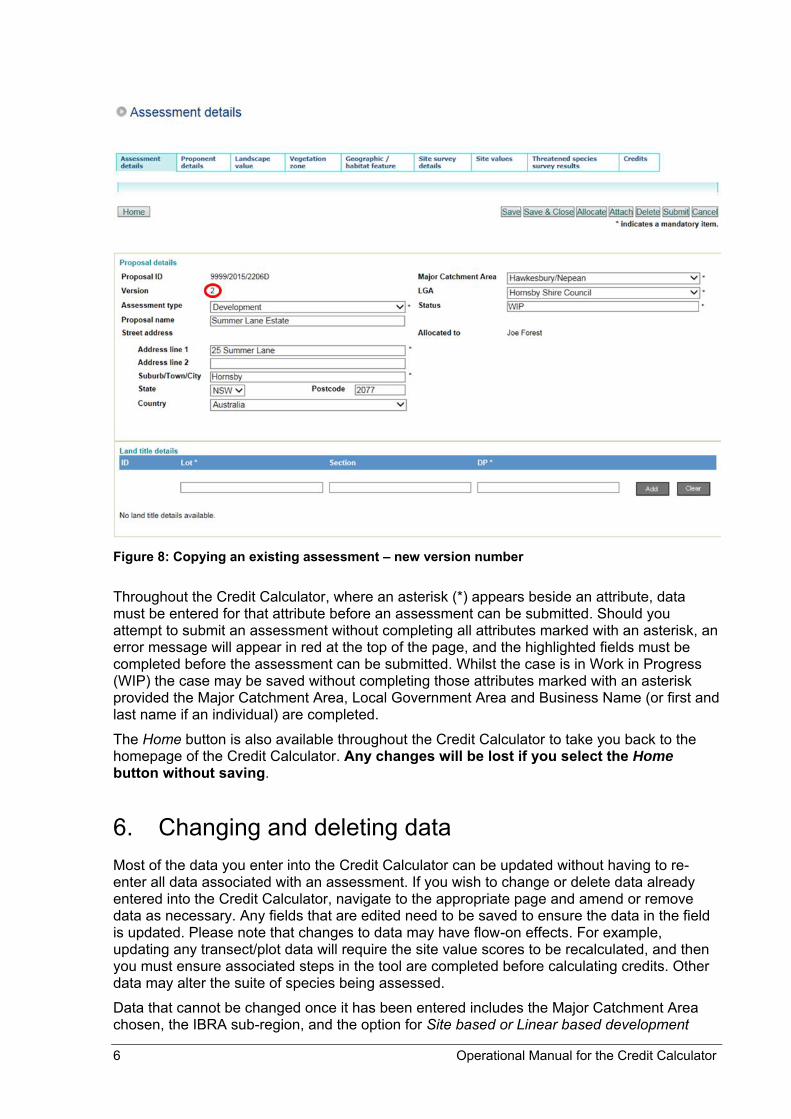
Figure 8: Copying an existing assessment – new version number
Throughout the Credit Calculator, where an asterisk (*) appears beside an attribute, data must be entered for that attribute before an assessment can be submitted. Should you attempt to submit an assessment without completing all attributes marked with an asterisk, an error message will appear in red at the top of the page, and the highlighted fields must be completed before the assessment can be submitted. Whilst the case is in Work in Progress (WIP) the case may be saved without completing those attributes marked with an asterisk provided the Major Catchment Area, Local Government Area and Business Name (or first and last name if an individual) are completed.
The Home button is also available throughout the Credit Calculator to take you back to the homepage of the Credit Calculator. Any changes will be lost if you select the Home button without saving.
6. Changing and deleting data Most of the data you enter into the Credit Calculator can be updated without having to re-enter all data associated with an assessment. If you wish to change or delete data already entered into the Credit Calculator, navigate to the appropriate page and amend or remove data as necessary. Any fields that are edited need to be saved to ensure the data in the field is updated. Please note that changes to data may have flow-on effects. For example, updating any transect/plot data will require the site value scores to be recalculated, and then you must ensure associated steps in the tool are completed before calculating credits. Other data may alter the suite of species being assessed.
Data that cannot be changed once it has been entered includes the Major Catchment Area chosen, the IBRA sub-region, and the option for Site based or Linear based development

Operational Manual for the Credit Calculator 7
(Major project module) in the landscape value assessment. If the incorrect Major Catchment Area is chosen for an assessment, the assessment must be re-started. If the wrong IBRA sub-region is selected, the assessment circle containing the incorrect IBRA sub-region can be deleted. You can then add a new assessment circle, select the correct IBRA sub-region and continue with the assessment. If vegetation zones have been linked to the deleted assessment circle, you will need to rebuild those links in the vegetation zone page. Should you wish to cancel any unsaved changes to the data, there is a Cancel button on each page. Once it is selected, a popup will appear asking if you are sure you want to cancel your changes. If Yes is selected, any unsaved data will be lost.
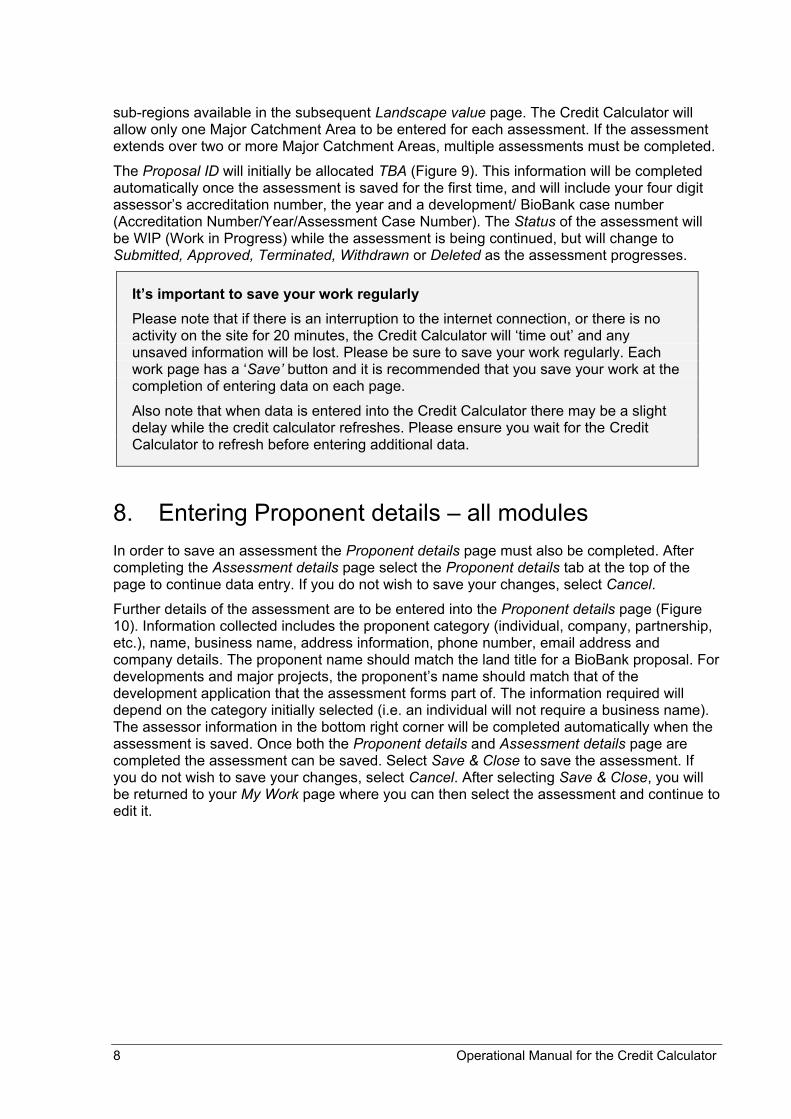
7. Entering assessment details – all modules The details of the assessment are entered into the Assessment details page (Figure 9). This information is required to record the location and details of the assessment. Information collected includes the assessment type (Development, Major project, Biobank site), proposal name, street address and Lot/DP details of the site. Additional details are also collected, such as the Major Catchment Area and Local Government Area (LGA). It is important to be accurate with this detail, as it will need to match any formal applications submitted to the Office of Environment and Heritage (OEH) for review and approval.
Figure 9: Assessment details page
The Assessment type information (Development, Major Project or BioBank) and LGA information can be selected from drop-down lists, while the proposal name and street address information is entered as free text. The Major Catchment Area chosen (see Appendix 8 of the BBAM (OEH 2014a), Appendix 6 of the FBA (OEH 2014b)) will filter the selection of IBRA
8 Operational Manual for the Credit Calculator
sub-regions available in the subsequent Landscape value page. The Credit Calculator will allow only one Major Catchment Area to be entered for each assessment. If the assessment extends over two or more Major Catchment Areas, multiple assessments must be completed.
The Proposal ID will initially be allocated TBA (Figure 9). This information will be completed automatically once the assessment is saved for the first time, and will include your four digit assessor’s accreditation number, the year and a development/ BioBank case number (Accreditation Number/Year/Assessment Case Number). The Status of the assessment will be WIP (Work in Progress) while the assessment is being continued, but will change to Submitted, Approved, Terminated, Withdrawn or Deleted as the assessment progresses.
It’s important to save your work regularly Please note that if there is an interruption to the internet connection, or there is no activity on the site for 20 minutes, the Credit Calculator will ‘time out’ and any unsaved information will be lost. Please be sure to save your work regularly. Each work page has a ‘Save’ button and it is recommended that you save your work at the completion of entering data on each page.
Also note that when data is entered into the Credit Calculator there may be a slight delay while the credit calculator refreshes. Please ensure you wait for the Credit Calculator to refresh before entering additional data.
8. Entering Proponent details – all modules In order to save an assessment the Proponent details page must also be completed. After completing the Assessment details page select the Proponent details tab at the top of the page to continue data entry. If you do not wish to save your changes, select Cancel.
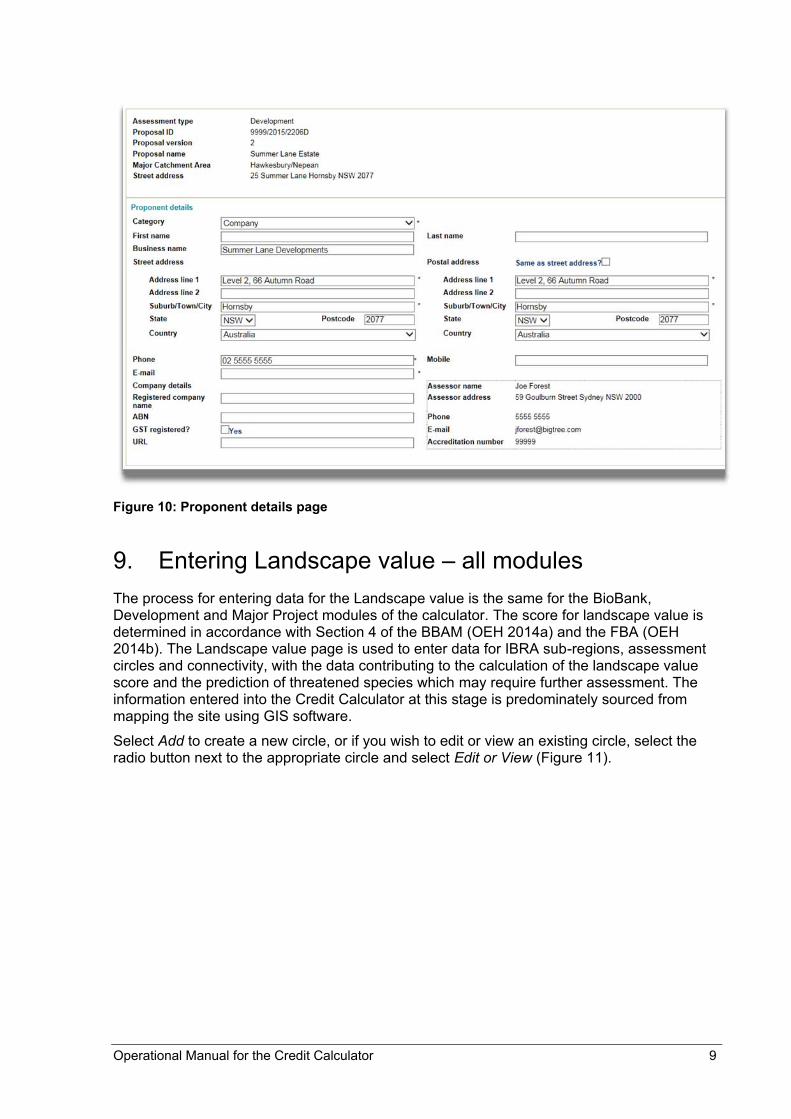
Further details of the assessment are to be entered into the Proponent details page (Figure 10). Information collected includes the proponent category (individual, company, partnership, etc.), name, business name, address information, phone number, email address and company details. The proponent name should match the land title for a BioBank proposal. For developments and major projects, the proponent’s name should match that of the development application that the assessment forms part of. The information required will depend on the category initially selected (i.e. an individual will not require a business name). The assessor information in the bottom right corner will be completed automatically when the assessment is saved. Once both the Proponent details and Assessment details page are completed the assessment can be saved. Select Save & Close to save the assessment. If you do not wish to save your changes, select Cancel. After selecting Save & Close, you will be returned to your My Work page where you can then select the assessment and continue to edit it.
Operational Manual for the Credit Calculator 9
Figure 10: Proponent details page
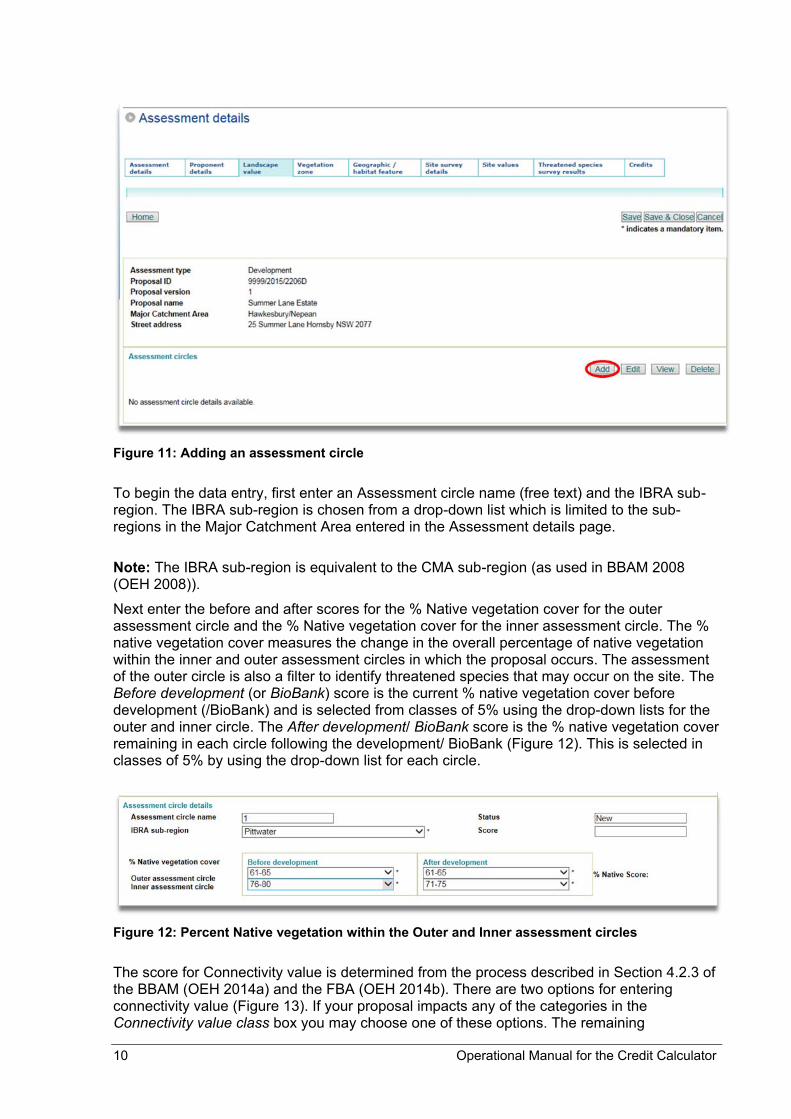
9. Entering Landscape value – all modules The process for entering data for the Landscape value is the same for the BioBank, Development and Major Project modules of the calculator. The score for landscape value is determined in accordance with Section 4 of the BBAM (OEH 2014a) and the FBA (OEH 2014b). The Landscape value page is used to enter data for IBRA sub-regions, assessment circles and connectivity, with the data contributing to the calculation of the landscape value score and the prediction of threatened species which may require further assessment. The information entered into the Credit Calculator at this stage is predominately sourced from mapping the site using GIS software.
Select Add to create a new circle, or if you wish to edit or view an existing circle, select the radio button next to the appropriate circle and select Edit or View (Figure 11).
10 Operational Manual for the Credit Calculator
Figure 11: Adding an assessment circle
To begin the data entry, first enter an Assessment circle name (free text) and the IBRA sub-region. The IBRA sub-region is chosen from a drop-down list which is limited to the sub-regions in the Major Catchment Area entered in the Assessment details page.
Note: The IBRA sub-region is equivalent to the CMA sub-region (as used in BBAM 2008 (OEH 2008)).
Next enter the before and after scores for the % Native vegetation cover for the outer assessment circle and the % Native vegetation cover for the inner assessment circle. The % native vegetation cover measures the change in the overall percentage of native vegetation within the inner and outer assessment circles in which the proposal occurs. The assessment of the outer circle is also a filter to identify threatened species that may occur on the site. The Before development (or BioBank) score is the current % native vegetation cover before development (/BioBank) and is selected from classes of 5% using the drop-down lists for the outer and inner circle. The After development/ BioBank score is the % native vegetation cover remaining in each circle following the development/ BioBank (Figure 12). This is selected in classes of 5% by using the drop-down list for each circle.
Figure 12: Percent Native vegetation within the Outer and Inner assessment circles
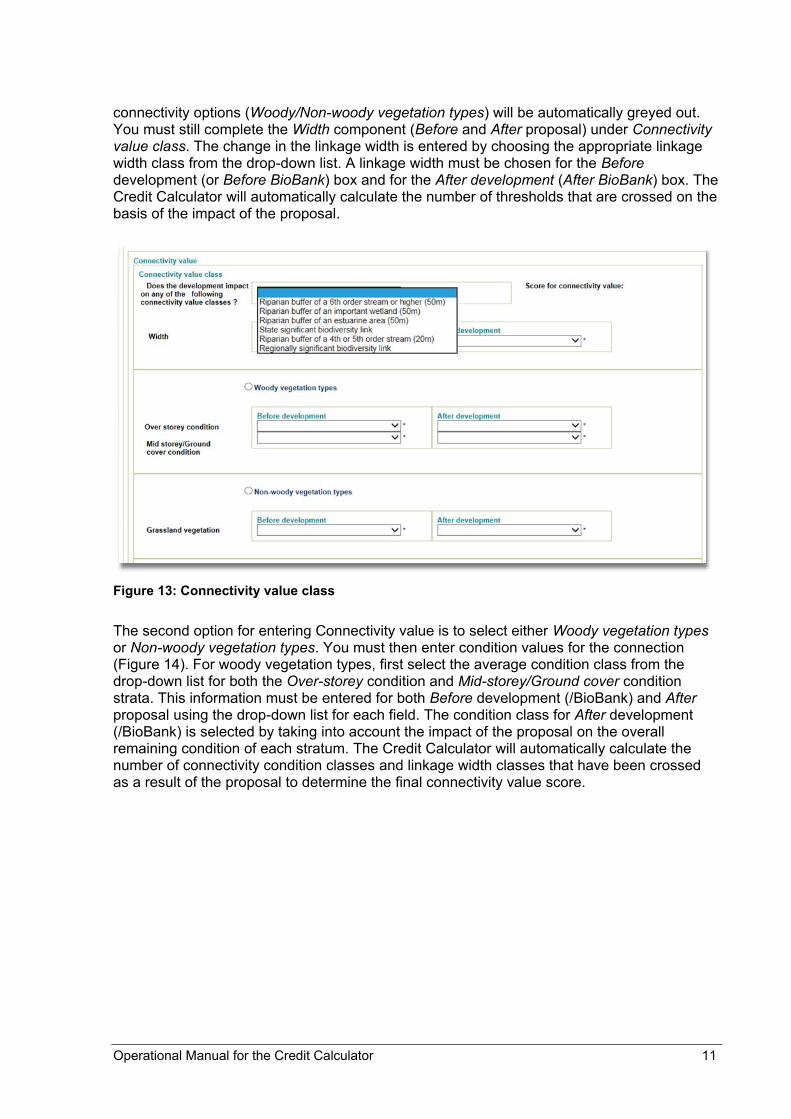
The score for Connectivity value is determined from the process described in Section 4.2.3 of the BBAM (OEH 2014a) and the FBA (OEH 2014b). There are two options for entering connectivity value (Figure 13). If your proposal impacts any of the categories in the Connectivity value class box you may choose one of these options. The remaining
Operational Manual for the Credit Calculator 11
connectivity options (Woody/Non-woody vegetation types) will be automatically greyed out. You must still complete the Width component (Before and After proposal) under Connectivity value class. The change in the linkage width is entered by choosing the appropriate linkage width class from the drop-down list. A linkage width must be chosen for the Before development (or Before BioBank) box and for the After development (After BioBank) box. The Credit Calculator will automatically calculate the number of thresholds that are crossed on the basis of the impact of the proposal.
Figure 13: Connectivity value class
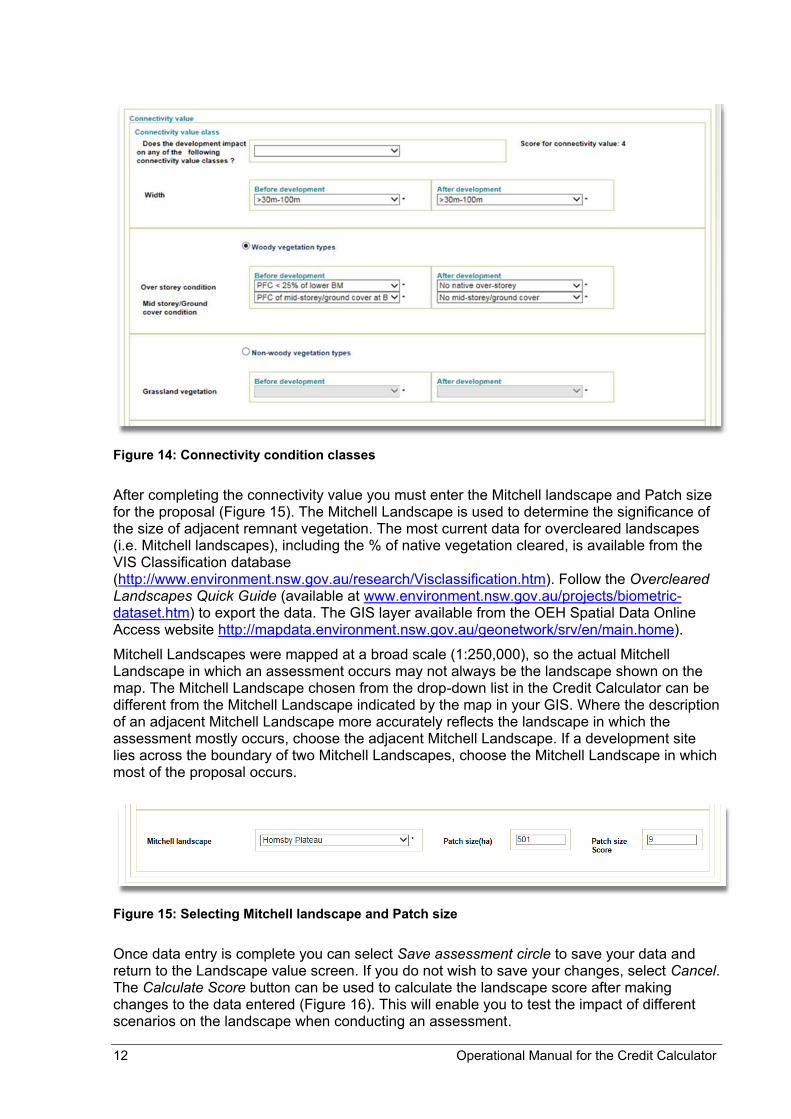
The second option for entering Connectivity value is to select either Woody vegetation types or Non-woody vegetation types. You must then enter condition values for the connection (Figure 14). For woody vegetation types, first select the average condition class from the drop-down list for both the Over-storey condition and Mid-storey/Ground cover condition strata. This information must be entered for both Before development (/BioBank) and After proposal using the drop-down list for each field. The condition class for After development (/BioBank) is selected by taking into account the impact of the proposal on the overall remaining condition of each stratum. The Credit Calculator will automatically calculate the number of connectivity condition classes and linkage width classes that have been crossed as a result of the proposal to determine the final connectivity value score.
12 Operational Manual for the Credit Calculator
Figure 14: Connectivity condition classes
After completing the connectivity value you must enter the Mitchell landscape and Patch size for the proposal (Figure 15). The Mitchell Landscape is used to determine the significance of the size of adjacent remnant vegetation. The most current data for overcleared landscapes (i.e. Mitchell landscapes), including the % of native vegetation cleared, is available from the VIS Classification database (http://www.environment.nsw.gov.au/research/Visclassification.htm). Follow the Overcleared Landscapes Quick Guide (available at www.environment.nsw.gov.au/projects/biometric-dataset.htm) to export the data. The GIS layer available from the OEH Spatial Data Online Access website http://mapdata.environment.nsw.gov.au/geonetwork/srv/en/main.home).
Mitchell Landscapes were mapped at a broad scale (1:250,000), so the actual Mitchell Landscape in which an assessment occurs may not always be the landscape shown on the map. The Mitchell Landscape chosen from the drop-down list in the Credit Calculator can be different from the Mitchell Landscape indicated by the map in your GIS. Where the description of an adjacent Mitchell Landscape more accurately reflects the landscape in which the assessment mostly occurs, choose the adjacent Mitchell Landscape. If a development site lies across the boundary of two Mitchell Landscapes, choose the Mitchell Landscape in which most of the proposal occurs.
Figure 15: Selecting Mitchell landscape and Patch size
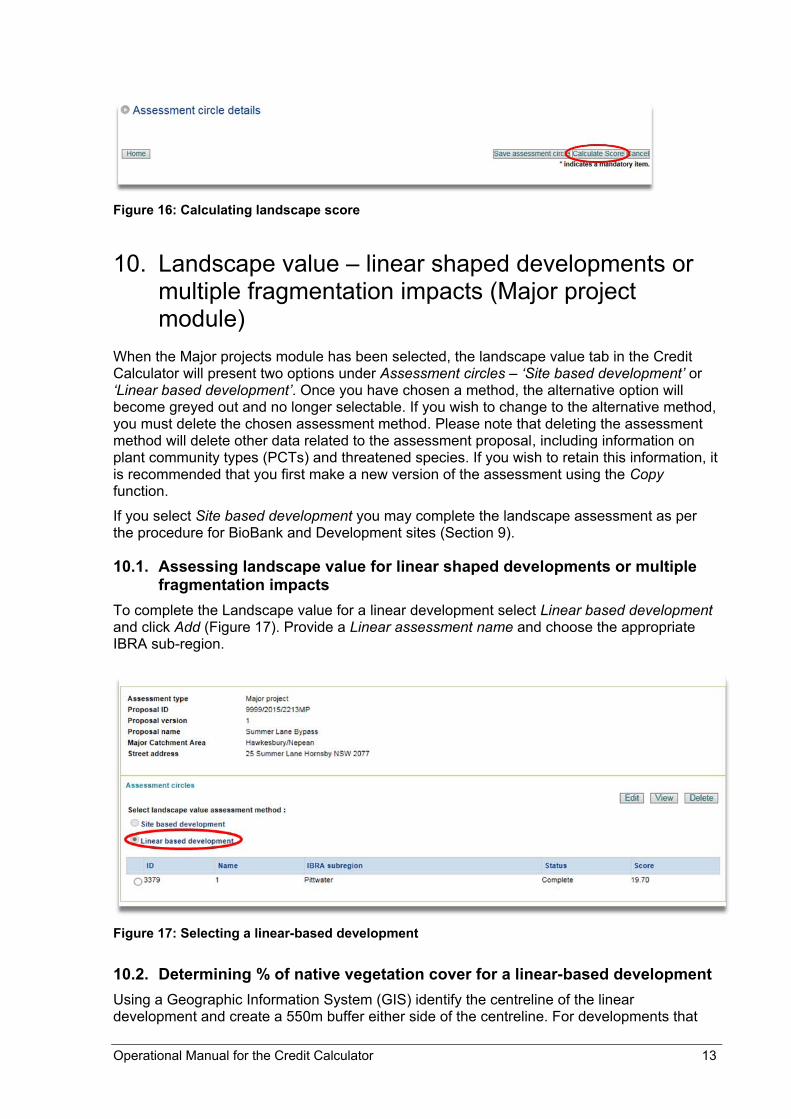
Once data entry is complete you can select Save assessment circle to save your data and return to the Landscape value screen. If you do not wish to save your changes, select Cancel. The Calculate Score button can be used to calculate the landscape score after making changes to the data entered (Figure 16). This will enable you to test the impact of different scenarios on the landscape when conducting an assessment.
Operational Manual for the Credit Calculator 13
Figure 16: Calculating landscape score
10. Landscape value – linear shaped developments or multiple fragmentation impacts (Major project module)
When the Major projects module has been selected, the landscape value tab in the Credit Calculator will present two options under Assessment circles – ‘Site based development’ or ‘Linear based development’. Once you have chosen a method, the alternative option will become greyed out and no longer selectable. If you wish to change to the alternative method, you must delete the chosen assessment method. Please note that deleting the assessment method will delete other data related to the assessment proposal, including information on plant community types (PCTs) and threatened species. If you wish to retain this information, it is recommended that you first make a new version of the assessment using the Copy function.
If you select Site based development you may complete the landscape assessment as per the procedure for BioBank and Development sites (Section 9).
10.1. Assessing landscape value for linear shaped developments or multiple fragmentation impacts
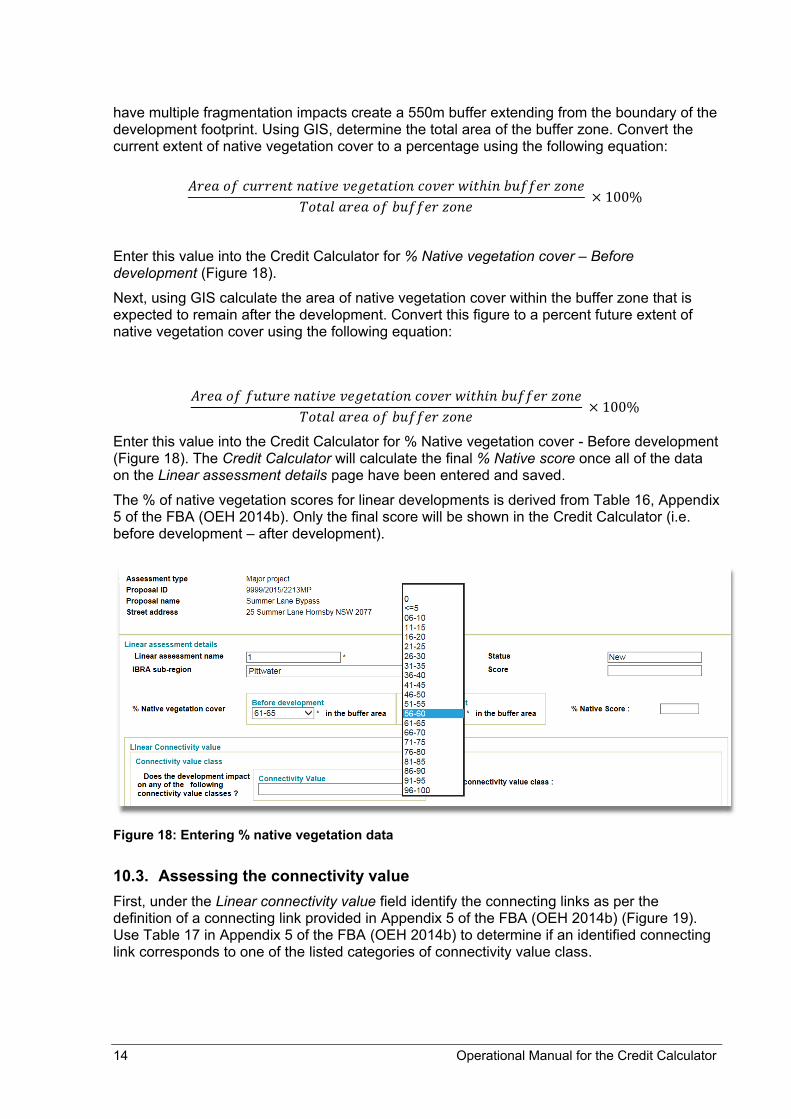
To complete the Landscape value for a linear development select Linear based development and click Add (Figure 17). Provide a Linear assessment name and choose the appropriate IBRA sub-region.
Figure 17: Selecting a linear-based development
10.2. Determining % of native vegetation cover for a linear-based development
Using a Geographic Information System (GIS) identify the centreline of the linear development and create a 550m buffer either side of the centreline. For developments that
14 Operational Manual for the Credit Calculator
have multiple fragmentation impacts create a 550m buffer extending from the boundary of the development footprint. Using GIS, determine the total area of the buffer zone. Convert the current extent of native vegetation cover to a percentage using the following equation:
𝐴𝑟𝑒𝑎 𝑜𝑓 𝑐𝑢𝑟𝑟𝑒𝑛𝑡 𝑛𝑎𝑡𝑖𝑣𝑒 𝑣𝑒𝑔𝑒𝑡𝑎𝑡𝑖𝑜𝑛 𝑐𝑜𝑣𝑒𝑟 𝑤𝑖𝑡ℎ𝑖𝑛 𝑏𝑢𝑓𝑓𝑒𝑟 𝑧𝑜𝑛𝑒
𝑇𝑜𝑡𝑎𝑙 𝑎𝑟𝑒𝑎 𝑜𝑓 𝑏𝑢𝑓𝑓𝑒𝑟 𝑧𝑜𝑛𝑒 × 100%
Enter this value into the Credit Calculator for % Native vegetation cover – Before development (Figure 18).
Next, using GIS calculate the area of native vegetation cover within the buffer zone that is expected to remain after the development. Convert this figure to a percent future extent of native vegetation cover using the following equation:
𝐴𝑟𝑒𝑎 𝑜𝑓 𝑓𝑢𝑡𝑢𝑟𝑒 𝑛𝑎𝑡𝑖𝑣𝑒 𝑣𝑒𝑔𝑒𝑡𝑎𝑡𝑖𝑜𝑛 𝑐𝑜𝑣𝑒𝑟 𝑤𝑖𝑡ℎ𝑖𝑛 𝑏𝑢𝑓𝑓𝑒𝑟 𝑧𝑜𝑛𝑒
𝑇𝑜𝑡𝑎𝑙 𝑎𝑟𝑒𝑎 𝑜𝑓 𝑏𝑢𝑓𝑓𝑒𝑟 𝑧𝑜𝑛𝑒 × 100%
Enter this value into the Credit Calculator for % Native vegetation cover - Before development (Figure 18). The Credit Calculator will calculate the final % Native score once all of the data on the Linear assessment details page have been entered and saved.
The % of native vegetation scores for linear developments is derived from Table 16, Appendix 5 of the FBA (OEH 2014b). Only the final score will be shown in the Credit Calculator (i.e. before development – after development).
Figure 18: Entering % native vegetation data
10.3. Assessing the connectivity value
First, under the Linear connectivity value field identify the connecting links as per the definition of a connecting link provided in Appendix 5 of the FBA (OEH 2014b) (Figure 19). Use Table 17 in Appendix 5 of the FBA (OEH 2014b) to determine if an identified connecting link corresponds to one of the listed categories of connectivity value class.

Operational Manual for the Credit Calculator 15
Figure 19: Selecting connectivity value class
If the development will impact on an identified connecting link, use Table 17 in Appendix 5 of the FBA (OEH 2014b) to determine the score of that connecting link. If there is no connecting link or an identified connecting link will not be impacted by the development, the connectivity value score is zero. The score for connectivity value will be automatically generated in the Credit Calculator once all of the data on the Linear assessment details page have been entered and saved.
10.4. Assessing the change in area to perimeter ratio Step 1. Calculate the area and perimeter of each patch Use GIS to calculate the area (in m2, not hectares) and perimeter (m) of each separate patch greater than 1 hectare (ha) in size within the buffer zone that will be impacted (i.e. intersected, modified or removed) by development. Treat each patch of vegetation >1 ha as a separate patch, i.e. disregard the gap requirement as per patch size definition in the BBAM/FBA (OEH 2014a & b). For a linear-shaped development this zone extends 550 m from each side of the centreline of the development and therefore includes the development footprint. For a multiple fragmentation development, the buffer zone extends from the boundary of the development footprint and therefore does not include the development footprint. Step 2. Calculate the total area and total perimeter length (before development) Calculate the total current area (m2) and total current perimeter length (m) of all the patch areas (>1 ha) that will be impacted by the development. This calculation provides the total area and total perimeter length before the development. Step 3. Determine the current area to perimeter ratio (before development) Calculate the current area to perimeter ratio by dividing the total current area (m2) by the total current perimeter length (m). Enter this value into ‘Area/Perimeter ratio – Before development’ field in the Credit Calculator, using a whole number. Step 4. For each patch size identified in Step 1, use GIS to determine the future area (m2) and future perimeter (m) after development. This includes all new and existing edges created by the impact of development. For this purpose both the area of new and existing patches can be <1 ha and the distance to other vegetation (as per definition of patch size in the FBA (OEH 2014b)) is irrelevant. Therefore, all new and existing patches that are created after development are counted within this calculation. Calculate the total future area (m2) and future perimeter length (metres) of all new and existing patches. Step 5. Determine the future area to perimeter ratio (after development) Calculate the future area to perimeter ratio by dividing the total future area (m2) by the total future perimeter length (m). Enter this value into the area to perimeter ratio after development in the Credit Calculator using a whole number (Figure 20).

16 Operational Manual for the Credit Calculator
Figure 20: Determining the proportional change in Area/Perimeter ratio
Step 6. Determine the proportional change in area to perimeter ratio
Determine the proportional change in area to perimeter ratio using the following equation:
������������������������ ���3� � ����������������������� ���5�
������������������������� 100%
The proportional change in area to perimeter ratio will be automatically generated by the Credit Calculator once all of the data on the Linear assessment details page have been entered and saved. The scores for proportional change in the area to perimeter ratio are contained in Table 19 in Appendix 5 of the FBA (OEH 2014b).
Note, if the proportional change in area to perimeter ratio is a negative value (i.e. the future area to perimeter ratio is greater than the current area to perimeter ratio) then the Credit Calculator will return a value of zero and the area to perimeter ratio score will be calculated as zero.
10.5. Assessing patch size
Using the Mitchell landscape GIS layer determine the Mitchell landscapes in which the development occurs. Use GIS to determine the patch size area for each Mitchell landscape. If there are multiple patches within one Mitchell landscape, use the largest patch for that landscape. Enter the patch size area for each Mitchell landscape into the Credit Calculator.
Use Table 18 in Appendix 5 of the FBA (OEH 2014b) to determine the patch size score for each Mitchell landscape using the corresponding patch size class and percent native vegetation cleared. The Credit Calculator will automatically generate the score for each Mitchell landscape.
The final patch size score is calculated by averaging the patch size scores for each Mitchell landscape. The Credit Calculator will automatically average these scores (Figure 21).
Figure 21: Adding Mitchell landscapes and patch sizes
Note: The Credit Calculator will not accept a patch size is 10,000ha or greater. If your assessment patch size exceeds 10,000ha you should enter 9,999.9ha into the Patch size field. As the largest patch size class in >1000ha this will not affect the numbers of credits generated.
Operational Manual for the Credit Calculator 17
11. Adding vegetation zones – all modules The Vegetation zone page is used to enter data for each vegetation zone on site including vegetation formation, type and condition class and to assign each vegetation zone to an assessment circle.
Note: Although the Credit Calculator displays the term ’Plant community type’ it currently employs the BioMetric Vegetation Type (BVT) classification.
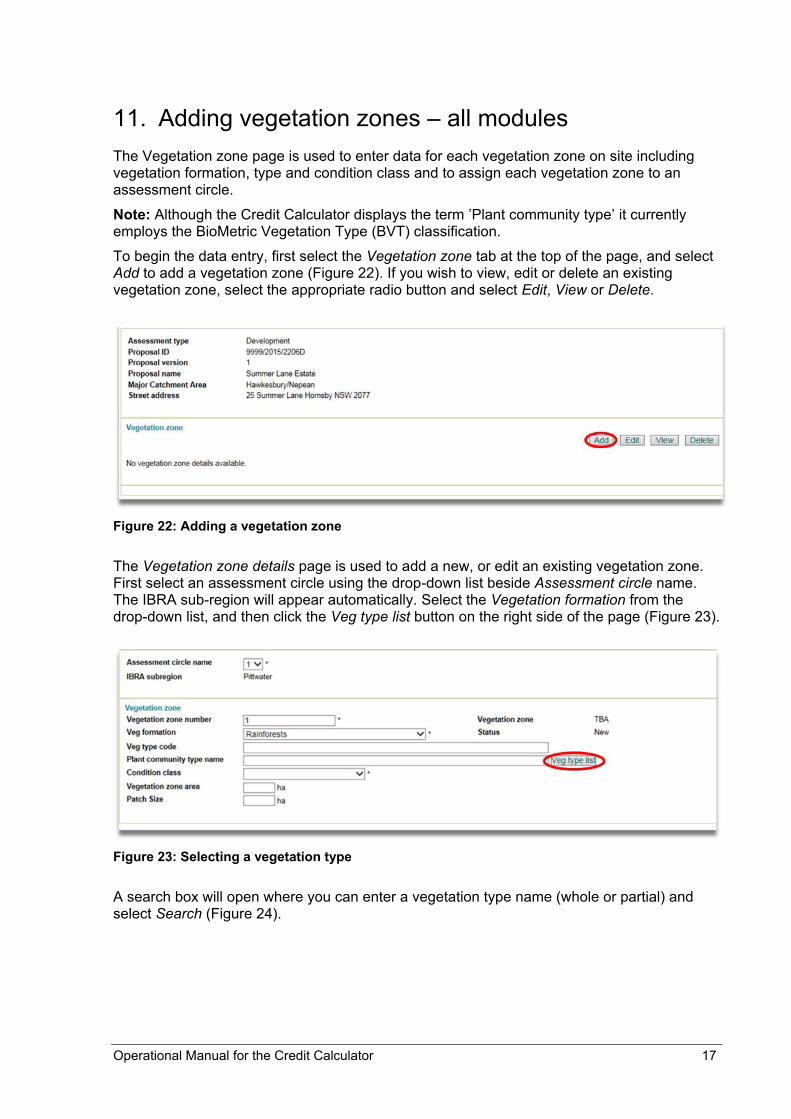
To begin the data entry, first select the Vegetation zone tab at the top of the page, and select Add to add a vegetation zone (Figure 22). If you wish to view, edit or delete an existing vegetation zone, select the appropriate radio button and select Edit, View or Delete.
Figure 22: Adding a vegetation zone
The Vegetation zone details page is used to add a new, or edit an existing vegetation zone. First select an assessment circle using the drop-down list beside Assessment circle name. The IBRA sub-region will appear automatically. Select the Vegetation formation from the drop-down list, and then click the Veg type list button on the right side of the page (Figure 23).
Figure 23: Selecting a vegetation type
A search box will open where you can enter a vegetation type name (whole or partial) and select Search (Figure 24).

18 Operational Manual for the Credit Calculator
Figure 24: Searching for a plant community type
Alternatively, you can select Search without entering any vegetation type details and obtain a complete list of all vegetation types within the selected formation (the list will be restricted to the vegetation formation selected earlier) (Figure 25). Select the radio button to the left of the appropriate vegetation type and click OK.
Figure 25: Plant community type – search results
Once the vegetation type is selected, a condition class can now be selected. From the drop-down list next to Condition class, select either ‘Low’, ‘Moderate/Good’, ‘Moderate/Good_Poor’, ‘Moderate/Good_Medium’, Moderate/Good_Derived grassland, ‘Moderate/Good_High’ or ‘Moderate/Good_Other’. (Note: The condition class you choose does not influence the credit calculation). Finally, enter a Vegetation zone area and patch size for this vegetation zone.
Once complete, select the Add vegetation zone button (for new vegetation zones) or Save vegetation zone (for existing vegetation zones) at the top right corner of the screen, or Cancel if you do not wish to save your changes.
Operational Manual for the Credit Calculator 19
12. Answering geographic/habitat feature questions– all modules
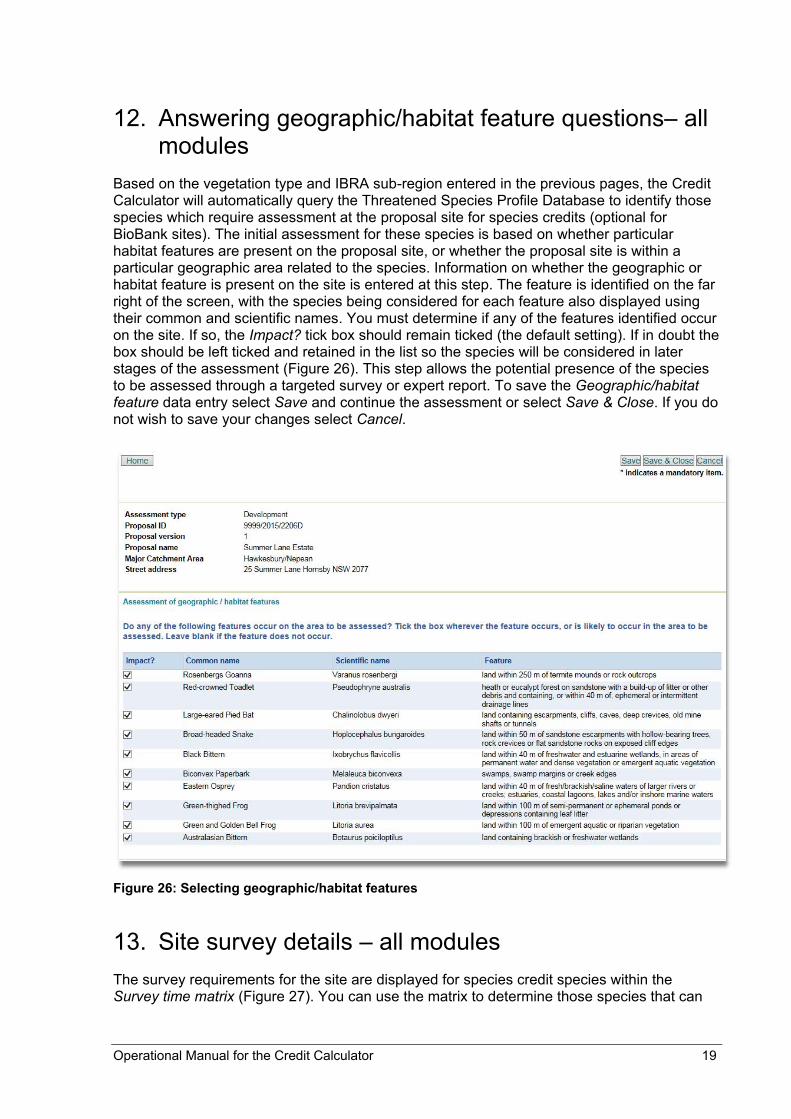
Based on the vegetation type and IBRA sub-region entered in the previous pages, the Credit Calculator will automatically query the Threatened Species Profile Database to identify those species which require assessment at the proposal site for species credits (optional for BioBank sites). The initial assessment for these species is based on whether particular habitat features are present on the proposal site, or whether the proposal site is within a particular geographic area related to the species. Information on whether the geographic or habitat feature is present on the site is entered at this step. The feature is identified on the far right of the screen, with the species being considered for each feature also displayed using their common and scientific names. You must determine if any of the features identified occur on the site. If so, the Impact? tick box should remain ticked (the default setting). If in doubt the box should be left ticked and retained in the list so the species will be considered in later stages of the assessment (Figure 26). This step allows the potential presence of the species to be assessed through a targeted survey or expert report. To save the Geographic/habitat feature data entry select Save and continue the assessment or select Save & Close. If you do not wish to save your changes select Cancel.
Figure 26: Selecting geographic/habitat features
13. Site survey details – all modules The survey requirements for the site are displayed for species credit species within the Survey time matrix (Figure 27). You can use the matrix to determine those species that can

20 Operational Manual for the Credit Calculator
be surveyed within the same times, and identify the times of year when particular species cannot be surveyed.
Figure 27: Survey time matrix
To review threatened species that are predicted on site, select the Go to predicted threatened species link above the Survey time matrix or scroll to the bottom of the page. The Predicted threatened species are listed by scientific name and common name, and include those species that are assessed for ecosystem credits. The offset multiplier value for each species is also listed.
Figure 28: Editing predicted threatened species
The status of each Predicted threatened species may be modified to not occur on site by selecting ‘Edit’ on the right hand column adjacent to each species (Figure 28). The offset multiplier may also be modified on this page. Any changes made to species on this page will be identified in the final reports and will require justification in the assessment report.
Operational Manual for the Credit Calculator 21
You can remove a species that is assessed for ecosystem credits from further assessment, or edit its offset multiplier value, by selecting Edit next to the appropriate species. If you consider the species is not present on site, the On site box should be un-ticked. To change the offset multiplier value you can edit the number that is within the offset multiplier value box. The Credit Calculator will record any changes made, for review by OEH. Once complete, select Save, or Clear, if you do not wish to save the changes. Note: An offset multiplier value may be changed for a species using the certified local data provisions under Section 2.2.2 of the BBAM (OEH 2014a) and the FBA (OEH 2014b), where the edited multiplier value more accurately reflects the local environmental conditions of the site. More appropriate local data requires approval from OEH and you must provide the reasons for using local data as part of the application. To remove the predicted species from the assessment, you must justify and document all decisions made in the Assessment Report.
A species can only be removed from further assessment at this step if none of the habitat components (breeding, foraging or roosting habitat) are present on site. Information on the habitat components for a species can be obtained from the Threatened Species Profile Database. For development sites, you must include the reasons for the species not being present on the site (i.e. the habitat components are not present) as part of the application. Any species removed at this step, or whose offset multiplier values are changed, are identified on the credit report.
To save the Site survey details data entered select Save and continue the assessment or select Save & Close. If you do not wish to save your changes select Cancel.
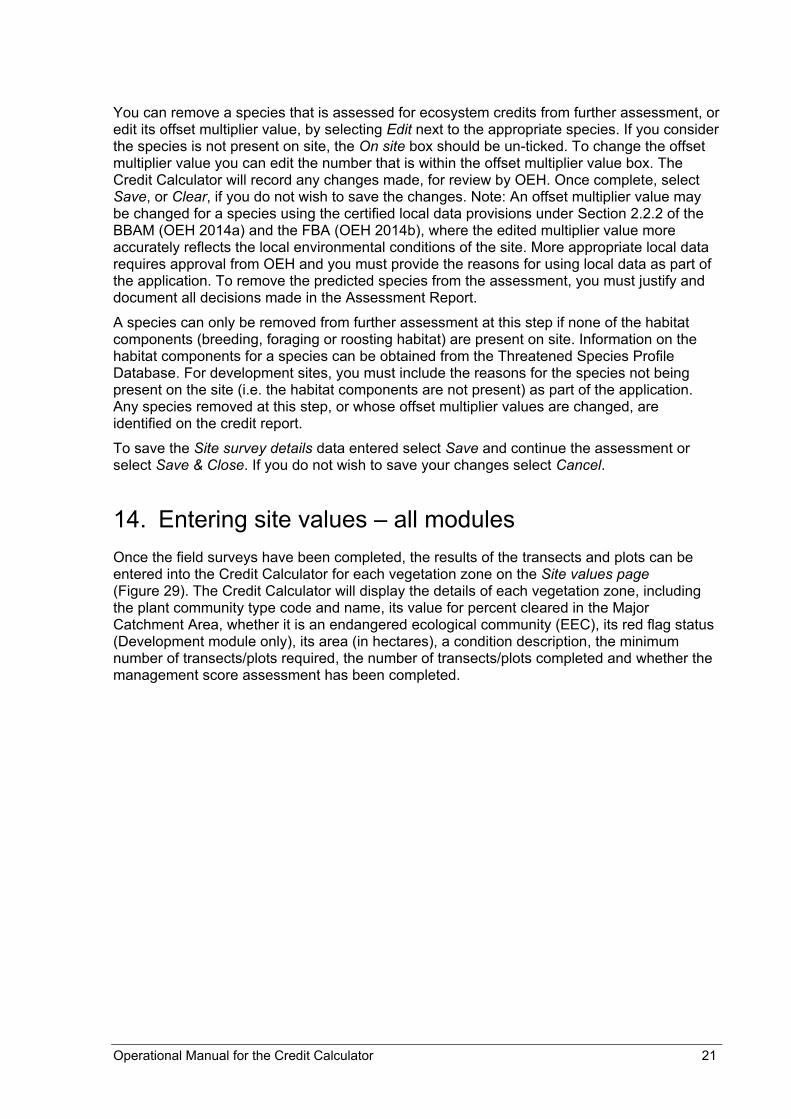
14. Entering site values – all modules Once the field surveys have been completed, the results of the transects and plots can be entered into the Credit Calculator for each vegetation zone on the Site values page (Figure 29). The Credit Calculator will display the details of each vegetation zone, including the plant community type code and name, its value for percent cleared in the Major Catchment Area, whether it is an endangered ecological community (EEC), its red flag status (Development module only), its area (in hectares), a condition description, the minimum number of transects/plots required, the number of transects/plots completed and whether the management score assessment has been completed.
22 Operational Manual for the Credit Calculator
Figure 29: Site values page
14.1. Vegetation zone EEC status – all modules
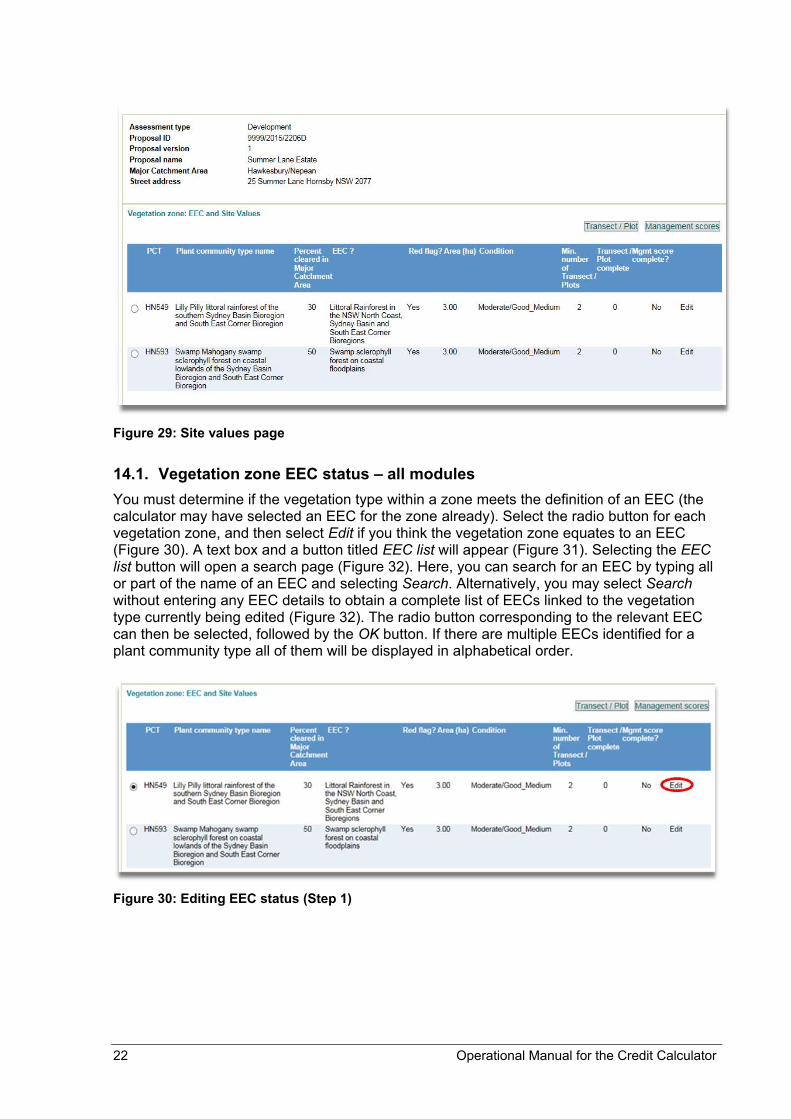
You must determine if the vegetation type within a zone meets the definition of an EEC (the calculator may have selected an EEC for the zone already). Select the radio button for each vegetation zone, and then select Edit if you think the vegetation zone equates to an EEC (Figure 30). A text box and a button titled EEC list will appear (Figure 31). Selecting the EEC list button will open a search page (Figure 32). Here, you can search for an EEC by typing all or part of the name of an EEC and selecting Search. Alternatively, you may select Search without entering any EEC details to obtain a complete list of EECs linked to the vegetation type currently being edited (Figure 32). The radio button corresponding to the relevant EEC can then be selected, followed by the OK button. If there are multiple EECs identified for a plant community type all of them will be displayed in alphabetical order.
Figure 30: Editing EEC status (Step 1)
Operational Manual for the Credit Calculator 23
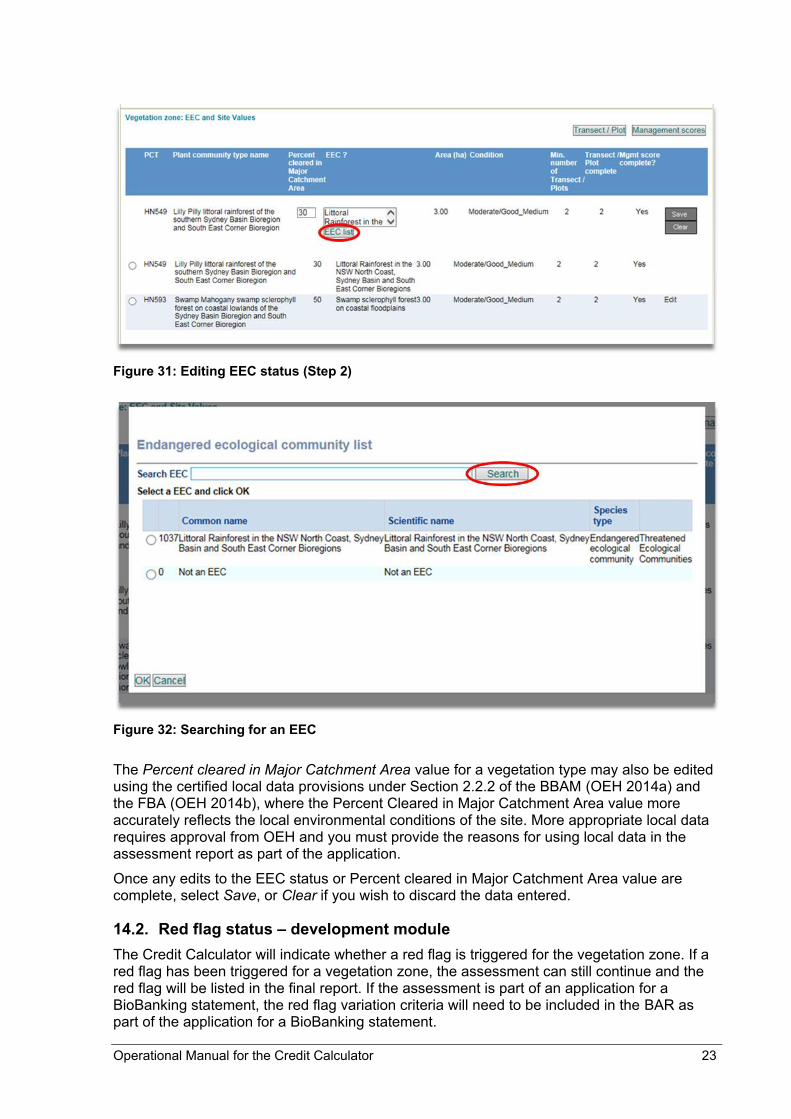
Figure 31: Editing EEC status (Step 2)
Figure 32: Searching for an EEC
The Percent cleared in Major Catchment Area value for a vegetation type may also be edited using the certified local data provisions under Section 2.2.2 of the BBAM (OEH 2014a) and the FBA (OEH 2014b), where the Percent Cleared in Major Catchment Area value more accurately reflects the local environmental conditions of the site. More appropriate local data requires approval from OEH and you must provide the reasons for using local data in the assessment report as part of the application.
Once any edits to the EEC status or Percent cleared in Major Catchment Area value are complete, select Save, or Clear if you wish to discard the data entered.
14.2. Red flag status – development module
The Credit Calculator will indicate whether a red flag is triggered for the vegetation zone. If a red flag has been triggered for a vegetation zone, the assessment can still continue and the red flag will be listed in the final report. If the assessment is part of an application for a BioBanking statement, the red flag variation criteria will need to be included in the BAR as part of the application for a BioBanking statement.
24 Operational Manual for the Credit Calculator
14.3. Entering vegetation transect/plot data – all modules
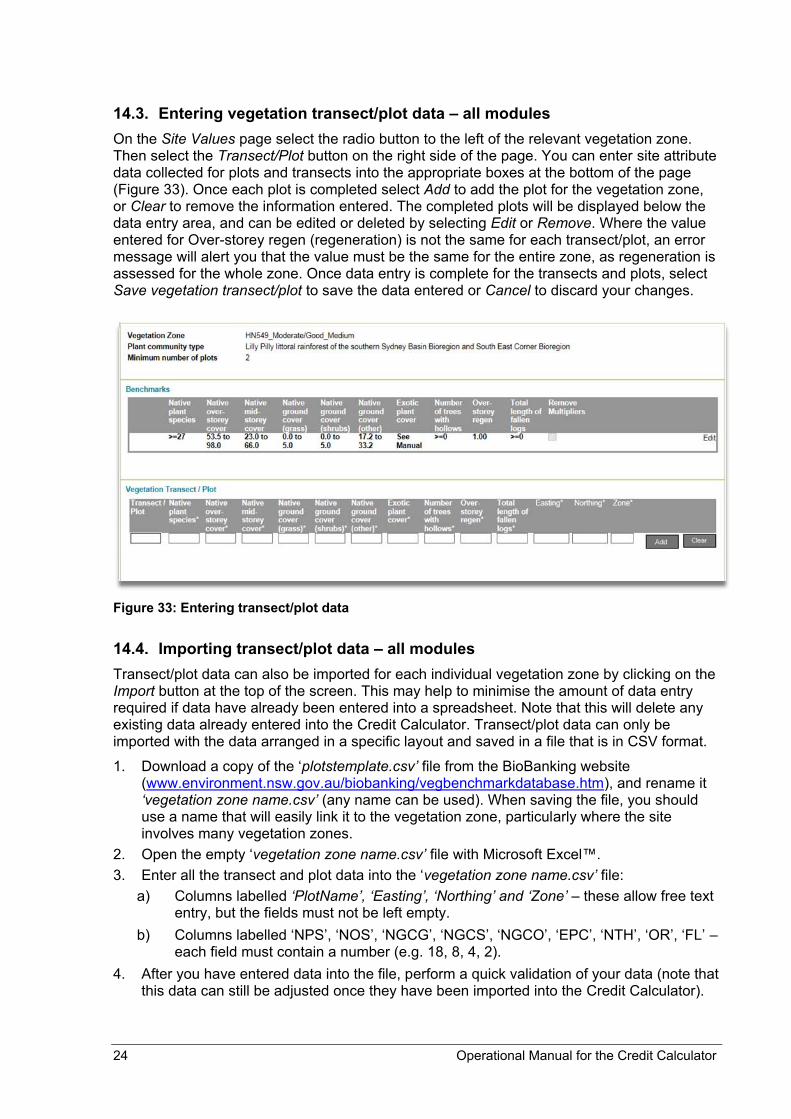
On the Site Values page select the radio button to the left of the relevant vegetation zone. Then select the Transect/Plot button on the right side of the page. You can enter site attribute data collected for plots and transects into the appropriate boxes at the bottom of the page (Figure 33). Once each plot is completed select Add to add the plot for the vegetation zone, or Clear to remove the information entered. The completed plots will be displayed below the data entry area, and can be edited or deleted by selecting Edit or Remove. Where the value entered for Over-storey regen (regeneration) is not the same for each transect/plot, an error message will alert you that the value must be the same for the entire zone, as regeneration is assessed for the whole zone. Once data entry is complete for the transects and plots, select Save vegetation transect/plot to save the data entered or Cancel to discard your changes.
Figure 33: Entering transect/plot data
14.4. Importing transect/plot data – all modules
Transect/plot data can also be imported for each individual vegetation zone by clicking on the Import button at the top of the screen. This may help to minimise the amount of data entry required if data have already been entered into a spreadsheet. Note that this will delete any existing data already entered into the Credit Calculator. Transect/plot data can only be imported with the data arranged in a specific layout and saved in a file that is in CSV format.
1. Download a copy of the ‘plotstemplate.csv’ file from the BioBanking website (www.environment.nsw.gov.au/biobanking/vegbenchmarkdatabase.htm), and rename it ‘vegetation zone name.csv’ (any name can be used). When saving the file, you should use a name that will easily link it to the vegetation zone, particularly where the site involves many vegetation zones.
2. Open the empty ‘vegetation zone name.csv’ file with Microsoft Excel™. 3. Enter all the transect and plot data into the ‘vegetation zone name.csv’ file:
a) Columns labelled ‘PlotName’, ‘Easting’, ‘Northing’ and ‘Zone’ – these allow free text entry, but the fields must not be left empty.
b) Columns labelled ‘NPS’, ‘NOS’, ‘NGCG’, ‘NGCS’, ‘NGCO’, ‘EPC’, ‘NTH’, ‘OR’, ‘FL’ – each field must contain a number (e.g. 18, 8, 4, 2).
4. After you have entered data into the file, perform a quick validation of your data (note that this data can still be adjusted once they have been imported into the Credit Calculator).
Operational Manual for the Credit Calculator 25
5. To save the files in Excel, allow Excel to request you to save the file, and then overwrite the existing file.
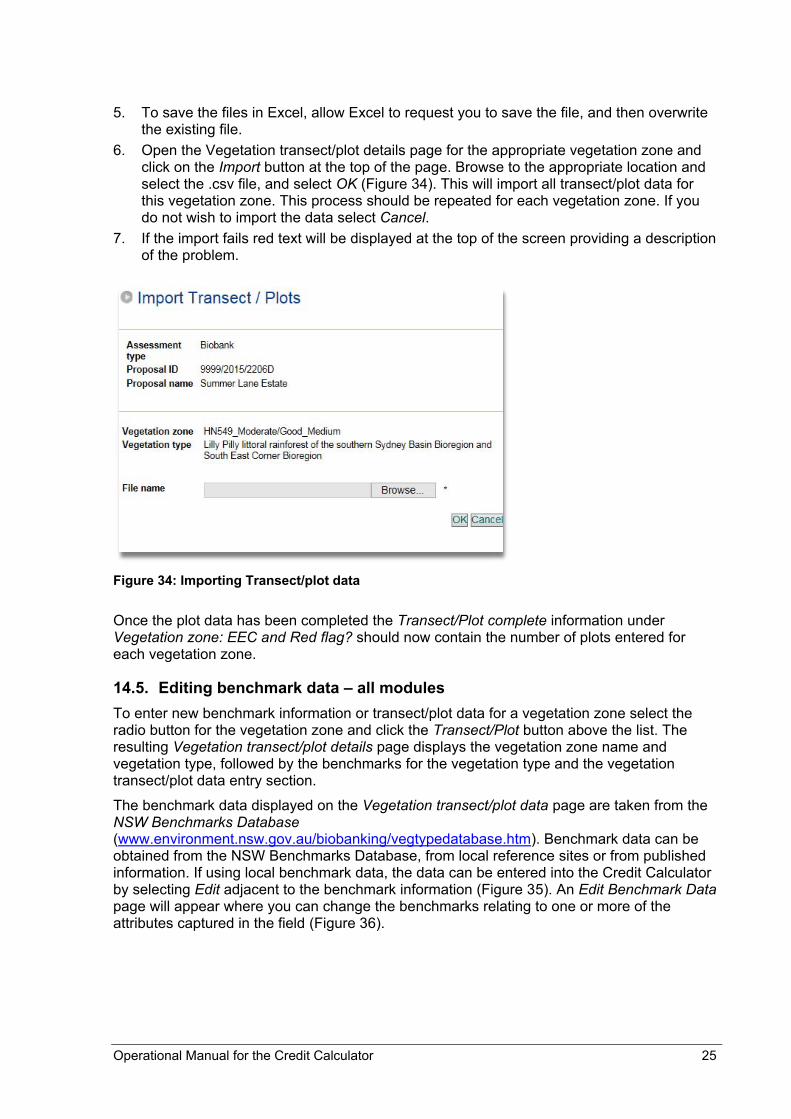
6. Open the Vegetation transect/plot details page for the appropriate vegetation zone and click on the Import button at the top of the page. Browse to the appropriate location and select the .csv file, and select OK (Figure 34). This will import all transect/plot data for this vegetation zone. This process should be repeated for each vegetation zone. If you do not wish to import the data select Cancel.
7. If the import fails red text will be displayed at the top of the screen providing a description of the problem.
Figure 34: Importing Transect/plot data
Once the plot data has been completed the Transect/Plot complete information under Vegetation zone: EEC and Red flag? should now contain the number of plots entered for each vegetation zone.
14.5. Editing benchmark data – all modules
To enter new benchmark information or transect/plot data for a vegetation zone select the radio button for the vegetation zone and click the Transect/Plot button above the list. The resulting Vegetation transect/plot details page displays the vegetation zone name and vegetation type, followed by the benchmarks for the vegetation type and the vegetation transect/plot data entry section.
The benchmark data displayed on the Vegetation transect/plot data page are taken from the NSW Benchmarks Database (www.environment.nsw.gov.au/biobanking/vegtypedatabase.htm). Benchmark data can be obtained from the NSW Benchmarks Database, from local reference sites or from published information. If using local benchmark data, the data can be entered into the Credit Calculator by selecting Edit adjacent to the benchmark information (Figure 35). An Edit Benchmark Data page will appear where you can change the benchmarks relating to one or more of the attributes captured in the field (Figure 36).
26 Operational Manual for the Credit Calculator
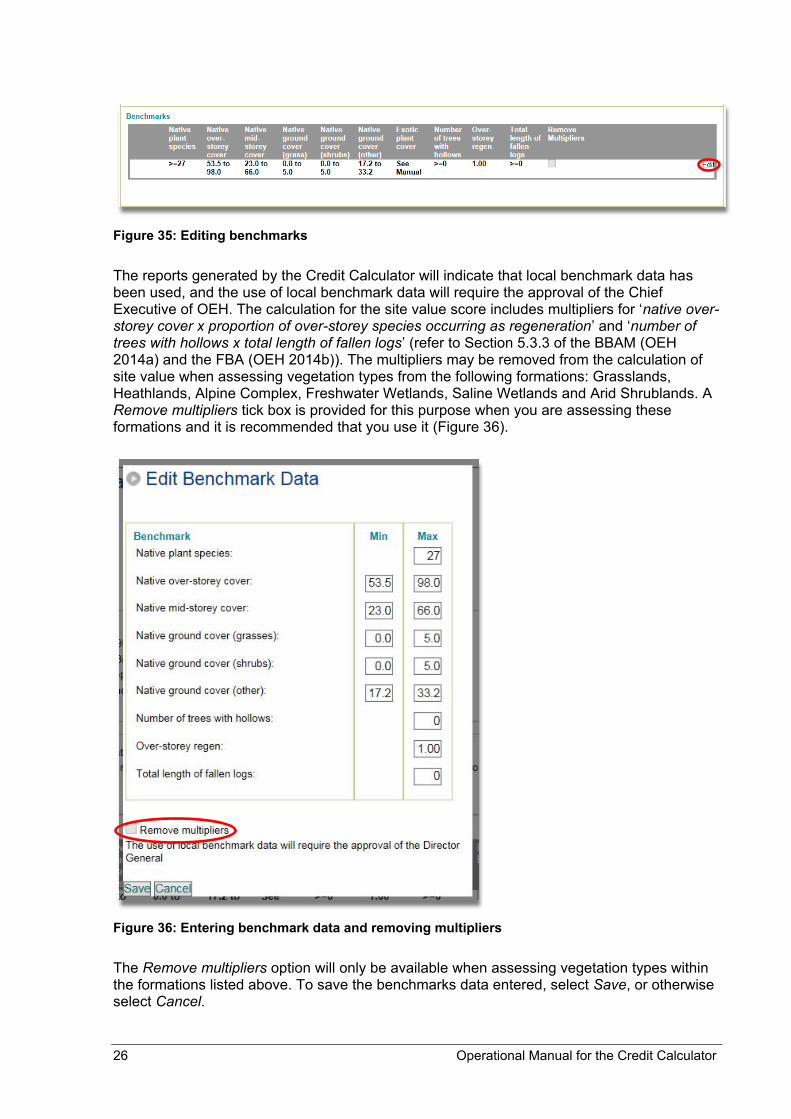
Figure 35: Editing benchmarks
The reports generated by the Credit Calculator will indicate that local benchmark data has been used, and the use of local benchmark data will require the approval of the Chief Executive of OEH. The calculation for the site value score includes multipliers for ‘native over-storey cover x proportion of over-storey species occurring as regeneration’ and ‘number of trees with hollows x total length of fallen logs’ (refer to Section 5.3.3 of the BBAM (OEH 2014a) and the FBA (OEH 2014b)). The multipliers may be removed from the calculation of site value when assessing vegetation types from the following formations: Grasslands, Heathlands, Alpine Complex, Freshwater Wetlands, Saline Wetlands and Arid Shrublands. A Remove multipliers tick box is provided for this purpose when you are assessing these formations and it is recommended that you use it (Figure 36).
Figure 36: Entering benchmark data and removing multipliers
The Remove multipliers option will only be available when assessing vegetation types within the formations listed above. To save the benchmarks data entered, select Save, or otherwise select Cancel.

Operational Manual for the Credit Calculator 27
14.6. Entering management zones – all modules
Management zones allow you to stratify a vegetation zone into different management units by assigning a different area or extent of impact for each management zone. This allows efficient simulation of different assessments based on the extent of impact from the proposal on biodiversity values. To enter management scores for each vegetation zone select the radio button beside each and select the Management scores button (Figure 37).
Figure 37: Adding management zones
The resulting Management zones page displays the vegetation zone name, plant community type and the total area of the vegetation zone (Figure 38).
Figure 38: Entering management zone data
To enter data for each Management zone:
1. Enter a management zone number/name in the Management zone box. It is recommended that you use an easily identifiable code/name (e.g. MZ1 – APZ, MZ2 – Clearing, etc.).
2. Enter the area of the management zone in the Area box. 3. Select Add if you wish the information to be saved. Select Clear if you do not want to
save the information entered. When Add is selected the management zone will be listed below the data entry boxes, with a radio button now visible.
4. Add all management zones related to the vegetation zone in the same way. The combined area of the management zones must equal the area of the vegetation zone.
28 Operational Manual for the Credit Calculator
14.7. Entering site scores – BioBank module
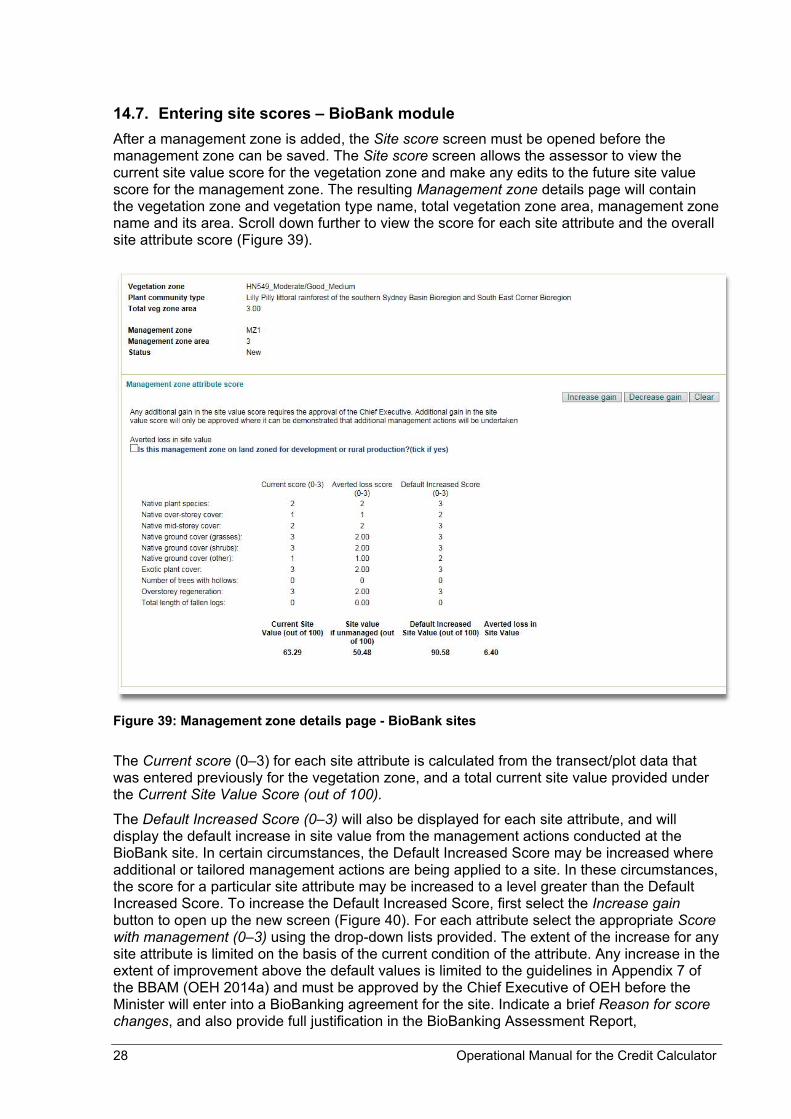
After a management zone is added, the Site score screen must be opened before the management zone can be saved. The Site score screen allows the assessor to view the current site value score for the vegetation zone and make any edits to the future site value score for the management zone. The resulting Management zone details page will contain the vegetation zone and vegetation type name, total vegetation zone area, management zone name and its area. Scroll down further to view the score for each site attribute and the overall site attribute score (Figure 39).
Figure 39: Management zone details page - BioBank sites
The Current score (0–3) for each site attribute is calculated from the transect/plot data that was entered previously for the vegetation zone, and a total current site value provided under the Current Site Value Score (out of 100).
The Default Increased Score (0–3) will also be displayed for each site attribute, and will display the default increase in site value from the management actions conducted at the BioBank site. In certain circumstances, the Default Increased Score may be increased where additional or tailored management actions are being applied to a site. In these circumstances, the score for a particular site attribute may be increased to a level greater than the Default Increased Score. To increase the Default Increased Score, first select the Increase gain button to open up the new screen (Figure 40). For each attribute select the appropriate Score with management (0–3) using the drop-down lists provided. The extent of the increase for any site attribute is limited on the basis of the current condition of the attribute. Any increase in the extent of improvement above the default values is limited to the guidelines in Appendix 7 of the BBAM (OEH 2014a) and must be approved by the Chief Executive of OEH before the Minister will enter into a BioBanking agreement for the site. Indicate a brief Reason for score changes, and also provide full justification in the BioBanking Assessment Report,

Operational Manual for the Credit Calculator 29
demonstrating how the additional management will improve the condition of the vegetation beyond that predicted by the methodology. If you wish to cancel the increased gain select Clear. The gain in site value may also be reduced if restrictions such as an easement for powerlines or an asset protection zone prevent the predicted gain in site value being realised. In this case, select the Decrease gain button to open the new screen. For each attribute select the appropriate Score with management (0–3) using the pull-down menus provided. The extent of the decrease for any site attribute is limited to the current condition of the attribute. Indicate a brief Reason for score changes. If you wish to cancel the Decrease in gain select Clear.
Figure 40: Changing default gains - BioBank sites
Once data entry is complete select either Save/back to Mgmt zone form, which will allow you to complete further management zones or, if you have completed all management zones for the vegetation zone you may select Save back to SV tab. If you wish to exit the page without saving, select Cancel.
The process of entering transect/plot data and management scores must be completed for all vegetation zones and management zones.
Note: Once a management zone has been added the Management zone details page must be opened to prompt the Credit calculator to calculate the Site Value. The site score pages for all management zones must be viewed and saved before the assessment can be submitted.
30 Operational Manual for the Credit Calculator
14.8. Calculating averted loss for a BioBank site.
The assessor may consider the averted loss in site value at the BioBank site through assessing the risk of decline should the BioBank site not be secured under a conservation measure (see Section 12.3 of BBAM (OEH 2014a)). In assessing the risk that the site value score will decline in a vegetation zone over the next 20 years, the assessor must consider the land-use zone and/or the permitted clearing entitlements that apply to the land. The 20-year period is defined as commencing at the time the BioBanking agreement is entered into. Native vegetation that has a high risk of decline in site value score is considered to be on:
1. lands that were or are zoned for residential (but not rural residential), business or industrial uses in a Local Environmental Plan (LEP) prior to the development of a Standard Instrument LEP (in accordance with the Standard Instrument (LEP) Order 2006), or
2. land that is zoned RU1 (Primary production).
Native vegetation on all other land is considered to have a low risk of decline in the site value score of the vegetation zone over a 20-year period.
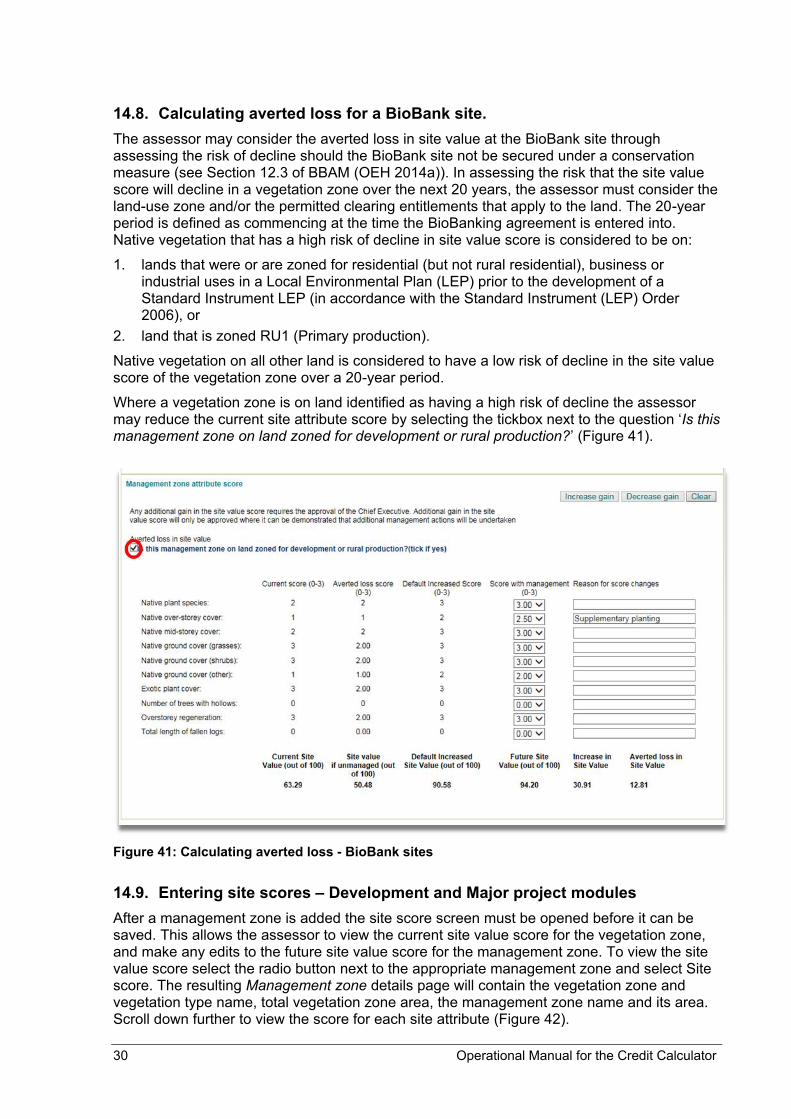
Where a vegetation zone is on land identified as having a high risk of decline the assessor may reduce the current site attribute score by selecting the tickbox next to the question ‘Is this management zone on land zoned for development or rural production?’ (Figure 41).
Figure 41: Calculating averted loss - BioBank sites
14.9. Entering site scores – Development and Major project modules
After a management zone is added the site score screen must be opened before it can be saved. This allows the assessor to view the current site value score for the vegetation zone, and make any edits to the future site value score for the management zone. To view the site value score select the radio button next to the appropriate management zone and select Site score. The resulting Management zone details page will contain the vegetation zone and vegetation type name, total vegetation zone area, the management zone name and its area. Scroll down further to view the score for each site attribute (Figure 42).
Operational Manual for the Credit Calculator 31
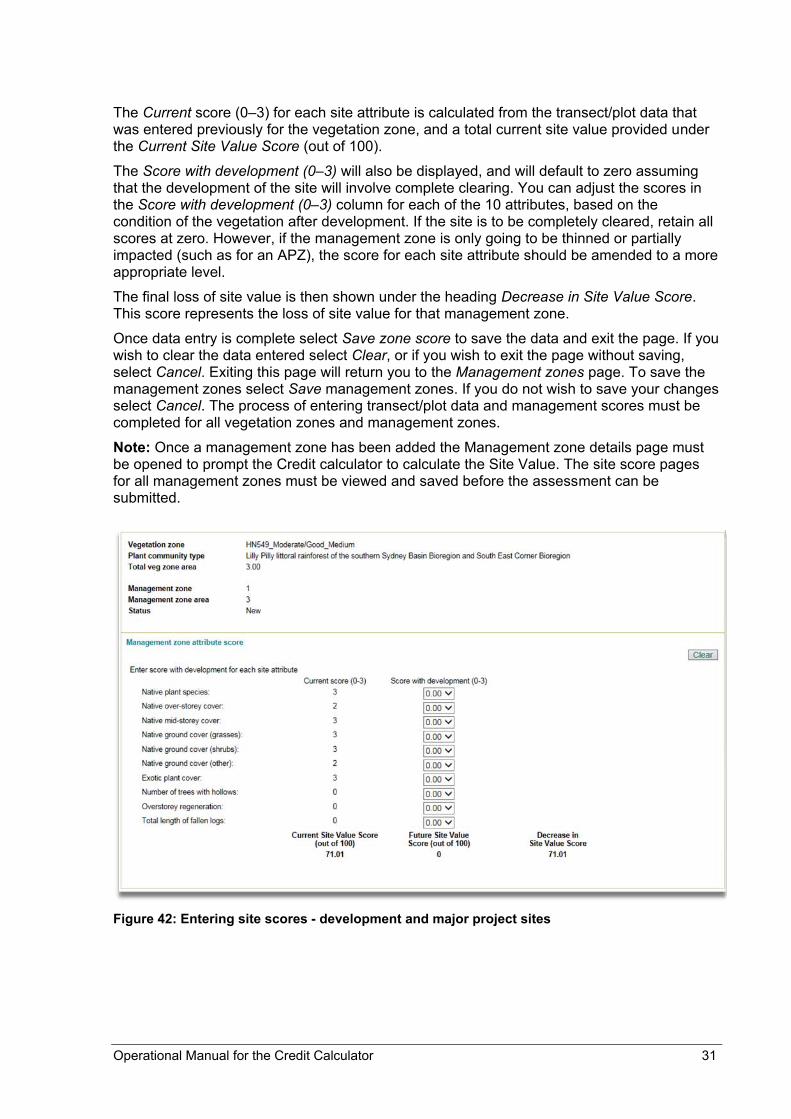
The Current score (0–3) for each site attribute is calculated from the transect/plot data that was entered previously for the vegetation zone, and a total current site value provided under the Current Site Value Score (out of 100).
The Score with development (0–3) will also be displayed, and will default to zero assuming that the development of the site will involve complete clearing. You can adjust the scores in the Score with development (0–3) column for each of the 10 attributes, based on the condition of the vegetation after development. If the site is to be completely cleared, retain all scores at zero. However, if the management zone is only going to be thinned or partially impacted (such as for an APZ), the score for each site attribute should be amended to a more appropriate level.
The final loss of site value is then shown under the heading Decrease in Site Value Score. This score represents the loss of site value for that management zone.
Once data entry is complete select Save zone score to save the data and exit the page. If you wish to clear the data entered select Clear, or if you wish to exit the page without saving, select Cancel. Exiting this page will return you to the Management zones page. To save the management zones select Save management zones. If you do not wish to save your changes select Cancel. The process of entering transect/plot data and management scores must be completed for all vegetation zones and management zones.
Note: Once a management zone has been added the Management zone details page must be opened to prompt the Credit calculator to calculate the Site Value. The site score pages for all management zones must be viewed and saved before the assessment can be submitted.
Figure 42: Entering site scores - development and major project sites
32 Operational Manual for the Credit Calculator
15. Threatened species survey results – Development and Major project modules
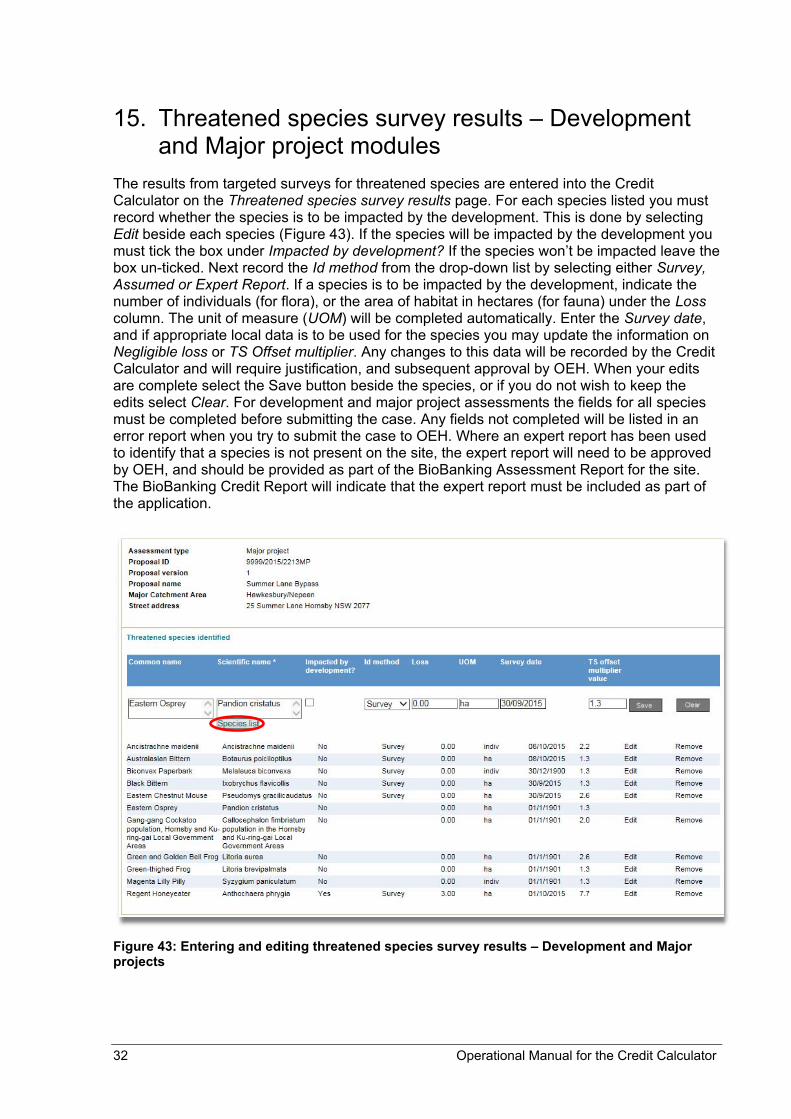
The results from targeted surveys for threatened species are entered into the Credit Calculator on the Threatened species survey results page. For each species listed you must record whether the species is to be impacted by the development. This is done by selecting Edit beside each species (Figure 43). If the species will be impacted by the development you must tick the box under Impacted by development? If the species won’t be impacted leave the box un-ticked. Next record the Id method from the drop-down list by selecting either Survey, Assumed or Expert Report. If a species is to be impacted by the development, indicate the number of individuals (for flora), or the area of habitat in hectares (for fauna) under the Loss column. The unit of measure (UOM) will be completed automatically. Enter the Survey date, and if appropriate local data is to be used for the species you may update the information on Negligible loss or TS Offset multiplier. Any changes to this data will be recorded by the Credit Calculator and will require justification, and subsequent approval by OEH. When your edits are complete select the Save button beside the species, or if you do not wish to keep the edits select Clear. For development and major project assessments the fields for all species must be completed before submitting the case. Any fields not completed will be listed in an error report when you try to submit the case to OEH. Where an expert report has been used to identify that a species is not present on the site, the expert report will need to be approved by OEH, and should be provided as part of the BioBanking Assessment Report for the site. The BioBanking Credit Report will indicate that the expert report must be included as part of the application.
Figure 43: Entering and editing threatened species survey results – Development and Major projects
Operational Manual for the Credit Calculator 33
15.1. Adding threatened species – Development and Major project sites
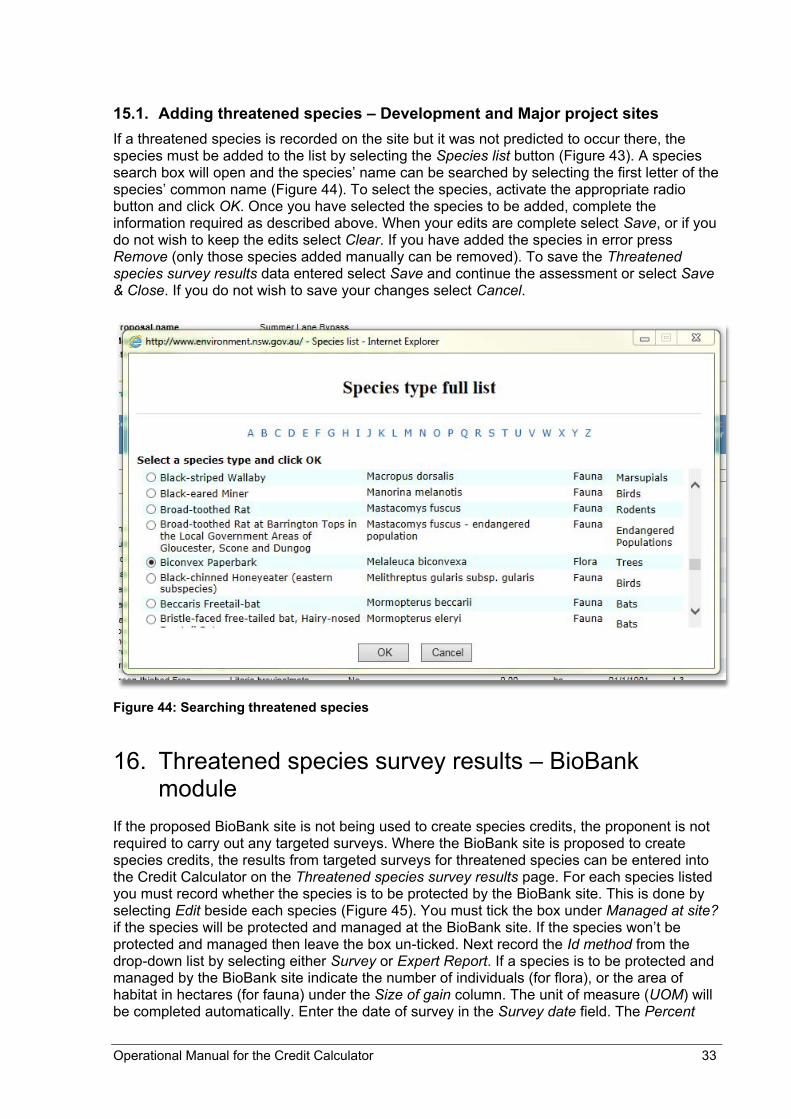
If a threatened species is recorded on the site but it was not predicted to occur there, the species must be added to the list by selecting the Species list button (Figure 43). A species search box will open and the species’ name can be searched by selecting the first letter of the species’ common name (Figure 44). To select the species, activate the appropriate radio button and click OK. Once you have selected the species to be added, complete the information required as described above. When your edits are complete select Save, or if you do not wish to keep the edits select Clear. If you have added the species in error press Remove (only those species added manually can be removed). To save the Threatened species survey results data entered select Save and continue the assessment or select Save & Close. If you do not wish to save your changes select Cancel.
Figure 44: Searching threatened species
16. Threatened species survey results – BioBank module
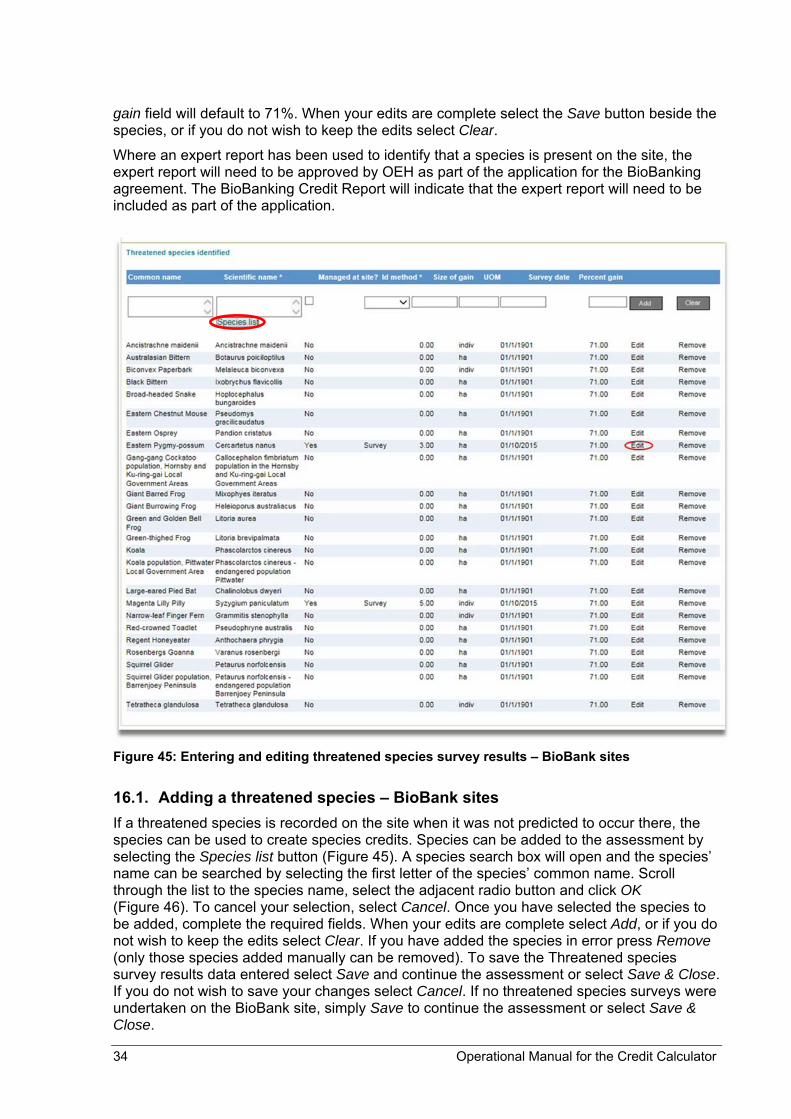
If the proposed BioBank site is not being used to create species credits, the proponent is not required to carry out any targeted surveys. Where the BioBank site is proposed to create species credits, the results from targeted surveys for threatened species can be entered into the Credit Calculator on the Threatened species survey results page. For each species listed you must record whether the species is to be protected by the BioBank site. This is done by selecting Edit beside each species (Figure 45). You must tick the box under Managed at site? if the species will be protected and managed at the BioBank site. If the species won’t be protected and managed then leave the box un-ticked. Next record the Id method from the drop-down list by selecting either Survey or Expert Report. If a species is to be protected and managed by the BioBank site indicate the number of individuals (for flora), or the area of habitat in hectares (for fauna) under the Size of gain column. The unit of measure (UOM) will be completed automatically. Enter the date of survey in the Survey date field. The Percent
34 Operational Manual for the Credit Calculator
gain field will default to 71%. When your edits are complete select the Save button beside the species, or if you do not wish to keep the edits select Clear. Where an expert report has been used to identify that a species is present on the site, the expert report will need to be approved by OEH as part of the application for the BioBanking agreement. The BioBanking Credit Report will indicate that the expert report will need to be included as part of the application.
Figure 45: Entering and editing threatened species survey results – BioBank sites
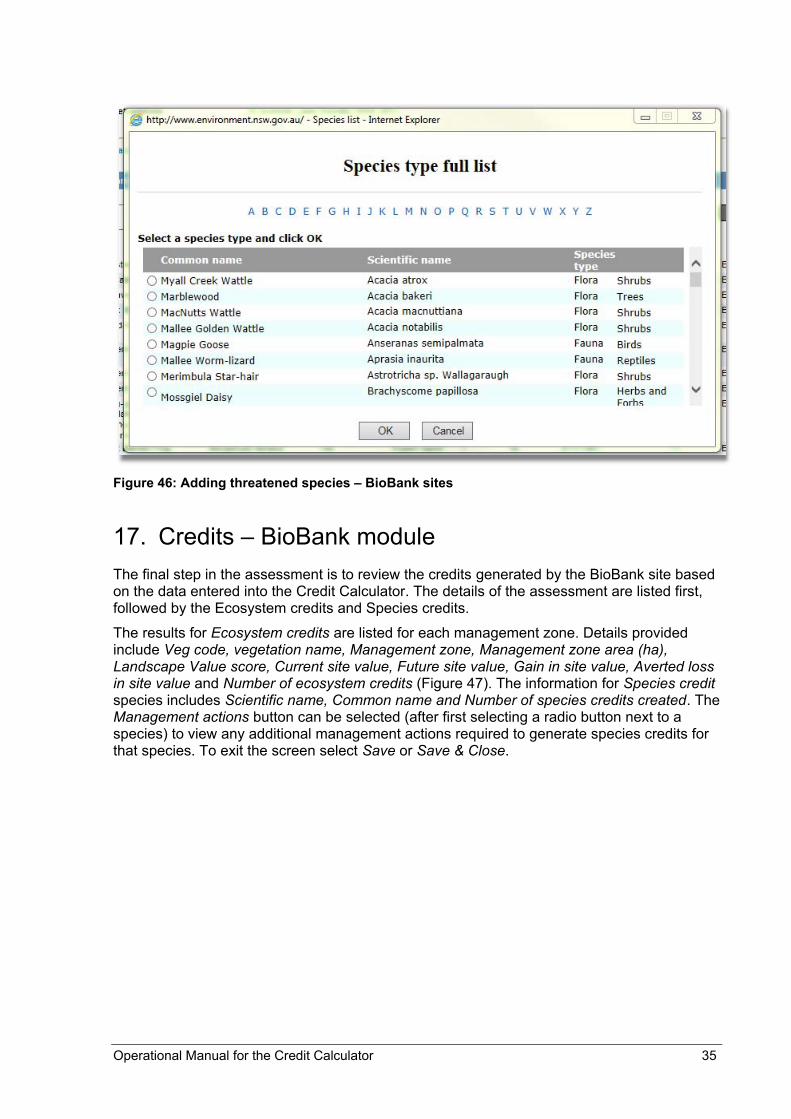
16.1. Adding a threatened species – BioBank sites If a threatened species is recorded on the site when it was not predicted to occur there, the species can be used to create species credits. Species can be added to the assessment by selecting the Species list button (Figure 45). A species search box will open and the species’ name can be searched by selecting the first letter of the species’ common name. Scroll through the list to the species name, select the adjacent radio button and click OK (Figure 46). To cancel your selection, select Cancel. Once you have selected the species to be added, complete the required fields. When your edits are complete select Add, or if you do not wish to keep the edits select Clear. If you have added the species in error press Remove (only those species added manually can be removed). To save the Threatened species survey results data entered select Save and continue the assessment or select Save & Close. If you do not wish to save your changes select Cancel. If no threatened species surveys were undertaken on the BioBank site, simply Save to continue the assessment or select Save & Close.
Operational Manual for the Credit Calculator 35
Figure 46: Adding threatened species – BioBank sites
17. Credits – BioBank module The final step in the assessment is to review the credits generated by the BioBank site based on the data entered into the Credit Calculator. The details of the assessment are listed first, followed by the Ecosystem credits and Species credits.
The results for Ecosystem credits are listed for each management zone. Details provided include Veg code, vegetation name, Management zone, Management zone area (ha), Landscape Value score, Current site value, Future site value, Gain in site value, Averted loss in site value and Number of ecosystem credits (Figure 47). The information for Species credit species includes Scientific name, Common name and Number of species credits created. The Management actions button can be selected (after first selecting a radio button next to a species) to view any additional management actions required to generate species credits for that species. To exit the screen select Save or Save & Close.

36 Operational Manual for the Credit Calculator
Figure 47: Credits generated – BioBank module
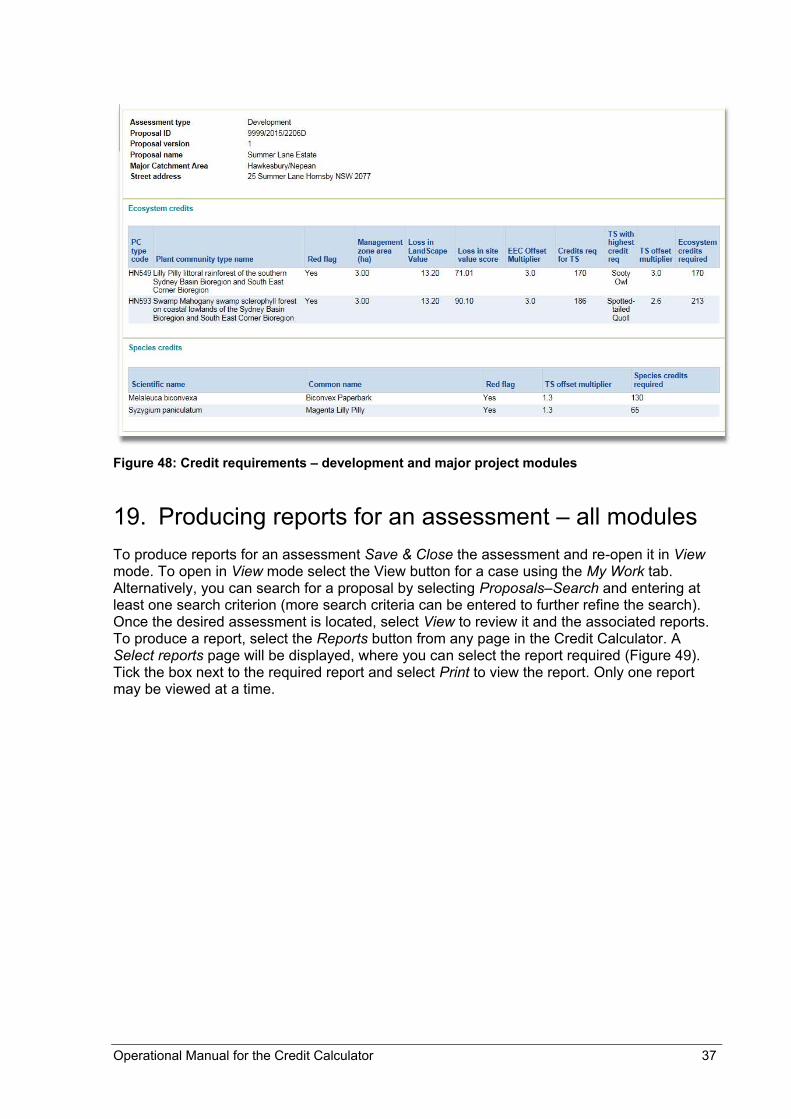
18. Credits – Development and Major project modules The final step in the assessment is to review the credits required for the development based on the data entered into the Credit Calculator. The details of the assessment are listed first, followed by the Ecosystem credits and Species credits. The results for ecosystem credits are listed for each management zone. Details provided include PC type code, Plant community type name, Red flag status, Management zone area (ha), Loss in Landscape Value, Loss in site value score, EEC Offset Multiplier, Credits required for TS, TS with Highest credit req, TS offset multiplier and Ecosystem credits required (Figure 48). The information for species credit species includes Scientific name, Common name, Red flag status, TS offset multiplier value and Species credits required. To exit the screen select Save or Save & Close.
Operational Manual for the Credit Calculator 37
Figure 48: Credit requirements – development and major project modules
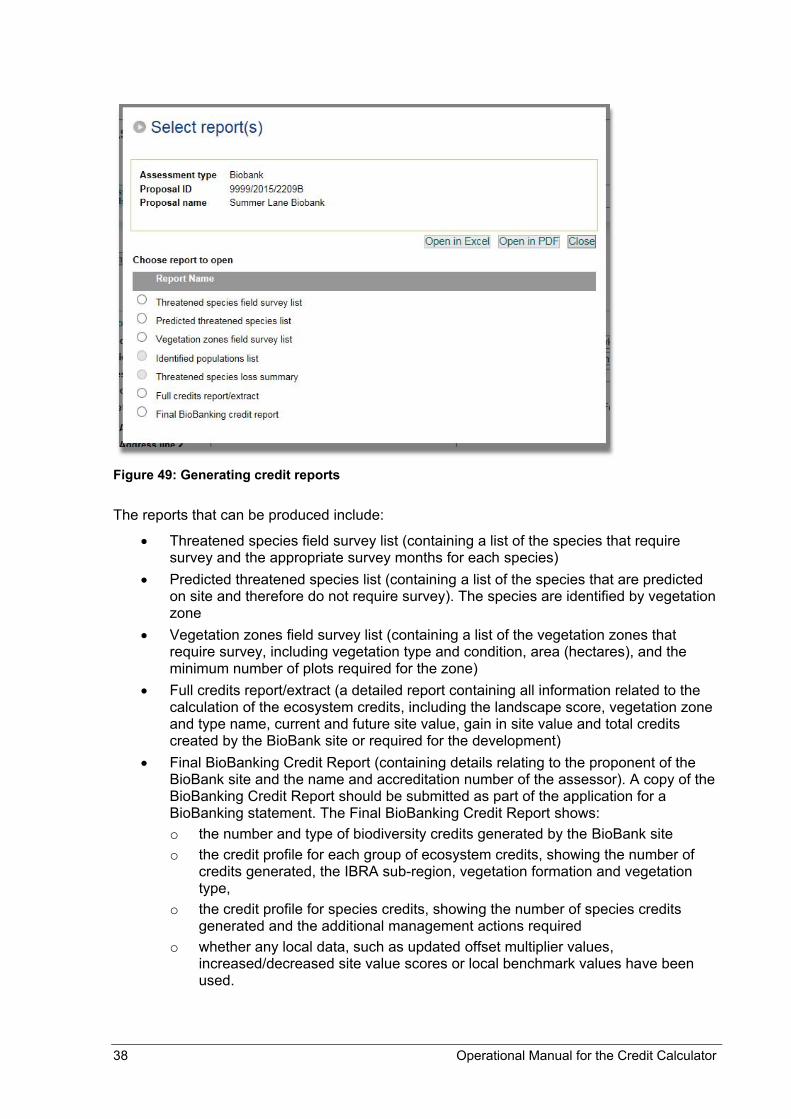
19. Producing reports for an assessment – all modules To produce reports for an assessment Save & Close the assessment and re-open it in View mode. To open in View mode select the View button for a case using the My Work tab. Alternatively, you can search for a proposal by selecting Proposals–Search and entering at least one search criterion (more search criteria can be entered to further refine the search). Once the desired assessment is located, select View to review it and the associated reports. To produce a report, select the Reports button from any page in the Credit Calculator. A Select reports page will be displayed, where you can select the report required (Figure 49). Tick the box next to the required report and select Print to view the report. Only one report may be viewed at a time.
38 Operational Manual for the Credit Calculator
Figure 49: Generating credit reports
The reports that can be produced include:
Threatened species field survey list (containing a list of the species that require survey and the appropriate survey months for each species)
Predicted threatened species list (containing a list of the species that are predicted on site and therefore do not require survey). The species are identified by vegetation zone
Vegetation zones field survey list (containing a list of the vegetation zones that require survey, including vegetation type and condition, area (hectares), and the minimum number of plots required for the zone)
Full credits report/extract (a detailed report containing all information related to the calculation of the ecosystem credits, including the landscape score, vegetation zone and type name, current and future site value, gain in site value and total credits created by the BioBank site or required for the development)
Final BioBanking Credit Report (containing details relating to the proponent of the BioBank site and the name and accreditation number of the assessor). A copy of the BioBanking Credit Report should be submitted as part of the application for a BioBanking statement. The Final BioBanking Credit Report shows: o the number and type of biodiversity credits generated by the BioBank site o the credit profile for each group of ecosystem credits, showing the number of
credits generated, the IBRA sub-region, vegetation formation and vegetation type,
o the credit profile for species credits, showing the number of species credits generated and the additional management actions required
o whether any local data, such as updated offset multiplier values, increased/decreased site value scores or local benchmark values have been used.
Operational Manual for the Credit Calculator 39
Reports can be produced at any stage throughout the assessment, however please note that reports will only be available up to the stage in the tool the assessment has reached (for instance, if an assessment is not yet finished, the final credit report will not be available).
20. Submitting an assessment Once an assessment is complete, the assessment details and all supporting documentation can be submitted online to OEH for approval. Once an assessment has been submitted for approval, the status of the assessment will change from WIP (work in progress) to submit. Once submitted, you will not be able to make any further edits to the proposal.
20.1. Attaching additional documents
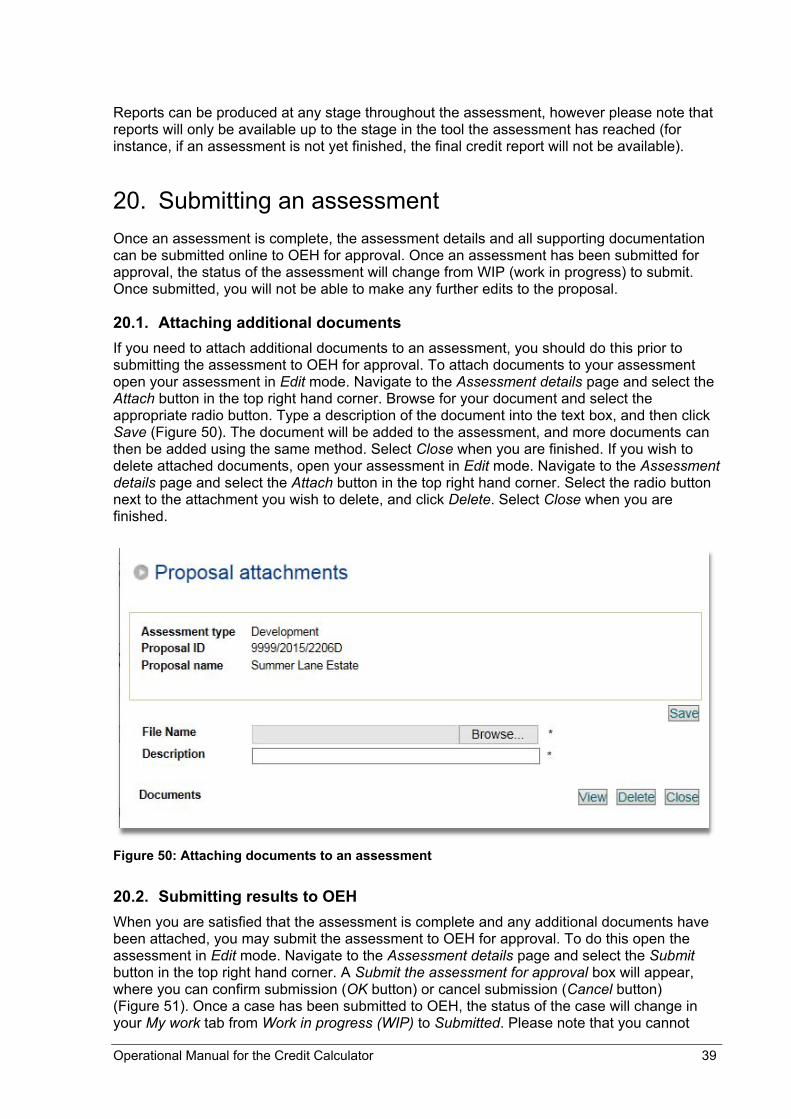
If you need to attach additional documents to an assessment, you should do this prior to submitting the assessment to OEH for approval. To attach documents to your assessment open your assessment in Edit mode. Navigate to the Assessment details page and select the Attach button in the top right hand corner. Browse for your document and select the appropriate radio button. Type a description of the document into the text box, and then click Save (Figure 50). The document will be added to the assessment, and more documents can then be added using the same method. Select Close when you are finished. If you wish to delete attached documents, open your assessment in Edit mode. Navigate to the Assessment details page and select the Attach button in the top right hand corner. Select the radio button next to the attachment you wish to delete, and click Delete. Select Close when you are finished.
Figure 50: Attaching documents to an assessment
20.2. Submitting results to OEH
When you are satisfied that the assessment is complete and any additional documents have been attached, you may submit the assessment to OEH for approval. To do this open the assessment in Edit mode. Navigate to the Assessment details page and select the Submit button in the top right hand corner. A Submit the assessment for approval box will appear, where you can confirm submission (OK button) or cancel submission (Cancel button) (Figure 51). Once a case has been submitted to OEH, the status of the case will change in your My work tab from Work in progress (WIP) to Submitted. Please note that you cannot
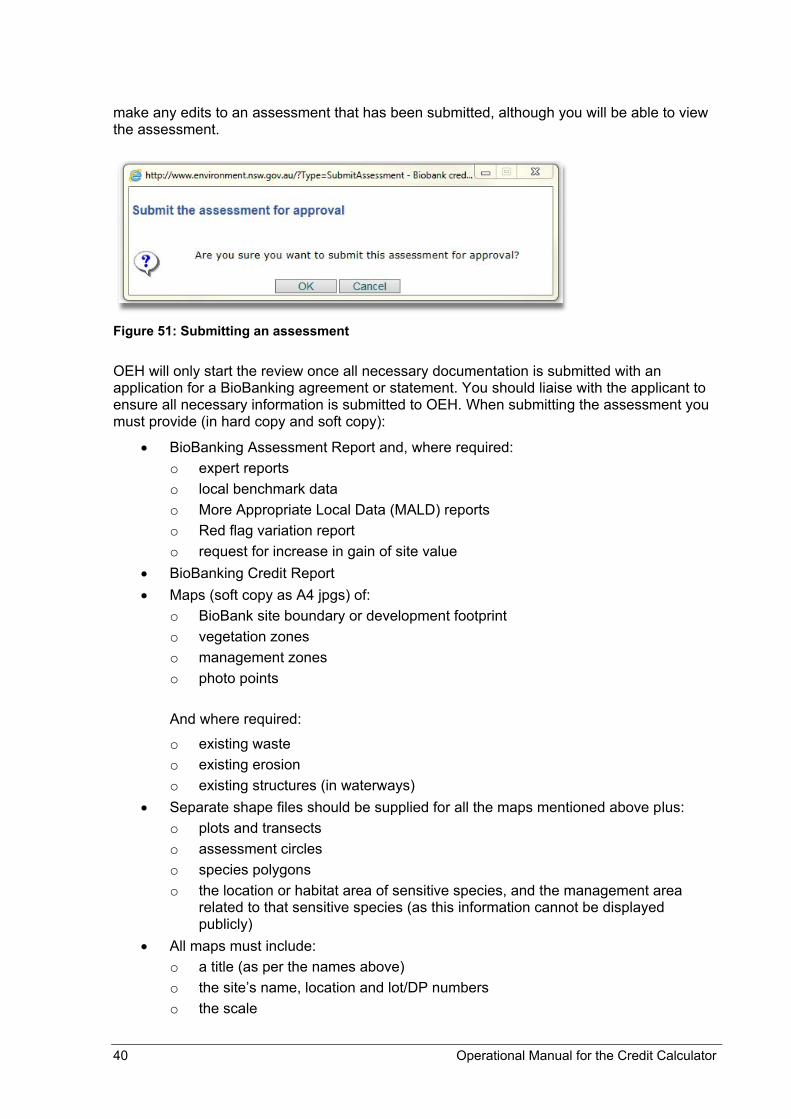
40 Operational Manual for the Credit Calculator
make any edits to an assessment that has been submitted, although you will be able to view the assessment.
Figure 51: Submitting an assessment
OEH will only start the review once all necessary documentation is submitted with an application for a BioBanking agreement or statement. You should liaise with the applicant to ensure all necessary information is submitted to OEH. When submitting the assessment you must provide (in hard copy and soft copy):
BioBanking Assessment Report and, where required: o expert reports o local benchmark data o More Appropriate Local Data (MALD) reports o Red flag variation report o request for increase in gain of site value
BioBanking Credit Report Maps (soft copy as A4 jpgs) of:
o BioBank site boundary or development footprint o vegetation zones o management zones o photo points
And where required:
o existing waste o existing erosion o existing structures (in waterways)
Separate shape files should be supplied for all the maps mentioned above plus: o plots and transects o assessment circles o species polygons o the location or habitat area of sensitive species, and the management area
related to that sensitive species (as this information cannot be displayed publicly)
All maps must include: o a title (as per the names above) o the site’s name, location and lot/DP numbers o the scale

Operational Manual for the Credit Calculator 41
o the date it was prepared o a legend.
Boundaries and zones must be confirmed on the site using a GPS. This information should be digitised onto an ortho-rectified aerial photo or SPOT-5 image. Maps must be easily readable and submitted to OEH as a Geographic Information System (GIS) file that is ESRI compatible. Shape files must use GDA94 datum. Name each shape file as: ‘BioBank site name_descriptor’. For example, ‘Hill Farm_photo points’ or ‘Hill Farm_management zones’. Photo points should be named A, B, C, D, E, F, G, etc. Photo points should be located in areas where change is expected, i.e. where replanting, natural regeneration, intensive weeding or other active management actions are to be carried out. As a rough guide, include at least one photo point in each management zone where active management actions will be undertaken. Boundaries and zones must be confirmed on the site using a GPS. This information should be digitised onto an ortho-rectified aerial photo or SPOT-5 image. Maps must be easily readable and submitted to OEH as a Geographic Information System (GIS) file that is ESRI compatible. Shape files must use GDA94 datum. Name each shape file as: ‘BioBank /development site name_descriptor’. For example, ‘Hill Farm_photo points’ or ‘Hill Farm_management zones’.
Requirements for submitting a BioBanking agreement application – landowners:
Proof of ownership (copies of land titles) Management actions using the template (provided in Word format) Biodiversity Credits Pricing Spreadsheet Application fee Signed application form LPMA approved Deposited Plan if full survey requested For additionality, a copy of any agreements relating to management actions already
required on the site, e.g. Conservation Agreement, PVP, management plan In-principle consent from property interest holders, including mortgagees, and their
contact details
21. References OEH 2008, BioBanking Assessment Methodology 2008, Office of Environment and Heritage,
Sydney (www.environment.nsw.gov.au/biobanking/assessmethodology.htm).
OEH 2014a, BioBanking Assessment Methodology 2014, Office of Environment and Heritage, Sydney (www.environment.nsw.gov.au/biobanking/assessmethodology.htm).
OEH 2014b, Framework for Biodiversity Assessment 2014, Office of Environment and Heritage, Sydney (www.environment.nsw.gov.au/biodivoffsets/bioffsetspol.htm).