Creating Web Pages on OZ Cathie LeBlanc and Evelyn Stiller Department of Computer Science your...
22
Creating Web Pages on OZ Cathie LeBlanc and Evelyn Stiller Department of Computer Science your machine in your office OZ jsmith estill er cbrown zshen wtaffe clebla nc pdrexe l Home home.html oz.plymouth.edu/ ~jsmith
-
date post
19-Dec-2015 -
Category
Documents
-
view
219 -
download
2
Transcript of Creating Web Pages on OZ Cathie LeBlanc and Evelyn Stiller Department of Computer Science your...

Creating Web Pages on OZCathie LeBlanc and Evelyn Stiller Department of Computer Science
your machin
e in your office
OZ
jsmith
estiller
cbrown
zshen
wtaffe
cleblanc
pdrexel
Home
home.html
oz.plymouth.edu/~jsmith

What to put on web pages?
• Information for your students– syllabus– class information (assignments, etc.)– contact information– class-related links– examples of student work
• Interaction for your students– quizzes– chats– practice exercises– simulations

Web page style guide• Don’t make your pages really long
– use tables and table of contents if page is going to be long
– more than two screenfuls is difficult to manage
• Always include a link back to your main home page
• Always include the date on which the page was last changed
• Try to highlight really important information– use a different color or blinking text (sparingly)
or just put the word NEW next to most recent stuff

1. Start Netscape Communicator2. Under menu item Communicator, select Composer

3) Start typing information you wish to have on your web page4) Format it as desired as you would a word-processing document5) Change the font-size, color, alignment, etc.
6) Change “Plymouth State College” into a link.
7) Enter the web address of PSC’s web page in quotes:“http://www.plymouth.edu”

8) Add an image stored on your computer by browsing.
Note: Fileformats gifand jpg will work but not bmp.

9) Verify that the image appears in Composer and center the image.
Make sure your cursoris positioned where you wish the imageto appear.

10) Select a few categories of information you wish to share.
11) Place cursor where text should appear. Align left and type.

12) Select your new text and change it into a bulleted list:
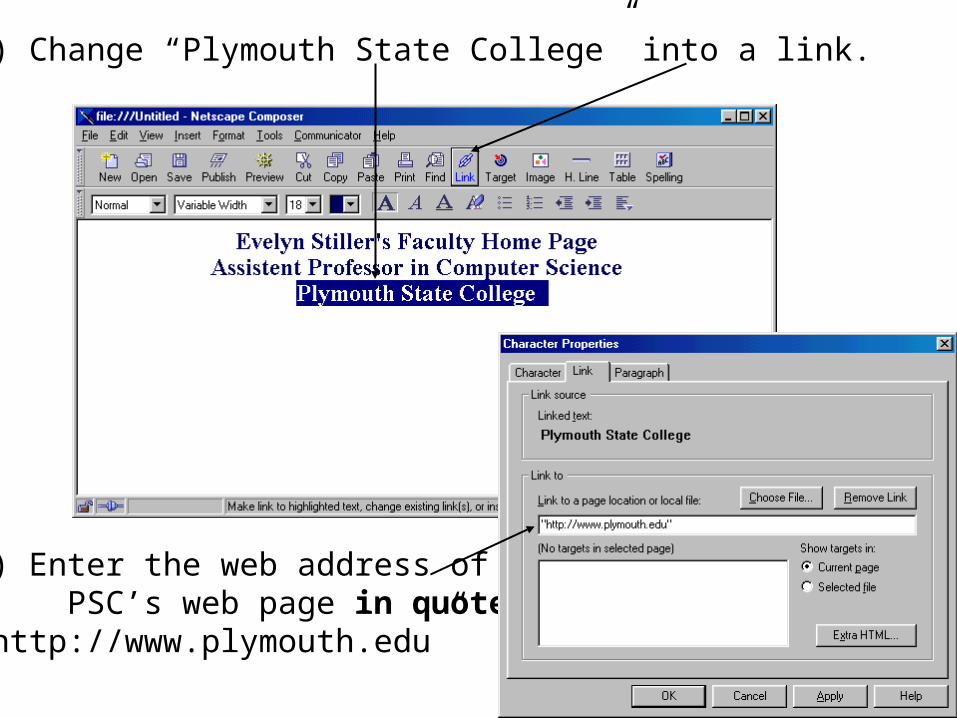
13) Add a horizontal line to separate the content of your web page.
Make sure you move your cursor to where the line should appearbefore pressing the H. line button.

14) Add a target marker after the horizontal line, and assign a name to it.
15) Now add content related to your first category of information. (Class syllabi in this case) .
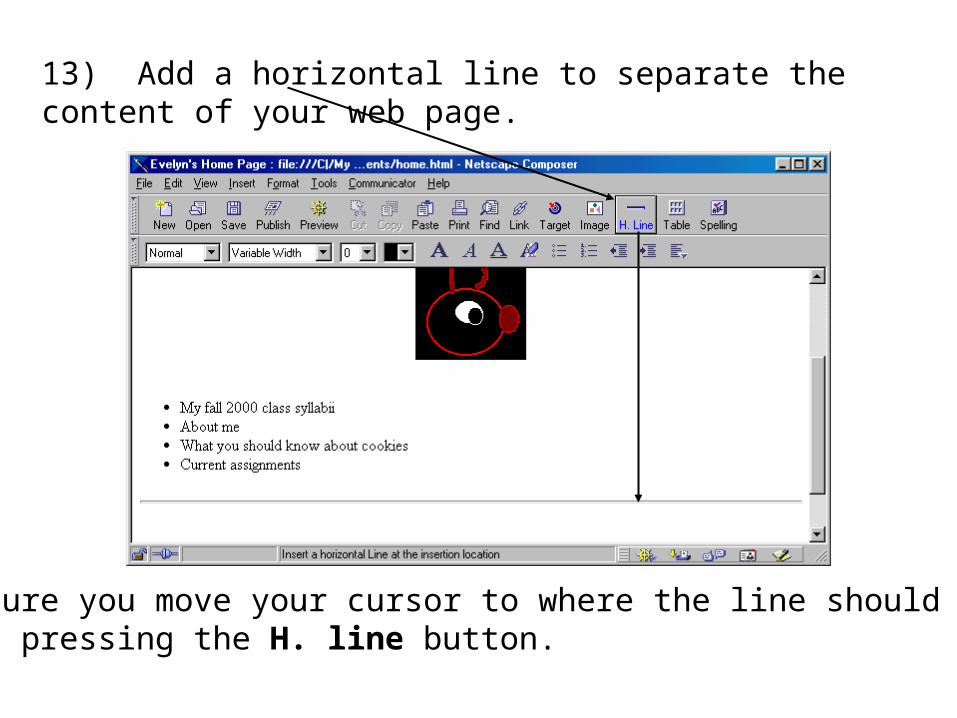
16) Create a link between your first bullet and its content by first selecting the bulleted item and pressing the link button.
17) Simply select the predefined target by clicking on its name.

18) Link your syllabus entries to a separate file, by selecting theappropriate text and pressing the link button.
19) Type the name of the file containing the course syllabus here. Make note of this name, because we will create this file later.

20) Preview your web page. All links should work except for your syllabus link.
Test your links.

21) Publish your web page. Give it a title and name the file home.html.
22) You must enter your oz password here. Note: the file name must be home.html only for your main web page file.

This warning is telling us that we have not yet created our syllabus file. That is OK for now.
This is the standard security warning. Also OK.
This is letting us know that our home.html file and our image file have been successfully up loaded.
23) Now you can test your home page. The sample web page can be viewed at: http://oz.plymouth.edu/~estiller/test.html

24) Create your syllabus by creating a new web page.
25) When you publish, change the name to your previously selected file name in step 19.

What to do in the event something doesn’t work
Note the term, permission and the correct file name. Call ITS and request help with setting the permissions for your web page.

Although this error message also uses the term , permission, it doesnot reference home.html. You may have saved your file in the wrongplace. Check your Home folder in your oz account or call ITS.
Also, your Home folder may have the wrong permissions.

Checking youroz account Homefolder ona windows machine.
Select your M drive and doubleclick the Home folder. Then scrolluntil you find home.html

If you do not have a Home folder, you will get this message when you try to publish your web page, and this message from Netscape.