Creating Realistic Fire in Blender
12
Simulation // Materials // Rendering // Compositing Creating Realistic Fire by Andrew Price in Blender 2.5 Learn how to harness the power of the smoke simulator to create impressive pyro effects!
description
Blender fire creation guide
Transcript of Creating Realistic Fire in Blender

Simulation // Materials // Rendering // Compositing
Creating Realistic Fire
by Andrew Price
in Blender 2.5
Learn how to harness the power of the smoke simulator to create impressive pyro effects!
About the AuthorI started using Blender in 2002 because I loved 3d art and wanted to make my own. I didn’t have thousands of dollars to drop on expensive software, so Blender seemed like a good alternative.
But I soon realized that Blender was more than just a free program, it was a professional suite that can create stunning art.
In early 2009, I started the website BlenderGuru.com with one goal in mind; To create serious tutorials for serious artists.
I hope you enjoy this eBook.
Andrew PriceBlenderGuru.com
NOTE: This tutorial was created with Blender 2.5 Alpha 1. Depending on your version, your screen may look different to the screenshots in this tutorial.

4 February 2010
Creating Realistic Fire in Blender
blenderguru.com
Select the default cube and scale it along the Z axis to make a tall
rectangular prism. This will act as our domain object that all smoke and fire will be created in. It is important that you scale this in object mode only or it can create problems later.
We need a flow object to emit smoke. Create a plane, and place
it inside the cube. Scale it down slightly and place it near the bottom of the cube to ensure the simulation runs smoothly.
Change the default lamp to a spotlight and set the energy level
to 2. You may wish to give it a subtle blue tint to imitate the night sky.
Position the camera in front of the domain. You can do this quickly by
going to the front view (NumPad 1) and hitting Ctrl+Alt+NumPad 0. You may wish to position the camera so the top of the domain cube isn’t visible. That way the smoke won’t suddenly disappear out the top.
With the cube selected, go to the physics panel and under the
smoke settings click Add. Four options will appear: None, Domain, Flow and Collision. Click Domain.
Set Divisions to 80, Heat to 0.2500 and check Initial Velocity. This will
make the fire shoot out of the plane.
Underneath those settings, check the Smoke High Resolution box.
This will create high resolution detail to the outside of our smoke. In this panel, change the Resolution to 2 and the Noise Method to FFT.
01 02
03 04
05 06 07
Setting up the sceneBefore we get into the fun simulations, let’s setup the scene.
If you are new to the smoke simulation. I’d recommend watching my Introduction to Smoke Simulation video.
It’s cool to smokeNow we get onto the fun stuff. The domain object controls how both the smoke and fire will move.
For the best results I’d recommend watching some videos of real fire so you have something to aim for. You can find a great selection of reference video at Pond5.com
PART ONE
PART TWO

5 February 2010
Creating Realistic Fire in Blender
blenderguru.com
Select the Plane object, go to the particle settings panel and click
the + button to create a new particle system.
To ensure our particles don’t show up in the render, set the Render
type to None. We don’t need to see the plane either, so disable the Emitter.
Save your work now, because it’s time to bake. Select the domain
object and in the Smoke panel, scroll to the Cache section and hit Bake All Dynamics.
Now go make yourself a cup of coffee. This may take a while.
With the particle system in place, switch to the physics panel and
under the smoke tab hit Add and Flow. Click the blank box under Particle System and select ParticleSystem from the drop down list.
Success! Once the simulation has finished baking, save your work.
Set the particle amount to 40,000 and the Lifetime to 1. Because we
enabled Initial Velocity in our domain, the Normal value will define how fast the fire is shot from our emitter. Change this to 0.5
08
10 1211
13
09
Fueling the FlamesWhilst most of the smoke behavior is defined by the controls of the domain object, the flow object also plays a part. The amount of particles you select play a major role in how the fast smoke moves.
Rendering smokeIt looks pretty in the 3d viewport, but it won’t show up in the render yet. This is where you can define how your smoke appears in the renders.
PART THREE
PART FOUR
Select the domain and add a new material. Change the material type
to Volume. Set the density to 0, Density Scale to 2, Scattering to 2 and Step Size to 0.010
14

6 February 2010
Creating Realistic Fire in Blender
blenderguru.com
Switch to the texture panel. Change the texture type to Voxel
Data. In the Domain Object field type Cube. Under Influence, enable Density.
Switch to the World Panel and change the horizon color to Black.
With the domain selected switch to the texture panel and add
a new texture underneath the smoke texture. Name it ‘Fire’ and set the type to Voxel Data.
In the Domain Object field type Cube. Now scroll to the Colors
section and select Ramp.
This color ramp will be our fire’s color scheme. The right hand side
acts as the base of the fire and the left side acts as the tip. Start with a white hot base which blends with warm yellow and finishes with a bright orange. Fade it out with a bright red point, set to Alpha 0. Place this very close to the orange point.
To make our fire appear brighter than the smoke we will set the
texture influence to Emission. We want the fire to be really bright so set the value to 5 (you will need to type this in manually as the slider won’t let you go that far).
Render! Did it get just get hot in here?
Render! Our smoke is ready to go.14 15
17 18
19 20 20
16
Playing with fireWith the smoke out of the way it’s time to get flammable. The best part is, our fire will use the exact same simulation as our smoke, so we only need to bake once!
PART FIVE

7 February 2010
Creating Realistic Fire in Blender
blenderguru.com
Glow baby, glow.Real fire creates a glare when looking at it. The compositor will help with that.
Burning embersIf you’re going for realism you need some embers. We will create this with the particle system and halos.
PART SIX
PART SEVEN
Switch to the compositor workspace by pressing Ctrl+Left
Arrow. Then hit Use Nodes.
Add a Blur Node (Add>Filter>Blur) and set the X and Y values to 10.
This will create a blur 10 pixels wide. Set the filter type from Flat to Gaussian, as this produces nicer results.
Combine the glow effect with the whole render by adding a
Mix node (Add>Color>Mix) and joining the outputs from the Blur node and the render layer. Set the mix type to Add and the Fac value to 1.
Switch back to the 3d view by pressing Ctrl+Right Arrow. Select
the Plane and go to the Particle Settings.
Press the + button to add a new particle system. Set the amount to
800, the lifetime to 250 and End value to 250. In the Velocity tab, set normal to 0 and the Z emitting power to 0.400
To vary the size of the embers, set the Random size to 1. To make
the embers float gracefully through the air set the Brownian to 0.800. Deselect the Emitter box and set the Gravity to 0 so that the embers don’t fall.
We don’t want our smoke to glow, so we need to isolate the fire. To
do this, add an RGB Curve (Add>Color>RGB Curve) and create a very steep S Bend. This will make only the bright arrears visible.
21
23 24
25 26 27
22
8 February 2010
Creating Realistic Fire in Blender
blenderguru.com
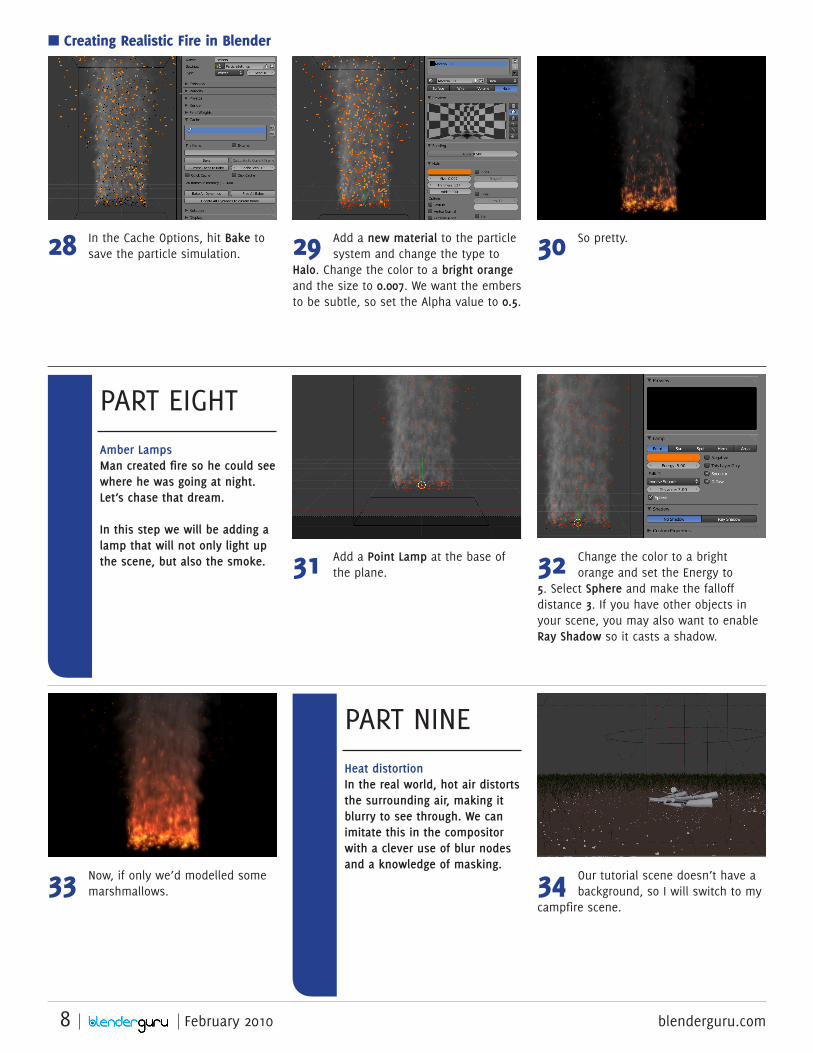
In the Cache Options, hit Bake to save the particle simulation.
Add a new material to the particle system and change the type to
Halo. Change the color to a bright orange and the size to 0.007. We want the embers to be subtle, so set the Alpha value to 0.5.
Add a Point Lamp at the base of the plane.
Our tutorial scene doesn’t have a background, so I will switch to my
campfire scene.
Now, if only we’d modelled some marshmallows.
Change the color to a bright orange and set the Energy to
5. Select Sphere and make the falloff distance 3. If you have other objects in your scene, you may also want to enable Ray Shadow so it casts a shadow.
So pretty.28 29
31
3433
32
30
Amber LampsMan created fire so he could see where he was going at night. Let’s chase that dream.
In this step we will be adding a lamp that will not only light up the scene, but also the smoke.
Heat distortionIn the real world, hot air distorts the surrounding air, making it blurry to see through. We can imitate this in the compositor with a clever use of blur nodes and a knowledge of masking.
PART EIGHT
PART NINE

9 February 2010
Creating Realistic Fire in Blender
blenderguru.com
Keep your domain and flow object on layer one, but move everything
else to the second layer.
We will need to separate our fire and scene from each other so we
can apply different effects to each. In the render panel, name the current layer ‘Fire’ and in the scene option, select both layer one and two, but make sure only layer one is selected in the layers option.
To make sure that objects in front of our fire are blocked out, check
the Zmask option and select layer 2 in the Zmask Layers section.
Now we need to create a separate render layer for our scene. Click
the + button and name the layer ‘Scene’. In the scene section select both layer one and two again, but this time make sure only layer two is selected in the layers option.
We can now switch to the compositor. We should have the
current glow node setup that we created earlier. We now need to add our scene to the setup. Add a new Render layer (Add>Input>Render layer) and select Scene from the drop down box.
We will now need to create our smoke mask that will define which
parts of the scene to blur. Add an Invert Node (Add>Color>Invert), set the Fac value to 1 and connect it to our Fire layer.
Add an RGB curve (Add>Color>RGB Curves) and connect it to the
Invert node. Create a shallow slope with the curve. This will exaggerate our smoke mask by making it very dark.
Add a Blur node (Add>Filter>Blur) and connect it to the RGB Curve.
Set the type to Fast Gaussian and the X and Y value to 10. This will blur the area around the fire as real heat would.
Our Zmask is now complete! We will use this to blur the scene.
35 37 38
39 40 41
42 43 44
10 February 2010
Creating Realistic Fire in Blender
blenderguru.com
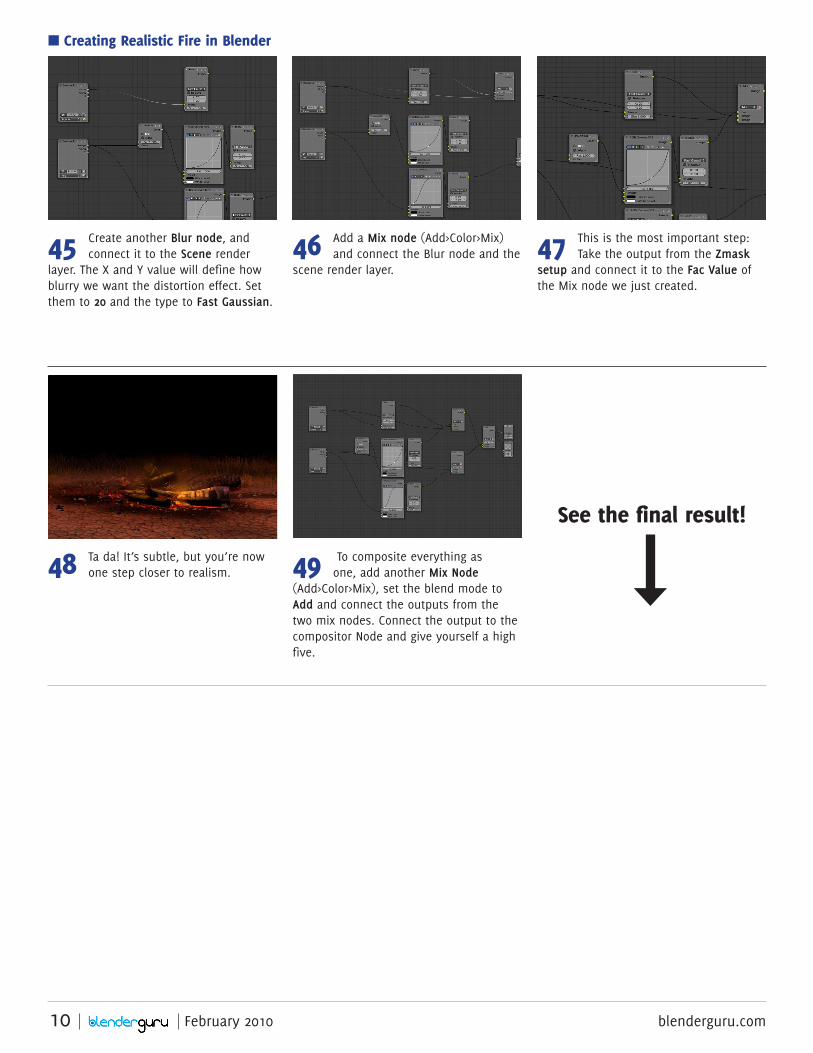
Create another Blur node, and connect it to the Scene render
layer. The X and Y value will define how blurry we want the distortion effect. Set them to 20 and the type to Fast Gaussian.
Add a Mix node (Add>Color>Mix) and connect the Blur node and the
scene render layer.
This is the most important step: Take the output from the Zmask
setup and connect it to the Fac Value of the Mix node we just created.
Ta da! It’s subtle, but you’re now one step closer to realism.
To composite everything as one, add another Mix Node
(Add>Color>Mix), set the blend mode to Add and connect the outputs from the two mix nodes. Connect the output to the compositor Node and give yourself a high five.
45 46 47
48 49
See the final result!

Download the finished .blend

Join the Blender Guru fan page!
Gain access to exclusive content, tutorials, and videos.
Enjoy the tutorial?