HRMS End User Training HRMS End User Training HRMS Payroll and Reports Training Guide X.

Creating Positions in HRMSand
Posting Job Orders in NC SchoolJobs powered by PeopleAdmin
Learning Objectives
Creating Positions in HRMS—LEA Configuration
—Position Titles
—Local Use Labels (Positions)
—Sites
—Position Management Console
Posting Job Orders in NC SchoolJobspowered by PeopleAdmin

Position Integration
—HRMS—Positions created in HRMS are the basis for Job Orders that are
available in NC SchoolJobs powered by PeopleAdmin
—NC SchoolJobs powered by PeopleAdmin—Positions are moved to the Applicant System available for job
posting
Creating Positions in HRMS
HRMS Job Creation Processes
LEA Configuration1. Add/Update Position Titles
2. Local Use Labels (Positions)
3. Sites
4. Position Management Console
Position Titles
LEA Configuration – Position Titles
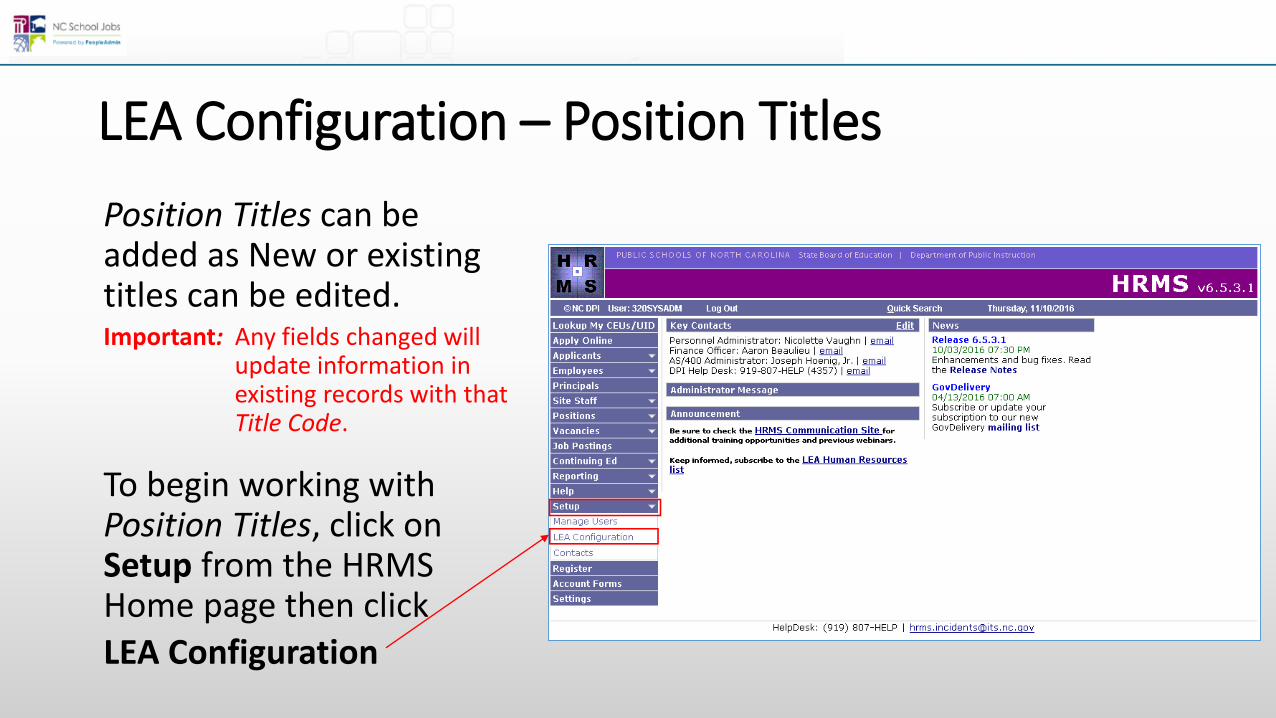
Position Titles can be added as New or existing titles can be edited. Important: Any fields changed will
update information in existing records with that Title Code.
To begin working with Position Titles, click on Setup from the HRMS Home page then click
LEA Configuration
LEA Configuration – Position Titles
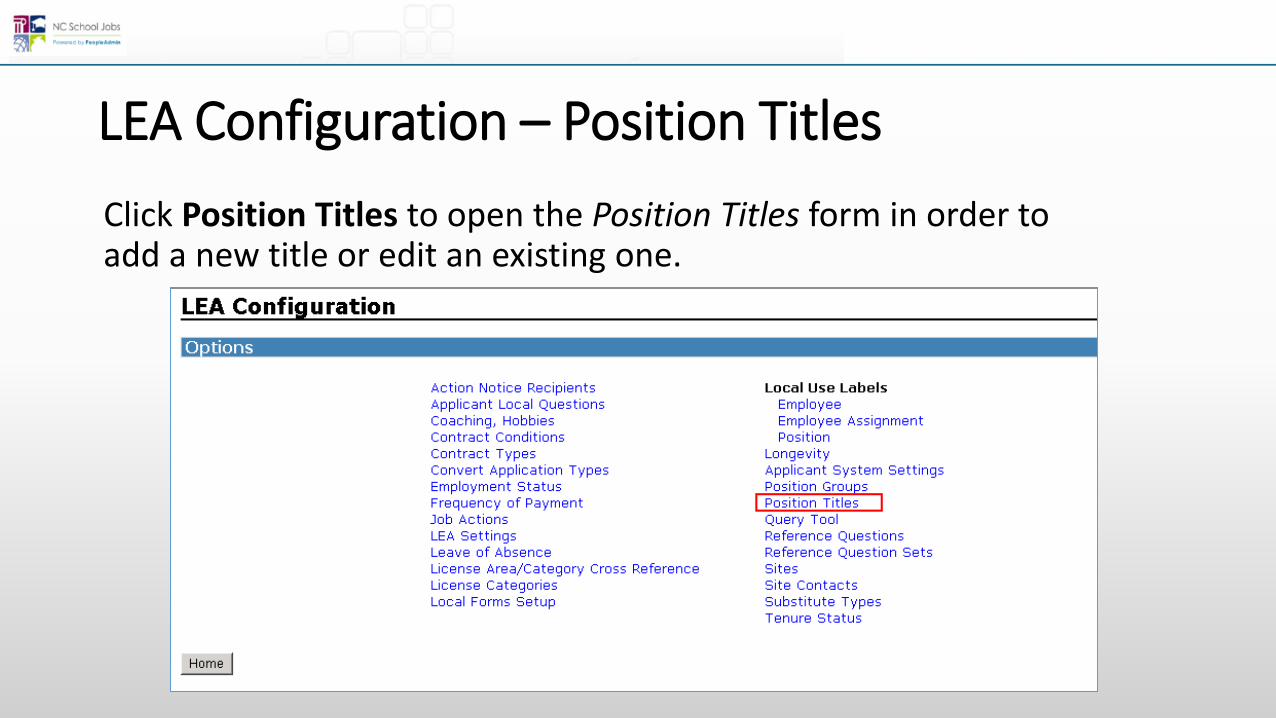
Click Position Titles to open the Position Titles form in order to add a new title or edit an existing one.

Position Titles Form
Position Titles are a way to classify positions with similar characteristics, such as function, level taught, content taught, etc.
The Position Choice Codefield in HRMS will be the Job Title used in NC SchoolJobspowered by PeopleAdmin.
Position Choice Code
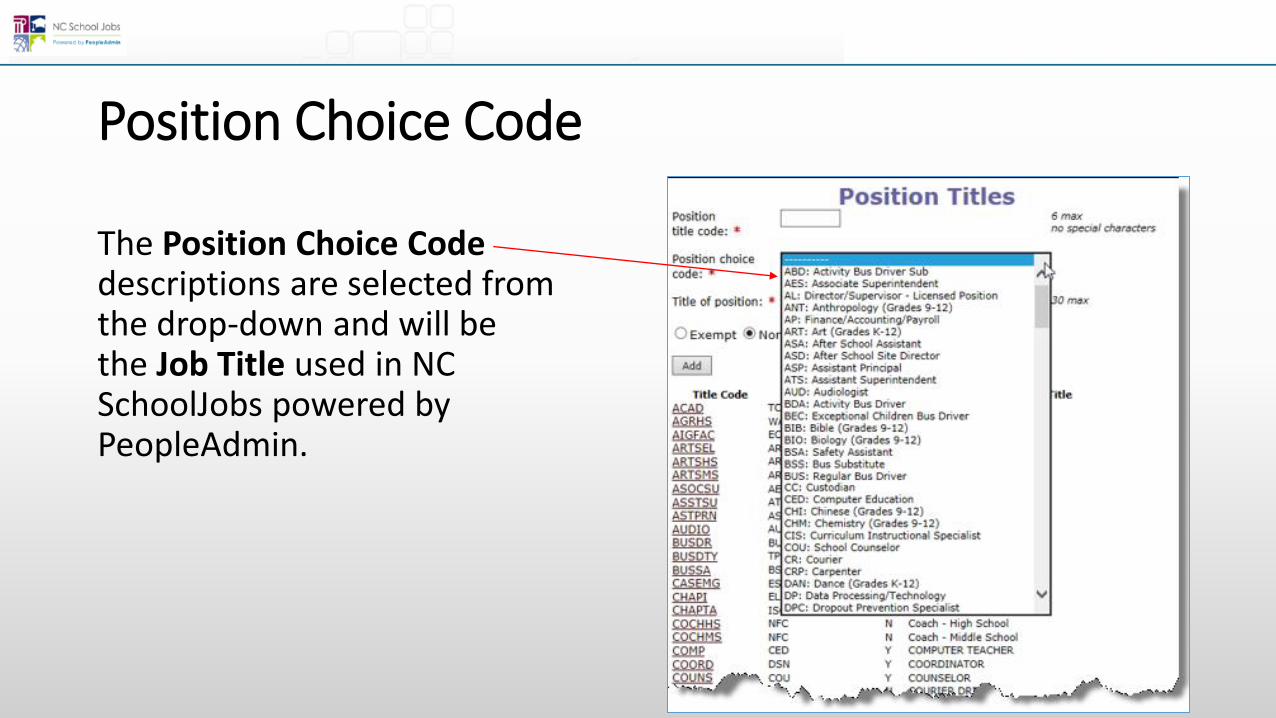
The Position Choice Code descriptions are selected from the drop-down and will be the Job Title used in NC SchoolJobs powered by PeopleAdmin.

Adding a Position Title
To add a Position Title:
1. Enter the desired information into the following fields: —Position title code (free form field)
—Position choice code (select from drop-down)
—Title of position (free form field)
2. Select Exempt or Non-exempt
3. Click Add
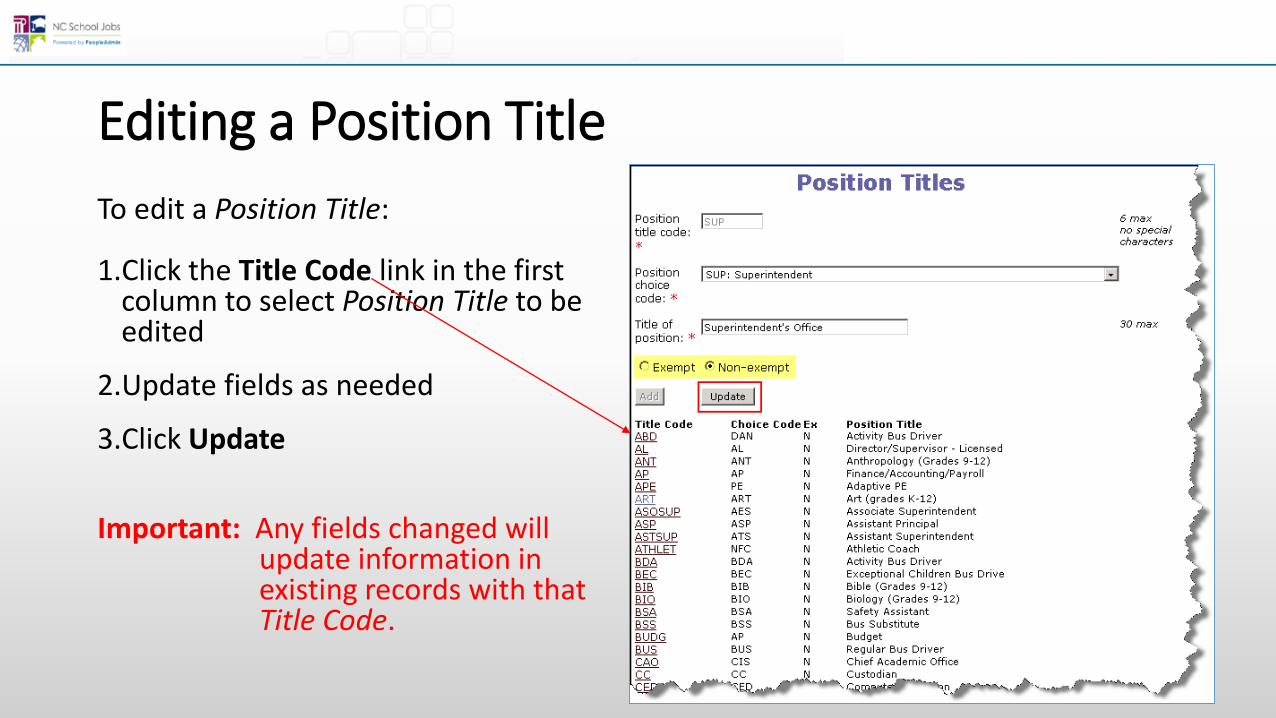
Editing a Position Title
To edit a Position Title:
1.Click the Title Code link in the first column to select Position Title to be edited
2.Update fields as needed
3.Click Update
Important: Any fields changed will update information in existing records with that Title Code.
Local Use Labels
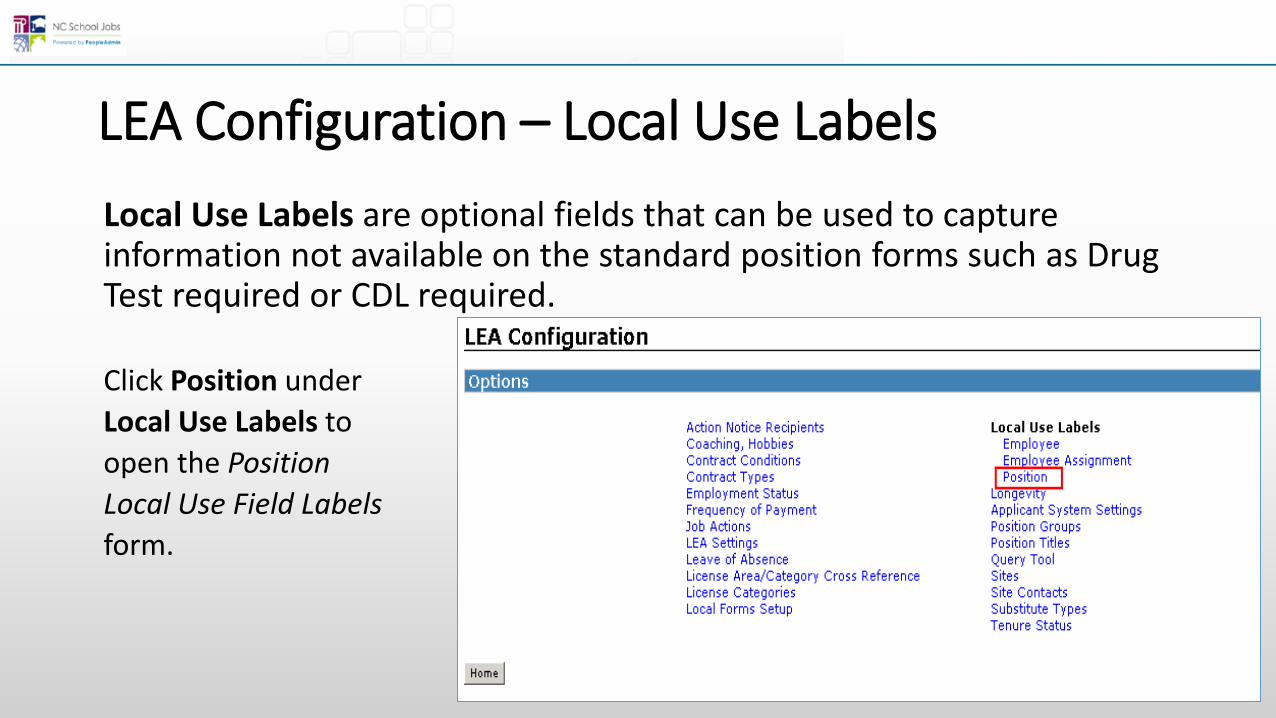
LEA Configuration – Local Use Labels
Local Use Labels are optional fields that can be used to capture information not available on the standard position forms such as Drug Test required or CDL required.
Click Position under
Local Use Labels to
open the Position
Local Use Field Labels
form.
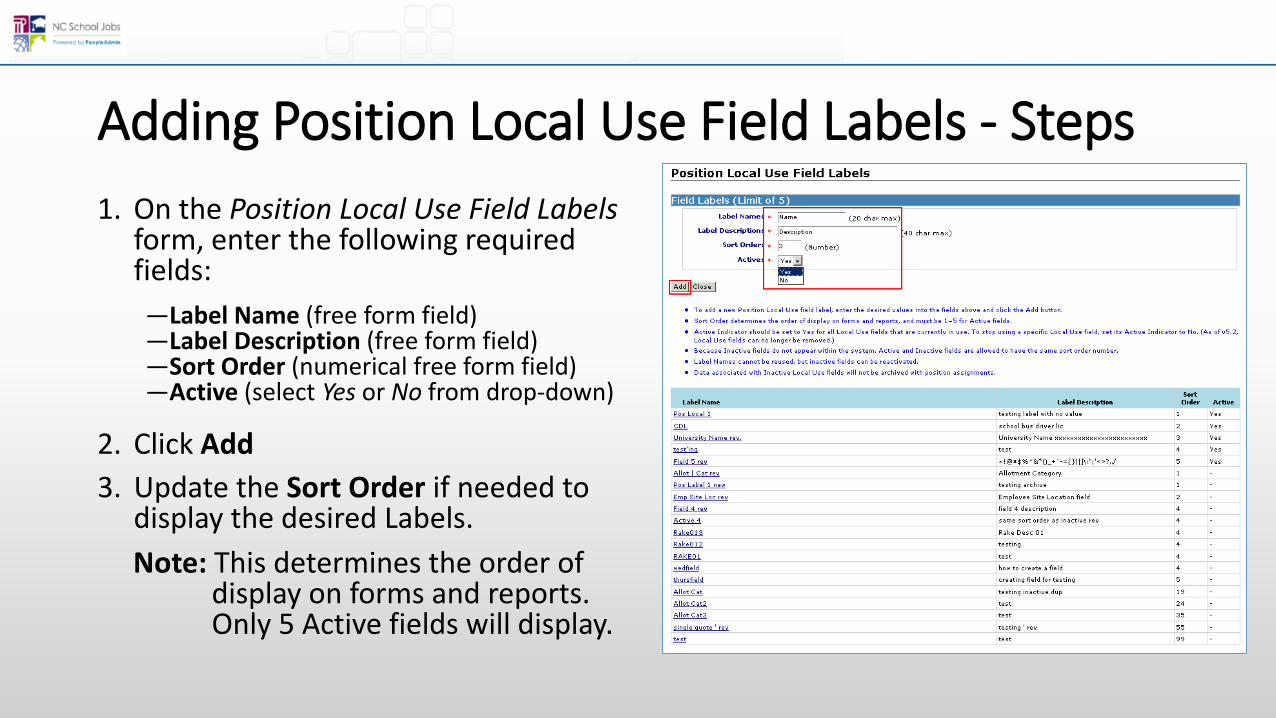
Adding Position Local Use Field Labels - Steps
1. On the Position Local Use Field Labels form, enter the following required fields:
—Label Name (free form field)—Label Description (free form field)—Sort Order (numerical free form field)—Active (select Yes or No from drop-down)
2. Click Add
3. Update the Sort Order if needed to display the desired Labels.
Note: This determines the order of display on forms and reports. Only 5 Active fields will display.
Sites

LEA Configuration – Sites
The Site Settings configuration form allows users to add and maintain a list of Sites, including schools and divisions, within the LEA.
A specific Site must be
selected when defining
a Position.
Click Sites to add
or edit district sites.
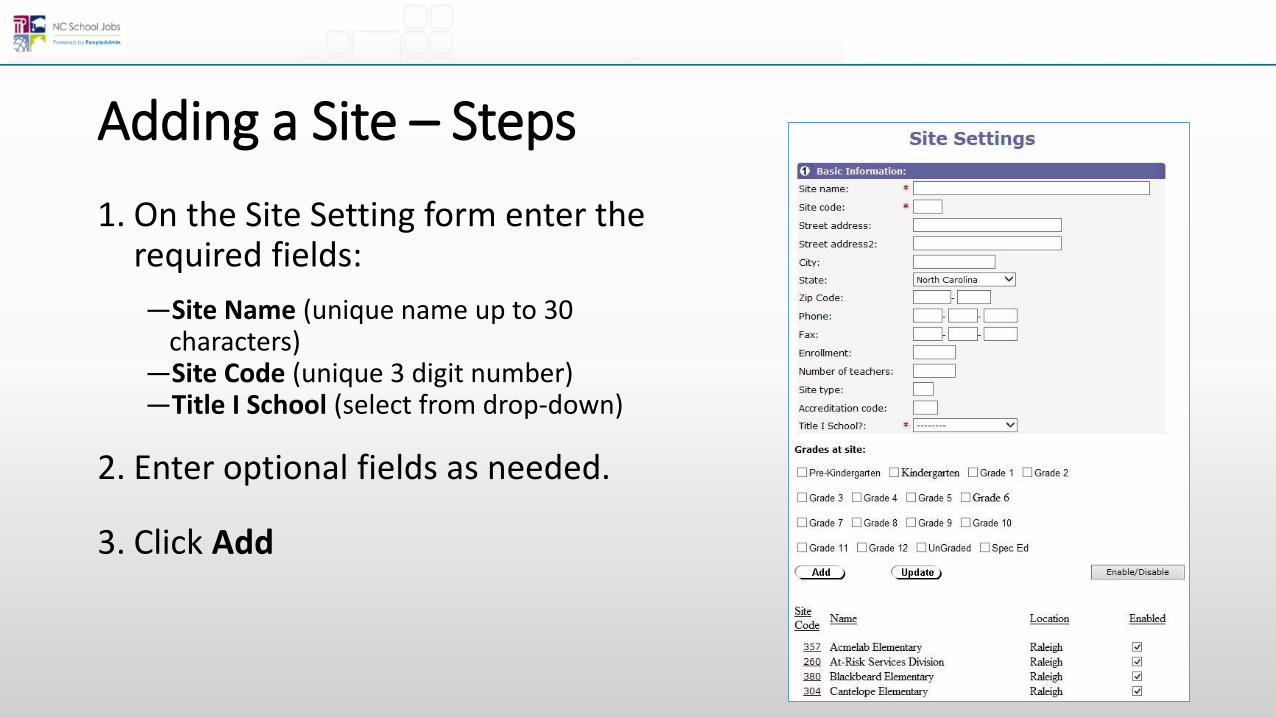
Adding a Site – Steps
1. On the Site Setting form enter the required fields:
—Site Name (unique name up to 30 characters)
—Site Code (unique 3 digit number)—Title I School (select from drop-down)
2. Enter optional fields as needed.
3. Click Add
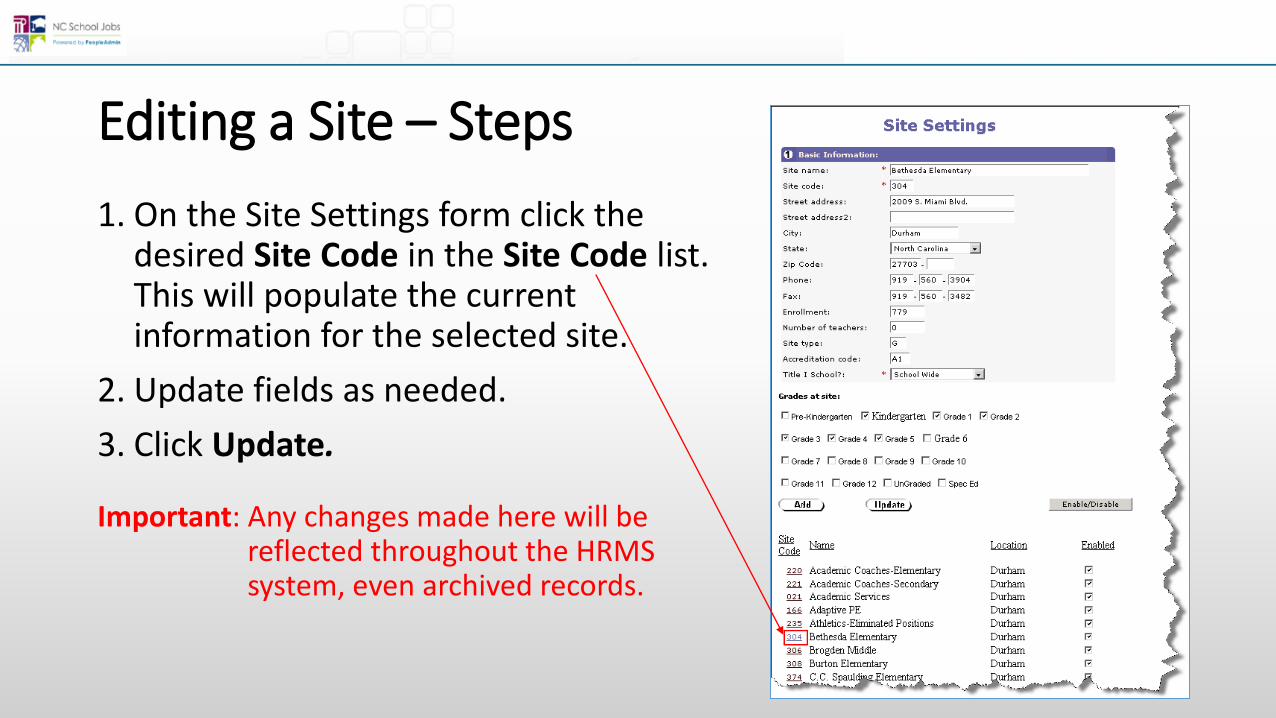
Editing a Site – Steps
1. On the Site Settings form click the desired Site Code in the Site Code list. This will populate the current information for the selected site.
2. Update fields as needed.
3. Click Update.
Important: Any changes made here will be reflected throughout the HRMS system, even archived records.

Position Management Console

Creating Positions
There are two ways to create positions:
1. Position ManagementThis option takes users to the Position Management Console which has additional functionality
2. Create PositionThis option takes users directly to the Create Position form
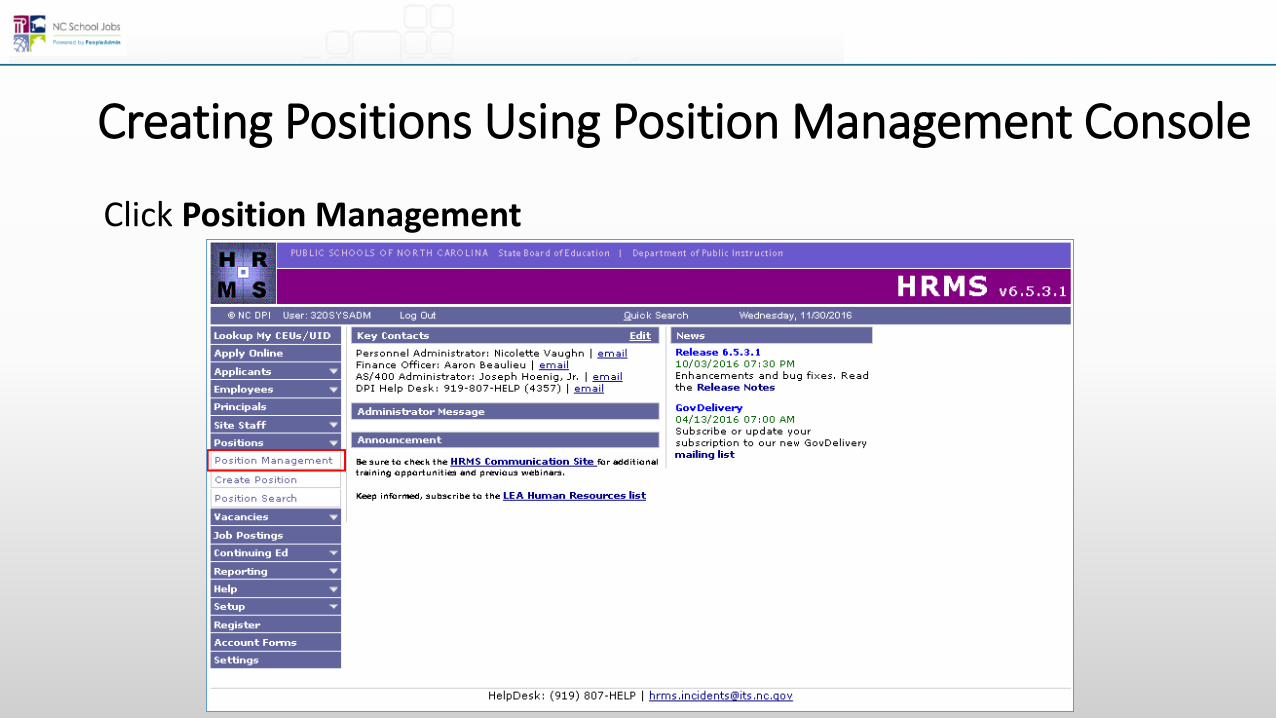
Creating Positions Using Position Management Console
Click Position Management
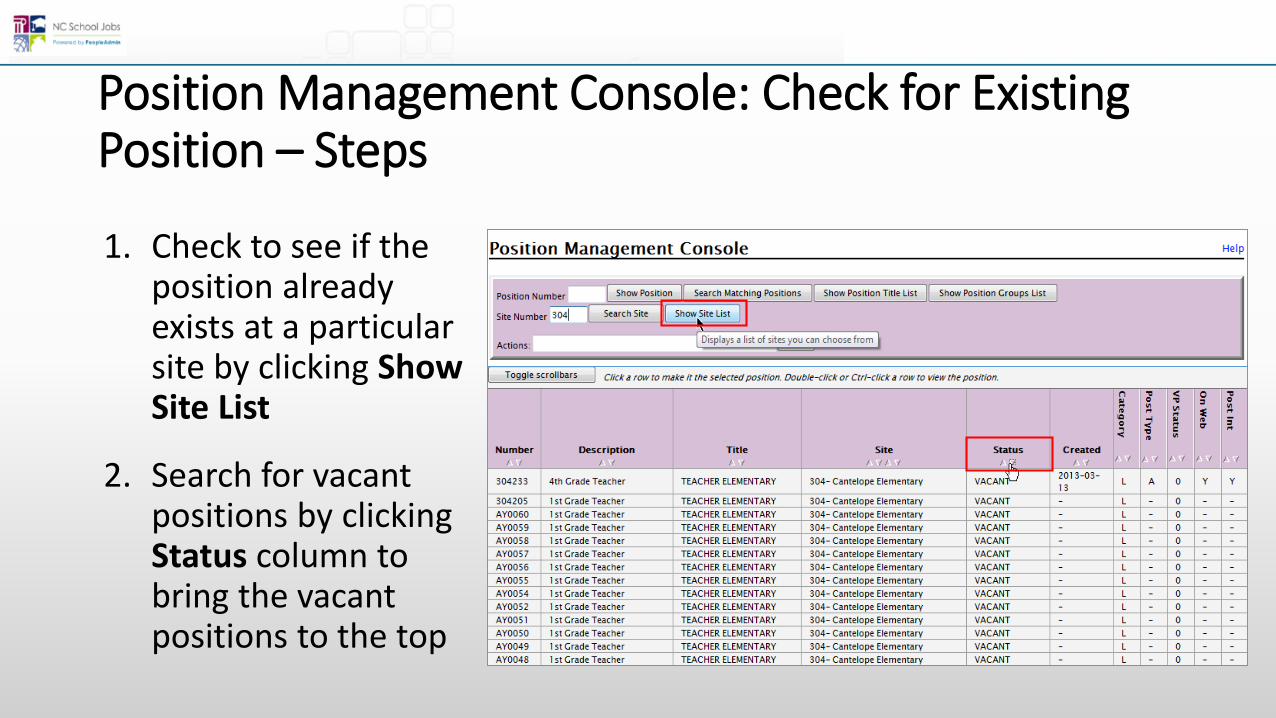
Position Management Console: Check for Existing Position – Steps
1. Check to see if the position already exists at a particular site by clicking Show Site List
2. Search for vacant positions by clicking Status column to bring the vacant positions to the top
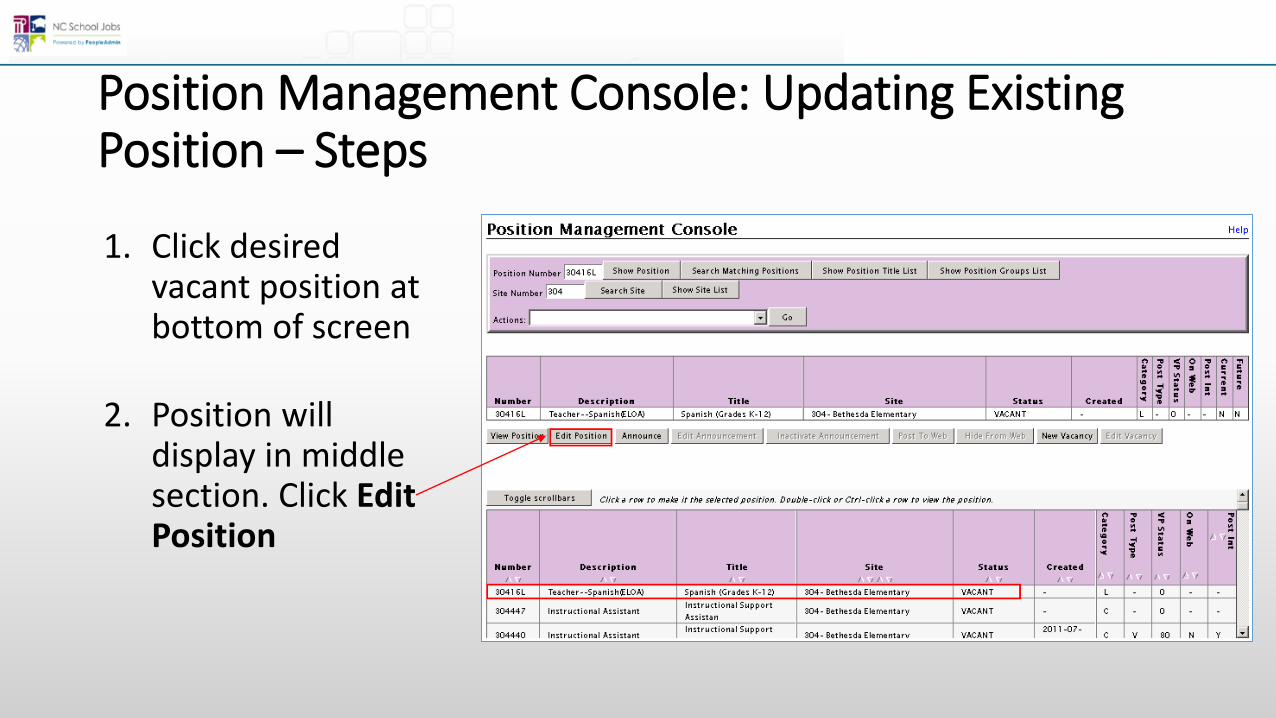
Position Management Console: Updating Existing Position – Steps
1. Click desired vacant position at bottom of screen
2. Position will display in middle section. Click Edit Position
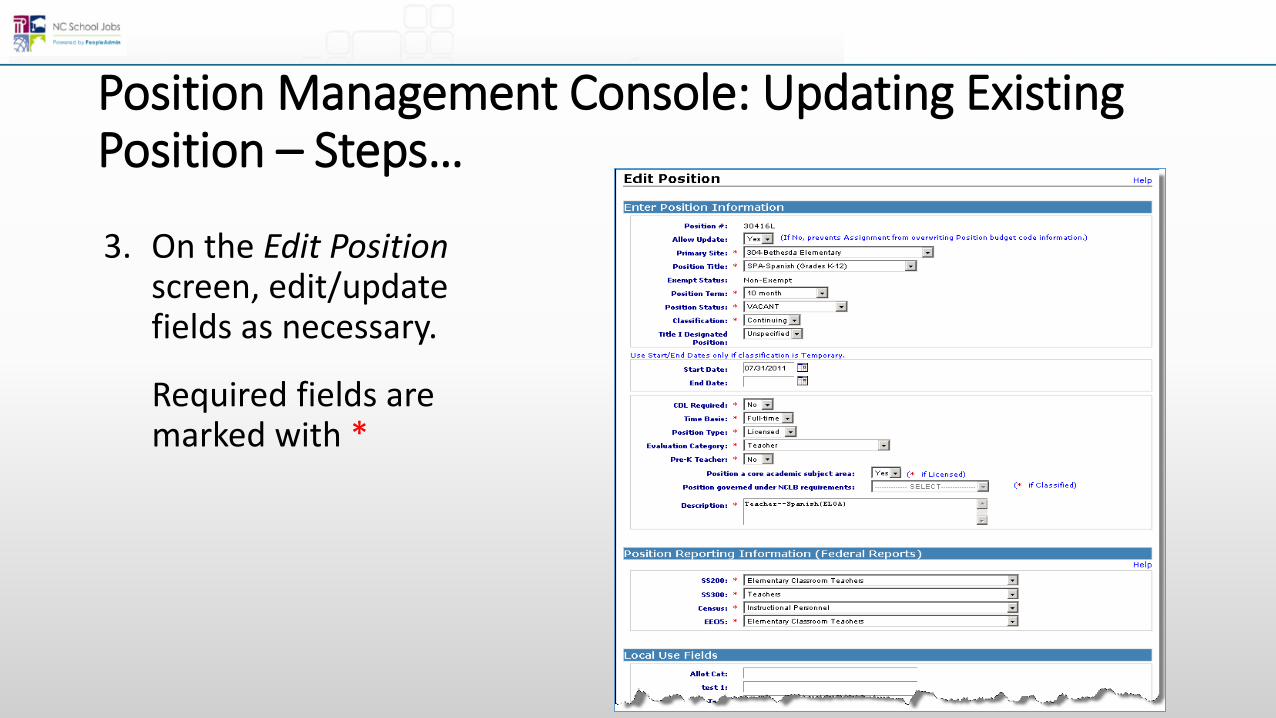
3. On the Edit Position screen, edit/update fields as necessary.
Required fields are marked with *
Position Management Console: Updating Existing Position – Steps…
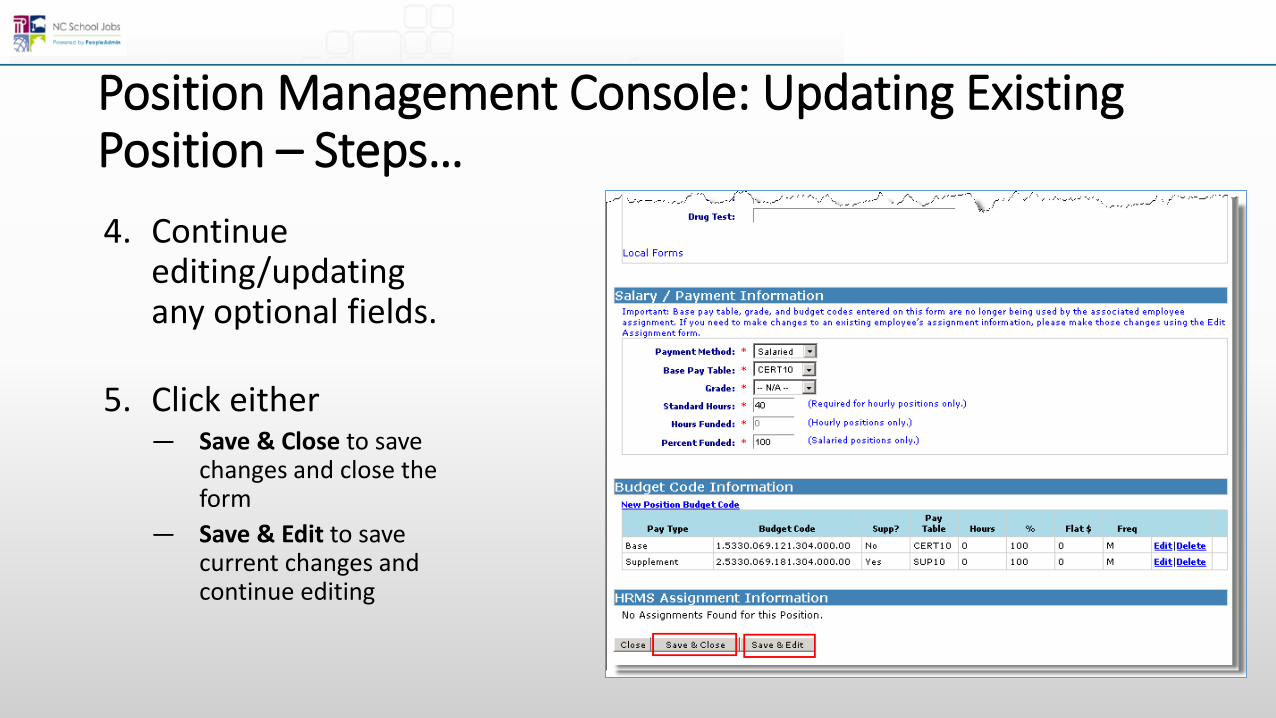
4. Continue editing/updating any optional fields.
5. Click either — Save & Close to save
changes and close the form
— Save & Edit to save current changes and continue editing
Position Management Console: Updating Existing Position – Steps…
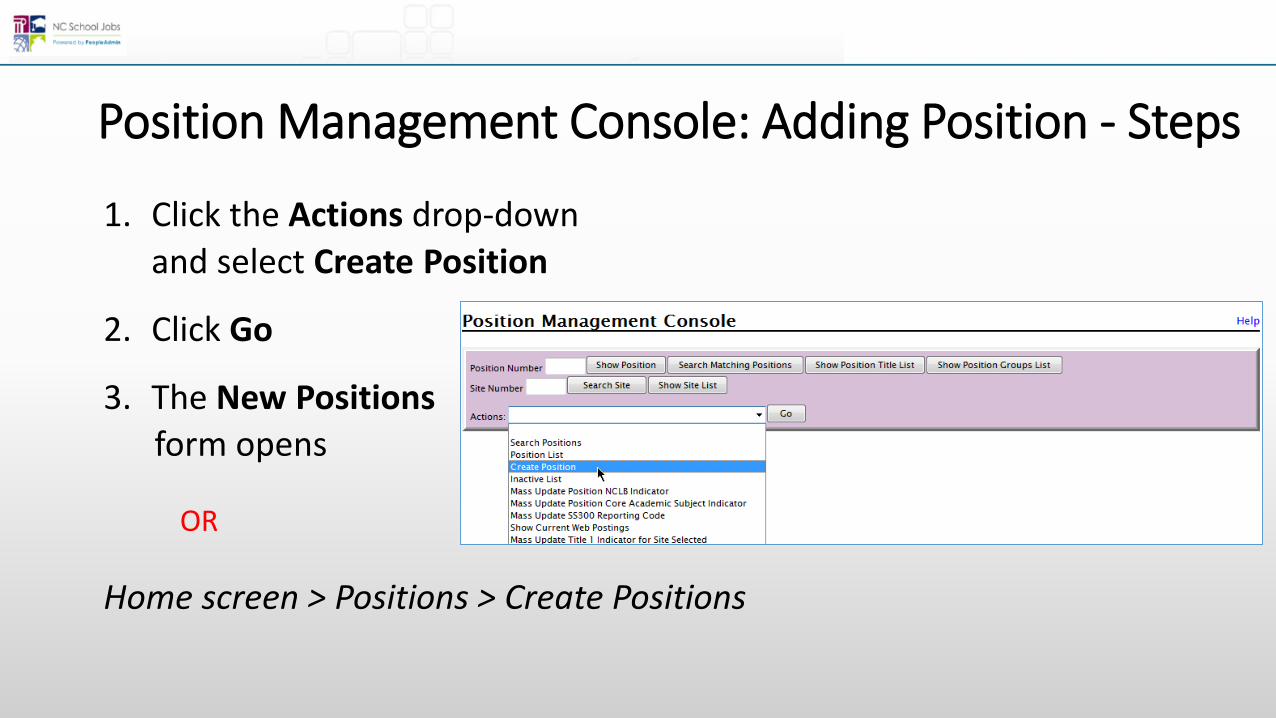
Position Management Console: Adding Position - Steps
1. Click the Actions drop-down
and select Create Position
2. Click Go
3. The New Positions
form opens
OR
Home screen > Positions > Create Positions
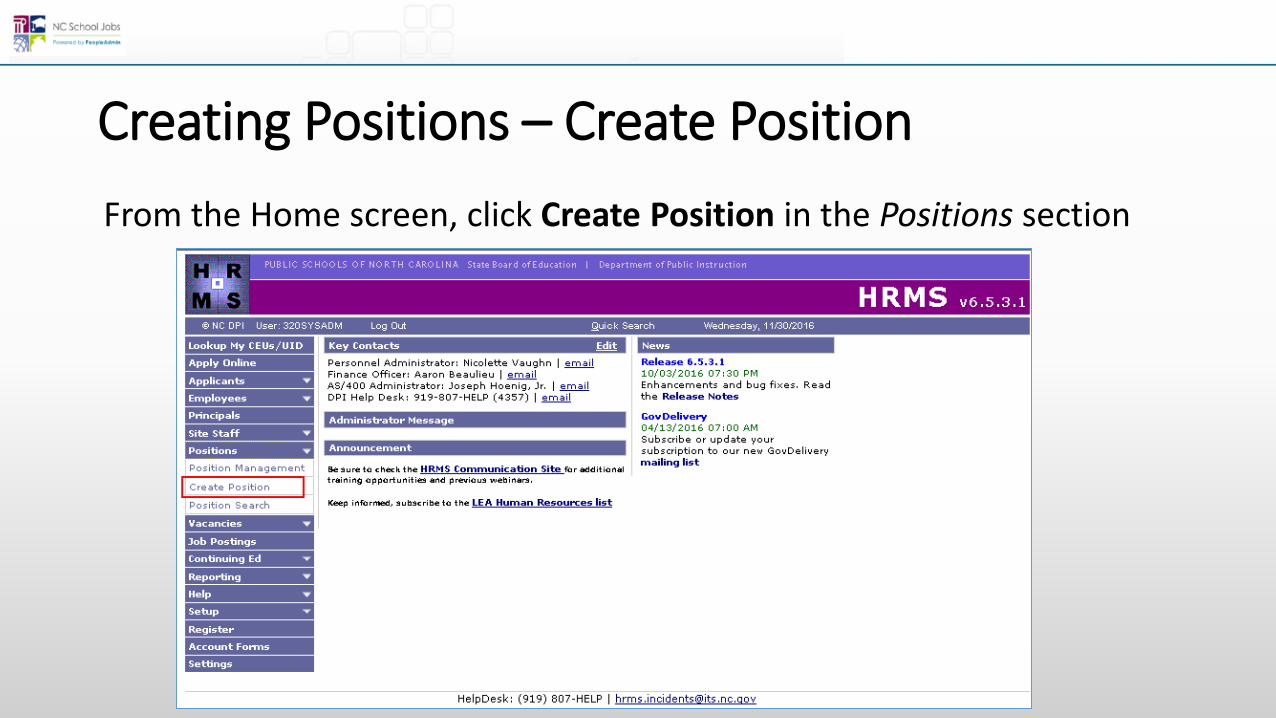
Creating Positions – Create Position
From the Home screen, click Create Position in the Positions section
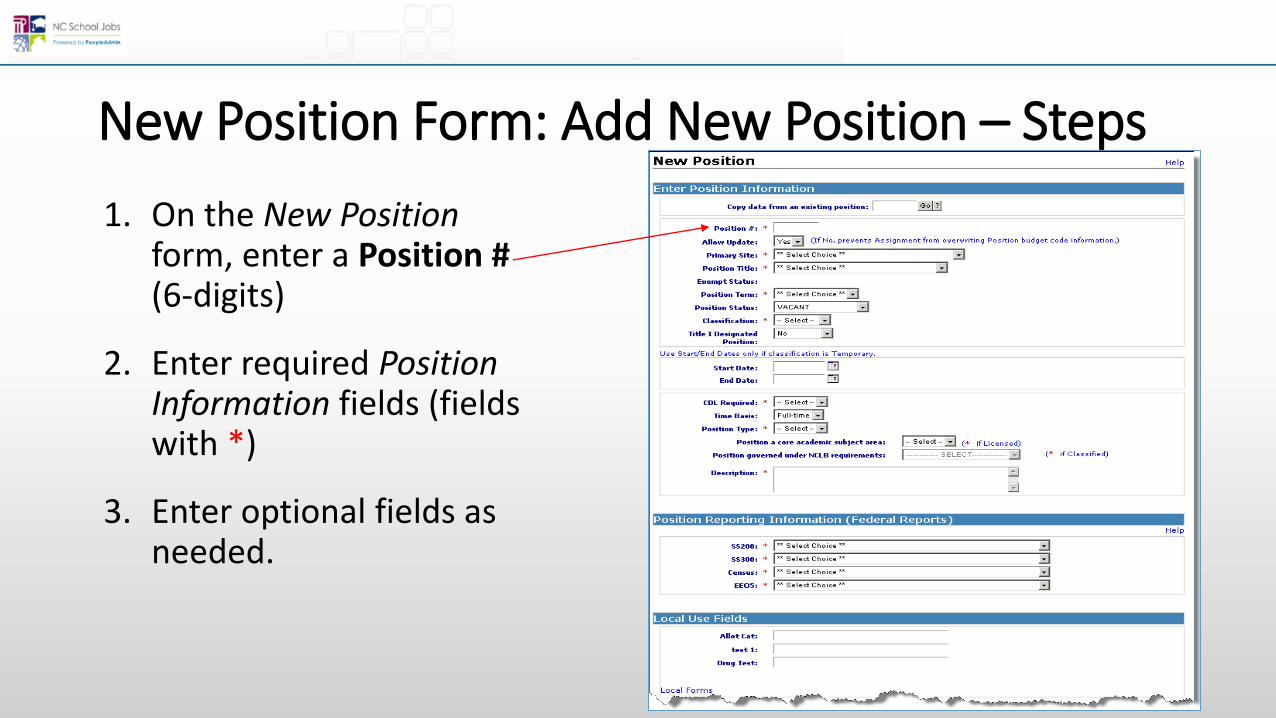
New Position Form: Add New Position – Steps
1. On the New Position form, enter a Position #(6-digits)
2. Enter required Position Information fields (fields with *)
3. Enter optional fields as needed.

4. Enter the following:— Position Reporting
Information as required
— Enter Local Use Fields if needed
— Enter Salary/Payment Information as required
5. Click Save & Edit then enter Budget Code Information
6. Click Save & Close
New Position Form: Add New Position – Steps
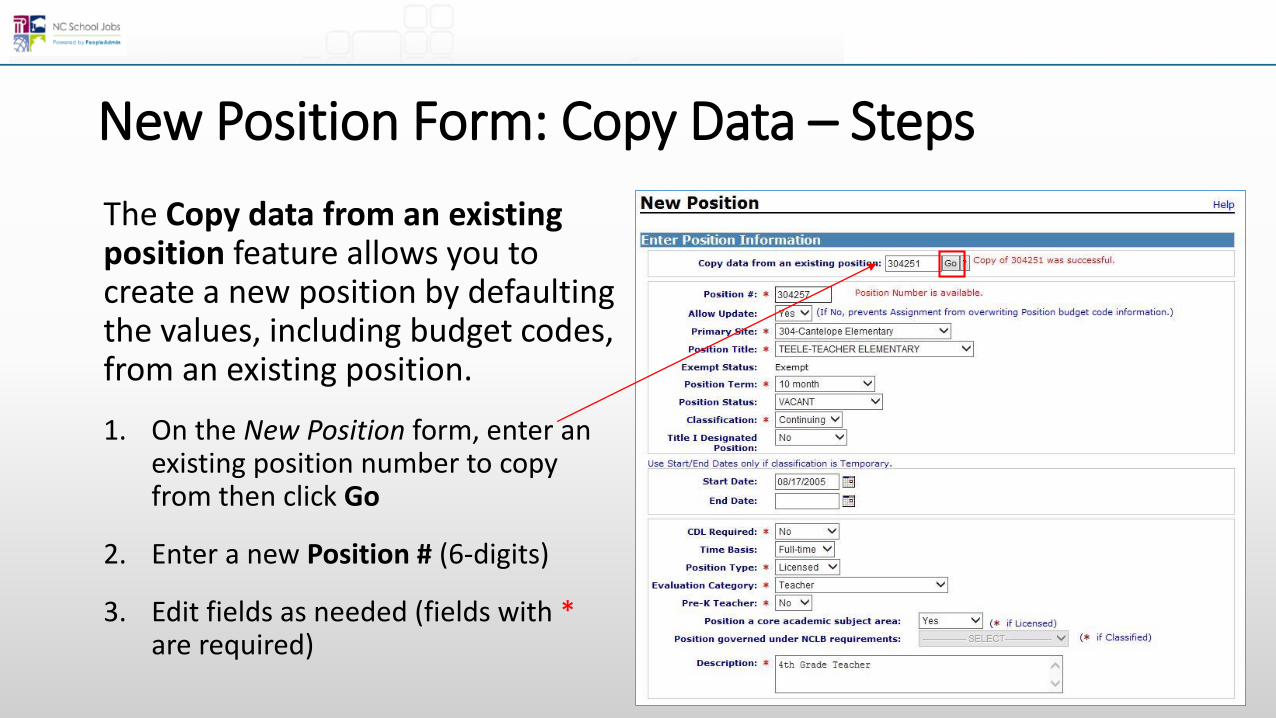
New Position Form: Copy Data – Steps
The Copy data from an existing position feature allows you to create a new position by defaulting the values, including budget codes, from an existing position.
1. On the New Position form, enter an existing position number to copy from then click Go
2. Enter a new Position # (6-digits)
3. Edit fields as needed (fields with * are required)
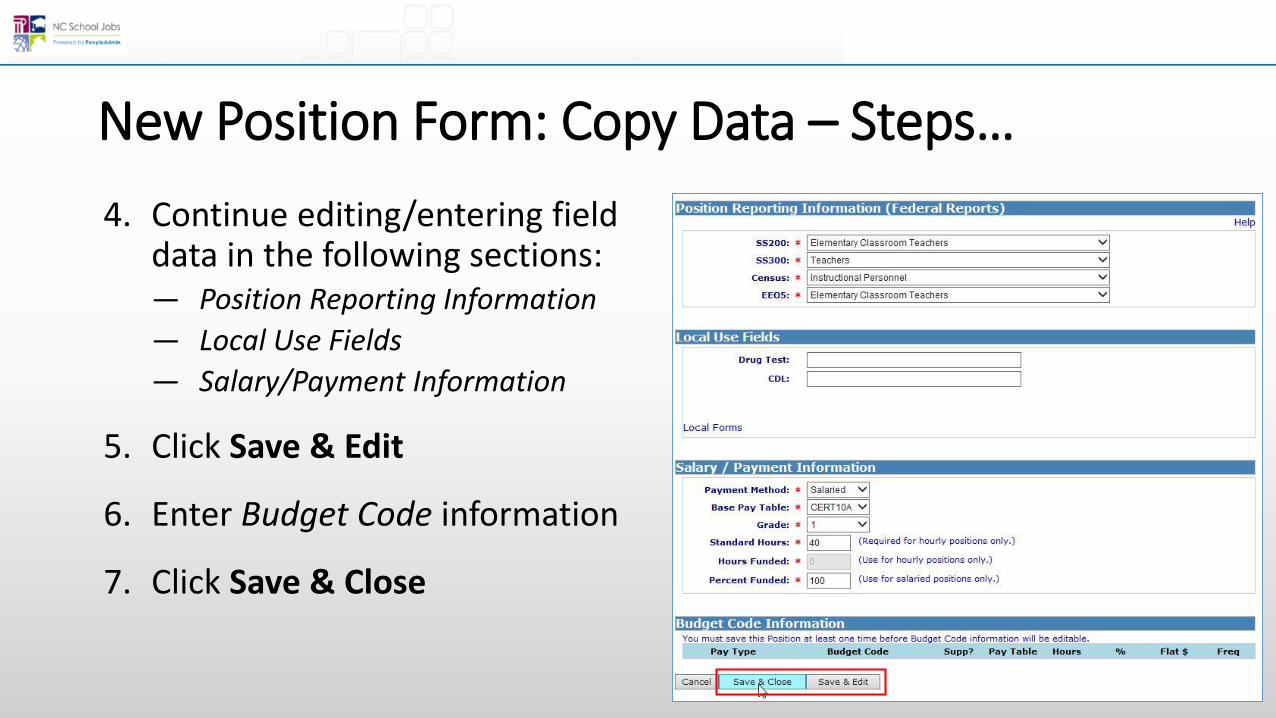
New Position Form: Copy Data – Steps…
4. Continue editing/entering field data in the following sections: — Position Reporting Information
— Local Use Fields
— Salary/Payment Information
5. Click Save & Edit
6. Enter Budget Code information
7. Click Save & Close
Posting Job Orders to NC SchoolJobspowered by PeopleAdmin
Reminders
Positions created in HRMS are the basis for Job Orders that are available in NC SchoolJobs powered by PeopleAdmin.
Positions created in HRMS are imported into NC School Jobs –this process takes 1 ½ to 2 hours.
Once a job order in NC SchoolJobs is activated, it will appear on your job board unless the order has a future date.
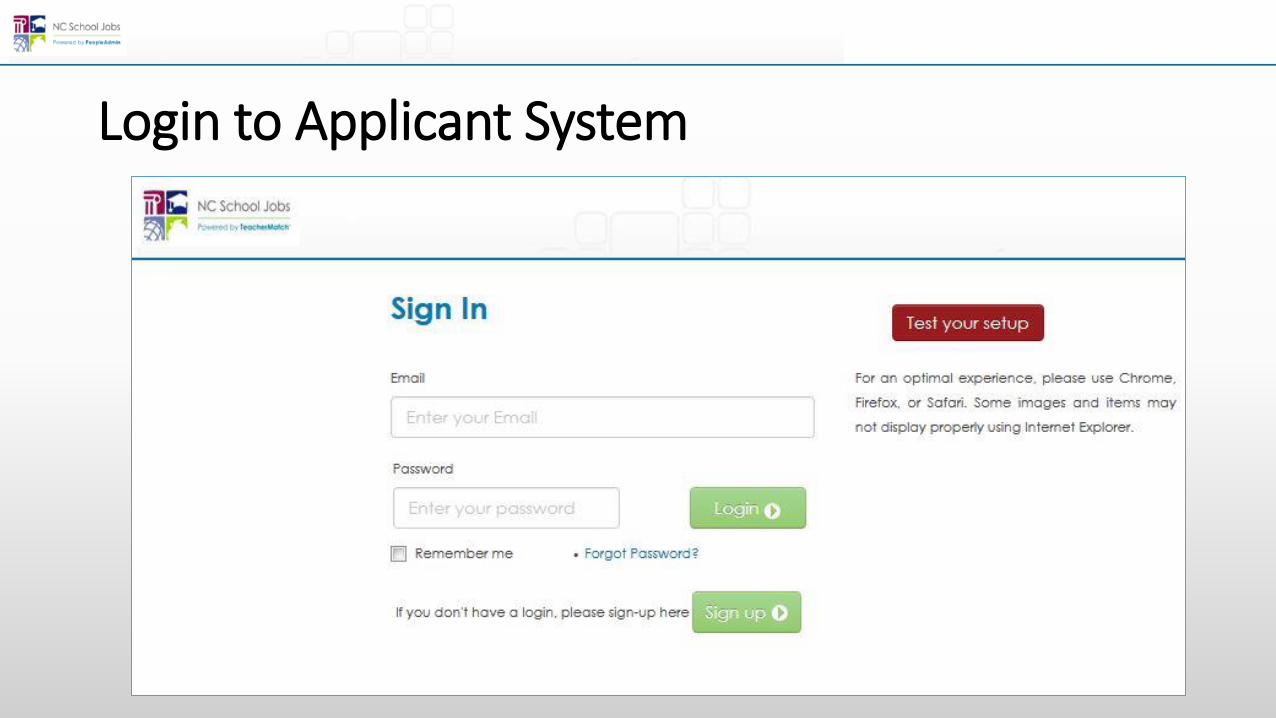
Login to Applicant System

Applicant System Landing Page
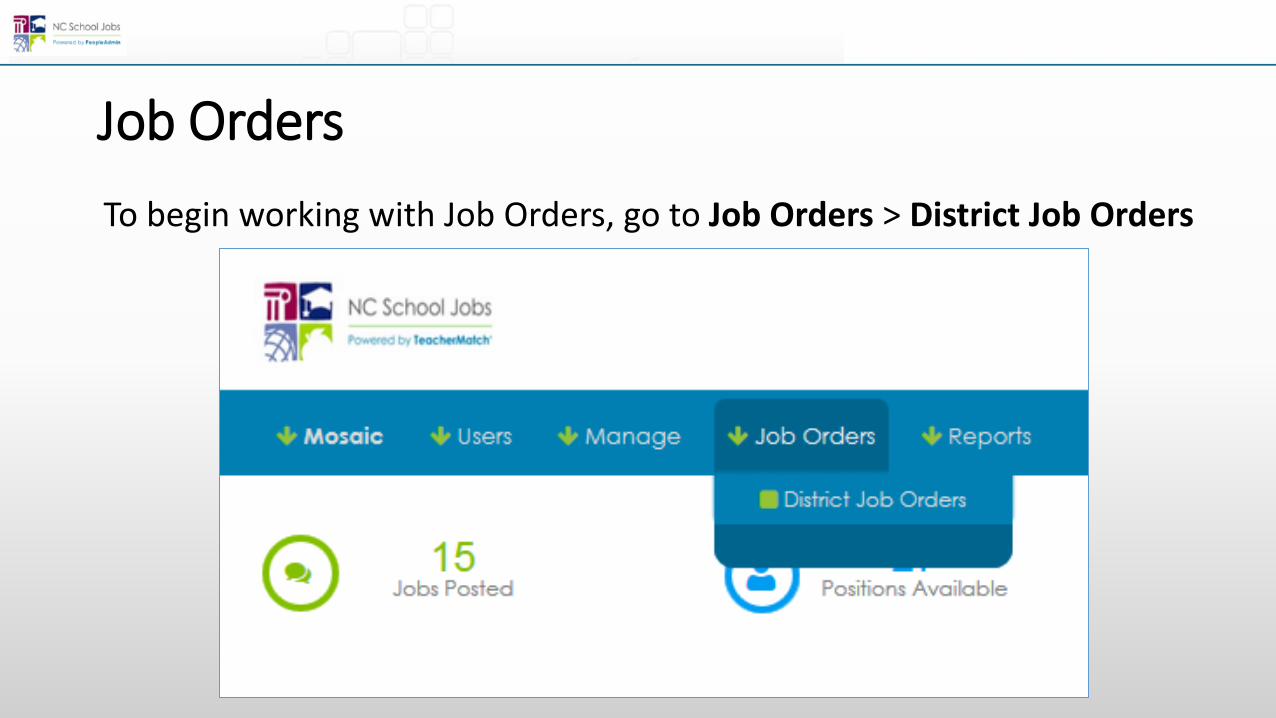
Job Orders
To begin working with Job Orders, go to Job Orders > District Job Orders
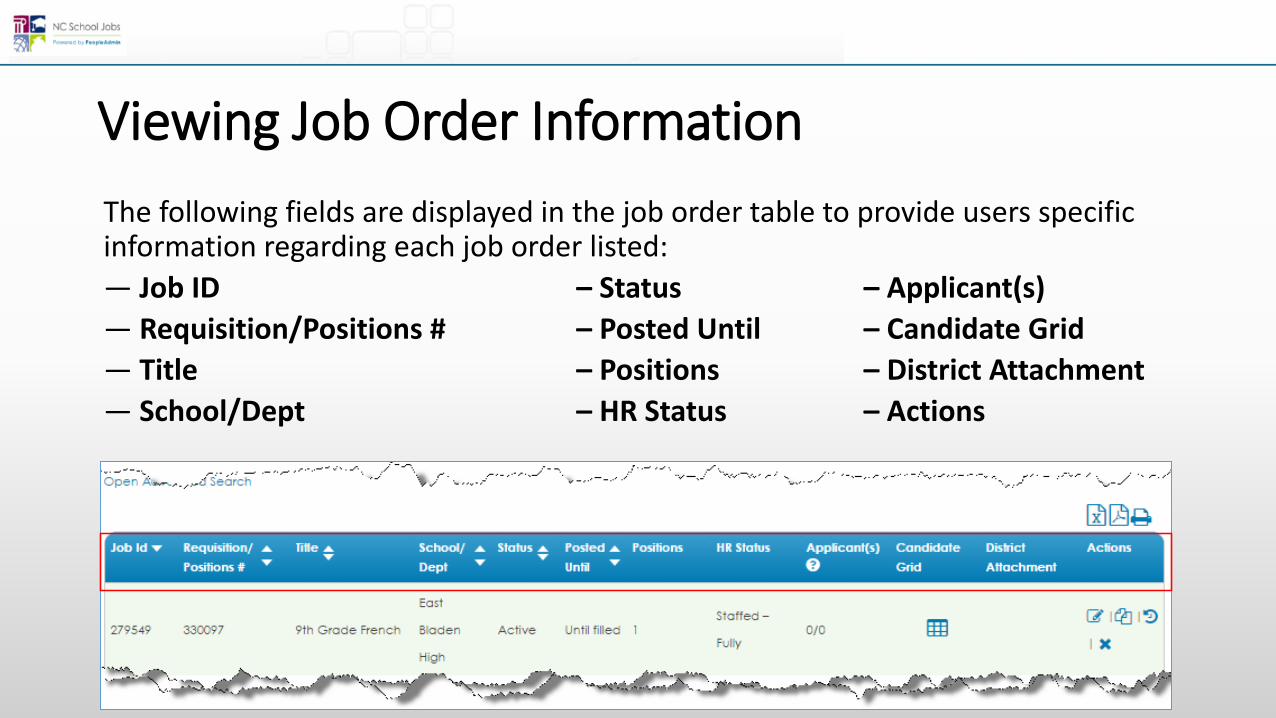
Viewing Job Order Information
The following fields are displayed in the job order table to provide users specific information regarding each job order listed:
— Job ID – Status – Applicant(s)
— Requisition/Positions # – Posted Until – Candidate Grid
— Title – Positions – District Attachment
— School/Dept – HR Status – Actions
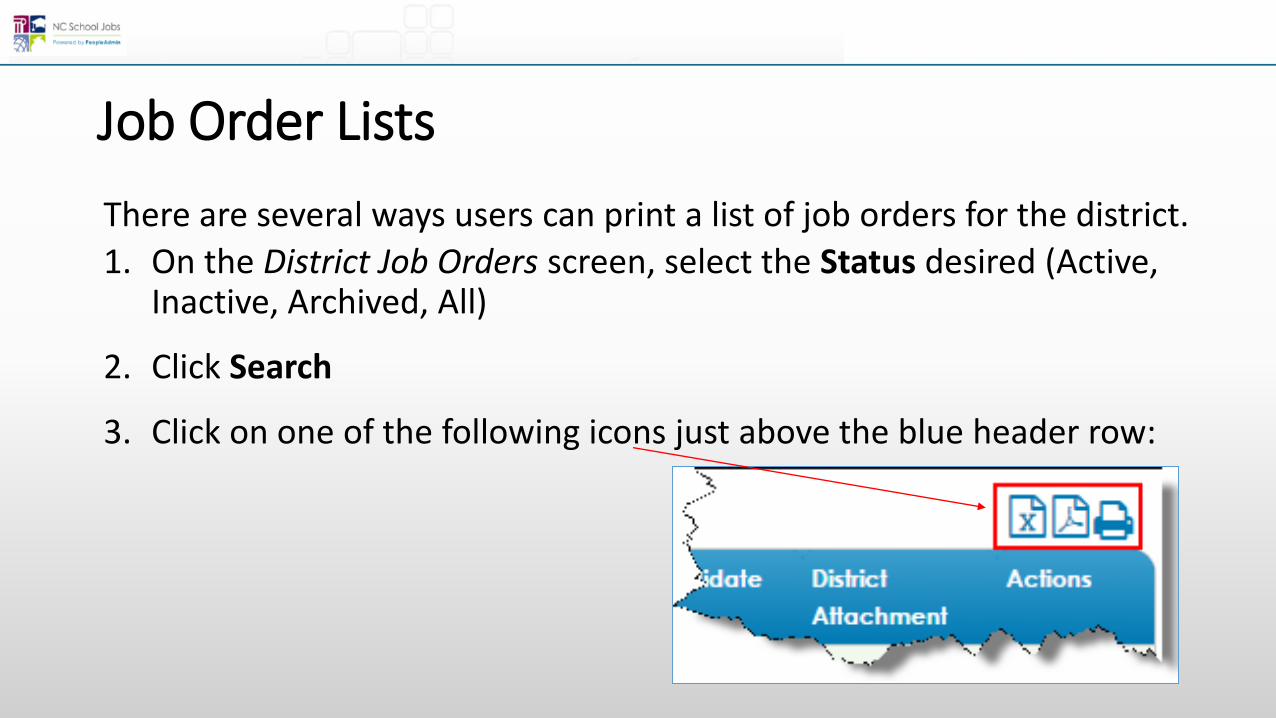
Job Order Lists
There are several ways users can print a list of job orders for the district.
1. On the District Job Orders screen, select the Status desired (Active, Inactive, Archived, All)
2. Click Search
3. Click on one of the following icons just above the blue header row:
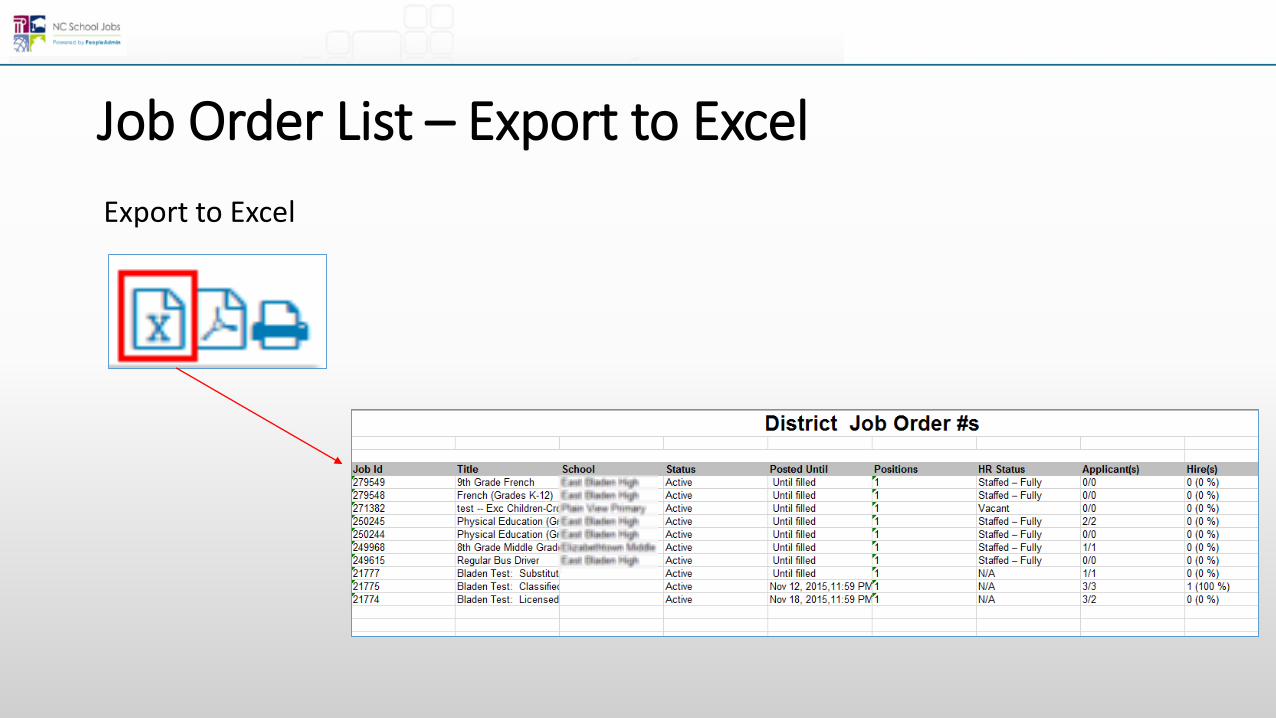
Job Order List – Export to Excel
Export to Excel

Job Order Lists – Export to PDF
Export to PDF
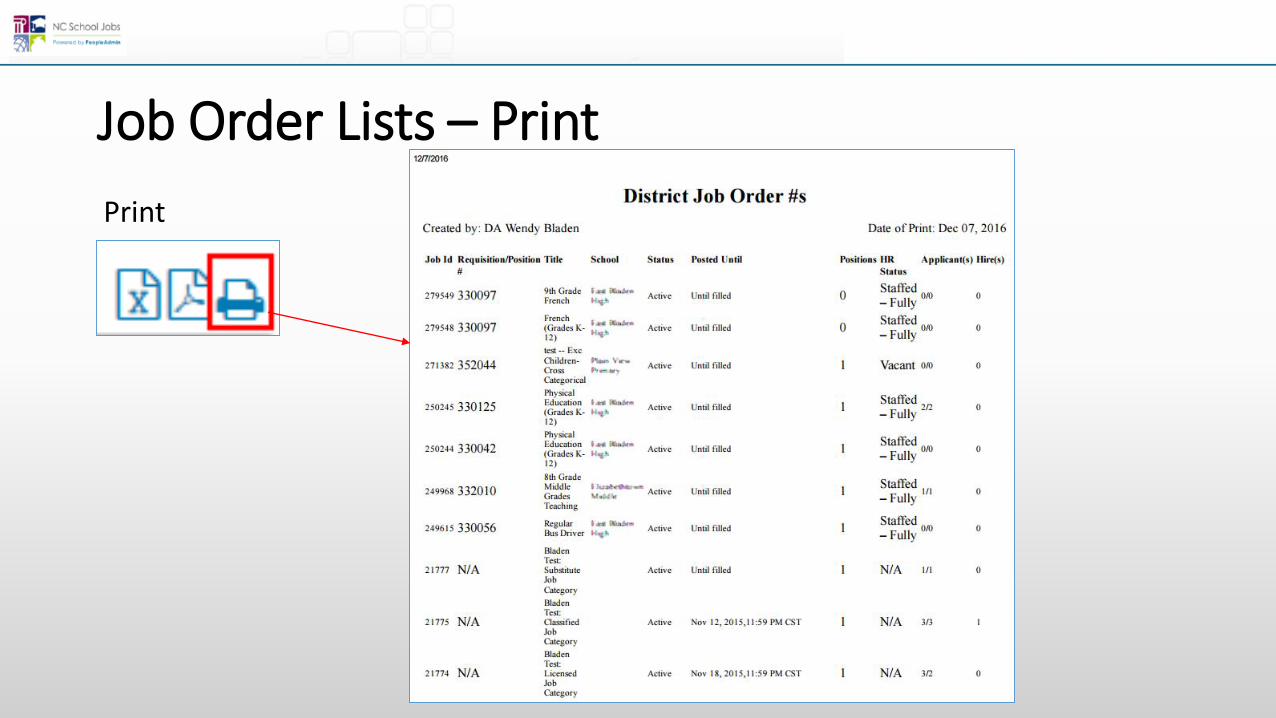
Job Order Lists – Print
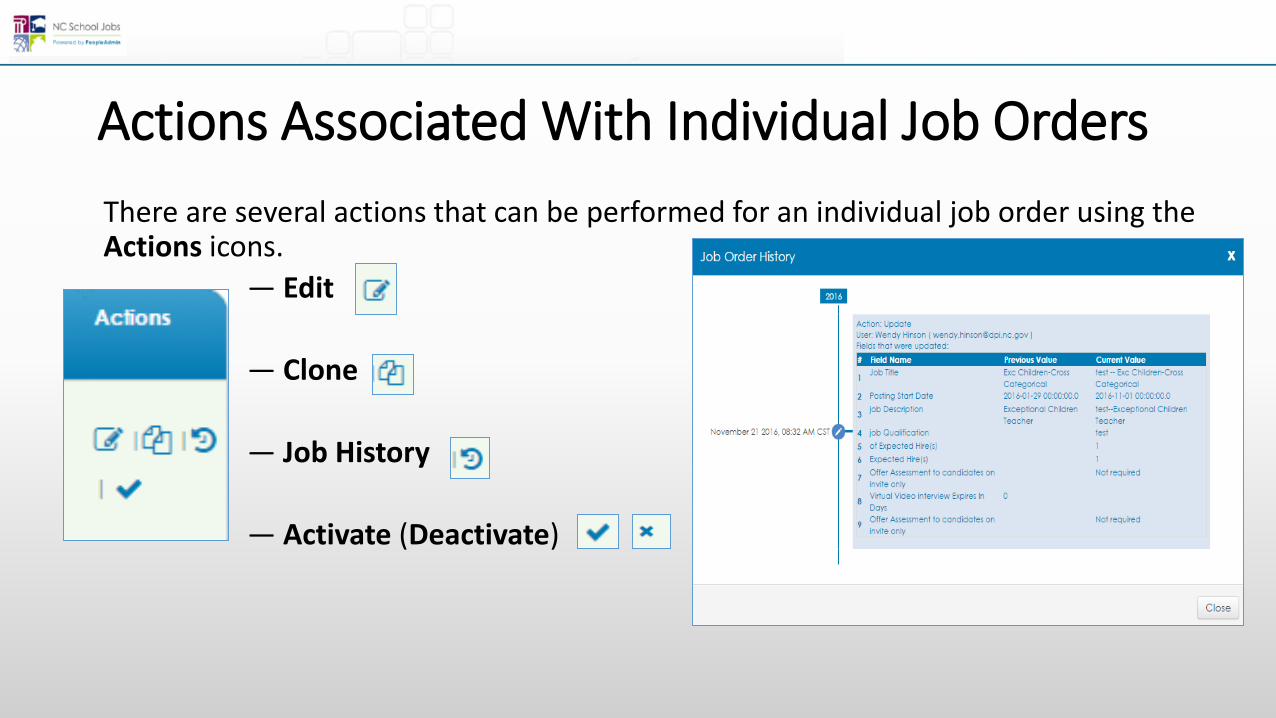
Actions Associated With Individual Job Orders
There are several actions that can be performed for an individual job order using the Actions icons.
— Edit
— Clone
— Job History
— Activate (Deactivate)
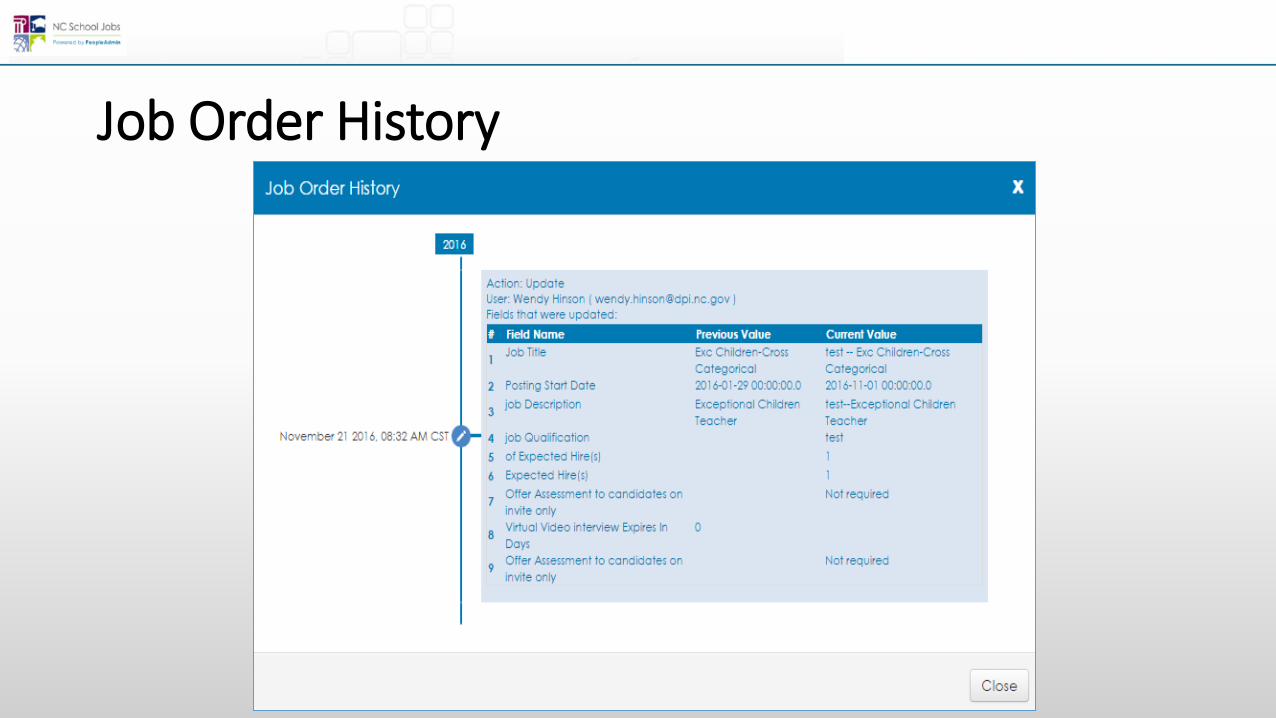
Job Order History

Job Orders – Edit or Clone
Job Orders – Important
Job Orders can be edited or cloned.
If an order has no previously hired candidate it can be edited.
—Initially when positions are moved from HRMS to the applicant system, there will not be any hired candidates associated with the job orders. Therefore, users should edit the order to activate.
—Newly created positions in HRMS will not have a hired candidate associated. These orders should also be edited.
Job Orders – Important…
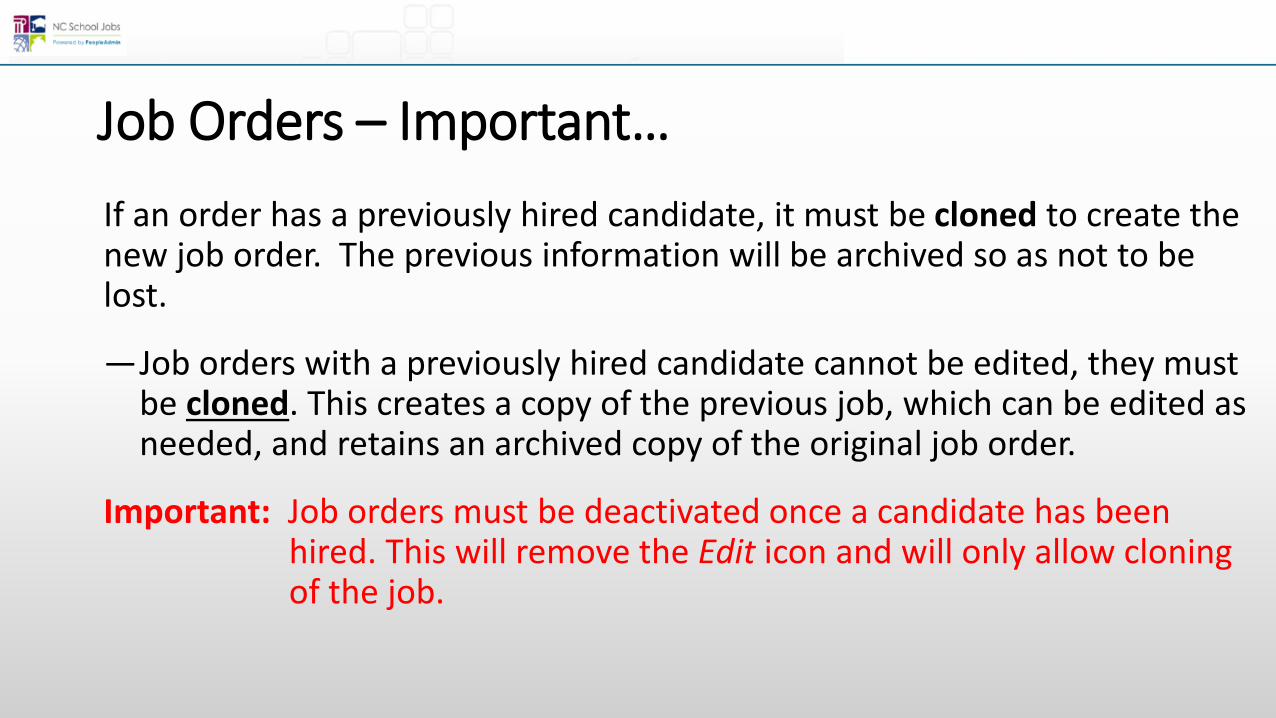
If an order has a previously hired candidate, it must be cloned to create the new job order. The previous information will be archived so as not to be lost.
—Job orders with a previously hired candidate cannot be edited, they must be cloned. This creates a copy of the previous job, which can be edited as needed, and retains an archived copy of the original job order.
Important: Job orders must be deactivated once a candidate has been hired. This will remove the Edit icon and will only allow cloning of the job.
Editing/Posting Job Orders

1. Click on Job Orders then District Job Orders in the blue navigation bar
Edit/Post a Job Order – Steps
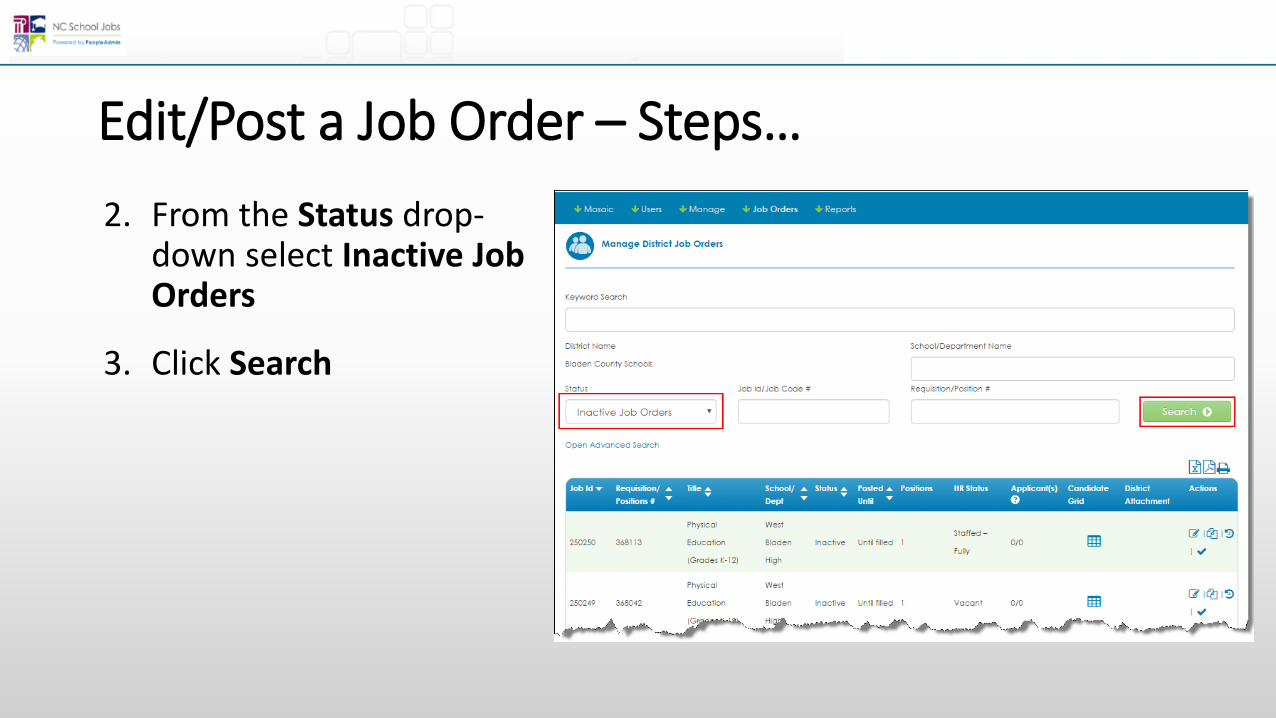
2. From the Status drop-down select Inactive Job Orders
3. Click Search
Edit/Post a Job Order – Steps…
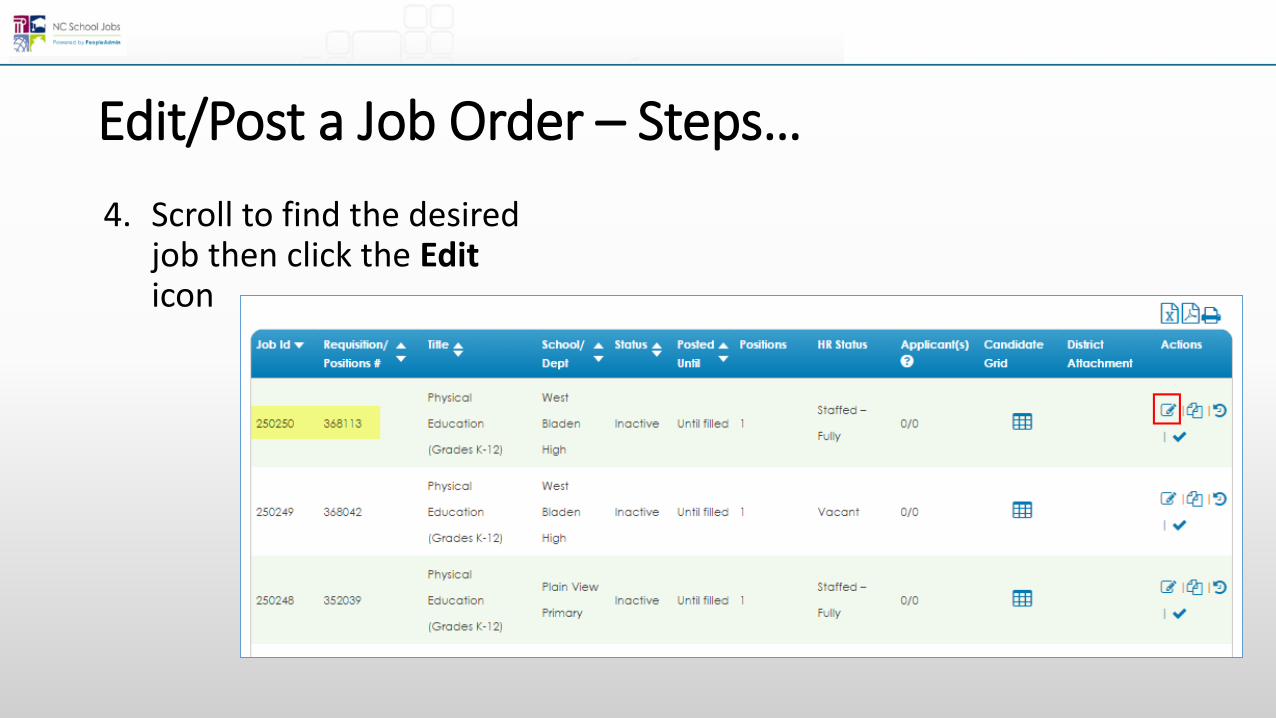
4. Scroll to find the desired job then click the Editicon
Edit/Post a Job Order – Steps…
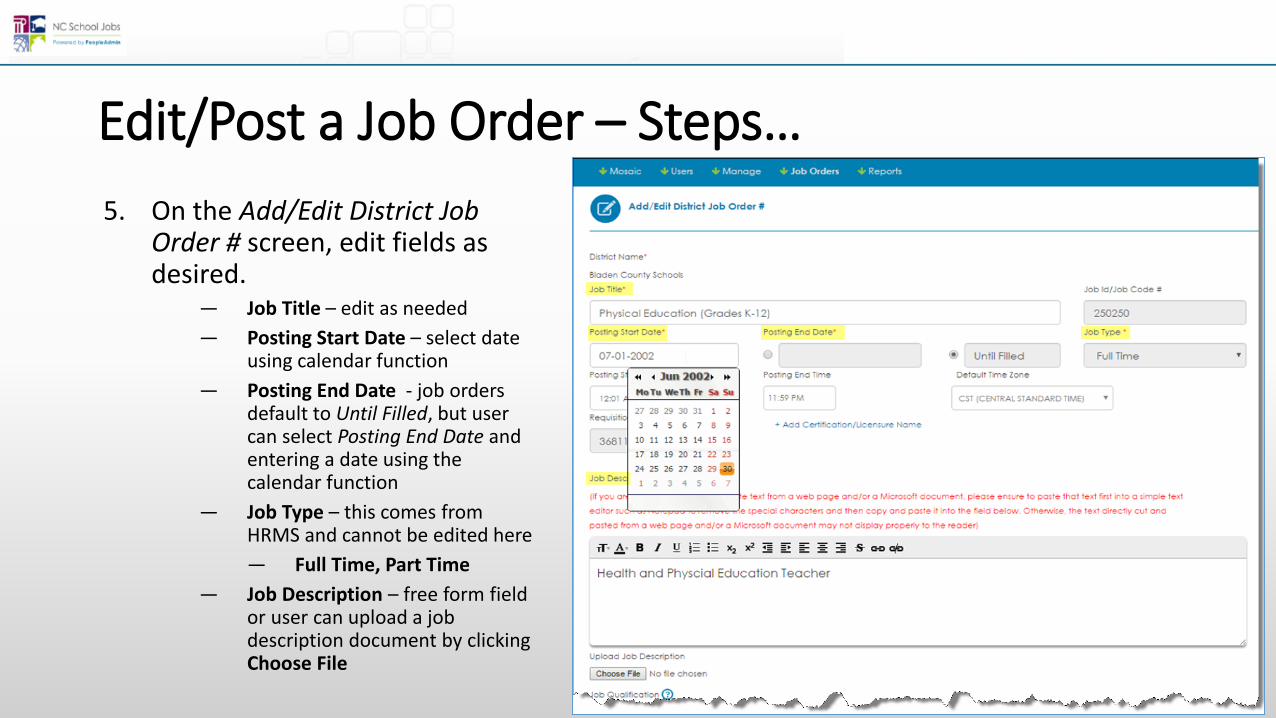
5. On the Add/Edit District Job Order # screen, edit fields as desired.
— Job Title – edit as needed
— Posting Start Date – select date using calendar function
— Posting End Date - job orders default to Until Filled, but user can select Posting End Date and entering a date using the calendar function
— Job Type – this comes from HRMS and cannot be edited here
— Full Time, Part Time
— Job Description – free form field or user can upload a job description document by clicking Choose File
Edit/Post a Job Order – Steps…
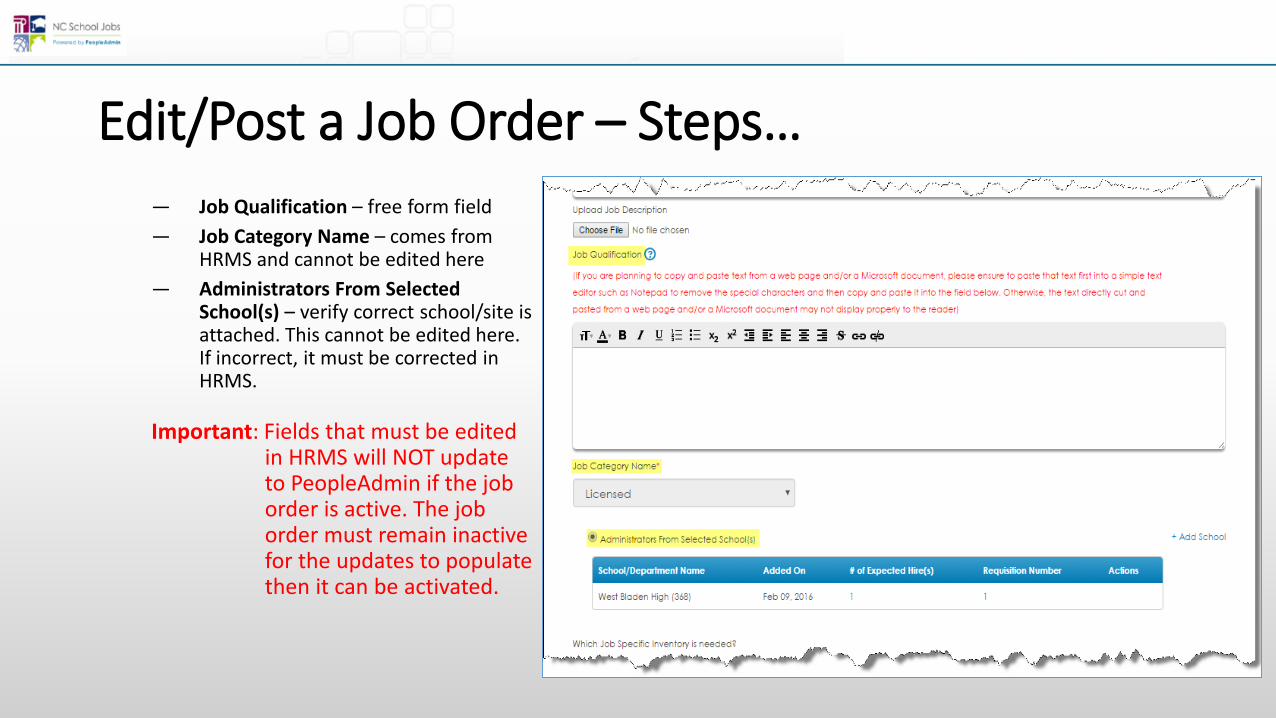
— Job Qualification – free form field
— Job Category Name – comes from HRMS and cannot be edited here
— Administrators From Selected School(s) – verify correct school/site is attached. This cannot be edited here. If incorrect, it must be corrected in HRMS.
Important: Fields that must be edited in HRMS will NOT update to PeopleAdmin if the job order is active. The job order must remain inactive for the updates to populate then it can be activated.
Edit/Post a Job Order – Steps…
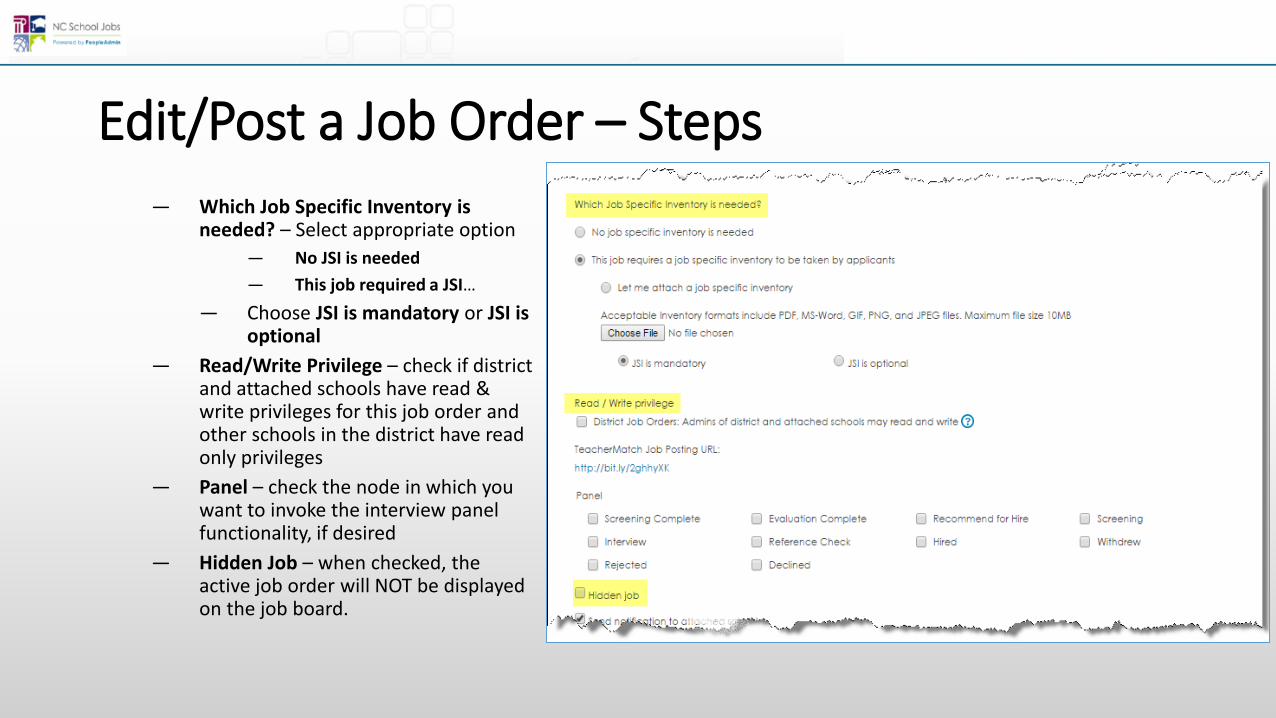
— Which Job Specific Inventory is needed? – Select appropriate option
— No JSI is needed
— This job required a JSI…
— Choose JSI is mandatory or JSI is optional
— Read/Write Privilege – check if district and attached schools have read & write privileges for this job order and other schools in the district have read only privileges
— Panel – check the node in which you want to invoke the interview panel functionality, if desired
— Hidden Job – when checked, the active job order will NOT be displayed on the job board.
Edit/Post a Job Order – Steps

— Send notification to attached schools
— Re-direct URL – applicants will be directed to this url once they complete an application
6. Click one of the following:— Save Job Order – this saves the
information but will not activate/post the job on the job board
— Save & Activate – this option saves the information and posts the job on the job board.
Edit/Post a Job Order – Steps…
Note: If a job order has a future Posting Start Date it will not display on the job board until that date.
Clone/Posting Job Orders
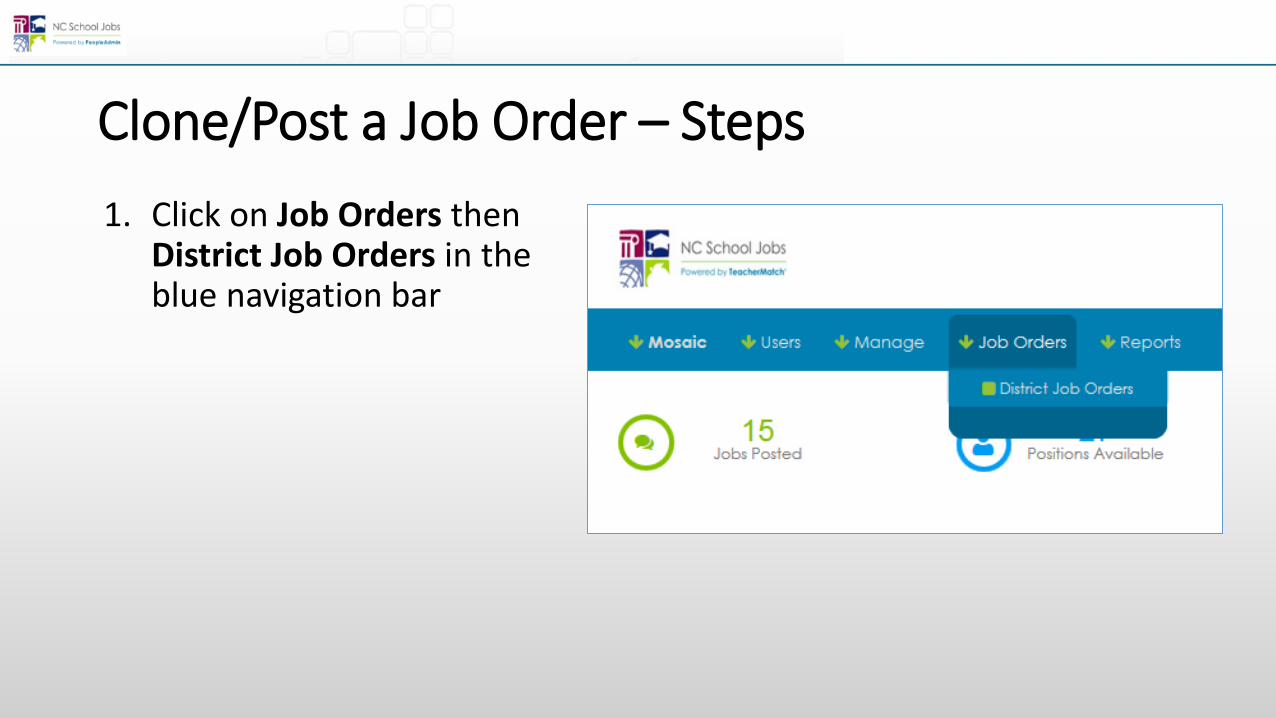
1. Click on Job Orders then District Job Orders in the blue navigation bar
Clone/Post a Job Order – Steps

2. From the Status drop-down select Inactive Job Orders
Job orders should be deactivated once a candidate is hired.
2. Click Search
Clone/Post a Job Order – Steps…
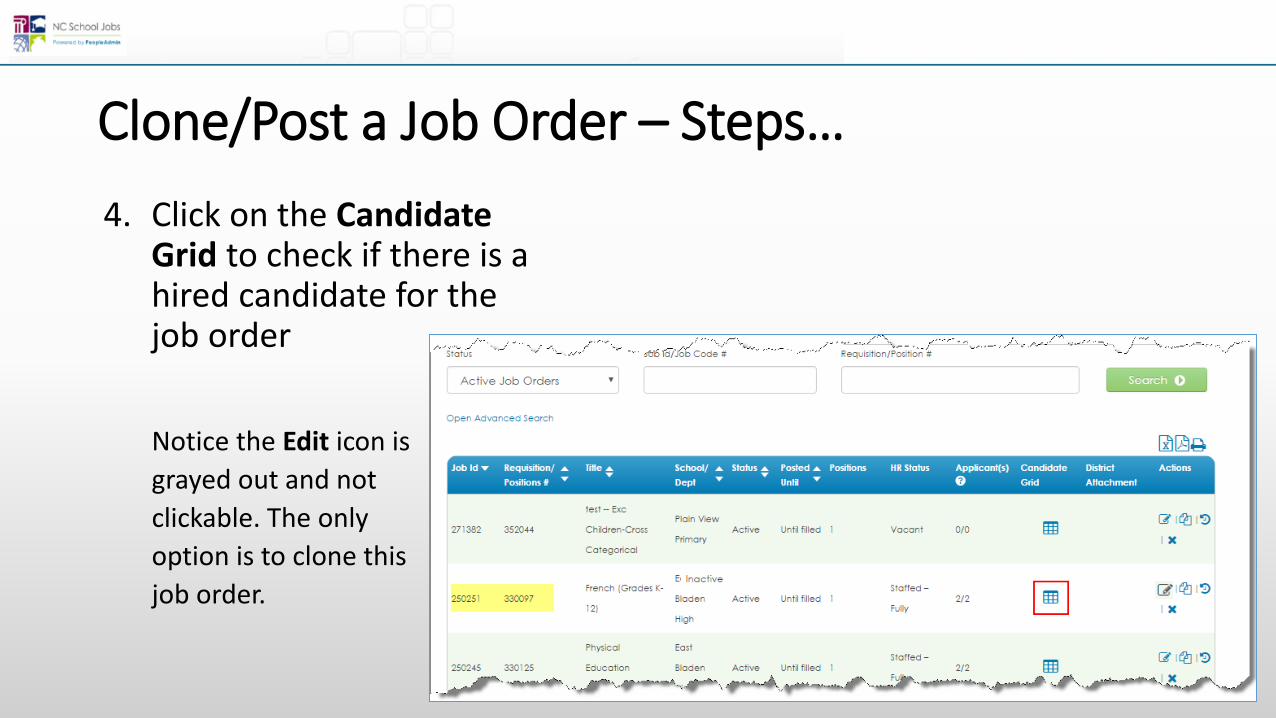
4. Click on the CandidateGrid to check if there is a hired candidate for the job order
Notice the Edit icon is
grayed out and not
clickable. The only
option is to clone this
job order.
Clone/Post a Job Order – Steps…

This job order has a previously hired candidate; therefore, the job order must be cloned instead of edited.
Check the Hired Candidates section to verify there is a hired candidate for the job. A hired candidate is denoted with Hired and a graduation cap in the Statusfield.
Clone/Post a Job Order – Steps…
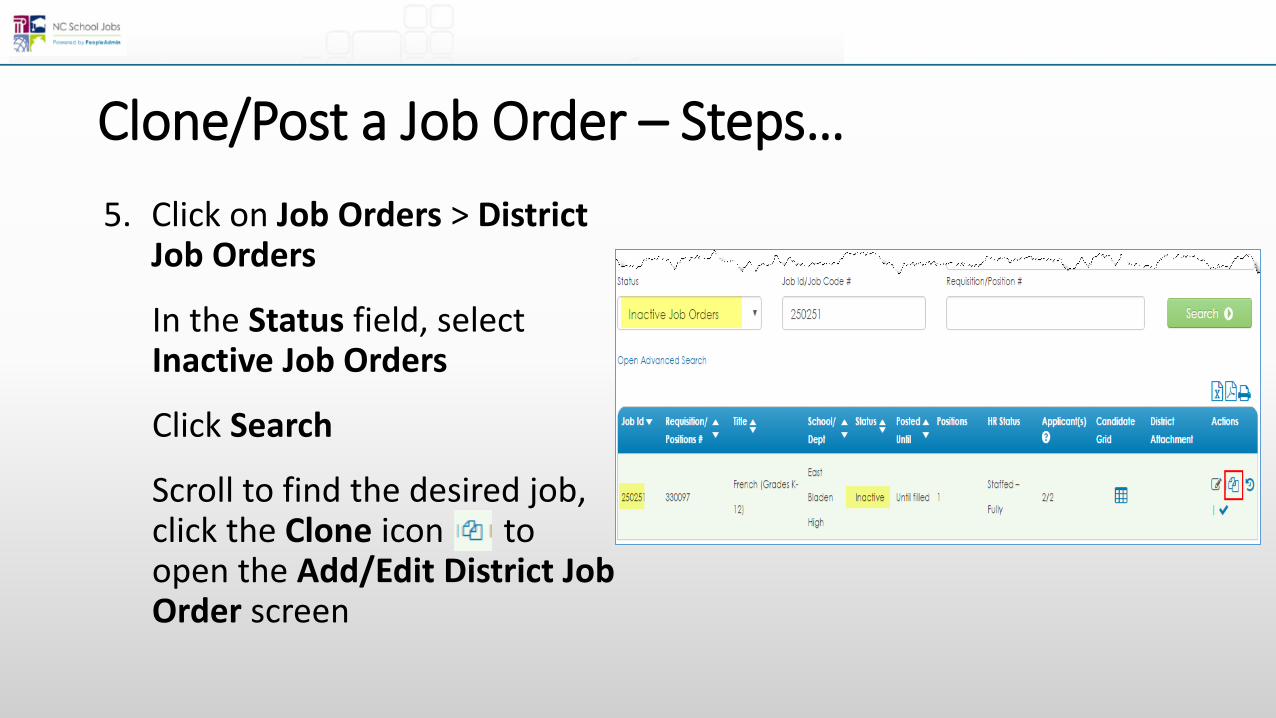
5. Click on Job Orders > District Job Orders
In the Status field, select Inactive Job Orders
Click Search
Scroll to find the desired job, click the Clone icon to open the Add/Edit District Job Order screen
Clone/Post a Job Order – Steps…
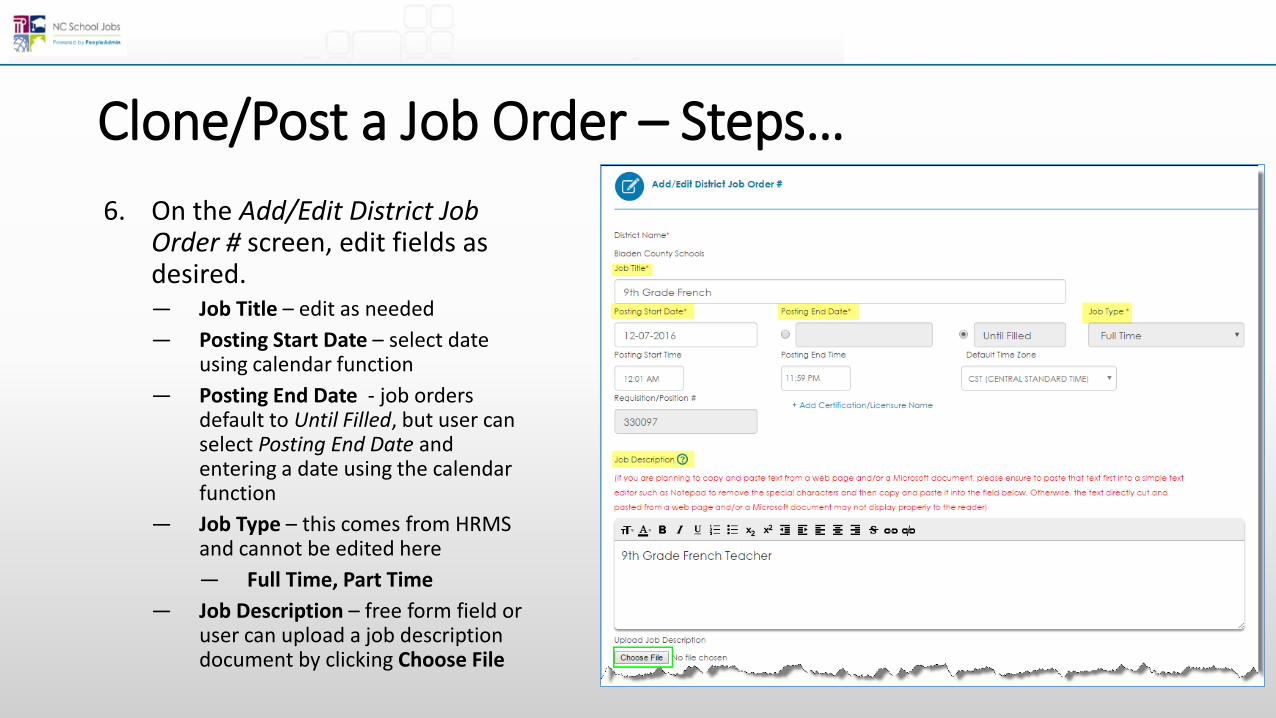
6. On the Add/Edit District Job Order # screen, edit fields as desired.— Job Title – edit as needed
— Posting Start Date – select date using calendar function
— Posting End Date - job orders default to Until Filled, but user can select Posting End Date and entering a date using the calendar function
— Job Type – this comes from HRMS and cannot be edited here
— Full Time, Part Time
— Job Description – free form field or user can upload a job description document by clicking Choose File
Clone/Post a Job Order – Steps…

— Job Qualification – free form field
— Job Category Name – comes from HRMS and cannot be edited here
— Administrators From Selected School(s) – verify correct school/site is attached. This cannot be edited here. If incorrect, it must be corrected in HRMS.
Important: Fields that must be edited in HRMS will NOT update to PeopleAdmin if the job order is active. The job order must remain inactive for the updates to populate then it can be activated.
Clone/Post a Job Order – Steps…
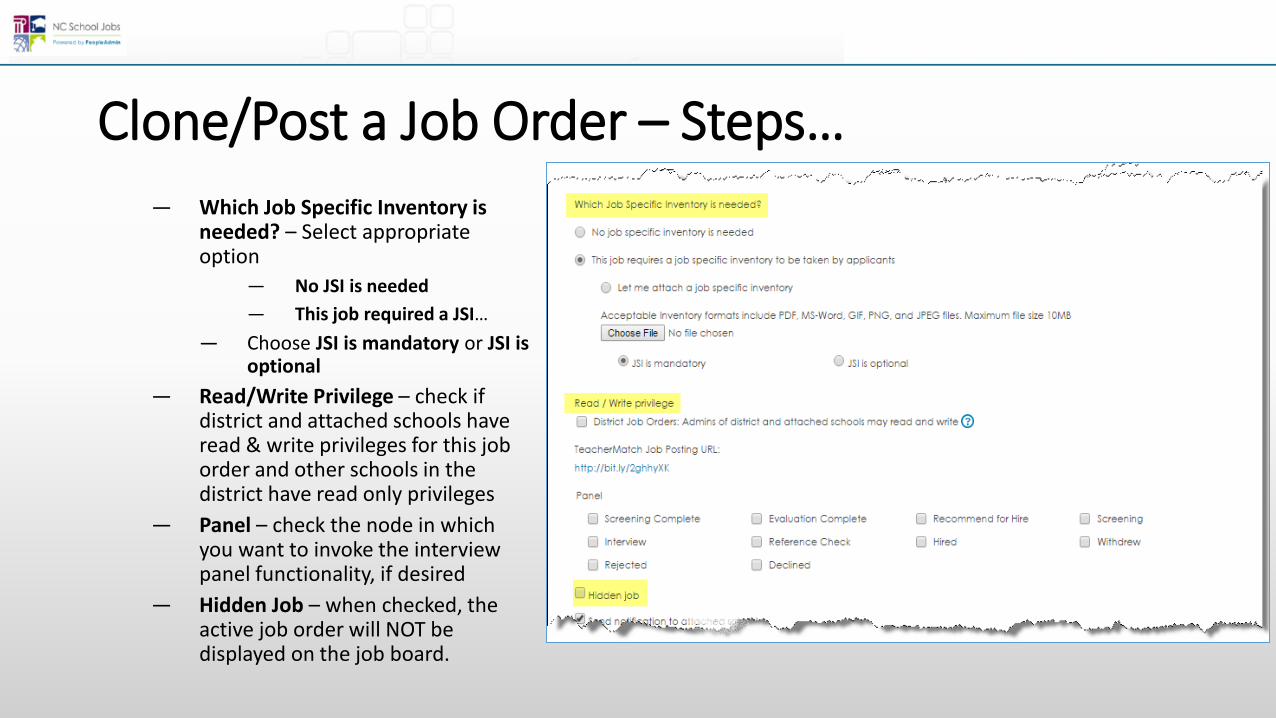
— Which Job Specific Inventory is needed? – Select appropriate option
— No JSI is needed
— This job required a JSI…
— Choose JSI is mandatory or JSI is optional
— Read/Write Privilege – check if district and attached schools have read & write privileges for this job order and other schools in the district have read only privileges
— Panel – check the node in which you want to invoke the interview panel functionality, if desired
— Hidden Job – when checked, the active job order will NOT be displayed on the job board.
Clone/Post a Job Order – Steps…
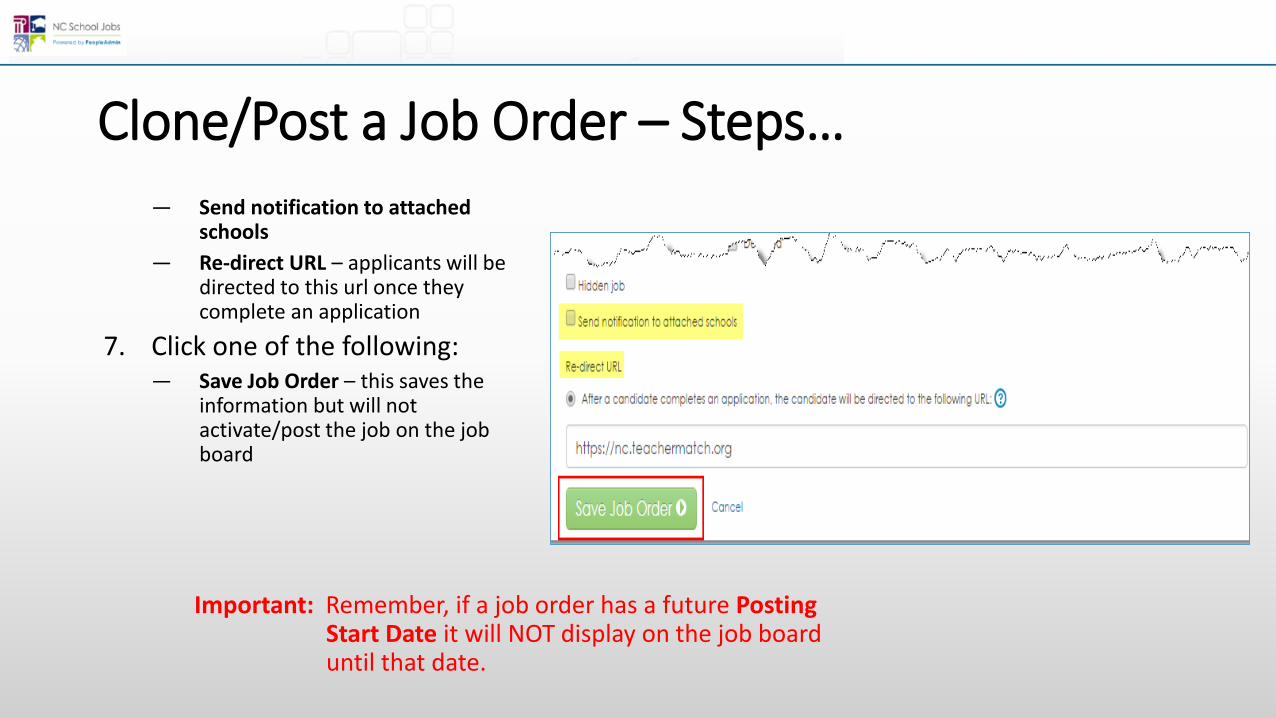
— Send notification to attached schools
— Re-direct URL – applicants will be directed to this url once they complete an application
7. Click one of the following:— Save Job Order – this saves the
information but will not activate/post the job on the job board
Clone/Post a Job Order – Steps…
Important: Remember, if a job order has a future Posting Start Date it will NOT display on the job board until that date.
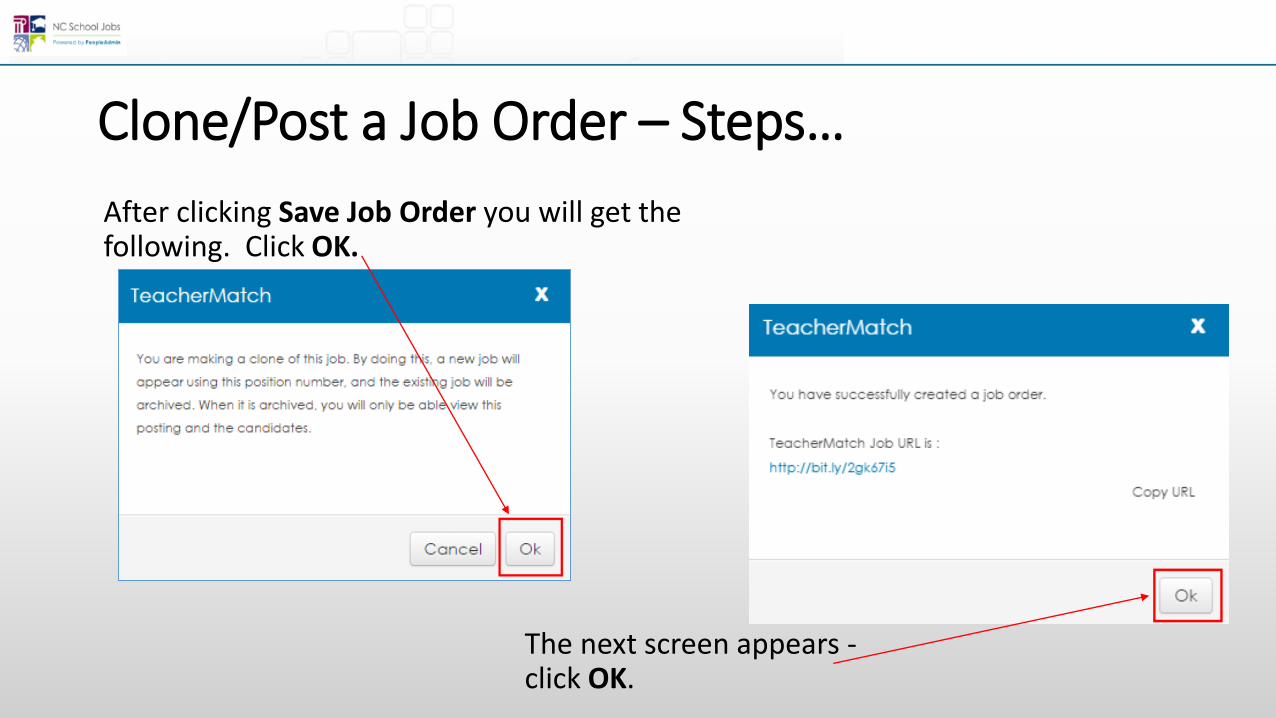
After clicking Save Job Order you will get the following. Click OK.
Clone/Post a Job Order – Steps…
The next screen appears -click OK.

New Job Order
Archived Job Order
Posting Jobs on Social Media
Social Media
Once configured, districts can automatically post jobs to social media sites when activating positions.
Social media can be a powerful recruitment tool. While establishing a social media program at your LEA requires an initial outlay of time to set up, it can result in new methods to reach potential candidates with minimal maintenance. If you do not currently use social media as part of your recruiting effort, take a moment to plan a program. Some of the key ingredients of this plan are: Branding, Stakeholder Identification/Engagement and determining the appropriate social media channels to use.
Social Media…
More information can be found on using social media to engage potential candidates on the Wiki at:
http://ncschooljobs.ncdpi.wikispaces.net/Using+Social+Media+to+Engage+Potential+Candidates#Plan%20a%20Program-Resources

Questions?
Note: PeopleAdmin contains functionality that is not currently used by NC. NC DPI has only been trained on the components we are utilizing at this time. If a district determines they would like to utilize additional existing functionality, please experiment with it in Cloud and know we are unable to support functionality on which we have not been trained.

HRMS Support Contact Information
HRMS Help Desk: (919) 807-HELP (807-4357, option 3, then option 2)
HRMS Communication Site: http://hrms.dpi.state.nc.us/
SchoolJobs Communication Site: http://ncschooljobs.ncdpi.wikispaces.net/HOME+-+NC+SchoolJobs