Guide To Creating Academic Posters Using Microsoft PowerPoint ...
Creating Large Format Posters Using PowerPoint
The ideal poster is designed to… • Tell a story • Provide a brief overview of your work • Initiate discussion • Stand alone when you’re not there to provide an explanation
Before you begin working in PowerPoint, sketch out your poster on paper. Determine what three to four key points you want the poster to express. Decide on the size, background and layout of your poster. Posters can be created with as few or as many descriptive sections as you want. Remember that simple is usually better.
The flow of your poster should be from top left to the bottom right. The movement of the eye over the poster should be natural (down columns or along rows). Use arrows, pointing hands, numbers or letters to clarify the sequence or flow of the poster. Some presenters will number the sections in sequence to guide a reader through the poster.
Poster Setup You will be making just ONE slide in PowerPoint for your poster. It will be a Custom slide with the page size set to the same size of the poster. For example, if you want your poster to be 36” x 48”, begin by setting the page size in PowerPoint to 36” x 48”. Do this first before you begin creating the poster!! Failure to do so may result in a poster that is not printable, or will not be printed in the size you want.
The new Morgan Library plotters are 42” wide. Therefore, posters to be printed on the Morgan Library plotters can be no more than 42” on one dimension (the plotter limitation) and up to 56” on the other dimension (the PowerPoint limitation). You also need to leave a 1 inch margin around the edges of the poster to prevent cropping.
Prices Charges for printing are per linear foot. Current rates can be found on our web site. When both dimensions are smaller than 42,” posters will be rotated during the printing process to maximize the width of the plotter paper (42”) and minimize the linear feet that are printed. For example, a 36” by 42” poster would count as 3 linear feet and would be priced as such.

Creating a New Poster
Create a new poster by clicking the Office Button in the upper left corner of the screen and selecting New. TIP: Press Ctrl N (N for New) to launch a New presentation.
From the New Presentation dialog box, click on Microsoft Office Online and click on More Categories. Under More categories, choose Posters.
Choose a poster design that most nearly fits your subject matter and size requirements.
If you do not see a poster design that fits, you can create your poster by going to the Office Button (or CTRN + N) for New and create a Blank Presentation.

Page Setup Switch to the Design tab and click on Page Setup. Change the drop-down for Slides sized for to be Custom. Enter the dimensions of your poster in the width and height boxes. Remember, PowerPoint has a maximum custom size of 56 inches by 56 inches, and the Morgan Library plotter can only print one dimension of 42 inches or smaller. Under Number of slides from choose 1. Select the Orientation for the Slides to be Portrait or Landscape. Click on OK to return to your slide.
Apply or Change the Design Theme You can apply a design theme to a Blank presentation or change the design theme from the Microsoft Office Online templates. From the Design tab, go to the Themes group and mouse over a Theme to get a Live Preview. AVOID design themes with a gradient background fill color, especially black, as this will not print well. There will be very thin lines running throughout the background of the finished poster due to the way PowerPoint draws gradient lines. The lines will not be seen on the computer screen but will show up on the finished poster. To correct this potential problem, click on Background Styles in the Background group, go to Format Background and change the background Fill to be a Solid fill. You can adjust the color by clicking on the Color drop-down.
If you have chosen a Design theme with graphics, you can turn them off in your poster by going to the Background Group of your Design tab and clicking on Hide Background graphics. To apply a design theme after you’ve started your poster, switch to the Design tab and choose a Theme. However, it usually works
best if you select the design theme first and then create your poster. Changing the design theme later will change fonts and layouts, and may cause undesired results
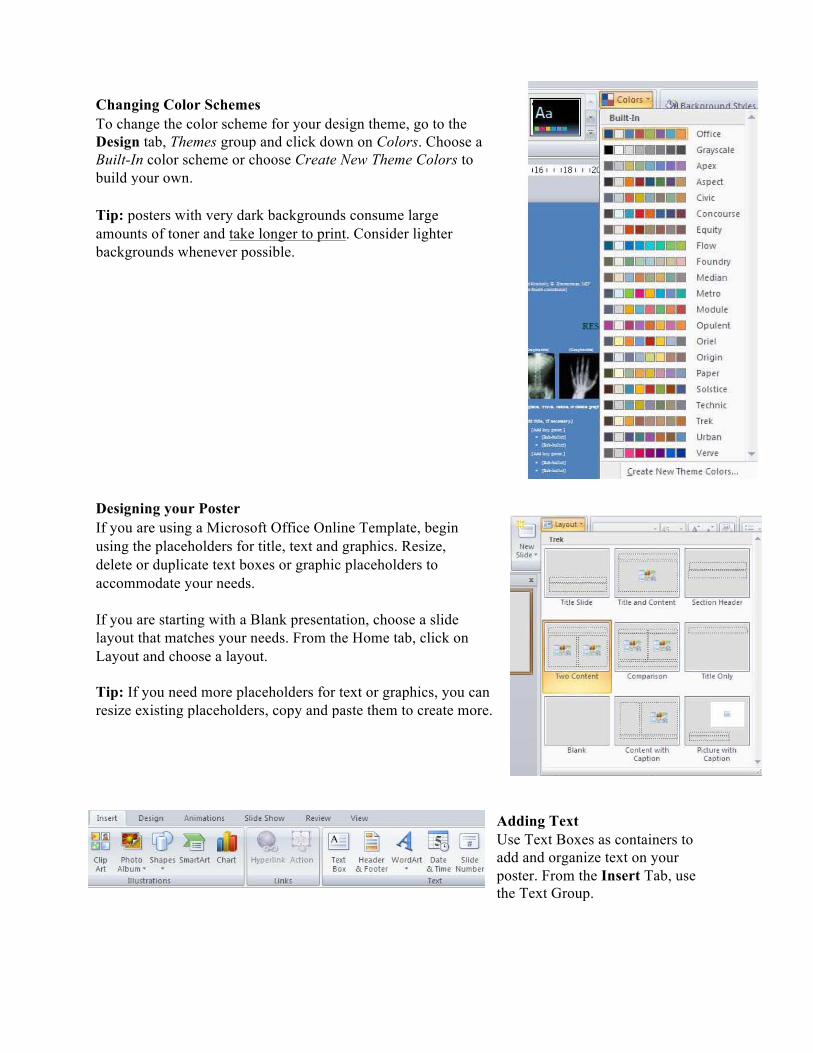
Changing Color Schemes To change the color scheme for your design theme, go to the Design tab, Themes group and click down on Colors. Choose a Built-In color scheme or choose Create New Theme Colors to build your own.
Tip: posters with very dark backgrounds consume large amounts of toner and take longer to print. Consider lighter backgrounds whenever possible.
Designing your Poster If you are using a Microsoft Office Online Template, begin using the placeholders for title, text and graphics. Resize, delete or duplicate text boxes or graphic placeholders to accommodate your needs.
If you are starting with a Blank presentation, choose a slide layout that matches your needs. From the Home tab, click on Layout and choose a layout.
Tip: If you need more placeholders for text or graphics, you can resize existing placeholders, copy and paste them to create more.
Adding Text Use Text Boxes as containers to add and organize text on your poster. From the Insert Tab, use the Text Group.

Click on the Text Box icon and using your left mouse button, drag and create a text box on your poster. Type the text in the text box.
Changing Fonts/Size/Style Select the text then click on the floating toolbar to change any of the font attributes (color, size, bold, etc.) or select a different font type. You can also go to the Home tab and choose the Font group.
Tip: To select all text in a textbox or placeholder to change the attributes for all the text within a textbox or placeholder, click once on the text to select the box. The outline will turn solid. Click a second time to select all text within that box then choose the attributes to be changed.
Fonts Fonts dictate the look and style of the poster but you should use multiple font styles sparingly. Consistency creates professionalism, while too many fonts create clutter. You will have to adjust the font size depending on the amount of text in your poster and the style of font you choose. Below are suggestions for types of fonts and sizes. Please keep in mind that these are only suggestions and that many more fonts are available that may work equally as well.
The most commonly used fonts are Times New Roman and Arial. (See Font Note on page 9.) For the title, consider using a large, bold Sans-Serif type font, such as Arial Black, Franklin Gothic Heavy, Tahoma, Trebuchet, or Verdana. Make the title Font size between 72-120 points.
For the subtitles, use the same font as your title or choose a different Sans-Serif font. Make the font size smaller than the title; somewhere between 48-80 points.
For the section headers (Abstract, methods, results, etc.) use the same font as your title or subtitle. Make the font size approximately 50% larger than the body text; between 36-72 points. Whatever size you choose, be sure to make all the section headers the same font size.
For body text, choose a Sans-Serif type font that’s very readable. Make the font Size between 24-48 points. Whatever size you choose, be sure to make all of the body text the same font size throughout the entire poster.
Aligning Text You can align any text so that it looks best on the poster and adds weight to the point you are making. To change text alignment, highlight the desired text and from the Home tab, in the Paragraph group, click on Align Text, More Options, and Format Text Effects.

Inserting and Formatting Illustrations
The majority of the Illustration tools are located on the Insert tab, Illustrations Group.
Adding Graphics You can add Pictures such as scanned photos, illustrations or art created from other programs. Select the folder that contains the file, click on the file name and choose OK.
Images Pictures for use on a poster should be scanned at 150 dpi at 100% of the size that they will appear on the poster. Limit image resolution to 150 dpi. Higher resolution results in large file sizes which take longer to print or occasionally do not print at all. Pictures imported from web sites are low resolution (72 dpi) images. These images are made for on-screen presentations and Web page use only. They should not be imported directly to a poster. Images used from the Web would have to be resized and have the resolution reset in a photo editing program like Photoshop before they can be used on a poster. If the images are not resized they will become pixilated and distorted. Be cautious about stretching images or making them significantly larger than their original size. Instead, use images scanned and sized specifically to fit your poster needs (150 dpi scanned at 100% of the size to appear on the poster).
Do not enlarge pictures once they are inserted into PowerPoint. If the image used will be larger in the poster than the original, it should be enlarged when scanned. Scan the original at a higher resolution to make up for the size difference. Save the image as a high quality JPEG file. The preferred image format for all inserted images is JPEG. Pay close attention to alignment and size between groups of related images.
If you need to adjust the size of an imported picture or logo, hold down the Shift key on your keyboard and then click and drag with your mouse on one of the corners in order to scale it proportionally. This will keep it from being distorted. Do not allow pictures to hang over the edge of the poster. Remember you need a 1 inch margin. Use the picture cropping tool or scale the image down proportionally.
Tips on inserting images: A raster graphic (bitmap image) uses a grid of individual pixels where each pixel can be a different color or shade. Vector graphics use mathematical relationships between points and the paths connecting them to describe an image. These relationships can produce an image scalable to any size and detail. Bitmaps are best for photographs and images with subtle shading. Vector graphics are typically line art or illustrations, such as logos. CSU vector logos for print use are available at: http://graphicstandards.colostate.edu/index.asp?url=download_logos_print They can be resized to any size and the colors can be changed with a vector graphics editing program like Illustrator or Freehand. The EPS and PDF versions are best.
Insert Shapes
Select the Insert Shapes drop down arrow to add shapes to your poster. Each shape has properties and can be resized, moved, have a color applied, and adjust line width.

The shape properties will be displayed when the object is selected. A new context sensitive tab will appear for Drawing Tools, Format.
Smart Art
The Smart Art icon can be used to add diagrams to your poster. There are several diagrams to choose from and each can contain text and have it formatting attributes modified.
Tip: As you resize a diagram, all text inside the “text” area of the diagram will resize automatically to accommodate the new size.
Choose the icon and the diagram will be inserted on the poster.
Click on the “text” area to add/remove/edit text.
Charts
Insert a Chart Click the placeholder that you want to contain the chart, or go to the Insert tab, Illustrations Group, Chart In the Insert Chart dialog box, click a chart, and then click OK. Office Excel 2007 opens in a split window and displays sample data on a worksheet.
To replace the sample data, click a cell on the worksheet, and then type the data that you want.
You can also replace the sample axis labels in Column A and the legend entry name in Row 1. Note: After you update the worksheet, the chart in PowerPoint updates automatically with the new data. When you are finished inputting the data in Excel, on the File menu, click Close.
Note To change the data in a chart you've inserted, use the Edit Data command.
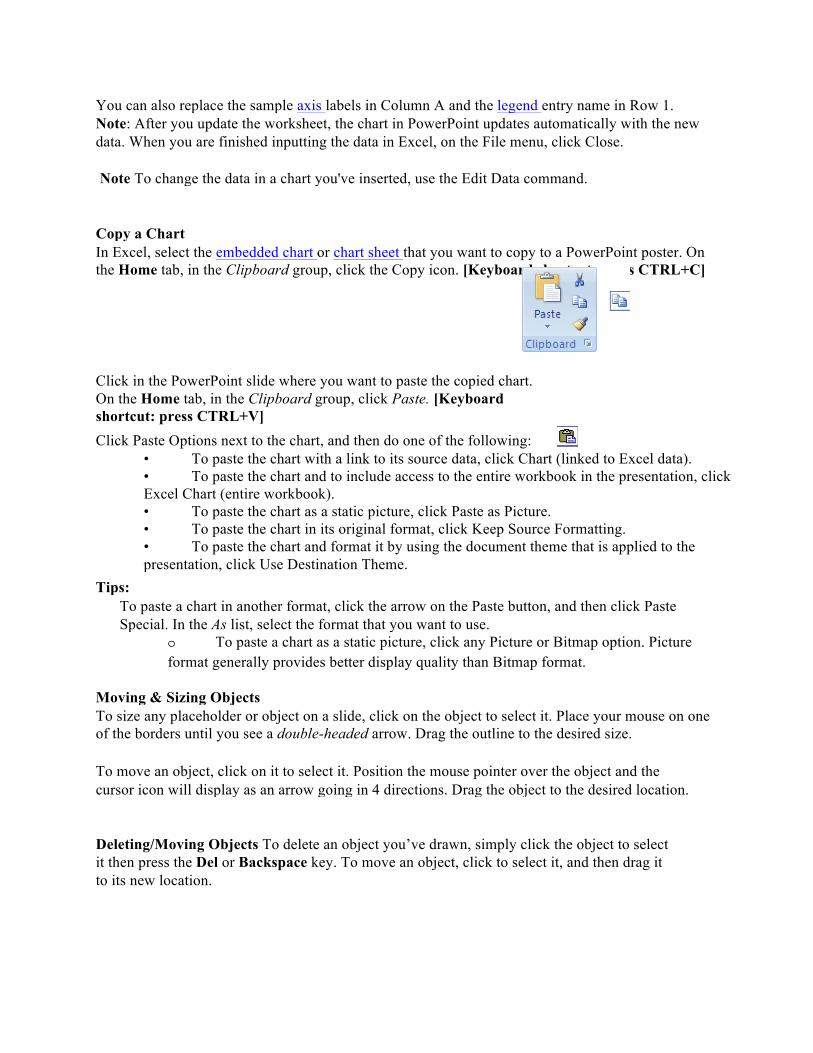
Copy a Chart In Excel, select the embedded chart or chart sheet that you want to copy to a PowerPoint poster. On the Home tab, in the Clipboard group, click the Copy icon. [Keyboard shortcut: press CTRL+C]
Click in the PowerPoint slide where you want to paste the copied chart. On the Home tab, in the Clipboard group, click Paste. [Keyboard shortcut: press CTRL+V] Click Paste Options next to the chart, and then do one of the following:
• To paste the chart with a link to its source data, click Chart (linked to Excel data). • To paste the chart and to include access to the entire workbook in the presentation, click Excel Chart (entire workbook). • To paste the chart as a static picture, click Paste as Picture. • To paste the chart in its original format, click Keep Source Formatting. • To paste the chart and format it by using the document theme that is applied to the presentation, click Use Destination Theme.
Tips: To paste a chart in another format, click the arrow on the Paste button, and then click Paste Special. In the As list, select the format that you want to use.
o To paste a chart as a static picture, click any Picture or Bitmap option. Picture format generally provides better display quality than Bitmap format.
Moving & Sizing Objects To size any placeholder or object on a slide, click on the object to select it. Place your mouse on one of the borders until you see a double-headed arrow. Drag the outline to the desired size.
To move an object, click on it to select it. Position the mouse pointer over the object and the cursor icon will display as an arrow going in 4 directions. Drag the object to the desired location.
Deleting/Moving Objects To delete an object you’ve drawn, simply click the object to select it then press the Del or Backspace key. To move an object, click to select it, and then drag it to its new location.
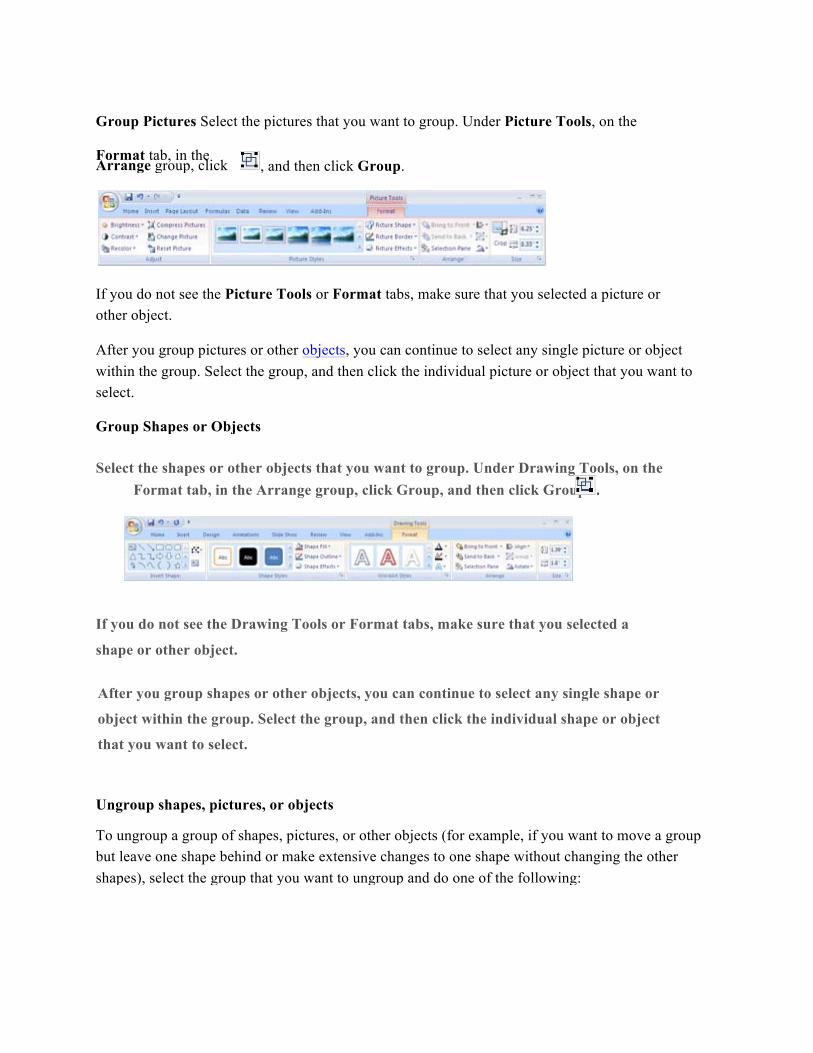
Group Pictures Select the pictures that you want to group. Under Picture Tools, on the
Format tab, in the Arrange group, click , and then click Group.
If you do not see the Picture Tools or Format tabs, make sure that you selected a picture or other object.
After you group pictures or other objects, you can continue to select any single picture or object within the group. Select the group, and then click the individual picture or object that you want to select.
Group Shapes or Objects
Select the shapes or other objects that you want to group. Under Drawing Tools, on the Format tab, in the Arrange group, click Group, and then click Group
If you do not see the Drawing Tools or Format tabs, make sure that you selected a
shape or other object.
After you group shapes or other objects, you can continue to select any single shape or
object within the group. Select the group, and then click the individual shape or object
that you want to select.
Ungroup shapes, pictures, or objects
To ungroup a group of shapes, pictures, or other objects (for example, if you want to move a group but leave one shape behind or make extensive changes to one shape without changing the other shapes), select the group that you want to ungroup and do one of the following:

1. To ungroup shapes or other objects, under Drawing Tools, on the Format tab, in the
Arrange group, click Group , and then click Ungroup .
2. To ungroup pictures, under Picture Tools, on the Format tab, in the Arrange group,
click , and then click Ungroup .
If you do not see the Drawing Tools, Picture Tools, or Format tabs, make sure that you selected a group of shapes, pictures, or other objects
Font Note If you use a font which is not recognized by the Morgan Library plotter, it will be necessary to embed the font into your poster file. To embed the fonts into your poster file, select Save As from the File menu. When the Save As dialog box appears, click on the Tools menu located in the upper right of the dialog box. Scroll down and check the box Embed TrueType Fonts and then click on the Save button at the bottom right. If you get an error message about a font, you are using a non-Microsoft font somewhere in your poster. It may be a symbol font that is used in your bullets or a special character that was inserted into a figure. PowerPoint cannot embed non-Microsoft fonts.