Creating and Editing Graphic Information In Adobe...
16
Creating and Editing Graphic Information In Adobe Illustrator Tutorial Updated August 2006
Transcript of Creating and Editing Graphic Information In Adobe...

Creating and Editing Graphic Information In Adobe Illustrator
Tutorial Updated August 2006
GRAPHICS TUTORIAL # D3Creating and Editing Graphic Information In Adobe Illustrator
CP-208 Plan Preparation Studio - Prof. Elizabeth Macdonald 2
In this tutorial we will learn two things: First, Creating a Land Use map and second, highlighting areas with color areas of aerial photographs and plans. A. Creating a Land Use Map from a Block/Parcel Map Using Adobe Illustrator
STEP - I. Creating a New Layer for the Land Use Map:
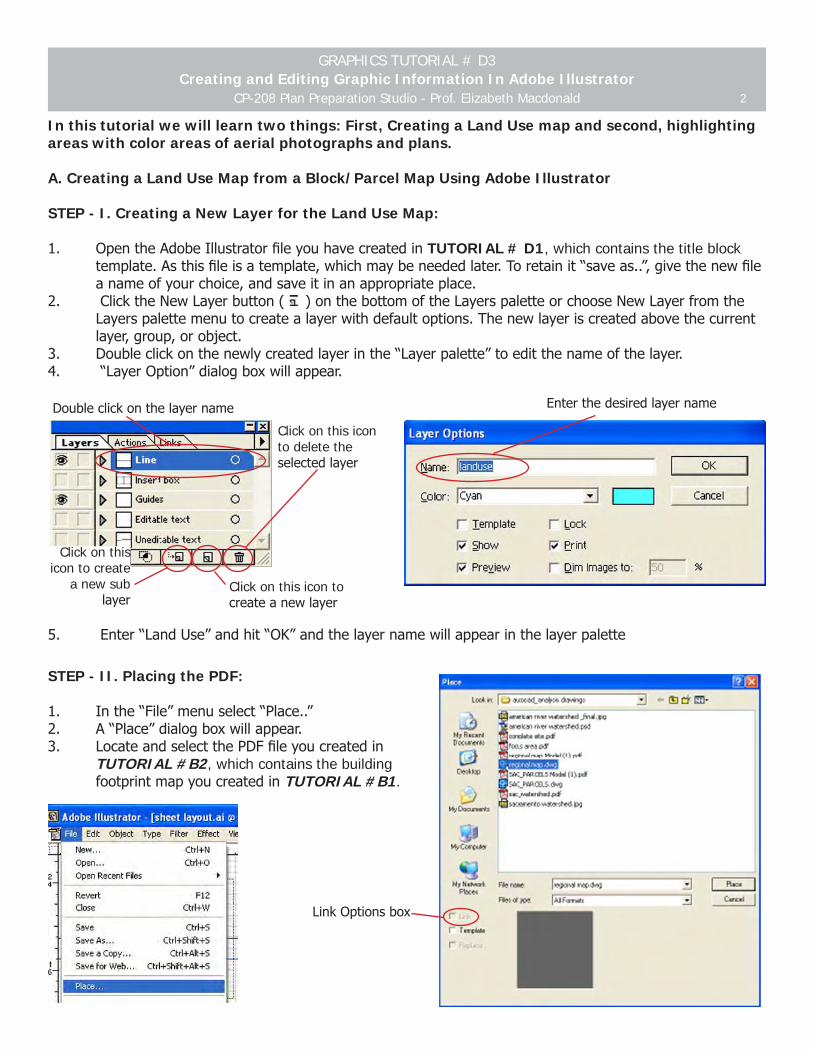
1. OpentheAdobeIllustratorfileyouhavecreatedinTUTORIAL # D1, which contains the title block template.Asthisfileisatemplate,whichmaybeneededlater.Toretainit“saveas..”,givethenewfile anameofyourchoice,andsaveitinanappropriateplace.2. ClicktheNewLayerbutton( )onthebottomoftheLayerspaletteorchooseNewLayerfromthe Layerspalettemenutocreatealayerwithdefaultoptions.Thenewlayeriscreatedabovethecurrent layer,group,orobject.3. Doubleclickonthenewlycreatedlayerinthe“Layerpalette”toeditthenameofthelayer.4. “LayerOption”dialogboxwillappear.
5. Enter“LandUse”andhit“OK”andthelayernamewillappearinthelayerpalette
STEP - II. Placing the PDF:
1. Inthe“File”menuselect“Place..”2. A“Place”dialogboxwillappear.3. LocateandselectthePDFfileyoucreatedin TUTORIAL #B2, which contains the building footprintmapyoucreatedinTUTORIAL #B1.
Click on this icon to createanewlayer
Click on this icon to delete the selectedlayer
Doubleclickonthelayername Enterthedesiredlayername
LinkOptionsbox
Click on this icon to create
a new sub layer
GRAPHICS TUTORIAL # D3Creating and Editing Graphic Information In Adobe Illustrator
CP-208 Plan Preparation Studio - Prof. Elizabeth Macdonald 3
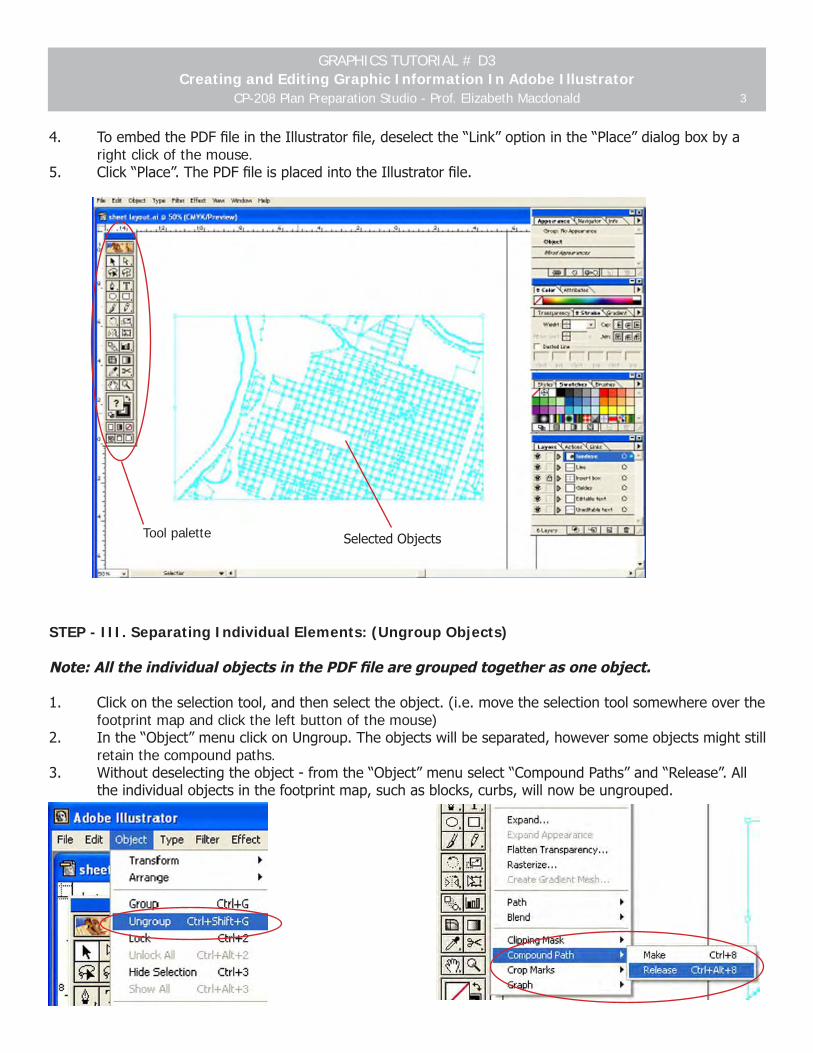
4. ToembedthePDFfileintheIllustratorfile,deselectthe“Link”optioninthe“Place”dialogboxbya right click of the mouse. 5. Click“Place”.ThePDFfileisplacedintotheIllustratorfile.
STEP - III. Separating Individual Elements: (Ungroup Objects) Note: All the individual objects in the PDF file are grouped together as one object.
1. Clickontheselectiontool,andthenselecttheobject.(i.e.movetheselectiontoolsomewhereoverthe footprint map and click the left button of the mouse) 2. Inthe“Object”menuclickonUngroup.Theobjectswillbeseparated,howeversomeobjectsmightstill retain the compound paths. 3. Withoutdeselectingtheobject-fromthe“Object”menuselect“CompoundPaths”and“Release”.All theindividualobjectsinthefootprintmap,suchasblocks,curbs,willnowbeungrouped.
Tool palette SelectedObjects
GRAPHICS TUTORIAL # D3Creating and Editing Graphic Information In Adobe Illustrator
CP-208 Plan Preparation Studio - Prof. Elizabeth Macdonald �
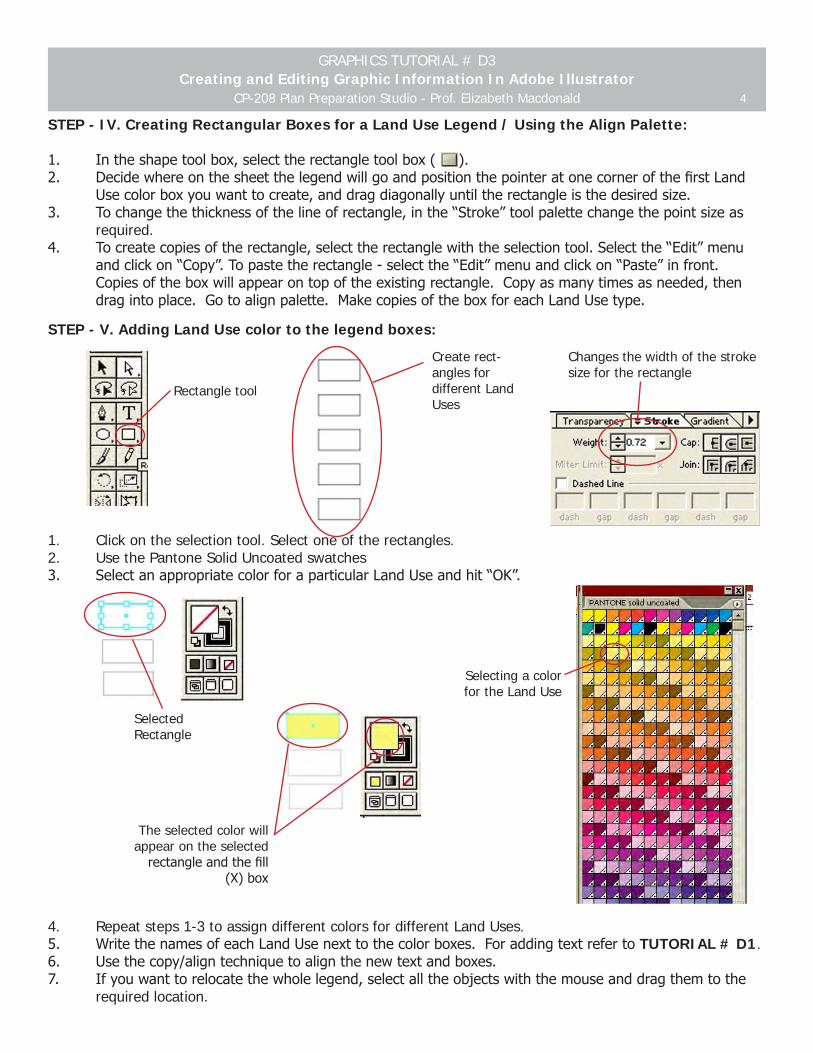
STEP - IV. Creating Rectangular Boxes for a Land Use Legend / Using the Align Palette:
1. Intheshapetoolbox,selecttherectangletoolbox().2. DecidewhereonthesheetthelegendwillgoandpositionthepointeratonecornerofthefirstLand Usecolorboxyouwanttocreate,anddragdiagonallyuntiltherectangleisthedesiredsize.3. Tochangethethicknessofthelineofrectangle,inthe“Stroke”toolpalettechangethepointsizeas required. 4. Tocreatecopiesoftherectangle,selecttherectanglewiththeselectiontool.Selectthe“Edit”menu andclickon“Copy”.Topastetherectangle-selectthe“Edit”menuandclickon“Paste”infront. Copiesoftheboxwillappearontopoftheexistingrectangle.Copyasmanytimesasneeded,then dragintoplace.Gotoalignpalette.MakecopiesoftheboxforeachLandUsetype.
STEP - V. Adding Land Use color to the legend boxes:
1. Click on the selection tool. Select one of the rectangles. 2. Use the Pantone Solid Uncoated swatches 3. SelectanappropriatecolorforaparticularLandUseandhit“OK”.
�. Repeat steps 1-3 to assign different colors for different Land Uses. 5. WritethenamesofeachLandUsenexttothecolorboxes.ForaddingtextrefertoTUTORIAL # D1. 6. Usethecopy/aligntechniquetoalignthenewtextandboxes.7. Ifyouwanttorelocatethewholelegend,selectalltheobjectswiththemouseanddragthemtothe required location.
Rectangle tool
Create rect-angles for different Land Uses
Changes the width of the stroke size for the rectangle
The selected color will appear on the selected rectangleandthefill
(X)box
Selecting a color for the Land Use
Selected Rectangle
GRAPHICS TUTORIAL # D3Creating and Editing Graphic Information In Adobe Illustrator
CP-208 Plan Preparation Studio - Prof. Elizabeth Macdonald �
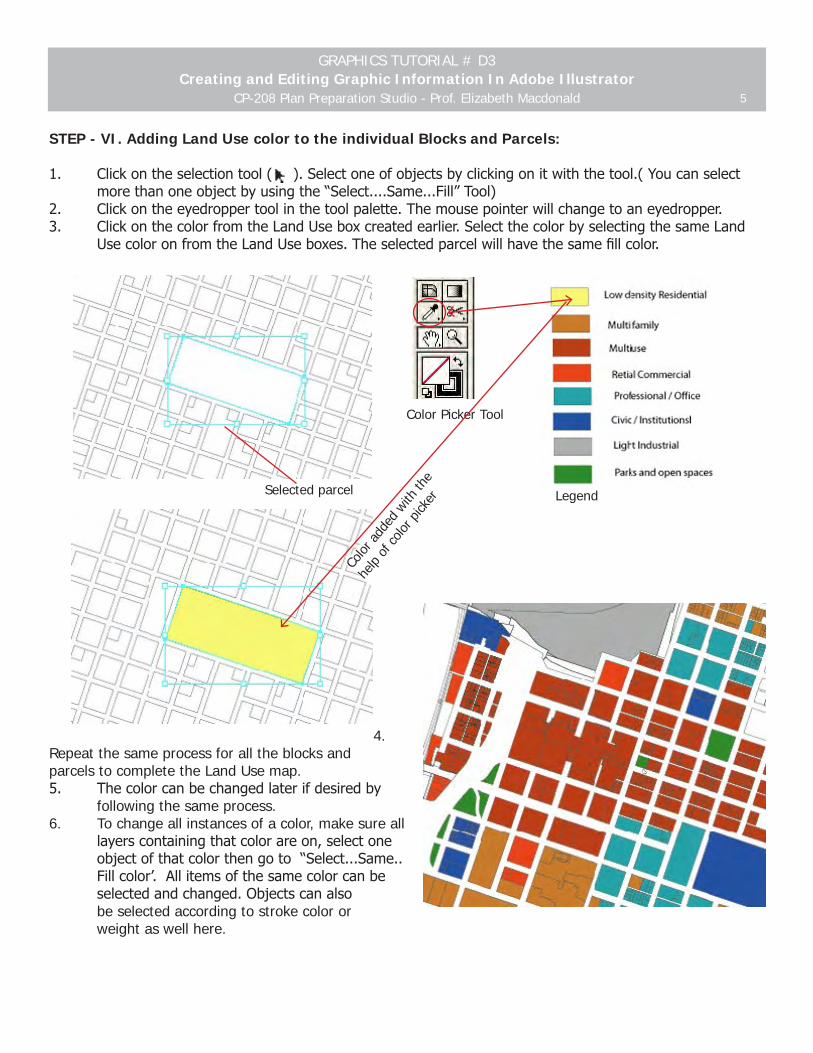
STEP - VI. Adding Land Use color to the individual Blocks and Parcels: 1. Clickontheselectiontool( ).Selectoneofobjectsbyclickingonitwiththetool.(Youcanselect morethanoneobjectbyusingthe“Select....Same...Fill”Tool)2. Clickontheeyedroppertoolinthetoolpalette.Themousepointerwillchangetoaneyedropper.3. ClickonthecolorfromtheLandUseboxcreatedearlier.SelectthecolorbyselectingthesameLand UsecoloronfromtheLandUseboxes.Theselectedparcelwillhavethesamefillcolor.
�. Repeat the same process for all the blocks and parcels to complete the Land Use map.5. Thecolorcanbechangedlaterifdesiredby following the same process.6. To change all instances of a color, make sure all layerscontainingthatcolorareon,selectone objectofthatcolorthengoto“Select...Same.. Fillcolor’.Allitemsofthesamecolorcanbe selectedandchanged.Objectscanalso be selected according to stroke color or weight as well here.
Color Picker Tool
LegendSelected parcel
Color
add
ed w
ith th
e
help
of co
lor p
icker

GRAPHICS TUTORIAL # D3Creating and Editing Graphic Information In Adobe Illustrator
CP-208 Plan Preparation Studio - Prof. Elizabeth Macdonald 6
B. Adding Color to Building Footprints:
Note: ForthistutorialafootprintdrawingcreatedinAutoCADwillberequired.APDFfileofthisAutoCADdrawing has to be made in order to bring the drawing an a known scale in Adobe Illustrator. TUTORIAL # B2 explainshowtocreateaPDFfilefromanAutoCADdrawing.
STEP -I. Opening a new drawing in Adobe Illustrator:
1. Open Adobe Illustrator. 2. Inthe“File”menuselect“Open”.
3. SelectthePDFfileyoucreatedinTUTORIAL # B2,whichcontainsthebuildingfootprintmapyou created in TUTORIAL # B1andclick“Open”.�. The footprint map will appear on the screen. 5. Iftheorientationoftheimageisnotasdesired,youcanrotatetheimage.6. Selectalltheobjects.Toselectthewholefootprintmapselecttwopointsoutsidetheimagewhichare diagonallyoppositeormakesurethatallotherlayersareoff.Hittherightbuttonofthemouse andclickon“Transform”andselect“rotate”intheavailableoptions.7. A“rotate”dialogboxwillappear,enterthenecessaryanglefortherequiredorientationofthedrawing. • For this tutorial enter -90 and hit “OK”
The“Rotate”dialogbox
GRAPHICS TUTORIAL # D3Creating and Editing Graphic Information In Adobe Illustrator
CP-208 Plan Preparation Studio - Prof. Elizabeth Macdonald �
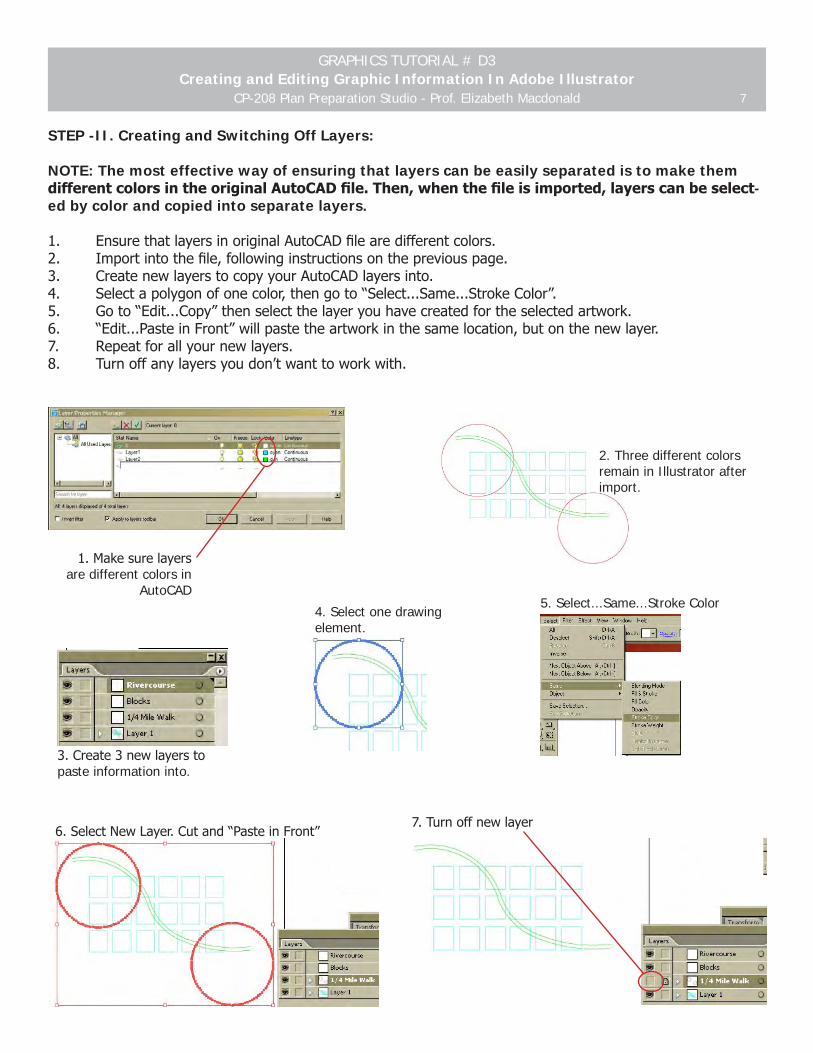
STEP -II. Creating and Switching Off Layers:
NOTE: The most effective way of ensuring that layers can be easily separated is to make them different colors in the original AutoCAD file. Then, when the file is imported, layers can be select-ed by color and copied into separate layers.
1. EnsurethatlayersinoriginalAutoCADfilearedifferentcolors.2. Importintothefile,followinginstructionsonthepreviouspage.3. CreatenewlayerstocopyyourAutoCADlayersinto.4. Selectapolygonofonecolor,thengoto“Select...Same...StrokeColor”.5. Goto“Edit...Copy”thenselectthelayeryouhavecreatedfortheselectedartwork.6. “Edit...PasteinFront”willpastetheartworkinthesamelocation,butonthenewlayer.7. Repeatforallyournewlayers.8. Turnoffanylayersyoudon’twanttoworkwith.
1.Makesurelayersare different colors in
AutoCAD
2. Three different colors remain in Illustrator after import.
3.Create3newlayerstopaste information into.
�. Select one drawing element.
�. Select...Same...Stroke Color
6.SelectNewLayer.Cutand“PasteinFront”7.Turnoffnewlayer
GRAPHICS TUTORIAL # D3Creating and Editing Graphic Information In Adobe Illustrator
CP-208 Plan Preparation Studio - Prof. Elizabeth Macdonald 8
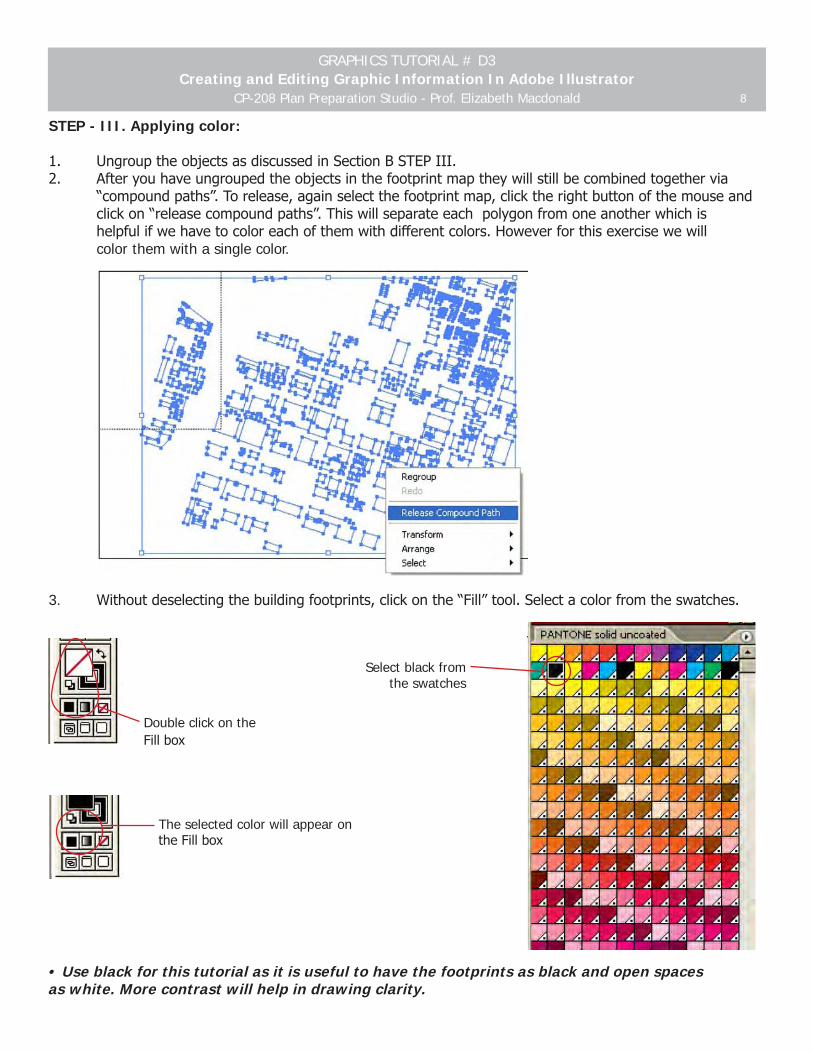
STEP - III. Applying color: 1. UngrouptheobjectsasdiscussedinSectionBSTEPIII.2. Afteryouhaveungroupedtheobjectsinthefootprintmaptheywillstillbecombinedtogethervia “compoundpaths”.Torelease,againselectthefootprintmap,clicktherightbuttonofthemouseand clickon“releasecompoundpaths”.Thiswillseparateeachpolygonfromoneanotherwhichis helpfulifwehavetocoloreachofthemwithdifferentcolors.Howeverforthisexercisewewill color them with a single color.
3. Withoutdeselectingthebuildingfootprints,clickonthe“Fill”tool.Selectacolorfromtheswatches.
Double click on the Fillbox
Select black from the swatches
The selected color will appear on theFillbox
• Use black for this tutorial as it is useful to have the footprints as black and open spaces as white. More contrast will help in drawing clarity.

GRAPHICS TUTORIAL # D3Creating and Editing Graphic Information In Adobe Illustrator
CP-208 Plan Preparation Studio - Prof. Elizabeth Macdonald �
4. Click“OK”inthecolorpickerdialogboxafterselectingthecolor.Onthescreentheblocksnowbefilled withwillappearwiththefilloftheselectedcolor.
5. Clickwiththecursoranywhereonthescreenoutsidetheobjectarea.Thiswilldeselectthebuilding footprints.
• This tutorial can be done with following methods: 1. By “Placing” an EPS file created from AutoCAD into an new or existing Illustrator file. This is helpful while you working on a presentation board in Adobe Illustrator. 2. By “Opening” a PDF file in Adobe Illustrator. This is helpful when you want to edit the PDF. 3. By “Placing” an AutoCAD drawing into Adobe Illustrator. • The advantage of the first two methods is that the drawing can be inserted at a known scale, but when a drawing is placed directly from AutoCAD we have to manually scale the drawing in Adobe Illustrator .
GRAPHICS TUTORIAL # D3Creating and Editing Graphic Information In Adobe Illustrator
CP-208 Plan Preparation Studio - Prof. Elizabeth Macdonald 10
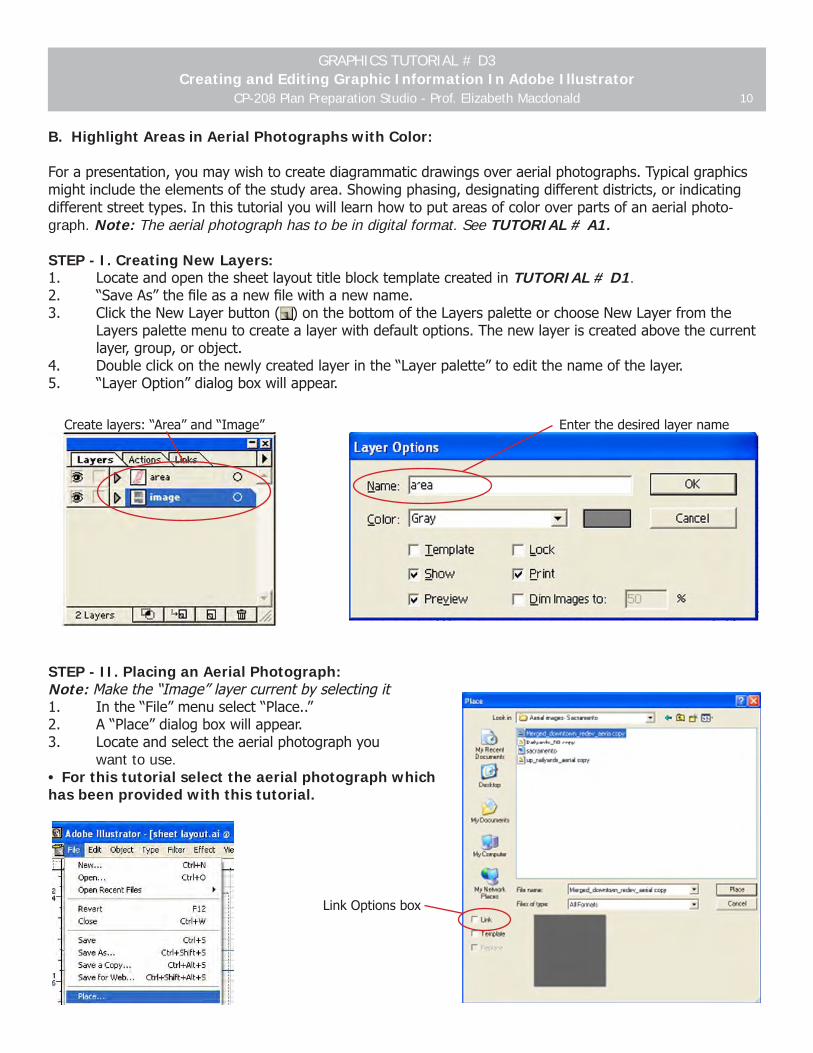
B. Highlight Areas in Aerial Photographs with Color:
Forapresentation,youmaywishtocreatediagrammaticdrawingsoveraerialphotographs.Typicalgraphicsmightincludetheelementsofthestudyarea.Showingphasing,designatingdifferentdistricts,orindicatingdifferentstreettypes.Inthistutorialyouwilllearnhowtoputareasofcoloroverpartsofanaerialphoto-graph. Note: The aerial photograph has to be in digital format. See TUTORIAL # A1.
STEP - I. Creating New Layers: 1. LocateandopenthesheetlayouttitleblocktemplatecreatedinTUTORIAL # D1. 2. “SaveAs”thefileasanewfilewithanewname.3. ClicktheNewLayerbutton( )onthebottomoftheLayerspaletteorchooseNewLayerfromthe Layerspalettemenutocreatealayerwithdefaultoptions.Thenewlayeriscreatedabovethecurrent layer,group,orobject.4. Doubleclickonthenewlycreatedlayerinthe“Layerpalette”toeditthenameofthelayer.5. “LayerOption”dialogboxwillappear.
STEP - II. Placing an Aerial Photograph: Note: Makethe“Image”layercurrentbyselectingit1. Inthe“File”menuselect“Place..”2. A“Place”dialogboxwillappear.3. Locateandselecttheaerialphotographyou want to use. • For this tutorial select the aerial photograph which has been provided with this tutorial.
LinkOptionsbox
EnterthedesiredlayernameCreatelayers:“Area”and“Image”
GRAPHICS TUTORIAL # D3Creating and Editing Graphic Information In Adobe Illustrator
CP-208 Plan Preparation Studio - Prof. Elizabeth Macdonald 11
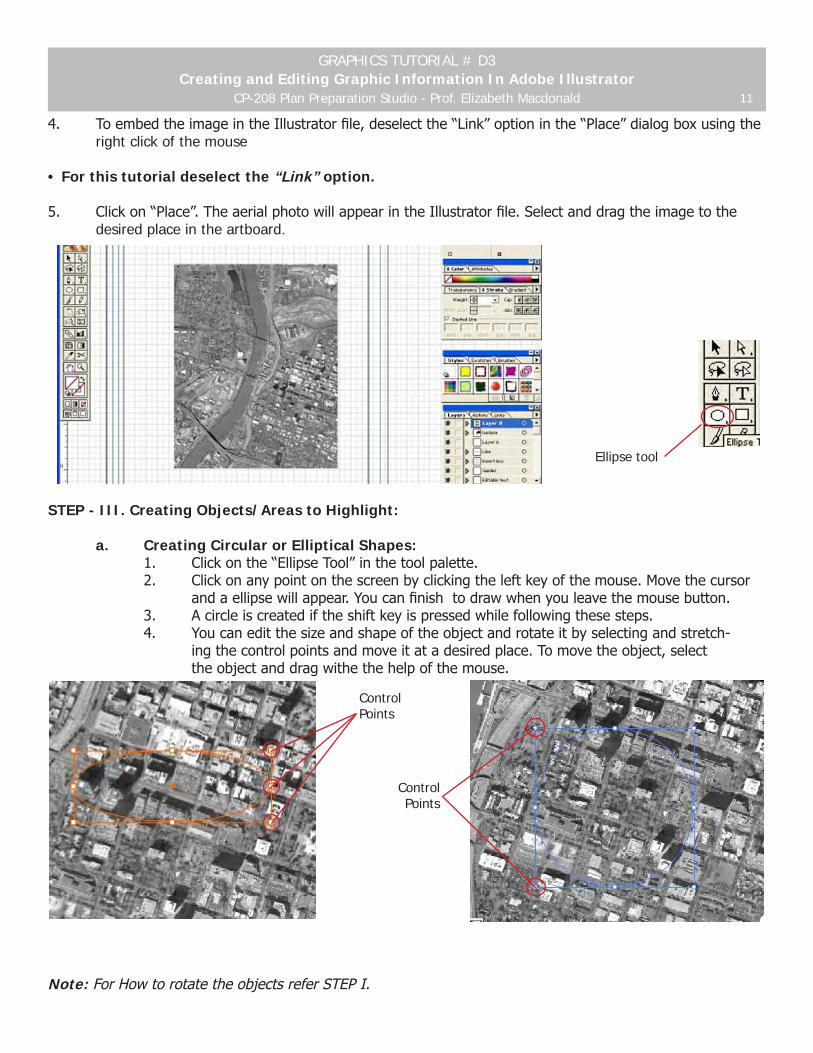
4. ToembedtheimageintheIllustratorfile,deselectthe“Link”optioninthe“Place”dialogboxusingthe right click of the mouse
• For this tutorial deselect the “Link” option.
5. Clickon“Place”.TheaerialphotowillappearintheIllustratorfile.Selectanddragtheimagetothe desired place in the artboard.
STEP - III. Creating Objects/Areas to Highlight: a. Creating Circular or Elliptical Shapes: 1. Clickonthe“EllipseTool”inthetoolpalette. 2. Clickonanypointonthescreenbyclickingtheleftkeyofthemouse.Movethecursor andaellipsewillappear.Youcanfinishtodrawwhenyouleavethemousebutton. 3. Acircleiscreatediftheshiftkeyispressedwhilefollowingthesesteps. 4. Youcaneditthesizeandshapeoftheobjectandrotateitbyselectingandstretch- ingthecontrolpointsandmoveitatadesiredplace.Tomovetheobject,select theobjectanddragwithethehelpofthemouse.
Note:ForHowtorotatetheobjectsreferSTEPI.
Ellipse tool
Control Points
Control Points
GRAPHICS TUTORIAL # D3Creating and Editing Graphic Information In Adobe Illustrator
CP-208 Plan Preparation Studio - Prof. Elizabeth Macdonald 12
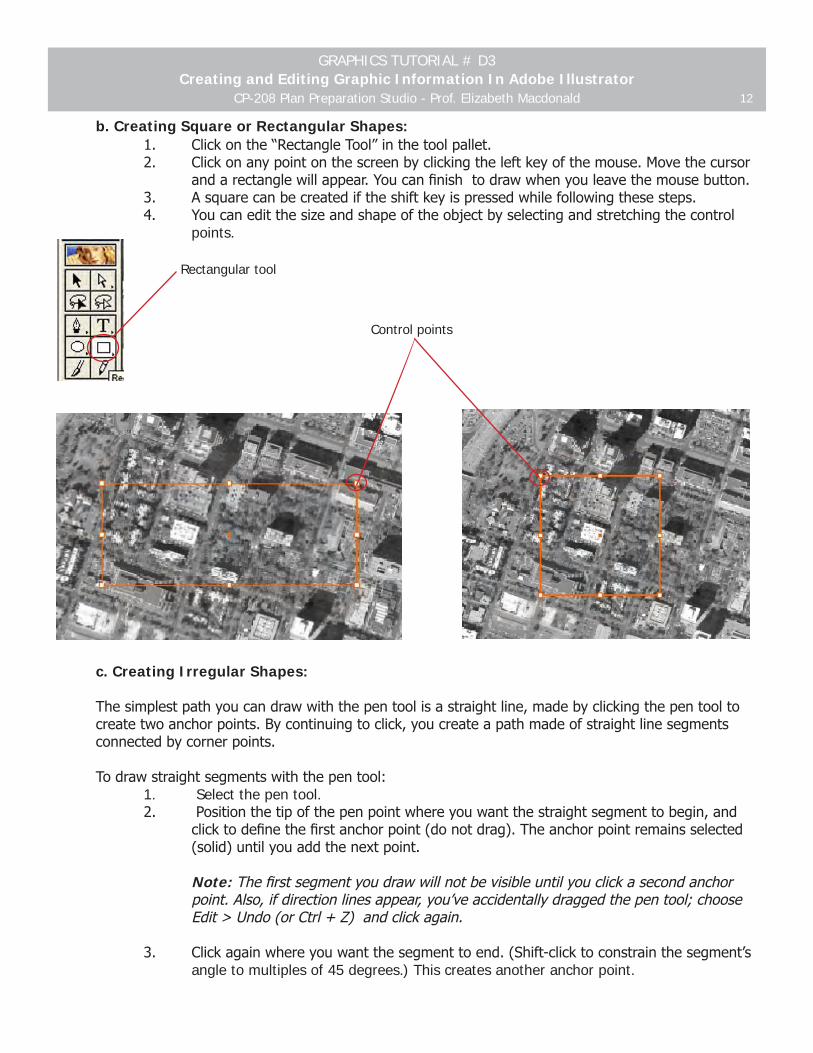
b. Creating Square or Rectangular Shapes: 1. Clickonthe“RectangleTool”inthetoolpallet. 2. Clickonanypointonthescreenbyclickingtheleftkeyofthemouse.Movethecursor andarectanglewillappear.Youcanfinishtodrawwhenyouleavethemousebutton. 3. Asquarecanbecreatediftheshiftkeyispressedwhilefollowingthesesteps. 4. Youcaneditthesizeandshapeoftheobjectbyselectingandstretchingthecontrol points.
c. Creating Irregular Shapes:
Thesimplestpathyoucandrawwiththepentoolisastraightline,madebyclickingthepentoolto createtwoanchorpoints.Bycontinuingtoclick,youcreateapathmadeofstraightlinesegments connectedbycornerpoints.
Todrawstraightsegmentswiththepentool: 1. Select the pen tool. 2. Positionthetipofthepenpointwhereyouwantthestraightsegmenttobegin,and clicktodefinethefirstanchorpoint(donotdrag).Theanchorpointremainsselected (solid)untilyouaddthenextpoint.
Note:Thefirstsegmentyoudrawwillnotbevisibleuntilyouclickasecondanchor point.Also,ifdirectionlinesappear,you’veaccidentallydraggedthepentool;choose Edit>Undo(orCtrl+Z)andclickagain.
3. Clickagainwhereyouwantthesegmenttoend.(Shift-clicktoconstrainthesegment’s angle to multiples of �� degrees.) This creates another anchor point.
Rectangular tool
Control points
GRAPHICS TUTORIAL # D3Creating and Editing Graphic Information In Adobe Illustrator
CP-208 Plan Preparation Studio - Prof. Elizabeth Macdonald 13
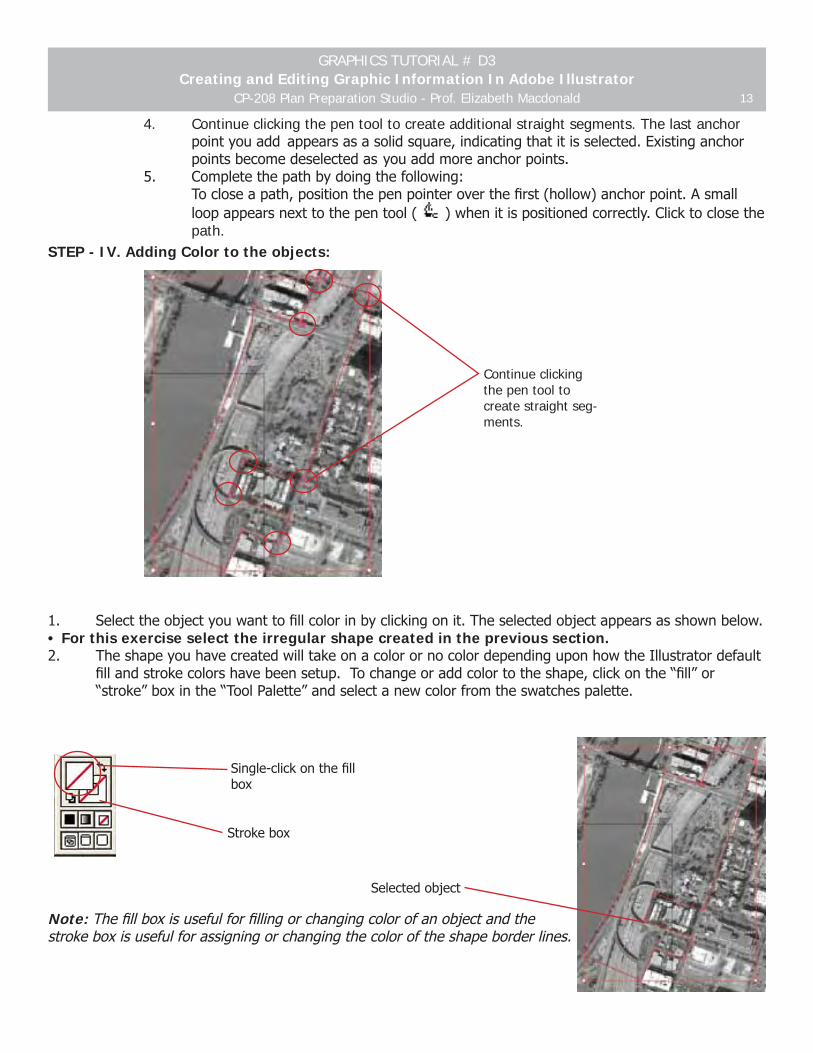
�. Continue clicking the pen tool to create additional straight segments. The last anchor pointyouaddappearsasasolidsquare,indicatingthatitisselected.Existinganchor pointsbecomedeselectedasyouaddmoreanchorpoints. 5. Completethepathbydoingthefollowing: Tocloseapath,positionthepenpointeroverthefirst(hollow)anchorpoint.Asmall loopappearsnexttothepentool( )whenitispositionedcorrectly.Clicktoclosethe path. STEP - IV. Adding Color to the objects:
1. Selecttheobjectyouwanttofillcolorinbyclickingonit.Theselectedobjectappearsasshownbelow.• For this exercise select the irregular shape created in the previous section. 2. TheshapeyouhavecreatedwilltakeonacolorornocolordependinguponhowtheIllustratordefault fillandstrokecolorshavebeensetup.Tochangeoraddcolortotheshape,clickonthe“fill”or “stroke”boxinthe“ToolPalette”andselectanewcolorfromtheswatchespalette.
Note: Thefillboxisusefulforfillingorchangingcolorofanobjectandthestrokeboxisusefulforassigningorchangingthecoloroftheshapeborderlines.
Continue clicking the pen tool to create straight seg-ments.
Single-clickonthefillbox
Strokebox
Selectedobject
GRAPHICS TUTORIAL # D3Creating and Editing Graphic Information In Adobe Illustrator
CP-208 Plan Preparation Studio - Prof. Elizabeth Macdonald 1�
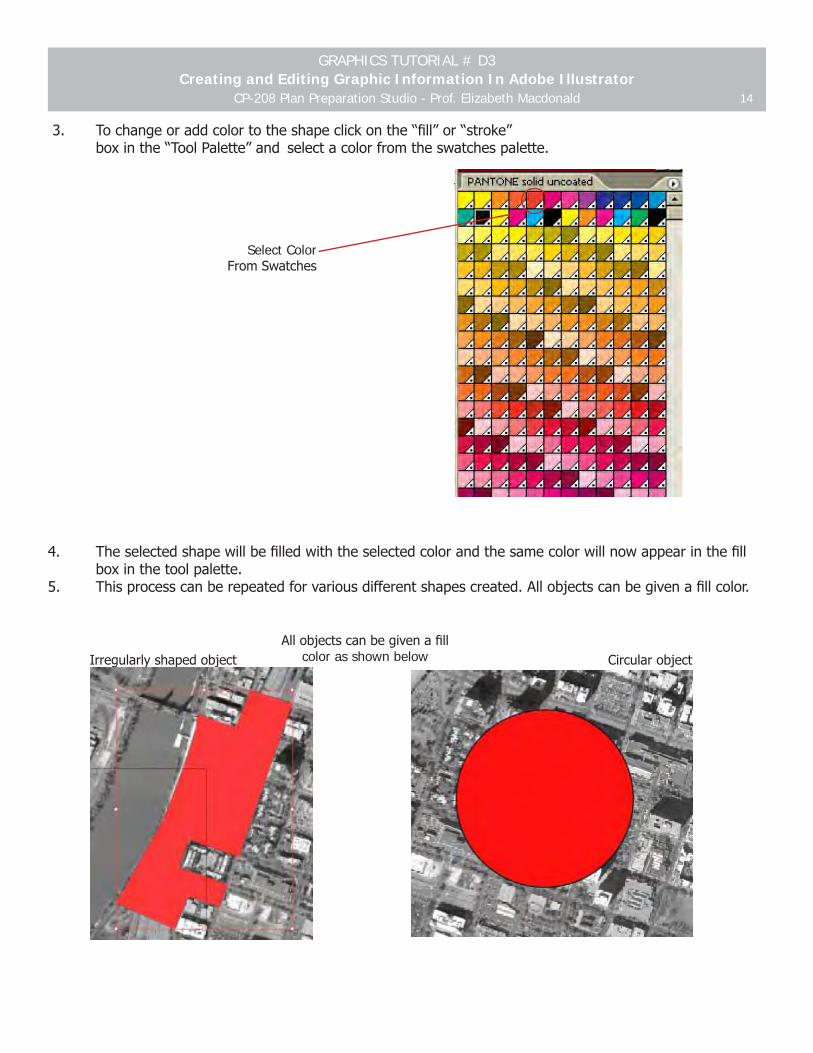
3. Tochangeoraddcolortotheshapeclickonthe“fill”or“stroke” boxinthe“ToolPalette”andselectacolorfromtheswatchespalette.
4. Theselectedshapewillbefilledwiththeselectedcolorandthesamecolorwillnowappearinthefill boxinthetoolpalette.5. Thisprocesscanberepeatedforvariousdifferentshapescreated.Allobjectscanbegivenafillcolor.
Irregularlyshapedobject CircularobjectAllobjectscanbegivenafill
color as shown below
Select Color FromSwatches
GRAPHICS TUTORIAL # D3Creating and Editing Graphic Information In Adobe Illustrator
CP-208 Plan Preparation Studio - Prof. Elizabeth Macdonald 1�
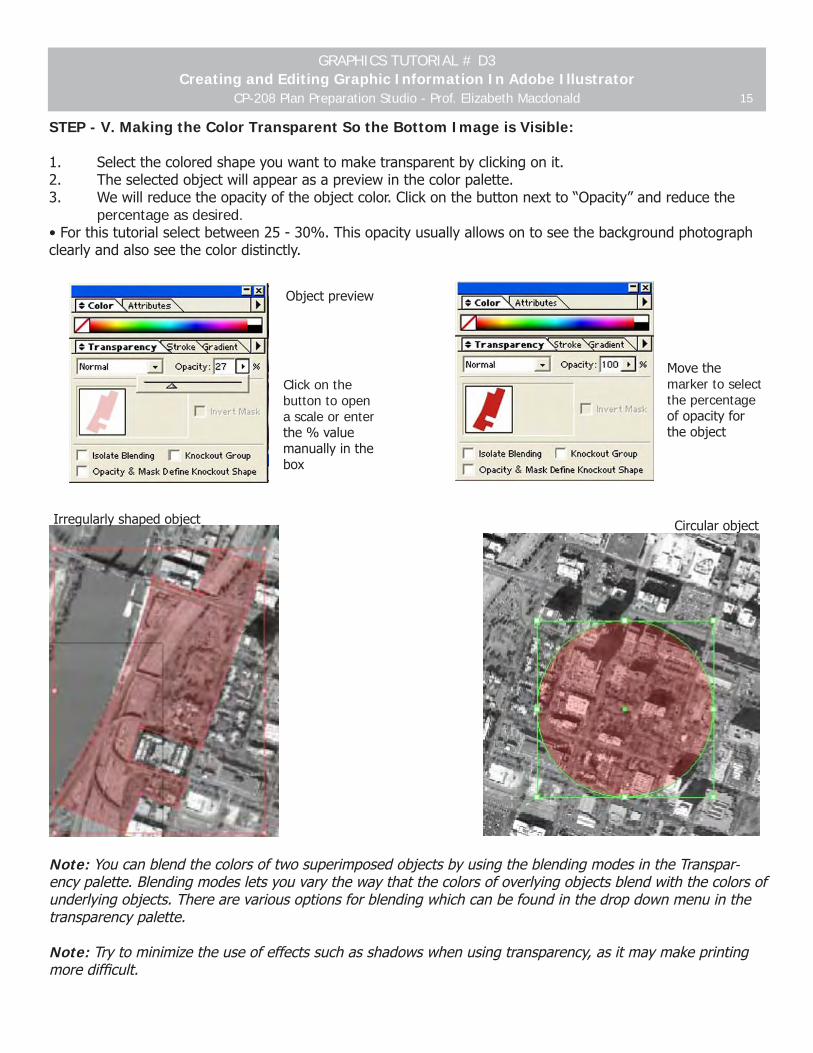
STEP - V. Making the Color Transparent So the Bottom Image is Visible:
1. Selectthecoloredshapeyouwanttomaketransparentbyclickingonit.2. Theselectedobjectwillappearasapreviewinthecolorpalette.3. Wewillreducetheopacityoftheobjectcolor.Clickonthebuttonnextto“Opacity”andreducethe percentage as desired.•Forthistutorialselectbetween25-30%.Thisopacityusuallyallowsontoseethebackgroundphotographclearlyandalsoseethecolordistinctly.
Note: YoucanblendthecolorsoftwosuperimposedobjectsbyusingtheblendingmodesintheTranspar-encypalette.Blendingmodesletsyouvarythewaythatthecolorsofoverlyingobjectsblendwiththecolorsofunderlyingobjects.Therearevariousoptionsforblendingwhichcanbefoundinthedropdownmenuinthetransparencypalette.
Note: Trytominimizetheuseofeffectssuchasshadowswhenusingtransparency,asitmaymakeprintingmoredifficult.
Movethemarker to select the percentage ofopacityfortheobject
Irregularlyshapedobject Circularobject
Objectpreview
Click on the button to open a scale or enter the%valuemanuallyinthebox
GRAPHICS TUTORIAL # D3Creating and Editing Graphic Information In Adobe Illustrator
CP-208 Plan Preparation Studio - Prof. Elizabeth Macdonald 16
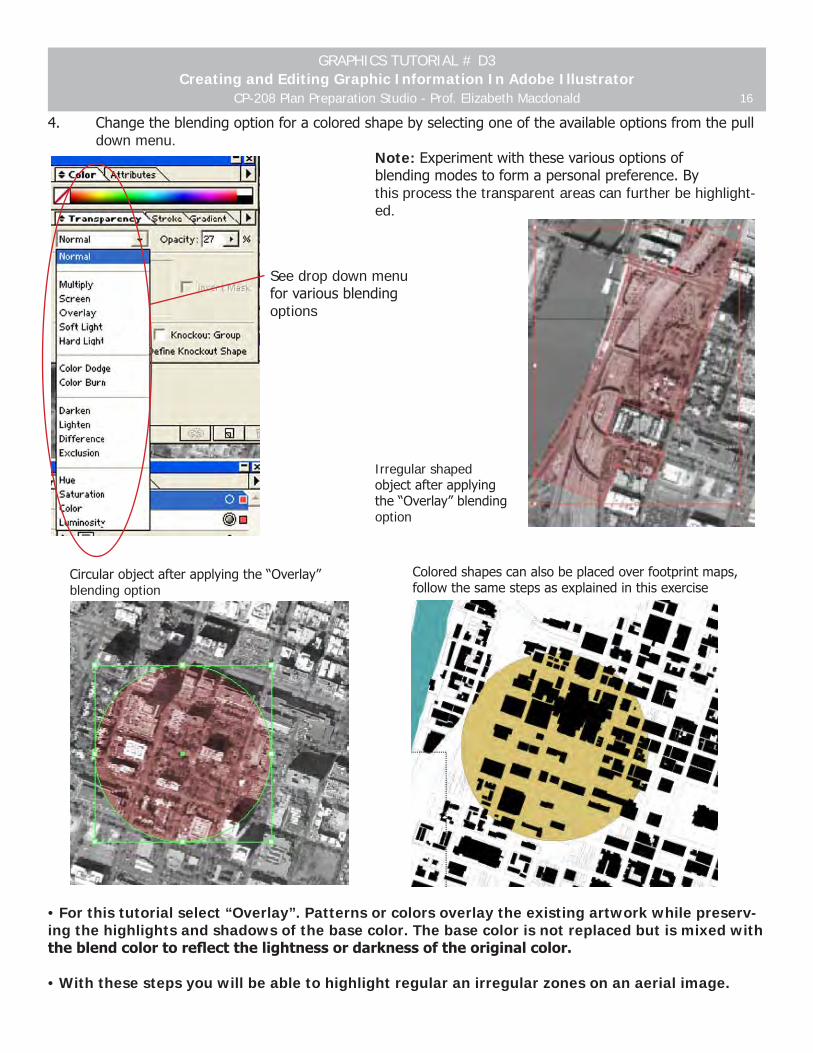
4. Changetheblendingoptionforacoloredshapebyselectingoneoftheavailableoptionsfromthepull down menu.
Note: Experimentwiththesevariousoptionsof blendingmodestoformapersonalpreference.By
this process the transparent areas can further be highlight-ed.
• For this tutorial select “Overlay”. Patterns or colors overlay the existing artwork while preserv-ing the highlights and shadows of the base color. The base color is not replaced but is mixed with the blend color to reflect the lightness or darkness of the original color.
• With these steps you will be able to highlight regular an irregular zones on an aerial image.
Irregular shaped objectafterapplyingthe“Overlay”blendingoption
Coloredshapescanalsobeplacedoverfootprintmaps,followthesamestepsasexplainedinthisexercise
Circularobjectafterapplyingthe“Overlay”blending option
See drop down menu forvariousblendingoptions