Creating an Accessible Microsoft Word Document … · Creating an Accessible Microsoft Word ......
25
Creating an Accessible Microsoft Word Document 2007 & 2010
Transcript of Creating an Accessible Microsoft Word Document … · Creating an Accessible Microsoft Word ......

Creating an Accessible
Microsoft Word Document
2007 & 2010
2
Information Technology for Minnesota Government | mn.gov/oet Document Revised: May 31, 2012
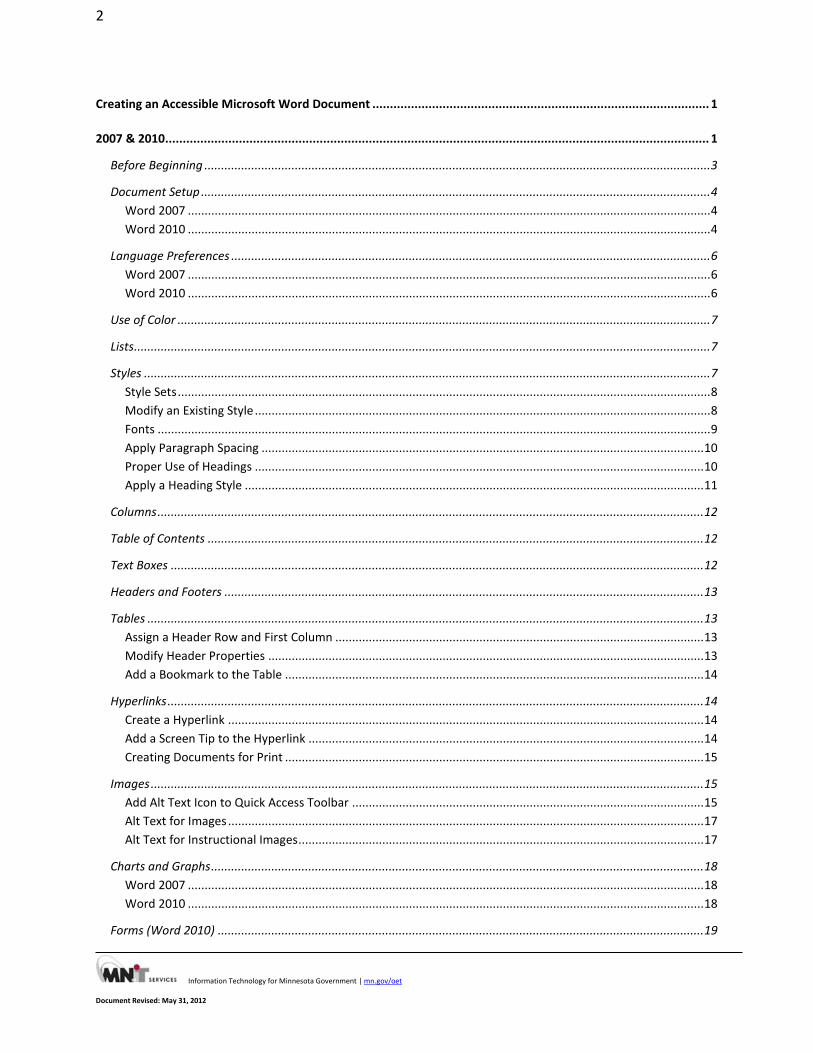
Creating an Accessible Microsoft Word Document ................................................................................................ 1
2007 & 2010........................................................................................................................................................... 1
Before Beginning ....................................................................................................................................................... 3
Document Setup ........................................................................................................................................................ 4 Word 2007 ............................................................................................................................................................ 4 Word 2010 ............................................................................................................................................................ 4
Language Preferences ............................................................................................................................................... 6 Word 2007 ............................................................................................................................................................ 6 Word 2010 ............................................................................................................................................................ 6
Use of Color ............................................................................................................................................................... 7
Lists ............................................................................................................................................................................ 7
Styles ......................................................................................................................................................................... 7 Style Sets ............................................................................................................................................................... 8 Modify an Existing Style ........................................................................................................................................ 8 Fonts ..................................................................................................................................................................... 9 Apply Paragraph Spacing .................................................................................................................................... 10 Proper Use of Headings ...................................................................................................................................... 10 Apply a Heading Style ......................................................................................................................................... 11
Columns ................................................................................................................................................................... 12
Table of Contents .................................................................................................................................................... 12
Text Boxes ............................................................................................................................................................... 12
Headers and Footers ............................................................................................................................................... 13
Tables ...................................................................................................................................................................... 13 Assign a Header Row and First Column .............................................................................................................. 13 Modify Header Properties .................................................................................................................................. 13 Add a Bookmark to the Table ............................................................................................................................. 14
Hyperlinks ................................................................................................................................................................ 14 Create a Hyperlink .............................................................................................................................................. 14 Add a Screen Tip to the Hyperlink ...................................................................................................................... 14 Creating Documents for Print ............................................................................................................................. 15
Images ..................................................................................................................................................................... 15 Add Alt Text Icon to Quick Access Toolbar ......................................................................................................... 15 Alt Text for Images .............................................................................................................................................. 17 Alt Text for Instructional Images ......................................................................................................................... 17
Charts and Graphs ................................................................................................................................................... 18 Word 2007 .......................................................................................................................................................... 18 Word 2010 .......................................................................................................................................................... 18
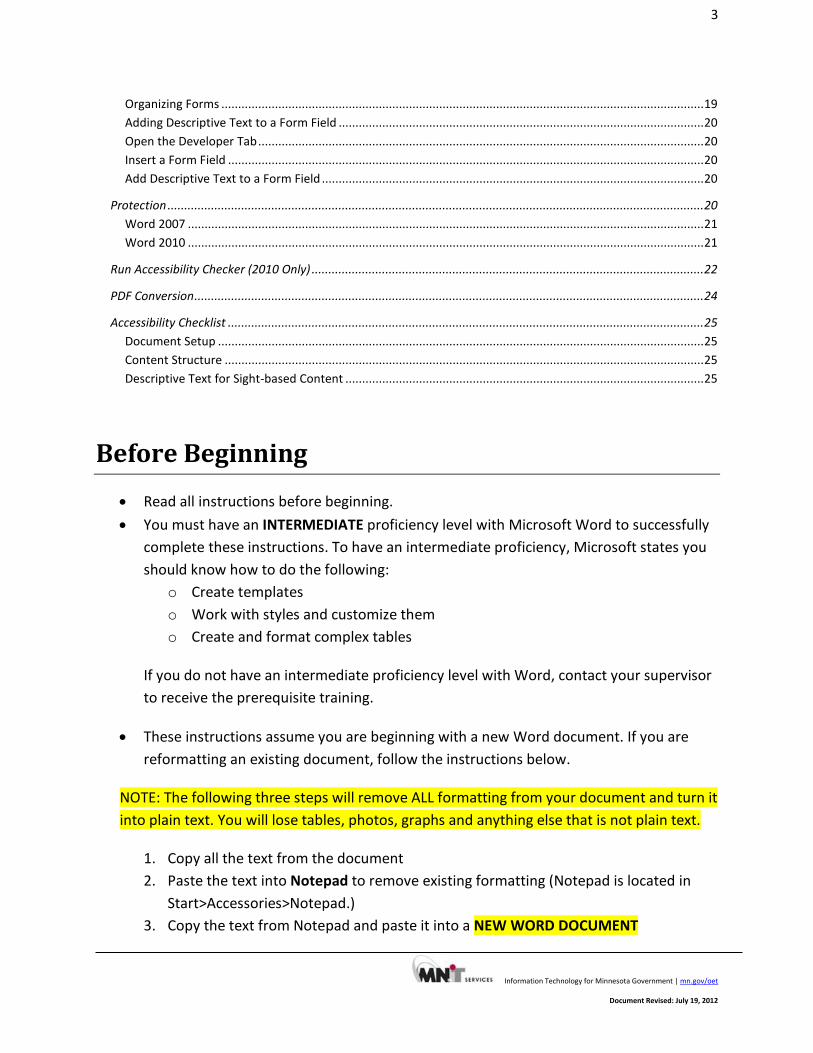
Forms (Word 2010) ................................................................................................................................................. 19
3
Information Technology for Minnesota Government | mn.gov/oet
Document Revised: July 19, 2012
Organizing Forms ................................................................................................................................................ 19 Adding Descriptive Text to a Form Field ............................................................................................................. 20 Open the Developer Tab ..................................................................................................................................... 20 Insert a Form Field .............................................................................................................................................. 20 Add Descriptive Text to a Form Field .................................................................................................................. 20
Protection ................................................................................................................................................................ 20 Word 2007 .......................................................................................................................................................... 21 Word 2010 .......................................................................................................................................................... 21
Run Accessibility Checker (2010 Only) ..................................................................................................................... 22
PDF Conversion ........................................................................................................................................................ 24
Accessibility Checklist .............................................................................................................................................. 25 Document Setup ................................................................................................................................................. 25 Content Structure ............................................................................................................................................... 25 Descriptive Text for Sight-based Content ........................................................................................................... 25
Before Beginning • Read all instructions before beginning. • You must have an INTERMEDIATE proficiency level with Microsoft Word to successfully
complete these instructions. To have an intermediate proficiency, Microsoft states you should know how to do the following:
o Create templates o Work with styles and customize them o Create and format complex tables
If you do not have an intermediate proficiency level with Word, contact your supervisor to receive the prerequisite training.
• These instructions assume you are beginning with a new Word document. If you are reformatting an existing document, follow the instructions below.
NOTE: The following three steps will remove ALL formatting from your document and turn it into plain text. You will lose tables, photos, graphs and anything else that is not plain text.
1. Copy all the text from the document 2. Paste the text into Notepad to remove existing formatting (Notepad is located in
Start>Accessories>Notepad.) 3. Copy the text from Notepad and paste it into a NEW WORD DOCUMENT
4
Information Technology for Minnesota Government | mn.gov/oet Document Revised: May 31, 2012
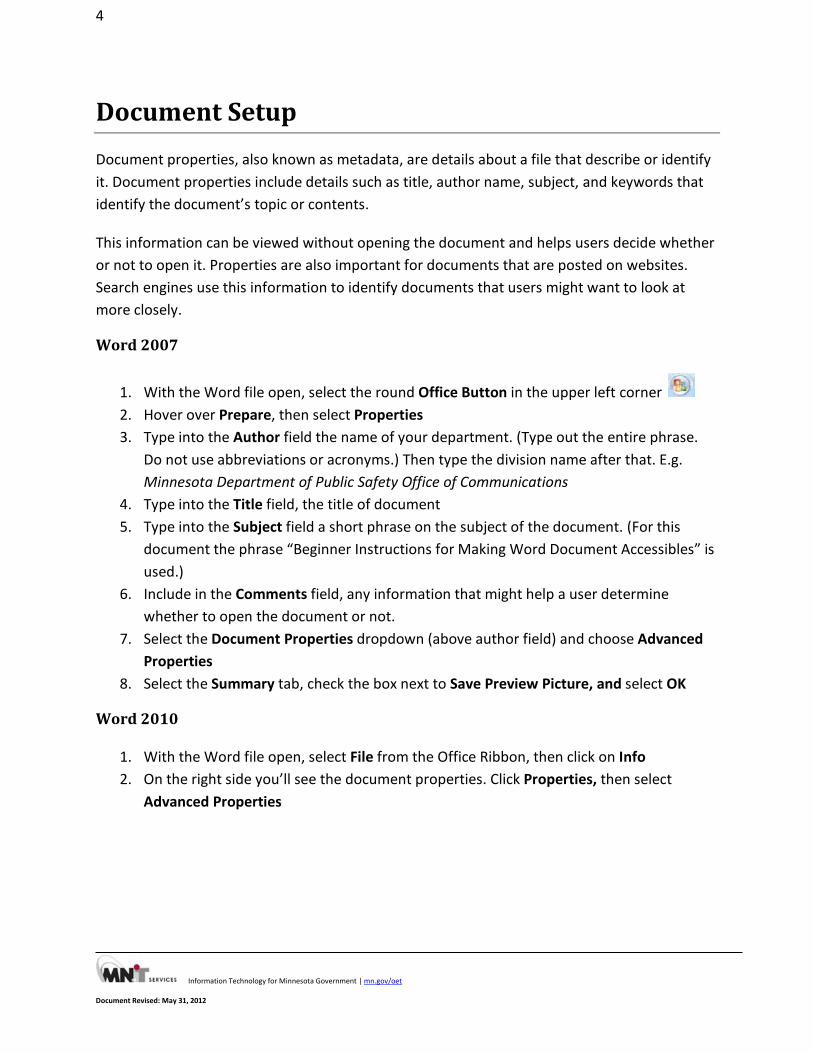
Document Setup Document properties, also known as metadata, are details about a file that describe or identify it. Document properties include details such as title, author name, subject, and keywords that identify the document’s topic or contents.
This information can be viewed without opening the document and helps users decide whether or not to open it. Properties are also important for documents that are posted on websites. Search engines use this information to identify documents that users might want to look at more closely.
Word 2007
1. With the Word file open, select the round Office Button in the upper left corner 2. Hover over Prepare, then select Properties 3. Type into the Author field the name of your department. (Type out the entire phrase.
Do not use abbreviations or acronyms.) Then type the division name after that. E.g. Minnesota Department of Public Safety Office of Communications
4. Type into the Title field, the title of document 5. Type into the Subject field a short phrase on the subject of the document. (For this
document the phrase “Beginner Instructions for Making Word Document Accessibles” is used.)
6. Include in the Comments field, any information that might help a user determine whether to open the document or not.
7. Select the Document Properties dropdown (above author field) and choose Advanced Properties
8. Select the Summary tab, check the box next to Save Preview Picture, and select OK
Word 2010
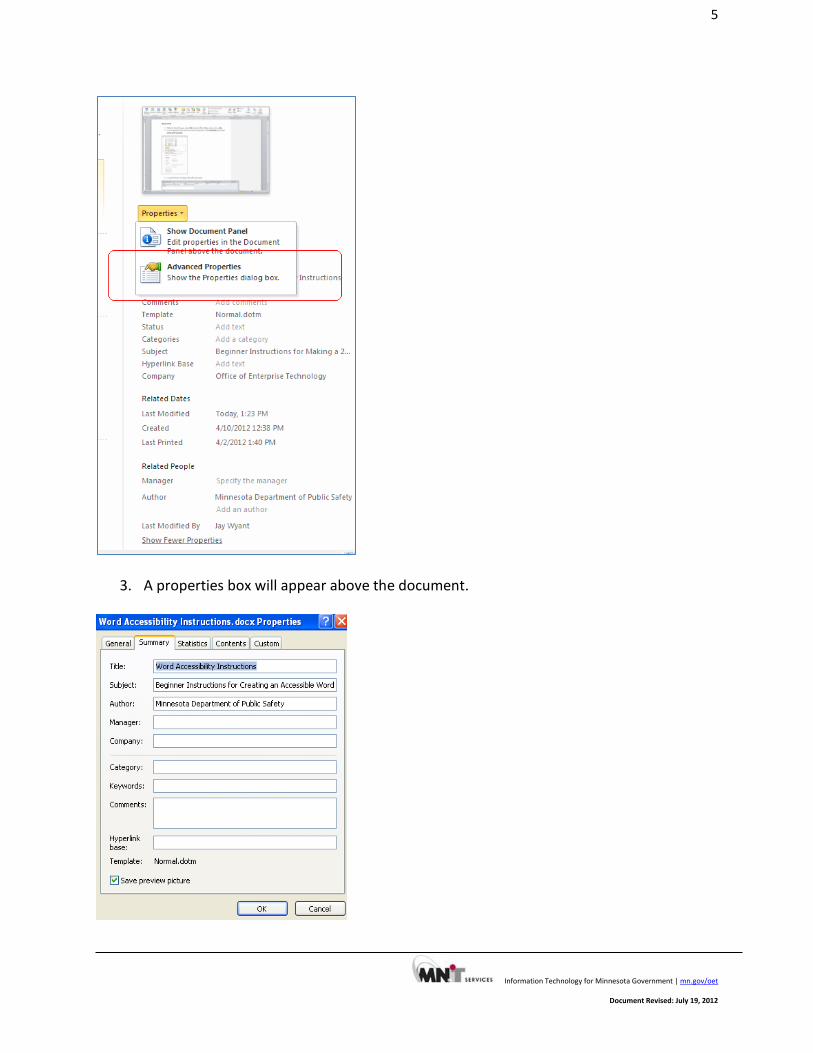
1. With the Word file open, select File from the Office Ribbon, then click on Info 2. On the right side you’ll see the document properties. Click Properties, then select
Advanced Properties
5
Information Technology for Minnesota Government | mn.gov/oet
Document Revised: July 19, 2012
3. A properties box will appear above the document.
6
Information Technology for Minnesota Government | mn.gov/oet Document Revised: May 31, 2012
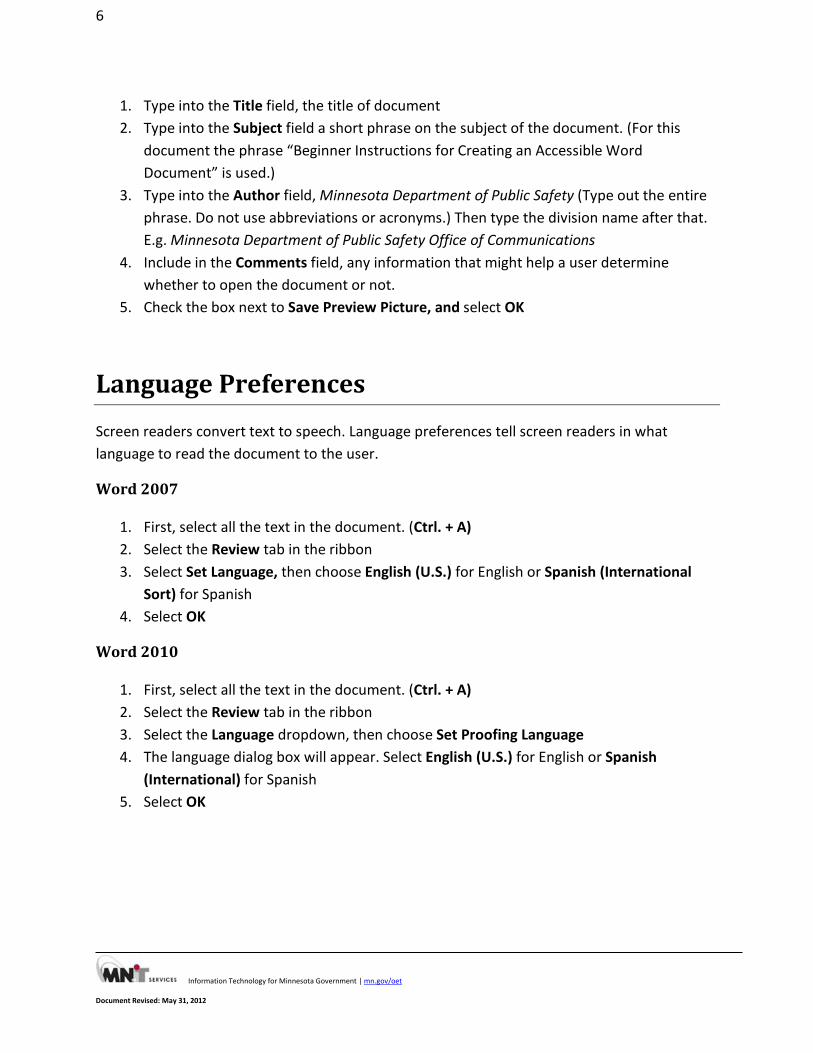
1. Type into the Title field, the title of document 2. Type into the Subject field a short phrase on the subject of the document. (For this
document the phrase “Beginner Instructions for Creating an Accessible Word Document” is used.)
3. Type into the Author field, Minnesota Department of Public Safety (Type out the entire phrase. Do not use abbreviations or acronyms.) Then type the division name after that. E.g. Minnesota Department of Public Safety Office of Communications
4. Include in the Comments field, any information that might help a user determine whether to open the document or not.
5. Check the box next to Save Preview Picture, and select OK
Language Preferences Screen readers convert text to speech. Language preferences tell screen readers in what language to read the document to the user.
Word 2007
1. First, select all the text in the document. (Ctrl. + A) 2. Select the Review tab in the ribbon 3. Select Set Language, then choose English (U.S.) for English or Spanish (International
Sort) for Spanish 4. Select OK
Word 2010
1. First, select all the text in the document. (Ctrl. + A) 2. Select the Review tab in the ribbon 3. Select the Language dropdown, then choose Set Proofing Language 4. The language dialog box will appear. Select English (U.S.) for English or Spanish
(International) for Spanish 5. Select OK

7
Information Technology for Minnesota Government | mn.gov/oet
Document Revised: July 19, 2012
Use of Color Never rely on color to convey meaning. People with low vision or who are color-blind have difficulty reading certain colors. Red and green can be particularly difficult.
For example, to denote whether a task is completed, it’s best to use special characters or checkmarks instead of highlighting them in yellow.
Color may be used as an enhancement.
Lists Always create lists using the bullet or numbering function, or the styles gallery. Do not create a list with hyphens or other characters or graphics.
When a list is created with the bullets or numbering function, a screen reader can tell the user how many items are in the list. It also can call out sub-items. If a list or bullets are created manually by inserting a picture or symbol and then adding text, no instruction will be available to screen readers.
Use bullets and numbering formats to create items in a list by:
1. Selecting bullets or numbers in the ribbon
2. There are different types of bullet styles. Select the dropdown arrow to view the choices.
Styles Most importantly, styles are used to create a reference structure for the document and help users navigate the document. Visually, the style that you choose acts like an outline.
You DO NOT need to use styles for highlighting a section of text with bold, underline, etc.

8
Information Technology for Minnesota Government | mn.gov/oet Document Revised: May 31, 2012
The Styles tool is found under the Home tab in the ribbon. At the most basic level, you will use Normal (paragraph), Heading 1, Heading 2 and Heading 3.
Style Sets
• There are a few different style sets to choose from. To view the styles select the Home tab in the Office Ribbon. Each style set includes sets of formatting (font, font size, color, etc) for paragraph and headings.
• To see more style sets, select Change Styles and hover over Style Sets. You’ll see style sets for include elegant, fancy, modern and more.
• Each style set has a different set of fonts and design. To see how they would appear in a document, hover over each one.
• If you are not satisfied with the selection, you may modify a style. However, you cannot create a new style that is accessible. Only default styles are accessible.
Modify an Existing Style
To modify and existing style to suit your design needs:
1. Right click on the style within a style set and select Modify

9
Information Technology for Minnesota Government | mn.gov/oet
Document Revised: July 19, 2012
A dialog box will appear.
2. Use the font selections under Formatting to design the style. To change indenting or other style elements, select the Format dropdown.
3. Note: It is good practice to leave the “Style based on” field set to “Normal” when you change the normal style
4. Click OK once selections are made.
Fonts
• Text should be at least 12-point type. • It’s best to use fonts that are simple and widely available. Not only are they easier to
read, but they also are available on most computers so you don’t run the risk of a font substitution being required.

10
Information Technology for Minnesota Government | mn.gov/oet Document Revised: May 31, 2012
Apply Paragraph Spacing
Do not use hard returns to create spacing. If you hit “enter” twice, a screen reader interprets the second “enter” as a new paragraph with not text. The screen readers will read the word “blank” out loud for every blank line.
Instead, use styles to adjust the spacing before or after a paragraph. To adjust the amount of space between paragraphs, modify the Normal style.
1. On the Home tab go to the styles section. 2. Right click on the Normal style 3. Select Modify 4. Select Format in the Modify dialog box 5. Select Paragraph 6. Then, select the number of points you want inserted before or after each paragraph.
Proper Use of Headings
To properly use headings, present each one in order. For example, Heading 1 (H1) will serve as the title of the document. You should not use H1 again. Heading 2 can be used after H1 is presented and can be used repeatedly (see example image below). Heading 3 can be used after H2 and can be used repeatedly. Heading 3 is a subcategory of H2, and so on.

11
Information Technology for Minnesota Government | mn.gov/oet
Document Revised: July 19, 2012
Headings create structure for a document like cookbook table of contents, indexes and page tabs create reference structure for categorized recipes.
Here’s an example of proper heading use:
Here is an example of improper heading use:
Apply a Heading Style
To apply a heading style:
1. Select the text you want the style to apply to. 2. Click the style you want in the Styles gallery. 3. Select OK
12
Information Technology for Minnesota Government | mn.gov/oet Document Revised: May 31, 2012
Columns Do not use tables to format columns. Tables read content left to right, not top to bottom. Tables should only be used to present tabular data.
To create columns:
1. Select the View tab, then select Print Layout 2. Select text you want to create as a column 3. Select the Page Layout tab, then select Columns 4. Choose the number of desired columns
Table of Contents Always use the table of contents style feature with linking to create tables of content. Never make a table of contents by typing in the chapter title, a series of dots and the page number.
To create a table of contents:
1. Place your curser where you want the table inserted 2. Click on the References tab, then select the Table of Contents dropdown 3. Select Insert Table of Contents to open the dialog box 4. Select the style of table you want to use the Formats dropdown 5. Select the depth of the table by choosing from the Show Levels dropdown 6. Select OK
Text Boxes Text boxes are not accessible. If a box of text is desirable for layout or design purposes, use a table with a single row, single column. Do not use a text box to insert a picture or graphic.

13
Information Technology for Minnesota Government | mn.gov/oet
Document Revised: July 19, 2012
Headers and Footers Do not place vital content in the header or footer. Screen readers do not read content located in the header or footer. Do use the header or footer or visual content such as letterhead logo and page numbers.
Tables Tables are only useful when they are presented properly. Before creating a table, take time to think about what you want to communicate and determine the best way to organize the information. Keep in mind that screen readers read tables from left to right moving down one row at a time.
After you’ve inserted the table…
Assign a Header Row and First Column
1. Select the table, then click on the Design Tab in the Table Tools ribbon
2. Select the boxes next to Header Row and First Column. If there are no row headings, First Column can be left un-checked.
Modify Header Properties
To properly format a table, create column headings and assign a row header.
1. Highlight the content in the top row 2. Right click, then select Table Properties 3. Select Row, then check the box next to “Repeat as header row at the top of each page”
(even if the table does not go over multiple pages)
When a row header is created, a screen reader associates the cell content with the header by reading the column name before the text in each cell.

14
Information Technology for Minnesota Government | mn.gov/oet Document Revised: May 31, 2012
First Name Last Name Phone Email Website
Add a Bookmark to the Table
In the top left cell of the table, assign a bookmark.
1. Place the curser in the cell, select Insert from the ribbon, then select Bookmark from the link tab
2. A bookmark dialog box will pop up. Bookmark naming conventions may not contain special characters, spaces or hyphens. However, underscores are acceptable.
3. Assign a meaningful name to the bookmark and click Add
Hyperlinks
• Do not name the link “Click Here” Choose a link name that will make sense when it is spoken out of context.
• When a screen reader encounters a hyperlink, it identifies the link so users know they can select it to get more information.
• Screen readers also can access all links in a document simultaneously by calling them up a list. That’s why it’s important that links makes sense out of context.
Create a Hyperlink
To create a hyperlink:
1. Highlight the text you want to hyperlink, and then right click to display the pop-up box. 2. Select Hyperlink to open the insert hyperlink dialog box. 3. Type or paste the URL into the Address field. Make sure that the address begins with
http:// or https://. 4. Click OK.
Add a Screen Tip to the Hyperlink
A screen tip provides helpful instructions that pop up when you hover over a hyperlink. They give the user information about what they will find on the linked page. The screen tip is most useful when the link is not sufficiently descriptive. The tip needs to be descriptive yet brief.
To create a screen tip:
15
Information Technology for Minnesota Government | mn.gov/oet
Document Revised: July 19, 2012
1. Select the text or image 2. Right click and select Edit Hyperlink 3. Click on ScreenTips in the upper right corner of the dialog box 4. In the ScreenTips Text field, type in your screen tip 5. Select OK 6. Select OK, again
Hover over the link below to the Department of Public Safety Website and you’ll see a screen tip that says “Find Minnesota driver’s license info, fire safety tips, emergency plans and more.”
Visit the Department of Public Safety Website
Creating Documents for Print
If you are creating a document designed to be printed as a handout or reference sheet, then it is good practice to include the URL text in the document. If descriptive text is linked, then the URL should not be an active link.
Visit the Department of Public Safety Website (https://dps.mn.gov/)
Images Screen readers are computer programs. They are not capable of looking at a picture and explaining it to someone who cannot see it. Humans need to intervene by looking at the picture and describing it so the screen reader can, in turn, read that explanation to the user. You can use the Alt (alternative) Text tool to create these descriptions.
Note: If an image doesn’t communicate essential information the Alt text should be short and simple. (E.g. Department of Public Safety Logo, Two Bumble Bees, Orange Flower)
Add Alt Text Icon to Quick Access Toolbar
So you may easily access the alt text feature, add it to the quick access toolbar:
1. Select the quick access toolbar dropdown at the top of the screen, then select More Commands

16
Information Technology for Minnesota Government | mn.gov/oet Document Revised: May 31, 2012
2. A dialog box will pop up. From the Choose commands from dropdown, select Commands not in the ribbon, highlight Alt Text, click Add, then select OK
17
Information Technology for Minnesota Government | mn.gov/oet
Document Revised: July 19, 2012
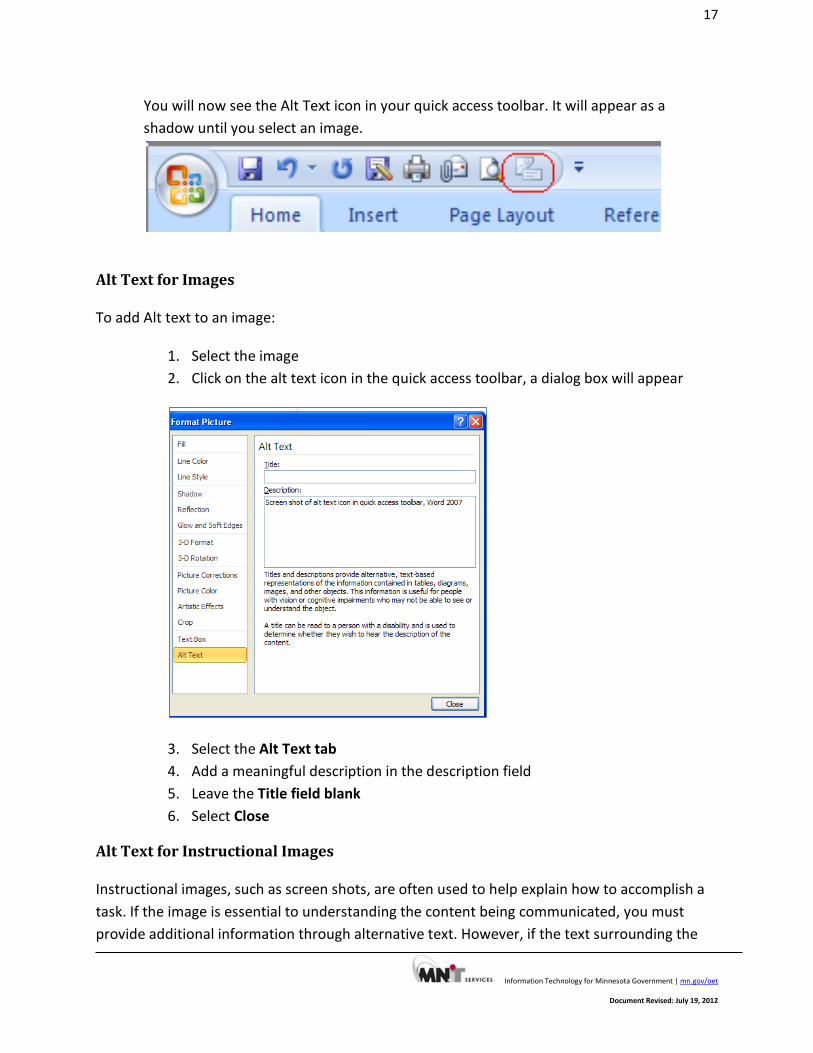
You will now see the Alt Text icon in your quick access toolbar. It will appear as a shadow until you select an image.
Alt Text for Images
To add Alt text to an image:
1. Select the image 2. Click on the alt text icon in the quick access toolbar, a dialog box will appear
3. Select the Alt Text tab 4. Add a meaningful description in the description field 5. Leave the Title field blank 6. Select Close
Alt Text for Instructional Images
Instructional images, such as screen shots, are often used to help explain how to accomplish a task. If the image is essential to understanding the content being communicated, you must provide additional information through alternative text. However, if the text surrounding the

18
Information Technology for Minnesota Government | mn.gov/oet Document Revised: May 31, 2012
screen shot provides the instructions to the user, you can use simple, less detailed alt text, such as “Screen shot of Table Properties dialog box described above.”
Charts and Graphs Like images, charts and graphs present information in a visual format. In Word 2010 you can assign Alt text, but 2007 does not provide the same function.
Word 2007
Provide meaningful text around a chart or graph that describes the information in the chart.
Word 2010
In Word 2010 you can assign Alt text to a chart or graph.
If meaningful text surrounds the chart or graph, the Alt text does not need to be detailed. Something simple, such as “pie chart depicting the information described in the paragraph above,” is sufficient.
If there is not sufficient description in the surrounding paragraphs, give detailed explanation for the description. See the example below.
Note: Do not rely on color alone to differentiate information in charts and graphs. You can still use color to differentiate information as long as you:
• Use patterns • Include the actual data • Add labels that identify different elements

19
Information Technology for Minnesota Government | mn.gov/oet
Document Revised: July 19, 2012
To assign Alt text:
1. Select the chart, right click and select Format Chart Area from the menu 2. Select Alt. Text and type in the title and description 3. Select Close
Forms (Word 2010) Note: Accessible Word forms are best created in Word 2010.
Organizing Forms
A good form is clear, simple and straightforward. The user should have no trouble knowing what kind of information you’re asking them to provide and exactly where the information should be entered.
• Don’t use tables or Excel to create forms. • Word 2010 has several tools that you can use to create accessible forms. • Always use form fields if you want people to enter information or answer specific
questions. • When you’re using form fields, make sure that they are placed next to the question or
text inquiry.
20
Information Technology for Minnesota Government | mn.gov/oet Document Revised: May 31, 2012
• Remember, people typically review information from left to right. Screen readers read information in the same way.
• Always include descriptive text for each form field.
Adding Descriptive Text to a Form Field
Screen readers beep when they encounter form fields. This lets the user know that the screen reader is going into “forms mode.” When a screen reader is in forms mode, it only reads the form field. It does not read the surrounding text.
Open the Developer Tab
You must use the Developer tab to create a form field. To add the Developer tab to your Ribbon, click on the File tab. Then select Options and select Customize Ribbon. Check the Developer option. Click OK. The Developer tab will now appear on your Ribbon.
Insert a Form Field
To insert a form field:
1. Click on the Developer tab 2. Within the Controls area, select the Legacy Forms Icon (It looks like a folder with tools
in front of it.) 3. Within Legacy Forms, select the type of form field (text box, check box, calendar, drop-
down menu) that suits your needs. 4. The form field will appear on your document at the spot where your cursor was placed.
Add Descriptive Text to a Form Field
To add descriptive text to your form field:
1. Right click on the form field in your document 2. Select Properties and click Add Help Text 3. You can to tell users what information you want them to enter in the form field by
checking the Type Your Own button and entering the text.
Protection Only protect a document if you don’t want people to modify it.

21
Information Technology for Minnesota Government | mn.gov/oet
Document Revised: July 19, 2012
Word 2007
1. Go to the Review tab, then select Protect Document (the Restrict Formatting and Editing pane will open)
2. In Section 2, select the box Allow only this type of editing in the document 3. From the dropdown box, select No Changes (Read only) 4. Then, under Section 3, click Yes, Start Enforcement Protection to open the dialog box 5. You do not have to choose a password. Click OK 6. Nobody, including you, will be able to make changes to the document (Note: You can
edit the document by stopping protection.)
Word 2010
7. Go to the File tab, choose Info and select Protect Documents 8. Click on Restrict Editing (the Restrict Formatting and Editing pane will open) 9. In Section 2, select the box Allow only this type of editing in the document 10. From the dropdown box, select No Changes (Read only) 11. Then, under Section 3, click Yes, Start Enforcement Protection to open the dialog box 12. You do not have to choose a password. Click OK 13. Nobody, including you, will be able to make changes to the document (Note: You can
edit the document by stopping protection.)
22
Information Technology for Minnesota Government | mn.gov/oet Document Revised: May 31, 2012
Run Accessibility Checker (2010 Only) The accessibility checker in Word 2010 helps document creators ensure the file is accessible. The checker describes each specific problem (if any), informs the creator why the issue is important and gives specific instructions for fixing.
To run the accessibility checker in Word 2010:
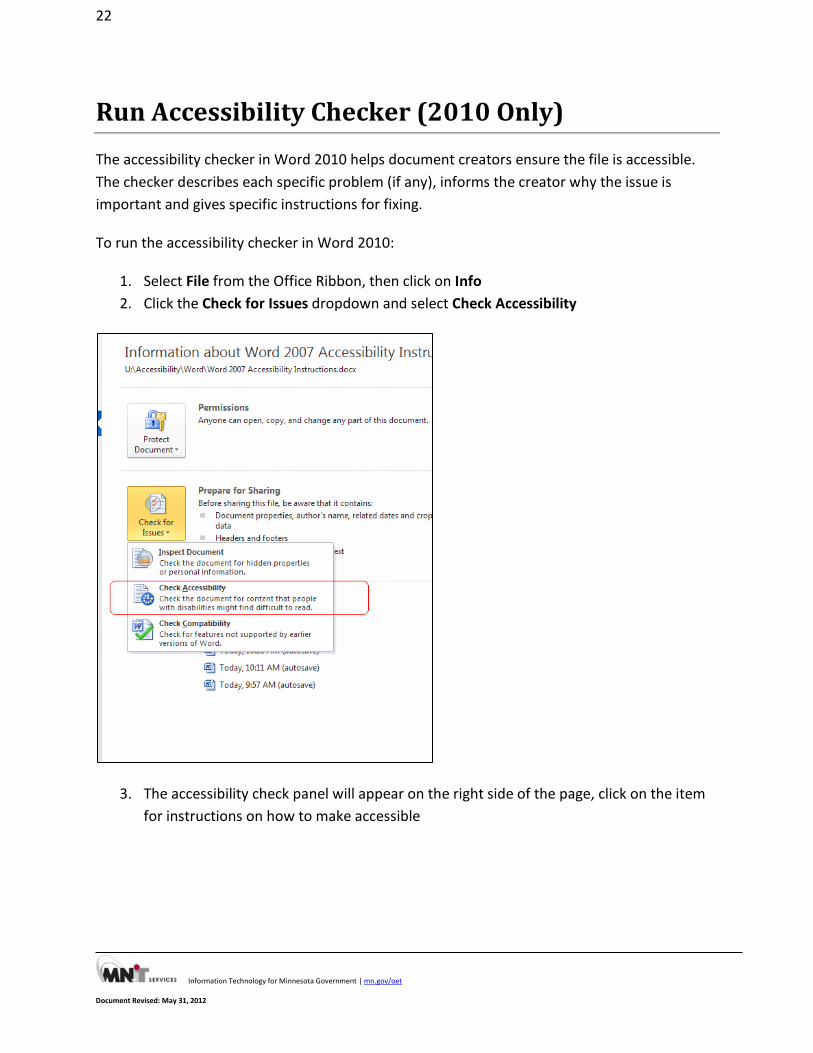
1. Select File from the Office Ribbon, then click on Info 2. Click the Check for Issues dropdown and select Check Accessibility
3. The accessibility check panel will appear on the right side of the page, click on the item for instructions on how to make accessible

23
Information Technology for Minnesota Government | mn.gov/oet
Document Revised: July 19, 2012

24
Information Technology for Minnesota Government | mn.gov/oet Document Revised: May 31, 2012
PDF Conversion To convert a document to an accessible PDF, you need Adobe Acrobat. (To test the PDF for accessibility, you need the Pro version.) If you are not trained in creating accessible PDFs, contact your supervisor to find out if there is someone in your division who is or if you need to be trained.
If you have been trained in creating accessible PDFs, follow the instructions for creating an accessible PDF.
Note: You cannot use the save as PDF feature in Word to create an accessible PDF.
25
Information Technology for Minnesota Government | mn.gov/oet
Document Revised: July 19, 2012
Accessibility Checklist Document Setup
Setting up a document adds important information so that users know what they are opening, and allows them to open the document with ease.
� Properties have been assigned to the document. � Language has been set to U.S. English, unless it is a translated document. � Protection has been set after document is complete.
Content Structure
Assigning structure to your content provides important information to the computer about how the content is organized. It allows users to efficiently navigate through the document, and fully utilize the content.
� No text boxes are used � Styles are used for paragraphs (Normal style). � Styles are used for title, headings, and all subheadings. � Styles are used for bulleted and numerical list items. � Styles are used for the table of contents. � Columns feature is used for laying text out in multiple columns. � Essential information is in the central document, not just header and/or footer areas. � Table headings and data cells are organized logically. � Tables have the header row, bookmark and Alt text assigned. � Tables have a bookmark assigned in the top left cell. � Hyperlink names are meaningful, begin with http:// or https://, and contain a tool tip. � Fill-in forms are meaningfully and logically organized, and include form-fields.
Descriptive Text for Sight-based Content
Without descriptive text, communication is indirect and unclear because it relies on the users to be able to see and interpret the information in the picture.
� Color is not used to convey meaning � Pictures, both decorative and informational, include alternative text. � Charts and graphs include alternative text or descriptive language in the surrounding
content � Form fields include alternative “help” text.