Creating a Blog at Blogger€¦ · Creating a Blog at Blogger.com Getting Started at Blogger.com...
22
Creating a Blog at Blogger.com Getting Started at Blogger.com Blogger.com (Click on the link to go to Blogger.) boasts that you can create a blog in three easy steps. You really can. This is a powerful, yet fairly easy blogging system. I think you will enjoy learning to use it. The three steps are: 1. Create an account 2. Name your blog 3. Choose a template (the layout and look of your blog) We begin by clicking on the big orange button: "Create Your Blog Now." Creating an Account 1. You are required to have a valid email address. You are not required to use gMail (Both Blogger and gMail are owned by Google.) 2. Choose a password. The system will interactively indicate how secure the password is. 3. Your display name is the name that appears on your account. 4. To prevent little internet robots from creating fake accounts, you must type in the strange little letter sequence. If you can not make out what it is, you can click on the handicapped icon and hear it spoken to you. Creating a Blog at Blogger.com - 1
Transcript of Creating a Blog at Blogger€¦ · Creating a Blog at Blogger.com Getting Started at Blogger.com...
Creating a Blog at Blogger.com
Getting Started at Blogger.com
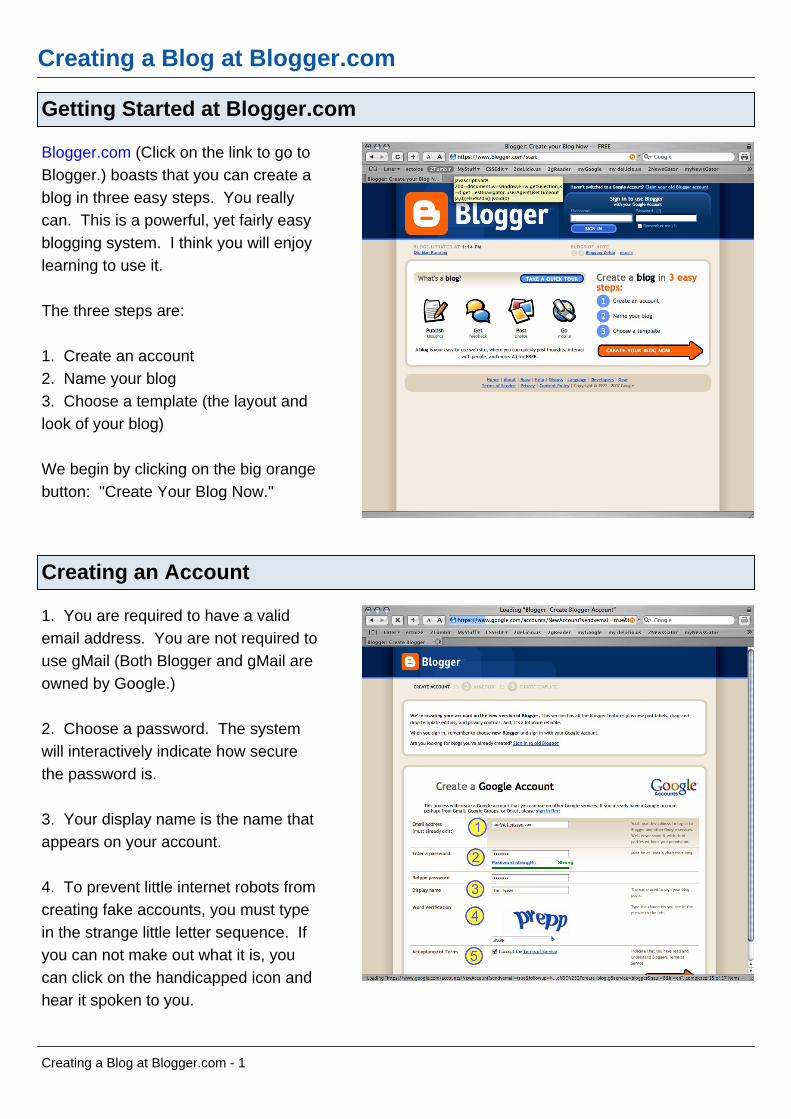
Blogger.com (Click on the link to go toBlogger.) boasts that you can create ablog in three easy steps. You reallycan. This is a powerful, yet fairly easyblogging system. I think you will enjoylearning to use it.
The three steps are:
1. Create an account2. Name your blog3. Choose a template (the layout andlook of your blog)
We begin by clicking on the big orangebutton: "Create Your Blog Now."
Creating an Account
1. You are required to have a validemail address. You are not required touse gMail (Both Blogger and gMail areowned by Google.)
2. Choose a password. The systemwill interactively indicate how securethe password is.
3. Your display name is the name thatappears on your account.
4. To prevent little internet robots fromcreating fake accounts, you must typein the strange little letter sequence. Ifyou can not make out what it is, youcan click on the handicapped icon andhear it spoken to you.
Creating a Blog at Blogger.com - 1
5. You must accept the terms ofservice.
Naming Your New Blog
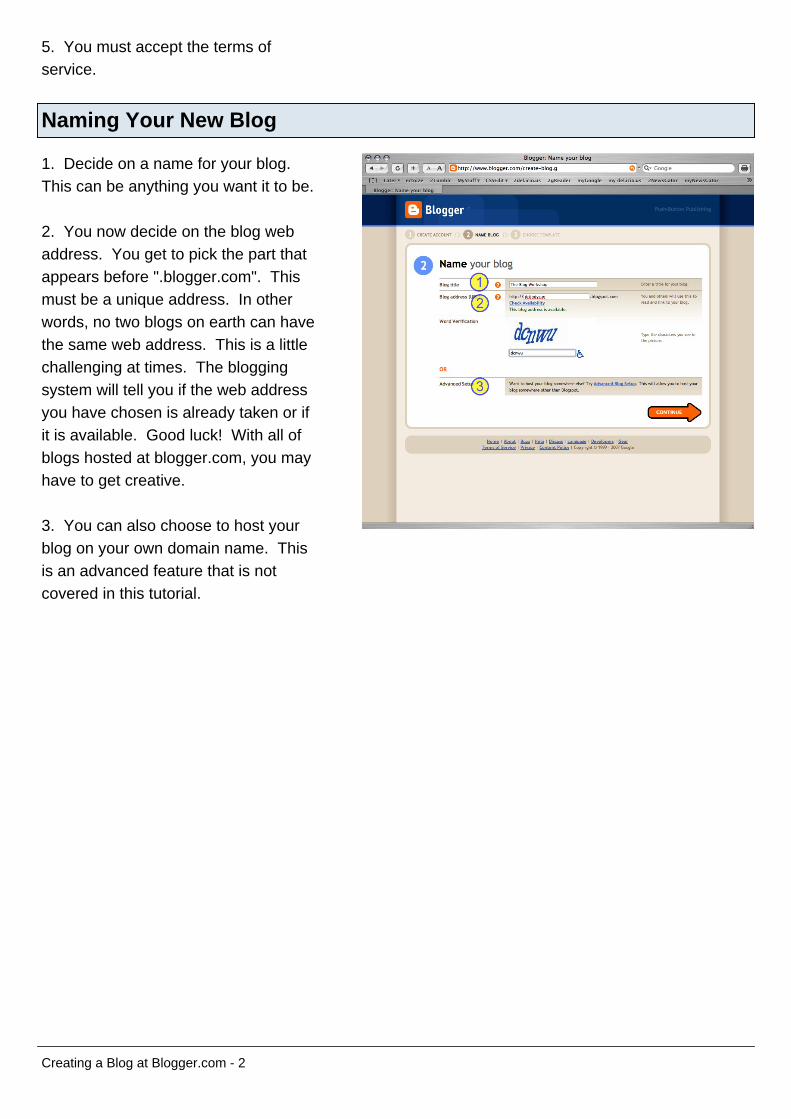
1. Decide on a name for your blog. This can be anything you want it to be.
2. You now decide on the blog webaddress. You get to pick the part thatappears before ".blogger.com". Thismust be a unique address. In otherwords, no two blogs on earth can havethe same web address. This is a littlechallenging at times. The bloggingsystem will tell you if the web addressyou have chosen is already taken or ifit is available. Good luck! With all ofblogs hosted at blogger.com, you mayhave to get creative.
3. You can also choose to host yourblog on your own domain name. Thisis an advanced feature that is notcovered in this tutorial.
Creating a Blog at Blogger.com - 2
Choose Your Template
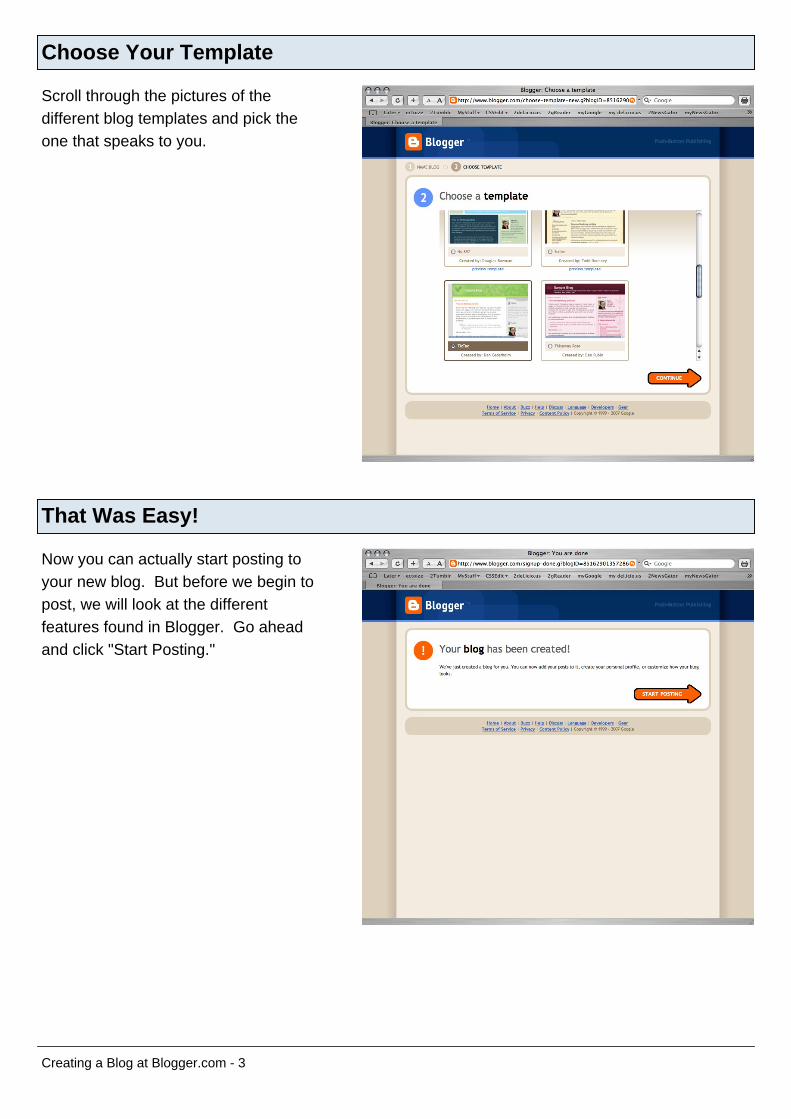
Scroll through the pictures of thedifferent blog templates and pick theone that speaks to you.
That Was Easy!
Now you can actually start posting toyour new blog. But before we begin topost, we will look at the differentfeatures found in Blogger. Go aheadand click "Start Posting."
Creating a Blog at Blogger.com - 3
Three Tabs with Subsections
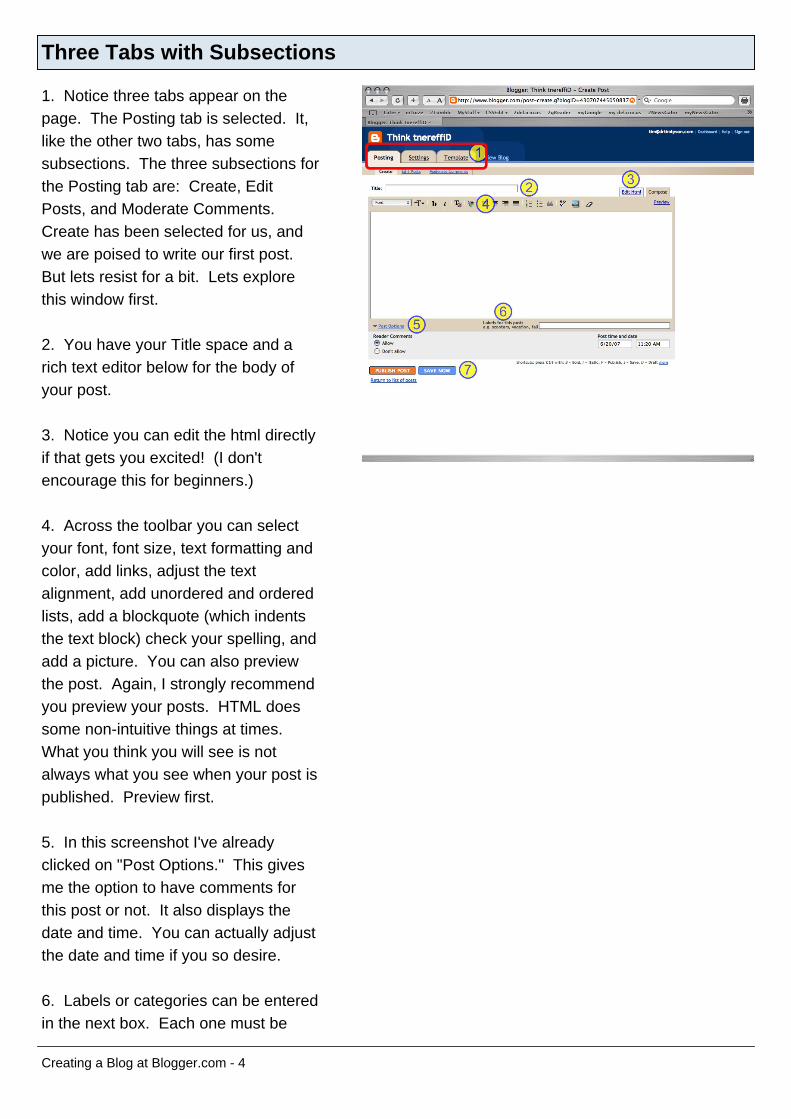
1. Notice three tabs appear on thepage. The Posting tab is selected. It,like the other two tabs, has somesubsections. The three subsections forthe Posting tab are: Create, EditPosts, and Moderate Comments. Create has been selected for us, andwe are poised to write our first post. But lets resist for a bit. Lets explorethis window first.
2. You have your Title space and arich text editor below for the body ofyour post.
3. Notice you can edit the html directlyif that gets you excited! (I don'tencourage this for beginners.)
4. Across the toolbar you can selectyour font, font size, text formatting andcolor, add links, adjust the textalignment, add unordered and orderedlists, add a blockquote (which indentsthe text block) check your spelling, andadd a picture. You can also previewthe post. Again, I strongly recommendyou preview your posts. HTML doessome non-intuitive things at times. What you think you will see is notalways what you see when your post ispublished. Preview first.
5. In this screenshot I've alreadyclicked on "Post Options." This givesme the option to have comments forthis post or not. It also displays thedate and time. You can actually adjustthe date and time if you so desire.
6. Labels or categories can be enteredin the next box. Each one must be
Creating a Blog at Blogger.com - 4
separated from the others with acomma. After you add labels for thefirst time, a link appears next to thewhite box. The link reads "Show All." When you click on it, all of the labelsyou have used to date appear beneathas links. To add an existing label orcategory to a post, simply click on itfrom that list. It will then appear in thewhite text area for you without yourneeding to type it again.
7. You can save your post withoutpublishing it. You can save this editand/or publish it at a later time. Youcan publish the post immediately.
Posting: Edit Post Subsection
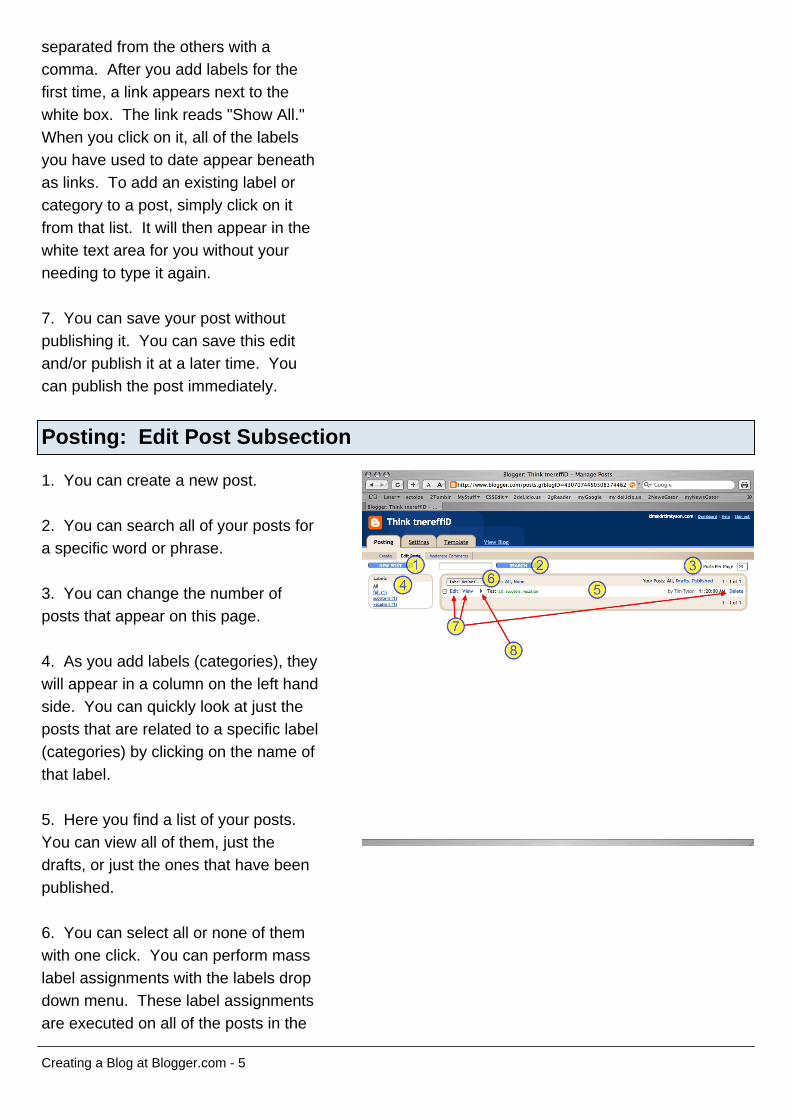
1. You can create a new post.
2. You can search all of your posts fora specific word or phrase.
3. You can change the number ofposts that appear on this page.
4. As you add labels (categories), theywill appear in a column on the left handside. You can quickly look at just theposts that are related to a specific label(categories) by clicking on the name ofthat label.
5. Here you find a list of your posts. You can view all of them, just thedrafts, or just the ones that have beenpublished.
6. You can select all or none of themwith one click. You can perform masslabel assignments with the labels dropdown menu. These label assignmentsare executed on all of the posts in the
Creating a Blog at Blogger.com - 5
list that have been selected by clickingon the box to the left of the post name.
7. You can edit, view, or delete a postindividually by clicking on the word youwish to execute (edit, view, or delete)next to the post.
8. By clicking on the little twiddle (thecorrect name for the little arrow thingienext to the post's title in the list: savethat for your next trivia contest), youcan see a tiny version of the post.
As you can see, this window ispower-packed with features. Playaround in here before you start postingyour really important "stuff" so you geta sense for what you can do.
Posting: Moderate Comments Subcategory
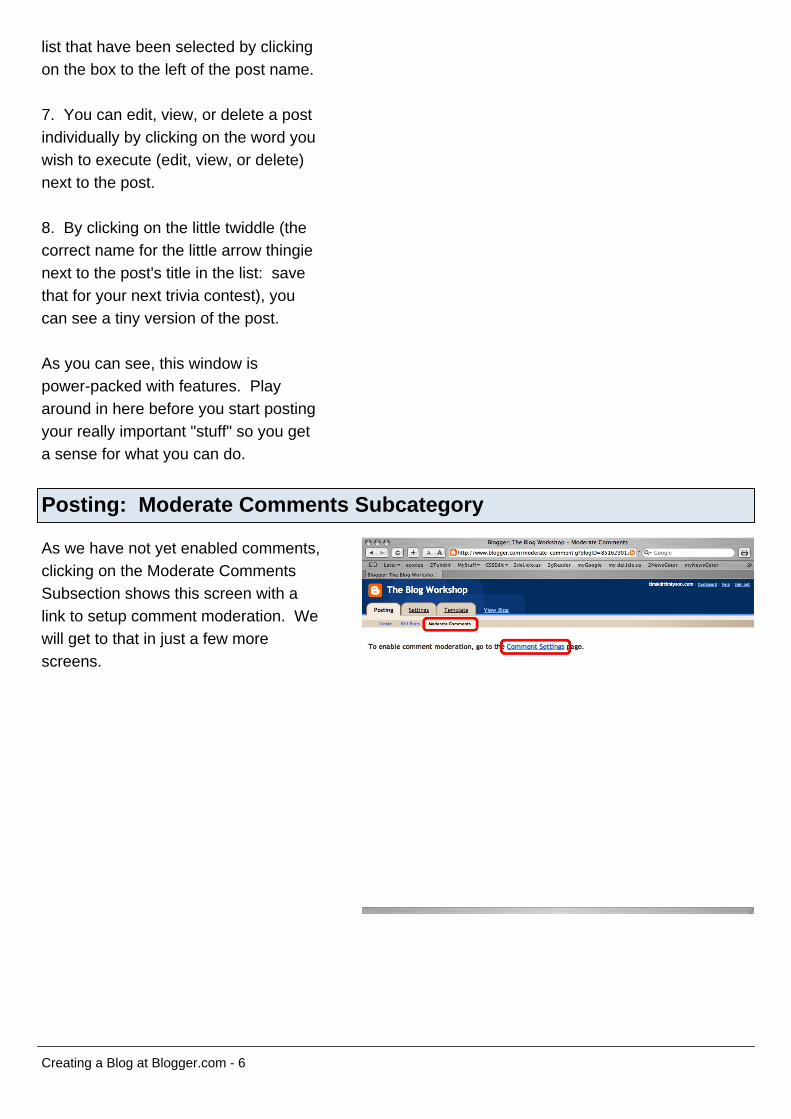
As we have not yet enabled comments,clicking on the Moderate CommentsSubsection shows this screen with alink to setup comment moderation. Wewill get to that in just a few morescreens.
Creating a Blog at Blogger.com - 6
The Settings Tab: The Basic Subsection
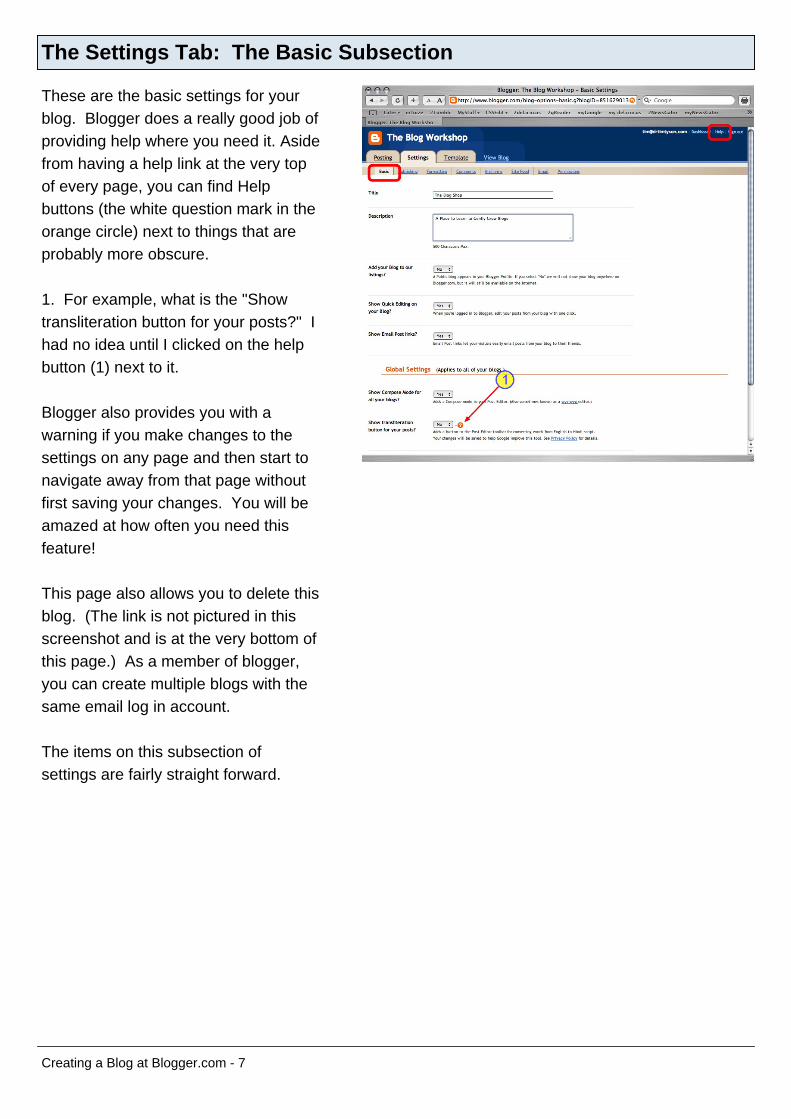
These are the basic settings for yourblog. Blogger does a really good job ofproviding help where you need it. Asidefrom having a help link at the very topof every page, you can find Helpbuttons (the white question mark in theorange circle) next to things that areprobably more obscure.
1. For example, what is the "Showtransliteration button for your posts?" Ihad no idea until I clicked on the helpbutton (1) next to it.
Blogger also provides you with awarning if you make changes to thesettings on any page and then start tonavigate away from that page withoutfirst saving your changes. You will beamazed at how often you need thisfeature!
This page also allows you to delete thisblog. (The link is not pictured in thisscreenshot and is at the very bottom ofthis page.) As a member of blogger,you can create multiple blogs with thesame email log in account.
The items on this subsection ofsettings are fairly straight forward.
Creating a Blog at Blogger.com - 7
The Settings Tab: The Publishing Subsection
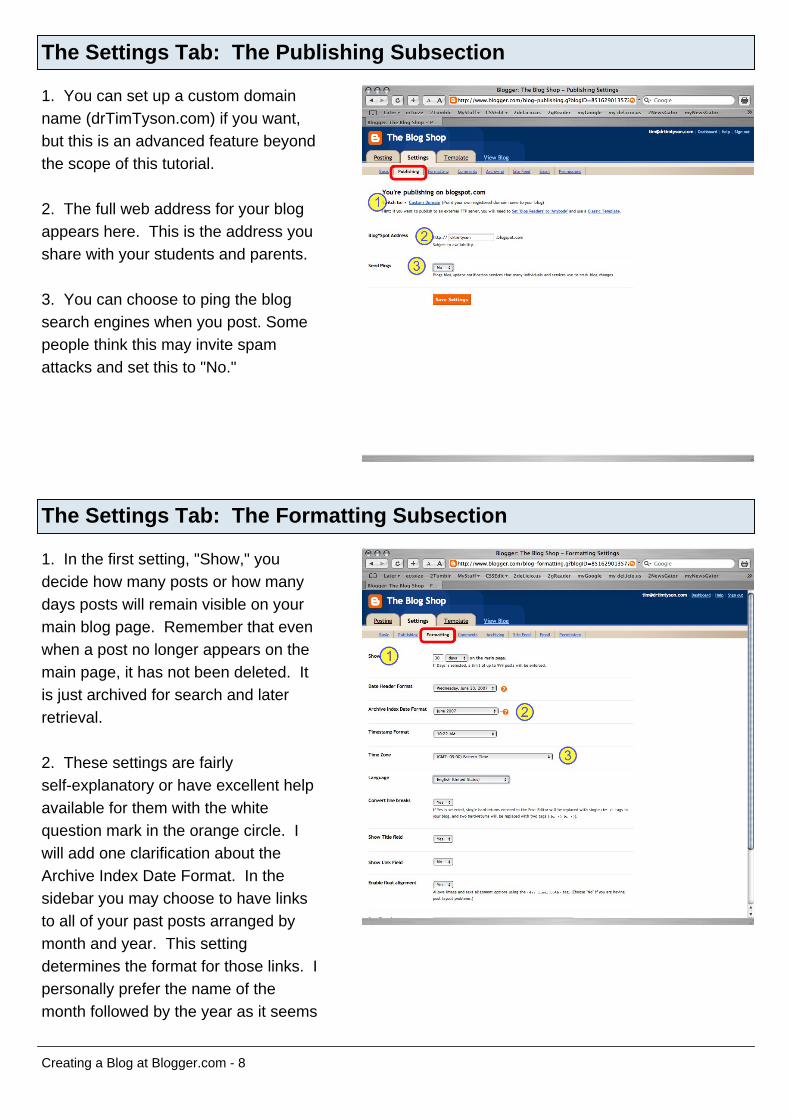
1. You can set up a custom domainname (drTimTyson.com) if you want,but this is an advanced feature beyondthe scope of this tutorial.
2. The full web address for your blogappears here. This is the address youshare with your students and parents.
3. You can choose to ping the blogsearch engines when you post. Somepeople think this may invite spamattacks and set this to "No."
The Settings Tab: The Formatting Subsection
1. In the first setting, "Show," youdecide how many posts or how manydays posts will remain visible on yourmain blog page. Remember that evenwhen a post no longer appears on themain page, it has not been deleted. Itis just archived for search and laterretrieval.
2. These settings are fairlyself-explanatory or have excellent helpavailable for them with the whitequestion mark in the orange circle. Iwill add one clarification about theArchive Index Date Format. In thesidebar you may choose to have linksto all of your past posts arranged bymonth and year. This settingdetermines the format for those links. Ipersonally prefer the name of themonth followed by the year as it seems
Creating a Blog at Blogger.com - 8
easier to grasp and understand at aglance.
3. Making sure you have the correcttime zone selected is important. Theserver on which your blog is locatedmay be in a different time zone andcould conceivably be on a different dayof the week. This information is usedto assign a date and time to each postwhen you publish it.
The Settings Tab: The Comments Subsection
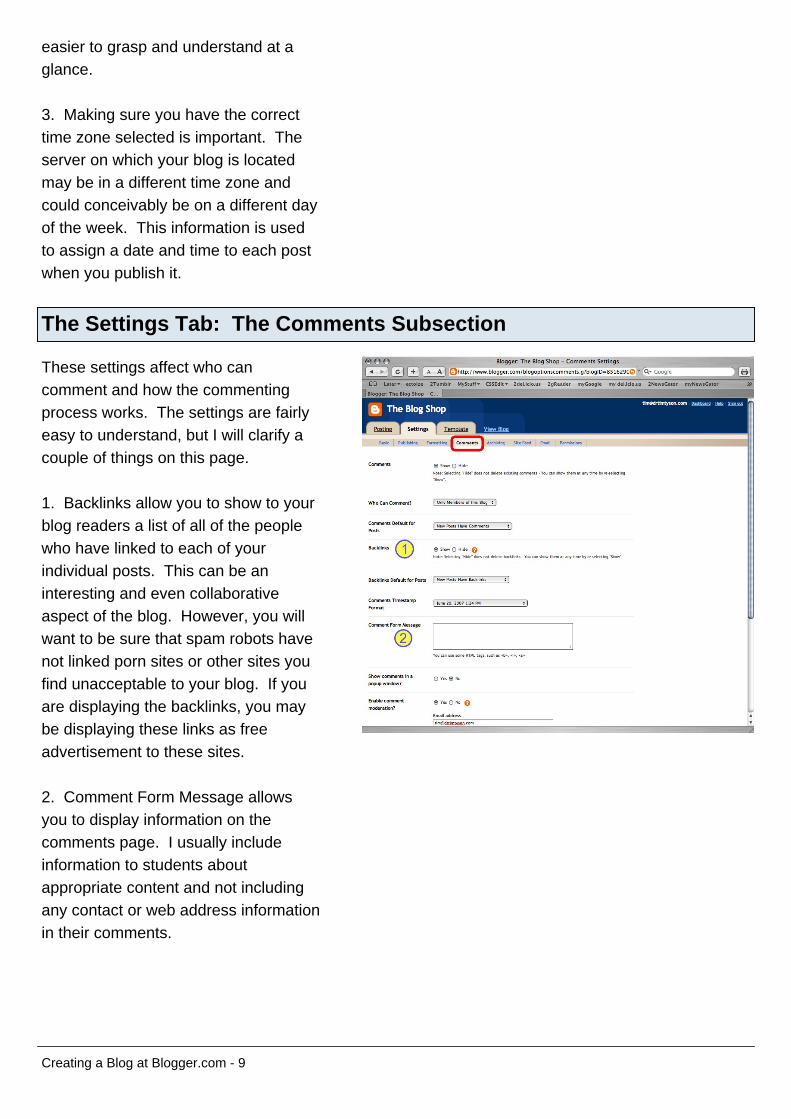
These settings affect who cancomment and how the commentingprocess works. The settings are fairlyeasy to understand, but I will clarify acouple of things on this page.
1. Backlinks allow you to show to yourblog readers a list of all of the peoplewho have linked to each of yourindividual posts. This can be aninteresting and even collaborativeaspect of the blog. However, you willwant to be sure that spam robots havenot linked porn sites or other sites youfind unacceptable to your blog. If youare displaying the backlinks, you maybe displaying these links as freeadvertisement to these sites.
2. Comment Form Message allowsyou to display information on thecomments page. I usually includeinformation to students aboutappropriate content and not includingany contact or web address informationin their comments.
Creating a Blog at Blogger.com - 9
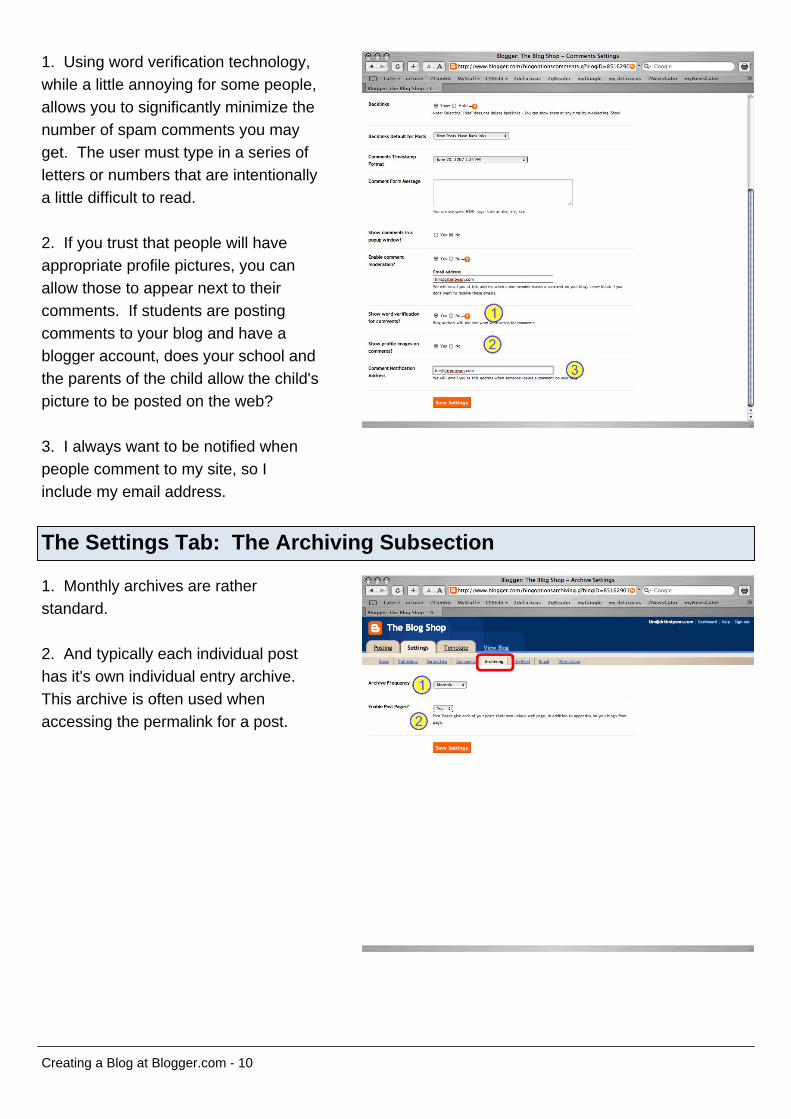
1. Using word verification technology,while a little annoying for some people,allows you to significantly minimize thenumber of spam comments you mayget. The user must type in a series ofletters or numbers that are intentionallya little difficult to read.
2. If you trust that people will haveappropriate profile pictures, you canallow those to appear next to theircomments. If students are postingcomments to your blog and have ablogger account, does your school andthe parents of the child allow the child'spicture to be posted on the web?
3. I always want to be notified whenpeople comment to my site, so Iinclude my email address.
The Settings Tab: The Archiving Subsection
1. Monthly archives are ratherstandard.
2. And typically each individual posthas it's own individual entry archive. This archive is often used whenaccessing the permalink for a post.
Creating a Blog at Blogger.com - 10
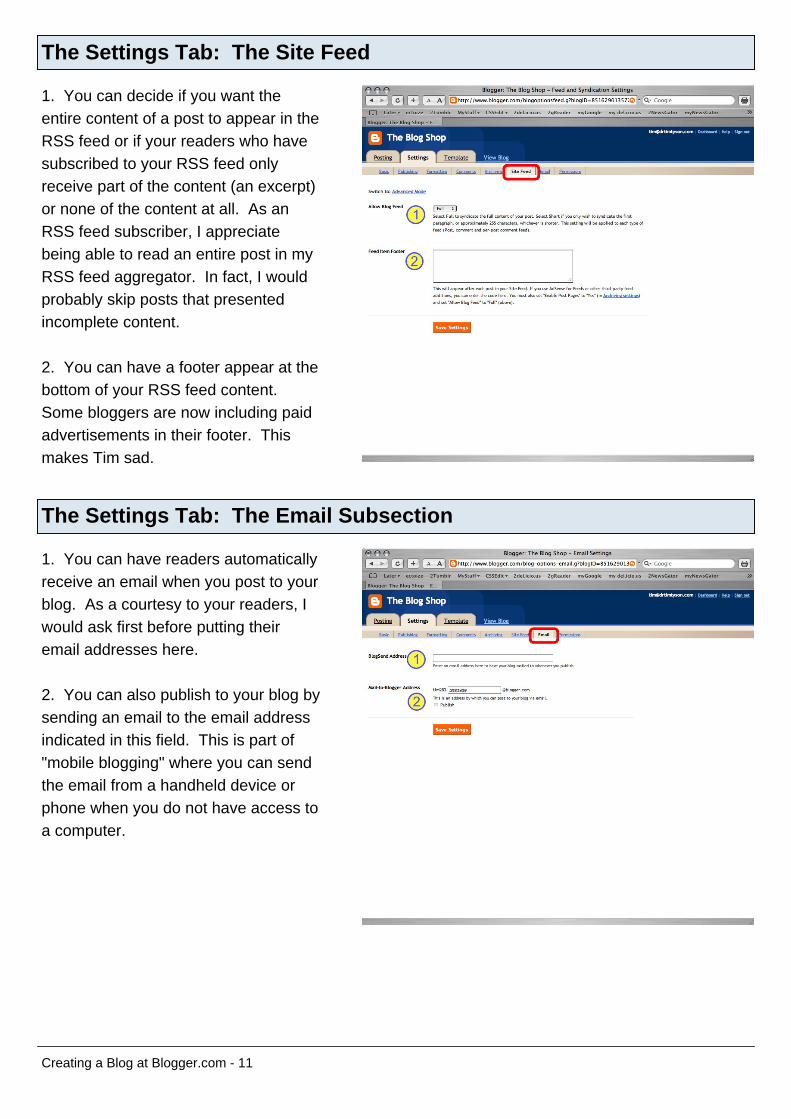
The Settings Tab: The Site Feed
1. You can decide if you want theentire content of a post to appear in theRSS feed or if your readers who havesubscribed to your RSS feed onlyreceive part of the content (an excerpt)or none of the content at all. As anRSS feed subscriber, I appreciatebeing able to read an entire post in myRSS feed aggregator. In fact, I wouldprobably skip posts that presentedincomplete content.
2. You can have a footer appear at thebottom of your RSS feed content. Some bloggers are now including paidadvertisements in their footer. Thismakes Tim sad.
The Settings Tab: The Email Subsection
1. You can have readers automaticallyreceive an email when you post to yourblog. As a courtesy to your readers, Iwould ask first before putting theiremail addresses here.
2. You can also publish to your blog bysending an email to the email addressindicated in this field. This is part of"mobile blogging" where you can sendthe email from a handheld device orphone when you do not have access toa computer.
Creating a Blog at Blogger.com - 11
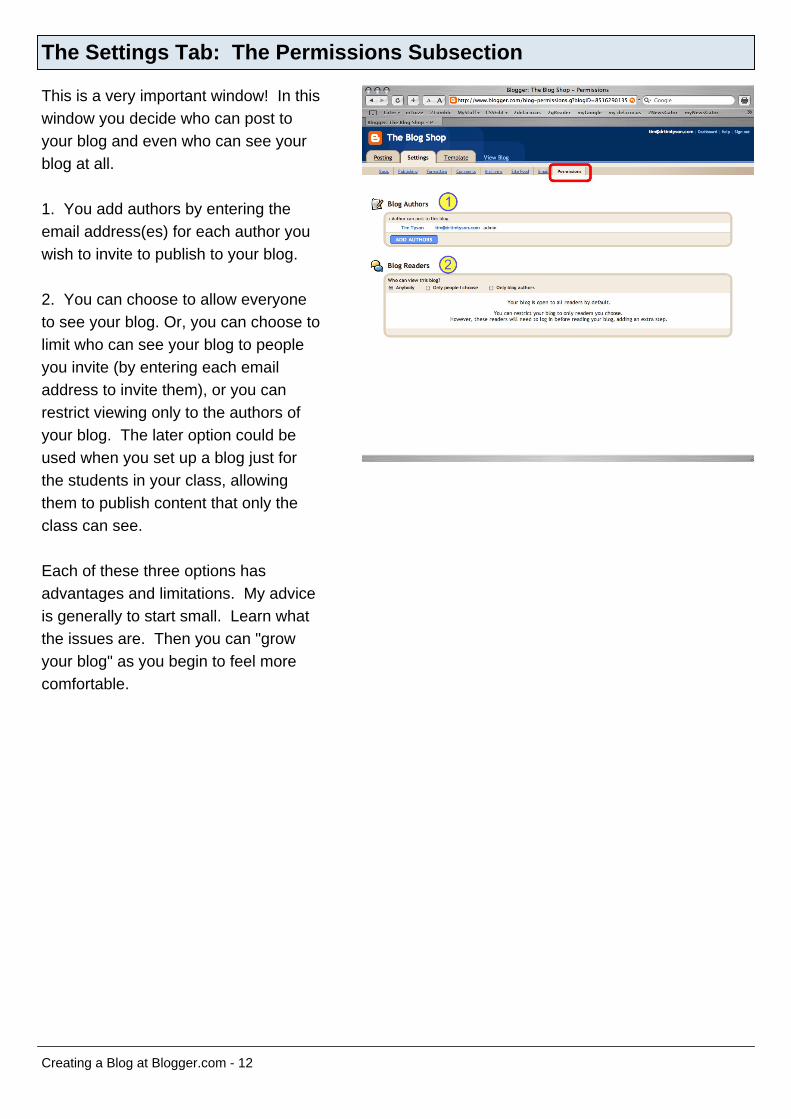
The Settings Tab: The Permissions Subsection
This is a very important window! In thiswindow you decide who can post toyour blog and even who can see yourblog at all.
1. You add authors by entering theemail address(es) for each author youwish to invite to publish to your blog.
2. You can choose to allow everyoneto see your blog. Or, you can choose tolimit who can see your blog to peopleyou invite (by entering each emailaddress to invite them), or you canrestrict viewing only to the authors ofyour blog. The later option could beused when you set up a blog just forthe students in your class, allowingthem to publish content that only theclass can see.
Each of these three options hasadvantages and limitations. My adviceis generally to start small. Learn whatthe issues are. Then you can "growyour blog" as you begin to feel morecomfortable.
Creating a Blog at Blogger.com - 12

The Template Tab
This tab allows you to change whatappears on your blog and the way itlooks: the template. It has foursubsections: Page Elements, Fontsand Colors, Edit HTML, and Pick NewTemplate.
1. Lets start with Page Elements. Withthis tab you decide what content youwant on your blog and where you wantit to appear on the page. You havethese main sections to work with: TheNavBar at the very top (presently blue),the Header, the Blog Posts, theSidebar (on the right side) with differentelements or "modules" (currently in thisexample you see Blog Archives andAbout Me), and a footer at the bottomof the page. Each of these can beedited by clicking on the Edit link. Andyou can rearrange the order of the"modules" in the sidebar by draggingthem up or down.
2. If you want to add additionalmodules to the sidebar, click on the"Add a Page Element" link.
We will explore each feature beginningwith editing the Banner. To edit theHeader, simply click on the Edit buttonin the Header's box.
Creating a Blog at Blogger.com - 13

Configure the Header
This dialog window appears when youclick the edit button from the last stepabove in The Template Tab section.
1. You can change the Title of yourblog.
2. You can change the descriptive textfor your blog.
3. You can upload a picture from yourhard drive for your header by clickingon "Choose File."
4. You can use a picture that isalready on the web. A word of cautionabout this last option: Copyright lawsapply. Additionally, picture files maybe removed or relocated by the owner. I would only recommend using thisoption if you have uploaded a picture toa specific folder on your server andknow the web address for the picture. Doing this requires that you have anFTP program and access to yourschool server. This is a bit moreadvanced. It's easier for most teachersto just pick a picture from theircomputer and upload it using the"Choose File" button mentioned above.
Creating a Blog at Blogger.com - 14
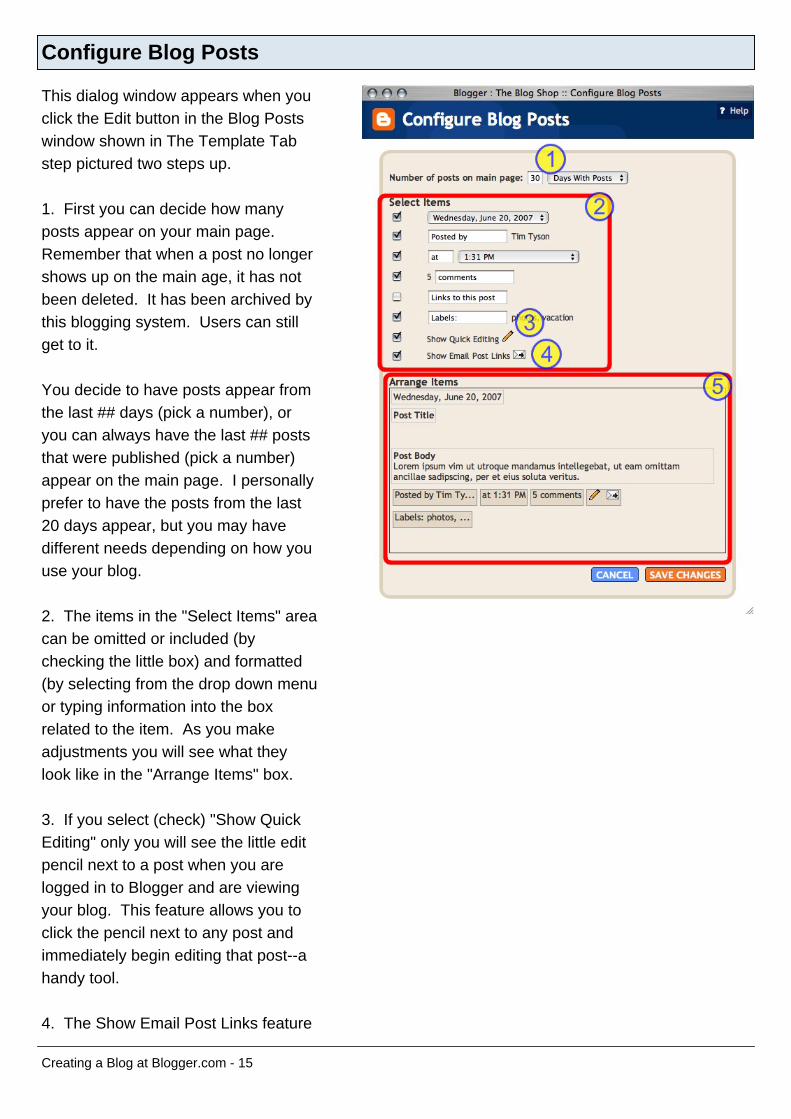
Configure Blog Posts
This dialog window appears when youclick the Edit button in the Blog Postswindow shown in The Template Tabstep pictured two steps up.
1. First you can decide how manyposts appear on your main page. Remember that when a post no longershows up on the main age, it has notbeen deleted. It has been archived bythis blogging system. Users can stillget to it.
You decide to have posts appear fromthe last ## days (pick a number), oryou can always have the last ## poststhat were published (pick a number)appear on the main page. I personallyprefer to have the posts from the last20 days appear, but you may havedifferent needs depending on how youuse your blog.
2. The items in the "Select Items" areacan be omitted or included (bychecking the little box) and formatted(by selecting from the drop down menuor typing information into the boxrelated to the item. As you makeadjustments you will see what theylook like in the "Arrange Items" box.
3. If you select (check) "Show QuickEditing" only you will see the little editpencil next to a post when you arelogged in to Blogger and are viewingyour blog. This feature allows you toclick the pencil next to any post andimmediately begin editing that post--ahandy tool.
4. The Show Email Post Links feature
Creating a Blog at Blogger.com - 15
places the little email icon next to yourpost. Readers that wish to send a postthrough email to a friend simply clickon this icon. A dialogue box appearsallowing them to input the emailaddress to which they wish to sendyour post--another handy little tool!
5. Finally, you can drag some of theitems in the "Arrange Items" box to adifferent location within the box.
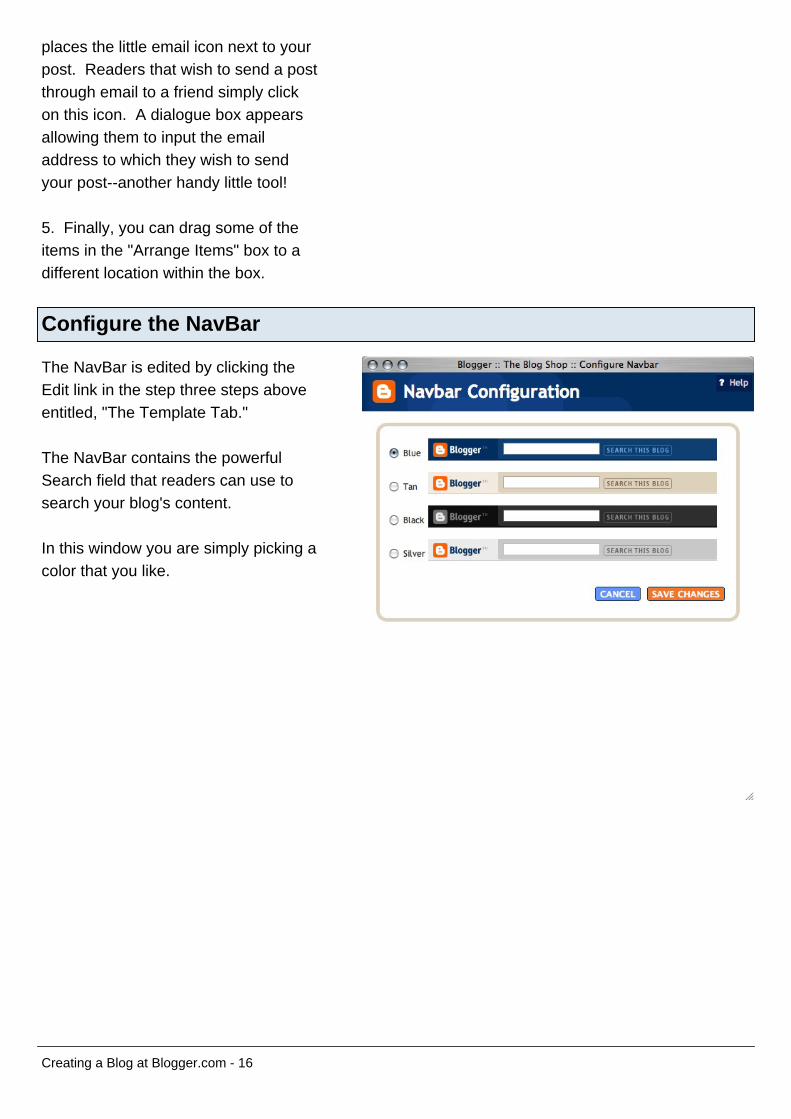
Configure the NavBar
The NavBar is edited by clicking theEdit link in the step three steps aboveentitled, "The Template Tab."
The NavBar contains the powerfulSearch field that readers can use tosearch your blog's content.
In this window you are simply picking acolor that you like.
Creating a Blog at Blogger.com - 16
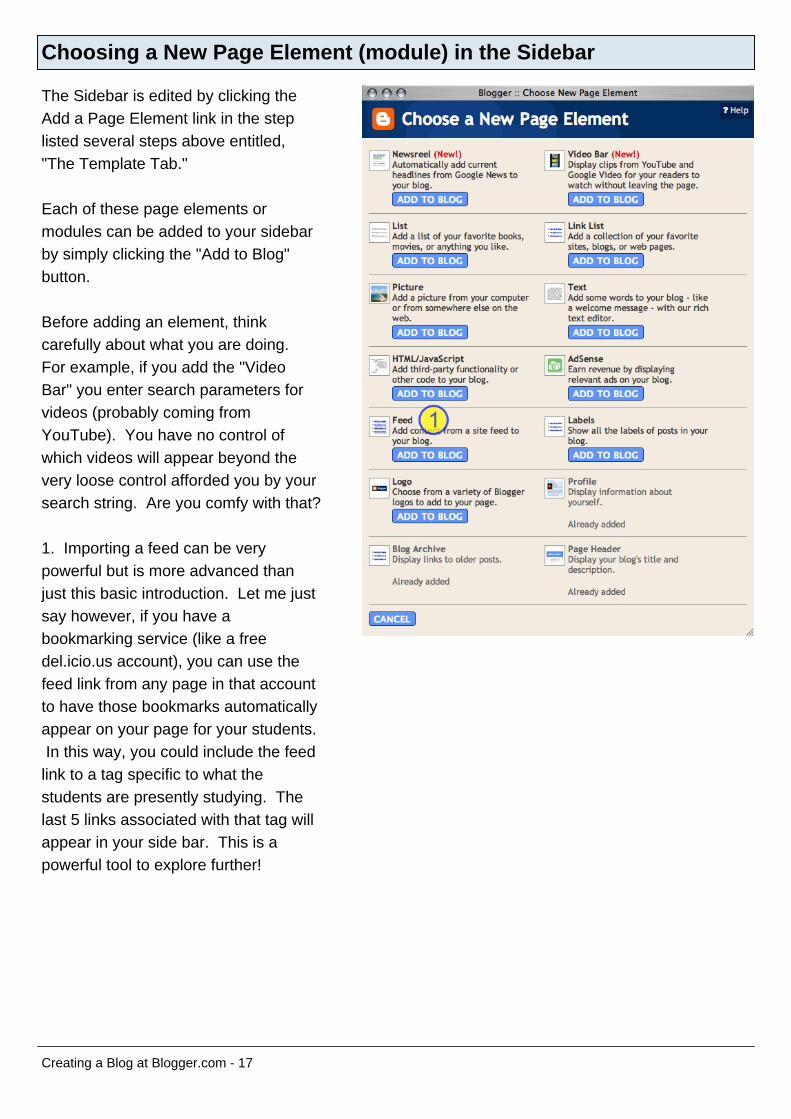
Choosing a New Page Element (module) in the Sidebar
The Sidebar is edited by clicking theAdd a Page Element link in the steplisted several steps above entitled,"The Template Tab."
Each of these page elements ormodules can be added to your sidebarby simply clicking the "Add to Blog"button.
Before adding an element, thinkcarefully about what you are doing. For example, if you add the "VideoBar" you enter search parameters forvideos (probably coming fromYouTube). You have no control ofwhich videos will appear beyond thevery loose control afforded you by yoursearch string. Are you comfy with that?
1. Importing a feed can be verypowerful but is more advanced thanjust this basic introduction. Let me justsay however, if you have abookmarking service (like a freedel.icio.us account), you can use thefeed link from any page in that accountto have those bookmarks automaticallyappear on your page for your students. In this way, you could include the feedlink to a tag specific to what thestudents are presently studying. Thelast 5 links associated with that tag willappear in your side bar. This is apowerful tool to explore further!
Creating a Blog at Blogger.com - 17
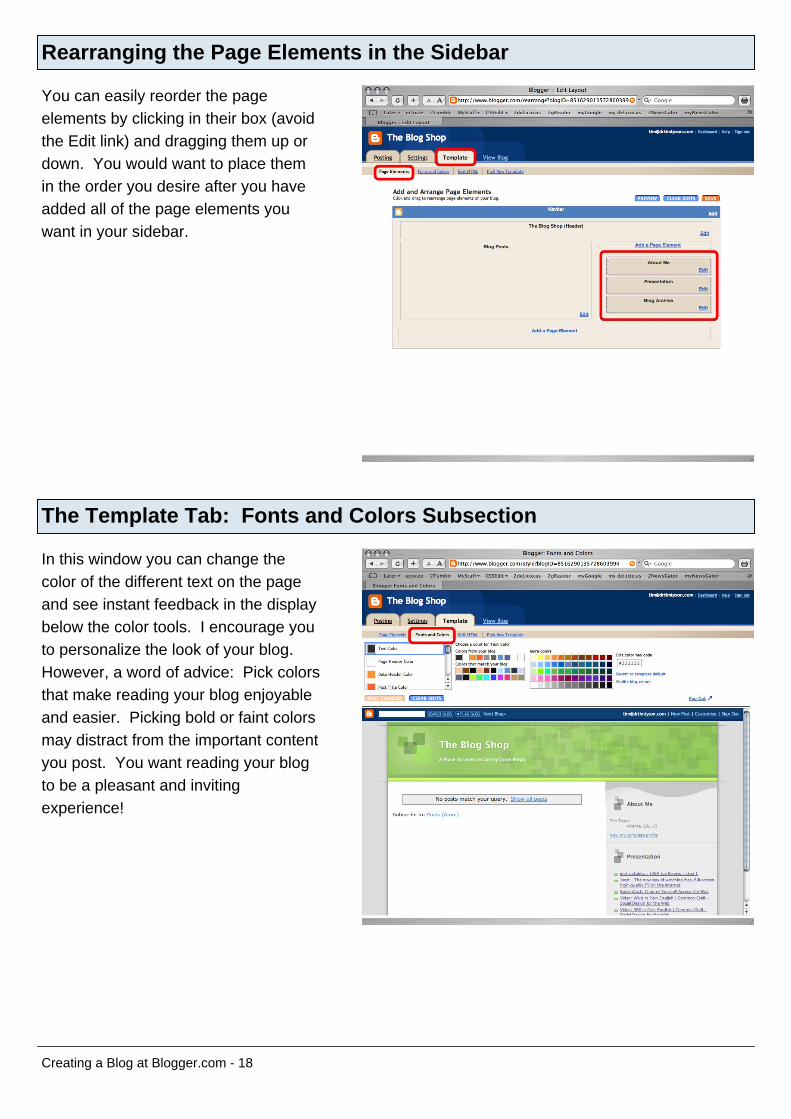
Rearranging the Page Elements in the Sidebar
You can easily reorder the pageelements by clicking in their box (avoidthe Edit link) and dragging them up ordown. You would want to place themin the order you desire after you haveadded all of the page elements youwant in your sidebar.
The Template Tab: Fonts and Colors Subsection
In this window you can change thecolor of the different text on the pageand see instant feedback in the displaybelow the color tools. I encourage youto personalize the look of your blog. However, a word of advice: Pick colorsthat make reading your blog enjoyableand easier. Picking bold or faint colorsmay distract from the important contentyou post. You want reading your blogto be a pleasant and invitingexperience!
Creating a Blog at Blogger.com - 18
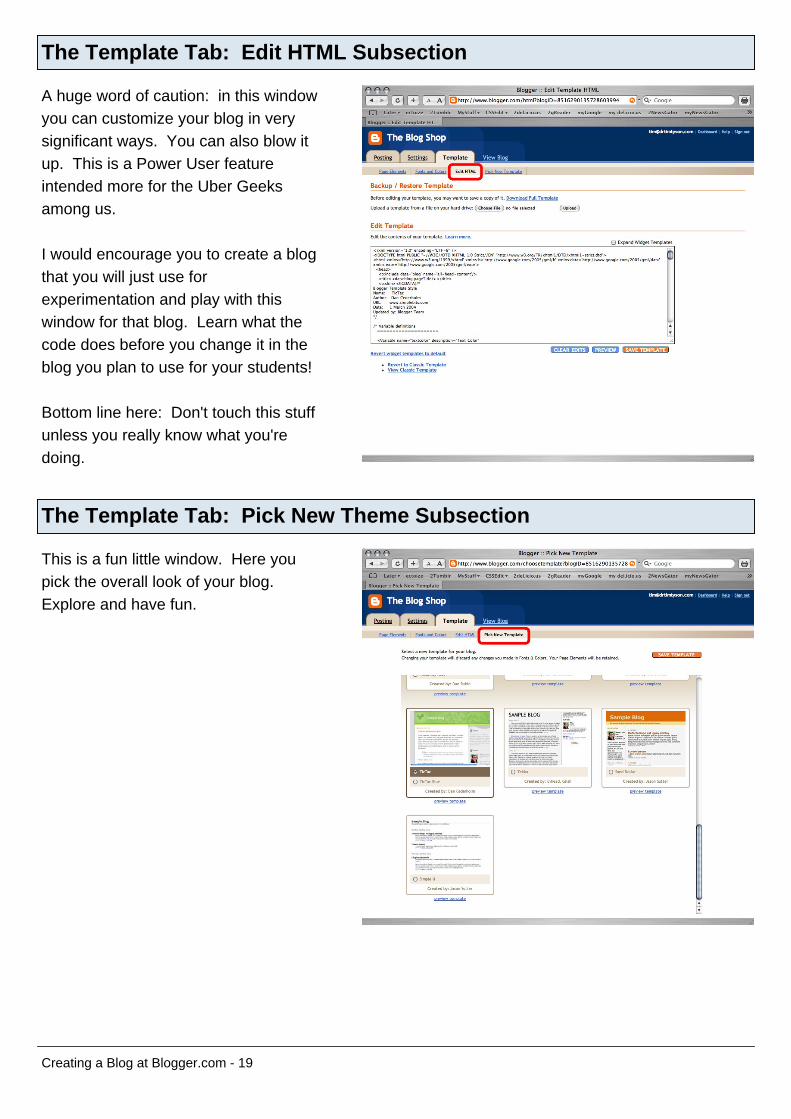
The Template Tab: Edit HTML Subsection
A huge word of caution: in this windowyou can customize your blog in verysignificant ways. You can also blow itup. This is a Power User featureintended more for the Uber Geeksamong us.
I would encourage you to create a blogthat you will just use forexperimentation and play with thiswindow for that blog. Learn what thecode does before you change it in theblog you plan to use for your students!
Bottom line here: Don't touch this stuffunless you really know what you'redoing.
The Template Tab: Pick New Theme Subsection
This is a fun little window. Here youpick the overall look of your blog. Explore and have fun.
Creating a Blog at Blogger.com - 19
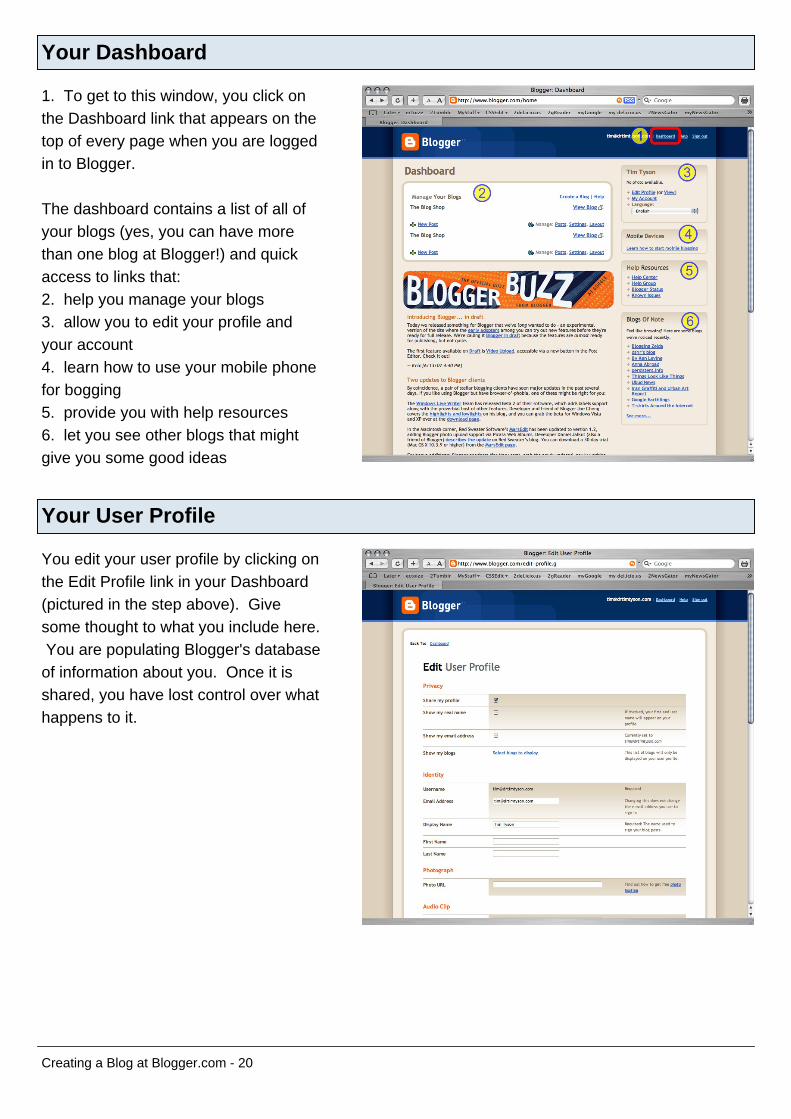
Your Dashboard
1. To get to this window, you click onthe Dashboard link that appears on thetop of every page when you are loggedin to Blogger.
The dashboard contains a list of all ofyour blogs (yes, you can have morethan one blog at Blogger!) and quickaccess to links that:2. help you manage your blogs3. allow you to edit your profile andyour account 4. learn how to use your mobile phonefor bogging5. provide you with help resources6. let you see other blogs that mightgive you some good ideas
Your User Profile
You edit your user profile by clicking onthe Edit Profile link in your Dashboard(pictured in the step above). Givesome thought to what you include here. You are populating Blogger's databaseof information about you. Once it isshared, you have lost control over whathappens to it.
Creating a Blog at Blogger.com - 20
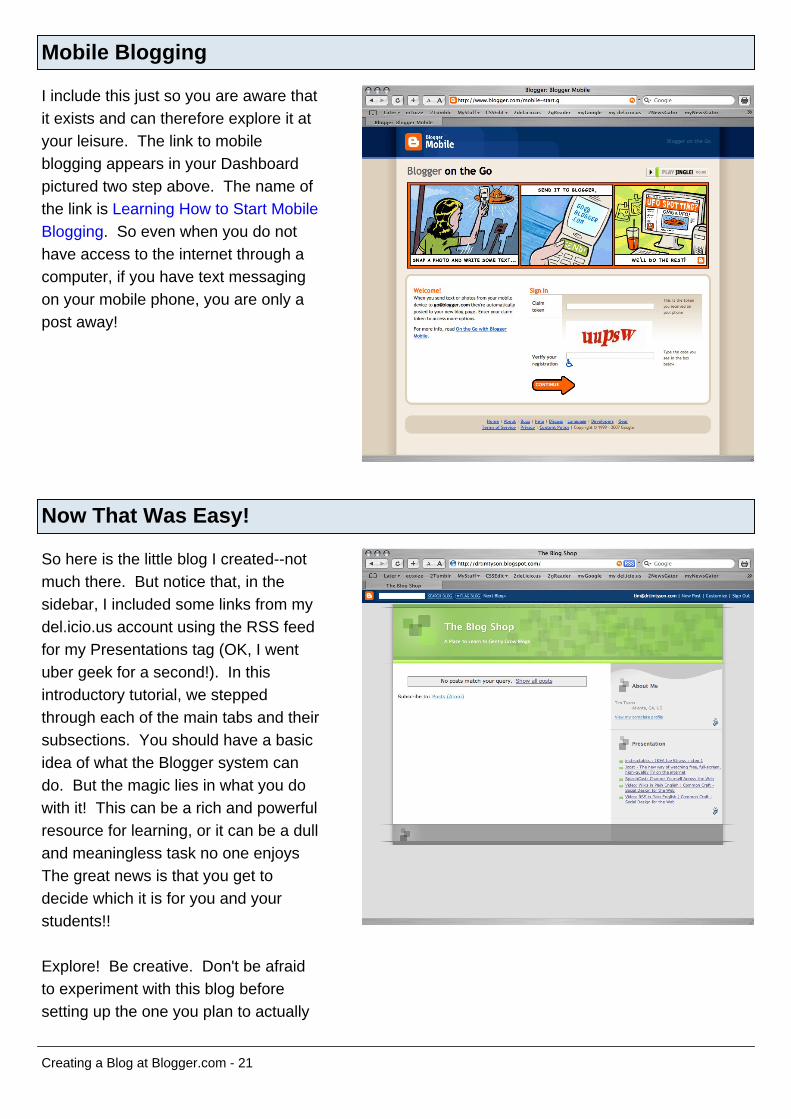
Mobile Blogging
I include this just so you are aware thatit exists and can therefore explore it atyour leisure. The link to mobileblogging appears in your Dashboardpictured two step above. The name ofthe link is Learning How to Start MobileBlogging. So even when you do nothave access to the internet through acomputer, if you have text messagingon your mobile phone, you are only apost away!
Now That Was Easy!
So here is the little blog I created--notmuch there. But notice that, in thesidebar, I included some links from mydel.icio.us account using the RSS feedfor my Presentations tag (OK, I wentuber geek for a second!). In thisintroductory tutorial, we steppedthrough each of the main tabs and theirsubsections. You should have a basicidea of what the Blogger system cando. But the magic lies in what you dowith it! This can be a rich and powerfulresource for learning, or it can be a dulland meaningless task no one enjoys The great news is that you get todecide which it is for you and yourstudents!!
Explore! Be creative. Don't be afraidto experiment with this blog beforesetting up the one you plan to actually
Creating a Blog at Blogger.com - 21

use with your students. I learnedblogging by setting up my personalblog and playing with it. I was thenable to add new things to myprofessional blog as I learned how todo them on my personal blog first.
This is an adventure in connecting andsharing, a wonderful way to reflect andto explore. Have many happy,wonderful and empoweringexperiences!!
Creating a Blog at Blogger.com - 22