
CREATE ENROLLMENT
39
© Entrust Corporation CREATE ENROLLMENT
Transcript of CREATE ENROLLMENT

© Entrust Corporation
CREATE ENROLLMENT

© Entrust Corporation
Enrollment Process
Follow the enrollment process to gather information from the applicant, enter the information
in an enrollment form, then issue a credential. The steps included in the enrollment process
are dependent on the fields on the credentials design.
◦ Enter Personal Information
◦ Capture a Photograph
◦ Capture a Signature
◦ Send Mobile Flash Pass
◦ Preview and Print

© Entrust Corporation
Create Enrollment
If you are an Issuance
Operator, you see the
Credentials page
after you login to your
account.

© Entrust Corporation
Create Enrollment
From the Credentials
page, click on the
Enroll icon.

© Entrust Corporation
Personal Information
Enter the Personal
Information for the
applicant and click on
NEXT.

© Entrust Corporation
Capture a Photograph
To enable automatic
cropping of the
photograph, select
Auto Crop.

© Entrust Corporation
Capture a Photograph
To capture a
photograph using a
web camera or
camera on a mobile
device, click on the
Capture icon.

© Entrust Corporation
Capture a Photograph
Adjust the camera to
position the applicant
in the frame and click
on CAPTURE.

© Entrust Corporation
Capture a Photograph
A photograph of the
applicant is captured.

© Entrust Corporation10
Edit a Photograph
To manually
crop the
photograph,
click on the Edit
icon.

© Entrust Corporation
Edit a Photograph
Position the cropping
frame on the
photograph and click
on CROP.

© Entrust Corporation
Edit a Photograph
The photograph is
cropped.

© Entrust Corporation
Upload a Photograph
To upload a
photograph, click on
the Upload icon.

© Entrust Corporation
Upload a Photograph
Select the image file
and click on Open.

© Entrust Corporation
Upload a Photograph
A photograph of the
applicant is uploaded.

© Entrust Corporation
Capture a Photograph
Click on NEXT.

© Entrust Corporation
Capture a Signature
To capture a
signature, click on the
Capture icon.

© Entrust Corporation
Capture a Signature
Have the applicant
sign in the Capture
Signature box using
the mouse or the
touch screen on a
mobile device and
click on CAPTURE.

© Entrust Corporation
Upload a Signature
To upload a signature,
click on the Upload
icon.

© Entrust Corporation
Upload a Signature
Select the image file
that contains the
signature and click on
Open.

© Entrust Corporation
Upload a Signature
Click on NEXT.

© Entrust Corporation
Mobile Flash Pass
Mobile Flash Passes are digital credentials that contain information for the applicant and a
barcode for identifying the user or gaining access to an area. Mobile Flash Passes requires
the issuer to have an Apple Developer account or a Google Developer account. Mobile
Flash Passes do not require the end-user to have an Apple Developer account or a Google
Developer account but do require the use of either Google Pay or Apple Wallet.

© Entrust Corporation
Mobile Flash Pass
To issue a Mobile
Flash Pass:
1. In the Email
Address field,
enter the email
address for the
applicant.
2. Click on SEND
MOBILE FLASH
PASS.
1
2

© Entrust Corporation
Mobile Flash Pass
If you are sure that
you want to send a
Mobile Flash Pass for
this credential, click on
SEND.

© Entrust Corporation
Mobile Flash Pass
A message indicates:
Enrollment
successfully
created.

© Entrust Corporation
Mobile Flash Pass
An email is sent to the
applicant indicating
that their Mobile Flash
Pass is ready to be
claimed and added to
Apple Wallet or
Google Pay.

© Entrust Corporation
Mobile Flash Pass in Apple Wallet
Here is an example of
what a Mobile Flash
Pass looks like in
Apple Wallet.

© Entrust Corporation
Mobile Flash Pass in Google Pay
Here is an example of
what a Mobile Flash
Pass looks like in
Google Pay.

© Entrust Corporation
Mobile Flash Pass
Once the Mobile Flash
Pass has been
claimed, the
claimStatus field
indicated CLAIMED
and the claimDate
field indicate when it
was claimed.

© Entrust Corporation
Mobile Flash Pass
The Search
Enrollment page, also
displays the
claimStatus field and
the claimDate field.

© Entrust Corporation
Mobile Flash Pass
Click on NEXT.

© Entrust Corporation
Preview and Print
A preview of the credential is displayed. Ensure that the applicants information appears correctly on the credential.
◦ To cancel the enrollment, click on CANCEL.
◦ To save the enrollment to the database, click on SAVE.
◦ To save the enrollment to the database and print the credential, click on SAVE AND PRINT.

© Entrust Corporation
Preview and Print
After clicking on SAVE
AND PRINT, the
Printers dialog page
appears.
1. Select the Printer
from the drop-down
list.
2. Select the Hopper
from the drop-down
list.
12

© Entrust Corporation
Preview and Print
Click on PRINT.

© Entrust Corporation
Preview and Print
A message indicates:
A print is
successfully
submitted. Go to
print queue to check
the job status.

© Entrust Corporation
Print Queue
The Print Queue
displays the print job
and its status.
Note: Only print jobs with a status Waiting or
Stopped can be deleted. To delete a print job
click on the Delete icon.

© Entrust Corporation
Print Queue
Once the credential is
printed, it disappears
from the print queue.

© Entrust Corporation
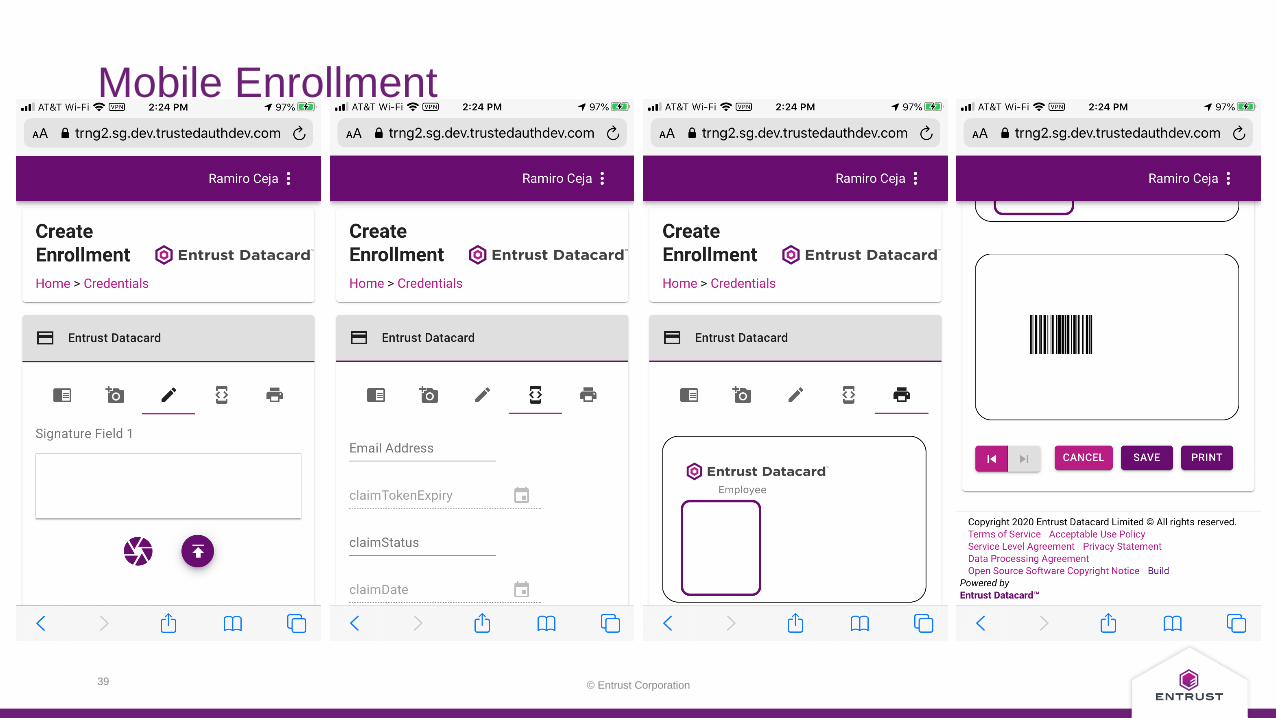
Mobile Enrollment
Enrollments can be
created from a mobile
device. When you
login as an Issuance
Operator, the software
takes you directly to
the Credentials page.
Here are a few
screens of what
Mobile Enrollment
looks like.
© Entrust Corporation39
Mobile Enrollment