Create and deploy a mobile app in Azure App Service and deploy a mobile app in Azure App Service...
28
Create and deploy a mobile app in Azure App Service Azure App Service is the only cloud service that integrates everything you need to quickly and easily build web and mobile apps for any platform and any device. Built for developers, App Service is a fully managed platform that has powerful capabilities such as built-in DevOps, continuous integration with Visual Studio Team Services and GitHub, staging and production support, and automatic patching. This tutorial shows how to deploy an ASP.NET mobile app to a mobile app in Azure App Service as a notification service by using Visual Studio 2015 or Visual Studio 2013. After you complete the tutorial, you’ll have a notification service that’s identical to the one that’s used in Microsoft Connect(); //2015, which will be executed in the cloud. The following illustration shows the completed application: You’ll learn these procedures: How to prepare your computer for Azure development by installing the Azure SDK for .NET. How to set up Visual Studio to create a new mobile app in Azure App Service while it creates an ASP.NET 5 mobile project. How to compose the Demo project that is presented in Microsoft Connect(); //2015. How to deploy a mobile project to a mobile app in App Service by using Visual Studio, and how to create a notification service. How to use the Azure portal to monitor and manage your mobile app.
Transcript of Create and deploy a mobile app in Azure App Service and deploy a mobile app in Azure App Service...
Create and deploy a mobile app in Azure App Service Azure App Service is the only cloud service that integrates everything you need to quickly and easily
build web and mobile apps for any platform and any device. Built for developers, App Service is a fully
managed platform that has powerful capabilities such as built-in DevOps, continuous integration with
Visual Studio Team Services and GitHub, staging and production support, and automatic patching.
This tutorial shows how to deploy an ASP.NET mobile app to a mobile app in Azure App Service as a
notification service by using Visual Studio 2015 or Visual Studio 2013. After you complete the tutorial,
you’ll have a notification service that’s identical to the one that’s used in Microsoft Connect(); //2015,
which will be executed in the cloud.
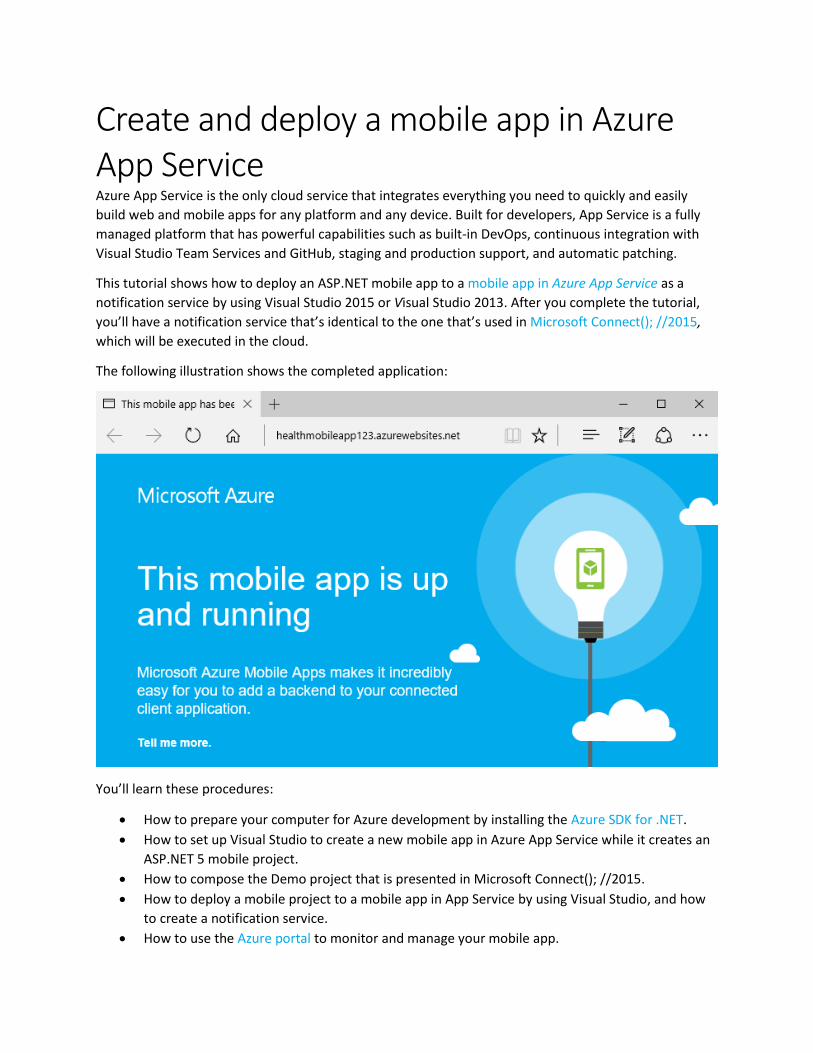
The following illustration shows the completed application:
You’ll learn these procedures:
How to prepare your computer for Azure development by installing the Azure SDK for .NET.
How to set up Visual Studio to create a new mobile app in Azure App Service while it creates an
ASP.NET 5 mobile project.
How to compose the Demo project that is presented in Microsoft Connect(); //2015.
How to deploy a mobile project to a mobile app in App Service by using Visual Studio, and how
to create a notification service.
How to use the Azure portal to monitor and manage your mobile app.
Sign up for Microsoft Azure You need an Azure account to complete this tutorial. You can:
Open an Azure account for free. You get credits that you can use to try paid Azure services. Even
after the credits are used up, you can keep the account and use free Azure services and
features, such as the Web Apps feature of Azure App Service.
Activate Visual Studio subscriber benefits. Your Visual Studio subscription gives you credits every
month that you can use for paid Azure services.
Get credits every month by joining to Visual Studio Dev Essentials.
If you want to get started with Azure App Service before you sign up for an Azure account, go to Try App
Service. There, you can immediately create a short-lived starter web app in App Service without a credit
card or commitments.
Set up the development environment To start, set up your development environment by installing the latest version of the Azure SDK.
Visual Studio 2015▶
Visual Studio 2013▶
If you don't have Visual Studio installed, use the link for Visual Studio 2015, and Visual Studio will be
installed along with the SDK.
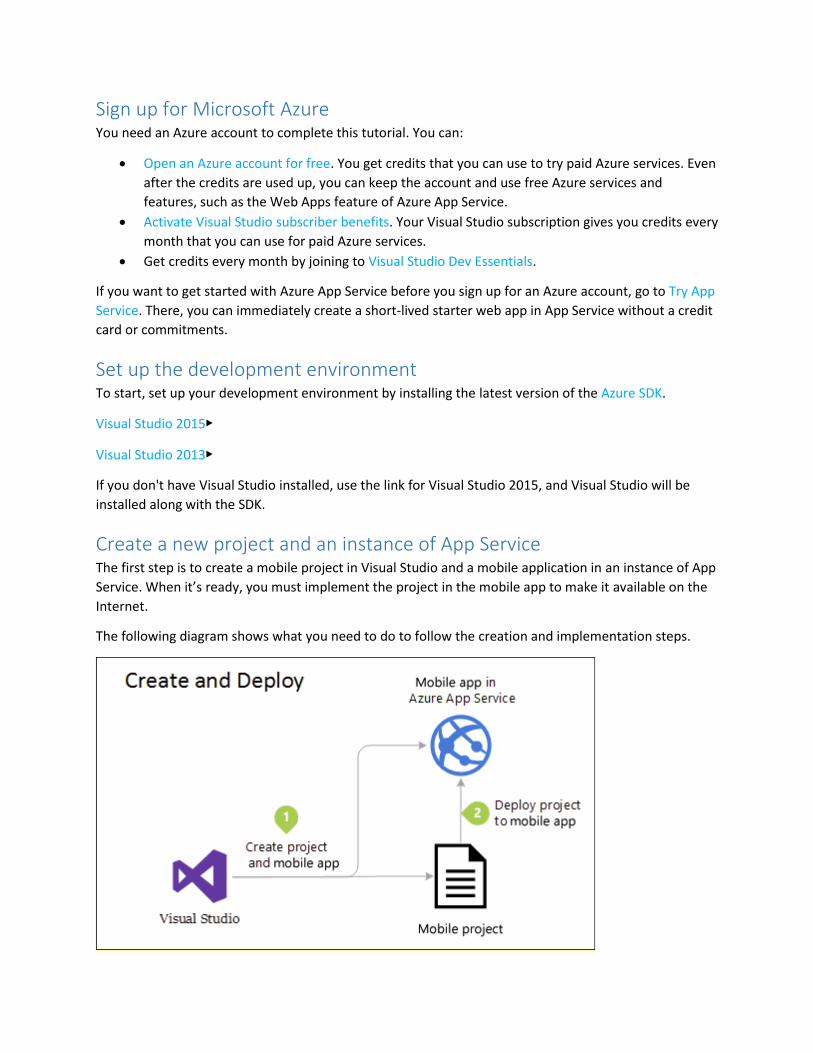
Create a new project and an instance of App Service The first step is to create a mobile project in Visual Studio and a mobile application in an instance of App
Service. When it’s ready, you must implement the project in the mobile app to make it available on the
Internet.
The following diagram shows what you need to do to follow the creation and implementation steps.
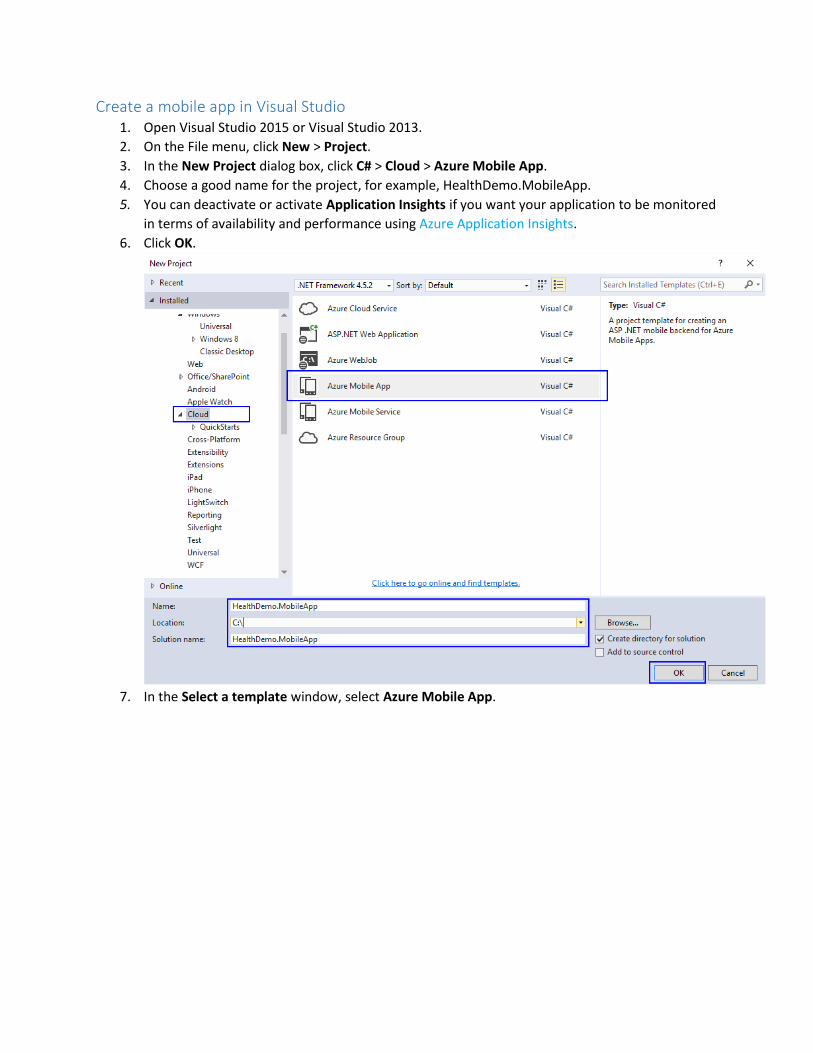
Create a mobile app in Visual Studio 1. Open Visual Studio 2015 or Visual Studio 2013.
2. On the File menu, click New > Project.
3. In the New Project dialog box, click C# > Cloud > Azure Mobile App.
4. Choose a good name for the project, for example, HealthDemo.MobileApp.
5. You can deactivate or activate Application Insights if you want your application to be monitored
in terms of availability and performance using Azure Application Insights.
6. Click OK.
7. In the Select a template window, select Azure Mobile App.
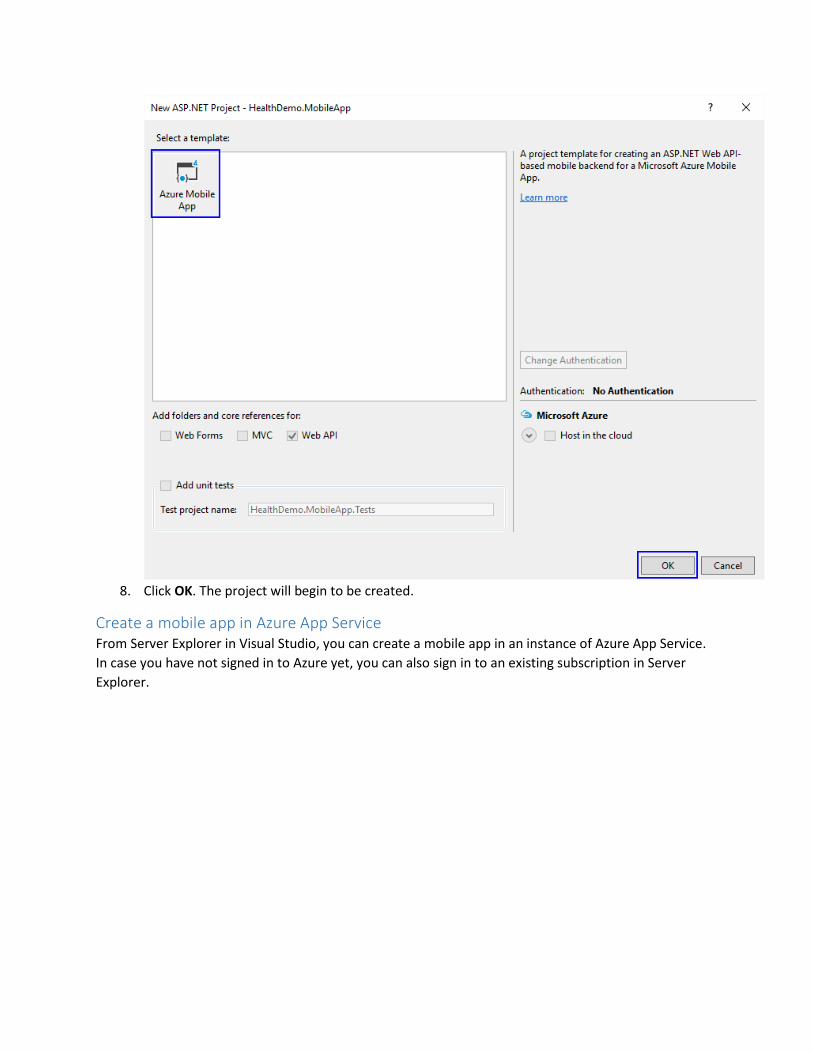
8. Click OK. The project will begin to be created.
Create a mobile app in Azure App Service From Server Explorer in Visual Studio, you can create a mobile app in an instance of Azure App Service.
In case you have not signed in to Azure yet, you can also sign in to an existing subscription in Server
Explorer.
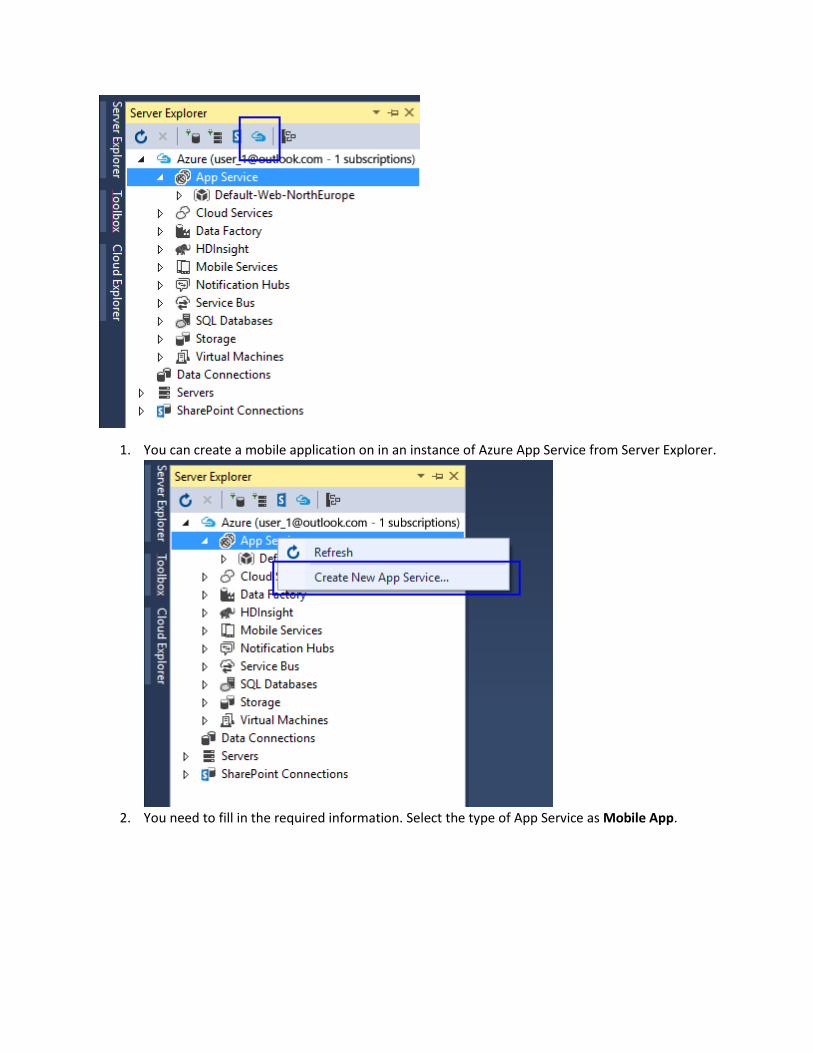
1. You can create a mobile application on in an instance of Azure App Service from Server Explorer.
2. You need to fill in the required information. Select the type of App Service as Mobile App.
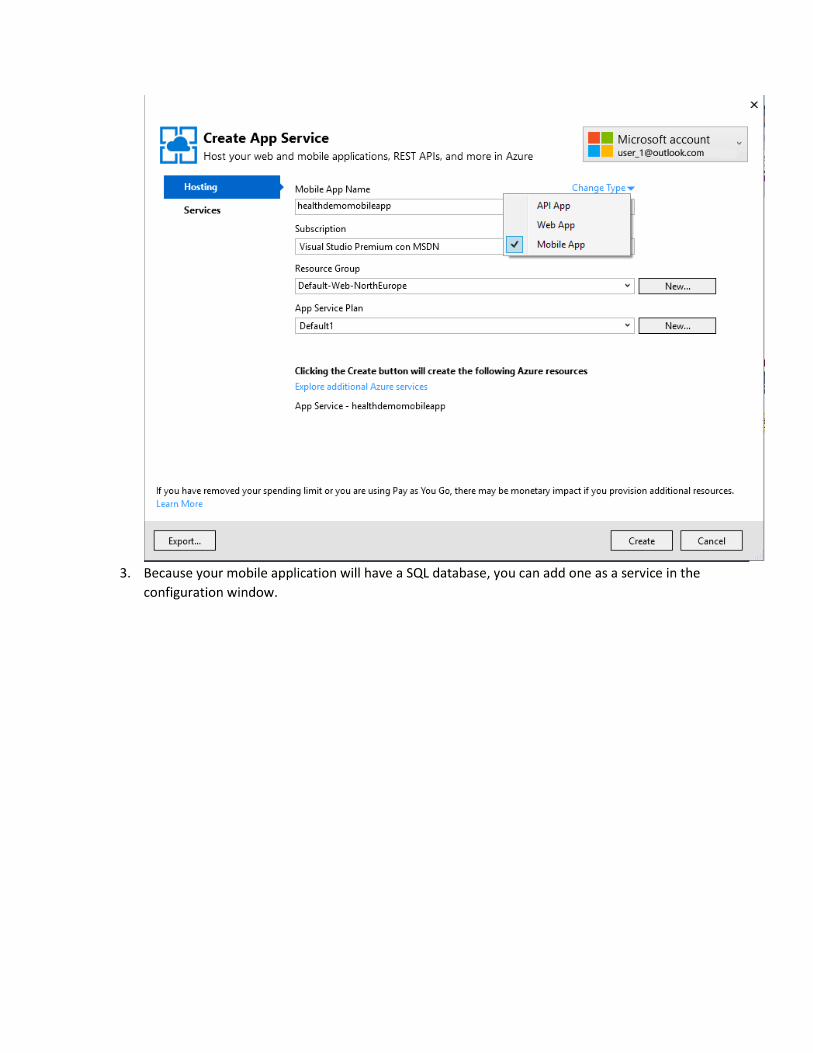
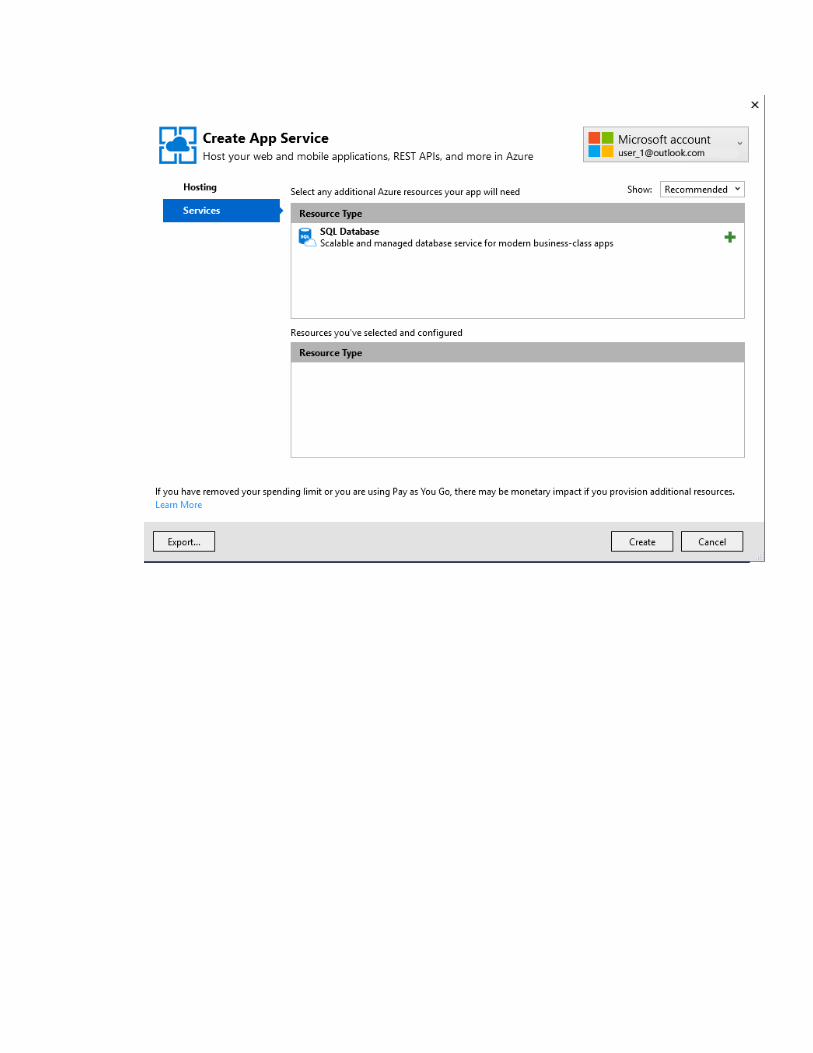
3. Because your mobile application will have a SQL database, you can add one as a service in the
configuration window.
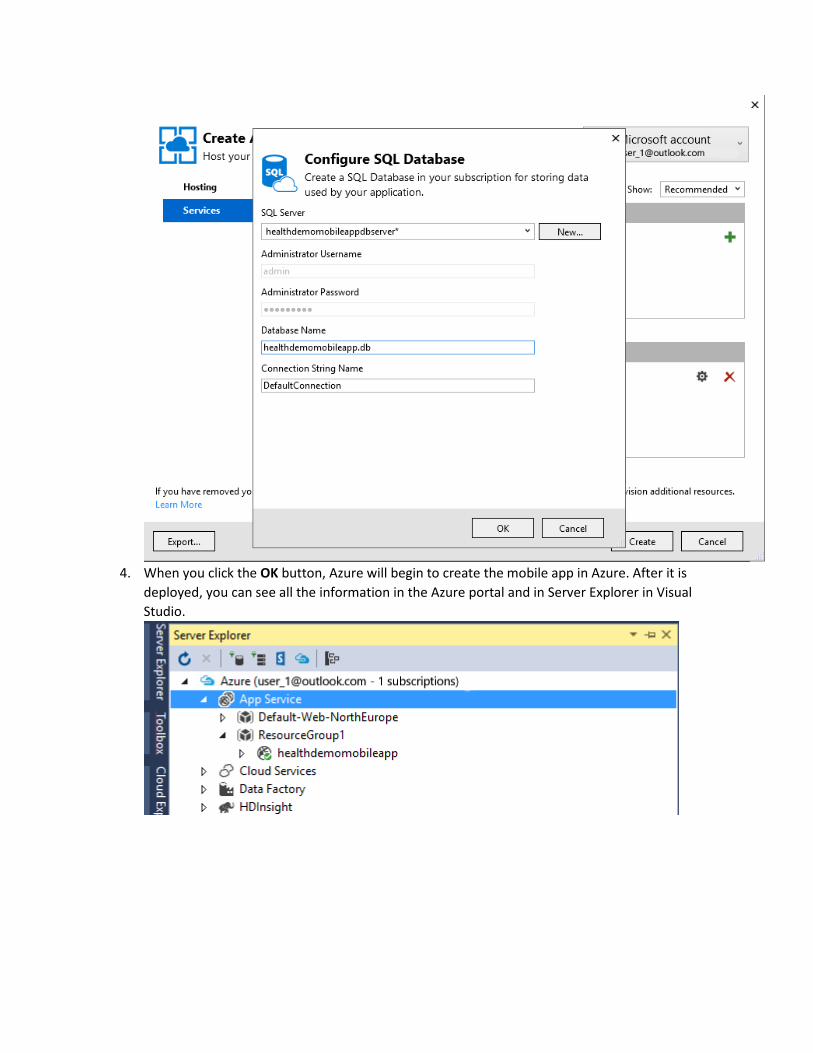
4. When you click the OK button, Azure will begin to create the mobile app in Azure. After it is
deployed, you can see all the information in the Azure portal and in Server Explorer in Visual
Studio.
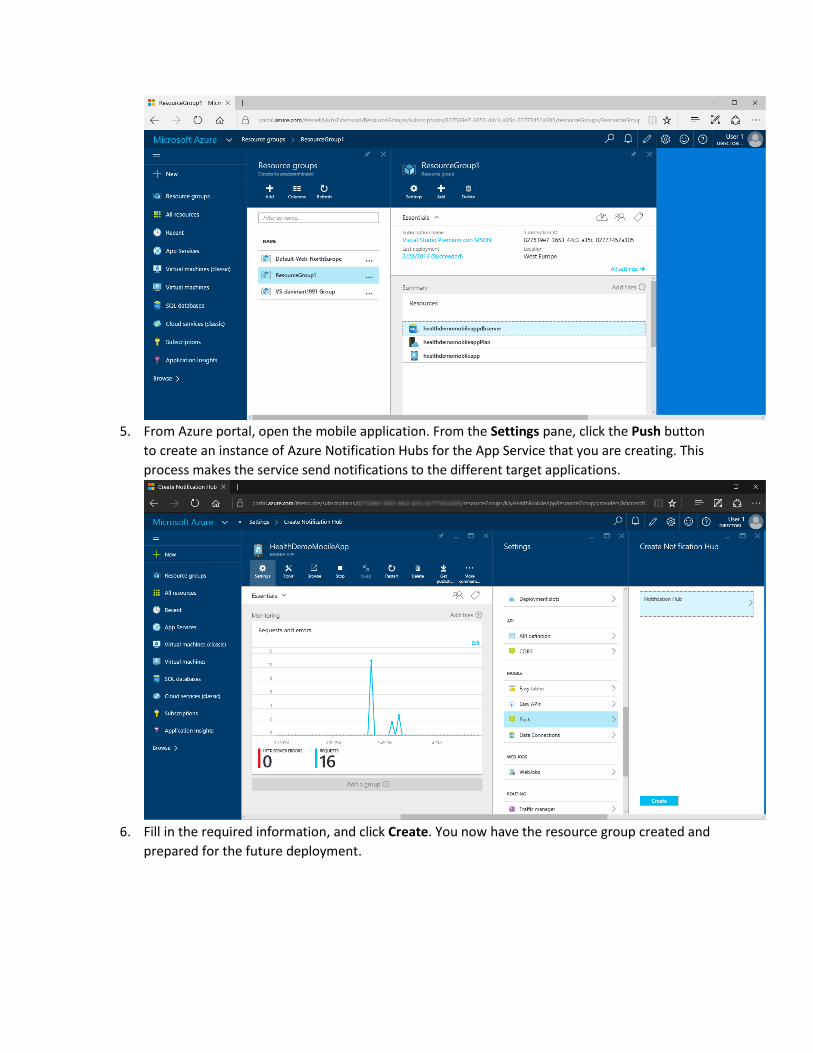
5. From Azure portal, open the mobile application. From the Settings pane, click the Push button
to create an instance of Azure Notification Hubs for the App Service that you are creating. This
process makes the service send notifications to the different target applications.
6. Fill in the required information, and click Create. You now have the resource group created and
prepared for the future deployment.
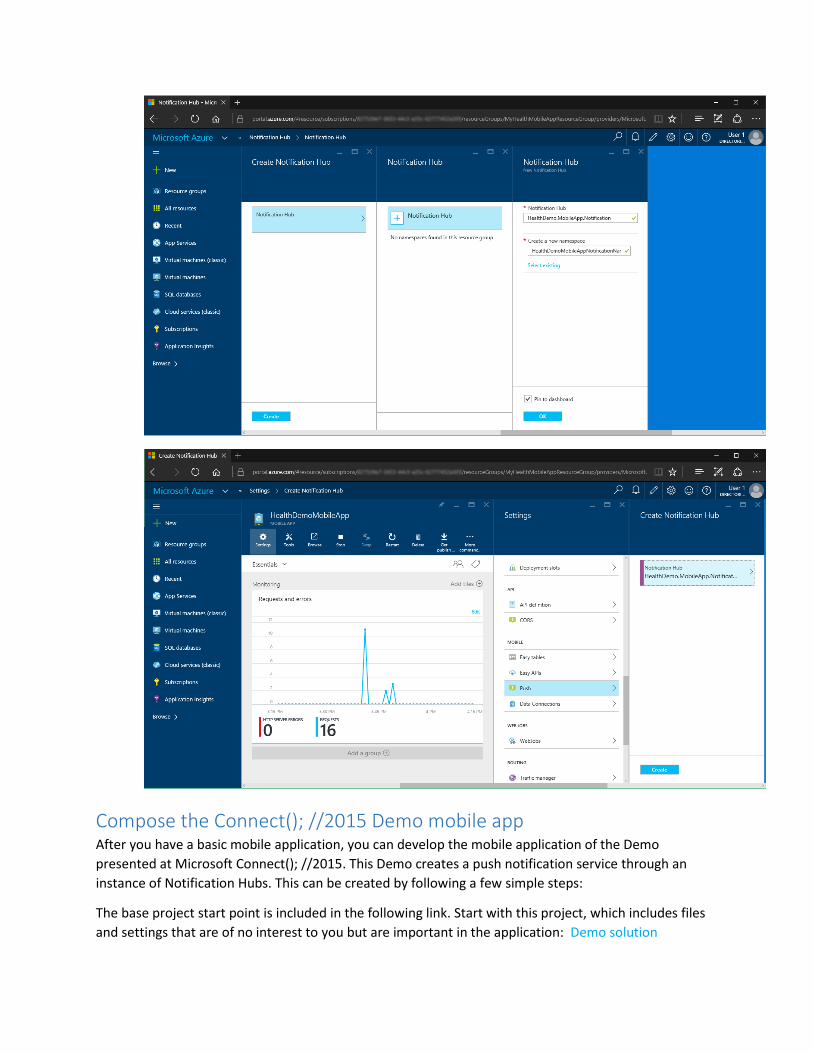
Compose the Connect(); //2015 Demo mobile app After you have a basic mobile application, you can develop the mobile application of the Demo
presented at Microsoft Connect(); //2015. This Demo creates a push notification service through an
instance of Notification Hubs. This can be created by following a few simple steps:
The base project start point is included in the following link. Start with this project, which includes files
and settings that are of no interest to you but are important in the application: Demo solution
Application start process 1. Remove the App_Start folder.
2. In the Startup.cs file, replace the content in the namespace region with the following content:
This change produces quick application initialization. Remove the initialized database in the absence of
information because you do not want the database to contain information from the beginning, and clear
the debug information that adds nothing to the application development.
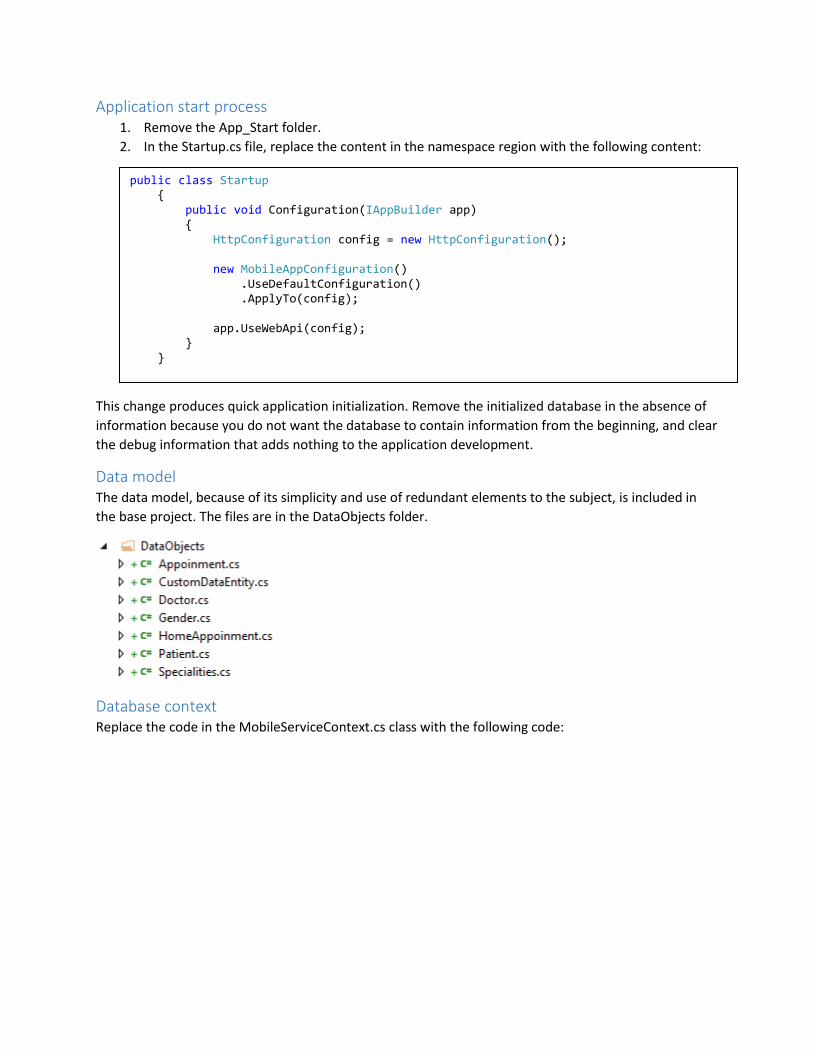
Data model The data model, because of its simplicity and use of redundant elements to the subject, is included in
the base project. The files are in the DataObjects folder.
Database context Replace the code in the MobileServiceContext.cs class with the following code:
public class Startup { public void Configuration(IAppBuilder app) { HttpConfiguration config = new HttpConfiguration(); new MobileAppConfiguration() .UseDefaultConfiguration() .ApplyTo(config); app.UseWebApi(config); } }
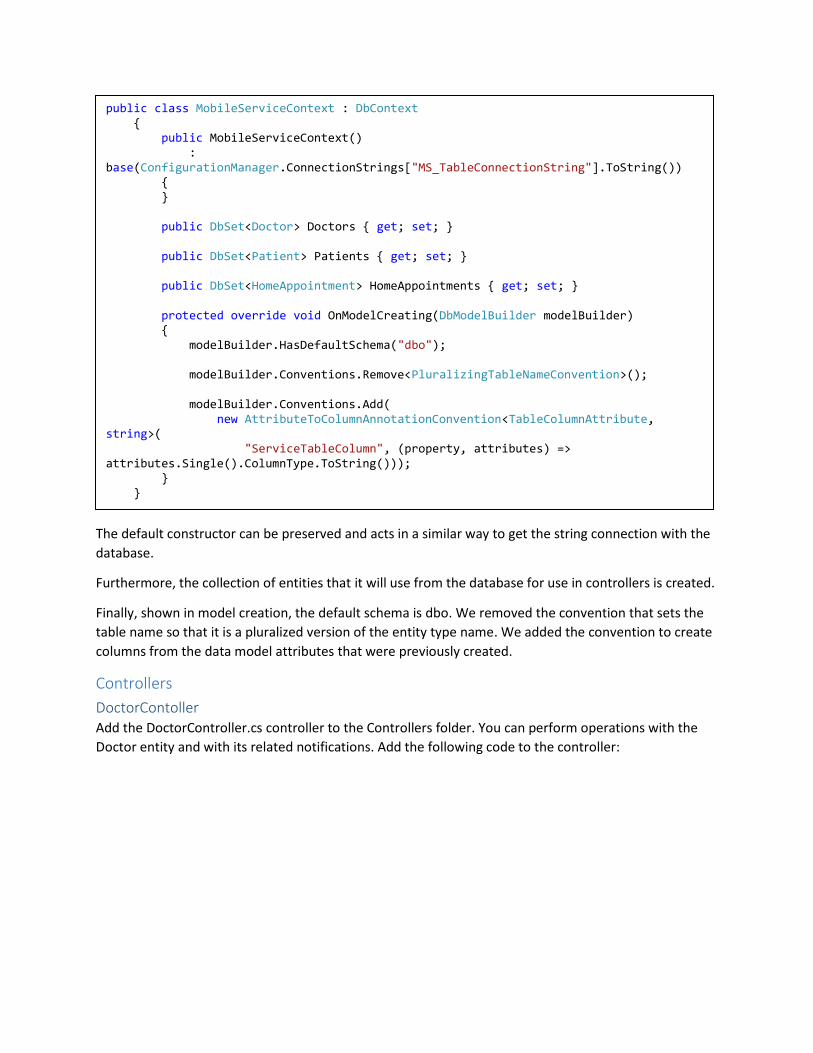
The default constructor can be preserved and acts in a similar way to get the string connection with the
database.
Furthermore, the collection of entities that it will use from the database for use in controllers is created.
Finally, shown in model creation, the default schema is dbo. We removed the convention that sets the
table name so that it is a pluralized version of the entity type name. We added the convention to create
columns from the data model attributes that were previously created.
Controllers
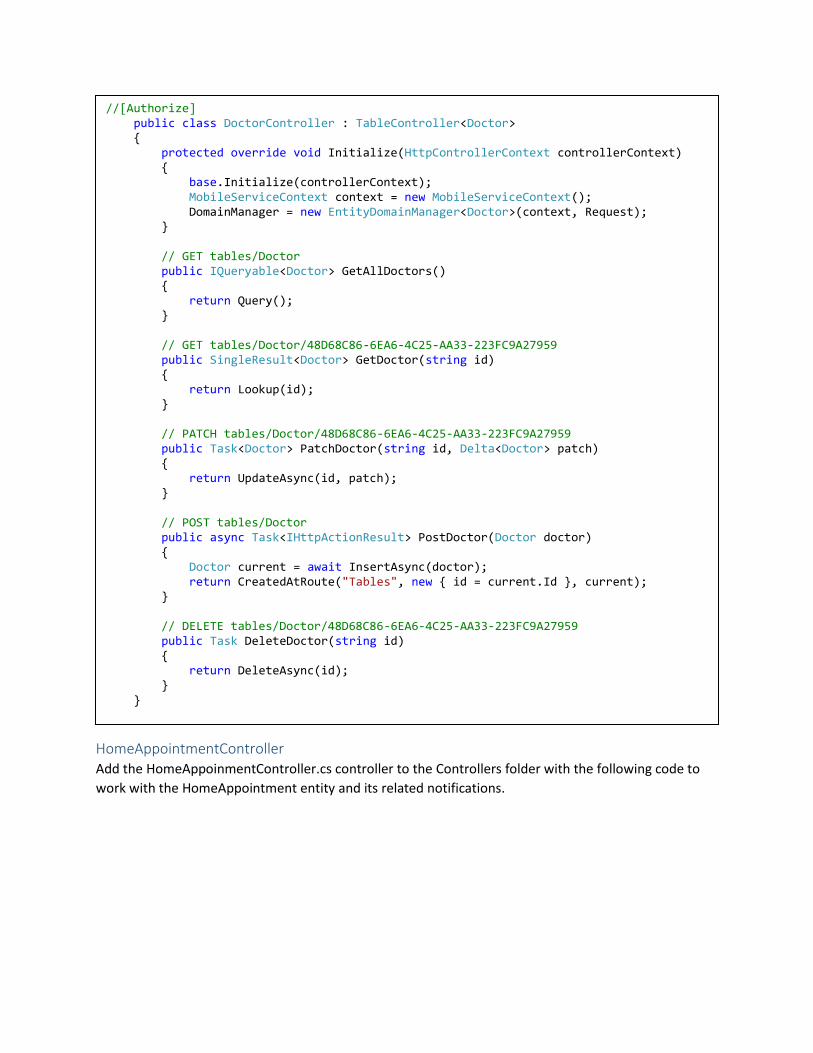
DoctorContoller Add the DoctorController.cs controller to the Controllers folder. You can perform operations with the
Doctor entity and with its related notifications. Add the following code to the controller:
public class MobileServiceContext : DbContext { public MobileServiceContext() : base(ConfigurationManager.ConnectionStrings["MS_TableConnectionString"].ToString()) { } public DbSet<Doctor> Doctors { get; set; } public DbSet<Patient> Patients { get; set; } public DbSet<HomeAppointment> HomeAppointments { get; set; } protected override void OnModelCreating(DbModelBuilder modelBuilder) { modelBuilder.HasDefaultSchema("dbo"); modelBuilder.Conventions.Remove<PluralizingTableNameConvention>(); modelBuilder.Conventions.Add( new AttributeToColumnAnnotationConvention<TableColumnAttribute, string>( "ServiceTableColumn", (property, attributes) => attributes.Single().ColumnType.ToString())); } }
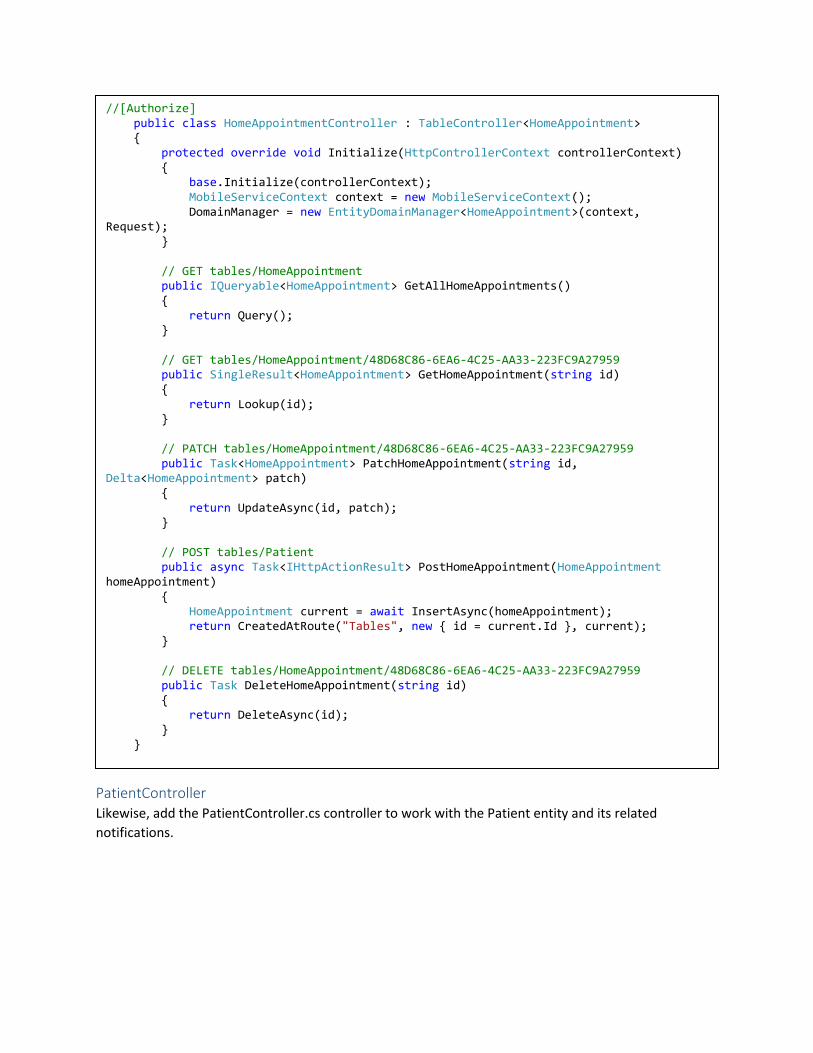
HomeAppointmentController Add the HomeAppoinmentController.cs controller to the Controllers folder with the following code to
work with the HomeAppointment entity and its related notifications.
//[Authorize] public class DoctorController : TableController<Doctor> { protected override void Initialize(HttpControllerContext controllerContext) { base.Initialize(controllerContext); MobileServiceContext context = new MobileServiceContext(); DomainManager = new EntityDomainManager<Doctor>(context, Request); } // GET tables/Doctor public IQueryable<Doctor> GetAllDoctors() { return Query(); } // GET tables/Doctor/48D68C86-6EA6-4C25-AA33-223FC9A27959 public SingleResult<Doctor> GetDoctor(string id) { return Lookup(id); } // PATCH tables/Doctor/48D68C86-6EA6-4C25-AA33-223FC9A27959 public Task<Doctor> PatchDoctor(string id, Delta<Doctor> patch) { return UpdateAsync(id, patch); } // POST tables/Doctor public async Task<IHttpActionResult> PostDoctor(Doctor doctor) { Doctor current = await InsertAsync(doctor); return CreatedAtRoute("Tables", new { id = current.Id }, current); } // DELETE tables/Doctor/48D68C86-6EA6-4C25-AA33-223FC9A27959 public Task DeleteDoctor(string id) { return DeleteAsync(id); } }
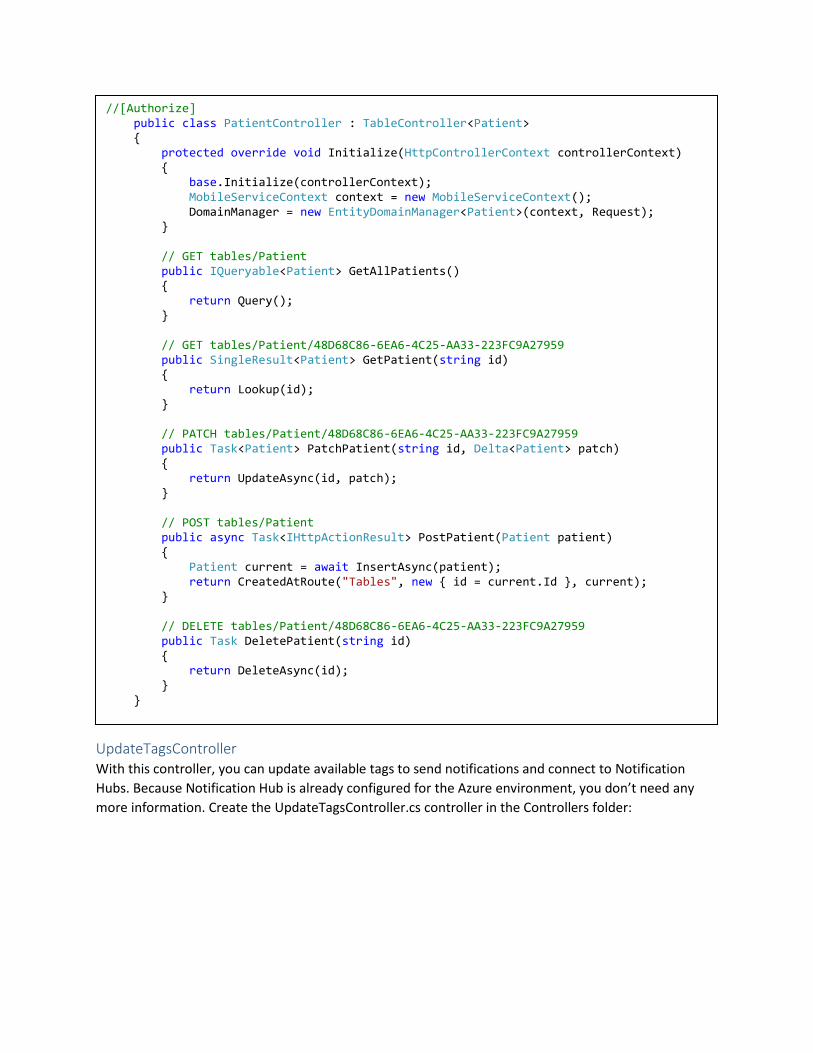
PatientController Likewise, add the PatientController.cs controller to work with the Patient entity and its related
notifications.
//[Authorize] public class HomeAppointmentController : TableController<HomeAppointment> { protected override void Initialize(HttpControllerContext controllerContext) { base.Initialize(controllerContext); MobileServiceContext context = new MobileServiceContext(); DomainManager = new EntityDomainManager<HomeAppointment>(context, Request); } // GET tables/HomeAppointment public IQueryable<HomeAppointment> GetAllHomeAppointments() { return Query(); } // GET tables/HomeAppointment/48D68C86-6EA6-4C25-AA33-223FC9A27959 public SingleResult<HomeAppointment> GetHomeAppointment(string id) { return Lookup(id); } // PATCH tables/HomeAppointment/48D68C86-6EA6-4C25-AA33-223FC9A27959 public Task<HomeAppointment> PatchHomeAppointment(string id, Delta<HomeAppointment> patch) { return UpdateAsync(id, patch); } // POST tables/Patient public async Task<IHttpActionResult> PostHomeAppointment(HomeAppointment homeAppointment) { HomeAppointment current = await InsertAsync(homeAppointment); return CreatedAtRoute("Tables", new { id = current.Id }, current); } // DELETE tables/HomeAppointment/48D68C86-6EA6-4C25-AA33-223FC9A27959 public Task DeleteHomeAppointment(string id) { return DeleteAsync(id); } }
UpdateTagsController With this controller, you can update available tags to send notifications and connect to Notification
Hubs. Because Notification Hub is already configured for the Azure environment, you don’t need any
more information. Create the UpdateTagsController.cs controller in the Controllers folder:
//[Authorize] public class PatientController : TableController<Patient> { protected override void Initialize(HttpControllerContext controllerContext) { base.Initialize(controllerContext); MobileServiceContext context = new MobileServiceContext(); DomainManager = new EntityDomainManager<Patient>(context, Request); } // GET tables/Patient public IQueryable<Patient> GetAllPatients() { return Query(); } // GET tables/Patient/48D68C86-6EA6-4C25-AA33-223FC9A27959 public SingleResult<Patient> GetPatient(string id) { return Lookup(id); } // PATCH tables/Patient/48D68C86-6EA6-4C25-AA33-223FC9A27959 public Task<Patient> PatchPatient(string id, Delta<Patient> patch) { return UpdateAsync(id, patch); } // POST tables/Patient public async Task<IHttpActionResult> PostPatient(Patient patient) { Patient current = await InsertAsync(patient); return CreatedAtRoute("Tables", new { id = current.Id }, current); } // DELETE tables/Patient/48D68C86-6EA6-4C25-AA33-223FC9A27959 public Task DeletePatient(string id) { return DeleteAsync(id); } }
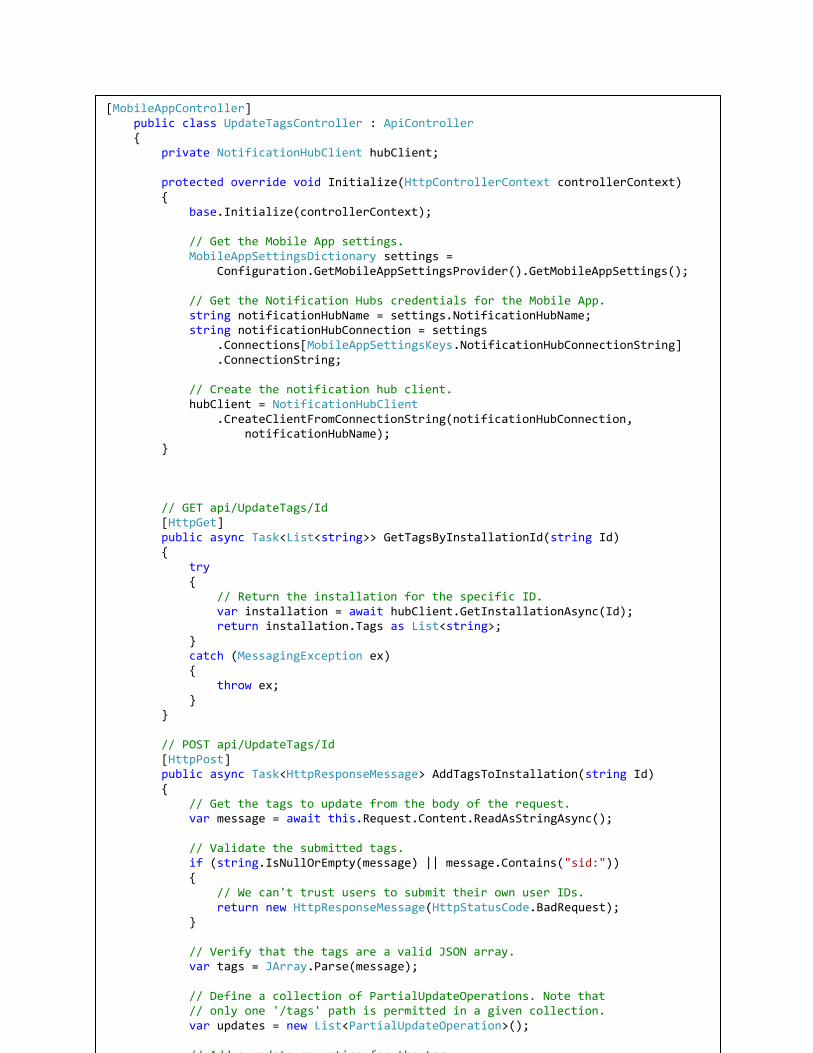
[MobileAppController] public class UpdateTagsController : ApiController { private NotificationHubClient hubClient; protected override void Initialize(HttpControllerContext controllerContext) { base.Initialize(controllerContext); // Get the Mobile App settings. MobileAppSettingsDictionary settings = Configuration.GetMobileAppSettingsProvider().GetMobileAppSettings(); // Get the Notification Hubs credentials for the Mobile App. string notificationHubName = settings.NotificationHubName; string notificationHubConnection = settings .Connections[MobileAppSettingsKeys.NotificationHubConnectionString] .ConnectionString; // Create the notification hub client. hubClient = NotificationHubClient .CreateClientFromConnectionString(notificationHubConnection, notificationHubName); } // GET api/UpdateTags/Id [HttpGet] public async Task<List<string>> GetTagsByInstallationId(string Id) { try { // Return the installation for the specific ID. var installation = await hubClient.GetInstallationAsync(Id); return installation.Tags as List<string>; } catch (MessagingException ex) { throw ex; } } // POST api/UpdateTags/Id [HttpPost] public async Task<HttpResponseMessage> AddTagsToInstallation(string Id) { // Get the tags to update from the body of the request. var message = await this.Request.Content.ReadAsStringAsync(); // Validate the submitted tags. if (string.IsNullOrEmpty(message) || message.Contains("sid:")) { // We can't trust users to submit their own user IDs. return new HttpResponseMessage(HttpStatusCode.BadRequest); } // Verify that the tags are a valid JSON array. var tags = JArray.Parse(message); // Define a collection of PartialUpdateOperations. Note that // only one '/tags' path is permitted in a given collection. var updates = new List<PartialUpdateOperation>(); // Add a update operation for the tag.
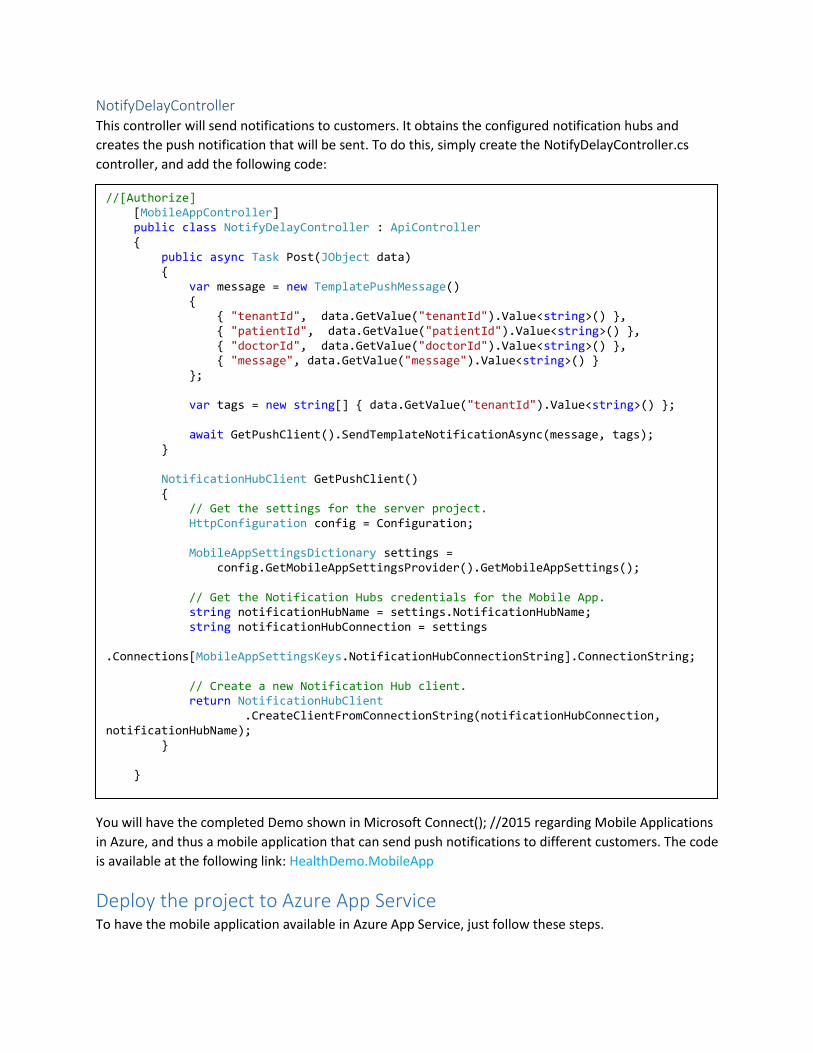
NotifyDelayController This controller will send notifications to customers. It obtains the configured notification hubs and
creates the push notification that will be sent. To do this, simply create the NotifyDelayController.cs
controller, and add the following code:
You will have the completed Demo shown in Microsoft Connect(); //2015 regarding Mobile Applications
in Azure, and thus a mobile application that can send push notifications to different customers. The code
is available at the following link: HealthDemo.MobileApp
Deploy the project to Azure App Service To have the mobile application available in Azure App Service, just follow these steps.
//[Authorize] [MobileAppController] public class NotifyDelayController : ApiController { public async Task Post(JObject data) { var message = new TemplatePushMessage() { { "tenantId", data.GetValue("tenantId").Value<string>() }, { "patientId", data.GetValue("patientId").Value<string>() }, { "doctorId", data.GetValue("doctorId").Value<string>() }, { "message", data.GetValue("message").Value<string>() } }; var tags = new string[] { data.GetValue("tenantId").Value<string>() }; await GetPushClient().SendTemplateNotificationAsync(message, tags); } NotificationHubClient GetPushClient() { // Get the settings for the server project. HttpConfiguration config = Configuration; MobileAppSettingsDictionary settings = config.GetMobileAppSettingsProvider().GetMobileAppSettings(); // Get the Notification Hubs credentials for the Mobile App. string notificationHubName = settings.NotificationHubName; string notificationHubConnection = settings .Connections[MobileAppSettingsKeys.NotificationHubConnectionString].ConnectionString; // Create a new Notification Hub client. return NotificationHubClient .CreateClientFromConnectionString(notificationHubConnection, notificationHubName); } }

You have already generated the necessary Azure resources to expedite future deployments. You don’t
have to create those resources again to run the mobile application .
1. In Solution Explorer, right-click on the HealthDemo.MobileApp project, and select Publish.
2. The Publish Web page opens. The wizard shows you a list of available Publish Profiles. If you
select Microsoft Azure App Service, you can see a list of available Azure subscriptions and the
resource groups that were previously created. Among them is the resource group that you used
to deploy the mobile application that you configured in previous steps.
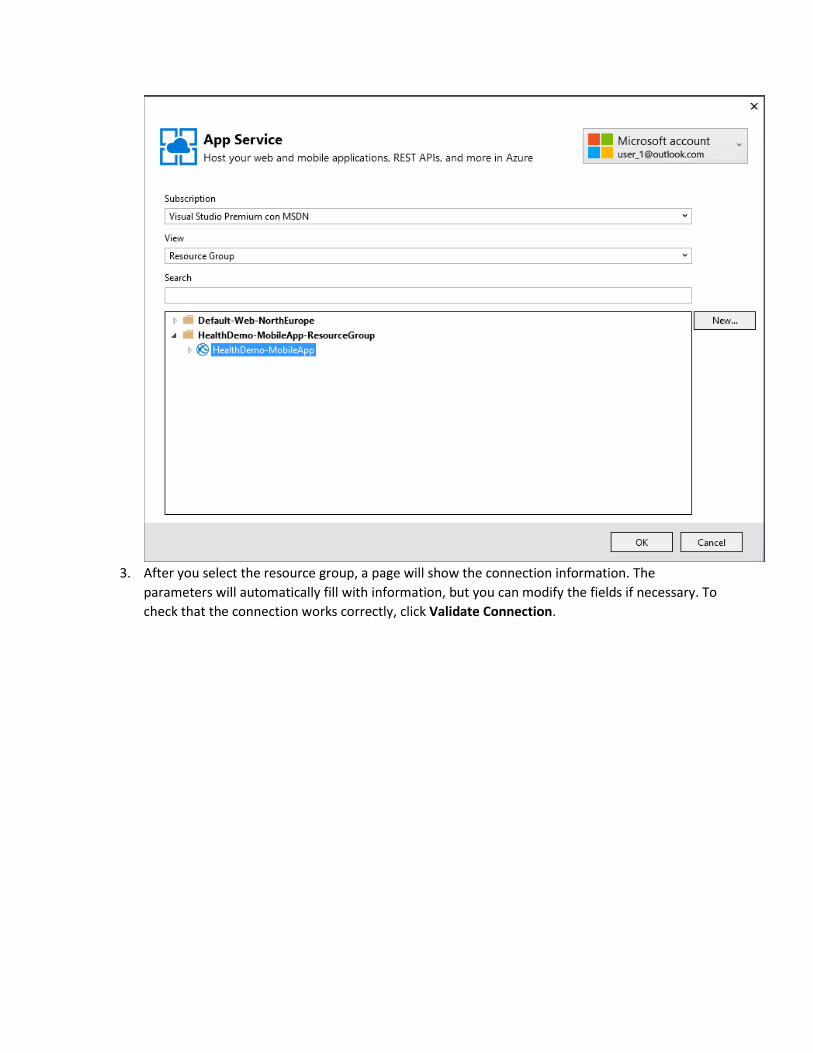
3. After you select the resource group, a page will show the connection information. The
parameters will automatically fill with information, but you can modify the fields if necessary. To
check that the connection works correctly, click Validate Connection.
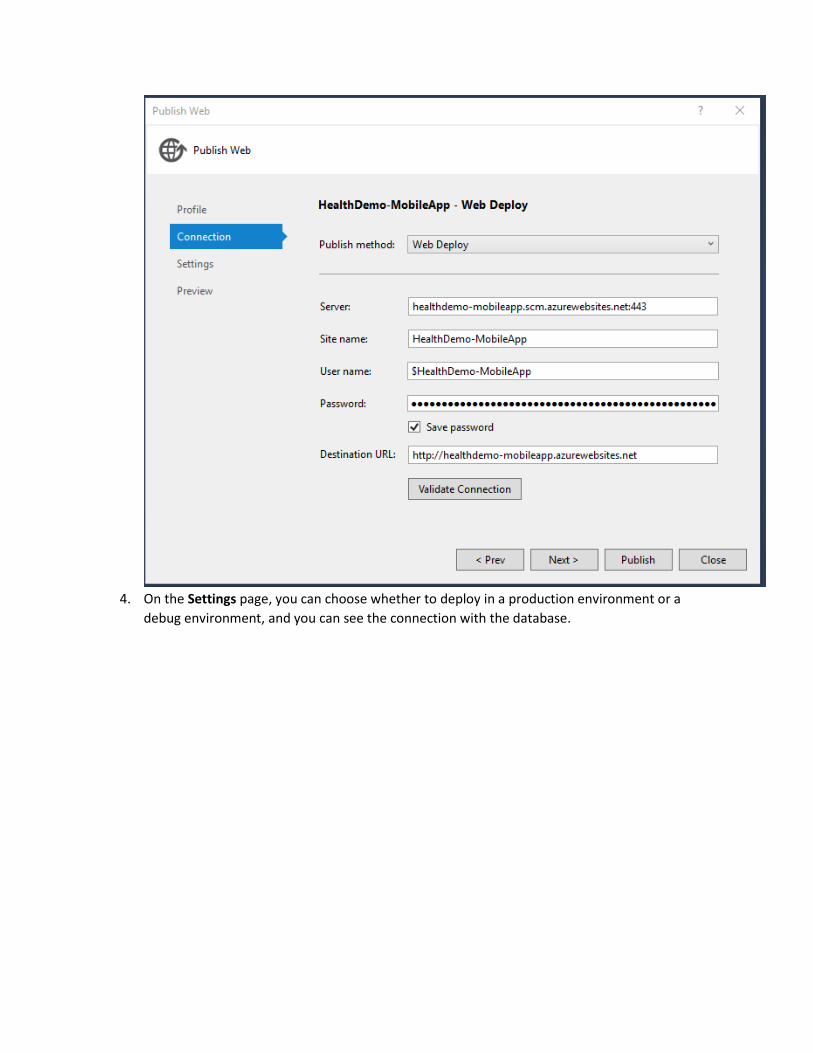
4. On the Settings page, you can choose whether to deploy in a production environment or a
debug environment, and you can see the connection with the database.
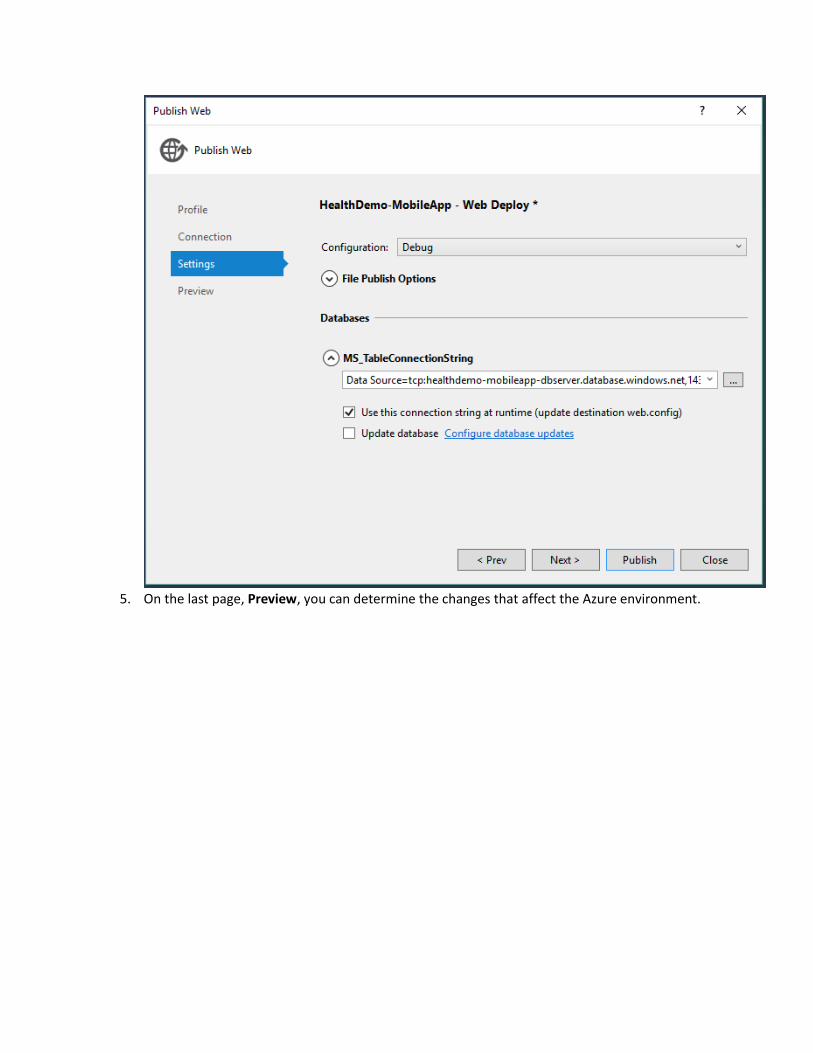
5. On the last page, Preview, you can determine the changes that affect the Azure environment.
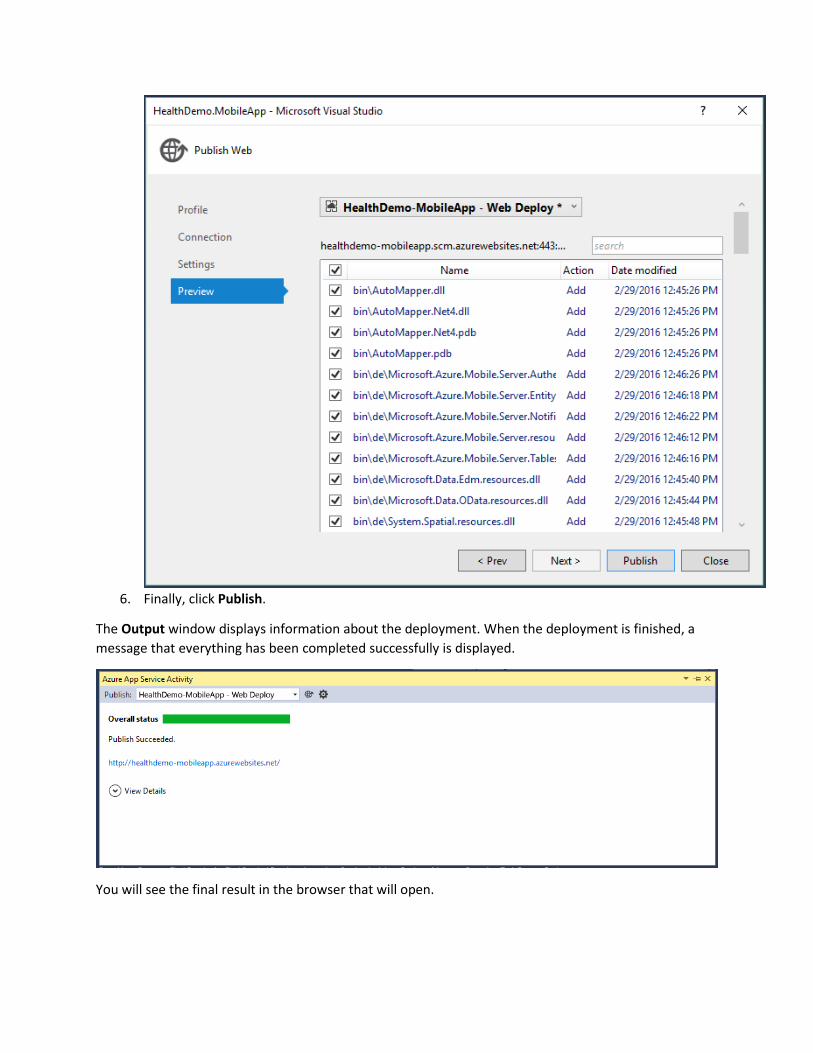
6. Finally, click Publish.
The Output window displays information about the deployment. When the deployment is finished, a
message that everything has been completed successfully is displayed.
You will see the final result in the browser that will open.
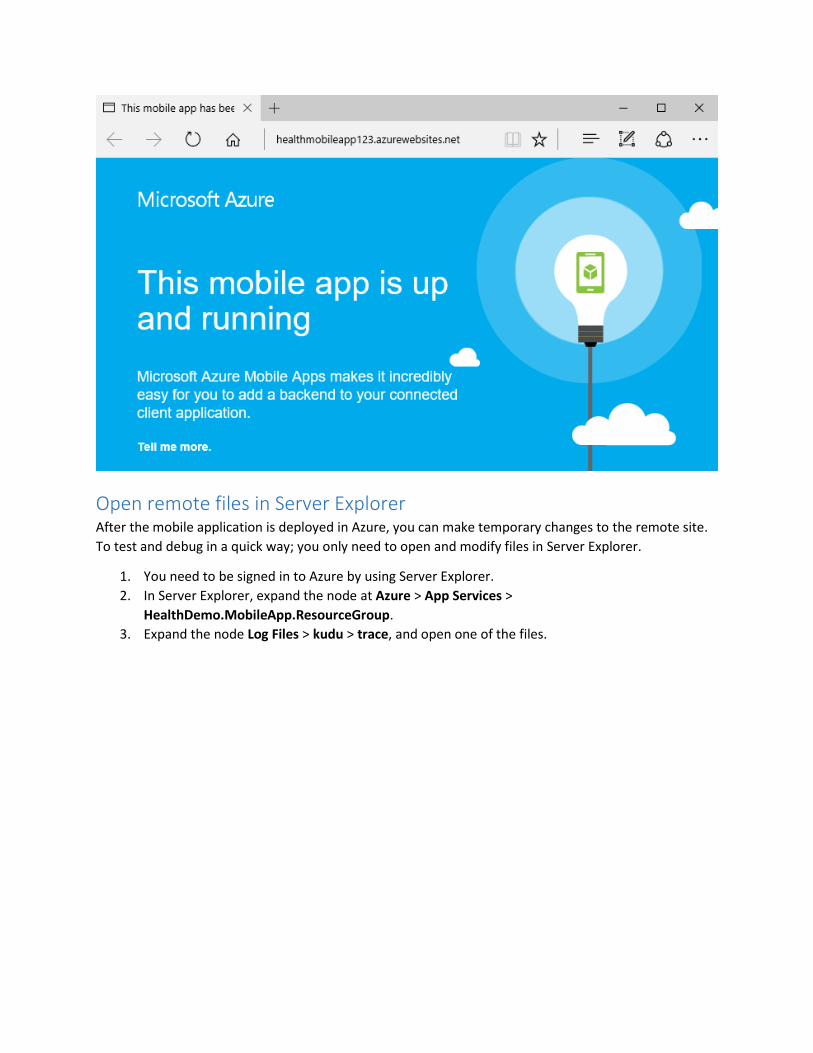
Open remote files in Server Explorer After the mobile application is deployed in Azure, you can make temporary changes to the remote site.
To test and debug in a quick way; you only need to open and modify files in Server Explorer.
1. You need to be signed in to Azure by using Server Explorer.
2. In Server Explorer, expand the node at Azure > App Services >
HealthDemo.MobileApp.ResourceGroup.
3. Expand the node Log Files > kudu > trace, and open one of the files.
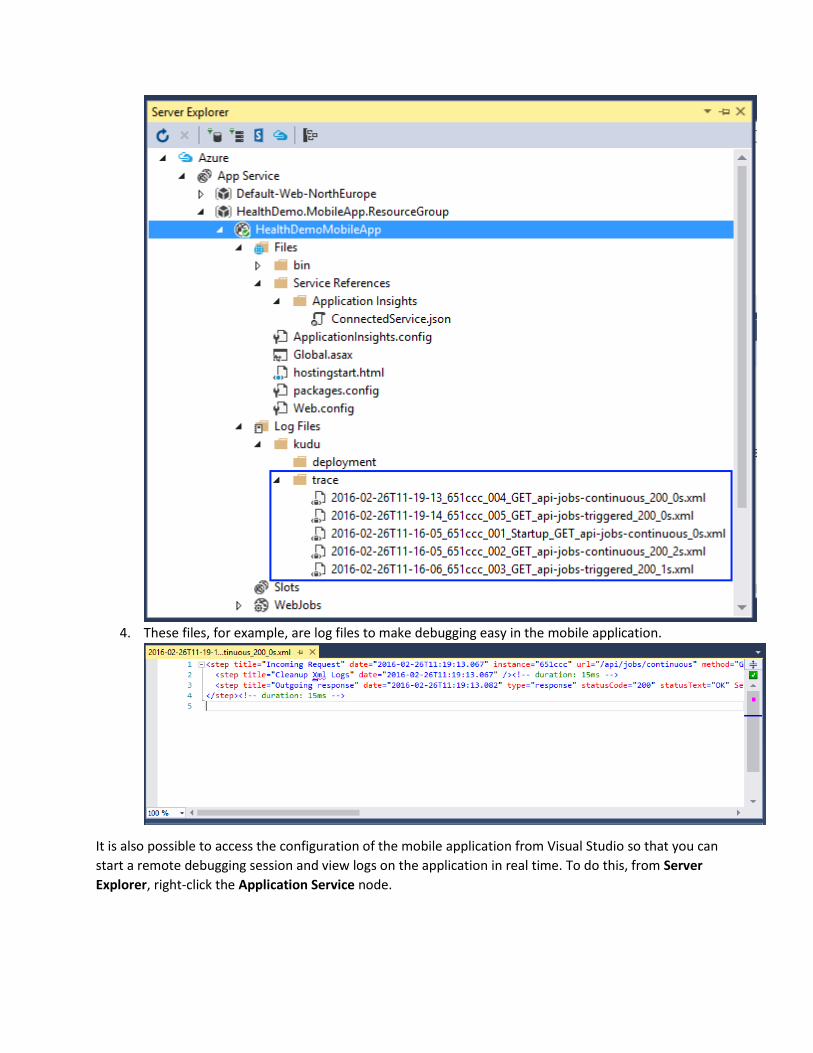
4. These files, for example, are log files to make debugging easy in the mobile application.
It is also possible to access the configuration of the mobile application from Visual Studio so that you can
start a remote debugging session and view logs on the application in real time. To do this, from Server
Explorer, right-click the Application Service node.
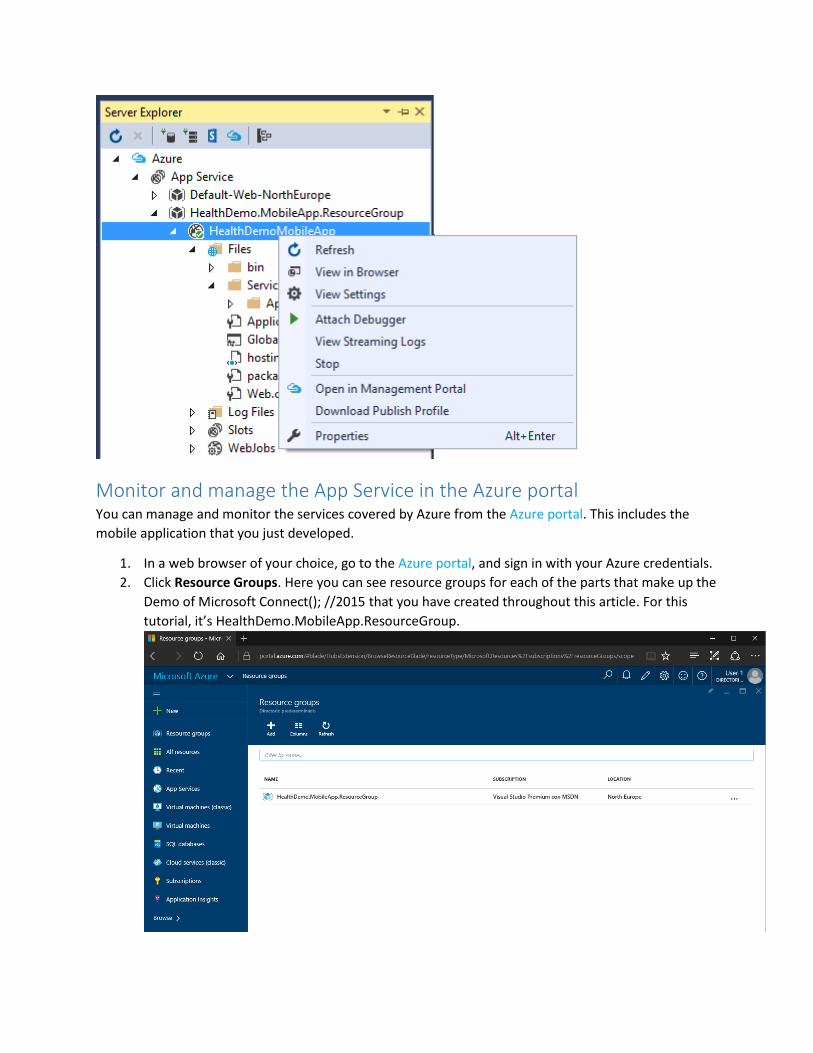
Monitor and manage the App Service in the Azure portal You can manage and monitor the services covered by Azure from the Azure portal. This includes the
mobile application that you just developed.
1. In a web browser of your choice, go to the Azure portal, and sign in with your Azure credentials.
2. Click Resource Groups. Here you can see resource groups for each of the parts that make up the
Demo of Microsoft Connect(); //2015 that you have created throughout this article. For this
tutorial, it’s HealthDemo.MobileApp.ResourceGroup.
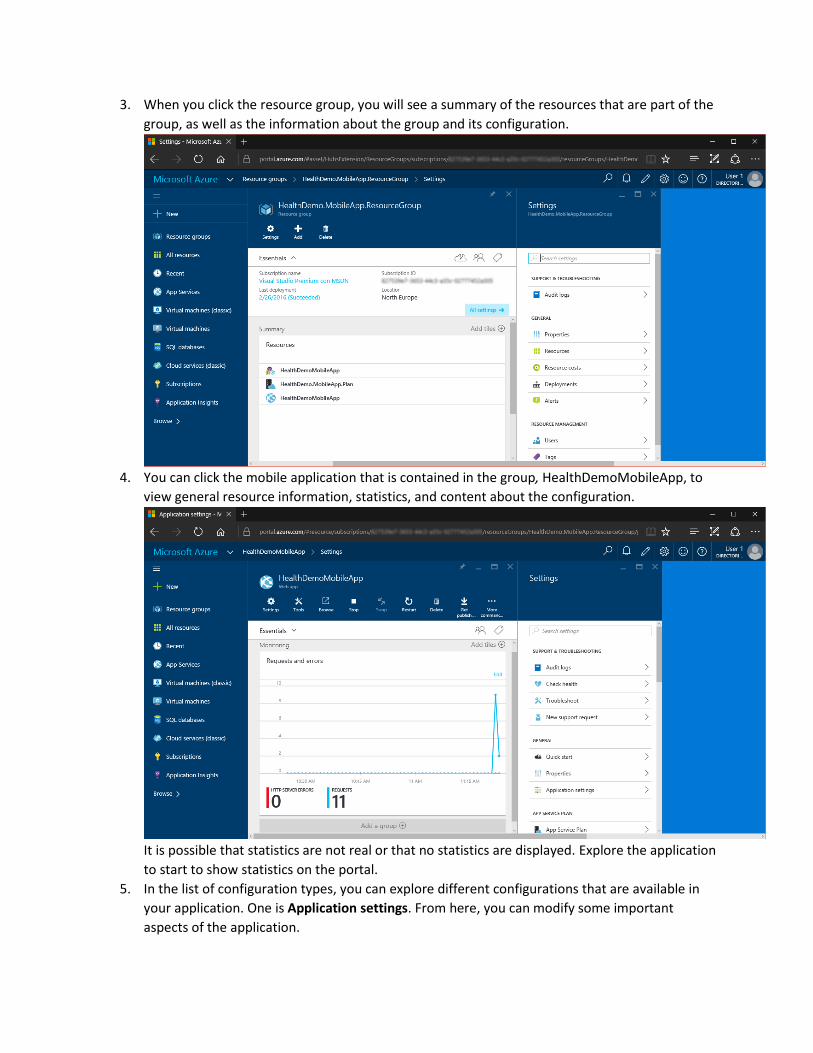
3. When you click the resource group, you will see a summary of the resources that are part of the
group, as well as the information about the group and its configuration.
4. You can click the mobile application that is contained in the group, HealthDemoMobileApp, to
view general resource information, statistics, and content about the configuration.
It is possible that statistics are not real or that no statistics are displayed. Explore the application
to start to show statistics on the portal.
5. In the list of configuration types, you can explore different configurations that are available in
your application. One is Application settings. From here, you can modify some important
aspects of the application.

From the portal, you can perform many actions that are related to applications and other Azure services,
such as databases and virtual machines.
Other suggested topics to explore What are the Azure App Services, why to use them, their concepts, and a basic introduction to
them.
Other ways to deploy a mobile project
For information about other ways to deploy mobile application projects to mobile apps by using
Visual Studio or by automating deployment from a source control system, see How to deploy an
Azure mobile app.
Visual Studio can also generate Windows PowerShell scripts that you can use to automate
deployment. For more information, see Automate everything (Building real-world cloud apps
with Azure).
How to add a custom domain name and SSL
For information about how to use SSL and your own domain (for example, www.healthdemo-
mobileapp.com instead of healthdemo-mobileapp.azurewebsites.net), see the following
resources:
o Configure a custom domain name in Azure App Service
o Enable HTTPS for an Azure mobile app
How to add real-time features such as chat
If your mobile app will include real-time features (such as a chat service, a game, or a stock
ticker), you can get the best performance by using ASP.NET SignalR with the WebSockets
transport method. For more information, see Using SignalR with Azure mobile apps.
How to choose between App Service, Azure Cloud Services, and Azure virtual machines for
mobile applications
In Azure, you can run mobile applications in App Service as shown in this tutorial, or in cloud
services or in virtual machines. For more information, see Azure mobile apps, cloud services,
and VMs: When to use which?
How to choose or create an App Service plan
How to choose or create a resource group
Azure Developer Tools – Learn more about the tools and find the recently released installers.