Create a Scriped SharePoint 2013 Development Environment Tutorial
56
Create a scripted SharePoint 2013 Development Environment Tutorial Introduction Creating a SharePoint Development Virtual Machine is something you might have to do quite a few times as a Developer. Even if it’s a pretty easy process, on a slow machine it can easily kill 4-5 hours of your day only to install SQL, SharePoint, Visual Studio and all the others tools you might need to get started. What if you could just script it so it’s all done automatically while you go take coffee, chat on SharePoint Community or whatever else you enjoy doing? In this tutorial we will learn how to build a script that we will keep using for as long as you keep developing on SharePoint 2013. The tutorial will be split in a few sections since in order to keep them focused and short, and at the end they will all be published in a downloadable PDF. I strongly encourage you to not only copy the scripts, but actually read the blog posts of why I did them like this and there are some parts where you will need to work as well! This Guide will show you how to install the following: Microsoft SharePoint Server 2013 – August 2013 CU (Also show you how to install future ones) Microsoft SQL Server 2012 + SP1 Microsoft Visual Studio 2012 + All the developers tools needed for SP 2013 Optional extra software: Microsoft SharePoint Designer 2013 Google Chrome Firefox NotePad++ Smp4dev ULSViewer HNSC Creator This guide was originally published on Absolute SharePoint Blog and has an a lot better code formatting! You can also follow it starting here: http://absolute-sharepoint.com/2013/10/create-a-scripted-sharepoint-2013-development- environment-tutorial-part-1.html Author Vlad Catrinescu Vlad is a SharePoint Consultant specializing in analyzing and deploying your perfect SharePoint Infrastructure. He also specializes into designing and implementing High Availability and Disaster Recovery SharePoint solutions as well as automating everything with the magic of PowerShell. Vlad got the Microsoft SharePoint Most Valuable Professional (MVP) award when he was 21 years old and is known in the community for founding the biggest and most active SharePoint Community that you can find at www.SharePoint- Community.net . Furthermore, he also blogs on his own blog at www.absolute-sharepoint.com . If you ever have any questions, want to connect, or just wanna say thanks, don’t hesitate to add me on twitter @vladcatrinescu or add me on LinkedIn at the following link: http://www.linkedin.com/in/vladcatrinescu
-
Upload
vlad-catrinescu -
Category
Documents
-
view
5.340 -
download
5
description
Creating a SharePoint Development Virtual Machine is something you might have to do quite a few times as a Developer. Even if it’s a pretty easy process, on a slow machine it can easily kill 4-5 hours of your day only to install SQL, SharePoint, Visual Studio and all the others tools you might need to get started. What if you could just script it so it’s all done automatically while you go take coffee, chat on SharePoint Community or whatever else you enjoy doing? In this tutorial we will learn how to build a script that we will keep using for as long as you keep developing on SharePoint 2013.
Transcript of Create a Scriped SharePoint 2013 Development Environment Tutorial

Create a scripted SharePoint 2013 Development Environment Tutorial
Introduction Creating a SharePoint Development Virtual Machine is something you might have to do quite a few times as a Developer. Even if it’s a pretty easy process, on a slow machine it can easily kill 4-5 hours of your day only to install SQL, SharePoint, Visual Studio and all the others tools you might need to get started. What if you could just script it so it’s all done automatically while you go take coffee, chat on SharePoint Community or whatever else you enjoy doing? In this tutorial we will learn how to build a script that we will keep using for as long as you keep developing on SharePoint 2013. The tutorial will be split in a few sections since in order to keep them focused and short, and at the end they will all be published in a downloadable PDF. I strongly encourage you to not only copy the scripts, but actually read the blog posts of why I did them like this and there are some parts where you will need to work as well!
This Guide will show you how to install the following:
Microsoft SharePoint Server 2013 – August 2013 CU (Also show you how to install future ones)
Microsoft SQL Server 2012 + SP1
Microsoft Visual Studio 2012 + All the developers tools needed for SP 2013
Optional extra software:
Microsoft SharePoint Designer 2013
Google Chrome
Firefox
NotePad++
Smp4dev
ULSViewer
HNSC Creator
This guide was originally published on Absolute SharePoint Blog and has an a lot better code formatting! You can also follow it starting here: http://absolute-sharepoint.com/2013/10/create-a-scripted-sharepoint-2013-development-environment-tutorial-part-1.html
Author
Vlad Catrinescu
Vlad is a SharePoint Consultant specializing in analyzing and deploying your perfect SharePoint Infrastructure. He also specializes into designing and implementing High Availability and Disaster Recovery SharePoint solutions as well as automating everything with the magic of PowerShell.
Vlad got the Microsoft SharePoint Most Valuable Professional (MVP) award when he was 21 years old and is known in the community for founding the biggest and most active SharePoint Community that you can find at www.SharePoint-Community.net . Furthermore, he also blogs on his own blog at www.absolute-sharepoint.com .
If you ever have any questions, want to connect, or just wanna say thanks, don’t hesitate to add me on twitter @vladcatrinescu or add me on LinkedIn at the following link: http://www.linkedin.com/in/vladcatrinescu

Contents Introduction ............................................................................................................................................................................ 1
Author ..................................................................................................................................................................................... 1
Prerequisites ........................................................................................................................................................................... 3
Creating the Domain and Service Accounts ............................................................................................................................ 3
Summary of Part 1 .............................................................................................................................................................. 5
Installing software prerequisites ............................................................................................................................................ 8
Installing SQL Server 2012..................................................................................................................................................... 10
Summary of Part 2 ............................................................................................................................................................ 14
Installing SharePoint 2013 .................................................................................................................................................... 16
Summary of Part 3 ............................................................................................................................................................ 29
Visual Studio 2012 Installation .............................................................................................................................................. 31
Install the Office Developer Tools for Visual Studio 2012 .................................................................................................... 32
Downloading the Office Developer Tools Package ........................................................................................................... 32
Installing Microsoft Office Developer Tools for Visual Studio 2012 ................................................................................. 33
Optional Software ................................................................................................................................................................. 36
NotePad++ ........................................................................................................................................................................ 36
Chrome .............................................................................................................................................................................. 36
Firefox ............................................................................................................................................................................... 37
Microsoft SharePoint Designer 2013 ................................................................................................................................ 37
SMTP4DEV, ULSViewer & HNSC Creator ........................................................................................................................... 41
Summary of Part 4 ............................................................................................................................................................ 42
Basic Optimizing .................................................................................................................................................................... 44
Advanced Optimization ......................................................................................................................................................... 50
Summary ............................................................................................................................................................................... 56

Prerequisites A Windows Server 2012 Virtual Machine
The Virtual Machine should have 2+ Cores (to avoid SharePoint 2013 Installation Error)
1 Private Network Card attached to the virtual machine. Do not add your External card with internet connection right away, I will tell you when you can!
All the Binaries and Licenses for the software you want to install.
Creating the Domain and Service Accounts Now that the Windows Server 2012 Virtual Machine is installed, the first thing we need to do is set the Execution Policy to Unrestricted. So, we will run this command:
Set-ExecutionPolicy unrestricted
Also, you can optionally turn off UAC to avoid annoying prompts on the development machine with this command
New-ItemProperty -Path HKLM:Software\Microsoft\Windows\CurrentVersion\policies\system -Name EnableLUA -PropertyType DWord -Value 0 -Force
Then first need to change the PC name to something understandable! So we will run this command (Don’t forget to change the PC Name to whatever you want):
$pcname = "DevMachine1" Rename-Computer -NewName $pcname -force
Next, we will set our private network card to a static IP. If you don’t, it will give errors later when creating the new forest. We set it to a static IP with this script:
$netadapter = Get-NetAdapter -Name Ethernet $netadapter | Set-NetIPInterface -Dhcp Disabled $netadapter | New-NetIPAddress -IPAddress 192.168.110.5 -PrefixLength 24 Set-DnsClientServerAddress -InterfaceAlias "Ethernet" -ServerAddresses "192.168.110.5"
Afterwards, we will Install the Active Directory Domain Services Role and Management tools, and restart the computer to make sure the NameChange finishes successfully.
Import-Module Servermanager Add-WindowsFeature -Name "ad-domain-services" -IncludeAllSubFeature -IncludeManagementTools Restart-Computer
After the computer restarts, log in with the administrator account and we will finally create the new forest and domain. The Script is the following (make sure you change the “vladdev.local” and “vladdev” for domain you wish to have)
Import-Module ADDSDeployment Install-ADDSForest ` -CreateDnsDelegation:$false ` -DatabasePath "C:\Windows\NTDS" ` -DomainMode "Win2012" ` -DomainName "vladdev.local" ` -DomainNetbiosName "VLADDEV" ` -ForestMode "Win2012" ` -InstallDns:$true ` -LogPath "C:\Windows\NTDS" ` -NoRebootOnCompletion:$false ` -SysvolPath "C:\Windows\SYSVOL" ` -Force:$true

The computer will now restart, and will ask you to re-login, but now it’s a Domain Controller (You can now add your internet connection for the rest of the tutorial )! We now need to create our SharePoint 2013 Service Accounts. To easily make that scripted, you should download the SharePoint 2013 Service Account Creator tool from CodePlex. When this tutorial was made, the tool was in version 1.5, so if the latest version is not 1.5 make sure you check if anything changed between then and now! What we are also going to do is create a folder on the C drive called “SharePoint” (C:\SharePoint). It’s very important to call it exactly like that because we will hardcode it in PowerShell to allow easier automation. So after we download and extract the tool in C:\SharePoint it should look like this:
We will open PowerShell like an Administrator, and run the following script to create the accounts:
cd c:\SharePoint .\sp2013serviceaccounts.ps1 -Level high -SPOU "SP Service Accounts" -SQLOU "SQL Service Accounts" -SQLLevel high -OptionalAccounts $true
Then, the script will ask us to input the password for all the service accounts. Since it’s a Development environment, we can give all the accounts the same password, so for example I want it to be “pass@word1” and Press Enter.
Now, the PowerShell script should run fine and the result should be something like this:

And, if you go check out the Active Directory Users and Computers, you should now have two new Organizational Units (OU) for Service Accounts called “SP Service Accounts” and “SQL Service Accounts” with a bunch of users in them
You might ask yourself why we don’t run everything under 1 user, since it’s a development machine… In my opinion a development machine should be as similar to a production one as possible and therefore running your code with only 1 account and many accounts may make you think works perfectly, but will not work in a more secure environment.
Summary of Part 1
In part 1 of the tutorial, we ran a bunch of PowerShell commands, but we can easily create only two scripts with them to make it easier to run afterwards. The first command you will always need to run by hand is “Set-ExecutionPolicy unrestricted” and, you cannot get away from this one. Next, let’s group our commands in three scripts.
The first script who will prepare the VM for the Domain Creation.

#Name: preparepc.ps1 #Purpose: Prepares the Virtual Machine for the Domain Creation Set-ExecutionPolicy unrestricted #turn off UAC New-ItemProperty -Path HKLM:Software\Microsoft\Windows\CurrentVersion\policies\system -Name EnableLUA -PropertyType DWord -Value 0 -Force #Set Static IP on Card $netadapter = Get-NetAdapter -Name Ethernet $netadapter | Set-NetIPInterface -Dhcp Disabled $netadapter | New-NetIPAddress -IPAddress 192.168.110.5 -PrefixLength 24 Set-DnsClientServerAddress -InterfaceAlias "Ethernet" -ServerAddresses "192.168.110.5" #Change PC Name $pcname = "DevMachine1" Rename-Computer -NewName $pcname -force #Add AD DS Role Import-Module Servermanager Add-WindowsFeature -Name "ad-domain-services" -IncludeAllSubFeature -IncludeManagementTools Restart-Computer
The second script who will create the domain!
#Name: createdomain.ps1 #Purpose: Creates the new Forest # Windows PowerShell script for AD DS Deployment Import-Module ADDSDeployment Install-ADDSForest ` -CreateDnsDelegation:$false ` -DatabasePath "C:\Windows\NTDS" ` -DomainMode "Win2012" ` -DomainName "vladdev.local" ` -DomainNetbiosName "VLADDEV" ` -ForestMode "Win2012" ` -InstallDns:$true ` -LogPath "C:\Windows\NTDS" ` -NoRebootOnCompletion:$false ` -SysvolPath "C:\Windows\SYSVOL" ` -Force:$true
And the Third Script that Creates the Accounts
#Name: createaccounts.ps1 #Purpose: Creates Service Accounts cd c:\SharePoint .\sp2013serviceaccounts.ps1 -Level high -SPOU "SP Service Accounts" -SQLOU "SQL Service Accounts" -SQLLevel high -OptionalAccounts $true

Now that we got them, let’s create those scripts and put them into our C:\SharePoint Folder. It should look something like:

Installing software prerequisites We will do everything under the assumption that even if this virtual machine is installed with an internet connection, we would be able to install all the next ones completely offline. First thing that we need is the sxs folder from a Windows Server 2012 ISO File. We will need it to install .Net Framework 3.5
Copy the whole sxs folder to C:\SharePoint.
Now, run PowerShell as an Administrator and run the following command to install .Net Framework 3.5
Import-Module ServerManager DISM.exe /Online /Enable-Feature /FeatureName:NetFx3 /All /LimitAccess /Source:"C:\SharePoint\sxs"
Next, you will probably connect to this Virtual machine with Remote Desktop, so let’s enable it!
(Get-WmiObject -Class "Win32_TerminalServiceSetting" -Namespace root\cimv2\terminalservices).SetAllowTsConnections(1) (Get-WmiObject -class "Win32_TSGeneralSetting" -Namespace root\cimv2\terminalservices -Filter "TerminalName='RDP-tcp'").SetUserAuthenticationRequired(0)
For Remote Desktop and SQL to work properly without too much hassle, we will also disable the firewall!
netsh advfirewall set allprofiles state off
Next, let’s disable IE Enhanced Security…. As it’s really annoying.

Set-ItemProperty -Path "HKLM:\SOFTWARE\Microsoft\Active Setup\Installed Components\{A509B1A7-37EF-4b3f-8CFC-4F3A74704073}" -Name isinstalled -Value 0 Set-ItemProperty -Path "HKLM:\SOFTWARE\Microsoft\Active Setup\Installed Components\{A509B1A8-37EF-4b3f-8CFC-4F3A74704073}" -Name isinstalled -Value 0 Rundll32 iesetup.dll, IEHardenLMSettings,1,True Rundll32 iesetup.dll, IEHardenUser,1,True Rundll32 iesetup.dll, IEHardenAdmin,1,True If (Test-Path "HKCU:\SOFTWARE\Microsoft\Active Setup\Installed Components\{A509B1A7-37EF-4b3f-8CFC-4F3A74704073}") { Remove-Item -Path "HKCU:\SOFTWARE\Microsoft\Active Setup\Installed Components\{A509B1A7-37EF-4b3f-8CFC-4F3A74704073}" } If (Test-Path "HKCU:\SOFTWARE\Microsoft\Active Setup\Installed Components\{A509B1A8-37EF-4b3f-8CFC-4F3A74704073}") { Remove-Item -Path "HKCU:\SOFTWARE\Microsoft\Active Setup\Installed Components\{A509B1A8-37EF-4b3f-8CFC-4F3A74704073}" } Remove-ItemProperty "HKCU:\SOFTWARE\Microsoft\Internet Explorer\Main" "First Home Page" -ErrorAction SilentlyContinue
Before the next reboot is required, we will add the SQL_Admin and SP_Admin accounts to the local administrator group… make sure you change the domain info!
$pcname = hostname Set-ADGroup -Add:@{'Member'="CN=Sp_Admin,OU=SP Service Accounts,DC=vladdev,DC=local", "CN=Sql_Admin,OU=SQL Service Accounts,DC=vladdev,DC=local"} -Identity:"CN=Domain Admins,CN=Users,DC=vladdev,DC=local" -Server:"$pcname.vladdev.local"
We might want to install / test some client software in the future, so let’s add the Desktop Experience Feature!
Add-WindowsFeature Desktop-Experience Restart-Computer
After the computer restarts, we will log in with the SQL_Admin account!

Installing SQL Server 2012
Everything until now was pretty straightforward and easy, especially since I gave you most of the scripts. However, installing SQL Server 2012 is not as easy and it will require some input from you! To Begin with, insert the SQL 2012 ISO (with SP1 Preferably) in the virtual machine, and let’s create a folder in C:\SharePoint called “SQL Binaries” and copy all the SQL Binaries inside it!
We won’t open Powershell right away… instead of me giving you all the script and configuration file which risks not working on your computer, I will show you step by step how to do it yourself! First, start setup.exe! Go in the Installation Tab and click on New SQL Server Instance. I won’t include every Screenshot, only those where you need to modify something.
The Minimum you need for the following screen is “Database Engine” and “Management Tools – Complete”

Do not Enter an Instance Name... It’s a Dev Environment!

Enter the Service Accounts we created in the earlier step and their good passwords!
Configure SQL in Mixed Mode and add SQL_Admin, SP_Admin and the “Domain Admins” group to the SQL Server Administrators.

And now we stop at this step! Do not click install!
You can see that on the bottom, we have a “Configuration File Path”. That’s the Configuration File we need, so go at the path there and copy the “ConfigurationFile.ini” file in C:\SharePoint\SQLBinaries . You can now cancel the Installation Wizard!
Now that we have everything configured in there, let’s see how we do it with PowerShell for the next times! Just fill the info for the following script!
cd c:\SharePoint .\SQLBinaries\Setup.exe /ConfigurationFile=.\SQLBinaries\ConfigurationFile.INI /Q /Action=Install /IAcceptSQLServerLicenseTerms /SQLSVCPASSWORD=pass@word1 /AGTSVCPASSWORD=pass@word1 /sapwd=pass@word1
If you go in the Start Menu, you should now have a bunch of SQL tools. You can open the Management Studio if you want to start checking your SQL Configuration.

SQL is now setup!
Summary of Part 2
In Part 2 of this tutorial, we enabled and disabled a bunch of Windows Features in order to make it easy for us to develop afterwards and to make sure everything installs smoothly. Furthermore we created the SQL Configuration file we will use in the future as well as install SQL. We only have two scripts we will use for future installations:
Script 1 that Enables all the features and installs .Net Framework 3.5 #Name: prereqsandfeatures.ps1 #Purpose: Installs Prerequisite Software and Features
#Disable Firewall netsh advfirewall set allprofiles state off #Disable IE Enhanced Security Write-Host -ForegroundColor White " - Disabling IE Enhanced Security..." Set-ItemProperty -Path "HKLM:\SOFTWARE\Microsoft\Active Setup\Installed Components\{A509B1A7-37EF-4b3f-8CFC-4F3A74704073}" -Name isinstalled -Value 0 Set-ItemProperty -Path "HKLM:\SOFTWARE\Microsoft\Active Setup\Installed Components\{A509B1A8-37EF-4b3f-8CFC-4F3A74704073}" -Name isinstalled -Value 0 Rundll32 iesetup.dll, IEHardenLMSettings,1,True Rundll32 iesetup.dll, IEHardenUser,1,True Rundll32 iesetup.dll, IEHardenAdmin,1,True If (Test-Path "HKCU:\SOFTWARE\Microsoft\Active Setup\Installed Components\{A509B1A7-37EF-4b3f-8CFC-4F3A74704073}") { Remove-Item -Path "HKCU:\SOFTWARE\Microsoft\Active Setup\Installed Components\{A509B1A7-37EF-4b3f-8CFC-4F3A74704073}" } If (Test-Path "HKCU:\SOFTWARE\Microsoft\Active Setup\Installed Components\{A509B1A8-37EF-4b3f-8CFC-4F3A74704073}") { Remove-Item -Path "HKCU:\SOFTWARE\Microsoft\Active Setup\Installed Components\{A509B1A8-37EF-4b3f-8CFC-4F3A74704073}"

} Remove-ItemProperty "HKCU:\SOFTWARE\Microsoft\Internet Explorer\Main" "First Home Page" -ErrorAction SilentlyContinue #Enable Remote Desktop (Get-WmiObject -Class "Win32_TerminalServiceSetting" -Namespace root\cimv2\terminalservices).SetAllowTsConnections(1) (Get-WmiObject -class "Win32_TSGeneralSetting" -Namespace root\cimv2\terminalservices -Filter "TerminalName='RDP-tcp'").SetUserAuthenticationRequired(0) #Add .Net FrameWork Import-Module ServerManager DISM.exe /Online /Enable-Feature /FeatureName:NetFx3 /All /LimitAccess /Source:"C:\SharePoint\sxs" #add SPAdmin and SQL Admin to Local(Domain) Administrators $pcname = hostname Set-ADGroup -Add:@{'Member'="CN=Sp_Admin,OU=SP Service Accounts,DC=vladdev,DC=local", "CN=Sql_Admin,OU=SQL Service Accounts,DC=vladdev,DC=local"} -Identity:"CN=Domain Admins,CN=Users,DC=vladdev,DC=local" -Server:"$pcname.vladdev.local" #Enable Desktop Experience Add-WindowsFeature Desktop-Experience Restart-Computer
Script #2 which installs SQL!
#Name: installsql.ps1 #Purpose: Installs SQL cd c:\SharePoint .\SQLBinaries\Setup.exe /ConfigurationFile=.\SQLBinaries\ConfigurationFile.INI /Q /Action=Install /IAcceptSQLServerLicenseTerms /SQLSVCPASSWORD=pass@word1 /AGTSVCPASSWORD=pass@word1 /sapwd=pass@word1 shutdown -l

Installing SharePoint 2013
The Installation of SharePoint 2013 will basically be done in two steps. The first step is, of course, preparing our source package and configuration, and the second step is installing it. Both those steps will be done with the help of two great tools done by Brian Lalancette. The first one is AutoSPInstaller that you can download here: https://autospinstaller.codeplex.com/ and the second one is AutoSPSourceBuilder that you can download here: https://autospsourcebuilder.codeplex.com .
First, let’s download AutoSPInstaller, and put the “SP” Folder in C:\SharePoint . Now, let’s download AutoSPSourceBuilder and extract it in C:\SharePoint Again. The folder should look something like:
Next thing you have to do is mount the SharePoint 2013 ISO file and open PowerShell as an administrator.
Run the following script (If you want to add language packs to your install you can now! Make sure to read the tools documentation if you modify stuff! Also, for this step you will need an internet connection so it can download the prerequisites! However, once we have them we won’t need them anymore for future Virtual Machines.
cd C:\SharePoint\AutoSPSourceBuilder .\AutoSPSourceBuilder.ps1 -Destination "C:\SharePoint\SP\2013" -GetPrerequisites $true
The script will start copying the Source Files from your ISO in the right folder in C:\SharePoint , as well as downloading the pre-requisites so they are offline in the future! It will look something like this: When Asked to enter a Cumulative Update, just press Enter, we don’t want to slipstream the updates using the old process, we will use the new “AutoSPInstaller” way!

While it runs, you can download the March 2013 PU from this link: http://download.microsoft.com/download/5/1/C/51CA768E-C79E-41BA-91D4-7F7D929B0BFE/ubersrvsp2013-kb2767999-fullfile-x64-glb.exe And the August 2013 Cumulative Update from this link: http://hotfixv4.microsoft.com/Microsoft%20SharePoint%20Server%202013/sp1/ubersrv2013kb2817616fullfilex64glb/15.0.4535.1000/free/466901_intl_x64_zip.exe The March 2013 CU is already an .exe file, however the August 2013 one is a zip, so you will have to extract it into the exe. After you do, copy both your executables and the .cab file into C:\SharePoint\SP\2013\Updates folder. It should look something like this :
When the AutoSPSourceBuilder finishes, it will have copied all the SharePoint 2013 Media in the C:\SharePoint\2013\SharePoint folder and all the prerequisites in C:\SharePoint\SP\2013\SharePoint\PrerequisiteInstallerFiles . Now that your media is prepared, you can actually delete the AutoSPSourceBuilder folder as we won’t be using it anymore. It will look something like this:

Now that our SharePoint Sources are ready, we can start configuring everything! Go in C:\SharePoint\SP\AutoSPInstaller and open “AutoSPInstallerInput.xml” with a notepad editor. You can also edit this file on your local machine since you probably have NotePad++ which makes modifying this document a lot easier! The Document is pretty well documented however I will go over with you with some settings we need to change. I will also show you a bit under an example of a configured AutoSPInstallerInput.xml that you can refer to incase you have any questions... so let’s start!
1. change the “PIDKEY” value with your actual SharePoint 2013 Key :
2. Change “OfflineInstall” to true: 3. Change the “AutoAdminLogon” to true and enter the sp_admin password. This will make sure we aren’t
prompted to reboot every time the Pre Req installer needs a reboot! :
4. Change the “CertificateRevocationListCheck” to true. If we keep it enabled, it will slow down your VM when not
connected to internet!:
5. Enter the passphrase of the farm... Make sure it’s pretty complicated!

Tip to make configuration faster! Do a Find/Replace with Domain\ for vladdev\ (for example) and domain.com for vladdev.local (for example). This will avoid you writing in the domain every time!
From now on, I won’t tell you what to change on each line, since it’s very well documented in the XML file, however I will post you screenshots of “Sections”. The only thing I want to make sure you do is set the <DBServer> to localhost! This will make sure it will always pick the MSSQL instance!
PS: I will have deleted comments from my screenshots so I am able to show you more actual configuration on a smaller
screenshot!

In the Logging Part, I changed the Path to C:\Logs\<logname> to make it easier to find them after! Won’t have to go to the long default path anymore!


For the Service Applications, the basic ones will only ask you if you want to provision or not... And some of them like “Search” And User profile will ask you for more detail! I will only show you the MMS, Search and User Profile Screnshots, use the comments in the XML to configure the rest if you need!

The SP_UserProfiles account currently does not have the necessary rights to sync users! You either have to give it the Replicating Directory Changes Permission (Click here for tutorial) OR, if you want an “easier” way... Just use the SP_Admin account! It’s already a local(domain) admin!


The rest of the Service Applications can be configured as you wish! After you’re done configuring the file, run the AutoSPInstallerLaunch.bat file. It will launch a CMD window as well as a PowerShell one and will look something like this!
And then it will install the prerequisites, Binaries, Updates and configure everything as you told it to in the AutoSPInstallerInput.XML. Here are some screenshots of it running.


And when the SharePoint 2013 installation is done, it will open the Web Applications and Central Administration in the Background
Summary of Part 3
This Part of the Guide has been quite complicated, however we managed to install SharePoint 2013 entirely scripted! The fun part is now that you already got your sources ready, so you won’t have to redo the “Source Preparation” ever again. Also, since it’s a development machine, the AutoSPInstallerInput.XML will probably never change between the installs, so now you got that forever as well! One thing that isn’t “cool” now is that we have to go to “C:\SharePoint\SP\AutoSPInstaller” to launch the script and not launch it from C:\SharePoint like all the other ones! So let’s create this script and put it in C:\SharePoint

#Name: installSharePoint.ps1 #Purpose: Installs SharePoint cd C:\SharePoint .\SP\AutoSPInstaller\AutoSPInstallerLaunch.bat
Your new C:\SharePoint should look something like this :

Visual Studio 2012 Installation It’s no secret that the only tool we really need for SharePoint Development is Visual Studio! In this part of the tutorial we will Install Visual Studio 2012, as well as the Office Developer Tools needed to develop on SharePoint 2013. First of all, we will copy all the Visual Studio Installation Bits from the ISO to a new folder in C:\SharePoint\Software\VisualStudio2012. We will put all the binaries from this chapter in C:\SharePoint\Software\ProgramName. This will make our structure a lot cleaner! It will look something like this:
Next, what we need to do is open the “AdminDeployment.xml” with a notepad editor and change <BundleCustomizations TargetDir="default" NoWeb="default"/> to <BundleCustomizations TargetDir="default" NoWeb="yes"/>
PS: First time it failed the installation because I entered “Yes” instead of “yes”. So make sure you enter everything in lowercase.
Then, open powershell and run the following command: (If you have Visual Studio Premium, the .exe name might change, so make sure you also change it in script!)
New-Item -ItemType directory -Path C:\AutoInstallLogs cd C:\SharePoint\Software\VisualStudio2012 .\vs_ultimate.exe /full /noweb /quiet /ProductKey XXXXXXXXXXXXX /Log C:\AutoInstallLogs\VS2012.txt
This Operation will take a while however, we will know when it’s done when it stops modifying files in the C:\AutoInstallLogs folder! I know it’s not the best way out here, however in part 6 we will see how to make it better!

Install the Office Developer Tools for Visual Studio 2012 This Process is divided in two steps: The first step is to actually download all the files, and the second step is to install them on a virtual machine! For the first step, you will obviously need an internet connection, however you can do it on any machine!
Downloading the Office Developer Tools Package The first thing you need to do is go to the MSDN Website here: http://msdn.microsoft.com/en-us/office/apps/fp123627.aspx and download the Microsoft Office Developer Tools for Visual Studio 2012 package.
Once it’s downloaded, open it with the GUI at least once, so it installs the latest version of the Web PlatForm Installer (4.6 at the time of this writing). As soon as the WPI window opens, close it! Afterwards, run this PowerShell command!
WebpiCmd.exe /offline /products:OfficeToolsForVS2012RTW /Path:C:\SharePoint\Software\OfficeToolsForVS2012RTW

It will download a bunch of files and will put them into folders pretty cleanly! Also, by default, the WebPlatForm Installer commands are not installed, and if you don’t have an internet connection, you might get a nasty error! So what we will do is download the WebPi binaries from here: http://www.iis.net/learn/install/web-platform-installer/web-platform-installer-v4-command-line-webpicmdexe-rtw-release (Direct Download: http://download.microsoft.com/download/7/0/4/704CEB4C-9F42-4962-A2B0-5C84B0682C7A/WebPlatformInstaller_amd64_en-US.msi )
Installing Microsoft Office Developer Tools for Visual Studio 2012
Now, Run the following Command in order to install it! The first 4 lines are only for “Future” Virtual Machines to make sure they install the newest Web Platform Installer and you don’t need to run them on this one!
C:\SharePoint\Software\OfficeToolsForVS2012RTW\WebPlatformInstaller_amd64_en-US.msi /q Start-Sleep -s 120 C:\SharePoint\Software\OfficeToolsForVS2012RTW\bin\WebpiCmd.exe /install /products:OfficeToolsForVS2012RTW /XML:C:\SharePoint\Software\OfficeToolsForVS2012RTW\feeds\latest\webproductlist.xml /AcceptEula


Once everything finishes installing, it will look something like this:
Note: This tutorial was done and tested with version 4.6 of the Web Platform Installer. If you ever have errors with an older version, please tell me and I will update the article!

Optional Software
NotePad++
To Install NotePad++, download the Notepad++ installer file from http://notepad-plus-plus.org/download/v6.5.html and save it in C:\SharePoint\Software\NotePad++
Run the Following Command:
cd C:\SharePoint\Software\NotePad++ .\npp.6.5.Installer.exe /S NotePad++ is now installed!
Chrome
To Install Chrome, download the Chrome MSI file from here http://www.google.com/chrome/eula.html?msi=true and save it in C:\SharePoint\Software\Chrome
Run the following Command:
Cd C:\SharePoint\Software\Chrome Msiexec /q /I GoogleChromeStandaloneEnterprise.msi
Google Chrome is now installed!

Firefox To Install FireFox, download the full Executable Package of FireFox English Version from http://www.mozilla.org/en-US/firefox/all/ and save it as an executable with no spaces (preferably) in C:\SharePoint\Software\FireFox
Run the following Command:
cd C:\SharePoint\Software\FireFox .\ffsetup.exe -ms
FireFox is now installed!
Microsoft SharePoint Designer 2013 SharePoint Designer 2013 is probably the most complicated out of the optional software. First of all, download the 64 bit executable from http://www.microsoft.com/en-ca/download/details.aspx?id=35491. Then, using PowerShell navigate to the folder where it was downloaded and run the following command:
.\sharepointdesigner_64bit.exe /extract:C:\SharePoint\Software\SPDesigner
You should now have something like this:

We will now go back to PowerShell and run the following command:
cd C:\SharePoint\Software\SPDesigner .\setup.exe /admin
The Microsoft Office Customization Tool will open and ask us to select what file we want to prepare! We will chose the only available product we have!
In the Setup > Licensing and user interface tab, select the “I accept the terms in the License Agreement” as well as set the display level to “None”

Afterwards, we will go to File > Save As, and we will save it in the C:\SharePoint\Software\SPDesigner\Updates folder and we will call it adminfile.msp !

We will then open PowerShell and run the following commands:
cd C:\SharePoint\Software\SPDesigner .\setup.exe /adminfile updates\adminfile.msp
SharePoint Designer 2013 is now installed!

SMTP4DEV, ULSViewer & HNSC Creator
The SMTP4Dev, ULSViwer and SharePoint Host named Site Collection (HNSC) Creator are “standalone” programs that do not require installation and that’s why I grouped them together! First of all, download all of them from the following links and paste the extracted executable in C:\SharePoint\Software\Standalone
SMTP4DEV: https://smtp4dev.codeplex.com
ULSVIEWER : http://archive.msdn.microsoft.com/ULSViewer
SharePoint Host named Site Collection (HNSC) Creator: https://hnsc.codeplex.com/
It should then look something like this:
You can also add any other standalone program that you need! After we’re done, we will run the following command:
Copy-Item C:\SharePoint\Software\StandAlone\* C:\Users\sp_admin\Desktop
It will then look something like this on your desktop!

Summary of Part 4 In this part of the tutorial, we installed Visual Studio 2012, Office Developer Tools for Visual Studio 2012, Google Chrome, FireFox, SharePoint Designer, NotePad++, as well as SMTP4Dev, ULSViewer and the SharePoint Host named Site Collection creator! To do that, we used a bunch of commands... now let’s group them into usable scripts!
Our First Script is to install Visual Studio 2012!
#Name: installvs2012.ps1 #Purpose: Installs Visual Studio 2012 cd C:\SharePoint\Software\VisualStudio2012 .\vs_ultimate.exe /full /noweb /quiet /p ProductKey=" XXXX-XXXX-XXXX-XXXX " /ForceRestart
The Second one is to install the Microsoft Office Developer Tools for Visual Studio 2012
#Name: installofficetools.ps1 #Purpose: Installs Microsoft Office Developer Tools for Visual Studio 2012 C:\SharePoint\Software\OfficeToolsForVS2012RTW\WebPlatformInstaller_amd64_en-US.msi /q Start-Sleep -s 120 C:\SharePoint\Software\OfficeToolsForVS2012RTW\bin\WebpiCmd.exe /install /products:OfficeToolsForVS2012RTW /XML:C:\SharePoint\Software\OfficeToolsForVS2012RTW\feeds\latest\webproductlist.xml /AcceptEula
The third and final one is to install all the other optional software!
#Name: installoptionalsoftware.ps1 #Purpose: Installs Notepad++, Chrome, FireFox, Designer, SMTP4DEV, ULSViewer & HNSC Creator Write-Host "Installing NotePad++" cd C:\SharePoint\Software\NotePad++ .\npp.6.5.Installer.exe /S Start-Sleep -s 120 Write-Host "Installing Goolge Chrome" Cd C:\SharePoint\Software\Chrome Msiexec /q /I GoogleChromeStandaloneEnterprise.msi Start-Sleep -s 120 Write-Host "Installing FireFox" cd C:\SharePoint\Software\FireFox .\ffsetup.exe -ms Start-Sleep -s 120 Write-Host "Installing SharePoint Designer 2013" cd C:\SharePoint\Software\SPDesigner .\setup.exe /adminfile updates\adminfile.msp Start-Sleep -s 200 Write-Host "Copying standalone programs" Copy-Item C:\SharePoint\Software\StandAlone\* C:\Users\sp_admin\Desktop Write-Host "DONE"

We have now installed all the software needed to Develop for SharePoint 2013. Here is how your SharePoint folder should look like:

Basic Optimizing As the title says, this part of the tutorial is really just BASIC optimizing. All the “cool” and advanced stuff will be done in the next part, however if you don’t mind doing a minimum of manual Work, you can stop here! All our scripts are now ready, however look at the following screenshot and what do you see?
That’s right... a bunch of scripts that aren’t really in order or descriptive! Now, if you give this like that to a developer, chances are he might run the scripts in incorrect order and have lots of errors. Let’s fix that a bit!

A lot better! However, I still don’t find it clean enough + the sp2013serviceaccounts.ps1 script is there with no number? Let’s move the “sp2013serviceaccounts.ps1” file and the XML folder into a new folder under “C:\SharePoint\SP\ServiceAccounts”
We also have to change the “createaccounts.ps1” script to now represent the new path. Your new script will now be this:
cd c:\SharePoint\sp\serviceaccounts .\sp2013serviceaccounts.ps1 -Level high -SPOU "SP Service Accounts" -SQLOU "SQL Service Accounts" -SQLLevel high -OptionalAccounts $true

The Next thing that I find really not cool is the random “sxs” folder. All the other folders have a descriptive and logical name, except the sxs one. Luckily, under “C:\SharePoint\SP\2013\SharePoint\PrerequisiteInstallerFiles\” there is another “sxs” folder that is used for the same thing by AutoSPInstaller (if we didn’t do it before). Let’s move the “SXS” folder from the “C:\SharePoint” to “C:\SharePoint\SP\2013\SharePoint\PrerequisiteInstallerFiles\”

We Now also have to change the “prereqsandfeatures.ps1” script to show the new path! So, change the “Add .Net Framework” section part to show this command;
#Add .Net FrameWork Import-Module ServerManager DISM.exe /Online /Enable-Feature /FeatureName:NetFx3 /All /LimitAccess /Source:"C:\SharePoint\SP\2013\SharePoint\PrerequisiteInstallerFiles\sxs"
We are now left with a clean, professional folder that is ready to install you a SharePoint 2013 Development Environment with minimal input!

Next, we see that number 8 and 9 are done by the same user, one after the other and PowerShell can simply queue them… so let’s combine them and change the name to 8. Installtools.ps1. The insides will be something like this:
#Name: installtools.ps1 #Purpose: Installs Microsoft Office Developer Tools for Visual Studio 2012 & Other Software Write-Host "Installing Microsoft Office Developer Tools for Visual Studio 2012" C:\SharePoint\Software\OfficeToolsForVS2012RTW\WebPlatformInstaller_amd64_en-US.msi /q Start-Sleep -s 120 C:\SharePoint\Software\OfficeToolsForVS2012RTW\bin\WebpiCmd.exe /install /products:OfficeToolsForVS2012RTW /XML:C:\SharePoint\Software\OfficeToolsForVS2012RTW\feeds\latest\webproductlist.xml /AcceptEula Write-Host "Installing NotePad++" cd C:\SharePoint\Software\NotePad++ .\npp.6.5.Installer.exe /S Start-Sleep -s 120 Write-Host "Installing Goolge Chrome"
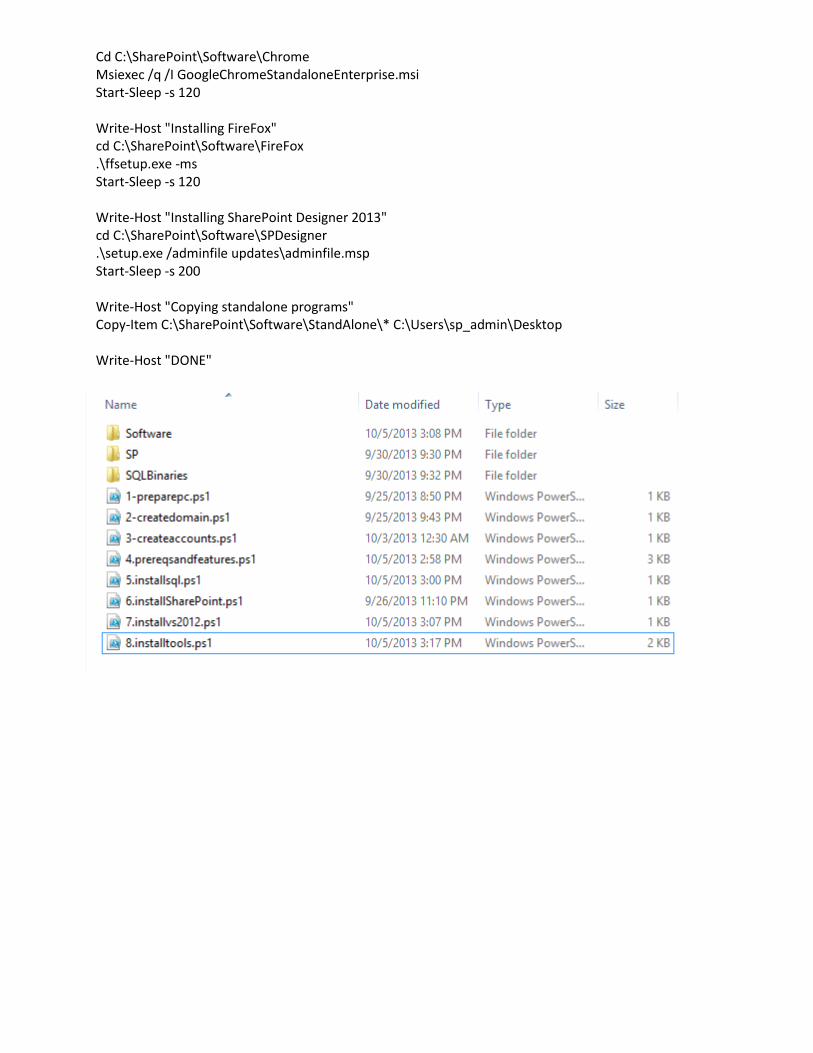
Cd C:\SharePoint\Software\Chrome Msiexec /q /I GoogleChromeStandaloneEnterprise.msi Start-Sleep -s 120 Write-Host "Installing FireFox" cd C:\SharePoint\Software\FireFox .\ffsetup.exe -ms Start-Sleep -s 120 Write-Host "Installing SharePoint Designer 2013" cd C:\SharePoint\Software\SPDesigner .\setup.exe /adminfile updates\adminfile.msp Start-Sleep -s 200 Write-Host "Copying standalone programs" Copy-Item C:\SharePoint\Software\StandAlone\* C:\Users\sp_admin\Desktop Write-Host "DONE"

Advanced Optimization Welcome to the advanced optimization part of the script. With this section we will make our script go from 6 scripts, to only running one script and then not touching it until it’s done! I warn you that this section will go a lot “Faster” trough the steps because I assume after the first 5 tutorials you got a better understanding of PowerShell! First of all, I want you to create a “Launchers” Folder and a config.xml file in the C:\SharePoint folder. We will see what we put in them later!
Open the config.xml file and we will add the following things. The localadminpassword is the password of your “local administrator” (the account you use before creating the domain), and the serviceaccountpwd is the password you will use for your Service Accounts!
<autovm> <localadminpassword>pass@word1</localadminpassword> <serviceaccountpwd>pass@word1</serviceaccountpwd> </autovm>
Now, open the preparepc.ps1 script and add the following after the “Add-WindowsFeature -Name "ad-domain-services" -IncludeAllSubFeature –IncludeManagementTools” line.
$xmlconfig = "C:\SharePoint\config.xml" [xml]$propertiesInput = Get-Content $xmlconfig $password = $propertiesInput.autovm.localadminpassword New-Item -Path "HKCU:\Software\Microsoft\Windows\CurrentVersion\" -Name RunOnce -ErrorAction SilentlyContinue | Out-Null New-ItemProperty -Path "HKCU:\Software\Microsoft\Windows\CurrentVersion\RunOnce" -Name SPVM -Value "`"C:\SharePoint\Launchers\createdomain.bat`" " -Force | Out-Null Set-ItemProperty -Path "HKLM:\SOFTWARE\Microsoft\Windows NT\CurrentVersion\Winlogon" -Name DefaultUserName -Value "Administrator" Set-ItemProperty -Path "HKLM:\SOFTWARE\Microsoft\Windows NT\CurrentVersion\Winlogon" -Name DefaultPassword -Value $password Set-ItemProperty -Path "HKLM:\SOFTWARE\Microsoft\Windows NT\CurrentVersion\Winlogon" -Name AutoAdminLogon -Value "1" Set-ItemProperty -Path "HKLM:\SOFTWARE\Microsoft\Windows NT\CurrentVersion\Winlogon" -Name ForceAutoLogon -Value "1" Restart-Computer
Let’s see what we did there! First, we took the password from the config.xml file and saved it in a variable called $password. Afterwards, since we have a reboot we will need a way to start the scripts... so we will use the “RunOnce” registry key. The RunOnce key is what the PC will do the next time a user logs on... in this case we will run “C:\SharePoint\Launchers\createdomain.bat” which we haven’t yet created! Now, the “Winlogon” registry values are there for the autologin. We know our initial account is called “Administrator” and using the $password variable, Windows will be able to automatically log us in! Now go in the Launchers Folder, and create a file called createdomain.bat that has the following inside:
"%SYSTEMROOT%\system32\windowspowershell\v1.0\powershell.exe" -Command Start-Process "$PSHOME\powershell.exe" -Verb RunAs -ArgumentList "'-NoExit -ExecutionPolicy Bypass C:\SharePoint\2-createdomain.ps1'"
Microsoft’s PowerShell Script scheduling isn’t 100% there yet, and I prefer to use .bat files to start our programs. This .bat will start PowerShell as an administrator and run the createdomain.ps1 script!

Now, let’s open the createdomain.ps1 script and at the beginning of the script add the following:
# Windows PowerShell script for AD DS Deployment $PlainPassword = "pass@word1" $SecurePassword = $PlainPassword | ConvertTo-SecureString -AsPlainText -Force $xmlconfig = "C:\SharePoint\config.xml" [xml]$propertiesInput = Get-Content $xmlconfig $password = $propertiesInput.autovm.localadminpassword New-Item -Path "HKCU:\Software\Microsoft\Windows\CurrentVersion\" -Name RunOnce -ErrorAction SilentlyContinue | Out-Null New-ItemProperty -Path "HKCU:\Software\Microsoft\Windows\CurrentVersion\RunOnce" -Name SPVM -Value "`"C:\SharePoint\Launchers\createusers.bat`" " -Force | Out-Null Set-ItemProperty -Path "HKLM:\SOFTWARE\Microsoft\Windows NT\CurrentVersion\Winlogon" -Name DefaultUserName -Value "Administrator" Set-ItemProperty -Path "HKLM:\SOFTWARE\Microsoft\Windows NT\CurrentVersion\Winlogon" -Name DefaultPassword -Value $password New-ItemProperty -Path "HKLM:\Software\Microsoft\Windows NT\CurrentVersion\WinLogon" -Name DefaultDomainName -Value "VLADDEV" Set-ItemProperty -Path "HKLM:\SOFTWARE\Microsoft\Windows NT\CurrentVersion\Winlogon" -Name AutoAdminLogon -Value "1" Set-ItemProperty -Path "HKLM:\SOFTWARE\Microsoft\Windows NT\CurrentVersion\Winlogon" -Name ForceAutoLogon -Value "1"
The $PlainPassword and $SecurePassword are the same string which will be used for the SafeModeAdministrator password, so it doesn’t ask us for the password anymore. The rest is a bit the same except since we will now be in a domain, we added a new-itemproperty (DefaultDomainName).. makesure you change VLADDEV to your actual domain. While in the same script, we will add this line “-SafeModeAdministratorPassword:$SecurePassword ` “ somewhere in the Install-ADDSForest command. It will look something like this:
Now we go in Launchers and create the “createusers.bat” file which will contain the following: "%SYSTEMROOT%\system32\windowspowershell\v1.0\powershell.exe" -Command Start-Process "$PSHOME\powershell.exe" -Verb RunAs -ArgumentList "'-NoExit -ExecutionPolicy Bypass C:\SharePoint\3-createaccounts.ps1'"
We are going to edit the createaccounts.ps1 file to look something like this: #Name: createaccounts.ps1 #Purpose: Creates Service Accounts cd c:\SharePoint\sp\serviceaccounts

.\sp2013serviceaccounts.ps1 -Level high -SPOU "SP Service Accounts" -SQLOU "SQL Service Accounts" -SQLLevel high -OptionalAccounts $true cd c:\SharePoint .\4.prereqsandfeatures.ps1
The Reason is that the account script and prereqs script can be done with the same users without reboot, so might as well queue them. Now open the sp2013serviceaccounts.ps1 file and find the line where you have $defaultpassword = Read-host .... . We are going to replace it with the password we get from our config file. So it should look something like this:
# get default password. If user put new password in XML, the XML will have priority $xmlconfig = "C:\SharePoint\config.xml" [xml]$propertiesInput = Get-Content $xmlconfig $defaultpassword = $propertiesInput.autovm.serviceaccountpwd
Now Open the prereqsandfeatures.ps1 file and before the Restart-Computer command, add the following:
New-Item -Path "HKLM:\Software\Microsoft\Windows\CurrentVersion\" -Name RunOnce -ErrorAction SilentlyContinue | Out-Null New-ItemProperty -Path "HKLM:\Software\Microsoft\Windows\CurrentVersion\RunOnce" -Name SPVM -Value "`"C:\SharePoint\Launchers\installsql.bat`" " -Force | Out-Null Set-ItemProperty -Path "HKLM:\SOFTWARE\Microsoft\Windows NT\CurrentVersion\Winlogon" -Name DefaultUserName -Value "sql_admin" Set-ItemProperty -Path "HKLM:\SOFTWARE\Microsoft\Windows NT\CurrentVersion\Winlogon" -Name DefaultPassword -Value $password New-ItemProperty -Path "HKLM:\Software\Microsoft\Windows NT\CurrentVersion\WinLogon" -Name DefaultDomainName -Value $env:USERDOMAIN -PropertyType "String" -Force | Out-Null Set-ItemProperty -Path "HKLM:\SOFTWARE\Microsoft\Windows NT\CurrentVersion\Winlogon" -Name AutoAdminLogon -Value "1" Set-ItemProperty -Path "HKLM:\SOFTWARE\Microsoft\Windows NT\CurrentVersion\Winlogon" -Name ForceAutoLogon -Value "1"
Now, in the Launchers folder, create the installsql.bat file with this inside:
"%SYSTEMROOT%\system32\windowspowershell\v1.0\powershell.exe" -Command Start-Process "$PSHOME\powershell.exe" -Verb RunAs -ArgumentList "'-NoExit -ExecutionPolicy Bypass C:\SharePoint\5.installsql.ps1'"
Good so now we got everything up until SQL to do itself. Now, open the installsql.ps1 script and after the .\SQLBinaries…. Line add the following
$xmlconfig = "C:\SharePoint\config.xml" [xml]$propertiesInput = Get-Content $xmlconfig $password = $propertiesInput.autovm.serviceaccountpwd New-Item -Path "HKLM:\Software\Microsoft\Windows\CurrentVersion\" -Name RunOnce -ErrorAction SilentlyContinue | Out-Null

New-ItemProperty -Path "HKLM:\Software\Microsoft\Windows\CurrentVersion\RunOnce" -Name SPVM -Value "`"C:\SharePoint\Launchers\installSharePoint.bat`" " -Force | Out-Null Set-ItemProperty -Path "HKLM:\SOFTWARE\Microsoft\Windows NT\CurrentVersion\Winlogon" -Name DefaultUserName -Value "sp_admin" Set-ItemProperty -Path "HKLM:\SOFTWARE\Microsoft\Windows NT\CurrentVersion\Winlogon" -Name DefaultPassword -Value $password New-ItemProperty -Path "HKLM:\Software\Microsoft\Windows NT\CurrentVersion\WinLogon" -Name DefaultDomainName -Value $env:USERDOMAIN -PropertyType "String" -Force | Out-Null Set-ItemProperty -Path "HKLM:\SOFTWARE\Microsoft\Windows NT\CurrentVersion\Winlogon" -Name AutoAdminLogon -Value "1" Set-ItemProperty -Path "HKLM:\SOFTWARE\Microsoft\Windows NT\CurrentVersion\Winlogon" -Name ForceAutoLogon -Value "1" shutdown -l
Now, in the Launchers folder, create the installSharePoint.bat file with this inside: "%SYSTEMROOT%\system32\windowspowershell\v1.0\powershell.exe" -Command Start-Process "$PSHOME\powershell.exe" -Verb RunAs -ArgumentList "'-NoExit -ExecutionPolicy Bypass C:\SharePoint\6.installSharePoint.ps1'" Now we’re OK up to the installation of SharePoint. Open the script AutoSPInstallerMain.ps1 from C:\SharePoint\SP\AutoSPInstaller\ and go at the very end. (Try to do a search for “ If ($isTracing) {Stop-Transcript; $script:isTracing = $false}” ) . After that line, add the following:
cd c:\sharepoint .\7.installvs2012andtools.ps1
Now... we do not have that PowerShell file yet however since both VisualStudio2012 and the Tools and Software are done with the same user, we will combine script 7 & 8 in one script that will be called: 7.installvs2012andtools.ps1 . We will also modify how we see if Visual Studio 2012 is installed. In theory, there is a switch called /forcereboot that would reboot when Visual Studio is done installing... However, it doesn’t work. So, I had the creative and ghetto idea to do this: Log the installation and when there is no writing in the logs for 5 minutes, it means that the installation is finished! So here is how the Visual Studio 2012 installation is now done:
Write-Host "Installing Visual Studio 2012" New-Item -ItemType directory -Path C:\AutoInstallLogs cd C:\SharePoint\Software\VisualStudio2012 .\vs_ultimate.exe /full /noweb /quiet /ProductKey XXXXXXXYYYYZZZZJJDJDJ /Log C:\AutoInstallLogs\VS2012.txt Start-Sleep -Seconds 240 $path = "C:\AutoInstallLogs" $y = gci $path |where{!($_.psiscontainer)}|sort -desc lastwritetime|select -first 1 $a = Get-Date

$timespan = New-TimeSpan -Start $y.lastwritetime -End $a while ($timespan.Minutes -lt 5) { Start-Sleep -Seconds 120 $y = gci $path |where{!($_.psiscontainer)}|sort -desc lastwritetime|select -first 1 $a = Get-Date $timespan = New-TimeSpan -Start $y.lastwritetime -End $a } Write-Host "Visual Studio 2012 Installation Done"
It’s probably not the best or cleanest way... however it works perfectly! Here is the rest of the script:
Write-Host "Installing Microsoft Office Developer Tools for Visual Studio 2012" C:\SharePoint\Software\OfficeToolsForVS2012RTW\WebPlatformInstaller_amd64_en-US.msi /q Start-Sleep -s 120 C:\SharePoint\Software\OfficeToolsForVS2012RTW\bin\WebpiCmd.exe /install /products:OfficeToolsForVS2012RTW /XML:C:\SharePoint\Software\OfficeToolsForVS2012RTW\feeds\latest\webproductlist.xml /AcceptEula Write-Host "Installing NotePad++" cd C:\SharePoint\Software\NotePad++ .\npp.6.5.Installer.exe /S Start-Sleep -s 120 Write-Host "Installing Goolge Chrome" Cd C:\SharePoint\Software\Chrome Msiexec /q /I GoogleChromeStandaloneEnterprise.msi Start-Sleep -s 120 Write-Host "Installing FireFox" cd C:\SharePoint\Software\FireFox .\ffsetup.exe -ms Start-Sleep -s 120 Write-Host "Installing SharePoint Designer 2013" cd C:\SharePoint\Software\SPDesigner .\setup.exe /adminfile updates\adminfile.msp Start-Sleep -s 200 Write-Host "Copying standalone programs" Copy-Item C:\SharePoint\Software\StandAlone\* C:\Users\sp_admin\Desktop Write-Host "DONE"
I know there weren’t many images in this part as in the other one, so here are some to give you an idea what it should look like at the end:


Summary
The finalized script is now done, and with only a few changes such as the PC name, you and your developers can create SharePoint 2013 development Virtual Machines with all the required tools with only a few clicks! I know the instructions weren’t the easiest, but the task wasn’t easy either! I hope you enjoyed and learned from this series as much as I enjoyed doing it and believe it or not, I wasn’t even sure it was doable when I first started the series.
PowerShell is a really powerful tool, and it can really create things that we couldn’t believe were possible a few years ago without additional software like MDT or SCCM. You can view the final video on YouTube here: http://www.youtube.com/watch?v=uJlz4xWCSk8