CRE Mobile Inventory Guide - Heartland Payment Systems
42
Mobile Inventory App Guide Rev 11/2021 A Global Payments Company
Transcript of CRE Mobile Inventory Guide - Heartland Payment Systems
Mobile Inventory App Guide
Rev 11/2021
A Global Payments Company
A Global Payments Company

Mobile Inventory App Guide
A Global Payments Company Page ii
Table of Contents
Overview .......................................................................................................................... 1
Requirements ................................................................................................................... 1
CRE Configuration ........................................................................................................... 2
Central API Connection .................................................................................................. 2
Setting Employee Permissions ...................................................................................... 1
Enable Mobile Inventory .............................................................................................. 1
Set ‘Add Item’ Permission ............................................................................................ 2
Configure Over-the-Air Preferences ............................................................................... 3
Configure Bar Code Preferences ................................................................................... 3
Configure Automatic Inactivity Logout ............................................................................ 4
Configure Picklist Preferences ....................................................................................... 4
Mobile Inventory App ....................................................................................................... 5
Download and Sign In .................................................................................................... 5
Components of Sign-In Screen ...................................................................................... 5
Automatic Inactivity Logout ............................................................................................ 6
Inventory ........................................................................................................................ 7
Scan Barcode .............................................................................................................. 8
Lookup Item ............................................................................................................... 10
Add Item ..................................................................................................................... 11
Edit Item ..................................................................................................................... 12
Adjust Stock ............................................................................................................... 13
Count Item ................................................................................................................. 15
View Alt SKUs ............................................................................................................ 16
Item Picklists .............................................................................................................. 17

Mobile Inventory App Guide
A Global Payments Company Page iii
Purchase Orders & Direct Store Deposits .................................................................... 22
Purchase Orders ........................................................................................................ 23
Direct Store Deposits ................................................................................................. 30
Pending Changes ......................................................................................................... 34
Other App Components ............................................................................................... 36
Refresh Inventory ....................................................................................................... 36
Settings ...................................................................................................................... 36
Data Retention During Internet Outages ...................................................................... 37

Mobile Inventory App Guide
A Global Payments Company Page 1
Overview CRE now offers a Mobile Inventory app for both iOS and Android that allows you to perform various inventory-related functions, including recording and adjusting inventory levels, creating and receiving purchase orders, and processing direct store deposits, all on a mobile device. . This document will guide you through the use and features of the Mobile Inventory App.
As of version 6.4.0, the Mobile Inventory app supports functionality related to Choice items and Tag Customization. For more information on Tag Customization, please refer to our Tag Customization Guide.
As of version 6.7.0, the Mobile Inventory app allows customers to create picklists and send them to CRE for completion.
As of version 6.8.0, the Mobile Inventory app allows customers to use Face ID for log-in.
We have worked to ensure backward-compatibility between versions of MIA and CRE so that merchants using older versions of CRE (minimum of 14.1005) can install and use the newest version of MIA.
Requirements
4 The Mobile Inventory app version 6.8.0 requires CRE version 14.1005 or later.
4 CRE must be online and connected to Heartland’s Central API.
4 In order to use the Mobile Inventory app, you must subscribe.
Please note: At this time, the Mobile Inventory app can be run on both Android (phones and tablets - version 8 and later) and Apple devices (iPhones, iPods, and iPads - version 11.0 and later).

Mobile Inventory App Guide
A Global Payments Company Page 2
CRE Configuration Central API Connection
4 Click the Internet Features tab, and then select Page 3 to access Central API.
4 Enter https://hpos.heartland.us/api in the URL box, enter values for Username and
Password, then click Connect.
4 If connection is successful, the button will turn green and read Connected.
4 Click Update to save changes and Exit to close.
4 In order to begin synchronizing, once you have successfully connected to the Central API, you must close/restart CRE POS.
Please note: You need only do this configuration at the file server, and not at the workstations.
Mobile Inventory App Guide
A Global Payments Company Page 1
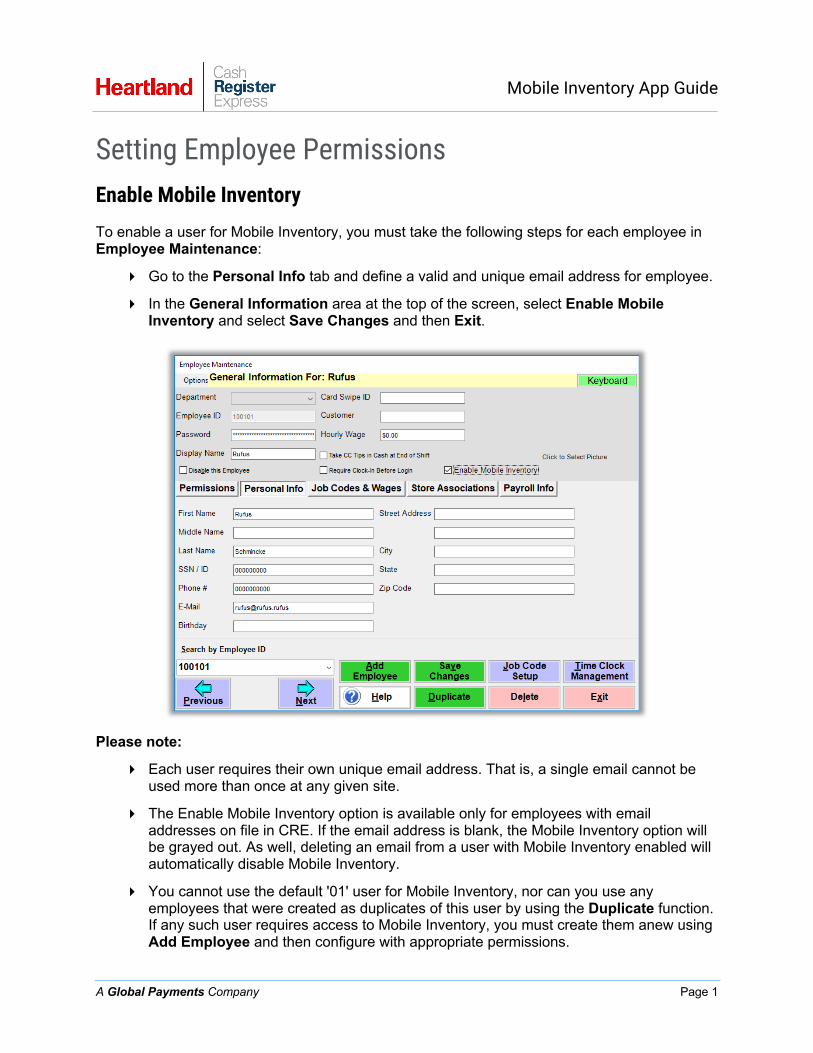
Setting Employee Permissions Enable Mobile Inventory To enable a user for Mobile Inventory, you must take the following steps for each employee in Employee Maintenance:
4 Go to the Personal Info tab and define a valid and unique email address for employee.
4 In the General Information area at the top of the screen, select Enable Mobile Inventory and select Save Changes and then Exit.
Please note:
4 Each user requires their own unique email address. That is, a single email cannot be used more than once at any given site.
4 The Enable Mobile Inventory option is available only for employees with email addresses on file in CRE. If the email address is blank, the Mobile Inventory option will be grayed out. As well, deleting an email from a user with Mobile Inventory enabled will automatically disable Mobile Inventory.
4 You cannot use the default '01' user for Mobile Inventory, nor can you use any employees that were created as duplicates of this user by using the Duplicate function. If any such user requires access to Mobile Inventory, you must create them anew using Add Employee and then configure with appropriate permissions.
Mobile Inventory App Guide
A Global Payments Company Page 2
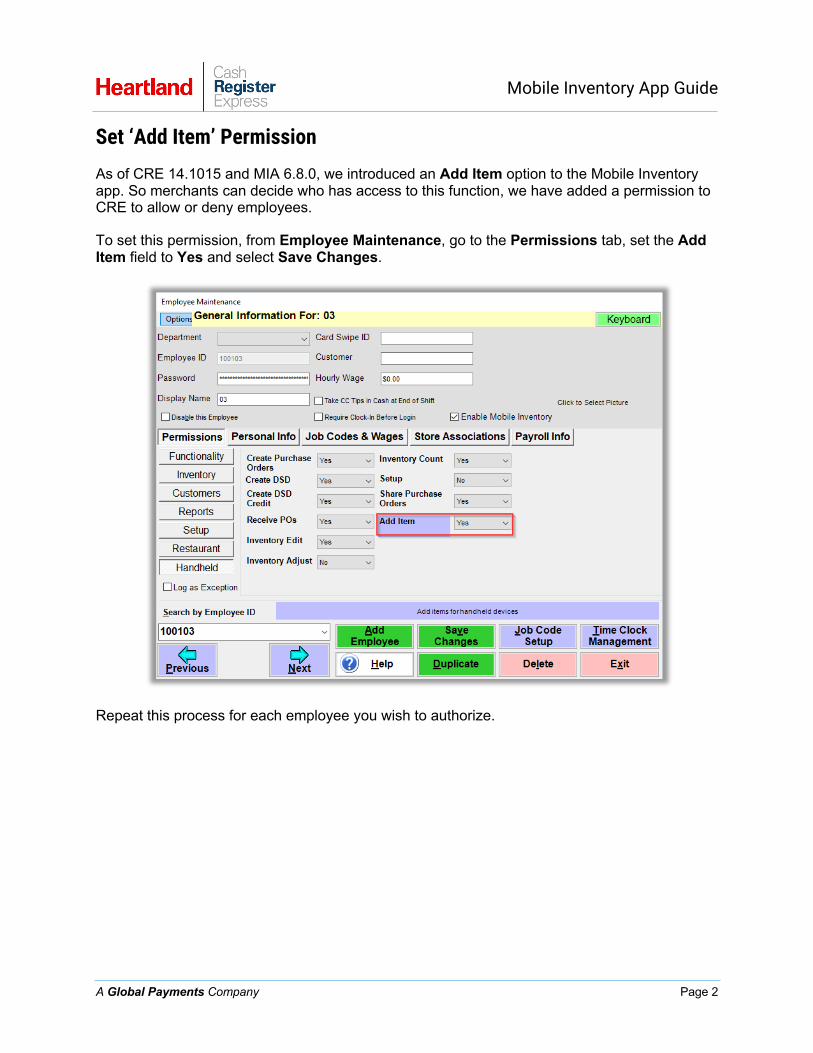
Set ‘Add Item’ Permission As of CRE 14.1015 and MIA 6.8.0, we introduced an Add Item option to the Mobile Inventory app. So merchants can decide who has access to this function, we have added a permission to CRE to allow or deny employees.
To set this permission, from Employee Maintenance, go to the Permissions tab, set the Add Item field to Yes and select Save Changes.
Repeat this process for each employee you wish to authorize.
Mobile Inventory App Guide
A Global Payments Company Page 3
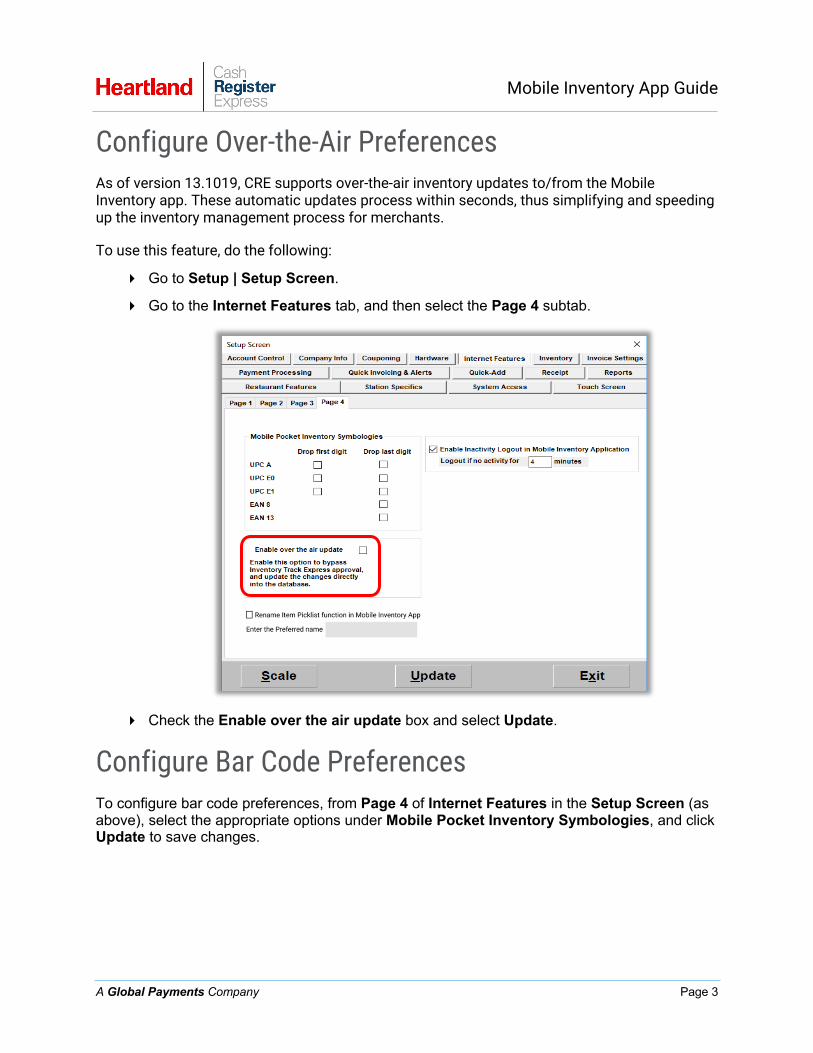
Configure Over-the-Air Preferences As of version 13.1019, CRE supports over-the-air inventory updates to/from the Mobile Inventory app. These automatic updates process within seconds, thus simplifying and speeding up the inventory management process for merchants.
To use this feature, do the following:
4 Go to Setup | Setup Screen.
4 Go to the Internet Features tab, and then select the Page 4 subtab.
4 Check the Enable over the air update box and select Update.
Configure Bar Code Preferences To configure bar code preferences, from Page 4 of Internet Features in the Setup Screen (as above), select the appropriate options under Mobile Pocket Inventory Symbologies, and click Update to save changes.

Mobile Inventory App Guide
A Global Payments Company Page 4
Configure Automatic Inactivity Logout As of CRE version 14.1005 and Mobile Inventory version 6.3.0, for added security, we have added an option to automatically log out users from the Mobile Inventory app after a specified number of minutes of activity. This setting must be enabled in Internet Features of CRE.
Once set, it will be picked up and enforced by the app the next time a user refreshes data.
With this setting enabled, the app will behave as follows:
4 If a user is inactive for the set duration, the app will automatically log them out and return them to the login screen.
4 When the user is ready to log back in, they will be required to enter their credentials.
4 If a user has pending changes at the time of automatic logout, the app will keep those changes intact as pending.
Configure Picklist Preferences As of CRE version 14.1014 and Mobile Inventory version 6.7.0, we have added a picklist feature. By default, the app will use Picklist to label such items. If you wish to assign a different name, check the box on Page 4 of Internet Features, enter preferred name in the box, and select Update.

Mobile Inventory App Guide
A Global Payments Company Page 5
Mobile Inventory App Download and Sign In 1 Download the Heartland Mobile Inventory app.
• For Android devices, download from Google Play.
• For iOS devices, download from the App Store.
2 Enter the Email and Password associated with your CRE store(s) from your Welcome Email.
3 Select Sign In. The first time you sign in, the app will prompt you to refresh the inventory associated with your store.
• If you have only a single store associated with your credentials, the app will automatically connect and retrieve that store’s data.
• If you have multiple stores associated with your credentials, the app will prompt you to select a store and will then connect and retrieve the selected store’s data.
Components of Sign-In Screen 4 Email: Use the email associated with your
CRE store(s) from your Welcome Email.
4 Password: Use the password associated with your CRE store(s) from your Welcome Email. You can show/hide your password by tapping the eye icon.
4 Remember Me: Check this box on devices used only by you.
4 Sign-In button: This button will be enabled after valid data is entered in Email and Password fields.
4 Forgot Password: Selecting this will open a browser window so you can reset your password.

Mobile Inventory App Guide
A Global Payments Company Page 6
Automatic Inactivity Logout As previously described, you can configure the Mobile Inventory app to automatically log out users after a designated number of minutes of inactivity. This setting must be defined in CRE. For more information, please refer back to this section.
Before logging out a user, the Mobile Inventory app will display a message informing them that they will soon be logged out unless they take action. The message displays when there is one minute remaining, based on the Inactivity Logout time set in CRE, and begins its countdown at 59 seconds. The countdown will continue unless the user selects one of the available options, or until the time reaches zero (0) seconds, at which point, the app will log the user out.
4 If the user chooses to Log Out Now before the countdown expires, the app will treat
the action as a manual log-out and will return them to the log-in screen where they will be required to enter their credentials manually when they wish to log back in.
4 If the user chooses to Stay Logged In before the countdown expires, the app will return the user to the previous page and will reset the allotted time for Inactivity Logout.

Mobile Inventory App Guide
A Global Payments Company Page 7
Inventory The Inventory screen is the default landing page of the Heartland Mobile Inventory app, and it displays immediately upon login. From this page, you can access and edit your inventory items by using either the Scan Barcode and Lookup Item function. The Inventory screen also displays the date and time of the last inventory update.

Mobile Inventory App Guide
A Global Payments Company Page 8
Scan Barcode Standard Items
If you select Scan Barcode, the app will open a barcode scanning viewer to perform the scan. Align the barcode in the green box so that the red line passes through it.
Once the app has captured the barcode, it will search for the matching item.
If a matching item for the barcode exists in the database, the app will display the Item Details page, as pictured in the example above. From here, you can edit the item details, as well as enter Adjust Stock and Count Item.
If the app does not find a matching item, it will display a message to that effect, with the option to add the item. Selecting OK will open the Add Item page.

Mobile Inventory App Guide
A Global Payments Company Page 9
Choice Items
If you scan a Choice item, the app will display all linked standard items, and will denote any linked standard items, both tagged and non-tagged. Tagged items will display in a hyphenated fashion, with their assigned tags preceding the item names (for example, ‘TagName - ItemName’).
Choice Item with Non-Tagged Items: In this example, we have scanned a Choice Item called ‘Baskets’ which has two non-tagged standard items attached to it (‘Large Basket’, and ‘Small Basket).
Choice Item with Tagged Items: In this example, we have scanned a Choice Item called ‘Choice Master’ which has two tagged standard items attached to it (‘Choice 0, tagged ‘Fresh’, and ‘Choice 1’ tagged ‘Stale).
In either case, From this page, as above, you can select the item you would like to view or edit, and the app will open the Item Details page for that item. For tagged items, this page includes the Tag field and the selected tag. Please note that the Tag field is not editable, and displays only for tagged items.
Mobile Inventory App Guide
A Global Payments Company Page 10
Lookup Item Standard Items
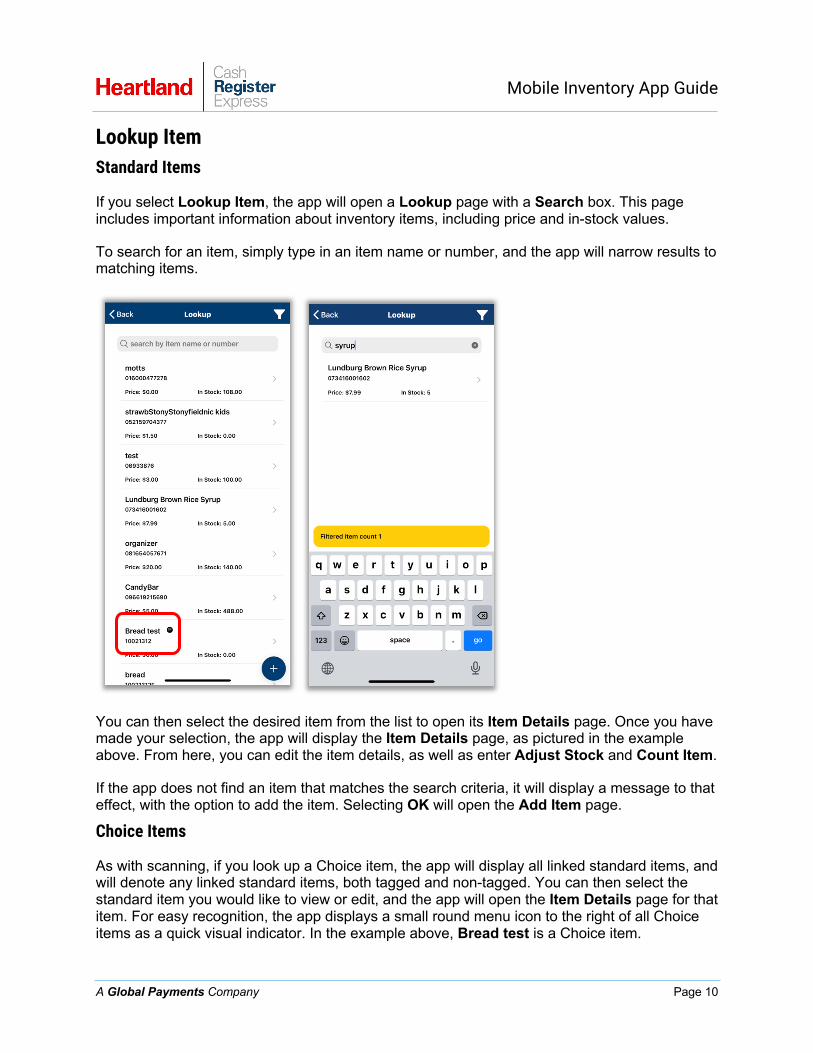
If you select Lookup Item, the app will open a Lookup page with a Search box. This page includes important information about inventory items, including price and in-stock values.
To search for an item, simply type in an item name or number, and the app will narrow results to matching items.
You can then select the desired item from the list to open its Item Details page. Once you have made your selection, the app will display the Item Details page, as pictured in the example above. From here, you can edit the item details, as well as enter Adjust Stock and Count Item.
If the app does not find an item that matches the search criteria, it will display a message to that effect, with the option to add the item. Selecting OK will open the Add Item page.
Choice Items
As with scanning, if you look up a Choice item, the app will display all linked standard items, and will denote any linked standard items, both tagged and non-tagged. You can then select the standard item you would like to view or edit, and the app will open the Item Details page for that item. For easy recognition, the app displays a small round menu icon to the right of all Choice items as a quick visual indicator. In the example above, Bread test is a Choice item.
Mobile Inventory App Guide
A Global Payments Company Page 11
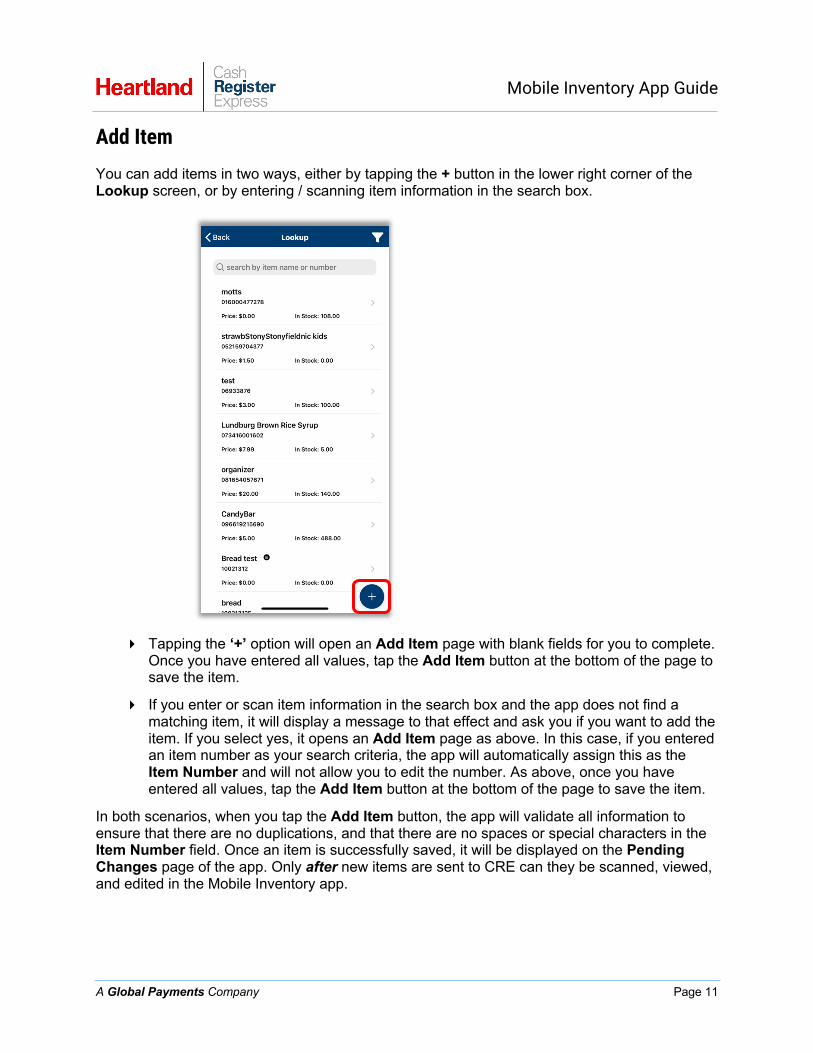
Add Item You can add items in two ways, either by tapping the + button in the lower right corner of the Lookup screen, or by entering / scanning item information in the search box.
4 Tapping the ‘+’ option will open an Add Item page with blank fields for you to complete.
Once you have entered all values, tap the Add Item button at the bottom of the page to save the item.
4 If you enter or scan item information in the search box and the app does not find a matching item, it will display a message to that effect and ask you if you want to add the item. If you select yes, it opens an Add Item page as above. In this case, if you entered an item number as your search criteria, the app will automatically assign this as the Item Number and will not allow you to edit the number. As above, once you have entered all values, tap the Add Item button at the bottom of the page to save the item.
In both scenarios, when you tap the Add Item button, the app will validate all information to ensure that there are no duplications, and that there are no spaces or special characters in the Item Number field. Once an item is successfully saved, it will be displayed on the Pending Changes page of the app. Only after new items are sent to CRE can they be scanned, viewed, and edited in the Mobile Inventory app.

Mobile Inventory App Guide
A Global Payments Company Page 12
Edit Item To edit an item, from the Item Details page, select the edit icon in the upper right corner of the page.
This will activate all editable fields so you can make desired changes. Once you have made your changes, select the save icon in the upper right corner.
Please note: You cannot edit Item Number or In Stock from this screen.

Mobile Inventory App Guide
A Global Payments Company Page 13
Adjust Stock This function allows you to adjust stock for inventory items within the app.
Increase or Decrease
1 From the Item Details page, select Adjust Stock.
2 Select an Action. By default, Increase is selected. To decrease stock level, as in our example, select Action and, in the window that opens, select Decrease and then OK.
3 Enter the number by which you wish to adjust your stock.
4 Select a Reason Code from the list. For more information on Reason Codes, please refer to our Vendors & Purchase Order Guide.
5 Select Save and Repeat if you have more adjustments to make. Select Save and Exit if you are finished with stock level adjustments.

Mobile Inventory App Guide
A Global Payments Company Page 14
Change Tag
The Mobile Inventory app allows you to transfer, or migrate, a quantity of items from one tagged status to the other. For more information on this feature, please refer to our Tag Customization Guide.
1 Find and select the desired item from the Inventory page and select Adjust Stock.
2 Select Change Tag.
3 Select the desired tag from the dropdown list and enter the quantity you wish to migrate.
4 Tap Save and Exit.
Please note:
4 If you enter a quantity greater than the quantity on hand, the app will display a message to that effect so you can correct the value.
4 Tag migration is unidirectional. For example, you can change an item’s tag from ‘New’ to ‘Old’, or ‘Fresh’ to ‘Stale’, but not vice versa.

Mobile Inventory App Guide
A Global Payments Company Page 15
Count Item This function allows you to enter a new count for an item’s stock level within the app.
1 From the Item Details page, select Count Item.
2 Enter the desired count value. Keep in mind that this value will replace the existing count an, therefore, should include ALL stock.
3 Select Save and Repeat if you have more adjustments to make. Select Save and Exit if you are finished with count adjustments.
Please note: Since some items, such as coupons and lottery pay-ins and pay-outs, are non-standard, they are ineligible for actions such as editing, adding to purchase orders, etc., in MIA. With this in mind, to avoid confusion and inadvertent errors, when these items are looked up or scanned, they now display in read-only mode. This is true as of MIA version 6.1.0 and CRE version 14.1001.

Mobile Inventory App Guide
A Global Payments Company Page 16
View Alt SKUs As of version 6.2.0, the Mobile Inventory app allows you to look up and view alternate SKUs for items. If the app finds multiple matches for the search criteria, it will display a Show All Alt SKUs button.
If you select this option, the app will display a list of all matching alternate SKUs.

Mobile Inventory App Guide
A Global Payments Company Page 17
Item Picklists As of version 6.7.0, the Mobile Inventory app allows customers to create picklists and add items to the picklist to send to CRE. This functionality allows merchants to choose items for end-customers who can then complete the payment for the picklisted items with the cashier at the CRE terminal.
Creating Picklists
To create a picklist, and add items to it, follow these steps:
1 Tap the Item Picklist button on the Inventory screen of MIA.
2 Tap the Create Item Picklist button located just below the search field.

Mobile Inventory App Guide
A Global Payments Company Page 18
3 Enter desired value in the Reference Holder field.
4 Tap the Add Items to Picklist button. This will open a page allowing you to scan or look up items to add to the picklist.
You can add any number of standard items to a single picklist as there is no limit on item quantity.

Mobile Inventory App Guide
A Global Payments Company Page 19
5 Once you have identified and selected an item to add, tap the Add Item button and enter the quantity when prompted. Repeat as needed.
The app will display additions to the picklist as shown here, with the most recently added item appearing at the top of the list.
6 Once you have added all items, tap the Save Item Picklist button.
Mobile Inventory App Guide
A Global Payments Company Page 20
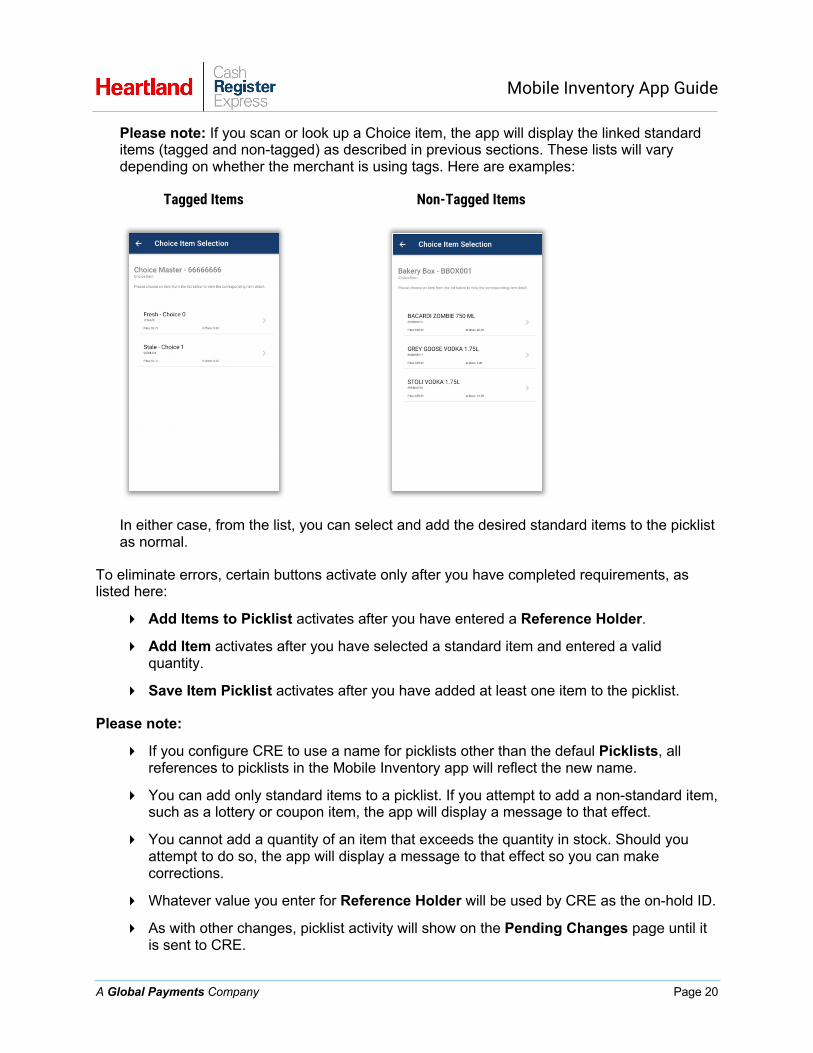
Please note: If you scan or look up a Choice item, the app will display the linked standard items (tagged and non-tagged) as described in previous sections. These lists will vary depending on whether the merchant is using tags. Here are examples:
Tagged Items Non-Tagged Items
In either case, from the list, you can select and add the desired standard items to the picklist as normal.
To eliminate errors, certain buttons activate only after you have completed requirements, as listed here:
4 Add Items to Picklist activates after you have entered a Reference Holder.
4 Add Item activates after you have selected a standard item and entered a valid quantity.
4 Save Item Picklist activates after you have added at least one item to the picklist.
Please note:
4 If you configure CRE to use a name for picklists other than the defaul Picklists, all references to picklists in the Mobile Inventory app will reflect the new name.
4 You can add only standard items to a picklist. If you attempt to add a non-standard item, such as a lottery or coupon item, the app will display a message to that effect.
4 You cannot add a quantity of an item that exceeds the quantity in stock. Should you attempt to do so, the app will display a message to that effect so you can make corrections.
4 Whatever value you enter for Reference Holder will be used by CRE as the on-hold ID.
4 As with other changes, picklist activity will show on the Pending Changes page until it is sent to CRE.

Mobile Inventory App Guide
A Global Payments Company Page 21
Viewing and Editing Picklists
If, after creating a picklist, a user discovers they need to view and/or edit it, they can easily do so via the Item Picklist button on the main Inventory page of the app. This page will display all picklists that have not yet been sent to CRE. To view and/or edit a picklist, tap the arrow to the side of the desired picklist and the app will display its details.
From this page, you can add more items to the picklist and change quantities of existing items. Once you have made all changes, tap the Save Item Picklist button and the picklist will appear in the Pending Changes section of the app.
CRE automatically converts all saved picklists into On-Hold invoices upon receipt. The On-Hold ID will use the Reference Holder entered in the Mobile Inventory app at the time of creation.
Cashiers can access and complete such invoices using the Fetch On-Hold control, just as any other on-hold invoice.
Deleting Picklists
To delete a picklist, go the Pending Changes screen of the app and swipe left on the picklist you wish to delete. This will display the Delete option. The app will display a confirmation prompt. Please note that, once a picklist has been sent to CRE, it will no longer be visible in MIA and, therefore, cannot be viewed, edited, or deleted.

Mobile Inventory App Guide
A Global Payments Company Page 22
Purchase Orders & Direct Store Deposits The Purchase Order page of the Mobile Inventory app allows you to perform several functions related to purchase orders and direct store deposits. These include:
4 Receive PO
4 Create PO
4 Credit DSD
4 Create DSD
The following section explains how to perform each of these.
Mobile Inventory App Guide
A Global Payments Company Page 23
Purchase Orders Receive PO
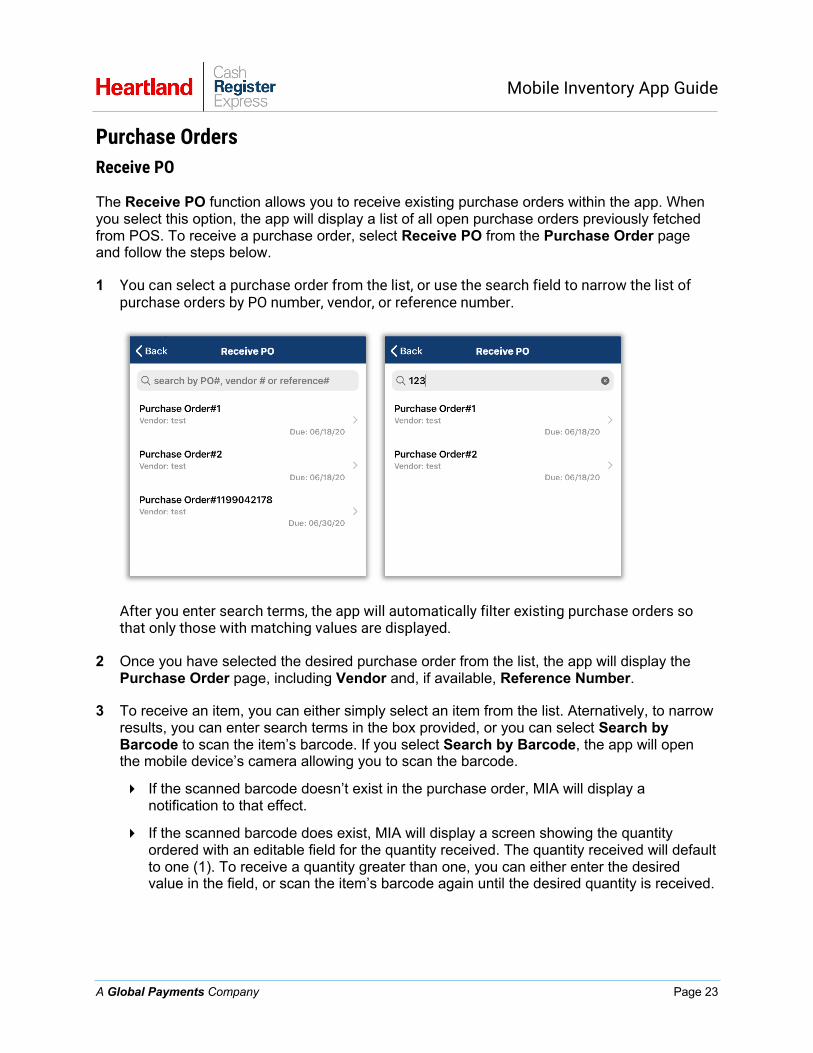
The Receive PO function allows you to receive existing purchase orders within the app. When you select this option, the app will display a list of all open purchase orders previously fetched from POS. To receive a purchase order, select Receive PO from the Purchase Order page and follow the steps below.
1 You can select a purchase order from the list, or use the search field to narrow the list of purchase orders by PO number, vendor, or reference number.
After you enter search terms, the app will automatically filter existing purchase orders so that only those with matching values are displayed.
2 Once you have selected the desired purchase order from the list, the app will display the Purchase Order page, including Vendor and, if available, Reference Number.
3 To receive an item, you can either simply select an item from the list. Aternatively, to narrow results, you can enter search terms in the box provided, or you can select Search by Barcode to scan the item’s barcode. If you select Search by Barcode, the app will open the mobile device’s camera allowing you to scan the barcode.
4 If the scanned barcode doesn’t exist in the purchase order, MIA will display a notification to that effect.
4 If the scanned barcode does exist, MIA will display a screen showing the quantity ordered with an editable field for the quantity received. The quantity received will default to one (1). To receive a quantity greater than one, you can either enter the desired value in the field, or scan the item’s barcode again until the desired quantity is received.

Mobile Inventory App Guide
A Global Payments Company Page 24
4 Once you have selected an item, the app will display the Item Name page where you can enter quantities received. In the Received box, enter the total quantity received, including any damaged items. If any items are damaged, enter the quantity in the Damaged box. Likewise, if any items are out-of-date or expired, enter the quantity in the Out-of-Date/Expired box.
The app will automatically adjust your inventory count for the received item to exclude all Damaged and Out-of-Date/Expired quantities. For example, if you ordered 48 of an item including 8 damaged and 3 expired, you would enter 48 in the Received box, 8 in the Damaged box, and 3 in the Out-of-Date/Expired box, and the item count would increase by 37. Be advised that the sum of Out-of-Date/Expired and/or Damaged items cannot exceed the quantity received.
Please note: The Out-of-Date/Expired option is available in version 6.6.0 and later of the Mobile Inventory app.
5 Once you have entered all quantities, select Save. This will return you to the Purchase Order page with the received and damaged values reflected.
Please note: As of version 6.1.0, to allow for greater flexibility and to support a wider range of scenarios, the app allows merchants to receive partial quantities of items and to leave associated purchase orders in ‘Open’ status, or to mark as ‘Complete’, depending on needs.
3 2 1

Mobile Inventory App Guide
A Global Payments Company Page 25
6 To complete a purchase order, select the Complete option next to Status.
7 Select Save Purchase Order to send it to the Pending Changes page where you can send to the POS when desired.
Please note: As of version 6.1.0, so that merchants have more control over the purchase order process, both in MIA and in CRE, the app now supports sending open purchase orders to CRE. To send an open purchase order, after receiving desired quantities of items, you must save the purchase order as described above. Once saved, simply go to the Pending Changes page and select Send to POS.

Mobile Inventory App Guide
A Global Payments Company Page 26
Share PO
As of version 6.2.0, we have added a Share Purchase Order button to the Mobile Inventory app so that authorized users can easily share PDFs of purchase orders with appropriate parties as needed. After approving a purchase order in CRE and refreshing the data in the Mobile Inventory app, the user will then see the new Share Purchase Order option. This option will display for all such purchase orders in ‘Receive’ status.
If a user selects the Share Purchase Order option, the app will display a screen indicating that the request is processing. . During this time, controls such as Back, Share Purchase Order, and Save Purchase Order will be disabled,
Once the request is complete, the user can share this file via their preferred medium as offered by their mobile device’s built-in share options (for example, WhatsApp, email, Messenger, etc.). The purchase order will be shared as a PDF attachment, and will be formatted as in the example below.
Mobile Inventory App Guide
A Global Payments Company Page 27
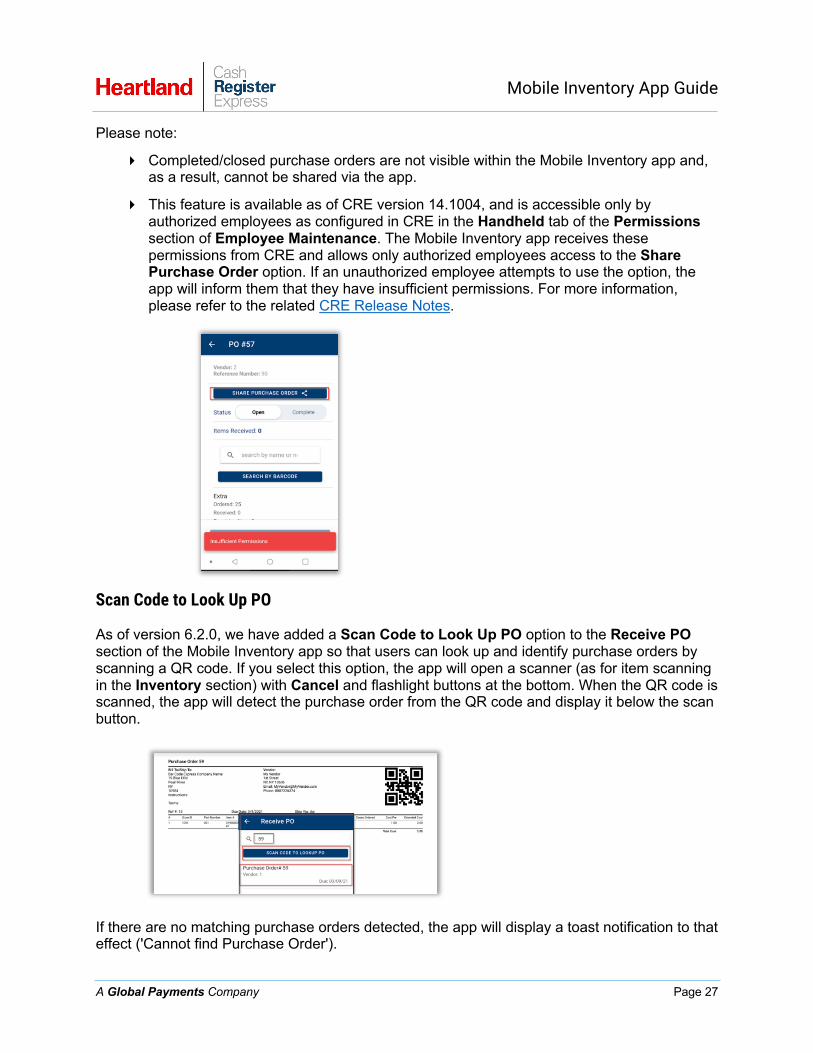
Please note:
4 Completed/closed purchase orders are not visible within the Mobile Inventory app and, as a result, cannot be shared via the app.
4 This feature is available as of CRE version 14.1004, and is accessible only by authorized employees as configured in CRE in the Handheld tab of the Permissions section of Employee Maintenance. The Mobile Inventory app receives these permissions from CRE and allows only authorized employees access to the Share Purchase Order option. If an unauthorized employee attempts to use the option, the app will inform them that they have insufficient permissions. For more information, please refer to the related CRE Release Notes.
Scan Code to Look Up PO
As of version 6.2.0, we have added a Scan Code to Look Up PO option to the Receive PO section of the Mobile Inventory app so that users can look up and identify purchase orders by scanning a QR code. If you select this option, the app will open a scanner (as for item scanning in the Inventory section) with Cancel and flashlight buttons at the bottom. When the QR code is scanned, the app will detect the purchase order from the QR code and display it below the scan button.
If there are no matching purchase orders detected, the app will display a toast notification to that effect ('Cannot find Purchase Order').

Mobile Inventory App Guide
A Global Payments Company Page 28
Create PO
The Create PO function allows you to create a new purchase order within the app. To create a purchase order, select Create PO from the Purchase Order page and follow the steps below.
1 Select Create PO to initiate the process. From the Create PO page that opens, select a Vendor from the list and enter a Reference Number.

Mobile Inventory App Guide
A Global Payments Company Page 29
2 Select Add Items. You can add items in two ways: Scan Barcode or Item Lookup. These behave as described in the Inventory section above. Please note: If you scan or look up a Choice item, the app will display the linked standard items (tagged and non-tagged) as described in previous sections. From the list of linked items, you may select and add desired standard items to your purchase order.
3 Once you have selected an item to add to the purchase order and select an appropriate value for Order By. Enter desired quantity and select Add Item.
Please note: Order By refers to the unit by which an item is ordered and received. In this example, Eaches would imply single units and Cases would indicate a full case, and the quantity (Eaches) contained therein would be defined in CRE Inventory Setup.
4 Once you have added all desired items to the purchase order, select Create PO to finalize.
5 Click OK on the success box.
Please note: The app will not activate the Add Items function until the Vendor and Reference Numbers have been completed.

Mobile Inventory App Guide
A Global Payments Company Page 30
Direct Store Deposits Credit DSD
The Credit DSD function allows you to perform a credit direct store deposit within the app. To create a credit DSD, select Credit DSD from the Purchase Order page follow the steps below.
1 Select Credit DSD to initiate the process. From the Credit DSD page that opens, select a Vendor from the list and enter a Reference Number.

Mobile Inventory App Guide
A Global Payments Company Page 31
2 Select Add Items. You can add items in two ways: Scan Barcode or Item Lookup. These behave as described in the Inventory section above.
Please note: If you scan or look up a Choice item, the app will display the linked standard items (tagged and non-tagged) as described in previous sections. From the list of linked items, you may select and add desired standard items to your DSD.
3 Once you have selected an item to add to the credit DSD, select an appropriate value for Order By (this refers to the unit by which an item is ordered and received), enter a quantity and select Add Item.
4 Once you have added all desired items to the credit DSD, select Create to finalize.
5 Select OK on the success box.
Please note: The app will not activate the Add Items function until the Vendor and Reference Numbers have been completed.

Mobile Inventory App Guide
A Global Payments Company Page 32
Create DSD
The Create DSD function allows you to perform a direct store deposit within the app. To create a direct store deposit, select Create DSD from the Purchase Order page follow the steps below.
1 Select Create DSD to initiate the process. From the Create DSD page that opens, select a Vendor from the list and enter a Reference Number.
Mobile Inventory App Guide
A Global Payments Company Page 33
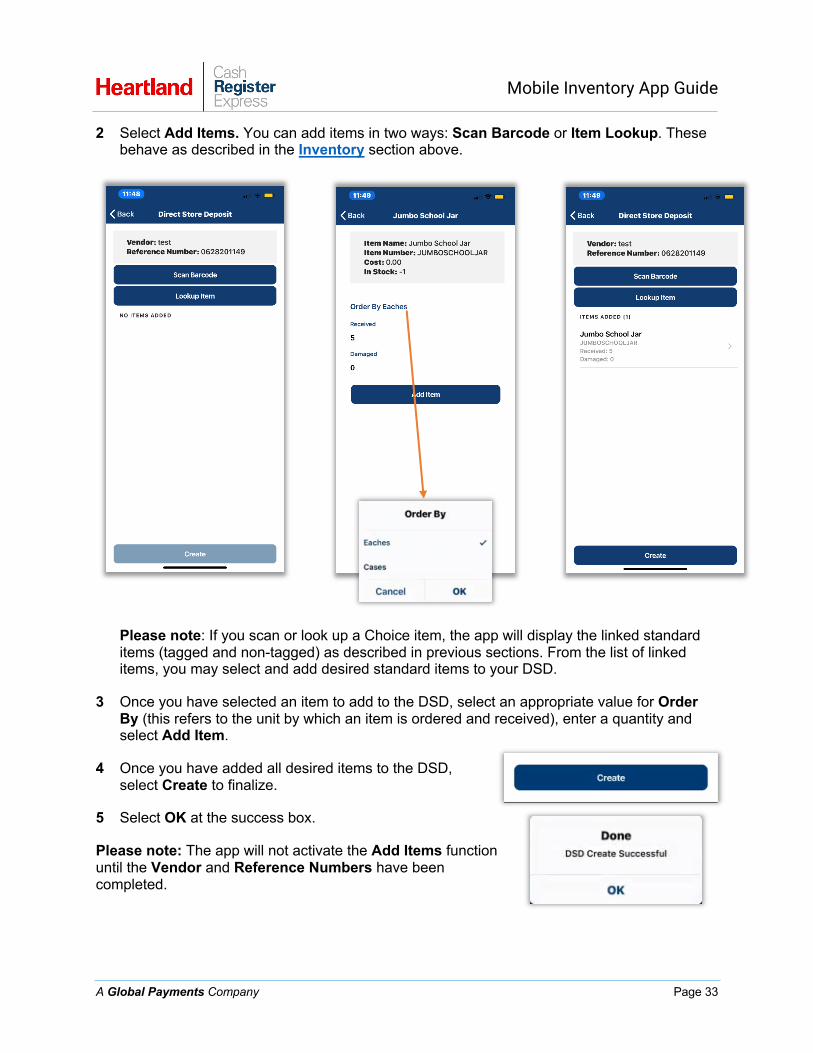
2 Select Add Items. You can add items in two ways: Scan Barcode or Item Lookup. These behave as described in the Inventory section above.
Please note: If you scan or look up a Choice item, the app will display the linked standard items (tagged and non-tagged) as described in previous sections. From the list of linked items, you may select and add desired standard items to your DSD.
3 Once you have selected an item to add to the DSD, select an appropriate value for Order By (this refers to the unit by which an item is ordered and received), enter a quantity and select Add Item.
4 Once you have added all desired items to the DSD, select Create to finalize.
5 Select OK at the success box.
Please note: The app will not activate the Add Items function until the Vendor and Reference Numbers have been completed.

Mobile Inventory App Guide
A Global Payments Company Page 34
Pending Changes The Pending Changes page of the Mobile Inventory app displays all changes that have been entered in the app, but not yet sent to POS. This page will also display the last updated (date and time) with the POS.
4 Pending changes are sorted by type.
4 A badge notification indicating a count for all pending changes displays in the lower corner of the app, atop the Pending Changes icon.

Mobile Inventory App Guide
A Global Payments Company Page 35
4 You can delete a pending change by touching the item from the list and swiping left.
To send pending changes to POS, tap the Send to POS button at the bottom of the screen and answer OK the confirmation prompt.
Wait for the success message and click OK.
Upon success, the date and time for the last update will reflect the sync.
Please note:
4 CRE must be running and have Internet connectivity in order for data synchronization (sending to, and receiving from, POS) to take place.
4 If you have over-the-air enabled, the app will automatically fetch refreshed site data immediately after sending data to CRE.

Mobile Inventory App Guide
A Global Payments Company Page 36
Other App Components Refresh Inventory To refresh the inventory data on your device, tap the Refresh icon in the upper left corner of the screen. This will refresh inventory data by pulling current data from CRE.
Please note: The refresh function overwrites local data so, if you have any pending changes on your device that you want to send to CRE, you must submit pending changes BEFORE refreshing.
Settings To access settings, tap the Settings icon in the upper right corner of screen. This page allows you to view and change the following settings:
• Enable Touch ID – This can be toggled off and on.
• Beep on Scan – This can be toggled off and on.
• Site Info – See image below on left. Consists of User Name, Site Name, and SiteID.
• About – See image below on right. Displays the following:
o EULA – opens end-user license agreement in browser window
o Privacy Statement – user-specific
• Change Password – Opens the password recovery page where you can easily change your password.
• Log Out – Logs out current user.
Mobile Inventory App Guide
A Global Payments Company Page 37
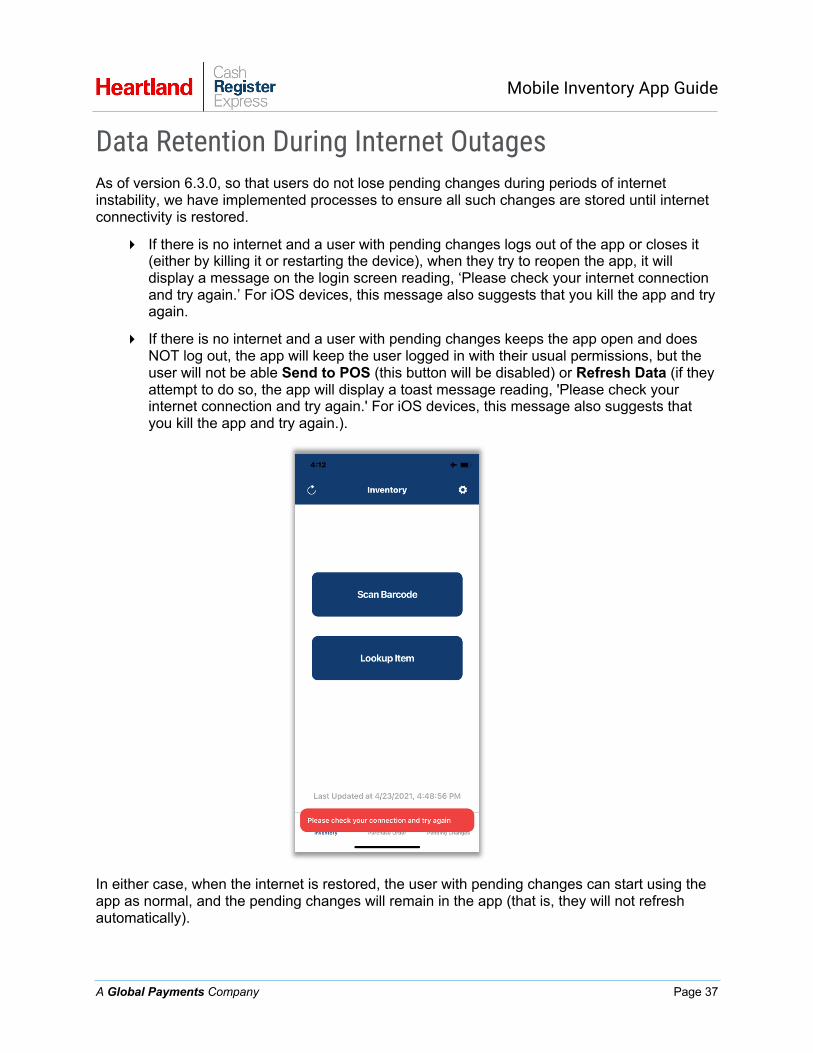
Data Retention During Internet Outages As of version 6.3.0, so that users do not lose pending changes during periods of internet instability, we have implemented processes to ensure all such changes are stored until internet connectivity is restored.
4 If there is no internet and a user with pending changes logs out of the app or closes it (either by killing it or restarting the device), when they try to reopen the app, it will display a message on the login screen reading, ‘Please check your internet connection and try again.’ For iOS devices, this message also suggests that you kill the app and try again.
4 If there is no internet and a user with pending changes keeps the app open and does NOT log out, the app will keep the user logged in with their usual permissions, but the user will not be able Send to POS (this button will be disabled) or Refresh Data (if they attempt to do so, the app will display a toast message reading, 'Please check your internet connection and try again.' For iOS devices, this message also suggests that you kill the app and try again.).
In either case, when the internet is restored, the user with pending changes can start using the app as normal, and the pending changes will remain in the app (that is, they will not refresh automatically).