Craft Creations Magazine - Autumn 2010
39
Transcript of Craft Creations Magazine - Autumn 2010

8/21/2019 Craft Creations Magazine - Autumn 2010
http://slidepdf.com/reader/full/craft-creations-magazine-autumn-2010 1/39
8/21/2019 Craft Creations Magazine - Autumn 2010
http://slidepdf.com/reader/full/craft-creations-magazine-autumn-2010 2/39
Issue 58
Autumn 2010
The UK’s Original Greetings Card Making Magazine - Full Of Creative Ideas
We hope you enjoy this free article taken from a back issue of the Craft CreationsMagazine. You may hand make copies of the card(s) featured in this project, togive away or sell, as many times as you like. You may not use the project, text,pattern or pictures for any other purpose nor make the project using any kind ofautomated process.
All the free articles available for download on our web site are at least one yearold. If you want the latest projects, designer profiles, gallery pages and more,then you need to subscribe to the quarterly Craft Creations Magazine.
Subscription Benefits:
* A free gift with every issue.
* 10% off every order placed with Craft Creations*.
* £2.50 off post and packing on orders over £20*.
*Prize competitions in every issue.
You can subscribe to the quarterly Craft Creations Magazine or purchase any ofthe back issues from our online shop - www.craftcreations.com
* All Craft Creations Magazine subscribers will receive an additional 10% discount off their orders duringtheir subscription period only. Subscribers will also receive £2.50 off post and packing on orders over £20(after discount). These benefits are not applicable on certain items such as: Magazine Subscriptions, Gift Vouchers, Products already on Promotion, Special Offers or 'SPOF' packs and cannot be combined withany other vouchers or offers. * At the present time all UK orders over £20 get free Post and Packing.
Craft Creations Limited
Ingersoll House, Delamare Road, Cheshunt, Hertfordshire, EN8 9HD, England.Tel: 01992 781900 Fax: 01992 634339 Web: www.craftcreations.com
The details above are correct as of 16th September 2011, but are subject to change without prior notice.
Hello,

8/21/2019 Craft Creations Magazine - Autumn 2010
http://slidepdf.com/reader/full/craft-creations-magazine-autumn-2010 3/393
Die-Cut DécoupageBy Jenny Kearley
INTRODUCTION:
These are quick and easy die-cut découpage sheets, simplypress out and layer using mini fixers. Here are some of our ideasfor the finished cards and, as usual, some great layer hints thatwill help make your designs look really special.
Polar Bears: DCD517Standard Mount: AP02U-51 Hammer Blue.Card Shown: HG03U-43 Linen White. The design is layered onto bluepearl card. Two square apertures are punched in the lower part of thepanel, the polar bear panels behind are on the inside back flap. Strips
of blue pearl paper are punched with stars and snowflakes to decorate.Layer Tips:Layer 2: Cut between leg and bottom on the big bear and curve theleg down.Layer 3: Top bear; curve both paws down, use a fixer on each paw andon the chin, gluing top of head down. Big bear; begin with the head, cutabove the ear and curve the head down, curve the bottom edge downusing sticky fixers at the top and on the ear. Next do the arm, curve thetop edge, allow it to slightly overlap the head using fixers by the ear andin the centre. Glue at the shoulder. When sticking the snow in place,add 3 or 4 fixers below big bear’s head, as well as your usual ones, thenposition so the top edge of the snow just about overlaps the bottom ofthe head and paw.Layer 4: Cut between the back leg and body, curve the body down.
Wise Men: DCD518Standard Mount: AP48G-HC-HO-61 White/Holographic Silver.Card Shown: SF01C-122 Pearl Turquoise.Lettering is XL563U-02 & XL564U-02.Layer Tips:Layers 2 & 3: Place sticky fixers along the top of the hills,the lower edges will then naturally bend down a bit andgive a less bulky look to the overall design.Layer 3: Glue the camel reins at both ends.Layer 4: Place a row of 5 evenly spaced fixers along thebottom edge of the picture. Curve the bottom of the purplecloak down. Curve the camel reins and glue both ends.
Layer 5: Glue the top of the middle head. Glue both endsof the reins down. Cut the blanket away from the man andcurve the top of the blanket down. Cut between the armand head dress, sticky fix man in place and glue the shoul-der. Sticky fix head into place and glue the top edge.Layer 6: Glue the shoulder.
Santa & Reindeer: DCD519Standard Mount: AP48U-51 Hammer Blue.Card Shown: SF01C-115 Pearl Regal Blue. Glitter Snowflakes ZL631U-82 andRed Rocaille Beads BEA38 sewn on over the berries on the border strip.Layer Tips:Layer 2: Cut between the body and sack on the left, curving the body down. Cutbetween the pom-pom and hat curving the hat down.
Layer 3: Cut the sack away from arm, curve bottom edge of sack down, sticky fixin place and glue by the hand. Sticky fix hat trim in the centre and glue both ends.Layer 4: Cut between the doll and the sack, curving the sack down at the cut,sticky fix and glue the sack by the hand. Curve the hand down at the cuff. Stickyfix the fur trim in the centre and glue both ends. Cut the painted lines at the top ofthe legs and curve the body down.
Layer 5: Glue theear where it joinsthe head.

8/21/2019 Craft Creations Magazine - Autumn 2010
http://slidepdf.com/reader/full/craft-creations-magazine-autumn-2010 4/394
Robin In Pine Tree: DCD520Standard Mount: AP48G-HC-GO-61 White/Gold.Card Shown: SF01C-108 Pearl Xmas Green.The wording is XL753U-01 with ZL727U-55 Holly Corners & Dotty Strips.You will need some red dots for the berries, lots of sheets have dots oryou can buy a complete sheet of dots ZL729U-54.The holly paper borders are CB032P.Layer Tips:Layer 2: Top pine cone; curve and glue the top of the cone down. Gluethe left edge of the branch.
Layer 3: Curve and glue the top pine cone as before. Cut the painted lineat the top of the leg, curve the body down at the cut and along the wholebottom edge.Layer 4: The little bit of top pine cone should be curved down at the topand bottom and glued in place with no fixer. Glue the wing where it joinsthe body.
Shepherds: DCD523Standard Mount: AP48U-51 Hammer Blue.Card Shown: SF01C-123 Pearl Mauve with a 2.5cm wide strip cutfrom the front panel to show the white inside.Layer Tips:Layer 3: Blue man; cut on the painted centre line of the purple shawland curve the left side down. Brown man; curve the shoulder down.The lamp will overlap the foot of the red man a little.Layer 4: Curve the head of the blue man down. Glue the brown manat the shoulders. Cut between the man and the sheep, cut betweenthe red and white robe on the right side and curve the red point down.Cut the folds of the white robe and curve them to give shape. Use asticky fixer on the head of the sheep, not the body, and do not use afixer on the man’s head, sticky fix the rest as normal and glue thesheep’s body, man’s head and the right hand side of the red cloak.Layer 5: Cut below the arm curving the body down, cut between theback and the fold of clothes on the right and curve the back down,cut the right shoulder between the head dress and red cloak curvingthe shoulder down. Do not use a sticky fixer on the head when stick-ing in place (this allows it to lay naturally against the previous layer).
Baby In Manger: DCD522Standard Mount: AP48G-HC-HO-61 White/Holographic Silver.Card Shown: GF31U-43 Linen White.The design is layered onto blue card. Happy Christmas peel-offs areZL534U-82. The starflakes are ZL698U-82, stuck onto blue card, cut
out and layered. The stable is hand cut from strips of CNT134C DarkChocolate pearl card embossed with a wood effect, this is placedover a hand cut aperture with the small manger design on the panelbehind.Layer Tips:Layer 3: Give the fence post some shape by lightly folding on thepainted corner down the length.Layer 4: The crossbars on the fence are optional, use sticky fixers onthe right hand side if used.Layer 5: Start with the baby, cut between the blanketand the head on both sides, curve the blanket down andcurve the rest of the blanket top down. The sheep cannow go in place overlapping the image on the blanket.Layer 6: Glue the top of the arm. Standing sheep; cutbetween the tail and body along the painted line and
curve the tail up a little and body down. Cut the linebetween body and back leg curving the body down.Laying sheep; cut between each leg and the body,curve the body down.

8/21/2019 Craft Creations Magazine - Autumn 2010
http://slidepdf.com/reader/full/craft-creations-magazine-autumn-2010 5/395
Poinsettia: DCD526Standard Mount: AP48U-23 Deep Green.Card Shown: GF31U-43 Linen White.Covered with creative papers CP163G and CP166G. The hole ispunched in the small panel with a round tag behind and a ribbonhanger both inside and out. The design is mounted on layers ofSR163P and Gold Ferro Paper.Layer Tips:Layer 2: Cut between petals of yellow flowers and shape them.Layer 3: Shape the white flower on the right hand side.Layer 4: Start with the holly leaf, glue the stem, then fix the maindesign in place. Sticky fix the top flower. Cut and shape the
petals of the white flowers.Layer 5: Top flower; shape the petals and curve the flower centredown. Main flower; cut between the top three darker petals andshape them.Layer 6: Curve the petals so the flower centre goes down andsticky fix by the petals only.
Boy On Sledge: DCD524Standard Mount:
AP48G-HC-GO-23 Deep Green/Gold.Card Shown: GF26U-43 Linen White. Peel-off wording isZL498U-81 and the blue pieces are Vivelle VIV11A4.Layer Tips:Layer 2: Cut between the tree and the top of the yellow present,curve the present down.Layer 3: Cut below the bow loop on the pink present and curvethe loop up. Glue the sledge at the top of the foot rest.Layer 4: Cut between the blue helmet and scarf and the chin andscarf, curve the scarf down at the end. Cut between the scarf andback, shape the scarf nicely and curve the back of the boy down.Glue the sledge as before.Layer 5: Curve the back of the boy down. Glue at the shoulderand the sledge as before and glue the back rope by the hand.Curve the sides of both helmets.
Robin In Apple Tree: DCD521Standard Mount: AP48G-HC-GO-61 White/Gold.Card Shown: SF01C-134 Pearl Dark Chocolate, cut to makemountain folds to the left. The white tags are CDT008P, inkedat the edges in brown. The peel offs used are XL753U-01 and XL780U-01. The little gold stars are brads BRD103.Layer Tips:Layer 2: Curve and glue all the single leaves where they join thestem. Glue the left end of the main branch.Layer 3: Curve and glue the single leaves as before. Curve thelower edge of the Robin’s body down.Layer 4: Glue theleaf where it joinsthe apple andthe wingwhere it joins thebody.
Girl With Sledge: DCD525Standard Mount: AP48G-HC-HO-61 White/Holographic Silver.Card Shown: SF08U-43 Linen White.This card uses the small découpage picture on the sheet. Thebackground is made using the waste backing from ZL698U-81,the wording is XL709U-01.Layer Tips (for the large découpage design):Layer 2: Cut under the chin and curve the neck down. Cut be-tween the basket and the side of the coat, curve the body down.Layer 3: Cut between the scarf and coat to remove the headand scarf completely.Sticky fix the coat in placegluing along the top edge.Curve the neck of the scarfdown and the left hand sideof the hair and sticky fix intoplace. Glue the hair on the leftif necessary. Glue the top ofleft purple present down andglue the bow by the centreonly lifting the loops. The treelooks a bit odd at this stagebut will be covered by layer 5.Layer 4: Bend the purplepresent on the painted cornerand glue the right hand edge
down.Layer 5: Sticky fix the batch ofpresents in place and glue theright hand corner of the purpleone. Sticky fix the bottom ofthe yellow present and gluethe top. Place a single fixer atthe top of the tree and twostacks of two fixers at thebottom then place the treeover them, use a little glue tostick the blue bow to the tree.
8/21/2019 Craft Creations Magazine - Autumn 2010
http://slidepdf.com/reader/full/craft-creations-magazine-autumn-2010 6/39
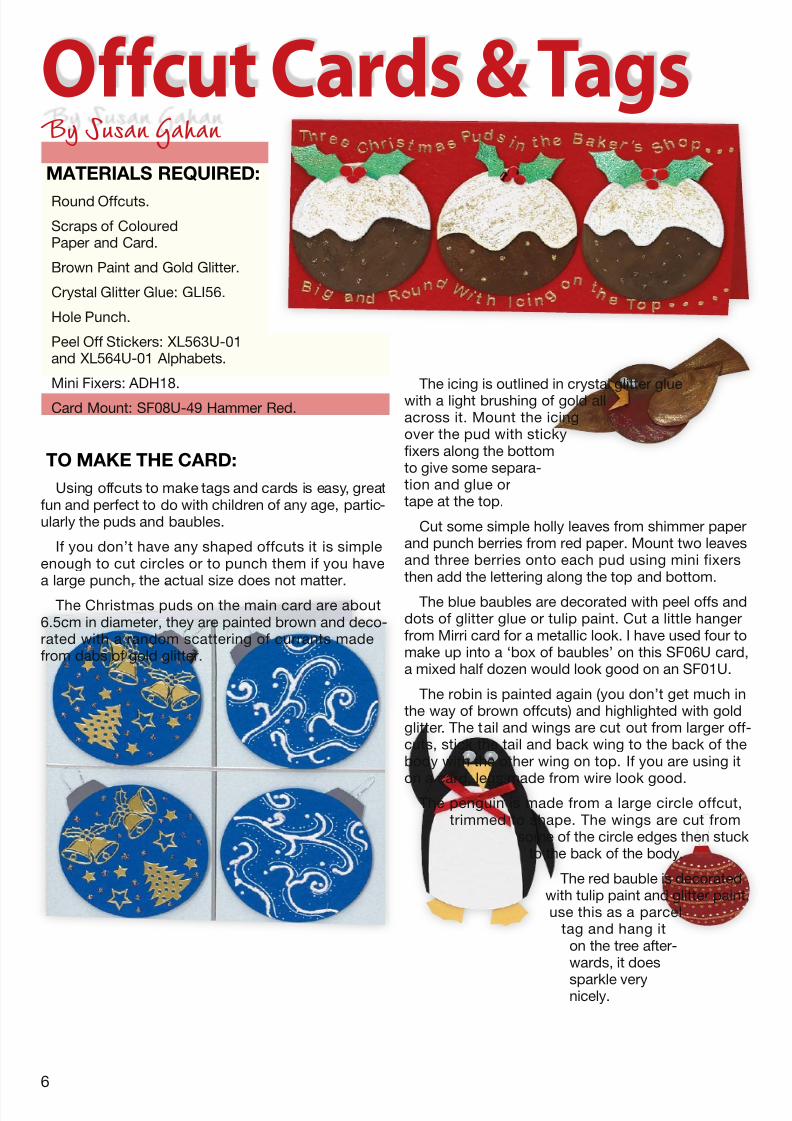
Offcut Cards & TagsBy Susan Gahan
6
MATERIALS REQUIRED:
Round Offcuts.
Scraps of ColouredPaper and Card.
Brown Paint and Gold Glitter.
Crystal Glitter Glue: GLI56.
Hole Punch.
Peel Off Stickers: XL563U-01and XL564U-01 Alphabets.
Mini Fixers: ADH18.
Card Mount: SF08U-49 Hammer Red.
TO MAKE THE CARD:
Using offcuts to make tags and cards is easy, greatfun and perfect to do with children of any age, partic-ularly the puds and baubles.
If you don’t have any shaped offcuts it is simpleenough to cut circles or to punch them if you havea large punch, the actual size does not matter.
The Christmas puds on the main card are about6.5cm in diameter, they are painted brown and deco-rated with a random scattering of currants madefrom dabs of gold glitter.
The icing is outlined in crystal glitter gluewith a light brushing of gold allacross it. Mount the icingover the pud with stickyfixers along the bottomto give some separa-tion and glue ortape at the top.
Cut some simple holly leaves from shimmer paperand punch berries from red paper. Mount two leavesand three berries onto each pud using mini fixersthen add the lettering along the top and bottom.
The blue baubles are decorated with peel offs anddots of glitter glue or tulip paint. Cut a little hangerfrom Mirri card for a metallic look. I have used four tomake up into a ‘box of baubles’ on this SF06U card,a mixed half dozen would look good on an SF01U.
The robin is painted again (you don’t get much inthe way of brown offcuts) and highlighted with goldglitter. The tail and wings are cut out from larger off-cuts, stick the tail and back wing to the back of thebody with the other wing on top. If you are using it
on a card, legs made from wire look good.The penguin is made from a large circle offcut,
trimmed to shape. The wings are cut fromsome of the circle edges then stuck
to the back of the body.
The red bauble is decoratedwith tulip paint and glitter paint,use this as a parcel
tag and hang iton the tree after-wards, it does
sparkle verynicely.

8/21/2019 Craft Creations Magazine - Autumn 2010
http://slidepdf.com/reader/full/craft-creations-magazine-autumn-2010 7/39
Outstanding TreesBy Jenny Kearley
7
MATERIALS REQUIRED:
Creative Papers: SR176P, SR177P andSR178P Candy Christmas.
Centura Pearl Card: CNT130C Green,CNT131C Pink and CNT132C Blue.
Large Eyelet Punch and Eyelet Mat.
Pencil and Scissors.
4mm Bling Bling Gems: GEM72 Fuchsia.
Craft Knife and Cutting Mat.
Mini Fixers and P.V.A. Craft Adhesive.
Standout Card Mount: CC03U-52 Popset White.
TO MAKE THE CARD:
Cut four 2cm wide x 18cm long strips from thecandy border paper, two with stars and two withwording. Cover the borders on the tree panel withthese strips as shown, cutting each corner to 45º tomake a neat mitred join.
Cut a 14cm square of bauble paper, cover the
front of the tree (on the card) with glue and stick thebauble paper onto it. Turn the card face down andtrim the paper to the edges of the tree. Punch holesrandomly over the surface using the large eyeletpunch over an eyelet mat or an old cutting mat.
Cut a 14cm square of green card and trace the treeshape from the card blank onto the back of it. Cutout the shape about 2mm outside the lines to make ita little larger. Place a few mini fixers onto the back ofthe tree panel on the card mount avoiding the holes.
Actual Size
Hold the card blank over the green tree with aneven amount showing all around and press intoplace. Place a sticky backed gem onto the green
tree through each of the holes in the candy layer.Cover the panel that goes behind the tree with
wording paper then fold the card mount along thepre-scored lines at the sides and above and belowthe tree so it stands away from the background.
Glue all four borders of the front panel (except thestandout parts) and fold it closed aligning the edgeof the inner panel with the left hand fold. Cut 3mmwide strips of pink card to fit just inside the apertureand glue in place tucking them behind the tree.
Cut a set of stars in the colours
shown (the back of the card will makea white star). Stick the large pink starto the top of the tree then layer theothers onto it in size order.
Cut a pot from pink card and addstrips of colour to decorate it beforesticking in place with mini fixers.
Cut out six coloured baubles fromthe paper and add one to the tip ofeach branch as shown. This card doesnot fit into an envelope, but looksgreat when presented in BOX47.
Left: This card was made in a similarway using the ice blue range of papersfor a frosty look.

8/21/2019 Craft Creations Magazine - Autumn 2010
http://slidepdf.com/reader/full/craft-creations-magazine-autumn-2010 8/39
Blue CandlesBy Ginny Adams
8
MATERIALS REQUIRED:
Scrapbook Paper: SCR536 Snowflakes.
Creative Foil Coated Pack: FLESC.
Colorset Paper: COL162P Lime, COL163P SpringGreen and COL164P Evergreen.
Scrap of White Card.
Gold Label Peel Offs: XL500U-02 Borders, XL701U-08 SnowflakeStrings, XL697U-08 Small Snowflakes, XL500U-01 Gold Borders, ZL774U-81 Gem Dotsand ZL534U-55 Wording.
Silver Glitter Glue: GLI46.
Tracing Paper and Pencil.
Hole Punch.
Scissors.
Craft Knife and Cutting Mat.
Sticky Fixers: ADH18.
Double Sided Tape: ADH13.
P.V.A. Craft Adhesive: PVA01.Card Mount: SF01U-29 Dark Blue.
TO MAKE THE CARD:
Cut a strip of snowflake paper to 25mm x 195mmand another to 75mm x 195mm. Stick the narrowpiece at the fold with an equal border top, bottomand left. Stick the large panel to the right of the cardwith an equal border top, bottom and right.
Stick a snowflake border down the centre of the
small panel, trimming the ends to the panel.
Use a medium width silver sticker to make a framearound each panel, place it just outside the paper soa tiny bit of the card shows between the panel andborder. Add a gem dot to each corner.
Cut a 12mm wide strip from the short edge of theblue foil card and cut the candles from it, one at70mm, one at 50mm and another at 45mm. Place amedium width gold border across each one, about4mm from the top.
Use double sided tape to stick these to the card,position them 4cm from the bottom of the largepanel, the largest in the centre, the smallest on theleft and the other to the right leaving a gap of about5mm between them.
Cut the flames from gold foil card, curve the topand bottom edges down and use a sticky fixer in thecentre to stick them into place on the candles.
Actual Size

8/21/2019 Craft Creations Magazine - Autumn 2010
http://slidepdf.com/reader/full/craft-creations-magazine-autumn-2010 9/399
VARIATION:
The embossed snowflake paper I used on my maincard is becoming hard to find, so why not try usingthe new ice blue papers SR181P & 182 as used inthe above version along with a Centura card blank(SF01C-115) which has a pearly finish.
Actual Size - Assembly Diagram
Trace all the leaves and transfer to the mediumgreen, dark green and light green paper as shownthen cut them out.
Fold the mid green leaves in half along the lengthand feather from the edge to near the centre by mak-ing several close together cuts, stop about 3mmfrom the centre fold. Cut along the whole lengthslanting them as shown on the diagram.
Unfold the leaves and place a little double sidedtape down the centre uncut part then arrange themover the candles, or place them onto the diagrambelow, then transfer to the card when the cluster iscomplete.
Fold and cut the dark green leaves in the sameway, use a bit of double sided tape on the bottom ofthese and a sticky fixer in the centre then arrangethem over the medium leaves.
Place a little double sided tape on one end ofthe holly leaves and a sticky fixer in the centre of
each before arranging them over the other leaveswith the sticky ends to the centre.
Punch three berries from the red foil and use asticky fixer to stick them in the centre of the arrange-ment. Add a glitter glue centre vein to the holly leavesand add a little dusting of glitter over the otherleaves, set aside to dry.
Trace the lantern base and top, transfer the baseto white card 5 times and the top to the back of thesilver foil card 5 times. Cut all of these out.
Place a 2cm length of double sided tape to theedge of the light green paper, cut along the edge ofthe tape to give you a sticky strip then trim 5 littlecandles from this, about 2mm wide. Stick one candleto the centre of each lantern.
Make a sticky strip of gold in the same way andcut little flames to sit on the candles. Use the narrowsilver border to make the panes on the lanterns, seediagram, and trim all the ends neatly.
Use a little strip of clear tape to stick the tops ontothe lanterns, overlap the tops by just a couple of
Actual Size
millimetres and place a sticky fixer at the top of thebase, this allows the top and the bottom to benddown to give a nice 3D shape.
Stick a lantern at the top of the blue strip of card,about 5mm from the top edge, stick by the fixer onlyfor now. See the photo for placement and angle. Addthe bottom lantern then the other 3 spaced evenlybetween them. Cut lengths of narrow silver border forthe wire, making them a little longer than the gap andtucking the ends under the lanterns.
Place a little glue on a piece of scrap card, tuckthe glued bit under thelantern to wipe some
glue off the card andpress carefully down tostick. Stick all the topsand bottoms in this way.
Add some snowflakesaround the lanterns andover the wording and afew snowflakes to themain panel.

8/21/2019 Craft Creations Magazine - Autumn 2010
http://slidepdf.com/reader/full/craft-creations-magazine-autumn-2010 10/39
Candle PanelsBy Barbara Parker
10
MATERIALS REQUIRED:
Stardream Paper: STD24P Crystal White.
Glitter Vinyl: PZL00U-80 Clear.
Gold Label Peel Offs:ZL486U-81 Clear Panels, ZL608U-55 HollyBorders, XL179U-01 Candles, 2 of XL443U-01Holly, XL093U-01 Poinsettias, XL730U-01Wording and XL632U-01 Borders.
Peel Off Pens: LUM01.
Craft Knife or Scissors.
Pencil and Ruler.
Sticky Fixers: ADH18.
Double Sided Tape: ADH13.
Card Mount: SF06M-85 Stardream Gold.
TO MAKE THE CARD:
Lightly draw a line down the centre of the frontpanel of the card starting and finishing about 1mmfrom the edges. Lightly draw a line across the cardfrom side to side in the same way (diagram 1).
Note: Due to the way the glitter is applied to thevinyl, the stickers have a more, or less, sparkly look
when viewed from different directions. It always looksbest if you place them the same way around.
Stick six of the glitter panels onto the crystal whitepaper and cut them out. Put one panel aside to useon the insert inside the card later.
Stand this card in a place where the late after-noon sun will catch the glitter, and the sparkle
from it will knock your eyes out.
It’s worth taking a little extra time to make theinside of the card as attractive as possible, I cutmy own insert and decorated it to match thefront of the card.
1 2
Arrange four of the panels diagonally on the card,keeping them about 1mm in from the edge, and with
the points on the marked lines (diagram 2). Stickthem in place using double sided tape, checking thatthey are all the same way around to keep the sparklethe same throughout the design.
Place a sticky fixer onto each corner and one inthe centre on the back of the fifth square panel. Makesure it is the same way around as all the others andstick it squarely onto the centre of the card.
Colour the berries in red on two strips of the hollyborder while it is still on the backing sheet and usethis to make a border around the edges of the card.
Work the two sides first using five pairs of leavesfrom the corner of the card to the corner of the panel.The top and bottom edges use four pairs and onesingle leaf including the berry. Place the single leaf atthe card corner and the pair beside the panel.
Choose two candles with the wax drips on the leftand two on the right from XL179 and stick these ontoclear glitter vinyl leaving just enough space to cut
them out easily. Stick four singleholly leaves from XL443 ontothe vinyl.
Add one largecandle with holly
leaves from XL093,and twenty pairs of

8/21/2019 Craft Creations Magazine - Autumn 2010
http://slidepdf.com/reader/full/craft-creations-magazine-autumn-2010 11/3911
TO MAKE THE INSERT:
Cut a piece of crystal white paper to 13.2cm x27.5cm and fold it in half to make an insert. Run aline of double sided tape down the inside front panelclose to the fold line and stick the insert in place.
Print a message onto a piece of crystal whitepaper and cut to a neat oblong, mine is about 6cm x7cm. Stick this just above the centre of the insertover the back panel, edge with a narrow border andadd a pair of holly leaves with the coloured berryplaced into each corner.
Stick the last glitter panel, diamond-wise, in thecentre on the left side. Add the last four pairs ofcoloured holly leaves to the corners and the last
poinsettia to the centre.
Stick a narrow gold border around it, about 6mmout from the panel. Add a pair of holly leaves withcoloured berries from the glitter border at each cor-ner of this frame, and at all 4 corners of the insert, onboth pages.
the small holly leaves from XL443.Lastly, add five poinsettias from XL093.
Cut around this whole set ofstickers keeping it as one piecefor easy colouring. Peel thebacking from the vinyl andstick the whole piece ontosome crystal white paper.
Using the peel off pens, colour the holly leaves ingreen, the berries in red and the candle flames inyellow. Colour the centre of each poinsettia in yellowand the petals in red, except for the top layer whichare left plain as shown in the photo. Cut out all theindividual items neatly to the sticker edges and uselittle squares of double sided tape to stick them inplace.
Stick the four small candles to the backgroundpanels placing a single holly leaf into the gap be-tween the two lower leaves on each, the top of theleaf should be tucked under the candle sticker. Addthe large candle to the centre panel.
Use the pairs of holly leaves to decorate the fourdiagonal panels on three corners of each as shownin the photo. Add pairs of holly leaves to each cornerof the top panel pointing outwards into the gapsbetween the lower panels as shown.
Stick a poinsettia into each corner of the cardusing a sticky fixer and add the wording around thepanels as shown.
8/21/2019 Craft Creations Magazine - Autumn 2010
http://slidepdf.com/reader/full/craft-creations-magazine-autumn-2010 12/39
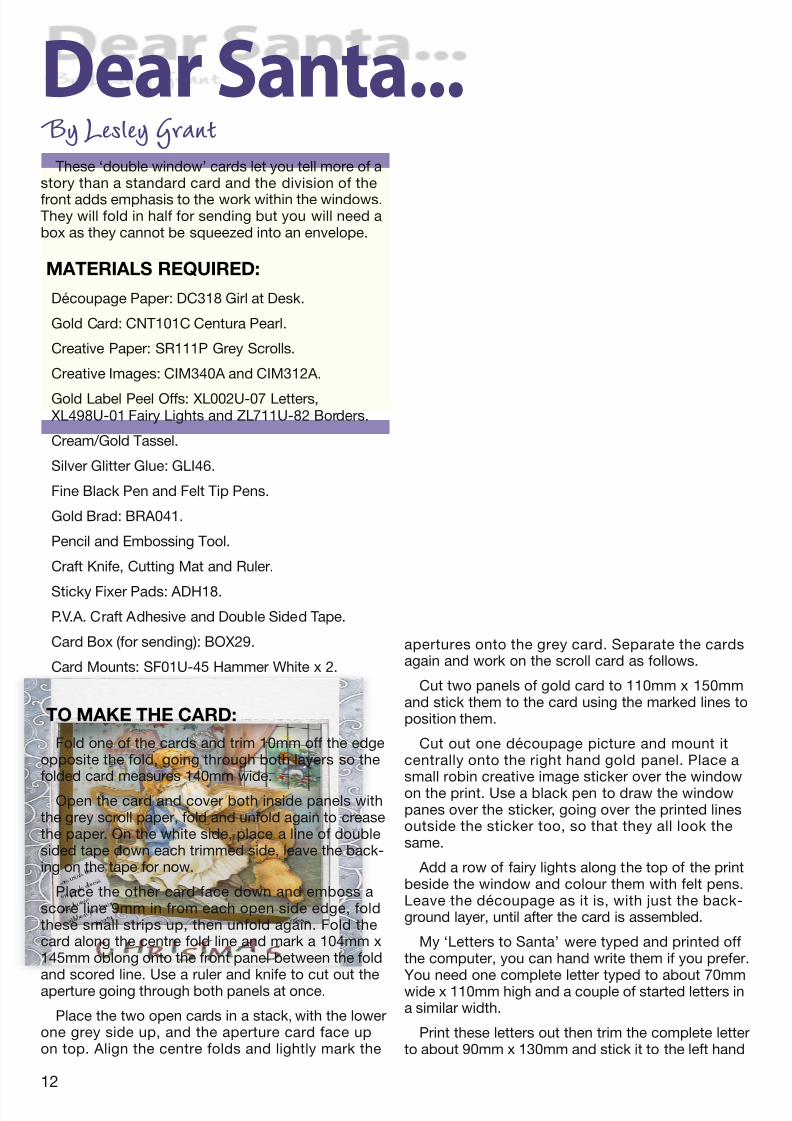
Dear Santa...By Lesley Grant
12
MATERIALS REQUIRED:
Découpage Paper: DC318 Girl at Desk.
Gold Card: CNT101C Centura Pearl.
Creative Paper: SR111P Grey Scrolls.
Creative Images: CIM340A and CIM312A.
Gold Label Peel Offs: XL002U-07 Letters, XL498U-01 Fairy Lights and ZL711U-82 Borders.
Cream/Gold Tassel.
Silver Glitter Glue: GLI46.
Fine Black Pen and Felt Tip Pens.
Gold Brad: BRA041.
Pencil and Embossing Tool.
Craft Knife, Cutting Mat and Ruler.
Sticky Fixer Pads: ADH18.
P.V.A. Craft Adhesive and Double Sided Tape.
Card Box (for sending): BOX29.
Card Mounts: SF01U-45 Hammer White x 2.
TO MAKE THE CARD:
Fold one of the cards and trim 10mm off the edgeopposite the fold, going through both layers so thefolded card measures 140mm wide.
Open the card and cover both inside panels withthe grey scroll paper, fold and unfold again to creasethe paper. On the white side, place a line of doublesided tape down each trimmed side, leave the back-ing on the tape for now.
Place the other card face down and emboss ascore line 9mm in from each open side edge, foldthese small strips up, then unfold again. Fold thecard along the centre fold line and mark a 104mm x145mm oblong onto the front panel between the fold
and scored line. Use a ruler and knife to cut out theaperture going through both panels at once.
Place the two open cards in a stack, with the lowerone grey side up, and the aperture card face upon top. Align the centre folds and lightly mark the
apertures onto the grey card. Separate the cardsagain and work on the scroll card as follows.
Cut two panels of gold card to 110mm x 150mmand stick them to the card using the marked lines toposition them.
Cut out one découpage picture and mount itcentrally onto the right hand gold panel. Place asmall robin creative image sticker over the windowon the print. Use a black pen to draw the windowpanes over the sticker, going over the printed linesoutside the sticker too, so that they all look thesame.
Add a row of fairy lights along the top of the printbeside the window and colour them with felt pens.Leave the découpage as it is, with just the back-ground layer, until after the card is assembled.
My ‘Letters to Santa’ were typed and printed offthe computer, you can hand write them if you prefer.
You need one complete letter typed to about 70mmwide x 110mm high and a couple of started letters ina similar width.
Print these letters out then trim the complete letterto about 90mm x 130mm and stick it to the left hand
These ‘double window’ cards let you tell more of astory than a standard card and the division of the
front adds emphasis to the work within the windows.They will fold in half for sending but you will need abox as they cannot be squeezed into an envelope.

8/21/2019 Craft Creations Magazine - Autumn 2010
http://slidepdf.com/reader/full/craft-creations-magazine-autumn-2010 13/3913
VARIATION:
This robin card is made in the same way but, Ihave added acetate to the ‘windows’ and scattereda mix of white and silver snowflakes over the front ofthe card. The robin’s background is cut away at theleft so the winter sky paper fits nicely around him.
of the card with 1cm showing on the front andwrap the rest around to the back. Trim all theends to the edges of the card.
Make a couple of small tags from gold card,stick a medium robin sticker to one and asmall postbox sticker to the other. Punch ahole in each and thread gold thread throughthe holes.
Cut a small slot for the brad at the top leftof the card front (see photo). Feed the bradthrough the slot, wrap the tag thread and thetassel cord around the brad then fix into place.
Add a clear glitter border sticker aroundeach aperture and add the greeting below theapertures. Work the découpage layers onto theprint in the right hand aperture and add somesilver glitter glue for the tinsel here and there.
Actual Size
gold panel. Trim the edges ofthe others so the words are inthe right place then tear themup and stick around the goldcard, some pieces can goacross the bottom of the dé-coupage picture as shown.
Assemble the two cardsas follows using the diagram
below for guidance. Open theaperture card out and placeface down. Place the deco-rated card face down over itand peel the backing from thetape on each side. Make surethe centre folds are alignedand fold the two side flapsfrom the aperture card downover the top card.
Cut three strips of grey paper
to 25mm x 210mm and coverthe back of each with doublesided tape. Stick one strip tothe front of the card between the apertures leavingthe ends long for now. Stick a strip down each side

8/21/2019 Craft Creations Magazine - Autumn 2010
http://slidepdf.com/reader/full/craft-creations-magazine-autumn-2010 14/39
Rocking SnowmenBy Alison Barrow
14
MATERIALS REQUIRED:
Creative Paper: SR157P PaleSnowflakes, SR040P ChristmasMix (optional).
Christmas Collage Sheets:CS005 and CS006.
Hammer White Card: CEM01.
Thin White Card.
Gold Label Stickers: ZL696U-52Star Strings, XL524U-17 and
XL283U-01 Wording.5 Small White Brads, 1 SmallDecorative Brad.
Small Hole Punch.
Craft Knife and Cutting Mat.
Sticky Fixers.
Double Sided Tape and Glue Stick.
Card Mount: GF31U-43 Linen White.
TO MAKE THE CARD:
Fold the narrow flap and lightly mark where itcomes onto the panel behind. Cover the inside frontand back panel to just past the marked line withsnowflake paper. Cut these as two separate piecesand leave a little gap between them so you don’tcover the fold line. Cover the front of both flaps withsnowflake paper too.
Cut the wide blue paper border from the collagesheet and add to the inside of the card placing it 2cm
from the bottom edge and cutting at the fold line asbefore. Glue the small flap closed.
Cut two panels with sloping tops from white ham-mer card using diagram 1 for the size and shape, andmaking sure they are exactly the same width as thelarge flap. Mark the position of the two black dotsunder the snowmen (not the ones on the star border)on the small panel only and punch them out.
Stick the larger white panel onto the large flap onthe card using sticky fixers and aligning the bottomand side edges.
Cut the star border from the collage sheet andstick a length of it across the small white panel 1.5cmfrom the bottom edge as shown (diagram 1).Measure1.5cm in from the right hand edge along the centre of
the border strip and cut a slot 2cm long by just 1mmwide, cut out the slot using a knife and ruler.
Roughly cut out the two loose snowmen andmount onto thin card leaving about 5cm of cardbelow each of them. Cut neatly around the tops ofthe snowman and cut the card below as shown toleave a 1.5cm wide x 3cm long ‘stick’ under each(see diagram 2 for guidance). Punch a small hole at8mm and another at 24mm from the bottom of thestick on each snowman.
Stick the remainder of the star border onto thincard and trim the red edges away. Cut the strip to14cm long, turn it face down and punch three smallholes along the centre at 1cm, 5cm and 8cm fromthe right hand end see diagram 2 for guidance.
Push a brad through the lower hole in the stickof one of the snowmen from the back, still from theback push it through the hole closest to the end ofthe narrow border strip and open out the ends (dia-gram 2). Do the same with the 2nd snowman.
Place the white panel face up on top of the snow-man strip as shown in diagram 3 and push a bradthrough each hole in the card, through the top hole inthe snowman stick and open out at the back.
Roughly cut out the two reindeer, mount onto cardand cut out neatly. Punch a small hole in the centre of
the body of one of the reindeer. Place onto the whitepanel so the hole in the reindeer, the slot and the holein the strip all line up. Push a brad through all the lay-ers and open the ends out at the back. Sticky fix thespare reindeer on top of the one on the panel.

8/21/2019 Craft Creations Magazine - Autumn 2010
http://slidepdf.com/reader/full/craft-creations-magazine-autumn-2010 15/3915
Diagram 1 - Actual Size
Diagram 3 - Front View
Stick the small diagonal snowman from the collage sheetonto thin card and cut him out keeping the blue square be-hind him. Glue him firmly onto the end of the pull strip asshown (diagram 3). Mount this finished panel onto the cardusing sticky fixers, keeping them away from the pull strip. Add a peel off border along the top of both snow panels.
The snowman with the lighterscarf is part of a printed panel, stickhim onto thin card before cutting the
panel away. Roughly cut out the treeand stick onto thin card before cut-ting out neatly. Add both of these tothe large white panel in the positionsshown.
Finish the front panel by addingthe sticker wording then open thecard and work on the small flap.
Roughly cut the birdhouse panelfrom the collage sheet and stickonto thin card before cutting it out
neatly. I used a small square motiffrom SR040P paper to cover thebird. If you don’t want to buy thesheet just for this, one of the motifson the collage sheet will do the job,or you can omit the next steps if youprefer.
Cut a slit in the birdhouse wherethe roof meets the inner blue back-ground on the bird square.
Diagram 2 - Back View
Cut a star motif square and mount onto thin card leaving anextra 5mm of card at the top. Score along the top of the square
where it meets thecard and bend gentlyso it does not lay flaton the card.
Run a line of double sided tape just above the slit on the backof the birdhouse, push the top of the star square through the slitand stick to the tape so just the square shows on the front of thecard. Stick the finished birdhouse panel onto the back flap.
The inside of the card is decorated with panels and a tag from thecollage sheets, add a brad to the tag before mounting. Cut an ob-long of white hammer card to 5.5cm x 9cm and glue in place, addthe border and wording ready to write your message.
Inside Back Panel
Back of Front Panel

8/21/2019 Craft Creations Magazine - Autumn 2010
http://slidepdf.com/reader/full/craft-creations-magazine-autumn-2010 16/39
CandleglowBy Jean Childs
16
MATERIALS REQUIRED:
Blue Card: CRE02C Dark Blue.
Mirri Paper: MIR06P Red and MIR09P Green.
Gold Label Stickers: XL096U-03 Black CandleWindow and XL563U-08 White Letters.
Micro Glitter: SND053 Yellow, SND055 Lt. Green,SND058 Green, SND051 White & SND059 Red.
Clear Acetate: PET01.
Black Peel Off Pen: LUM01 (assorted colour set).
Fiskars Shapeboss Starter Set: SBK01 (optional).
Craft Knife and Cutting Mat.
Clear Glue: ADH19.
UHU General Purpose Glue: ADH01.
Double Sided Tape: ADH13.
Card Mount: SF06U-69 Hi-5 Cryogen White.
TO MAKE THE CARD:
Peel the window sticker from the sheet and placesticky side up on the table. Lower the acetate ontothe sticker and press the sticker firmly in place keep-ing your fingers off the acetate as far as possible.
With the sticker face up, use a black Lumocolourpen to colour inside the outer border only.
Fold a piece of clean white paper in half to make acrisp fold then open out again. Place the sticker facedown (acetate up) onto the unfolded paper and usethe dries clear glue to ‘colour in’ the two candles.Sprinkle white glitter over the candles then tap theexcess off onto the paper. Use the fold in the paperto pour the excess back into the pot.
Fill in the remaining areas of the design in the sameway, using glue then glitter, work from the lightestcolours through to the darker ones. Set aside to dry.
Although it doesn’t show very well in the mainpicture, I have embossed a twist border around theedges of my card, I used a Hi-5 card blank as it gives
clear and crisp outlines when embossing.Emboss the border along the fold-edge and the
bottom edge on the front of the front panel. Embossthe border along the top edge and the right handedge on the inside of the back panel.
Add a bit of Christmas sparkle to your cards withthese window stickers and some gorgeous glitter.
Cut a piece of blue card to roughly 8cm squareand use a little UHU to stick the design to it. Use aknife and ruler to trim the edges to the sticker edges.
Make a light pencil mark diagonally across thefront panel of the card going from the top left cornerto the bottom right corner. Measure 4.5 cm, alongthis line, from the top corner and make a small mark.
Use glue or double sided tape to stick the glitteredpanel to the card, position the top left corner on themark you have just made and align the bottom rightcorner with the diagonal pencil line.
Open the card out flat, lay a ruler along the pencilline and use a knife to cut from the corner of the cardto the panel, and from the panel to the bottom corner.Still using the ruler, cut around the top and right handedges of the panel to remove the top of the card.
Stick strips of 6mm double sided tape along theback edge of the red and green Mirri paper. Then trimat 7mm wide to make sticky Mirri strips.
Close the card and mark 5mm out from all fouredges of the glitter panel, draw a light pencil squarefrom these marks. Open the card and using the greenstrip on the back panel, stick it from the fold-edge tothe pencil corner, cut the corner to an angle. Then,go from this corner, cut at an angle too, down to thebottom of the card along the pencil line.
Use the red strip on the front panel, start at the cuttop edge, down to the pencil corner, cut at an angleand then go from the corner to the cut edge. Trim alledges neatly to the card and add the lettering alongthese strips.

8/21/2019 Craft Creations Magazine - Autumn 2010
http://slidepdf.com/reader/full/craft-creations-magazine-autumn-2010 17/39
3D Christmas TreesBy Christine Robinson
MATERIALS REQUIRED:
Peel Off Stickers: ZL524U-55 Words,ZL633U-55 Borderlines, XL696U-01 Star Border,and ZL698U-55 Starflakes.
Creative Papers: SR109P Green Scrolls,and CP166G Words.
Ferro Paper: F01A4 Gold.
Ribbon: RIB12-01 Gold.
Tracing Paper and Pencil.
Craft Knife and Cutting Mat.
Double Sided Tape: ADH13.
Card Mount: DF01U-23 Deep Green.
TO MAKE THE CARD:
Actual Size
Right Hand Panel
VARIATION:
Add some glitter dots from thestarflake sheet between the flakes.
This design was made in justthe same way but I used a DF06Usquare card and a blue and silvercolour scheme. The snowy sky
paper on the front is CreativePaper CP171S.
Place the open card mount face down on your worksurface. Cut an oblong aperture 130mm x 80mm intothe centre of the left hand panel using a craft knife.Turn the card face up and cover the panel with theChristmas words paper, trimming away the paper
over the aperture and to the edges of the card.Stick a glitter border around the aperture on both
sides. Tie the gold ribbon around the side ofthe aperture and tie in a knot onthe front of the card, trim theends as needed.
Trace the tree from the dia-gram and, with the card facedown, transfer the lines tothe centre of the righthand panel. Cover the
panel with green scrollspaper and trim as before.Carefully cut and stickpieces of the star bor-der around the treeaperture on both sides.
Cut a 1cm widestrip of Ferro paperand stick this 2cmfrom the bottom ofthe tree panel.
Stick the starborder alongeach edge and trimto size. Use the words toadd a greeting.
Cover the inside ofthe centre panel with
Ferro paper.
Stick an assort-ment of glitter
starflakes ontothe paper,
checking howthey look with
the tree panel foldedover them as you go,to get a nice effect.
17

8/21/2019 Craft Creations Magazine - Autumn 2010
http://slidepdf.com/reader/full/craft-creations-magazine-autumn-2010 18/39
A Winter’s TaleBy Pat Wellavise
18
MATERIALS REQUIRED:
Creative Paper: SR067P Winter Sky.
Glitter Paper: STG04P White.
Coloured Paper: Black, Grey, White, Light Brown,Dark Brown, Red and Silver Holographic.
Gold Label Stickers: XL321U-03 Letters and XL697U-08 Snowflakes.
Gems: GE05-01 Gold and GE05-03 Red.
Scissors and Clear Glitter Glue: GLI56.
Tracing Paper, Pencil and a Brown Pencil.
UHU All Purpose Adhesive: ADH01.
Card Mount: SF01U-30 Smooth White.
TO MAKE THE CARD:
Actual Size
Scatter small snowflakes across the sky. Use theclear glitter glue to ‘snow’ the top half of all the lettersand then add a thickish line across the top of theglitter paper.
Add a line of glitter all around the pond and a fewsmears under the reindeer then add snow to the rightof all the tree trunks and branches with a little moreunder each tree. Glue a red gem to the reindeer’s
nose and add two gold gems to the collar to finish.
Cut a piece of sky paper to 11cm deep and stickto the top of the card front. Cut the glitter paper to11cm deep, shape the top to make hills using thegreen line below and glue to the bottom of the card.
Trace all the shapes from the diagram below andtransfer them to the relevant colour paper, makingextra trees as required then cut them all out. Thepond is cut from holographic paper.
Add the trees and pond using the picture to guideyou. Add the little white piece of tail, antlers and col-lar to the reindeer, colour the hooves in brown anddraw in the eye then add him onto the card.
Stick the wording to the sky in nice flowing curves(trace the blue curve lines below, cut along the tracedline then use the shaped tracing paper to line the let-
ters up to if you cannot do this freehand).

8/21/2019 Craft Creations Magazine - Autumn 2010
http://slidepdf.com/reader/full/craft-creations-magazine-autumn-2010 19/39
Star CrackersBy Annette Hartley
19
MATERIALS REQUIRED:
Glitter Paper: STG01P Goldand STG06P Green.
Glitter Card; STG01C Goldand STG06C Green.
Plain Scrap Card.
Peel-Offs: XL409U-01 Starsand ZL604U-54 Lettering.
Tiffany Ribbon: RIB09 Gold.
Strong Thread.
Star Paper Punch: PPW110 (similar).
Craft Knife and Scissors.
Sticky Fixer Pads: ADH18.
Double Sided Tape: ADH13.
Card Mount: AP75U-49 Hammer Red.
TO MAKE THE CARD:
2cm x 8cm
3.5cm x 5cm
Glitter Paper - Coloured Side Down
Place stardust glitter paper behind the apertures,
gold in the outside ones and green in the centre, thenstick the back flap in place behind them.
Punch eight gold and six green stars from theglitter card, lay them onto the card alternating thecolours. Add a letter sticker to each star to makethe message and sticky fix them into place.
Make two green and one gold cracker as follows.Cut a piece of scrap card to 2cm x 8cm. Roll thistightly up to create a solid tube 2cm wide, and use alittle double sided tape to secure the end, see right.
Cut a piece of glitter paper to 3.5cm x 5cm and,on the back, place a line of double sided tape alongone long edge, and a 1cm length in the centre ofthe other long edge. Remove the backing from bothpieces, place the card tube onto the small piece oftape (see far right) ensuring it is central then roll up
so the glitter paper wraps tautly around the tube and
the line of tape sticks it neatly.
Wrap a piece of thread around the paper at eachend of the tube and pull tight to crease the paper in.Tie the thread in place and trim the ends close to theknot. Tie a piece of tiffany ribbon over the thread andtrim the ends neatly as shown in the photo.
Use a little double sided tape to stick the finishedcrackers diagonally onto the card and add small goldstars to decorate the tubes.
Try using ‘modern’ paper colours with white cards
for a different look, see my examples below.

8/21/2019 Craft Creations Magazine - Autumn 2010
http://slidepdf.com/reader/full/craft-creations-magazine-autumn-2010 20/39
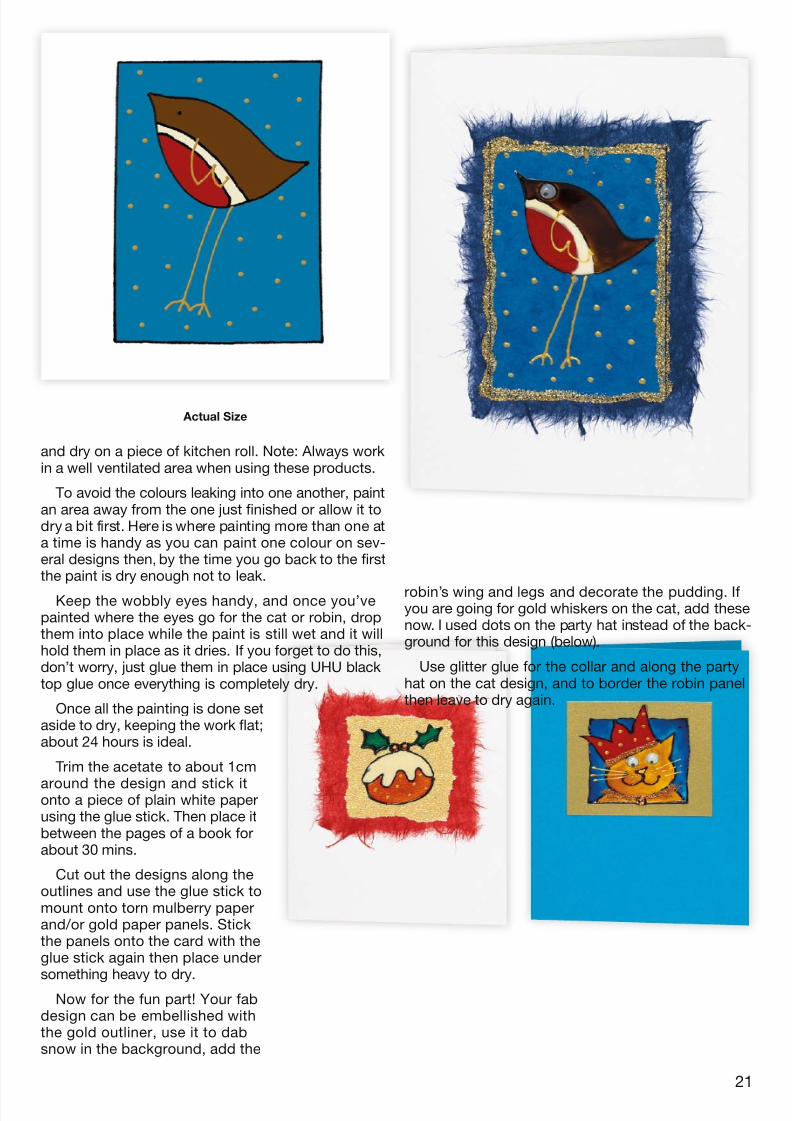
Christmas QuickiesBy Robin Lynch
20
MATERIALS REQUIRED:
Mulberry Paper: M02A4 White, M05A4 Red andM12A4 Dark Blue.
Gold Ferro Paper: F01A4.
Plain White Paper and Kitchen Roll.
Glass Paints: GPP016 Lemon, GPP019 Opaque
White, GPP024 Light Green, GPP027 Vermillion,GPP028 Brown and GPP029 Turquoise.
Outliner: GPA010 Gold and GPA009 Black.
Brush Cleaner GPA001 or White Spirits.
Fine Nozzle: TIP01 and a Fine Paintbrush.
Clear Acetate Sheet: PET01.
5mm Wobbly Eyes: TRM03.
Small Sharp Scissors.
Gold Glitter Glue: GLI44.
Glue Stick: ADH07 and Masking Tape: ADH33.
Card Mount: SF03U-27 Bright Blue, -23 DeepGreen or -30 Smooth White.
TO MAKE THE CARD:
Actual Size
Glass paints are great for making really colourfulcards. Buying a set of colours can seem quite expen-
sive but a little goes a long way. Using the outlinercan be tricky at first but practice makes perfect!
Actual Size
Place the acetate over the design you want tomake and hold in place with a little masking tape.
Note: If you are making a batch
of cards, you could do several out-lines on a strip of acetate, movethe strip up after each outline tocarefully trace again, then cutthem up after they are finished.
Use black outliner to trace thedesign, ensuring there are no gapsor the paint will leak out. Any mis-takes can be cleaned off with acotton bud.
Note: The gold outliner on each
design is added after the paintis dry. The cat’s whiskers can beblack and done at this stage (maincard above), or gold and addedafter the paint is dry (blue card).
Set the outlines aside to dry for about 45 mins,then you can start painting. Place the outline designsonto white paper while you paint them.
Use a small paintbrush to apply the paint, allow itto flow out from the brush in preference to using a
painting motion, making sure thepaint goes right up to the outliner.Clean the brush in white spirit orbrush cleaner between colours
8/21/2019 Craft Creations Magazine - Autumn 2010
http://slidepdf.com/reader/full/craft-creations-magazine-autumn-2010 21/3921
Actual Size
robin’s wing and legs and decorate the pudding. Ifyou are going for gold whiskers on the cat, add thesenow. I used dots on the party hat instead of the back-ground for this design (below).
Use glitter glue for the collar and along the partyhat on the cat design, and to border the robin panelthen leave to dry again.
and dry on a piece of kitchen roll. Note: Always workin a well ventilated area when using these products.
To avoid the colours leaking into one another, paintan area away from the one just finished or allow it todry a bit first. Here is where painting more than one ata time is handy as you can paint one colour on sev-eral designs then, by the time you go back to the firstthe paint is dry enough not to leak.
Keep the wobbly eyes handy, and once you’vepainted where the eyes go for the cat or robin, dropthem into place while the paint is still wet and it willhold them in place as it dries. If you forget to do this,don’t worry, just glue them in place using UHU blacktop glue once everything is completely dry.
Once all the painting is done setaside to dry, keeping the work flat;about 24 hours is ideal.
Trim the acetate to about 1cm
around the design and stick itonto a piece of plain white paperusing the glue stick. Then place itbetween the pages of a book forabout 30 mins.
Cut out the designs along theoutlines and use the glue stick tomount onto torn mulberry paperand/or gold paper panels. Stickthe panels onto the card with theglue stick again then place undersomething heavy to dry.
Now for the fun part! Your fabdesign can be embellished withthe gold outliner, use it to dabsnow in the background, add the

8/21/2019 Craft Creations Magazine - Autumn 2010
http://slidepdf.com/reader/full/craft-creations-magazine-autumn-2010 22/39
Cascading TreesBy Sue Walters
22
MATERIALS REQUIRED:
Creative Paper, SR113P Purple Scrolls,SR112P Purple Words and CP010G Purple with Gold.
Gold Paper: STG01P Gold Stardust.
Decorations, Such as Peel Off Stickers, Ribbons,Glitter Glue, Mini Gems, etc.
Tracing Paper and Pencil.
Craft Knife and Cutting Mat.
P.V.A. Craft Adhesive.
Card Mount: CD12U-43 Linen White.
TO MAKE THE CARD:
sheet. Cut the bottom of the strip to shapeusing the dotted lines on the diagram.
Lay the paper in place over the frontpanel, mark the top edge and trim thepaper, a little oversize to be safe, thenglue in place over the panel. Use the restof this strip to cover the third panel, shap-
ing the bottom as for the first. Trim all theedges to the card shape.
Cut a piece of word paper to 8cm x17cm and another to 8cm x 22cm, ensurethe words are the right way to go across
These trees are great fun to make, especially when it comesto ‘dressing the tree’. I couldn’t decide which creative paper
I liked best so I just made lots of them in different papers!
Trace the tree from the diagram on the following page, ignor-ing the dotted line for now. Lay the diagram over the folded cardand use tracing paper to transfer the lines to it.
With the card folded, cut the notches down both sides ofthe tree and cut away the lower part to make the trunk, goingthrough all the layers at once. Cut the top of the tree goingthrough the back panel and left hand side of the second panel.
Cover the tree using paper of your choice. For the main cardI’ve used different purplesas follows. Cut a 2cm stripof the purple/gold paperand cover the front(when folded) ofthe trunk on each
panel, trimmingthe paper neatlyto the card at thebottom and sides.
Cut a 1cm widestrip of gold Star-dust paper andstick a piece alongthe top edge ofthe paper alreadyon the trunk oneach panel.
Cut a strip ofpurple scroll paper,8cm wide, fromone edge of the

8/21/2019 Craft Creations Magazine - Autumn 2010
http://slidepdf.com/reader/full/craft-creations-magazine-autumn-2010 23/3923
VARIATIONS:
Actual Size
The grey version (previous page) usesthe same papers as the purple, althoughthe scrolls and words are reversed. I’vedecorated it in a more simple way with
silver glitter, silver gems and peel offsnowflakes in colour 64 to give a
pretty hint of colour.
Using the same paper on each
panel works well too(right). I’ve stuck withsimple white snow-flakes to tie in withthe paper and ac-cented it with silversticker dots.
For the blue andwhite card(below) Iused the
shape of the tree top fromthe diagram to cut ‘branches’to shape, these are stuckin alternate colours to eachpanel.
The two tone blue one(on the previous page) usesthe same idea as the lastone but I cut each pair of‘branches’ down the centre.These are placed down thetree with pale blue on the
left and the darker blue onthe right. This gives a morerandom effect than just stick-ing the paper on the treewith a join down the centre.
the tree. You can select a part of the sheet to make particular words appear on thefront or inside if desired but it does look fine just used randomly too.
Cut the bottom edge of both panels as before and cover the second and fourthpanels, trimming neatly as before.
Now all there is to do is decorate the tree, this one uses gold glitter glue takendiagonally across on all the layers. The gold ribbon bows are placed three onthe back panel, two on the next 2 panels and just one on the front panel.It’s finished off with tiny star gems (GE03) in gold and purple, and
a few glitter peel off dots.
8/21/2019 Craft Creations Magazine - Autumn 2010
http://slidepdf.com/reader/full/craft-creations-magazine-autumn-2010 24/39
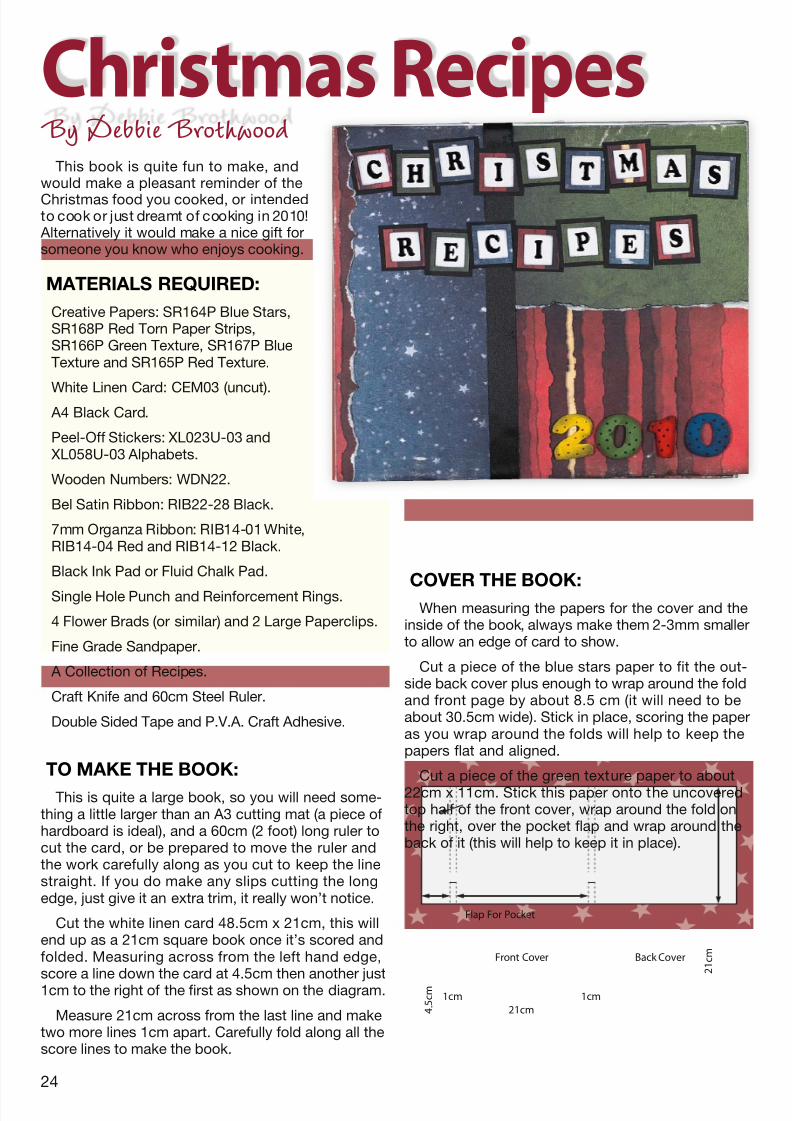
Christmas RecipesBy Debbie Brothwood
24
MATERIALS REQUIRED:
Creative Papers: SR164P Blue Stars,SR168P Red Torn Paper Strips,SR166P Green Texture, SR167P BlueTexture and SR165P Red Texture.
White Linen Card: CEM03 (uncut). A4 Black Card.
Peel-Off Stickers: XL023U-03 and XL058U-03 Alphabets.
Wooden Numbers: WDN22.
Bel Satin Ribbon: RIB22-28 Black.
7mm Organza Ribbon: RIB14-01 White,RIB14-04 Red and RIB14-12 Black.
Black Ink Pad or Fluid Chalk Pad.
Single Hole Punch and Reinforcement Rings.
4 Flower Brads (or similar) and 2 Large Paperclips.
Fine Grade Sandpaper.
A Collection of Recipes.
Craft Knife and 60cm Steel Ruler.
Double Sided Tape and P.V.A. Craft Adhesive.
TO MAKE THE BOOK:
This is quite a large book, so you will need some-thing a little larger than an A3 cutting mat (a piece ofhardboard is ideal), and a 60cm (2 foot) long ruler tocut the card, or be prepared to move the ruler andthe work carefully along as you cut to keep the linestraight. If you do make any slips cutting the longedge, just give it an extra trim, it really won’t notice.
Cut the white linen card 48.5cm x 21cm, this willend up as a 21cm square book once it’s scored andfolded. Measuring across from the left hand edge,score a line down the card at 4.5cm then another just1cm to the right of the first as shown on the diagram.
Measure 21cm across from the last line and maketwo more lines 1cm apart. Carefully fold along all thescore lines to make the book.
This book is quite fun to make, andwould make a pleasant reminder of the
Christmas food you cooked, or intendedto cook or just dreamt of cooking in 2010! Alternatively it would make a nice gift forsomeone you know who enjoys cooking.
4 . 5
c m1cm 1cm
21cm
2 1 c mFront Cover
Flap For Pocket
Back Cover
COVER THE BOOK:When measuring the papers for the cover and the
inside of the book, always make them 2-3mm smallerto allow an edge of card to show.
Cut a piece of the blue stars paper to fit the out-side back cover plus enough to wrap around the foldand front page by about 8.5 cm (it will need to beabout 30.5cm wide). Stick in place, scoring the paperas you wrap around the folds will help to keep thepapers flat and aligned.
Cut a piece of the green texture paper to about22cm x 11cm. Stick this paper onto the uncoveredtop half of the front cover, wrap around the fold onthe right, over the pocket flap and wrap around theback of it (this will help to keep it in place).

8/21/2019 Craft Creations Magazine - Autumn 2010
http://slidepdf.com/reader/full/craft-creations-magazine-autumn-2010 25/3925
THE INSIDE OF THE BOOK:
Open the book and cut a piece of blue texturepaper to fit neatly onto the inside front cover (about21cm square). Stick a 1cm strip of the green paper tothe middle folded section of the book, and a piece ofthe red texture paper to cover the inside back panel(about 21cm square).
Cut a piece of the red stripe paper to about 22cm x12cm. Tear along the top edge of the paper to leaveabout 10.5cm. Always tear with the right side facingup, as this allows the white of the paper to be visible.
Run the black ink pad along the ripped edge of thepaper to ‘age’ it before attaching it to the bottom ofthe front cover, wrapping around the fold and pocketas before.
Cut an 80cm length of black ribbon, centre it verti-cally on the front of the book, overlapping where allthe papers meet. Stick it in place leaving the endsfree for now.
There is no need to be too exact with the dimen-sions for the wording panels, they are placed roughlyand look fine with slight differences in size.
Take a spare piece of the white linen card and cuta 17mm strip from it. Mark out and cut sixteen 14mmwide pieces from the strip. Ink all the edges of thesewhite panels.
Cut 22mm strips from each of the red, green andblue papers used on the front cover. Mark out andcut 19mm wide pieces from these strips, you will
need six red and five each of blue and green. Cut a
27mm strip from the black card and make sixteen24mm wide panels in the same way. Glue a colouredpaper panel to each of the black panels then a whitepanel on top.
Starting with a red panel, then green, then blue adda peel off capital letter to each, to spell out ‘CHRIST-MAS RECIPES’ alternating the colours throughout.
Lay the letter panels on the front of the book to judge the spacing, make sure you leave just a littleextra space at the left of the ‘C’ of ‘Christmas’ for thetorn strip to be placed later (see close up picture left),then when you are happy, glue them all in place.
Ink the wooden numbers ‘2010’ a little, then fix tothe bottom right of the book.
Cut a piece of red stripe paper to about 6 cm wideand tear along one of the long sides, ink the tornedge and attach along the fold of the book with just1 cm of the ripped edge showing on the front. Wrapthe rest around the fold and onto the back panel.
Approximately Actual Size

8/21/2019 Craft Creations Magazine - Autumn 2010
http://slidepdf.com/reader/full/craft-creations-magazine-autumn-2010 26/3926
CREATING THE RECIPES:
Search your own recipe collection and copy out or photo-copy your favourites, alternatively search the Internet forrecipes, as I have done. Each recipe for the back of the frontpanel needs to fit onto an 18cm wide x 20cm long piece ofpaper when printed out, with the heading or the first line ofprint at 5cm from the top of the page, as that part is hidden
underneath the flap.
Shorter recipes, or those on a theme (perhaps drinks) canbe printed and cut to any size as these are simply clippedonto the book. Some recipes using a smaller font size can beadapted to fit onto tags. Print a draft copy first, then once
COMPLETING THE BOOK:
Measure and punch out 4 equally spacedholes down the centre of the flap on the frontpanel. Cut all your recipe pages to the samesize, position one centrally under the flap andmark through the holes onto the paper.
Punch holes through all of the recipesa few at a time, re-marking the holes asneeded and then line up under the flap andpush a brad through all the holes. Open thebrads at the back of the recipes and coverthe top of the back sheet where it fits behindthe flap with double sided tape. Fold thepanel into place and press firmly to stick.
Tie the loose ends of the ribbon over therecipe pages. Use the paperclips to secure
the other recipes to the back section of thebook and slip the tags into the pocket.
Lightly sand all over the book using a finegrade sandpaper and ink or chalk/ink theedges and creases to create a ‘used’ look.
To create the pocket on the back panel, cut a piece of redstripe paper to about 20.5cm x 7cm. Tear the top edge andink all edges. Add a thin strip of double sided tape to theinside edges of all but the ripped edge, line up againstthe sides and bottom of the page trimming as necessary,and stick down. Use peel-off letters to create the words onthe pocket, randomly spaced out and at varying angles toeach other.
Make five tags with the left over white card, centrally punch
a hole through the top of each tag, add a reinforcing ringto the front and back of the punched hole. Thread and tie adifferent colour ribbon through each of the holes.
you are sure of the fit print straight onto cre-ative paper, cut to size and stick to the tags.I ripped the top of my tag recipes, just to adda little interest.
Approximately Actual Size
Actual Size

8/21/2019 Craft Creations Magazine - Autumn 2010
http://slidepdf.com/reader/full/craft-creations-magazine-autumn-2010 27/39
Wall HangersBy Eileen Goodwill
27
MATERIALS REQUIRED:
Old Christmas Cards With Clear, Bright Images.
Pieces of Plain Card, White, Cream, Gold and Silver are Useful.
Selection of Ribbons in Colours to Match.
Stickers and Gems.
Hole Punch.
Craft Knife and Cutting Mat.Ruler.
P.V.A. Craft Adhesive.
TO MAKE THE CARD:
These wall hangers were made with my recycling hat on, I used oldChristmas cards and a few bits and pieces to make them and they really
are eye-catching.
Many of the Christmas cards you can buy or thosethat you receive are far too lovely to display for sucha short while and this idea makes use of them in asimple and attractive way.
These hangers have panels of plain card cut toabout 12cm square, each is decorated with a mainmotif cut from an old card and smaller motifs aroundthem or coloured stickers, the kind you can easilypick up from stationery shops.
If your motif is a bit small or plain add impact bygiving it a background, like the Father Christmas onmy hanger, he has been mounted on acircle then onto two panels of card witha little ribbon loop decoration.
Simply use the hole punch to make
holes in each panel, make sure theyare in the same position on each panelso they line up with each other, and tiethem together with ribbon.
Adding a shaped top makes it lookgood and using a contrast colour forthe top works well too.
Many cards have small images on littlesquare or round backgrounds,using morethan one of these on a panel with a fewpretty stickers can look really good.
My smaller, round hanger has beads and abell at the bottom, the panels are made from abag of offcuts and the motifs all came from oneChristmas card, so it was easy to put together.

8/21/2019 Craft Creations Magazine - Autumn 2010
http://slidepdf.com/reader/full/craft-creations-magazine-autumn-2010 28/39
Pretty PoinsettiasBy Anita Easton
28
MATERIALS REQUIRED:
Creative Paper: SR106P Red Words.
Dotty Paper: CDG160P (similar).
Gold Mirri Card: MIR01C.
Scrap of Thin Card.
Gold Ribbon: RIB12-01.
Organza Ribbon: RIB14-15 Burgundy.
Gold Button, Needle and Thread.
Tracing Paper and Pencil.
Craft Knife or Scissors.
Double Sided Tape: ADH13.
Mini Fixers: ADH18.
P.V.A. Craft Adhesive.
Card Mount: SF06U-46 Hammer Cream.
TO MAKE THE CARD:
I love the layers of these flowers andhow the different papers work together to
make the whole. Use a smart gold buttonin the centre for added impact.
Stick a line of double sided tape along one longedge on the back of the gold Mirri card. Cut two
3mm wide strips from this edge so that you have twosticky gold strips. Use this to make the border aroundthe card front 5mm in from the edges.
Stiffen the wording paper and the dotty paper bygluing to a piece of scrap card, you won’t need thewhole sheet, just enough to make the leaves. Placeunder something heavy for a short while to keepthem flat while the glue dries.
Trace the three leaf diagrams and transfer them tosome scrap card. Cut out these shapes to use astemplates.
Place the large leaf template onto the stiffenedword paper, and position it so the words go downthe length of the shape rather than across it. Drawaround it to make the first leaf shape then move itand draw five more shapes in the same way.
Next, use the smallest leaf template on the wordpaper to make the six small leaves in the same way.Place the medium template onto the dotty paper andmake six medium leaves.
Cut a rough circle, about 4cm diameter from scrap
card and make a couple of holes in the centre, about8mm apart, using a needle or pricking tool. Place thecard circle on the centre of the card front (don’t fix itin place) and assemble the large leaves onto it, keep-ing the two punched holes clear.

8/21/2019 Craft Creations Magazine - Autumn 2010
http://slidepdf.com/reader/full/craft-creations-magazine-autumn-2010 29/3929
VARIATIONS:
Actual Size
Lightly curve the leaves by bending along a pencil,or similar. Use glue or double sided tape to stick theleaves to the circle, equally placed around it with therounded ends to the centre. The tips of the leavesshould be close to, or just crossing over the goldborder, but still fit within the card panel.
Use an 18cm length of burgundy ribbon to make aloop going from the bottom left corner to the centreand another length to make a loop from the top rightback to the centre sticking them to the circle of card.
Use 14cm lengths of gold to make a smaller loopover the top of each of the burgundy loops, and anextra two at the other two corners of the card.
Note: There is no need to assemble on the cardmount to work on the inner sets of leaves.
Make a circle of dotty leaves over the large leaves,curving as before and securing in place with minifixers to add depth. Add four loops of gold ribbonover this ring of leaves in about the same positions
as the four on the fist layer, securing them to theleaves near the centre. Arrange the small word leavesover this, curving and using mini fixers as before.
Use a needle and thread to stitch the button tothe card circle. Tape one end of the thread to theback of the circle, take the needle up through onehole, through the button and down through thesecond hole. Draw the thread as tight as needed to
make a secure flower centre and tape the thread endto the back of the circle again. Glue the assembledflower firmly onto the card to finish.
Left and previous page: Keeping with traditionalChristmas colours I used a mix of red and greenpapers and added some green organza ribbon too.The colour changes make quite a difference to the
look of the design.
Above: This one uses a modern colour scheme oflilac and grey which is very popular at the moment. Adding peel off borders to the ribbon gives them alovely bit of sparkle.

8/21/2019 Craft Creations Magazine - Autumn 2010
http://slidepdf.com/reader/full/craft-creations-magazine-autumn-2010 30/39
Slider StickersBy Marian Chivers
30
MATERIALS REQUIRED:
Creative Images: CIM217A Victorian Girls & Snowman.
Creative Borders: CB019PPale Blue Christmas.
Creative Paper:SR067P Wintry Sky.
Pearl Card: CNT107C Redand CNT103C White.
Mirri Card: MIR02C Silver.
Gold Label Peel Offs:ZL649U-82 Rope Borders.
Red/Gold Ribbon.
2 Small Christmas Trees.
Clear Glitter Glue: GLI56.
Sticky Fixers: ADH05.
Double Sided Tape: ADH13.
Hole Punch and Embossing Tool.
Craft Knife, Cutting Mat and Ruler.
1mm Deep Mini Fixers: ADH27.
Card Mount: DEC6C-103 White Pearl.
TO MAKE THE CARD:
1a. Lay the card open and face down. On the lefthand panel, mark two rectangles measuring 57mm x74mm, positioned 10mm from each edge as shown.If you have marked it all correctly there will be a
10mm gap between them in the centre too.1b. Use a ruler and embossing tool to score the lefthand end of each oblong (red line). Use a knife andruler to cut the other three sides of both panels.
1c. Emboss another fold line exactly half way acrosseach panel as shown (blue dashed line). Push bothpanels through to the front a little.
2. Turn the card over keeping the cut-outs to the left.Fold both of the scored lines on each panel to makelittle hills and leave them folded for now.
10mm
10mm
10mm
1 0 m m
mm
Score
Score
Push Through
mm
m m
core
Score
Score
Push Through
1a
2
3a
3b
1b
1c

8/21/2019 Craft Creations Magazine - Autumn 2010
http://slidepdf.com/reader/full/craft-creations-magazine-autumn-2010 31/3931
Sky Paper
on Back
3a. Cut two pieces of white card to 10cm x 5cm.Score and fold one end of each up at 1cm from theedge. Unfold and add a strip of double sided tape tothe folded end. Place the folded end through oneaperture under the ‘hill’ folded flap.
3b. Make sure the strips are central in the apertures,peel off the tape backing and stick to the flaps.
4. Cut a piece of sky paper to 90mm x 140mm and
stick to the inside back panel placing it centrally fromtop to bottom and 12mm from the right hand edge.This allows it to show behind the apertures once thecard is folded, except for a 2mm strip at the rightedge, to keep it clear of the sliders. This 2mm gap isnot visible when the card is assembled.
4
Inside of
Card
5
6
5. Work on the back of the front panel making sureno tape is placed in the way of the sliders at the leftedge. Place tape along the three edges of the panelas shown. Use a 1mm deep mini fixer at the edge ofthe card between the apertures as shown and add astrip of tape along next to it. Place another strip tothe right of the apertures and add a couple of stripsto fill in the open area to the right as shown.
Make sure the flaps are unfolded as shown in dia-gram 5, before folding the back panel over ontothe tape pressing it firmly to seal.
6. With the card face up, fold the ‘hill’flaps back up, which will push the sliderends out. Punch a hole in the centre ofeach slider close to the end.
Use the photo on the right toguide you as you complete the card.Cut a 7cm length of ribbon and placedouble sided tape along half of it. Push one endof the ribbon through the hole, remove the backing
from the tape.Press the twoends of ribbonneatly togetherand trim.
Place a stripof holly borderacross eachslider just below
the punchedhole. Add a stripof rope border on both sides and trim all neatly to theedge of the slider. Press all pieces as flat as possibleso they don’t catch as the strip slides in and out.Stick a strip of rope border around both apertures.
Cut two panels of red card to 65mm x 85mm andtwo silver panels to 55mm x 75mm. Stick the silverto the red and place a large sticker in the centre ofeach. Stick one to each of the bottom halves of thefolded flaps.
Cut the Happy Christmas border so you have oneset of words with a dot at each end and stick this toa piece of silver card. Cut around it to leave a 2mmsilver border. Stick this to a piece of red card andtrim around it to leave a 2mm red border. Make an-other in the same way.
Fold the flaps so the picture panels stand up andsticky fix the word panels onto the sky paper 10mmfrom the lower edge of the apertures, the bottom ofthe picture panels will tuck neatly behind these tokeep the panels in the upright position.
Place a holly border 15mm in from the fold andadd a rope border each side, trimming all of these tothe edge of the card.
Stick one of the small Victorian stickers to silvercard and trim around it to leave a 2mm silver bor-der. Mount onto red card and trim to leave a 2mmred border. Sticky fix this panel over the centre ofthe holly border as shown.
Add a small tree over the border on both sidesof this panel, if you don’t have anything similar
you could used glitter stickers on acetateand mount using sticky fixers for depth.
Add some sparkle by using a l itt leclear glitter on the snow and the
fur trims on the coats of the girls.

8/21/2019 Craft Creations Magazine - Autumn 2010
http://slidepdf.com/reader/full/craft-creations-magazine-autumn-2010 32/39
Striped StockingsBy Elizabeth Sangster
32
MATERIALS REQUIRED:
Mirri Paper: MIR06P Red and MIR09P Green.
Pearl White Paper: CNT103P.
Gold Label Peel Offs: XL410U-02 Wording and XL170U-02 Borders.
Silver Thread: MDM342.
Tracing Paper, Pencil and Scissors.
Craft Knife, Ruler and Cutting Mat.
Masking Tape: ADH33.
Double Sided Tape and Mini Fixers.
Card Mount: DF04U-45 Hammer White.
TO MAKE THE CARD:
1
4
7
5
8
10
11
2
3
6
9
12
These are very quick to make once you get goingand you can use different colour papers, mounts etc.
to ring the changes. I made over 50 of these for lastChristmas.
Trace the stocking outline from the diagram below,
transfer it to the centre panel of the card, positioningit low, and making sure the toe points to the rightwhen looking at the front of the card. Carefully cutaway to leave a stocking shaped aperture.
Place the card face down over the magazine, align-ing the aperture over the diagram, use a little maskingtape to hold it in place.
Cut a 25mm wide strip of the red, green and whitepaper from each sheet and fold in half lengthwise.
Place a strip of the double sided tape around the
stocking shaped aperture andremove the backing.
Begin at the top of thestocking using a red strip.Place the folded edge ofthe paper along line 1 withabout 7mm overlapping ateach end, press onto thetape and snip the ex-cess off, save it touse later.
Use agreen stripto coverthe nextsegment, Actual Size
pressing it onto the tape to stick and trimming in thesame way. The third segment is covered with a whitestrip which is taped and trimmed as before.
The rest of the stocking is worked in the sameway alternating between red, green and white. Onceall the segments are covered, use a strip of doublesided tape around the back of the stocking andaround all four edges of the back panel, remove thebacking and fold the flap closed.
Edge the aperture with the silver border takingit neatly around theshape and then addthe wording. Stick twoholly leaves onto greenpaper, cut to the stickeredge and mount usingmini fixers adding a dotto the centre.
Cut off three 15cmlengths of silver thread,
tie a knot roughly in thecentre and stick firmlyto the top of the stock-ing so that the strandshang down.

8/21/2019 Craft Creations Magazine - Autumn 2010
http://slidepdf.com/reader/full/craft-creations-magazine-autumn-2010 33/39
Medallion MotifsBy Linda Spivey
33
MATERIALS REQUIRED:
Creative Papers and Tags: SR102P Cream,CP004G Red/Gold and CP006G Green/Gold,SR063P Red/Green and SRT06P Christmas Tags.
Scrap Piece of Card.
Gold Label Peel Offs: XL566U-01 Wording and XL409U-01 Happy Christmas.
Red Bow: BOW71-05.
Star Gem: GEM12 (Assorted Pack).
Gold Pen, Tracing Paper and Pencil.
Scallop Shape Scissors: SCI18.
Scissors or Craft Knife.
Sticky Fixers and Double Sided Tape.
Card Mount: SF01U-68 Europa Ivory.
TO MAKE THE CARD:
Cut 2 strips of green/gold paper to 2cm x 21cmand 2 strips of red/gold to 1.5cm x 21cm. Trim onelong side of each strip with the scallop scissors.
Stick these strips to the edges of the card front,start with the green placing the straight side on theouter edges.
Add the red strips over the top of the green onesaligning the scallops.
Cut a strip of green/gold paper to 7.5cm x 21cm,trim the long edges with the scallop scissors, stick inthe centre of the card front then use a knife and rulerto cut all the strips to the edges of the card.
Trace the medallion shapes using the black lineson the diagram, transfer them onto some scrap cardand cut out. Use these as templates for the design.
Place template 1 onto the cream paper positioningit so the words are straight when a point is at the top.
Use the gold pen to carefully draw around the tem-plate and cut it out to the outside of the gold line.
Do the same for the other shapes placing numbers2 and 4 on red paper and 3 on green. Cut shape 5from the red/green stripe paper.
Stick these shapes in numerical order onto thecard front using sticky fixers between each layer andglue a red star gem on the top.
Add the tag below the medallion using sticky fixersand glue a bow into the corner. Add the gold sticker
wording to the tag and above & below the medallionas shown.
This design also works well in other colours ordifferent pattern papers, try purple with silver or coolblues and white/silver papers.
1 2
3
4
5
Actual Size

8/21/2019 Craft Creations Magazine - Autumn 2010
http://slidepdf.com/reader/full/craft-creations-magazine-autumn-2010 34/39
Star TwistsBy Linda Lacey
34
MATERIALS REQUIRED:
Creative Papers: SR065P Dark Snowflakes andSR066P Light Snowflakes.
Stardream Card: STD01C Silver.
Plain White Card and Pearl White Paper.
Gold Label Peel Offs: XL700U-02 Star Bordersand ZL524U-59 Wording.
Creative Borders: CB007P Blue Christmas.
Silver Glitter Glue: GLI46.
Tracing Paper and Pencil.Ruler and Embossing Tool.
Craft Knife and Cutting Mat.
Sticky Fixer Pads: ADH05.
P.V.A. Craft Adhesive: PVA01.
Card Mounts: HG01U-43 Linen White x 2.
TO MAKE THE CARD:
Cover the front panel of one card in the dark snow-flake paper and the front panel of the other in lightsnowflake paper.
Place the two cards back to back, making surethe covered ends are together and the edges areperfectly aligned. Tape them together with a littlemasking tape. Trace the stars, the centre line aboveand below the stars (shown white) and the top andside edges of the card from the diagram, using aruler to keep the lines perfectly straight.
With the dark snowflake card facing up, align the
tracing with the top and open side edge of the righthand (covered) panel and tape in place. Using asharp craft knife and ruler, cut just the right half of thestar through both cards (shown red on the diagram).Begin each cut at the inner point of the line each timeand make sure you don’t cut past the outer points asit will show on your card.
Carefully remove the tracing and keep it to oneside. Separate the cards and cut away the half-starfrom the dark card only, cutting from the top pointto the dip at the centre using a knife and ruler.
Turn the pale card face down, place the ruleralong the edge of the half-star, make sure it is per-fectly aligned and emboss a line above and belowthe star, but not through the star, as shown by thewhite line on the diagram.
Keeping the card face down, place the tracing onthe left hand panel, align it with the left edge of thecard and mark where the centre line comes at the topand bottom. Emboss a line down the card on thesemarks. Keep the tracing aside for later. Fold the palecard along the centre then fold the ends up to makea concertina shape, the half-star is not folded.
Unfold the card and glue the back of the smallfront panel (the one with the hole from the star cut-out). Hold the two cards back to back again, slip thehalf-star through the hole in the dark card and placethe covered ends together to stick. Align them verycarefully and ensure the star holes line up too.
Once the glue is dry enough that there is no move-ment, glue the small panel at the far end of the palecard and stick to the other end of the dark card, alignthe edges carefully once again. Fold the card and
gently flatten along all the fold lines.Cut a piece of the white card to 12cm square and
another to 11cm square, cover the large one in darksnowflake paper and the small one in light snowflakepaper on one side only.

8/21/2019 Craft Creations Magazine - Autumn 2010
http://slidepdf.com/reader/full/craft-creations-magazine-autumn-2010 35/3935
Place the star tracing over a piece of silver card,tape lightly in place and cut along the outer lines to
Actual Size
Top Of Card
make a large silver star. Place the tracing over thedark square, tape in place and cut out the middle
size star. Place the tracing over the smallsquare and cut out a small star.
Glue the back of the large silver star andstick in place on the card, aligning the edgeswith the half-star already on the card.
Use sticky fixers to layer the dark blue starcentrally over the silver one and add the palestar on top.
Unfold the card and cover the back halfpanel with the light snowflake paper. I haveprinted a verse on some pearly paper to fit onthe other half of this panel, stick this in placenow if you are doing the same and add a blueborder sticker down both edges of the panel.
Use the star border to go around the edgesof the card front and add the greeting to thetop corner.

8/21/2019 Craft Creations Magazine - Autumn 2010
http://slidepdf.com/reader/full/craft-creations-magazine-autumn-2010 36/39
Singing SnowmenBy Glynis Clark
36
MATERIALS REQUIRED:
Snowman Découpage Paper: DC226.
Clear Glitter Glue: GLI56.
Pencil and Ruler.
Scissors and Craft Knife.
P.V.A. Craft Adhesive.
A4 Card: REG02 Creative Smooth White.
TO MAKE THE CARD:
1
3
4
2
1. Roughly cut out all four snowmen imagesfrom the sheet, using a ruler to keep theedges of the snow straight at the sides andbottom. Then roughly trim away bits fromeach group as shown in diagram 2.
2. Place the sheet of A4 card asshown, spread a thin layer of glueover the back of each picture andstick to the card as shown. Startwith snowmen 1 at 9cm from thetop and 1cm from the left side as
shown. Stick the others in placealong the edges of the card. Meas-ure and mark the tabs on images 1, 2 and 3 as shown.
Cut all the images out, using a ruler to keep thetabs nice and straight and trimming neatly to theimage edge this time, take care around the postsas they may be a bit weak, add extra card behindthem if this is the case.
3a. Begin with snowmen group 1. Score both sidetabs at the edge of the snow (9cm from each end).
Fold one side over
the image and scorethe tab again in linewith the centre ofthe carol book. Foldthe tab back on
itself then score and fold this part in half again asshown below.
3b. Fold the other side in, score where it meets thefirst tab (in line with the fold in the book) and do thesame for the other side. Unfold the last fold on each
side (see tabs shown darker in the diagram).3c. Snowmen 2 go to the left of group ‘1’, fold thetab forward where it joins the snowman, unfold andfold forward at the end of the snow as shown. Gluethe tab on ‘1’ (shown darker) and stick ‘2’ in placealigning the red lines. Do the same with snowmen 3using the green lines for alignment. Your card shouldlook like diagram 4 at this point.
Lay snowmen 4 on the top, line up the bottomedge and mark the top of the snow on the tabsbeneath. Cut the tabs to shape so they won’t show
on the front. Glue the tabs and press snowmen 4 intoplace. Gently push the two sides together slightly tostand the card for a lovely 3D effect.
Add sparkle to the finished card with a little clearglitter on all the snow, the bobbles on the hats and
the lampposts. Note: This cardwill fit into an ENV07 envelope.

8/21/2019 Craft Creations Magazine - Autumn 2010
http://slidepdf.com/reader/full/craft-creations-magazine-autumn-2010 37/39
Elegant StarsBy Thea Kentish
37
MATERIALS REQUIRED:
Paper: Stardream STD01P Silver and Stardust STG07P Blue.
Gold Label Peel Offs: XL500U-02 Straight Borders and XL703U-02 Narrow Borders.
Silver Gems: GEM50 and GEM70.
Fine Blue Pen, Tracing Paper and Pencil.
Craft Knife, Cutting Mat and Ruler.
Double Sided Tape: ADH13.
Card Mount: SF08U-56 Textura Ivory.
TO MAKE THE CARD:
18mm
1
2
3
4
5
6
Back View
Actual Size
2
3
1
Cut a piece of blue paper to 7cm x 15cm and stick to the front ofthe card leaving an equal border to the top and sides. Draw a fineblue line about 1mm out from the paper and stick a medium widthborder 1mm out around the line.
1. Cut four small triangles and one each of the other two sizes, use aknife and ruler when cutting all the pieces to keep the lines straight.
Place a strip of double sided tape along the short edge of the bluepaper, on the back. Trim a 3mm wide strip from this edge to make a
sticky blue strip. Stick a piece of the strip along the short edge of thetwo larger triangles and along any edge of the other four, all at about2mm from the edge. Leave the trimming until you have added a peeloff border above and below the blue then snip them all off at once.
2. Place each triangle so the blue strip is on the back at the bottomedge and stick a piece of double sided tape to the left half of theback of each one.
3. Stick the large bottom triangle in place, about 1cm from the bot-tom of the panel making sure the top, flat edge is level. Make asmall pencil mark on the card exactly half way across this edge and
another 18mm down the left edge. Fit the lefthand triangle in, tucking the right edge underthe left half of the first triangle and using thetwo pencil marks for alignment. The bluestripe should be on the right as shown. Addthe other triangles in numerical order tuckingeach into the previous one and in the posi-tions shown so the blue strips go in a spiral.
Add two small silver gems between each ofthe blue strips and a larger onein the centre of the star.
I have printed my greeting onthe computer before startingthe card, you could do thesame, use a stamp or use asticker.

8/21/2019 Craft Creations Magazine - Autumn 2010
http://slidepdf.com/reader/full/craft-creations-magazine-autumn-2010 38/39
Fun FoilsBy Nicki Brixey
38
MATERIALS REQUIRED:
Silver Foil Sheets: MF002.
Shaded Blue Card: PK474 Bt. Rainbow.
Silver Paper.
Scrap of Silver Holographic Card.
Glitter Glue:GLI46 Silver and GLI51 Blue.
Silver Pen: WRI18.
Tracing Paper and Pencil.
Embossing Tool and Scissors.
Masking Tape: ADH33.
Sticky fixer Pads: ADH05.
P.V.A. Craft Adhesive.
Card Mount: DEC6U-45 Hammer White.
TO MAKE THE CARD:
These cards are made using sheet foiland, although this is quite expensive, you
get lots of small motifs from each sheet, soit works out very cost effective for a batchof cards and they are great fun to do.
Actual Size
Cut a piece of silver paper to 70mm x 75mm withrough edges or trace mine from the picture below.Glue the panel to the card frontabout 20mm from the top andcentral sideways.
Cut a piece of the rainbowcard to 55mm x 60mm using
the part that goes from purpleto blue, and glue to the centreof the silver panel.
Add a flourish of glitter dotsfrom the top left to the lowerright, see the main photo, mak-ing some silver and some blue.
Add a trunk of silver glitter inthe centre of the blue panel,begin about 1cm into the blueand take it to 1cm below thesilver panel. Set aside to dry.
Trace the star, tree and potoutlines from the picture onthe right, add the scrolls if you
prefer not to do these free hand. Transfer the starto the holographic card, cut out and mount using asticky fixer at the top of the silver panel.
Transfer the pot to the silver foil and cut out. Thiscuts easily with craft scissors, though I use an oldpair not my best. Stick the pot over the trunk with the
top point over the panel and asmall gap between the paneland pot on the right.
Place the tree tracing overthe foil and emboss the outline.
Take the tracing off the foiland turn the foil over. Align thetracing to the embossed lineand hold in place with a littlemasking tape.
Place on a soft surface suchas a folded towel and use theembossing tool to emboss thepattern lines or draw freehandscrolls inside the outline.
Remove the tracing and cutthe tree just outside the em-bossed outline. You can rein-force the outline once the treeis cut out if necessary. Stick in

8/21/2019 Craft Creations Magazine - Autumn 2010
http://slidepdf.com/reader/full/craft-creations-magazine-autumn-2010 39/39
VARIATIONS:
You can make the whole set of these Christmas foils usingthe actual size pictures shown here, and there’s even one for Valentine’s day for those who like to prepare early.
place with sticky fixers in the centre, allowing the sides totouch the card. Use the silver pen to add the greeting, or useglitter glue or peel offs as I have in the designs on this page.
a soft colour overthem, use chalk witha pad of cotton woolto apply. It gives a lit-tle white around the
Actual Size
Actual Size
Actual Size
The string is a piece ofgold cord and the large‘Noel’ is hand writtenusing red glitter paint.
The red foil is good
for Valentine’s day too,simple concentric heartsembossed on the motifworks well and the swishof red glitter dots is givenmore impact by adding
Using a bit of ribbon works well behind thisgold tree and I’ve added glitter stars amongthe pearly paint drops.
The bauble is a simple and fun variation,I’ve used glass paint inside a tulipglitter outline for the holly leaves but
you could use green foil just as easily.