CPMO
108
1 | Page Contents Task One Introduction to the Garment Industry 6 History 6 First industrial Revolution Second Industrial Revolution Third Industrial Revolution World Trade in the Garment Industry Today (i.e. The Post-Quota Era) 8 Introduction Impact of Quota Elimination on Global Trade Factors that effect the Garment Industry at a Global Level 15 Global Positioning of the Garment Industry 20 Sizing in the Garment Industry 22 History Need for Size and Fit Spec Development Process Consumer Perception of Apparel Fit Role of Size and Fit in Consumers Decision Making Process Role of Size and Fit Skills in Apparel Retailing Terms, Definitions and Body Measurement Procedures Pattern Making 28 Introduction History Process Types of Pattern making in Garment Manufacturing Pattern making Technique Contents of Paper Patterns Pattern Grading 35 Introduction Shrinkage Incorporation in Pattern Grading
-
Upload
yogesh-sharma -
Category
Documents
-
view
47 -
download
0
Transcript of CPMO

1 | P a g e
Contents
Task One
Introduction to the Garment Industry 6
History 6
First industrial Revolution
Second Industrial Revolution
Third Industrial Revolution
World Trade in the Garment Industry Today (i.e. The Post-Quota Era) 8
Introduction
Impact of Quota Elimination on Global Trade
Factors that effect the Garment Industry at a Global Level 15
Global Positioning of the Garment Industry 20
Sizing in the Garment Industry 22
History
Need for Size and Fit
Spec Development Process
Consumer Perception of Apparel Fit
Role of Size and Fit in Consumers Decision Making Process
Role of Size and Fit Skills in Apparel Retailing
Terms, Definitions and Body Measurement Procedures
Pattern Making 28
Introduction
History
Process
Types of Pattern making in Garment Manufacturing
Pattern making Technique
Contents of Paper Patterns
Pattern Grading 35
Introduction
Shrinkage Incorporation in Pattern Grading

2 | P a g e
Shrinkage
Shrinkage Adjusting
Task Two
Pre-production: Fabric Selection 39
Introduction
General Consideration of Fabrics
Fabric Identification for Garment
Pre-production: Fabric Relaxation 42
Pre-production: About Fibers, Yarns and Fabrics 42
Fibers
Yarns
Fabrics
Pre-production: Fabric Inspection 53
Introduction
General Inspection Procedures
Fabric Inspection Guidelines
Fabric Sampling Plan
Fabric Inspection Documentation
Pre-production: Fabric Storage 55
Pre-production: Product Design 56
Pre-production: Marker Making, Cutting and Bundling 57
Introduction to Maker Making
Marker making Considerations
Marker Layout for Cutting Specific Fabrics
Fabric Spreading
Cutting fabric Layups
Bundling
Pre-Production: Fusing Technology 67
Introduction
Advantage of using Fusing Technology
Process
Requirements of Fusing

3 | P a g e
Various Fusing Equipment
Methods of Fusing
Production: Sewing and Finishing 72
Introduction
About Sewing Process
Line Balancing
Cycle Time
Handling System
Pressing and Folding
Post-production: Packaging 73
Shipping Packaging
Merchandise Packaging
Packaging Tags and Fasteners
Workflow 84
Method Study 85
Introduction
Need for Method Study
Task 3
Introduction to Production Systems 87
Individual System/Make Through/Whole Garment System 87
Section or Process System 88
Straight Line System 89
Progressive Bundle System 92
Unit Production System 93
Modular Production System 94
Quick Response Sewing System 95
Evaluation of Production Systems 97
Conclusion 97

4 | P a g e
Task 4
Introduction to Sampling 100
Need for Sampling 100
Details attached to the Garment Samples 100
Types of Samples 101
Sampling Process 101
Introduction
Development Sample
Salesmen Sample
Fit/Photo Sample
Approval Sample
Wash Test Sample
Pre-Production Sample
Production Sample or Shipment Sample
References

5 | P a g e
TASK ONE
Project Brief
Students are expected to do the research work in library correlating the classroom teaching
on global positioning and sizing in the garment industry with the reference study material to
write the written document of the complete work. The written work is suggested to be
supported by charts and graphs for analysis purpose.

6 | P a g e
Introduction to Garment Industry
Apparel Production is a Labour-Intensive process by which raw material are converted into
finished saleable garments. The garment industry is one of the most active international
trade sectors. The global fashion apparel industry is one of the most important sectors of
the economy in terms of investment, revenue and trade and employment generation all
over the world. Advance in technology and global trade have made production more
efficient and cost-effective for many countries today. The global supply chain for the apparel
industry is composed of:
Fiber producers, textile plants and findings manufacturers
Manufacturers that produce apparel products
Distributors and transporters of fashion goods
Retailers including stores, catalogues, television shopping networks and online
website
End consumer who purchases the fashion goods
History
Before the Industrial Revolution
Prior to the mechanised textile manufacturing, which began during the eighteenth century,
Craft Style Production was the norm. People purchased raw material for the purpose of
weaving and sewing textile products by hand in their homes.
During, this time India produced and exported very fine fabrics that were highly desired.
Textile designs from China, India and Japan, highly influenced the Western Cultures.
European manufacturers began coping and producing textiles in Asian styles. England in
particular was producing sophisticated patterned fabrics that were quite elaborate, which
made them more expensive than those imported from India. The labour intensive task of
weaving these fabrics by hand made it difficult for England to compete with lower priced
goods imported from India.
First Industrial Revolution
The development and improvement in coal, iron and steam driven mechanisms in the
eighteenth century England resulted in an Industrial Revolution. Technological
7 | P a g e
advancements in textile machinery and the creation of mills and factories gave way to
development of mass produced textile goods at competitive prices.
The first textile invention of note during this time was John Kay’s 1733 flying shuttle. This
development significantly increased weaving speeds by using a mechanically driven shuttle
that was passed back and forth at greater speeds than could be achieved manually, which
increased fabric output while reducing labour costs. As a result of increasing weaving
speeds, demand for production spun yarns grew.
In 1792 Eli Whitney revolutionarised the industry with his cotton gin that mechanised
cleaning and separation of fibers. During this time cotton was the most widely used fiber for
textile goods.
In 1830 Barthelemy Thimonnier created the chain stitch sewing machine that allowed for
mechanised sewing.
In 1846 Ellias Howle invented the lockstitch sewing machine, which provided better- quality
stitching. These inventions were followed by the first commercially produced paper patterns
for apparel and the addition of the first synthetic dyes and fibers.
Second Industrial Revolution
The second industrial revolution began in 1870 and was centred on chemicals, electricity
and steel. In 1872 Factory-Style Production was becoming more efficient through inventions
powered by steam and electricity, such as cutting machines that allowed several layers of
fabric to be cut simultaneously. During the second industrial revolution, inventors made
great advances in commercial production of synthetic fiber rayon and viscose rayon.
Increased production of textile goods made way for new outlets to sell goods.
Aaron Montgomery Ward established the first mail-order catalogue in 1872. In 1894
Frederick Winslow Taylor revolutionarised Assembly-Line Production by timing each task in
production of goods to eliminate waste time and increase efficiency.
The development of many synthetic fibers such as acetate, acrylic, mod acrylic, lyocell,
polyester and spandex ensued during the twentieth century.
Third Industrial Revolution
Textile advances in the development of fibers has continued into the twenty-first century
with technologically complex fibers including nano (diameter less than 0.5 microns),
biochemical (with electronic sensors that communicate information about the biological
conditions of the wear’s body) and high-performance hybrid/ multi-functional fibers (which

8 | P a g e
absorb and evaporate moisture and perspiration away from the body while offering anti-
microbial properties), as well as renewable, sustainable and biodegradable fibers such as
bamboo and organic cotton. The third industrial revolution is an era focused on Economic
Sustainability and Climatic Change.
In a 2006 article, Hans Sennholz, president of the Foundation for Economic Education and
author of the Underground Economy (2006) wrote that the third industrial revolution is an
information revolution that greatly expand the scope of tradable services and tends to move
many service jobs offshore from United States of America to India, China and other
industrial newcomers where Labour is much Cheaper.
Jeremy Rifkin, adviser to the European Union and author of bestsellers on economic issues,
has defined the three critical challenges of the latest industrial revolution as the Global
Economic Crisis, Energy Security and Climate Change.
World Trade In The Garment Industry Today (i.e. The Post-Quota Era)
Introduction
In 1995 members of the World Trade Organization (WTO) agreed to phase out agreements
that had controlled trade in textiles and apparel for more than 30 years. On January 1, 2006,
the worldwide system of textile and apparel quotas came to an end. Because the quota
system had forced buyers to purchase goods where quota was available, not where goods
were most efficiently produced, it shielded many developing countries from two significant
sources of competition: global supply chain forces and competition from large suppliers,
including China and India.
Impact of Quota Elimination on Global Trade
China is by far the largest supplier of textiles and apparel to the United States and the
European Union. It claimed 35 percent of U.S. and EU apparel import markets in 2007, up
from 20 percent in 2002. This rapid growth has been largely at the expense of East Asian
producers such as Taiwan, Korea, and Hong Kong, but has also affected regional producers
in Eastern Europe, Mexico, and Central America, as well as smaller supplier countries. The
European Commission estimates that apparel production in the EU declined by more than
32 percent from 1996 to 2006. Large suppliers, such as Bangladesh, Pakistan, India and Sri
Lanka, maintained market share or gained small amounts. The performance of members of
the Association of Southeast Asian Nations (ASEAN) in U.S. and EU markets has been mixed:
They have lost market share in the EU but gained market share by nearly a third in the
United States, their primary market. In both markets, smaller producers from Africa, South

9 | P a g e
America, and the Pacific have generally lost sales in relative and absolute terms (refer Figure
1-1)
The United States and EU began phasing out quotas on selected apparel in 1995; the
phasing-out of quotas on sensitive products, including more than 90 percent of U.S. textile
and apparel imports, did not begin until 2002. Since quotas ended completely in 2005,
exports from some countries have grown while exports from others have ceased. More than
100 countries trade apparel with the major markets—so who are the winners and losers? In
general, small countries exporting US$500 million or less to the United States or €500
million or less to the EU in 2004 have experienced a 22 percent to 34 percent decline in
exports. Small countries exporting to the United States have suffered the most. More than
85 percent of small suppliers to the EU experienced a decline in export values; more than 90
percent of small exporters to the United States lost sales in the U.S. market. Only Egypt,
Haiti, Morocco, Tunisia, and Botswana maintained a positive growth position in the U.S.
market (see Table 2-1). At the same time, exports from Fiji, Nepal, South Africa, and others
have been nearly eliminated since 2005. Similar trends have appeared in the EU market,
where only a few small producers have increased exports (see Table 1-2).
Figure 1-1
EU and U.S. Market Shares by Region

10 | P a g e
Source: Data from Eurostat; analysis by Nathan Associates Inc.
Source: Data from USITC; analysis by Nathan Associates Inc.

11 | P a g e
Table 1-1
Source: Data from USITC; analysis by Nathan Associates Inc.

12 | P a g e
Table 1-2
Source: Data from Eurostat; analysis by Nathan Associates Inc.
In 2004, 28 exporters supplied the U.S. apparel market with exports valued at more than
US$500 million. In 2007, these large suppliers accounted for 94 percent of U.S. imports of
apparel (Figure1-2). Likewise, in 2004, 22 large exporters supplied the EU market with
exports valued at more than €500 million; by 2007 they accounted for more than 90 percent
of EU imports of apparel.

13 | P a g e
Figure 1-2
Source: Data from Eurostat and USITC; analysis by Nathan Associates Inc.
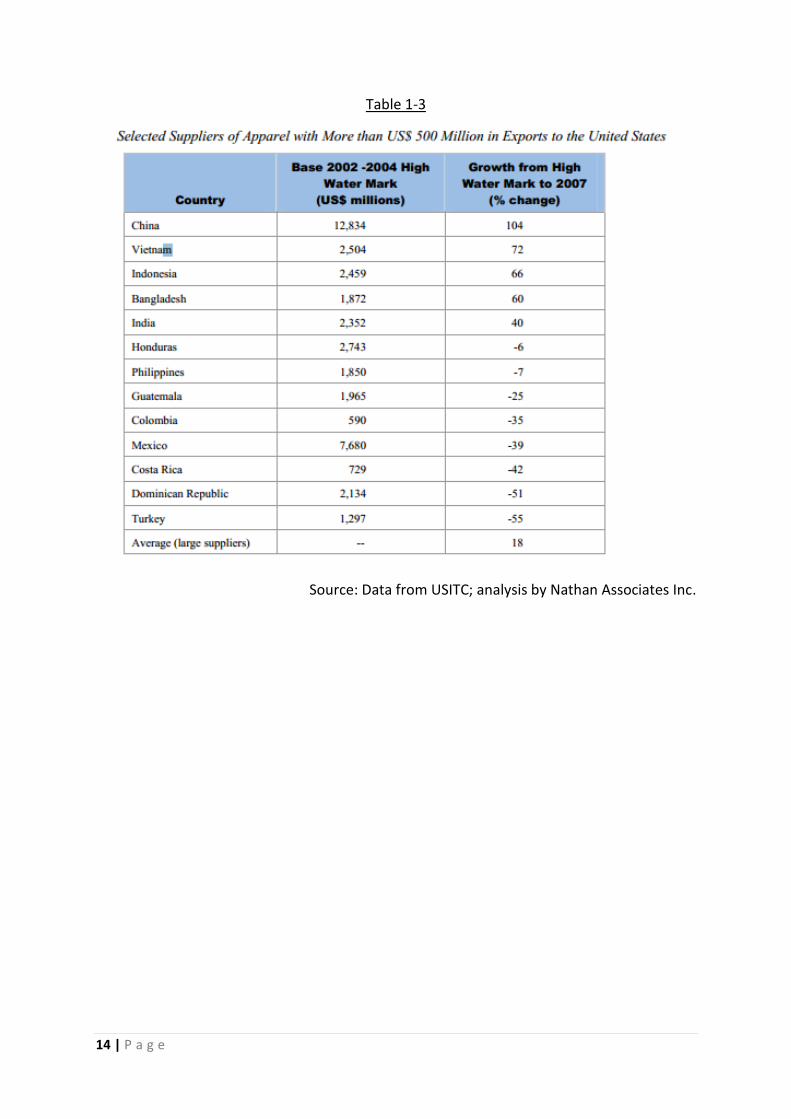
Although large suppliers dominate the U.S. and EU markets and their market share has grown since
textile and apparel quotas were eliminated, even among these suppliers there have been winners
and losers since 2005. Half of the 28 large suppliers to the United States have experienced losses and
half experienced gains (see Table 1-3), with the largest tending to gain rapidly (e.g., China, Vietnam,
Indonesia, India and Bangladesh). The losers include large regional producers such as Mexico,
Honduras, the Dominican Republic, and non-regional producers such as Turkey and the Philippines.
The Dominican Republic and Mexico both lost more than US$1 billion in exports. Exporters in some
countries, such as Turkey, compensated for the decline in exports to the United States with a rise in
exports to the EU (see Table 1-4).
In the EU market, Bangladesh and India have done particularly well since 2005, while a number of
regional producers in Tunisia, Morocco, and Romania have lost sales (see Table 1-4). Indonesia lost
18 percent of its sales in the EU, but a rise in sales to the United States created a net gain. Thus, the
export situation remains complex as supply chains adjust to optimal positions.
14 | P a g e
Table 1-3
Source: Data from USITC; analysis by Nathan Associates Inc.

15 | P a g e
Table 1-4
Source: Data from Eurostat; analysis by Nathan Associates Inc.
Factors That Effect The Garment Industry Today At a Global Level
As a consequence of the three industrial revolutions, the global economic and political
scenario and age old traditions of the garment industry, today the growth of the industry is
dependent on the following factors;
Labour Cost
Despite great technological advances to streamline production over the past few centuries,
the manufacturing of fashion goods still remains a labour-intensive, driving companies to

16 | P a g e
seek low wages in order for their products to remain profitable and competitive. As a result
it can be found in almost all developing countries, particularly least-developed countries.
Since the 1950s, the industry has seen several migrations, all involving Asia and at each
stage involving a shift to a country where labor costs were initially lower. In the 1950s and
early 1960s, the move was from North America and Western Europe to Japan, as western
textile and clothing production was largely displaced by Japanese imports. The second shift
was from Japan to Hong Kong, Taiwan and South Korea, which together dominated global
clothing exports in the 1970s and early 1980s. By the late 1980s and the 1990s there was a
third migration, away from Hong Kong, Taiwan and South Korea to other lower-cost,
developing countries. This included a big shift of production to mainland China, where
economic reform and opening up had prompted a surge in export-oriented industrial
growth. A number of South-east Asian countries including Indonesia, Thailand, Malaysia and
the Philippines, as well as Sri Lanka, also benefited from the migration. And in the 1990s,
other new suppliers emerged in South Asia and Latin America.
The impact of these dramatic geographic shifts on importing countries was severe. In 1992
about 49% of all retail apparel sold in the US was made domestically; by 1999 that
proportion had fallen to 2%. In Hong Kong, Taiwan and South Korea, the industry was forced
to adjust to rising wages and labour shortages. By the end of the eighties, manufacturers in
these countries needed to find lower-cost production bases and ways. In one analysis, “In
this division of labor, skill-intensive activities, which provided relatively high gross margins,
such as product design, sample making, quality control, packing, warehousing, transport,
quota transactions and local financing in the apparel industry, stayed in East Asia and
labour-intensive activities were relocated.” Thus countries in Africa, such as Mauritius and
Lesotho, enjoyed a surge in inward investment for garment manufacturing, but usually only
took over the lower-margin parts of the supply chain. China is overwhelmingly the biggest
clothing exporter, but extra-EU exports are still sizeable. Meanwhile, the USA, EU and Japan
account for the majority of clothing imports.
Infrastructure
Availability of land and resources is very essential in setting up of the industry and its
growth. Low cost of land, electricity, water and raw material are the factors that lure the
investors to setup industry in that particular area. In case of unavailability of any of the
factors, setting up and running of the industry takes more capital investment.
Since apparel production in the past decade has become a lean job due to lean buyers,
hence the countries with easy availability of these factors at a low cost are favourable.

17 | P a g e
Education
For running the industry well educated people are required to take up higher level
managerial posts in the factory and to supervise the labourers in their job. The supervision
of apparel production in a factory, communication between the buyer and manufacturer
and analysis of the industries performance is done by people who have received formal
education. Thus, an area/country with a higher level of education system and larger number
of educational institutions which provide academic as well as practical inputs for running
the industry are a favourable location for a growing industry.
Society
The social environment of a space is a crucial factor that affects the growth of the industry
as the work force involved in the industry and the end consumer (not in all cases) emerge
from the local surroundings of the unit. Thus, a society with a modern outlook and safe
environment helps in the growth of business and the industry.
Market Growth
An increase in the amount of sales will pull the industry to manufacture more and thus,
generate employment along with industrial growth. A healthy market demand, which is the
result of increase in prosperity, leads in setting up of more and more retail outlets in a
particular are/ country. These retail outlets sources the goods from a manufacturing unit
may or may not be located in the same region/country. Thus, both the ends benefit and
hence, there is a growth experienced in the industry as a whole.
Government Policies
The government policies of a country effect the setup of an industry as major support is
required from the government to achieve higher profit from production and exports. Some
of China’s policies and their impact on the garment industry in China is discussed below;
The yuan’s de facto peg to the US dollar, maintained at a level that critics allege
significantly undervalues China’s currency, makes exports far cheaper to the rest of
the world than might be the case if the currency was allowed to float.
China additionally gives all exporters big tax breaks, so in effect a state subsidy.
Companies which have needed capital for investment have also for several years
benefited from easily-obtainable credit from the statecontrolled banks, although

18 | P a g e
excessive fixed asset investment has tightened the supply of loans in some over-
heated sectors of the economy in recent years.
In practice (although legislation says otherwise), standards of intellectual property
rights, environmental controls and labor protection are often less rigorous than in
competing countries, with a consequent (and possibly short-term) cost advantage.
As Chinese garment manufacturers have expanded, the government has encouraged them
to move downstream into retail, and upstream into fabric manufacturing, all of which has
promoted the ability to offer overseas customers the desired full package service.
Environment
An increased awareness of global climatic changes has inspired some companies, as well as
governments, to explore eco-friendly and socially responsible options for manufacturing
goods.
Judiciary
A stable and influential judiciary system is necessary as in case of disputes and disorder,
judiciary acts as a neutral regulator and settles. Absence of a judiciary system or inefficiency
of the judiciary system leads to an turbulent environment in the country at politicial, social
and economic level hence, making it difficult for the industry to function in its fuul capacity.
International Trade Policies
International trade policies greatly influence the production in apparel industry as seen in
the past. On January 1, 2005, the World Trade Organisation abolished textile qoutas, to the
great benefit of countries with a large-scale production capacity and low wages, which
enabled them to provide more cost-effective manufacturing than others to companies
around the globe. As a result of this by 2006, the five countries leading apparel exports were
China, Hong Kong, Turkey, Mexico and India. The leading Apparel Importers during the same
year were the European Union, Unites States of America, Japan, Hong Kong and the Russian
Federation. In 2009, the top five exporting countries leading the global textile industry were
China, Turkey, Pakistan, India and Taiwan, according to Export Bureau statistics.
Preferential Trade
19 | P a g e
Preferential trade agreements and arrangements6 have stimulated apparel production and
sometimes accelerated growth in textile and apparel exports, especially in beneficiary
countries outside South and Southeast Asia and China. Free trade agreements, such as the
North American Free Trade Area (NAFTA), the Dominican Republic–Central America–United
States Free Trade Agreement (CAFTA-DR), and US–Jordan Free Trade Agreement provide
reciprocal market access, so both parties benefit from lower tariffs. Preferential
arrangements, such as the EU Everything But Arms Program and the United States African
Growth and Opportunity Act, provide unilateral benefits that the granting country can
revoke while free trade agreements provide long-term security of market access.
Before quotas were eliminated, producers in beneficiary countries enjoyed liberal quota
access and tariff relief. They may still have tariff relief, but this benefit is far less significant
than that conferred by quota access. Tariffs on textiles and apparel are high when compared
to other traded manufactures, but are not as restrictive as quotas were. The average U.S.
duty on apparel items is 17 percent and the average EU duty is 12 percent; the tariff
equivalent of quotas has been estimated to have been more than twice that.7 In addition,
preferential trade benefits usually require compliance with rules on sourcing of materials
and fabrics; achieving compliance drives up costs. Thus, for many producers preferential
access provides less than the full tariff rate advantage—and that advantage may amount to
less than the production cost advantage enjoyed by many large Asian suppliers.
Countries with sizable apparel assembly operations linked to preferential access to the U.S.
and EU markets are already losing apparel exports as buyers search for locations that offer
lower production cost and other advantages. Figure 1-3 shows U.S. import market shares for
preferential apparel suppliers from North America, the Caribbean, South America, Africa,
and the Middle East. From 2002–2007, market share for these regions fell by a third, despite
the growing number of countries receiving benefits (e.g., through the CAFTA–DR, the U.S.–
Morocco Free Trade Agreement, or Egypt’s Qualified Industrial Zones). However,
preferential suppliers Egypt, Morocco, Jordan, Haiti, and Nicaragua have gained or
maintained their sales in nominal terms.
All other preferential suppliers from Africa to South America have lost sales in dollar and
market share terms, underscoring that a major benefit of preferential access was eliminated
with the end of quotas that restricted most of the largest suppliers.
The reduction in quota benefits for preferential suppliers has put more emphasis on rules of
origin, which specify the source of fabrics and yarns that confer tariff preferences on
products entering the U.S. and EU markets. Rules of origin require suppliers to purchase
materials from certain countries that may or may not be the most competitive suppliers as
determined by cost, delivery, and quality. Flexible rules of origin permit purchases from the
most competitive suppliers. The interest in using such rules to manage trade is apparent in
the current EU debate over revising its rules of origin to include value-added criteria that
can be tailored to a country’s stage of industrial development. As competition in the major

20 | P a g e
markets increases, more countries can be expected to seek more flexible preferential
benefits by negotiating special exceptions (derogations), tariff preference levels, and liberal
value-added requirements. However, it should be noted that improved market access is
rarely a substitute for competitiveness based on efficiency, delivery, and service and instead
complements these factors. This fact was underscored in the prior section, where it was
shown that many countries that lack preferential access are realizing the highest growth
rates in the post-quota world (e.g., China, India, Vietnam, Indonesia). A strategy based on
preferential access alone cannot be sustained in a continually changing global market.
Figure 1-3
Global Positioning Of the Garment Industry
The garment industry can be seen as a supply chain consisting of a number of discrete
activities. Increasingly the supply chain from sourcing of raw materials via design and
production to distribution and marketing is being organized as an integrated production
network where the production is sliced into specialized activities and each activity is located
where it can contribute the most to the value of the end product.
When the location decision of each activity is being made; essential variables like costs,
quality, reliability of delivery, access to quality inputs and transport and transaction costs
are taken into consideration.
21 | P a g e
Hence, there has been a shift experience in manufacturing post 2005 from developing to
developed nations, as discussed under the previous topic ‘World Trade in the Garment
Industry Today (i.e. The Post-Quota Era)’ on page 7.
The entire value chain has been altered during the past decade by the emergence of very
large “lean retailers” such as Wal-Mart in the United States and Pinault-Printemps-Redoute
in Europe. These global buyers, in implementing advanced ICT in their own retailing, stock
management and ordering operations, have driven a geographic relocation of value all the
way back through the supply chain. Four decades ago, the industrialized countries
dominated global exports in textiles and clothing; these days, developing countries produce
half of the world’s textile exports and nearly three-quarters of world clothing exports
(UNCTAD, 2005). While the share of developing countries in the textile and garment trade
has been rising, the increase has been more pronounced in the more labor-intensive and
lower-value added segment of garment manufacture. Many of the high-value activities have
not migrated. According to one study, the EU textile and clothing industry has retained high
value added segments (for example, new materials, technical textiles, high-end fashion, and
sportswear) where design and research & development are important competitive factors.
This kind of innovation uses human capital (in design and marketing) more intensively than
information technology (e-businessWatch, 2005).
Macroeconomic statistics for some developed countries offer a rough and ready
confirmation: for example, according to the Bureau of Economic Analysis figures for the
United States, in the 10 years to 2004, the output of the apparel industry (in dollars)
declined by 44% whereas the corresponding decline in value added was only 11% (data last
accessed 14 March 2006). Figures are unfortunately not available for global output and
value added or GDP in textiles and apparel by country or country group. However, there can
be little doubt from case study analysis that the dominant pattern so far has been the
relocation of lower value output.
In practice, the MFA and ATC had only limited success in protecting manufacturers in the US
and EU, which continued to decline. Instead, the restrictions stimulated unintended growth
in garment manufacturing in a number of low-cost quota-free countries in Africa and Asia.
At the same time, the quota system kept garment prices higher than they would otherwise
have been, to the detriment of European and American consumers. The result has been a
highly distorted trading pattern which in the run-up to the lifting of quotas had already
begun to unravel, creating winners and losers. The losers are the countries which had
benefited from the artificial advantages created by the quota system. Ahead of quota
removal, they began to see garment factory closures and job losses as production capacity
shifted to China and other producers, including India, that were about to become free of
quotas. Many of the countries worst hit were those which were most dependent on
garment production for export revenues. The value of Chinese clothing exports to the US
had jumped 56% in the first nine months of 2005, and 44% to the EU in the first eight

22 | P a g e
months of 2005. Tough trade negotiations began, and the protracted uncertainty caused
considerable disruption to the industry. The final result was agreements with China by mid-
2005 on new lower-level voluntary quotas that would restrict Chinese export growth into
the US and EU until the end of 2008 and 2007 respectively. Vulnerable developing country
producers have thus been given some extra time during which to adjust to a completely
quota free environment, although many will still suffer from China’s increasing market share
of exports to the US and EU, and the gains which India and Bangladesh can make now that
their exports are unrestricted. The saving grace for some low-income countries will be the
complex system of tariffs and preferential trade agreements that remains firmly in place.
Similarly, The African Growth and Opportunity Act (AGOA) offers duty- and quota-free entry
into the US until 2015 for certain textile and apparel products from designated sub-Saharan
African countries, subject to strict rules about raw materials origin. Tariffs on textiles and
clothing are generally higher than for other manufactured goods, so this preferential market
access offers many developing countries a very useful platform from which to devise a
strategy for their textiles and garments industry. In total, there are more than 100 regional
trade agreements that can affect the relative competitiveness of countries in various
industries.
Sizing In Garment Industry
History
First sewing machine was invented in the Victorian era, after the development of machine
elite class use to have a seamstress who stitched the clothes for them on sewing machine.
Before sewing machines everything was done by hand. The seamstresses went to the home
of the woman who wanted to stitch the clothes. As industrial revolution started in the 19th
century, garment industry too began to evolve but it was in its infancy and had no
developed system for garment manufacturing. Seamstresses observed that they can
develop standard patterns which can fit more than one woman. They developed a
mathematical sizing system to accommodate most women with very few patterns. As
businessmen, interested in lowering costs, they continued developing these patterns to
become paper “information systems” engineered to control quantities of exact
reproductions in cutting and stitching clothing in mass production systems.
The apparel industry grew from these tailors/businessmen, as they built manufacturing
factories for production, which pattern engineering accommodated. Pattern engineering
grew a great industry in the early and mid-20th century. Pattern making was first taught to
“apprentices” who were called “designers”. Creative designers of styles didn’t exist in the

23 | P a g e
early 20th century. Paris was center of the developments in style and creation in garments
at that time and many other countries copied from there. Later designers created booklets
for teaching the pattern making systems mathematically – that came to be called “pattern
drafting”. One dis-advantage of mass production was that designers put little effort in
bringing new designs and patterns but they either copied or else made very little changes.
Even today the readymade garment industry does not bring too many new ideas in the
products rather it is creating mass garments to reduce cost. Garment industry has
developed many new and time saving techniques, processes and machinery for the effective
production today. The most important is the CAD/CAM which enables the designer, pattern
maker, marker and grader to do their jobs precisely and effectively.
Need For Size and Fit
Consumer satisfaction is a desirable outcome for apparel manufacturers and retailers since
satisfied customers can lead to increased store patronage, repeat purchase and brand
loyalty (Otieno, 2000a). However, dissatisfaction of men and women with fit of available
sizes in clothes has been identified in numerous countries, including New Zealand and one
of the reasons for this could be the changing dimensions of the body over time, not
accommodated by commensurate changes in apparel sizes (Winks, 1997; Goldsberry, Shim
and Reich, 1996; Ashdown, 1998). This could point to the need for sizing surveys of the
population that help to create appropriate sizing systems for manufacturers, although other
reasons such as inconsistencies in size labels or the information provided upon them could
be contributing factors (Chun-Yoon and Jasper, 1995). Approaches adopted to reduce
consumer dissatisfaction include adaptation of technology for mass customisation of clothes
or collection of dimensions for more up-to-date sizing standards. For sizing standards,
several countries have implemented sizing surveys, and specific technology such as 3D body
scanning has been employed to create appropriate sizing systems for manufacturers. Size
UK, size USA and more recently the SCALE project in Australia provide examples of this
approach to the problem of creating apparel that fits the general population.
The impact of the lack of size standards may be examined from the perspective of each of
the participants in the chain viz. the apparel manufacturer, retailer and the consumer. The
manufacturer’s decisions on sizing are influenced by the intended look and target market.
Some manufacturers have also considered the psychological aspects of the consumer,
through ‘vanity sizing’ which has been researched (for example: Lenda Jo, 2002) and also
reported in the press (for example: Martin, 2006).Thus decisions by various manufacturers
to change size dimensions has resulted in significant variations for the same size label. From
the 1consumer’s perspective the dissatisfaction regarding size and fit of clothes has been
researched, as indicated above. Despite the attempt of some researchers highlighting the
need for retailers’ to help consumers in selection of apparel through advise on fit during the
selection process and through stocking of appropriate sizes (Otieno, 2000 ), very little

24 | P a g e
research exists on the retailers’ perspective regarding size and fit and processes adopted to
meet the consumers’ requirements. Research in this area may contribute to a better
understanding of size and fit related issues in apparel industry.
HEAD (for headwear) - Measure around the head with the measuring tape, above
the brow ridges.
TOPS
o NECK Measure your body around the base of the neck, allowing for a
comfortable fit.
o CHEST With arms relaxed at sides, measure around the fullest part of the
chest and shoulder blades.
o SLEEVE LENGTH With arm bent at 90 degrees, place hand on hip. Start at the
center back of the
o neck and measure across the shoulder to the elbow, then down to the
bottom of the cuff.
BOTTOMS
o WAIST Measure your natural waist at the height you would normally wear
your pants.
o HIPS With heels together, measure around the fullest part of the hips.
o INSEAM Measure inside the leg from crotch seam down to the desired
length, normally to the top of the ankle or top of the shoe.
Spec Development Process
Identify the Target Market: The group of people who are prospective customers are
taken into consideration. This group is based on demographics, psychographics and
geography.
Select Target Group: A group of more than 100 people is selected from this target
market.
Take-Down Sizing: The required body measurements of these 100 people are taken
in record.
Divide the Data into Different Sizes: The collected data is divided into small (S),
medium (M), large (L) and extra-large segment (XL). The difference between S, M, L
and XL is called grade rule.
Develop Dress Form on Size Medium: A sample is developed on size medium which is
then tested on a model.
Grading: Once the sample passes after testing and alteration, the medium size
pattern is graded to smal, large and extra large for production.

25 | P a g e
Consumer Perceptions of Apparel Fit- Implications For Apparel Retailing
The role apparel fit plays in the customers’ satisfaction with apparel purchase seems to have
differing mechanisms for evaluation depending on end use of purchase. In shopping for
children’s clothes, Norum (1995) found that fit was significantly related to consumer
satisfaction and with perceptions regarding product quality. This facet was again highlighted
in another study where fit and size was cited as the aspects that parents shopping for
children complained about the most (Otieno, 2000b). Fit and size issues cited were
mismatch in dimensions across chest, arm, shoulder, waist and incorrect labelling.
However, for their own use Labat and Delong (1990) found apparel fit satisfaction related
to body cathexis(consumer’s evaluation of self and body), with fit satisfaction being lower
for hip and waist as compared to other body sites. This evaluation of fit would vary
according to the shopper profile and could provide some opportunity for the retailer to play
a role. Customers are likely to select stores for apparel purchase based on their perception
or experience regarding the range, sizes and fit of apparel offerings. Specialised niche stores
and store image was found to be related to customer demographic variables such as race,
income and marital status (Gagliano and Hathcote, 1994). Demographic characteristics have
been found to influence fashion attitudes and store patronage.
Role of Size and Fit in Consumer’s Apparel Purchase Decision Making Process
Eckman, Damhorst and Kadolph (1990) proposed a three stage decision-making process for
apparel consisting of interest phase, trial phase and decision phase. The interest phase in a
garment was influenced by factors such as colour, styling and fabric, but the trial phase was
influenced by fit, styling and appearance. When the purchase decision was positive, reasons
provided were fit and appearance, but when an apparel item was rejected the reasons
provided were, fit, styling and appearance. As observed by the authors, fit may be strongly
related to aesthetic criteria in that fit affects perception of line, shape and appearance on
the body. Thus fit and its’ influence upon appearance seem to play an important role in the
decision making 2process of the consumer. Eckman, Damhorst and Kadolph (1990)
recommend that sales personnel may require training to help them positively reinforce and
service clients on these criteria and to provide influential product information at the
appropriate stages of the purchase decision making process. However, this facet remains
unexplored from the retailers’ perspective.
Role of Size and Fit Skills in Apparel Retailing

26 | P a g e
The relevance of various selling skills for apparel retailers was investigated by Garner and
Buckley (1988) and they found that skills relating to fashion merchandising knowledge,
including salesmanship, consumer behaviour and communication were rated above textiles
and product knowledge. However, knowledge of ready to wear sizing and knowledge of
garment fitting and alteration were also perceived as important. Fair, Hamilton and Norum
(1990) suggest that while there has been a shift away from requirements for specific
product knowledge, the ability to communicate product knowledge is seen as important.
The relevance of skills in fit assessment needs to be examined in the context of selling skills
identified in personal selling literature where research has been done on factors
contributing to selling effectiveness. Selling skills has been viewed as comprising of three
distinct components: Interpersonal skills such as knowing how to cope with and resolve
conflicts; salesmanship skills such as how to make a presentation and close a sale; and
technical skills such as knowledge of product features, benefits and procedures required by
the company (Ford et al., 1987; cited in Rentz et al., 2002). Rentz et al. (2002) found that
self-ranking on sales and quota performance were correlated with high levels of score on
the three skill components. Highest factor loadings were reported for knowledge of product
line under technical knowledge, ability to present the message and close the sale under
salesmanship skills and awareness and understanding of the nonverbal communication of
others under interpersonal skills. Extending this model to the apparel context, it could be
postulated that knowledge of fit assessment and product line could be one of the key
components of technical and salesmanship skills and could be expected to play a key role on
the perceived performance by the retail sales person.
Thus, there appears to be an information gap on the relevance and contribution of size and
fit assessment skills towards a sales person’s effectiveness
Terms, Definitions and Body Measurement Procedure
The first part of the standard defines the list of body dimensions to be used for designating
clothes sizes, together with an anatomical explanation and measurement guidelines. All
body dimensions are measured, preferably without or as few as possible clothes, in
centimetres, except for the body mass.
The standard also defines a pictogram that can be used in language-neutral labels to
indicate one or several of the following body dimensions.
Head girth: maximum horizontal girth (circumference) of the head measured above
the ears

27 | P a g e
Neck girth: girth of the neck measured with the tape measure passed 2 cm below the
Adam's apple and at the level of the 7th cervical vertebra
Chest girth: maximum horizontal girth measured during normal breathing with the
subject standing erect and the tape-measure passed over the shoulder blades
(scapulae), under the armpits (axillae), and across the chest
Bust girth: maximum horizontal girth measured during normal breathing with the
subject standing erect and the tape-measure passed horizontally, under the armpits
(axillae), and across the bust prominence (preferably measured with moderate
tension over a brassiere that shall not deform the breast in an unnatural way and
shall not displace its volume)
Under-bust girth: horizontal girth of the body measured just below the breasts
Waist girth: girth of the natural waistline between the top of the hip bones (iliac
crests) and the lower ribs, measured with the subject breathing normally and
standing erect with the abdomen relaxed
Hip girth: horizontal girth measured round the buttocks at the level of maximum
circumference
Height: vertical distance between the crown of the head and the soles of the feet,
measured with the subject standing erect without shoes and with the feet together
(for infants not yet able to stand upright: length of the body measured in a straight
line from the crown of the head to the soles of the feet)
Inside leg length: distance between the crotch and the soles of the feet, measured in
a straight vertical line with the subject erect, feet slightly apart, and the weight of
the body equally distributed on both legs
Arm length: distance, measured using the tape-measure, from the armscye/shoulder
line intersection (acromion), over the elbow, to the far end of the prominent wrist
bone (ulna), with the subject's right fist clenched and placed on the hip, and with the
arm bent at 90°
Hand girth: maximum girth measured over the knuckles (metacarpals) of the open
right hand, fingers together and thumb excluded
Foot length: horizontal distance between perpendiculars in contact with the end of
the most prominent toe and the most prominent part of the heel, measured with the
subject standing barefoot and the weight of the body equally distributed on both
feet

28 | P a g e
Body mass: measured with a suitable balance in kilograms
Pattern Making
Introduction
The appearance and fit of a garment is highly dependent on each process. Patternmaking is
one of the earliest steps in the development of a garment. It is a craft that has evolved over
the centuries into a skilled technical process. Today, patternmaking tools have been
carefully tailored to quickly perform repetitive time-consuming tasks, allowing apparel
companies to cater to the fast paced world of fashion. Now days sophisticated software
programs are used for pattern making.
History
Prior to the Industrial Revolution the art of patternmaking was highly revered. Tailors
meticulously worked with their client's personal measurements to customize patterns.
Clothing made by tailors was elaborate and relegated only to the very rich. With the onset
of the Industrial Revolution, standardized patterns were essential to the success of ready-to-
wear clothing. Initial attempts to create standardized patterns resulted in poorly fitting
garments with little detail. Men's suits were boxy, plain, ill-fitting sacks. After lengthy
experimentation and standardized sizing, patternmaking made a triumphant transformation
from customization to standardization.
Patterns can be formed by either a 2D or 3D process. Often a combination of methods is
used to create the pattern. The most common 2D patternmaking methods are flat, drafting
and reverse engineering. In the flat method, a pattern is generated from an existing
foundation pattern called a sloper or block. A sloper is a pattern that has no seam
allowances or style lines. From a sloper a myriad of garment styles can be generated. The
patternmaker creates a new style by adding design details such as a collar, pocket and
pleats. The flat patternmaking method is widely used in the ready-to-wear market because
it is fast and accurate.
In the drafting method, patterns are made directly from measurements taken from a pre-
existing garment, an individual or a body form. Using the collected measurements, the
pattern is drawn directly onto paper.
29 | P a g e
Reverse engineering is sometimes referred to as garment deconstruction or a knock-off. In
the reverse engineering process, patterns are made from an existing garment. The garment
is taken apart, analysed and the patterns pieces are made.
In the 3D patternmaking process, the pattern pieces are generated from a 3D form. Draping
is one of the oldest methods used to generate a pattern. In the traditional draping process,
a garment is produced by moulding, cutting and pinning fabric to a mannequin or individual.
Style lines and constructions details of the drape are carefully marked and removed. Fabric
pieces with the construction and style details are generated. The fabric pieces are then laid
flat over pattern paper and traced. The pattern is finalized by adding directional markings
such as grain-lines, notches, buttonholes, correct seam and hem allowances and facings.
Draping is especially helpful when developing intricate garment styles or using unusual
fabric.
Computers have been used by apparel companies since the early 1980's. Pattern Design
Systems (PDS) have become invaluable tools to the patternmaker, assisting in much of the
repetitive tasks associated with patternmaking. PDS systems are capable of storing an
incredible amount of data that can be quickly retrieved, tweaked and re-filed. Using a
mouse or stylus, patternmakers are able to swiftly add style details and make changes.
There are many benefits to PDS - speed, accuracy and ease of data transmission being some
of the most obvious. In today's competitive environment, software companies are zeroing in
on the growing demands of the apparel manufacturer.
The ability to mass produce customized patterns according to an individual's unique body
shape could offer tremendous benefits to the consumer, retailer and apparel manufacturer.
The textile industry continues to research this exciting field with a long term goal of bringing
superior fit and performance to the customer.
The apparel industry is notoriously fast-paced and competitive. Innovative software
companies continue to make improvements to their PDS to enable apparel companies to
better serve their customers. Current research focuses on generating patterns that produce
better fitting garments and 3D visualization tools to help fine tune style. With on-going
technological advances and diligent research, patternmaking software companies continue
to successfully address the needs of their customers.
Pattern Making Process

30 | P a g e
Pattern grading is the scaling of a pattern to a different size by incrementing important
points of a pattern to smaller or bigger sizes.
Once a designer has completed a drawing of a garment, it is transformed into a sample
pattern. "Patternmaking" is the process of creating all the correctly sized pieces needed to
make a complete garment. For many smaller manufacturers, pattern making is still done on
paper because the cost of computerized systems remains prohibitive.
The patternmaker may use one of the following techniques to develop a sample pattern.
S/he may "manipulate" a new pattern by using geometric rules to modify or alter existing
pattern pieces. S/he may translate a design that has been "draped" and pinned on a dress
form by converting the shapes of the draped garment sections into paper pattern pieces.
Alternatively, s/he may pin pieces of muslin to a garment being copied and rub tailor's chalk
over the seams and darts, making a "muslin rub." The chalk markings are then used to
create a flat paper pattern.
From this initial pattern, a sample garment is developed. The sample process allows a
designer to correct any problems inherent in translating a one-dimensional sketch into a
two-dimensional garment; it ensures that the designer's fabric yardage specifications are
accurate; and it provides an opportunity to spot potential production problems inherent in a
design. Once the sample is made, the manufacturer makes a small batch of duplicates for its
sales force to test market. If they sell well, the garment goes into larger volume production.
Although many firms still make patterns by hand, larger manufacturers make production
patterns on a computer using CAD software. Other systems have been developed that allow
patternmakers to create patterns manually by using a life-sized, sensitized table and a stylus

31 | P a g e
attached to a computer. As the patternmaker indicates points with the stylus, the pattern
pieces are automatically entered into the CAD system where they can immediately be
accessed for grading and marking. Although pattern making is becoming increasingly
computerized, patternmakers still must learn the manual method because making patterns
manually develops an advanced understanding of garment construction, knowledge that
cannot yet be replaced by a computer.
Types of Pattern Making in garment manufacturing
There are various types of pattern making in garment manufacturing.
Block Pattern
Block pattern is a basic pattern
without any style features and
incorporates the measurements,
proportions and posture of the body
for which garments, developed from
this pattern, are intended. Block
pattern can be developed by either of
the following methods.
The flat method
The components of the pattern,
usually the body and sleeve, are
constructed by a draft(technical
drawing) which incorporates the measurements and proportions of the
particular system used by the pattern maker. It cad be produced by a
computer.
Modelling
It entails the fitting of the block garment usually in toile, on a workroom
stand of the appropriate size, when the fit balance are satisfactory, motile is
removed from the stand and each component is copied on to pattern paper
and the necessary making up allowances added.
Garment Pattern
The styled patterns used for cutting the original sample garments can be
developed by a variety of means, including the flat method, modelling or a
combination of both. When using the flat method, the pattern maker
introduces style lines of the garment on to a copy of the block pattern,
performs the necessary manipulation and then adds the requisite sewing and

32 | P a g e
other allowances to each component.
Notches are made in related
components in the seam lines as
guides for alignment and matching
during sewing and make-up.
Computerised Pattern Making
At most large manufacturers, patterns
are made on a computer with
computer aided design (CAD) systems,
the pattern maker manipulating small
graphic patterns on the computer
screen with a hand-held control device.
Geometry drives can make an infinite
number of changes to the shapes and sizes the pattern including creating new design
lines or adding pleats, fullness, and seam allowances. To allow pattern makers to
make patterns manually on a computer, another system has been developed
allowing the pattern maker to work life size on a sensitized table with traditional
tools and stylus that is attached to the table and the computer.
The stylus picks up the lines drawn on the table and shows them on the screen.
Changes can also be made directly on the screen. In both cases, patterns are
immediately available for other operations such as grading and marker making. The
essential features of this technology are pattern design and pattern generation
systems.
Pattern design system the pattern maker inputs to the system all the block patterns
in current use and with the aid of the computer can construct garment patterns from
them. Pattern generation system when the pattern components for the top cloth
have been developed on the computer via pattern design system. The pattern
generation programmer automatically generates the pattern for auxiliary
components such as linings and foibles.
Pattern Making Technique
Pattern making is a highly skilled technique which calls for technical ability, and a sensitivity
to interpret a design with a practical understanding of garment construction. For successful
dress designing patter making forms the fundamental step. This function connects design to
production by producing paper templates for all components such as cloth, hemming,
fusibles etc. which have to be cut for completing a specific garment.
There are three methods of preparing patterns:

33 | P a g e
Drafting: Is a two dimensional basic method of preparing a paper pattern. The
pattern is prepared on brown paper using personal measurements of the wearer.
The garment prepared by this method fits exactly to the satisfaction of the wearer. It
is economical to draft one's own pattern. Also changes in style can be made adopting
the basic pattern.
This type of pattern can be constructed by drafting manually or produced by a
computer which has been programmed to construct basic patterns according to
given measurements and proportions.
Draping: Draping can be treated as one involving a detailed survey and study of the
figure to build up a reliable fitting experience. Draping originally was called
modelling. This was the original method of constructing garment patterns and is still
widely used in the clothing design houses in Paris Draping is a free approach and is
always to a certain extent experimental and cannot be described as a precise
technique.
Modelling is done in a fitting room on a dressform with a stand. Dressforms vary in
size. Generally an average sized dress form of bust 88 cms or 92 cms is selected for
this purpose. The designer works from a sketch or a mental picture and gives a 3-
dimension form to an idea of a garment. The wrong side of the fabric is draped on
the dressform or a figure. The effect of the fabric as it flows and drapes is readily
visible on the dress form. Muslin cloth is used for draping. As the fabric is draped on
the dress form pin, and mark the stitching line with a pencil. The muslin pattern
which is the end product of draping is removed from the stand and each component
is copied on to the paper pattern and necessary allowances are then added to give
the design effect as planned by the designer.
Bought or Commercial Patterns: These patterns provide fashions in current trend
designed to fit certain sizes. It is available in tissue paper. These patterns indicate
neck sizes for garments such as shirts, chest or bust measurements for children and
women; waist, hip and length measurements for pants and skirts. Even to those with
the ability and desire to design their own clothing, a commercial pattern makes a
good starting point.
These patterns explain the steps in using the pattern and are mostly used by dress
manufacturing companies. It also gives information on suitable fabrics, quantity of
material required, pattern layouts etc. Most figures differ considerably from the
average. Uses of Paper Patterns:
Paper patterns are useful not only to the beginner but also to the expert as
there is no risk of the material being wrongly cut.

34 | P a g e
It is particularly useful to the beginner as it is a better method of learning
than cutting the material directly.
Paper patterns can be preserved and used whenever required and is
therefore time and labour saving.
Adjustment in paper patterns can be done to ensure perfect fitting.
By using the basic paper pattern it is possible to bring changes in the design.
For example the basic sleeve can be adopted to puff or bell sleeve.
The use of paper pattern will enable one to cut a garment with a minimum
amount of fabric because it is possible for the dress designer to try out the
placement of pattern pieces in an economical way.
Contents of Paper Patterns
Margin: Extra safety margins are cut beyond the actual cutting line to make
adjustments while stitching. Margins are generally allowed on upholstery items such
as sofa slip covers.
Cutting line: This is the actual line on which garments are cut.
Stitching line: Paper pattern shows the exact stitching line so that the person
stitching the garment will identify where exactly the actual stitching has to be done.
Fold line: When there are two sides to a pattern such as back & front side then the
fold line on the pattern has to be clearly indicated marking it as Fold Line.
Grain line: Every pattern piece has an arrow indicating the grainline - whether the
fabric has to be cut on straight or cross grain, Collars, cuffs and other trimmings are
cut on the cross grain to give a better finish to the garment.
Construction details: Tucks, darts, button holes, centre front, centre back, pocket
markings, buttons, style features of the garment are all shown on the paper pattern'
Graceful curves and shapes wherever required on the paper pattern are also clearly
indicated.
Pattern size and particulars like front, back, sleeve, collar, cuff etc are shown.
If necessary the pattern can also suggest and explain the steps in preparing the
garment like marking, cutting and stitching the garment. This is generally done in a
commercial pattern to enable the sewer to use the pattern correctly.

35 | P a g e
Pattern Grading
Introduction
Patterns initially are made in only one size. In order to produce clothing that fits various
body types and sizes, the pattern pieces must be increased or decreased geometrically to
create a complete range of sizes. The process of resizing the initial pattern is called
"grading." Each company determines its own grade specifications for each size, and size
specifications vary slightly from manufacturer to manufacturer.
Grading is the method used to increase or decrease the sample size production pattern to
make up a complete size range. For example, the sample size 10 patterns must be made
larger to accommodate sizes 12, 14 and 16 and smaller for sizes 8 and 6. Each company sets
predetermined grade specifications, or rules. For example, a missy manufacturer’s grade
rules might call for increments of one and a half inches in width and a quarter inch in length
for each size.
Today most manufacturers grade pattern on CAD systems. The pattern maker guides a
cursor around the edges of the sample pattern on a digitized table. At each of the key
points, he or she pushes a button to record a grade point. Each point is cross referenced by
a grade-rule table stored in the computer, which enlarges or reduces the pattern
automatically according to the predetermined direction. If the pattern was originally made
by computer; data are already in the computer and can be enlarged or reduced
automatically.
Pre-programmed grade rules for increase or decrease are automatically applied to the
pieces of each grading location. Then the computer can print out the pattern in each new
size. Manufacturers often use an outside service to make patterns, grade patterns, and
make the marker.
Although many small firms still use traditional grading methods, grading, like patternmaking,
is becoming increasingly computerized. Using a CAD system, the pattern can be resized
according to a predetermined table of sizing increments (or "grade rules"). The
computerized plotter can then print out the pattern in each size. Because the productivity
gains are so great, small to medium-sized manufacturers are beginning to acquire their own
CAD systems for grading.
Alternatively, they may use an outside grading service to perform this function.
Shrinkage Incorporation in Pattern Grading

36 | P a g e
Grading and shrinkage incorporation in a pattern is very important and plays a big role in
not only getting correct fit and drape of a garment but also measurements as graded specs.
Pattern grading is a technique of scaling a pattern to reproduce a pattern in other sizes. It
must be done accurately. To properly fit a pattern to a range of sizes, each pattern piece
needed to be graded, or systematically increased or decreased. The purpose of grading is to
proportionally increase or decrease the size of a pattern, while maintaining shape, fit,
balance and scale of style details. It’s important to remember that grading only makes a
shape larger or smaller and isn’t intended to change a shape. Grading also reflects the fact
that individuals of different sized are proportionately different, not uniformly different.
Terms;
Stacking or “0” point for grading :For grading it is important to have stack point
which will define the “x” or “y” grading of pattern. It is defined as “0” point located
at the centre of the pattern of a Front, back or sleeve panel. For centre front it is
perpendicular to the centre of check line. For sleeve the “0” point is centre of sleeve
at the bicep line.
Length Grade:
Front and back neck drop is applied to shoulder neck point. Shoulder line
should remain parallel between sizes.
Body length is distributed between the shoulder neck point and the bottom.
Grading is divided between shoulder/beck point, neck drop, armhole, waist,
hip and bottom. Body length combined grading is total of centre front length
and neck drop.
Neck width is applied at the shoulder neck point it is always parallel to check
line.
Armhole curve is combined measurement of armhole width and armhole
height grade
Sleeve Grade
Sleeve armhole is combined measurement of sleeve cap height grade and
sleeve bicep grade along the armhole curve.
Sleeve length from shoulder is distributed between the sleeve cap and
bottom sleeve edge. Sleeve cap grade is applied above bicep line and sleeve
cap while balance length is divided between bicep line and sleeve cuff.

37 | P a g e
Shrinkage
When fabric is cut for making garments, it is important to ensure that fabric is fully relaxed
and is not subjected to any additional tension or strain during rolling or unrolling while
layering for cutting. So fabrics are often relaxed prior to cutting to ensure that the shrinkage
is minimized in a garment. Garments which are unwashed and can shrink while laundering
at customers end are made with measurements with shrinkage tolerance included. Woven
fabric garments typically shrink just a little. This will usually be about 2-3% which is fairly
unnoticeable. Knits that are not garment dyed will be more affected by washing and drying.
Shrinkage for knit fabrics can be anywhere from 1-8% and 95% of this shrinkage will take
place the first time it is laundered. In these cases shrinkage is incorporated in all the
patterns of a garment. This shrinkage incorporated in patterns could be lengthwise or width
wise depending on type of fabric.
Shrinkage Adjusting
Shrinkage adjustments should not distort the original shape and balance of the patterns.
When shrinkage is applied to a panel in garment all corresponding patterns must also be
applied with shrinkage adjustments.

38 | P a g e
TASK TWO
Project Brief
Students are expected to do the research work in library , garment industry correlating the
classroom teaching on fabric , fabric storage , cutting , lay planning , line balancing ,
pressing , labelling , packing etc. in the garment industry with the reference study material
to write the written document of the complete work. The written work is suggested to be
supported by charts and graphs for analysis purpose.
39 | P a g e
Pre-Production: Fabric Selection
Introduction
Clothing refers to the various articles used to cover the body. Apparel may be divided into
two classes. First one the desire for warmth and for protection against elements, Secondly
the desire for satisfaction we receive from wearing clothing that makes us appear to
advantage. Baby's cloths need not be full of frills or elaborate, since the baby's comfort
should be the main criterion. Their clothes are meant to protect them from colds and chills,
while allowing enough freedom of movement for the limbs. Clothes should not be tight as
they will hamper the circulation and breathing
The appearance of a garment is greatly influenced by the fabric used for construction, not
all fabrics are suitable for all garments. To choose a suitable fabric for a specific end use calls
for basic knowledge in fabric construction and types of fabrics available in the market.
Fabrics are produced mostly from yarns. Few fabrics are directly produced from fabrics.
Fabrics are made from yarns and are constructed mostly either by weaving or knitting. In
Indian market, seventy percent of the fabrics are produced by weaving. Among the other
fabric constructions, lace making is worth mentioning. Felts are fabrics made directly from
fibers without making yarns.
Common scenarios of fabric selection;
Infant Clothing
Baby skin is very sensitive. Clothes must be soft and pliable to be really comfortable.
Hence soft, knitted, fabrics are popular. Cotton fabrics are suited for babies.
Synthetic are not absorbent and cause irritation for summer, simple cotton dresses
are suitable in the winter, a cotton dress is worn and on over it woolen garment can
be worn for comfort.
Toddler
The clothes for a toddler should be designed so that it gives mainly protection and
comfort. A toddler learns to stands, sit, creep, crawl, walk and climb. The clothes
toddler wear should allow them to move freely and comfortable. The clothes should
be light in weight but should give warmth. Soft, smooth, fabric which do not collect
soil and dirt would be ideal.
Pre School Child
At this age of 3 to 4 years the child become interest in its clothes, so selection should
be done carefully where the child learn mostly through clothes. Bright colours and

40 | P a g e
their favourite colours red, yellow, blue and green are preferred by children. Play
clothes should be more in their wardrobe.
A Preschool child clothes should be appropriative, durable and comfortable. Cotton
for summer wear, woollen for winter and teri-cot, silk materials can be worn with
cotton lining.
For Adults
Petticoats are generally are under wear garments which are worn next to the skin.
They should be absorbent and smooth which give comfort to the wearer. Generally
cotton, poplin, thin cambric, satin or rayon varieties can be worn. Slightly thick
variety of cotton handloom material can be used for petticoats for children.
Fabrics used in garment manufacturing can be categorised into two groups: properties and
characteristics. A property is a static physical dimension such as yards per pound; whereas,
characteristic is the reaction of the fabrics when a force is imposed up on it. Elongation,
elasticity, shrinkage and seam strength are examples of characteristics. These are measure
of reactions to dynamic conditions. Characteristics are physical or chemical changes in the
fabric resulting from the application of outside forces.
General Considerations of Fabrics
The apparel producer is interested primarily in the characteristics of a fabric. Although fabric
characteristics are related to fabric properties, a fabric property is of no interest to the
apparel manufacture unless it controls a fabric characteristic or cost factor vital to him, or
unless the property itself such as thickness or weight, has definite utility or style value.
There are three viewpoints to stipulating fabric selection;
The consumer’s view point
The fabric producer’s view point
The garment producer’s view point
The consumer’s interests lies solely in the appearance and wear ability characteristics of the
fabric; the durability, utility and style values. The garment producer is interested in the
garment production working characteristics of the fabric, the cost of producing a given
garment with the fabric. If the garment producer is a jobber or manufacturer who sells the
garment directly or indirectly to consumers, he will be interested, also, in all the consumer
values. If the garment producer is a contractor his interest lies only in the field of the
production cost aspect of the working characteristics. The same applies to the fabric
producer. If he fabricates cloth for garment manufactures, he must consider garment
production work characteristics. However, if the fabric producer makes cloth for over the
counter retail sales, he does not have to consider whether the working characteristics are
good enough to produce the garment with industrial equipment and methods.

41 | P a g e
Fabric Identification for Garment
Designers and merchandisers may go to major fabric markets to collect ideas, check trends,
examine few products, and seek sample yardage. Fabrics may be designed and developed
by apparel designers or merchandisers and ordered from mills or converters according to
the apparel manufacture’s specification. Acquisition of piece goods is accomplished after
fabric samples and product specifications have been examined and lead times. Minimums,
delivery dates, put – up, and price have been negotiated. Identification of appropriate
fabrics is based on product information and testing provided by fabric vendors and/or
testing and product development conducted by apparel manufacturers. Sources of
information include fabric samples, specifications, and certification.
Apparel Fabric for Women’s and Children’s Wear
In the purchase of their apparel most women seek primarily for “look rightness and
serviceability”. For outer apparel look – rightness is probably the first consideration.
In the purchase of underclothing and children’s wear, serviceability is commonly the
first consideration, although look – rightness is nearly always a factor, too.
Serviceability is a combination of suitability of fabric and the quality of garments
construction. Differences in weight automatically limit some fabrics to particular
seasons and uses. In summer thin fabrics, such as voile, eyelet, batiste, sheer, creeps
and chiffons, in winter, for heavier materials such as wood tweeds, homes puns,
velvet, corduroy, and fur like fabric. Some stiff fabrics look better when a crisp
appearance is required; soft and clinging fabrics are appropriate when slinky, draped
effect is desired; rich and luxurious fabrics look best in the evening; washable fabrics
appear to advantage when worn in the house, in garden, and for sports.
Apparel Fabric for Men’s and boy’s Wear
Men's wear may be classified as: Men's clothing and Men's furnishings. A similar
division may be made for boy's wear. Work clothing is often treated as separate
classification. Men's and boy's furnishings are composed of similar articles, the chief
of which are shirts, sleepwear, underwear, hosiery, robes, ties, hand kerchiefs, belts,
suspenders, garters, muffles and scarf, sweaters and bathing suits. Men's jewellery
(non - textile) such as cuff links, studs, tie clips and stickpins, are also commonly
included in the classification. Men's clothing includes garments such as suits,
topcoats, cover coats, jackets and slacks. Boy's clothing includes suits, topcoats,
overcoats, jackets, and raincoats. With the emergence of fashion as selling force,
there are more divisions of men's and boy's section in department and specialty
stores.

42 | P a g e
Pre-Production: Fabric Relaxation
Relaxing” refers to the process that allows material to relax and contract prior to
being manufactured. This step is necessary because the material is continually
under tension throughout the various stages of the textile manufacturing process,
including weaving, dyeing, and other finishing processes. The relaxing process
allows fabrics to shrink so that further shrinkage during customer use is minimized.
Garment manufacturers perform the relaxing process either manually or
mechanically. Manual fabric relaxing typically entails loading the bolt of fabric on a
spinner and manually feeding the material through a piece of equipment that relieves
tension in the fabric as it is pulled through. Mechanical fabric relaxing performs this
same process in an automated manner.
Many garment manufacturers will also integrate quality assurance into this process
to ensure that the quality of the fabric meets customer standards. This step is
performed by manually spot-checking each bolt of fabric using a backlit surface to
identify manufacturing defects such as color inconsistency or flaws in the material.
Fabrics that fail to meet customer standards are returned to the textile manufacturer.
Pre-Production: About Fibers, Yarns And Fabrics
Fibers, yarns and fabrics used by the mills and manufacturers to create apparel products
and accessories are raw materials. Fabric is produced from natural fibers or manufactured
filaments that are spun, twisted, cured, shrunk, bulked or manipulated in other ways to
create in other ways to create yarn for weaving or knitting. Yarns are woven, knitted,
knotted and twisted or felted in different formations to produce a variety of fabrics.
Fibers
The smallest unit of a fabric structure is a fiber. The minimum length to width ratio for a
fiber is 100 to 1. Fibers used in apparel products are cellulose derived from plants, protein
from animals or synthetic chemicals.
Fibers are available in staple and filament forms.

43 | P a g e
Filament
Comparatively long fibers that are measured in meters or yards that are used as
filaments or cut into staple (tow) to be spun into yarns or woven, knitted or
processed into non-woven fabrics. The only natural filament fiber is silk, typically
1,463 meters in length. All others are synthetic.
Staple
Short fibers measured in millimetres or inches ranging from 5 millimeters to 500
millimeters in length. Staple length fibers appear naturally in celluslosic fibers such
as cotton or flax. They may also be cut from filament fibers. Staple fibers are spun
into yarns or made into fabrics.
Some fibers are also called tow. Tow are synthetic fiber strands that are cut down into
staple lengths, ranging from 2.5 millimeters to 203 millimeters, to be spun into yarns or
used to make fabrics.
Classification of fibers based on their origin:
Cellulosic Fibers
Fibers made from cell wall of seeds, leaves, stems, or bast.
Example;
Cotton
Flax / Linen
Jute
Ramie
Hemp
Sisal
Protein Fibers
Fibers that are naturally found in animal hair, feathers and silk.
Example;
Alpaca
Angora
Camel Hair
Cashgora
Cashmere
Down
Horsehair
44 | P a g e
Llama
Mohair
Silk
Vicuna
Wool
Synthetic Fibers
Fibers composed of monomers linked together to form polymers.
Example;
Acrylic
Aramid
Elasterell-p
Lastrol
Modacrylic
Nylon
Olefin
Saran
Cellulosic and protein fibers are natural fibers and synthetic fibers are manufactured fibers.
Some fibers derived from cellulosic fibers become manufactured fribers during processing.
Example; acetate, viscose, rayon, lyocell, bamboo and azlon.
Yarn
A yarn is composed of staple or filament fibers conductive to the formation of textiles by
weaving, knitting or knotting, or chemical, thermal or mechanical bonding. The composition
of a yarn consists of fiber content, fiber length, ply and twist.
Singles Yarn
A yarn formed by twisting fibers or multiple filaments together. When the yarn is
twisted in the reverse direction, the fibers can be pulled from it. A singles yarn can
also consist of one continuous filament fiber.
Ply
A twisted strand of two or more singles yarns. The number of ply depends on the
qualities desired in the yarn:
Strength
Smoothness
Diameter

45 | P a g e
Construction
Use
Twist
The number of turns applied to a yarn to hold the fibers together.
Z-twist: The direction in which the twist of a yarn is applied. Z- twist yarns,
when held vertically, create spiral diagonal lines that extend from left to
upper right, forming same type of line as indicated by the midlle section of
the letter Z. these yarns become tighter when twisted on their axis in the
right direction.
S-twist: S yarns, when held vertically, create spiral diagonal lines that extend
from right to the upper left, forming the same type of line as indicated by the
middle section of the left. These yarns become tighter when twisted on their
axis in the left direction.
Turns per inch/meter/centimetre
The amount of twist added to a length of yarn when one end is rotated while the
other is held stationary. The amount of twist added to a yarn affects the;
Abrasion resistance
Appearance
Cost
Performance
Strength
Yarn Number
Method for measuring the fitness of a yarn. Yarn number systems include direct and
indirect.
Direct Yarn Number: Yarn number system for measuring the mass/weight per unit
length of filament yarn; the larger the yarn the higher the number. This is used to
measured filament yarns. The direct yarn number system is further delineated into
the following;
Denier: Used to describe the mass per unit length of filament yarns
Tex: Used to describe the mass per unit length of spun yarns made from silk
or manufactured fibers
Kilotex: Used to describe the mass per unit length of thick spun yarns made
from silk or manufactured fibers

46 | P a g e
Decitex: Used to describe the mass per unit length of fine filament yarns
Indirect Yarn Number: Yarn number system for measuring the length per unit of
mass/weight of spun yarn made from staple fibers; the finer yarn, the higher the
number. This system is used for measuring cotton, linen, abd wool yarns. The
indirect yarn number system is further delineated into the following;
Cotton Count: Used to describe the length per unit of mass/weight of cotton
and cotton blend yarns.
Lea: Used to describe the length per unit mass/weight of linen and linen-like
fiber yarns.
Metric: Used to describe the length per unit mass/weight of all spun yarns.
Run: Used to describe length per unit of mass/ weight of coarse woollen
blend yarns.
Worsted: Used to describe the length per unit mass/weight of fine worsted
wool, worsted wool blends and acrylic yarns.
Yarn Specifications
A yarn specification is a detailed list or description of the standards to be met as well
as the means for determining whether requirements for the material or product are
satisfactory or not. Yarn specifications include;
Dye specifications and colour standards
Fiber content
Yarn type
Yarn structure
Yarn twist
Number of turns per inch
Single or number of plied yarns
Yarn number and yarn number system
Strength and elongation requirements and tolerances
Tolerance for yarn defects and threshold levels for acceptable degree of
irregularity
Fabrics
Fabric structure is the result of the process by which fiber or yarn becomes cloth / fabric /
textile. Fabric structures range from woven, knit, nonwoven, braided or knotted materials.
Any combination of finishes or treatments may be applied to the fiber, yarn, or goods at one

47 | P a g e
or more stages of production, whether for functional, decorative or permanent purposes.
Finishes and treatments affect the hand, weight and texture of the finished material.
Variations and combinations of fiber, yarn, construction and finish determine the design
potential of the finished fabric, including how it may be draped.
Fabric selection for garments depends on:
Design and style of the garment
Type of garment
Purpose, function and use of the garment
Care of the garment
Addition of findings and trimmings
Method of construction
Classification of fabrics based on fabric structure;
Woven
All woven fabric s possess a weave structure. This the manner in which warp and
filling yarns are interlaced at 90-degree angles tpo each other to form a woven
fabric. The method used to interlace the yarns determines the weave structure.
Fabric width depends on the size of the loom or the manufacturer’s specifications.
The number of harnesses determines the construction of woven goods. A harness is
the mechanism on a loom that looks like a rectangular frame that holds the
heedless, needle like wires threaded with yarns. The harnesses are raise and lowered
to create a path for the shuttle to pass through during the creation of woven
material. Two harnesses for plain, three or more for twill, five to twelve for satin and
as many as forty for jacquard. Types of weave structures;
Plain Weave: A basic weave structure in which
filling yarns are passed over and under each
warp yarn alternating each row. Plain weaves
can be balanced (the number of warp and filling
yarns are identical in numbers, size and type)
and unbalanced (the number of warp yarns is
different in size, type or number from the filling
yarns, giving the fabric a ribbed texture.
Twill Weave: A basic weave structure in which the filling yarn is carried over
two or more warp tarns then under one or more yarns to the left or right in
subsequent rows. Right hand twill weaves create diagonal line that extends

48 | P a g e
from the lower left to the upper right.
Left hand twill weaves create a
diagonal line that extends from the
lower right to the upper left. Tiwll
weaves can be even (the number of
filling yarns passing over and under
the warp yars is the same), uneven
(the number of yarns on the afce of
the fabric is different from those on
the back. Uneven twill fabrics can be
warp-face or weft-faced), warp-face
twill (the warp yarns create the diagonal effect because more of these yarns
are on the surface of the fabrics) and Weft-faced twill (the filling or weft,
yarns create the diagonal effect because more of these yarns are on the
surface of the fabric).
Satin Weave: A variation of an extremely unbalance twill weave having four
or more yarns float on the surface before passing under one yarn. Satin
weaves can be warp-face or weft face.
Leno Weave: An advance weave structure in
which a pair of warp yarns is twisted back and
forth, creating a loop in which the filling yarn
is caught and held in place. Leno weave
structures include; grenadine and
marquisette.

49 | P a g e
Pile Weave: An advanced weave structure created by weaving in an
additional set of warp or filling yarns into the base yarns that appear as loops
on the surface of the fabric. These loops can remain or be cut.
Double Cloth Weave: An advanced weave structure created by weaving two
fabrics on the same loom, above and below each other, having two layers
interlock by another set of yarns that interlaces both fabrics to attach them
together or as one cloth.

50 | P a g e
Dobby Weave: An advanced weave structure that creates a geometric
pattern in the fabric.
Jacquard Weave: An advanced weave structure that creates a motif or
figured pattern in the fabric.
Knits
A fabric structure constructed through the process of interlocking loops. Knit fabrics
consist of a series of stitches that are formed by needles. These stitches are
produced by one or more interlocking loops of yarn ends or equivalent material.
Terms related to knits;
Wales: are the vertical columns of stitches or loops in the lengthwise
direction of the fabric.
Courses: are the horizontal rows of stitches or loops in the crosswise
direction of the fabric.
Gauge: indicates the number of wales per inch in a knitted fabric; fineness of
the knit fabric; the number of needles per inch used in a machine to create a
knit fabric; and size of the stitch.
Variations in the pattern of knits are achieved by changing the arrangement of the
basic stitch of loop. The basic nature of the structure of knits offers stretch-ability
not found in woven goods. The ability of a knit to stretch varies according to the
direction and complexity of the formation of loops, the size of the stitch (gauge), and
the weight of the yarn (denier). Knits can be manufactured to stretch in either the
course or wale direction, or both, depending on the elasticity desired.
Knitting machines produce either tubular or flat goods in a variety of widths
depending on the type of machine and specifications of manufacturers. Tubular and
flat goods are used for cut and sew production of knit garments.
Flatbed knitting machines can produce full-fashioned or knit to shape garments
knitted to fit the shape of the body through addition or subtraction of stitches. Pre-
shaped, two dimensional knitted pieces of a garment are produced by knitting
machine and emerge ready to be stitched together. Linking or looping is the process
of joining knit trims to the garment by means of Elastic Chain Stitch Seam.
Knit and wear garments can also be produced on some flatbed knitting machines.
Similar to full-fashioned, knit and wear produces pre-shaped three-dimensional
knitted garments to fit the shape of the body but do not require additional stitching
assembly operations such as cutting, sewing and linking.

51 | P a g e
The direction in which the loops are formed determines the knit structure. The two
general classifications of knitted structures are weft knits and warp knits.
Weft Knit: identified by one continuous yarn forming courses across the
fabric. A single yarn passes horizontally to all the needles to construct loops
in a course or row. Each new course is added to the last row of stitches.
These knits are characterised by their moderate to high amount of stretch in
the course direction. The amount of stretch provided in the wale direction
varies.
Warp: identified by a series of yarns forming wales in the lengthwise
direction of the fabric. Each course stitch is formed by a different yarn.
Courses are joined together by the adjacent course or row. These knits are
characterized by their lack of stretch in lengthwise direction. The amount of
stretch provided in the clockwise direction varies.
Twisted
Open work fabric structures such as lace and net are made by twisting and knotting,
looping, knitting or stitching a network of thread or yarn together.
Lace: An open network structure created through twisting and knotting is
produced in a wide range of widths, weights, textures and motifs with or
without decoratively finished edges. The intricacy and density of the design,
fiber content, yarn size and type and the number of yarns per square
inch/meter determines the quality.
Net: An openwork fabric structure created through twisting ina variety of
widths.
Nonwovens
A nonwoven fabric is made from a fiber web structure rather than from yarns. A
fiber web structure can be produced chemically with bonding agents, mechanically
through fiber entanglement, or thermally by fusing the fibers together with heat.
The method of manufacturing nonwoven fabrics varies with the nature of the fiber,
web formation and bonding agents used. Depending on the technique, the fibers
may be laid in a parallel, cross, or random web formation.
Nonwoven fiber web structures and their processes for fabric formation include:
Dry-laid and wet-laid web formations: in which either needle punching
mechanically locks fibers together or chemical adhesives bind the fibers
together.

52 | P a g e
Hydro-entangled or spun-laced web formations: in which high-pressure water
jets mechanically lock the fibers together.
Melt-down and spun-bonded, spun-laid or flash-spun web formations: in
which heat and pressure bond the fiber together.
Nonwoven fabric structures;
Composite: A fabric formed by a process in which outer or face fabric is
joined to the back or lining ply by an adhesive, bonding, foam fusing or
thermoplastic agent. Bonding or laminating changes the hand of the outer
layer, stabilizes open weaves, reinforces a stretch or pliable surface, acts as a
backing and provides stability to the face fabric. Laminated fabrics include
foam between the face and the under-ply, whereas bonded fabrics are fused
directly to the under-ply.
Felt: A nonwoven fabric structure produced by the application of moisture,
heat, agitation and pressure to a web of fibers, forming an interlocking,
uniform matted material.
Film: A sheet of clear or opaque material formed from thermoplastic
polymer. Film is produced in a variety of textures ranging from smooth to
rough and in finishes ranging from shiny to matte. It can provide a protective
membrane.
Animal Skins
Animal skins come from small animals and hide from larger animals.
Fur: Fur is dressed (chemical process to preserve fur to maintain suppleness
and prevent rotting) animal pelt (Fur that has not been chemically processed)
containing both skin and hair of the animal.
Leather: Leather is the skin or hide of an animal that is chemically processed
into one of a variety of surfaces, thicknesses and colours. The irregular shape
of a finished skin is determined by the animal. Skins and hides are sold by the
square foot. Each skin is marked at the tail end of the wrong side, indicating
its total length. The thickness of the skin determines the number of ounces
that 1 square foot equals.
Terms;
Split Leather: from a thick hide that is processed into thinner sheets to
obtain a rough surface on both sides.

53 | P a g e
Suede: the flesh side of the hide or skin to preserve leather to
maintain suppleness and prevent rotting.
Tanning: Chemical process to preserve leather to maintain suppleness
and prevent rotting.
Top-grained leather: Outer surface of the hide or skin with the hair
removed.
Pre-Production: Fabric Inspection
Introduction
Apparel manufacturers inspect the fabric stock upon arrival, so that any fabric irregularities
are caught early in the production process. Textile producers also generally inspect fabrics
before sending them to manufacturers.
Fabric Inspection is an
important aspect followed
prior to garment
manufacturing to avoid
rejects due to fabric quality
and facing with unexpected
loss in manufacturing.
Fabric inspection is done for
fault/defect rate, fabric
construction, fabric weight,
shrinkage, end to end or
edge to edge shading,
colour, hand feel,
length/width, print defect
and appearance. Fabric
inspection ensures to
minimize the rejection of
cut panels or rejected garments due to fabric faults. Cutting inspected and approved fabric
ensures not only finished garment quality but also reduce rejects, improves efficiency and
timely deliveries.
General Inspection Procedures
Fabric inspection is done in suitable and safe environment with enough ventilation
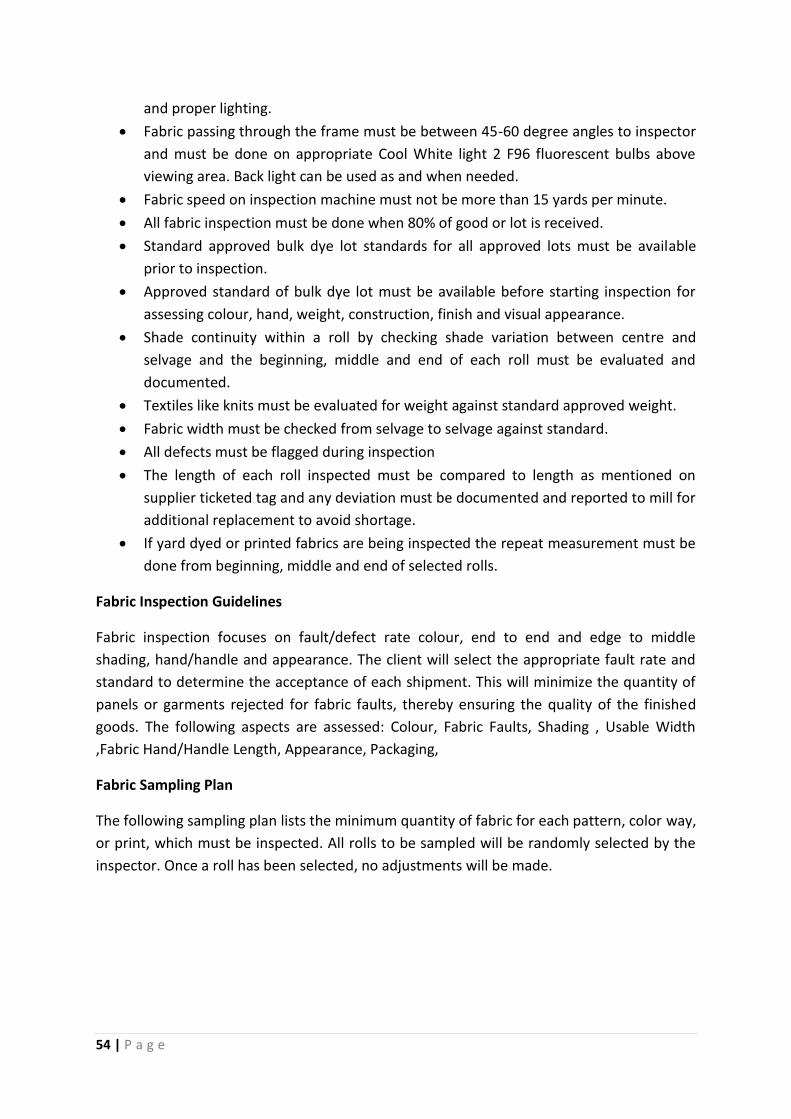
54 | P a g e
and proper lighting.
Fabric passing through the frame must be between 45-60 degree angles to inspector
and must be done on appropriate Cool White light 2 F96 fluorescent bulbs above
viewing area. Back light can be used as and when needed.
Fabric speed on inspection machine must not be more than 15 yards per minute.
All fabric inspection must be done when 80% of good or lot is received.
Standard approved bulk dye lot standards for all approved lots must be available
prior to inspection.
Approved standard of bulk dye lot must be available before starting inspection for
assessing colour, hand, weight, construction, finish and visual appearance.
Shade continuity within a roll by checking shade variation between centre and
selvage and the beginning, middle and end of each roll must be evaluated and
documented.
Textiles like knits must be evaluated for weight against standard approved weight.
Fabric width must be checked from selvage to selvage against standard.
All defects must be flagged during inspection
The length of each roll inspected must be compared to length as mentioned on
supplier ticketed tag and any deviation must be documented and reported to mill for
additional replacement to avoid shortage.
If yard dyed or printed fabrics are being inspected the repeat measurement must be
done from beginning, middle and end of selected rolls.
Fabric Inspection Guidelines
Fabric inspection focuses on fault/defect rate colour, end to end and edge to middle
shading, hand/handle and appearance. The client will select the appropriate fault rate and
standard to determine the acceptance of each shipment. This will minimize the quantity of
panels or garments rejected for fabric faults, thereby ensuring the quality of the finished
goods. The following aspects are assessed: Colour, Fabric Faults, Shading , Usable Width
,Fabric Hand/Handle Length, Appearance, Packaging,
Fabric Sampling Plan
The following sampling plan lists the minimum quantity of fabric for each pattern, color way,
or print, which must be inspected. All rolls to be sampled will be randomly selected by the
inspector. Once a roll has been selected, no adjustments will be made.

55 | P a g e
Fabric Inspection Documentation
To ensure proper documentation on the Inspection report the following should be correctly
recorded.
Mill Name
Fabric P.O. Number
Mill / Supplier roll number
Roll length
Ticketed
Actual
Difference between ticketed and actual
Recorded cut-able width
1st Measurement – At the start of the roll at least 2 meters or yards into the roll
2nd Measurement – At the middle of the roll
3rd Measurement – At the end of the roll at least 2 meters or yards before the end
Number of defect points per roll by 4 point system
Defect result calculated by roll in points/ 100 Sq Yards/Meters
Inspector comments if any per roll
Pre-Production: Fabric Storage
Cloth stocks should be stored so as to avoid soiling or mechanical damage, where possible at
a standard temperature and humidity, so that dimensional changes do not take palce in
56 | P a g e
store and there is no danger of fungal attack. The ends of rolls must be protected against
the light and dirt if stocks are held for any length of time. Care must be taken to avoid
distortion or damage during handling. Since most cloth arrives in heavy bolts, mechanically
handling not only reduces labour costs but may also avoid damage as well.
Never store cloth directly on the floor or cross stack. Racking, with fabric identification,
improves access and reduces damage. Folding into cuttle must only be done one or two
days before laying up.
Pre- Production: Product Design
Many apparel companies hire both merchandisers and designers as part of their design
and development team. Merchandisers often oversee and guide the design team to
determine what, when, and how much apparel to produce. At planning meetings, designers
use concept boards to present their ideas to the development and management teams.
These concept boards are typically collages of color and fabric swatches, fashion sketches,
and magazines photos that capture the theme or mood of the design ideas. Previous
season's sales figures, sales forecasts for the new season, and the overall outlook of
upcoming seasons will also be discussed in these planning sessions.
Designers begin to materialize their ideas using hand sketches, off-the-rack
garments, technical drawings, three-dimensional draping on dress forms, or computer-aided
design (CAD). CAD is becoming increasingly popular, partially due to the ease with which
images can be redrawn, altered, and modified; and partially attributable to the active
marketing efforts of apparel computer system manufacturers such as Gerber Technology,
Lectra Systems, Pad Systems, Inc., Snap Fashun and Tukatech, Inc.
After the design team reviews the line, designers transform those final designs destined for
actual production into sample garments. If the product is to be made offshore, the final
designs are translated into garment specification sheets. A garment specification sheet
consists of all the important information required to complete a pattern and prototype of
the design. Increasingly, garment specification software programs facilitate this process.

57 | P a g e
Pre-Production: Marker Making, Cutting And Bundling
Introduction to Marker Making
In preparation for production, graded patterns and textile materials must be prepared for
cutting, bundling and assembly. The sized production pattern pieces must be arranged in
layout appropriate for cutting.
A marker is a layout of pattern pieces and guide for cutting the garment fabric for
production. A marker may be digital or manually drawn, in one or all size ranges for a style.
Markers are also used for cutting prototypes in sample sizes. Patternmaking and grading
integrated software can create markers to be sent to automated cutting machines to
streamline production operations.
The Layout of Pattern Pieces, also known as Marker Layout, is the arrangement of
interlocking pattern pieces on paper or virtually on a computer, in preparation for cutting.
Maker layout considerations
Pattern layouts help estimate yardage requirements for garments. Pattern pieces are
arranged with regard to the structure, design and width of fabric. A marker is planned to get
the most use of yardage to minimize waste, known as Fabric Fallout, which is the material
remaining on the cutting table after garment parts are off-loaded.
Grain-line marks on individual pattern pieces indicate the direction of the lengthwise grain.
Factors of garment design affecting the direction of grain placement of pattern pieces on a
marker layout include:
Balance
Direction or pattern in fabric design or construction
Direction of raised, brushed or looped nap
Light refraction quality of weave or knit fabric
When preparing marker layouts for cutting, the marker maker places the lengthwise grain,
as indicated on the individual pattern pieces, on the length grain of goods.
When a marker maker creates a digital marker, a Buffer, or invisible barrier, can protect all
or specific pieces from being placed too close to another in the layout. Another option when
creating digital marker is Blocking. Blocking protects pattern pieces and accommodates the
width of the knife blade to prevent unintentional cutting. If a paper copy of a digital marker
is needed for cutting, it is sent to a printer to be plotted on a continuous roll having the
same width dimensions as the fabric to be cut and is the length of the marker.
Marker Layout for cutting specific fabrics

58 | P a g e
Marker makers consider layout in relation to how the fabric will be spread on the cutting
table. Fabric Spread indicates how the material will be laid into multiple piles for cutting.
When each layer of fabric is laid face up or face down in the spread, it is referred to as
Single-Ply Spread. Single-ply spreads are cut at each end of the spread in order to keep all
layers facing the same direction. A Face-To-Face Spread is laid out like an accordion. Each
new ply of fabric is spread and folded back on the previous layer so that the face sides of the
fabric lie against each other. Garments are cut from tubes of fabric in a Tubular Spread. Such
garments do not have side seams.
Goods with particular weaves, patterns or finishes known as Directional Fabrics, need
special consideration in planning a marker layout. This group of fabrics includes:
Brushed
Knitted
Looped
Napped
One-way fabric design
Pile
Satin
Geometric fabric designs such as plaids, stripes checks and borer designs require a special
layout so that after the fabric is cut and seamed, the pattern matches.
Types of Marker Layouts for specific fabrics
Animal Skin Marker Layout: Skins are considered napped fabrics and require a one-
way marker layout on a single spread.
Bordered Fabric Design Marker Layout: pattern pieces are arranged on the marker
on either the length-or-cross-grain direction of a border print to use or emphasise
the border design on the garment.
Finished Border Fabric Maker Layout: Pattern pieces are arranged on the marker on
either the length-or-cross-grain direction of a finished border fabric to utilize the
border design on the garment.
Diagonal Design Fabric or Diagonal Print Fabric Marker Layout: All pattern pieces are
placed in the same direction of fabrics printed with stripes, geometric pattern or
motif pattern that forms diagonal lines from selvage to selvage.
Diagonal Weave Fabric or Twill type Fabric Marker Layout: Pattern pieces are
arranged on the marker in a one-way direction with the grain-line parallel to the
selvage of a twill weave to avoid colour tone differences caused by light refraction.

59 | P a g e
Directional Design Fabrics Marker Layout: Pattern pieces are placed in the same
direction in the marker layout
Knit Fabric Marker Layout: Pattern pieces are arranged on the marker in a one-way
direction with the grain-line parallel to the selvage for tubular, sweater and other
knit fabrics to avoid colour tone differences caused by light refraction.
Light-reflecting fabric Marker Layout: Pattern pieces are arranged on the marker in
one way direction with the grain-line parallel to the selvage to avoid colour tone
differences caused by light refraction.
Napped Fabric Marker Layout: Pattern pieces are arranged on the marker in one way
direction with the grain-line parallel to the selvage to avoid colour tone differences
caused by light refraction. Garments are designed to have the brushed surface
oriented downward.
Pile Fabric Marker Layout: Pattern pieces are arranged on the marker in one way
direction with the grain-line parallel to the selvage to avoid colour tone differences
caused by light refraction. When the marker is laid out for cutting the fabric in the
downwards direction, the pile of the material in the finished garment possesses a
smooth texture and the colour tone is lighter, with silver cast sheen. However, some
velvet or velour fabrics are laid out on the marker so they are cut with the pile
oriented in an upwards direction. This provides a more luxurious appearance to the
garment.
Balanced Plaid Marker Layout: Pattern pieces are arranged in the marker layout so
the geometric pattern design matches or produces chevrons at seam lines.
Unbalanced Plaid Marker Layout: Pattern pieces are arranged in the marker layout in
one way direction.
Uneven Plaid Marker Layout: Pattern pieces are arranged in the marker layout in one
way direction in order to match the plaid at the seams.
Balanced Stripe Marker Layout: Pattern pieces are arranged in the marker layout so
the geometric pattern design matches or produces chevrons at seam lines.
Even Stripe Marker Layout: Pattern pieces are arranged in the marker layout so the
geometric pattern design matches or produces chevrons at seam lines.
Uneven Stripe Maker Layout: One-way marker layout is required to continue stripes
in consecutive order at a seam line.
Fabric Spreading
60 | P a g e
Fabric is shipped on rolls to manufacturers and cloth is measured, inspected and rewound in
preparation for cutting. The wound fabric is placed on a spreading machine that moves back
and forth over the cutting table, laying the piles at the desired length, as determined by the
marker layout. The spreading machine and cutting table widths are determined by the
widths of the goods. Table length is determined by the type of marker, plus allowance for
the fabric stretch factor and type of machinery.
A Layup is the total number of fabric Piles, one over the other, in a one-way spread, for
cutting multiple garment components when many garments must be cut simultaneously for
mass production. The complete marker is placed on the top of the ply on a layup that will be
manually cut. When a spread would be cut using a computer driven machine, the digital
marker is sent to the cutting machine and the cutting tool essentially draws the marker
layout on the layup as it is cut. Design elements and fabric type determine how a marker is
planned and how the fabric piles are spread.
When material is stretched as it is laid it is referred to as a Tight Spread. The opposite type is
known as Slack Spread, which possesses ripples and ridges in the layup that are caused by
spreading the fabric too loosely in the length-wise direction between the ends. When Fabric
Layups are created the selvages of the piles can be aligned at the centre or the edge of the
material. A Centre-Aligned Spread aligns the vertical midpoints of each ply, which creates a
layup having both sides that are equidistant from the lengthwise midpoint of the spread. A
Straight-Edge-Aligned Spread precisely aligns the selvages of the piles on one side of the
layup to form a straight edge. Depending upon the consistency of the width of the material
being spread, the opposite side of the layup may or may not be vertically aligned to form
parallel edges.
Equipment and terms used in fabric spreading;
Cutting Table: A stationary flat work area at waist height, with a width and length
designed according to the plant layout, fabric, spreading machine, or cutting
procedures. A cutting table is a base or work surface for layout and cutting
operations.
Plies: Multiple layers of fabric spread out for the purpose of cutting many garments
and their corresponding component parts at the same time.
Spreading Fabric: The process of superimposing a predetermined number of fabric
plies on the cutting table either manually or by means of a fabric spreading machine.
The end result of spreading is referred to as a lay, spread or layup.
Cut-off Machine: A magnetically guided electric cutter designed with a long handle
and equipped with a circular blade that operates in a grooved cross-table track.
61 | P a g e
End Catcher or End Guide Rail: A weighted crossbar hinged to a clamp secured base
that spans the cutting table. The catcher or end rail can be placed and locked at any
position on the spreading table. A serrated rubber facing on the crossbar eliminates
teeth and pinholes in the goods. The catcher is designed to swing out of the way
when cutting. An end catcher or end guide rail is used to:
Secure cloth in position when moving a spreader back and forth
Fold over goods at ends
Hold fabric ends securely
Spreading machines used at manufacturing units;
Face-to Face Spreader: Automated spreading machines that lays and aligns a ply of
fabric with each pass over the cutting table. A catcher actuates a reversing gear at
each end of the layup. The speed of the machine can be set to conform to the type
of fabric to be cut.
Manual Spreader: A manually operated spreading machine with a rail that permits
the operator to maintain alignment of the fabric edges while laying multiple plies of
the fabric on the cutting table. This type of spreader can lay face to face or one-way.
One-way Spreader: An automated spreading machine riding on a geared rail
synchronized to work with an end guide rail and cut-off machine at either end of the
layup.
Tubular Knit Spreader: An automated spreading machine with an adjustable
electromagnet to hold assorted widths of tubular fabrics in place. The machine is
actuated by the catchers to reverse direction of spreading at each end of the layup.
Cutting Fabric Layups
In preparation for cutting fabrics, manufacturers employ a variety of machines, including
large pieces of stationary equipment and handheld tools. Stationary and portable cutting
equipment in a variety of sizes are engineered for heavy-duty and general-purpose cutting
of lightweight to heavy-duty fabrics, from work clothes to lingerie. Blades are designed with
straight, serrated, wave or saw-toothed edges, to accommodate various constructions and
layup heights. In addition there are knifes engineered to cut through synthetic, foam, and
rubber materials.
Knives are sharpened with smooth, medium, coarse grit stones or belts, depending on the
edge needed for the type of fabric to be cut. A knife used for synthetic fabric requires
lubrication to reduce heat build-up, which causes fabric fusion.

62 | P a g e
To ensure the safety of the operator and produce quality cutting along the ends and
selvages of the fabric spread, manually operated portable cutting machines, such as , band
knife or knife blade, require a minimum of 4 inches of unoccupied space between the edges
of the cutting table and all edges of the fabric layup.
Stationary cutting machines controlled by computer software may contain a self-sharpening
blade, water jet, or a laser to cut the plies of fabric in a layup. Fabric plies are laid on the
table with a bristled surface to be cut by an automated machine with a vertical reciprocating
blade. The layup is covered with a film of plastic , then a vacuum beneath the bristled
surface removes the air to provide a dense, compressed block for cutting.
Machines used in the process;
Cloth Measuring and Inspection Machine: A stationary motor driven unit containing
a means for supporting a bolt of fabric and a mandrel for rerolling the fabric after it
has passed over an inspection board. Cloth measuring and inspection machines are
used;
To wind and unwind fabric
To measure and examine goods
Tpoo package and split fabric rolls
For inventory purposes.
Clamp: A gripping device consisting of two opposing metal arms joined at a central
pivot point to form handles and bills. Clamps are used to;
Hold fabric layers together
Hold a marker to a layup
Drill: A portable electrical driven rod operating with a vertical drilling motion, housed
in a frame and a base, with a control switch and handle. There are two styles of drill
points available;
Awl drill point: A solid needle that either cuts a hole in the fabric or severs
the yarns at a designated point. Awl drill points create a permanent hole that
is visible in the fabric but will be concealed within the finished garment.
Hypodermic drill point: A hollow needle filled with marking fluid that is
either removed during the pressing or permanently remains in the fabric.
The type of needles used is dictated by the type of fabric. Thinner needles are used
for closely woven fabrics and thicker needles are used for loosely woven fabrics.
Drills are used to;
Pierce holes for pattern markings
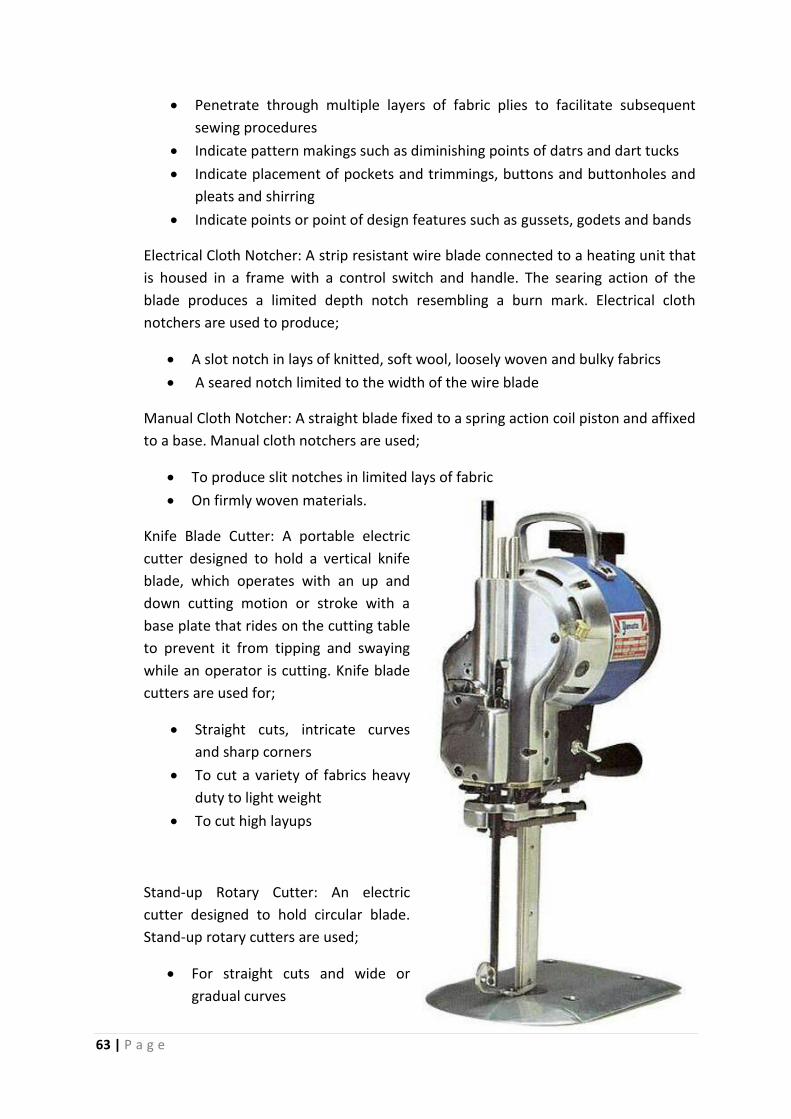
63 | P a g e
Penetrate through multiple layers of fabric plies to facilitate subsequent
sewing procedures
Indicate pattern makings such as diminishing points of datrs and dart tucks
Indicate placement of pockets and trimmings, buttons and buttonholes and
pleats and shirring
Indicate points or point of design features such as gussets, godets and bands
Electrical Cloth Notcher: A strip resistant wire blade connected to a heating unit that
is housed in a frame with a control switch and handle. The searing action of the
blade produces a limited depth notch resembling a burn mark. Electrical cloth
notchers are used to produce;
A slot notch in lays of knitted, soft wool, loosely woven and bulky fabrics
A seared notch limited to the width of the wire blade
Manual Cloth Notcher: A straight blade fixed to a spring action coil piston and affixed
to a base. Manual cloth notchers are used;
To produce slit notches in limited lays of fabric
On firmly woven materials.
Knife Blade Cutter: A portable electric
cutter designed to hold a vertical knife
blade, which operates with an up and
down cutting motion or stroke with a
base plate that rides on the cutting table
to prevent it from tipping and swaying
while an operator is cutting. Knife blade
cutters are used for;
Straight cuts, intricate curves
and sharp corners
To cut a variety of fabrics heavy
duty to light weight
To cut high layups
Stand-up Rotary Cutter: An electric
cutter designed to hold circular blade.
Stand-up rotary cutters are used;
For straight cuts and wide or
gradual curves
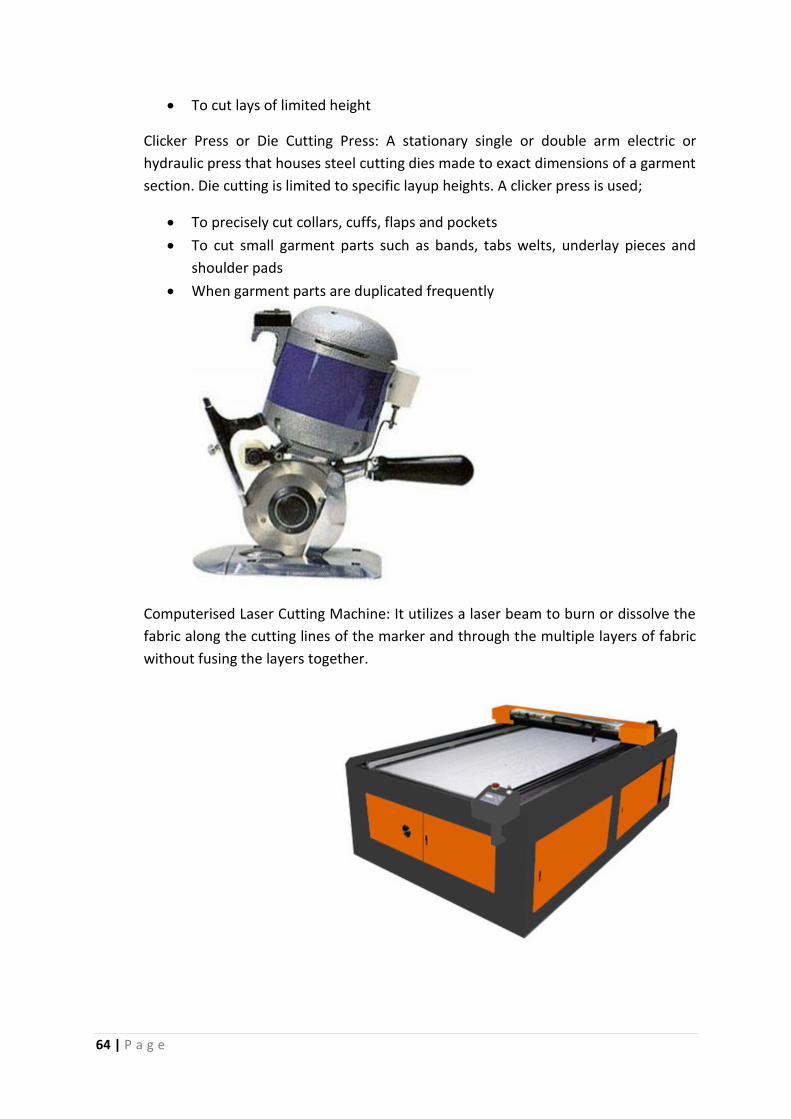
64 | P a g e
To cut lays of limited height
Clicker Press or Die Cutting Press: A stationary single or double arm electric or
hydraulic press that houses steel cutting dies made to exact dimensions of a garment
section. Die cutting is limited to specific layup heights. A clicker press is used;
To precisely cut collars, cuffs, flaps and pockets
To cut small garment parts such as bands, tabs welts, underlay pieces and
shoulder pads
When garment parts are duplicated frequently
Computerised Laser Cutting Machine: It utilizes a laser beam to burn or dissolve the
fabric along the cutting lines of the marker and through the multiple layers of fabric
without fusing the layers together.

65 | P a g e
Computerized Water Jet cutting Machine: A computer driven cutting machine that
utilizes a high intensity water jet stream to pierce through the multiple layers of
fabric at a high rate of speed that does not wet the fabric plies.
Computerized Vertical Reciprocating Blade Cutting Machine: A computer driven
cutting machine that utilizes a vertical reciprocating blade to shear through the
multiple layers of fabric.

66 | P a g e
Bundling
Bundle is a stack of cut garment sections that have been separated from the layup and
folded or tied. Bundles are sorted and grouped according to pattern to pattern size and
shade marking.
Upon commencement of cutting, a worker will offload the pattern pieces from the cutting
table, which are then counted, prepped to indicate shade and grouped and bundled
according to the designated production process to be used. If the garment parts require
fusing of interlinings this is typically completed in the cutting room.
Manufacturers use a variety of bundling methods depending upon their needs, with four
basic systems being the most common among local manufacturers:
Item bundling: all pieces that comprise a garment are bundled together.
Group bundling: several (10-20) garments are put together in a bundle and given to a
single operator or team to sew.
Progressive bundling: pieces corresponding to specific sections of the garment (such
as sleeves or a collar) are bundled together and given to one operator. Other
operators sew other parts of the garment, which are then assembled into the
finished garment in the final phase.
Unit production system (UPS): individual garment pieces are delivered to sewers
using a computerized, fully mechanized "assembly line" that runs throughout the
manufacturing facility. Using a UPS computer monitoring system, a manufacturer
can fully track the production of a garment, identify where sewing slowdowns are
occurring, and reroute garment pieces to other sewers who work more quickly.
Gerber Garment Technology Inc. manufactures a UPS system, which eliminates the
need for passing apparel piece bundles from worker to worker. This lowers labour
costs because employees spend less time handling bundles and more time sewing. It
also facilitates short-cycle manufacturing.
Modular or "team based" manufacturing: is another type of bundling that combines
some of the above characteristics. Developed in Japan, it is the grouping of sewing
operators into teams of eight to ten. Rather than each sewer performing a single
task, they work together on a garment from start to finish. One-third of the U.S.
apparel industry has switched to either unit production or modular manufacturing.
In Los Angeles, however, only a few major manufacturers engage in computerized
unit productions (constituting about ten per-cent of total production) while the
majority of contractors still use progressive bundling.
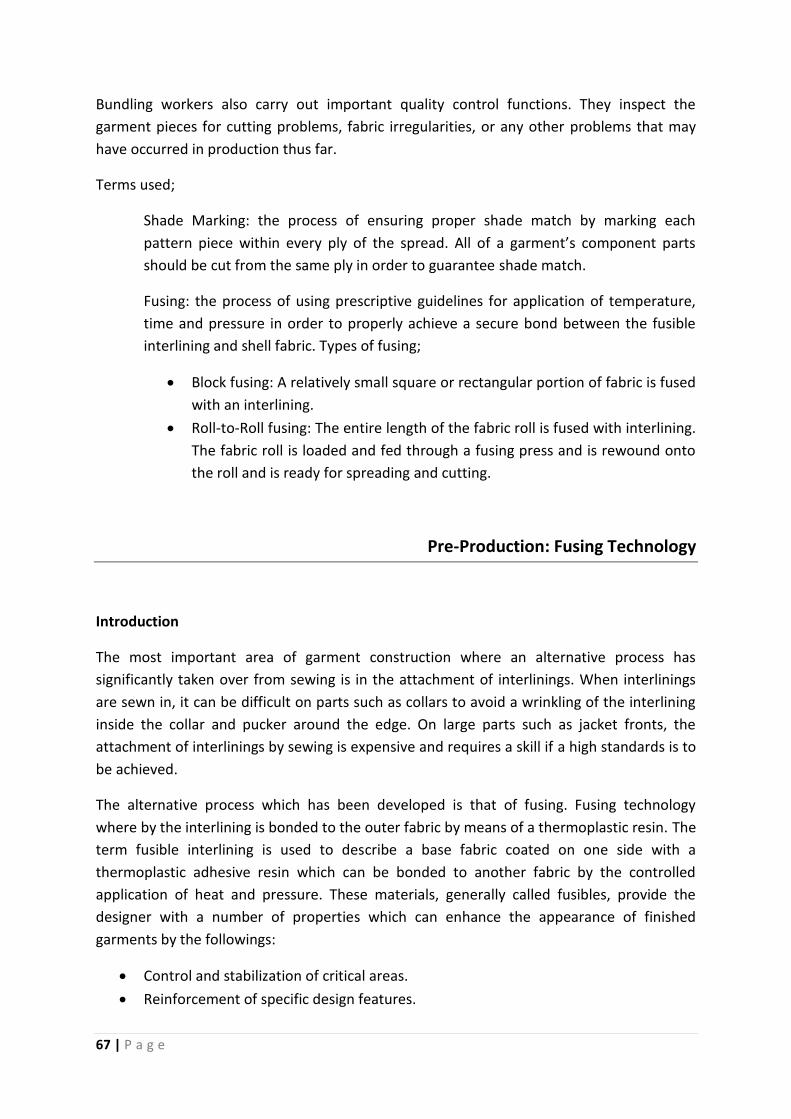
67 | P a g e
Bundling workers also carry out important quality control functions. They inspect the
garment pieces for cutting problems, fabric irregularities, or any other problems that may
have occurred in production thus far.
Terms used;
Shade Marking: the process of ensuring proper shade match by marking each
pattern piece within every ply of the spread. All of a garment’s component parts
should be cut from the same ply in order to guarantee shade match.
Fusing: the process of using prescriptive guidelines for application of temperature,
time and pressure in order to properly achieve a secure bond between the fusible
interlining and shell fabric. Types of fusing;
Block fusing: A relatively small square or rectangular portion of fabric is fused
with an interlining.
Roll-to-Roll fusing: The entire length of the fabric roll is fused with interlining.
The fabric roll is loaded and fed through a fusing press and is rewound onto
the roll and is ready for spreading and cutting.
Pre-Production: Fusing Technology
Introduction
The most important area of garment construction where an alternative process has
significantly taken over from sewing is in the attachment of interlinings. When interlinings
are sewn in, it can be difficult on parts such as collars to avoid a wrinkling of the interlining
inside the collar and pucker around the edge. On large parts such as jacket fronts, the
attachment of interlinings by sewing is expensive and requires a skill if a high standards is to
be achieved.
The alternative process which has been developed is that of fusing. Fusing technology
where by the interlining is bonded to the outer fabric by means of a thermoplastic resin. The
term fusible interlining is used to describe a base fabric coated on one side with a
thermoplastic adhesive resin which can be bonded to another fabric by the controlled
application of heat and pressure. These materials, generally called fusibles, provide the
designer with a number of properties which can enhance the appearance of finished
garments by the followings:
Control and stabilization of critical areas.
Reinforcement of specific design features.

68 | P a g e
Minimum of modification to the “handle “of the top cloth.
Preservation of a crisp and fresh look.
Advantage of using Fusing Technology
In most cases the use of fusible interlinings shortens manufacturing time with a
consequent reduction in direct labour cost.
There is a reduction in the skill required in many operators involving fusing
compared with the sewing in of interlinings and this leads to a reduction in training
time.
It is easier to achieve consistent quality in the lamination process than it is with
many of operations of sewing in of interlinings.
Fusible interlinings provide opportunities for alternative methods of garment
construction.
Process
Regardless of which fusible and machine are used, fusing is controlled by four processing
components:
Temperature: There is a limited range of temperatures that are effective for each
type of resin. Too high a temperature causes the resin to become too viscous, which
could result in the resin being forced through to the right side of the cloth
Time: Time is the only time element of any value during the fusing process is when
the top cloth and fusible are under pressure in the heating zone of the machine .This
time cycle for a particular fusible is determined by :
Whether the fusible has a high –or low melt resin.
If a high or heavy substrate is being used.
The nature of the top cloth being used, thick or thin, dense or open.
Pressure: When the resin is viscous, pressure is applied to the top cloth and fusible
assembly to ensure that:
Full contact is made between the top cloth and fusible.
Heat transfer is at the optimum level.
There is an even penetration of the viscous resin into the fibres of the top
cloth.
Cooling: Enforced cooling is used so that the fused assemblies can be handled
immediately after fusing. Cooling can be induced by various systems. Including
water-cooled plates, compressed air circulation and vacuum.
Requirements of Fusing
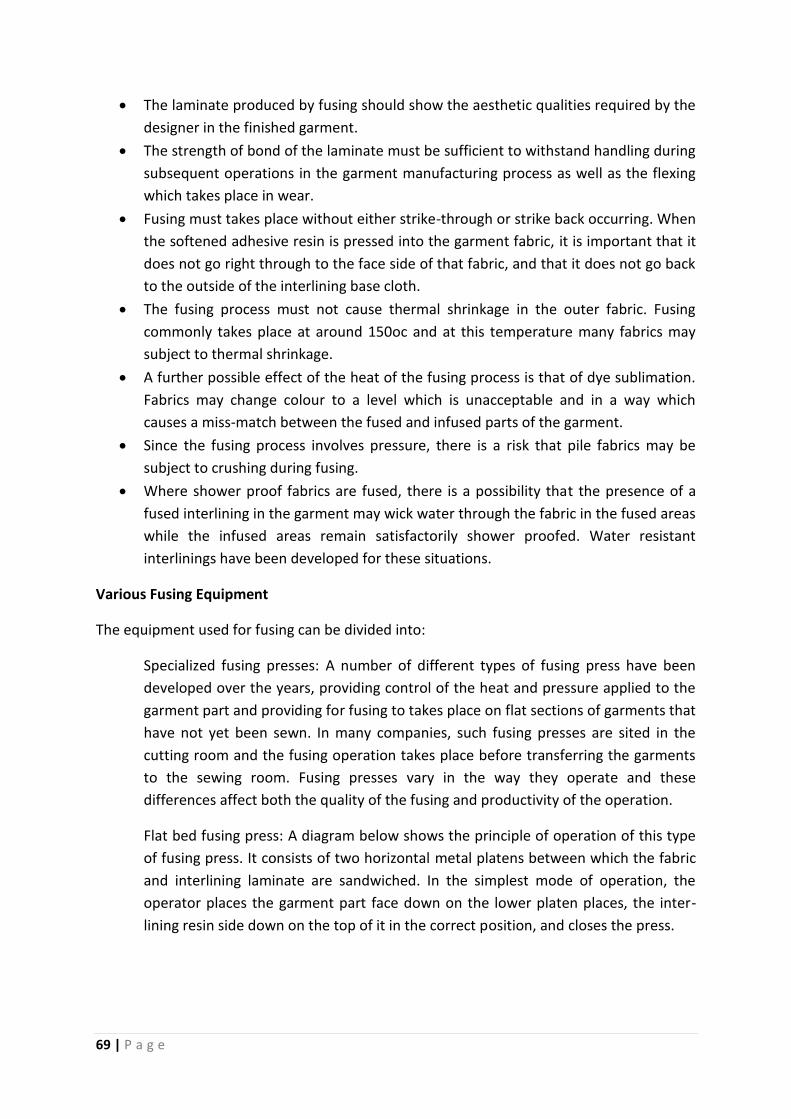
69 | P a g e
The laminate produced by fusing should show the aesthetic qualities required by the
designer in the finished garment.
The strength of bond of the laminate must be sufficient to withstand handling during
subsequent operations in the garment manufacturing process as well as the flexing
which takes place in wear.
Fusing must takes place without either strike-through or strike back occurring. When
the softened adhesive resin is pressed into the garment fabric, it is important that it
does not go right through to the face side of that fabric, and that it does not go back
to the outside of the interlining base cloth.
The fusing process must not cause thermal shrinkage in the outer fabric. Fusing
commonly takes place at around 150oc and at this temperature many fabrics may
subject to thermal shrinkage.
A further possible effect of the heat of the fusing process is that of dye sublimation.
Fabrics may change colour to a level which is unacceptable and in a way which
causes a miss-match between the fused and infused parts of the garment.
Since the fusing process involves pressure, there is a risk that pile fabrics may be
subject to crushing during fusing.
Where shower proof fabrics are fused, there is a possibility that the presence of a
fused interlining in the garment may wick water through the fabric in the fused areas
while the infused areas remain satisfactorily shower proofed. Water resistant
interlinings have been developed for these situations.
Various Fusing Equipment
The equipment used for fusing can be divided into:
Specialized fusing presses: A number of different types of fusing press have been
developed over the years, providing control of the heat and pressure applied to the
garment part and providing for fusing to takes place on flat sections of garments that
have not yet been sewn. In many companies, such fusing presses are sited in the
cutting room and the fusing operation takes place before transferring the garments
to the sewing room. Fusing presses vary in the way they operate and these
differences affect both the quality of the fusing and productivity of the operation.
Flat bed fusing press: A diagram below shows the principle of operation of this type
of fusing press. It consists of two horizontal metal platens between which the fabric
and interlining laminate are sandwiched. In the simplest mode of operation, the
operator places the garment part face down on the lower platen places, the inter-
lining resin side down on the top of it in the correct position, and closes the press.

70 | P a g e
Continuous fusing systems: These systems operate by passing the garment part, with
its interlining placed on it, past a heat source and, either simultaneously or
subsequently, applying pressure. Heat is provided in one of three ways:
With direct heating, the conveyor belt carries the components to be fused
into direct contact with a heated surface, either a drum or curved plates.
With indirect heating, the components are carried through a heated
chamber.
With low temperature, gradient heating, the components are carried through
a pre-heating zone. Heating is either direct or indirect. With this approach the
temperature reached at the glue line is only just above that required to make
the resin a viscous fluid and in some cases fusing takes place satisfactorily
with a glue line temperature of only 120oc .This reduces the possibility of
heat shrinkage in the outer fabric and is a feature of some of the most recent
fusing presses.
High frequency fusing: In the fusing press described so far, heat has been provided
by electric heating elements. This limits the number of thickness of fabric which can
be fused at once because of the time taken for the heat to transfer through the
fabric to the resin. If multiple layers of fabric and interlining could be stacked up and
fused simultaneously, productivity might be increased. Over a number of years,
attempts have been made to do this by generating heat by means of high frequency
energy, in the same way as in a microwave cooker.

71 | P a g e
Hand iron: Only those interlinings which can be fused at relatively low temperatures,
low pressures and in relatively short times are at all suitable for fusing by hand iron.
There are a number of difficulties. The operator cannot know the temperature at the
glue line and cannot apply pressure uniformly. The operator estimates the time
subsequently .Only small parts can be fused with any degree of success ,and then
only by pressing the iron for a fixed time onto the fusible, covering the area step by
step and using steam to help the heat transfer.
Steam press: In this case fusing takes place on presses of the type used for
intermediate and final pressing of made up garments. Temperature at the glue line is
achieved by steam from the head of the press .The temperature reached depends on
the steam pressure at the press head, the efficiency of the press and its cladding.
Pressure is provided mechanically or pneumatically by closing the press head on the
buck. Vacuum in the lower part of the press, or buck, assists rapid cooling.
Methods of Fusing
Some of the variations will now be described and illustrating them will demonstrate some of
the method of garment construction that involves fusible interlinings. The main variations
are:
Reserve fusing: In this method the outer fabric lies on top of the fusible. It is
sometimes used in fusing shirt and blouse collars. On flat bed presses with elements
only in the top platen, it is necessary to adjust temperature settings.
Sandwich fusing: This is effectively carried out only on a horizontal continuous press
where heat is applied both from above and below. Two pairs of components,
forming two laminates, are fused together, with the two outer fabrics on the outside
of the sandwich (of four layers) and the two interlinings on the inside. With correct
temperature settings, the glue line temperature may be achieved in both laminates
but the potential for strike-back occurring and causing all the layers to adhere
together is considerable.
Double Fusing: This is the fusing of two sorts of interlining to the outer fabric in one
operation. It is most commonly used in shirt collars and men’s jacket fronts
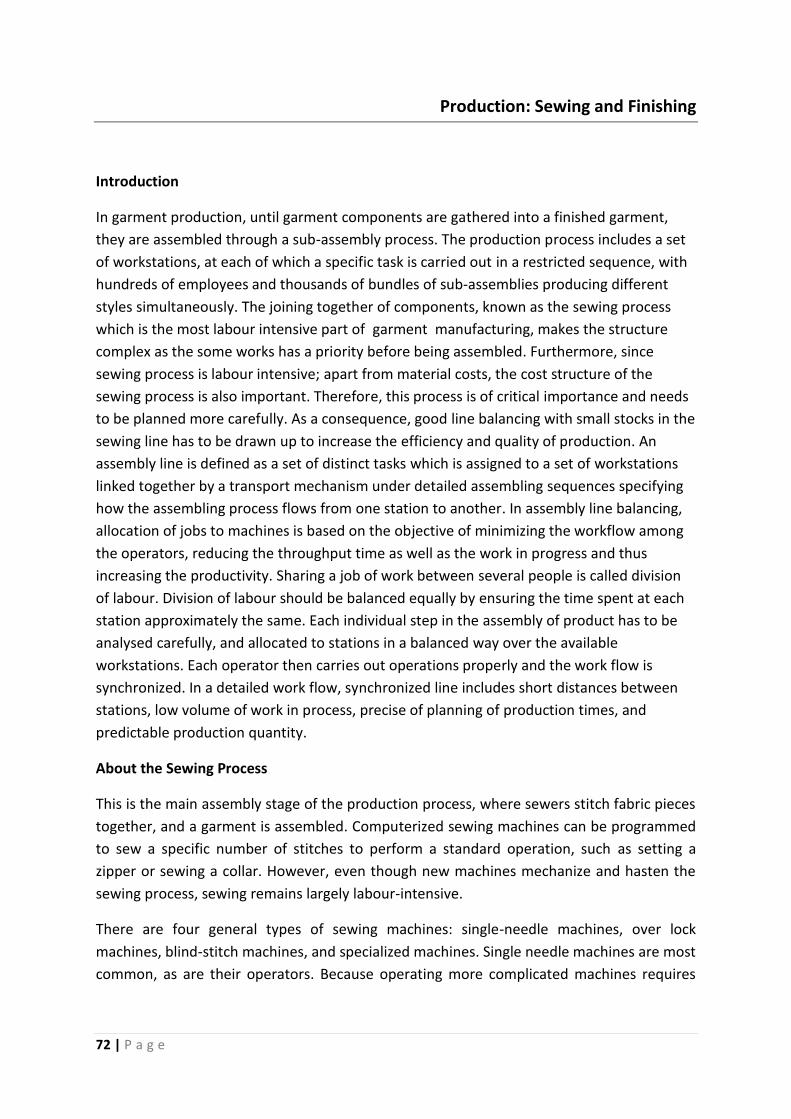
72 | P a g e
Production: Sewing and Finishing
Introduction
In garment production, until garment components are gathered into a finished garment,
they are assembled through a sub-assembly process. The production process includes a set
of workstations, at each of which a specific task is carried out in a restricted sequence, with
hundreds of employees and thousands of bundles of sub-assemblies producing different
styles simultaneously. The joining together of components, known as the sewing process
which is the most labour intensive part of garment manufacturing, makes the structure
complex as the some works has a priority before being assembled. Furthermore, since
sewing process is labour intensive; apart from material costs, the cost structure of the
sewing process is also important. Therefore, this process is of critical importance and needs
to be planned more carefully. As a consequence, good line balancing with small stocks in the
sewing line has to be drawn up to increase the efficiency and quality of production. An
assembly line is defined as a set of distinct tasks which is assigned to a set of workstations
linked together by a transport mechanism under detailed assembling sequences specifying
how the assembling process flows from one station to another. In assembly line balancing,
allocation of jobs to machines is based on the objective of minimizing the workflow among
the operators, reducing the throughput time as well as the work in progress and thus
increasing the productivity. Sharing a job of work between several people is called division
of labour. Division of labour should be balanced equally by ensuring the time spent at each
station approximately the same. Each individual step in the assembly of product has to be
analysed carefully, and allocated to stations in a balanced way over the available
workstations. Each operator then carries out operations properly and the work flow is
synchronized. In a detailed work flow, synchronized line includes short distances between
stations, low volume of work in process, precise of planning of production times, and
predictable production quantity.
About the Sewing Process
This is the main assembly stage of the production process, where sewers stitch fabric pieces
together, and a garment is assembled. Computerized sewing machines can be programmed
to sew a specific number of stitches to perform a standard operation, such as setting a
zipper or sewing a collar. However, even though new machines mechanize and hasten the
sewing process, sewing remains largely labour-intensive.
There are four general types of sewing machines: single-needle machines, over lock
machines, blind-stitch machines, and specialized machines. Single needle machines are most
common, as are their operators. Because operating more complicated machines requires

73 | P a g e
additional training, there is frequently an oversupply of single-needle operators and a
shortage of sewers who can use other machines.
Brief on different types of machines:
Bar-tacking Machine: A sewing machine that produces a tightly placed zigzag stitch
to reinforce areas of a garment that need extra strength. These are used for
securing;
Belt loops
Pocket openings
The base of fly front closures on jeans
Buttonhole Machine: A sewing machine that produces a stitched buttonhole. These
can produce;
Stitched buttonholes
Keyhole buttonholes
Stitched eyelet holes
Button Sewing machine: A sewing machine that stitches a button or sews on snap to
a garment.
Chain-Stitch Machine: A sewing machine that produces stitches formed either by
one lopper thread or by a looper thread and needle threads. Varities of chain stitch
machine include;
Blind stitch
Single needle chain stitch basting
Flatbed two needle double chain stitch
Feed off the arm lapseamer
Feed off the arm double chain stitch
Feed off the arm four needle double chain stitch
Feed off the arm four needle flatseamer
Cover-stitch Machine: A sewing machine that produces stitches formed by a lopper
thread and multiple needle threads that joins two plies of fabric while covering the
raw edges.
Lockstitch Machine: A sewing machine that produces a series of straight stitches
formed by interlocking of bobbin thread and needle thread. Varieties of lockstitch
machines include;
Single needle lockstitch
Double needle lockstitch

74 | P a g e
Single needle zigzag lockstitch
Over-lock Machine: A sewing machine that forms stitches over the edge of a seam.
Sewers need to be familiar with many different types of fabric and how to stitch each, but
they usually specialize in a particular fabric or a particular machine. Working with cotton
knit fabrics is very different from working with denim, silk, or linen. Learning how to work
with each fabric type is part of the training-usually informal-that sewers undergo. Sewers
may also specialize in zipper-setting, embroidery, and other hand stitching techniques.
Sewers may also affix labels. Certain labels identify the garment as belonging to a particular
line and designer. Other labels inform the consumer of fabric content, care instructions,
country of origin, size, or production by a union shop.
Sewing Process of a Shirt

75 | P a g e
Line Balancing
Line balancing is usually undertaken to minimize imbalance between machines or personnel
while meeting a required output from the line. The production rate is indicated as cycle time
to produce one unit of the product, the optimum utilization of work force depends on the
basis of output norms. The actual output of the individual may be different from the output
norms. The time to operate the system, hence, keeps varying. It is, therefore, necessary to
group certain activities to workstations to the tune of maximum of cycle time at each work
station. The assembly line needs to balance so that there is minimum waiting of the line due
to different operation time at each workstation. The sequencing is therefore, not only the
allocation of men and machines to operating activities, but also the optimal utilization of
facilities by the proper balancing of the assembly line.
The process of assembly line balancing involves three steps:
Take the units required (demand or production rate) per day and divide it into the
productive time available per day (in minutes or seconds). This operation gives us
what is called the cycle time. Namely, the maximum time that the product is
available at each workstation if the production rate is to be achieved.
Cycle time = production time available per day / units required per day
Calculate the theoretical minimum number of workstations. This is the total task
duration time (the time it takes to make the product) divided by the cycle time.
Fractions are rounded to the next higher whole number.
Minimum Number of Workstations = Σ Time for Task i / Cycle Time (i= 1 to n)
Where n is the number of assembly tasks.
Balance the line by assigning specific assembly tasks to each workstation. An
efficient balance is one that will complete the required assembly, follow the
specified sequence, and keep the idle time at each work stations to a minimum.
Cycle Time
Cycle time is defined as how frequently a finished product comes out of our production
facility. Cycle time includes all types of delays occurred while completing a job. So cycle time
can be calculated by the following formula.
Total Cycle Time = processing time + set up time + waiting time + moving time + inspection
time + rework time + other delays to complete the job
To meet customer demand or monitor productivity the cycle time and takt time should be
balanced in parallel. The higher cycle time than takt time may result the late delivery and
customer dissatisfaction whereas shorter cycle time than takt time may cause the excess
inventory or excess use of resource.

76 | P a g e
Handling System
The movement of cut parts around the sewing room should be kept to a minimum; for
example, it usually pays to make parts separately and to deliver them direct to a matching in
point. Most creasing is due to poor handling techniques.
Pressing and Folding
Pressing smoothens the surface, shrinks fullness and shapes the fabric at darts, curved
seams and cap sleeves. Fiber content determines the temperature of the pressing tool. Fiber
structure determines how the fabric is to be handled. Pressing tools selected depend on:
Type of fabric
Type of fabric finish
Type of garment
Construction of garment
Technique of pressing
Terms;
Pressing: The process of alternatively pressing down and lifting up a heated iron on
fabrics or newly stitched seams, darts and other parts of the agreement to set them.
Ironing: The process of sliding an heated iron back and forth over a wrinkled fabric or
garment by means of pressing with or without steam.
Set: The process of flattening or creasing a section of fabric or garment by means of
pressing with or without steam.
Steam: The process by which steam is passed through fabric, usually downward by
means of a steam iron, sleeve buck, form finisher or damped press cloth.
Shrink: The steaming process whereby an area of a garment or fabric is caused to
draw in or contract in size.
Under-press: the process of pressing small units of work such as finished collars,
cuffs, pockets, yokes, seams, darts and tucks, as a construction of garment proceeds.
Finger-pressing: The process of using one’s fingers in place of an iron to open a seam
or to crease a fold.
Sponging: The process of dampening the surface of a fabric or garment by means of
a wet sponge.
Production pressing equipment;

77 | P a g e
Gravity Feed Iron: A weighted metal plate, approximately 8 inches long by 5 inches
wide, that tapers to a point at one end, furnished with a handle and steam release
knob control. These irons are used to smooth or crease fabrics and to provide steady
source of steam for sustained operation.
Iron Rest: A flat rectangular shaped heat resistant flexible rubber or silicone coated
metal plate where an iron rests when not in use.
Iron Shoe: A metal fitting with a Teflon sheet laminated to the bottom surface that is
perforated and shaped to strap on the sole of a steam iron. An iron shoe is used in
place of pressing cloth to:
Prevent scorching that produces shine on the surface of fabrics
Evenly distribute steam from the iron over the entire ironing surface
Press the face of garments made of synthetic fabrics or blends
Industrial Vacuum Ironing Board: A flat board, approximately 54 inches wide, that
tapers to 6 inches at one end and is supported at table height.
Steam Iron and Boiler: A weighted metal plate, approximately 8 inches long by 5
inches wide, that tapers to a point at one end, furnished with a handle and steam
release knob. These irons are used to smooth or crease fabrics and to provide steady
source of steam for sustained operation.
Steam Press: A two piece flat or curved padded form that applies heat, moisture and
pressure when the upper and lower opposing beds are activated by a foot pedal or
handle. A steam press is used to:
Facilitate the pressing of a particular garment part such as a collar, shoulder
or body of a coat
Shape and smooth the final garment
Smooth and shape garment parts
Shrink fabrics before they are sewn
Press creases and pleats in the garments
Press the face and underside of garments at the same time
Form Finisher: A collapsible fabric structure simulating a garment shape that inflates
and applies heat and steam when activated. A form finisher is used to press an entire
garment at one time and is chosen because it will not distort the shape of the
garment or mar the fabric.

78 | P a g e
Post-Production: Packaging
Packaging can be defined as the process of packaging goods, or it can refer to the actual
container and component materials that hold and protect apparel products.
Packaging is available in a variety of forms, materials, sizes and quantities. Some important
functions of packaging include:
Maintaining shape of the product
Providing support for the product
Providing information to the consumer such as brand, size, price, style and colour
Aiding with merchandising on the sales floor
Attracting consumer to the product
Protecting against damage due to dirt, dust, light, mold, mildew and soil
Protecting against damage due to creasing, crushing, moisture, tearing, pressure and
wrinkling
Shipping Packaging
Merchandise is produced; it is packed and shipped o retailers in bulk. The end consumer
does not see the outer containment packaging used for shipping from the factory. Shipping
packaging includes the crate, box or bag and packing materials used during shipment of bulk
goods from the factory to retail revenue. It does not include the covering or wrapping used
for individual items within a shipment.
Terms;
Carton: A rigid, one piece container, made of paper or plastic, used to hold items
shipped in bulk that are folded, hung, or bundled together for transport.
Crate: A sturdy wooden container that holds cartons during shipping.
Hanger Box: A carton equipped with a rack for holding garments hung on hangers.
Shipping Box: Corrugated cardboard or rigid plastic container for transporting goods.
Packaging Tape: paper or plastic film with adhesive applied to one side that may
contain filament threads to reinforce and secure boxes during shipment.
Strapping: band of steel, polyester or nylon or plastic material manually or
mechanically wrapped around a shipping box and heat sealed to provide strength
and stability during shipping.
79 | P a g e
Merchandise Packaging
The materials used to pack individual product units for shipping or sale to the end user are
known as merchandise packaging. Many products are packed to ease the transition
between shipment and placement on the sales floor. Floor-Ready Merchandise is packed
and shipped from the factory, essential as it will be stocked and displayed in the retail store.
Individual product units are prepared with the required hand tags, bar code and price
stickers or tickets, security tags or devices and hung on hangers, folded or packed with the
appropriate means for making the merchandise ready for placement on store fixtures.
Merchandise packaging is classified as;
Packaging for Flat Folded or Rolled Merchandise: Folded items require fasteners to
secure the product to another packaging component to maintain the shape and
aesthetic appeal. Some apparel items are folded and secured with pins or clips to
retain the shape of the item within packaging. Pins and clips in several different
types and sizes are made of metal or plastic. Pins and clips are used for;
Attaching a hangtag to a garment
Securing the arms of a hung garment during shipping
Securing folded garments within the packaging
Apparel items that are packed in flat folded or rolled forms include;
Fleece sweatshirts and sweatpants
Jeans
Knit tops
Men’s dress shirts
Men’s and children’s undergarments and thermals
Pajamas
Scarves
Socks and hosiery
Sweaters
Ties
T-shirts
Turtle necks
Terms;
Box: A heavy pare, cardboard or plastic container formed or folded into
shape and glued together.

80 | P a g e
Flat Bag: A flexible polyethylene film sack sealed at the bottom with an open
top that can be secured with a heat seal, tied, stapled or taped with double
sided adhesive. They may contain air holes.
Tape: A strong, clear, semi-transparent or tan-coloured strip of material
having an adhesive surface on one or both sides.
Jet Clip: A clear or white plastic fastener. Jet clips are used to secure folded
blouses, shirts, slacks or jeans and commonly put in boxes of 1000.
Pinch Clip: A matte or shiny aluminium C-shaped bendable clip used to secure
woven or knitted garments that are folded.
Ball Point Pin: A pin with a very fine diameter having rounded tip and a flat or
rounded head that is used on fine or delicate fabrics.
Straight Pin: A pin with a very fine tapered sharp tip and a flat or round head.
T Pin: A rigid metal wire, from 1 to 2 inches in length, with a sharply pointed
tip and a T-bar-shaped head formed from the wire.
X clip/ Metal Clip: A rigid metal wire with rounded smooth ends that is
formed into a X shape with one closed end and one open end.
Tissue Paper: A lightweight translucent paper.
Butterfly: A small plastic or paperboard form available in a variety of shapes
and sizes to support the front collar portion of a folded dress shirt.
Neckband Insert: A plastic or paperboard band. The neckband is inserted
between the shirt neck band and collar to provide support and maintain the
shape of the collar.
Rubber Band: Flexible, extendable ring made from natural or synthetic rubber
latex and fillers.
Shirt Board: A paperboard stiffener that forms and supports folded shirts,
which are pinned and clipped onto the board.
Packaging for Hung Merchandise: Some products are best merchandised and
displayed hung. Apparel items that are packed on hangers include:
Suits
Dresses
Shirts
Blouses
Sweaters

81 | P a g e
Coats
Jackets
Pajamas
Trousers
Skirts
Shorts
Socks
Tights
Material used;
Duo jet Clip Tie Back Fastener: Two clear or white plastic clips with or without
teeth tied together with plastic thread. It is used to secure blouses, shirts and
sweaters that are hung.
Bra and Panty Hanger: these have end clips to which merchandise is secured
so as not to slip off the hanger. These hangers are packed in cartons of 500
units.
Bottom Hanger, Pant Hanger or Skirt Hanger: Clear, white or black plastic or
wooden hanger with a swivel chrome hook and a rod with metal clips and
vinyl cushions or one with metal clamps or clips that slide to hold a garment
in place.
Coat Hanger: Clear, white or black plastic or wooden hanger with wide,
smooth, sloped shoulders with a standard or long swivel chrome look.
Combination Hanger: Clear, white or black plastic or wooden sloped shoulder
hanger with a swivel chrome hook and a metal rod with plastic or metal clips
with vinyl cushions.
Suit Hanger with Bar: Black plastic smooth, contoured, slopped shoulder
hanger with a swivel chrome hook and moulded plastic bar to hang trousers.
Suit hanger with Dropped Hook Bar: White or black plastic hanger with wide
rounded smooth shoulders, a swivel hook and metal wire rod dropped 10
inches from the shoulders that is equipped with plastic or metal clips with
vinyl cushions.
Suit Hanger with Locking Bar: Black plastic or wooden curved, slopped hanger
with a swivel chrome hook and a wooden or plastic round rod with a thick
metal wire that hooks onto the rod.

82 | P a g e
Top hanger, Shirt Hanger or Dress Hanger: Clear, white or black plastic or
wooden sloped shoulder hanger with swivel chrome or fully moulded in
plastic with a stationary hook.
Hanger Foam Cover: A cover that is stretched over the hanger to prevent
garments from slipping off.
Hang Tape: Black or white, cotton or polyester woven tape that is sewn into
garments to allow them to be hung safely and securely.
Poly Bag: A flexible polyethylene film sack, like those used by drycleaners,
having one open end and one closed end with a 3 inch hanger hole.
Packaging Tags and Fasteners
An important aspect of merchandise packaging is the hangtag. A Hangtag is a cardstock,
plastic, fabric, wooden, metal or other material in the form of a square, rectangle, or die cut
shaped tag that is attached to an apparel item by means of plastic fastener, braided cord, or
safety pin with a ribbon. Fasteners secure hangtags to garments or product packaging.
Information provided on hangtags can include:
Brand
Size
Style or fit
Price
Country of origin
Colour
SKU number
Bar code
Style number
Care information
Fiber information
Distributor
Garment properties
When bar code and price are included on one hangtag, it is known as an integrated tag.
Types of tags;
Bar code Ticket: A cardstock paper tag or self-adhesive sticker printed with a bar
code and price. Bar code stickers are affixed to a hangtag whereas bar code tickets
are fastened to the garment alongside the hangtag.

83 | P a g e
Joker Tag: A cardstock or paperboard tab that is stitched or attached with a plastic
fastener to the waistband of casual pants and jeans. Joker tags are easily removed
before the garment is worn and include information such as:
Size
Brand
Colour
Price
Bar code
Country of origin
Pocket Flasher: A cardstock or paperboard pocket shaped tag that is stitched or
attached with a plastic fastener to the back pocket of casual pants and jeans.
Information found on Pocket flashers includes:
Size
Brand
Colour
Price
Bar code
Country of origin
Sock Band: A paper or cardstock band with or without an adhesive back to to attach
to socks and hosiery sold by the pair or in bundles. Sock bands provide information
such as:
Size
Brand
Colour
Price
Bar code
Country of origin
Pressure-sensitive Size Wrapper: A paper or plastic film with a self-adhesive back
that is affixed to tops to convey size or fit.
Bar Loc Fastener: Opaque white plastic fattener having moulded beads along the
length the length with one end that is pointed and one shaped like a barrel.
Plastic Fasteners: Clear, white or black plastic fasteners with a smooth filament body
and T shaped ends that are used to attach tags to garments by means of tagging gun.
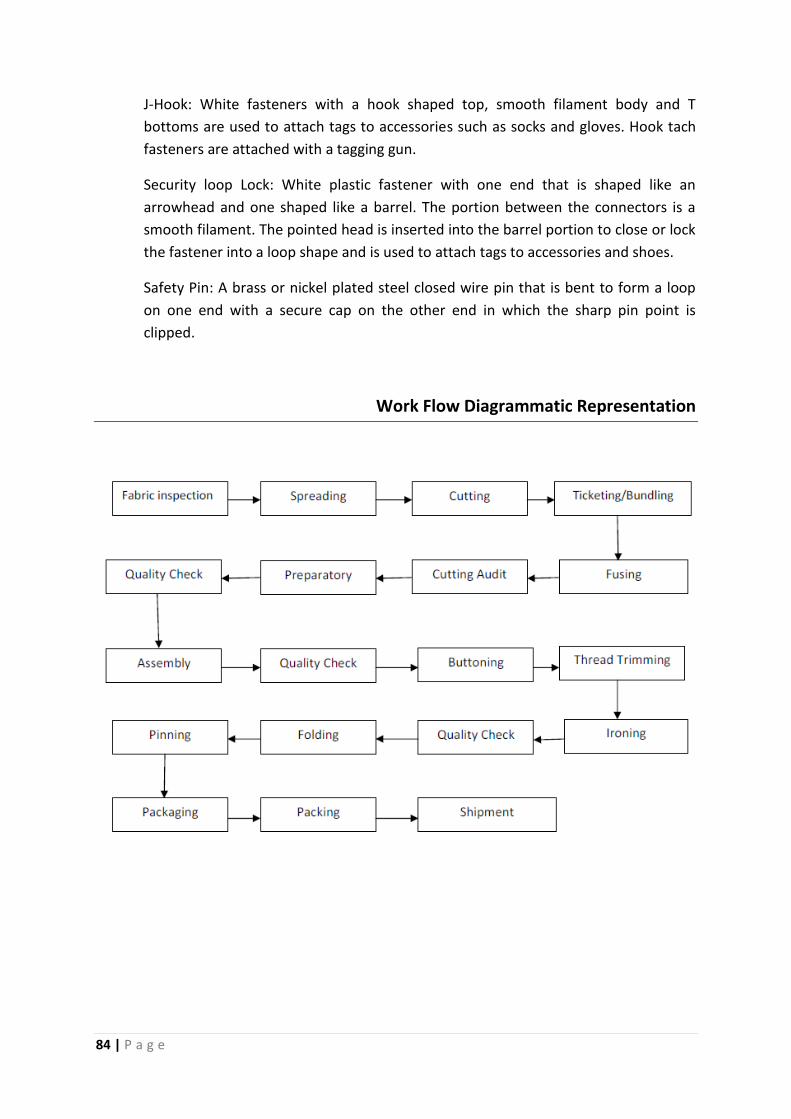
84 | P a g e
J-Hook: White fasteners with a hook shaped top, smooth filament body and T
bottoms are used to attach tags to accessories such as socks and gloves. Hook tach
fasteners are attached with a tagging gun.
Security loop Lock: White plastic fastener with one end that is shaped like an
arrowhead and one shaped like a barrel. The portion between the connectors is a
smooth filament. The pointed head is inserted into the barrel portion to close or lock
the fastener into a loop shape and is used to attach tags to accessories and shoes.
Safety Pin: A brass or nickel plated steel closed wire pin that is bent to form a loop
on one end with a secure cap on the other end in which the sharp pin point is
clipped.
Work Flow Diagrammatic Representation

85 | P a g e
Method Study
Introduction
Method study focuses on how a task can (should) be accomplished. Whether controlling a
machine or making or assembling components, how a task is done makes a difference in
performance, safety, and quality. Using knowledge from ergonomics and methods analysis,
methods engineers are charged with ensuring quality and quantity standards are achieved
efficiently and safely. Methods analysis and related techniques are useful in office
environments as well as in the factory.
Methods techniques are used to analyse the following:
Movement of individuals or material. Analysis for this is performed using flow
diagrams and process charts with varying amounts of detail.
Activity of human and machine and crew activity. Analysis for this is performed using
activity charts (also known as man-machine charts and crew charts).
Body movement (primarily arms and hands). Analysis for this is performed using
micro-motion charts.
Need for Method Study
Different operatives will develop different ways of doing a job. Not all can be right.
Some ways of working may have been developed because they were easier to learn
or the operative had a special skill.
The systematic Recording of methods is essential for Work Measurement and helps
when we wish to compare different approaches.
The identification of the best method is a skill, learned by practice, like all other
skills. It is not uncommon for a good consultant to walk around a factory and to stop
at an inefficient operation without any conscious selection. But by carefully
examining methods is critical way; we gradually acquire skill to identify bad ones and
to suggest better ones.
One argument for the specialist practitioner is that better methods can sometimes
only come from a factory wide change.
86 | P a g e
TASK THREE
Project Brief
Students will compare the production systems with regard to their different features,
advantages and disadvantages. They are expected to write analytical analysis and compare
different production systems.

87 | P a g e
Introduction
A production system is the combination of resources and work flow sequencing needed to
manufacture finished, saleable garments. Work Flow refers to the specific movement of
garment component pieces and materials during the production process from the beginning
to the end. Work in Process or Work in Progress is the quantity of incomplete products in
the course of assembly. Factories must be attentive to Material Handling, which is efficient
flow of materials and garment components as they progress through the manufacturing
process. A production system includes:
Handling of materials, garment component parts and findings
Labour force
Production and assembly equipment and machinery
Logical sequence for the movement of materials and garment components during
assembly
Individual System/Make Through/Whole Garment System
This is essentially the traditional method of production whereby one operator assembles
the entire garment. In men's bespoke wear, it is not uncommon for a tailor to perform
nearly every operation required to make the garment, including machining, hand work and
pressing.
With this production system the operator would be given a bundle of cut work and would
proceed to sew it according to his or her own method of work. Of necessity, the labour
required by this system must be highly skilled and versatile, a combination which is
becoming exceedingly rare and increasingly expensive.
This type of system is effective when a very large variety of garments have to be produced
in extremely small quantities. A typical application would be in the sewing room of a
boutique, which produces its own merchandise.
There are two types of Whole Garment Production Systems: Complete Whole Garment and
Departmental Whole Garment. In the whole garment system one individual makes the
entire garment from cutting the cloth to sewing and pressing the garment. The garment is
ready for dispatch once the operator completes the final operation. This type of system is
used in a few places, which are engaged in custom-wholesale. They are normally high priced

88 | P a g e
and exclusively made for a particular customer. They are limited in number and distribution;
normally about 10-20 garments are made.
The departmental whole garment system is also used by custom wholesale manufacturers
as well as high price or better dress manufacturers. In the departmental whole garment
system one individual does all the work with the equipment allocated to a department. For
example, one person does all the cutting work in cutting department, second person does
all the sewing work in sewing department, and the third person does the pressing and
packing work. The workers in this system may use more than one equipment to complete
their respective job.
Advantages:
This system is more effective when a very large variety of garments have to be
produced in extremely small quantities.
In Individual piece rate system the operators will do with full involvement: To finish
more pieces, to earn more money.
Operator will be specialised in his own working area.
As the pay depends upon the complication of the operation, the operator will try to
finish the complicated operation also without any difficulties.
The Work in Progress (WIP) is reduced, at a time one cut garment to one operator
and so the amount as inventory is reduced.
Disadvantages:
Highly skilled labourers are used, so the cost of labour is high.
The operator is more concerned on the number of pieces finished rather than the
quality of work.
Productivity is less due to lack of specialisation.
For long run/bulk quantity of same style is not effective in this system.
Section Or Process System - Group System
This is a development of the making through system, with the difference that the operators
specialise in one major component and sew it from beginning to end. For example, an
operator specialising in fronts would assemble the front, set the pockets, etc and perform all
the operations required to finish that particular component.
The sewing room would have a number of sections, each containing versatile operators
capable of performing all the operations required for a specific component. The sections are
built according to the average garment produced, and include:

89 | P a g e
Pre-assembling (the preparation of small parts)
Front making
Back making
Main assembly (closing, setting collars and sleeves, etc)
Lining making
Setting linings
Finishing operations (buttonholes, blind-stitching, etc)
All in all, this is a very efficient system for producing a variety of styles in reasonable
quantities. Figure 1 shows a typical layout and workflow for this type of system.
Advantages:
As the labour of all levels, i.e., semi-skilled, skilled, trainee can be used in this
system; the labour cost is less compared with individual system.
Productivity is higher compared to individual system, because of the use of special
machine and all types of labour.
This system is very efficient for producing a variety of styles in reasonable quantities.
Automation and specialisation can be done.
Absenteeism and machine breakdown problems will not cause serious problems.
Disadvantages:
All the levels of operators are involved in the work, so the quality of garment should
be strictly maintained.
Even though productivity is high still the highly skilled operators are required to
perform simple operation within the section.
Group of people involved in each section and so we require more WIP, which
increases the inventory cost.
As this is not a bundling system, there are more chances to mix up of lost, shade
variation, sizes, so quality and production will be affected.
Straight-Line Or 'Synchro' System
As its name suggests, this system is based on a synchronised flow of work through each
stage of producing a garment. Time-synchronisation is the most important factor of this
system because the flow of work cannot be synchronised if there are considerable
variations in the standard times allowed for all the operations performed on the line.

90 | P a g e
For example, if one operation has a value of 1.5 minutes SAM, then all the other operations
in the line must have the same, or a very close, value. The manipulation required to balance
the standard time for each operator can sometimes lead to illogical combinations of whole
or part operations which are not always conducive to the overall efficiency of individual
operators.
The synchro-system by its very nature is rigid and particularly vulnerable to absenteeism
and machine breakdowns. At all times reserve operators and machines must be available to
fill the gaps. In addition, this system requires a sufficient volume of the same type of
garment to keep the line in continuous operation.
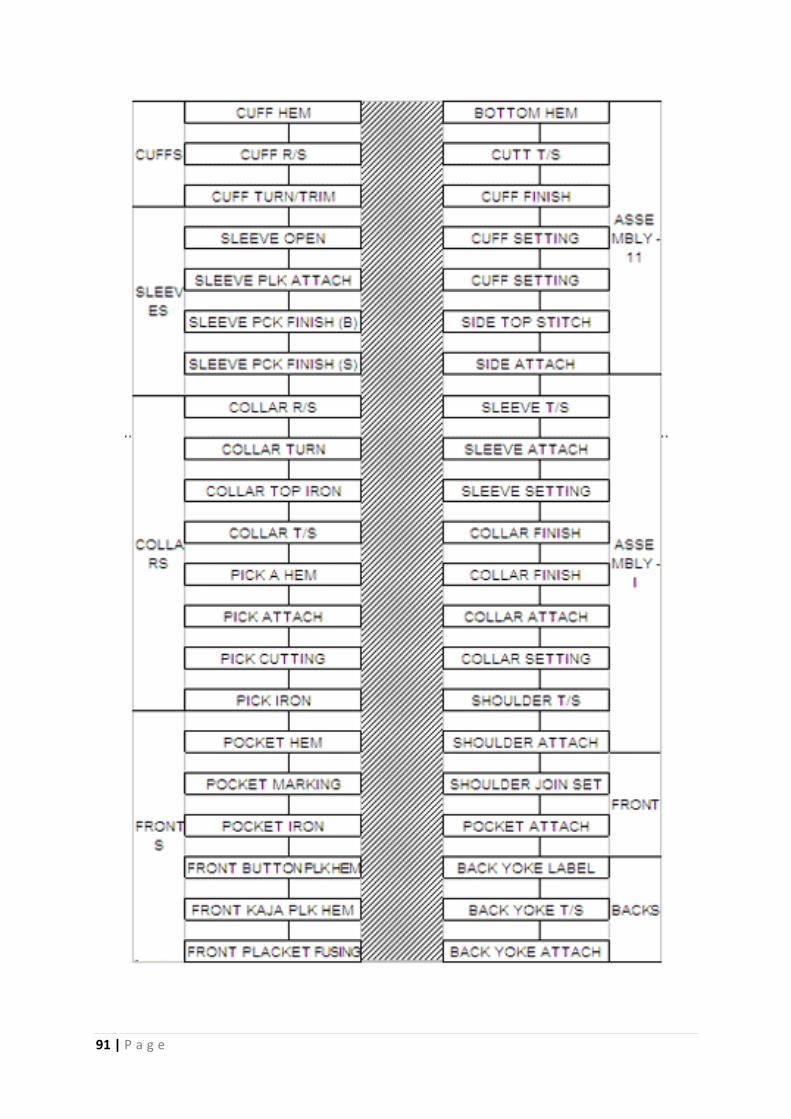
91 | P a g e

92 | P a g e
Progressive Bundle System
The progressive bundle system (PBS) as the name implies the bundles of garment parts are
moved sequentially from operation to operation. This system, often referred to as the
traditional production system, has been widely used by apparel manufacturers for several
decades and still is today. It was reported by the AAMA Technical Advisory Committee that
80 per cent of the apparel manufacturers used the bundle system and also predicted that
use of bundle systems would decrease as firms seek more flexibility in their production
systems.
Bundles consist of garment parts needed to complete a specific operation or garment
component. For example, an operation bundle for pocket setting might include shirt fronts
and pockets that are to be attached. Some firms operate with a standard bundle size, while
other firms vary bundle sizes according to cutting orders, fabric shading, size of the pieces in
the bundle, and the operation that is to be completed. Bundles are assembled in the cutting
room where cut parts are matched up with corresponding parts and bundle tickets. Bundles
of cut parts are transported to the sewing room and given to the operator scheduled to
complete the operation. One operator is expected to perform the same operation on all the
pieces in the bundle, retie the bundle, process coupon, and set it aside until it is picked up
and moved to the next operation.
Advantages:
This system may allow better utilisation of specialised machines, as output from one special
purpose automated machine may be able to supply several operators for the next
operation. Small bundles allow faster throughput unless there are bottlenecks and extensive
waiting between operations.
Disadvantages:
It is driven by cost efficiency for individual operations. As the operators perform the same
operation on a continuing basis, and are compensated by piece rates become extremely
efficient at one operation and may not be willing to learn a new operation because it
reduces their efficiency and earnings. Individual operators that work in a progressive bundle
system are independent of other operators and the final product. Slow processing,
absenteeism, and equipment failure may also cause major bottlenecks within the system.
Large quantities of work in process. This may lead to longer throughput time, poor quality
concealed by bundles, large inventory, extra handling, and difficulty in controlling inventory.

93 | P a g e
Unit Production System
A unit production system (UPS) is a type of line layout that uses an overhead transporter
system to move garment components from work station to work station for assembly. All
the parts for a single garment are advanced through the production line together by means
of a hanging carrier that travels along an overhead conveyor. The overhead rail system
consists of the main conveyor and accumulating rails for each work station. Carriers are
moved along the main conveyor and switched to an accumulating rail at the work station
where an operation is to be performed. At the completion of an operation the operator
presses a button, and the carrier moves on to the next operation. Most unit production
systems are linked to a computer control center that routes and tracks production and
provides up-to-the-minute data for management decisions.
The unit production system transports all the pieces of one complete product through the
manufacturing process. An addressable product carrier takes all the pieces of one entire unit
(ie, for trousers - backs, fronts, pockets, etc) through the different steps of production.
Operations are performed at individual workstations. The end result is a cost-efficient
product, processed from pieces to completion.
Workflow in Unit Production System;
Load all the pieces in a product carrier
The product carrier with the pieces will be routed through the different operation
steps
At every machine/operation the patented chain will position the product ideally
Completed the product arrives to an unloading station. The empty product carrier
returns to the loading station.
Advantages:
Improved lead times - less Work In Process.
Improved space utilisation,
Increased productivity
Throughput time in the sewing room can be drastically reduced.
Direct labor costs are reduced
Indirect labor costs may be reduced by elimination of bundle handling and requiring
fewer supervisors.
Improved production and quality monitoring.
Reduced space utilisation.
Improved ergonomics.
Disadvantages:

94 | P a g e
Highly expensive - buying equipment and Cost of installing
Specialised training for the system.
Modular Production System
A modular production system is a contained, manageable work unit that includes an
empowered work team, equipment, and work to be executed. The number of teams in a
plant varies with the size and needs of the firm and product line. Teams may be used to
perform all the operations or a certain portion of the assembly operations depending on the
organisation of the module and processes required. Before a firm can establish a modular
production system, it must prioritise its goals and make decisions that reflect the needs of
the firm. With a team-based system operators are given the responsibility for operating
their module to meet goals for throughput and quality. The team is responsible for
maintaining a smooth work flow, meeting production goals, maintaining a specified quality
level, and handling motivational support for the team. Team members develop an
interdependency to improve the process and accomplish their goals. Interdependency is the
relationship among team members that utilises everyone's strengths for the betterment of
the team.
Workflow in Modular Production;
A Modular Production System operates as a Pull System, with demand for work coming
from the next operator in line to process the garment. Wastage is normal, and workflow is
continuous and does not wait ahead of each operation. This increases the potentials for
flexibility of styles and quantities of products that can be produced.
Workflow within a module may be with a Single-piece hand-off, Kanban, or Bump-back
system. If a single-piece hand-off is used, machines are arranged in a very tight
configuration. As soon as an operation is completed the part is handed to the next
operator for processing. Operations need to be well balanced as there is usually only one
garment component between each operation. Some modules may operate with a buffer
or small bundle of up to ten pieces of work between operators. If a small bundle is used,
an operator will complete the operation on the entire bundle and carry the bundle to the
next operation. An operator may follow a component or bundle for as many operations as
they have been trained or until the adjacent operator is ready to assume work on the
bundle.
A Kanban uses a designated work space between operations to balance supply with
demand. The designated space will hold a limited number of completed components (two
or three) in queue for the next operation. If the designated space is full, there is no need

95 | P a g e
to produce more until it is needed or the space empties. This limit builds up of product
ahead of the next operation. When the space is full the operator can assist with other
operations that may be slow.
The bump-back or TSS (Toyota Sewing System) approach was developed by the Toyota
Sewn Product Management System and is probably the most widely used type of team-
based manufacturing. It is a stand-up module with flexible work zones and cross-trained
operators. Operators may be cross-trained on up to four different successive operations.
This enables operators to shift from operation to operation until the next operator is
ready to begin work on the garment. The operator needing work steps to the beginning of
the zone and takes over the processing at whatever point it is in the production process.
The operator who has been relieved of the garment will then move back to the beginning
of the work zone and take over work on another garment. This approach enables
continuous work on a garment and allows each operator to perform several different
operations. This arrangement frequently uses a 4-to-l ratio of machines to operators.
Advantages:
High flexibility
Fast throughput times
Low wastages
Reduced absenteeism
Reduced Repetitive Motion Ailments
Increased employee ownership of the production process
Empowered employees
Improved Quality
Disadvantages:
A high capital investment in equipment.
High investment in initial training.
High cost incurred in continued training
Quick Response Sewing System
This system was first developed in Japan to enable quick responses to be made to market
changes, especially when orders for individual styles were in small lots. Each workstation is
equipped with two or four machines and the operator will take the garment through the
required operations, including pressing, before it is transported to the next workstation.

96 | P a g e
Quick response system layout;
Some of the basic machinery is duplicated in different stations and if there is a
bottleneck in one section the overload is automatically transported to other stations
where operator capacity is available.
All the parts of one garment are loaded into a hanging clamp attached to the trolley
and in theory, there should only be one garment at each workstation. Work is
transported by a computer controlled, overhead trolley system and each station has
an individual controller, which provides the operator with information on the style
being worked on. This information comes from an information card, which
accompanies each trolley.
A less sophisticated version of QRS uses a wheeled trolley, which contains the components
for one garment and is pushed along the floor from operator to operator.
Another feature of QRS is that all the operators work in a standing position so that they can
move quickly from one machine to another within their own workstation. Machine heights
are adjusted accordingly and touch-pads and knee-pads controls are used instead of
conventional foot pedals.
Features;
Supervision: Freed to work with the operators.
Labour: Of necessity the operators must be highly skilled in the operation of all the
different machines in one workstation.
Quality: In-process inspection stations are built into the line and the inspector is able
to return faulty work via the system to the operator concerned.
Productivity: This is very high because the operator handles the garment once only
for a number of operations, instead of once for each operation.
Throughput time: As there are so few garments on the line throughput time is
extremely short, which is the objective of this system.
Layout: A typical unit would have eight work stations arranges around the transport
system.
There is no doubt that this type of system is one of the best answers to the garment
production revolution, which is becoming more apparent every day. Fashion changes are
becoming more frequent and as a consequence order lots are proportionately smaller. A
production system, which enables changeovers to be made in the minimum of time is
ideally suited to this new and dynamic situation.

97 | P a g e
Evaluation of Production Systems
Any production system has four primary factors, which make up the system. Processing
Time + Transportation Time + Temporary Storage Time + Inspection Time = Total Production
Time.
Processing time is sum total of working time of all operations involved in manufacture of a
garment. Transportation time involves the time taken to transport semi-finished or finished
garments from one department to another or from one operation/machine to another.
Temporary storage time is time during which the garment/bundle is idle as it waits for next
operation or for completion of certain parts. Inspection time is time taken for inspecting
semi-finished garments for any defects during manufacturing or inspecting fully finished
garments before packing.
The main aim of any production system is to achieve minimum possible total production
time. This automatically reduces in-process inventory and its cost. The sub-assembly system
reduces temporary storage time to zero by combining temporary storage time with
transportation time.
Conclusion
The main aim of any production system is to make the total production time as small as
possible. The choice of the production system highly depends on the volume of production
and the strategy of production. Basic goods can be manufactured in large quantities, with
large cuttings, work bundles, and limited fabric, colour, and trim variation. For basic goods, a
traditional production system such as progressive bundle system can be adopted. The
modular system or some type of flexible manufacturing can be adopted for the production
of fashion goods.
Considering the required capital and training for production system changes, transition from
the traditional production system to a flexible manufacturing system is limited for most
apparel manufacturers. Some firms may also use the combination of the production systems
-- the progressive bundle system for producing small parts combined with modular
production for garment assembly. This reduces the investment in specialised equipment and
reduces the team size needed. Some industry consultants believe that a modular system
combined with a unit production system provides the most flexibility, fastest throughput,
and most consistent quality. This would be particularly useful for large items such as
coveralls or heavy coats. The UPS would move the garment instead of the operators. Each

98 | P a g e
manufacturer needs to determine what is best for its product line and production
requirements

99 | P a g e
TASK FOUR
Project Brief
Students are required to document the sampling process in garment industry and write the
importance of each step in the complete process.

100 | P a g e
Introduction
Garment samples are inevitably important and are developed tested before starting the
bulk production. It means making a sample of the garment which requires to be sold.
Sampling is one of the main processes in Garment Industry and it has a vital role in
attracting buyers. Because the buyers generally place the order after they are satisfied with
the quality of the samples.
Need For Sampling
The samples decide the ability of an exporter. The buyer will access the exporter and his
organisation only by the samples. If the samples are of good quality and with reasonable
price naturally the buyers will be forced to place the order. So it is essential that the samples
should be innovative and with optimum quality. The purpose of sampling is not only to get
bulk orders but also give some additional benefits to the exporters. By doing sampling the
exporter can estimate the yarn consumption for developing the fabric, a clear idea on
costing more ever the manufacturing difficulties. Besides by doing sampling only the
exporter can optimize the processing parameters for mass production, which helps to avoid
all kind of bottlenecks. All these works are carried out by the sampling department, which is
led by a sampling in-charge.
The Details Attached To The Garment Sample
After the confirmation of order, each sample sent to the buyer has the following details
attached to it, with the help of a tag. It contains the details pertaining to both, what the
buyer has demanded and what supplement fabric/trim etc they have used (if applicable).
Reference number
Colour
Fabric
Composition
Description
Quantity
Style number

101 | P a g e
Size
Store
There may be a separate sampling department in a company. But as the merchandiser is the
person who is interacting with the buyers regarding samples and other requirements, this
sampling department will work under the supervision of merchandising department. Also,
as the samples are to be made according to the buyers’ price ranges and quality levels,
merchandiser has to advise sampling department suitably.
Types of Samples
The manufacturer needs to send many samples to buyers, which are;
Salesmen samples or promotional samples
Proto samples or fit samples
Counter samples or reference samples or approval samples
Wash test samples
Photo samples
Fashion show samples
Pre-production samples
Production samples
Shipment samples
Sampling Process
Introduction
The process of sample department varies from context to context, and the development
process covers a wide range of diverse products from new fibers, fiber blends, new yarns,
fabric structures ,finishes and surface effects and all types of made up products such as
knitwear, hosiery, cut and sewn garments, household products, technical and medical
products.
There are different phases of sampling;

102 | P a g e
The first phase covers the development of the initial concept or design idea through
its approval by the customer and full review/ risk analysis by the development and
production teams.
The second phase covers the process following acceptance of the first prototype
sample and includes the functions of sourcing and ordering component, testing the
product and carry out trails once the finalized sample specifications has been drawn
up, the third and final phase commences.
The third phase includes a range of activities that are carried out before large scale
or bulk production capacity outside the home producer/developers wherever this is
applicable.
Workflow of Sampling
Development samples or enquiry samples
When manufacturers work with some buyers continuously, they will have to keep on
sending samples to them very often. Whenever buyers have enquiries, they may need
samples. Buyers may like to see the garments in a new fabric. For one enquiry, they may
need samples in different fabrics to choose from. If they want to develop new style in new
fabric, then also we will have to send these samples.

103 | P a g e
Manufacturers have to spend too much on these samples. But these samples are inevitably
important to develop business. Sometimes, even the buyer is not so confident of some
enquiries, if our samples are good and attractive at reasonable prices, they will bring orders.
Also manufacturers will have to send samples to the newly contacted buyers to show their
workmanship, product range, quality standards and price level. These samples should be
sent so that they would attract the buyers.
So it is better for a company to have a separate sampling department so that they can
create new styles in new fabrics to impress the buyers.
Salesmen Samples or Promotional Samples
Some buyer needs these samples for getting the orders from their customers. If the buyer is
having 7 salesmen in his office, then the buyer will ask companies to make 7 samples in each
style. The salesmen will book the orders from their customers, by showing these samples.
Buyer will place the order to manufacturers accumulating the quantities.
If manufacturers have sent samples for 5 styles, sometimes, they may get orders for all 5
styles, 3 styles or 1 style. Sometimes, they may not get order for even a single style.
Expected sales may not be possible, due to poor quality, unsuitable colours, improper
measurements, unmatched prints or embroidery, etc. of salesmen samples. Or it may be
due to local business recession or competition or unsuitable prices. Any way, they have to
make these salesmen samples perfectly with sincere interest to get orders.
Manufacturers might have spent more money, time, etc. for making these samples. But as
manufacturers don’t get orders, they cannot blame the buyer. The buyer too cannot help
them in this regard. To avoid this embarrassing situation, manufacturers discuss about the
cost of these samples with the buyer before proceeding for sampling.
Normally the sampling will cost approximately 3 to 5 times of the garment price.
Manufacturers cannot expect to get the full cost from the buyer. As these samples will alos
help them in business, hence they ask the buyer to accept 2 or 3 times of garment price as
the sampling cost, for the styles which they don’t get orders.
Photo Samples or Fit Samples
These samples are to be made after getting the order sheets. These samples are needed to
check the measurements, style and fit. So they can be made in available similar fabrics but
in the actual measurements and specifications.
Some buyers may need these samples if they want to print the photos of garments on photo
inlays, packing box, hangtag, etc. These samples may be needed for local advertisement or
buyer’s promotional occasions.
104 | P a g e
In any case, the samples will be worn by the highly paid models. The buyers will arrange the
photo shoot session, by spending huge money to the advertising agencies. So the buyers will
need these samples strictly on time. If they don’t get samples on time, the buyers will have
to pay more compensation to the advertising agencies and models.
Buyers will ask us to make the photo samples according to the intended model’s body fit. So
it is important to strictly adhere to these measurements. Buyer may ask these samples to
send either from production or before starting production.
Counter Samples or Reference Samples or Approval Samples
These samples are to be made in actual fabrics with actual trims. If the order is for 3 colours,
buyer may need samples in any one colour and swatches (fabric bits) in other colours. These
samples should be strictly as per the specifications in the order sheets. Manufacturers have
to get the approval for these samples from the buyer before starting production.
After getting the approval, the approved samples should be followed in production.
Sometimes, buyer may comment on fabric, measurements, making, etc. Manufacturers
have to follow his comments carefully in production.
Some buyers will mention that the order sheets subject to the approval of counter samples.
So these samples are very important.
Wash test samples
If these samples are sent before starting production and if manufacturers get some remarks
or comments on these samples, we can correct them in production. But some buyers will
need us to send these samples from production before shipment. In this case, these samples
may be considered as ‘shipment samples’. If these samples are rejected due to some
complaints, then manufacturers will not have no excuse they will be in real trouble.
Pre-Production Samples
These samples are almost like approval samples. They have to be made in actual production
fabric with actual bulk trims. They will represent that the production will be like these
samples.
These samples are important as this is the last stage of sampling process before the final
bulk production is started and all the garments produced hence would be according to the
specifications of these samples.
Production Samples
These samples are to be sent before shipment to get the buyer’s confirmation for shipment.
Hence, these samples are needed to be perfect in all manners. Buyer may check these
samples for everything or anything. Sometimes, they may do wash test also. Manufacturers

105 | P a g e
should not get any remark or comment. They have to get only ‘OK’ from the buyer. Then
only they can ship the goods and they can be sure of getting payment. So these samples are
to be sent with more and more care.
These samples are checked by the buyer so that s/he may know that the production is
carried out as per the requirement and as per the samples approved previously.
Shipment Samples
These samples are to be sent after shipment. They should be sent in actual packing with all
labels, tags, etc. (Generally these samples will not be tested by buyer for anything. And even
if manufacturers get some comments from buyers, they can save themselves by stating that
these samples were sent from the left over garments after the shipment; hence there might
be some mistakes. If they expect any comments in these samples, it is better to inform the
buyer during sending these samples).
106 | P a g e
References
Janace E. Bubonia. Apparel Production Terms and Process. New York: Fairchild Books, 2011.
Chutler A.J. Introduction To Clothing Production Management. Hong Kong: Blackwell
Publishing, 2007
https://publications.theseus.fi/bitstream/handle/10024/34405/Paneru_Naresh.pdf?sequen
ce=1, May 11, 2012
http://egateg.usaid.gov/sites/default/files/Postquota%20Textiles%20and%20Apparel%20Tr
ade.pdf, May 11, 2012
http://www.textileschool.com/School/Apparel/ApparelManufacturing/FabricSelection.aspx,
May 12, 2012
http://www.textileschool.com/School/Apparel/ApparelManufacturing/FabricInspectionGuid
elines.aspx, May 12, 2012
http://www.textileschool.com/School/Apparel/ApparelManufacturing/PatternMaking.aspx,
May 12, 2012
http://www.textileschool.com/School/Apparel/ApparelManufacturing/TypesofPatternMaki
ng.aspx, May 12, 2012
http://www.textileschool.com/School/Apparel/ApparelManufacturing/PatternGrading.aspx
May 12, 2012
http://www.textileschool.com/School/Apparel/ApparelManufacturing/ProductDesign.aspx,
May 12, 2012
http://www.textileschool.com/School/Apparel/ApparelManufacturing/Spreading.aspx, May
12, 2012
http://www.textileschool.com/School/Apparel/ApparelManufacturing/PatternMarking.aspx
, May 12, 2012
http://www.textileschool.com/School/Apparel/ApparelManufacturing/ConstructionMarking
.aspx, May 12, 2012
http://www.textileschool.com/School/Apparel/ApparelManufacturing/LayoutCuttingMarkin
g.aspx, May 12, 2012
http://www.textileschool.com/School/Apparel/ApparelManufacturing/LayoutProcedure.asp
x, May 12, 2012

107 | P a g e
http://www.textileschool.com/School/Apparel/ApparelManufacturing/PreparingforLayout.a
spx, May 12, 2012
http://www.textileschool.com/School/Apparel/ApparelManufacturing/Fusing.aspx, May 12,
2012
http://www.textileschool.com/School/Apparel/ApparelManufacturing/FusingProcessRequir
ement.aspx, May 12, 2012
http://www.textileschool.com/School/Apparel/ApparelManufacturing/FusingEquipments.as
px, May 12, 2012
http://www.textileschool.com/School/Apparel/ApparelManufacturing/FusingMethods.aspx,
May 12, 2012
http://www.textileschool.com/School/Apparel/ApparelManufacturing/ImportanceofPattern
MakinginGarmentmaking.aspx, May 12, 2012
http://www.textileschool.com/School/Apparel/ApparelManufacturing/Cutting.aspx, May
12, 2012
http://www.textileschool.com/School/Apparel/ApparelManufacturing/CuttingTechniques.a
spx, May 12, 2012
http://www.textileschool.com/School/Apparel/ApparelManufacturing/CuttingRoomManag
ement.aspx, May 12, 2012
http://www.textileschool.com/School/Apparel/ApparelManufacturing/FabricCuttingStandar
ds.aspx, May 12, 2012
http://www.textileschool.com/School/Apparel/ApparelManufacturing/Bundling.aspx, May
12, 2012
http://www.textileschool.com/School/Apparel/ApparelManufacturing/Sewing.aspx, May
12, 2012
http://www.textileschool.com/School/Apparel/ApparelManufacturing/PressingorFolding.as
px, May 12, 2012
http://www.textileschool.com/School/Apparel/ApparelManufacturing/FinishingandDetailin
g.aspx, May 12, 2012

108 | P a g e