Coyote Predation of Livestock (agdex 684-19)Department/deptdocs.nsf/all/agdex43/$FILE/684-19.pdfThe...
38
Coyote Predation of Livestock Coyote Predation of Livestock
Transcript of Coyote Predation of Livestock (agdex 684-19)Department/deptdocs.nsf/all/agdex43/$FILE/684-19.pdfThe...

Coyote Predationof Livestock
Coyote Predationof Livestock
7 78753 06141 7
AGDEX 684-19
Printed in Canada
joyce.wong
Typewritten Text
Purchase the print version of Coyote Predation of Livestock for $8. Buy it on-line www.rtw.ca/b681
joyce.wong
Typewritten Text
joyce.wong
Typewritten Text
joyce.wong
Typewritten Text
joyce.wong
Typewritten Text
joyce.wong
Typewritten Text
joyce.wong
Typewritten Text
joyce.wong
Typewritten Text
joyce.wong
Typewritten Text
joyce.wong
Typewritten Text
joyce.wong
Typewritten Text
joyce.wong
Typewritten Text
joyce.wong
Typewritten Text
joyce.wong
Typewritten Text
joyce.wong
Typewritten Text
joyce.wong
Typewritten Text
joyce.wong
Typewritten Text
COYOTE PREDATION
OF LIVESTOCK
Revised by
Robert C. Acorn and Michael J. Dorrance
joyce.wong
Typewritten Text
Purchase the print version of Coyote Predation of Livestock for $8. Buy it on-line www.rtw.ca/b681

COYOTE PREDATION OF LIVESTOCK
The information in this publication has been prepared for educational purposes. Reference to trade names is made for clarity and does not imply endorsement or licensing by Alberta Agriculture and Rural Development.
Published by:
Agriculture Information Services Alberta Agriculture and Rural Development 7000 - 113 Street Edmonton, AB T6H 5T6 Canada
Editor: Tracey Feist, Ground Words Communications Electronic Publishing Production: Carolyn Boechler Graphic Designer: John Gillmore Production Manager: Scott Reid
Copyright © 1998. Her Majesty the Queen in Right of Alberta. All rights reserved.
No part of this publication may be reproduced, stored in a retrieval system, or transmitted in any form or by any means, electronic, mechanical photocopying, recording, or otherwise without written permission from Agriculture Information Serivces, Alberta Agriculture and Rural Development.
ISBN 0-7732-6141-9
Printed November 1998 Reprinted March 2010
Printed in Canada
Copies of this publication may be purchased from:
Publications Office Alberta Agriculture and Rural Development Telephone: 1-800-292-5697 (toll-free in Canada) 780-427-0391 or see the website <www.agriculture.alberta.ca/publications> for information about other publications, CD-ROMs and DVDs.
joyce.wong
Typewritten Text
Purchase the print version of Coyote Predation of Livestock for $8. Buy it on-line www.rtw.ca/b681
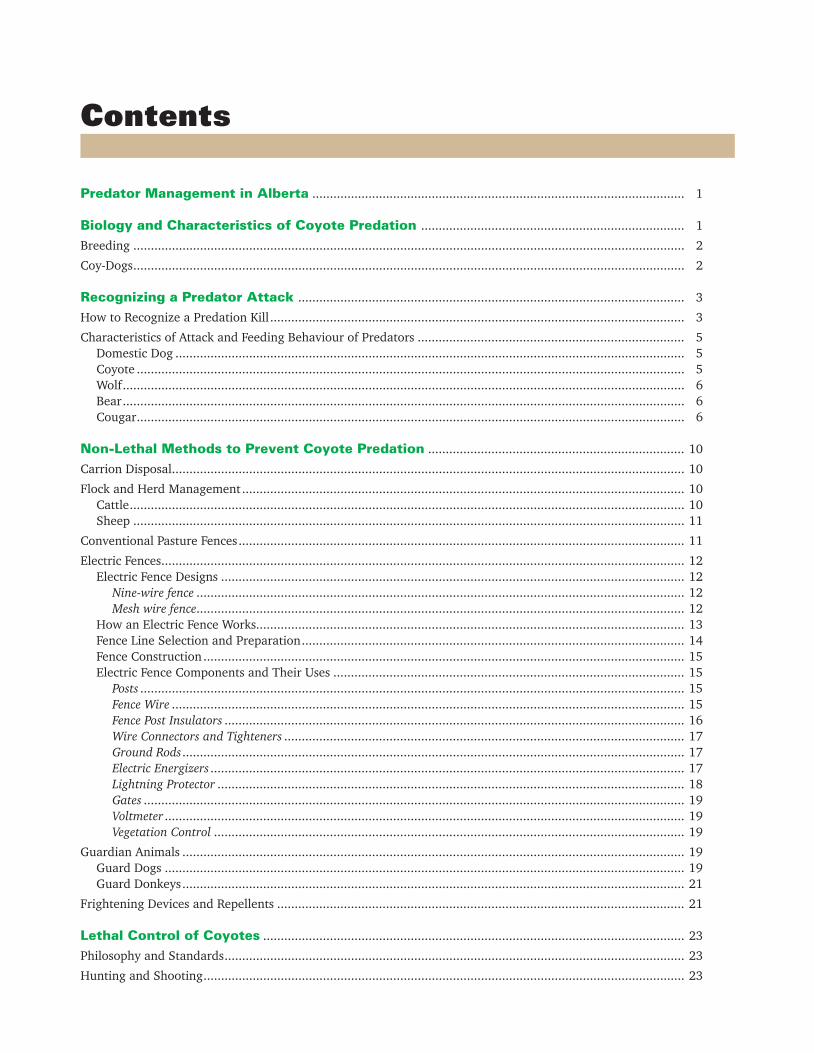
Preface
The coyote is the major predator of livestock in Alberta and accounts for over 75 per cent of all predation losses each year. A proper understanding of predation will help livestock producers prevent or minimize livestock losses from coyotes and other predators.
Acknowledgements
This is the fourth revision of the original publication prepared in 1982 entitled, Prevention and Control of Coyote Predation. John B. Bourne, Cecil M. Cross, Phillip N. Merrill and Dwight C. Rodtka are acknowledged for providing information used in the preparation of this booklet.
This booklet helps to explain the ecology of coyote predation of livestock and describes the various techniques to prevent and control livestock predation by coyotes. Procedures used to identify predation of livestock are also discussed.
Contents
Predator Management in Alberta .......................................................................................................... 1
Biology and Characteristics of Coyote Predation ........................................................................... 1
Breeding ............................................................................................................................................................. 2
Coy-Dogs ............................................................................................................................................................. 2
Recognizing a Predator Attack .............................................................................................................. 3
How to Recognize a Predation Kill ...................................................................................................................... 3
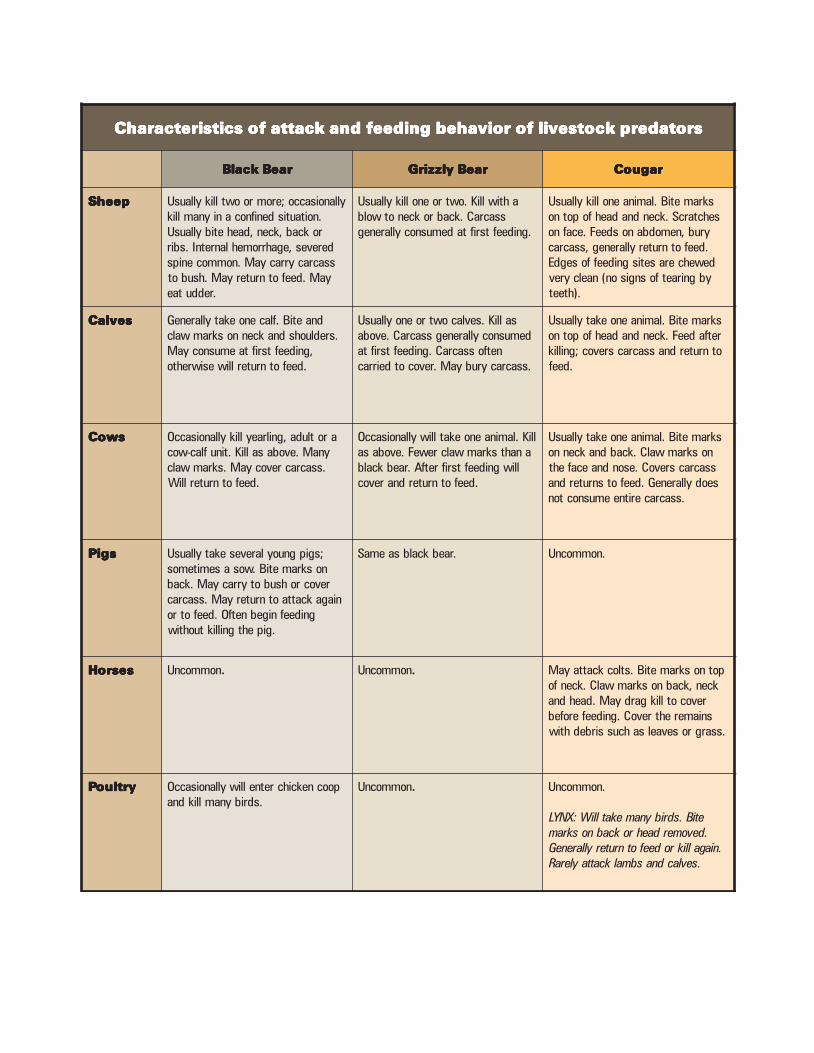
Characteristics of Attack and Feeding Behaviour of Predators ............................................................................ 5Domestic Dog ................................................................................................................................................. 5Coyote ............................................................................................................................................................ 5Wolf ................................................................................................................................................................ 6Bear ................................................................................................................................................................ 6Cougar ............................................................................................................................................................ 6
Non-Lethal Methods to Prevent Coyote Predation ......................................................................... 10
Carrion Disposal .................................................................................................................................................. 10
Flock and Herd Management .............................................................................................................................. 10Cattle .............................................................................................................................................................. 10Sheep ............................................................................................................................................................. 11
Conventional Pasture Fences ............................................................................................................................... 11
Electric Fences ..................................................................................................................................................... 12Electric Fence Designs .................................................................................................................................... 12
Nine-wire fence ........................................................................................................................................... 12Mesh wire fence........................................................................................................................................... 12
How an Electric Fence Works.......................................................................................................................... 13Fence Line Selection and Preparation ............................................................................................................. 14Fence Construction ......................................................................................................................................... 15Electric Fence Components and Their Uses .................................................................................................... 15
Posts ........................................................................................................................................................... 15Fence Wire .................................................................................................................................................. 15Fence Post Insulators ................................................................................................................................... 16Wire Connectors and Tighteners .................................................................................................................. 17Ground Rods ............................................................................................................................................... 17Electric Energizers ....................................................................................................................................... 17Lightning Protector ..................................................................................................................................... 18Gates .......................................................................................................................................................... 19Voltmeter .................................................................................................................................................... 19Vegetation Control ...................................................................................................................................... 19
Guardian Animals ............................................................................................................................................... 19Guard Dogs .................................................................................................................................................... 19Guard Donkeys ............................................................................................................................................... 21
Frightening Devices and Repellents .................................................................................................................... 21
Lethal Control of Coyotes ........................................................................................................................ 23
Philosophy and Standards ................................................................................................................................... 23
Hunting and Shooting ......................................................................................................................................... 23
Foothold Traps .................................................................................................................................................... 24
Neck Snares ........................................................................................................................................................ 24
Poisons ................................................................................................................................................................ 25Sodium Cyanide ............................................................................................................................................. 25
M-44 Components and How They Work....................................................................................................... 26M-44 Setting Procedures and Precautions .................................................................................................... 26Placement of M-44 Devices .......................................................................................................................... 26
Sodium Monofluoroacetate (Compound 1080) .............................................................................................. 27What is Sodium Monofluoroacetate and How Does it Work? ........................................................................ 27Use of Compound 1080 ............................................................................................................................... 27SLD (Single Lethal Dose) Baits .................................................................................................................... 28Carcass Bait ................................................................................................................................................ 29Toxic Neck Collar ........................................................................................................................................ 29
Den Hunting ....................................................................................................................................................... 31
1
Predator Management in Alberta
authorized inspectors and landholders to apply poisons, snares and traps to remove coyotes under a permit system. Poisons must be used in compliance with the Pest Control Products Act of Canada. The Wildlife Act allows Alberta residents with the landholder’s permission, to trap and shoot coyotes under provincial license on the landholder’s property.
Alberta Agriculture administers a coyote predation management program in co-operation with municipal agricultural service boards. Landholders may obtain information, advice, materials and assistance to resolve coyote predation problems from Alberta Agriculture or from their agriculture service board office. A variety of predation management approaches and measures are available to effectively address concerns of coyote predation.
Alberta Agriculture and Rural Development and Alberta Environment, Fish and Wildlife Services share responsibility for the management of livestock predation. Alberta Environment manages livestock predation by all wildlife species except coyotes on private land, under authority of the Wildlife Act of Alberta. Alberta Agriculture manages livestock predation by coyotes under authority of the Agricultural Pests Act of Alberta. The coyote is the major predator of livestock in Alberta and accounts for more than 75 per cent of all livestock predation each year.
The Agricultural Pests Act designates the coyote as a “nuisance” and provides the authority for coyote control. A landholder may control coyotes on his or her land by shooting and destroying coyote dens. The Agricultural Pests Act also allows Alberta Agriculture-
Biology and Characteristics of Coyote Predation
The majority of coyotes in Alberta are found in agricultural areas, where rodents, and other small animals including pocket gophers, ground squirrels, rabbits, hares and mice, constitute most of their food supply. Most of the rest of their food, especially during winter, comes from scavenging livestock and other animal carcasses.
In central Alberta, the home range of an adult coyote averages 12 square kilometres, but can be two or three times larger. Maximum home range diameter varies between 2 and 7 kilometres and averages about four kilometres. Adult coyotes tend to establish permanent home ranges while juvenile coyotes tend to wander before selecting a permanent territory. An injury, such as a crippled foot, may prevent an adult from establishing a permanent home range. Home ranges of resident coyotes overlap only slightly. Non-resident coyotes wander throughout an area, but tend to avoid the resident coyotes.
Coyotes are opportunistic predators, usually attacking the easiest prey. Any coyote has the potential to kill livestock, but only some do. Most livestock predation involves lambs, young calves, and unconfined poultry. The risks of predation are much higher for livestock born on pasture as compared with those born under confined and supervised conditions. There tends to be
a direct correlation between farm management and coyote predation. Farmers who have proper facilities, follow good management practices and use proven predation prevention measures generally have far fewer coyote problems than those farmers lacking in these areas.
About two-thirds of all sheep killed by coyotes are lambs and the remainder are adult sheep. Once started, predation usually continues until the sheep are moved, farm management is changed, or the offending coyotes are removed. Province-wide sheep predation losses average less than one per cent of all ewes and lambs annually, although predation rates tend to be higher on farms with forest or bush cover than on farms with little or no cover. Coyotes tend to prey on the smaller lambs in a flock, orphan lambs and lambs of old and crippled ewes. Coyote predation on sheep varies seasonally in Alberta, being highest during the grazing period (spring, summer and fall), and almost nil in winter when livestock is confined.
Generally, the effect of coyote predation on Alberta’s cattle industry and cattle producers is insignificant when compared to other causes of cattle mortality. About one to two per cent of the 30,000 cattle producers in Alberta have losses from coyote predation each year. Coyotes kill about one of every 3,000 calves

2
BreedingCoyotes usually breed in February and March, with pups born 63 days later in April and May. The average litter size is five to seven, but may be higher or lower depending on factors such as the population density of coyotes and food supply. A coyote den is often a renovated, former home of a badger, fox or skunk. Pups begin appearing at the den entrance at about three weeks of age and are often playing outside the den at six weeks. The pups begin eating regurgitated meat supplied by both parents at approximately four weeks of age. They are weaned between five and eight weeks of age. The female may move the pups to a new den, perhaps to avoid detection or to escape a build-up of fleas.
By mid-July, pups have left the den and accompany the parents on hunting forays. The family usually remains together until October, when the juveniles become more independent and begin to disperse from the parents’ home territory. They may travel as far as 90 kilometres to a new territory. Occasionally, the family will remain together in a loose association until the breeding season in late winter.
Coy-DogsCoyotes sometimes crossbreed with domestic dogs and produce fertile offspring. The hybrids can socially integrate with the coyote population, however, the breeding physiology of a “coy-dog” is different than a coyote. The coyote’s breeding season is restricted to an approximate two-month period in late winter. In contrast, the breeding season of female coy-dogs is in December, therefore, mating with male coyotes should not occur. Male coy-dogs can breed throughout the year but do not help rear the pups, unlike male coyotes. Although male coy-dogs may breed female coyotes, successful reproduction and pup survival is unlikely.
The mortality of pups from coy-dog parents is very high. Coy-dog females have their pups in mid-winter, generally when food is scarce and weather conditions are harsh. Pups from coy-dog parents are at a disadvantage because they receive only maternal care and likely a limited food supply. In addition, these pups frequently have dental anomalies, probably because a dog’s teeth don’t quite fit in a coyote’s jaw. Predators with dental problems are at a distinct disadvantage.
born per year in Alberta, which usually occurs during the spring calving season. Fall calving on pasture also incurs calf predation. On farms where predation occurs, no more than one calf is usually lost to coyotes. Of 370 Alberta producers who lost calves to coyotes in 1991, 83 per cent lost one calf, 12 per cent lost two calves, and only five per cent lost more than two calves.
Figure 1. Ages of calves killed by coyotes in Alberta during 1991, as a percentage of the 454 calves (less than five months old) that were killed.
Coyotes rarely attack healthy adult cows or yearlings. In fact, coyote predation on normal, healthy cattle over two months old is rare. Occasionally, a cow is attacked while calving. Calves under one week of age, especially newborns, are most vulnerable to attack. Of 454 calves less than five months of age that were killed by coyotes in Alberta in 1991, 30 per cent were one day old, 60 per cent were seven days of age or less, 85 per cent were 30 days of age or less, and 94 per cent were 60 days of age or less. Health problems (i.e., weakness, illness, injury) leading up to calf predation must be seriously considered when calf predation occurs. Special attention must be provided to animals that are compromised and made vulnerable in some way to coyote attack.

3
Recognizing a Predator Attack
Figure 3. Signs of a predator attack on struggling prey include broken and flattened vegetation, drag marks and lots of blood or trails of blood.
The site where a carcass is found holds important evidence to the cause of death. Signs of a predator attack and struggling prey include broken and flattened vegetation, drag marks, blood or trails of blood. Don’t confuse a predator attack with signs of trampling by other livestock or the feeding behaviour of predators that scavenge a carcass. The position of the carcass, and the feeding behaviour of the predator is also important in assessing if predation occurred.
Signs associated with a predator attack:
• alert, nervous livestock
• injured livestock
• mother calling and searching for her young
• predator hair on fences
• digholes under fences
• fresh predator tracks in pasture near a carcass
• predator feces near a carcass
Newborn and very young animals are particularly vulnerable to coyotes. About one-third of the calves that are killed by coyotes are only one day old. Young lambs, less than seven kilograms, are often killed and carried away by coyotes. However, stillborn and young animals that die shortly after birth, of causes other than predation, can be scavenged by coyotes. It is often
How to Recognize a Predation KillIt is often difficult to determine an animal’s cause of death. If predation is suspected, you should take immediate measures to prevent further livestock losses. This can be done by completing a prompt, careful investigation of the carcass and surrounding area. This helps to determine whether an animal was healthy and killed by a predator, sick or injured and killed by a predator, or died from other causes and was scavenged by a predator. A prompt investigation also makes it easier to identify the predator involved.
Figure 2. Bleeding and bruising of tissues that occur when an animal is bitten, clawed and injured during a predator attack.
The most important and characteristic indicators of predation are bleeding and bruising of tissues that occur when an animal is bitten, clawed and injured during a predator attack. An animal will only bleed or bruise when it is alive or for a very brief time after death. A careful and thorough examination of the carcass may reveal punctures, cuts and tears from a predator’s teeth and claws.
Generally, the larger the prey, the more severe and extensive the predation damage will be. External wounds may not be obvious, especially on smaller prey. Skin the hide from around wounds and feeding sites, and from parts of the carcass commonly associated with predation; look for bruises and bleeding of internal tissue. For example, skin the neck, flanks, hind legs and back of a lamb carcass. The absence of bleeding and bruises on a carcass that was fed upon by predators indicates scavenging and death from causes other than predation.
4
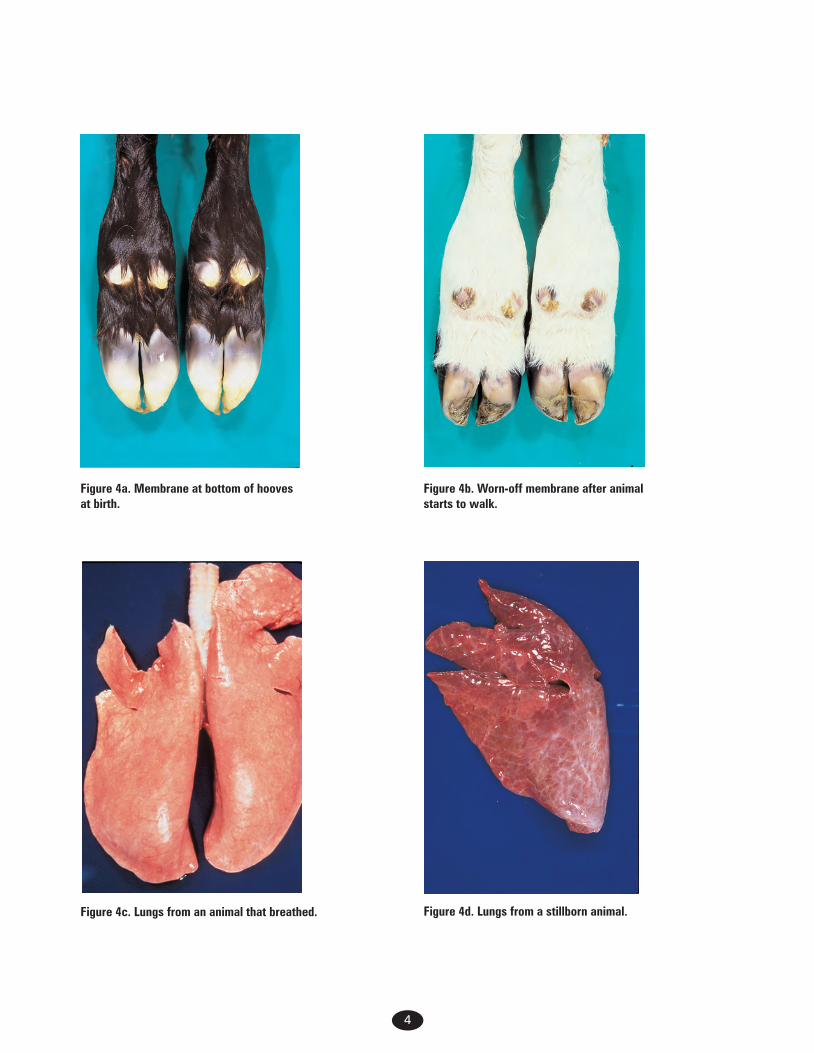
Figure 4d. Lungs from a stillborn animal.
Figure 4a. Membrane at bottom of hooves at birth.
Figure 4b. Worn-off membrane after animal starts to walk.
Figure 4c. Lungs from an animal that breathed.
5
very difficult to distinguish predation of live newborn animals from scavenge feeding by scavengers on stillborn young.
The following factors may help you determine if an animal was born alive or dead:
• At birth, the bottom of hooves are covered by a soft membrane. This membrane wears off quickly when an animal starts to walk. Inspect these membranes for any wear or marks to indicate that the animal was on its feet (Figures 4a and 4b).
• Lungs from an animal that breathed are pink in colour and feel light and spongy. In contrast, lungs from a stillborn animal are hard and purplish-red in colour (Figures 4c and 4d). Lung tissue will float in water if the animal breathed before death.
• A mother normally licks a live, newborn animal at birth to remove birth secretions and membranes. A newborn that was not licked by the mother was probably dead at birth.
Characteristics of Attack and Feeding Behaviour of Predators
Domestic Dog
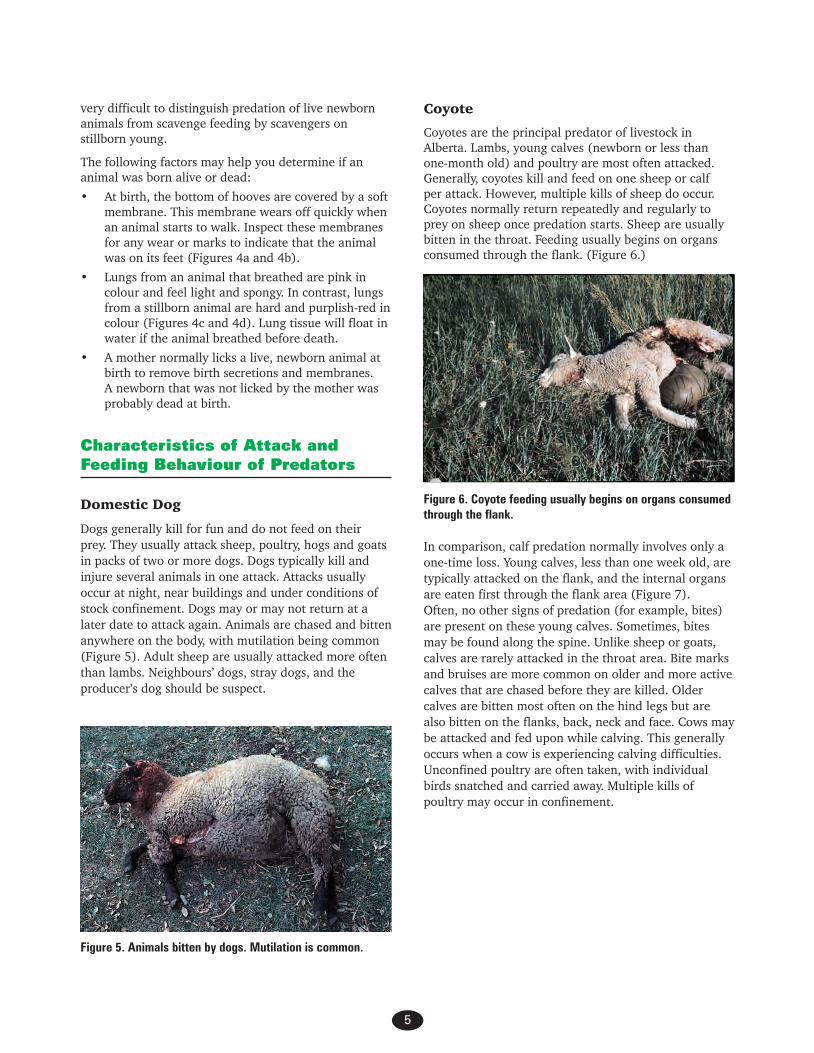
Dogs generally kill for fun and do not feed on their prey. They usually attack sheep, poultry, hogs and goats in packs of two or more dogs. Dogs typically kill and injure several animals in one attack. Attacks usually occur at night, near buildings and under conditions of stock confinement. Dogs may or may not return at a later date to attack again. Animals are chased and bitten anywhere on the body, with mutilation being common (Figure 5). Adult sheep are usually attacked more often than lambs. Neighbours’ dogs, stray dogs, and the producer’s dog should be suspect.
Figure 5. Animals bitten by dogs. Mutilation is common.
Coyote
Coyotes are the principal predator of livestock in Alberta. Lambs, young calves (newborn or less than one-month old) and poultry are most often attacked. Generally, coyotes kill and feed on one sheep or calf per attack. However, multiple kills of sheep do occur. Coyotes normally return repeatedly and regularly to prey on sheep once predation starts. Sheep are usually bitten in the throat. Feeding usually begins on organs consumed through the flank. (Figure 6.)
Figure 6. Coyote feeding usually begins on organs consumed through the flank.
In comparison, calf predation normally involves only a one-time loss. Young calves, less than one week old, are typically attacked on the flank, and the internal organs are eaten first through the flank area (Figure 7). Often, no other signs of predation (for example, bites) are present on these young calves. Sometimes, bites may be found along the spine. Unlike sheep or goats, calves are rarely attacked in the throat area. Bite marks and bruises are more common on older and more active calves that are chased before they are killed. Older calves are bitten most often on the hind legs but are also bitten on the flanks, back, neck and face. Cows may be attacked and fed upon while calving. This generally occurs when a cow is experiencing calving difficulties. Unconfined poultry are often taken, with individual birds snatched and carried away. Multiple kills of poultry may occur in confinement.

6
Figure 7. The normal focus of attack by coyotes on newborn calves is the flank.
WolfCattle on forested pastures are most vulnerable to predation by wolves. However, predation on sheep, hogs and other domestic animals also occurs near wolf habitat. Predation is normally repeated. Most often, wolves kill older calves, seven to nine months of age. Cattle and other large prey are typically bitten on the hind quarters while being chased (Figure 8). Bites to the front legs, flanks and face may also occur. Usually one animal is killed per attack of larger prey. Generally, signs of a chase and struggle include blood, tracks and disturbed ground. Wolves usually begin feeding on the hind legs and internal organs of larger prey. Wolves have much stronger jaw strength than coyotes and can break and consume all but the largest bones. Smaller prey, like sheep and hogs, are easier for wolves to kill. Wolves, like domestic dogs, will often select adult sheep in preference to lambs. Multiple kills are common with typical bites to the head, throat, back and hindquarters. Wounds are generally more extensive and severe on prey killed by wolves than by coyotes. Smaller prey may be quickly and completely consumed or dragged away. Hide and bones are often eaten as well as flesh.
Bear
Figure 8. Cattle and other large prey are typically bitten on the hind quarters during an attack by wolves.
Bears may attack cattle, sheep, hogs and other domestic animals. Bears kill livestock by biting the head, neck or back areas (Figure 9). The neck may be broken. Claw marks on the hide of the neck and back may occur, but are more prevalent on black bear kills than grizzly bear kills. Smaller prey are often consumed at the first feeding. A carcass may be dragged to cover before or after initial feeding. Multiple kills often occur during an attack of penned hogs or sheep. The hide is normally not eaten and is often pulled off the carcass as feeding occurs. The hide on the legs may be turned inside out. Meat is consumed in preference to internal organs; bones are not chewed and scattered. Grizzly bears usually cover their prey after the initial feeding, whereas black bears rarely do so.
Figure 9. Bears will kill livestock by bites to the head, neck, or back.
CougarCougars usually kill smaller livestock including sheep, goats, calves and colts with a bite on the upper part of the neck. Claw marks that penetrate the hide are often present on the back and neck, especially on larger prey. Tufts of hair pulled from the hide may be present near a carcass. The neck may be broken from a severe bite. Prey is usually dragged to cover before feeding. Cougars begin to feed on internal organs through an opening behind the ribs, but leave the stomach untouched. Flesh from the front quarters and neck may be eaten. Cougars usually attempt to cover the carcass, but may not return to feed on a carcass a second time. Carrion is not normally eaten.
For more detailed information on the identification of livestock predation, see Methods of Investigating Predation of Livestock, available from the Alberta Agriculture Publications Office, 7000-113 Street, Edmonton AB T6H 5T6, telephone toll-free 1-800-292-5697.

7
Figure 10. Footprints of canid predators.
C. Red Fox
5.5 cm. (2.25”)
B. Coyote
7.5 cm. (3”)
A. Wolf
12.5 cm. (5”)
D. Large Dog
10 cm. (4”)


10
Non-Lethal Methods to Prevent Coyote Predation
Preventing predation is a better approach than any actions that might be taken after predation occurs. There are a number of ways to control livestock predation without removing coyotes. Sometimes all that is required are minor changes in farm management practices that will discourage coyotes from feeding or staying on your property. Like all predators, coyotes are opportunists and take advantage of an easy, available source of food. If calves, sheep or poultry are readily accessible and unprotected, coyotes may kill them.
Carrion DisposalDead livestock, stillborn young and afterbirth attract coyotes and other predators. All carrion should be removed from the farm. Untreated carcass dumps or “bone piles” on the farm encourage coyotes to remain in the area and pose a menace to nearby livestock. Provincial law requires prompt and proper disposal of dead livestock.
Livestock producers near large urban centres may use rendering plants that pick up dead stock. A nearby fur farm may also pick up unspoiled dead animals. However, sheep are not accepted at rendering plants because of disease concerns. The wool also fouls rendering equipment.
Many rural municipalities maintain pits for disposal of animals that are killed on highways; these pits may also be used for disposal of farm livestock. If on-farm disposal is necessary, place dead animals in a pit, cover them with lime and bury to a depth of two metres.
Flock and Herd Management
The more time you spend with your livestock, the less likely predation will occur. Livestock producers who work off-farm tend to spend less time with their livestock, which places them at a greater risk of predation.
CattleCows are vulnerable to attack by coyotes while giving birth, particularly difficult births. Cows that are about to give birth, especially first-calf heifers, should always be kept in a convenient, secure location for protection and ease of supervision. Do not allow cows to escape
and give birth in areas away from the main herd. The chances of predation greatly increase when cows give birth alone. The smell of blood and behaviour of livestock during the birth process attracts coyotes. Remove afterbirth and dead calves as soon as possible.
A prolonged, difficult birth increases the time cows are vulnerable to coyote predation and also produces a weakened calf that may be more susceptible to predation. Inadequate calcium and magnesium in the diet can reduce muscle contractions and cause prolonged birth. Inadequate calcium and magnesium can occur in cereal-based (green feed and silage) diets. Cows that are overfed can also have difficult births due to the accumulation of fat in the pelvic area.
Calves up to a week old, especially newborns, are most commonly attacked by coyotes. Small, sick, injured or otherwise abnormal calves are more susceptible to coyote predation. Weak calves have more trouble attracting the cow’s attention, and the bonding between a cow and her calf is delayed. In turn, a weak bond probably decreases the probability that a cow will defend her calf.
Proper nutrition helps reduce problems at birth and produces stronger, healthier calves. Cows that are borderline deficient in copper, selenium and vitamins A and E can have weak calves. Therefore, cows should receive a complete trace mineral supplement that includes vitamins. Cows can also be injected with vitamins.
Also, to help reduce the chance of coyote predation:
• Use breeding bulls that produce smaller calves, so that difficult labours are minimized.
• Maintain regular surveillance during calving season.
• Maintain a definite breeding season that does not drag on for months. A short calving season increases the chances that proper surveillance will be maintained.
• Avoid placement of pregnant cows and young calves in bush pastures where surveillance is difficult.
• Maintain fences to prevent young calves from wandering outside of calving areas and away from the protection of their mothers.
11
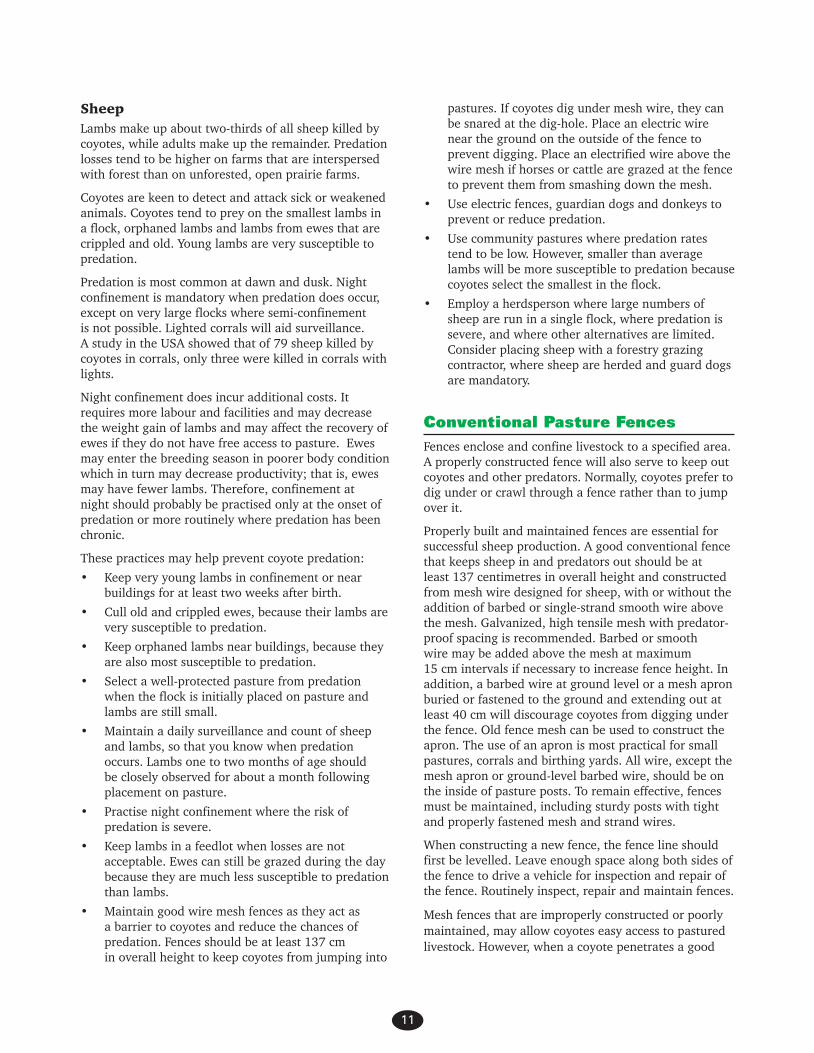
SheepLambs make up about two-thirds of all sheep killed by coyotes, while adults make up the remainder. Predation losses tend to be higher on farms that are interspersed with forest than on unforested, open prairie farms.
Coyotes are keen to detect and attack sick or weakened animals. Coyotes tend to prey on the smallest lambs in a flock, orphaned lambs and lambs from ewes that are crippled and old. Young lambs are very susceptible to predation.
Predation is most common at dawn and dusk. Night confinement is mandatory when predation does occur, except on very large flocks where semi-confinement is not possible. Lighted corrals will aid surveillance. A study in the USA showed that of 79 sheep killed by coyotes in corrals, only three were killed in corrals with lights.
Night confinement does incur additional costs. It requires more labour and facilities and may decrease the weight gain of lambs and may affect the recovery of ewes if they do not have free access to pasture. Ewes may enter the breeding season in poorer body condition which in turn may decrease productivity; that is, ewes may have fewer lambs. Therefore, confinement at night should probably be practised only at the onset of predation or more routinely where predation has been chronic.
These practices may help prevent coyote predation:
• Keep very young lambs in confinement or near buildings for at least two weeks after birth.
• Cull old and crippled ewes, because their lambs are very susceptible to predation.
• Keep orphaned lambs near buildings, because they are also most susceptible to predation.
• Select a well-protected pasture from predation when the flock is initially placed on pasture and lambs are still small.
• Maintain a daily surveillance and count of sheep and lambs, so that you know when predation occurs. Lambs one to two months of age should be closely observed for about a month following placement on pasture.
• Practise night confinement where the risk of predation is severe.
• Keep lambs in a feedlot when losses are not acceptable. Ewes can still be grazed during the day because they are much less susceptible to predation than lambs.
• Maintain good wire mesh fences as they act as a barrier to coyotes and reduce the chances of predation. Fences should be at least 137 cm in overall height to keep coyotes from jumping into
pastures. If coyotes dig under mesh wire, they can be snared at the dig-hole. Place an electric wire near the ground on the outside of the fence to prevent digging. Place an electrified wire above the wire mesh if horses or cattle are grazed at the fence to prevent them from smashing down the mesh.
• Use electric fences, guardian dogs and donkeys to prevent or reduce predation.
• Use community pastures where predation rates tend to be low. However, smaller than average lambs will be more susceptible to predation because coyotes select the smallest in the flock.
• Employ a herdsperson where large numbers of sheep are run in a single flock, where predation is severe, and where other alternatives are limited. Consider placing sheep with a forestry grazing contractor, where sheep are herded and guard dogs are mandatory.
Conventional Pasture FencesFences enclose and confine livestock to a specified area. A properly constructed fence will also serve to keep out coyotes and other predators. Normally, coyotes prefer to dig under or crawl through a fence rather than to jump over it.
Properly built and maintained fences are essential for successful sheep production. A good conventional fence that keeps sheep in and predators out should be at least 137 centimetres in overall height and constructed from mesh wire designed for sheep, with or without the addition of barbed or single-strand smooth wire above the mesh. Galvanized, high tensile mesh with predator-proof spacing is recommended. Barbed or smooth wire may be added above the mesh at maximum 15 cm intervals if necessary to increase fence height. In addition, a barbed wire at ground level or a mesh apron buried or fastened to the ground and extending out at least 40 cm will discourage coyotes from digging under the fence. Old fence mesh can be used to construct the apron. The use of an apron is most practical for small pastures, corrals and birthing yards. All wire, except the mesh apron or ground-level barbed wire, should be on the inside of pasture posts. To remain effective, fences must be maintained, including sturdy posts with tight and properly fastened mesh and strand wires.
When constructing a new fence, the fence line should first be levelled. Leave enough space along both sides of the fence to drive a vehicle for inspection and repair of the fence. Routinely inspect, repair and maintain fences.
Mesh fences that are improperly constructed or poorly maintained, may allow coyotes easy access to pastured livestock. However, when a coyote penetrates a good
12
mesh fence, it is easier to find the point of entry. The fence can be modified to prevent coyote entry, or a snare may be set at the entry site to capture the problem coyote. An electrified wire may be added to the outside bottom of a mesh fence that is in good condition to discourage coyotes from digging under (see the following section on electric fences).
Cattle and horses can damage mesh wire fences. They may reach their heads through the fence directly above the mesh. Coyotes can easily jump through a fence where the mesh wire is stretched and pushed down. Electrifying a wire just above the mesh prevents damage to fences by cattle and horses, adds years of service to the fence and aids in the prevention of coyote predation.
Electric FencesFor more than 20 years, electric fences in Alberta have protected livestock from predators. An evaluation of electric fences to protect sheep from coyote predation was first conducted by Alberta Agriculture in the mid 1970s. This study showed a 90 per cent reduction in sheep predation losses on farms with electrified pasture fences. Other studies have confirmed the effectiveness of electric fences to prevent sheep predation. Electric fences are easily adapted to most livestock operations, relatively easy to maintain and economical to build. However, electric fences require routine inspection and maintenance to ensure proper operation and protection capability.
Electric Fence DesignsAn effective electric fence for predator control can be constructed from multiple strands of smooth wire or from a combination of wire mesh and single strands of wire. A mesh wire fence is more expensive to build than a fence made from single-strand wire. However, an electrified mesh wire fence presents a greater physical barrier to predators and requires less maintenance than a fence made from single-strand wires.
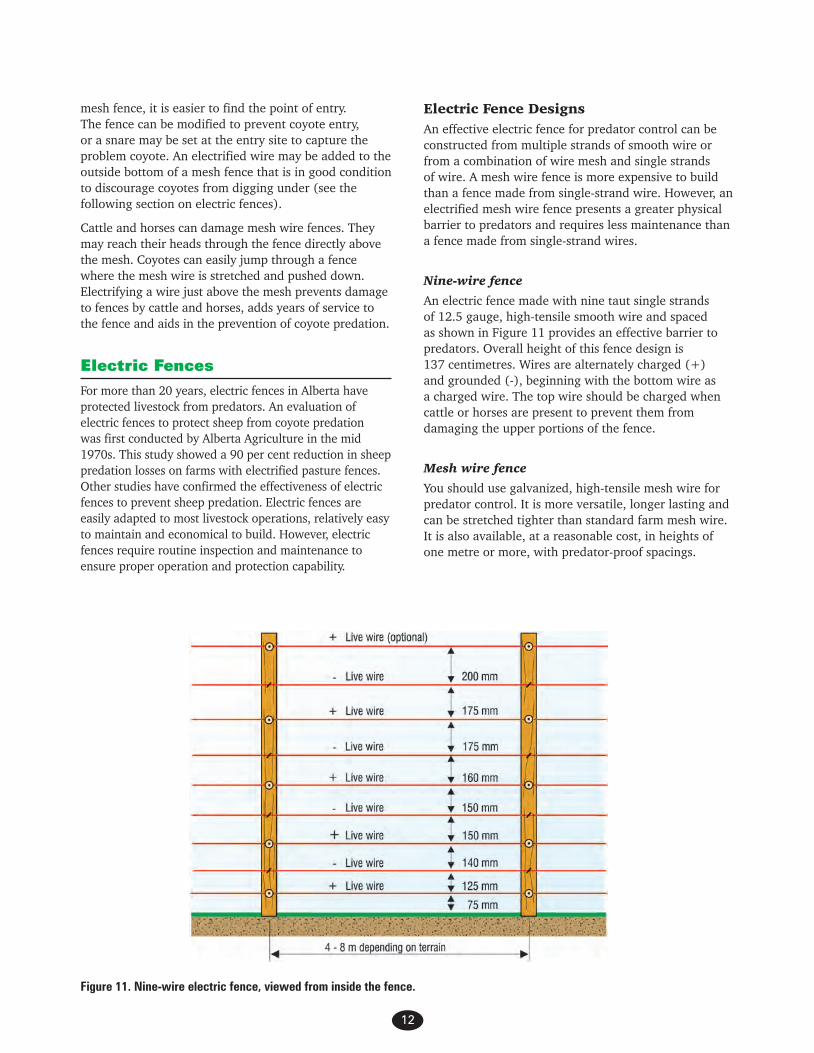
Nine-wire fence
An electric fence made with nine taut single strands of 12.5 gauge, high-tensile smooth wire and spaced as shown in Figure 11 provides an effective barrier to predators. Overall height of this fence design is 137 centimetres. Wires are alternately charged (+) and grounded (-), beginning with the bottom wire as a charged wire. The top wire should be charged when cattle or horses are present to prevent them from damaging the upper portions of the fence.
Mesh wire fence
You should use galvanized, high-tensile mesh wire for predator control. It is more versatile, longer lasting and can be stretched tighter than standard farm mesh wire. It is also available, at a reasonable cost, in heights of one metre or more, with predator-proof spacings.
Figure 11. Nine-wire electric fence, viewed from inside the fence.

13
To build a new mesh wire fence, place the mesh wire on the inside of the pasture posts. Pull the mesh taut, position the bottom of the mesh tight to the ground and staple the mesh securely to the posts. The fence wire must be tight to the ground to reduce the chances of a coyote digging under. If a fence is not taut, the wires will sag and make a gap easier to penetrate by coyotes. Single-strand 12.5 gauge high-tensile wires can be placed about 15 centimetres apart above the mesh to increase the height of the fence to 137 centimetres or more.
An existing sheep fence made from mesh and barbed wire can be electrified. However, the fence must be in good condition. The wire must be free of rust, undamaged and taut. The mesh wire must not have spacings larger than 15 centimetres by 15 centimetres. Coyotes may crawl through spaces larger than 15 centimetres. Fence posts must be sturdy and preferably tall enough to make the fence at least 137 centimetres tall. Add extensions to increase post height to at least 137 centimetres if the posts are not tall enough to support the top wires.
To stop coyotes from digging under the fence, place a charged 12.5-gauge high-tensile wire 10 to 15 centimetres above ground level and 10 to 20 centimetres out from the mesh. If the fence posts are 10 centimetres or more in diameter and the mesh is attached on the inside of the posts, insulators and the charged wire can be attached directly to the outside of the posts. If the fence posts are less than 10 centimetres in diameter or the mesh is on the outside of the posts, offset brackets will be needed. Brackets can be built or purchased. Damaged mesh or mesh with openings
larger than 15 centimetres by 15 centimetres may allow coyotes to crawl through the fence. Repair or replace damaged mesh. Add one or more strands of high-tensile smooth wire 15 centimetres apart above the mesh to increase the total height of the fence to at least 137 centimetres. This height is the minimum acceptable to prevent coyotes from jumping the fence. Make sure the mesh and single wires are taut. If horses or cattle use the fence, electrify the top wire to keep them from pushing on the wires.
How an Electric Fence WorksFor electricity to flow in an electric fence, there must be a complete and uninterrupted (closed) circuit. The electrical current must travel from its source (fence energizer) through the circuit (fence) and back to the source. This only occurs when a charged wire of the fence becomes grounded.
Under normal operating conditions, an electric fence functions as an incomplete (open) circuit with repeating pulses of electricity generated by the energizer sent through the charged wires of the fence. When an animal touches a charged wire, a closed circuit is created. An electrical pulse travels through the animal and back to the energizer, delivering a shock to the animal. Other objects and materials, including vegetation, sticks, fallen trees and non-insulated posts in contact with charged wires can also create a partial or total closed circuit. As a result, there is a reduced electrical charge (voltage) and an inadequate shock to repel coyotes that contact charged wires of the fence.
Figure 12. An electrified mesh wire fence viewed from outside pasture.
14
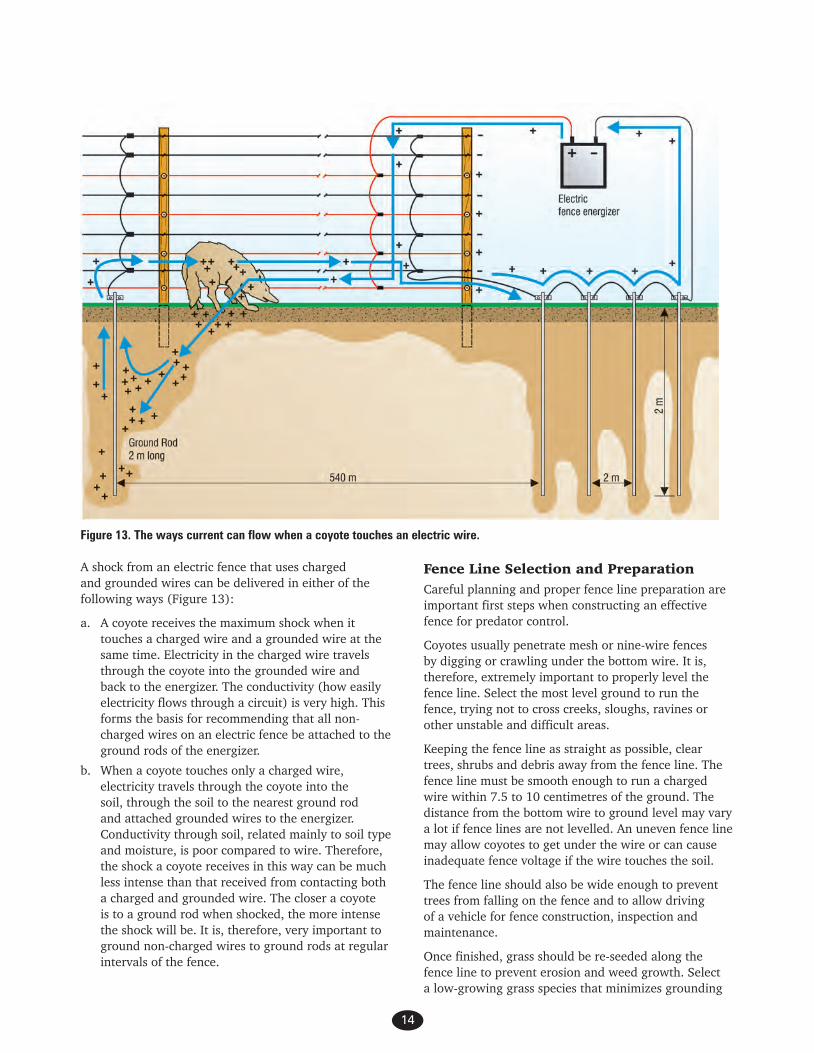
A shock from an electric fence that uses charged and grounded wires can be delivered in either of the following ways (Figure 13):
a. A coyote receives the maximum shock when it touches a charged wire and a grounded wire at the same time. Electricity in the charged wire travels through the coyote into the grounded wire and back to the energizer. The conductivity (how easily electricity flows through a circuit) is very high. This forms the basis for recommending that all non-charged wires on an electric fence be attached to the ground rods of the energizer.
b. When a coyote touches only a charged wire, electricity travels through the coyote into the soil, through the soil to the nearest ground rod and attached grounded wires to the energizer. Conductivity through soil, related mainly to soil type and moisture, is poor compared to wire. Therefore, the shock a coyote receives in this way can be much less intense than that received from contacting both a charged and grounded wire. The closer a coyote is to a ground rod when shocked, the more intense the shock will be. It is, therefore, very important to ground non-charged wires to ground rods at regular intervals of the fence.
Fence Line Selection and PreparationCareful planning and proper fence line preparation are important first steps when constructing an effective fence for predator control.
Coyotes usually penetrate mesh or nine-wire fences by digging or crawling under the bottom wire. It is, therefore, extremely important to properly level the fence line. Select the most level ground to run the fence, trying not to cross creeks, sloughs, ravines or other unstable and difficult areas.
Keeping the fence line as straight as possible, clear trees, shrubs and debris away from the fence line. The fence line must be smooth enough to run a charged wire within 7.5 to 10 centimetres of the ground. The distance from the bottom wire to ground level may vary a lot if fence lines are not levelled. An uneven fence line may allow coyotes to get under the wire or can cause inadequate fence voltage if the wire touches the soil.
The fence line should also be wide enough to prevent trees from falling on the fence and to allow driving of a vehicle for fence construction, inspection and maintenance.
Once finished, grass should be re-seeded along the fence line to prevent erosion and weed growth. Select a low-growing grass species that minimizes grounding
Figure 13. The ways current can flow when a coyote touches an electric wire.

15
problems of the bottom-charged wire. Common broad-leafed weeds that can cause grounding problems can be controlled with herbicides, or a mechanized cutter.
Fence ConstructionFor more information on constructing a fence see Fencing with Electricity, available from the Alberta Agriculture Publications Office, 7000-113 Street, Edmonton AB T6H 5T6. This publication explains the materials and procedures used to construct a proper livestock fence and is recommended as a supplement to the following information.
Electric Fence Components and Their UsesTo ensure the maximum benefit from an electric fence:
• Select the best equipment and materials to meet the requirements of the area being fenced.
• Follow proper construction procedures and requirements without taking shortcuts.
• Routinely inspect and maintain the fence.
Posts
Pressure-treated wood posts are the most economical and practical to use when building electric predation control fences. The number, length and diameter of the posts needed depend on how long, high, level and straight the fence will be.
Corner posts, end posts and brace posts form the backbone of a fence, and must withstand considerable tension when wires are tightened. These posts should be about 15 centimetres in diameter, 250 centimetres long and driven 90 centimetres or more into the ground. Double brace the corner and end posts on long spans of fence. Improperly constructed end and corner post assemblies will fail to sustain the wire tension required for an effective predation control fence.
Line posts serve to support the fence wires in the proper position. On relative level terrain in a straight area of the fence, use line posts that are at least 215 centimetres long and 8 to 10 centimetres in diameter. Drive them about 60 centimetres into the ground. On level ground, line posts can be spaced up to eight metres apart. On hills and hollows, line posts must be spaced five metres or less apart to ensure proper wire spacing. In high strain areas of the fence, such as on curves and at the bottom of a hill, use longer and thicker posts and drive them deeper into the ground.
Fence Wire
Fence line wire most suitable for electric fencing should possess the following properties:
• high-tensile strength
• long-term resistance to corrosion
• low electrical resistance (carries electricity well)
Galvanized 12.5 gauge high-tensile, single-strand smooth wire and galvanized high-tensile mesh wire meet these properties and are also economical. Galvanized single-strand wire costs about 40 to 50 per cent less than double-strand barbed wire, is less susceptible to breakage and easier to use. Galvanized wire provides over 35 years of protection against rust and corrosion. Single-strand galvanized wire is available in 45 kilograms rolls and galvanized mesh wire is available in 100 metre rolls.
High-tensile wire can be joined together or fastened at end posts with a figure-eight knot or with commercial compression sleeves (Figure 14). Compression sleeves provide the strongest connection and are quick and easy to use. High-tensile strand and mesh wire should be stretched tight enough to maintain the proper distances between wires and to prevent the wire from sagging. Over-tightening can cause post structure damage.
Use insulated 12.5 gauge wire to connect the positive (+) terminal of the energizer to the charged (+) wires of the fence. Connect two insulated wires this way in parallel to provide the best connection and least impedance. (Impedance is the total opposition offered by an electric circuit to the flow of an alternating current of a single frequency). The difference between the impedance of the connection wire and the impedance of the fence wire reduces the efficiency of the energizer; the effectiveness of the energizer pulse decreases with the distance travelled in the connection wire. Therefore, the connection wire should be as short as possible. Charged wires should be connected to each other with insulated wire at approximately 0.5 kilometre intervals along the fence. Grounded wires (-) should also be connected together at this same distance with single-strand high-tensile wire.

16
Figure 14. Methods of connecting wire.
Fence Post Insulators
Insulators hold the charged wires in place and prevent the loss of electrical charge through the post to the ground. Use insulators on all charged wires. Insulators, generally made of plastic, are available in different quality and designs (Figure 15). The more expensive insulators are made to function better and generally last much longer than the cheaper types. The most common line post insulator is a moulded plastic design that is nailed or stapled in place. The nail or staple must not be driven too deeply in the post as this can damage or distort the insulator. A plastic tube insulator can be slipped onto single-strand smooth wire (one for each post). They are fastened to the post with a staple. Plastic wraparound insulators also slip over single-strand smooth wire for positioning on the outside of posts at curves and at corners, or at end posts. Rigid plastic, double “U” insulators can be used to insulate tightened wires at end posts, corner posts and gate locations.
Figure 15. Types of insulators.
“W” nail on post insulator High strain wrap around tube insulator Steel “Y” on post insulator
Glass filled polyester strain insulator Insulating tube Porcelain reel insulator
Wires joined by crimping sleeves.
Figure eight knot.

17
Wire Connectors and Tighteners
Compression sleeves should be used for permanent connections, such as joining line wires or mesh wire together. A compression sleeve tool must be used to securely crimp the sleeves onto the wire. These tools are available from any electric fencing supply outlet. Proper wire splices with compression sleeves are as strong as the wire.
Removable, galvanized clamps can be used to attach the charged and ground wires from the energizer onto the fence. They can also be used to connect common wires together at regular intervals along the fence. Galvanized clamps can be installed with a screwdriver or wrench. To prevent corrosion at connections and poor electrical contact, apply either a non-drying sealant, wrap with waterproof electrician’s tape or use zinc-encircled “cold-galvanizing” paint.
Several types of ratchet-type wire tighteners are available for single-strand, high-tensile wire (Figure 16). They are attached to each strand of wire. A handle is used to wrap excess wire onto the tightener until the wire is taut. Tighten the wires just enough to remove any slack and to maintain proper spacing between the wires. If the wires are too slack, the space between the wires will vary and may be wide enough to allow a coyote to jump between the wires. One tightener is required for about every 400 metres of wire.
Mesh wire can be tightened and secured at a corner or end post. Securely nail two strong wooden boards together over the mesh to provide an even pulling point. Attach chains, cables or strong ropes from the pull boards to a tractor. Pull the mesh tight. Cut off surplus mesh and secure the mesh to the end or corner post. Make sure the bottom of the mesh is tight to the ground before it is secured. Bring the mesh around the post and twist all of the end horizontal wires back, about three full turns, onto the horizontal wires of the mesh in the corresponding locations. Once all wires are secured, remove the tractor and tightening boards. Do not over-tighten the mesh to prevent damage to the wire and fence post assemblies.
Ground Rods
Ineffective shock on a properly wired and energized fence is usually caused by an inadequate electrical ground. To properly ground an electric fence, drive four 185 centimetre lengths of ground rod or galvanized pipe (20 millimetres) into the soil at 185 centimetre intervals next to the energizer. Place ground rods in a damp location if possible. Leave 7 to 15 centimetres of rod out of the soil. Connect a continuous ground wire in a series from the negative terminal of the energizer to each rod or pipe (Figure 13). Use 12.5 gauge, high-tensile wire to connect all of the ground rods to the negative terminal of the energizer and to the ground wires of the fence. Use ground rods clamps to attach the ground connection wire to the ground rods. Drive ground rods at 500 metre intervals along the fence and attach to the fence ground wires. Do not position ground rods closer than eight metres to the following:
• any telephone rod
• any underground metal pipe system
• any metal support or other part of a structure sitting on or driven into the ground
Electric Energizers
Electric fence energizers have improved considerably in recent years due to new technology. Many brands of high-output energizers are now available.
Most energizers are uni-polar units which have a positive (+) charge terminal and a negative (-) ground terminal. Many of these units have a setting for high, medium and low voltage output. Uni-polar energizers are most effective on an electric fence with alternating charged and grounded wires.
Bi-polar energizers are used less frequently. They have both a positive-charge terminal and a negative-charge terminal, as well as a ground terminal. The positive and negative terminals are connected to alternate wires of a fence with multiple single-strand wires. The ground terminal is connected to ground rods. An animal that touches any single wire of the fence receives one half of the energizer’s voltage output. When positive and negative wires are touched at the same time, the full energizer shock is received.
Figure 16. Wire tighteners for single-strand wire.

18
Insulators must be used on all wires of a fence with a bi-polar energizer. Bi-polar energizers have an advantage over uni-polar units because:
a. all fence wires are charged, and
b. less charge is lost when the fence is grounded by grass or other materials.
Bi-polar energizers generally provide a stronger shock under poor conditions (i.e. grass, etc. touching wires) and on longer than normal lengths of fence in comparison to uni-polar energizers.
Consider the following factors when selecting an energizer:
• quality, type and length of wire to be electrified
• availability of mainline power
• rated and actual outputs of various energizers
• initial and operational costs of various units
Units best suited for predator control are high-energy, solid-state (no moving parts), 110 volt or 12 volt battery-operated types. The 110 volt energizers are the most practical since they can produce high shocking power on a long fence, don’t require a battery and as much maintenance.
Battery-operated units are used where 110 volt power is not available. Use a 100 amperage, heavy duty industrial (deep-cycle) battery. These batteries can be frequently drained of power and recharged without damage. To maintain top efficiency, the battery must be regularly charged or exchanged for a fully charged one. With some high output energizers, batteries must be recharged or exchanged twice per week. Solar panels can be used to maintain a peak battery charge if they are sized appropriately to the energizer. Solar panels are expensive, but work very well and require little maintenance. Where practical, rotating recharged batteries on a regular basis is less expensive than using a solar panel. Keep in mind that energizers, batteries and solar panels attract attention and are prone to theft, especially at unsecured or unguarded locations.
An energizer must have a time interval of at least 0.75 seconds between pulses to allow a shocked animal time to pull back from the fence. For this reason, only one energizer on one wire or one section of fence should be used. An increased pulse rate or almost steady flow of electricity through a wire, generated by more than one energizer, could be extremely dangerous or lethal to any animal or person touching the wire. Two energizers may be required to adequately charge a very long fence. If two energizers are used, the fence should be split into two separate sections with each section electrified and grounded entirely independent of the other. Do not use one energizer on the top wires of a fence and another energizer on the bottom wires,
since a grounding fault on the fence could cause both energizers to charge one wire. This could prove very dangerous to any animal or person touching the wire.
The energy capability and shocking power of fence energizers are the net effect of voltage and amperage. A combination of electrical pressure (voltage) with which the current is delivered and electrical volume (amperage) is the standard for energizer selection. The product of amperage and voltage is joules (volts x amps = joules). A nine-wire fence with five charged wires around 160 acres of land (16 kilometres of charged wire) with very little vegetative interference requires an energizer of at least 8 to 10 joules rating.
To be effective, an energizer must produce enough voltage to overcome the insulation resistance of the hair and hide of an animal and still give a sufficient electrical shock. The “guard voltage” or voltage produced on a fence is dependent on the quality of the energizer, the length of wire electrified, and the condition and quality of the fence. Guard voltage on a given distance of fence can vary substantially over time, depending on environmental conditions and the condition of the fence. Use an energizer that produces a minimum guard voltage of 5000 volts or more over the length of the fence.
There are many energizers on the market, all varying in quality and performance. Manufacturers usually rate their energizers according to the length of fence line they will power under ideal conditions. For normal field conditions, divide the manufacturer’s figures in half to get the length of wire the energizer will effectively power.
Ensure that the energizer you purchase will provide adequate voltage over the length of wire to be energized on your fence. Do not try to overextend an energizer. Generally, the more expensive the energizer, the better it will be for shock output and fence line coverage.
Lightning Protector
Most electric fence energizers now have built-in lightning protection. Yet energizers can still be damaged by a lightning strike depending upon the intensity and location of the strike on the fence. Replacement modules, lightning diverter and shock kits are available for most energizers. This is installed between the energizer and the fence. Lightning that strikes the fence is pushed into the ground by the diverter and prevents damage to the energizer. The diverter must be very well grounded to work properly. Since lightning usually strikes the top wire of the fence, proper and sufficient grounding of this ground wire will divert most of the charge into the ground.

19
Gates
Conventional wooden or metal gates can be used on an electric fence if the openings within the gates are smaller than 10 centimetres. Gates should be at least 137 centimetres tall to discourage predators from jumping over them. The area under the gate can be filled flush with gravel or hard-packed soil, or a wooden sill can be constructed to discourage predators from digging under the gate.
Live wires and grounded wires can be buried underground, or taken above the gate on a crossbar. Going over a gate is cheaper than an underground connection. However, an overhead connection is inconvenient and hazardous when tall equipment is used. Use double-insulated cable below ground level. Connect grounded wires with 12.5 gauge, high-tensile wire. Bury both live and grounded wires at least 30 centimetres deep and encase them in a 12 millimetre plastic pipe. Turn the ends of the pipe down above ground to keep out water. Electrified gates can be purchased, or conventional gates can be electrified with additional hardware.
Voltmeter
This is an invaluable and necessary tool to check fence voltage and locate faults in the system. Use a digital voltmeter calibrated in kilovolts. To determine the area of electrical loss on a fence, take readings at an increasing distance from the energizer. A significant drop in voltage indicates the area with the problem.
Vegetation Control
Vegetation in contact with charged wires can reduce fence voltage, particularly in wet weather. Remove the vegetation beneath fence lines, especially in areas where rainfall or foggy conditions are common. Removal of vegetation with herbicides has the advantage of reducing vegetative litter under the fence. Litter can cause inadequate grounding of an animal that touches a charged wire. Do not use soil sterilant under a fence line. Over time, soil that is treated with a soil sterilant will lose its structure, and wind and water erosion will occur. Ground squirrels and pocket gophers may also dig in the sterilized soil, and their mounds can ground the bottom-charged wire.
A strip of vegetation 15 centimetres on the inside of the fence and 30 centimetres on the outside of the fence can be controlled with a single treatment of glyphosate. For an appropriate application rate of herbicide, see Crop Protection (the blue book) available from the Alberta Agriculture Publications Office, 7000-113 Street, Edmonton AB T6H 5T6, telephone toll-free 1-800-292-5697.
Spot treatment with glyphosate or other chemicals may be required annually for persistent weed species.
Mechanical grass trimmers can be used to cut vegetation under the fence as an alternative to chemical control. However, vegetation cutting will be required on a regular basis throughout the growing season.
Guardian AnimalsLivestock guardian animals can be an effective, non-lethal method to prevent coyote predation of sheep and other livestock. However, a sincere commitment of time and patience by the livestock owner is required to develop the full and proper potential of the guardian animal. Livestock guardian effectiveness is complemented when other predation management procedures are practised. For example, electric fences and guardian animals work very well together to prevent sheep predation.
Guard DogsGuard dogs have been used for hundreds of years to protect livestock in Europe and Asia, and are becoming very popular in Alberta. Guard dogs are widely used by producers, especially those with larger than average flocks. In 1993, about one-half of the sheep in Alberta were protected by guard dogs. There are several different breeds of guard dogs that originate from Europe.
The Great Pyrenees (Figure 17) is the most common breed of livestock guardian dog in Alberta. The Pyrenees is one of the best choices of a guard dog and can be used on rangelands as well as smaller pastures. Other breeds include the Akbash, the Anatolian Shepherd, the Maremma, the Shar Planinetz, the Kuvasz and the Komondor. All have been used successfully to guard livestock.
Figure 17. The Great Pyrenees is the most common breed of livestock guardian dog in Alberta.
Photo courtesy of Skeenawhip Kennels
20
Before you buy a dog, however, you should become familiar with the overall concept of livestock guarding dogs. A guard dog may not be appropriate for some operations, and even a successful dog may not adequately solve a predation problem.
You will be most successful if you start with a pup about seven to eight weeks old. Purchase a pup from a reputable breeder, preferably one who has sold working dogs before. Select a pup that appears confident, as neither sex has proven superior to the other. Make certain the dog is free from physical problems. Most breeders will certify their dogs to be free from hip dysplasia, and some will guarantee replacement for a dog that fails to perform properly.
Place the new puppy immediately with lambs or other young of whatever livestock it is eventually expected to protect. When the pup is working with sheep, its lambs may harm the pup. As a result, the puppy may need a small enclosure within the sheep corral where it can get away. Periodically observe the dog, particularly during the first several days. The object of this rearing process is to develop a bond between the pup and sheep. This association is important and may determine the success or failure of a dog later in life. The pup and lambs usually get along well together. Lambs may allow a pup to groom them. However, a pup will occasionally become too playful with lambs and may even injure them. This excessive play behaviour should not be tolerated. Therefore, it is important to watch a pup during socialization to ensure that excessive play is strongly discouraged.
There are several approaches to take when a pup or adolescent dog becomes too playful with lambs. One approach is to simply remove the dog from the sheep, or tie the dog when it can’t be supervised. Simply preventing a situation from becoming a problem is easier than trying to change an established behaviour. An alternative is to place the dog with larger sheep or more aggressive rams that won’t tolerate the dog’s playful antics. Usually the overly playful period is outgrown, so the best solution to the problem is to keep the dog suitably supervised until it matures.
Once a bond is formed between the dog and sheep, even a four-to-six-month-old pup will remain with sheep if encouraged to do so. Since a pup’s bond to sheep can easily be overshadowed by a bond to people, it is important to encourage the dog to be with the flock. However, if the sheep are kept near the farmyard, a dog will likely include people in its guarding routine; its bond to sheep need not be as absolute as it would be in an operation where the sheep are kept some distance from the headquarters. In contrast, a strong bonding to sheep is essential if a dog must protect sheep that are more than 1 or 2 kilometres from the house. It is also important to feed and keep the dog in the pasture
where the sheep are kept to maintain the bond. Keep the sheep away from the dog feeder because most sheep will readily eat dog food.
Once a dog is mature and proven trustworthy, it may be allowed access to all phases of the livestock operation. The degree of freedom allowed a dog is left to the owner’s discretion. Since each dog’s temperament is different, each operation must be handled in an individual manner.
The sheep, once accustomed to a guard dog, will accept the dog as a member of the flock and usually respond only when the dog barks or runs through the flock in the course of its guarding routine.
Physical encounters between guard dogs and predators are relatively rare. A coyote, for example, would not normally fight with a dog that is three or four times its size and capable of wounding or killing it.
Guard dogs keep predators away from sheep with a combination of behaviours. A guard dog is very mobile, patrolling the area around the sheep and investigating an intruder or a disturbance. In the course of patrolling, a dog scent-marks. This behaviour, typical of the dog family, is used to denote a territory or convey other information. Guard dogs also usually bark in response to a disturbance. In most situations, the actions of patrolling, scent-marking and barking alert coyotes to the dog. Most coyotes will respect the dog’s presence and leave the area.
About 75 per cent of the guard dogs placed with livestock become successful guardians. However, there are several problems associated with using these dogs to protect sheep. The most serious occurs when a guard dog injures or kills a sheep. Although the number of guard dogs that kill sheep is small, it is still a serious problem. Harassing and eventually killing sheep may result from boredom, especially in immature dogs confined with sheep in a small area. Rehabilitation is possible for guard dogs that inadvertently kill sheep during playful behaviour. However, dogs that continue this behaviour will obviously not be suitable flock guardians.
Mortality of guard dogs is an important consideration. An unattended dog with sheep is not a traditional practice in North America. Therefore, dogs near the owner’s livestock or wandering off their owner’s property, are at risk of being shot.
Dogs can be killed or harmed by poisons, snares and traps used for coyote control. Be very careful to protect guard dogs when these control measures are used. Do not use poison in a carcass or in small meat baits when guard dogs are present, even if the dog is tied or confined during the baiting period. Coyotes may cache or scatter poisoned meat in the pasture vicinity to be found at a later date by the guard dog. M-44 devices,
21
traps, snares and toxic collars can be used if working dogs are tied or confined in another area until control work is completed.
Some dogs are hit by vehicles and others die from health problems. Some may become overly aggressive to people; this should be considered by farmers using this form of predator management.
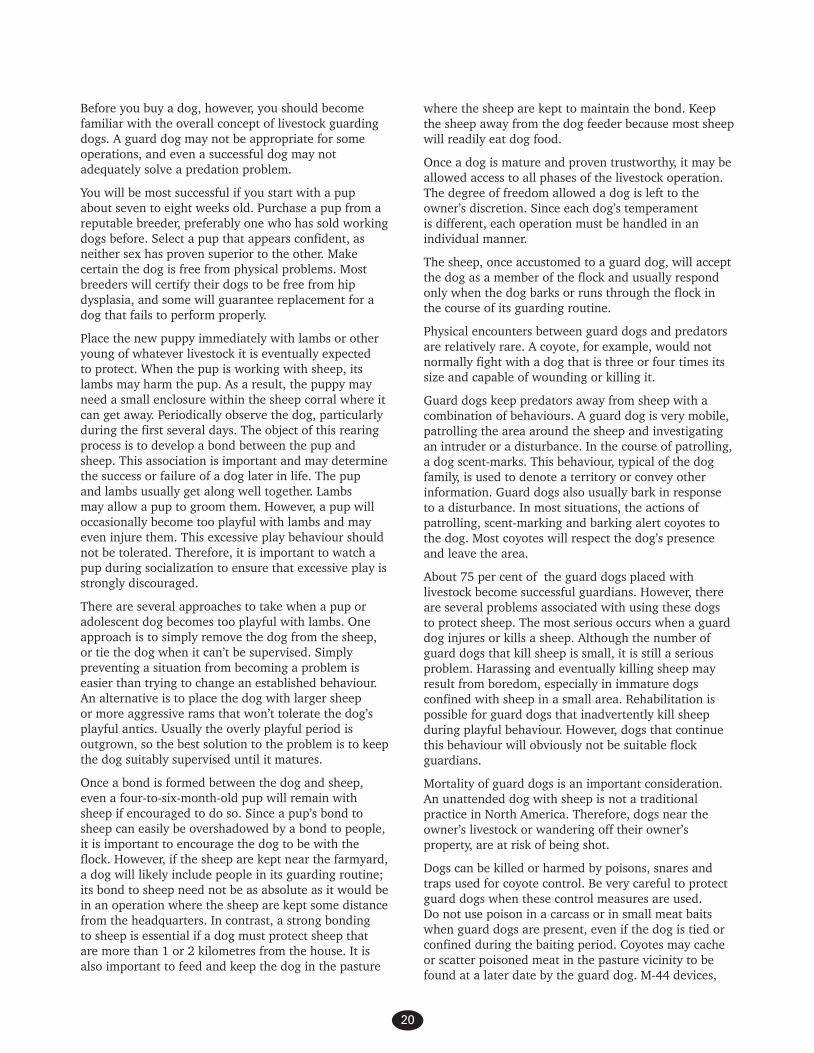
Guard DonkeysDonkeys have been used successfully to protect sheep and other livestock (Figure 18). The livestock protection behaviour of a donkey is based on its inherent dislike of dogs. Typically, a donkey brays, bares its teeth, chases and attempts to kick and bite dogs and coyotes. A donkey responds in this manner not as protection for livestock but as an expression of its aggression towards dogs and coyotes.
decreases as flock size increases. A donkey should be removed from the flock at lambing to prevent accidental or intentional injuries to lambs and the disruption of the ewe-lamb bond. Cattle producers concerned with coyotes at calving time have used donkeys successfully to prevent predation.
Do not allow a donkey access to feeds containing Rumensin or other additives intended only for ruminants. For more information on use of donkeys to guard livestock, see Protecting Livestock with Guard Donkeys, available from the Alberta Agriculture Publications Office, 7000-113 Street, Edmonton AB T6H 5T6.
No single method of predator control, including the use of guardian animals, is universally effective. For many farmers, livestock guardians are an excellent method that complements their predation management. Some farmers may find guard donkeys are more practical for their operation than guard dogs, while others may prefer guard dogs. Some livestock producers have used other animals for guarding sheep including llamas and horses. Some farmers have not been successful in using guardian animals to prevent predation.
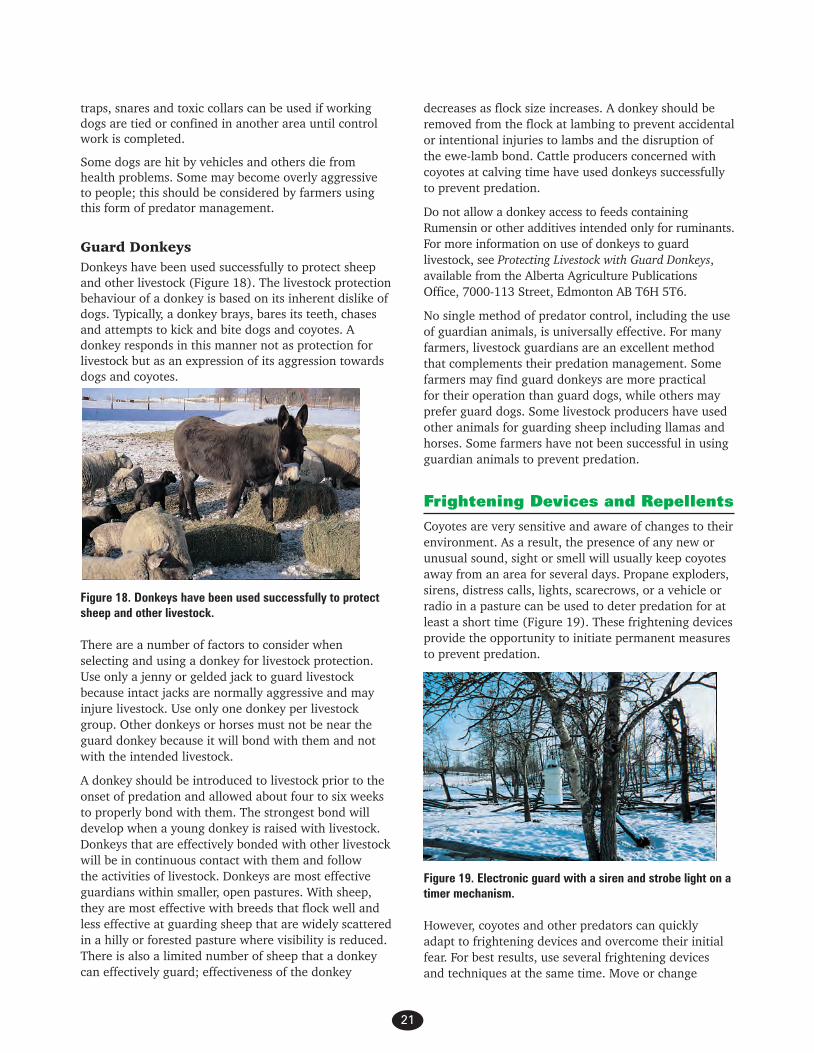
Frightening Devices and RepellentsCoyotes are very sensitive and aware of changes to their environment. As a result, the presence of any new or unusual sound, sight or smell will usually keep coyotes away from an area for several days. Propane exploders, sirens, distress calls, lights, scarecrows, or a vehicle or radio in a pasture can be used to deter predation for at least a short time (Figure 19). These frightening devices provide the opportunity to initiate permanent measures to prevent predation.
Figure 18. Donkeys have been used successfully to protect sheep and other livestock.
There are a number of factors to consider when selecting and using a donkey for livestock protection. Use only a jenny or gelded jack to guard livestock because intact jacks are normally aggressive and may injure livestock. Use only one donkey per livestock group. Other donkeys or horses must not be near the guard donkey because it will bond with them and not with the intended livestock.
A donkey should be introduced to livestock prior to the onset of predation and allowed about four to six weeks to properly bond with them. The strongest bond will develop when a young donkey is raised with livestock. Donkeys that are effectively bonded with other livestock will be in continuous contact with them and follow the activities of livestock. Donkeys are most effective guardians within smaller, open pastures. With sheep, they are most effective with breeds that flock well and less effective at guarding sheep that are widely scattered in a hilly or forested pasture where visibility is reduced. There is also a limited number of sheep that a donkey can effectively guard; effectiveness of the donkey
Figure 19. Electronic guard with a siren and strobe light on a timer mechanism.
However, coyotes and other predators can quickly adapt to frightening devices and overcome their initial fear. For best results, use several frightening devices and techniques at the same time. Move or change
22
these devices frequently so coyotes do not become accustomed to a set pattern. For example, the volume should be changed on a radio, a vehicle should be moved to a new position in a pasture, and the clothes and position should be changed on a scarecrow.
A wide variety of chemical repellents and deterrents can repel coyotes from livestock. Most are taste or odour offensive and can be applied as body sprays, collars and ear tags, odour stations along fences and aversive chemicals placed in food baits. While some may work temporarily, no single chemical repellent works well enough for general use. Therefore, chemical repellents are not recommended for coyote control in Alberta. Similarly, taste aversion with lithium chloride and other chemicals has not proven effective and is not recommended as a preventative technique.

23
Philosophy and StandardsAlberta Agriculture recognizes that while the coyote can be a nuisance to agriculture, it is also a valuable wildlife species. Coyotes consume dead animals and eat rodents that are harmful to agriculture. They are a valuable fur resource and they provide recreation and enjoyment to many people. These attributes more or less counterbalance the act of coyotes occasionally preying on livestock. It is this philosophy that guides coyote predation management in Alberta.
The department advocates the use of predation prevention measures supported by selective control of coyotes when stopping predation is necessary. De-population of coyotes to prevent potential predation is generally ineffective, unnecessary and not justified based on knowledge of coyote biology and the history of coyote control.
Farmers should manage livestock to discourage coyote activity and prevent predation. They can hunt and shoot coyotes on their land or give another person permission to do so. During the trapping season, a farmer with a resident trapper’s licence can snare or trap coyotes on his land. A farmer may also provide written permission to another person with a resident trapper’s licence, to trap and snare and hunt coyotes on his property.
Alberta Agriculture views the use of poison and snares as support tools in the overall approach to livestock predation management. Poisons and snares are lethal materials that are potentially hazardous to all animals, and must be used under strict controls and limited to instances of necessity rather than convenience. Removal of coyotes with these materials should not be seen as the first and only way to manage predation. Coyote control with these materials should be secondary to and used to supplement and support other measures of predation control, or to provide short-term relief of predation while more permanent methods of predation control are established. Generally, the least amount of poison should be used to stop predation. Poison should not be used to control predation of pets and hobby animals, unconfined poultry and rabbits, nor livestock improperly confined and supervised.
Farmers having livestock predation may seek assistance and advice on predation management from their municipal agricultural fieldman. When conditions warrant, poison or snares may be used where coyote predation has recently occurred. The farmer or an Alberta Agriculture-authorized inspector may use poison or snares under permit on the farmer’s land. Farmers
must be fully instructed by an inspector before they use poison or snares.
Hunting and ShootingLandholders can shoot coyotes on their land or authorize a resident to do so throughout the year. The same holds true for the holder of a grazing lease on public land, and a resident with a valid hunting licence can shoot coyotes on a grazing lease throughout the year with written authorization from the lease holder.
Federal legislation requires that firearms must be unloaded when they are stored or transported. Firearms must normally be stored:
• in a locked container,
• secured by a trigger lock or other locking device, or
• rendered inoperable by the removal of the bolt.
Firearms can only be stored with ammunition while in a locked container. Some exceptions to temporary storage and use of firearms for predator control by farmers may apply. However, a farmer should obtain clarification on firearm use for predator control from their local police.
To be successful at shooting coyotes, you must have a proper, well-sighted firearm and be able to hit coyote-sized targets at various distances. Although you can use almost any calibre of firearm to shoot coyotes at close range, a high velocity rifle with a scope is best-suited for shooting coyotes at longer distances.
Most of the varmint calibre rifles like the .22-250, .243 and .250 work well for coyotes. These rifles have at least three common, desirable attributes: relatively light recoil, relatively light muzzle blast, and relatively flat trajectory of the bullet to the target. A high muzzle blast and high recoil may cause some people to flinch or jerk the trigger, which reduces accuracy. In contrast, a light recoil and muzzle blast increases the probability that you will practise more often and become a better marksmen. A flat trajectory is desirable because you can sight the rifle directly on a coyote at 200 to 300 metres with a reasonable chance of hitting the animal.
Sight the rifle to hit a 8 to 10 centimetre diameter target at a distance of 140 to 230 metres. A shotgun with a number two or four shot can be used in close bush cover. Landholders who want to shoot coyotes should be aware of distances on their property. When the time comes for a shot, the distance to a coyote can be accurately estimated, and allowances can be made for the point of aim and the amount of wind.
Lethal Control of Coyotes
24
Coyotes can be enticed to come to a call and then shot. In order to be successful, practice and proper calling techniques are necessary. Coyote calls and directions on using them are available from sporting goods, firearms, and trapping stores.
There are several types of predator calls which work in different ways. One type of call mimics a sharp coyote bark or yelp that elicits a barking response from a coyote. Another predator call can mimic an injured or dying coyote. If this call is used near a den where pups are present, an adult may soon investigate. The most popular type of call is the prey distress call that mimics a rabbit or fawn in distress. On hearing these calls, coyotes respond to the opportunity for a meal.
The best time to call coyotes is early morning or several hours before dark. A very windy day is not good for calling because a coyote may not hear the call or may detect the scent of the caller. On a calm day the call may be heard for a kilometre or more.
Select a location to call that offers both a good view of the surrounding area and natural cover to camouflage your presence. Wear clothing that blends with surroundings and breaks the outline of your body. For example, white coveralls provide good camouflage for snow cover. Sneak into a call site and wait at least five minutes to catch your breath and get set up. Call facing downwind, as a coyote responding to a call will usually circle and approach upwind. Stop calling when you see a coyote approaching. If the coyote stops, some coaxing with low-volume calls may bring it closer. Some coyotes remain hidden, unwilling to break cover. Intermittent calls may eventually bring them into the open. Be positioned properly and be ready to shoot at all times.
If you shoot and miss, remain still; the coyote may not know where the shot came from and may not run away. Some coaxing calls may again bring the animal towards you. If the animal sees you, however, it will run away, and you may as well move to another location.
If you shoot a coyote, remain hidden and still for a few minutes as other coyotes may appear. Call several times and wait for a response. If no response is received after 15 minutes of calling, move a kilometre or more before calling again.
Foothold Traps
Foothold traps, a traditional tool of trappers, date back to the earliest days of fur trapping in North America. In recent years, the trapping industry and governments have come under mounting public pressure to ban the use of
the foothold trap because of the controversy on damage and suffering caused to captured animals. Research to improve the foothold trap has resulted in some minor changes to newer designs. However, concerns and social pressure against the foothold trap remains. Tougher regulations on the use and inspection of traps have recently been implemented, however, the future use of the foothold trap continues to remain in doubt.
Generally, traps have not been used for coyote predation control in Alberta, probably because trapping is time consuming and involves a special skill that most people will not attempt to learn. Landholders interested in trapping coyotes may obtain a resident fur trapper’s licence and instruction from Alberta Fish and Wildlife. Alberta Agriculture does not provide traps for coyote control nor does it view traps as a necessary tool to manage livestock predation by coyotes.
Neck Snares
Neck snares, constructed of braided steel cable, have been used for many years by fur trappers to capture coyote, wolf and fox. Neck snares are also effective to remove problem coyotes from farms where livestock predation has occurred. Snares are harmless to birds but will capture deer, other wildlife and farm animals if set improperly. Avoid settting snares on game trails, as this will increase the chances of catching non-target animals.
During the fur season, a landholder may obtain a resident trapper’s licence from Alberta Fish and Wildlife or provide written authority to another resident who holds a trapper’s licence to trap and snare coyotes on his property. However, first-time trappers may have to successfully complete a trapping course.
Neck snares, supplied by an Alberta Agriculture-authorized inspector, are available for coyote predation control under permit. These snares are individually numbered, marked for accountability and must be used under standards provided by Alberta Agriculture.
Snares must be made with quality, proper size steel-braided cable and locking device. If inferior material is used to construct a snare, a coyote may break or chew off the snare and escape. Several strands of haywire should be used to securely anchor the snare to prevent escape.
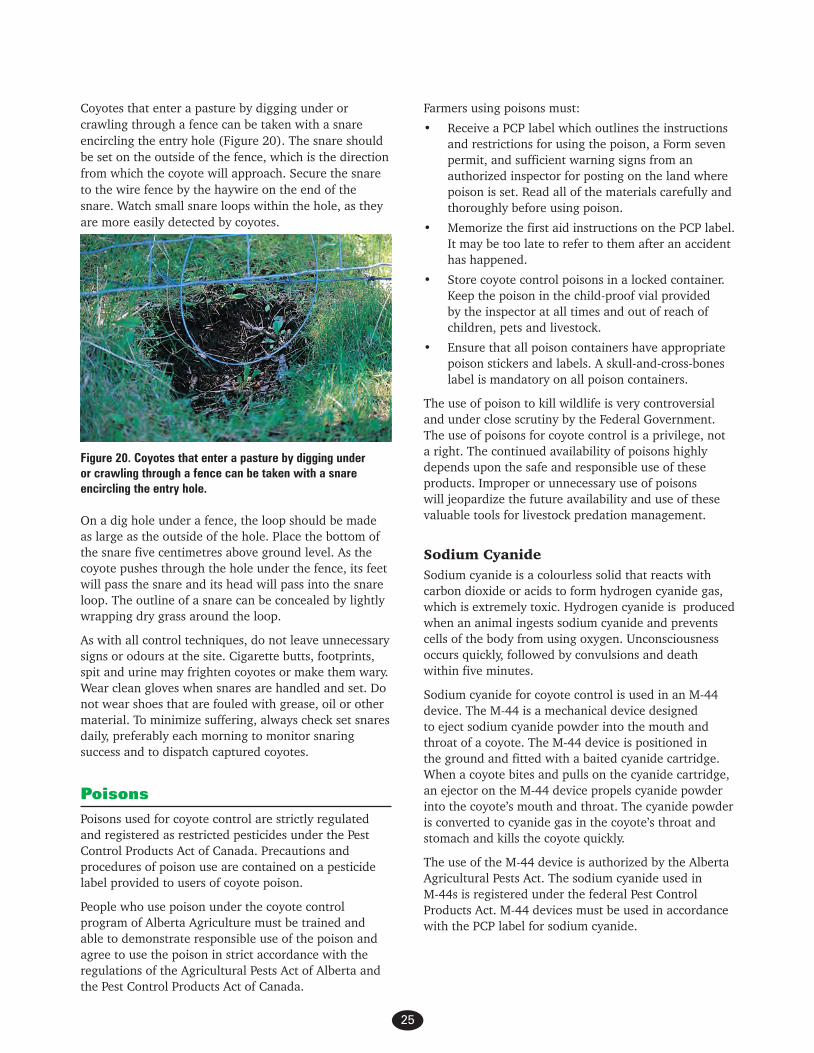
25
Coyotes that enter a pasture by digging under or crawling through a fence can be taken with a snare encircling the entry hole (Figure 20). The snare should be set on the outside of the fence, which is the direction from which the coyote will approach. Secure the snare to the wire fence by the haywire on the end of the snare. Watch small snare loops within the hole, as they are more easily detected by coyotes.
Farmers using poisons must:
• Receive a PCP label which outlines the instructions and restrictions for using the poison, a Form seven permit, and sufficient warning signs from an authorized inspector for posting on the land where poison is set. Read all of the materials carefully and thoroughly before using poison.
• Memorize the first aid instructions on the PCP label. It may be too late to refer to them after an accident has happened.
• Store coyote control poisons in a locked container. Keep the poison in the child-proof vial provided by the inspector at all times and out of reach of children, pets and livestock.
• Ensure that all poison containers have appropriate poison stickers and labels. A skull-and-cross-bones label is mandatory on all poison containers.
The use of poison to kill wildlife is very controversial and under close scrutiny by the Federal Government. The use of poisons for coyote control is a privilege, not a right. The continued availability of poisons highly depends upon the safe and responsible use of these products. Improper or unnecessary use of poisons will jeopardize the future availability and use of these valuable tools for livestock predation management.
Sodium CyanideSodium cyanide is a colourless solid that reacts with carbon dioxide or acids to form hydrogen cyanide gas, which is extremely toxic. Hydrogen cyanide is produced when an animal ingests sodium cyanide and prevents cells of the body from using oxygen. Unconsciousness occurs quickly, followed by convulsions and death within five minutes.
Sodium cyanide for coyote control is used in an M-44 device. The M-44 is a mechanical device designed to eject sodium cyanide powder into the mouth and throat of a coyote. The M-44 device is positioned in the ground and fitted with a baited cyanide cartridge. When a coyote bites and pulls on the cyanide cartridge, an ejector on the M-44 device propels cyanide powder into the coyote’s mouth and throat. The cyanide powder is converted to cyanide gas in the coyote’s throat and stomach and kills the coyote quickly.
The use of the M-44 device is authorized by the Alberta Agricultural Pests Act. The sodium cyanide used in M-44s is registered under the federal Pest Control Products Act. M-44 devices must be used in accordance with the PCP label for sodium cyanide.
Figure 20. Coyotes that enter a pasture by digging under or crawling through a fence can be taken with a snare encircling the entry hole.
On a dig hole under a fence, the loop should be made as large as the outside of the hole. Place the bottom of the snare five centimetres above ground level. As the coyote pushes through the hole under the fence, its feet will pass the snare and its head will pass into the snare loop. The outline of a snare can be concealed by lightly wrapping dry grass around the loop.
As with all control techniques, do not leave unnecessary signs or odours at the site. Cigarette butts, footprints, spit and urine may frighten coyotes or make them wary. Wear clean gloves when snares are handled and set. Do not wear shoes that are fouled with grease, oil or other material. To minimize suffering, always check set snares daily, preferably each morning to monitor snaring success and to dispatch captured coyotes.
PoisonsPoisons used for coyote control are strictly regulated and registered as restricted pesticides under the Pest Control Products Act of Canada. Precautions and procedures of poison use are contained on a pesticide label provided to users of coyote poison.
People who use poison under the coyote control program of Alberta Agriculture must be trained and able to demonstrate responsible use of the poison and agree to use the poison in strict accordance with the regulations of the Agricultural Pests Act of Alberta and the Pest Control Products Act of Canada.

26
M-44 Components and How They Work
The parts of an M-44 device (Figure 21) are as follows:
Stake (A) — a pipe-like part with a flattened bottom end. It is driven flush into the ground with a driving pin and holds the ejector mechanism. A spring clip mechanism on the top of the stake fits over the trigger of the ejector mechanism.
Ejector Mechanism (B) — a spring-activated pin in this component forces cyanide powder from the cyanide cartridge when the mechanism is fired. The ejector mechanism is fitted into the stake, with the trigger of the ejector placed under the spring clip of the stake. The top part of the ejector is threaded to attach the loaded cyanide cartridge.
Setting Tool — a plier used to depress the pin of the ejector mechanism. With the pin depressed, the trigger of the ejector mechanism is locked in the firing position.
Cyanide Cartridge (C) — a small plastic cylindrical case that holds the cyanide powder.
Cartridge Holder (D) — a metal part threaded on the bottom and covered with fabric or wax. The cyanide cartridge is inserted into the cartridge holder. The loaded cartridge is tightened onto the cocked ejector mechanism.
Figure 21. The parts of an M-44 device.
M-44 Setting Procedures and Precautions
1. Avoid accidents! Always wear safety glasses, a heavy-duty dust mask and gloves to protect yourself in case the M-44 device is accidentally discharged.
2. Always wear gloves kept only for coyote control. Gloves reduce the amount of human odour left on an M-44 device and protect your hands from cyanide contact. Leave as little foreign odour and disturbance as possible at the site where an M-44 device is placed.
3. At a selected site, clear a 30 centimetre diameter spot of any long grass and other debris. Also scratch up the site with your hammer. This tends to attract the coyote along with the food lure used.
4. Remove the ejector mechanism from the stake. Drive the stake into the soil until it is flush with ground level. Use a long driving pin to prevent damage to the top of the stake and spring clip.
5. Depress the pin of the ejector mechanism with the setting plier, and lock the pin in the set position by lifting the trigger located on the side of the ejector mechanism. The pin is locked down to fire when the ejector trigger is in a horizontal position.
6. Place the locked ejector mechanism into the stake ensuring that the ejector trigger is under the spring clip of the stake.
7. From an upwind position, always use an out-stretched arm to carefully screw the loaded cartridge holder onto the ejector mechanism. A light, downward pressure must be used when a loaded cartridge holder is attached or removed from the ejector mechanism. An upward pull will cause the M-44 device to fire. Always keep your face away from the M-44 when a loaded cartridge holder is attached. Never work directly over a loaded M-44 device.
8. Apply a food lure to the set device. Lure prepared by Alberta Agriculture is normally supplied by the inspector, although home-made and commercial lures can also be used effectively. Apply the lure with downward strokes to prevent accidental firing of the device.
9. Always remember the following precautions when you attach or remove a loaded cartridge holder: stay upwind; wear gloves, safety glasses and a heavy-duty dust mask; use an outstretched arm; exert a downward pressure; and keep your face away from the M-44 device.
10. Check M-44s at least every 72 hours. Remove and replace fired cartridges and re-apply lure as needed. The top of the loaded cartridge holder will be frayed and open if it has been fired; a stick or grass stem can be inserted inside the cartridge holder. However, you should always assume that an M-44 device is dangerous. Carefully unscrew the loaded cartridge holder from the ejector mechanism. Inspect the cartridge to determine if it has been fired.
11. All M-44s must be removed as soon as coyote predation has stopped and no later than 30 days after placement.
Placement of M-44 Devices
Proper placement of an M-44 greatly influences its success. Study the situation carefully before setting one.
D
B
C A

27
Try to locate the travel routes and direction from which coyotes are approaching a predation site. An M-44 device must be placed where a coyote will easily find it. One well-placed set is often better than several poorly located ones. A hilltop or knoll makes a good site, as do locations along livestock trails, fence lines or on the edge of a bush or field. M-44 devices should not be set in low areas prone to flooding or standing water from rains.
Place M-44 devices off to one side of a sheep or game trail to prevent animals from stepping on it. Do not set M-44s where livestock other than sheep or goats have access to them. Some livestock including cattle and horses may lick, bite and chew at the applied food lure and cause the device to fire and potential death. Pets, especially dogs, are also at risk, and must not have access to pastures where M-44 devices are placed. Do not use M-44s where herd or guard dogs are present unless the dogs are first removed or confined away from the area.
A kill site is a good location to use sodium cyanide. Remove the livestock carcass and replace it with an M-44 device. A coyote will usually find the device and pull it.
A written record must be kept of the location where M-44s are set. Make the description as detailed as possible so that anyone can find the device. You may have trouble finding the M-44 without a distinctive landmark. For example, place a rock, a large piece of wood or a tree branch five paces north or south of the set device. Locate the rock or piece of wood and then it should be easy to find the M-44.
Sodium Monofluoroacetate (Compound 1080)In Alberta, Compound 1080 has replaced strychnine for coyote removal because it is a more selective poison. The small amount required to kill a coyote is less likely to harm a person or animals such as bears and wolves. In addition, the chances of secondary poisoning is low for animals that feed on coyotes killed with 1080. The major hazard of 1080 use is to domestic dogs that consume baits set for coyotes. Dogs should be confined when 1080 baits are used; adjacent neighbours must also be notified of poison use.
What is Sodium Monofluoroacetate and How Does it Work?
Sodium Monofluoroacetate is a white, practically tasteless crystalline material with a slight acetate odour and acid-salty taste. Compound 1080 is only absorbed when swallowed, and not through normal, unbroken skin. Sodium monofluoroacetate is a slow acting poison. Symptoms of poisoning appear within 15 to 45 minutes and death usually occurs within 24 hours. Sodium monofluoroacetate forms highly toxic fluorocitrate
in the cells of the body. Fluorocitrate blocks energy production causing loss of cell function and cell death. Eventually organ or organ system function fails, with death from cardiac and/or nervous system failure.
Compound 1080 poisoning symptoms include initial effects on the nervous system followed later by effects on the heart. A dog poisoned with sodium monofluoroacetate becomes hyperactive, frequently howls, has running fits and actions suggestive of hallucinations or hysteria. Death from heart failure usually follows continual body contractions combined with running movements while laying stretched out.
There is no practical antidote for compound 1080 poisoning, only symptoms are treated. Once cardiac effects are observed, death is assured. As with all poisons, Compound 1080 is an extremely toxic chemical and is dangerous to people, wildlife and domestic animals if used improperly.
Use of Compound 1080
Compound 1080 is mainly used for coyote control in a tablet form. Each tablet contains enough 1080 to kill one coyote; that is, it contains a single lethal dose of poison.
Compound 1080 tablets can be used in two ways:
1. A single tablet can be placed in a bite-sized piece of meat weighing less than 100 grams (e.g. chicken head). This is the preferred method and will be called an “SLD bait” (single lethal dose bait). Each of these individual baits will kill only one coyote. When several SLD baits are set at a predation site, they should be set far enough apart to discourage one coyote or other animal from eating all the baits. If correct bait placement procedures are followed, there is less chance of poisoning other species with SLD baits than with a large carcass bait. SLD baits are often placed along coyote trails leading to a predation site. An unpoisoned coyote-killed livestock carcass can be a “draw bait” to attract coyotes to the predation site. As coyotes approach the draw bait, the SLD baits are found and consumed. However, animals scavenging the untreated draw bait are not harmed.
2. Up to a maximum of six tablets can be placed in a coyote-killed livestock carcass. A coyote which returns and feeds on the carcass is likely also involved in killing the animal. Poison should only be placed in a carcass when the carcass is fresh. In warm weather, this is generally less than one day after death. Otherwise, the carcass should be used as a draw for SLD baits or the carcass should be

28
removed and disposed of. Placing poison in a carcass will increase the chances of non-coyote poisoning. Also, disposal of unconsumed portions of a poisoned carcass is more difficult than disposing of SLD baits.
SLD (Single Lethal Dose) Baits
What makes the best SLD bait? One 1080 tablet placed in a small, bite-sized (less than 100 grams) piece of meat makes an SLD bait (Figure 22). Chicken heads make an excellent bait at all times of the year and should be used in preference to other bait materials. The beak should be opened and the tablet placed in the throat. Chicken heads are preferred because they are not readily consumed by ants, carrion beetles, or mice. The skull makes an effective bait even after the head is dried out or stripped of flesh by insects.
Figure 22. One 1080 tablet placed in a small, bite-sized (less than 100 grams) piece of meat makes an SLD bait.
Soft meats (hamburger, liver, flesh) do not make good SLD baits during the warm seasons because they quickly rot and are eaten by mice or insects.
Raw eggs can be used during warmer months. Make a small hole in the end of the egg with a knife and insert one tablet. Seal the opening with lard, fat or tape. Be sure to place a lure or odour attractant on the egg because an egg does not have much scent. Chicken eggs make a good bait because normally they can’t be broken by animals smaller than a skunk.
Coyote lure is usually placed on or close to SLD baits. SLD baits must be covered with a layer of either sod, soil, snow or, dry chicken or cattle manure. Coyote lure can be placed on the cover material or on vegetation within close proximity of the bait.
Lures are usually made from strong-smelling ingredients that attract coyotes to the site. Common components of lure include coyote urine, rotten meat, fish oil, beaver castor, skunk or mink musk, and anise oil. Alberta Agriculture provides a lure made primarily from beef brains and salmon oil. Many commercial lures are also available.
One to three SLD baits should be placed at a time, but not close together, at a predation site. Spacing the baits out on different coyote trails in association with a livestock kill site will improve poisoning efforts. Replace consumed baits until predation stops. SLD baits make for more effective coyote control. They reduce non-target animal hazards. They are also easier to pick up and destroy after control has been completed than is a poisoned carcass.
Occasionally, a poison cannot be used directly at a livestock kill site because it may be too close to a road or a residence. However, the livestock carcass may be used as a draw bait by moving it to a location where poison can be used. Place the draw bait carcass near the approach trails used by coyotes and in an open area 50 to 75 metres from a creek or bush cover. Baits placed immediately adjacent to a creek or bush are frequently taken by non-target species so avoid these areas.
If the carcass of a coyote kill is not available, baits can be set along coyote trails leading to the kill site or area where livestock are being held.
Set bait to minimize non-target animal consumption and poisoning. If bait is consumed by a non-target animal, the animal may needlessly be killed, and the bait will not be available for the intended coyote. Coyotes will readily find and consume a SLD bait that is covered with a 5 to 10 centimetres covering of soil, snow or sod. Covering a SLD bait only with grass or other light vegetation is not recommended as wind may blow it away leaving the bait visible to non-target animals.
Birds almost never pick up a bait if it cannot be seen from above. Carrion beetles, ants and other insects consume SLD baits very quickly in warm weather. Carrion beetles are attracted by ammonia given off by rotting flesh. Consumption of SLD bait by insects can be reduced or prevented by applying a layer of dry chicken manure over the bait. Cattle will frequently investigate a dead carcass. They may also be attracted to the odour of coyote lure, particularly if it contains fish oil. An SLD bait should not be placed nearer than 15 metres to a carcass used as a draw bait if cattle are present to reduce the chances of the SLD bait being trampled. Also, coyote lure should not be used, or applied only sparingly to the covered SLD bait.

29
A dig-hole set works very well for applying SLD baits. It mimics the burrow of a rodent (Figure 23). The hole should be about 5 to 10 centimetres in diameter and about 15 to 20 centimetres deep at an angle into the soil. A dig-hole set can be used with or without a draw bait. Place a bait in the hole and cover with about five centimetres of soil. Coyote lure may be placed on the bait or at the tip of the hole. Rodent burrows are often investigated by coyotes. Therefore, the hole set offers a visual attractant for coyotes as well as protects the bait if cattle are present. Cattle may still trample the site without destroying the bait. In winter, snow can be mounded and an SLD bait buried about 7.5 centimetres into the top of the mound. Coyote lure can be applied to the bait and on top of the mound for extra attraction. Snow mounds make checking and locating baits easier, even after a heavy snowfall. A coyote attracted to the snow mound will dig out and consume the concealed bait. This is usually obvious upon bait inspection and baits can therefore be accounted for.
Figure 23. A dig-hole set works very well for applying SLD baits. It mimics the burrow of a rodent.
DO NOT place 1080 in a carcass used as a draw bait when SLD baits are used. A poisoned draw bait will increase the poisoning hazard to scavengers, particularly birds, and is more difficult to dispose of if not totally consumed by coyotes.
Carcass Bait
When it is necessary to poison a carcass, the poison should be only be placed in areas protected by intact hide or on the underside of the carcass to minimize hazards to birds.
Toxic Neck Collar
The toxic neck collar kills coyotes that attack sheep or goats. This technique exploits the coyote’s habit of killing these animals with a bite to the throat area. A coyote will actually suffocate a sheep or goat with
numerous bites to the throat that eventually collapses the windpipe.
Like all other coyote control techniques, the toxic collar is more useful in some situations than in others. It is the most selective and safe way to use poisons for coyote control. These techniques are useful where other lethal controls are inappropriate or poison bait or cyanide guns are ineffective. The toxic collar can be a valuable tool for coyote control.
Figure 24. Toxic neck collar – the rubber bladders containing 1080 solution are firmly attached to two velcro straps.
Collars are made in two sizes for big and small-sized sheep or goats. Each toxic collar has two rubber bladders that contain a solution of water and sodium monofluoroacetate. The bladders are firmly attached to two velcro straps (Figure 24). A collar is fitted on a sheep or goat so that one bladder is on each side of the throat just under the jaw (Figure 25). The velcro straps are fastened on top of the head. One strap fastens behind the ears and the other in front to hold the collar in place. These straps should be stapled together in two different places to further secure the collars on the animal. The straps should not be too tight or they may cause sores beneath the collar. A coyote that attacks a collared animal will usually bite and puncture the collar and receive a lethal oral dose of poison. The poison is only delivered to those coyotes that attack a sheep or goat. Thus, the toxic collar is harmless to coyotes not involved in livestock predation and to other non-target species.
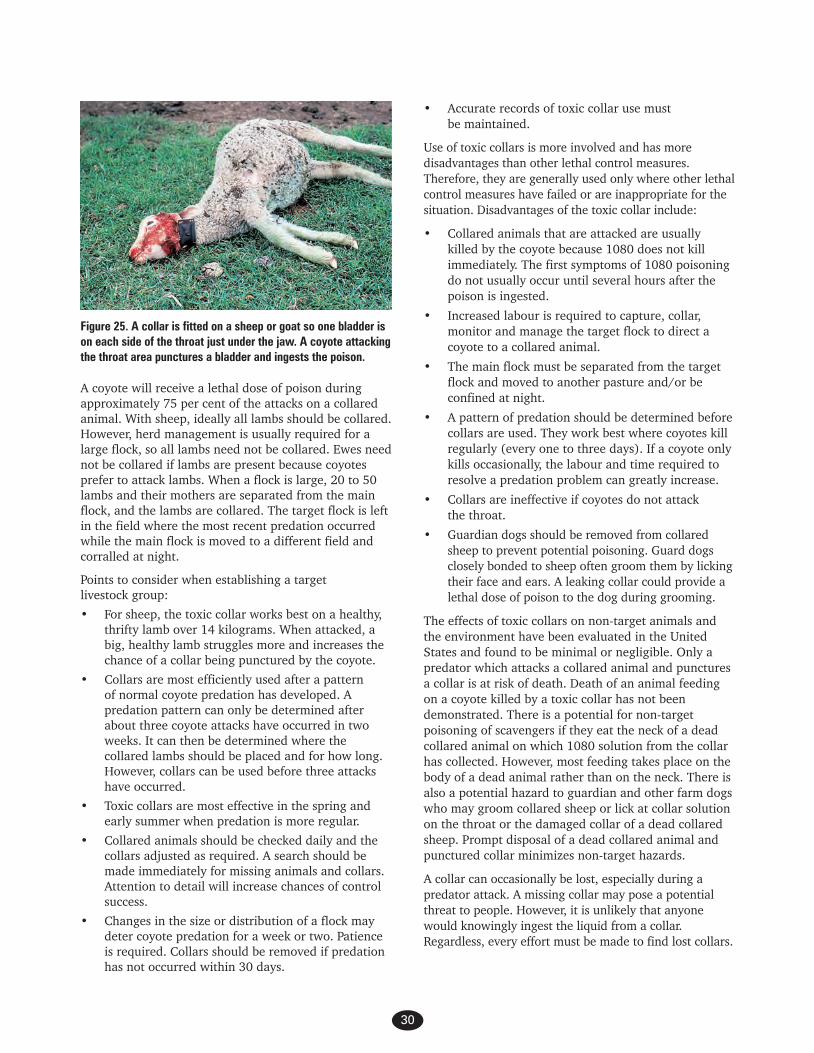
30
Figure 25. A collar is fitted on a sheep or goat so one bladder is on each side of the throat just under the jaw. A coyote attacking the throat area punctures a bladder and ingests the poison.
A coyote will receive a lethal dose of poison during approximately 75 per cent of the attacks on a collared animal. With sheep, ideally all lambs should be collared. However, herd management is usually required for a large flock, so all lambs need not be collared. Ewes need not be collared if lambs are present because coyotes prefer to attack lambs. When a flock is large, 20 to 50 lambs and their mothers are separated from the main flock, and the lambs are collared. The target flock is left in the field where the most recent predation occurred while the main flock is moved to a different field and corralled at night.
Points to consider when establishing a target livestock group:
• For sheep, the toxic collar works best on a healthy, thrifty lamb over 14 kilograms. When attacked, a big, healthy lamb struggles more and increases the chance of a collar being punctured by the coyote.
• Collars are most efficiently used after a pattern of normal coyote predation has developed. A predation pattern can only be determined after about three coyote attacks have occurred in two weeks. It can then be determined where the collared lambs should be placed and for how long. However, collars can be used before three attacks have occurred.
• Toxic collars are most effective in the spring and early summer when predation is more regular.
• Collared animals should be checked daily and the collars adjusted as required. A search should be made immediately for missing animals and collars. Attention to detail will increase chances of control success.
• Changes in the size or distribution of a flock may deter coyote predation for a week or two. Patience is required. Collars should be removed if predation has not occurred within 30 days.
• Accurate records of toxic collar use must be maintained.
Use of toxic collars is more involved and has more disadvantages than other lethal control measures. Therefore, they are generally used only where other lethal control measures have failed or are inappropriate for the situation. Disadvantages of the toxic collar include:
• Collared animals that are attacked are usually killed by the coyote because 1080 does not kill immediately. The first symptoms of 1080 poisoning do not usually occur until several hours after the poison is ingested.
• Increased labour is required to capture, collar, monitor and manage the target flock to direct a coyote to a collared animal.
• The main flock must be separated from the target flock and moved to another pasture and/or be confined at night.
• A pattern of predation should be determined before collars are used. They work best where coyotes kill regularly (every one to three days). If a coyote only kills occasionally, the labour and time required to resolve a predation problem can greatly increase.
• Collars are ineffective if coyotes do not attack the throat.
• Guardian dogs should be removed from collared sheep to prevent potential poisoning. Guard dogs closely bonded to sheep often groom them by licking their face and ears. A leaking collar could provide a lethal dose of poison to the dog during grooming.
The effects of toxic collars on non-target animals and the environment have been evaluated in the United States and found to be minimal or negligible. Only a predator which attacks a collared animal and punctures a collar is at risk of death. Death of an animal feeding on a coyote killed by a toxic collar has not been demonstrated. There is a potential for non-target poisoning of scavengers if they eat the neck of a dead collared animal on which 1080 solution from the collar has collected. However, most feeding takes place on the body of a dead animal rather than on the neck. There is also a potential hazard to guardian and other farm dogs who may groom collared sheep or lick at collar solution on the throat or the damaged collar of a dead collared sheep. Prompt disposal of a dead collared animal and punctured collar minimizes non-target hazards.
A collar can occasionally be lost, especially during a predator attack. A missing collar may pose a potential threat to people. However, it is unlikely that anyone would knowingly ingest the liquid from a collar. Regardless, every effort must be made to find lost collars.
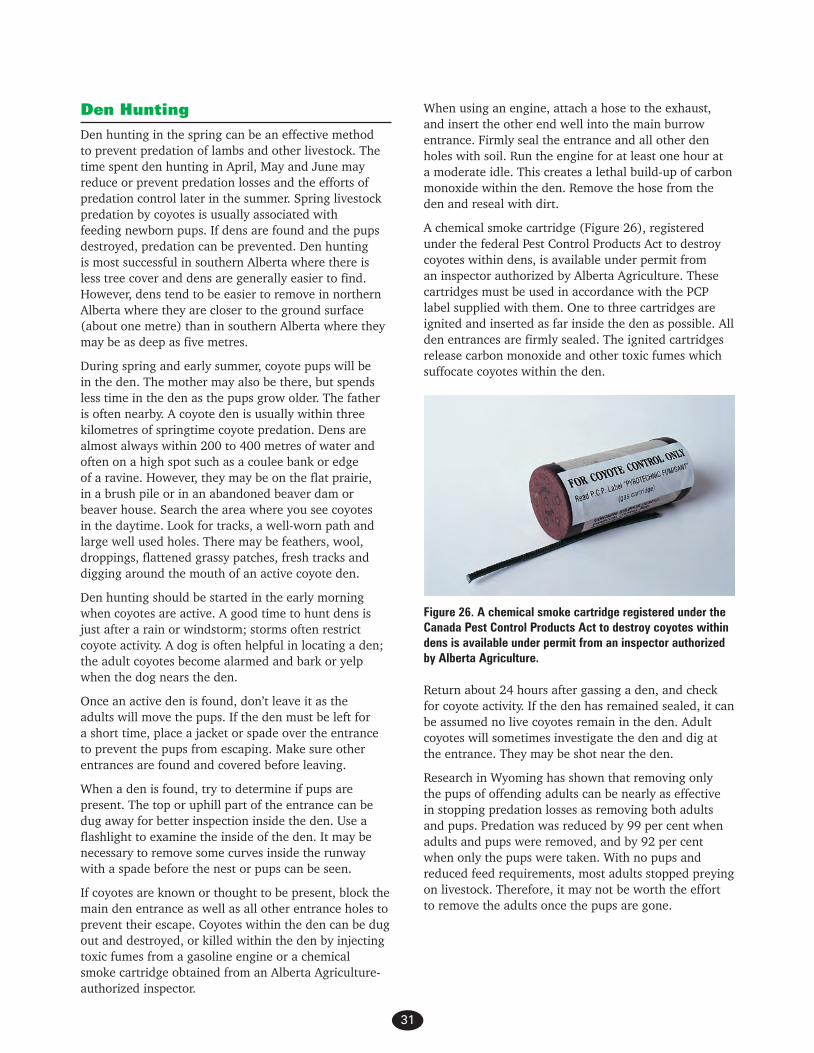
31
When using an engine, attach a hose to the exhaust, and insert the other end well into the main burrow entrance. Firmly seal the entrance and all other den holes with soil. Run the engine for at least one hour at a moderate idle. This creates a lethal build-up of carbon monoxide within the den. Remove the hose from the den and reseal with dirt.
A chemical smoke cartridge (Figure 26), registered under the federal Pest Control Products Act to destroy coyotes within dens, is available under permit from an inspector authorized by Alberta Agriculture. These cartridges must be used in accordance with the PCP label supplied with them. One to three cartridges are ignited and inserted as far inside the den as possible. All den entrances are firmly sealed. The ignited cartridges release carbon monoxide and other toxic fumes which suffocate coyotes within the den.
Den HuntingDen hunting in the spring can be an effective method to prevent predation of lambs and other livestock. The time spent den hunting in April, May and June may reduce or prevent predation losses and the efforts of predation control later in the summer. Spring livestock predation by coyotes is usually associated with feeding newborn pups. If dens are found and the pups destroyed, predation can be prevented. Den hunting is most successful in southern Alberta where there is less tree cover and dens are generally easier to find. However, dens tend to be easier to remove in northern Alberta where they are closer to the ground surface (about one metre) than in southern Alberta where they may be as deep as five metres.
During spring and early summer, coyote pups will be in the den. The mother may also be there, but spends less time in the den as the pups grow older. The father is often nearby. A coyote den is usually within three kilometres of springtime coyote predation. Dens are almost always within 200 to 400 metres of water and often on a high spot such as a coulee bank or edge of a ravine. However, they may be on the flat prairie, in a brush pile or in an abandoned beaver dam or beaver house. Search the area where you see coyotes in the daytime. Look for tracks, a well-worn path and large well used holes. There may be feathers, wool, droppings, flattened grassy patches, fresh tracks and digging around the mouth of an active coyote den.
Den hunting should be started in the early morning when coyotes are active. A good time to hunt dens is just after a rain or windstorm; storms often restrict coyote activity. A dog is often helpful in locating a den; the adult coyotes become alarmed and bark or yelp when the dog nears the den.
Once an active den is found, don’t leave it as the adults will move the pups. If the den must be left for a short time, place a jacket or spade over the entrance to prevent the pups from escaping. Make sure other entrances are found and covered before leaving.
When a den is found, try to determine if pups are present. The top or uphill part of the entrance can be dug away for better inspection inside the den. Use a flashlight to examine the inside of the den. It may be necessary to remove some curves inside the runway with a spade before the nest or pups can be seen.
If coyotes are known or thought to be present, block the main den entrance as well as all other entrance holes to prevent their escape. Coyotes within the den can be dug out and destroyed, or killed within the den by injecting toxic fumes from a gasoline engine or a chemical smoke cartridge obtained from an Alberta Agriculture-authorized inspector.
Figure 26. A chemical smoke cartridge registered under the Canada Pest Control Products Act to destroy coyotes within dens is available under permit from an inspector authorized by Alberta Agriculture.
Return about 24 hours after gassing a den, and check for coyote activity. If the den has remained sealed, it can be assumed no live coyotes remain in the den. Adult coyotes will sometimes investigate the den and dig at the entrance. They may be shot near the den.
Research in Wyoming has shown that removing only the pups of offending adults can be nearly as effective in stopping predation losses as removing both adults and pups. Predation was reduced by 99 per cent when adults and pups were removed, and by 92 per cent when only the pups were taken. With no pups and reduced feed requirements, most adults stopped preying on livestock. Therefore, it may not be worth the effort to remove the adults once the pups are gone.

Coyote Predationof Livestock
Coyote Predationof Livestock
7 78753 06141 7
AGDEX 684-19
Printed in Canada
joyce.wong
Typewritten Text
Purchase the print version of Coyote Predation of Livestock for $8. Buy it on-line www.rtw.ca/b681