Courtney hill graphics course work you frgot to save it
18
Initial idea 4 Component: This is my fourth initial idea of a reception for the new build of Kings Langley School. This has a futuristic look as it is quite geometrical and has clean, sharp edges and lots of natural light. I like this idea because it is simplistic but doesn’t look basic. Materials: The windows of the reception could be made from acetate, acrylic or HIPS as these materials can be transparent or translucent. The wall can be made from MDF, foam board or HIPS as these materials are strong. Processes and Techniques: The MDF, Acrylic and HIPS can be cut using the laser cutter which would create accurate sized walls. They can also be but using the band saw but that would be more time consuming and also requires sanding after whereas the laser cutter creates a smooth edge for you. The acetate can be cur using scissors but it is a flexible material and can be difficult to work with. The Foam board can be cut using a scalpel and it a very lightweight material so would be good for a model. This is an idea for the school where the blocks run parallel to each other with the quad in-between, the hall at the back and the sports department on the left. The school logo will be featured on the hall and the p.e department. Is it a realistic design that can fit onto a 600mm x 400mm base? Yes as the blocks are on top of each other and therefor wont take up too much room so it will be able to fit on to this sized base. Does it feature the Kings Langley School emblem throughout the model? It will be featured on the reception and the PE department but wont be necessary around the rest of the school so to an extent yes and no. Does it contain classrooms for every subject? Yes (see plan on left). There are lots of room in the blocks as they are 4 story so that there would be lots of classrooms for every subject. Does it contain an up to date football pitch, rugby pitch, netball court and tennis court? Yes, the netball courts can be changed into tennis courts buy putting nets up and the football pitch also has rugby makings on so that it can be used as a rugby pitch and also means that it would help design criteria part 1 as it wont take up loads of room having separate pitches and courts. Does it have bright colours indicating the different departments in the school? No but colours can be added if necessary. (perhaps to the darker coloured band that it featured throughout all of the designs for this idea). Does it consider environmental and sustainability factors, for example wasting materials and clear choice of most beneficial sustainable and aesthetical model? Although acrylic plastic can not be recycled, it is a thermo plastic which can be re-heated and re-shaped it a mistake has been made so it would reduce waste materials. Some materials used are recyclable. Component: This is an idea for the physical education changing rooms which matches the main blocks for the school. I has a futuristic look as there is a large amount of glass has a lots of clean edges. Materials: The wall can be made from MDF, HIPS or foam board. I would be easier to use the HIPS or Foam board because the already come with a white finish whereas the MDF is a wood colour and that would require to be painted and would make an extra stage during the making of the model. The glass roof, doors and windows can be made from acetate or acrylic plastic or HIPS. The acrylic plastic and the HIPS would be a better material to use as the acetate is flimsy whereas they are stronger which makes the whole process of shaping and gluing the windows on a lot easier. Techniques: For the MDF, Acrylic and HIPS these materials can be laser cut which would make a very accurate and high quality finish. These materials could also be cut using the band saw but to create a good finish the material would have to be sanded down at the edges, by using the laser cutter it removes that stage and these for makes it a lot quicker. And also when the laser cutter is running I could be working on something else. Component: This is an idea for the swimming pool which has an abnormal shape at the font which looks clean and fits with he futuristic theme. There is lots of natural light because of the skylights and the large windows at the front. Materials : The windows of the swimming pool could be made from acetate, acrylic or HIPS as these materials can be transparent or translucent. Techniques: The wall can be made from MDF, foam board or HIPS as these materials are strong. The foam board can be cut out using a scalpel. The MDF can be cut using the Laser Cutter or band saw. The acetate can be cut with scissors and vacuum formed if it is needed to be made 3D. The acrylic plastic can be cut using the band saw or using the laser cutter. Component: This is an idea for the main blocks for the new build of Kings Langley School. The blocks are 2 story but because of one of the blocks on top it is technically 4 story. It has a band going round the building for aesthetics. Materials: The wall can be made from MDF, HIPS or foam board. I would be easier to use the HIPS or Foam board because the already come with a white finish whereas the MDF is a wood colour and that would require to be painted and would make an extra stage during the making of the model. The glass roof, doors and windows can be made from acetate or acrylic plastic or HIPS. The acrylic plastic and the HIPS would be a better material to use as the acetate is flimsy whereas they are stronger which makes the whole process of shaping and gluing the windows on a lot easier. Processes and techniques: The MDF, Acrylic and HIPS can be cut using the laser cutter which would create accurate sized walls. They can also be but using the band saw but that would be more time consuming and also requires sanding after whereas the laser cutter creates a smooth edge for you. The acetate can be cur using scissors but it is a flexible material and can be difficult to work with. The Foam board can be cut using a scalpel and it a very lightweight material so would be good for a model.
-
Upload
robynmd -
Category
Automotive
-
view
11 -
download
0
Transcript of Courtney hill graphics course work you frgot to save it

Initial idea 4
Component: This is my fourth initial idea of a reception for the new build of Kings Langley School. This has a futuristic look as it is quite geometrical and has clean, sharp edges and lots of natural light. I like this idea because it is simplistic but doesn’t look basic. Materials:The windows of the reception could be made from acetate, acrylic or HIPS as these materials can be transparent or translucent.The wall can be made from MDF, foam board or HIPS as these materials are strong.Processes and Techniques:The MDF, Acrylic and HIPS can be cut using the laser cutter which would create accurate sized walls. They can also be but using the band saw but that would be more time consuming and also requires sanding after whereas the laser cutter creates a smooth edge for you.The acetate can be cur using scissors but it is a flexible material and can be difficult to work with. The Foam board can be cut using a scalpel and it a very lightweight material so would be good for a model.
This is an idea for the school where the blocks run parallel to each other with the quad in-between, the hall at the back and the sports department on the left. The school logo will be featured on the hall and the p.e department. Is it a realistic design that can fit onto a 600mm x 400mm base?Yes as the blocks are on top of each other and therefor wont take up too much room so it will be able to fit on to this sized base.Does it feature the Kings Langley School emblem throughout the model?It will be featured on the reception and the PE department but wont be necessary around the rest of the school so to an extent yes and no.Does it contain classrooms for every subject?Yes (see plan on left). There are lots of room in the blocks as they are 4 story so that there would be lots of classrooms for every subject.Does it contain an up to date football pitch, rugby pitch, netball court and tennis court?Yes, the netball courts can be changed into tennis courts buy putting nets up and the football pitch also has rugby makings on so that it can be used as a rugby pitch and also means that it would help design criteria part 1 as it wont take up loads of room having separate pitches and courts.Does it have bright colours indicating the different departments in the school? No but colours can be added if necessary. (perhaps to the darker coloured band that it featured throughout all of the designs for this idea).Does it consider environmental and sustainability factors, for example wasting materials and clear choice of most beneficial sustainable and aesthetical model?Although acrylic plastic can not be recycled, it is a thermo plastic which can be re-heated and re-shaped it a mistake has been made so it would reduce waste materials. Some materials used are recyclable.
Component:This is an idea for the physical education changing rooms which matches the main blocks for the school. I has a futuristic look as there is a large amount of glass has a lots of clean edges.Materials:The wall can be made from MDF, HIPS or foam board. I would be easier to use the HIPS or Foam board because the already come with a white finish whereas the MDF is a wood colour and that would require to be painted and would make an extra stage during the making of the model.The glass roof, doors and windows can be made from acetate or acrylic plastic or HIPS. The acrylic plastic and the HIPS would be a better material to use as the acetate is flimsy whereas they are stronger which makes the whole process of shaping and gluing the windows on a lot easier. Techniques:For the MDF, Acrylic and HIPS these materials can be laser cut which would make a very accurate and high quality finish. These materials could also be cut using the band saw but to create a good finish the material would have to be sanded down at the edges, by using the laser cutter it removes that stage and these for makes it a lot quicker. And also when the laser cutter is running I could be working on something else.
Component:This is an idea for the swimming pool which has an abnormal shape at the font which looks clean and fits with he futuristic theme. There is lots of natural light because of the skylights and the large windows at the front.Materials:The windows of the swimming pool could be made from acetate, acrylic or HIPS as these materials can be transparent or translucent.Techniques:The wall can be made from MDF, foam board or HIPS as these materials are strong.The foam board can be cut out using a scalpel.The MDF can be cut using the Laser Cutter or band saw.The acetate can be cut with scissors and vacuum formed if it is needed to be made 3D.The acrylic plastic can be cut using the band saw or using the laser cutter.
Component:This is an idea for the main blocks for the new build of Kings Langley School. The blocks are 2 story but because of one of the blocks on top it is technically 4 story. It has a band going round the building for aesthetics.Materials: The wall can be made from MDF, HIPS or foam board. I would be easier to use the HIPS or Foam board because the already come with a white finish whereas the MDF is a wood colour and that would require to be painted and would make an extra stage during the making of the model.The glass roof, doors and windows can be made from acetate or acrylic plastic or HIPS. The acrylic plastic and the HIPS would be a better material to use as the acetate is flimsy whereas they are stronger which makes the whole process of shaping and gluing the windows on a lot easier. Processes and techniques:The MDF, Acrylic and HIPS can be cut using the laser cutter which would create accurate sized walls. They can also be but using the band saw but that would be more time consuming and also requires sanding after whereas the laser cutter creates a smooth edge for you.The acetate can be cur using scissors but it is a flexible material and can be difficult to work with. The Foam board can be cut using a scalpel and it a very lightweight material so would be good for a model.
Design Criteria
Initial Idea 1 Initial Idea 2 Initial Idea 3 Initial Idea 4
Must be a realistic design that can fit onto a 600mm x 400mm base.
Because the main blocks of the building are an ‘L’ shape this enables the blocks to interlock and therefor take up less room so it is able to fit onto the 400mm x 600 mm base. The netball court converts into a tennis court which means that the model can easily fit onto the base as the courts wont take up loads of room. This is the same for the football and rugby pitch which again reduces the amount of space the model will take up and will make it fit better onto the 600mm x 400mm base.8/10
The netball court converts into a tennis court which means that the model can easily fit onto the base as the courts wont take up loads of room. This is the same for the football and rugby pitch which again reduces the amount of space the model will take up and will make it fit better onto the 600mm x 400mm base.
7/10
This design would easily fit onto a 600mm x 400 mm base because the main blocks are built one on top of the other which means that more rooms would be able to fit in a smaller area. Also the netball courts can change into tennis courts and the football pitch can change into a rugby pitch which means that the designs would be able to fitter better onto the 600mm x 400mm base as the sporting facilities wont take up too much room.9/10
In this design the reception hall and staff room are in the same building (hall at the bottom, reception in the middle and the staff room on the top) this takes up less room than having them all in separate buildings. The blocks are also aligned on top of each other. This means that this design can easily fit onto the 600mm x 400mm base. 8/10
Should feature the Kings Langley School emblem throughout the model.
In this idea the emblem will be featured only on the reception, PE changing rooms and the swimming pool. I felt that it was slightly unnecessary for the school logo to be featured on other places in the school. I put the logo on the sports parts of the school as it suitable there because other schools would be visiting for meets/games and it is useful to highlight that it is Kings Langley School. The reception features the logo because it is suitable so visitors recognise that it is in fact Kings Langley School.5/10
The logo is only featured on the reception in this logo so doesn’t completely fit the design criteria. But the Kings Langley School emblem can be added to other buildings during the making stage or the final design stage if it is chosen.
4/10
The kings Langley logo will be featured on the front of the reception so that visitors can clearly see that it is Kings Langley School. The logo will also be featured on the swimming pool/ changing rooms so that visiting school for sports can identify that it is Kings Langley School.5/10
The kings Langley logo will be featured on the reception so that visitors know that it is Kings Langley School. The emblem will also be featured on the changing rooms and the swimming pool so that external schools coming for sports meets will know that it is Kings Langley school.6/10
Must be a clear and coherent model so that the viewer can understand clearly each aspect of the model and what its purpose is.
The model is clear as the learning blocks are all the same style so there is no confusion and the swimming pool has a glass roof in which the pool can be seen through which clear identifies what it is. Also the reception is the shape of an ‘R’ which shows people that that is the Reception. 8/10
The model is clear as the learning blocks are all the same style so there is no confusing and the swimming pool has a glass roof in which the pool can be seen through which clear identifies what it is. The reception is also situated at the front of the school so it is clear that it is the reception and is clear to viewers that it is the reception as it will have a ‘Reception’ written on the front.
8/10
The reception is featured at the front of the school which is clear to visitors what it is and it will also have ‘reception’ written across the front of the building to clearly identify it. The swimming pool will also have a glass roof so that inside the pool can be seen and shows clearly what it is.8/10
This model is simplistic which makes it clear to see what each component is. The reception is at the front so it is clear that it is the reception. The learning blocks are all the same style so there is no confusing and the swimming pool has a glass roof in which the pool can be seen through which clear identifies what it is. 8/10
Must include all of the necessary rooms for educational purposes; e.g. classrooms for every subject, a hall, canteen, staff room etc.
As these block are two story there is plenty of classrooms for all of the different subject as there are 4 blocks within the school and 8 classrooms per block which means over all there is 32 classrooms overall which is a sufficient amount of classrooms for Kings Langley School.7/10
Each floor of the blocks contains 8 class rooms which means that in total there is 48 classrooms which is a good amount of classrooms for the school as it can hold all of the students and also has extra inc case there is a problem with any of the classrooms.
9/10
Because of the blocks being one on top of the other, I can increase or decrease the amount of blocks there are so it will be suitable for the amount of people in kings Langley school. In each of the cubes there will be four classrooms and I am probably going have 10 of the blocks in the school.(2 sets of the picture above).8/10
In this design there are two blocks with the third resting on top each of these blocks will contain 6 classrooms so in total the school would contain 36 classrooms which is a sufficient amount of classrooms for the amount of students at Kings Langley School.8/10

Design Criteria
Initial Idea 1 Initial Idea 2 Initial Idea 3 Initial Idea 4
The school needs to have a modern and futuristic theme throughout and needs to have bright colours indicating the different departments in the school.
This idea has a futuristic look as it features very shape and clean edges to the buildings throughout and also has lots of glass and natural light which is a popular theme throughout modern and futuristic looking buildings. But this model does not feature the bright colours throughout representing the different blocks but the colours can be added if it looks appropriate but I feel that if there is bright colours throughout this design it would reduce the futuristic look.6/10
This idea has a futuristic look as it has the curved edges on the back of the block which creates an abnormal and modern look. There are lots of windows featured throughout the building which enables lots of natural light which is a common feature in modern builds. This design also features the colours to resemble the different subject blocks.
8/10
I believe that the blocks being aligned one on top of the other creates a futuristic look as it give the idea of ‘floating’ buildings and looks creative. Also the building all contain sharp clean edges throughout and features lots of windows throughout which can be seen in many modern/futuristic buildings.8/10
This model has a futuristic look because of the reception of the school as it is a hexagonal shape which is peculiar and looks modern. Also the main blocks of the school have the bridge walkway in between the three blocks and the blocks have lots of windows on them which is a common feature in modern futuristic builds.9/10
Must consider environmental and sustainability factors, for example wasting materials and clear choice of most beneficial sustainable and aesthetical model. The materials used must also be cost effective.
Using the laser cutter for the materials I have suggested in the initial ideas section will reduce the amount of waste materials as I can fit and cut out the windows or walls extremely close together whereas if I was using the Tenon saw I wouldn’t squeeze the designs as close together because there is a chance that the material might break. Also the material I am most likely going to be using for the windows, Acrylic, is a thermo plastic which mean that if I need to use the line bender or oven to create a bend or a curve, I will be able to reheat the plastic to make it go back to its original shape. The materials used in this are cost effective as they can be reused so if a mistake is made then the material can be used for another component instead of being thrown away.7/10
The Styrofoam that could be used for the curved edges of the main blocks can not be recycled but if it is a big enough piece of Styrofoam it can be reused.
Using the laser cutter for the materials I have suggested in the initial ideas section will reduce the amount of waste materials as I can fit and cut out the windows or walls extremely close together whereas if I was using the Tenon saw I wouldn’t squeeze the designs as close together. Also the material I am most likely going to be using for the windows, Acrylic, is a thermo plastic which mean that if I need to use the line bender or oven to create a bend or a curve, I will be able to reheat the plastic to make it go back to its original shape. Because most of the materials used can be reused this will reduce costs as more materials wont have to be bought instead old pieces can be used instead.
7/10
The material I am most likely going to use for the walls of the building is foam board which I can cut using a scalpel. Using the scalpel is better for the environment in comparison to using the laser cutter for materials such as HIPS as the laser cutter creates harmful fumes. But because foam board can not be recycled because it is made from two parts but the material can be reused. . Also the material I am most likely going to be using for the windows, Acrylic, is a thermo plastic which means that if I need to use the line bender or oven to create a bend or a curve, I will be able to reheat the plastic to make it go back to its original shape. . The materials used in this are cost effective as they can be reused so if a mistake is made then the material can be used for another component instead of being thrown away.8/10
I will be able to reduce waste materials by using the laser cutter to cut out the acrylic windows as it will be able to cut out the shapes extremely close to each other whereas if I used the band saw, there would be a lot more waste materials as the shapes would not be able to be cut out as close to each other because the acrylic might snap. Acrylic plastic is also a thermoplastic which mean it can be recreated into different shapes, this can reduce waste materials as if a mistake is made while bending the plastic on the line bender or the oven, I will be able to put it back in the oven to make it go back to its original shape. For the walls I can use MDF which is a good materials to use as it can be cut using the laser cutter so it reduces waste materials and it can also be recycled. 9/10
The school must cater for sporting so there needs to be an up to date football pitch, rugby pitch, netball court and tennis court.
This design contains an indoor swimming pool, tennis courts, netball courts, football pitch and a rugby pitch therefor this design fits this aspect of my design criteria exactly. This design also has an extra to the criteria as it contains an athletics track.10/10
This design has an indoor swimming pool situated at the back off the school. It also has a netball court that can be changed into a basketball or a tennis court. There is also a football pitch that can be changed into a rugby pitch. The hall can be used as a gym for indoor sporting activities and there is also an athletics track Therefor it contains a lot of sporting facilities.
10/10
This design contains a tennis court, netball court, football pitch and a rugby pitch therefor this design fits this aspect of my design criteria exactly. This design also has an extra to the criteria as it contains an athletics track and an indoor swimming pool.10/10
This design has an indoor swimming pool situated at the back off the school. It also has a netball court that can be changed into a basketball or a tennis court. There is also a football pitch that can be changed into a rugby pitch. The hall can be used as a gym for indoor sporting activities and there is also an athletics track Therefor it contains a lot of sporting facilities.
10/10
Third party feedback/ assessment.
By Amy Whittingham
51/70Even though these buildings are futuristic, they seem simplistic and small in comparison to other designs. This design would be less of an advantage to include in the final design as there isn’t as many classrooms as the other buildings.
53/70This idea resembles the school precisely as the
schools emblem is visual on the building of the reception. The reception building is something I would advise Courtney to consider in her final design. However the other building in this initial idea is basic and the curvaceous shape doesn’t suit the rest of the school.
56/70Yet again in this design I can see that the concept of abnormal shapes as buildings has been taken into consideration. Also there is an element of sticking to the design criteria of a futuristic school.
58/10Within this design I like the way there is different shapes used for buildings As well as this in regards to the visual concept, I can see that windows was a focus for this design as both buildings have wide, lengthy windows. The design suits the design criteria as it is futuristic.

Features/ Ideas to develop
Likeable features from Design Ideas that could be used for developing a
final design.
The purpose of this is to establish what I need to incorporate and further develop into my final design. I selected element from some of my initial ideas that I felt suited my design criteria the most and also matched so that I could create the best possible design. The development section may also help me to think about materials and processes used rather than the design of the product, helping the model look aesthetically pleasing whilst being sustainable at the same time.
It is necessary to have blocks in the school as there needs to be areas in which the students can learn. I chose this design as it fit with the futuristic theme and having one of the blocks on to reduces the amount of space that it takes up and means that the school wont be to ‘crammed together’ and will be able to fit onto the base properly. This block also adds to the futuristic look. I will also try to alter the design slightly so that it will be more economically friendly. I will also change some parts to the building in order for it to correlate with the other buildings for example using the same colour scheme and having the same style doors.
It is necessary to have blocks in the school as there needs to be areas in which the students can learn. I chose this design as it fit with the futuristic theme and having one of the blocks on to reduces the amount of space that it takes up and means that the school wont be to ‘crammed together’ and will be able to fit onto the base properly. This block also adds to the futuristic look. I will alter the designs slightly so that they all match for example I will use the same style doors for all of the buildings.
I have chosen this reception from my initial idea one as it fits with my specification the best as it has lots of windows which go with the futuristic theme. I will develop this in my final design by making the hall at the back look less cube shaped and make it more interesting perhaps by creating abnormal shaped windows. I will also add the school logo and writing saying ‘reception’ on it in the next stage of design.
In some of the initial ideas I did not include a changing room but this is necessary for the school. I will make the changing rooms fit in with the same theme as the rest of the school so that all of the components match. This can then be incorporated into my final design close to the main hall as that will be the indoor sports areas or it will be situated at the back of the school by the sports field, this will be determined when design the final idea.
When designing a school its important for it to fit its function, thereforethe students must be able to access the school, as part of thedevelopment to my school I will need to add an entrance with multipleforms of transport, in terms of accessing a bus I could either buymodel buses from a shop or make them by using HDPE and vacuumforming multiple buses, however this raises sustainability issues withplastic being sourced from oil and heat requiring lots of energy inorder to run the vacuum former. I also plan to add a futuristic waitingarea/bus stop in this area of the school.
By completing this piece of work I have learnt that there are lots of different elements andcomponents that my school could include, and when everything is put together the schoolsaesthetical and futuristic value will increase. The next step in this design project is to developmy final design and incorporate all these features in to a design so that I can get a clear ideaOf my final design and hopefully come out with the best outcome achievable for my school.
I want to develop the idea of having the ‘L’ shaped building as it is good at reducing the amount of space that the school takes up and means that there is more room for lots of sporting activities. I want to change the style of the block slightly so that it is more aesthetically pleasing and I need to incorporate a colour scheme for each block so that it fits with my design criteria.
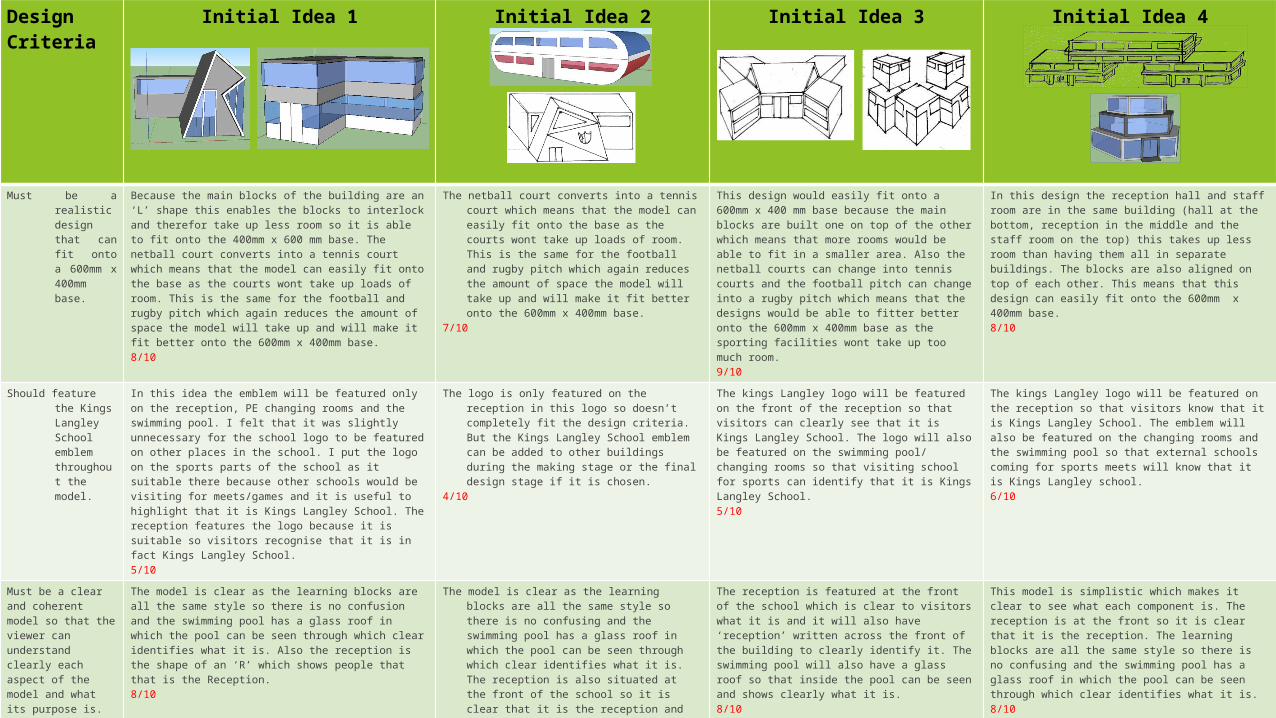
DevelopmentThis is a development of the main blocks for the new build of Kings Langley School which incorporates two aspects of my initial ideas. This design has the layout of the design on the left as it has the trio of blocks with one resting on top but it also has the window ideas for the idea on the left, as it has continuous glass going round every corner. I chose these features from my initial ideas as I felt they fit with the modern and futuristic theme because of the large amount of glass and the ‘balancing’ block on top. From the photos on the left you can see that the blocks aren’t attached together this is because it will be easier for the model to be sorted as the height of the blocks wont take up much room as they can be dismantled and stored separately.
I started off by sketching a few thumbnail ideas incorporating The features of each of the buildings. I then considered different materials and methods; taking in consideration environmental factors. Once I had got the design that I wanted and also the methods/ manufacturing techniques, I made measurements of the scale and started creating the walls of the model on ‘2D design. I changed the scale of the page to 1mm (virtual) = 10mm (real life) and the started outlining the walls to the building. As the walls were going to be made from ply wood and the windows were going to be made from a transparent acrylic plastic, I had to separate draw the surfaces of the building to then be laser cut. Once I had finished the 2d design, I changed the colour of the lines to red so that the laser cutter would cut it out. Once the walls were laser cut from the ply wood, I changed the material to acrylic and also used the laser cutter to cut them out. Using two materials for the same building that can be laser cut reduces the amount of time spent as the measurements for the two materials were virtually the same so I only needed to alter the sizing slightly and also the laser cutter doesn’t require manual labour which means during the time the laser cutter was working, I could then start working on the floor and roof. I used a thin corrugated card for the floor and roof and used a pencil and a ruler to measure them out accordingly. I then used a Scalpel, mat and metal ruler to cut out the shape. Once I had cut the shape out I used the glue gun again to stick the roof and floor to the buildings. At first I was going to glue all of the buildings together to hold it in place but I reconsidered that as I felt it would be more appropriate for the model to be able to be made into smaller sections for storage.
I chose to use Acrylic plastic for the windows of my model as it is available in transparent colours and is also strong. Acrylic can also be laser cut which is a very useful piece of equipment as is doesn’t require manual labour. I also chose to use ply wood for the walls of my building as it is thin and easy to work with as many different manufacturing methods can be used on this material. I also considered using MDF instead of the Ply wood but I didn’t go with that option as MDF needs to be painted for it to look aesthetically pleasing whereas plywood has a natural grain look which doesn’t need to be painted over as the natural look is very pleasing and contrasts the clear modern acrylic plastic. I also chose these materials for economical reasons as Ply wood can be re used and recycled and acrylic can be reused and is also a thermoplastic. For the roof of the building, I was originally going to used foam board but I changed my mind as it is not recyclable so I therefor chose a thin corrugated card as it is more economically friendly. The corrugated card can be cut using a scalpel which means that there is any electricity or energy being used up and the material is also recyclable so there isn’t much waste materials.
Choice of materials and manufacturing processes:
2D Design
I decided to try making the main blocks for the school using different materials. I chose to use a thin corrugated card because it is a very easy material to work with as it can be cut using scissors or a scalpel. I used the scalpel to cut it because I find it easier to use. Although the corrugated card is an easier material to use compared to the ply wood, it is less aesthetically pleasing because the ply wood has a natural gran and has a really nice effect and the corrugated part of the card can be visible in some areas and it doesn’t look very appealing. I changed the acrylic plastic windows for acetate because it can be cut easily using scissors and doesn’t require as many stages as cutting the acrylic plastic with the laser cutter as I didn’t have to use 2D design Although easier to use, acetate is not as aesthetically pleasing as acrylic plastic because it warps whereas the acrylic is very strong and holds its shape my better.
In my final design I will use the acrylic plastic and the Ply wood because although more time consuming, I would rather have a model of a higher quality and good aesthetics.

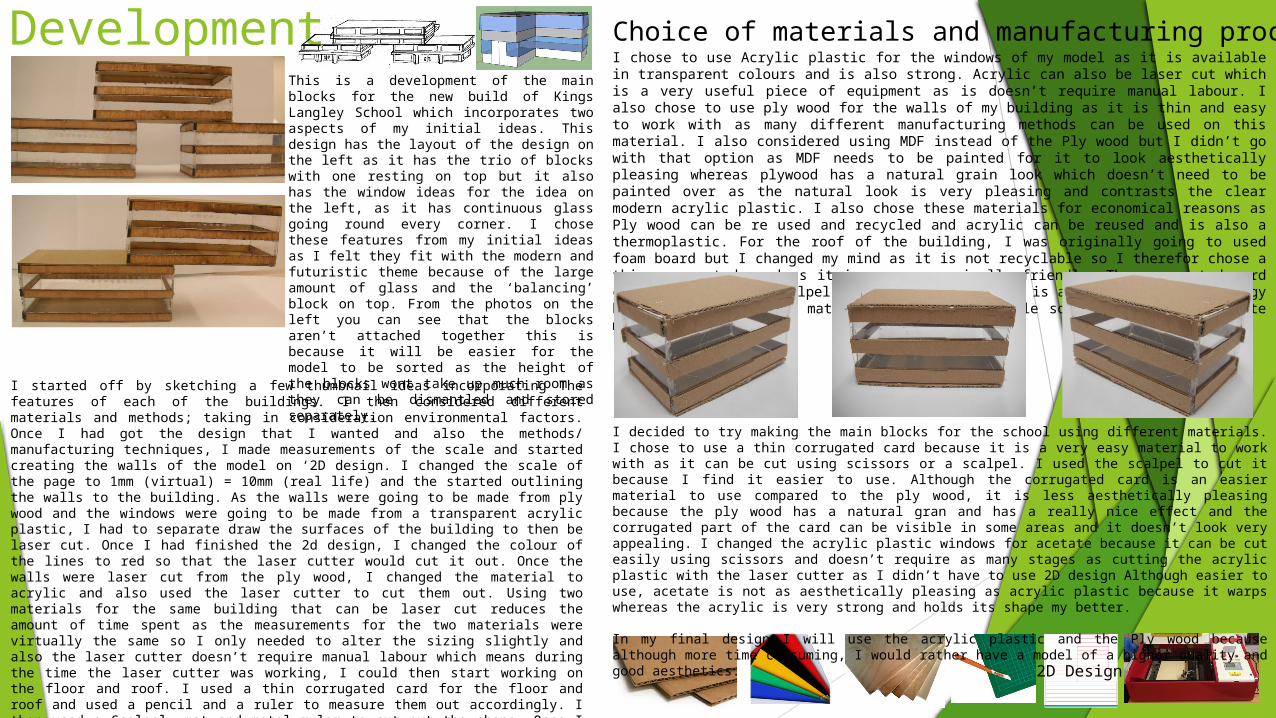
Development 2:
I started off by doing the design with thin corrugated card so that it looked exactly the same as the google sketch up design but I found that it look extremely basic and I really did not like the way that it looked at all. I tried changing the design so that it looked more aesthetically pleasing so I cut the middle of the windows out to create one big window but it didn’t look any better so I decided that I would alter the design of the windows completely. I sketched different designs down on to paper so that the windows looked aesthetically pleasing and I decided that I would try to make on the one to the lest with the triangular shaped windows as I felt it fitted with my design criteria as it looks futuristic. But I might make more alterations to the design because I feel it looks at bit boxy with the new design so I might incorporate the new windows onto the original shape of the changing rooms.
When I made the first model I used corrugated card in which I had to cut using a scalpel which I found very easy to use and it was easy to recover from mistakes if they were made. I used the glue gun to secure the pieces in place. I used a blue tinted acetate to create the windows and also glued it down with the hot glue gun. This process was extremely simple and not time consuming at all. When I decided to change the design of the model I thought that I should try a different material to see if it was better than then corrugated card. The alternative I used was Acrylic plastic because it comes in a range of colours and is also aesthetically pleasing. Because I was using acrylic plastic I could only use the laser cutter to cut it out because of the abnormal shaped windows; therefor I drew up a 2D design which could then be sent to the laser cutter. 2D design is a lot more difficult than sketching out designs as it is hard to get the correct measurements but once the measurements are correct, they are extremely accurate. I then changed the colour of the areas that needed to be cut out to red and changed the lines in which just needed to be etched into blue. I then sent it to the laser cutter to be cut out. Once I got all of the pieces from the laser cutter, i then gathered some blue acetate again and used the glue gun to stick it onto the back of the windows so there was no visible glue which meant that the quality was very high. I then stuck the whole building together using the glue gun but I found that it was very difficult to get the edges to line up properly (as you can see from the images on the left). This is because the acrylic plastic is a fairly thick material and this means that the measurements that I had made on the 2D design were incorrect as the thickness of the plastic added about 5mm to some of the edges so the corners didn’t align properly. But if I would use this material for my final design I would ensure that my 2D design takes into account the thickness of the plastic; although this may be time consuming, it will make the quality a lot higher than using the corrugated card.
For my final design I will use the last development with the triangular shaped windows but I will make it out of mount board as the material overall looks more aesthetically pleasing as the acrylic plastic is a difficult material to use because of the thickness.
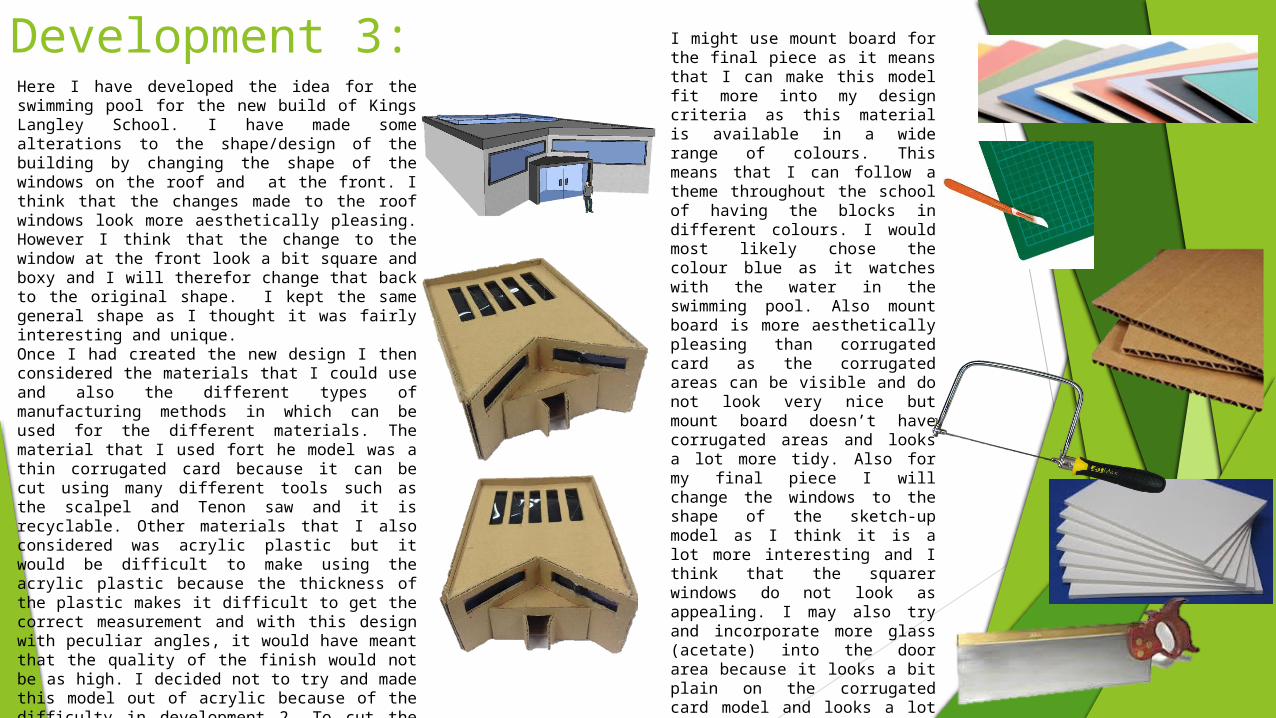
Development 3:Here I have developed the idea for the swimming pool for the new build of Kings Langley School. I have made some alterations to the shape/design of the building by changing the shape of the windows on the roof and at the front. I think that the changes made to the roof windows look more aesthetically pleasing. However I think that the change to the window at the front look a bit square and boxy and I will therefor change that back to the original shape. I kept the same general shape as I thought it was fairly interesting and unique.Once I had created the new design I then considered the materials that I could use and also the different types of manufacturing methods in which can be used for the different materials. The material that I used fort he model was a thin corrugated card because it can be cut using many different tools such as the scalpel and Tenon saw and it is recyclable. Other materials that I also considered was acrylic plastic but it would be difficult to make using the acrylic plastic because the thickness of the plastic makes it difficult to get the correct measurement and with this design with peculiar angles, it would have meant that the quality of the finish would not be as high. I decided not to try and made this model out of acrylic because of the difficulty in development 2. To cut the corrugated card I used the scalpel as I find it a lot easier to use than other methods as I have more control and I feel that it has a good quality as it is very sharp and doesn’t make jagged edges. I used the glue gun to stick all of the pieces together but the glue gun has a very messy finish so I may consider suing PVA glue to glue the card to card as it will look nicer and the clue gun for the acetate to card.
I might use mount board for the final piece as it means that I can make this model fit more into my design criteria as this material is available in a wide range of colours. This means that I can follow a theme throughout the school of having the blocks in different colours. I would most likely chose the colour blue as it watches with the water in the swimming pool. Also mount board is more aesthetically pleasing than corrugated card as the corrugated areas can be visible and do not look very nice but mount board doesn’t have corrugated areas and looks a lot more tidy. Also for my final piece I will change the windows to the shape of the sketch-up model as I think it is a lot more interesting and I think that the squarer windows do not look as appealing. I may also try and incorporate more glass (acetate) into the door area because it looks a bit plain on the corrugated card model and looks a lot more interesting with it on the Sketch-up model. Instead of using blue mount board I may use a blue tinted acetate for the windows as it still represents the theme of colour throughout the school and will look more modern than having the whole building in the colour blue.
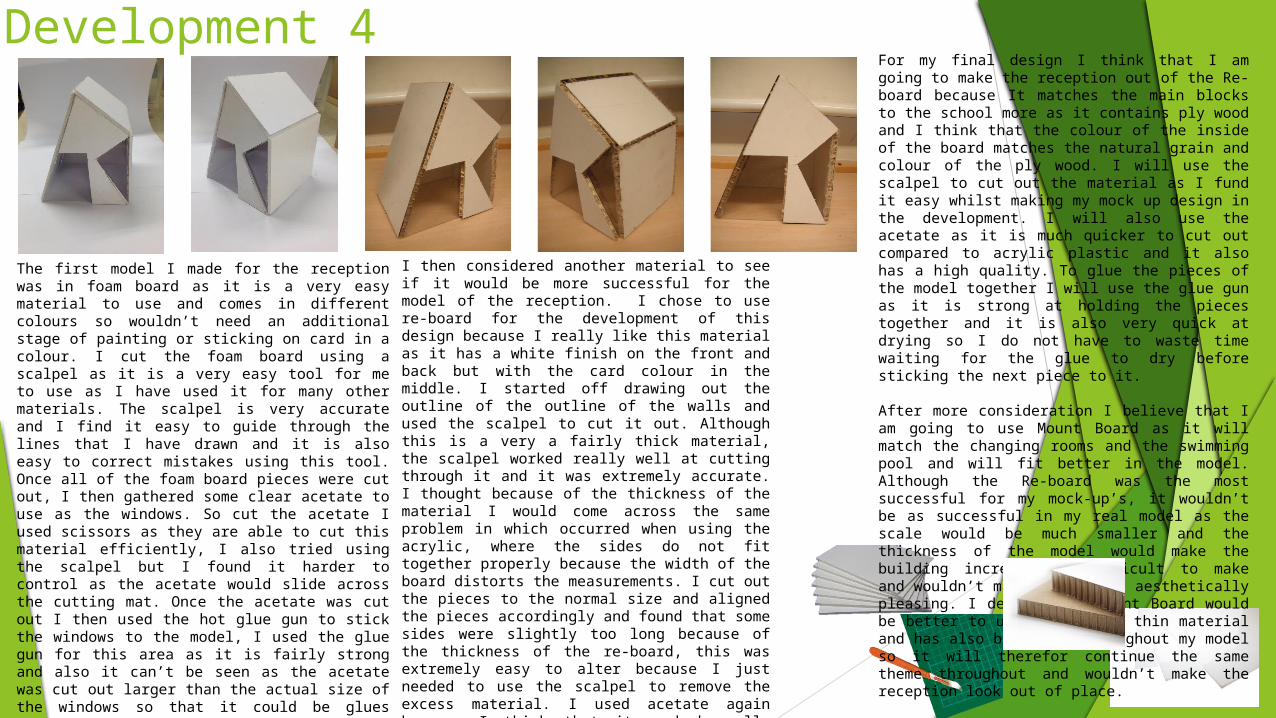
Development 4
The first model I made for the reception was in foam board as it is a very easy material to use and comes in different colours so wouldn’t need an additional stage of painting or sticking on card in a colour. I cut the foam board using a scalpel as it is a very easy tool for me to use as I have used it for many other materials. The scalpel is very accurate and I find it easy to guide through the lines that I have drawn and it is also easy to correct mistakes using this tool. Once all of the foam board pieces were cut out, I then gathered some clear acetate to use as the windows. So cut the acetate I used scissors as they are able to cut this material efficiently, I also tried using the scalpel but I found it harder to control as the acetate would slide across the cutting mat. Once the acetate was cut out I then used the hot glue gun to stick the windows to the model, I used the glue gun for this area as it is fairly strong and also it can’t be seen as the acetate was cut out larger than the actual size of the windows so that it could be glues behind so it has a higher quality. I then assembled the rest of the building also using the hot glue gun because of its strength and the fact that it dries extremely quickly. The only problem with using the hot glue gun for visible areas is the fact that it isn’t the most aesthetically pleasing and can be seen as messy.
I then considered another material to see if it would be more successful for the model of the reception. I chose to use re-board for the development of this design because I really like this material as it has a white finish on the front and back but with the card colour in the middle. I started off drawing out the outline of the outline of the walls and used the scalpel to cut it out. Although this is a very a fairly thick material, the scalpel worked really well at cutting through it and it was extremely accurate. I thought because of the thickness of the material I would come across the same problem in which occurred when using the acrylic, where the sides do not fit together properly because the width of the board distorts the measurements. I cut out the pieces to the normal size and aligned the pieces accordingly and found that some sides were slightly too long because of the thickness of the re-board, this was extremely easy to alter because I just needed to use the scalpel to remove the excess material. I used acetate again because I think that it worked really successfully and it would be too time consuming to use acrylic plastic when the acetate already looks appealing. I used the glue gun to stick all of the pieces together and because of the thickness of the material the glue wasn’t visible and it looked really appealing.
For my final design I think that I am going to make the reception out of the Re-board because It matches the main blocks to the school more as it contains ply wood and I think that the colour of the inside of the board matches the natural grain and colour of the ply wood. I will use the scalpel to cut out the material as I fund it easy whilst making my mock up design in the development. I will also use the acetate as it is much quicker to cut out compared to acrylic plastic and it also has a high quality. To glue the pieces of the model together I will use the glue gun as it is strong at holding the pieces together and it is also very quick at drying so I do not have to waste time waiting for the glue to dry before sticking the next piece to it.
After more consideration I believe that I am going to use Mount Board as it will match the changing rooms and the swimming pool and will fit better in the model. Although the Re-board was the most successful for my mock-up’s, it wouldn’t be as successful in my real model as the scale would be much smaller and the thickness of the model would make the building increasingly difficult to make and wouldn’t make it look as aesthetically pleasing. I decided the Mount Board would be better to use as it is a thin material and has also been used throughout my model so it will therefor continue the same theme throughout and wouldn’t make the reception look out of place.
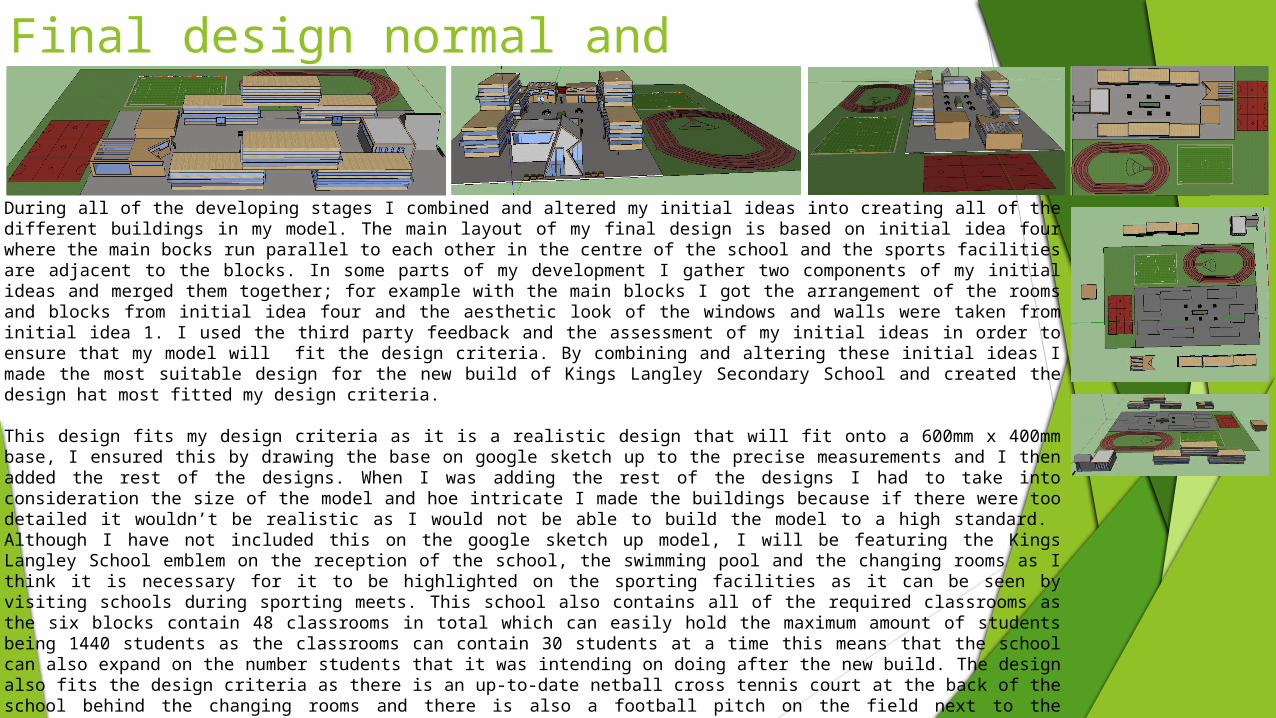
Final design normal and exploded.
During all of the developing stages I combined and altered my initial ideas into creating all of the different buildings in my model. The main layout of my final design is based on initial idea four where the main bocks run parallel to each other in the centre of the school and the sports facilities are adjacent to the blocks. In some parts of my development I gather two components of my initial ideas and merged them together; for example with the main blocks I got the arrangement of the rooms and blocks from initial idea four and the aesthetic look of the windows and walls were taken from initial idea 1. I used the third party feedback and the assessment of my initial ideas in order to ensure that my model will fit the design criteria. By combining and altering these initial ideas I made the most suitable design for the new build of Kings Langley Secondary School and created the design hat most fitted my design criteria.
This design fits my design criteria as it is a realistic design that will fit onto a 600mm x 400mm base, I ensured this by drawing the base on google sketch up to the precise measurements and I then added the rest of the designs. When I was adding the rest of the designs I had to take into consideration the size of the model and hoe intricate I made the buildings because if there were too detailed it wouldn’t be realistic as I would not be able to build the model to a high standard. Although I have not included this on the google sketch up model, I will be featuring the Kings Langley School emblem on the reception of the school, the swimming pool and the changing rooms as I think it is necessary for it to be highlighted on the sporting facilities as it can be seen by visiting schools during sporting meets. This school also contains all of the required classrooms as the six blocks contain 48 classrooms in total which can easily hold the maximum amount of students being 1440 students as the classrooms can contain 30 students at a time this means that the school can also expand on the number students that it was intending on doing after the new build. The design also fits the design criteria as there is an up-to-date netball cross tennis court at the back of the school behind the changing rooms and there is also a football pitch on the field next to the athletics track which has been updated from just line on the field to the proper synthetic rubber, tartan but for the model will be made from a different material. The only section of the design criteria in which this design does not fit is that it required that all of the departments have different colours to specify what they are; I felt this did not work with this design because the different subjects are shared in the same buildings and the colour on random parts of the buildings would look messy and tacky and would not follow the futuristic theme. I also noticed while doing my initial ideas and developments that the colour for each individual subject only worked on the designs where each subject had their own block but I felt that this made the model look unhinged and very disordered.

A
A
B
B
C
D
D
D
E
E
F
Dimensions
E
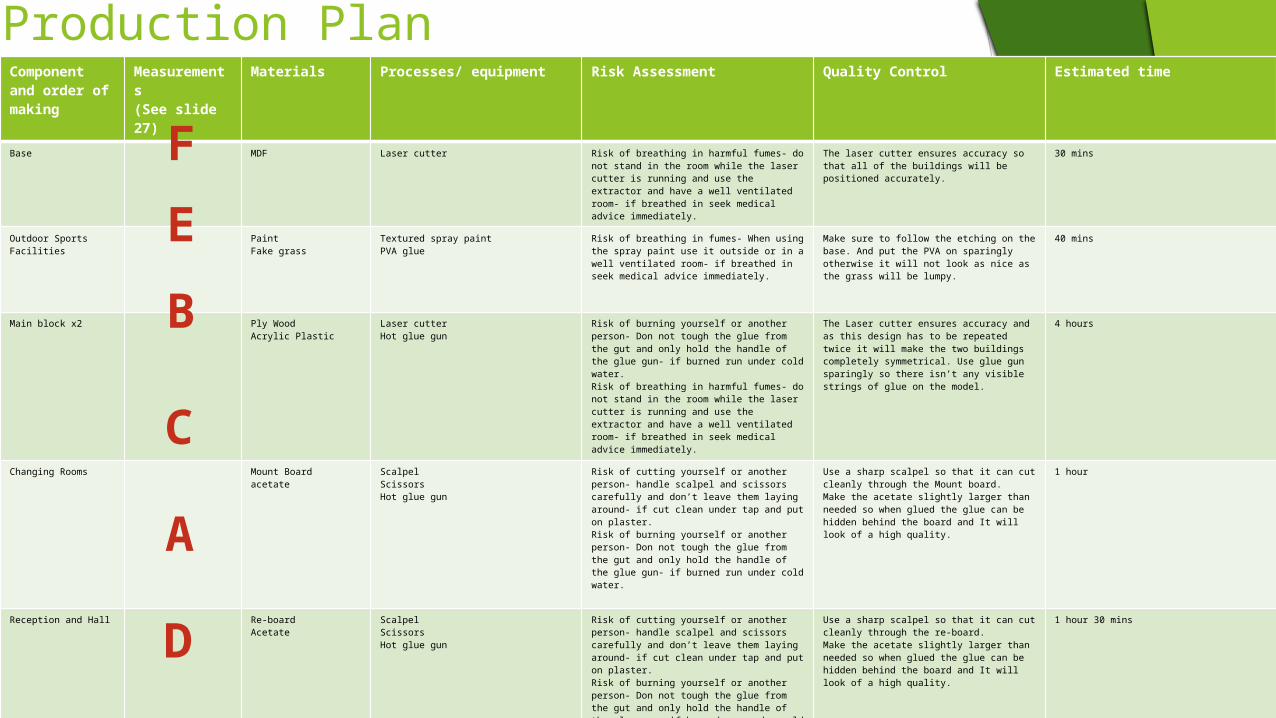
Production PlanComponent and order of making
Measurements(See slide 27)
Materials Processes/ equipment Risk Assessment Quality Control Estimated time
Base MDF Laser cutter Risk of breathing in harmful fumes- do not stand in the room while the laser cutter is running and use the extractor and have a well ventilated room- if breathed in seek medical advice immediately.
The laser cutter ensures accuracy so that all of the buildings will be positioned accurately.
30 mins
Outdoor Sports Facilities
PaintFake grass
Textured spray paintPVA glue
Risk of breathing in fumes- When using the spray paint use it outside or in a well ventilated room- if breathed in seek medical advice immediately.
Make sure to follow the etching on the base. And put the PVA on sparingly otherwise it will not look as nice as the grass will be lumpy.
40 mins
Main block x2 Ply WoodAcrylic Plastic
Laser cutter Hot glue gun
Risk of burning yourself or another person- Don not tough the glue from the gut and only hold the handle of the glue gun- if burned run under cold water.Risk of breathing in harmful fumes- do not stand in the room while the laser cutter is running and use the extractor and have a well ventilated room- if breathed in seek medical advice immediately.
The Laser cutter ensures accuracy and as this design has to be repeated twice it will make the two buildings completely symmetrical. Use glue gun sparingly so there isn’t any visible strings of glue on the model.
4 hours
Changing Rooms Mount Boardacetate
ScalpelScissors Hot glue gun
Risk of cutting yourself or another person- handle scalpel and scissors carefully and don’t leave them laying around- if cut clean under tap and put on plaster.Risk of burning yourself or another person- Don not tough the glue from the gut and only hold the handle of the glue gun- if burned run under cold water.
Use a sharp scalpel so that it can cut cleanly through the Mount board. Make the acetate slightly larger than needed so when glued the glue can be hidden behind the board and It will look of a high quality.
1 hour
Reception and Hall Re-boardAcetate
ScalpelScissors Hot glue gun
Risk of cutting yourself or another person- handle scalpel and scissors carefully and don’t leave them laying around- if cut clean under tap and put on plaster.Risk of burning yourself or another person- Don not tough the glue from the gut and only hold the handle of the glue gun- if burned run under cold water.
Use a sharp scalpel so that it can cut cleanly through the re-board. Make the acetate slightly larger than needed so when glued the glue can be hidden behind the board and It will look of a high quality.
1 hour 30 mins
Swimming Pool Mount Boardacetate
ScalpelScissors Hot glue gun
Risk of cutting yourself or another person- handle scalpel and scissors carefully and don’t leave them laying around- if cut clean under tap and put on plaster.Risk of burning yourself or another person- Don not tough the glue from the gut and only hold the handle of the glue gun- if burned run under cold water.
Use a sharp scalpel so that it can cut cleanly through the Mount board. Make the acetate slightly larger than needed so when glued the glue can be hidden behind the board and It will look of a high quality.
1 hour
A
B
F
E
D
C

Orthographic

Criteria How it was metIs it a realistic design that can fit onto a 600mm x 400mm base?
As shown by the floor plan the design fits well onto the 300mm x 600mm base as on sketch-up I set up the base first and added the buildings individually ensuring that the scale was correct and that the buildings were to small and complex for the model.
Does it feature the Kings Langley School emblem throughout the model?
Although my Sketch-up does not show this, the school emblem will be featured on the reception, changing rooms, and swimming pool. This means that the emblem is featured throughout the model but focusing on the sporting department.
Does it contain classrooms for every subject? The two main blocks contain the necessary amount of classrooms for the new build of kings Langley school as they both contain four floors and many classrooms
Does it contain an up to date football pitch, rugby pitch, netball court and tennis court?
The school contains a Football pitch/ Rugby pitch, a swimming poll and a netball/ tennis court and also a hall which can be used for indoor sports which means that the design caters for the school sporting desires.
Does it have bright colours indicating the different departments in the school?
This is the only section of the design criteria in which the school does not meet as I felt it was extremely unpractical as there is a large amount of subjects taught and for these all to have different colour schemes for the department would mean that the school would be overcrowded with loads of buildings and the model would also not meet specification one as the buildings wouldn’t suitably fit on the base.
Does it consider environmental and sustainability factors, for example wasting materials and clear choice of most beneficial sustainable and aesthetical model?
Using the laser cutter for the materials I have suggested in the initial ideas section will reduce the amount of waste materials as I can fit and cut out the windows or walls extremely close together which means that I can reduce waste materials. Whilst I was trying to find the most sustainable materials I also had to consider the aesthetics of the materials but I fell that the model contains sustainable materials and also aesthetically pleasing materials too.
2D Floor Plan and Evaluation of final design

Step and description
photo Quality control Tools, equipment and process Risk assessment
Step 1: design base outline using 2d design and laser cut
Set the scale of the paper on 2d design as 600mm x 400mm so that the design fits accurately onto the base and use the measurement tool to make all of the buildings accurate size.
Make the size of the page on 2D design 400mm x 600mm, then add the lines for the base of the buildings using the measurement tool. Once the outline for the base is complete, change the colour of the lines to blue so that the laser cutter etches it out.
The laser cutter can produce dangerous fumes so ensure that the room is well ventilated.
Step 2: paint base. Use masking tape to cover up areas that do no need to be painted to stop the spray paint getting into where it isn’t needed.
Use masking tape to cover up the areas that do not need to be painted. Then spray the base with the textured spray making sure to shake the bottle properly before using and hold it approximately 30cm away from the base.
When using the spray paint make sure the area is well ventilated. I sprayed my base outside so that there was no risk.
Step 3: put grass on the base. Using masking tape to stick the grass down is a lot neater than using PVA glue as it may make it go lumpy and it won’t look as good.
I used double sided tape for the powdered fake grass to stick to.
No risk
Step 4: cutting out the changing rooms.
I had to make sure that the scalpel was sharp so that when I cut it, it was in a clean line. If the scalpel wasn’t sharp, the cut outs would be less neat.
I used a ruler and pencil for measurements and then used a scalpel and ruler to cut out the mount board, making sure that I had the cutting board underneath
Keeps fingers away from the blade of the scalpel and when putting the scalpel away walk with the blade pointing down.
Step 5: cutting out windows for changing rooms and gluing all pieces together.
When cutting out the windows I made them slightly larger than the actual size of the window so that when I use the glue gun to stick the windows down, the glue will not be visible.
Scissors to cut out the acetate and the glue gun to glue the windows to the building and then used the glue gun to glue all of the walls of the building together.
Be careful when using the scissors as the are sharp and there is a risk of cutting yourself or other people. The glue gun can get very hot when in use and the glue that comes out can also be hot as well. Do not put fingers near the glue when its wet and do not touch the top of front of the glue gun.
Step 6: 2d design of main blocks for windows and walls and laser cut.
I had to ensure all measurements were correct so that all of the pieces fit together properly and that the buildings are the correct scale to the base and the rest of the school. I also had to remember to laser cut in the door at the front.
I created the walls and the windows on the same 2d design to make sure all of the measurements were correct and then I move the windows onto a different page. I then laser cut the windows and the walls separately because they are two different materials. I used Ply wood for the walls and I laser cut that first, and then I used clear acrylic plastic for the windows and laser cut that after.
The laser cutter can produce dangerous fumes so ensure that the room is well ventilated.
Step 7: glue the walls and windows together for the main block
When using the glue gun I used very little as it can be quite messy. Because I used a small amount it meant that I the glue was barely visible and was still of quite a high quality. I also has to make sure that I glued the correct pieces together as some buildings had a door at the front and others did not.
Applying the glue from the glue gun on the acrylic plastic and ply wood to create the walls and then gluing the walls together using the glue gun again to create the building.
The glue gun can get very hot when in use and the glue that comes out can also be hot as well. Do not put fingers near the glue when its wet and do not touch the top of front of the glue gun.
Step 8: cutting out the roof for the main blocks.
I had to make sure that the scalpel was sharp so that when I cut it, it was in a clean line. If the scalpel wasn’t sharp, the cut outs wouldn’t be as good quality.
I used a ruler and pencil for measurements and then used a scalpel and ruler to cut out the mount board, making sure that I had the cutting board underneath
Keeps fingers away from the blade of the scalpel and when putting the scalpel away walk with the blade pointing down.

Step and description photo Quality control Tools, materials, equipment and process
Risk assessment
Step 9: Painting the athletics track and tennis courts.
I put masking tape down over the grass next to the track and tennis courts so that I didn’t get any paint on the grass and also use two layers .
I started off by covering the track area with pva glue and the sprinkled sand over the top of the glue to create a textured base to paint on so that it has a similar texture to a real life track. I then mixed different paints together to create the correct colour and when the pva glue was dry I painted the track. Once that was finished I used a tip-ex pen to create the lines on the track. For the netball courts I just painted the area grey and then used white tip-ex to create the lines.
No risk.
Step 10: cutting out the walls for the swimming pool.
I had to make sure that the scalpel was sharp so that when I cut it, it was in a clean line. If the scalpel wasn’t sharp, the cut outs wouldn’t be as good quality. Also with the swimming pool there are quite thing areas the needed to be cut out and using a blunt craft knife would make it very difficult and may result in the mount board ripping .
I used a ruler and pencil for measurements and then used a scalpel and ruler to cut out the mount board , making sure that I had the cutting board underneath.
Keeps fingers away from the blade of the scalpel and when putting the scalpel away walk with the blade pointing down.
Step 11: cutting out the windows for the swimming pool and gluing the building together.
When cutting out the windows I made them slightly larger than the actual size of the window so that when I use the glue gun to stick the windows down, the glue will not be visible.
Scissors to cut out the acetate and the glue gun to glue the windows to the building and then used the glue gun to glue all of the walls of the building together. I chose a blue tinted acetate to match the theme of water in the swimming pool.
Be careful when using the scissors as the are sharp and there is a risk of cutting yourself or other people. The glue gun can get very hot when in use and the glue that comes out can also be hot as well. Do not put fingers near the glue when its wet and do not touch the top of front of the glue gun.
Step 12: cutting out the reception and hall.
I had to make sure that the scalpel was sharp so that when I cut it, it was in a clean line. If the scalpel wasn’t sharp, the cut outs wouldn’t be as good quality.
I used a ruler and pencil for measurements and then used a scalpel and ruler to cut out the mount board, making sure that I had the cutting board underneath
Keeps fingers away from the blade of the scalpel and when putting the scalpel away walk with the blade pointing down.
Step 13: cutting out the windows for the reception and hall and gluing together.
When cutting out the windows I made them slightly larger than the actual size of the window so that when I use the glue gun to stick the windows down, the glue will not be visible.
Scissors to cut out the acetate and the glue gun to glue the windows to the building and then used the glue gun to glue all of the walls of the building together. I chose a blue tinted acetate as I felt it suited the swimming pool more as it goes with the theme of water.
Be careful when using the scissors as the are sharp and there is a risk of cutting yourself or other people. The glue gun can get very hot when in use and the glue that comes out can also be hot as well. Do not put fingers near the glue when its wet and do not touch the top of front of the glue gun.
Step 14: the grass for the football pitch.
I used a different colour grass for the football pitch to make it stand out from the school field. I used the same method as the school field by using double sided tape to stick the powdered grass to. I then used a tip-ex pen to create the lines for the football pitch to make it more realistic.
I used double sided tape for the powdered fake grass to stick to and a tip-ex pen to create the lines of the football pitch.
No risk.
Step 15: foliage. To make this of I high quality I used the fake grass to cover the MDF as it would have looked out of place also the fake grass covered any of the glue used to secure the trees which made it look neat.
I used the pillar drill with the disk cutter attachment to cut out small circular disks of MDF and use double sided tape to cover the top and put fake grass on top. For some of these disks attacked a tree into the hole in the middle and secured with the glue gun.
The glue gun can get very hot when in use and the glue that comes out can also be hot as well. Do not put fingers near the glue when its wet and do not touch the top of front of the glue gun. I got a member of staff to operate the pillar drill for me as it is a dangerous piece of equipment in which can cause serious injury is not used properly.

What are youtesting
How you carriedout the test
PhotographicEvidence
Result (what you found out) PossibleImprovements
Strength To test the strength of the buildings I applied a heavy weight to the tops to see if they could withstand it. I used multiple pieces of MDF to supply this weight, this would apply a good amount of weight but not too much.
These tests help me to find out that all of my buildings could withstand certain amounts of pressure from MDF. However it wasn't hard for me to see that some of the buildings could withstand more in comparison to others. The main blocks were the strongest as they are made of stronger materials (Ply wood and Acrylic plastic) than the other blocks which are made from mount board and acetate. But generally All of these buildings could handle the weight and didn’t create or bend.
I could add MDF pillars to the insides of the buildings in which are made from mount board just to ensure that the buildings can withstand the pressure from the MDF boards. This pillars will create a stronger and more study building as the material can withstand a larger weight.
Is the model easy totransport?
To test if the model could be transported around I walked around the D&T block carrying the model.
I found that all of my buildings stayed together securely and didn’t more at all. However the trees in which I had stuck to the model did start to wobble around and probably would eventually fall of if the model had to be transported a lot.
To fix this issue I will probably glue the trees down with a stronger glue so that they are secured into position better and there would be no risk of them wobbling or leaning to the side.
Does it matchoriginal idea?
I compared the Model I had made with the final design that I had created on google sketch-up.
In comparison to my final design there were very few changes: one of the changes was that I added a shelter over the front of the swimming pool and I also added the shrubbery and trees for aesthetics which weren’t included in the design.
All of the changes were implemented as improvements to the design and therefor do not need to be improved.
Quality ofmanufacture
I used a Spirit Level andmade sure that the buildings Ihad made were level and thesurfaces were flat and were the appropriate proportions.
Doing this test allowed me to see that thePlanning stage thoroughly helped myManufacturing stage when creating my models, With every single model being nearly completely level and providing accurate flat or curved surfaces which were pre-planned
I could improve the accuracy of some of the buildings in which I made out of mount board as Some of them were slightly inaccurate but overall the standard of manufacture was high.
Quality of finish My quality of finish was tested throughout the whole of the testing/ development stage as it gave me the opportunity to alter materials or methods in order to create the best finish possible. I also tested the quality of finish once the final model was complete I carried this test out by asking other students questions about my final design and the quality of the model.
I found out the many students found some areas of the model were finished to a high standards whereas others needed improvement so there were some inconsistencies. However the improvements were very minor and easy to change and if I was to recreate the model I could easily alter these problems.
Some of the recommendations I was given by other students was to use a different type of grass for the inside of my athletics tack as it was slightly patchy. Another possible improvement was to use a different type of glue as the glue gun can be quite unappealing as it can create stringy webs around the model.
Third Party Feedback
Person 3:
I like modern look of the school e.g. stacked buildings, as well as the natural look and feel of the design. There is also lots of space for students. However I feel like more specific buildings are needed to help provide more variety in subjects and facilities. However as a whole I really like the design due to the overall natural and modernised look.
Person 1:
This model looks very unique, as it’s a modernistic build of a school, which resembles a realistic look of the modern schools of today. I like how the building are all the same size and the fact that the design itself is clean and neat. If I was to make one improvement, it would be to clean up any of the stringy glue on the clear acrylic, therefore making it more aesthetically pleasing; perhaps using a different form of glue would be more successful.
Person 2:
The model looks very interesting and well made. If thought of as being there, the buildings looks very nice and are feasible and would work for having classrooms in them, whist still having modern buildings. The sports areas are well thought out, having large areas in between them for other activities. The only improvement I have to offer if the addition of smaller seating areas to give a better view to scale of the design.
Person 4:
I really like the stacked buildings, I think they look really interesting and unusual which would appeal to a potential student looking to go to somewhere that offers something a bit different. The school also appears to have plenty of facilities for sports classrooms. For small improvements on the model I would only say that some of the buildings don’t quite match the engravings on the board but apart from that I think the design is workable and has some cool and unique elements.

Final Model