
Course Planner Guide for Schools and Districts - intoCareers · Accessing the Course Planner Editor...
29
The Site Administration Course Planner tools allows you to customize the course planner in the student’s portfolio by adding a site- specific introduction, and by adding site-specific course lists and pathways with suggested course plans. intoCareers, 2014
Transcript of Course Planner Guide for Schools and Districts - intoCareers · Accessing the Course Planner Editor...
The Site Administration Course Planner tools allows you to customize the course planner in the student’s portfolio by adding a site-specific introduction, and by adding site-specific course lists and pathways with suggested course
plans.
intoCareers, 2014

1 Copyright 2014. intoCAREERS, University of Oregon.
Table of Contents Requesting Assistance ............................................................................. 2
Introduction to Course Planner in the Portfolio ............................................... 2
Introduction to the Course Planner Editor ..................................................... 4
Quick Help .......................................................................................... 5
Accessing the Course Planner Editor and Custom Link ..................................... 5
Setting the Course Planner Custom Link ..................................................... 5
Navigation in the Course Planner Editor ..................................................... 6
Using No Site-Specific Data .................................................................... 7
Using State Pathways with Site-Specific Courses ........................................... 7
Using State Pathways with Site-Specific Pathways ......................................... 8
Building Custom Pathways ........................................................................ 9
Add Courses ...................................................................................... 9
Add Pathways and Link to Courses .......................................................... 11
Add Pathways ................................................................................ 11
Link Courses to Pathways .................................................................. 12
Deleting Site-Specific Information ............................................................ 13
Setting the Introduction ........................................................................ 14
Displaying State Pathways ...................................................................... 15
Generating Reports .............................................................................. 16
Generate Courses Report ..................................................................... 16
Generate Pathways Report .................................................................. 16
Generate Courses in Pathways Report ..................................................... 17
Exporting Information ........................................................................... 18
Export Courses ................................................................................. 18
Export Pathways ............................................................................... 20
Export Courses in Pathways .................................................................. 21
Importing Information ........................................................................... 23
Import Courses ................................................................................. 23
Import Pathways ............................................................................... 25
Import Courses in Pathways ................................................................. 27
2 Copyright 2014. intoCAREERS, University of Oregon.
Requesting Assistance If you need assistance or information when completing this process, contact your state CIS office.
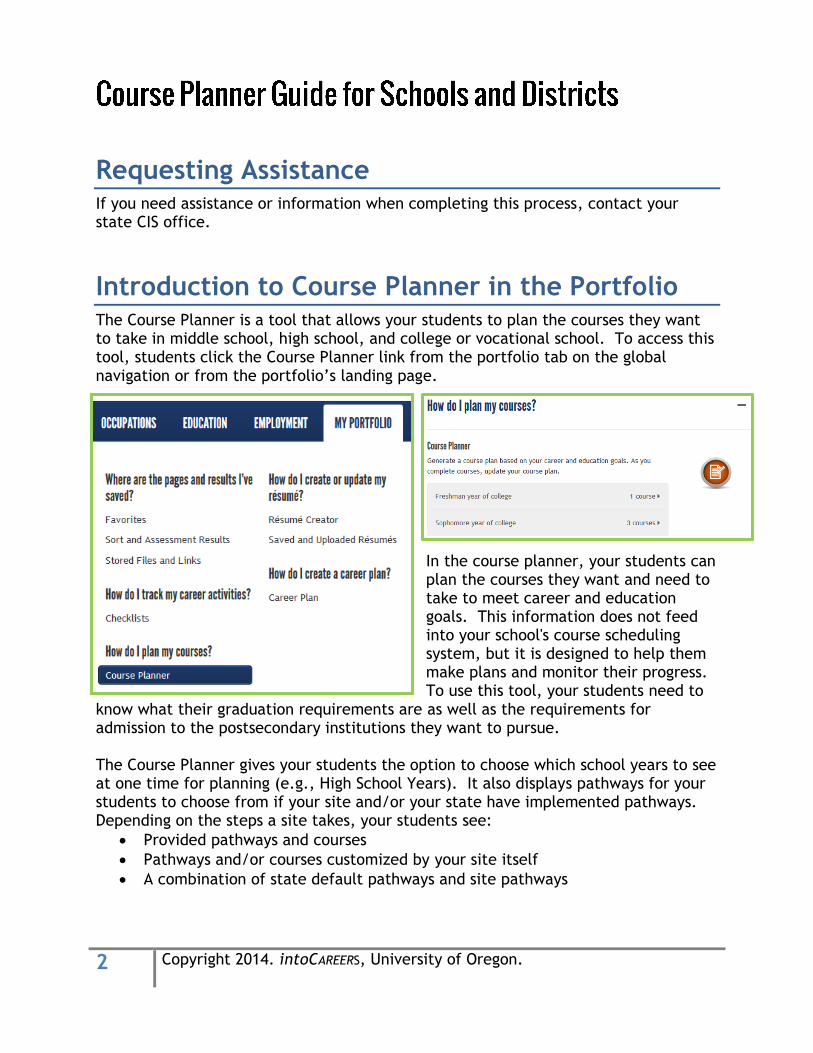
Introduction to Course Planner in the Portfolio The Course Planner is a tool that allows your students to plan the courses they want to take in middle school, high school, and college or vocational school. To access this tool, students click the Course Planner link from the portfolio tab on the global navigation or from the portfolio’s landing page.
In the course planner, your students can plan the courses they want and need to take to meet career and education goals. This information does not feed into your school's course scheduling system, but it is designed to help them make plans and monitor their progress. To use this tool, your students need to
know what their graduation requirements are as well as the requirements for admission to the postsecondary institutions they want to pursue. The Course Planner gives your students the option to choose which school years to see at one time for planning (e.g., High School Years). It also displays pathways for your students to choose from if your site and/or your state have implemented pathways. Depending on the steps a site takes, your students see:
Provided pathways and courses
Pathways and/or courses customized by your site itself
A combination of state default pathways and site pathways

3 Copyright 2014. intoCAREERS, University of Oregon.
When students choose a pathway (Add to Course Plan button), a secondary pop-up window appears. This window allows the student to see the courses that are recommended in the pathway for each school year, and what the recommended term length is for that course. They can then choose which school years they want to add the courses into. This process auto-fills their planner with the pathway information and reduces the amount of time students spend on data entry.
Note: If your browser doesn’t open the secondary pop-up window, be sure to allow pop-up windows for the CIS website. Some browsers will have pop-up dialogs at the top or bottom of the current window asking to allow pop-up windows. The examples below are for Firefox and Internet Explorer browsers.
Throughout CIS, students can learn about recommended courses to help them pursue career and education goals. For example, they can see recommended electives in the Helpful High School Courses content for any occupation. If your state or your site

4 Copyright 2014. intoCAREERS, University of Oregon.
elects to upload course offerings, courses are available from a drop-down list for planning. Within each school year, courses display first by term sequence and subject sequence (defined by your state operator), and then by course name.
Introduction to the Course Planner Editor The Course Planner Editor allows you to customize the content students see in your school’s account when using the Course Planner in their portfolio. You can:
Customize the introduction to the student’s course planner
Customize the course list students see in the drop-down menu of available courses
Customize the list of pathways students see when browsing suggested course plans
By customizing the content, you provide students with essential information, expedite their planning, and empower them to become more involved in their 4-year plan. If you have never customized the Course Planner for your site:
If your state CIS operator preloads state courses and pathway information, you see state courses and pathways without site-specific content (several CIS states implement state pathways).
If your state CIS operator does not preload state courses and pathway information, you see no course data.
Sites have several options for incorporating state pathways into their own site-specific information. You may choose to:
Options: Instructions Located In:
Remove existing site-specific content to display only state pathways
Deleting Site-Specific Information (p. 13)
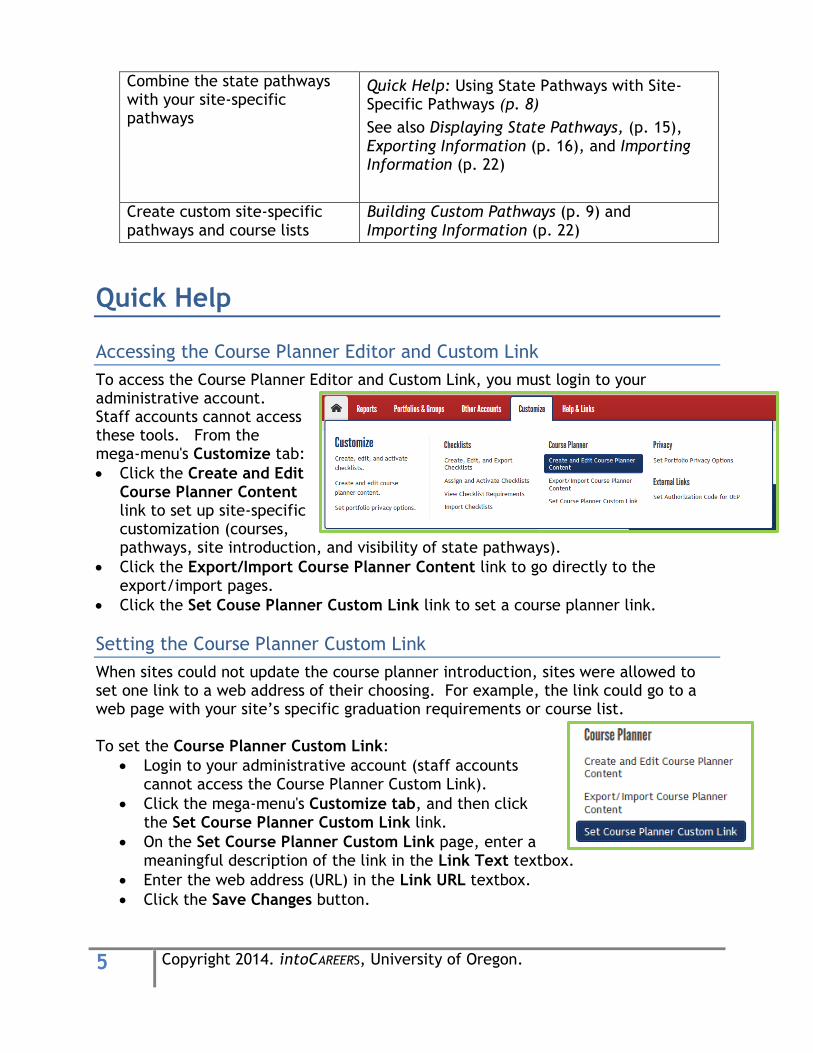
Combine state pathways with a drop-down list of your site-specific courses
Quick Help: Using State Pathways with Site-Specific Courses (No Site Pathways, State Pathways Pre-loaded) (p. 7)
See also Displaying State Pathways (p. 15), Exporting Information (p. 16), and Importing Information (p. 22)
5 Copyright 2014. intoCAREERS, University of Oregon.
Combine the state pathways with your site-specific pathways
Quick Help: Using State Pathways with Site-Specific Pathways (p. 8)
See also Displaying State Pathways, (p. 15), Exporting Information (p. 16), and Importing Information (p. 22)
Create custom site-specific pathways and course lists
Building Custom Pathways (p. 9) and Importing Information (p. 22)
Quick Help
Accessing the Course Planner Editor and Custom Link
To access the Course Planner Editor and Custom Link, you must login to your administrative account. Staff accounts cannot access these tools. From the mega-menu's Customize tab:
Click the Create and Edit Course Planner Content link to set up site-specific customization (courses, pathways, site introduction, and visibility of state pathways).
Click the Export/Import Course Planner Content link to go directly to the export/import pages.
Click the Set Couse Planner Custom Link link to set a course planner link.
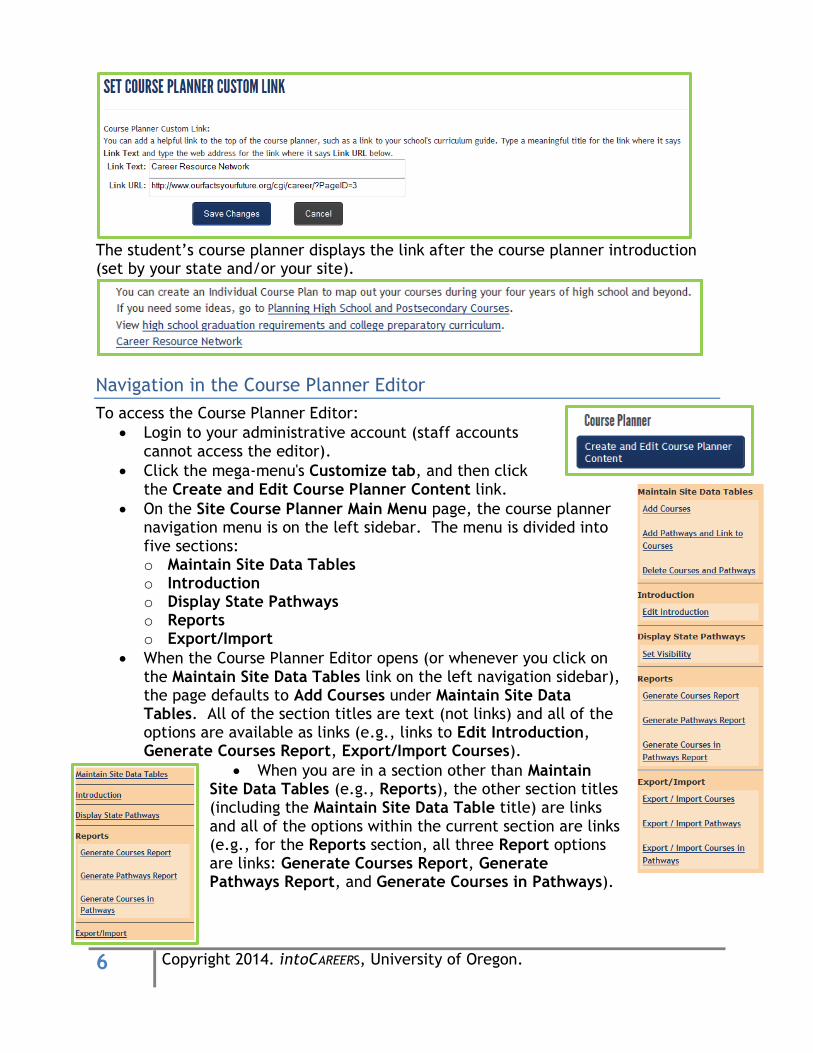
Setting the Course Planner Custom Link
When sites could not update the course planner introduction, sites were allowed to set one link to a web address of their choosing. For example, the link could go to a web page with your site’s specific graduation requirements or course list. To set the Course Planner Custom Link:
Login to your administrative account (staff accounts cannot access the Course Planner Custom Link).
Click the mega-menu's Customize tab, and then click the Set Course Planner Custom Link link.
On the Set Course Planner Custom Link page, enter a meaningful description of the link in the Link Text textbox.
Enter the web address (URL) in the Link URL textbox.
Click the Save Changes button.
6 Copyright 2014. intoCAREERS, University of Oregon.
The student’s course planner displays the link after the course planner introduction (set by your state and/or your site).
Navigation in the Course Planner Editor
To access the Course Planner Editor:
Login to your administrative account (staff accounts cannot access the editor).
Click the mega-menu's Customize tab, and then click the Create and Edit Course Planner Content link.
On the Site Course Planner Main Menu page, the course planner navigation menu is on the left sidebar. The menu is divided into five sections: o Maintain Site Data Tables o Introduction o Display State Pathways o Reports o Export/Import
When the Course Planner Editor opens (or whenever you click on the Maintain Site Data Tables link on the left navigation sidebar), the page defaults to Add Courses under Maintain Site Data Tables. All of the section titles are text (not links) and all of the options are available as links (e.g., links to Edit Introduction, Generate Courses Report, Export/Import Courses).
When you are in a section other than Maintain Site Data Tables (e.g., Reports), the other section titles (including the Maintain Site Data Table title) are links and all of the options within the current section are links (e.g., for the Reports section, all three Report options are links: Generate Courses Report, Generate Pathways Report, and Generate Courses in Pathways).
7 Copyright 2014. intoCAREERS, University of Oregon.
Using No Site-Specific Data
If your site has not currently uploaded any site-specific courses or pathways, your students see no courses in the Course Planner, unless your state has implemented state courses (with or without pathways).
Using State Pathways with Site-Specific Courses
Some sites prefer to display only local courses in their course planners. If your state has pre-loaded pathways, you can let your students view the state pathways by using one of two options. Either:
Set the visibility of the state pathways (see Displaying State Pathways – p. 15), or
Integrate the state courses with your site courses and add the state pathways to your site. Then both state default courses and your site courses are available in the course drop-down menu in the student’s course planner (see instructions below).
To integrate the state courses with your site courses and add the state pathways to your site, you need to follow the steps below to integrate the state data:
1. Download your current site course list, selecting the export site courses option (see Export Courses – p. 18).
2. Delete all content from the site account (see Deleting Site-Specific Information – p. 13).
3. Download the three Excel files necessary for the state pathways (see Exporting Information – p. 18). Select:
a. Export courses, export state courses option (see Export courses - p. 18) b. Export pathways, export state pathways option (see Export pathways -
p.20) c. Export courses in pathways, export state courses in pathways option (see
Export Courses in Pathways – p. 21) 4. Open the Excel files for the state courses (step 3a) and your site courses (step
1). Append (copy-paste) your site courses to the bottom of the existing state course list. The existing state courses may be non-specific titles (e.g., ‘Choose 1 English Class’), but the courses must be included in your list for the students to have the courses included in the pathways.
DO NOT delete, rearrange, or rename the columns. Use plain text in all cells (no bold, italics, etc.) with no line breaks for your entries.
Save the file as a new Excel spreadsheet on your desktop. 5. Import the following three Excel files back into CIS (see Importing Information
– p. 23): a. Your modified courses file (step 4) b. Previously downloaded state pathways file (step 3b) c. Previously downloaded state courses in pathways file (step 3c)

8 Copyright 2014. intoCAREERS, University of Oregon.
Using State Pathways with Site-Specific Pathways
If you currently have courses mapped to pathways and uploaded for your site, you have two options to integrate the state pathways. Either:
Set the visibility of state pathways (Displaying State Pathways – p. 15), or
Integrate the state courses and pathways with your site courses and pathways. Then both state default courses and your site courses are available in the course drop-down menu in the student’s course planner.
To integrate the state courses and pathways with your site courses and pathways, you need to follow the steps below to integrate the state data:
1. Download your current content from your site in three Excel files (see Exporting Information – p. 18). Select:
a. Export courses, export site courses option (p. 18) b. Export pathways, export site pathways option (p.20) c. Export courses in pathways, export site courses in pathway option (p.
21) 2. Delete all content from the site account (see Deleting Site-Specific Information
– p. 13). 3. Download the three Excel files necessary for the state pathways content (see
Exporting Information - p. 18). Select: a. Export courses, export state default courses option b. Export pathways, export state default pathways option c. Export courses in pathways, export state default courses in pathway
option 4. Open the Excel files for the state courses (step 3a) and your site courses (step
1a). Append (copy-paste) your site courses to the bottom of the existing state course list.
DO NOT delete, rearrange, or rename the columns. Use plain text in all cells (no bold, italics, etc.) with no line breaks for your entries.
Save the file as a new Excel spreadsheet on your desktop. 5. Open the Excel files for the state pathways (step 3b) and your site pathways
(step 1b). Append (copy-paste) your site pathways to the bottom of the existing state pathways list.
DO NOT delete, rearrange, or rename the columns. Use plain text in all cells (no bold, italics, etc.) with no line breaks for your entries.
Save the file as a new Excel spreadsheet on your desktop. 6. Open the Excel files for the state courses in pathways (step 3c) and your site
courses in pathways (step 1c). Append (copy-paste) your site courses in pathways entries to the bottom of the existing state courses in pathways list.
DO NOT delete, rearrange, or rename the columns. Use plain text in all cells (no bold, italics, etc.) with no line breaks for your entries.
Save the file as a new Excel spreadsheet on your desktop. 7. Import the Excel files back into CIS. (Importing Information – p. 23)
a. Modified pathways file (step 4) b. Modified courses file (step 5) c. Modified linkage file (step 6)
9 Copyright 2014. intoCAREERS, University of Oregon.
Building Custom Pathways Every site can build custom pathways in the Course Planner Editor manually. This involves adding courses, adding pathways, and manually linking the courses to specific pathways and school years (adding courses in pathways). You do the editing in the Maintain Site Data Tables section of the Course Planner Editor. NOTE: If you have created Courses, Pathways, or Courses in Pathways by uploading an Excel spreadsheet, don’t import again. Instead, use the editing screens to make minor adjustments.
Add Courses
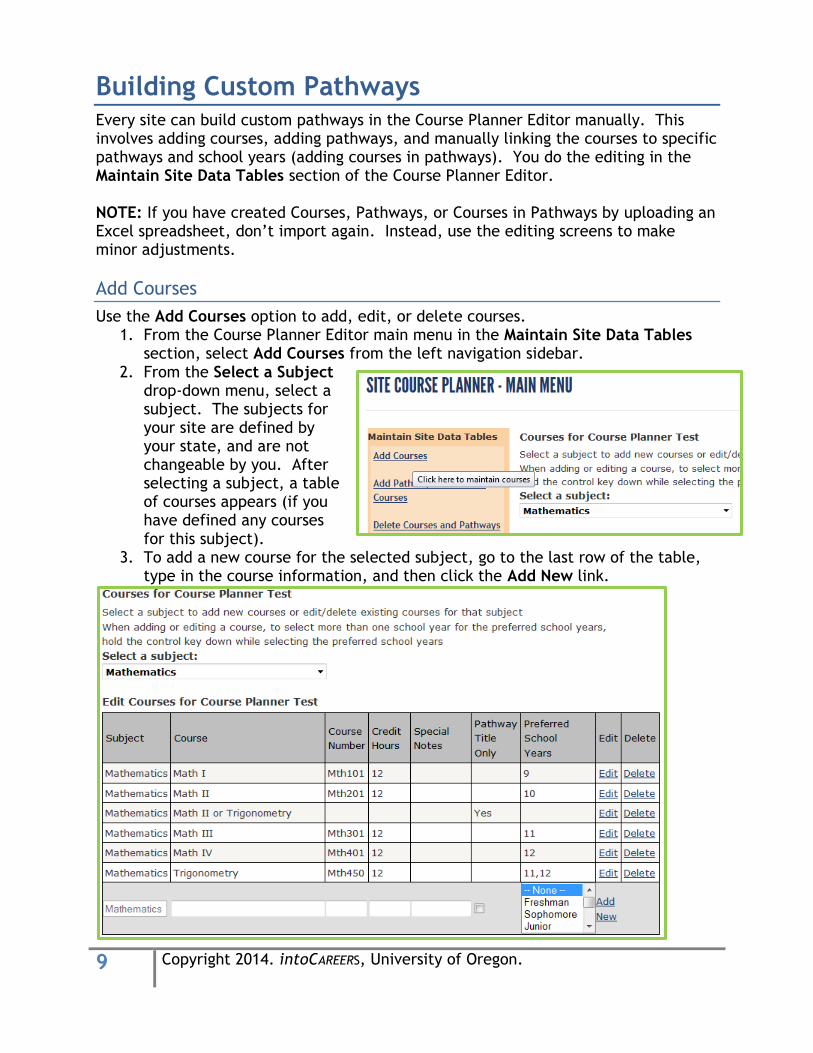
Use the Add Courses option to add, edit, or delete courses. 1. From the Course Planner Editor main menu in the Maintain Site Data Tables
section, select Add Courses from the left navigation sidebar. 2. From the Select a Subject
drop-down menu, select a subject. The subjects for your site are defined by your state, and are not changeable by you. After selecting a subject, a table of courses appears (if you have defined any courses for this subject).
3. To add a new course for the selected subject, go to the last row of the table, type in the course information, and then click the Add New link.
10 Copyright 2014. intoCAREERS, University of Oregon.
4. Click Edit to edit an existing course. After you click the Edit link, it changes to an Update/Cancel option, which you can use to Update or Cancel the information you entered in the course fields.
5. Click Delete to delete an existing course. The Courses table has these fields:
Subject is the selected subject (read-only; selected from the Select a Subject drop-down menu above the Edit Courses table).
Course is the course title (e.g., Geometry for subject Mathematics).
Course number (optional) is the course number for the course (e.g., ‘Mth201’); it can be up to 20 characters.
Credit hours (optional) column is the number of credit hours for the course (e.g., ‘0.5’, ‘9’, or ‘9 to 12’); it can be up to 10 characters.
Special Notes (optional) column is for special notes, such as ‘Online course’: o Site administrators can see the special note when exporting the course
list. o Students can see the special note when adding pathway course data to
their course plan. o Students can see the special note in their course list only if your state
has included the notes column for your site type (e.g., for high schools).
Pathway Title Only (optional) is a flag to indicate that the course can be selected when adding to Pathways (Courses in Pathways), but the course does not display in the student’s drop-down menu for a given subject:
o Use this feature for displaying choices for courses, such as ‘Choose one class’ or ‘Art I or Art II’.
o When adding or editing the course, click the checkbox under the Pathway Title Only column to indicate that it is selectable only when adding to Pathways.
o In View mode, a ‘Yes’ displays in the column when the course is a Pathway Title Only course.
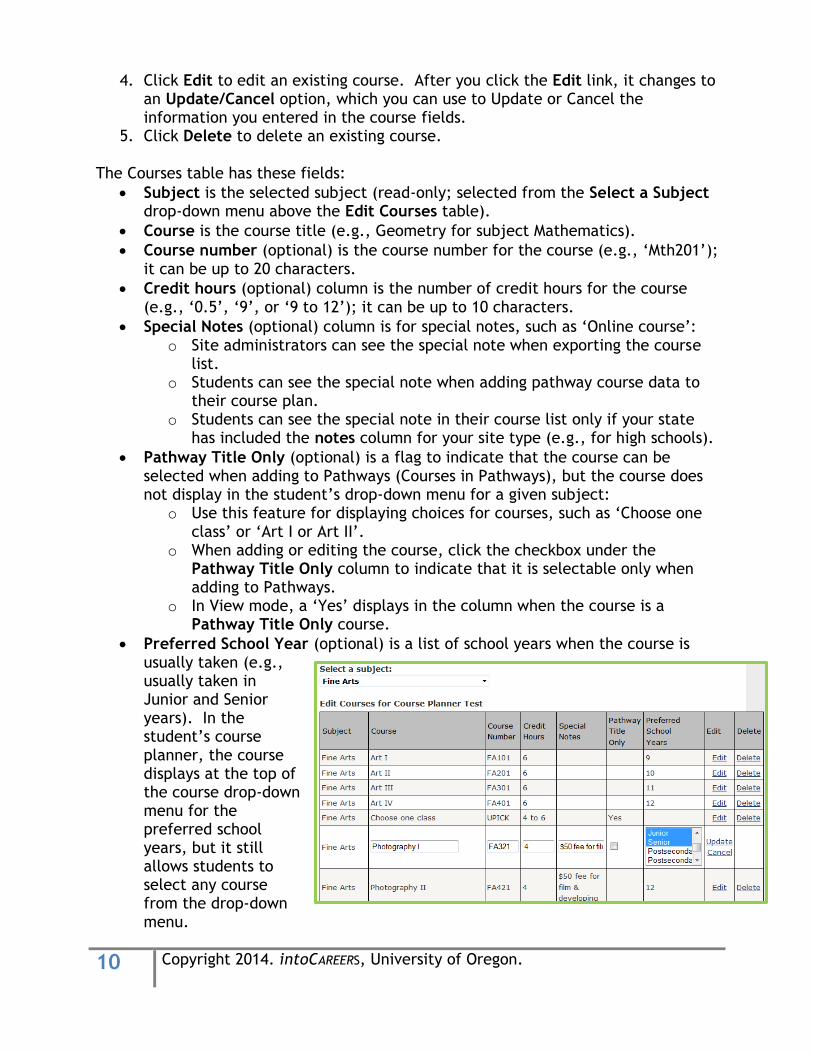
Preferred School Year (optional) is a list of school years when the course is usually taken (e.g., usually taken in Junior and Senior years). In the student’s course planner, the course displays at the top of the course drop-down menu for the preferred school years, but it still allows students to select any course from the drop-down menu.

11 Copyright 2014. intoCAREERS, University of Oregon.
o When adding or editing, select ‘—None –‘ from the Preferred School
Years drop-down menu if the course doesn’t have a preferred year. o To select more than one school year for the preferred school years, hold
the control key down while making the selections (in the example above, both Junior and Senior years are selected).
o In View mode, the column is a comma-separated list of the school year number(s) showing your selected school years; the column is blank when you make no selections.
Add Pathways and Link to Courses
Use the Add Pathways and Link to Courses option:
To add, edit, or delete pathways (the pathway name, school year, and requirements shown in the student’s course plan, seen when the student selects a pathway name and clicks the Add to Course Plan button).
To add, edit, or delete courses in pathways (the courses that are linked to each pathway and school year combination).
Add Pathways
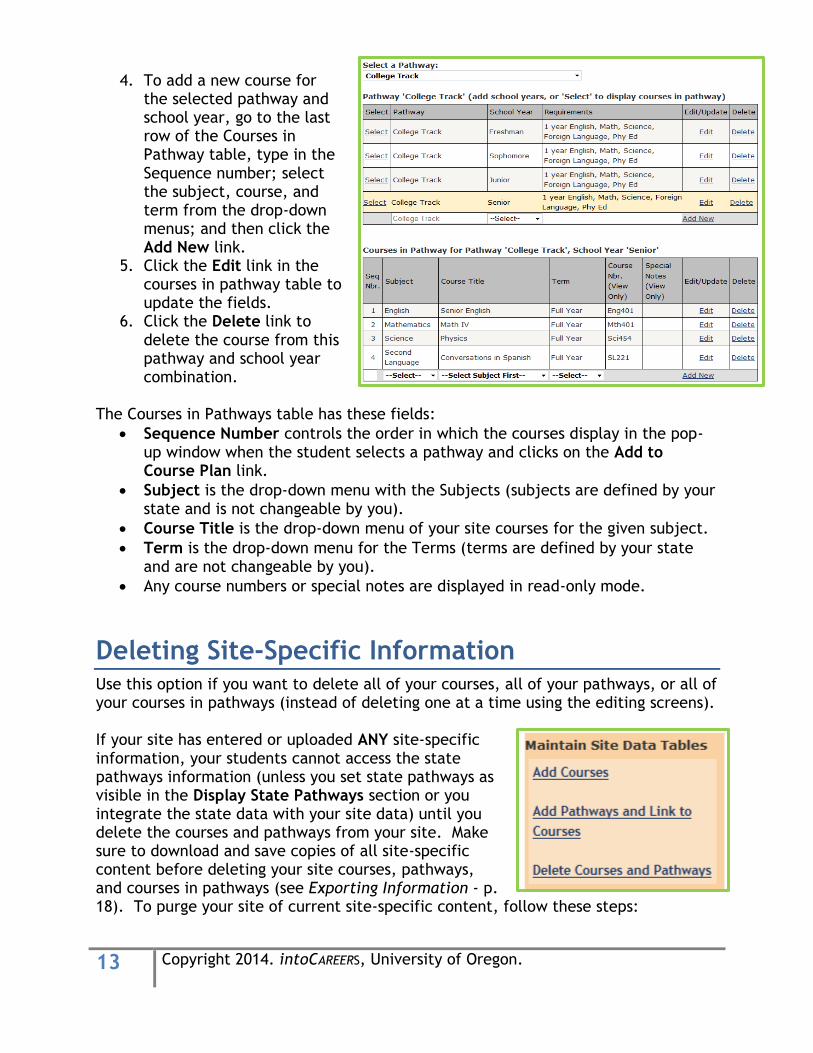
1. From the Course Planner Editor main menu in the Maintain Site Data Tables section, select Add Pathways and Link to Courses from the left navigation sidebar to add, edit, or delete pathways. (Also see Link Courses to Pathways – p. 12.)
2. To add a new pathway:
a. Select New from the Select a Pathway drop-down menu to create a new pathway.
b. Type in the name for the pathway, select the first school year you would like to plan (e.g., Freshman), enter the general requirements for that school year (e.g., Full year Math, Science, English, and Social Studies), and click Add New.

12 Copyright 2014. intoCAREERS, University of Oregon.
c. Repeat step b for each school year contained in the pathway (excluding entering the name of the pathway, since it is already defined).
3. To edit an existing pathway, select the pathway from the Select a Pathway drop-down menu.
a. To change the name of a pathway, click the Edit link (which changes to Update/Cancel links), change the pathway name, and click Update.
b. All the school years for that pathway are updated with the new name. c. If you type in a different pathway name, the pathway name must not
already exist for your site.
4. Click the Delete link to delete the pathway and school year combination from the template table. Delete all school years for this pathway to delete the entire pathway.
5. The Select link is explained in Link to Courses in Pathways (see below). The Pathways table has these required fields:
Pathway is the name of pathway: o The name of the pathway must be the same for all entered school years.
School Year is the drop-down menu with the School Years for the site type: o Each pathway name and school year combination must be unique (for
example, you cannot have two entries for ‘College Prep’ pathway for school year ‘Freshman’ with different requirements).
o You can only define pathways up to school year 12 (the state defines pathways for higher grades using the postsecondary programs of study).
Requirements is the general requirements required for the selected year: o An example of requirements is ‘Full year Math, Science, English, and one
elective’. o Do not repeat the list of specific courses linked to your pathway.
Link Courses to Pathways Once you have defined pathways and courses, you can link courses to a specific pathway and school year combination.
1. From the Course Planner Editor main menu in the Maintain Site Data Tables section, select Add Pathways and Links to Courses from the left navigation sidebar.
2. Select an existing pathway from the Select a Pathway drop-down menu. (Also see Add Pathways – p. 11.)
3. Click the Select link in the Pathways table; then the courses linked to that pathway and school year combination appears (or a blank table appears if there are no courses).
13 Copyright 2014. intoCAREERS, University of Oregon.
4. To add a new course for the selected pathway and school year, go to the last row of the Courses in Pathway table, type in the Sequence number; select the subject, course, and term from the drop-down menus; and then click the Add New link.
5. Click the Edit link in the courses in pathway table to update the fields.
6. Click the Delete link to delete the course from this pathway and school year combination.
The Courses in Pathways table has these fields:
Sequence Number controls the order in which the courses display in the pop-up window when the student selects a pathway and clicks on the Add to Course Plan link.
Subject is the drop-down menu with the Subjects (subjects are defined by your state and is not changeable by you).
Course Title is the drop-down menu of your site courses for the given subject.
Term is the drop-down menu for the Terms (terms are defined by your state and are not changeable by you).
Any course numbers or special notes are displayed in read-only mode.
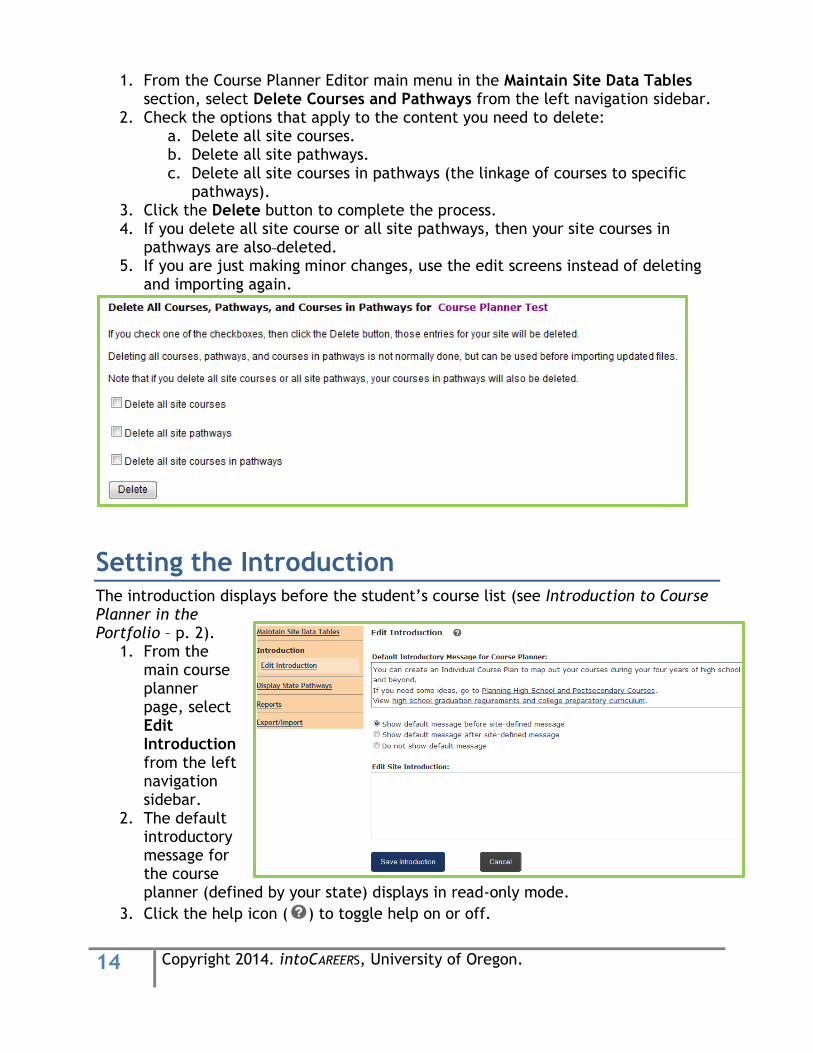
Deleting Site-Specific Information Use this option if you want to delete all of your courses, all of your pathways, or all of your courses in pathways (instead of deleting one at a time using the editing screens). If your site has entered or uploaded ANY site-specific information, your students cannot access the state pathways information (unless you set state pathways as visible in the Display State Pathways section or you integrate the state data with your site data) until you delete the courses and pathways from your site. Make sure to download and save copies of all site-specific content before deleting your site courses, pathways, and courses in pathways (see Exporting Information - p. 18). To purge your site of current site-specific content, follow these steps:
14 Copyright 2014. intoCAREERS, University of Oregon.
1. From the Course Planner Editor main menu in the Maintain Site Data Tables section, select Delete Courses and Pathways from the left navigation sidebar.
2. Check the options that apply to the content you need to delete: a. Delete all site courses. b. Delete all site pathways. c. Delete all site courses in pathways (the linkage of courses to specific
pathways). 3. Click the Delete button to complete the process. 4. If you delete all site course or all site pathways, then your site courses in
pathways are also deleted. 5. If you are just making minor changes, use the edit screens instead of deleting
and importing again.
Setting the Introduction The introduction displays before the student’s course list (see Introduction to Course Planner in the Portfolio – p. 2).
1. From the main course planner page, select Edit Introduction from the left navigation sidebar.
2. The default introductory message for the course planner (defined by your state) displays in read-only mode.
3. Click the help icon ( ) to toggle help on or off.
15 Copyright 2014. intoCAREERS, University of Oregon.
4. Enter a site-specific introduction: a. It can be up to 1000
characters. b. It can be in HTML format
(the roll-down help menu has a link to some free HTML editors). c. The student’s course planner is displayed in HTML5 format, so use
Cascading Style Sheet (CSS) classes and styles to format the text. For example, to have the word ‘Courses’ display in bold font:
This will format correctly: <span style=”font-weight: bold;”>Courses</span>
This may not format correctly: <b>Courses</b>
5. Select the order that the default introduction message displays: a. Before the site-defined message b. After the site-defined message c. Not at all (don’t display the default message). However, if your state
operator selected to force the display of the default message, this option is not available.
6. Click the Save Introduction button.
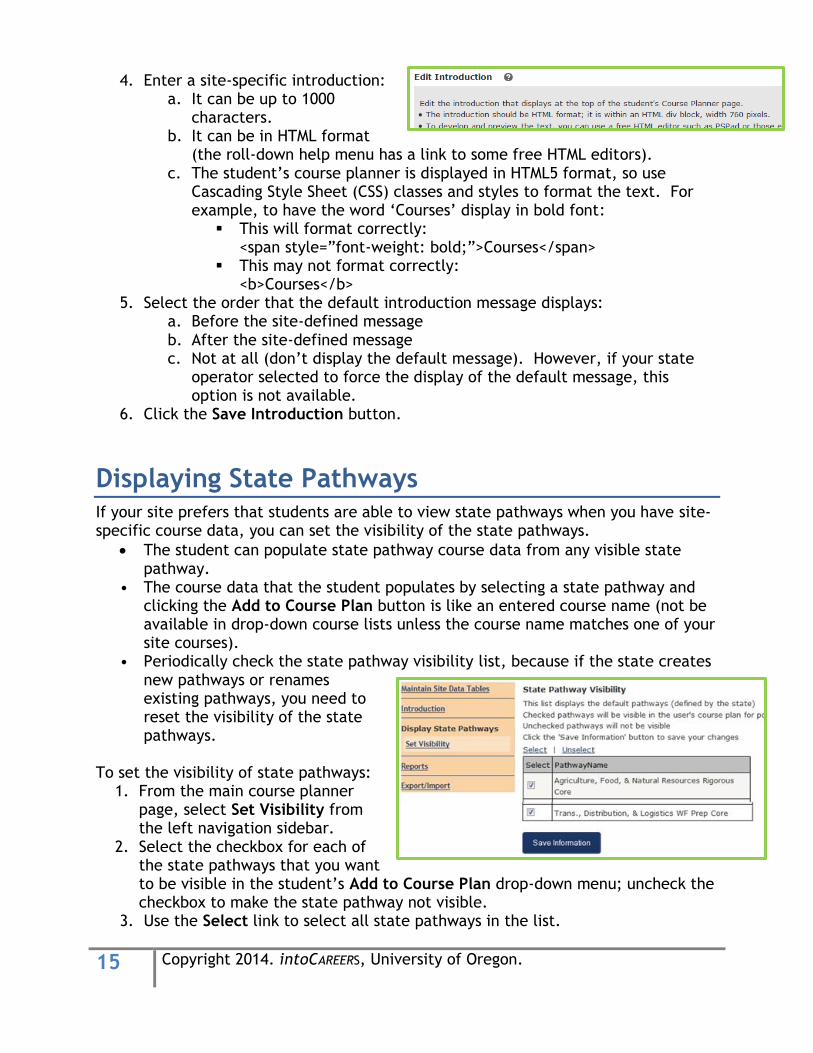
Displaying State Pathways If your site prefers that students are able to view state pathways when you have site-specific course data, you can set the visibility of the state pathways.
The student can populate state pathway course data from any visible state pathway.
• The course data that the student populates by selecting a state pathway and clicking the Add to Course Plan button is like an entered course name (not be available in drop-down course lists unless the course name matches one of your site courses).
• Periodically check the state pathway visibility list, because if the state creates new pathways or renames existing pathways, you need to reset the visibility of the state pathways.
To set the visibility of state pathways: 1. From the main course planner
page, select Set Visibility from the left navigation sidebar.
2. Select the checkbox for each of the state pathways that you want to be visible in the student’s Add to Course Plan drop-down menu; uncheck the checkbox to make the state pathway not visible.
3. Use the Select link to select all state pathways in the list.
16 Copyright 2014. intoCAREERS, University of Oregon.
4. Use the Unselect link to unselect all state pathways. 5. Click the Save Information button to save the visibility settings.
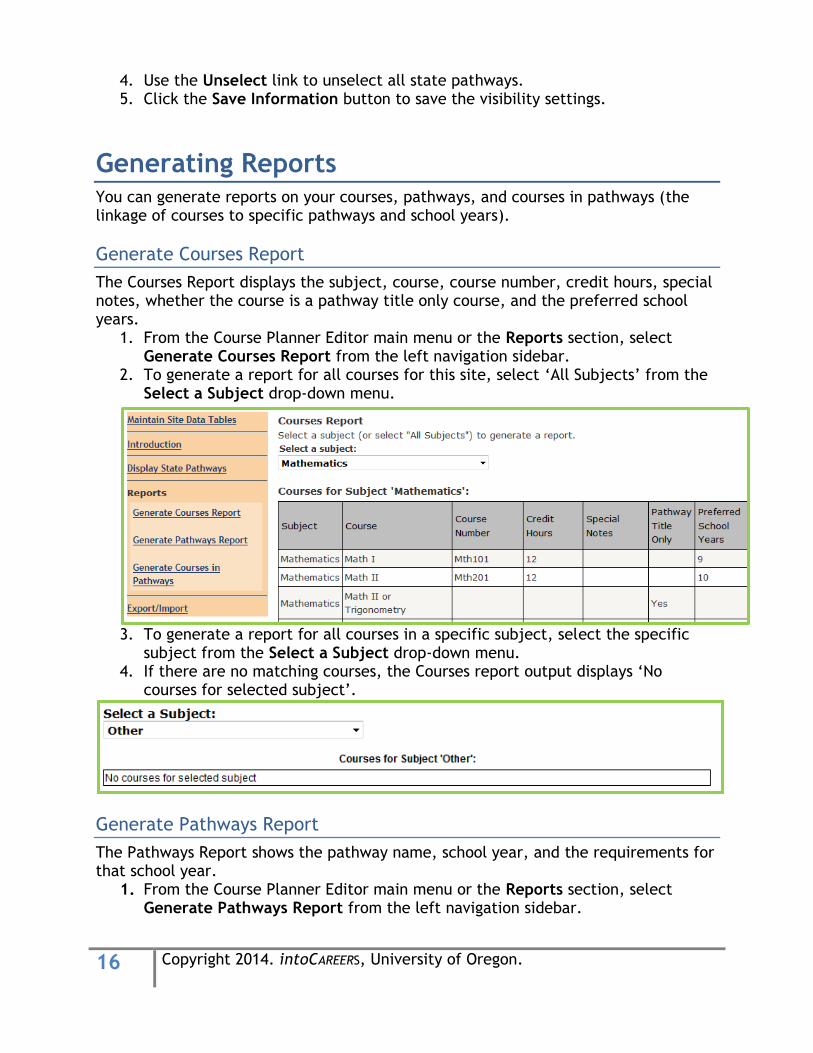
Generating Reports You can generate reports on your courses, pathways, and courses in pathways (the linkage of courses to specific pathways and school years).
Generate Courses Report
The Courses Report displays the subject, course, course number, credit hours, special notes, whether the course is a pathway title only course, and the preferred school years.
1. From the Course Planner Editor main menu or the Reports section, select Generate Courses Report from the left navigation sidebar.
2. To generate a report for all courses for this site, select ‘All Subjects’ from the Select a Subject drop-down menu.
3. To generate a report for all courses in a specific subject, select the specific subject from the Select a Subject drop-down menu.
4. If there are no matching courses, the Courses report output displays ‘No courses for selected subject’.
Generate Pathways Report
The Pathways Report shows the pathway name, school year, and the requirements for that school year.
1. From the Course Planner Editor main menu or the Reports section, select Generate Pathways Report from the left navigation sidebar.
17 Copyright 2014. intoCAREERS, University of Oregon.
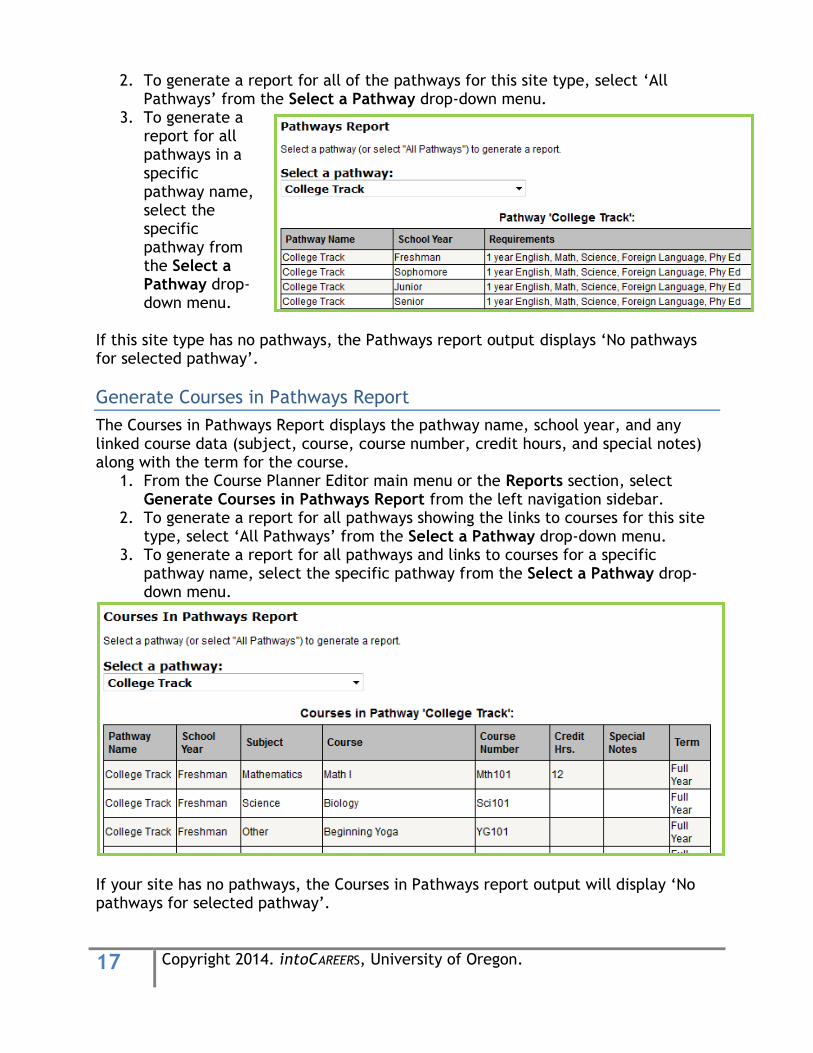
2. To generate a report for all of the pathways for this site type, select ‘All Pathways’ from the Select a Pathway drop-down menu.
3. To generate a report for all pathways in a specific pathway name, select the specific pathway from the Select a Pathway drop-down menu.
If this site type has no pathways, the Pathways report output displays ‘No pathways for selected pathway’.
Generate Courses in Pathways Report
The Courses in Pathways Report displays the pathway name, school year, and any linked course data (subject, course, course number, credit hours, and special notes) along with the term for the course.
1. From the Course Planner Editor main menu or the Reports section, select Generate Courses in Pathways Report from the left navigation sidebar.
2. To generate a report for all pathways showing the links to courses for this site type, select ‘All Pathways’ from the Select a Pathway drop-down menu.
3. To generate a report for all pathways and links to courses for a specific pathway name, select the specific pathway from the Select a Pathway drop-down menu.
If your site has no pathways, the Courses in Pathways report output will display ‘No pathways for selected pathway’.

18 Copyright 2014. intoCAREERS, University of Oregon.
You can use this report to find which pathways do not have courses linked to them (the subject, course, and term columns in the report output are blank).
Exporting Information Use the export features to export blank templates for editing; to export your state courses, pathways, or courses in pathways to use as a starting point or to merge with your site data; or to export your site’s existing courses, pathways, or courses in pathways. Each export section has a help area with instructions on exporting. Click the help icon
( ) to toggle help on or off.
Export Courses
1. From the Course Planner Editor main menu, click on Export/Import Courses link on the left navigation sidebar.
2. The left navigation sidebar changes to the Export/Import section, with export/import of courses enabled.
3. Select Export Courses on the left navigation sidebar. 4. You have three options for exporting:
a. Export blank template (this option is always available).
b. Export state default courses to use as a starting point (this option is only available when your state has defined courses).
19 Copyright 2014. intoCAREERS, University of Oregon.
c. Export existing site courses (this option is only available when your site has defined courses).
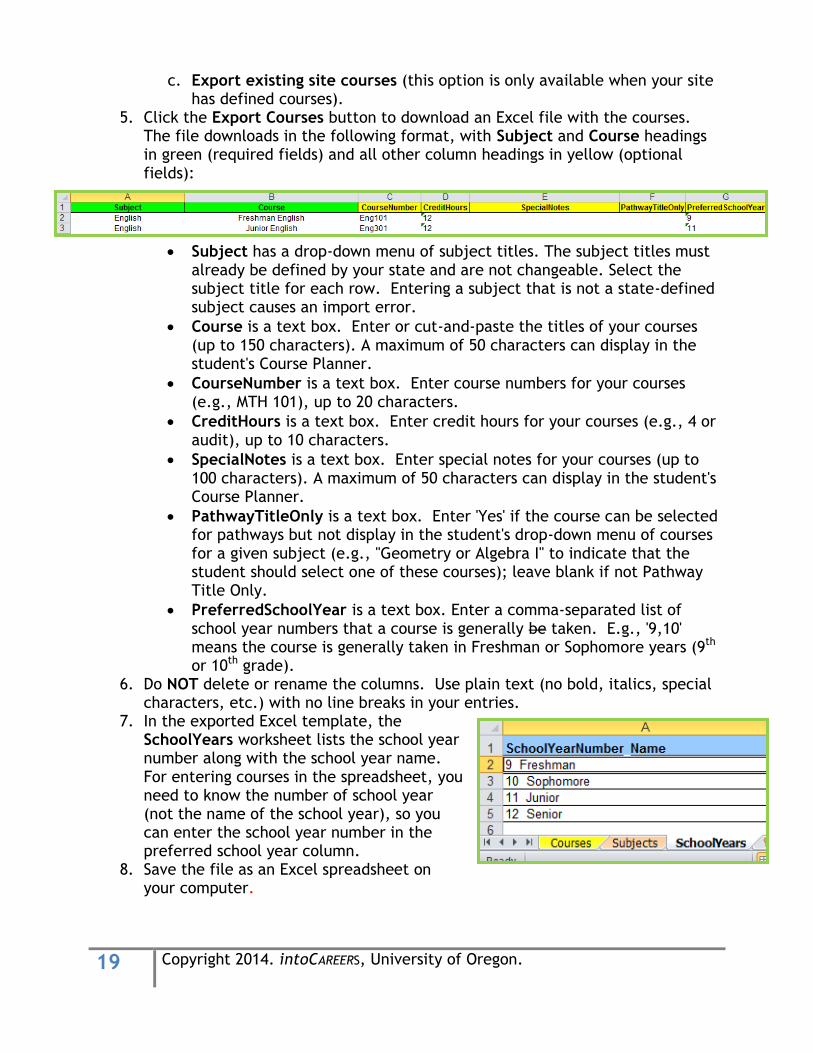
5. Click the Export Courses button to download an Excel file with the courses. The file downloads in the following format, with Subject and Course headings in green (required fields) and all other column headings in yellow (optional fields):
Subject has a drop-down menu of subject titles. The subject titles must already be defined by your state and are not changeable. Select the subject title for each row. Entering a subject that is not a state-defined subject causes an import error.
Course is a text box. Enter or cut-and-paste the titles of your courses (up to 150 characters). A maximum of 50 characters can display in the student's Course Planner.
CourseNumber is a text box. Enter course numbers for your courses (e.g., MTH 101), up to 20 characters.
CreditHours is a text box. Enter credit hours for your courses (e.g., 4 or audit), up to 10 characters.
SpecialNotes is a text box. Enter special notes for your courses (up to 100 characters). A maximum of 50 characters can display in the student's Course Planner.
PathwayTitleOnly is a text box. Enter 'Yes' if the course can be selected for pathways but not display in the student's drop-down menu of courses for a given subject (e.g., "Geometry or Algebra I" to indicate that the student should select one of these courses); leave blank if not Pathway Title Only.
PreferredSchoolYear is a text box. Enter a comma-separated list of school year numbers that a course is generally be taken. E.g., '9,10' means the course is generally taken in Freshman or Sophomore years (9th or 10th grade).
6. Do NOT delete or rename the columns. Use plain text (no bold, italics, special characters, etc.) with no line breaks in your entries.
7. In the exported Excel template, the SchoolYears worksheet lists the school year number along with the school year name. For entering courses in the spreadsheet, you need to know the number of school year (not the name of the school year), so you can enter the school year number in the preferred school year column.
8. Save the file as an Excel spreadsheet on your computer.
20 Copyright 2014. intoCAREERS, University of Oregon.
Export Pathways
1. From the Course Planner Editor main menu, click on Export/Import Pathways link on the left navigation sidebar.
2. The left navigation sidebar changes to the Export/Import section, with export/import of pathways enabled.
3. Select Export Pathways on the left navigation sidebar.
4. You have three options for exporting:
a. Export blank template (this option is always available). b. Export state default pathways to use as a starting point (this option is
only available when your state has defined pathways). c. Export existing site pathways (this option is only available when your
site has defined pathways). 5. Click the Export Pathways button to download an Excel file with the pathways.
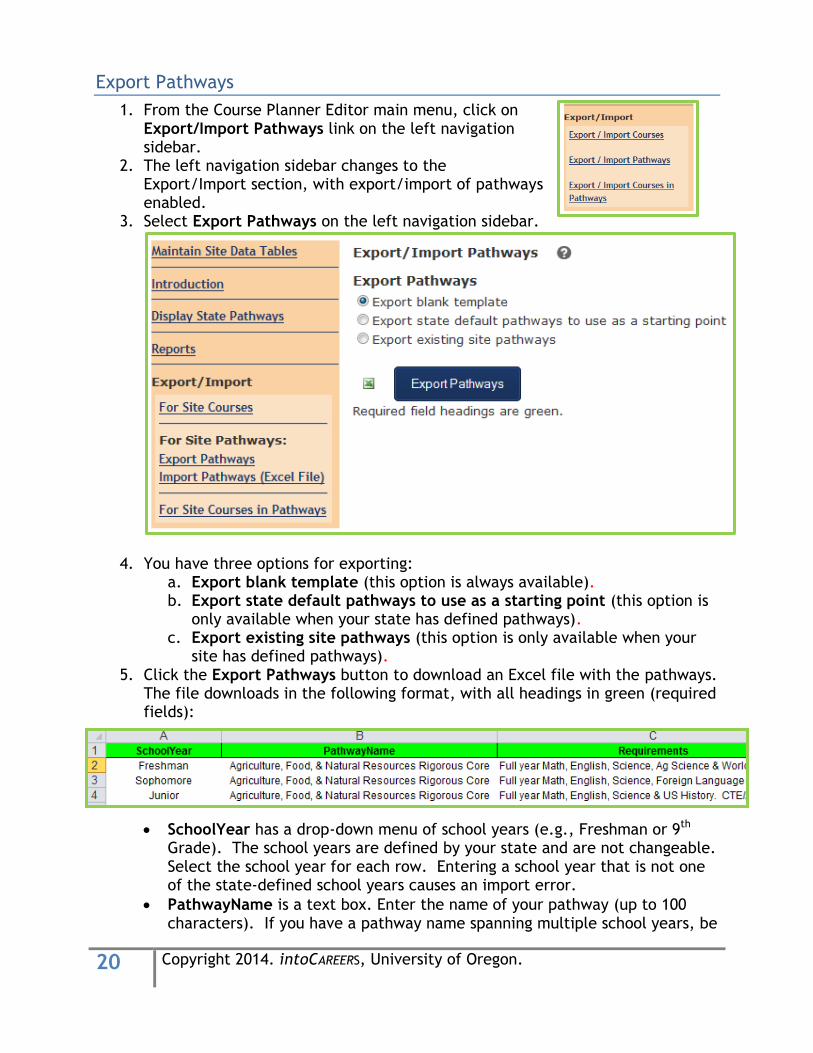
The file downloads in the following format, with all headings in green (required fields):
SchoolYear has a drop-down menu of school years (e.g., Freshman or 9th Grade). The school years are defined by your state and are not changeable. Select the school year for each row. Entering a school year that is not one of the state-defined school years causes an import error.
PathwayName is a text box. Enter the name of your pathway (up to 100 characters). If you have a pathway name spanning multiple school years, be
21 Copyright 2014. intoCAREERS, University of Oregon.
sure that the pathway name is the same for those school years (e.g., ‘College Prep’ pathway used for Freshman, Sophomore, Junior, and Senior school years).
Requirements column is a text box. Enter requirements for your pathway for that school year (up to 100 characters). E.g. ‘Full year Mathematics, English, Science, and one elective’.
6. DO NOT delete or rename the columns. Use plain text (no bold, italics, special characters, etc.) with no line breaks for your entries.
7. Save the file as an Excel spreadsheet on your computer.
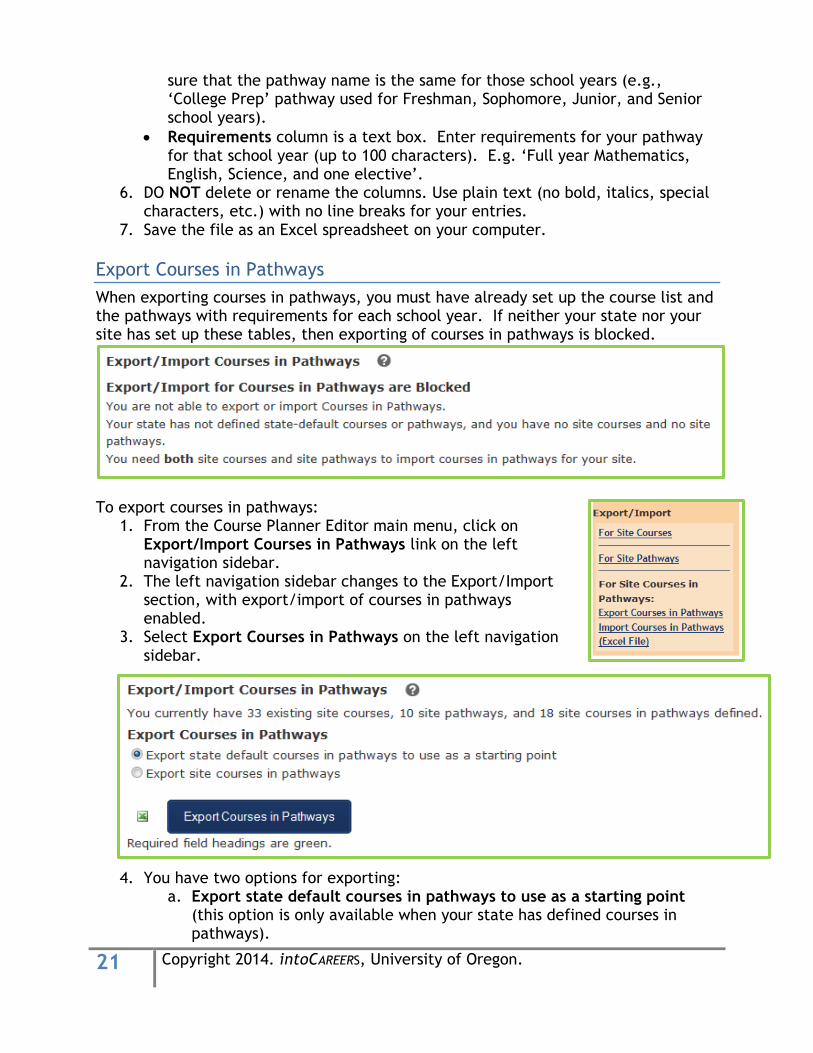
Export Courses in Pathways
When exporting courses in pathways, you must have already set up the course list and the pathways with requirements for each school year. If neither your state nor your site has set up these tables, then exporting of courses in pathways is blocked.
To export courses in pathways:
1. From the Course Planner Editor main menu, click on Export/Import Courses in Pathways link on the left navigation sidebar.
2. The left navigation sidebar changes to the Export/Import section, with export/import of courses in pathways enabled.
3. Select Export Courses in Pathways on the left navigation sidebar.
4. You have two options for exporting: a. Export state default courses in pathways to use as a starting point
(this option is only available when your state has defined courses in pathways).
22 Copyright 2014. intoCAREERS, University of Oregon.
b. If your site has uploaded both courses and pathways: i. Export blank template (when you have no courses in pathways). ii. Export site courses in pathways (when you have defined courses
in pathways). 5. Click the Export Courses in Pathways button to download an Excel file with
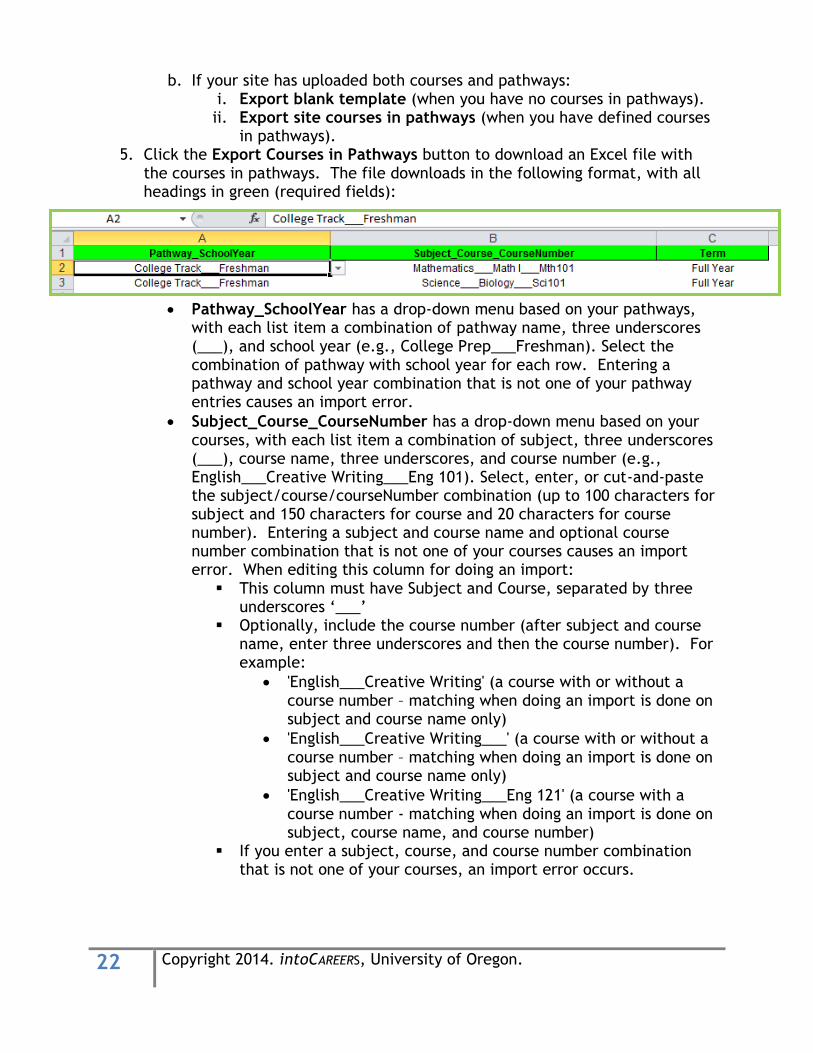
the courses in pathways. The file downloads in the following format, with all headings in green (required fields):
Pathway_SchoolYear has a drop-down menu based on your pathways, with each list item a combination of pathway name, three underscores (___), and school year (e.g., College Prep___Freshman). Select the combination of pathway with school year for each row. Entering a pathway and school year combination that is not one of your pathway entries causes an import error.
Subject_Course_CourseNumber has a drop-down menu based on your courses, with each list item a combination of subject, three underscores (___), course name, three underscores, and course number (e.g., English___Creative Writing___Eng 101). Select, enter, or cut-and-paste the subject/course/courseNumber combination (up to 100 characters for subject and 150 characters for course and 20 characters for course number). Entering a subject and course name and optional course number combination that is not one of your courses causes an import error. When editing this column for doing an import:
This column must have Subject and Course, separated by three underscores ‘___’
Optionally, include the course number (after subject and course name, enter three underscores and then the course number). For example:
'English___Creative Writing' (a course with or without a course number – matching when doing an import is done on subject and course name only)
'English___Creative Writing___' (a course with or without a course number – matching when doing an import is done on subject and course name only)
'English___Creative Writing___Eng 121' (a course with a course number - matching when doing an import is done on subject, course name, and course number)
If you enter a subject, course, and course number combination that is not one of your courses, an import error occurs.
23 Copyright 2014. intoCAREERS, University of Oregon.
If you do not enter a course number and you have two courses that match (e.g., with the same subject and course name but with different course numbers or special notes), the import selects the first course in the list – so verify that the correct one was selected.
Term has a drop-down menu of term names (e.g. Fall Term or 1st Quarter). The term names are defined by your state and are not changeable. Select the term for each row. Entering a term that is not a state-defined term causes an import error.
6. DO NOT delete or rename the columns. Use plain text (no bold, italics, special characters, etc.) with no line breaks for your entries.
7. Save the file as an Excel spreadsheet on your computer.
Importing Information
Use the import features to import courses, pathways, or courses in pathways from another state or site. Each import section has a help area with instructions on importing in trial run mode and importing in non-trial run mode. Click the help icon to toggle help on or off.
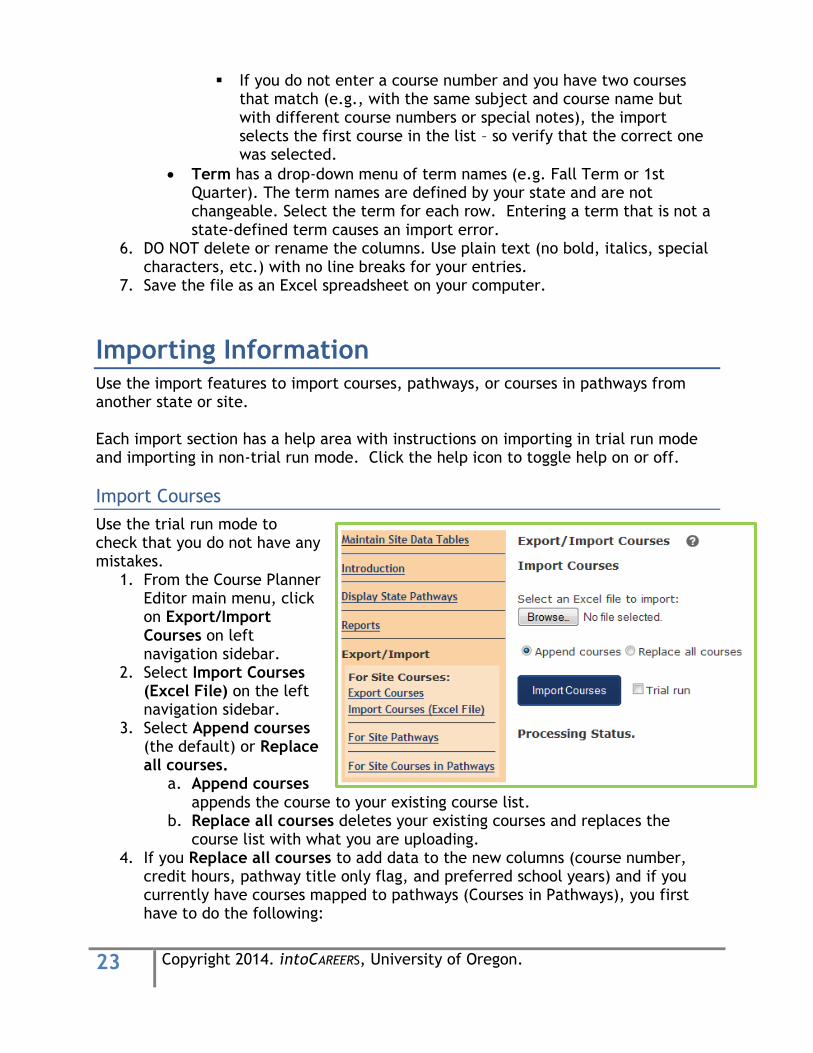
Import Courses
Use the trial run mode to check that you do not have any mistakes.
1. From the Course Planner Editor main menu, click on Export/Import Courses on left navigation sidebar.
2. Select Import Courses (Excel File) on the left navigation sidebar.
3. Select Append courses (the default) or Replace all courses.
a. Append courses appends the course to your existing course list.
b. Replace all courses deletes your existing courses and replaces the course list with what you are uploading.
4. If you Replace all courses to add data to the new columns (course number, credit hours, pathway title only flag, and preferred school years) and if you currently have courses mapped to pathways (Courses in Pathways), you first have to do the following:
24 Copyright 2014. intoCAREERS, University of Oregon.
a. Export the existing Courses in Pathways (see Export Courses in Pathways – p. 21). Save this template to re-import after you import your course data.
b. Delete the existing Courses in Pathways (see Deleting Site-Specific Information – p. 13).
c. You cannot import the replacement course list until you delete your existing site Courses in Pathways.
5. Click the Browse or Choose File button to select the Excel course spreadsheet you saved on your desktop. (The name of the button depends on your browser.)
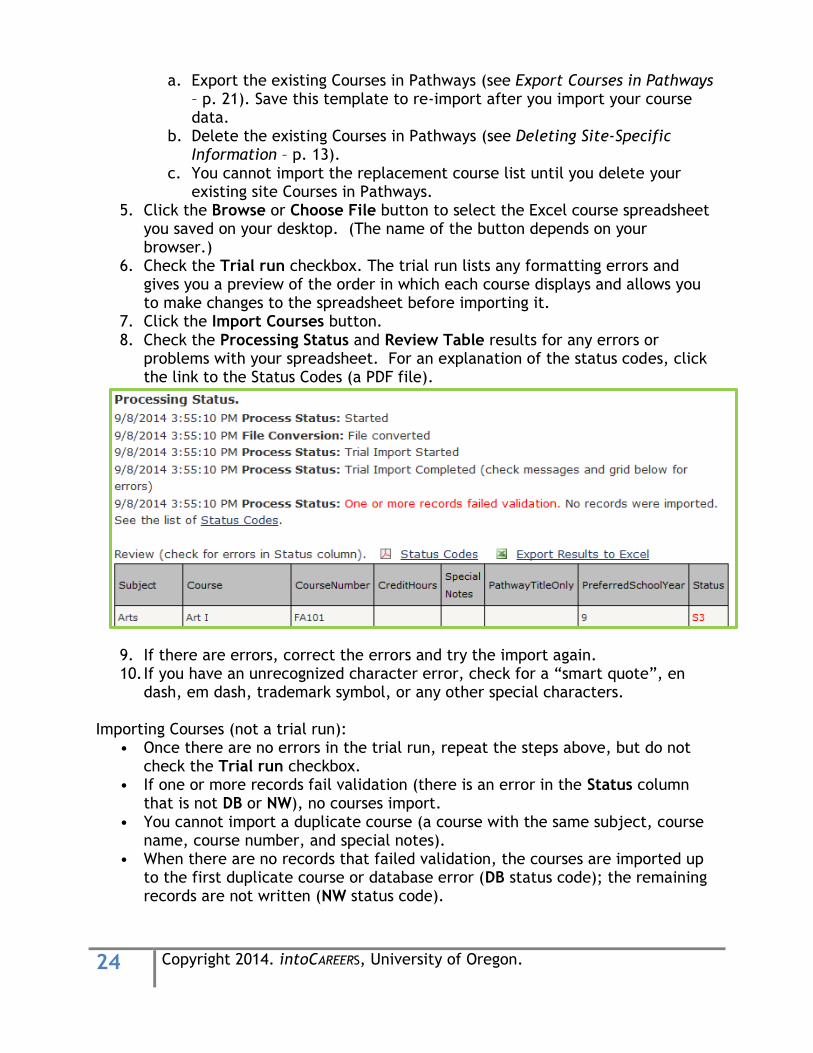
6. Check the Trial run checkbox. The trial run lists any formatting errors and gives you a preview of the order in which each course displays and allows you to make changes to the spreadsheet before importing it.
7. Click the Import Courses button. 8. Check the Processing Status and Review Table results for any errors or
problems with your spreadsheet. For an explanation of the status codes, click the link to the Status Codes (a PDF file).
9. If there are errors, correct the errors and try the import again. 10. If you have an unrecognized character error, check for a “smart quote”, en
dash, em dash, trademark symbol, or any other special characters. Importing Courses (not a trial run):
• Once there are no errors in the trial run, repeat the steps above, but do not check the Trial run checkbox.
• If one or more records fail validation (there is an error in the Status column that is not DB or NW), no courses import.
• You cannot import a duplicate course (a course with the same subject, course name, course number, and special notes).
• When there are no records that failed validation, the courses are imported up to the first duplicate course or database error (DB status code); the remaining records are not written (NW status code).
25 Copyright 2014. intoCAREERS, University of Oregon.
Import Pathways
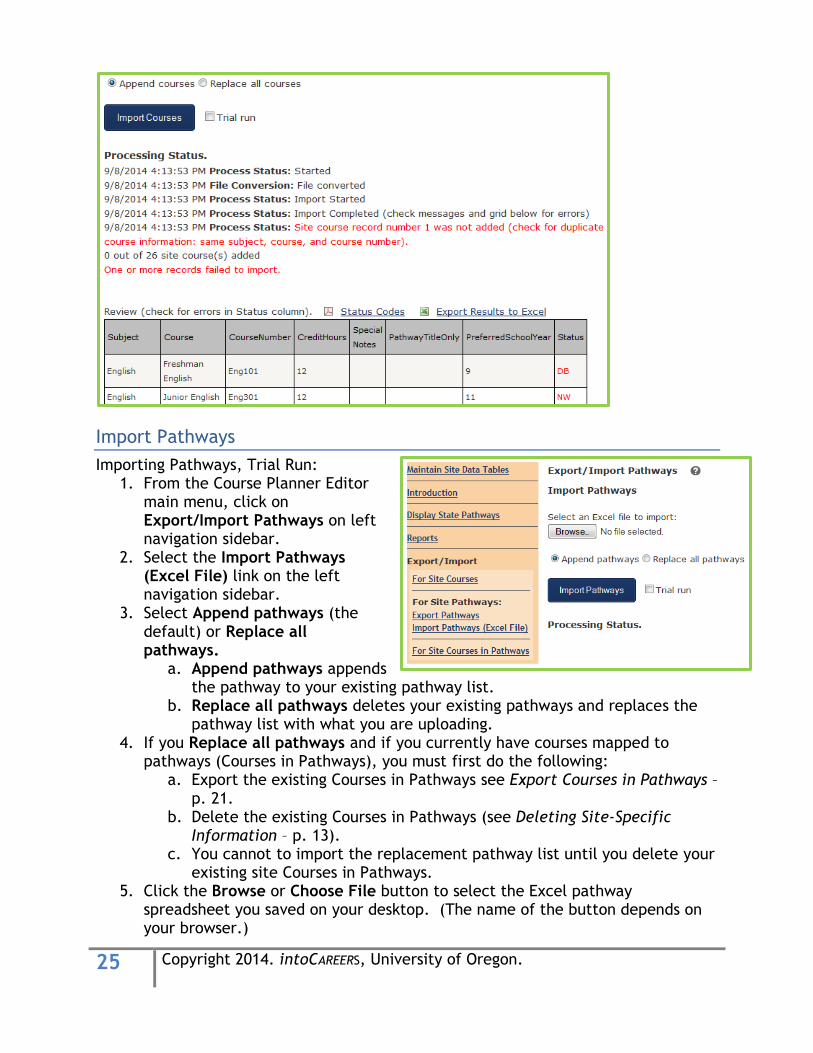
Importing Pathways, Trial Run: 1. From the Course Planner Editor
main menu, click on Export/Import Pathways on left navigation sidebar.
2. Select the Import Pathways (Excel File) link on the left navigation sidebar.
3. Select Append pathways (the default) or Replace all pathways.
a. Append pathways appends the pathway to your existing pathway list.
b. Replace all pathways deletes your existing pathways and replaces the pathway list with what you are uploading.
4. If you Replace all pathways and if you currently have courses mapped to pathways (Courses in Pathways), you must first do the following:
a. Export the existing Courses in Pathways see Export Courses in Pathways – p. 21.
b. Delete the existing Courses in Pathways (see Deleting Site-Specific Information – p. 13).
c. You cannot to import the replacement pathway list until you delete your existing site Courses in Pathways.
5. Click the Browse or Choose File button to select the Excel pathway spreadsheet you saved on your desktop. (The name of the button depends on your browser.)
26 Copyright 2014. intoCAREERS, University of Oregon.
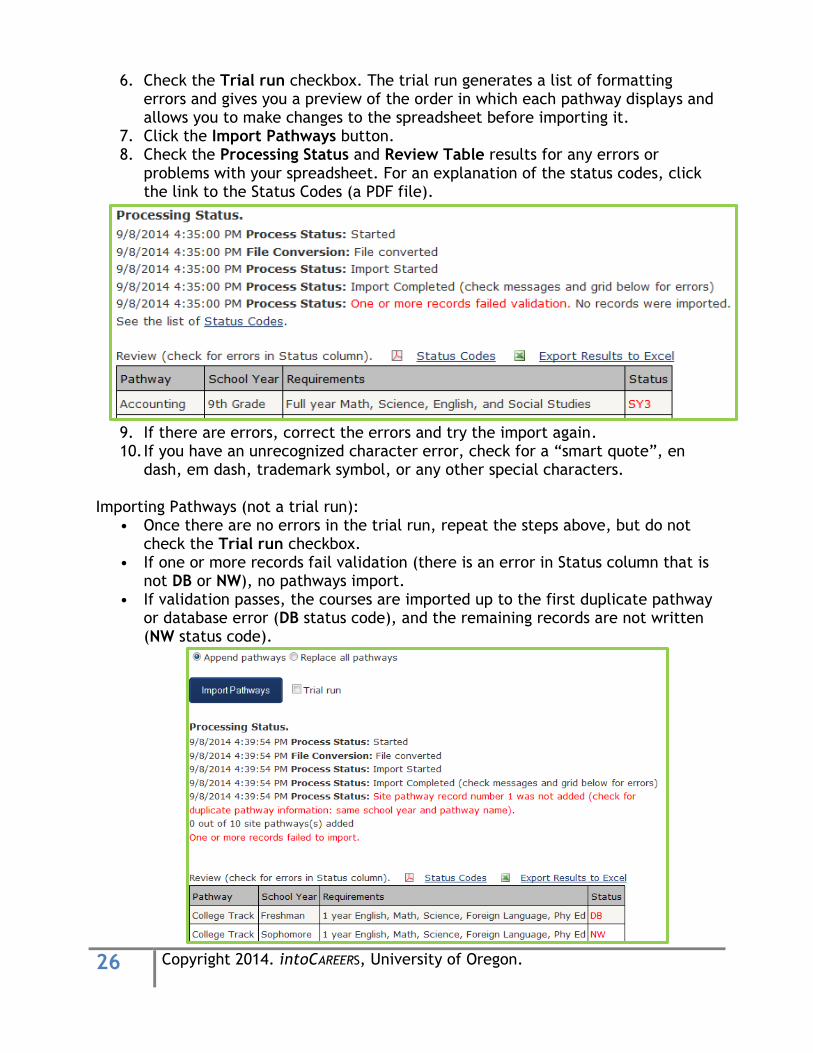
6. Check the Trial run checkbox. The trial run generates a list of formatting errors and gives you a preview of the order in which each pathway displays and allows you to make changes to the spreadsheet before importing it.
7. Click the Import Pathways button. 8. Check the Processing Status and Review Table results for any errors or
problems with your spreadsheet. For an explanation of the status codes, click the link to the Status Codes (a PDF file).
9. If there are errors, correct the errors and try the import again. 10. If you have an unrecognized character error, check for a “smart quote”, en
dash, em dash, trademark symbol, or any other special characters. Importing Pathways (not a trial run):
• Once there are no errors in the trial run, repeat the steps above, but do not check the Trial run checkbox.
• If one or more records fail validation (there is an error in Status column that is not DB or NW), no pathways import.
• If validation passes, the courses are imported up to the first duplicate pathway or database error (DB status code), and the remaining records are not written (NW status code).
27 Copyright 2014. intoCAREERS, University of Oregon.
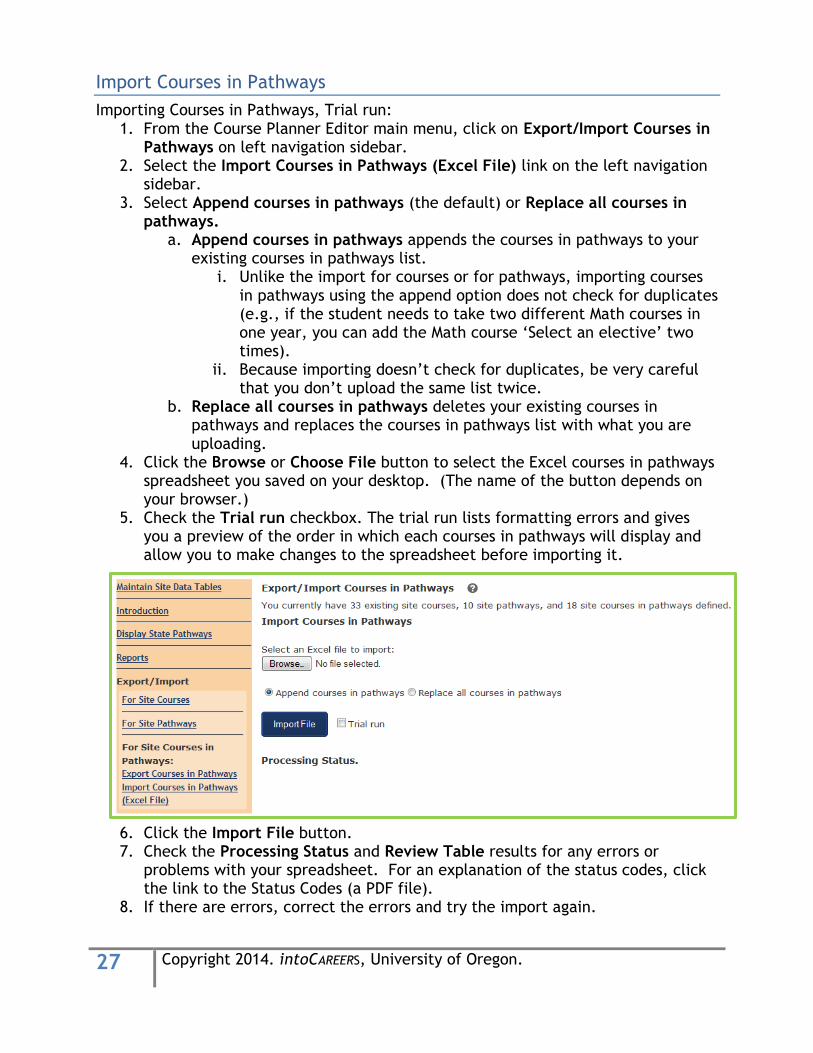
Import Courses in Pathways
Importing Courses in Pathways, Trial run: 1. From the Course Planner Editor main menu, click on Export/Import Courses in
Pathways on left navigation sidebar. 2. Select the Import Courses in Pathways (Excel File) link on the left navigation
sidebar. 3. Select Append courses in pathways (the default) or Replace all courses in
pathways. a. Append courses in pathways appends the courses in pathways to your
existing courses in pathways list. i. Unlike the import for courses or for pathways, importing courses
in pathways using the append option does not check for duplicates (e.g., if the student needs to take two different Math courses in one year, you can add the Math course ‘Select an elective’ two times).
ii. Because importing doesn’t check for duplicates, be very careful that you don’t upload the same list twice.
b. Replace all courses in pathways deletes your existing courses in pathways and replaces the courses in pathways list with what you are uploading.
4. Click the Browse or Choose File button to select the Excel courses in pathways spreadsheet you saved on your desktop. (The name of the button depends on your browser.)
5. Check the Trial run checkbox. The trial run lists formatting errors and gives you a preview of the order in which each courses in pathways will display and allow you to make changes to the spreadsheet before importing it.
6. Click the Import File button. 7. Check the Processing Status and Review Table results for any errors or
problems with your spreadsheet. For an explanation of the status codes, click the link to the Status Codes (a PDF file).
8. If there are errors, correct the errors and try the import again.
28 Copyright 2014. intoCAREERS, University of Oregon.
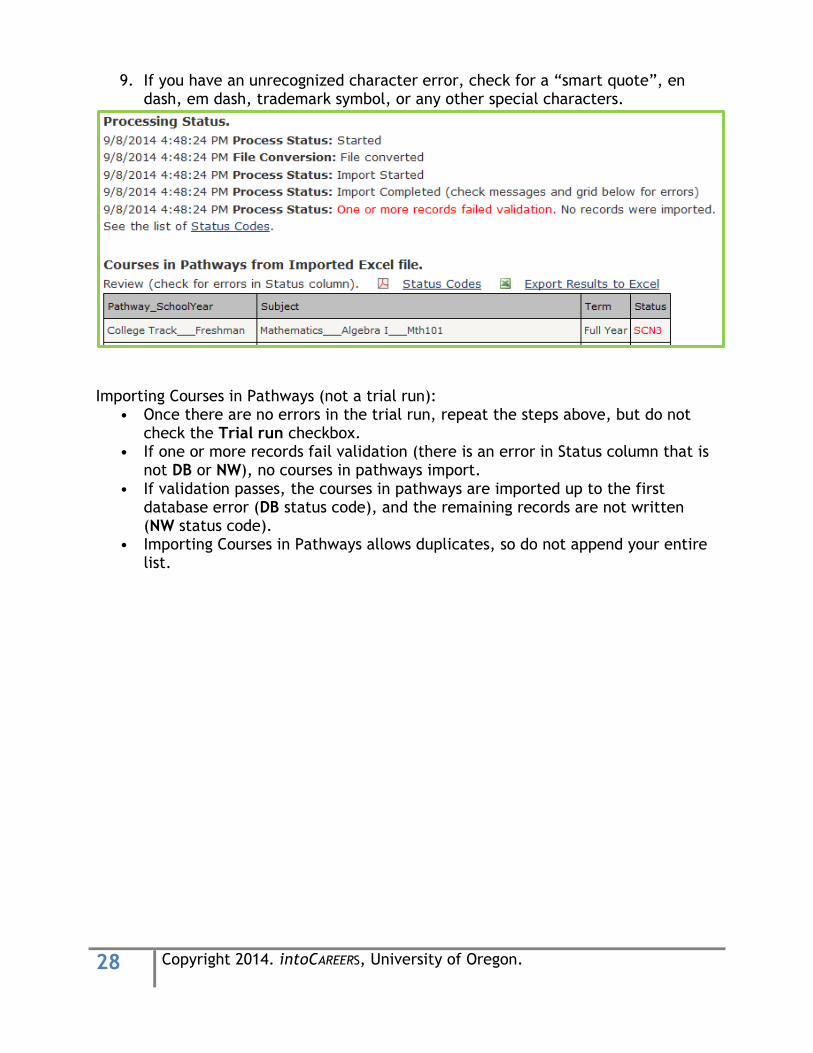
9. If you have an unrecognized character error, check for a “smart quote”, en dash, em dash, trademark symbol, or any other special characters.
Importing Courses in Pathways (not a trial run):
• Once there are no errors in the trial run, repeat the steps above, but do not check the Trial run checkbox.
• If one or more records fail validation (there is an error in Status column that is not DB or NW), no courses in pathways import.
• If validation passes, the courses in pathways are imported up to the first database error (DB status code), and the remaining records are not written (NW status code).
• Importing Courses in Pathways allows duplicates, so do not append your entire list.