CORKSPORT Power Series Axle Back Exhaust
9
PAGE 1 INSTALLATION INSTRUCTIONS CORKSPORT Power Series Axle Back Exhaust 2018+ Mazda 6 2.5T PART #: ATK-6-101-10 Need Help With Your Installation? Call (360) 260-CORK
Transcript of CORKSPORT Power Series Axle Back Exhaust
PAGE 1
I N S T A L L A T I O N I N S T R U C T I O N S
CORKSPORT Power Series Axle Back Exhaust 2018+ Mazda 6 2.5T
PART #: ATK-6-101-10 Need Help With Your Installation? Call (360) 260-CORK

PAGE 2
CORKSPORT Power Series Axle Back Exhaust 2018+ Mazda 6 2.5T
PRODUCT DESCRIPTION: The CorkSport Power Series Axle Back Exhaust for 2018+ Mazda 6 with the 2.5T engine provides a great sound to match the performance of the new Sky-T. Comfortable during daily driving yet noisy enough to have some fun on a backroad, the CS exhaust really is the best of both worlds. This sound comes from 80mm piping and flow-thru resonators that also give a horsepower increase. To finish it off, the exhaust tips have been enlarged & lengthened to compliment the new look of the Mazda 6. Please let us know your feedback of the by submitting a review at: https://corksport.com/2018-mazda-6-2.5l-turbo-axle-back-exhaust.html
PRE-INSTALLATION NOTES:
Verify that the car is on a level surface before proceeding. Use appropriate load rated jack stands to support the vehicle. These instructions were written for reference only and the use of a factory service manual is recommended. How our instructions work: To best cover all of our customers experience levels, we have included a table of contents/order of operations along with step-by-step instructions. Make sure your vehicle is cooled down prior to starting installation. If you are going to work on your car within an hour of having driven it, use a fan to cool off the car.
MATERIALS & TIME: GENERAL INFO:
Time Est: 2hr
Difficulty: 2/5
CEL: No
Warranty: 2-Year
TOOLING LIST: • 14mm Socket • 17mm Socket • 3/8” Drive Ratchet • 6” Extension • 1/2” Drive Ratchet • 17mm Wrench • Flathead Screwdriver • Lubricant Spray • Jack Stands • Floor Jack • Channel Lock Pliers • Bungee Cord
Optional: • Exhaust Hanger Pliers • Push Clip Removal Tool • Blue Painter’s Tape
PARTS LIST: • One (1) CorkSport
Axleback Section for MZ6 2.5T
• One (1) CorkSport Connector Pipe for MZ6 2.5T
• Two (2) 80mm Exhaust Gaskets
• Four (4) M10x1.25x35 Bolts
• Four (4) M10x1.25 Nuts • Four (4) M10 Lock
Washers • Eight (8) M10 Flat
Washers

PAGE 3
ORDER OF OPERATIONS & TABLE OF CONTENTS:
OEM CAT BACK REMOVAL Section 1: Removing the OEM Axle Back Section Pg. 4-6 CORKSPORT CAT BACK INSTALLATION Section 2: Installing the CorkSport Axle Back Pg. 6-7 Section 3: Aligning the Exhaust Tips & Reassembling the Vehicle Pg. 8

PAGE 4
DETAILED INSTRUCTIONS:
1. Removing the OEM Axle Back Section Verify that the car is on a level surface before proceeding. Use appropriate load rated hydraulic jack and jack stands to support the vehicle. a) Engage the parking brake and raise the front of the vehicle with a hydraulic floor jack, then support with jack stands.
Please refer to the owners manual for proper jack stand location. b) Raise the rear of the vehicle with a hydraulic floor jack, then support with jack stands. You will need to access the midpipe & axle back exhaust sections. Shown in Figure 1a.
Figure 1a
OEM Axle Back Section
c) Using a 14mm socket & ratchet, remove the two nuts that connect the OEM axle back section to the OEM midpipe section. Nuts are shown circled in red in Figure 1b.
Figure 1b
PAGE 5
DETAILED INSTRUCTIONS:
1. Removing the OEM Axle Back Section (continued)
Figure 1c
Figure 1d
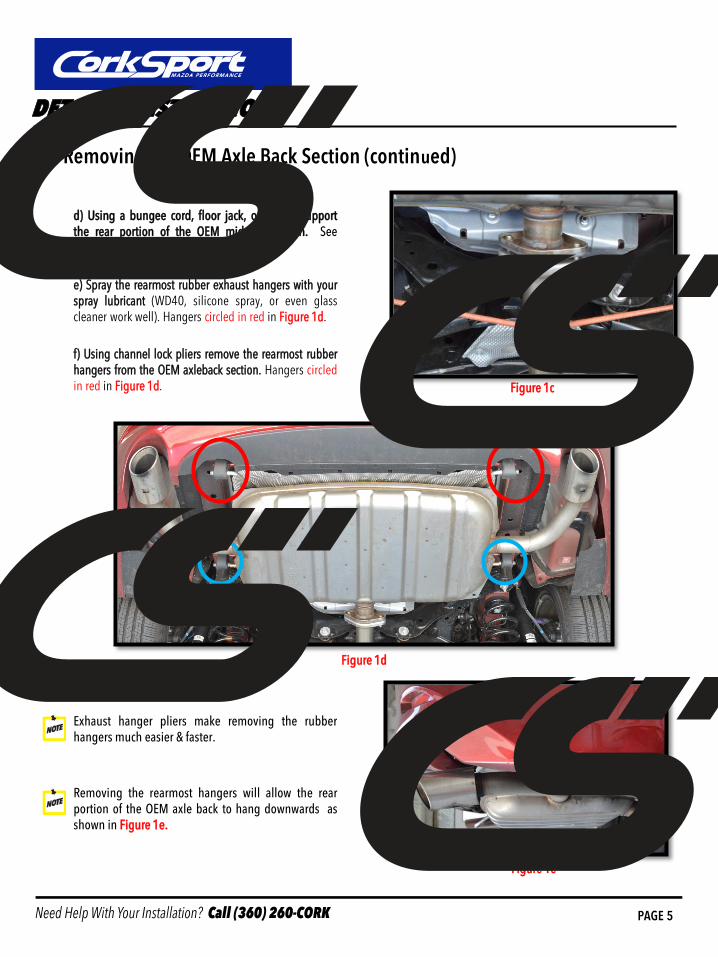
d) Using a bungee cord, floor jack, or friend, support the rear portion of the OEM midpipe section. See Figure 1c for clarity. e) Spray the rearmost rubber exhaust hangers with your spray lubricant (WD40, silicone spray, or even glass cleaner work well). Hangers circled in red in Figure 1d. f) Using channel lock pliers remove the rearmost rubber hangers from the OEM axleback section. Hangers circled in red in Figure 1d. Exhaust hanger pliers make removing the rubber hangers much easier & faster. Removing the rearmost hangers will allow the rear portion of the OEM axle back to hang downwards as shown in Figure 1e.
Figure 1e

PAGE 6
DETAILED INSTRUCTIONS:
1. Removing the OEM Axle Back Section (continued) g) Remove the two remaining rubber hangers from the OEM axle back section. Circled in blue in Figure 1d on the previous page. The underside will look like Figure 1f upon removal. Support the axleback as you remove it from the rubber hangers to keep it from falling to the ground or onto you. The easiest way is to get a friend to help you or use a floor jack.
Figure 1f
Figure 2a
2. Installing the CorkSport Axle Back
Flange with straight section connects to axleback
Figure 2b
Flanges represented by red lines. Gasket represented by blue line.
a) Attach the small CorkSport connecting pipe to the CorkSport axle back using the supplied hardware and a supplied gasket. Ensure the orientation matches what is shown in Figure 2a. Only hand tighten for now. Ensure the flanges are aligned and you use the same hardware setup as shown in Figure 2b on the previous page.
PAGE 7
DETAILED INSTRUCTIONS:
2. Installing the CorkSport Axle Back (continued)
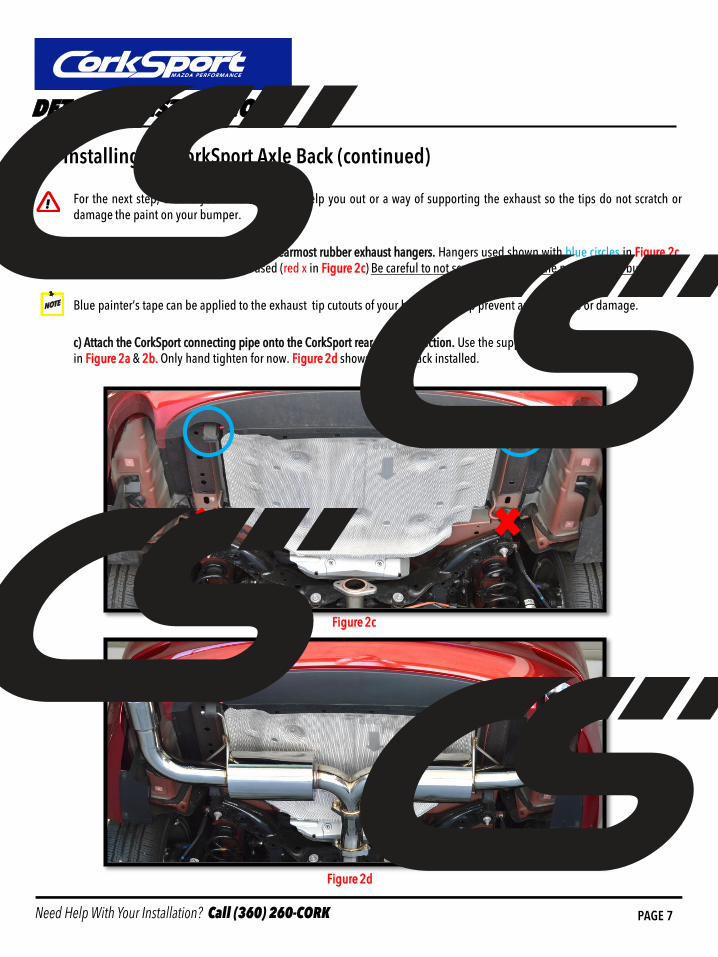
For the next step, ensure you have a friend to help you out or a way of supporting the exhaust so the tips do not scratch or damage the paint on your bumper. b) Install the CorkSport axle back onto the rearmost rubber exhaust hangers. Hangers used shown with blue circles in Figure 2c. The forward axleback hangers are not used (red x in Figure 2c) Be careful to not scratch or damage the paint on your bumper. Blue painter’s tape can be applied to the exhaust tip cutouts of your bumper to help prevent any scratches or damage. c) Attach the CorkSport connecting pipe onto the CorkSport rear midpipe section. Use the supplied hardware & gaskets as shown in Figure 2a & 2b. Only hand tighten for now. Figure 2d shows the axleback installed.
Figure 2c
Figure 2d
PAGE 8
DETAILED INSTRUCTIONS:
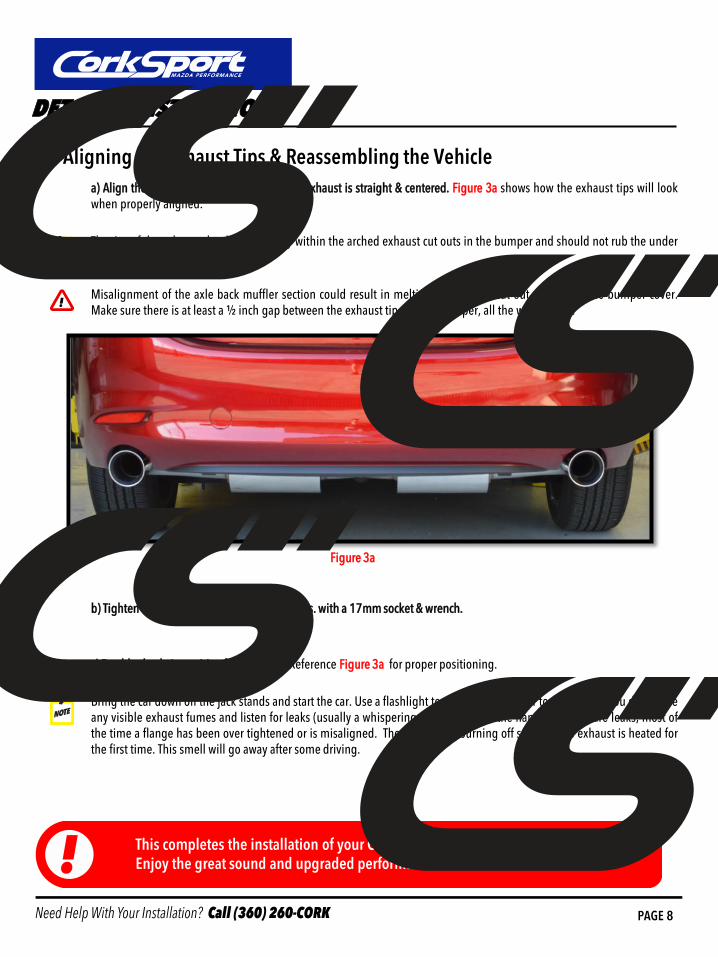
3. Aligning the Exhaust Tips & Reassembling the Vehicle a) Align the exhaust tips and hangers so the exhaust is straight & centered. Figure 3a shows how the exhaust tips will look when properly aligned. The tips of the exhaust should fit perfectly within the arched exhaust cut outs in the bumper and should not rub the under body heat shields or sub frame. Misalignment of the axle back muffler section could result in melting the exhaust cut out sections of the bumper cover. Make sure there is at least a ½ inch gap between the exhaust tip and the bumper, all the way around. b) Tighten all supplied hardware to 35-40 ft-lbs. with a 17mm socket & wrench. c) Double check tip position for clearance. Reference Figure 3a for proper positioning. Bring the car down off the jack stands and start the car. Use a flashlight to check under the car to ensure that you do not see any visible exhaust fumes and listen for leaks (usually a whispering or tick sound at the flange). If there are leaks, most of the time a flange has been over tightened or is misaligned. There may be a burning off smell as the exhaust is heated for the first time. This smell will go away after some driving.
Figure 3a
This completes the installation of your CorkSport Cat Back Exhaust. Enjoy the great sound and upgraded performance!

PAGE 9
WHAT’S NEXT?
CorkSport Short Ram Intake ______________________________________ The CorkSport Mazda6 Power Series Short Ram Intake replaces your restrictive factory airbox with a free-flowing intake system to get more power and sound out of your 2.5L SkyActiv Turbo. Increase efficiency, power, and style under your hood with the CorkSport Short Ram Intake. Each component in the CS intake system was designed for function and fitment to get the best out of your Mazda 6 Turbo. Dynamometer testing showed gains of 8-12WHP and some of the best sound we’ve heard from a short ram intake that installs in as little as 30minutes!
CorkSport License Plate Relocation Kit ______________________________________ Give your 2018+ Mazda 6 a visual boost, improve airflow, and avoid those pesky tickets with the CorkSport License Plate Relocation Kit. By offsetting your factory license plate and moving it to the factory tow hook location on the driver’s side, you are able to keep your plate out of your radiator and intercooler’s air while staying legal and looking good.