Core Services Installation Guide
24
Orbix 3.3 fi Core Services Installation Guide Service Pack 10, March 2009
Transcript of Core Services Installation Guide
Orbix 3.3®
Core Services Installation GuideService Pack 10, March 2009

© 2009 Progress Software Corporation and/or its affiliates or subsidiaries. All rights reserved. These materials and all Progress® software products are copyrighted and all rights are reserved by Progress Software Corporation and/or its affiliates or subsidiaries. The infor-mation in these materials is subject to change without notice, and Progress Software Corporation and/or its affiliates or subsidiaries assume no responsibility for any errors that may appear therein. The references in these materials to specific platforms sup-ported are subject to change.
A (and design), Actional, Actional (and design), Allegrix, Allegrix (and design), Apama, Apama (and Design), Artix, Business Empowerment, DataDirect (and design), DataDirect Connect, DataDirect Connect64, DataDirect Technologies, DataDirect XML Converters, DataDirect XQuery, DataXtend, Dynamic Routing Architecture, EasyAsk, EdgeXtend, Empowerment Center, Fathom, IntelliStream, IONA, IONA (and design), Mindreef, Neon, Neon New Era of Networks, O (and design), ObjectStore, OpenEdge, Orbix, PeerDirect, Persistence, POSSENET, Powered by Progress, PowerTier, Progress, Progress DataXtend, Progress Dynamics, Progress Business Empowerment, Progress Empowerment Center, Progress Empowerment Program, Progress OpenEdge, Progress Profiles, Progress Results, Progress Software Developers Network, Progress Sonic, ProVision, PS Select, SequeLink, Shadow, ShadowDirect, Shadow Interface, Shadow Web Interface, SOAPscope, SOAPStation, Sonic, Sonic ESB, SonicMQ, Sonic Orchestration Server, Sonic Software (and design), SonicSynergy, SpeedScript, Stylus Studio, Technical Empowerment, WebSpeed, Xcalia (and design), and Your Software, Our Technology-Experience the Connection are registered trademarks of Progress Software Corporation or one of its affiliates or subsidiaries in the U.S. and/or other countries. AccelEvent, Apama Dashboard Studio, Apama Event Manager, Apama Event Modeler, Apama Event Store, Apama Risk Firewall, AppsAlive, AppServer, ASPen, ASP-in-a-Box, BusinessEdge, Cache-Forward, DataDirect Spy, DataDirect SupportLink, FUSE, FUSE Mediation Router, FUSE Message Broker, FUSE Services Framework, Future Proof, Ghost Agents, GVAC, High Performance Integration, Looking Glass, ObjectCache, ObjectStore Inspector, ObjectStore Performance Expert, OpenAccess, Pantero, POSSE, ProDataSet, Progress ESP Event Manager, Progress ESP Event Modeler, Progress Event Engine, Progress RFID, PSE Pro, SectorAlliance, SeeThinkAct, SmartBrowser, SmartComponent, SmartDataBrowser, SmartDataObjects, SmartDataView, SmartDialog, SmartFolder, SmartFrame, SmartObjects, SmartPanel, SmartQuery, SmartViewer, SmartWindow, Sonic Business Integration Suite, Sonic Process Manager, Sonic Collaboration Server, Sonic Continuous Availability Architecture, Sonic Database Service, Sonic Workbench, Sonic XML Server, StormGlass, The Brains Behind BAM, WebClient, Who Makes Progress, and Your World. Your SOA. are trademarks or service marks of Progress Software Corporation or one of its affiliates or subsidiaries in the U.S. and other countries. Java and all Java-based marks are trademarks or registered trademarks of Sun Microsystems, Inc. in the U.S. and other countries. Any other trademarks contained herein are the property of their respective owners.
Updated: November 12, 2009
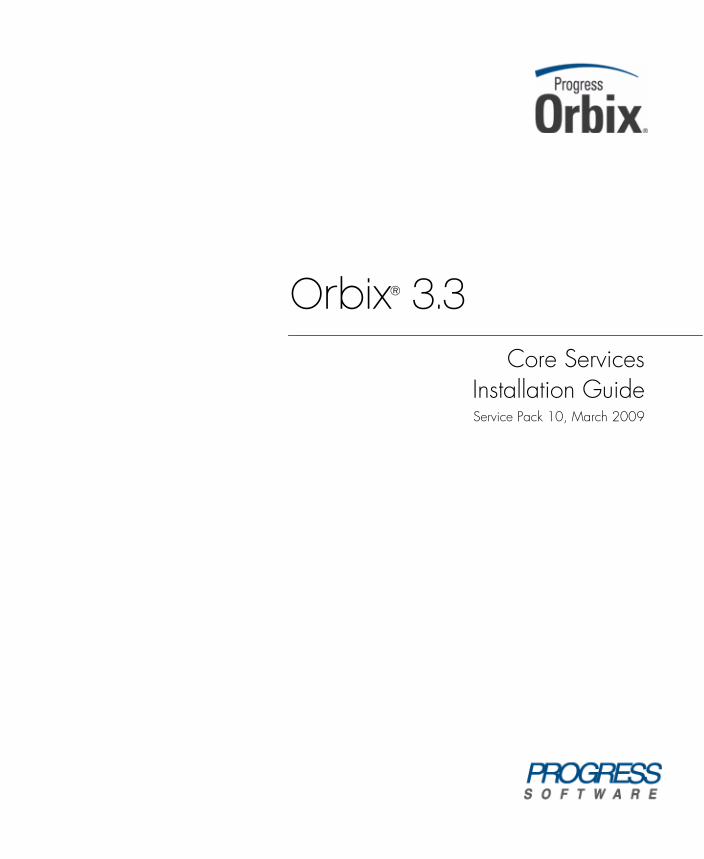
Contents
Chapter 1 Installing Orbix 3.3 SP 10 Core Services 1Introduction 2Prerequisites to Installing Orbix 3.3 SP 10 5Installing Orbix 3.3 SP 10 without the GUI 12Installing Orbix 3.3 SP 10 with the GUI 13Verifying your Installation 15Uninstalling Orbix 3.3 SP 10 Core Services 18Further Information 19
iii

CONTENTS
iv
CHAPTER 1
Installing Orbix 3.3 SP 10 Core ServicesThis document provides instructions for installing Orbix 3.3 SP 10 Core Services on Microsoft Windows, Red Hat Enterprise Linux, Sun Solaris, IBM AIX, and HP-UX. For details of installing Orbix 3.3 SP 10 on other platforms, see the Orbix 3.3 SP 10 Installation Guide.
In this document This chapter discusses the following topics:
Introduction page 2
Prerequisites to Installing Orbix 3.3 SP 10 page 5
Installing Orbix 3.3 SP 10 without the GUI page 12
Installing Orbix 3.3 SP 10 with the GUI page 13
Verifying your Installation page 15
Uninstalling Orbix 3.3 SP 10 Core Services page 18
Further Information page 19
1
CHAPTER 1 | Installing Orbix 3.3 SP 10 Core Services
Introduction
Introduction Orbix 3.3 SP 10 Core Services includes Orbix Java Edition, Orbix C++ Edition, and OrbixNames. Orbix 3.3 SP 10 Core Services is available on the following platforms:
� Windows XP
� Windows 2003 Server
� Windows Vista
� Windows 2008 Server
� Red Hat Enterprise Linux 4
� Solaris 9
� Solaris 10
� AIX 5.3
� AIX 6.1
� HP-UX Itanium
Product components Orbix 3.3 SP 10 Core Services is comprised of the following:
� Development platform for Java
� Development platform for C++
� OrbixNames
The full Orbix product includes additional components such as OrbixOTS, Orbix WonderWall, Orbix COMet, Orbix Code Generation Toolkit, and OrbixEvents. For more details, see the Orbix 3.3 SP 10 Release Notes.
Note: For details of installing Orbix 3.3 SP 10 on other platforms, see the Orbix 3.3 SP 10 Installation Guide.
2
Introduction
JRE requirements The Orbix 3.3 SP 10 installation was built with InstallAnywhere, which is a Java application. The installer requires a JRE (Java Runtime Environment). You should provide the JRE yourself (see �Installation prerequisites� on page 5), or use a pre-installed JRE or JDK before launching the installer.
Installation steps To install Orbix 3.3 SP 10, perform the following steps:
� Determine your installation type.
� Check the prerequisites for installing Orbix 3.3 SP 10.
� Install Orbix 3.3 SP 10 on your host machine.
� Verify your installation.
Before you begin your installation Before installing Orbix 3.3 SP 10, it is recommended that you read the Orbix 3.3 SP 10 Release Notes.
Orbix 3.3 SP 10 license codes You must have a valid license code to install Orbix 3.3 SP 10 Java Edition, Orbix 3.3 SP 10 C++ Edition, and OrbixNames. The code is a long numeric string taking the general form:
00000000-11111111-22222222-33333333-44444444
Your license code should be included in a loose sheet in your Orbix 3.3 SP 10 pack. Otherwise, as Orbix 3.3 SP 10 is a service pack release of Orbix 3.3, the license codes provided for Orbix 3.3 are valid for Orbix 3.3 SP 10. If you do not have any license codes, please contact Support before proceeding any further.
Note: Orbix 3.3 SP 10 cannot be installed on machines that do not support 256 (8 bit) colors. This is because the Orbix installer is built on the Java platform, which does not support 16 colors.
Note: When installing Orbix 3.3 SP 10 using PCAnywhere (over a remote client), the display resolution must be of type VGA (640 x 480).
3
CHAPTER 1 | Installing Orbix 3.3 SP 10 Core Services
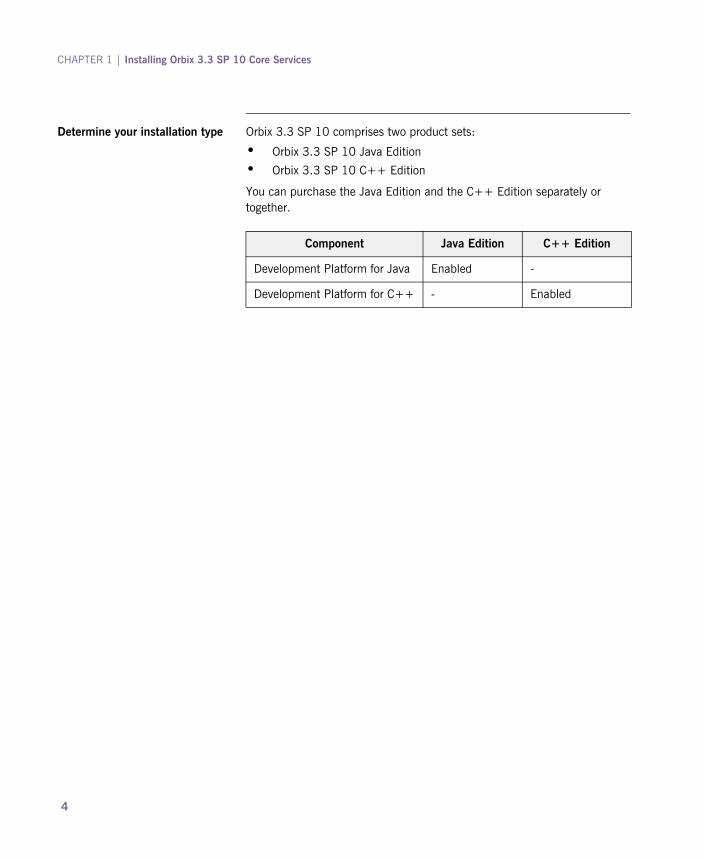
Determine your installation type Orbix 3.3 SP 10 comprises two product sets:
� Orbix 3.3 SP 10 Java Edition
� Orbix 3.3 SP 10 C++ Edition
You can purchase the Java Edition and the C++ Edition separately or together.
Component Java Edition C++ Edition
Development Platform for Java Enabled -
Development Platform for C++ - Enabled
4
Prerequisites to Installing Orbix 3.3 SP 10
Prerequisites to Installing Orbix 3.3 SP 10
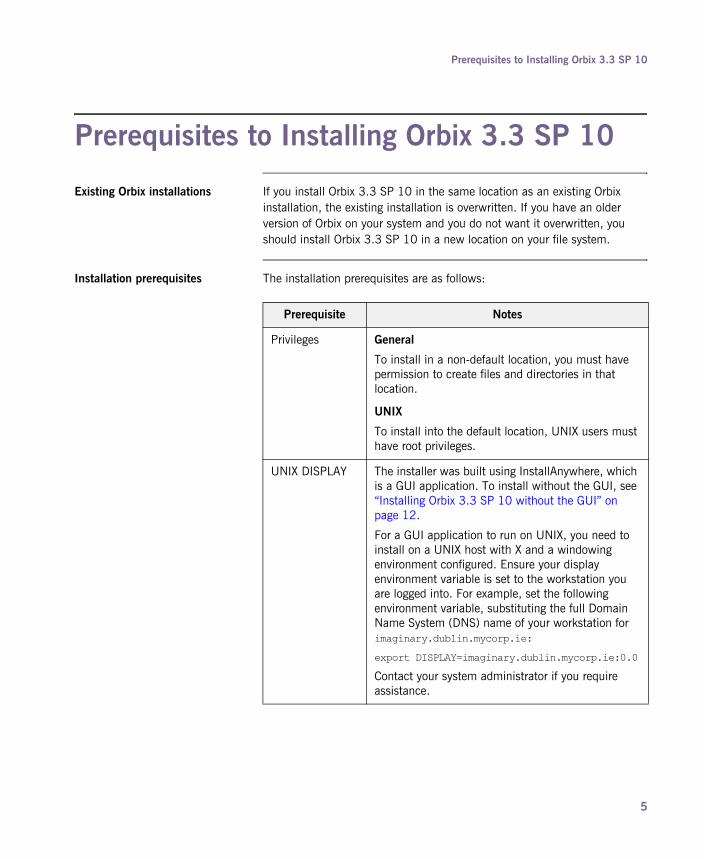
Existing Orbix installations If you install Orbix 3.3 SP 10 in the same location as an existing Orbix installation, the existing installation is overwritten. If you have an older version of Orbix on your system and you do not want it overwritten, you should install Orbix 3.3 SP 10 in a new location on your file system.
Installation prerequisites The installation prerequisites are as follows:
Prerequisite Notes
Privileges General
To install in a non-default location, you must have permission to create files and directories in that location.
UNIX
To install into the default location, UNIX users must have root privileges.
UNIX DISPLAY The installer was built using InstallAnywhere, which is a GUI application. To install without the GUI, see �Installing Orbix 3.3 SP 10 without the GUI� on page 12.
For a GUI application to run on UNIX, you need to install on a UNIX host with X and a windowing environment configured. Ensure your display environment variable is set to the workstation you are logged into. For example, set the following environment variable, substituting the full Domain Name System (DNS) name of your workstation for imaginary.dublin.mycorp.ie:
export DISPLAY=imaginary.dublin.mycorp.ie:0.0
Contact your system administrator if you require assistance.
5

CHAPTER 1 | Installing Orbix 3.3 SP 10 Core Services
CD-ROM location of installers The Orbix 3.3 Core services SP 10 installers on the CD-ROM are located in a specific directory for each platform. Browse the CD-ROM to find the installer for your platform. For example, the installer for Red Hat Enterprise Linux 4 is located in the following directory:
/cdrom/RHLINUX4/install.bin
Mounting the CD-ROM The following example commands can be used to mount the CD-ROM:
JRE The installer was built using InstallAnywhere, which is a Java application, and requires a JRE (Java Runtime Environment). You must provide the location of the JRE for the installation to run.
You need access on all platforms to an existing JRE (or JDK) version 1.5.0 or higher. Alternatively, you should obtain and install the JRE yourself on your system before running the installer. When installing a JRE, install all required patches on all platforms.
Domain name The installer requires your domain name for Orbix 3.3 SP 10 configuration. The Domain Name System (DNS) to resolve Internet or UNIX computer names. Contact your network administrator to obtain the domain name for your TCP/IP internet prior to installing Orbix 3.3 SP 10.
Prerequisite Notes
Platform Command
Windows No command required
Linux mount -t iso9660 /dev/cdrom /cdrom
Solaris mount -r -F hsfs /dev/c0t0d0s2 /cdrom
AIX mount -o ro -v cdrfs /dev/cd0 /cdrom
HP-UX mount -t cdfs -o cdcase /dev/dsk/c3t2d0 /cdrom
6

Prerequisites to Installing Orbix 3.3 SP 10
The commands used to mount the CD-ROM will vary depending on your system configuration. For example, /cdrom might need to be replaced with a different mount point. Contact your system administrator if you require assistance.
In addition, you can simplify this process using tools such as vold on Solaris and Linux, or smitty on AIX.
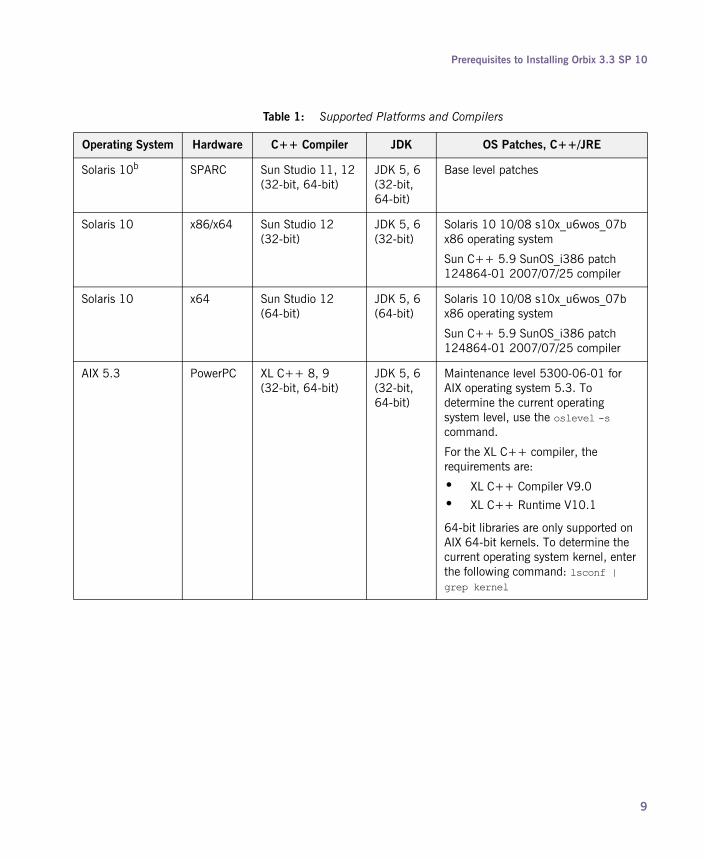
Operating systems and compilers Table 1 shows the operating systems and compilers supported by Orbix 3.3 SP 10 at the time of this release. Please refer to the following web page for any changes to this list after the release:
http://web.progress.com/orbix/supported_platforms.html
Table 1: Supported Platforms and Compilers
Operating System Hardware C++ Compiler JDK OS Patches, C++/JRE
Windows XP x86/x64 Visual Studio 2003, 2005 (32-bit)
JDK 5, 6 (32-bit)
Windows XP SP2
Windows 2003 Server Standard Edition
x86/x64 Visual Studio 2003, 2005 (32-bit)
JDK 5, 6 (32-bit)
Windows 2003 Server Standard Edition SP1
Windows 2003 Server Enterprise x64 Edition
x64 Visual Studio 2005 (64-bit)
JDK 5, 6 (64-bit)
Windows 2003 Server Enterprise x64 Edition SP1
Windows Vista x86/x64 Visual Studio 2005 (32-bit)
JDK 6 (32-bit)
Windows Vista Ultimate x64 Edition
x64 Visual Studio 2005 (64-bit)
JDK 5, 6 (64-bit)
Windows 2008 Server
x86/x64 Visual Studio 2005 (32-bit)
JDK 6 (32-bit)
Windows 2008 Server SP1
Windows 2008 Server x64 Edition
x64 Visual Studio 2005 (64-bit)
JDK 6 (64-bit)
Windows 2008 Server x64 Edition SP1
7

CHAPTER 1 | Installing Orbix 3.3 SP 10 Core Services
Red Hat Linux ES 4.0
x86/x64 GCC 3.4.x (32-bit)
JDK 5, 6 (32-bit, 64-bit)
Linux patches can be displayed using the following commands:
Linux kernel:
Command: rpm -q kernelRequired version: kernel-2.6.9-42.0.10.EL
GCC 3.4.6 runtime and development environment:
Command: rpm -q gccRequired version: gcc-3.4.6-3.1
Command: rpm -q gcc-c++Required version: gcc-c++-3.4.6-3.1
Command: rpm -q libstdc++Required version: libstdc++-3.4.6-3.1
Command: rpm -q libgccRequired version: libgcc-3.4.6-3.1
Command: rpm -q binutilsRequired version: binutils-2.15.92.0.2-21
Note: Update to the latest packages using the Red Hat Update Agent by typing the command up2date from a shell prompt.
Solaris 9a SPARC Sun Studio 8 (32-bit, 64-bit)
JDK 5, 6 (32-bit)
112963-03: SunOS 5.9: linker patch111711-01: 32-bit Shared library patch for C++111712-01: 64-bit Shared library patch for C++112661-02: SunOS 5.9: IIIM and X Input & Output Method patch112785-09: X11 6.6.1: Xsun patch
Table 1: Supported Platforms and Compilers
Operating System Hardware C++ Compiler JDK OS Patches, C++/JRE
8
Prerequisites to Installing Orbix 3.3 SP 10
Solaris 10b SPARC Sun Studio 11, 12 (32-bit, 64-bit)
JDK 5, 6 (32-bit, 64-bit)
Base level patches
Solaris 10 x86/x64 Sun Studio 12 (32-bit)
JDK 5, 6 (32-bit)
Solaris 10 10/08 s10x_u6wos_07b x86 operating system
Sun C++ 5.9 SunOS_i386 patch 124864-01 2007/07/25 compiler
Solaris 10 x64 Sun Studio 12 (64-bit)
JDK 5, 6 (64-bit)
Solaris 10 10/08 s10x_u6wos_07b x86 operating system
Sun C++ 5.9 SunOS_i386 patch 124864-01 2007/07/25 compiler
AIX 5.3 PowerPC XL C++ 8, 9 (32-bit, 64-bit)
JDK 5, 6 (32-bit, 64-bit)
Maintenance level 5300-06-01 for AIX operating system 5.3. To determine the current operating system level, use the oslevel -s command.
For the XL C++ compiler, the requirements are:
� XL C++ Compiler V9.0
� XL C++ Runtime V10.1
64-bit libraries are only supported on AIX 64-bit kernels. To determine the current operating system kernel, enter the following command: lsconf | grep kernel
Table 1: Supported Platforms and Compilers
Operating System Hardware C++ Compiler JDK OS Patches, C++/JRE
9

CHAPTER 1 | Installing Orbix 3.3 SP 10 Core Services
It is recommended that you install all the patches listed in this section to avoid any potential issues. Please consult specific vendor websites for more information on patches.
AIX 6.1 PowerPC XL C++ 9 (32-bit, 64-bit)
JDK 5, 6 (32-bit, 64-bit)
Maintenance level 6100-02-01-0847 for AIX operating system 6.1. To determine the current operating system level, use the oslevel -s command.
For the XL C++ compiler, the requirements are:
� XL C++ Compiler V9.0
� XL C++ Runtime V10.1
January 2009 PTF for XL C/C++ Enterprise Edition for AIX, V9.0
64-bit libraries are only supported on AIX 64-bit kernels. To determine the current operating system kernel, enter the following command: lsconf | grep kernel
HPUX 11.23 (IA-64)
Itanium 2 aCC 6.1x (64-bit)
JDK 5, 6 (64-bit)
All recommended operating system patches up to March 2004.
PHSS_29659 aC++ runtime (A.05.55)
Patches can be displayed by using the following commands:
swlist -l product '*ava*'swlist -l product 'PH??_*'swlist | grep PHswlist | grep XS
a. Solaris 9 support with Sun Studio 8 (32-bit) is also available with the Orbix full product. 64-bit libraries are onlyavailable with the Orbix Core Services product.
b. Solaris 10 support with Sun Studio 11 (32-bit) is also available with the full Orbix product. 64-bit libraries are onlyavailable with the Orbix Core Services product.
Table 1: Supported Platforms and Compilers
Operating System Hardware C++ Compiler JDK OS Patches, C++/JRE
10
Prerequisites to Installing Orbix 3.3 SP 10
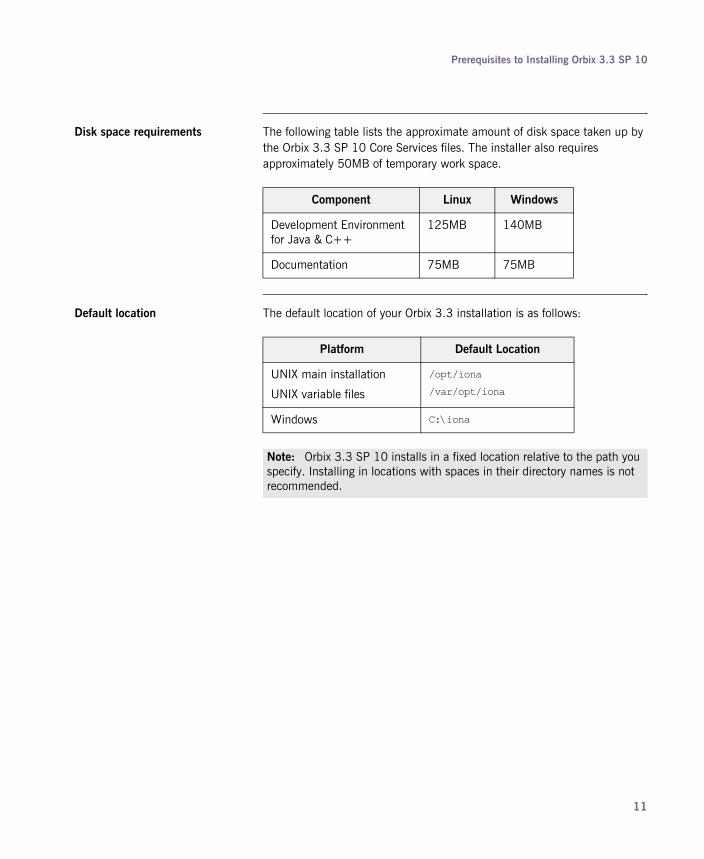
Disk space requirements The following table lists the approximate amount of disk space taken up by the Orbix 3.3 SP 10 Core Services files. The installer also requires approximately 50MB of temporary work space.
Default location The default location of your Orbix 3.3 installation is as follows:
Component Linux Windows
Development Environment for Java & C++
125MB 140MB
Documentation 75MB 75MB
Platform Default Location
UNIX main installation
UNIX variable files
/opt/iona
/var/opt/iona
Windows C:\iona
Note: Orbix 3.3 SP 10 installs in a fixed location relative to the path you specify. Installing in locations with spaces in their directory names is not recommended.
11

CHAPTER 1 | Installing Orbix 3.3 SP 10 Core Services
Installing Orbix 3.3 SP 10 without the GUI
Overview Installing Orbix 3.3 SP 10 in silent install mode allows you to run the installer without using the GUI. The silent mode installer looks to a template file that provides the required information.
For more detailed information, see the following Knowledge Base article (4087.633):
Silent Mode of Installation for Orbix and SSL Installers Version 3.3.3 and Above
Installing in silent mode To install in silent mode, specify the following:
$ ./install.bin -f /path/to/template.file
Where template.file includes the following information.
##Specimen properties with operating system licence codes.##--------------------------------------------------------------------##C++ and Java##--------------------------------------------------------------------##Specify the directory where you want Orbix 3.3 SP 10 installedUSER_INSTALL_DIR=/local/install/dir##Specify the location of your Java Developemnt KitJAVA_LOCATION=/local/java/install/dirJAVA_VERSION=1.5INSTALLER_UI=SILENT##Specify the components of Orbix you want to installPRODUCTS="Orbix 3.3 - Java Edition and C++ Edition"## Specify your licence key: c++ and javaLICENCE_KEY_1=<Licence Key1>LICENCE_KEY_2=<Licence Key2>##Specify the domain for the installationDOMAIN=emea.progress.com##--------------------------------------------------------------------
12

Installing Orbix 3.3 SP 10 with the GUI
Installing Orbix 3.3 SP 10 with the GUI
Overview This section describes how to install Orbix 3.3. SP 10 using the GUI installer, which is based on InstallAnywhere.
Installation steps To install Orbix 3.3. SP 10 using the GUI, perform the following steps:
1. In the Select Product screen, select the Orbix 3.3 SP 10 product set that you have purchased (for example, Orbix 3.3 Java Edition). Click Next to continue.
2. In the License Information screen, enter the license code(s) that you have purchased in the appropriate text field(s). Click Next to continue. The license keys requested here depend on the product set you selected in the previous screen.
3. In the License Agreement screen, click Yes to agree to the terms of the License Agreement, and click Next to continue.
4. In the Choose Orbix Installation Folder screen, enter the file location that you wish to install Orbix 3.3 SP 10 into (for example, C:\iona). Click Next to continue.
5. In the Domain Information screen, enter your domain name, and click Next to continue.
6. In the JDK Configuration screen, enter the location of your Java Development Kit. This is not required for Orbix 3.3 SP 10 C++ Edition. Click Install to continue.
7. A progress bar is displayed while the files are installed.
8. After the installation is complete, the Orbix welcome page launches automatically.
Note: You must have permission to create files and directories in this location.
13
CHAPTER 1 | Installing Orbix 3.3 SP 10 Core Services
9. In the Reboot Computer screen, choose whether to restart your computer now or later.
10. The Install Complete screen is displayed to confirm that the installation is finished. Click Done to finish the installation.
14
Verifying your Installation
Verifying your Installation
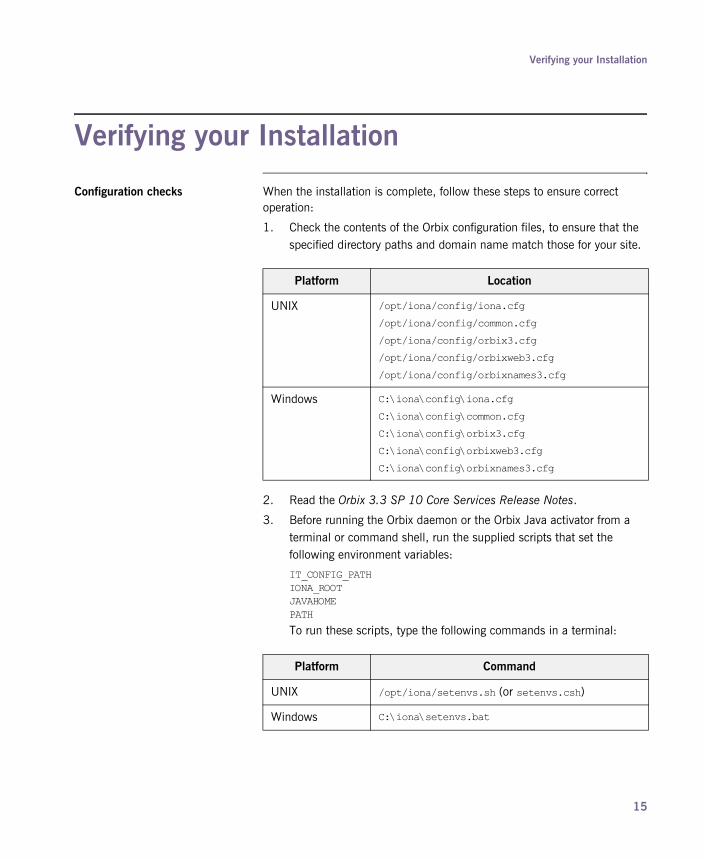
Configuration checks When the installation is complete, follow these steps to ensure correct operation:
1. Check the contents of the Orbix configuration files, to ensure that the specified directory paths and domain name match those for your site.
2. Read the Orbix 3.3 SP 10 Core Services Release Notes.
3. Before running the Orbix daemon or the Orbix Java activator from a terminal or command shell, run the supplied scripts that set the following environment variables:
IT_CONFIG_PATHIONA_ROOT JAVAHOMEPATH
To run these scripts, type the following commands in a terminal:
Platform Location
UNIX /opt/iona/config/iona.cfg
/opt/iona/config/common.cfg
/opt/iona/config/orbix3.cfg
/opt/iona/config/orbixweb3.cfg
/opt/iona/config/orbixnames3.cfg
Windows C:\iona\config\iona.cfg
C:\iona\config\common.cfg
C:\iona\config\orbix3.cfg
C:\iona\config\orbixweb3.cfg
C:\iona\config\orbixnames3.cfg
Platform Command
UNIX /opt/iona/setenvs.sh (or setenvs.csh)
Windows C:\iona\setenvs.bat
15
CHAPTER 1 | Installing Orbix 3.3 SP 10 Core Services
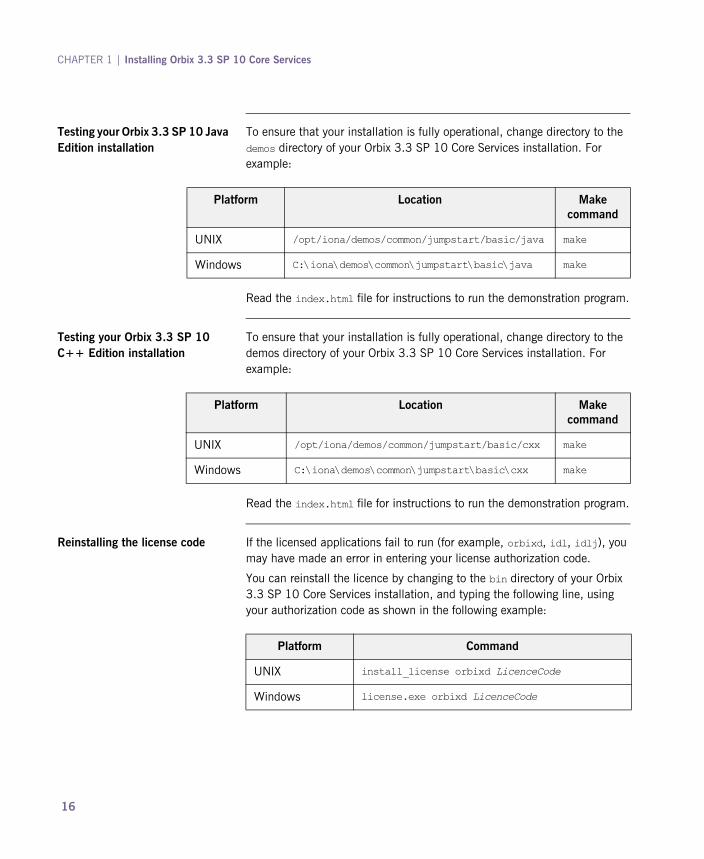
Testing your Orbix 3.3 SP 10 Java Edition installation
To ensure that your installation is fully operational, change directory to the demos directory of your Orbix 3.3 SP 10 Core Services installation. For example:
Read the index.html file for instructions to run the demonstration program.
Testing your Orbix 3.3 SP 10 C++ Edition installation
To ensure that your installation is fully operational, change directory to the demos directory of your Orbix 3.3 SP 10 Core Services installation. For example:
Read the index.html file for instructions to run the demonstration program.
Reinstalling the license code If the licensed applications fail to run (for example, orbixd, idl, idlj), you may have made an error in entering your license authorization code.
You can reinstall the licence by changing to the bin directory of your Orbix 3.3 SP 10 Core Services installation, and typing the following line, using your authorization code as shown in the following example:
Platform Location Make command
UNIX /opt/iona/demos/common/jumpstart/basic/java make
Windows C:\iona\demos\common\jumpstart\basic\java make
Platform Location Make command
UNIX /opt/iona/demos/common/jumpstart/basic/cxx make
Windows C:\iona\demos\common\jumpstart\basic\cxx make
Platform Command
UNIX install_license orbixd LicenceCode
Windows license.exe orbixd LicenceCode
16

Verifying your Installation
You should replace orbixd with the filename of the application that fails to run, and replace LicenceCode with your licence authorization code.
The following Orbix 3.3 SP 10 application files are enabled by the corresponding product license authorization codes:
Structure of installed directories A complete installation of Orbix 3.3 SP 10 Core Services has the following directory structure in the installation location:
Application Java Edition code C++ Edition code
orbixd - Orbix C++ Daemon
Code enables Code enables
idl - Orbix C++ IDL compiler
- Code enables
idlj - Orbix Java IDL compiler
Code enables -
Directory Description
\bin Binary images for all components
\config Repositories and configuration files for all components
\contrib Utilities contributed by Orbix engineers and partners
\demos Demonstrations for all components
\docs Links to the latest information on Orbix 3.3 SP 10
\idl IDL files
\include Header files
\lib Development libraries
\tools GUI tools
\UninstallOrbix Files for uninstalling Orbix 3.3 SP 10
17

CHAPTER 1 | Installing Orbix 3.3 SP 10 Core Services
Uninstalling Orbix 3.3 SP 10 Core Services
Uninstalling Orbix To uninstall Orbix 3.3 SP 10 Core Services, run the UninstallOrbix file in the UninstallOrbix directory of your Orbix installation. Examples are as follows:
Platform Uninstall script
UNIX /opt/iona/UninstallOrbix/UninstallOrbix
Windows C:\iona\UninstallOrbix\UninstallOrbix
Note: The uninstaller removes the complete installation of Orbix 3.3 SP 10 Core Services, but does not remove any files added or generated after installation (for example, log files, executables generated in demo runs, implementation repositories, and so on).
18
Further Information
Further Information
Technical support If you require further technical assistance with using this product, please see the following web page:
http://www.progress.com/support_main/index.ssp
19
CHAPTER 1 | Installing Orbix 3.3 SP 10 Core Services
20