Copyright © Glencoe/McGraw-Hill Carpentry & Building Construction Installing Electrical Switches...
22
Copyright © Glencoe/McGraw-Hill Carpentry & Building Construction Installing Electrical Switches and Receptacles Installing Electrical Switches and Receptacles
-
Upload
rafe-wilson -
Category
Documents
-
view
220 -
download
0
Transcript of Copyright © Glencoe/McGraw-Hill Carpentry & Building Construction Installing Electrical Switches...
Copyright © Glencoe/McGraw-HillCarpentry & Building ConstructionInstalling Electrical Switches and Receptacles
Installing Electrical Switches and Receptacles
Copyright © Glencoe/McGraw-HillCarpentry & Building ConstructionInstalling Electrical Switches and Receptacles
The viewer is expressly advised to consider and use all safety precautions described in this presentation or that might also be indicated by undertaking the activities described herein. In addition, common sense should be exercised to help avoid all potential hazards.
Publisher assumes no responsibility for the activities of the viewer or for the subject matter experts who prepared this presentation. Publisher makes no representation or warranties of any kind, including but not limited to, the warranties of fitness for particular purpose or merchantability, nor for any implied warranties related thereto, or otherwise. Publisher will not be liable for damages of any type, including any consequential, special or exemplary damages resulting, in whole or in part, from viewer's use or reliance upon the information, instructions, warnings or other matter contained in this presentation.
Safety Notice
Copyright © Glencoe/McGraw-HillCarpentry & Building ConstructionInstalling Electrical Switches and Receptacles
Installing Electrical Switches and Receptacles
Observe safety rules.Make sure tools and equipment are
available. Check materials.Follow the steps described here.
Copyright © Glencoe/McGraw-HillCarpentry & Building ConstructionInstalling Electrical Switches and Receptacles
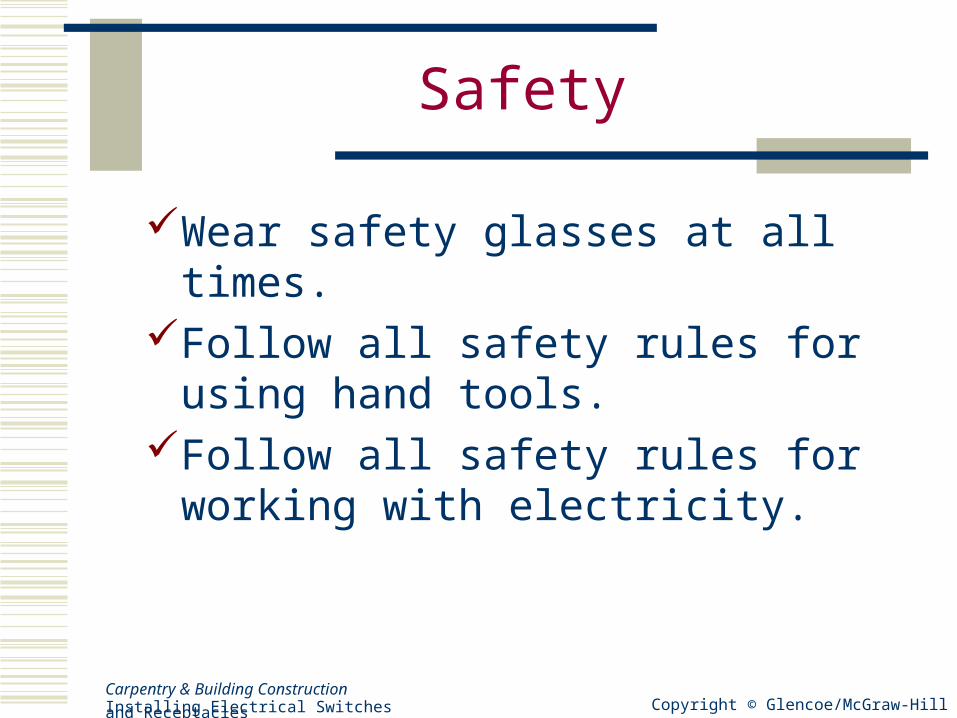
Safety
Wear safety glasses at all times.Follow all safety rules for using
hand tools.Follow all safety rules for working
with electricity.

Copyright © Glencoe/McGraw-HillCarpentry & Building ConstructionInstalling Electrical Switches and Receptacles
Tools and Equipment
Screwdriver Linesperson’s
pliers Needlenose pliers Multipurpose
electrician’s pliers
Cable ripper Wire stripper Circuit tester Utility knife
Copyright © Glencoe/McGraw-HillCarpentry & Building ConstructionInstalling Electrical Switches and Receptacles
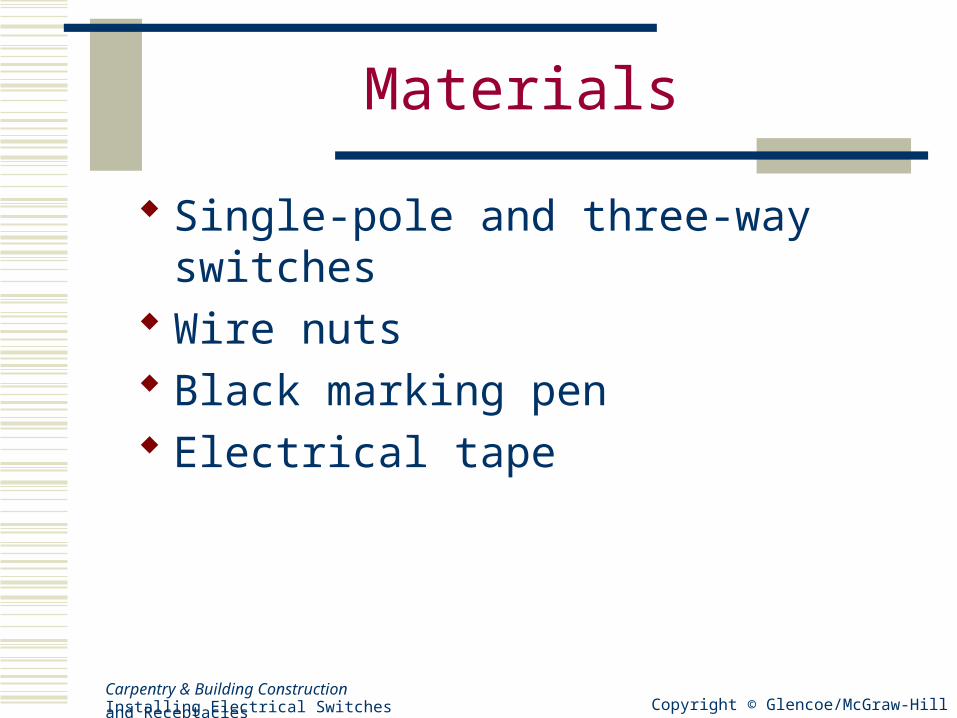
Materials
Single-pole and three-way switches Wire nuts Black marking pen Electrical tape
Copyright © Glencoe/McGraw-HillCarpentry & Building ConstructionInstalling Electrical Switches and Receptacles
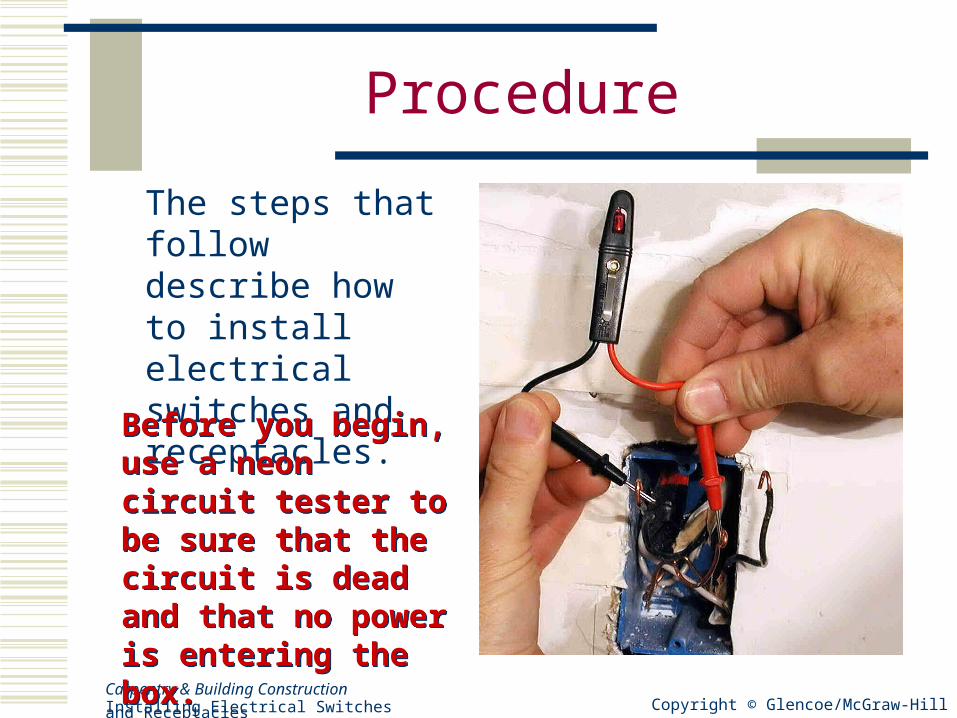
Procedure
The steps that follow describe how to install electrical switches and receptacles.
Before you begin, use a neon circuit tester to be sure that the circuit is dead and that no power is entering the box.
Before you begin, use a neon circuit tester to be sure that the circuit is dead and that no power is entering the box.
Copyright © Glencoe/McGraw-HillCarpentry & Building ConstructionInstalling Electrical Switches and Receptacles
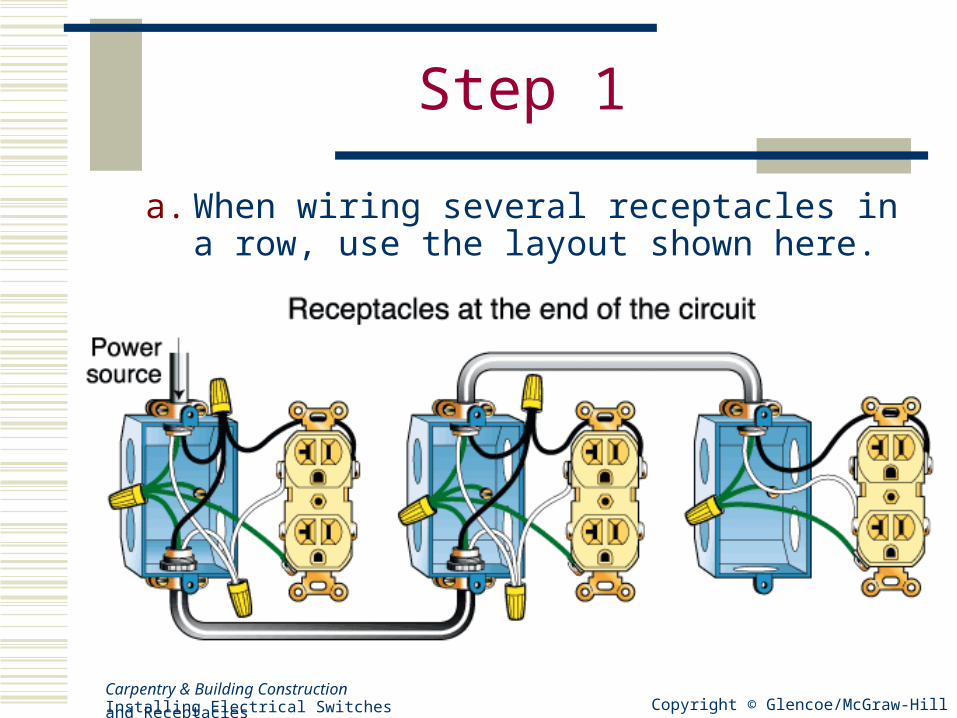
Step 1
a. When wiring several receptacles in a row, use the layout shown here.
Copyright © Glencoe/McGraw-HillCarpentry & Building ConstructionInstalling Electrical Switches and Receptacles
Step 1
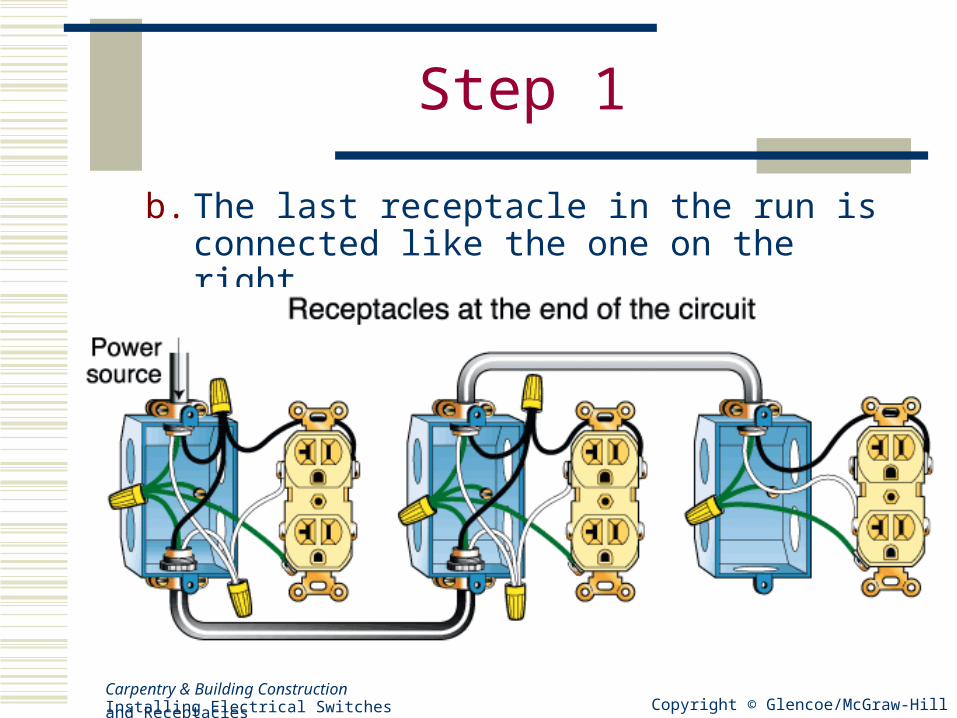
b. The last receptacle in the run is connected like the one on the right.
Copyright © Glencoe/McGraw-HillCarpentry & Building ConstructionInstalling Electrical Switches and Receptacles
Step 1
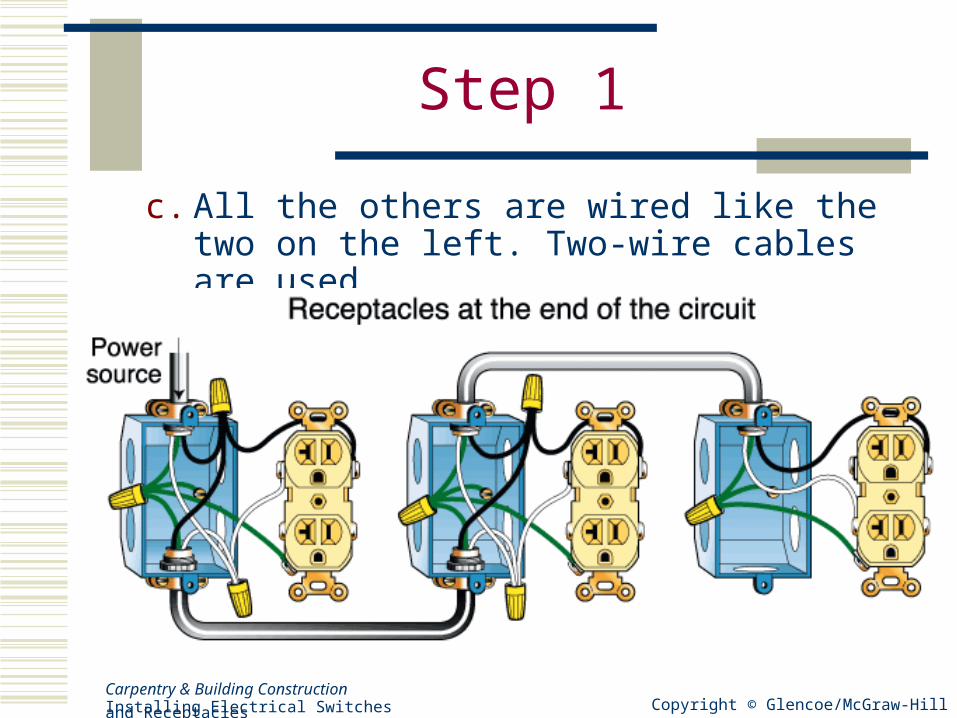
c. All the others are wired like the two on the left. Two-wire cables are used.
Copyright © Glencoe/McGraw-HillCarpentry & Building ConstructionInstalling Electrical Switches and Receptacles
Step 2
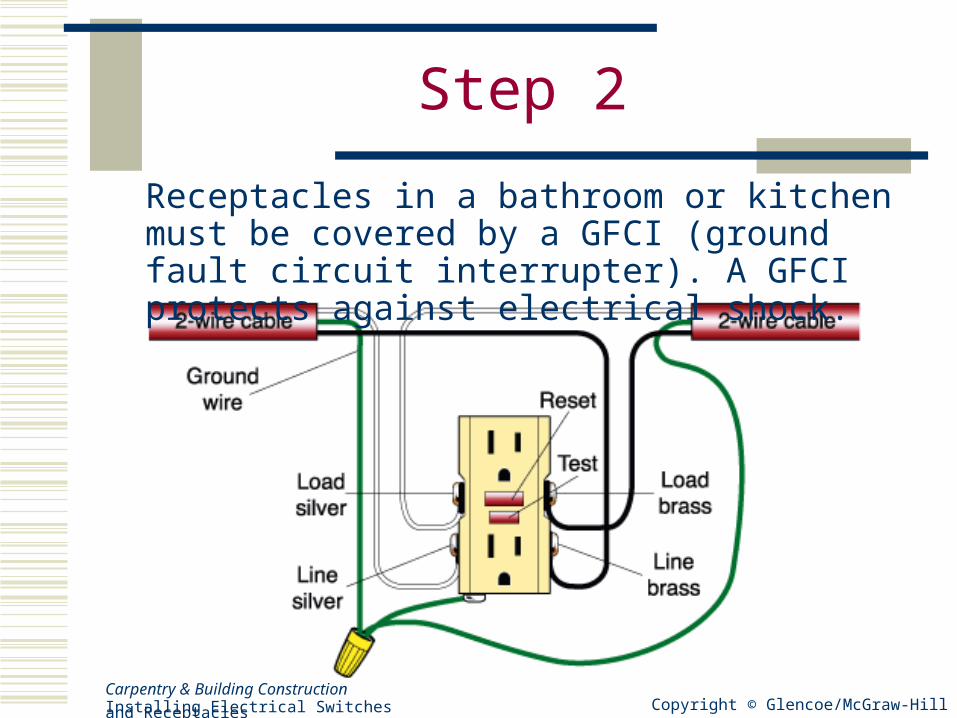
Receptacles in a bathroom or kitchen must be covered by a GFCI (ground fault circuit interrupter). A GFCI protects against electrical shock.
Copyright © Glencoe/McGraw-HillCarpentry & Building ConstructionInstalling Electrical Switches and Receptacles
Step 2
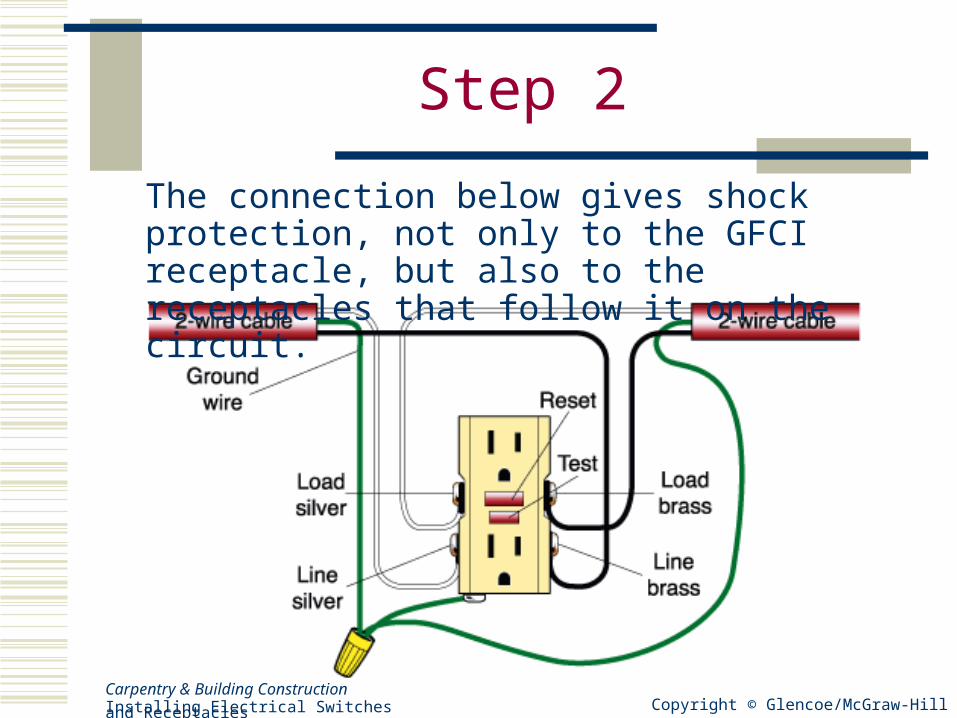
The connection below gives shock protection, not only to the GFCI receptacle, but also to the receptacles that follow it on the circuit.

Copyright © Glencoe/McGraw-HillCarpentry & Building ConstructionInstalling Electrical Switches and Receptacles
Step 2
To install a GFCI:a. Connect the wires from the power source to
the “line” screw terminals.
Copyright © Glencoe/McGraw-HillCarpentry & Building ConstructionInstalling Electrical Switches and Receptacles
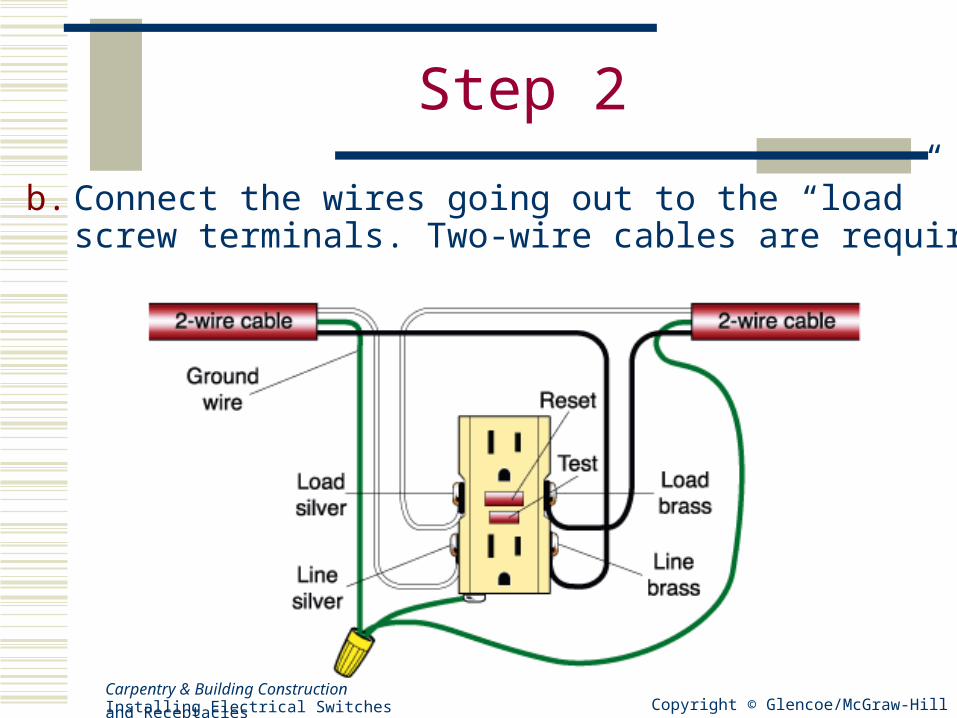
Step 2
b. Connect the wires going out to the “load” screw terminals. Two-wire cables are required.

Copyright © Glencoe/McGraw-HillCarpentry & Building ConstructionInstalling Electrical Switches and Receptacles
Step 3
A light and switch at the end of a circuit are connected as shown here. This is the simplest light and switch combination.
Copyright © Glencoe/McGraw-HillCarpentry & Building ConstructionInstalling Electrical Switches and Receptacles
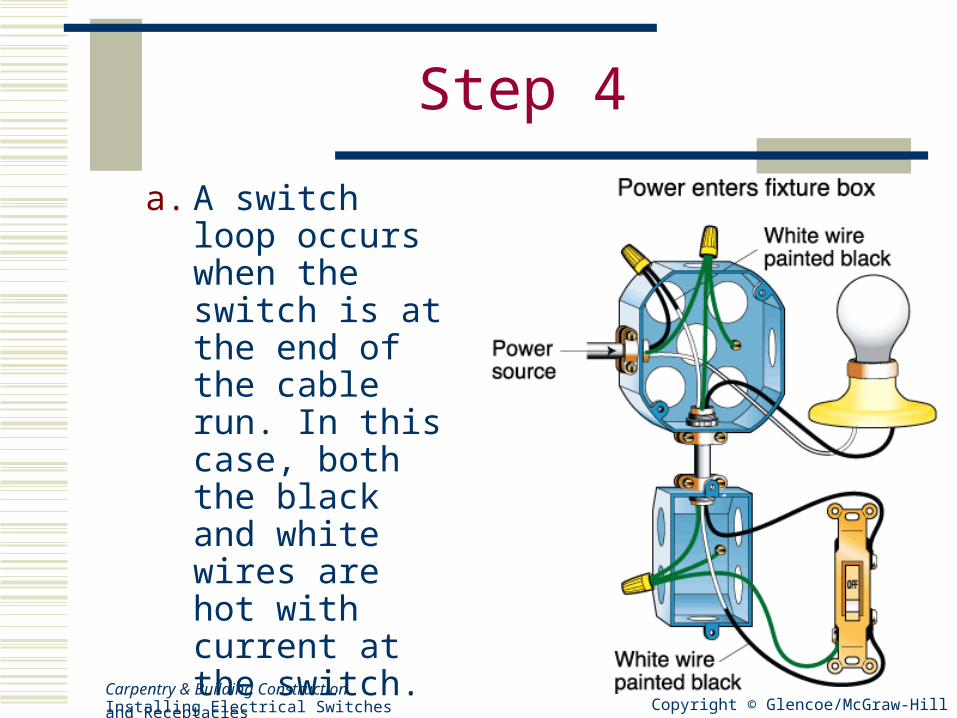
Step 4
a. A switch loop occurs when the switch is at the end of the cable run. In this case, both the black and white wires are hot with current at the switch.
Copyright © Glencoe/McGraw-HillCarpentry & Building ConstructionInstalling Electrical Switches and Receptacles
Step 4
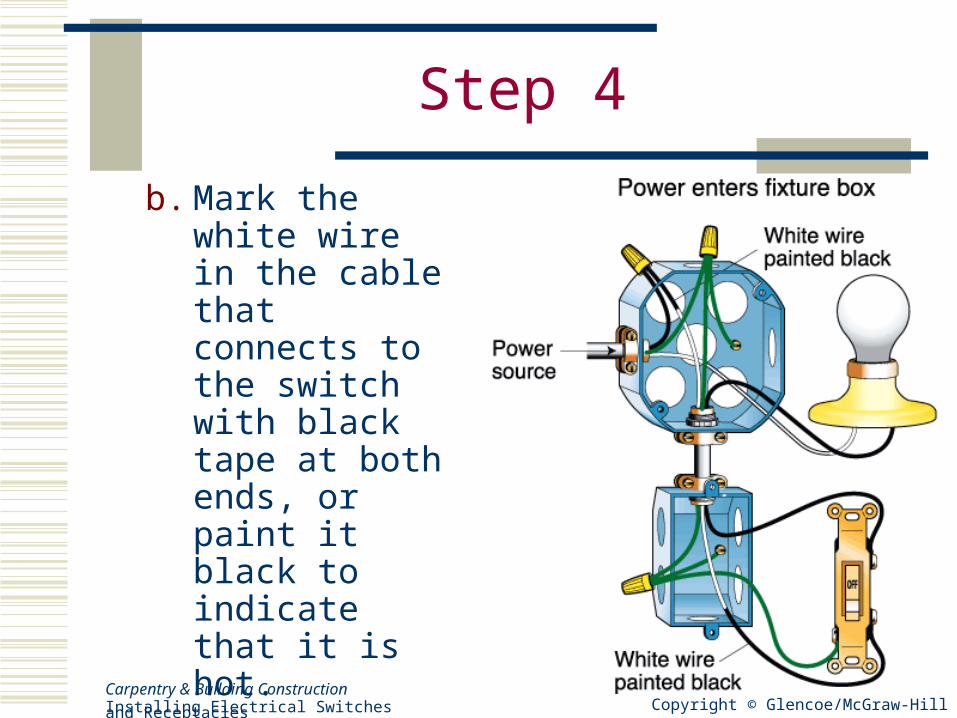
b. Mark the white wire in the cable that connects to the switch with black tape at both ends, or paint it black to indicate that it is hot.
Copyright © Glencoe/McGraw-HillCarpentry & Building ConstructionInstalling Electrical Switches and Receptacles
Step 5
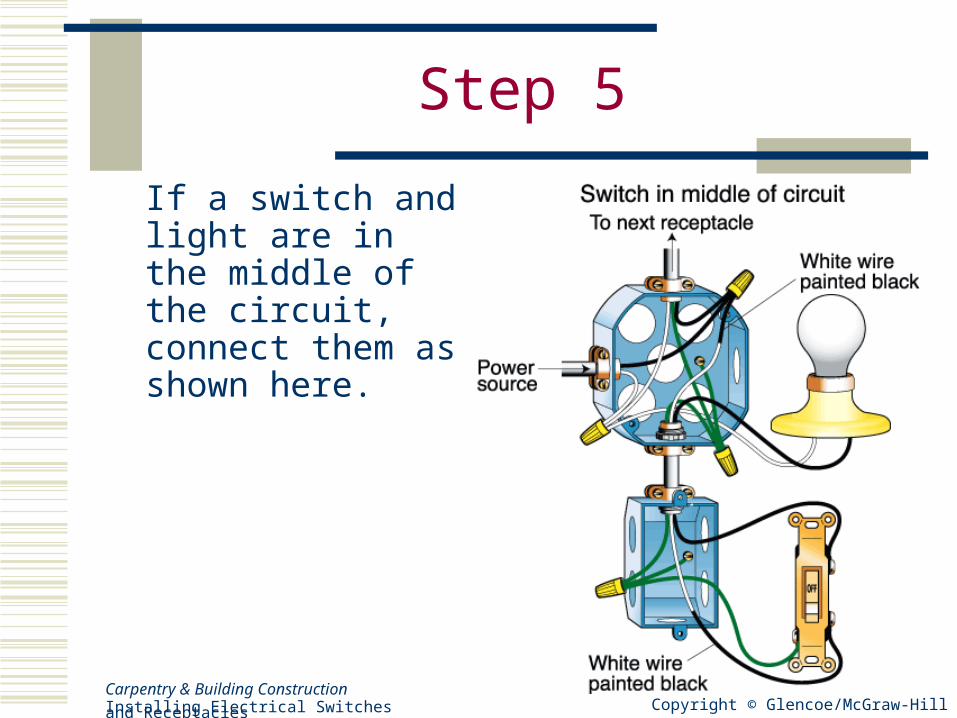
If a switch and light are in the middle of the circuit, connect them as shown here.
Copyright © Glencoe/McGraw-HillCarpentry & Building ConstructionInstalling Electrical Switches and Receptacles
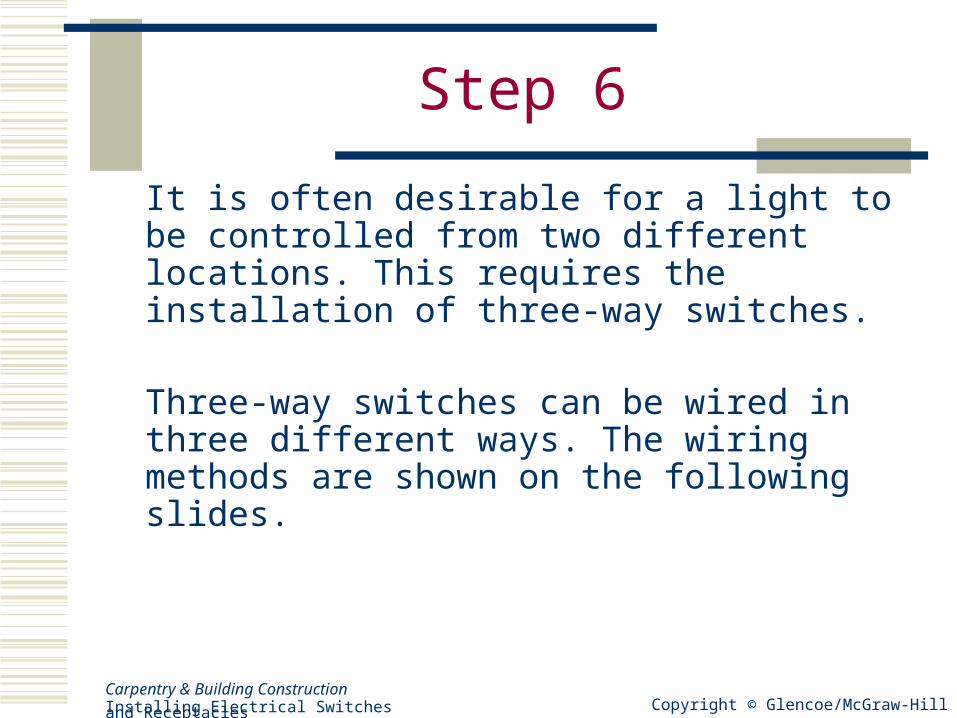
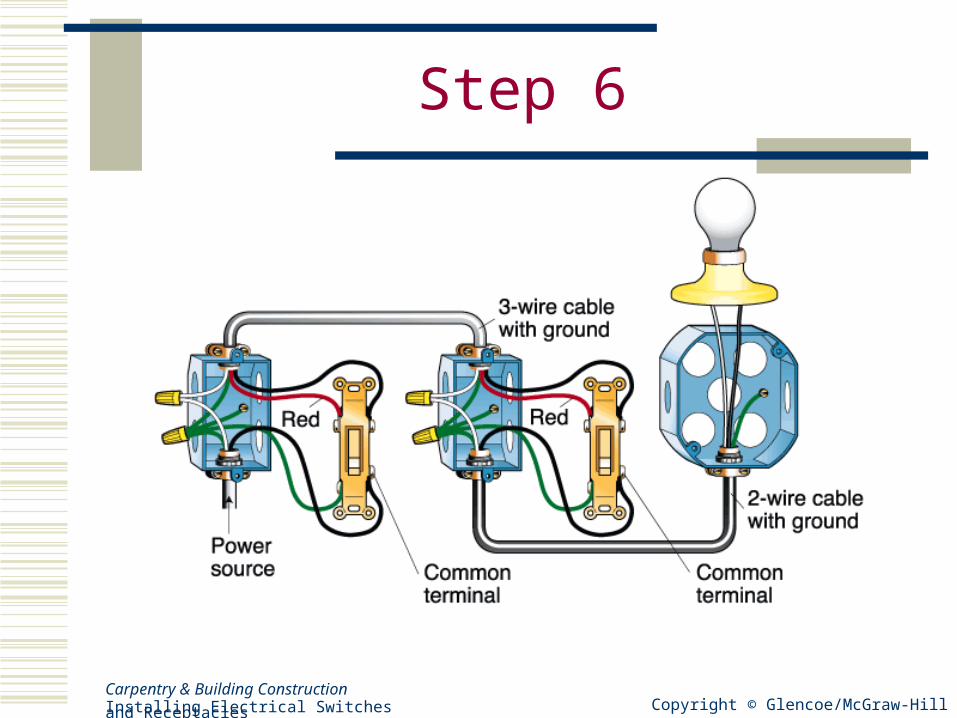
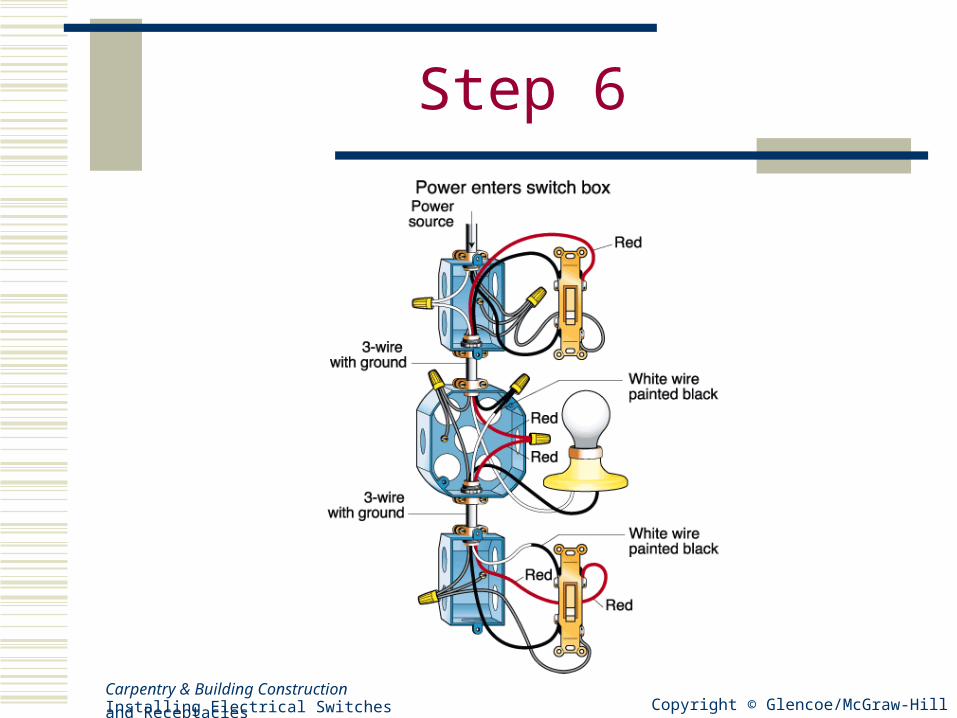
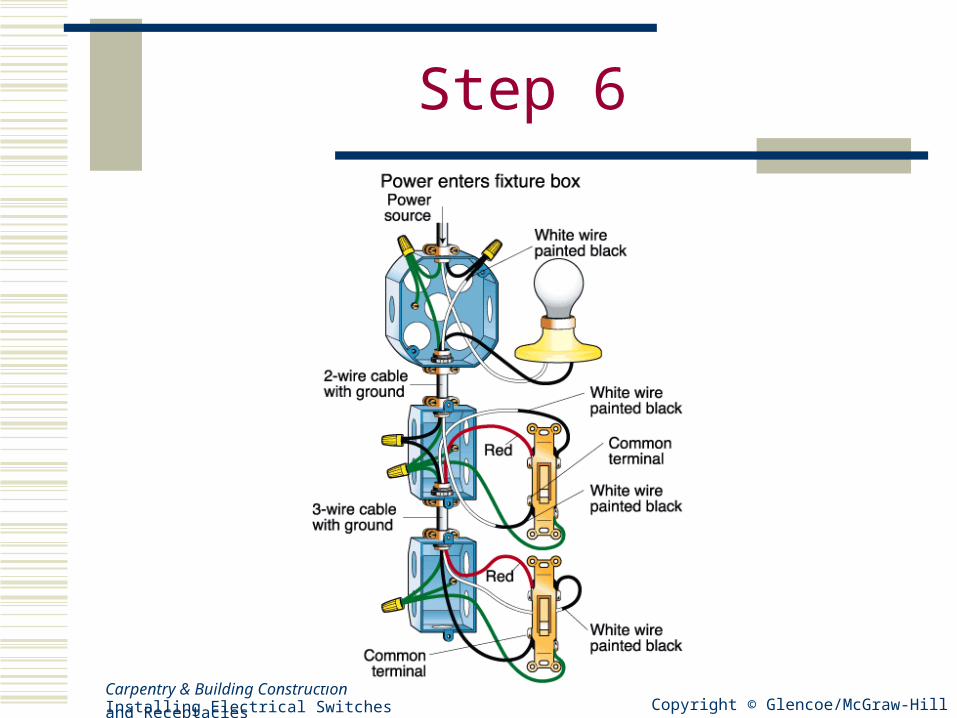
Step 6
It is often desirable for a light to be controlled from two different locations. This requires the installation of three-way switches.
Three-way switches can be wired in three different ways. The wiring methods are shown on the following slides.
Copyright © Glencoe/McGraw-HillCarpentry & Building ConstructionInstalling Electrical Switches and Receptacles
Step 6
Copyright © Glencoe/McGraw-HillCarpentry & Building ConstructionInstalling Electrical Switches and Receptacles
Step 6
Copyright © Glencoe/McGraw-HillCarpentry & Building ConstructionInstalling Electrical Switches and Receptacles
Step 6