FiberExpress Ultra HD System Patch Panel Housings, Patch ...
Upload
nguyenhanhCategory
view
213download
0
Trend Micro Incorporated reserves the right to make changes to this document and tothe product described herein without notice. Before installing and using the product,review the readme files, release notes, and/or the latest version of the applicabledocumentation, which are available from the Trend Micro website at:
http://docs.trendmicro.com/en-us/enterprise/trend-micro-endpoint-sensor.aspx
Trend Micro, the Trend Micro t-ball logo, OfficeScan, Control Manager, and TrendMicro Endpoint Sensor are trademarks or registered trademarks of Trend MicroIncorporated. All other product or company names may be trademarks or registeredtrademarks of their owners.
Copyright © 2017. Trend Micro Incorporated. All rights reserved.
Document Part No.: APEM18106/171129
Release Date: November 2017
Protected by U.S. Patent No.: Patents pending.

This documentation introduces the main features of the product and/or providesinstallation instructions for a production environment. Read through the documentationbefore installing or using the product.
Detailed information about how to use specific features within the product may beavailable at the Trend Micro Online Help Center and/or the Trend Micro KnowledgeBase.
Trend Micro always seeks to improve its documentation. If you have questions,comments, or suggestions about this or any Trend Micro document, please contact us [email protected].
Evaluate this documentation on the following site:
http://www.trendmicro.com/download/documentation/rating.asp

i
Table of ContentsPreface
Preface .................................................................................................................. v
Documentation .................................................................................................. vi
Audience ............................................................................................................ vii
Document Conventions .................................................................................. vii
Terminology ..................................................................................................... viii
Chapter 1: System RequirementsServer Installation Checklist .......................................................................... 1-2
Server Requirements .............................................................................. 1-2Server Performance ................................................................................ 1-5Database Requirements ......................................................................... 1-5
Agent Installation Checklist .......................................................................... 1-5Agent Requirements ............................................................................... 1-7Local Agent Installation Considerations ............................................. 1-7Network Considerations ........................................................................ 1-8
Other Security Software ................................................................................. 1-9
Integration with Deep Discovery Analyzer .............................................. 1-10
Integration with Control Manager ............................................................. 1-11
Chapter 2: Trend Micro Endpoint Sensor InstallationTrend Micro Endpoint Sensor Server Installation .................................... 2-2
Database Server .................................................................................... 2-11Management Console .......................................................................... 2-15Server Identification ............................................................................. 2-16Server Communication ........................................................................ 2-18Certificate Import ................................................................................. 2-19Internal Proxy for Agent Connection to Server .............................. 2-20About the Management Console Admin Account Password ....... 2-22
Endpoint Sensor 1.6 Update 3 Critical Patch Installation Guide
ii
Local Agent Installation .............................................................................. 2-22
Local Agent Silent Installation ................................................................... 2-23
Trend Micro Endpoint Sensor Server Uninstallation ............................. 2-24
Local Agent Uninstallation ......................................................................... 2-25
Local Agent Silent Uninstallation .............................................................. 2-25
Chapter 3: OfficeScan IntegrationAbout Trend Micro OfficeScan Integration ............................................... 3-2
About Plug-in Manager ................................................................................. 3-2
Installing OfficeScan ...................................................................................... 3-3
Agent Installation Considerations When Using OfficeScan .................... 3-4
Using the Trend Micro Endpoint Sensor Deployment Tool ................... 3-4Trend Micro Endpoint Sensor Deployment Tool Installation ........ 3-5Plug-in Program Management ............................................................. 3-6Trend Micro Endpoint Sensor Deployment Tool Uninstallation ... 3-6Deployment Tool Error Codes ............................................................ 3-7
Trend Micro Endpoint Sensor Agent Deployment Tasks ..................... 3-11Downloading the Installation Package .............................................. 3-11Installing the Trend Micro Endpoint Sensor Agent ....................... 3-13Monitoring Trend Micro Endpoint Sensor Agents ........................ 3-14
The OfficeScan Agent Tree ........................................................................ 3-14The OfficeScan Agent Tree ................................................................ 3-14Agent Tree Specific Tasks ................................................................... 3-14
Chapter 4: Technical SupportTroubleshooting Resources ........................................................................... 4-2
Using the Support Portal ....................................................................... 4-2Threat Encyclopedia .............................................................................. 4-2
Contacting Trend Micro ................................................................................ 4-3Speeding Up the Support Call .............................................................. 4-4
Sending Suspicious Content to Trend Micro ............................................. 4-4Email Reputation Services .................................................................... 4-4

Table of Contents
iii
File Reputation Services ........................................................................ 4-5Web Reputation Services ....................................................................... 4-5
Other Resources ............................................................................................. 4-5Download Center ................................................................................... 4-5Documentation Feedback ..................................................................... 4-6
IndexIndex .............................................................................................................. IN-1


v
Preface
PrefaceWelcome to the Trend Micro™ Endpoint Sensor™ Installation Guide. This documentprovides details related to the server and agent installation.
NoteRefer to the Endpoint Sensor Administrator's Guide or Online Help for product overview andconfiguration.
Topics include:
• Documentation on page vi
• Audience on page vii
• Document Conventions on page vii
• Terminology on page viii
Endpoint Sensor 1.6 Update 3 Critical Patch Installation Guide
vi
DocumentationThe documentation set for Endpoint Sensor includes the following:
Table 1. Product Documentation
Document Description
Administrator's Guide The Administrator’s Guide contains detailed instructions onhow to configure and manage Endpoint Sensor , andexplanations of Endpoint Sensor concepts and features.
Installation Guide The Installation Guide discusses requirements andprocedures for installing the Endpoint Sensor server andagent.
Readme The Readme contains late-breaking product informationthat is not found in the online or printed documentation.Topics include a description of new features, known issues,and product release history.
Online Help The Online Help contains explanations of Endpoint Sensorcomponents and features, as well as procedures needed toconfigure Endpoint Sensor .
Support Portal The Support Portal is an online database of problem-solving and troubleshooting information. It provides thelatest information about known product issues. To accessthe Support Portal, go to the following website:
http://esupport.trendmicro.com
View and download product documentation from the Trend Micro Online Help Center:
http://docs.trendmicro.com/en-us/home
Evaluate this documentation at the following website:
http://docs.trendmicro.com/en-us/survey.aspx
Preface
vii
AudienceThe Endpoint Sensor documentation is written for network administrators, systemsengineers, and information security analysts. The documentation assumes that the readerhas an in-depth knowledge of networking and information security, which includes thefollowing topics:
• Network topologies
• Server management
• Database management
• Incident response procedures
• Content security protection
Document ConventionsThe documentation uses the following conventions:
Table 2. Document Conventions
Convention Description
UPPER CASE Acronyms, abbreviations, and names of certaincommands and keys on the keyboard
Bold Menus and menu commands, command buttons, tabs,and options
Italics References to other documents
Monospace Sample command lines, program code, web URLs, filenames, and program output
Navigation > Path The navigation path to reach a particular screen
For example, File > Save means, click File and then clickSave on the interface
Endpoint Sensor 1.6 Update 3 Critical Patch Installation Guide
viii
Convention Description
Note Configuration notes
Tip Recommendations or suggestions
Important Information regarding required or default configurationsettings and product limitations
WARNING! Critical actions and configuration options
TerminologyThe following table provides the official terminology used throughout the EndpointSensor documentation:
Table 3. Endpoint Sensor Terminology
Terminology Description
Server The Endpoint Sensor server
Agent endpoint The host where the Endpoint Sensor agent is installed
Administrator (or EndpointSensor administrator)
The person managing the Endpoint Sensor server
Management console The user interface for configuring and managing EndpointSensor server settings
Activation Code Codes that enable all Endpoint Sensor features for aspecified period of time.
Preface
ix
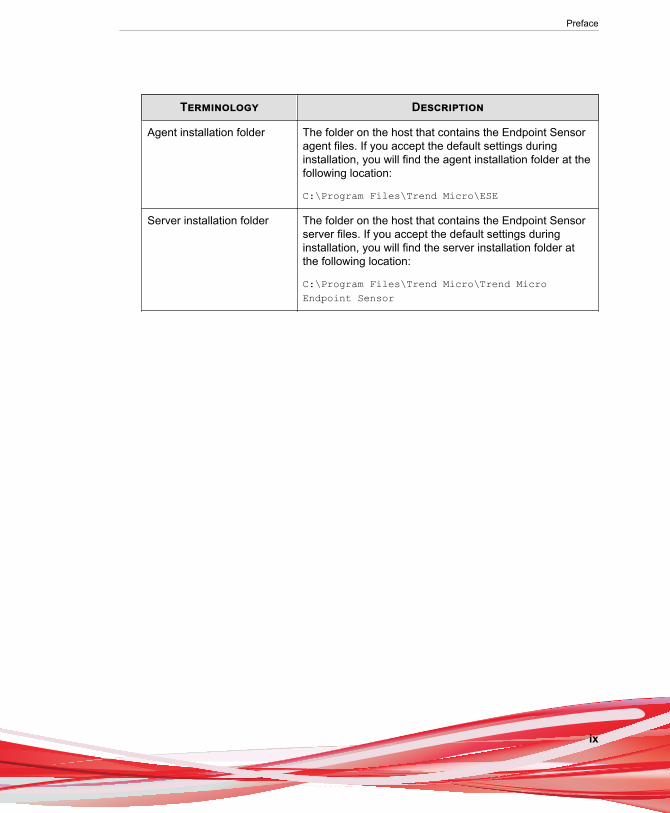
Terminology Description
Agent installation folder The folder on the host that contains the Endpoint Sensoragent files. If you accept the default settings duringinstallation, you will find the agent installation folder at thefollowing location:
C:\Program Files\Trend Micro\ESE
Server installation folder The folder on the host that contains the Endpoint Sensorserver files. If you accept the default settings duringinstallation, you will find the server installation folder atthe following location:
C:\Program Files\Trend Micro\Trend MicroEndpoint Sensor

1-1
Chapter 1
System RequirementsThis section provides an overview of the Endpoint Sensor server and agent installation,including key considerations.
Topics include:
• Server Installation Checklist on page 1-2
• Agent Installation Checklist on page 1-5
• Other Security Software on page 1-9

Endpoint Sensor 1.6 Update 3 Critical Patch Installation Guide
1-2
Server Installation ChecklistTo ensure a successful installation of the Endpoint Sensor server, perform the following:
• Obtain the following from Trend Micro:
• Endpoint Sensor server installer package
• Full or trial version Activation Code
For details about the available Endpoint Sensor versions, refer to the OnlineHelp or Administrator's Guide.
• Verify that all required hardware and software specifications have been met beforeinstallation.
For details, see Server Requirements on page 1-2.
• Verify that a working IPv4 address has been assigned to the server.
Server Requirements
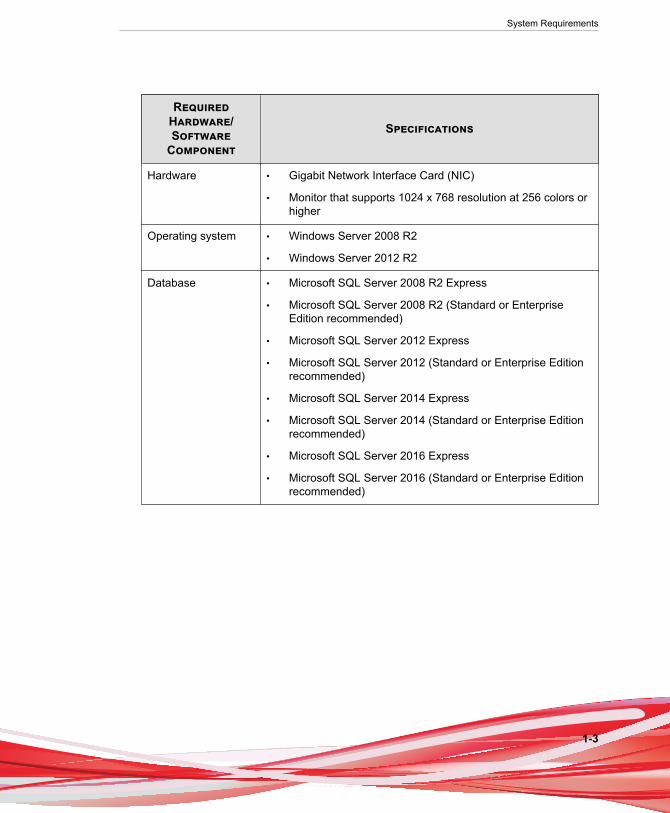
Table 1-1. Required Hardware and Software Components for Server Installation
RequiredHardware/Software
Component
Specifications
CPU At least 2GHz Intel Core2 Duo or compatible
• AMD 64 processor
• Intel 64 processor
RAM • 4GB minimum
• 16GB recommended
Available disk space • 500GB minimum
• 1TB recommended
System Requirements
1-3
RequiredHardware/Software
Component
Specifications
Hardware • Gigabit Network Interface Card (NIC)
• Monitor that supports 1024 x 768 resolution at 256 colors orhigher
Operating system • Windows Server 2008 R2
• Windows Server 2012 R2
Database • Microsoft SQL Server 2008 R2 Express
• Microsoft SQL Server 2008 R2 (Standard or EnterpriseEdition recommended)
• Microsoft SQL Server 2012 Express
• Microsoft SQL Server 2012 (Standard or Enterprise Editionrecommended)
• Microsoft SQL Server 2014 Express
• Microsoft SQL Server 2014 (Standard or Enterprise Editionrecommended)
• Microsoft SQL Server 2016 Express
• Microsoft SQL Server 2016 (Standard or Enterprise Editionrecommended)
Endpoint Sensor 1.6 Update 3 Critical Patch Installation Guide
1-4
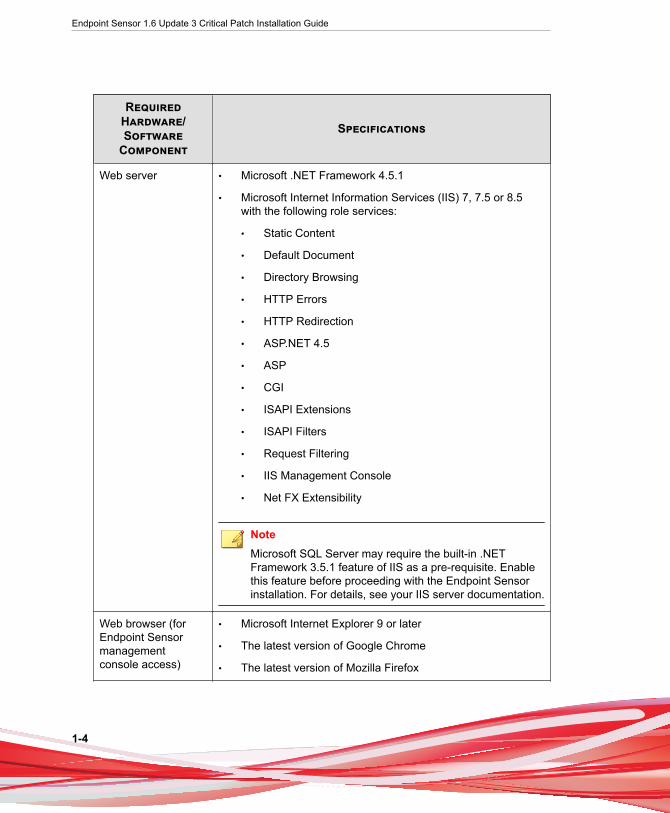
RequiredHardware/Software
Component
Specifications
Web server • Microsoft .NET Framework 4.5.1
• Microsoft Internet Information Services (IIS) 7, 7.5 or 8.5with the following role services:
• Static Content
• Default Document
• Directory Browsing
• HTTP Errors
• HTTP Redirection
• ASP.NET 4.5
• ASP
• CGI
• ISAPI Extensions
• ISAPI Filters
• Request Filtering
• IIS Management Console
• Net FX Extensibility
NoteMicrosoft SQL Server may require the built-in .NETFramework 3.5.1 feature of IIS as a pre-requisite. Enablethis feature before proceeding with the Endpoint Sensorinstallation. For details, see your IIS server documentation.
Web browser (forEndpoint Sensormanagementconsole access)
• Microsoft Internet Explorer 9 or later
• The latest version of Google Chrome
• The latest version of Mozilla Firefox
System Requirements
1-5
Server PerformanceEnterprise networks require servers with higher specifications than those required forsmall and medium-sized businesses.
The number of agents that a single Endpoint Sensor server can manage depends onseveral factors, such as available server resources and network topology. Contact yourTrend Micro representative for help in determining the optimal number of agents foryour Endpoint Sensor server deployment.
NoteTrend Micro does not recommend installing Endpoint Sensor in a virtual machine. AEndpoint Sensor running in a virtual machine may not perform optimally. Additionally, if avirtual machine is reset to a previous state, this can lead to inconsistency of data betweenserver and agent.
Database RequirementsEndpoint Sensor stores data in an SQL database. When you install Endpoint Sensor ona server that does not have access to a Microsoft SQL Server, Setup provides the optionto install Microsoft SQL 2008 Express.
Tip
• Trend Micro highly recommends using Microsoft SQL Server Standard or EnterpriseEdition. SQL Express is suitable for testing purposes but not for productionenvironments. Due to the limitations of SQL Express, large networks requireMicrosoft SQL Server Standard or Enterprise Edition.
For details, see Database Server on page 2-11.
• For enterprise environments, Trend Micro does not recommend installing the SQLserver and the Endpoint Sensor server in the same physical machine.
Agent Installation ChecklistTo ensure a successful installation of the Endpoint Sensor agent, perform the following:
Endpoint Sensor 1.6 Update 3 Critical Patch Installation Guide
1-6
• Use the ping command to check if the server can communicate with the agent.
If there is no ping response, verify that your firewall program allows networktraffic between the server and agent. For details, check with your networkadministrator or refer to your firewall program documentation.
• Verify that the target endpoints have an IPv4 address.
Endpoints that are using IPv6 addresses must also have IPv4 addresses. Installingthe Endpoint Sensor agent on a pure IPv6 endpoint is not supported.
• Verify that the Endpoint Sensor agent installer is available in the Endpoint Sensorserver installation folder (the default location is c:\Program Files\TrendMicro\Trend Micro Endpoint Sensor\Download\Agent\).
• Verify that the agents meet the required hardware and software specifications. Fordetails, see Agent Requirements on page 1-7.
• Use IIS Manager to check if the ports are correctly set.
• Verify that additional requirements needed for a local installation of EndpointSensor agents have been met. Refer to the following guidelines:
For details, see Local Agent Installation Considerations on page 1-7.
• If you intend to install the Endpoint Sensor agent on endpoints managed byOfficeScan, refer to OfficeScan Integration on page 3-1. In particular, see theguidelines found in Agent Installation Considerations When Using OfficeScan on page3-4.
System Requirements
1-7
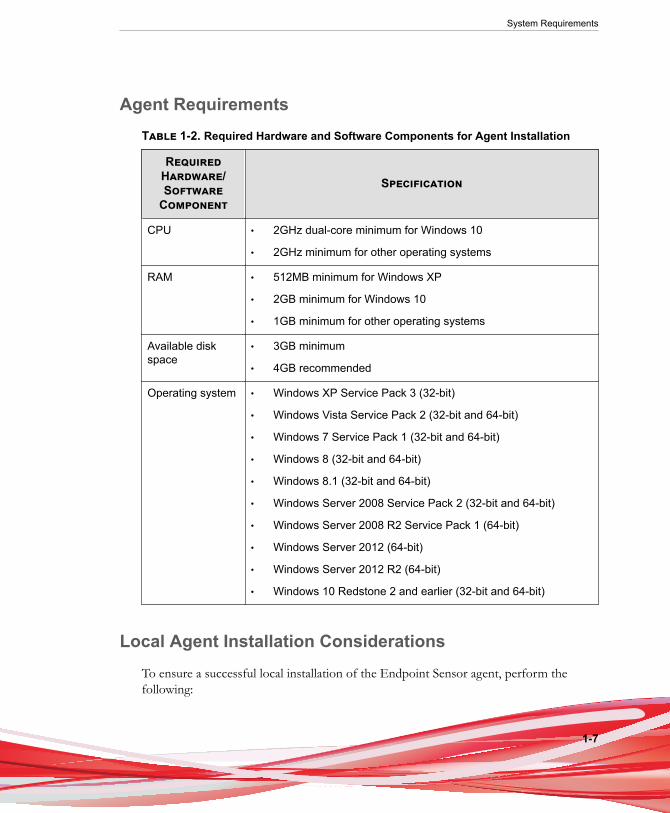
Agent RequirementsTable 1-2. Required Hardware and Software Components for Agent Installation
RequiredHardware/Software
Component
Specification
CPU • 2GHz dual-core minimum for Windows 10
• 2GHz minimum for other operating systems
RAM • 512MB minimum for Windows XP
• 2GB minimum for Windows 10
• 1GB minimum for other operating systems
Available diskspace
• 3GB minimum
• 4GB recommended
Operating system • Windows XP Service Pack 3 (32-bit)
• Windows Vista Service Pack 2 (32-bit and 64-bit)
• Windows 7 Service Pack 1 (32-bit and 64-bit)
• Windows 8 (32-bit and 64-bit)
• Windows 8.1 (32-bit and 64-bit)
• Windows Server 2008 Service Pack 2 (32-bit and 64-bit)
• Windows Server 2008 R2 Service Pack 1 (64-bit)
• Windows Server 2012 (64-bit)
• Windows Server 2012 R2 (64-bit)
• Windows 10 Redstone 2 and earlier (32-bit and 64-bit)
Local Agent Installation ConsiderationsTo ensure a successful local installation of the Endpoint Sensor agent, perform thefollowing:

Endpoint Sensor 1.6 Update 3 Critical Patch Installation Guide
1-8
• The agent installer, EndpointSensor.exe, found at <Trend MicroEndpoint Sensor server installation path>\Download\Agent\,has been shared or copied to the target endpoint.
• Check that your firewall program allows Trend Micro Endpoint Sensor tocommunicate using the correct ports.
• Confirm that the endpoint has an IPv4 address.
Endpoints that are using IPv6 addresses must also have IPv4 addresses. Installingthe Endpoint Sensor agent on a pure IPv6 endpoint is not supported.
Note
Trend Micro does not recommend installing Endpoint Sensor in a virtual machine. AEndpoint Sensor running in a virtual machine may not perform optimally. Additionally, if avirtual machine is reset to a previous state, this can lead to inconsistency of data betweenserver and agent.
Network Considerations
Endpoint Sensor generates network traffic whenever communication occurs betweenserver and agent, namely:
Table 1-3. Network Traffic
Network Traffic Description
Heartbeat Agent sends a periodic signal every 90 seconds to inform theserver that the agent is online.
Reply investigationreport
Agent investigates the endpoint and sends the report to theserver.
Reply monitoringreport
Agent finds a match during monitoring and sends a report tothe server.
Endpoint status update Agent sends an update to the server if endpoint settings havechanged.
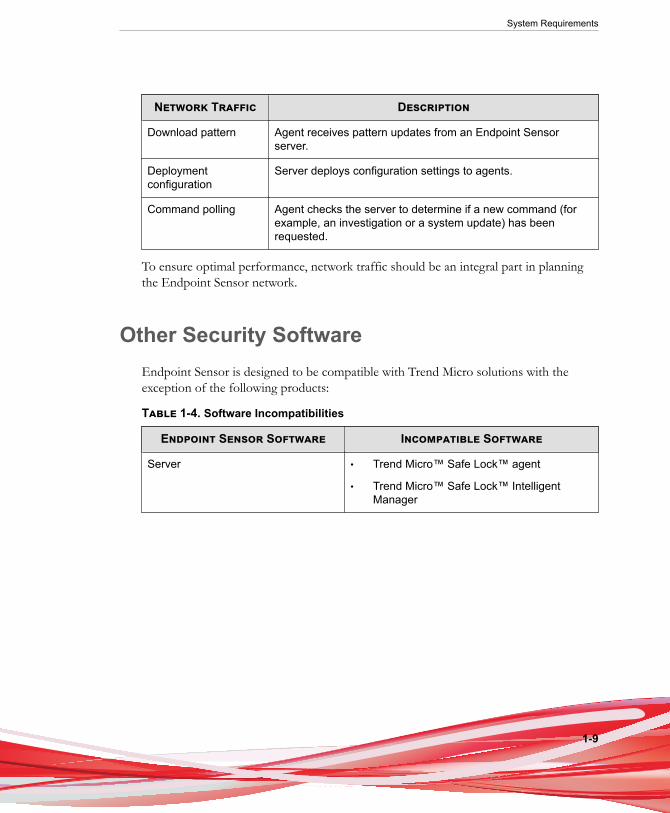
System Requirements
1-9
Network Traffic Description
Download pattern Agent receives pattern updates from an Endpoint Sensorserver.
Deploymentconfiguration
Server deploys configuration settings to agents.
Command polling Agent checks the server to determine if a new command (forexample, an investigation or a system update) has beenrequested.
To ensure optimal performance, network traffic should be an integral part in planningthe Endpoint Sensor network.
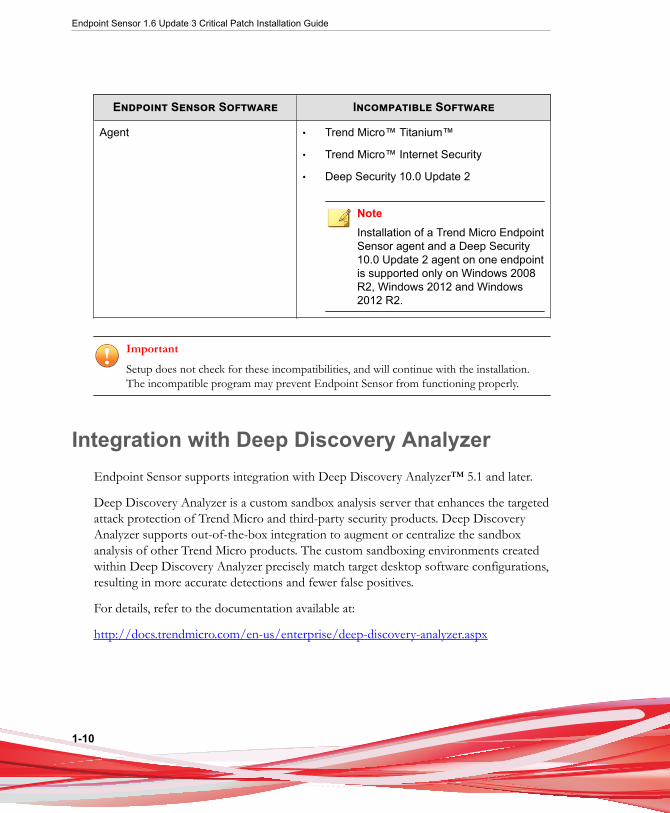
Other Security SoftwareEndpoint Sensor is designed to be compatible with Trend Micro solutions with theexception of the following products:
Table 1-4. Software Incompatibilities
Endpoint Sensor Software Incompatible Software
Server • Trend Micro™ Safe Lock™ agent
• Trend Micro™ Safe Lock™ IntelligentManager
Endpoint Sensor 1.6 Update 3 Critical Patch Installation Guide
1-10
Endpoint Sensor Software Incompatible Software
Agent • Trend Micro™ Titanium™
• Trend Micro™ Internet Security
• Deep Security 10.0 Update 2
NoteInstallation of a Trend Micro EndpointSensor agent and a Deep Security10.0 Update 2 agent on one endpointis supported only on Windows 2008R2, Windows 2012 and Windows2012 R2.
ImportantSetup does not check for these incompatibilities, and will continue with the installation.The incompatible program may prevent Endpoint Sensor from functioning properly.
Integration with Deep Discovery AnalyzerEndpoint Sensor supports integration with Deep Discovery Analyzer™ 5.1 and later.
Deep Discovery Analyzer is a custom sandbox analysis server that enhances the targetedattack protection of Trend Micro and third-party security products. Deep DiscoveryAnalyzer supports out-of-the-box integration to augment or centralize the sandboxanalysis of other Trend Micro products. The custom sandboxing environments createdwithin Deep Discovery Analyzer precisely match target desktop software configurations,resulting in more accurate detections and fewer false positives.
For details, refer to the documentation available at:
http://docs.trendmicro.com/en-us/enterprise/deep-discovery-analyzer.aspx
System Requirements
1-11
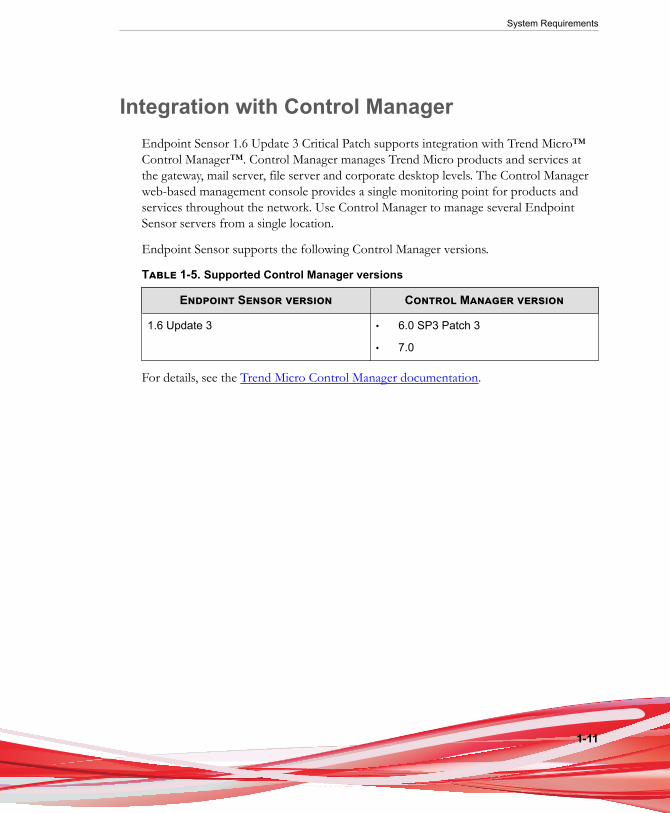
Integration with Control ManagerEndpoint Sensor 1.6 Update 3 Critical Patch supports integration with Trend Micro™Control Manager™. Control Manager manages Trend Micro products and services atthe gateway, mail server, file server and corporate desktop levels. The Control Managerweb-based management console provides a single monitoring point for products andservices throughout the network. Use Control Manager to manage several EndpointSensor servers from a single location.
Endpoint Sensor supports the following Control Manager versions.
Table 1-5. Supported Control Manager versions
Endpoint Sensor version Control Manager version
1.6 Update 3 • 6.0 SP3 Patch 3
• 7.0
For details, see the Trend Micro Control Manager documentation.

2-1
Chapter 2
Trend Micro Endpoint SensorInstallation
This section provides details about the Endpoint Sensor server and agent installationprocedures.
Note
For agent installation using OfficeScan, see OfficeScan Integration on page 3-1.
Topics include:
• Trend Micro Endpoint Sensor Server Installation on page 2-2
• Local Agent Installation on page 2-22
• Local Agent Silent Installation on page 2-23
• Trend Micro Endpoint Sensor Server Uninstallation on page 2-24
• Local Agent Uninstallation on page 2-25
• Local Agent Silent Uninstallation on page 2-25
Endpoint Sensor 1.6 Update 3 Critical Patch Installation Guide
2-2
Trend Micro Endpoint Sensor ServerInstallation
Note
• Before installing the server, make sure you have performed all the steps necessary inServer Installation Checklist on page 1-2.
• Ensure that the installation is performed in a supported operating system. Setup doesnot check the operating system during installation, and will continue with theinstallation. Running in an unsupported operating system may prevent the TrendMicro Endpoint Sensor server from functioning properly.
• For existing installations running earlier versions of Endpoint Sensor , Trend Microprovides an upgrade tool that transfers the configuration of the existing server to anew Endpoint Sensor 1.6 server. For details, contact Trend Micro support.
• Enabling the FIPS compliant algorithm in Windows may prevent product activationfrom functioning properly. To prevent issues related to product activation, verify thatthe FIPS compliant algorithm is disabled in Windows before installing the EndpointSensor server.
For details, refer to the documentation available at:
https://support.microsoft.com/en-us/help/811833/
Procedure
1. Launch the Endpoint Sensor server Setup program(EndpointSensorSetup.exe).
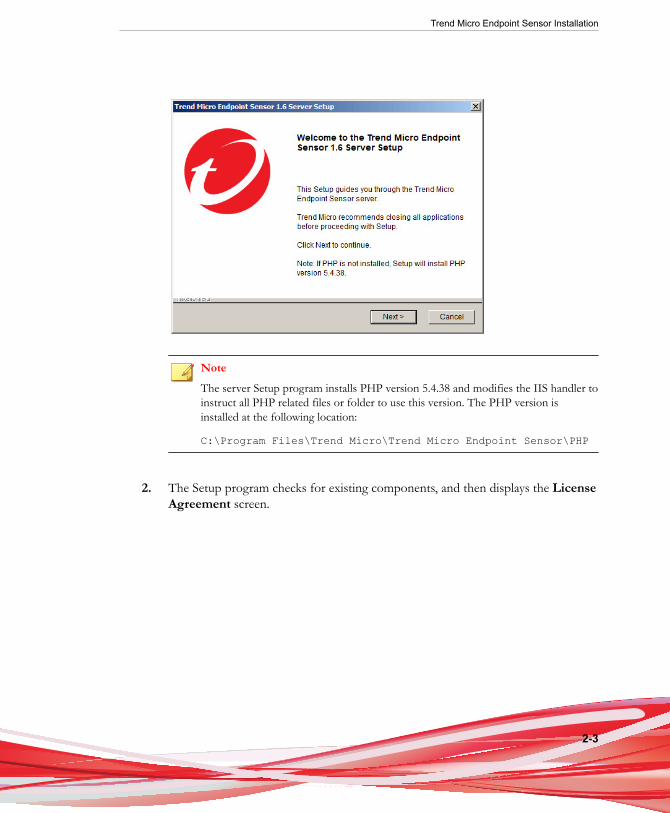
Trend Micro Endpoint Sensor Installation
2-3
NoteThe server Setup program installs PHP version 5.4.38 and modifies the IIS handler toinstruct all PHP related files or folder to use this version. The PHP version isinstalled at the following location:
C:\Program Files\Trend Micro\Trend Micro Endpoint Sensor\PHP
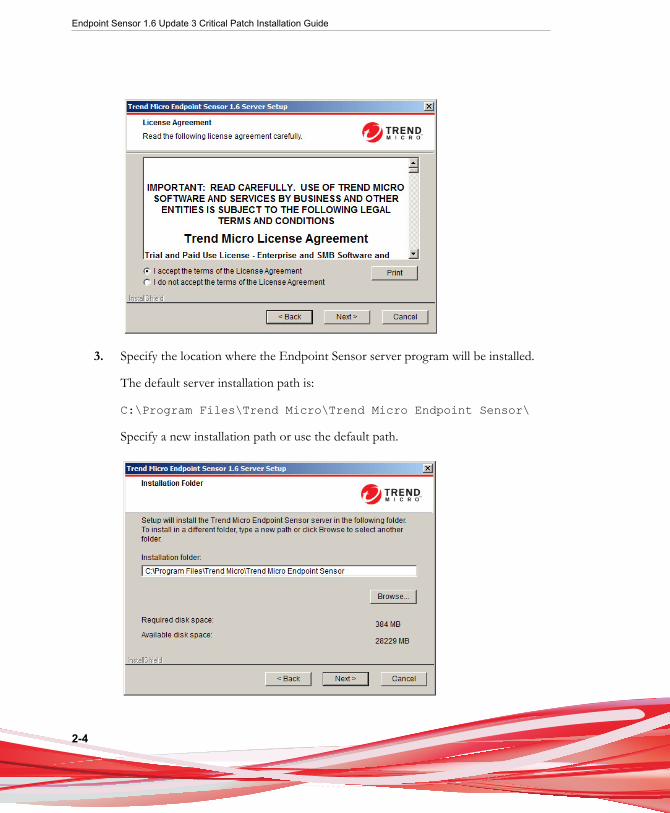
2. The Setup program checks for existing components, and then displays the LicenseAgreement screen.
Endpoint Sensor 1.6 Update 3 Critical Patch Installation Guide
2-4
3. Specify the location where the Endpoint Sensor server program will be installed.
The default server installation path is:
C:\Program Files\Trend Micro\Trend Micro Endpoint Sensor\
Specify a new installation path or use the default path.
Trend Micro Endpoint Sensor Installation
2-5
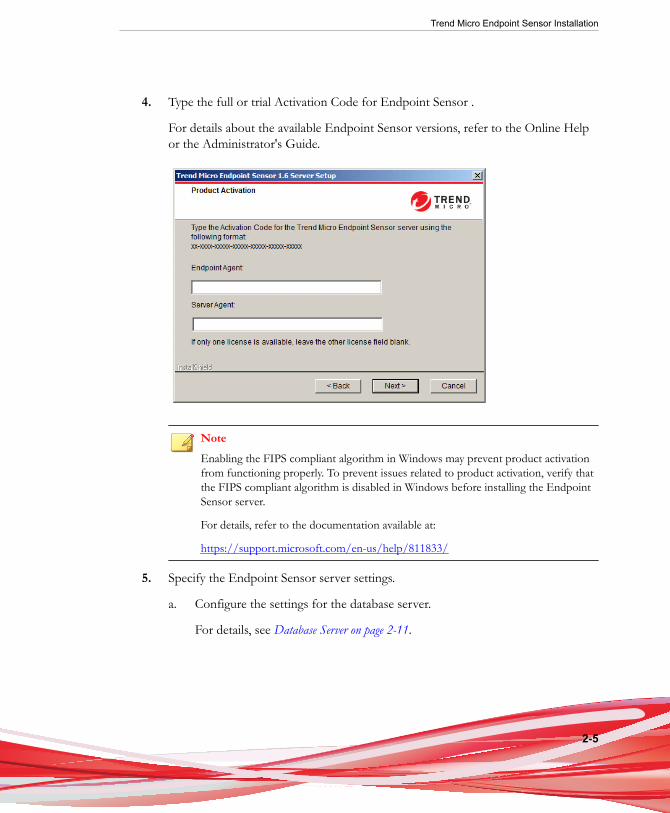
4. Type the full or trial Activation Code for Endpoint Sensor .
For details about the available Endpoint Sensor versions, refer to the Online Helpor the Administrator's Guide.
NoteEnabling the FIPS compliant algorithm in Windows may prevent product activationfrom functioning properly. To prevent issues related to product activation, verify thatthe FIPS compliant algorithm is disabled in Windows before installing the EndpointSensor server.
For details, refer to the documentation available at:
https://support.microsoft.com/en-us/help/811833/
5. Specify the Endpoint Sensor server settings.
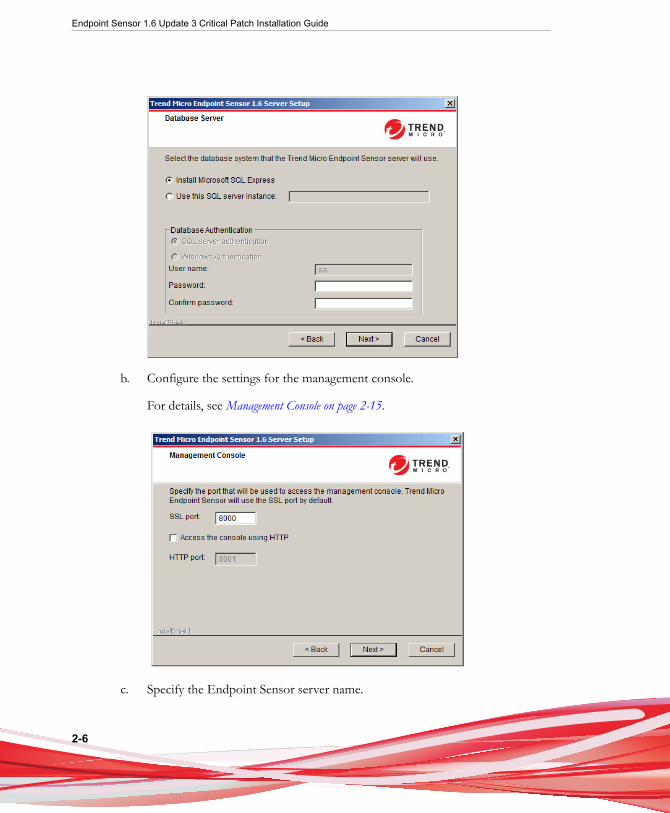
a. Configure the settings for the database server.
For details, see Database Server on page 2-11.
Endpoint Sensor 1.6 Update 3 Critical Patch Installation Guide
2-6
b. Configure the settings for the management console.
For details, see Management Console on page 2-15.
c. Specify the Endpoint Sensor server name.
Trend Micro Endpoint Sensor Installation
2-7
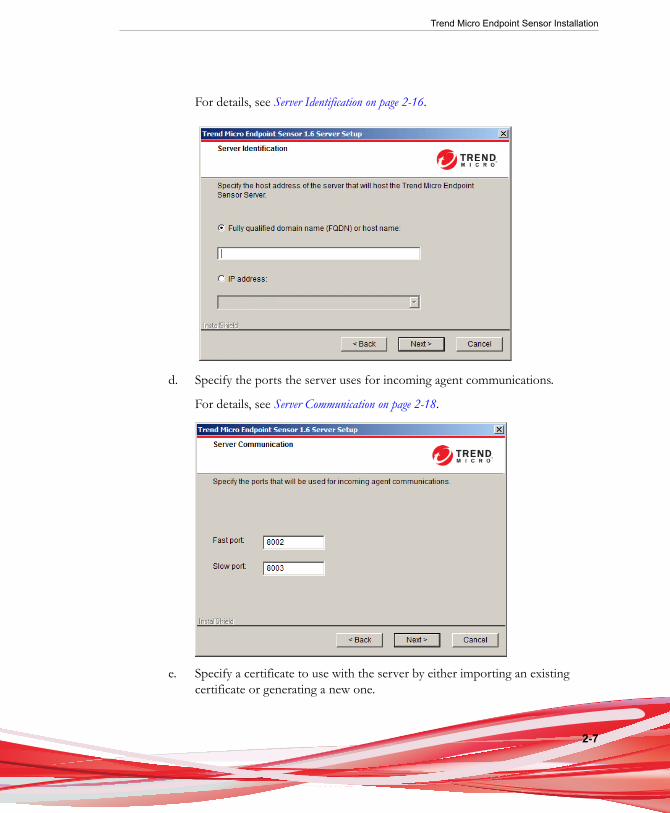
For details, see Server Identification on page 2-16.
d. Specify the ports the server uses for incoming agent communications.
For details, see Server Communication on page 2-18.
e. Specify a certificate to use with the server by either importing an existingcertificate or generating a new one.
Endpoint Sensor 1.6 Update 3 Critical Patch Installation Guide
2-8
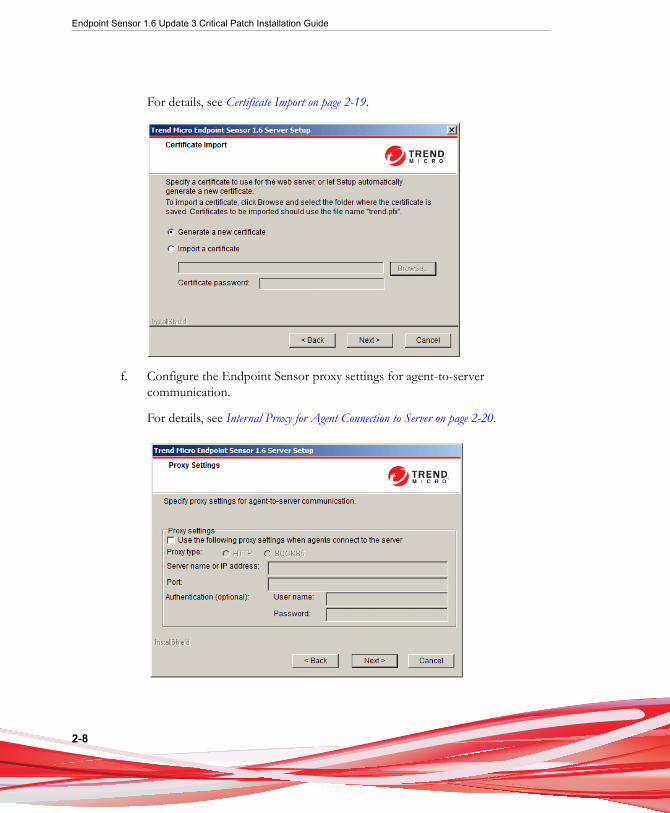
For details, see Certificate Import on page 2-19.
f. Configure the Endpoint Sensor proxy settings for agent-to-servercommunication.
For details, see Internal Proxy for Agent Connection to Server on page 2-20.
Trend Micro Endpoint Sensor Installation
2-9
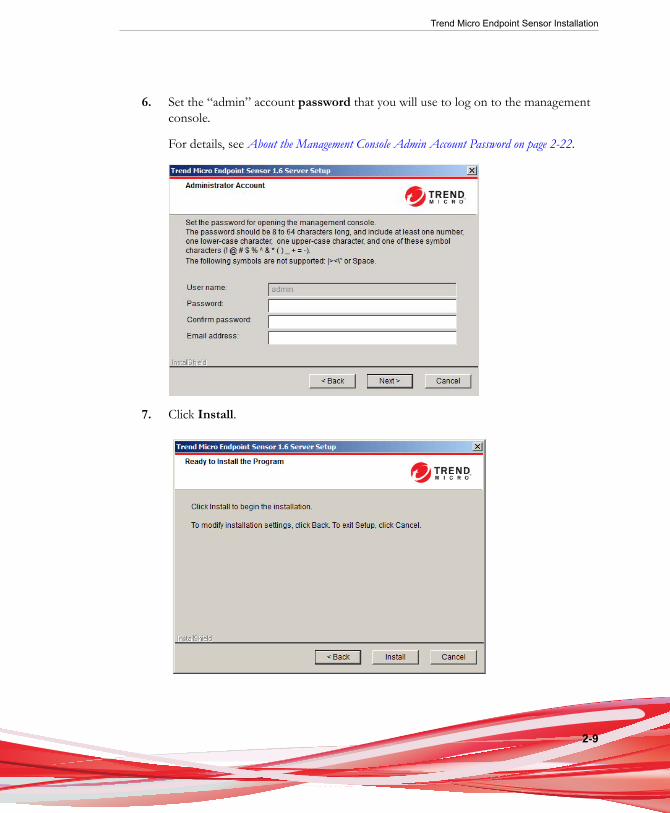
6. Set the “admin” account password that you will use to log on to the managementconsole.
For details, see About the Management Console Admin Account Password on page 2-22.
7. Click Install.
Endpoint Sensor 1.6 Update 3 Critical Patch Installation Guide
2-10
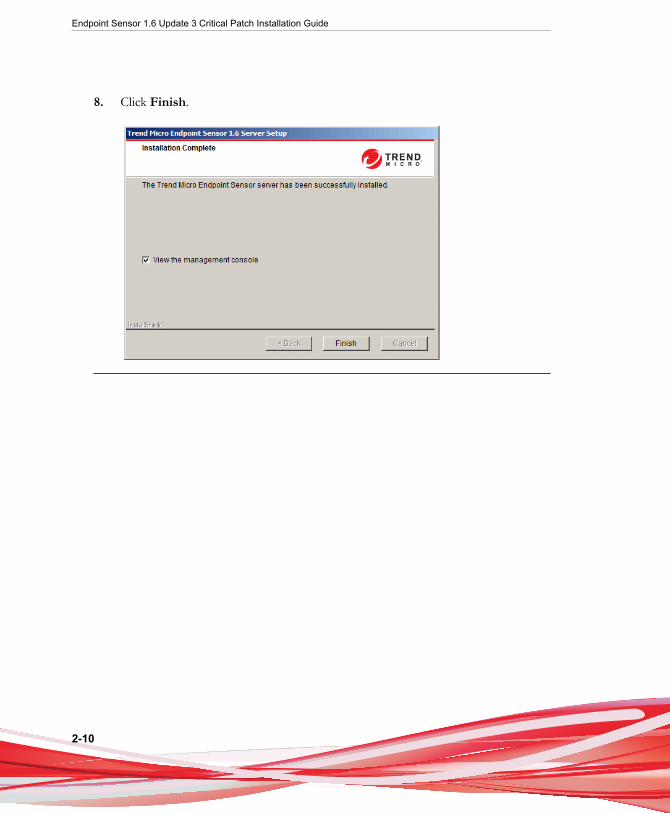
8. Click Finish.
Trend Micro Endpoint Sensor Installation
2-11
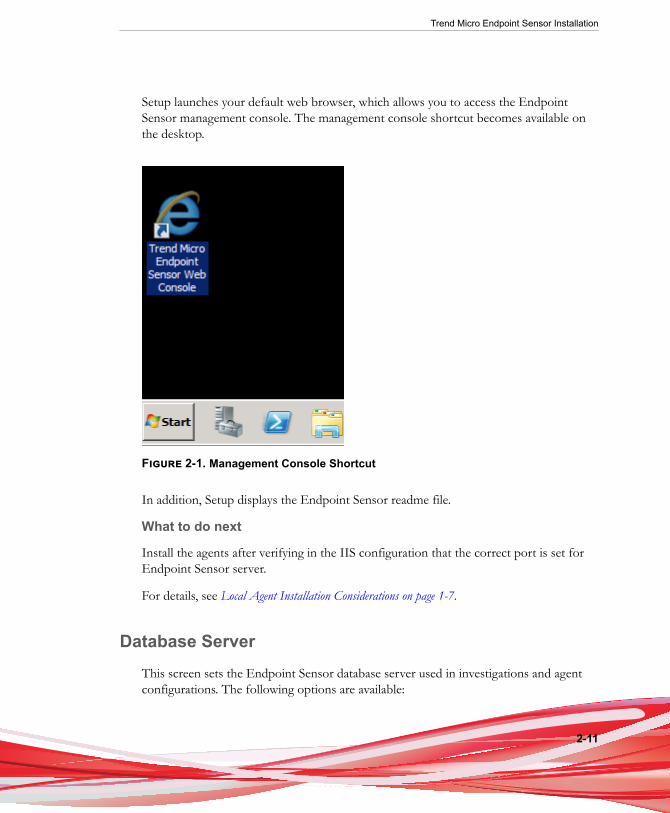
Setup launches your default web browser, which allows you to access the EndpointSensor management console. The management console shortcut becomes available onthe desktop.
Figure 2-1. Management Console Shortcut
In addition, Setup displays the Endpoint Sensor readme file.
What to do next
Install the agents after verifying in the IIS configuration that the correct port is set forEndpoint Sensor server.
For details, see Local Agent Installation Considerations on page 1-7.
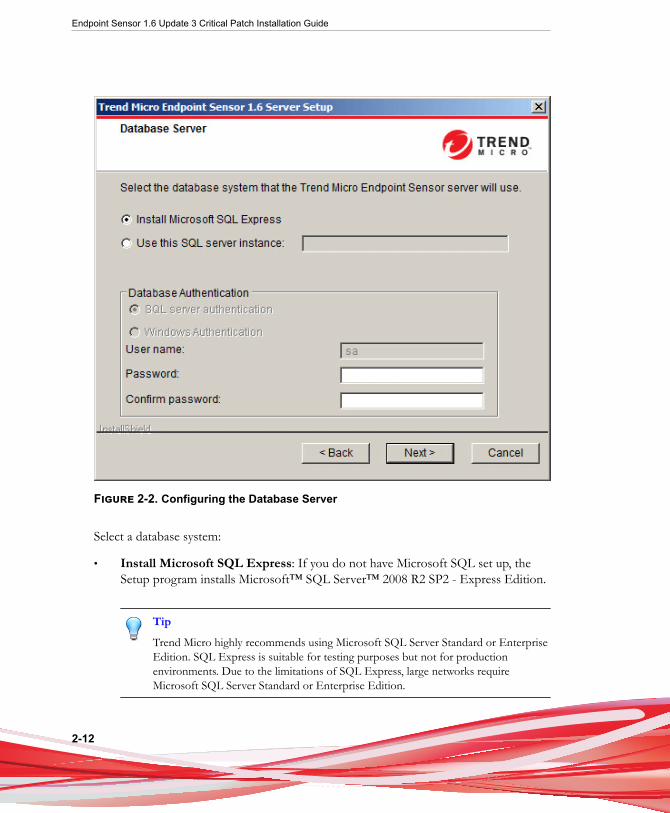
Database ServerThis screen sets the Endpoint Sensor database server used in investigations and agentconfigurations. The following options are available:
Endpoint Sensor 1.6 Update 3 Critical Patch Installation Guide
2-12
Figure 2-2. Configuring the Database Server
Select a database system:
• Install Microsoft SQL Express: If you do not have Microsoft SQL set up, theSetup program installs Microsoft™ SQL Server™ 2008 R2 SP2 - Express Edition.
Tip
Trend Micro highly recommends using Microsoft SQL Server Standard or EnterpriseEdition. SQL Express is suitable for testing purposes but not for productionenvironments. Due to the limitations of SQL Express, large networks requireMicrosoft SQL Server Standard or Enterprise Edition.
Trend Micro Endpoint Sensor Installation
2-13
• Use this SQL Server instance: Type the SQL Server instance that you want touse. To specify another SQL server, identify the server using its FQDN, IPv4address, or NetBIOS name.
Note
• A database from another Endpoint Sensor installation (or from a backup) canbe used, as long as they are of the same version. However, ensure that the newenvironment matches exactly with the original environment of the database.
• Restoring a database to a previous state can lead to inconsistency of databetween server and agent.
Provide credentials to access the database server:
• SQL Server Account
By default, the user name is sa.
• Windows Account
Type the user name in this format: domain name\user name. The accountshould meet the following requirements:
• Belongs to the Administrators Group
• Assigned with the Log on as a service user rights
• Assigned with the dbcreator and db_owner database roles
Note
To use a Windows account, the ASP.NET Impersonation feature of the server's IISinstallation must be enabled and configured to use the Specific user identity. See the IISdocumentation for more information on the ASP.NET Impersonation feature.
Assign a secure password for the Endpoint Sensor database.
Endpoint Sensor 1.6 Update 3 Critical Patch Installation Guide
2-14
Tip
Follow the guidelines below to select a secure password:
• Use a long password. Trend Micro recommends using a password of at least 10characters, but longer passwords are preferred.
• Avoid names or words in dictionaries.
• Use a combination of mixed-case letters, numbers, and other characters.
• Avoid simple patterns such as “101010” or “abcde.”
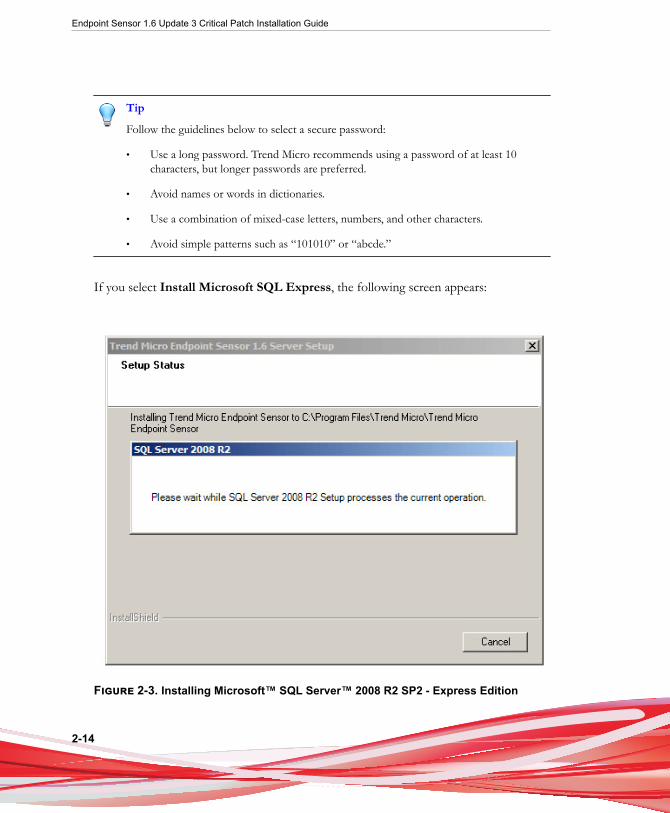
If you select Install Microsoft SQL Express, the following screen appears:
Figure 2-3. Installing Microsoft™ SQL Server™ 2008 R2 SP2 - Express Edition

Trend Micro Endpoint Sensor Installation
2-15
Management Console
Confirm that the required IIS server and role services have already been installed.
For details, see Server Installation Checklist on page 1-2.
This screen sets how the network connects to the Endpoint Sensor server managementconsole. Accept the default settings or specify new ones. The following options areavailable:
Figure 2-4. Configuring the Management Console Settings
• SSL port: Accept the default value (8000) or specify a new port. By default, theEndpoint Sensor management console is accessed using HTTPS.
Endpoint Sensor 1.6 Update 3 Critical Patch Installation Guide
2-16
• Access the console using HTTP: If the IIS server requires HTTP, select thisoption to enable the setting below.
• HTTP port: Accept the default value (8001) or specify a new port number. Ifthe port is changed, access the management console using the new port.
Server Identification
Specify the host address of the server where Endpoint Sensor is being installed. Thehost address functions as a server ID which agents will use to connect with the server.The following options are available:
Figure 2-5. Configuring the Server Identification

Trend Micro Endpoint Sensor Installation
2-17
ImportantOnce the installation completes, the server identification specified on this screen becomespermanent. If there is a need to change the server identification at a later time, both theEndpoint Sensor server and all registered agents must be reinstalled.
• Fully qualified domain name (FQDN) or host name: Type the FQDN or hostname of the Endpoint Sensor server.
• IP address: Select from the list of available IPv4 addresses.
Endpoint Sensor 1.6 Update 3 Critical Patch Installation Guide
2-18
Server Communication
This screen identifies the ports that the Endpoint Sensor server uses for incoming agentcommunications.
Figure 2-6. Server Communication
Endpoint Sensor uses HTTPS for server communication. The following options areavailable:
• Fast port: Default is 8002.
• Slow port: Default is 8003. Investigations using the System Process Audit methoduse the slow port for server communication.
Trend Micro Endpoint Sensor Installation
2-19
Certificate Import
This screen sets the certificate used by the web server.
Figure 2-7. Configuring Certificate Import
The following options are available:
• Generate a new certificate: Endpoint Sensor automatically generates a newcertificate for the web server during installation.
• Import a certificate: Import an existing certificate. Ensure that the certificatemeets the following criteria:
• The certificate is in *.pfx format.
Endpoint Sensor 1.6 Update 3 Critical Patch Installation Guide
2-20
• The certificate uses Trend.pfx as its file name.
• The certificate should be password-protected.
Internal Proxy for Agent Connection to ServerThis screen defines the settings for agent-to-server communication through a proxy.
ImportantThese settings will be applied to all agent installation packages sent from the EndpointSensor server. After agents have been installed, the agent-to-server proxy settings cannot bechanged from the Endpoint Sensor management console. The management console canonly set proxy settings for new agents. Ensure that your agent-to-server proxy settings arecorrect before completing this step.
If you need to change agent-to-server proxy settings after agents have already beeninstalled, contact Trend Micro support.
Trend Micro Endpoint Sensor Installation
2-21
Figure 2-8. Setting the Proxy for Agent-to-Server Communication
The following options are available:
• Use the following proxy settings when agents connect to the server: Select toenable the proxy settings.
• Proxy type: Endpoint Sensor supports proxy connection over HTTP or SOCKS5protocols.
• Server name or IP address: Specify the host name or IP address of the proxyserver.
• Port: Specify the proxy server's port.
• Authentication: If the proxy server requires a user name or password, specifycredentials here.
Endpoint Sensor 1.6 Update 3 Critical Patch Installation Guide
2-22
About the Management Console Admin AccountPassword
During the Endpoint Sensor server installation, setup creates the default "admin"account and prompts for a password for this account.
Endpoint Sensor uses the following criteria to check the password strength:
• The password is 8 to 64 characters long
• The password contains:
• at least one number
• at least one lower-case character
• at least one upper-case character
• at least one of these symbol characters (! @ # $ % ^ & * ( ) _ + = -)
• The password does not contain any of these unsupported symbols: |><\" orspace
Tip
Follow the guidelines below to select a secure password:
• Use a long password. Trend Micro recommends using a password of at least 10characters, but longer passwords are preferred.
• Avoid names or words in dictionaries.
• Use a combination of mixed-case letters, numbers, and other characters.
• Avoid simple patterns such as “101010” or “abcde.”
Local Agent InstallationConfirm that all installation requirements have been met. For details, see Local AgentInstallation Considerations on page 1-7.

Trend Micro Endpoint Sensor Installation
2-23
Procedure
1. On the server, copy the file EndpointSensor.exe. By default, the file is locatedin the following folder:
C:\Program Files\Trend Micro\Trend Micro Endpoint Sensor\Download\Agent\Endpointsensor.exe
2. On the target endpoint, paste the copied file in a local folder, and run cmd.exe asan administrator.
3. In the cmd.exe window, navigate to the folder where EndpointSensor.exewas pasted.
4. Issue the following command:
EndpointSensor.exe
EndpointSensor.exe installs the agent program in the background.
5. Log on to the Endpoint Sensor management console, and verify that the newly-installed agent is now listed in the Endpoints screen.
Note
If the agent is missing from the Endpoints screen, verify that your firewall programallows network traffic between the server and agent. If the problem persists, contactTrend Micro support.
Local Agent Silent InstallationIf installation of the agent will be automated, a silent install may be performed. Theinstallation process does not display messages or windows during its progress. A silentinstallation is ideal for a large-scale enterprise deployment.
Before continuing, confirm that all installation requirements have been met. For details,see Local Agent Installation Considerations on page 1-7.
Endpoint Sensor 1.6 Update 3 Critical Patch Installation Guide
2-24
Procedure
1. On the server, copy the file EndpointSensor.exe. By default, the file is locatedin the following folder:
C:\Program Files\Trend Micro\Trend Micro Endpoint Sensor\Download\Agent\Endpointsensor.exe
2. On the target endpoint, paste the copied file in a local folder, and run cmd.exe asan administrator.
3. Go to the folder where EndpointSensor.exe is copied.
4. Issue the following command:
EndpointSensor.exe /C:"agentsetuplauncher.exe -quiet -install"
EndpointSensor.exe installs the agent program in the background. Theinstallation process does not display messages or windows during its progress.
5. Log on to the Endpoint Sensor management console, and verify that the newly-installed agent is now listed in the Endpoints screen.
NoteIf the agent is missing from the Endpoints screen, verify that your firewall programallows network traffic between the server and agent. If the problem persists, contactTrend Micro support.
Trend Micro Endpoint Sensor ServerUninstallation
Procedure
1. On the server which hosts Endpoint Sensor , click Control Panel > Programsand Features. Locate and double-click “Endpoint Sensor .”
Trend Micro Endpoint Sensor Installation
2-25
2. Follow the on-screen instructions.
The server uninstallation program removes the server files. A confirmationmessage appears upon completion.
3. Click Finish to close the uninstallation program.
Local Agent Uninstallation
Procedure
1. On the target endpoint, run cmd.exe as an administrator.
2. Locate the folder where EndpointSensor_Uninstall.exe is installed
3. Issue the following command:
EndpointSensor_Uninstall.exe
The program uninstalls the agent program in the background.
Log on to the Endpoint Sensor management console. The Endpoints screen should nolonger list the host name and other information related to the uninstalled agent.
Local Agent Silent Uninstallation
Procedure
1. On the target endpoint, run cmd.exe as an administrator.
2. Locate the folder where EndpointSensor.exe is installed
3. Issue the following command:
EndpointSensor_uninstall.exe /C:"agentsetuplauncher.exe -quiet -uninstall"
Endpoint Sensor 1.6 Update 3 Critical Patch Installation Guide
2-26
EndpointSensor.exe uninstalls the agent program in the background. Theuninstallation process does not display messages or windows during its progress.
Log on to the Endpoint Sensor management console. The Endpoints screen should nolonger list the host name and other information related to the uninstalled agent.
3-1
Chapter 3
OfficeScan IntegrationThe following content explains how to use the Trend Micro Endpoint SensorDeployment Tool OfficeScan plug-in to deploy Endpoint Sensor across an enterprisewith endpoints managed by OfficeScan.
Topics include:
• About Trend Micro OfficeScan Integration on page 3-2
• About Plug-in Manager on page 3-2
• Installing OfficeScan on page 3-3
• Agent Installation Considerations When Using OfficeScan on page 3-4
• Using the Trend Micro Endpoint Sensor Deployment Tool on page 3-4
• Trend Micro Endpoint Sensor Agent Deployment Tasks on page 3-11
• The OfficeScan Agent Tree on page 3-14
Endpoint Sensor 1.6 Update 3 Critical Patch Installation Guide
3-2
About Trend Micro OfficeScan IntegrationOfficeScan protects enterprise networks from malware, network viruses, web-basedthreats, spyware, and mixed threat attacks. An integrated solution, OfficeScan consists ofan agent that resides at the endpoint and a server program that manages all agents.
The agent guards the endpoint and reports its security status to the server. The server,through the web-based management console, makes it easy to set coordinated securitypolicies and deploy updates to every agent.
NoteFor information about OfficeScan, see the supporting documentation at:
http://docs.trendmicro.com/en-us/enterprise/officescan.aspx
Use the OfficeScan Trend Micro Endpoint Sensor Deployment Tool plug-in to deployEndpoint Sensor agents to OfficeScan managed endpoints. You can select endpointsbased on specific criteria and see the status of the deployment.
After the Trend Micro Endpoint Sensor Deployment Tool plug-in deploys the EndpointSensor agent software, the Endpoint Sensor agent synchronizes to the Endpoint Sensorserver specified in the plug-in. OfficeScan does not manage Endpoint Sensor agents orperform investigations. The OfficeScan agent and the Endpoint Sensor agent areindependent on the same endpoint.
About Plug-in ManagerOfficeScan includes a framework called Plug-in Manager that integrates new solutionsinto the existing OfficeScan environment. To help ease the management of thesesolutions, Plug-in Manager provides at-a-glance data for the solutions in the form ofwidgets.
NoteNone of the plug-in solutions currently support IPv6. The server can download thesesolutions but is not able to deploy the solutions to pure IPv6 Trend Micro EndpointSensor agents or pure IPv6 hosts.

OfficeScan Integration
3-3
Plug-in Manager delivers the following:
• Native Product Features
Some native OfficeScan features are licensed separately and activated through Plug-in Manager. In this release, two features fall under this category, namely, TrendMicro Virtual Desktop Support and OfficeScan Data Protection.
• Plug-in programs
Plug-in programs are not part of the OfficeScan program. The plug-in programshave separate licenses and management consoles. Access the management consolesfrom within the OfficeScan web console. Examples of plug-in programs are TrendMicro OfficeScan ToolBox and Trend Micro Security (for Mac).
• Dashboard tabs and widgets
The OfficeScan Summary screen requires Plug-in Manager to display the tabs andwidgets used to monitor the OfficeScan server and agent protection status.
This document provides a general overview of plug-in program installation andmanagement and discusses plug-in program data available in widgets. Refer to specificplug-in program documentation for details on configuring and managing the program.
Installing OfficeScanFor information about installing and configuring OfficeScan, see the documentationavailable at:
http://docs.trendmicro.com/en-us/enterprise/officescan.aspx
For information on how to prepare the OfficeScan Trend Micro Endpoint SensorDeployment Tool before deploying agents, see the Endpoint Sensor Installation andMigration Guide.
Endpoint Sensor 1.6 Update 3 Critical Patch Installation Guide
3-4
Agent Installation Considerations When UsingOfficeScan
When using OfficeScan to install the Endpoint Sensor agent, check that yourenvironment meets the following criteria:
• The server must have one of the following versions of OfficeScan installed:
• OfficeScan version 10.6
• OfficeScan version 10.6 Service Pack 1
• OfficeScan version 10.6 Service Pack 2
• OfficeScan version 10.6 Service Pack 3
• OfficeScan version 11
• OfficeScan version 11 Service Pack 1
• OfficeScan XG
• The server must have Microsoft Internet Explorer 9 or later installed.
• The OfficeScan installation must have Plug-in Manager installed.
• The OfficeScan installation must not be installed in an Apache HTTP Serverenvironment. Endpoint Sensor does not support Apache HTTP Serverenvironments.
Using the Trend Micro Endpoint SensorDeployment Tool
This section outlines how to configure OfficeScan in order to install or uninstall theTrend Micro Endpoint Sensor Deployment Tool.
Topics include:
• Trend Micro Endpoint Sensor Deployment Tool Installation on page 3-5
OfficeScan Integration
3-5
• Plug-in Program Management on page 3-6
• Trend Micro Endpoint Sensor Deployment Tool Uninstallation on page 3-6
• Deployment Tool Error Codes on page 3-7
Trend Micro Endpoint Sensor Deployment ToolInstallation
Plug-in programs display on the Plug-in Manager console. Use the console todownload, install, and manage the programs. Plug-in Manager downloads the installationpackage for the plug-in program from the Trend Micro ActiveUpdate server or from acustom update source, if one has been properly set up. An Internet connection isnecessary to download the package from the ActiveUpdate server.
When Plug-in Manager downloads an installation package or starts the installation, Plug-in Manager temporarily disables other plug-in program functions such as downloads,installations, and upgrades.
Plug-in Manager does not support plug-in program installation or management from theTrend Micro Control Manager single sign-on function.
Installing Trend Micro Endpoint Sensor Deployment Tool
Procedure
1. Open the OfficeScan web console and click Plug-in Manager in the main menu.
2. On the Plug-in Manager screen, go to the Endpoint Sensor plug-in section andclick Download.
The size of the plug-in program package displays beside the Download button.Plug-in Manager stores the downloaded package to <OSCE serverinstallation folder>\PCCSRV\Download\Product.
Monitor the progress or navigate away from the screen during the download.
3. Click Agree to install the plug-in program.
Endpoint Sensor 1.6 Update 3 Critical Patch Installation Guide
3-6
Monitor the progress or navigate away from the screen during the download.
After the installation, the current plug-in program version displays on the Plug-inManager screen.
Note
• If OfficeScan encounters problems downloading or installing the package, check theserver update logs on the OfficeScan web console. On the main menu, click Logs >Server Update.
• Trend Micro recommends using Internet Explorer 9 to access Trend Micro EndpointSensor Deployment Tool.
Plug-in Program ManagementConfigure settings and perform program-related tasks from the plug-in program’smanagement console, which is accessible from each OfficeScan web console. Tasksinclude activating the program and deploying the plug-in program agent to endpoints.Consult the documentation of the specific plug-in program for details on configuringand managing the program.
Managing Trend Micro Endpoint Sensor Deployment Tool
Procedure
1. Open the OfficeScan web console and click Plug-in Manager in the main menu.
2. On the Plug-in Manager screen, go to the plug-in program section and clickManage Program.
Trend Micro Endpoint Sensor Deployment ToolUninstallation
Uninstall a plug-in program in the following ways:

OfficeScan Integration
3-7
• Uninstall the OfficeScan server, which uninstalls Plug-in Manager and all installedplug-in programs. For instructions on uninstalling the OfficeScan server, see theOfficeScan Installation and Upgrade Guide.
• Uninstall the plug-in program from the Plug-in Manager console.
WARNING!
Uninstalling the Trend Micro Endpoint Sensor Deployment Tool automatically uninstallsall agents listed in the agent tree. To ensure that all agents uninstall properly, use the agenttree to uninstall all agents first before uninstalling the Trend Micro Endpoint SensorDeployment Tool.
For details, see Uninstalling the Trend Micro Endpoint Sensor Agent on page 3-17.
Uninstalling Trend Micro Endpoint Sensor Deployment Toolfrom the Plug-in Manager Console
Procedure
1. Open the OfficeScan web console and click Plug-in Manager in the main menu.
2. On the Plug-in Manager screen, go to the plug-in program section and clickUninstall.
3. Refresh the Plug-in Manager screen after the uninstallation.
The plug-in program is available for reinstallation.
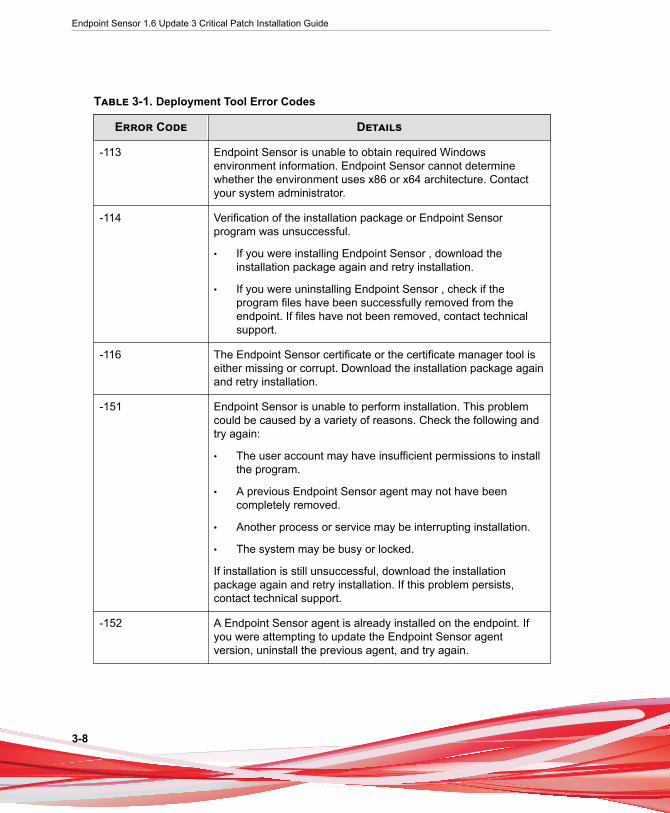
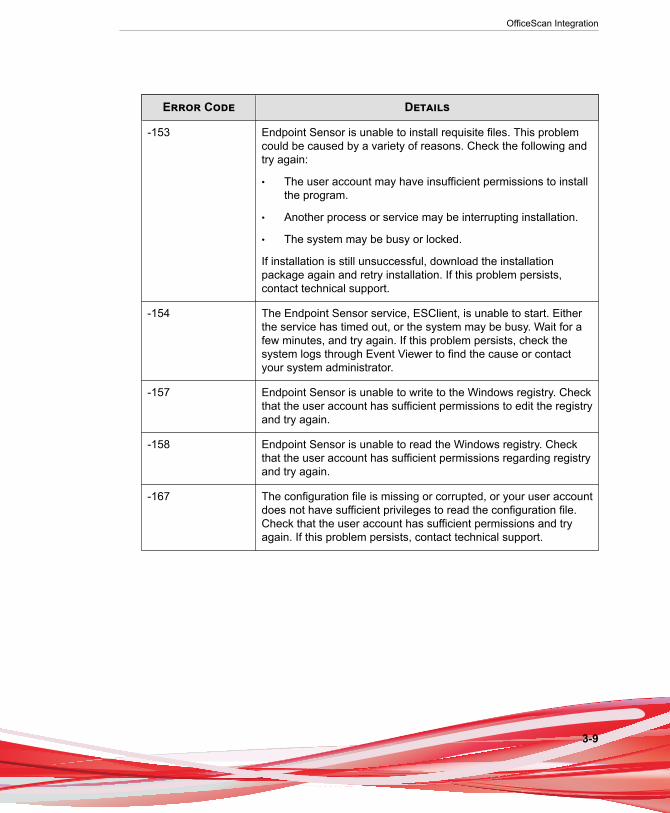
Deployment Tool Error Codes
The following error codes may appear while using the Trend Micro Endpoint SensorDeployment Tool. Use the following list for potential solutions to issues you mayencounter.
Endpoint Sensor 1.6 Update 3 Critical Patch Installation Guide
3-8
Table 3-1. Deployment Tool Error Codes
Error Code Details
-113 Endpoint Sensor is unable to obtain required Windowsenvironment information. Endpoint Sensor cannot determinewhether the environment uses x86 or x64 architecture. Contactyour system administrator.
-114 Verification of the installation package or Endpoint Sensorprogram was unsuccessful.
• If you were installing Endpoint Sensor , download theinstallation package again and retry installation.
• If you were uninstalling Endpoint Sensor , check if theprogram files have been successfully removed from theendpoint. If files have not been removed, contact technicalsupport.
-116 The Endpoint Sensor certificate or the certificate manager tool iseither missing or corrupt. Download the installation package againand retry installation.
-151 Endpoint Sensor is unable to perform installation. This problemcould be caused by a variety of reasons. Check the following andtry again:
• The user account may have insufficient permissions to installthe program.
• A previous Endpoint Sensor agent may not have beencompletely removed.
• Another process or service may be interrupting installation.
• The system may be busy or locked.
If installation is still unsuccessful, download the installationpackage again and retry installation. If this problem persists,contact technical support.
-152 A Endpoint Sensor agent is already installed on the endpoint. Ifyou were attempting to update the Endpoint Sensor agentversion, uninstall the previous agent, and try again.
OfficeScan Integration
3-9
Error Code Details
-153 Endpoint Sensor is unable to install requisite files. This problemcould be caused by a variety of reasons. Check the following andtry again:
• The user account may have insufficient permissions to installthe program.
• Another process or service may be interrupting installation.
• The system may be busy or locked.
If installation is still unsuccessful, download the installationpackage again and retry installation. If this problem persists,contact technical support.
-154 The Endpoint Sensor service, ESClient, is unable to start. Eitherthe service has timed out, or the system may be busy. Wait for afew minutes, and try again. If this problem persists, check thesystem logs through Event Viewer to find the cause or contactyour system administrator.
-157 Endpoint Sensor is unable to write to the Windows registry. Checkthat the user account has sufficient permissions to edit the registryand try again.
-158 Endpoint Sensor is unable to read the Windows registry. Checkthat the user account has sufficient permissions regarding registryand try again.
-167 The configuration file is missing or corrupted, or your user accountdoes not have sufficient privileges to read the configuration file.Check that the user account has sufficient permissions and tryagain. If this problem persists, contact technical support.
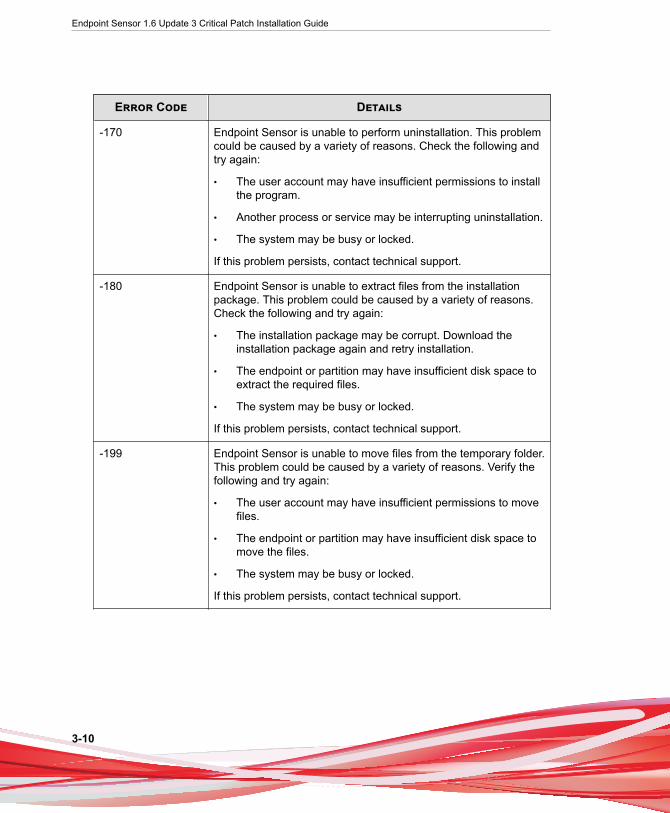
Endpoint Sensor 1.6 Update 3 Critical Patch Installation Guide
3-10
Error Code Details
-170 Endpoint Sensor is unable to perform uninstallation. This problemcould be caused by a variety of reasons. Check the following andtry again:
• The user account may have insufficient permissions to installthe program.
• Another process or service may be interrupting uninstallation.
• The system may be busy or locked.
If this problem persists, contact technical support.
-180 Endpoint Sensor is unable to extract files from the installationpackage. This problem could be caused by a variety of reasons.Check the following and try again:
• The installation package may be corrupt. Download theinstallation package again and retry installation.
• The endpoint or partition may have insufficient disk space toextract the required files.
• The system may be busy or locked.
If this problem persists, contact technical support.
-199 Endpoint Sensor is unable to move files from the temporary folder.This problem could be caused by a variety of reasons. Verify thefollowing and try again:
• The user account may have insufficient permissions to movefiles.
• The endpoint or partition may have insufficient disk space tomove the files.
• The system may be busy or locked.
If this problem persists, contact technical support.
OfficeScan Integration
3-11
Trend Micro Endpoint Sensor AgentDeployment Tasks
The following procedure explains how to install Endpoint Sensor agents.
Procedure
1. Install and open the Trend Micro Endpoint Sensor Deployment Tool plug-in.
For details, see Using the Trend Micro Endpoint Sensor Deployment Tool on page 3-4.
2. Configure the Endpoint Sensor server and download the agent installation package.
For details, see Downloading the Installation Package on page 3-11.
3. Install the Endpoint Sensor agent program to selected endpoints.
For information on using Agent Tree to select domains and agents, see Agent TreeSpecific Tasks on page 3-14.
For information about agent installation, see Installing the Trend Micro Endpoint SensorAgent on page 3-13.
Once installation is complete, each OfficeScan agent acts independently of eachEndpoint Sensor agent.
4. On the Summary screen, verify that all agents have been installed.
For information about the Summary screen, see Monitoring Trend Micro EndpointSensor Agents on page 3-14.
5. Use the Endpoint Sensor management console to manage agents and performinvestigations.
Downloading the Installation PackageBefore you can deploy the Endpoint Sensor agents, you must specify the location wherethe Endpoint Sensor server downloads the agent installation package.

Endpoint Sensor 1.6 Update 3 Critical Patch Installation Guide
3-12
Note
At any time, if you want to change the current server URL or reset the proxy settings, clickReset Trend Micro Endpoint Sensor Server URL and proxy server.
Procedure
1. Go to Administration > Server Setup.
2. Specify the URL of the Endpoint Sensor server.
This is the same URL of the Endpoint Sensor server management console.Endpoint Sensor agents report to this server.
3. If you intend to download the agent installation package over a proxy, specify yourproxy settings.
Endpoint Sensor can also use the same proxy server set in OfficeScan. To specifyproxy settings for Endpoint Sensor , use the Trend Micro Endpoint SensorDeployment Tool Set Server screen.
Table 3-2. Proxy Setting Requirements
Field Action Required
Proxy settings toggle Check the box to enable communication over a proxy.
Proxy protocol Endpoint Sensor supports proxy over HTTP orSOCKS5 protocols.
Server name or IP address Specify the IP address or URL of the proxy server.
Port Specify the port of the proxy server.
User ID If the proxy server requires authentication, specify theuser name for authentication.
Password If the proxy server requires authentication, specify thepassword for authentication.
4. Click Set and Download.
OfficeScan Integration
3-13
Endpoint Sensor tests the connection to the server, sets the server for EndpointSensor agent management, and then attempts to download the latest agentinstallation package from that server.
Note
After configuration, the screen changes to show which server has been set up. Todownload the latest agent installation package, click Get latest package.
Installing the Trend Micro Endpoint Sensor Agent
Note
You can install the Endpoint Sensor agent program to domains or individual agents but notto the root domain.
Procedure
1. Open the plug-in console and go to the Agent Management screen.
2. In the agent tree, select specific domains or agents.
3. Click Deploy Agent.
The Deploy Agent confirmation screen appears.
Important
Verify that the operating system of the endpoints where agents will be deployed issupported by Trend Micro Endpoint Sensor Deployment Tool, as the tool will skipinstallation on endpoints with unsupported operating systems. Trend Micro EndpointSensor will generate a list of the endpoints that the Endpoint Sensor agent was notinstalled on after installation. For details on supported operating systems, refer to theSystem Requirements section of the Installation Guide.
4. Click Install.
Endpoint Sensor begins deploying the agent to the selected endpoints.
Endpoint Sensor 1.6 Update 3 Critical Patch Installation Guide
3-14
If Endpoint Sensor agent installation was skipped on any endpoints, EndpointSensor generates a list of those endpoints.
5. Click Close to return to the Agent Management screen.
Monitoring Trend Micro Endpoint Sensor AgentsThe Summary screen shows the installation status of the Endpoint Sensor agents.
The Agent Installation Status widget displays the number of endpoints with theEndpoint Sensor agent installed.
NoteClick the Agents hyperlink to view the agents in the Agent Management tree.
The OfficeScan Agent TreeThe OfficeScan agent tree displays all the agents grouped into domains that the servercurrently manages. Agents are grouped into domains so you can simultaneouslyconfigure, manage, and apply the same configuration to all domain members.
The OfficeScan Agent TreeThe OfficeScan agent tree displays all the agents grouped into domains that the servercurrently manages. This allows administrators to configure, manage, and apply the sameconfiguration to all domain members.
Agent Tree Specific TasksThe agent tree displays when you access certain screens on the web console. Above theagent tree are menu items specific to the screen you have accessed. These menu itemsallow you to perform specific tasks, such as configuring agent settings or initiating agenttasks. To perform any of the tasks, first select the task target and then select a menuitem.

OfficeScan Integration
3-15
The agent tree provides access to the following functions:
• Search for computers: Locate specific endpoints by typing search criteria in thetext box.
• Advanced Search: Click the hyperlink to display the Advanced Search screen.Locate specific endpoints by using specific search criteria.
For details, see Performing an Advanced Search on page 3-15.
• Synchronize with OfficeScan: Synchronize the plug-in program’s agent tree withthe OfficeScan server’s agent tree.
For details, see Synchronizing the Agent Tree on page 3-16.
• Deploy Agent: Install and deploy Endpoint Sensor agents to selected endpoints orupgrade existing Endpoint Sensor agents to the latest version.
For details, see Installing the Trend Micro Endpoint Sensor Agent on page 3-13.
• Uninstall: Uninstall Endpoint Sensor agents from the selected endpoints.
For details, see Uninstalling the Trend Micro Endpoint Sensor Agent on page 3-17.
Administrators can also manually search the agent tree to locate endpoints or domains.Specific computer information displays in the table on the right.
Performing an Advanced Search
Procedure
1. Open the plug-in program console. On the Agent Management screen, click theAdvanced Search link.
The Advanced Search screen appears.
2. Search for agents by specifying the available criteria.

Endpoint Sensor 1.6 Update 3 Critical Patch Installation Guide
3-16
Table 3-3. Search Criteria
Criteria Description
IPv4 range Searching by IPv4 address range requires a portion of anIP address starting with the first octet. The search returnsall endpoints with IP addresses containing that entry. Forexample, typing 10.5 returns all endpoints in the IP addressrange 10.5.0.0 to 10.5.255.255.
Host name Search by host name.
Platform NoteEndpoint Sensor supports both 32-bit and 64-bitplatforms.
For example, type Windows Server to return a list of allWindows Server platform endpoints available.
Search by operating system.
Connection status Search by agent connection status.
Installation status Search by agent installation status.
Domain name Search by agent domain name.
Build version Search by agent version.
3. Click Search.
Synchronizing the Agent TreeBefore the plug-in program can deploy settings to agents, administrators need tosynchronize the agent tree with the OfficeScan server.
Procedure
1. Open the plug-in console.
2. On the Agent Management screen, click Synchronize with OfficeScan.
OfficeScan Integration
3-17
A confirmation message screen appears.
3. Allow a few moments for the synchronization to complete.
After the synchronization completes, the message The client tree hasbeen successfully synchronized with the OfficeScan serverappears.
4. Click Close to return to the Agent Management screen.
Uninstalling the Trend Micro Endpoint Sensor Agent
Procedure
1. Open the plug-in console and go to the Agent Management screen.
2. In the agent tree, select specific domains or agents.
3. Click Uninstall.
4. Click OK to confirm the uninstallation.
5. Click Close in the confirmation dialog.
6. Monitor the uninstallation of the Endpoint Sensor agent in the Installation Statuscolumn of the Agent Management screen.
TipAllow some time for the uninstallation process to complete. Click the Refresh buttonperiodically to view the updated status.


4-1
Chapter 4
Technical SupportLearn about the following topics:
• Troubleshooting Resources on page 4-2
• Contacting Trend Micro on page 4-3
• Sending Suspicious Content to Trend Micro on page 4-4
• Other Resources on page 4-5
Endpoint Sensor 1.6 Update 3 Critical Patch Installation Guide
4-2
Troubleshooting ResourcesBefore contacting technical support, consider visiting the following Trend Micro onlineresources.
Using the Support PortalThe Trend Micro Support Portal is a 24x7 online resource that contains the most up-to-date information about both common and unusual problems.
Procedure
1. Go to http://esupport.trendmicro.com.
2. Select from the available products or click the appropriate button to search forsolutions.
3. Use the Search Support box to search for available solutions.
4. If no solution is found, click Contact Support and select the type of supportneeded.
Tip
To submit a support case online, visit the following URL:
http://esupport.trendmicro.com/srf/SRFMain.aspx
A Trend Micro support engineer investigates the case and responds in 24 hours orless.
Threat EncyclopediaMost malware today consists of blended threats, which combine two or moretechnologies, to bypass computer security protocols. Trend Micro combats this complexmalware with products that create a custom defense strategy. The Threat Encyclopedia
Technical Support
4-3
provides a comprehensive list of names and symptoms for various blended threats,including known malware, spam, malicious URLs, and known vulnerabilities.
Go to http://about-threats.trendmicro.com/us/threatencyclopedia#malware to learnmore about:
• Malware and malicious mobile code currently active or "in the wild"
• Correlated threat information pages to form a complete web attack story
• Internet threat advisories about targeted attacks and security threats
• Web attack and online trend information
• Weekly malware reports
Contacting Trend MicroIn the United States, Trend Micro representatives are available by phone or email:
Address Trend Micro, Incorporated
225 E. John Carpenter Freeway, Suite 1500
Irving, Texas 75062 U.S.A.
Phone Phone: +1 (817) 569-8900
Toll-free: (888) 762-8736
Website http://www.trendmicro.com
Email address [email protected]
• Worldwide support offices:
http://www.trendmicro.com/us/about-us/contact/index.html
• Trend Micro product documentation:
http://docs.trendmicro.com
Endpoint Sensor 1.6 Update 3 Critical Patch Installation Guide
4-4
Speeding Up the Support Call
To improve problem resolution, have the following information available:
• Steps to reproduce the problem
• Appliance or network information
• Computer brand, model, and any additional connected hardware or devices
• Amount of memory and free hard disk space
• Operating system and service pack version
• Version of the installed agent
• Serial number or Activation Code
• Detailed description of install environment
• Exact text of any error message received
Sending Suspicious Content to Trend MicroSeveral options are available for sending suspicious content to Trend Micro for furtheranalysis.
Email Reputation Services
Query the reputation of a specific IP address and nominate a message transfer agent forinclusion in the global approved list:
https://ers.trendmicro.com/
Refer to the following Knowledge Base entry to send message samples to Trend Micro:
http://esupport.trendmicro.com/solution/en-US/1112106.aspx
Technical Support
4-5
File Reputation Services
Gather system information and submit suspicious file content to Trend Micro:
http://esupport.trendmicro.com/solution/en-us/1059565.aspx
Record the case number for tracking purposes.
Web Reputation Services
Query the safety rating and content type of a URL suspected of being a phishing site, orother so-called "disease vector" (the intentional source of Internet threats such asspyware and malware):
http://global.sitesafety.trendmicro.com/
If the assigned rating is incorrect, send a re-classification request to Trend Micro.
Other ResourcesIn addition to solutions and support, there are many other helpful resources availableonline to stay up to date, learn about innovations, and be aware of the latest securitytrends.
Download Center
From time to time, Trend Micro may release a patch for a reported known issue or anupgrade that applies to a specific product or service. To find out whether any patchesare available, go to:
http://www.trendmicro.com/download/
If a patch has not been applied (patches are dated), open the Readme file to determinewhether it is relevant to your environment. The Readme file also contains installationinstructions.
Endpoint Sensor 1.6 Update 3 Critical Patch Installation Guide
4-6
Documentation FeedbackTrend Micro always seeks to improve its documentation. If you have questions,comments, or suggestions about this or any Trend Micro document, please go to thefollowing site:
http://www.trendmicro.com/download/documentation/rating.asp
IN-1
IndexAabout
OfficeScan, 3-2agent
install, 3-13local installation, 2-22monitoring, 3-14silent installation, 2-23silent uninstallation, 2-25uninstall, 3-17
agent tree, 3-14about, 3-14specific tasks, 3-14synchronize, 3-16
Cconnection
agent connection to server, 2-20
Ddatabase server, 2-11documentation feedback, 4-6
Iinstallation
agent, 3-13local, 2-22
silent, 2-23plug-in program, 3-5server, 2-2status, 3-14
Mmanagement console, 2-15
admin password, 2-22
OOfficeScan
synchronize, 3-16
Ppassword, 2-22Plug-in Manager, 3-2plug-in program
installation, 3-5uninstall, 3-7
portserver communication, 2-18
proxyagent connection to server, 2-20
Rrequirements
agent, 1-7server, 1-2–1-4
Sserver
communication, 2-18database, 2-11identification, 2-16installation, 2-2listening port, 2-18requirements, 1-2–1-4uninstallation, 2-24
server identification, 2-16SQL
Express, 2-12screen, 2-14Server, 2-13
support

Endpoint Sensor 1.6 Update 3 Critical Patch Installation Guide
IN-2
resolve issues faster, 4-4
Uuninstallation
agent, 3-17local
silent, 2-25local agent, 2-25plug-in program, 3-7