Copyright © 2012 ROLAND CORPORATIONThe Arranger function now uses “Adaptive Chord Voicing...
44
Transcript of Copyright © 2012 ROLAND CORPORATIONThe Arranger function now uses “Adaptive Chord Voicing...


Copyright © 2012 ROLAND CORPORATION
All rights reserved. No part of this publication may be reproduced in any form without the written permission of ROLAND CORPORATION.
2
C-01-1
• It is forbidden by law to make an audio recording, video recording, copy or revision of a third party’s copyrighted work (musical work, video work, broadcast, live performance, or other work), whether in whole or in part, and distribute, sell, lease, perform, or broadcast it without the permission of the copyright owner.
C-01-2• Do not use this product for purposes that could
infringe on a copyright held by a third party. We assume no responsibility whatsoever with regard to any infringements of third-party copyrights arising through your use of this product.
C-03-4
• The copyright of content in this product (the sound waveform data, style data, accompaniment patterns, phrase data, audio loops and image data) is reserved by Roland Corporation.
C-03-5
• Purchasers of this product are permitted to utilize said content for the creating, performing, recording and distributing original musical works.
C-03-6
• Purchasers of this product are NOT permitted to extract said content in original or modified form, for the purpose of distributing recorded medium of said content or making them available on a computer network.
C-06-8 • You cannot save song data that is copyrighted.
C-06-9
• Unauthorized use of the exported notation data for purposes other than personal enjoyment without permission from the copyright holder is forbidden by law.
2a • MMP (Moore Microprocessor Portfolio) refers to a patent portfolio concerned with microprocessor architecture, which was developed by Technology Properties Limited (TPL). Roland has licensed this technology from the TPL Group.
• XG ( ) is a registered trademark or a trademark of Yamaha Corporation.
• XGlite ( ) is a registered trademark or a trademark of Yamaha Corporation.
3a • Roland, GS, SuperNATURAL, DigiScore, VIMA, VIMA TUNES, D-BEAM are either registered trademarks or trademarks of Roland Corporation in the United States and/or other countries.
T-01 • Company names and product names appearing in this document are registered trademarks or trademarks of their respective owners.
Before using this unit, carefully read the sections entitled: “IMPORTANT SAFETY INSTRUCTIONS” (Owner’s Manual page 2), “USING THE UNIT SAFELY” (Owner’s Manual page 3–5, Supplementary Manual page 2), and “IMPORTANT NOTES” (Owner’s Manual page 6–7, Supplementary Manual page 2). These sections provide important information concerning the proper operation of the unit. Additionally, in order to feel assured that you have gained a good grasp of every feature provided by your new unit, Owner’s Manual and Supplementary Manual should be read in its entirety. The manuals should be saved and kept on hand as a convenient reference.
WARNING
309 Power Supply• With the factory settings, the AT-900P
will automatically be switched off 4 hours after you stop playing or operating the unit. If you don’t want the unit to turn off automatically, change the “AUTO OFF” setting to “OFF” as described on “Auto Off Function (AUTO OFF).”
NOTEThe settings you were editing will be lost when the unit is turned off. If you want to keep your settings, you must save your settings before turning the unit off.
004 Do not use or store in the following types of locations• Subject to temperature extremes
(e.g., direct sunlight in an enclosed vehicle, near a heating duct, on top of heat-generating equipment); or are
• Damp (e.g., baths, washrooms, on wet floors); or are
• Exposed to steam or smoke; or are
• Subject to salt exposure; or are
• Humid; or are
• Exposed to rain; or are
• Dusty or sandy; or are
• Subject to high levels of vibration and shakiness.
CAUTION
123 Handle leaking batteries carefullyIf fluid has leaked from a battery, make sure not to touch it with your bare hands.
If any of the leaking fluid gets into your eyes, the loss of vision may result. Do not rub your eyes; use clean water to flush them thoroughly. Then, promptly see a doctor.
Burning of the skin or dermatitis may result if fluid has gotten onto your skin or clothing. Use clean water to flush affected areas thoroughly; then, promptly see a doctor.
Using a soft cloth, carefully wipe any remaining fluid from the inside of the battery compartment. Then, install new batteries.
Used for instructions intended to alert the user to the risk of injury or material damage should the unit be used improperly.
* Material damage refers to damage or other adverse effects caused with respect to the home and all its furnishings, as well to domestic animals or pets.
Used for instructions intended to alert the user to the risk of death or severe injury should the unit be used improperly.
The symbol alerts the user to things that must be carried out. The specific thing that must be done is indicated by the design contained within the circle. In the case of the symbol at left, it means that the power-cord plug must be unplugged from the outlet.
The symbol alerts the user to important instructions or warnings.The specific meaning of the symbol is determined by the design contained within the triangle. In the case of the symbol at left, it is used for general cautions, warnings, or alerts to danger.
The symbol alerts the user to items that must never be carried out (are forbidden). The specific thing that must not be done is indicated by the design contained within the circle. In the case of the symbol at left, it means that the unit must never be disassembled.
About WARNING and CAUTION Notices About the Symbols
ALWAYS OBSERVE THE FOLLOWING
Additional Precautions
558e • The sound of keys being struck and vibrations produced by playing an instrument can be transmitted through a floor or wall to an unexpected extent. Please take care not to cause annoyance to others nearby.
567 • When you operate the expression pedal, please be careful not to get your fingers pinched between the movable part and the panel. In places where small children are present, make sure that an adult provides supervision and guidance.
IMPORTANT NOTES
USING THE UNIT SAFELY Copyrights/Licences/Trademarks
3
Introduction
About this ManualThis document (Supplementary Manual) explains the new functionality of the AT-900 Platinum Edition (hereafter referred to as the AT-900P).
For details on other functionality, please refer to the AT-900 owner’s manual.
New Functions Explained in This Manual
“Pipe organ” voices■■ High-quality pipe organ voices have been added. You’ll be able to play classic pipe organ pieces with realistic sound.
■■ A pipe organ group has been added to Quick Registration, allowing you to select voice settings suitable for pipe organ performance.
■■ We’ve added settings that facilitate the enjoyment of a full-fledged pipe organ sound when external speakers are connected.
Vintage organ “Flute”■■ In addition to the organ sounds (JAZZ TYPE) you expect from the Music Atelier, organ sounds suitable for pop and rock (ROCK TYPE) have been added.
■■ You can now apply overdrive while performing.
■■ You can now edit organ sounds in detail, including aspects typical of the organ such as the rotary effect and percussion.
SuperNATURAL voices“Articulation voices” have been renamed as “SuperNATURAL voices.” New SuperNATURAL voices have also been added.
D-BEAMMore functions and effects can now be controlled using the D-BEAM controller.
Rhythm■■ We have added new rhythms that are easy to use with organ performances. Some of the drum sets have improved sounds that offer greater realism and power. For details on the rhythms that have been added, refer to “List of Added Rhythms.”
■■ The Arranger function now uses “Adaptive Chord Voicing technology” so that the automatic accompaniment will change in a smoother and more musical way when you change chords.
■■ In conjunction with this, the Rhythm Mode setting formerly present on the AT-900 has been removed; the function will always operate as with the “ORIGINAL” setting.
■■ You can now adjust the volume balance for each accompaniment part.
Recording and playback■■ In addition to the existing recording method (SMF), songs can now be recorded in the form of audio data.
■■ Such audio recordings can be burned to a CD-R and finalized to create a music CD.
■■ The song tempo (playback speed) can now be changed.
What are SuperNATURAL Voices?Taking advantage of Behavior Modeling Technology, SuperNATURAL is Roland’s exclusive sound set that achieves a new level of realism and expression that were difficult to realize with previous sound generators.
Behavior Modeling TechnologyNot only physical modeling of the instruments, Roland takes it a step further by modeling the instrument’s distinctive behavior that responds to how the performer plays, resulting in true-to-life, expressive sounds in realtime.
4
Introduction
Hymn playerA “Hymn Player,” which provides an organ accompaniment for hymns, has been added.
NotationYou can now export three-staff organ notation in BMP format. This is useful for educational needs.
Various other settings■■ We have added various settings related to sound and images, as well as functions that change the operation of buttons.
■■ Now you can also select the language shown in the screen.
Demo songsWe have added the following three songs that take advantage of the SuperNATURAL voices and the expressive power of the pipe organ.
Song Title Composer Player Copyright
Pipe Sounds Hector Olivera Hector Olivera © 2012 Roland Corporation
NATURAL Jazz Ralf Schink Ralf Schink © 2012 Roland Corporation
Choral BWV731 J.S.Bach Hector Olivera © 2012 Roland Corporation
5
Contents
USING THE UNIT SAFELY . . . . . . . . . . . . . . . . . . . . . . . . . . . . . 2
IMPORTANT NOTES. . . . . . . . . . . . . . . . . . . . . . . . . . . . . . . . . . 2
Introduction . . . . . . . . . . . . . . . . . . . . . . . . . . . . . . . . . . . . . . . . 3
About this Manual. . . . . . . . . . . . . . . . . . . . . . . . . . . . . . . . . . . . . . . . . 3
New Functions Explained in This Manual . . . . . . . . . . . . . . . . . . . 3
Auto Off Function (AUTO OFF) . . . . . . . . . . . . . . . . . . . . . . . 6
Performance . . . . . . . . . . . . . . . . . . . . . . . . . . . . . . . . . . . . . . . . 7
Main Screen . . . . . . . . . . . . . . . . . . . . . . . . . . . . . . . . . . . . . . . . . . . . . . . 7
Sound/Keyboard Screen . . . . . . . . . . . . . . . . . . . . . . . . . . . . . . . . . . . 7
Screen Shown When Voice Select Button Is Pressed . . . . . . . . . 7
“Pipe Organ” Voices. . . . . . . . . . . . . . . . . . . . . . . . . . . . . . . . . . . . . . . . 8
New Pipe Organ Voices . . . . . . . . . . . . . . . . . . . . . . . . . . . . . . . 8
Selecting a Pipe Organ in Quick Registration . . . . . . . . . . 8
Using the External Speakers Appropriately for Pipe Organ. . . . . . . . . . . . . . . . . . . . . . . . . . . . . . . . . . . . . . . . . . . . . . . . 9
Adjusting the Volume of the External Speakers . . . . . . . . 9
Vintage Organ “Flute” . . . . . . . . . . . . . . . . . . . . . . . . . . . . . . . . . . . . .10
Selecting the Flute Type . . . . . . . . . . . . . . . . . . . . . . . . . . . . .10
Personalizing Your Organ Sound . . . . . . . . . . . . . . . . . . . .10
Adjusting the Volume of the Vintage Organ (VintageOrgan Volume) . . . . . . . . . . . . . . . . . . . . . . . . . . . . .11
Selecting a SuperNATURAL Voice. . . . . . . . . . . . . . . . . . . . . . . . . .12
Optimal Settings for Playing a SuperNATURAL Voice. .13
Playing a SuperNATURAL Voice . . . . . . . . . . . . . . . . . . . . . .13
Selecting the Part to Control. . . . . . . . . . . . . . . . . . . . . . . . .15
Switching the D-BEAM Function . . . . . . . . . . . . . . . . . . . . . . . . . .16
Rhythm. . . . . . . . . . . . . . . . . . . . . . . . . . . . . . . . . . . . . . . . . . . . 17
Adjusting the Volume Balance of the Arranger (Accomp Part Balance) . . . . . . . . . . . . . . . . . . . . . . . . . . . . . . . . . . . . . . . . . . . . .17
Creating Original Accompaniment Rhythms . . . . . . . . . . . . . . .18
Preparations for Creating User Rhythms. . . . . . . . . . . . . .19
Recording and Playback . . . . . . . . . . . . . . . . . . . . . . . . . . . . 22
SMF Recording . . . . . . . . . . . . . . . . . . . . . . . . . . . . . . . . . . . . . . . . . . .22
Audio Recording . . . . . . . . . . . . . . . . . . . . . . . . . . . . . . . . . . . . . . . . .22
Adjusting the Audio Recording Level (Audio Rec Gain) . . . . .23
Creating a Music CD . . . . . . . . . . . . . . . . . . . . . . . . . . . . . . . . . . . . . .23
Preparing a CD-R Disc for Playback on Another CD Player (Finalize) . . . . . . . . . . . . . . . . . . . . . . . . . . . . . . . . . . . . . . . . . . . . . . . . .24
Changing the Tempo (Playback Speed) of a Song . . . . . . . . . .25
Hymn Player . . . . . . . . . . . . . . . . . . . . . . . . . . . . . . . . . . . . . . . 26
Select Hymn (hymns) or Prelude (preludes). . . . . . . . . . . . . . . .26
Select a Hymn to Play Back . . . . . . . . . . . . . . . . . . . . . . . . . . . . . . .26
Selecting a Hymn by Specifying a Number . . . . . . . . . . .26
Playing Back a Hymn . . . . . . . . . . . . . . . . . . . . . . . . . . . . . . . . . . . . .26
Playing Back a Prelude . . . . . . . . . . . . . . . . . . . . . . . . . . . . . . . . . . . .26
Selecting a Hymn Book . . . . . . . . . . . . . . . . . . . . . . . . . . . . . . . . . . .27
Notation . . . . . . . . . . . . . . . . . . . . . . . . . . . . . . . . . . . . . . . . . . . 28
Exporting Notation Data in BMP Format. . . . . . . . . . . . . . . . . . .28
Various Other Settings . . . . . . . . . . . . . . . . . . . . . . . . . . . . . 29
Adjusting the Low/Mid/High Frequency Levels (Master EQ Low/Middle/High). . . . . . . . . . . . . . . . . . . . . . . . . . . . .29
Switching the Function of the [Manual] Button . . . . . . . . . . . .29
Applying the Damper Pedal to the Solo Part (Solo Damper). . . . . . . . . . . . . . . . . . . . . . . . . . . . . . . . . . . . . . . . . . . .30
Selecting the Screen Language (Language) . . . . . . . . . . . . . . .30
Hiding the Beat Indicator . . . . . . . . . . . . . . . . . . . . . . . . . . . . . . . . .30
Using Visual Control (Visual Control) . . . . . . . . . . . . . . . . . . . . . .31
Switching On/Off Song and Slide Show Synchronization (Slide Show Sync). . . . . . . . . . . . . . . . . . . . . . . . . . . . . . . . . . . . . . . . .32
Using Aux Out for Monitor Speakers (Aux Out Mode) . . . . . .32
Switching Between New Drum Sets and Old Drum Sets (Drum Set Mode) . . . . . . . . . . . . . . . . . . . . . . . . . . . . . . . . . . . . . . . . .33
List of Added Voices . . . . . . . . . . . . . . . . . . . . . . . . . . . . . . . . 34
List of Added Rhythms . . . . . . . . . . . . . . . . . . . . . . . . . . . . . 35
Settings That Are Stored After the Power Is Turned Off . . 36
Main Specifications. . . . . . . . . . . . . . . . . . . . . . . . . . . . . . . . . 37
6
Auto Off Function (AUTO OFF)
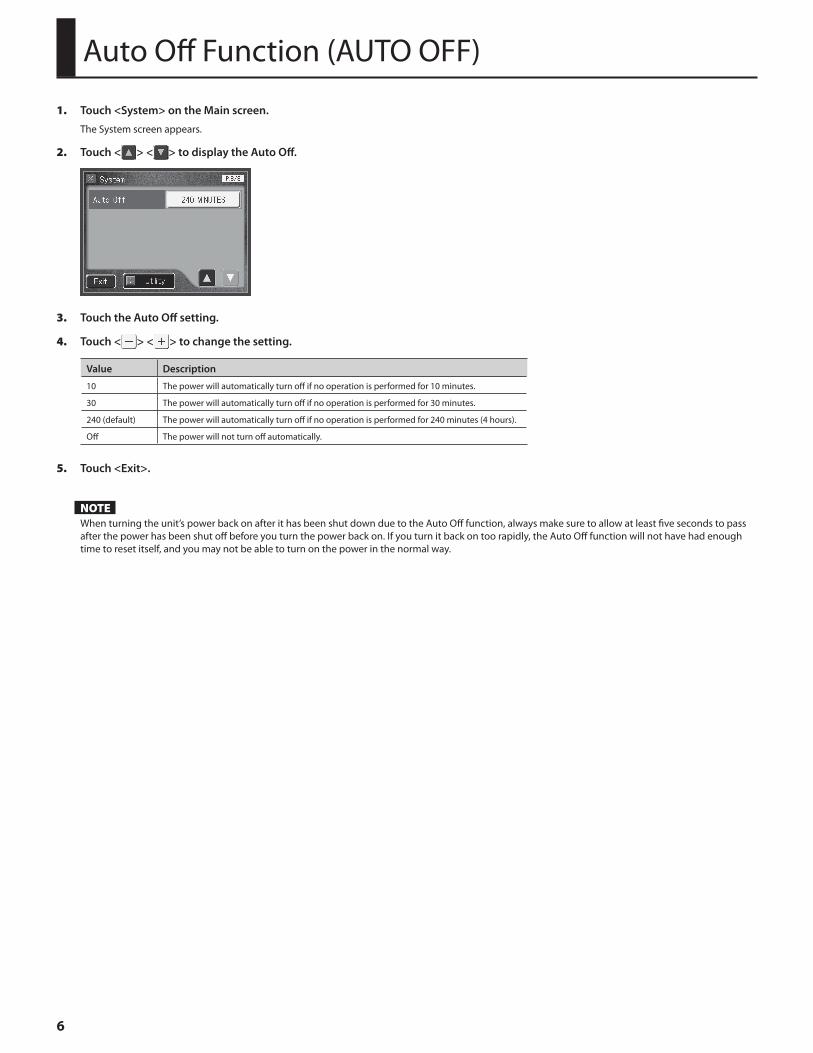
1.■ Touch <System> on the Main screen.
The System screen appears.
2.■ Touch < > < > to display the Auto Off.
3.■ Touch the Auto Off setting.
4.■ Touch < > < > to change the setting.
Value Description
10 The power will automatically turn off if no operation is performed for 10 minutes.
30 The power will automatically turn off if no operation is performed for 30 minutes.
240 (default) The power will automatically turn off if no operation is performed for 240 minutes (4 hours).
Off The power will not turn off automatically.
5.■ Touch <Exit>.
NOTEWhen turning the unit’s power back on after it has been shut down due to the Auto Off function, always make sure to allow at least five seconds to pass after the power has been shut off before you turn the power back on. If you turn it back on too rapidly, the Auto Off function will not have had enough time to reset itself, and you may not be able to turn on the power in the normal way.

7
Performance
Main ScreenIn the main screen, the beat indication has been moved to the right side of the screen. This allows you to view the beat indication at all times.
MEMOYou can also hide the beat indication (p. 30).
Sound/Keyboard ScreenIn the Sound/Keyboard screen you can make octave shift settings for all parts.
When you touch a part name, the Others Voice screen will appear, allowing you to make voice settings.Octave shift
The Others Voice screen will appear
Screen Shown When Voice Select Button Is PressedFor each part, the Others Voice screen will appear even if you press a voice select button other than the [Others] button. Since the voices are shown in a list, it will be easier to select voices of the same group.
When you select a voice, the indicator of the [Others] button will light.
(Example) When you press the Upper Orchestral [A.Guitar] button

8
Performance
“Pipe Organ” VoicesHigh-quality pipe organ voices have been added. You’ll be able to perform classic pipe organ pieces using the appropriate sounds.
New Pipe Organ Voices
OrganCornet V
Cornet V Tr
CelVI 16+8+4
Cel16+8+4+Vx
CelesteIII8’
UndaMrsIII8’
BachPrinc 8’
Bourdon 16’
Nasat 2-2/3’
Tierce1-3/5’
Fugara 8’
2ndFltHarm8’
2ndTrompet8 ‘
2ndTrom8’ Tr
Hautbois8’Tr
Cromorne 8’
Baryton 8’
Baryton8’ Tr
Violone 16’
BassPosaune 16’
Selecting a Pipe Organ in Quick Registration1.■ Touch <Quick Registration> on the Main screen.
The Quick Registration screen appears.
2.■ Touch a button that shows a Quick Registration group.
A sub-window appears, allowing you to select a Quick Registration group.
3.■ Touch the Pipe Organ.
The sub-window closes, and the Quick Registration screen returns to the display.
4.■ Touch <Upper>, <Lower>, or <Pedal>, switching the respective button’s indicator on or off, to select the keyboard to which the voice is to be assigned.
5.■ Touch < > < > to switch pages, and touch the desired keyword.
The voice will be assigned to the selected keyboard.
If you want to continue changing the voice settings, repeat steps 2–5.
9
Performance
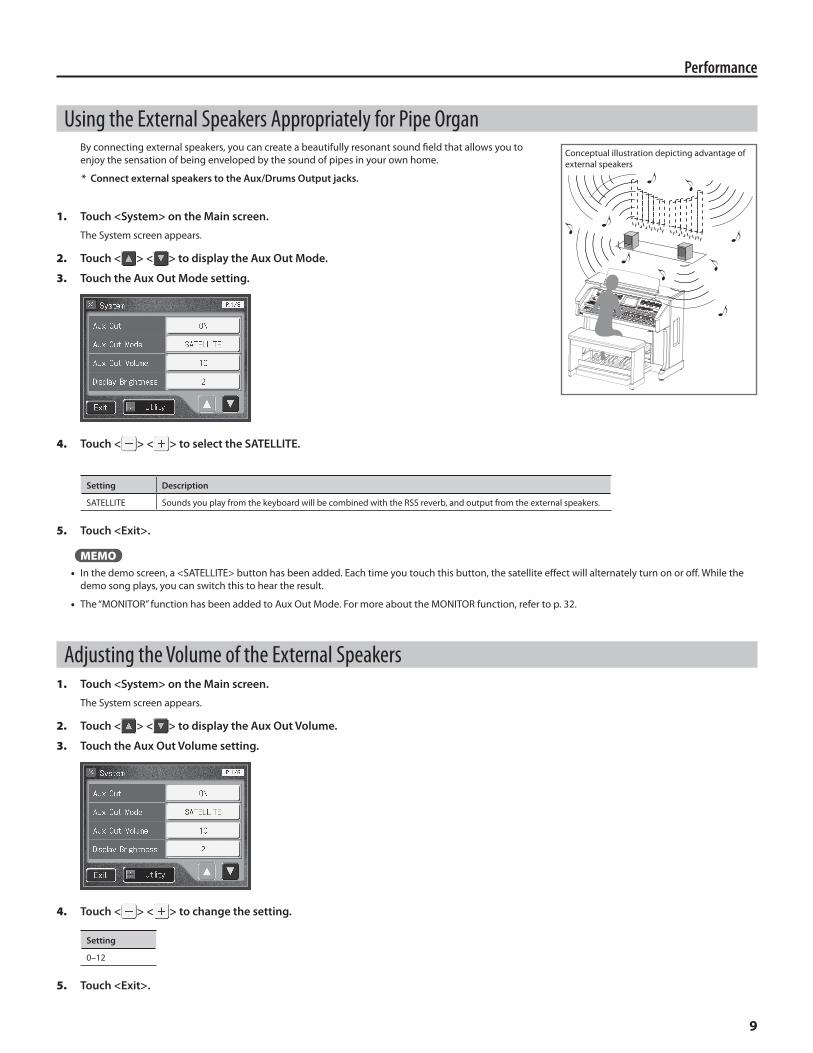
Using the External Speakers Appropriately for Pipe OrganBy connecting external speakers, you can create a beautifully resonant sound field that allows you to enjoy the sensation of being enveloped by the sound of pipes in your own home.
* Connect external speakers to the Aux/Drums Output jacks.
1.■ Touch <System> on the Main screen.
The System screen appears.
2.■ Touch < > < > to display the Aux Out Mode.
3.■ Touch the Aux Out Mode setting.
4.■ Touch < > < > to select the SATELLITE.
Setting Description
SATELLITE Sounds you play from the keyboard will be combined with the RSS reverb, and output from the external speakers.
5.■ Touch <Exit>.
MEMO•■ In the demo screen, a <SATELLITE> button has been added. Each time you touch this button, the satellite effect will alternately turn on or off. While the
demo song plays, you can switch this to hear the result.
•■ The “MONITOR” function has been added to Aux Out Mode. For more about the MONITOR function, refer to p. 32.
Adjusting the Volume of the External Speakers1.■ Touch <System> on the Main screen.
The System screen appears.
2.■ Touch < > < > to display the Aux Out Volume.
3.■ Touch the Aux Out Volume setting.
4.■ Touch < > < > to change the setting.
Setting
0–12
5.■ Touch <Exit>.
Conceptual illustration depicting advantage of external speakers

10
Performance
Vintage Organ “Flute”The vintage organ Flute type and overdrive have been added. These allow you to enjoy playing the organ in a variety of styles such as jazz, pop, and rock.
You can also edit details of the sound that are distinctive of organs, such as the rotary sound and percussion settings.
MEMOIn conjunction with this, the “Rotary Speed” and “Rotary Color” settings previously found on the AT-900 have been removed, and now are combined in the Vintage Flute Options screen.
Selecting the Flute Type1.■ Press the Vintage Organ [Flute] button so it’s lit.
The Vintage Organ screen appears.
2.■ Touch <Jazz> or <Rock>.
Setting Description
JazzThis is the standard organ sound of the Music Atelier. With richly expressive sound from the low to the high ranges, it is appropriate for jazz performance.
* If you select JAZZ, the Rotary Type (p. 11) will automatically be set to “TYPE 1.”
RockThis is a newly added organ sound. It produces a powerful tone with excellent presence, and is appropriate for pop or rock performance.
* If you select Rock, the Rotary Type (p. 11) will automatically be set to “TYPE 2.”
Personalizing Your Organ Sound 1.■ Touch < > (Utility) on the Vintage Organ screen.
The Vintage Flute Options screen appears.
2.■ Touch < > < > to access the setting that you want to edit.
3.■ Touch the setting.
4.■ Touch < > < > to change the setting.
Setting Setting value Description
Overdrive 0–12 Specifies the depth of the overdrive effect.
Vib/Cho Part UPPER+LOWER, UPPER, LOWER Selects the part(s) to which the vibrato or chorus effect will be applied.
Leakage Level 0–31 Specifies the amount of leakage noise (noise characteristic of tonewheel organs).
11
Performance
Setting Setting value Description
Percussion Level 0–15 Specifies the percussion volume.
On Click Level 0–31 Specifies the level of the click sound that is heard when you press a key.
Off Click Level 0–31 Specifies the level of the click sound that is heard when you release a key.
Organ Low Gain -12–12 Specifies the amount of boost/cut for the low-frequency range.
Organ High Gain -12–12 Specifies the amount of boost/cut for the high-frequency range.
Rotary Type TYPE1, TYPE2
Selects the type of rotary effect.
TYPE1: A mild rotary effect with an extended high-frequency range.
TYPE2: A dynamic rotary effect with a powerful low-frequency range.
Woofer Accel 1–16 Specifies how quickly the woofer’s rotation speed will change when you switch the rotation speed.
Tweeter Accel 1–16 Specifies how quickly the tweeter’s rotation speed will change when you switch the rotation speed.
Woofer Slow Speed 0–127 Specifies the woofer’s rotation speed when low speed is selected.
Tweeter Slow Speed 0–127 Specifies the tweeter’s rotation speed when low speed is selected.
Woofer Fast Speed 0–127 Specifies the woofer’s rotation speed when high speed is selected.
Tweeter Fast Speed 0–127 Specifies the tweeter’s rotation speed when high speed is selected.
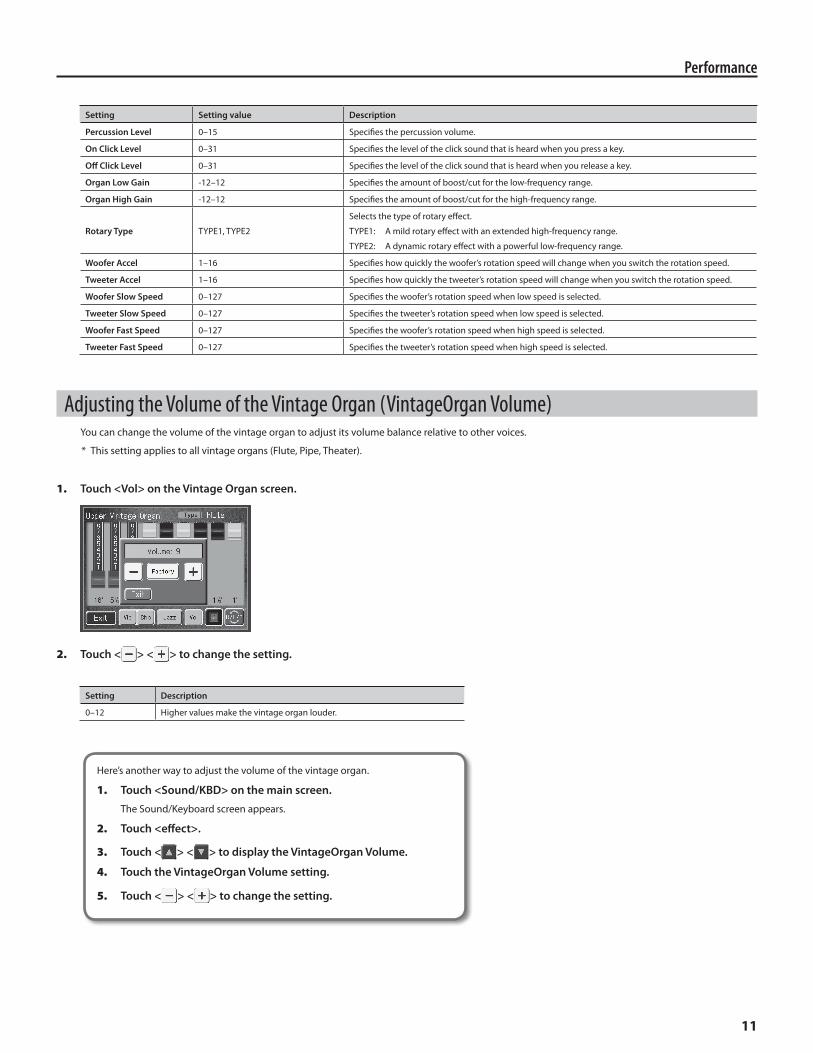
Adjusting the Volume of the Vintage Organ (VintageOrgan Volume)You can change the volume of the vintage organ to adjust its volume balance relative to other voices.
* This setting applies to all vintage organs (Flute, Pipe, Theater).
1.■ Touch <Vol> on the Vintage Organ screen.
2.■ Touch < > < > to change the setting.
Setting Description
0–12 Higher values make the vintage organ louder.
Here’s another way to adjust the volume of the vintage organ.
1.■ Touch <Sound/KBD> on the main screen.
The Sound/Keyboard screen appears.
2.■ Touch <effect>.
3.■ Touch < > < > to display the VintageOrgan Volume.
4.■ Touch the VintageOrgan Volume setting.
5.■ Touch < > < > to change the setting.

12
Performance
Selecting a SuperNATURAL VoiceMEMOIn conjunction with the change from “Articulation voices” to “SuperNATURAL voices,” the voice name indications have also changed.
Articulation voices SuperNATURAL voices
Voice name Art.*** (e.g., Art.Violin) N.*** (e.g., N.Violin)
* SuperNATURAL voices can only be selected using the [Others] buttons of the Solo, Upper Orchestral, Lower Orchestral, and Pedal Orchestral parts.
1.■ Press the [Others] button of the part on which you want to play a SuperNATURAL voice.
2.■ Touch a button that shows a sound group.
A sub-window will appear, allowing you to select a voice group.
3.■ In the sub-window, touch <SuperNATURAL>.
“SuperNATURAL” will be selected as the voice group.
4.■ Touch < > < > to switch screens, and touch a voice name.
A SuperNATURAL voice will be selected.

13
Performance
Optimal Settings for Playing a SuperNATURAL VoiceYou can play SuperNATURAL voices even more effectively by making the appropriate solo mode and foot switch settings.
You can also automatically set these controllers for optimally playing a SuperNATURAL voice.
MEMO
Due to the change from “Articulation voices” to “SuperNATURAL voices,” the displayed function names have also changed.
Articulation voices SuperNATURAL voices
Function name ART.CONTROL 1, 2 N.CONTROL 1, 2
1.■ In the SuperNATURAL voice selection screen, touch <Auto Set>.
The following message will appear.
* If you want to cancel the change, touch <Cancel>.
2.■ Touch <OK>.
The setting will be changed. The following settings are changed.
Parameter Value set Description
Aftertouch ON Aftertouch will be applied to the Solo and Upper Orchestral parts.
L Foot Switch N.CONTROL1 Applies an effect to the SuperNATURAL voice
* Refer. to “Playing a SuperNATURAL voice”R Foot Switch N.CONTROL2
Playing a SuperNATURAL VoiceWhen you play a SuperNATURAL voice, its tone quality will change appropriately when you play legato or staccato passages.
In addition, using the foot switches or D-BEAM while you perform can apply a variety of effects to the sound, making your performance expression even richer and more realistic.
If you want to use the foot switches while performing, assign the foot switch functions (L Foot Switch, R Foot Switch) to “N.CONTROL 1” and “N.CONTROL 2.”
Characteristics of the SuperNATURAL voices
Voice name CharacteristicsFoot switch effect
N.CONTROL 1 N.CONTROL 2
N.ViolinA sound with beautifully applied portamento and vibrato.
N.Violin NV adds vibrato only when you apply aftertouch.Portamento PizzicatoN.Violin NV
N.Cello
N.Er Hu This is characterized by the portamento and ornaments distinctive to the Er Hu. Portamento Ornament
N.Strings Allows you to use tremolo and pizzicato to create the atmosphere of orchestral strings. Tremolo Pizzicato
N.VintageEP1 A classic electric piano sound.
Hold HoldN.VintageEP2 A frequently used electric piano sound of a different type than N.VintageEP1.
N.’60s EP The sound of an electric piano often heard in pop music of the 1960s.
N.NylonStrGt This sound is distinguished by a Hold effect that sustains the notes, and by sound effects in the low-frequency range.
Hold HarmonicsN.FlamencoGt Play chords to produce a strummed sound.
N.SteelStrGt A harmonics effect allows for the sounding of just the harmonic content of the string’s sound.

14
Performance
Voice name CharacteristicsFoot switch effect
N.CONTROL 1 N.CONTROL 2
N.Harp If you hold down one note and play a second note, the notes between the two you played will be sounded as a glissando. Glissando Nail
N.Koto The distinctive character of a koto is produced by the tremolo effect of repeatedly picking a string, and by the characteristic ornamentation that applies a pitch change at the beginning of the note. Tremolo Ornament
N.Tsugaru This is the sound of a Tsugaru shamisen. The strum effect lets you produce the typical phrases of repeated notes. Portamento Strum
N.Trumpet It is especially effective to utilize the fall technique in which the trumpet’s pitch descends through the overtone series.
Glissando FallN.Mute Tp This is the sound of a trumpet with a mute attached.
N.FlugelHorn This is a flugelhorn; its sound is sweeter and milder than that of a trumpet.
N.Trombone This sound is distinctive for its smooth glissando, which is characteristic of the trombone. Glissando Fall
N.FrenchHorn This horn sound has a wide dynamic range extending from mellow, softly played notes to powerful, strongly played notes. Glissando Staccato
N.SopranoSax
This is notable for its beautifully supple tone and its growl playing technique. Glissando GrowlN.Alto Sax
N.Tenor Sax
N.Flute This is a realistic flute voice that includes the sound of the air that escapes when the instrument is blown. Staccato Growl
N.OboeThe ability to sustain long notes and the beautiful vibrato make this voice special.
Staccato HoldN.EnglishHrn
N.Bassoon This voice is distinguished by a deep-sounding low range and a crispness when played staccato.
N.Clarinet This sound delivers the warm tone typical of a clarinet and a distinctive sense of pitch when a glissando is played.
N.ClarinetNV is a voice with no vibrato.Glissando Staccato
N.ClarinetNV
N.Pan Flute Playing strongly while using the flutter effect will produce a phrase that repeats while accenting the same pitch. Flutter Staccato
N.Ocarina Although its sound is simple and unaffected, this voice has a certain timelessness. Glissando Ornament
N.Shakuhachi You can use ornaments in a way that is unique to the shakuhachi. Glissando Ornament
N.AcordionIt This is an Italian accordion. A pitch one octave below the note you play will also sound.
Hold HoldN.AcordionFr This is a French accordion. A characteristic sense of chorus is produced by deliberately skewing the tuning slightly.
N.Bandoneon This is the bandoneon familiar to tango aficionados. It has a more straightforward sound than that of the accordion.
N.Harmonica The effect of the growl performance technique faithfully simulates the distinctive characteristics of the harmonica’s sound. Glissando Growl
N.AcousticBs This realistic sound even includes the sound of the fingers plucking the string and hitting the fingerboard. The pitches will be connected if you play legato. Portamento
HarmonicsN.FingeredBs By skillfully using the slap effect you can add accents to your bass phrases. Slap
N.Vibraphone The tremolo switch will alternately turn on/off each time you press the foot switch. Hold Tremolo Switch
N.Marimba When a chord is played, the marimba’s distinctive tremolo effect will repeat the notes in alternation. Glissando Tremolo
N.Timpani If you play strongly while using the roll effect, an emphasized note will be sounded loudly when you release the keyboard. Flam Roll
Foot switch effectsEffect Description
Portamento, Glissando These performance techniques connect one note with the next. Depending on the construction of the instrument, the pitch transition can be smooth or stepwise.
Pizzicato In this performance technique, the strings of the violin are plucked with the fingers rather than bowed with the bow, producing sharply defined notes.
Ornament This performance technique produces a rapid change in pitch at the beginning of the note, in a way that is distinctive of that particular instrument.
Tremolo This is the technique of rapidly repeating a single note, or rapidly alternating between multiple notes.
Hold This effect lets you press the damper pedal to sustain the note you played.
Strum This is the technique of sweeping across the strings of a guitar or similar instrument.
Harmonics This is a technique in which a string of the guitar is fingered lightly to sound an overtone. A pitch one octave higher than the keyboard note will be heard.
Nail This is the technique of using the fingernails to pluck a harp or similar instrument, producing a clearer and brighter sound than when the skin of the finger plucks the string.
Fall This is the technique of rapidly lowering the pitch of a wind instrument while simultaneously producing a decrescendo.
Staccato On a wind instrument, this is the technique of using the tongue to articulate the notes sharply, producing a clearly defined attack.
Growl This technique produces a powerful sound by simultaneously breathing and growling into a wind instrument.
Flutter On a wind instrument, this is the technique of blowing while fluttering the tongue to produce a tremolo-like effect.
15
Performance
Effect Description
Slap This is the technique of vigorously playing the strings of a bass so that they strike the fingerboard. Compared to conventional playing, this produces a brighter sound with a more pronounced attack.
Tremolo Switch This is the switch for the electric motor that rotates a fan mounted above the resonators, making the sound waver.
Flam On percussion instruments, this technique adds an ornamental note slightly before the actual note.
Roll This is the technique of playing consecutively repeated notes on a percussion instrument.
MEMOIf you assign the “Pitch Up” function to the D-BEAM, you’ll be able to smoothly raise the pitch for conventional voices. However, with the following SuperNATURAL voices, you’ll obtain a more specialized effect.
•■ Wind instruments such as N.Trumpet, N.Alto Sax, and N.FluteThe effect will raise the pitch one octave in smoothly connected steps; this is the opposite of the Fall effect.
•■ N.HarmonicaThe sound will be muted, much like the sound produced when the player’s hands are wrapped around the harmonica.
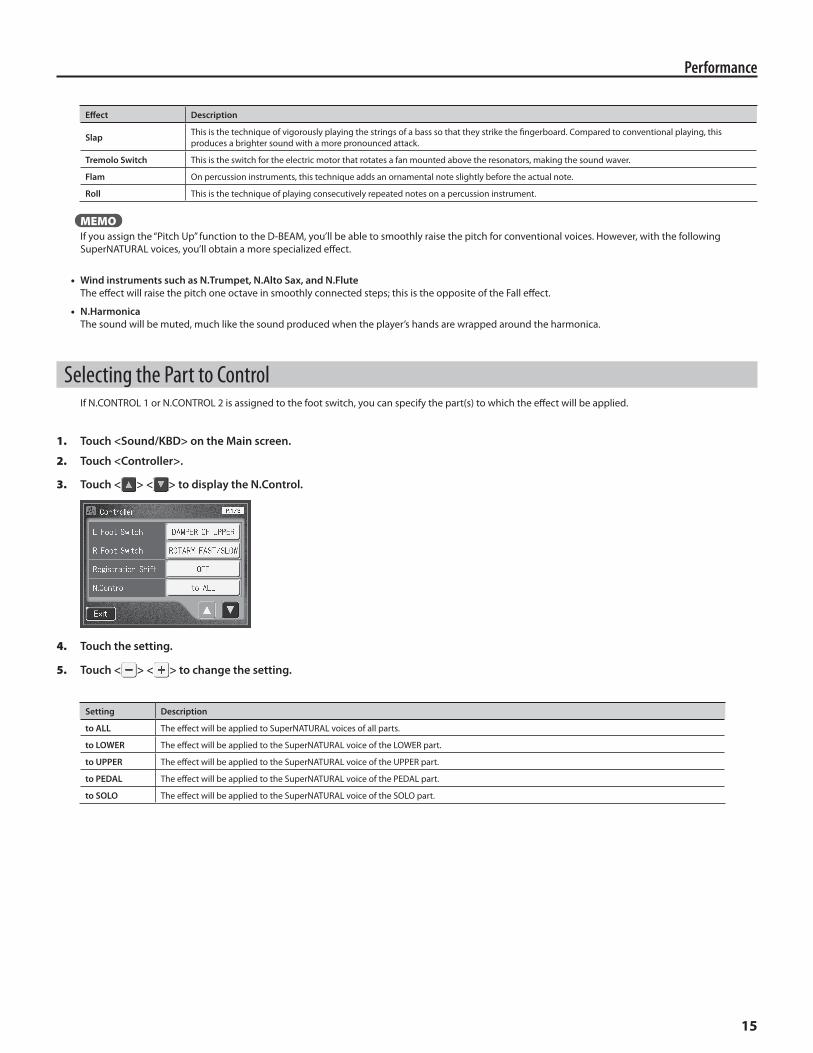
Selecting the Part to ControlIf N.CONTROL 1 or N.CONTROL 2 is assigned to the foot switch, you can specify the part(s) to which the effect will be applied.
1.■ Touch <Sound/KBD> on the Main screen.
2.■ Touch <Controller>.
3.■ Touch < > < > to display the N.Control.
4.■ Touch the setting.
5.■ Touch < > < > to change the setting.
Setting Description
to ALL The effect will be applied to SuperNATURAL voices of all parts.
to LOWER The effect will be applied to the SuperNATURAL voice of the LOWER part.
to UPPER The effect will be applied to the SuperNATURAL voice of the UPPER part.
to PEDAL The effect will be applied to the SuperNATURAL voice of the PEDAL part.
to SOLO The effect will be applied to the SuperNATURAL voice of the SOLO part.

16
Performance
Switching the D-BEAM FunctionWe have added more functions and sound effects that can be controlled by the D-BEAM controller.
Turning on/off functions and effects that have been added1.■ Simultaneously press the D-BEAM [Pitch] and [Volume] buttons so that the [Pitch] [Filter] [Volume] buttons are all lit orange.
D-BEAM Assign is now on.
2.■ Press the D-BEAM [Pitch], [Filter], or [Volume] button, so its indicator goes out.
D-BEAM Assign is now off.
Switching functions or sound effects1.■ Simultaneously press the D-BEAM [Pitch] and [Volume] buttons so that the [Pitch] [Filter] [Volume] buttons are all lit orange.
The D-BEAM Assign screen appears.
2.■ While the D-BEAM Assign screen is displayed, select the function or sound effect that you want to control with the D-BEAM.
Setting Explanation
Modifying the sound
Rotary Fast/Slow Switch the rotation speed of the rotary speaker between “Fast” and “Slow.”
Wheel Brake This simulates the way in which the tone wheels stop rotating when you switch off the power on a tone wheel organ. This effect is valid for Vintage organ “Flute.”
Pitch UpThe notes played on the upper keyboard will rise in pitch as you move your hand toward the D-BEAM.* The Pitch Up effect will not be applied to the vintage organ “Flute” voice.
ModulationThe vibrato effect is added to the voices played on the Upper keyboard.* Please note that only the appropriate voices will allow vibrato to be added, refer to “Voice List” (Appendix: separate booklet).
Fill In Inserts a fill-in into the Rhythm.
Break Stop the Rhythm at the end of that measure (Break).
N.Control 1Produce the same effect as the foot switch assignment for the SuperNATURAL voice.
N.Control 2
Sound effects
Crash Cymbal The sound of a cymbal played with a stick.
Concert Cymbal A pair of orchestral cymbals played with both hands.
Concert BD An orchestral bass drum.
Church Bell The sound of a church bell, with a slight echo.
Big Gong The sound of a gong.
Wind chime Down The sound of a wind chime played from high to low notes.
Triangle The sound of a triangle.
Vibra Slap The sound of a vibraslap; an instrument with a wooden resonator struck by a vibrating arm.
Wind Whistle A comical-feeling whistle with a changing pitch.
Big Shot The sound of a cannon shot.
Smash Glass The sound of breaking glass.
MEMO•■ While D-BEAM Assign is on, you can hold down the D-BEAM [Pitch], [Filter], or [Volume] button for a number of seconds to display the D-BEAM Assign
screen, where you can check which function is assigned.
•■ The volume of the effect is linked with the volume of the manual percussion. For details on adjusting the manual percussion volume, refer to “Adjust the Volume Balance” (AT-900/900C Owner’s Manual, p. 74).

17
Adjusting the Volume Balance of the Arranger (Accomp Part Balance)Here’s how to adjust the volume balance for each of the arranger’s accompaniment parts.
1.■ Press one of the part balance buttons.
The Part Balance Monitor screen appears.
2.■ Touch < >.
The Accomp Part Balance screen appears.
3.■ Touch the part that you want to adjust.
4.■ Touch < > < > to adjust the volume.
* You can also use the [Value] dial to adjust the volume.
You can also access the Accomp Part Balance screen as follows.
1.■ Touch <Rhythm> on the Main screen.
The Rhythm screen appears.
2.■ Touch < > (Utility).
The Utility screen appears.
3.■ Touch <Part Balance>.
The Accomp Part Balance screen appears.
Rhythm

18
Rhythm
Creating Original Accompaniment RhythmsAn original Rhythm of your own is created by starting with one of the internal Rhythms, then modifying it. You can edit some of the internal Rhythms to create your own original Rhythms. These original Rhythms are called “User Rhythms.” This function is called “Rhythm Customize.”
Process for creating User Rhythms
Displaying the Rhythm Customize screen
Open the Rhythm Customize screen
Select the division
Make the division settings
Preparations for Creating User Rhythms
Edit the Rhythm
Change the percussion
Creating the User Rhythm
Changing the name of a User Rhythm
Save the User Rhythm to the User memory or USB memory
Saving the User Rhythm
Copying the User Rhythm
• Copy User Rhythm on USB memory to the User Memory
• Copy User Rhythm on User Memory to the USB memory
Change the Rhythm tempo
Refer to the owner’s manual for details on the steps from “Make the Division Settings” through “Copying the User Rhythm.”

19
Rhythm
Preparations for Creating User Rhythms
Displaying the Rhythm Customize screen
1.■ Touch <Rhythm> on the Main screen.
The Rhythm screen appears.
2.■ Touch < > (Utility).
The Utility screen appears.
3.■ Touch <Customize>.
The Rhythm Customize screen appears.
5 443
7 8
6
9 10 11 12 13
21
When opening a new Rhythm Customize screen
5 443
7 8
6
9 10 11 12 13
21
When calling up a source
14
1 Rhythm Name
2 Beat
3 Division Name (p. 21)
4 button
Switches the page when the Rhythm pattern is displayed over multiple pages.
5 (Zoom Out/Zoom In) button
Expands (zooms in) and reduces (zooms out) the Rhythm pattern display
6 Current location (Measure: Beat: Tick)
7Instrument Name
Indicates the name of the instrument used in the Rhythm.
8Rhythm Pattern Display
Displays the notes in the selected Rhythm pattern.
9 (Utility) button
Displays the menu with settings for the Rhythm Customize function.
10 (Preview) button
Allows you to listen to the created Rhythm.
11 (Delete) button
Deletes the Rhythm in the displayed measure.
12 (Copy) button
Copies the Rhythm in the displayed measure and adds it to the end of that measure.
13 button
When more than eight different instruments are used in a Rhythm, press these buttons to switch through the instrument names.
14Scroll Bar
This indicates the position of the current measure in the overall Rhythm
20
Rhythm
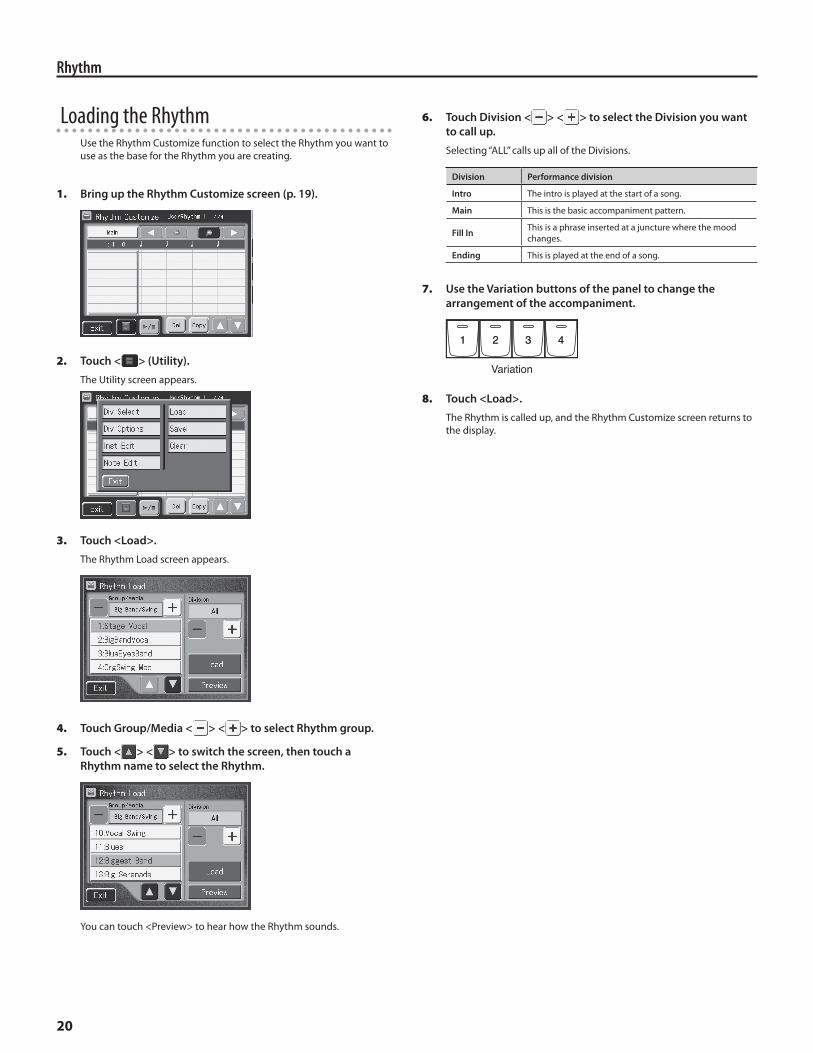
Loading the RhythmUse the Rhythm Customize function to select the Rhythm you want to use as the base for the Rhythm you are creating.
1.■ Bring up the Rhythm Customize screen (p. 19).
2.■ Touch < > (Utility).
The Utility screen appears.
3.■ Touch <Load>.
The Rhythm Load screen appears.
4.■ Touch Group/Media < > < > to select Rhythm group.
5.■ Touch < > < > to switch the screen, then touch a Rhythm name to select the Rhythm.
You can touch <Preview> to hear how the Rhythm sounds.
6.■ Touch Division < > < > to select the Division you want to call up.
Selecting “ALL” calls up all of the Divisions.
Division Performance division
Intro The intro is played at the start of a song.
Main This is the basic accompaniment pattern.
Fill In This is a phrase inserted at a juncture where the mood changes.
Ending This is played at the end of a song.
7.■ Use the Variation buttons of the panel to change the arrangement of the accompaniment.
8.■ Touch <Load>.
The Rhythm is called up, and the Rhythm Customize screen returns to the display.

21
Rhythm
Selecting the Division1.■ Bring up the Rhythm Customize screen (p. 19).
2.■ Touch < > (Utility).
The Utility screen appears.
3.■ Touch <Div Select>.
MEMOYou can open the Division Select screen by touching the Division name indication in the Rhythm Customize screen.
4.■ Touch a Division name to select the Division.
This returns you to the Rhythm Customize screen.
The name of the selected division now appears in the Rhythm Customize screen.
You can touch < > to hear how the Rhythm sounds.

22
The AT-900P lets you record your own performances. You can record yourself playing along with a song, or play back your recorded performance and listen to it.
The AT-900P lets you record in the following ways.
Recording format Description
SMF recordingRecords the song in SMF format.
You’ll be able to record and play back parts individually, using the ATELIER’s distinctive functionality.
Audio recording
Records the song in audio format.
You’ll be able to play back the song on your digital audio player or computer.
* Performances recorded in audio format are saved on a USB memory. If you want to make an audio recording, connect your USB memory to the External Memory connector.
Types of audio files that the AT-900P can play
Sampling Frequency 44.1 kHz
Bit Depth 16-bit
File Extension “.WAV”
SMF Recording1.■ Make the panel settings that you want to use for recording.
2.■ Press the [Rec] button.
* If you decide not to record, touch <Cancel>.
3.■ Touch <SMF> to select SMF recording.
4.■ Press the [Play/Stop] button.
Audio RecordingNOTEUSB memory is required for audio recording.
Since audio recording writes the data directly to USB memory, you can’t record unless USB memory is connected to the External Memory connector. You must connect your USB memory to the External Memory connector before recording.
Settings for Recording Performances1.■ Select a song. If you wish to record a new song, proceed to
step 2.
For detail, refer to “Loading Performance Songs Into the ATELIER” (AT-900/900C Owner’s Manual p. 183).
2.■ Set the panel so you have everything the way you want for your recording.
Recording Settings3.■ Press the [Rec] button.
* If you decide not to record, touch <Cancel>.
4.■ Touch <Audio> to select audio recording.
Start recording5.■ Press the [Play/Stop] button.
When recording starts, the [Play/Stop] and [Rec] buttons’ indicators light up.
Stop recording6.■ Press the [Play/Stop] button.
Recording will stop, and the rename screen appears.
* If you don’t need to change the name of the song, proceed to step 10.
7.■ Touch the character select button ( ) to switch between letters and numerals.
8.■ Touch the screen to specify the desired character.
The following characters can be selected.
A B C D E F G H I J K L M N O P Q R S T U V W X Y Z
_ 0 1 2 3 4 5 6 7 8 9
Delete a character.
Move the cursor (the symbol that indicates the location at which characters will be input) to left or right.)
9.■ When you’re done making the settings, touch <OK>.
The recorded song will be saved to USB memory.
Play Back the Recorded Performance10.■ Touch <Play> to begin playback.
After playback reaches the end of the performance, it will stop automatically.
MEMOYou can also begin playback by pressing the Composer [Play/Stop] button.
11.■ To stop playback at any point, touch <Stop>.
MEMOYou can also stop playback by pressing the Composer [Play/Stop] button.
Recording and Playback
23
Recording and Playback
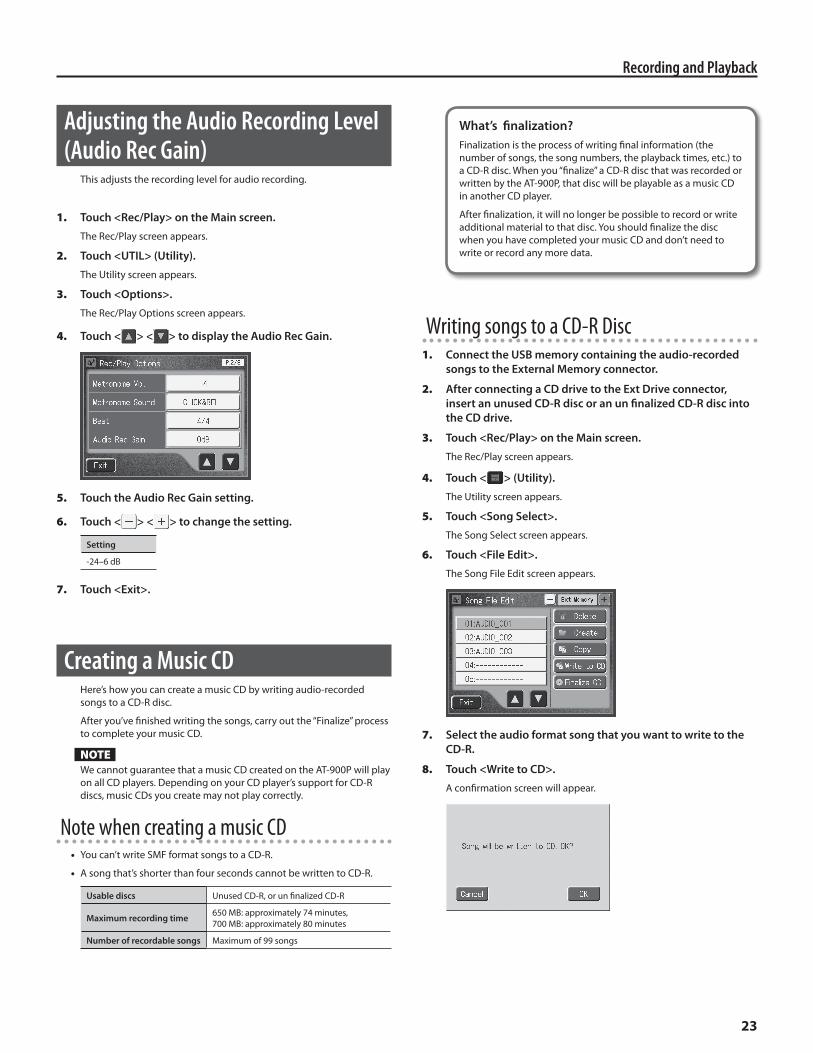
Adjusting the Audio Recording Level (Audio Rec Gain)
This adjusts the recording level for audio recording.
1.■ Touch <Rec/Play> on the Main screen.
The Rec/Play screen appears.
2.■ Touch <UTIL> (Utility).
The Utility screen appears.
3.■ Touch <Options>.
The Rec/Play Options screen appears.
4.■ Touch < > < > to display the Audio Rec Gain.
5.■ Touch the Audio Rec Gain setting.
6.■ Touch < > < > to change the setting.
Setting
-24–6 dB
7.■ Touch <Exit>.
Creating a Music CDHere’s how you can create a music CD by writing audio-recorded songs to a CD-R disc.
After you’ve finished writing the songs, carry out the “Finalize” process to complete your music CD.
NOTEWe cannot guarantee that a music CD created on the AT-900P will play on all CD players. Depending on your CD player’s support for CD-R discs, music CDs you create may not play correctly.
Note when creating a music CD•■ You can’t write SMF format songs to a CD-R.
•■ A song that’s shorter than four seconds cannot be written to CD-R.
Usable discs Unused CD-R, or un finalized CD-R
Maximum recording time 650 MB: approximately 74 minutes, 700 MB: approximately 80 minutes
Number of recordable songs Maximum of 99 songs
Writing songs to a CD-R Disc1.■ Connect the USB memory containing the audio-recorded
songs to the External Memory connector.
2.■ After connecting a CD drive to the Ext Drive connector, insert an unused CD-R disc or an un finalized CD-R disc into the CD drive.
3.■ Touch <Rec/Play> on the Main screen.
The Rec/Play screen appears.
4.■ Touch < > (Utility).
The Utility screen appears.
5.■ Touch <Song Select>.
The Song Select screen appears.
6.■ Touch <File Edit>.
The Song File Edit screen appears.
7.■ Select the audio format song that you want to write to the CD-R.
8.■ Touch <Write to CD>.
A confirmation screen will appear.
What’s finalization?Finalization is the process of writing final information (the number of songs, the song numbers, the playback times, etc.) to a CD-R disc. When you “finalize” a CD-R disc that was recorded or written by the AT-900P, that disc will be playable as a music CD in another CD player.
After finalization, it will no longer be possible to record or write additional material to that disc. You should finalize the disc when you have completed your music CD and don’t need to write or record any more data.
24
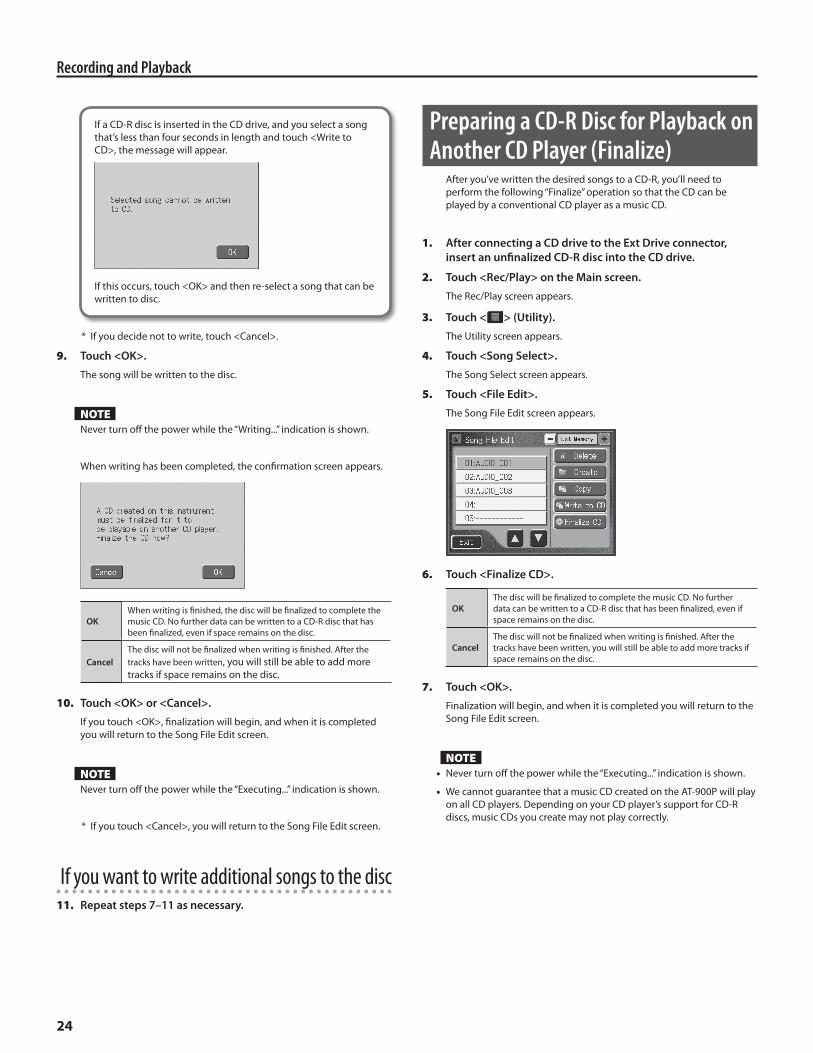
Recording and Playback
* If you decide not to write, touch <Cancel>.
9.■ Touch <OK>.
The song will be written to the disc.
NOTENever turn off the power while the “Writing...” indication is shown.
When writing has been completed, the confirmation screen appears.
OKWhen writing is finished, the disc will be finalized to complete the music CD. No further data can be written to a CD-R disc that has been finalized, even if space remains on the disc.
CancelThe disc will not be finalized when writing is finished. After the tracks have been written, you will still be able to add more tracks if space remains on the disc.
10.■ Touch <OK> or <Cancel>.
If you touch <OK>, finalization will begin, and when it is completed you will return to the Song File Edit screen.
NOTENever turn off the power while the “Executing...” indication is shown.
* If you touch <Cancel>, you will return to the Song File Edit screen.
If you want to write additional songs to the disc11.■ Repeat steps 7–11 as necessary.
Preparing a CD-R Disc for Playback on Another CD Player (Finalize)
After you’ve written the desired songs to a CD-R, you’ll need to perform the following “Finalize” operation so that the CD can be played by a conventional CD player as a music CD.
1.■ After connecting a CD drive to the Ext Drive connector, insert an unfinalized CD-R disc into the CD drive.
2.■ Touch <Rec/Play> on the Main screen.
The Rec/Play screen appears.
3.■ Touch < > (Utility).
The Utility screen appears.
4.■ Touch <Song Select>.
The Song Select screen appears.
5.■ Touch <File Edit>.
The Song File Edit screen appears.
6.■ Touch <Finalize CD>.
OKThe disc will be finalized to complete the music CD. No further data can be written to a CD-R disc that has been finalized, even if space remains on the disc.
CancelThe disc will not be finalized when writing is finished. After the tracks have been written, you will still be able to add more tracks if space remains on the disc.
7.■ Touch <OK>.
Finalization will begin, and when it is completed you will return to the Song File Edit screen.
NOTE•■ Never turn off the power while the “Executing...” indication is shown.
•■ We cannot guarantee that a music CD created on the AT-900P will play on all CD players. Depending on your CD player’s support for CD-R discs, music CDs you create may not play correctly.
If a CD-R disc is inserted in the CD drive, and you select a song that’s less than four seconds in length and touch <Write to CD>, the message will appear.
If this occurs, touch <OK> and then re-select a song that can be written to disc.

25
Recording and Playback
Changing the Tempo (Playback Speed) of a Song
You can change the tempo of an SMF format song, and change the playback speed of a music CD or audio format song.
Changing the tempo (playback speed) will not affect the pitch. You can also change the tempo even while the song is playing.
1.■ Press the Tempo [ ] [ ] buttons to adjust the tempo (playback speed).
Pressing the Tempo [ ] button will make the tempo slower, and pressing the Tempo [ ] button will make the tempo faster.
For an SMF format song, the tempo can be adjusted in a range of =10–500.
For a music CD song or an audio format song, you can adjust the playback speed in a range of 75%–125% relative to an original playback speed of 100%.
2.■ To return to the normal tempo (playback speed) of the song, press the Tempo [ ] and [ ] buttons simultaneously.
The “normal tempo (playback speed)” is the appropriate tempo that is pre-specified for each song.

26
Hymn Player
We have added a “Hymn Player,” which plays an organ accompaniment for hymns.
Select Hymn (hymns) or Prelude (preludes)
1.■ Touch <Rec/Play> on the Main screen.
The Rec/Play screen appears.
2.■ Touch <Hymn Player>.
The Hymn Player screen appears.
3.■ Touch <Hymn> or <Prelude>.
Select a Hymn to Play Back1.■ Touch a hymn title in the Hymn Player screen.
The Hymn Select screen appears.
2.■ Touch the title to select the song that you want to play back.
3.■ Touch <Exit>.
MEMOIn the Hymn Player screen, you can also select a song by touching
< > < >.
Selecting a Hymn by Specifying a Number1.■ Touch <Number> on the Hymn Player screen.
The Hymn Select screen appears.
2.■ Touch the screen to specify the number.
3.■ When you’ve specified the number, touch <OK>.
The hymn of the number you specified will be selected.
Playing Back a Hymn1.■ In the Hymn Player screen, touch <Hymn> and then touch
< >.
An introduction for the selected hymn will play.
When the introduction ends, touch < >.
The main verse will begin playing.
If you touch < > when the main verse ends, the main verse will play repeatedly.
If you want playback to start from the main verse, touch <Verse> and
then touch < >. Only the main verse will be played.
Playing Back a Prelude1.■ In the Hymn Player screen, touch <Prelude> and then touch
< >.
The preludes will play back consecutively.
When you touch < >, the < > indication will blink, and playback will stop when the current song has played to the end.
If you want to stop playback immediately, touch < > once again.
* You can select the type of prelude by touching < > < >.
27
Hymn Player
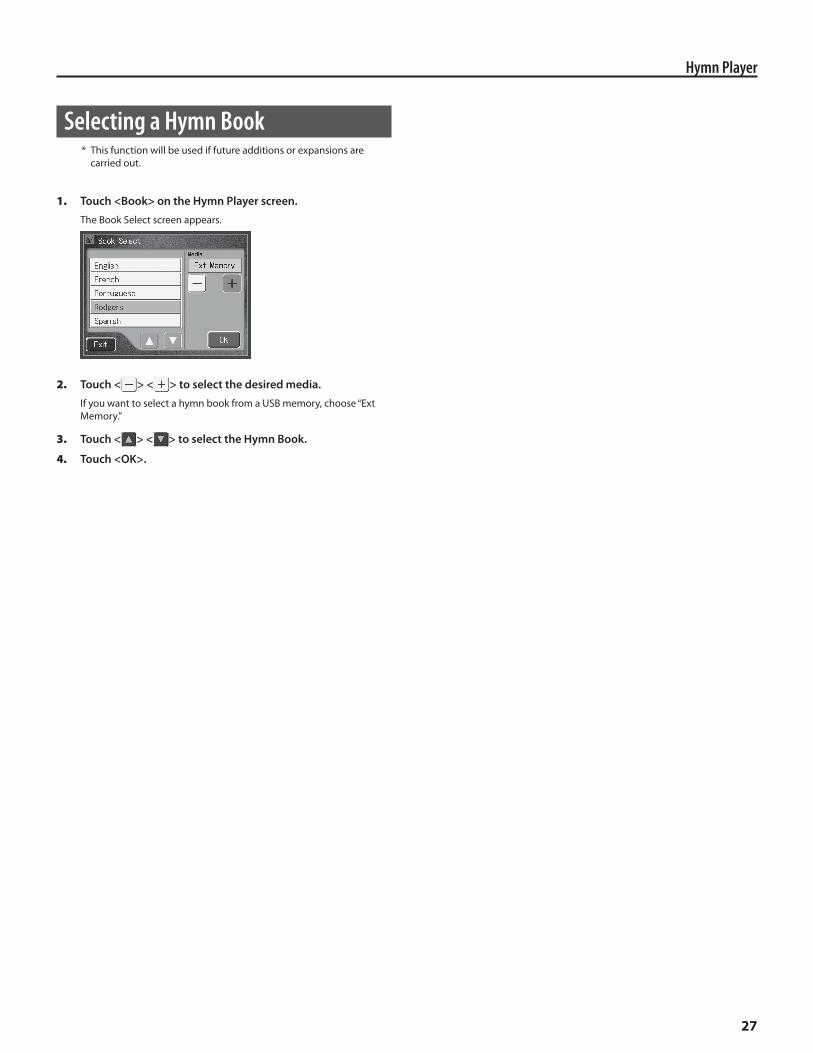
Selecting a Hymn Book* This function will be used if future additions or expansions are
carried out.
1.■ Touch <Book> on the Hymn Player screen.
The Book Select screen appears.
2.■ Touch < > < > to select the desired media.
If you want to select a hymn book from a USB memory, choose “Ext Memory.”
3.■ Touch < > < > to select the Hymn Book.
4.■ Touch <OK>.

28
Notation
Three-staff organ notation can be saved as image data to a separately sold USB flash drive. You can use this saved image data on your computer.
Notation output sample
Exporting Notation Data in BMP FormatNOTE
•■ You cannot save song data that is copyrighted.
•■ Unauthorized use of the exported notation data for purposes other than personal enjoyment without permission from the copyright holder is forbidden by law.
1.■ Record a song in SMF format. Alternatively, select a song that has already been recorded.
2.■ Connect your USB memory to the external memory connector.
3.■ Touch <Rec/Play> on the Main screen.
The Rec/Play screen appears.
4.■ Touch <DigiScore>.
The notation display screen will appear.
5.■ Touch <Export>.
6.■ After you’ve read the message, touch <OK>.
If you selected a song that is copyrighted, a screen like the following will appear.
If this screen appears, touch <OK> to return to step 1, and select a different song.
7.■ Specify the range that you want to save, and the orientation in which the notation is to be output.
Setting Setting Value Description
Direction PORTRAIT, LANDSCAPE Sets the orientation of the notation being output.
Start Measure (song top) – Selects the measure at which output begins.
End Measure – (song end) Selects the measure at which output ends.
8.■ Touch <Execute>.Saving of the image data will begin.

29
Various Other Settings
Adjusting the Low/Mid/High Frequency Levels (Master EQ Low/Middle/High)
Here’s how to adjust the levels of each frequency band (low, mid, high).
1.■ Touch <Sound/KBD> on the Main screen.
The Sound/Keyboard screen appears.
2.■ Touch <Effect>.
3.■ Touch < > < > to display the Master EQ Low, Middle, or High.
4.■ Touch the setting.
5.■ Touch < > < > to change the setting.
Setting Setting Value Description
Master EQ Low -12–12 Amount of boost/cut for the low-frequency range
Master EQ Middle -12–12 Amount of boost/cut for the middle-frequency range
Master EQ High -12–12 Amount of boost/cut for the high-frequency range
6.■ Touch <Exit>.
Switching the Function of the [Manual] Button
Here’s how to switch the function of the [Manual] registration button.
1.■ Touch <Registration> on the Main screen.
The Registration Load screen appears.
2.■ Touch < > (Utility).
A sub-window appears.
3.■ Touch <Options> .
4.■ Touch the Manual Button Assign setting.
5.■ Touch < > < > to change the setting.
Setting Description
MANUAL
If you turn the [Manual] button on (lit), the current panel settings will be registered to the [Manual] button; the registration will be automatically updated whenever you switch the panel settings.
SHIFT + Load Next
The Load Next function will be available.
The registration will change each time you press the [Manual] button. If you press the [Manual] button again when the registration [12] button is selected, the Load Next function will operate; the next registration set saved in the USB memory will be called up. A window asking you to confirm whether you want to load the registrations will appear in the display. If you press the [Manual] button again, the registration set will be confirmed and the registration [1] button will be selected.
GENERAL CANCEL
All voice-related settings will be cancelled, returning the instrument to a condition in which no voice has been selected.
This function is convenient when you want to make registration settings from scratch.

30
Various Other Settings
Applying the Damper Pedal to the Solo Part (Solo Damper)
If desired, you can make the damper pedal affect the Solo part as well.
1.■ Touch <Sound/KBD> on the Main screen.
The Sound/Keyboard screen appears.
2.■ Touch <Controller> .
3.■ Touch < > < > to display the Solo Damper.
4.■ Touch the Solo Damper setting to switch between “ON” and “OFF.”
Setting Description
ON The damper pedal effect will be applied to the Solo part.
OFF The damper pedal effect will not be applied to the Solo part.
Selecting the Screen Language (Language)
You can specify the language in which the demo screen messages, confirmation messages, and error messages are shown.
NOTEThis will not change the language in which function names or parameter names are shown.
1.■ Touch <System> on the Main screen.
The System screen appears.
2.■ Touch < > < > to display the Language.
3.■ Touch the Language setting.
4.■ Touch < > < > to change the setting.
Setting
DUTCH, ENGLISH, FRENCH, GERMAN, ITALIAN, JAPANESE, PORTUGUESE, SPANISH
5.■ Touch <Exit>.
Hiding the Beat IndicatorHere’s how to hide the beat indicator in the main screen.
1.■ Touch <System> on the Main screen.
The System screen appears.
2.■ Touch < > < > to display the Beat Indicator.
3.■ Touch the Beat Indicator setting to switch between “ON” and “OFF.”
Setting Description
ON The beat will be shown in the right side of the screen.
OFF The beat will not be shown.

31
Various Other Settings
Using Visual Control (Visual Control)The ATELIER can be connected to a video device that supports MIDI Visual Control or V-LINK, and control images on that device.
1.■ Touch <System> on the Main screen.
The System screen appears.
2.■ Touch < > < > to display the Visual Control.
3.■ Touch the Visual Control setting.
4.■ Touch < > < > to change the setting.
Setting Description
OFF The Visual Control function is switched off.
MIDI VISUAL CTL 1
Enables the control of MIDI Visual Control devices.
When a Registration button is pressed, “Bank Select” and “Program Change Number” messages are transmitted from the MIDI Out connector as video control messages. At this time, the Control MIDI transmit channel setting is disregarded, and the messages are transmitted via Channel 16.
MIDI VISUAL CTL 2
Enables the control of MIDI Visual Control devices.
In addition to the functions of “MIDI VISUAL CONTROL 1,” MIDI VISUAL CONTROL 2 also sets the device to transmit “Note messages” as video control messages from the MIDI Out connector when one of the twelve right most keys in the Lower keyboard is pressed. In this case, the Lower and Solo MIDI transmit channel settings are disregarded, and the messages are transmitted via Channel 16.
Setting Description
V-LINK 1
Enables the control of V-LINK devices.
When a Registration button is pressed, “Bank Select” and “Program Change Number” messages are transmitted from the MIDI Out connector as video control messages. At this time, the Control MIDI transmit channel setting is disregarded, and the messages are transmitted via Channel 16.
V-LINK 2
Enables the control of V-LINK devices.
In addition to the functions of “V-LINK 1, V-LINK 2 also sets the device to transmit “Note messages” as video control messages from the MIDI Out connector when one of the twelve right most keys in the Lower keyboard is pressed. In this case, the Lower and Solo MIDI transmit channel settings are disregarded, and the messages are transmitted via Channel 16.
The MIDI transmit channel used for video control messages is fixed at channel 16.
MEMO•■ The Visual Control function is turned on, and the VISUAL CONTROL
icon appears in the Main screen.
•■ By holding down the Video Input [Camera] button while using the [DVD] button, you can turn on the Visual Control function MIDI VISUAL CONTROL 1.
•■ For more on switching video images, refer to the owner’s manual for the connected device.
5.■ Touch <Exit>.
What is the MIDI Visual Control?MIDI Visual Control is an internationally-used recommended practice that was added to the MIDI specification so that visual expression could be linked with musical performance. Video equipment that is compatible with MIDI Visual Control can be connected to electronic musical instruments via MIDI in order to control video equipment in tandem with a performance.
What is the V-LINK?V-LINK is a function that allows music and images to be performed together. By using MIDI to connect two or more V-LINK compatible devices, you can easily enjoy a wide range of visual effects that are linked to the expressive elements of a music performance.

32
Various Other Settings
Switching On/Off Song and Slide Show Synchronization (Slide Show Sync)
For a VIMA TUNES (CD-ROM for VIMA) song, you can specify whether images will be switched in synchronization with the song as it plays back or stops.
If you want to change the interval at which the images are switched, specify the Slide Show Interval.
1.■ Touch <System> on the Main screen.
The System screen appears.
2.■ Touch < > (Utility).
3.■ Touch <VIMA TUNES>.
4.■ Touch <Options>.
5.■ Touch the Slide Show Sync setting to change the setting.
Setting Description
ON Images will be switched in synchronization as the song plays or stops.
OFF Images will not be switched in synchronization as the song plays or stops. They will switch automatically.
6.■ Touch <Exit>.
Using Aux Out for Monitor Speakers (Aux Out Mode)
Now you can specify that the Aux Out jacks will output the same sound as the Main Out jacks.
For example, at a concert this setting would allow you to use the Main Out for the PA mixer and the Aux Out for monitor speakers.
1.■ Touch <System> on the Main screen.
The System screen appears.
2.■ Touch < > < > to display the Aux Out Mode.
3.■ Touch the Aux Out Mode setting.
4.■ Touch < > < > to select “MONITOR.”
5.■ Touch <Exit>.

33
Various Other Settings
Switching Between New Drum Sets and Old Drum Sets (Drum Set Mode)
For rhythms that use “Pop” or “Rock” as the drum set, the Drum Set Mode setting now allows you to specify whether the new drum set or the old drum set will be used.
* For rhythms that use a drum set other than “Pop” or “Rock,” changing the Drum Set Mode will not affect the sound.
1.■ Touch <Rhythm> on the Main screen.
The Rhythm screen appears.
2.■ Touch < > (Utility).
The Utility screen appears.
3.■ Touch <Options>.
4.■ Touch < > < > to display the Drum Set Mode.
5.■ Touch the Drum Set Mode setting to switch between “ORIGINAL” and “VARIATION.”
Setting Description
ORIGINAL Original drum set will be used.
VARIATION New drum set, which exudes ambience of live performance, will be used.
6.■ Touch <Exit>.
For the following rhythms, you can change the Drum Set Mode setting and hear how the sound differs.
Rhythm group: Oldies/Contempo
Rhythm Drum set used
S.8-Beat Pop
S.Rock Rock
34
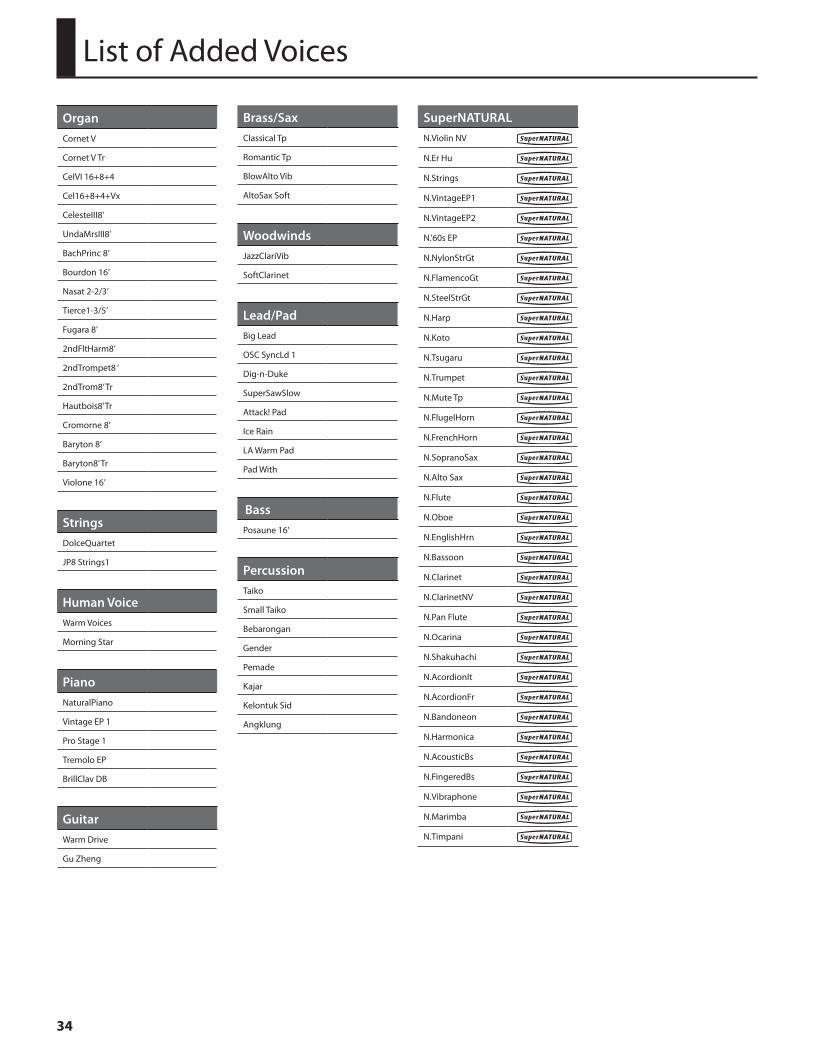
List of Added Voices
OrganCornet V
Cornet V Tr
CelVI 16+8+4
Cel16+8+4+Vx
CelesteIII8’
UndaMrsIII8’
BachPrinc 8’
Bourdon 16’
Nasat 2-2/3’
Tierce1-3/5’
Fugara 8’
2ndFltHarm8’
2ndTrompet8 ‘
2ndTrom8’ Tr
Hautbois8’Tr
Cromorne 8’
Baryton 8’
Baryton8’ Tr
Violone 16’
StringsDolceQuartet
JP8 Strings1
Human VoiceWarm Voices
Morning Star
PianoNaturalPiano
Vintage EP 1
Pro Stage 1
Tremolo EP
BrillClav DB
GuitarWarm Drive
Gu Zheng
Brass/SaxClassical Tp
Romantic Tp
BlowAlto Vib
AltoSax Soft
WoodwindsJazzClariVib
SoftClarinet
Lead/PadBig Lead
OSC SyncLd 1
Dig-n-Duke
SuperSawSlow
Attack! Pad
Ice Rain
LA Warm Pad
Pad With
BassPosaune 16’
PercussionTaiko
Small Taiko
Bebarongan
Gender
Pemade
Kajar
Kelontuk Sid
Angklung
SuperNATURALN.Violin NV
N.Er Hu
N.Strings
N.VintageEP1
N.VintageEP2
N.’60s EP
N.NylonStrGt
N.FlamencoGt
N.SteelStrGt
N.Harp
N.Koto
N.Tsugaru
N.Trumpet
N.Mute Tp
N.FlugelHorn
N.FrenchHorn
N.SopranoSax
N.Alto Sax
N.Flute
N.Oboe
N.EnglishHrn
N.Bassoon
N.Clarinet
N.ClarinetNV
N.Pan Flute
N.Ocarina
N.Shakuhachi
N.AcordionIt
N.AcordionFr
N.Bandoneon
N.Harmonica
N.AcousticBs
N.FingeredBs
N.Vibraphone
N.Marimba
N.Timpani

35
Big Band/SwingStage Vocal *1
BigBandVocal
BlueEyesBand *1
OrgSwing Med
OrgJazz Fast
S.Swing
Gold Swing
Jazz Club
Jazzy Choir
Vocal Swing
Blues
Country/GospelCountryFlyer *1
Cajun Time
HonkyTonkin’
Chapel
CountryRoads
Oldies/ContempoPop Vocal *1
Lying Beat *2
Sky Beat *1
AdultContemp *2
Eric Beat
Volare Gipsy
LoveSlowRock *1
CoolSlowRock *1
S.8-Beat *1
S.16-Beat *2
S.Rock *2
S.Funk *1
S.Shuffle *1
S.Triplet *1
Gold MedBeat *1
GoldSlowBeat *2
Sister Pop *2
Ibiza Dance
So Easy *1
British Pop *2
Light Pop *1
Radio Pop *2
MoonlightPop
Detroit Pop
UK Pop *1
Groovy Pop
Easy Groove *1
ShufflFusion *2
Feel Good
Ladies Dance
Dream Dance
Ballerman
DJ Groove
Club House
Cool Rap
80sRetroDsco *2
Big Rock *2
Dark Rock *2
Alternative1
AmericanRock
Alabama Rock
Guitar Lady
Rockabilly
Michael’sPop
Beach Sound
Let’s Dance
Rollin’
Gold Beat *2
Gold Disco *2
BalladFrank’s Way
Easy Ballad *1
Home Beat
S.Ballad *2
Soft Beat *1
Night Pop
Love Romance
Organ Ballad
Nice Ballad
WorldFrench Waltz
Sevilla
LatinRomanticBegn
Carlos Beat
Oye Son *1
Organ Bossa
Organ Samba
S.Bossa Nova
S.Samba
LatinContemp *1
Dream ChaCha *1
It’s Cumbia
Caribbean
Latin
Waltz/MarchLast Dance
Waltz
Musette
Trad/ShowtimeGold Jive
It Fox *1
It Swing Fox
ItHullyGully
2000’sBolero
Quick Step
Festival
WesternMovie
Entertaining
Simple Fox
AcousticGuitar Pop *2
List of Added Rhythms
For the rhythms marked with *1 and *2, you can change the drum set.
Refer to “Drum Set Mode” (p. 33).
*1: Pop Set
*2: Rock Set

36
The following settings have been added.
Settings that are stored after the power is turned offAuto Off
Aux Out Mode
Aux Out Volume
Master EQ Low
Master EQ Middle
Master EQ High
Manual Button Assign
Language
Drum Set Mode
Settings that are stored In the registration setManual Button Assign
Drum Set Mode
Settings that are stored in the individual registration buttons Vintage Flute Type
Overdrive
Vib/Cho Part
Leakage Level
Percussion Level
On Click Level
Off Click Level
Organ Low Gain
Organ High Gain
Rotary Type
Woofer Accel
Tweeter Accel
Woofer Slow Speed
Tweeter Slow Speed
Woofer Fast Speed
Tweeter Fast Speed
Vintage Organ Volume
N.Control
D-BEAM button setting
Accomp Part Balance
Solo Damper
Settings That Are Stored After the Power Is Turned Off

37
Main Specifications
Roland AT-900 Platinum Edition: MUSIC ATELIER
Keyboard
Upper 56 keys (C3–G7)
Lower 76 keys (Waterfall keyboard, E1–G7)
Pedal 25 keys (C2–C4)
Initial Touch Upper, Lower (10 levels for each)
After Touch Upper (10 levels)
Sound GeneratorMUSIC ATELIER Sound Generator (Included SuperNATURAL Voices)
Virtual Tone Wheel
Conforms to GENERAL MIDI Level 2, GENERAL MIDI System, GS and XGlite format
Voice
539 voices (Included 40 SuperNATURAL Voices and 31 Active Expression Voices)
Upper Part Organ, Symphonic, Orchestral
Lower Part Organ, Symphonic, Orchestral
Solo Part Solo
Pedal Part Organ, Orchestral
Vintage Organ Flute (2 types, with harmonic bars), Pipe, Theater
Rhythm439 rhythms in 10 groups x 4 variations
User Rhythm 99 rhythms
Rhythm Customize Pattern editing of the internal rhythms (Drum Set, Beat, Tempo, Note)
Arranger Function Tempo, Arranger On/Off, Start/Stop, Sync Start, Intro, Ending, Intro Count Down, Break, Auto Fill In, Variation (4 variations), One Touch Program, Chord Intelligence, Chord Hold, Leading Bass, Auto Standard Tempo, Accomp Part Balance
Music Assistant 900 titles x 4 variations
One Touch Program 439 rhythms x 2 groups x 4 variations
Quick Registration 264 settings in 13 groups
Drums/SFX Sets 19 Drum sets + 1 SFX set
Manual Percussion Sets 14 sets
Harmony Intelligence 36 types
Master Tuning 415.3 Hz–466.2 Hz (0.1 Hz steps)
Key Transpose -4–+7 (in semitones)
Playback Transpose -6–+5 (in semitones)
EffectsRSS Reverb, Chorus, Sustain, Vibrato, Pitch Bend, Glide, Master EQ
Organ voices: Rotary Sound, Overdrive, Vibrato/Chorus
Registration12 memories
Function Load Next, Manual Button Assign, File Edit
Composer
Tracks 7 tracks
Note Storage Approx. 40,000 notes
Song Length Max. 999 measures
Tempo Quarter note = 20–500
Resolution 120 ticks per quarter note
Controls Song Select, Play/Stop, Rec, Rewinding, Fast-forwarding, Tempo
Recording Realtime (Replace, Punch In/Out, Loop)
Edit Function Delete Measure, Delete Track, Erase, Copy, Quantize
Score Display DigiScore (Great Staff, G Clef Staff, F Clef Staff, with note name, with Lyrics)
Audio Recording WAV (44.1 kHz, 16-bit Linear Format)
File StorageMedia USB flash memory
Save Format MUSIC ATELIER original format, SMF format 0, WAV format
Songs Max. 99 songs for each folder
Other CD Writing, DigiScore BMP Export, Hymn Player (350 Songs Include), MIDI Visual Control
Rated Power Output 10 W + 10 W + 60 W + 60 W + 100 W
Speaker
Tweeter 5 cm x 4
Full-range (small) 8 cm x 2
Full-range (large) 16 cm x 4
Woofer 30 cm x 1
Display TFT Color LCD 800 x 480 dots (Touch screen)

38
Main Specifications
Controllers
Upper Harmonic Bar: 16’, 5-1/3’, 8’, 4’, 2-2/3’, 2’, 1-3/5’, 1-1/3’, 1’
Lower Harmonic Bar: 16’, 5-1/3’, 8’, 4’, 2-2/3’, 2’, 1-3/5’, 1-1/3’, 1’
Pedal Harmonic Bar: 16’, 8’
Solo Harmonic Bar
Percussion: 4’, 2-2/3’, Fast Decay
Pitch Bend/Modulation lever
D-BEAM (function assignable)
Pedals, SwitchesDamper pedal
Expression pedal
Foot Switch: 2 pcs. (on the expression pedal, function assignable)
Connectors
Main Output jacks (L/Mono, R)
Aux/Drums Output jacks (L/Mono, R)
Bass Output jack (mono)
Input jacks (L/Mono, R)
Video In jack (Camera): RCA phono type
DVD Player In jacks (Video, L, R): RCA phono type
Ext In jacks (Video, L, R): RCA phono type
Video Output jacks (Analog RGB, Video): HD DB-15 type, RCA phono type
Phones jack x 2: Stereo 1/4-inch phone type
Mic jack: 1/4-inch phone type
MIDI connectors (In, Out)
USB COMPUTER port
USB MEMORY port
Ext Drive connector
AC Inlet
Power Consumption 420 W
Finish Satin walnut
Dimensions
Console (included Music Rest)
1,374 (W) x 700 (D) x 1,350 (H) mm
54-1/8 (W) x 27-9/16 (D) x 53-3/16 (H) inches
Pedalboard1,160 (W) x 844 (D) x 128 (H) mm
45-11/16 (W) x 33-1/4 (D) x 5-1/16 (H) inches
Total1,374 (W) x 1,020 (D) x 1,350 (H) mm
54-1/8 (W) x 40-3/16 (D) x 53-3/16 (H) inches
Bench1,075 (W) x 379 (D) x 622 (H) mm
42-3/8 (W) x 14-15/16 (D) x 24-1/2 (H) inches
Weight
Console 180 kg / 397 lbs
Pedalboard 24 kg / 52 lbs
Total 204 kg / 449 lbs
Bench 21 kg / 46 lbs
Accessories
Music Rest
2 screws for the Music Rest
Power Cord
Pedalboard
Bench
Remote Control
Alkaline battery (AA, LR6) x 2
Owner’s Manual
Supplementary Manual
Voice&Rhythm Guide
Leaflet (Rhythm List)
Options (sold separately)
Stereo Headphones
USB Flash Memory (Use USB Flash Memory sold by Roland. We cannot guarantee operation if other products are used.)
CD Drive
Microphone
* In the interest of product improvement, the specifications and/or appearance of this unit are subject to change without prior notice.

39
Information When you need repair service, call your nearest Roland Service Center or authorized Roland distributor in your country as shown below.
AFRICA
EGYPTAl Fanny Trading Offi ce9, EBN Hagar Al Askalany Street, ARD E1 Golf, Heliopolis, Cairo 11341, EGYPT TEL: (022)-417-1828
REUNIONMARCEL FO-YAM Sarl25 Rue Jules Hermann, Chaudron - BP79 97 491 Ste Clotilde Cedex, REUNION ISLAND TEL: (0262) 218-429
SOUTH AFRICAT.O.M.S. Sound & Music (Pty)Ltd.2 ASTRON ROAD DENVER JOHANNESBURG ZA 2195, SOUTH AFRICA TEL: (011) 417 3400
Paul Bothner(PTY)Ltd.Royal Cape Park, Unit 24 Londonderry Road, Ottery 7800 Cape Town, SOUTH AFRICA TEL: (021) 799 4900
ASIA
CHINARoland Shanghai Electronics Co.,Ltd.5F. No.1500 Pingliang Road Shanghai 200090, CHINA TEL: (021) 5580-0800
Roland Shanghai Electronics Co.,Ltd. (BEIJING OFFICE)3F, Soluxe Fortune Building63 West Dawang Road, Chaoyang District, Beijing, CHINA TEL: (010) 5960-2565
HONG KONGTom Lee Music 11/F Silvercord Tower 130 Canton RdTsimshatsui, Kowloon,HONG KONGTEL: 852-2737-7688
Parsons Music Ltd. 8th Floor, Railway Plaza, 39 Chatham Road South, T.S.T, Kowloon, HONG KONG TEL: 852-2333-1863
INDIARivera Digitec (India) Pvt. Ltd.411, Nirman Kendra Mahalaxmi Flats Compound Off . Dr. Edwin Moses Road, Mumbai-400011, INDIA TEL: (022) 2493 9051
INDONESIAPT. Citra IntiramaRuko Garden Shopping Arcade Unit 8 CR, Podomoro City Jl.Letjend. S.Parman Kav.28Jakarta Barat 11470, INDONESIA TEL: (021) 5698-5519/5520
KOREACosmos Corporation1461-9, Seocho-Dong, Seocho Ku, Seoul, KOREA TEL: (02) 3486-8855
MALAYSIA/SINGAPORERoland Asia Pacifi c Sdn. Bhd.45-1, Block C2, Jalan PJU 1/39, Dataran Prima, 47301 Petaling Jaya, Selangor, MALAYSIATEL: (03) 7805-3263
PHILIPPINESG.A. Yupangco & Co. Inc.339 Gil J. Puyat Avenue Makati, Metro Manila 1200, PHILIPPINES TEL: (02) 899 9801
TAIWANROLAND TAIWAN ENTERPRISE CO., LTD.9F-5, No. 112 Chung ShanNorth Road Sec. 2 Taipei 104,TAIWAN R.O.C.TEL: (02) 2561 3339
THAILANDTheera Music Co. , Ltd.100-108 Soi Verng Nakornkasem, New Road,Sumpantawong, Bangkok 10100, THAILAND TEL: (02) 224-8821
VIET NAM VIET THUONG CORPORATION 386 CACH MANG THANG TAM ST. DIST.3, HO CHI MINH CITY, VIET NAMTEL: (08) 9316540
OCEANIA
AUSTRALIA/NEW ZEALAND Roland Corporation Australia Pty.,Ltd. 38 Campbell Avenue Dee Why West. NSW 2099, AUSTRALIA
For Australia TEL: (02) 9982 8266 For New Zealand TEL: (09) 3098 715
CENTRAL/LATIN AMERICA
ARGENTINAInstrumentos Musicales S.A.Av.Santa Fe 2055 (1123) Buenos Aires, ARGENTINA TEL: (011) 4508-2700
BARBADOSA&B Music Supplies LTD12 Webster Industrial Park Wildey, St.Michael, BARBADOS TEL: (246) 430-1100
BRAZILRoland Brasil Ltda.Rua San Jose, 211 Parque Industrial San Jose Cotia - Sao Paulo - SP, BRAZIL TEL: (011) 4615 5666
CHILEComercial Fancy II S.A.Rut.: 96.919.420-1 Nataniel Cox #739, 4th Floor Santiago - Centro, CHILE TEL: (02) 688-9540
COLOMBIACentro Musical Ltda.Cra 43 B No 25 A 41 Bododega 9 Medellin, COLOMBIA TEL: (574) 3812529
COSTA RICAJUAN Bansbach Instrumentos MusicalesAve.1. Calle 11, Apartado 10237, San Jose, COSTA RICA TEL: 258-0211
CURACAOZeelandia Music Center Inc.Orionweg 30 Curacao, Netherland Antilles TEL: (305) 5926866
DOMINICAN REPUBLICInstrumentos Fernando GiraldezCalle Proyecto Central No.3 Ens.La Esperilla Santo Domingo, DOMINICAN REPUBLIC TEL: (809) 683 0305
ECUADORMas MusikaRumichaca 822 y Zaruma Guayaquil - ECUADOR TEL: (593-4) 2302364
EL SALVADOROMNI MUSIC75 Avenida Norte y Final Alameda Juan Pablo II, Edifi cio No.4010 San Salvador, EL SALVADOR TEL: 262-0788
GUATEMALACasa InstrumentalCalzada Roosevelt 34-01,zona 11 Ciudad de Guatemala, GUATEMALA TEL: (502) 599-2888
HONDURASAlmacen Pajaro Azul S.A. de C.V.BO.Paz Barahona 3 Ave.11 Calle S.O San Pedro Sula, HONDURAS TEL: (504) 553-2029
MARTINIQUEMusique & SonZ.I.Les Mangle 97232 Le Lamentin, MARTINIQUE F.W.I. TEL: 596 596 426860
Gigamusic SARL10 Rte De La Folie 97200 Fort De France MARTINIQUE F.W.I. TEL: 596 596 715222
MEXICOCasa Veerkamp, s.a. de c.v.Av. Toluca No. 323, Col. Olivar de los Padres 01780 Mexico D.F., MEXICO TEL: (55) 5668-6699
NICARAGUABansbach Instrumentos Musicales NicaraguaAltamira D'Este Calle Principal de la Farmacia 5ta.Avenida 1 Cuadra al Lago.#503 Managua, NICARAGUA TEL: (505) 277-2557
PANAMASUPRO MUNDIAL, S.A.Boulevard Andrews, Albrook, Panama City, REP. DE PANAMATEL: 315-0101
PARAGUAYDistribuidora De Instrumentos MusicalesJ.E. Olear y ESQ. Manduvira Asuncion, PARAGUAY TEL: (595) 21 492147
PERUAudionetDistribuciones Musicales SAC Juan Fanning 530 Mirafl ores Lima - PERU TEL: (511) 4461388
TRINIDADAMR LtdGround Floor Maritime Plaza Barataria TRINIDAD W.I. TEL: (868) 638 6385
URUGUAYTodo Musica S.A.Francisco Acuna de Figueroa 1771 C.P.: 11.800 Montevideo, URUGUAY TEL: (02) 924-2335
VENEZUELAInstrumentos Musicales Allegro,C.A.Av.las industrias edf.Guitar import #7 zona Industrial de Turumo Caracas, VENEZUELA TEL: (212) 244-1122
EUROPE
BELGIUM/FRANCE/HOLLAND/LUXEMBOURGRoland Central Europe N.V.Houtstraat 3, B-2260, Oevel (Westerlo) BELGIUM TEL: (014) 575811
CROATIAART-CENTARDegenova 3. HR - 10000 Zagreb, CROATIA TEL: (1) 466 8493
CZECH REP.CZECH REPUBLIC DISTRIBUTOR s.r.oVoctárova 247/16 180 00 Praha 8, CZECH REP. TEL: (2) 830 20270
DENMARK Roland Scandinavia A/SSkagerrakvej 7 Postbox 880DK-2100 Copenhagen,DENMARK TEL: 3916 6200
FINLANDRoland Scandinavia As, Filial FinlandVanha Nurmijarventie 62 01670 Vantaa, FINLANDTEL: (0) 9 68 24 020
GERMANY/AUSTRIARoland Elektronische Musikinstrumente HmbH.Oststrasse 96, 22844 Norderstedt, GERMANY TEL: (040) 52 60090
GREECE/CYPRUSSTOLLAS S.A. Music Sound Light155, New National Road Patras 26442, GREECE TEL: 2610 435400
HUNGARYRoland East Europe Ltd.2045. Törökbálint, FSD Park 3. ép., HUNGARYTEL: (23) 511011
IRELANDRoland IrelandE2 Calmount Park, Calmount Avenue, Dublin 12, Republic of IRELAND TEL: (01) 4294444
ITALYRoland Italy S. p. A. Viale delle Industrie 8, 20020 Arese, Milano, ITALY TEL: (02) 937-78300
NORWAYRoland Scandinavia Avd. Kontor NorgeLilleakerveien 2 Postboks 95 Lilleaker N-0216 Oslo, NORWAY TEL: 2273 0074
POLANDROLAND POLSKA SP. Z O.O.ul. Kty Grodziskie 16B 03-289 Warszawa, POLAND TEL: (022) 678 9512
PORTUGALRoland Systems Group EMEA, S.L.Branch Offi ce PortoEdifício Tower Plaza Rotunda Eng. Edgar Cardoso 23, 9ºG 4400-676 Vila Nova de Gaia, PORTUGALTEL: (+351) 22 608 00 60
ROMANIAFBS LINESPiata Libertatii 1, 535500 Gheorgheni, ROMANIA TEL: (266) 364 609
RUSSIARoland Music LLCDorozhnaya ul.3,korp.6 117 545 Moscow, RUSSIA TEL: (495) 981-4967
SERBIAMusic AP Ltd.Sutjeska br. 5 XS - 24413 Palic, SERBIATEL: (024) 539 395
SLOVAKIADAN Acoustic s.r.o. Povazská 18. SK - 940 01 Nové Zámky, SLOVAKIA TEL: (035) 6424 330
SPAINRoland Systems Group EMEA, S.L.Paseo García Faria, 33-35 08005 Barcelona, SPAIN TEL: 93 493 91 00
SWEDEN Roland Scandinavia A/S SWEDISH SALES OFFICEMårbackagatan 31, 4 tr.SE-123 43 Farsta, SWEDENTEL: (0) 8 683 04 30
SWITZERLANDRoland (Switzerland) AG Landstrasse 5, Postfach, CH-4452 Itingen, SWITZERLAND TEL: (061) 975-9987
UKRAINEEURHYTHMICS Ltd.P.O.Box: 37-a. Nedecey Str. 30 UA - 89600 Mukachevo, UKRAINE TEL: (03131) 414-40
UNITED KINGDOM Roland (U.K.) Ltd.Atlantic Close, SWANSEA SA7 9FJ, UNITED KINGDOMTEL: (01792) 702701
MIDDLE EAST
BAHRAINMoon StoresNo.1231&1249 Rumaytha Building Road 3931, Manama 339, BAHRAIN TEL: 17 813 942
IRANMOCO INC.Jadeh Makhsous Karaj (K-9), Nakhe Zarin Ave.Jalal Street, Reza Alley No.4 Tehran 1389716791, IRAN TEL: (021)-44545370-5
ISRAELHalilit P. Greenspoon & Sons Ltd.8 Retzif Ha'alia Hashnia St. Tel-Aviv-Yafo ISRAEL TEL: (03) 6823666
JORDANMUSIC HOUSE CO. LTD. FREDDY FOR MUSIC P. O. Box 922846 Amman 11192, JORDAN TEL: (06) 5692696
KUWAITEASA HUSAIN AL-YOUSIFI & SONS CO.Al-Yousifi Service Center P.O.Box 126 (Safat) 13002, KUWAIT TEL: 00 965 802929
LEBANONChahine S.A.L.George Zeidan St., Chahine Bldg., Achrafi eh, P.O.Box: 16-5857 Beirut, LEBANON TEL: (01) 20-1441
OMANTALENTZ CENTRE L.L.C.Malatan House No.1 Al Noor Street, Ruwi SULTANATE OF OMAN TEL: 2478 3443
QATARAL-EMADI TRADING & CONTRACTING CO.P.O. Box 62, Doha, QATAR TEL: 4423-554
SAUDI ARABIAaDawliah Universal Electronics APLBehind Pizza Inn Prince Turkey Street aDawliah Building, PO BOX 2154, Alkhobar 31952, SAUDI ARABIA TEL: (03) 8643601
SYRIATechnical Light & Sound CenterPO Box 13520 Bldg No.49 Khaled Abn Alwalid St.Damascus, SYRIA TEL: (011) 223-5384
TURKEY ZUHAL DIS TICARET A.S.Galip Dede Cad. No.33 Beyoglu, Istanbul, TURKEY TEL: (0212) 249 85 10
U.A.E.Zak Electronics & Musical Instruments Co. L.L.C.Zabeel Road, Al Sherooq Bldg., No. 14, Ground Floor, Dubai, U.A.E. TEL: (04) 3360715
NORTH AMERICA
CANADA Roland Canada Ltd. (Head Offi ce)5480 Parkwood Way Richmond B. C., V6V 2M4, CANADATEL: (604) 270 6626
Roland Canada Ltd. (Toronto Offi ce)170 Admiral Boulevard Mississauga On L5T 2N6, CANADATEL: (905) 362 9707
U. S. A. Roland Corporation U.S.5100 S. Eastern Avenue Los Angeles, CA 90040-2938, U. S. A. TEL: (323) 890 3700
As of Feb. 1, 2011 (ROLAND)

40
The text appearing on page 306 in the AT-900 Owner’s Manual has been changed to the following.
* 5 1 0 0 0 2 7 2 7 9 - 0 2 *


1905449B