
Converting ACT to Sales Force
33
Last updated July 18, 2011 © Copyright 2010-2011 JL Technical Group. Reproduction, adaptation or translation without prior written permission is prohibited, except as allowed under the copyright Converting from ACT! to Salesforce.com ® Using Exporter ®
-
Upload
saraswatankur -
Category
Documents
-
view
218 -
download
0
Transcript of Converting ACT to Sales Force

8/3/2019 Converting ACT to Sales Force
http://slidepdf.com/reader/full/converting-act-to-sales-force 1/33
Last updated July 18, 2011© Copyright 2010-2011 JL Technical Group.
Reproduction, adaptation or translation without prior written permission is prohibited, except as allowed under the copyright
Converting from ACT!
to Salesforce.com ®
Using Exporter®

8/3/2019 Converting ACT to Sales Force
http://slidepdf.com/reader/full/converting-act-to-sales-force 2/33
ContentsGetting Started .............................................................................................................. 1
Before you Begin ....................................................................................................................................... 1 Step 1 -- Export the ACT! data using Exporter ........................................................... 2
Start the Exporter ...................................................................................................................................... 2 Step 2 -- Add Fields to Salesforce ............................................................................... 5
Adding a custom field to the Salesforce Contact Record ......................................................................... 6 Adding a Custom Field for ACT! Notes and History data ....................................................................... 10
Step 3 -- Import your data ........................................................................................... 11 Start the Salesforce Import Wizard! ........................................................................................................ 11
................................................................................................................ 11 Find the data file produced by the Export. .............................................................................................. 12 Check the field mapping .......................................................................................................................... 12
Step 4 -- Checking your data ...................................................................................... 13 Company/Account data ........................................................................................................................... 14
Advanced Topics......................................................................................................... 15 Files for Import ........................................................................................................................................ 15 Building the UserID file and the ContactID file ........................................................................................ 16 User ID File ............................................................................................................................................. 16 Contact_Account ID File ......................................................................................................................... 18 Replace the ACT IDs with the Salesforce IDs ........................................................................................ 20 Apex Data Loader ................................................................................................................................... 21
Appendix A – Preparing your ACT! Database .......................................................... 26 Finding Duplicates ................................................................................................................................... 26 Remove the Old Data. ............................................................................................................................. 27
Appendix B – How the differences are handled ....................................................... 28

8/3/2019 Converting ACT to Sales Force
http://slidepdf.com/reader/full/converting-act-to-sales-force 3/33
Account Assignment ............................................................................................................................... 28 Blank Contacts ........................................................................................................................................ 28 Account Addresses ................................................................................................................................. 28 Groups ..................................................................................................................................................... 29 Secondary contacts (ACT! 2005+ only) ................................................................................................. 29
8/3/2019 Converting ACT to Sales Force
http://slidepdf.com/reader/full/converting-act-to-sales-force 4/33
1 JL Technical Group
Getting Started
The following is a step by step guide to help you transfer your ACT! database into
Salesforce.com.(SFDC) This method allows you to use the Contact/Account Import Wizard
provided by Salesforce which will get you up and running quickly.
Using the standard Import Wizard, you will be able to import
All Contact data with custom ACT! fields
Notes from ACT!
Histories from ACT!
The Notes/History items will appear as merged fields containing up to 32000 characters on separate
lines. These fields are searchable in Salesforce, They contains the text of the note or history, the entry
date and record manager sorted by date. See the Checking your data section for an example.
Group Membership information for each contact
ACT! Company data which is converted into Salesforce Accounts .(ACT! 2005+)
Secondary Contacts linked to their primary contact. (ACT! 2005+)
If you need to import additional data or want the notes and history items to appear individually, you can
do this with the Informatica Data Loader or the Salesforce Apex Data Loader. Use of the Salesforce
Apex Data Loader is described in the Advanced Topics of this document.
Before you Begin
You need to make certain your ACT! database is free of duplicate records, does not contain blank
records and contains only the data you want to bring into Salesforce. The Salesforce Import Wizard
will only accept 225 fields. If you have added a large number of custom fields to your Contact and
Company tables, you will need to remove some of these. Appendix A contains instructions and tips
to help with this process.
.
8/3/2019 Converting ACT to Sales Force
http://slidepdf.com/reader/full/converting-act-to-sales-force 5/33
2 JL Technical Group
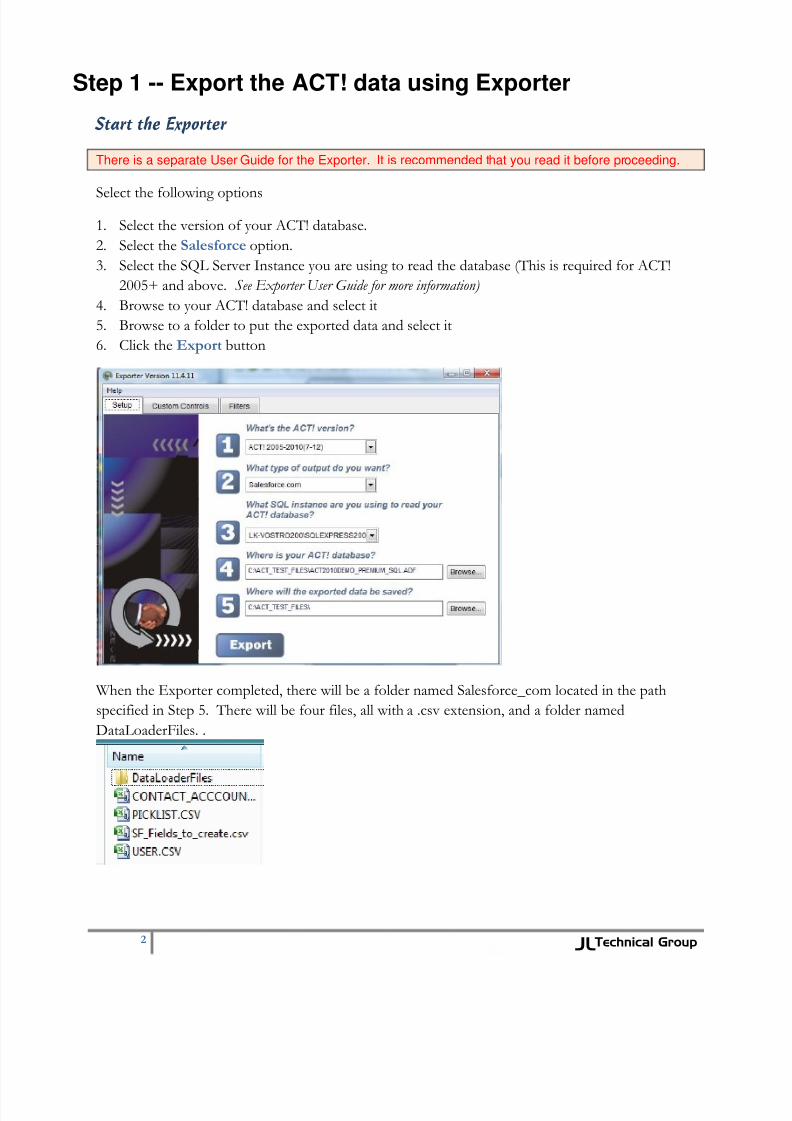
Step 1 -- Export the ACT! data using Exporter
Start the Exporter
There is a separate User Guide for the Exporter. It is recommended that you read it before proceeding.
Select the following options
1. Select the version of your ACT! database.
2. Select the Salesforce option.
3. Select the SQL Server Instance you are using to read the database (This is required for ACT!
2005+ and above. See Exporter User Guide for more information)
4. Browse to your ACT! database and select it
5. Browse to a folder to put the exported data and select it
6. Click the Export button
When the Exporter completed, there will be a folder named Salesforce_com located in the path
specified in Step 5. There will be four files, all with a .csv extension, and a folder named
DataLoaderFiles. .
8/3/2019 Converting ACT to Sales Force
http://slidepdf.com/reader/full/converting-act-to-sales-force 6/33
3 JL Technical Group
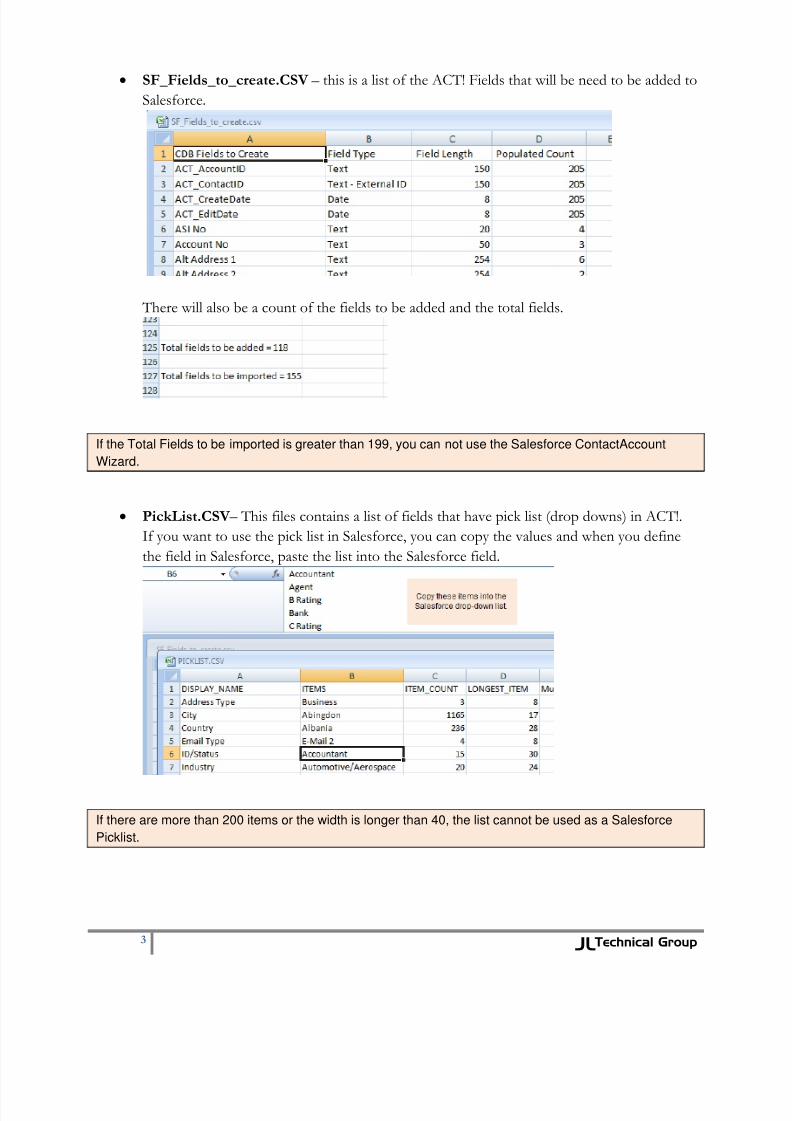
SF_Fields_to_create.CSV – this is a list of the ACT! Fields that will be need to be added to
Salesforce.
There will also be a count of the fields to be added and the total fields.
If the Total Fields to be imported is greater than 199, you can not use the Salesforce ContactAccount
Wizard.
PickList.CSV – This files contains a list of fields that have pick list (drop downs) in ACT!.
If you want to use the pick list in Salesforce, you can copy the values and when you define
the field in Salesforce, paste the list into the Salesforce field.
If there are more than 200 items or the width is longer than 40, the list cannot be used as a Salesforce
Picklist.

8/3/2019 Converting ACT to Sales Force
http://slidepdf.com/reader/full/converting-act-to-sales-force 7/33
4 JL Technical Group
User .CSV – This file contains the user information from your ACT! database. It’s very
important that the ACT! user name matches the Salesforce user name. This will insure that
contacts and accounts will be assigned properly when you import the data.
CONTACT_ACCOUNT.CSV – this is the file you will use with the Salesforce Import
Wizard to import the ACT! contacts, accounts and notes into Salesforce.
DataLoaderFiles – this folder contains additional separate files which have been prepared
for use with the Salesforce Apex Data Loader.
All the files can be opened with Excel by double clicking on the file icon. We recommend that you print
the SF_Fields_to_create file so you can work with it when adding fields to Salesforce.

8/3/2019 Converting ACT to Sales Force
http://slidepdf.com/reader/full/converting-act-to-sales-force 8/33
5 JL Technical Group
Step 2 -- Add Fields to Salesforce
You will probably not want to add all ACT! fields to Salesforce. However, we strongly recommend
that you add the ACT_CONTACTID and the ACT_ACCOUNTID. This will insure that you can
link back to your ACT! Database if you want to use the Data Loader to add the tables that the
Import Wizard does not support. There are other fields created by the Exporter that you may want
to add to Salesforce. These are
GroupMembership This is a list of the groups a contact belongs to. You can use this tobuild views in Salesforce to emulate the ACT! groups. (Mapped toGroup Membership)
X_History This field contains all the history items for the contact. (Mapped toa custom field)
X_Notes This field contains all the notes for the contact. (Mapped to acustom field)
Contact Note This field contains all the notes and history records for a contact.If you do not plan to use a Data Loader to import history items asCompleted Tasks, you should assign the Contact Note field to thisfield.
X_Activities This field contains the next four activities scheduled for the contact.If you choose not to import the activities separately, you can usethis field to rebuild your calendar in Salesforce.
If you are planning to import the notes and history as separate items as described in the Advanced Topics
section, we recommend that you do NOT import them with the Salesforce wizard. And, if you have a lot
of notes, you might want to exclude them for being added to the Contacts table by selecting this option in
the Custom Controls tab on the exporter. This will make the upload of your data more efficient.
8/3/2019 Converting ACT to Sales Force
http://slidepdf.com/reader/full/converting-act-to-sales-force 9/33
6 JL Technical Group
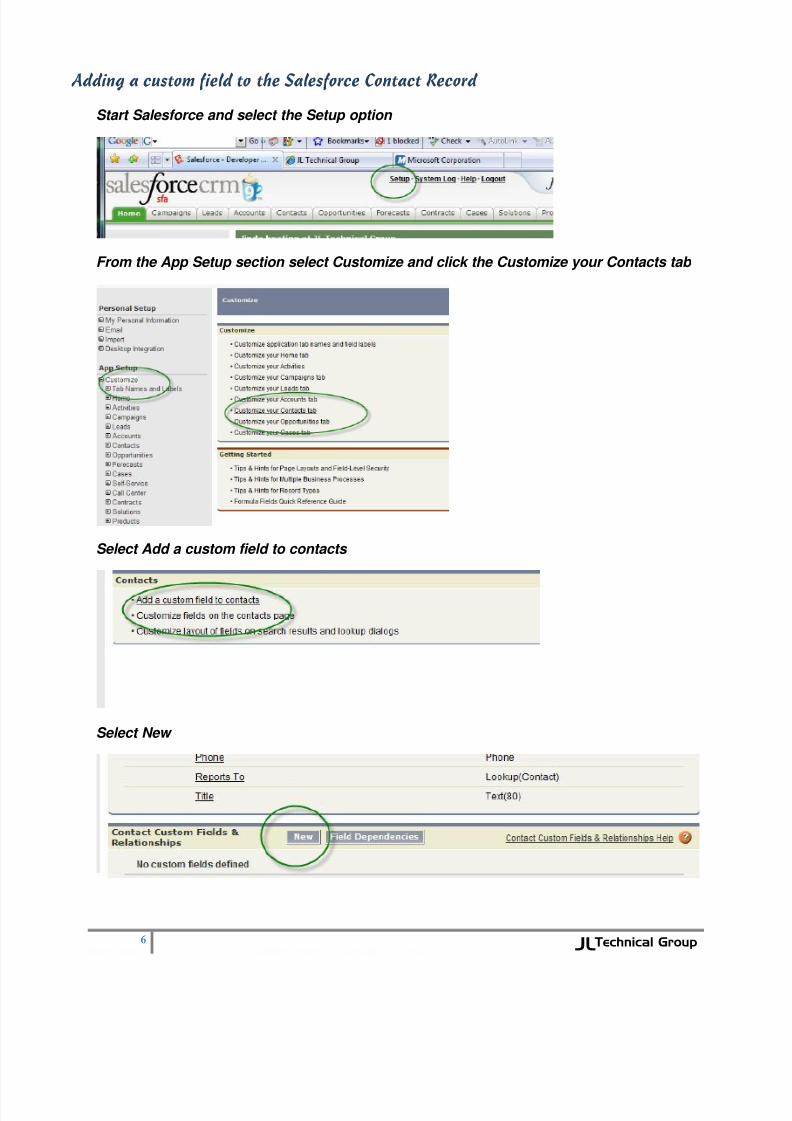
Adding a custom field to the Salesforce Contact Record
Start Salesforce and select the Setup option
From the App Setup section select Customize and click the Customize your Contacts tab
Select Add a custom field to contacts
Select New
8/3/2019 Converting ACT to Sales Force
http://slidepdf.com/reader/full/converting-act-to-sales-force 10/33
7 JL Technical Group
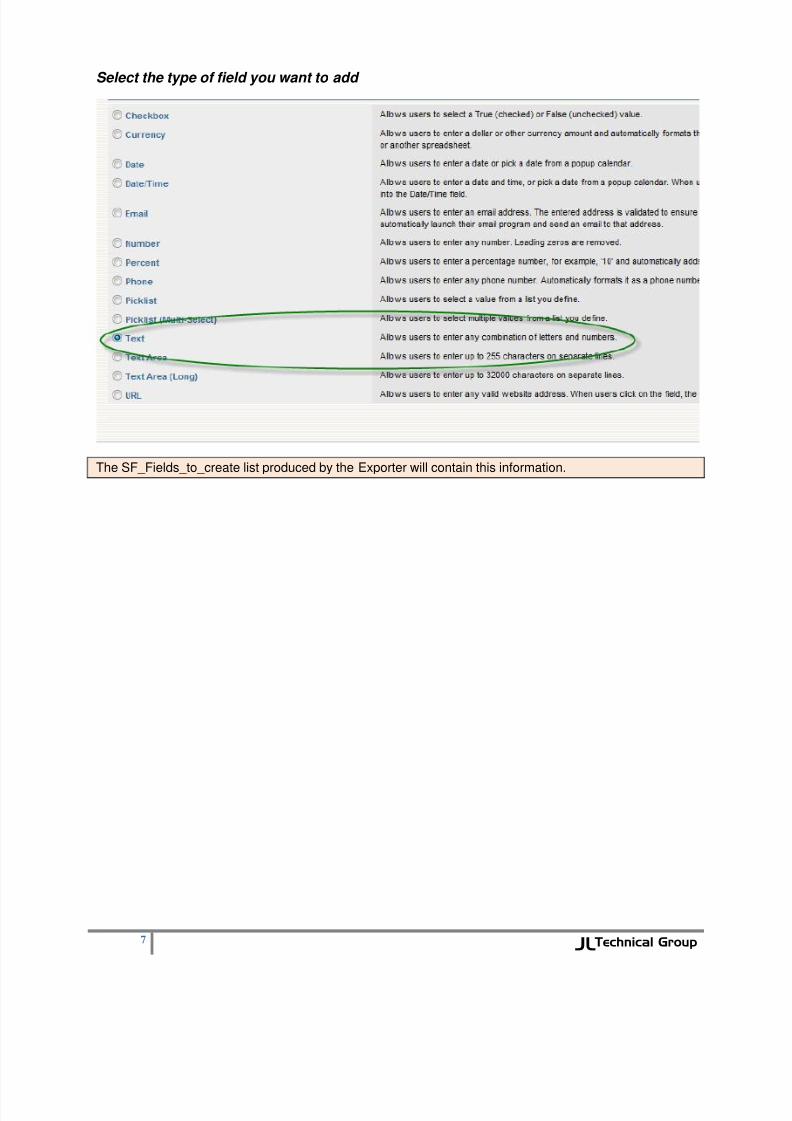
Select the type of field you want to add
The SF_Fields_to_create list produced by the Exporter will contain this information.
8/3/2019 Converting ACT to Sales Force
http://slidepdf.com/reader/full/converting-act-to-sales-force 11/33
8 JL Technical Group
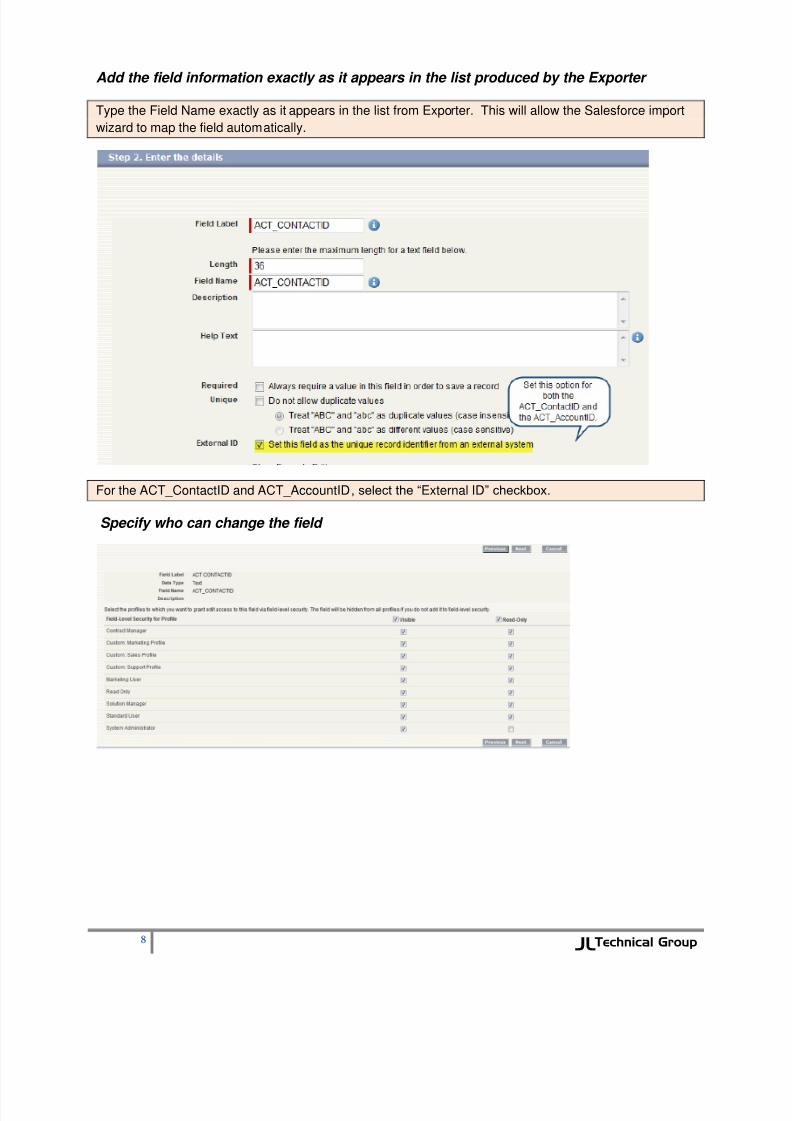
Add the field information exactly as it appears in the list produced by the Exporter
Type the Field Name exactly as it appears in the list from Exporter. This will allow the Salesforce import
wizard to map the field automatically.
For the ACT_ContactID and ACT_AccountID, select the “External ID” checkbox.
Specify who can change the field

8/3/2019 Converting ACT to Sales Force
http://slidepdf.com/reader/full/converting-act-to-sales-force 12/33
9 JL Technical Group
Finally specify where you want the field to appear
Repeat the above steps until you’ve added all the fields from ACT! that you want to use
in Salesforce.
You will also need to add the ACT_AccountID field to the Account table to allow linking to Account
records if you plan to import Activities and other ACT! data. Be sure to select the “External ID” checkbox
for this field.

8/3/2019 Converting ACT to Sales Force
http://slidepdf.com/reader/full/converting-act-to-sales-force 13/33
10 JL Technical Group
Adding a Custom Field for ACT! Notes and History data
If you will be adding the Notes and History records as separate items using the Salesforce Apex
Data Loader, you can skip this step.
Otherwise you can create new Salesforce fields to hold the merged note and history records. You
can either add separate fields – x_notes and x_history or the combined x_note_history field.
Since the Import Wizard can have “issues” with large records, we recommend that you export only the
merged fields that you plan to import. You can exclude the merged fields you will not be using. By
selecting the Exporter Option Control tab and specifying which fields to exclude.
Follow the steps above; but use the Text Area (Long) field type for the notes and history merge
fields.

8/3/2019 Converting ACT to Sales Force
http://slidepdf.com/reader/full/converting-act-to-sales-force 14/33
11 JL Technical Group
Step 3 -- Import your data
Start the Salesforce Import Wizard!
On the Salesforce Setup page, select Import Accounts/Contacts
These instructions are for loading your data as Contacts. The data can be loaded into Leads using thesame procedure. However, there are some features that contacts have that are not included with Leads.
So, before proceeding you should have a good idea how you want your Salesforce database structured.
Exporter maps the ACT! Record Manager to the Salesforce Record Owner. Unlike ACT!, you CANNOT
have inactive users in Salesforce. Any ACT! Record Manager that does not match an active user in
SFDC will be assigned to the user who is doing the import.

8/3/2019 Converting ACT to Sales Force
http://slidepdf.com/reader/full/converting-act-to-sales-force 15/33
12 JL Technical Group
Find the data file produced by the Export.
The name will be CONTACT_ACCOUNT.CSV
The Exporter will populate the Account information. It uses the following rules:
If the Contact belongs to a Company in ACT! (2005+), the data is taken from the Company record in ACT!
Otherwise, the Company information is taken from the Contact record and used to create a Salesforce
account.
Check the field mapping
Since the field labels were set to match the Import Wizard, all ACT! fields should be
automatically mapped. At the end of the mapping display sequence, Salesforce will provide a list
of fields that were not mapped. Check this to be certain that you haven’t missed any important
data. If all is OK, Click the Import Now! Button and your data will load.
Even though the fields are pre-labeled by the Exporter, similar names of user fields can cause the Import
Wizard to select the wrong column to map. Before clicking the Import Now! Button,
CHECK AND RECHECK HOW EACH FIELD IS MAPPED!

8/3/2019 Converting ACT to Sales Force
http://slidepdf.com/reader/full/converting-act-to-sales-force 16/33
13 JL Technical Group
Step 4 -- Checking your data
Because the structure of Salesforce is different than ACT!, your data will appear a bit different than
it did in ACT!.
We recommend that you use the Salesforce Page Layout tool to move the ACT! data into sections so it
will be easier to view.
8/3/2019 Converting ACT to Sales Force
http://slidepdf.com/reader/full/converting-act-to-sales-force 17/33
14 JL Technical Group
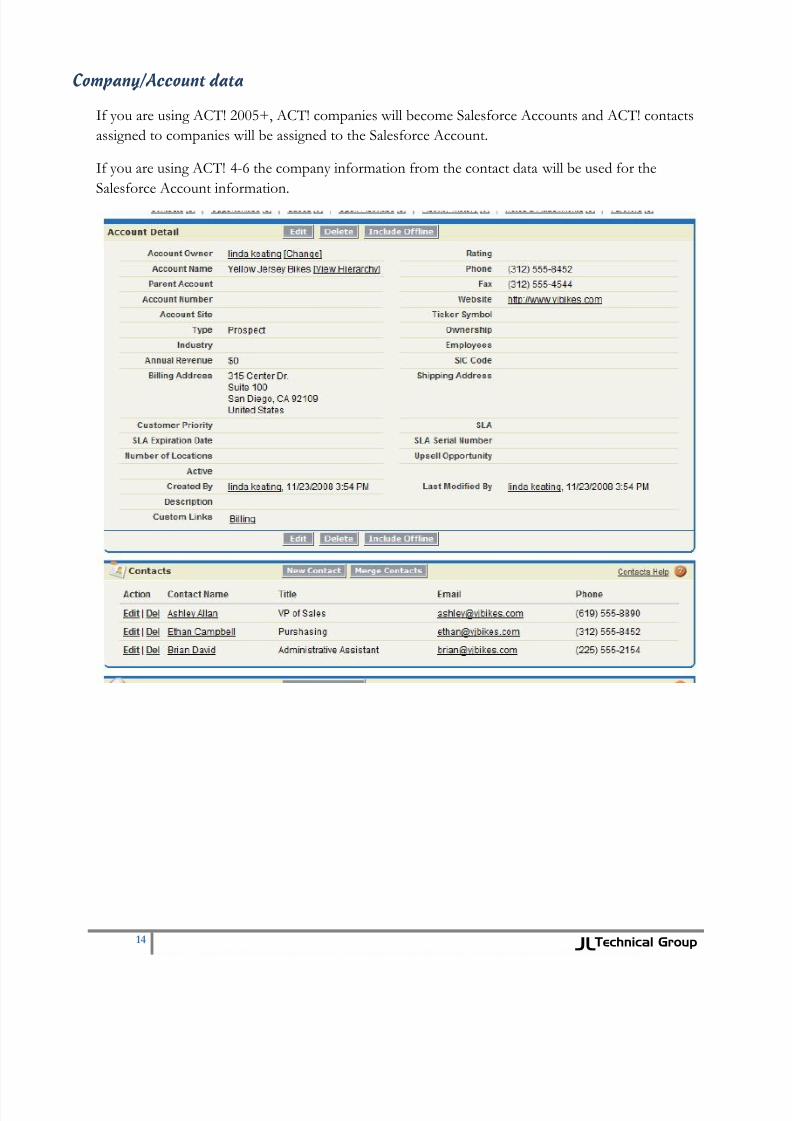
Company/Account data
If you are using ACT! 2005+, ACT! companies will become Salesforce Accounts and ACT! contacts
assigned to companies will be assigned to the Salesforce Account.
If you are using ACT! 4-6 the company information from the contact data will be used for the
Salesforce Account information.

8/3/2019 Converting ACT to Sales Force
http://slidepdf.com/reader/full/converting-act-to-sales-force 18/33
15 JL Technical Group
Advanced Topics
After you have loaded your Contact_Account data into Salesforce, you can now load the other
pieces of the ACT! database. In many cases this won’t be necessary. However, if you need to
import extended data from ACT!, this section describes how to do it. It’s a bit complex and it’s best
if you have a technical knowledge of the structure of both the ACT! and Salesforce databases.
These instructions use the Apex data loader from SFDC.
The API (Application Program Interface) must be turned on for your account to use the Apex Data Loader
Your Salesforce Sales Rep can do this for you.
Files for Import
In the Salesforce_com folder, you will find a folder named DataLoader files.
In this folder you will see the auxiliary pieces of the ACT! database. We recommend using the
Activity_History_Note to import into the Salesforce Task object. This will create Open Tasks for
the ACT! Activities and Completed Tasks for the Notes and History items.
The path and name of any attachments and library documents are included as a history and will appear in
the Completed Tasks section of Salesforce. The actual document is not imported.
The individual tables (Notes.csv, History.csv and Activities.csv) are also included in case you wish to load
them individually or in a different area.

8/3/2019 Converting ACT to Sales Force
http://slidepdf.com/reader/full/converting-act-to-sales-force 19/33
16 JL Technical Group
Building the UserID file and the ContactID file
In order to have the activities, opportunities, etc. assigned to the proper user and contact, the ACT!
user name and ACT! ContactID must be converted to the Salesforce ID. The easiest way to do this
is to create Salesforce reports and export them to CSV files.
User ID File To run user reports you require the following permissions: "Run Reports" and "View Setup and
Configuration".
1. Go to the Reports Tab
2. Click on the "Create new Custom Report" button.
Remove all the columns and then drag the
Full Name
UserID
fields to the report.
8/3/2019 Converting ACT to Sales Force
http://slidepdf.com/reader/full/converting-act-to-sales-force 20/33
17 JL Technical Group
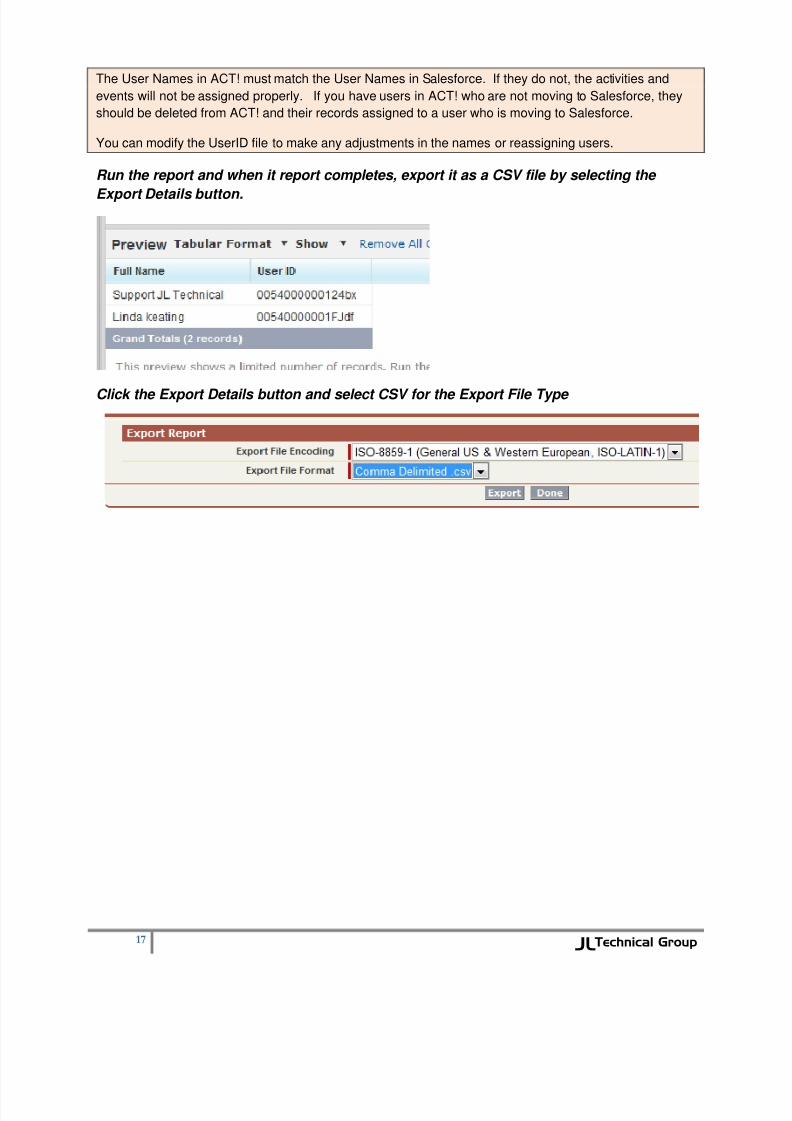
The User Names in ACT! must match the User Names in Salesforce. If they do not, the activities and
events will not be assigned properly. If you have users in ACT! who are not moving to Salesforce, they
should be deleted from ACT! and their records assigned to a user who is moving to Salesforce.
You can modify the UserID file to make any adjustments in the names or reassigning users.
Run the report and when it report completes, export it as a CSV file by selecting the
Export Details button.
Click the Export Details button and select CSV for the Export File Type

8/3/2019 Converting ACT to Sales Force
http://slidepdf.com/reader/full/converting-act-to-sales-force 21/33
18 JL Technical Group
Contact_Account ID File
The process for creating the Contact ID file is similar to the User ID file.
Under Select Category, select “Accounts & Contacts” and under Report Type, choose “Contacts &
Accounts”.
Select Remove All Columns and then
From the “Contact: General” selection drag First Name, Last Name, and Contactid
From the “ Accounts: General” section drag Account Name and Account ID
From the “Custom Info” section drag ACT_ContactID and ACT_AccountID

8/3/2019 Converting ACT to Sales Force
http://slidepdf.com/reader/full/converting-act-to-sales-force 22/33
19 JL Technical Group
The report should look like this
Click the Export Details button and select CSV for the Export File Type

8/3/2019 Converting ACT to Sales Force
http://slidepdf.com/reader/full/converting-act-to-sales-force 23/33
20 JL Technical Group
Replace the ACT IDs with the Salesforce IDs
Next run the SalesforceIDFix program which was installed with the Exporter.
This program will replace the ACT! User ID with the Salesforce UserID and the ACT_ContactID
and ACT_AccountID with the Salesforce IDs. This allows the Activities, Opportunities, etc. to be
assigned to the proper user and contact. This program will create a file with a FIXED_ before the
name, e.g., FIXED_OPPORTUNITY.CSV. This will be the file you use for import. You should check
this file to be certain all user name and ID fields were converted to Salesforce IDs.
Contents of Dataloader folder after running the SalesforceIDFix program
8/3/2019 Converting ACT to Sales Force
http://slidepdf.com/reader/full/converting-act-to-sales-force 24/33
21 JL Technical Group
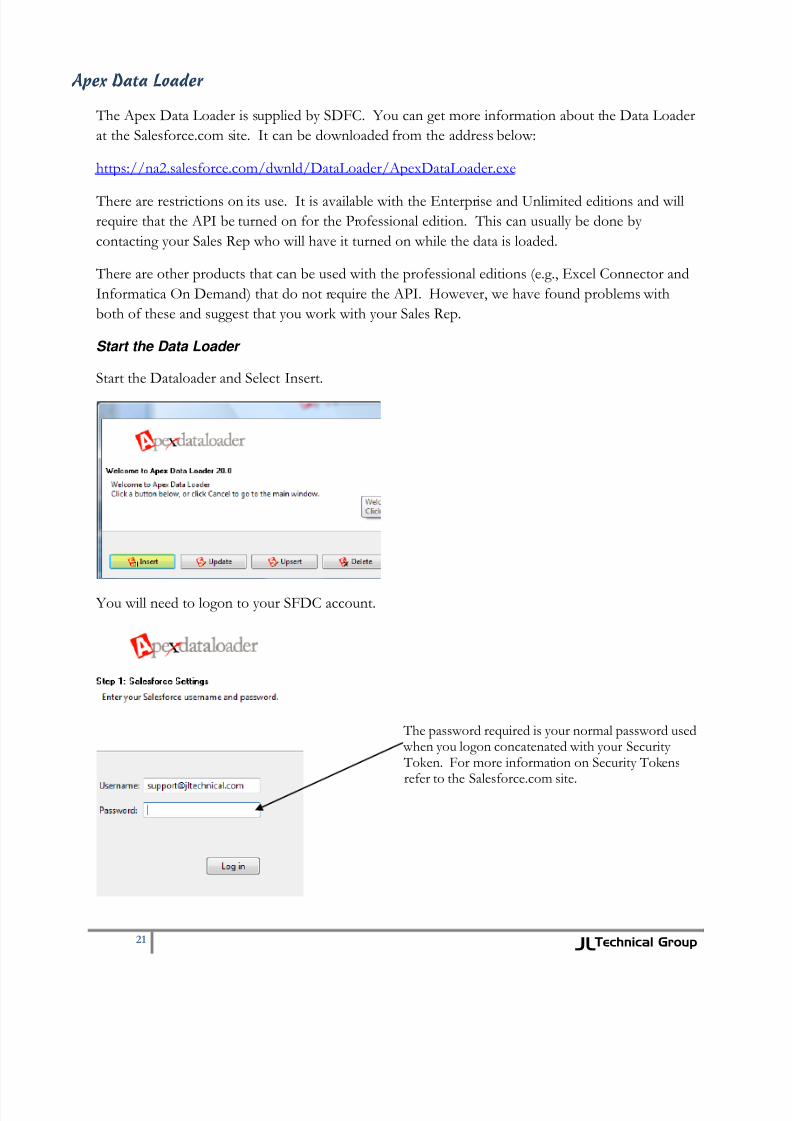
Apex Data Loader
The Apex Data Loader is supplied by SDFC. You can get more information about the Data Loader
at the Salesforce.com site. It can be downloaded from the address below:
https://na2.salesforce.com/dwnld/DataLoader/ApexDataLoader.exe
There are restrictions on its use. It is available with the Enterprise and Unlimited editions and willrequire that the API be turned on for the Professional edition. This can usually be done by
contacting your Sales Rep who will have it turned on while the data is loaded.
There are other products that can be used with the professional editions (e.g., Excel Connector and
Informatica On Demand) that do not require the API. However, we have found problems with
both of these and suggest that you work with your Sales Rep.
Start the Data Loader
Start the Dataloader and Select Insert.
You will need to logon to your SFDC account.
The password required is your normal password used when you logon concatenated with your Security Token. For more information on Security Tokens
refer to the Salesforce.com site.

8/3/2019 Converting ACT to Sales Force
http://slidepdf.com/reader/full/converting-act-to-sales-force 25/33
22 JL Technical Group
Select “ Task ” at the Salesforce Object
In the “Choose CSV file box, browse to theFixed_Activity_History_Note.csv file
The Data Loader will notify you when the file is
loaded
Click OK to proceed to Step 3 (Mapping)
8/3/2019 Converting ACT to Sales Force
http://slidepdf.com/reader/full/converting-act-to-sales-force 26/33
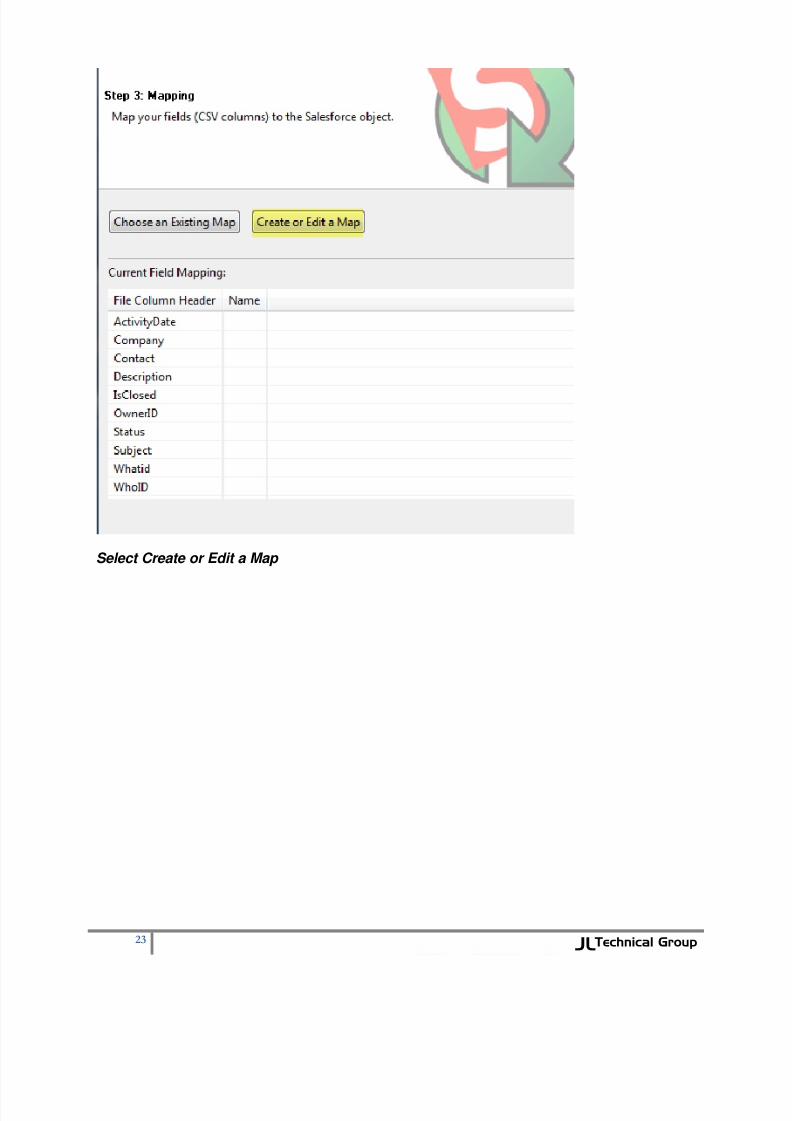
23 JL Technical Group
Select Create or Edit a Map

8/3/2019 Converting ACT to Sales Force
http://slidepdf.com/reader/full/converting-act-to-sales-force 27/33
24 JL Technical Group
Select “ Auto-Match Fields to Columns ”
Click OK and then Next>
8/3/2019 Converting ACT to Sales Force
http://slidepdf.com/reader/full/converting-act-to-sales-force 28/33
25 JL Technical Group
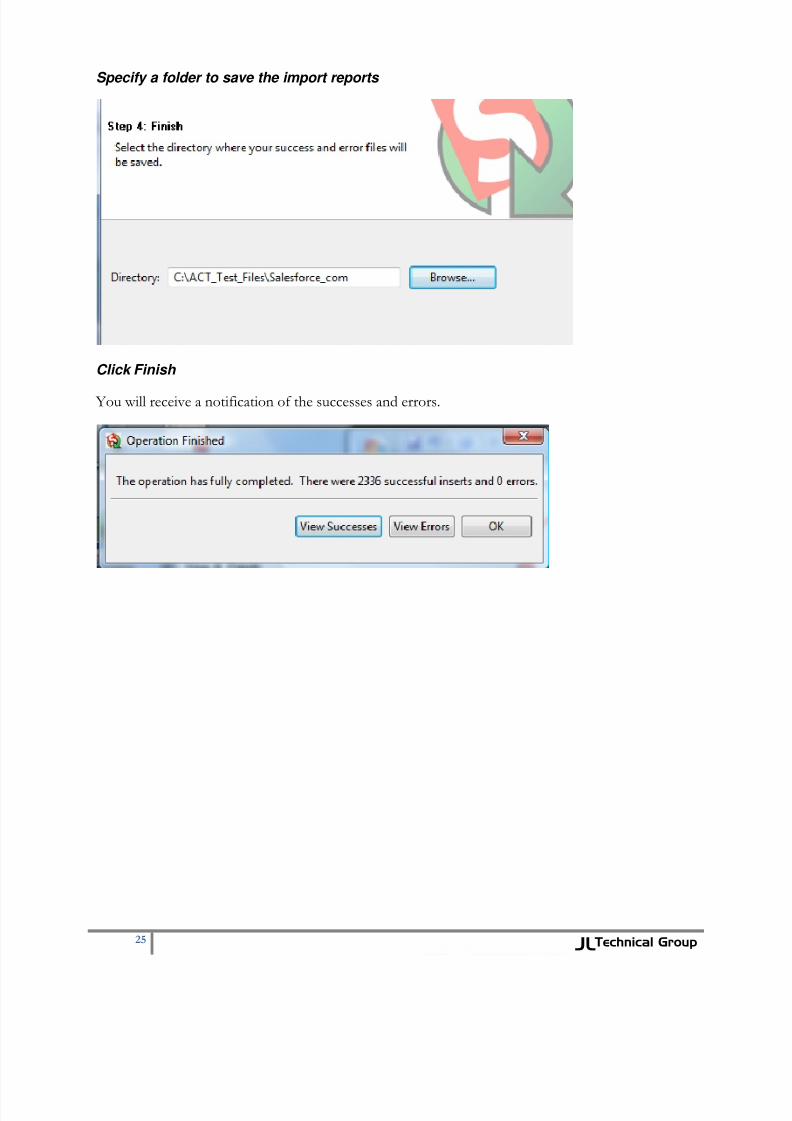
Specify a folder to save the import reports
Click Finish
You will receive a notification of the successes and errors.
8/3/2019 Converting ACT to Sales Force
http://slidepdf.com/reader/full/converting-act-to-sales-force 29/33
26 JL Technical Group
Appendix A – Preparing your ACT! Database
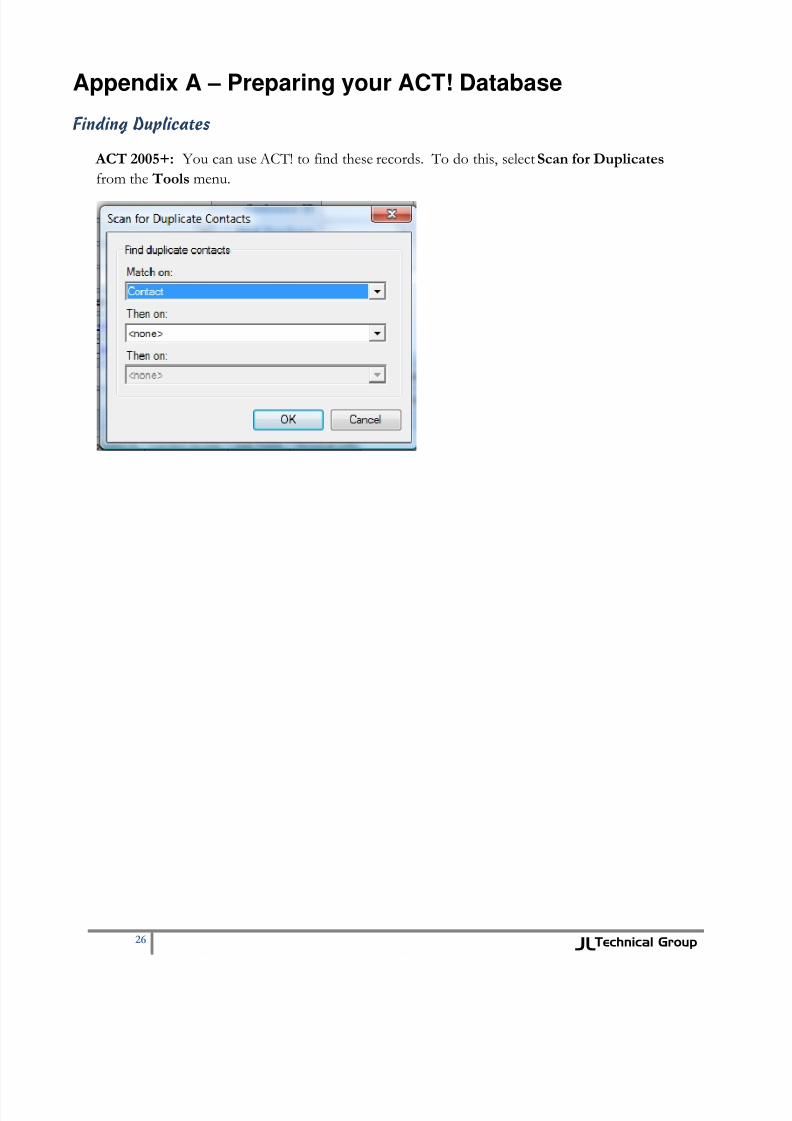
Finding Duplicates
ACT 2005+: You can use ACT! to find these records. To do this, select Scan for Duplicates
from the Tools menu.

8/3/2019 Converting ACT to Sales Force
http://slidepdf.com/reader/full/converting-act-to-sales-force 30/33
27 JL Technical Group
Remove the Old Data.
ACT! allows you to save a lot of “stuff” . Unfortunately, a lot the the “stuff” is really junk. So, you
might want to take some time and get rid of the data that you will never use.

8/3/2019 Converting ACT to Sales Force
http://slidepdf.com/reader/full/converting-act-to-sales-force 31/33
28 JL Technical Group
Appendix B – How the differences are handled
There are msny differences in structure between the ACT! and Salesforce databases. The following
explains how the Exporter deals with these:
Account Assignment
In Salesforce.com, if a contact is not assigned to a company, then the record owner is the only user
that has access to the contact. Therefore, when the import files are prepared, each contact is
assigned an account using the following rules.
If a contact belongs to an ACT! company, the account information for that contact will be taken
from the ACT! company data.
If a contact does not belong to an ACT! company and the Company name is present in the contact’s
record, then this company name will be used to create a Salesforce.com account.
If a contact does not belong to an ACT! company and does not have a company name in the record,
the contact will be assigned to a Salesforce.com Account called “ ACT! Blank Company – Reassign ”
Blank Contacts
If the Contact name is blank and there is a Company name, then the contact will be named Contact
at companyname .
Account Addresses
ACT! companies can have three address fields. Salesforce.com only has two. When ACT! company data is used to populate the Salesforce.com Account addresses the following rules are used:
If the ACT! company Billing Address field is blank, the Address is moved to the Salesforce.com
Billing Address.
If both the ACT! company and billing addresses contain data, the ACT! company address is put into
a field which will need to be created labeled, ACT_Company_Address.

8/3/2019 Converting ACT to Sales Force
http://slidepdf.com/reader/full/converting-act-to-sales-force 32/33
29 JL Technical Group
Groups
There are no groups in Salesforce.com. However, they can be simulated using Salesforce views.
Exporter provides a field labeled Group Membership which contains a list of all the groups the
contact belongs to. To use this in Salesforce, do the following:
1.
On the Contacts home page, click the Create a New View option.2. Give the view a name – e.g., the name of your ACT! Group
3. Specify the filter for the group
a. In the Field dropdown, select the Group Membership field.
b. In the Operator field, select contains
c. In the Value field, enter the name of the group.
Secondary contacts (ACT! 2005+ only)
Salesforce does not have a similar function to ACT!’s secondary contacts. If you want to includesecondary contacts, you will need to load them separately using DataLoader. Secondary contacts
will be linked to their primary contact in Salesforce. You will see the primary contact ID in the
Reports To: field of Salesforce. The secondary contacts data is found in the Secondary_Contacts
file within the Dataloader Files folder and will be transformed with the SalesforceID Fix program.

8/3/2019 Converting ACT to Sales Force
http://slidepdf.com/reader/full/converting-act-to-sales-force 33/33