Contents · Contents . Introduction 2 . ... It is also useful to note that when practicing asanas...
73
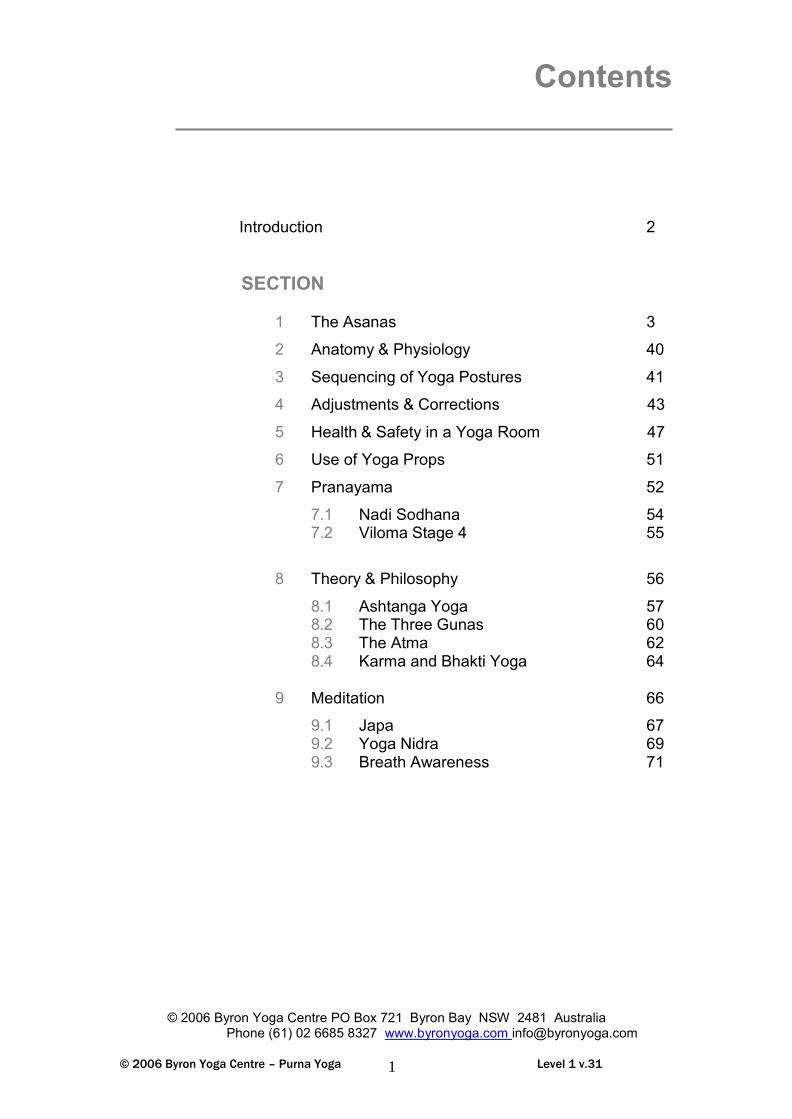
© 2006 Byron Yoga Centre – Purna Yoga Level 1 v.31 1 Contents Introduction 2 SECTION 1 The Asanas 3 2 Anatomy & Physiology 40 3 Sequencing of Yoga Postures 41 4 Adjustments & Corrections 43 5 Health & Safety in a Yoga Room 47 6 Use of Yoga Props 51 7 Pranayama 52 7.1 Nadi Sodhana 54 7.2 Viloma Stage 4 55 8 Theory & Philosophy 56 8.1 Ashtanga Yoga 57 8.2 The Three Gunas 60 8.3 The Atma 62 8.4 Karma and Bhakti Yoga 64 9 Meditation 66 9.1 Japa 67 9.2 Yoga Nidra 69 9.3 Breath Awareness 71 © 2006 Byron Yoga Centre PO Box 721 Byron Bay NSW 2481 Australia Phone (61) 02 6685 8327 www.byronyoga.com [email protected]
Transcript of Contents · Contents . Introduction 2 . ... It is also useful to note that when practicing asanas...
© 2006 Byron Yoga Centre – Purna Yoga Level 1 v.31 1
Contents
Introduction 2
SECTION
1 The Asanas 3
2 Anatomy & Physiology 40
3 Sequencing of Yoga Postures 41
4 Adjustments & Corrections 43
5 Health & Safety in a Yoga Room 47
6 Use of Yoga Props 51
7 Pranayama 52
7.1 Nadi Sodhana 54 7.2 Viloma Stage 4 55
8 Theory & Philosophy 56
8.1 Ashtanga Yoga 57 8.2 The Three Gunas 60 8.3 The Atma 62 8.4 Karma and Bhakti Yoga 64
9 Meditation 66
9.1 Japa 67 9.2 Yoga Nidra 69 9.3 Breath Awareness 71
© 2006 Byron Yoga Centre PO Box 721 Byron Bay NSW 2481 Australia Phone (61) 02 6685 8327 www.byronyoga.com [email protected]

© 2006 Byron Yoga Centre – Purna Yoga Level 1 v.31 2
Introduction
Welcome to Level One – Introduction to Yoga Teacher Training. The goal of this teacher training course is for participants to achieve a holistic knowledge of yoga, and gain the skills necessary to teach yoga to others with safety, awareness and understanding.
Participants will be able to deepen their own practice on a physical, mental and spiritual level by gaining insight and appreciation of the yogic path.
The qualification that will be attained from completing this course will be “Level One Certificate of Achievement in Yoga Teacher Training” issued by Byron Yoga Centre. The Byron Yoga Centre Level One Certificate is registered and accredited by Yoga Alliance.
This qualification covers the skills and knowledge required for conducting a beginner’s yoga class. This qualification would also enable graduates to undertake basic tasks in assisting larger general classes.
The structure of the course is as follows:
9 core subjects will be studied: YGTPRC402A Asana HLTAP301B Anatomy and Physiology YGTTEA403A Sequencing of Yoga Postures YGTTEA403A Adjustments and Corrections HLTWHS001 Work Place and Health & Safety YGTTEA403A Use of Yoga Props YGTPRC402A Pranayama YGTWOR401A Theory and Philosophy YGTPRC402A Meditation
We aim to embrace the principles of adult learning and trust that you will find the course fun and interactive.
All the very best on your yoga journey!
John Ogilvie
A special note for the practicing of asanas.
It is also useful to note that when practicing asanas it is always good to keep both the pelvic floor and core muscles engaged. Also when talking about benefits of practicing asanas it is good to remember how beneficial they all are for the endocrine system.

© 2006 Byron Yoga Centre – Purna Yoga Level 1 v.31 3
1 The Asanas
Part One 1.1 Bidalasana 4
1.2 Tadāsana 5
1.3 Balāsana 6
1.4 Adho Mukha Virāsana 7
1.5 Adho-Mukha Svanasana 8
1.6 Savāsana 9
1.7 Śalabhāsana 1 10
1.8 Bhujangasana 11
1.9 Uttanasana 12
1.10 Ashva Sanchalanasana 13
1.11 Sūrya Nāmaskar 14
1.12 Vrksāsana 17
1.13 Adho Mukha Vrksāsana 18
1.14 Eka Pada Rajakapotasana 20
1.15 Virabhadrasana 1 21
1.16 Trikonasana 22
1.17 Virabhadrasana 2 23
1.18 Prasarita Padottanasana 24
1.19 Supta Padangusthasana 25
1.20 Setu Bandha Sarvangasana 26
1.21 Ardha Matsyendrāsana III 27
1.22 Viparita Karani 29
1.23 Salamba Sarvangāsana 30
1.24 Matsyāsana Variation 32
1.25 Dandāsana 33
1.26 Paschimottanāsana 34
1.27 Upavistha Konāsana 35
1.28 Baddha Konāsana 37

© 2006 Byron Yoga Centre – Purna Yoga Level 1 v.31 4
Contraindications and Cautions
1.1 Bidalasana "Cat & Cow" pose
• Neck injury: keep the head in line with the torso. • Carpal tunnel syndrome: use props underneath the heels of the hands as
support, or avoid the pose. • Pregnancy: work between neutral spine and tucked spine (don’t arch the lower
back down into ‘cow’ pose).
Benefits
• Stretches the back and front torso and neck. • Provides a gentle massage to the spine and abdominal organs, and opens the
groin which increases the range of movement in the hip joints. • Strengthens and mobilises the shoulder girdle.
Technique
• Start on your hands, with fingers spread, and knees in a table top position. Make sure your knees are set directly below your hips and your wrists directly below your shoulders. Centre your head in a neutral position, eyes looking at the floor, elbows unlocked and elbow creases facing each other.
• On inhalation look forward, lift sitting bones, chest moves forward, neck extended.
• On exhalation draw chin to chest, lift chest to ceiling and let buttocks tuck under.
• Continue back and forth with your own breath. Focus on lengthening the spine. • To release take buttocks to heels and come back into Balasana, Child pose.
Common Misalignments
• Hands too far forward or back. • Hands too narrow or wide. • Knees misaligned. • Collapsing between the shoulder blades, lower back or neck. • Hyper-extending elbows.

© 2006 Byron Yoga Centre – Purna Yoga Level 1 v.31 5
Samasthiti: Even Balance
1.2 Tadāsana Mountain Posture
The basis of most postures, especially the standing postures.
Contraindications and Cautions
• Low blood pressure if pose held too long. • Pregnancy: keep feet hip-distance or wider apart.
Benefits
• Facilitates good alignment and good posture when standing, which strengthens and tones the core muscles.
Technique • Come to standing at the front of the mat with big toes
together and the ankles touching or slightly apart, with equal weight in back and front of feet.
• Lift up on arches of feet, lifting through quadriceps, but keep a micro bend in knees. Lift kneecaps up, buttocks slightly firm, navel moving in and up.
• Keep extending upwards through spine with shoulders relaxing down, head extending upwards through the crown. Close the eyes, looking down towards heart centre.
• Hands are placed in line with hips, extending through fingers, palms facing thighs but out and slightly away from body.
• Front of chest is open, also back of chest is broad. Try to move the shoulder blades away from each other.
Common Misalignments 1. Tucking pelvis under. • Lower back flattened • Rounding in the thoracic (kyphosis)
2. Thrusting pelvis out
(Lumbar lordosis, sway back)
Examples of Incorrect Alignment
Lordosis Kyphosis • Hyperextension in the lower back causes compaction in the lower back. • Unduly tightens quadriceps and hip flexors
3. Avoid hyper-extended knees.
4. For knock-knees, bring feet slightly apart.
5. Hands / fingers not active.
© 2006 Byron Yoga Centre – Purna Yoga Level 1 v.31 6
A resting position in yoga.
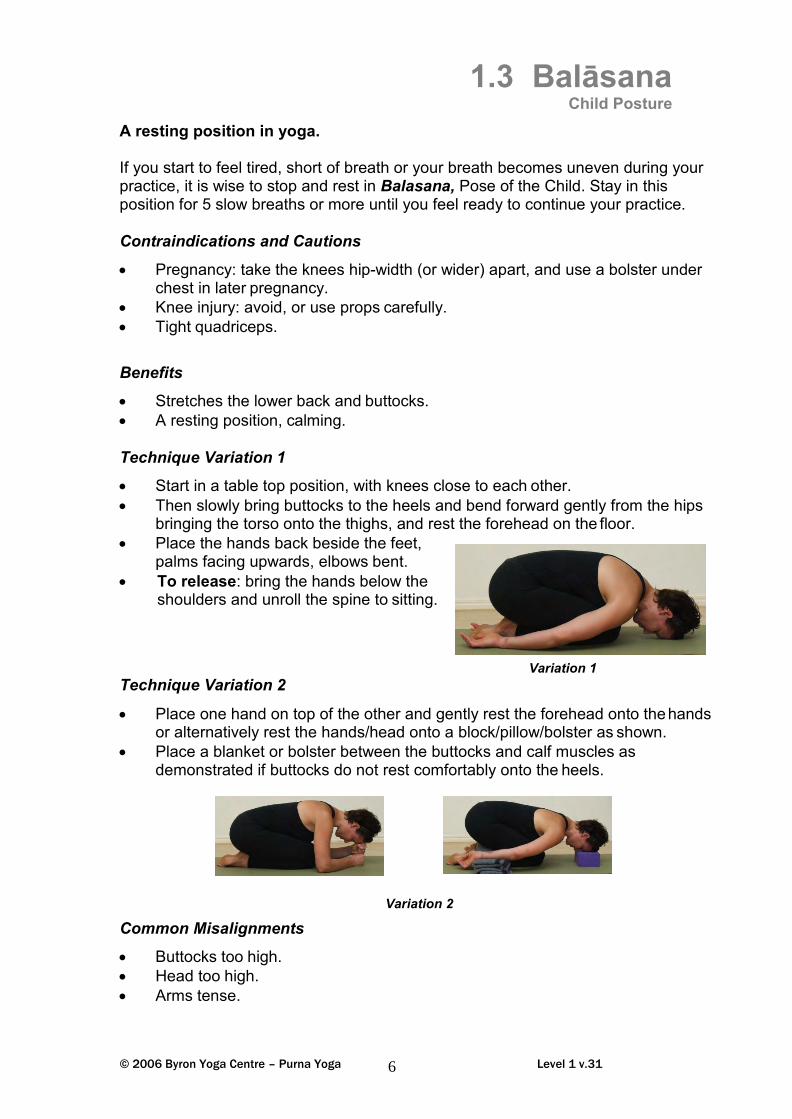
1.3 Balāsana Child Posture
If you start to feel tired, short of breath or your breath becomes uneven during your practice, it is wise to stop and rest in Balasana, Pose of the Child. Stay in this position for 5 slow breaths or more until you feel ready to continue your practice.
Contraindications and Cautions
• Pregnancy: take the knees hip-width (or wider) apart, and use a bolster under chest in later pregnancy.
• Knee injury: avoid, or use props carefully. • Tight quadriceps.
Benefits
• Stretches the lower back and buttocks. • A resting position, calming.
Technique Variation 1
• Start in a table top position, with knees close to each other. • Then slowly bring buttocks to the heels and bend forward gently from the hips
bringing the torso onto the thighs, and rest the forehead on the floor. • Place the hands back beside the feet,
palms facing upwards, elbows bent. • To release: bring the hands below the
shoulders and unroll the spine to sitting. Technique Variation 2
Variation 1
• Place one hand on top of the other and gently rest the forehead onto the hands or alternatively rest the hands/head onto a block/pillow/bolster as shown.
• Place a blanket or bolster between the buttocks and calf muscles as demonstrated if buttocks do not rest comfortably onto the heels.
Common Misalignments
• Buttocks too high. • Head too high. • Arms tense.
Variation 2

© 2006 Byron Yoga Centre – Purna Yoga Level 1 v.31 7
1.4 Adho-Mukha Virāsana Down-face Warrior Posture
Beginner’s variation with knees wide. Contraindications and Cautions
• Knee injury: avoid or use props carefully. • Late pregnancy: can use a bolster to rest chest (not belly)
onto and turn head to one side. Benefits
• Stretches and opens the groin which increases the range of movement in the hip joints.
• Stretches and opens the lower back. • A resting position.
Technique Variation 1
• Sit the buttocks onto the heels with the big toes touching and the knees as wide as the hips or even as wide as the mat.
• Keep the buttocks resting on the heels with fingertips on floor.
• Inhale, look forward, lifting and opening the chest. • Exhale, keep buttocks on heels, walk hands forward,
bringing upper body down towards floor, and rest the head on the floor. • Hold and breathe. • To release: inhale, look forward and on the exhalation walk hands back,
drawing body upright. Technique Variation 2
• If the student finds it difficult to rest the buttocks onto the heels, a blanket or bolster can be placed between the calves and thighs as demonstrated. (Figure A) Figure A OR
• Rest the top of the hands onto the thighs or bolster sitting upright. (Figure B)
• Gently tuck the tailbone under and lengthen the spine – draw the shoulders away from the ears and lift the crown of the head toward the ceiling. (Figure B)
Common Misalignments
• Buttocks too high. • Head too high. • Knees too wide. • Shoulders hunching.
Figure B

© 2006 Byron Yoga Centre – Purna Yoga Level 1 v.31 8
1.5 Adho-Mukha Svanasana Downward-Facing Dog
Contraindications and Cautions
• Carpal tunnel syndrome: use props underneath the heels of the hands as support, or avoid the pose.
• Tight hamstrings: bend the knees. • Rotator cuff/shoulder injury and/or excessively tight shoulders: Practice Ardha
Adho-Mukha Svanasana variation (half dog). • Late pregnancy: may need to practice Ardha Adho-Mukha Svanasana or Adho
Mukha Virasana. Benefits
• Stretches the back, shoulders, hamstrings, calves, arches of the feet, and hands.
• Strengthens the arms and legs. • Strengthens and tones the heart. • Improves digestion. • Lengthens the spine and releases the
neck. Technique
• Come into Balasana and stretch arms forward. Firmly plant the hands. • Come up on to hands and knees. Check position of hands, shoulder-width
apart or slightly wider, middle finger pointing forward or slightly out. • Take knees and feet hip-width apart, inhale and tuck toes under. • Exhale as you lift the sitting bones toward ceiling. Relax head and neck down
and gradually start to straighten legs. Ease heels towards the floor. • Keep heels out, toes turned slightly in so that outside edges of feet are parallel
with edges of the mat. • Avoid hyper-extending the elbows and knees, micro-bend if necessary. Roll the
deltoid muscles out to create space and length around neck. Inside creases of elbows face each other.
• To release: bend knees to floor, buttocks to heels, coming into Balasana. Common Misalignments
• Alignment and positioning of hands/feet. • Distance between hands and feet. • Neck tension. • Bent elbows and/or collapsing between the shoulder
blades. • Rounded spine and/or torso too far forward: bend the
knees. • Hyper-extended elbows or knees.

© 2006 Byron Yoga Centre – Purna Yoga Level 1 v.31 9
Contraindications and Cautions
• Back injury or discomfort: place a bolster under the backs of the knees for support.
• Pregnancy: raise your head and chest on a bolster or lie on your side.
Benefits
1.6 Savāsana Corpse Posture
• It is important to consciously relax following your yoga practice and to rest both the mind and body. This helps balance and calm the nervous system.
• Be sure to allow yourself this time to lie in Savāsana for at least 5-10 minutes, or even longer if you are feeling stressed or low in energy.
• Savāsana will leave you feeling both refreshed and rejuvenated.
Technique
• Lie flat on the back, with arms about 15cm away from the body, palms facing up.
• Bolster may be used under knees to take any tension away in lower back.
• Move the feet slightly apart to a comfortable position, approximately hip width, allow the feet to fall out to the side.
• The back of the neck is kept long. A blanket may be used here. • The head and spine should be in a straight line. • The eyes are closed. • Relax the whole body and try to stop physical movement. • Become aware of the natural breath and allow it to become rhythmic and
relaxed. • After 5 minutes or so, softly and gently ask students to bring awareness
back to the body. • When ready, bring some gentle movement to the body, starting with the
fingers and toes. • Take arms along floor past head, and stretch the whole body, then relax
the arms. • Bend knees and roll to the right side, keeping eyes closed.
Variation for Pregnancy Lie on left side (or whichever side is more comfortable) using bolster between knees for support and folded blanket under the head.
Common Misalignments
• Hyper-extension of neck. • Head tilting to one side / body not positioned symmetrically.

© 2006 Byron Yoga Centre – Purna Yoga Level 1 v.31 10
1.7 Śalabhāsana One Locust Posture
Contraindications and Cautions
• Avoid when menstruating or pregnant. • Sore back: extra caution in posture.
Benefits
• The pose aids digestion and relieves gastric troubles and flatulence. • Since the spine is stretched back it becomes more elastic, and the pose
relieves pain in the sacral and lumbar regions. • The bladder and the prostate gland also benefit from the exercise and remain
healthy. • Strengthens the spine and whole posterior body. • Strengthens the core. • Opens the chest and facilitates deep thoracic breathing. • Beneficial for those suffering from disc injury and kyphosis.
Technique
• Lie down prone on the mat, full length with arms down by the side, fingers pointing back behind you.
• Feet together or no more than hip-width apart. • Activate pelvic floor muscles, and draw navel to spine. • Inhale, with forehead to floor. • Exhale, begin to raise the head, chest, arms and legs from the floor. • Gradually try to lift the thighs and ribcage completely off the floor. • Move chin towards chest and shoulder blades towards kidneys, stretch
legs out behind, pointing toes. • Hold for 5-8 breaths. • To release: Exhale, lower down, and then counterpose with Balasana.
Common Misalignments
• Feet too wide: place a block between the calves. • Back of neck compressed: tuck chin toward the chest. • Tension in shoulders. • Excessive tightening of buttocks.

© 2006 Byron Yoga Centre – Purna Yoga Level 1 v.31 11
Contraindications and Cautions
• Sore back: avoid the posture. • Avoid during pregnancy.
1.8 Bhujangasana Cobra Pose
Benefits
• Strengthens the spine. • Stretches and opens the chest, shoulders, and abdomen, good for kyphosis. • Firms the buttocks. • Massages abdominal organs. • Opens the heart and lungs and facilitates thoracic breathing. • Therapeutic for asthma.
Technique
• Lie prone on floor stretching legs back behind. Tops of feet on floor, feet together or no more than hip-width apart.
• Hands placed under shoulders with palms to floor, tips of fingers under shoulders. Draw shoulder blades down the spine. Keep elbows shoulder width.
• Press tops of feet, thighs and pubis firmly into floor. • Activate pelvic floor muscles and draw navel to spine. • Inhale and begin to lift chest off floor. • Drishti is on the floor in front. • Keep navel area touching the floor, and shoulder-blades drawing back
towards the kidneys, lengthening neck. • Hold for 5-8 breaths. • Exhale, release, and come back into Balasana to counterpose.
Common Misalignments
• Legs too wide. • Lifting chest too high. • Hunching the shoulders. • Elbows splaying out.

© 2006 Byron Yoga Centre – Purna Yoga Level 1 v.31 12
Intense stretch and forward bend Contraindications and Cautions
1.9 Uttanasana Standing Forward Bend
• Disc injury: do this pose with bent knees, or perform Ardha (Half) Uttanasana variation, with the hands on shins.
• Untreated high blood pressure perform Ardha (Half) Uttanasana. • Tight hamstrings or hyper-extension of the knees: bend the knees slightly. • Late pregnancy: may need to practice Ardha Adho Mukha Svanasana or Adho
Mukha Virasana.
Benefits
• Oxygenates the brain and reduces fatigue. • Stretches the hamstrings, calves, lower back and buttocks. • Tractions spine and neck. • Improves digestion. • A calming, inward-turning pose.
Technique
• Stand with feet together at front of mat in Tadasana. • Inhale, place hands on hips, lengthen spine. • Exhale, bending knees slightly, hinge forward from hips and
extend torso forward. Bring shoulders to hip-height. • Inhale, lengthening more through front of body, • Exhale, and take fingers to floor, in line with feet. • Gradually release the neck, lifting shoulder-blades up towards
waist, and straighten legs without hyperextending knees. Lift the sitting bones, and lengthen body down towards the earth.
• Soften toes and spread them wide apart, keeping equal weight on balls and heels of feet.
To release – For beginners: inhale, bend the knees, take chin to chest and unroll spine to standing. As students get stronger: inhale, begin to raise head slightly, take the arms out to the side, and lift torso up leading with the heart to Urdhva Hastasana.
Uttanasana can be used as a resting position between the standing poses: stay in the pose for 30 seconds to 1 minute. It can also be practiced as a pose in itself.
Common Misalignments
• Knees hyper-extended: bend knees slightly. • Head lifting and tightening neck. • Feet too narrow, wide or misaligned. • Spine rounding: may need to bend knees. Resting Variation

© 2006 Byron Yoga Centre – Purna Yoga Level 1 v.31 13
1.10 Ashva Sanchalanasana Horse Rider's Pose or High Lunge Pose
Contraindications and Cautions
• Any serious knee injuries: extra caution with front knee alignment, and if necessary, do the gentle variation.
• Neck issues: look down at the floor instead of straight ahead. • Late pregnancy: place both hands on inside of front foot.
Benefits
• Stretches the groin, psoas muscle and quadriceps. • Strengthens the legs and arms.
Technique
• Stand in Tadasana. • Inhale, lift and open chest and raise arms to Urdhva Hastasana. • Exhale bend knees and swan dive forward, placing fingertips in line with
toes in Uttanasana. • Inhale and bend knees a little deeper, looking forward. • Exhale, take a big step back with left foot, resting knee to floor. • Keeping knee aligned above heel. • For stronger variation, straighten left leg, extending through the heel, ball
of foot on floor. • Gradually soften right buttock toward floor, left groin towards floor, firm
the left knee upwards. • Gradually lift torso as high above right thigh as possible with fingers still
touching the floor, equal weight/pressure shared between each hand and front foot.
• Try to square off the hips to front of mat. • To release: inhale, lift and open chest,
looking forward. • Exhale, and step the right foot back to
Adho Mukha Svanasana and change sides.
Gentle Variation
• Bend back knee to rest it on the floor. Common Misalignments
• Front foot and knee position. • Neck compression. • Hips not squared off.

© 2006 Byron Yoga Centre – Purna Yoga 14
Level 1 v.30
1.11 Sūrya Nāmaskar Gentle Salute to the Sun
A gentle variation of Surya Namaskar. Contraindications and Cautions
• As per the individual postures. Benefits
• Warms and opens the body. • Prepares the body for the deeper yoga stretches.
Technique Stand in Tadasana, then …
1. Urdhva Hastasana
• Inhale. Raise the arms, palms facing towards each other as you lengthen the spine.
• Look up only if it’s comfortable for the neck, otherwise look straight ahead.
• Draw the shoulders down away from the ears to lengthen the neck.
2. Exhale into Uttanasana (intense stretch and forward bend)
• For beginners, bend the knees to protect the lower back– eventually keep the legs straight [without hyperextending knees] and lifting the sit-bones.
• Rest the hands onto/towards the floor. • Relax the head and neck.
3. Inhale to a half-lift, looking down, lifting the chest, flattening the back with the
fingertips resting in line with the toes – bend the knees if you need to.

© 2006 Byron Yoga Centre – Purna Yoga Level 1 v.31 15
4. Exhale, Lunge - Ashva Sanchalanasana (variation)
• Step right foot back and lower onto the right knee.
5. Inhale. Raise the head looking forward.
• Keep the hands on the floor shoulder- width apart and stretch up onto the fingertips.
• Check knee alignment - Keeping knee aligned above heel.
• Lift the chest and drop the shoulders away from the ears. 6. Exhale. Step left foot back into …
Extended Balasana – Pose of the Child • Rest the buttocks onto the heels. • Keep the hands stretching forward.
7. Inhale into …
Bhujangasana – The Cobra (stay on hands and knees if pregnant)
• From Balasana swoop through between hands keeping elbows shoulder width.
• Drawing navel back to spine to protect lower back.
• Spread the fingers, squeeze the shoulder-blades together.
• Lift the chest and drop the shoulders away from the ears looking ahead and down, with a long neck.
• Place the feet hip-width apart.
8. Exhale into –
Adho Mukha Svanasana – Down Face Dog
• Place hands shoulder-width apart with the fingers evenly spread. • Bring weight down on the third knuckle of the index finger. • Upper back is broad – move the shoulders apart
and towards your buttocks. • Relax the head and neck. • Position the feet hip-width apart and slightly
pigeon-toed, so the outside edges of feet are parallel to the edges of the mat.
• Straighten the legs and move the heels onto or towards the floor.

© 2006 Byron Yoga Centre – Purna Yoga Level 1 v.31 16
9. Inhale - From Adho Mukha Svanasana …
• Step the right foot forward into a lunge with chest lifted.
10. Exhale as you step the left foot forward to Uttanasana.
11. Inhale.
• Bend the knees in Uttanasana, raise the arms and lift the torso.
• Stretch the arms towards the ceiling as you inhale to Urdhva Hastasana taking care with the neck.
12. Exhale, and lower the arms into Tadasana.
REPEAT ON THE LEFT SIDE:
1. Standing in Tadasana at the front of mat. 2. Inhale, take arms out and up to Urdhva Hastasana, look up only if
comfortable for the neck.
3. Exhale, bend the knees to protect lower back, and swan dive to Uttanasana.
4. Inhale to a half-lift, look forward, stretching body away from legs. 5. Exhale, take left leg back to a lunge, left knee to floor. 6. Inhale, lift and open chest. Check knee alignment. 7. Exhale, take right leg back, knees to mat, buttocks to heels, Balasana. 8. Inhale, firm the belly, bend the elbows, swoop between hands: Bhujangasana, Cobra
(stay on hands and knees if pregnant), taking care with back and neck.
9. Exhale to Adho Mukha Svanasana. 10. Inhale, bring left foot all the way forward to a lunge, right knee to mat, lift and open
chest.
11. Exhale, right foot forward to Uttanasana. 12. Inhale up to Urdhva Hastasana. 13. Exhale, Tadasana.
Note: If right foot steps back, right foot then steps forward, and vice versa. Both sides [right and left legs] = 1 ROUND of Surya Namaskar.

© 2006 Byron Yoga Centre – Purna Yoga Level 1 v.31 17
1.12 Vrksāsana Tree Posture
Contraindications and Cautions
• Low blood pressure if pose is held too long. • Untreated high blood pressure: don't raise arms overhead. • Take care with unstable sacroiliac joint: practice gentle variation.
Benefits
• Gently opens the hips. Tones the leg muscles. • A posture to ground and centre the body. • Good for emotional and mental balancing. • Strengthens the ankles and increases balance.
Technique
• Stand in Tadasana, feet together, hands on hips. • Find a point directly ahead at eye level in front to focus on:
drishthi, or gaze point. • Take weight onto left foot. • Stage 1: Bend the right knee, turn the right foot out to the side
and rest the right heel on the left ankle [not knee]. • Or, Stage 2: Engage the core muscles, then take hold of right ankle with
the right hand and place sole of foot on inner left thigh. • Keep hip bones parallel to front of mat, then draw the right knee back,
opening through the hips. • Inhale and take the arms out to the side and upwards like the branches
of a tree. • Exhale, bend elbows, palms together just above the head. • Relax shoulders away from ears.
To release: • Inhale stretching arms up. • Exhale, turn palms out and lower arms to shoulder height. • Inhale, stretch right leg out in front, leaning forward slightly. • Exhale, release arms and right foot to floor. • Stretch ankles by coming up onto the toes.
Variation
• If you experience difficulty with balancing, keep the right foot on the floor [Stage 1], with the heel resting on the left ankle, or use the wall for support.
Common Misalignments
• Lifting shoulders too high. • Pushing hip out to the side.
© 2006 Byron Yoga Centre – Purna Yoga Level 1 v.31 18
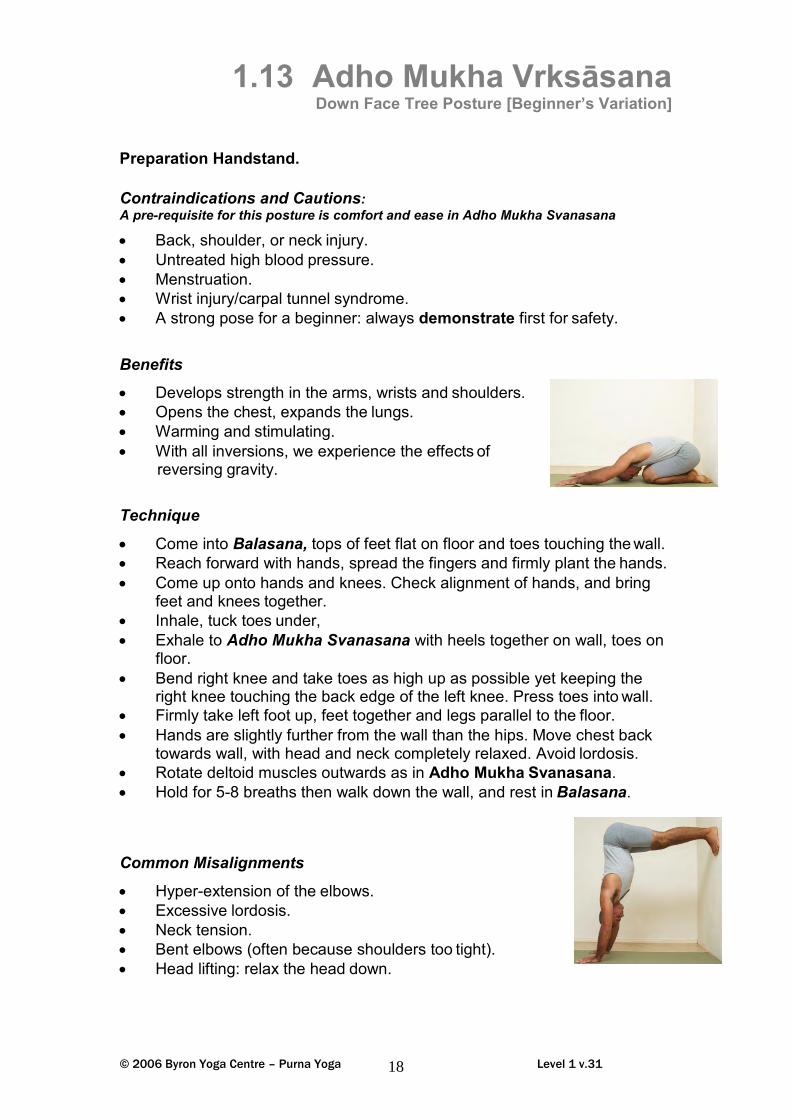
1.13 Adho Mukha Vrksāsana Down Face Tree Posture [Beginner’s Variation]
Preparation Handstand.
Contraindications and Cautions: A pre-requisite for this posture is comfort and ease in Adho Mukha Svanasana
• Back, shoulder, or neck injury. • Untreated high blood pressure. • Menstruation. • Wrist injury/carpal tunnel syndrome. • A strong pose for a beginner: always demonstrate first for safety.
Benefits
• Develops strength in the arms, wrists and shoulders. • Opens the chest, expands the lungs. • Warming and stimulating. • With all inversions, we experience the effects of
reversing gravity.
Technique
• Come into Balasana, tops of feet flat on floor and toes touching the wall. • Reach forward with hands, spread the fingers and firmly plant the hands. • Come up onto hands and knees. Check alignment of hands, and bring
feet and knees together. • Inhale, tuck toes under, • Exhale to Adho Mukha Svanasana with heels together on wall, toes on
floor. • Bend right knee and take toes as high up as possible yet keeping the
right knee touching the back edge of the left knee. Press toes into wall. • Firmly take left foot up, feet together and legs parallel to the floor. • Hands are slightly further from the wall than the hips. Move chest back
towards wall, with head and neck completely relaxed. Avoid lordosis. • Rotate deltoid muscles outwards as in Adho Mukha Svanasana. • Hold for 5-8 breaths then walk down the wall, and rest in Balasana.
Common Misalignments
• Hyper-extension of the elbows. • Excessive lordosis. • Neck tension. • Bent elbows (often because shoulders too tight). • Head lifting: relax the head down.

© 2006 Byron Yoga Centre – Purna Yoga Level 1 v.31 19
Incorrect Alignment: Shoulders too far forward. Chest needs to move back towards the wall.
Feet too high
Feet too low

© 2006 Byron Yoga Centre – Purna Yoga Level 1 v.31 20
1.14 Eka Pada Rajakapotasana One-Legged King Pigeon Pose
Contraindications and Cautions
• Acute sacroiliac injury. • Ankle or knee injury: support with props. • Caution with excessively tight hips or thighs:
support with props. • Lower back discomfort: bring torso forward
onto forearms. • Late pregnancy: don’t go very far forward.
Benefits
• Stretches the hips, groin and psoas. • Helps prevents sciatica.
Technique
• From Adho Mukha Svanasana, bend right knee, slide right toes along left side of mat, bringing knee in behind right wrist, left knee to floor.
• Stretch left leg out behind. Press the top of foot into the mat. • A prop may need to used under right buttock. • Look over left shoulder to make sure your leg is straight, aligned with
edge of mat. • Prioritise squaring off the hips. Inhale, look forward, lifting chest. • Exhale and walk hands forward, keeping hips aligned to floor. • Forehead to floor, or resting forehead to hands or stay up on elbows. • Stay for 10 to 15 breaths. • To release: inhale, look forward. • Exhale, lift torso up as you walk hands back, then tuck left toes under
and step back into Adho Mukha Svanasana and change sides. Common Misalignments
• Hip alignment: collapsing to one side. • Back leg splayed and foot twisted.

© 2006 Byron Yoga Centre – Purna Yoga Level 1 v.31 21
Contraindications and Cautions
1.15 Virabhadrasana 1 Warrior 1 Posture
• Shoulder issues: keep raised arms shoulder width apart or slightly wider, or keep hands on hips.
• Neck issues: keep head in neutral position- do not look up at hands. • Knee issues: lessen or avoid the lunge. • Acute sacroiliac injury: practice the variation with heel raised,
toes pointing forward. • A good option for pregnancy is to keep hands on hips or in
Namaste. Benefits
• Expands the chest to facilitate deep breathing. • Relieves stiffness in shoulders and neck. • Tones the calf muscles and strengthens the legs. • Lengthens the spine and stretches the psoas muscle. • Energises and builds stamina.
Technique • Stand at front of mat in Tadasana. • Take feet hip-width apart. • Place hands onto hips and step left foot back just over
one leg length. Turn the back toes towards the front of mat as much as is comfortable, working left heel down while lifting left inner arch.
• Prioritise squaring off the hips. Moving the back hip forward, both hip bones moving towards being parallel to front of mat. Engage core muscles.
• Bend right knee, keeping knee aligned above heel. • Inhale and raise arms up to shoulder-width apart,
shoulder-blades moving down the spine, neck long. Draw elbows back out of range of vision, and eventually bring the hands together.
• Look up if comfortable for the neck. • Lift and open chest, hold and breathe. • To release: inhale, look forward. • Exhale, lower arms, hands to hips as you step left foot forward.
Variation For sacroiliac issues, knee pain, or if it feels too uncomfortable in the extended leg/calf, stay up on the ball of the foot. Eventually as the calf muscle lengthens, the heel will rest onto the floor. In this variation, middle toe of back foot is in line with the heel, pointing directly forwards.
Common Misalignments • Hunched shoulders and/or bent elbows. • Position of hips: hips not parallel. • Feet and knee position. • Lower back: excessive lordosis/ ribs jutting out.

© 2006 Byron Yoga Centre – Purna Yoga Level 1 v.31 22
1.16 Trikonasana Extended Triangle Posture
Contraindications and Cautions
• Neck issues: don't turn head to look upward- continue looking straight ahead, or down towards the floor, and keep both sides of the neck evenly long.
• Acute sacroiliac injury: allow the top hip to gently roll forward. • If any lower back pain is experienced in the posture, raise the torso higher, or
alternatively come out of the pose. • Hamstring/adductor tear: avoid the posture. • Late pregnancy: use props for support. • Teachers should mirror this pose from side-on, in
student’s view. Benefits
• Tones the leg muscles. • Strengthens the ankles. • Gentle lateral extension which strengthens the
side and back body. Technique
• Stand in the centre of mat, facing the side of the mat in Tadasana.
• Step legs just over a leg length apart. The angle between the 2 thighs should be a 90 degree angle.
• Turn right foot to the right 90 degrees, and line up the heel of right foot with the heel or centre arch of left foot.
• Turn left toes in slightly so that the heel is turned out wider than toes. • Lift up kneecaps, and keep a microbend in front knee to avoid hyperextending.
Ideally the middle of knee points in direction of middle toe. • Inhale, raise the arms to shoulder height. Engage the core. • On the next inhalation, reach out to the right side from the hips, especially
extending the underside of the body. • Exhale, and take right arm down and left arm up. Press the back of right hand
against the shin, without collapsing onto the hand. • Either look down, or if comfortable look forward, tilt chin to chest, and turn head
up, look up past thumb of left hand. • Form two ‘right angle’ triangles, one with legs on floor and one with right arm,
torso and right leg, keeping straight lines. To release: • Exhale, bend front knee slightly and inhale come back to standing. • Exhale, and change sides.
Common Misalignments
• Leaning top shoulder forward. • Thrusting buttock out: raise the torso • Feet position. • Hyper-extension in the front knee: bend the knee slightly.

© 2006 Byron Yoga Centre – Purna Yoga Level 1 v.31 23
1.17 Virabhadrasana 2 Warrior 2 Posture
Contraindications and Cautions
• Neck issues: don't look over the front hand; continue to look straight ahead with both sides of the neck lengthened evenly.
• Acute sacroiliac injury: allow the back hip to gently roll forward. • Knee issues: don’t go all the way into full lunge, or avoid the pose. • Teachers should always mirror this pose from side-on, in student’s view.
Benefits
• Strengthens the legs and arms. • Tones the abdominal organs. • Gently works towards opening the hips. • Stretches the adductors. • Builds stamina.
Technique
• Stand in centre of mat and side on to mat in Tadasana.
• Step legs apart, approximately 1.5 leg lengths or slightly wider.
• Turn right foot to the right 90 degrees, and line up the heel of right foot with the heel or centre arch of left foot.
• Turn left toes in slightly so that the heel is turned out wider than toes.
• Raise the arms to shoulder-height, and extend through the fingers. Move shoulders down away from ears. Engage core.
• Bend right knee into a lunge, and keep knee aligned above heel, back leg strong.
• Keep the head directly above the hips, centre line of body perpendicular to floor.
• If comfortable, turn the head to gaze along right arm and beyond, chin drawn slightly down. Extend through fingers of both hands.
• Buttocks moving downward, pubic bone lifting towards navel. To release: • Inhale, straighten bent leg. • Exhale, change sides.
Common Misalignments • Feet and knee alignment or feet too close. • Leaning torso towards bent knee. • Back arm dropping.
© 2006 Byron Yoga Centre – Purna Yoga Level 1 v.31 24
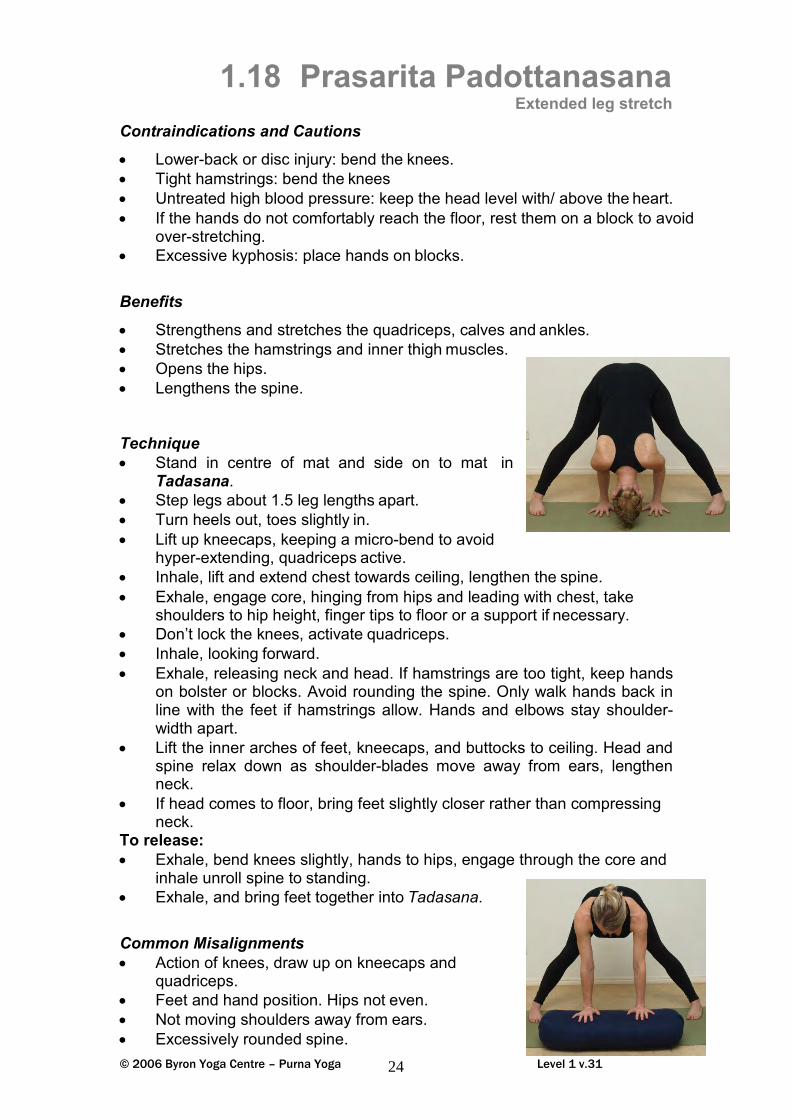
1.18 Prasarita Padottanasana Extended leg stretch
Contraindications and Cautions
• Lower-back or disc injury: bend the knees. • Tight hamstrings: bend the knees • Untreated high blood pressure: keep the head level with/ above the heart. • If the hands do not comfortably reach the floor, rest them on a block to avoid
over-stretching. • Excessive kyphosis: place hands on blocks.
Benefits
• Strengthens and stretches the quadriceps, calves and ankles. • Stretches the hamstrings and inner thigh muscles. • Opens the hips. • Lengthens the spine.
Technique • Stand in centre of mat and side on to mat in
Tadasana. • Step legs about 1.5 leg lengths apart. • Turn heels out, toes slightly in. • Lift up kneecaps, keeping a micro-bend to avoid
hyper-extending, quadriceps active. • Inhale, lift and extend chest towards ceiling, lengthen the spine. • Exhale, engage core, hinging from hips and leading with chest, take
shoulders to hip height, finger tips to floor or a support if necessary. • Don’t lock the knees, activate quadriceps. • Inhale, looking forward. • Exhale, releasing neck and head. If hamstrings are too tight, keep hands
on bolster or blocks. Avoid rounding the spine. Only walk hands back in line with the feet if hamstrings allow. Hands and elbows stay shoulder- width apart.
• Lift the inner arches of feet, kneecaps, and buttocks to ceiling. Head and spine relax down as shoulder-blades move away from ears, lengthen neck.
• If head comes to floor, bring feet slightly closer rather than compressing neck.
To release: • Exhale, bend knees slightly, hands to hips, engage through the core and
inhale unroll spine to standing. • Exhale, and bring feet together into Tadasana.
Common Misalignments • Action of knees, draw up on kneecaps and
quadriceps. • Feet and hand position. Hips not even. • Not moving shoulders away from ears. • Excessively rounded spine.
© 2006 Byron Yoga Centre – Purna Yoga Level 1 v.31 25
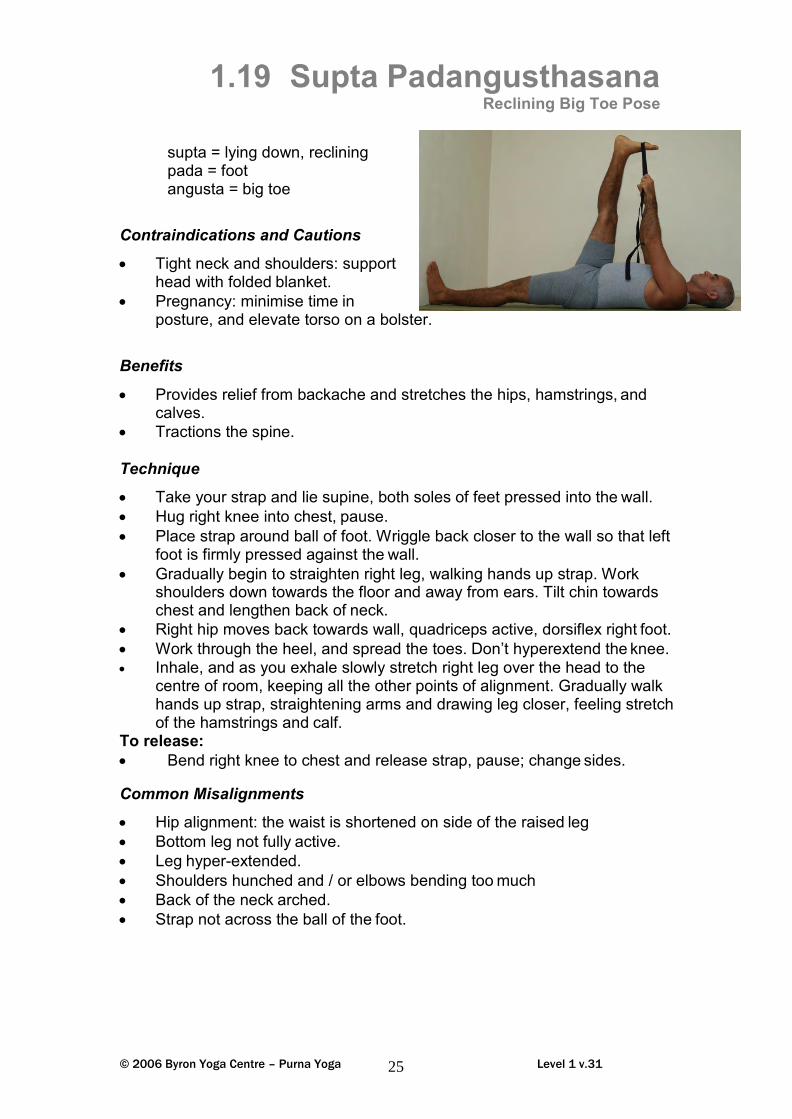
1.19 Supta Padangusthasana Reclining Big Toe Pose
supta = lying down, reclining pada = foot angusta = big toe
Contraindications and Cautions
• Tight neck and shoulders: support head with folded blanket.
• Pregnancy: minimise time in posture, and elevate torso on a bolster.
Benefits
• Provides relief from backache and stretches the hips, hamstrings, and calves.
• Tractions the spine. Technique
• Take your strap and lie supine, both soles of feet pressed into the wall. • Hug right knee into chest, pause. • Place strap around ball of foot. Wriggle back closer to the wall so that left
foot is firmly pressed against the wall. • Gradually begin to straighten right leg, walking hands up strap. Work
shoulders down towards the floor and away from ears. Tilt chin towards chest and lengthen back of neck.
• Right hip moves back towards wall, quadriceps active, dorsiflex right foot. • Work through the heel, and spread the toes. Don’t hyperextend the knee. • Inhale, and as you exhale slowly stretch right leg over the head to the
centre of room, keeping all the other points of alignment. Gradually walk hands up strap, straightening arms and drawing leg closer, feeling stretch of the hamstrings and calf.
To release: • Bend right knee to chest and release strap, pause; change sides.
Common Misalignments
• Hip alignment: the waist is shortened on side of the raised leg • Bottom leg not fully active. • Leg hyper-extended. • Shoulders hunched and / or elbows bending too much • Back of the neck arched. • Strap not across the ball of the foot.

© 2006 Byron Yoga Centre – Purna Yoga Level 1 v.31 26
1.20 Setu Bandha Sarvangasana Bridge Pose
setu = dam, dike, or bridge bandha = lock
Contraindications and Cautions • Extra care with sore back or neck. • Knee injury/discomfort: have feet
further away from buttocks. • In early pregnancy don’t raise hips
so high and avoid from 4th month of pregnancy.
Benefits • Deep neck stretch and release. • Builds thoracic strength and facilitates thoracic breathing. • Stimulates digestive system. • Shoulder-stand alternative and preparation.
Technique • Lie supine on mat, knees bent, feet hip-width apart. Turn toes in, heels
out. • Keep knees above ankles, shins perpendicular to floor, feet flat. • Stretch arms alongside the body with palms facing down. Lengthen neck
along floor. • Inhale, tilt chin towards chest and look towards heart centre. Draw navel
to spine to engage core. • WARNING: Never turn the head in the pose! • Exhale and lift hips up towards knee-height. Stay grounded with outside
edges of feet parallel, and equal weight four corners of feet. Inward rotation of quadriceps.
• Bring hands together under the body and interlock the fingers, walk up onto the shoulders to increase lift. Broaden through the front and the upper back of the body.
• Keeping knees aligned above heels. • Maintain Tadasana feet. • Buttocks are firm but not clenched. To release: • Release hands and lower body down to mat one vertebra at a time. • Gently hug knees to chest.
Common Misalignments • Feet too wide or narrow. • Feet too close to buttocks and heels lifting. • Knees too wide. • If necessary for alignment or for more
challenge, place block between knees and squeeze.
• Rolling onto outside edges of feet. • Hyper-extending elbows.

© 2006 Byron Yoga Centre – Purna Yoga Level 1 v.31 27
1.21 Ardha Matsyendrāsana III Lord of the Fish Pose
Contraindications and Cautions
• If you are pregnant, menstruating, have a sore lower back or would like to practice more gently, then perform the open variation.
• Back or spine injury. • Sore knee either side: keep bottom leg straight. • Neck issues: don’t turn the head too far. • Note: this is one pose with 2 variations – demonstrate the open twist
quickly, and then hold the closed twist. Don’t hold both sides.
Benefits
• Massages internal organs, particularly liver and spleen. • Rejuvenates spine. Excellent counter pose for backbends. • Benefits digestive and reproductive systems.
Safety
• Keep lower leg extended if you experience knee pain. • Raise buttocks on blanket if tight in hips.
Technique
• Sit with legs in front, knees bent and feet flat on floor. • Reach right hand under right knee and take hold of left foot,
drawing it back beside the right buttock. • Left knee comes to centre line of body. • Take right foot to shin, and if comfortable over left leg. • For open twist:
Place left hand onto floor one hand width behind sacrum and hook right elbow to inside of right knee.
• Inhale, lift and lengthen spine. • Exhale, twisting from navel upwards, and then turn to look
over left shoulder.

© 2006 Byron Yoga Centre – Purna Yoga Level 1 v.31 28
Stay there, or for the closed, stronger variation: • Place right hand onto floor one hand width behind body. • Raise the left arm and place the left elbow to outside of right
knee, • Inhale, lift and lengthen spine. • Exhale, and turn to look over right shoulder.
To release: • Inhale, looking back towards centre of room. • Exhale, release.
Variation for students with tighter hips
• Left leg bent as demonstrated. • Keep the right foot in front of left shin, rather than crossing it over the left
knee. • Support the buttocks on folded blanket. • Place hand on block behind. • Turn and twist as described above.
Common Misalignments
• Not keeping both buttocks evenly on the floor. • Chest collapsing.

© 2006 Byron Yoga Centre – Purna Yoga Level 1 v.31 29
1.22 Viparita Karani The ‘Fountain of Youth’ posture
Contraindications and Cautions
• Menstruation: keep hips same height as shoulders (buttocks not raised). • Pregnancy: Raise the torso on a bolster, avoid lying flat. Take extra care
after 4th month of pregnancy, or avoid posture. Benefits
• Restorative posture for students who are: • Fatigued or stressed. • Suffering lower back discomfort. • Menstruating, or in early pregnancy.
• Reverses effects of gravity and rests the heart. • Increases blood supply to vital organs. • A cooling and calming posture which lowers blood pressure. • Safe hamstring stretch for those with disc injury or acute sacroiliac injury. • Alternate posture for inversions. This can be performed individually or
while other students are doing stronger postures. • Known as the “Fountain of Youth”, said to reverse the effects of aging! • Also effective in the treatment of shock.
Technique
• Sit on left side of mat, right hip to wall. • Pivot around and lie down along mat with legs raised
up the wall, buttocks resting on floor and ideally touching wall if hamstrings will allow.
• Keep knees and feet together, quadriceps switched on and feet dorsiflexed.
• Relax the shoulders, and tuck chin to chest to lengthen the back of the neck.
• Close the eyes and look in and down to the heart centre. The hands can rest on the belly.
• To release: bend knees to chest and carefully roll to the right side. Push up with the left hand to come to sitting.
Common misalignments
• Buttocks lifting off floor due to tight hamstrings. Bring buttocks further away from wall and/or bend the knees.
• Using blankets under the torso with head on floor as in Salamba Sarvangasana, Shoulder-stand. In Viparita Karani, blankets are:
a) under head b) under entire body, or c) to elevate the hips only.

© 2006 Byron Yoga Centre – Purna Yoga Level 1 v.31 30
1.23 Sālamba Sarvangāsana Supported Body Posture (variation for Beginners)
Contraindications and Cautions • Untreated high blood pressure. • Menstruation. • Neck injury. • Acute kyphosis: practice an alternative such as Setu Bandha
Sarvangasana. • Pregnancy: avoid unless student is quite experienced. • Salamba Sarvangasana is considered to be an intermediate to
advanced pose. Do not perform this pose without sufficient prior experience or unless you have the supervision of an experienced instructor.
• For safety, this pose should be first demonstrated to beginners. Benefits • Stimulates the thyroid and parathyroid glands in the neck, which help to
regulate the hormones in the body. • Reverses effects of gravity and rests the heart. • Increases vitality. • A deep neck release. • Cooling and calming pose. • Opens the chest, increases thoracic girdle strength and improves
breathing. Safety • Release if any strain is felt in the neck and/or face. The breath should be
relaxed and smooth while in the posture. • Do not turn the head when in the posture, always keep eyes looking
upward. • Use 2-3 blankets to support the neck. • The neck should never experience more than a gentle stretch.
Technique • Take two or three blankets neatly folded to stack-size, and place one on
top of each other about one hand distance from wall. The folded edge is out away from wall, blankets stacked by about 1 cm each towards wall.
• Run fingers along edge of blanket to ensure it is well-folded. • Sit on left side of mat with right hip to wall. • Pivot around and lie down along mat with legs raised up the wall;
buttocks resting on floor, ideally touching wall. • Check distance of shoulders from edge of blanket is 4-5 cm. • Keep knees together, feet together. Heels stay in position on the wall as
you pivot on heels and take toes to wall, bending knees and working hips towards the centre of the room.
• Quickly place palms onto back with fingers pointing towards buttocks. Work elbows in towards being shoulder-width apart.
• Neck and face relaxed, breath calm. Don’t turn the head. • To release: remove hands, roll down and hug knees to chest.

© 2006 Byron Yoga Centre – Purna Yoga Level 1 v.31 31
Note: • The feet are on the wall at knee-height, shins parallel to floor. • Ideally feet and knees together, excepting sacroiliac issues- then feet
and knees are hip-width apart. • For tight neck/shoulders have the hips lower, creating less angle on neck
(see Figure 4). As student becomes more supple, bring hips away from wall towards middle of room encouraging a straight line of knees, hips and shoulders.
Blanket Fold
Figure 1 Figure 2 Figure 3
Figure 4 Arm / hand position Figure 5 Shoulder Position on Blanket
Figure 6 Common Misalignments
• Blankets incorrect distance from wall, facing wrong direction or badly folded.
• Head incorrectly aligned with blankets, eg head on blanket. • Tension and/or pressure in face, throat or breath. • Spine rounded and/or chest collapsed. • Elbows splaying out.

© 2006 Byron Yoga Centre – Purna Yoga Level 1 v.31 32
1.24 Matsyāsana Variation Fish Posture
Contraindications and Cautions • Serious lower-back or neck injury. • Pregnancy: exercise care, and avoid after 4th month. • Note: for safety, this pose must first be demonstrated to beginners.
Benefits
• Stretches the thoracic area and opens the chest to facilitate deep breathing.
• Gently stretches the neck. • Ideal counterpose to Salamba Sarvangasana.
Technique
• Lie onto the back with knees bent. • Raise the buttocks off the floor and slide
the hands under the body. • Press palms flat onto the floor, wrists under buttocks. Tuck arms close to
body, elbows straight. • Extend the legs along the floor,
dorsiflexing the feet. • On the inhalation come onto the elbows,
lifting the chest towards the ceiling. The back of the head remains in light contact with the floor at all times.
• Take 2-3 breaths only, opening and closing the mouth to stretch the throat.
• To Release • Slide the head along the floor, away from the shoulders, allow the chin to
move towards the chest as you lower the arms/shoulders back onto the floor.
• Hug knees to chest. Common Misalignments
• Head lifts off floor. • Feet not dorsiflexed.

© 2006 Byron Yoga Centre – Purna Yoga Level 1 v.31 33
1.25 Dandāsana The Rod
Contraindications and Cautions
• Pregnancy: feet hip-width or wider apart. • Tight hamstrings or sore back: raise the
buttocks on folded blankets, and/or bend the knees.
Benefits
• Massages and tones kidneys and waist. • Helps to increase core strength.
Correct
• Opens the chest and facilitates thoracic breathing. • Strengthens the back muscles. • The foundation of all the seated postures.
Technique
• Sit upright on a folded blanket with the legs extended in front. For correct alignment, sit right on the edge of the folded blanket, and draw the flesh of the buttocks out to perch high on the sitting bones [anterior pelvic tilt].
• Place the hands beside the hips keep arms active, elbows slightly bent, and fingers pointing forward, fingers engaged with the floor. For those with longer arms, have the hands slightly out away from the body, but still in line with the hips.
• Keep thighs and feet together. • Extend through the heels and draw the toes back toward you in
dorsiflexion. • Lift up the kneecaps, keeping a micro-bend to avoid hyper-extending,
with quadriceps active. • Lift the chest and lengthen the spine. Draw the navel to spine. • Slightly tuck the chin in towards the chest to lengthen the back of the
neck. The crown of the head ascends towards ceiling. Common Misalignments
• Quadriceps not working. • Knees hyper-extending. • Feet not dorsiflexing. • Chin lifting and neck compressing. • Lumbar / chest collapsing.
Incorrect

© 2006 Byron Yoga Centre – Purna Yoga Level 1 v.31 34
1.26 Paschimottanāsana Intense Back of Whole Body Stretch
Contraindications and Cautions • Lower-back injury: sit up high on a folded blanket and keep your torso
relatively upright and/or bend the knees. Disc injury: avoid this pose. • Work gently into the posture. • If you find it difficult to lift and lengthen from the waist/lower back during
forward bends, rest the buttocks onto a blanket. • Pregnancy: feet hip-width or wider apart, and use a strap.
Benefits • Tones the abdominal organs and the kidneys. • Rejuvenates the spine. • Increases blood supply to the pelvic region. • Stretches the lower back, hamstrings and calves. • A gentle and calming position which helps to draw
energy into the body, also helping to cultivate patience and tolerance.
Technique
• Sit in Dandasana, ideally on a folded blanket, with anterior pelvic tilt.
• Bend the knees to place a strap around the feet, and again come back into Dandasana with a straight spine.
• Keep the length and lift in the spine as you hinge from the hips and walk the hands down the strap. If the hands can comfortably reach the feet, hold onto the outside edges of the feet, extend away through inside balls of feet.
• Keep the length and lift in the spine as you bend forward. Avoid rounding the upper back; keep the heart lifting and shoulders drawing back. With each inhalation feel the spine gently lift and lengthen, and with each exhalation allow the body to release forward, deepening into the posture.
To release: • Inhale, looking forward, exhale release.
Beginner’s Variation:
• If hands do not comfortably reach the feet, best to demonstrate the use of a strap.
• At this level, keep the focus on lifting the chest. Common Misalignments
• Action of knees/feet not working. • Chin lifted/neck compressed. • Shoulders hunched. • Lumbar/chest collapsing. • Spine rounding – back out of the posture, and/or
use a strap.

© 2006 Byron Yoga Centre – Purna Yoga Level 1 v.31 35
1.27 Upavistha Konāsana Seated Angle Posture
Contraindications and Cautions
• Lower-back disc injury: sit up high on a folded blanket and keep torso relatively upright.
• A strong posture – work slowly and gently allowing the inner thigh muscles to soften and release with each exhalation.
• If a student finds it difficult to lift and lengthen from the waist/lower back during any of the forward bends, sit higher on more blankets.
Benefits
• Stretches the hamstrings and the adductors. • Increases circulation to the pelvic area. • Increases hip mobility.
Technique
• Sit on a blanket in Dandasana, and extend both legs out to the side as wide as you comfortably can.
• Place the fingertips onto the floor behind you, with fingers pointing back. • Lift up kneecaps, keeping a micro-bend to avoid hyper-extending.
Activate quadriceps, and dorsi-flex feet. • Press into floor, lift the chest and lengthen the spine. • Stay here, or to deepen into the pose take the hands in front of you and
walk the hands forward, tilting from the pelvis (anterior pelvic tilt). Lengthen the spine with each inhalation, softening and deepening with each exhalation. Relax the head and neck.
• Hold and breathe. Keep the legs activated and feet strong. • To release: walk the hands back towards the body and use the hands
under knees to draw the legs back to the body.
Common Misalignments
• Action of knees, or hyperextension. • Feet relaxed, or falling in or out. Big toes should point to ceiling. • Lumbar / chest collapsing, rounding upper back.

© 2006 Byron Yoga Centre – Purna Yoga Level 1 v.31 36
Three Variations: 1. Gentle
• Place the hands behind the body. • Lift and lengthen the spine, open the
chest. • Stay sitting upright. • Hold and breathe.
2. Forward Bend
• Position the hands in front of the
body. • Lift and lengthen the spine. • Stay sitting upright, or walk the
hands forward. • Hold and breathe.
3. Using 2 straps
• Place a strap around each foot. Teacher may need to assist student with this.
• Gently draw the strap towards torso. • Lift and lengthen spine. • Keep the chest/sternum lifting. • Relax the head and neck. • Draw shoulders away from ears. • Keep the legs active by drawing
the kneecaps and toes back toward the body.

© 2006 Byron Yoga Centre – Purna Yoga Level 1 v.31 37
1.28 Baddha Konāsana Bound Angular Pose, or Cobbler’s Pose
Contraindications and Cautions
• Groin or knee injury: only perform this pose with block or blanket support under the knees/ thighs.
• Tight hips / lower back: sit on folded blankets and stay sitting upright. Benefits
• Stretches tight hips and groin. • Increases blood supply to pelvis and abdomen. • Stimulates kidneys, prostate and bladder. • Maintains healthy reproductive organs in men and women. • Prevents varicose veins in pregnancy.
Safety for all variations
• If the knees are high off the floor and you feel any strain on the knees, support the legs with blankets or blocks.
Decrease the height of the blankets as you become more familiar/comfortable with the posture.
Technique
• Sit on the floor in Dandasana with anterior pelvic tilt. Bring the soles of the feet together, and draw them in towards the groin.
• Either place the hands on the floor behind the torso, hold onto the ankles, or interlace the fingers in front of the toes, without lifting the toes off the floor.
• Lift the chest, lengthen the spine, and relax the head and neck.
• Allow the knees to soften towards the floor with each exhalation, but maintain the lift of the spine.
• Hold and breathe. To release: • Take hold of knees and gently bring them
together. Common Misalignments
• Chin lifting. • Hands under feet. • Lumbar / chest collapsing.

© 2006 Byron Yoga Centre – Purna Yoga Level 1 v.31 38
Option to come forward.
A Elbows to side B Hands extended forward Technique A
• With the inhalation lengthen the spine, lift the chest, and gently move
forward on the exhalation. Technique B
• Use the hands to open the soles of the feet like the pages of a book towards the ceiling, as demonstrated.
• On the inhalation lengthen the spine, lift the chest and gently move forward on exhalation.
To release: • Inhale, looking forward, exhale release to sit upright. • Take hold of knees and gently bring them together.

© 2006 Byron Yoga Centre – Purna Yoga Level 1 v.31 39
Supta Baddha Konasana – Reclining Variation
A restorative posture with benefits similar to Viparita Karani and the additional benefit of an inner groin stretch.
• Care to be taken for students with knee injury: use support under knees. • Students with back pain may need to avoid this posture. • Place a bolster lengthways on the mat as demonstrated below. • Sit in Baddha Konasana in front of the bolster with a 10cm gap between
buttocks and bolster. • Option to place a strap around your sacrum/lower back, between the
knees and around the feet as demonstrated.
• The strap should be firm but not too tight and should not ride up around the waist but stay low around the base of the sacrum.
• Lower onto the elbows and then lie back along the bolster. • Place the hands beside the body with palms facing the ceiling. • For a stronger stretch into the shoulders take the thumbs into the
creases of the elbow and place the arms above the head. CAUTION – Can cause discomfort in lower back.
* Pregnancy variation: Incline the bolster on a brick or another bolster
In the Posture…
• Keep the soles of the feet together. • Gently move pubic bone towards navel. • Draw the chin in towards the chest and lengthen the spine.
If neck/shoulders are tight, support the head on folded blanket.
To release: • Inhale, looking forward, place hands beside the body. • Come up onto elbows, then release to sit upright. • Take hold of knees and gently bring them together.

© 2006 Byron Yoga Centre – Purna Yoga Level 1 v.31 40
2 Anatomy & Physiology
The aim of this part of the Yoga Teacher Training is to provide students with a functional understanding of Anatomy and Physiology.
As a Yoga Teacher you will be required to understand the basic principles of anatomy (ie. the names of the bones and muscles), however, more importantly you will need to understand dynamic and applied anatomy to understand the body when it is in motion.
This segment will provide you with a greater understanding of the correct utilisation of the body and the knowledge required to adjust and teach yoga effectively. You will need to understand conscious control of the muscular movements in the body and this in turn will enable you to adjust and teach yoga with confidence and accuracy. It will also help you to understand where and when to be cautious.
A sound understanding of dynamic anatomy and physiology is the basis for not only perfection in movement, but also increased awareness and insight into your practice.
A useful book to reference from is “Anatomy of Movement” by Blandine Calais Germain – published by Eastland.

© 2006 Byron Yoga Centre – Purna Yoga Level 1 v.31 41
3 Sequencing
The Sequencing of Yoga Postures The sequencing of postures is done to achieve certain goals, for example:
• To generally warm up the body for our practice of certain asanas. • To work on certain areas, e.g. hips or back bends. • To modify the way we feel, e.g. a restorative sequence. • As counter-poses after a particular type of asana, e.g. Matsyāsana (Fish Pose)
after Salamba Sarvangasana (Shoulder-stand). • To rest between strong asanas. • To calm or cool the body down toward the end of our practice.
A sequence of postures is sometimes called a vinyasa, or to be more correct, vinyasa krama. Krama is the step, nyasa means “to place,” and the prefix vi- translates as “in a special way.” The concept of vinyasa krama tells us that it is not enough to simply take a step - that step needs to take us in the right direction and be made in the right way and in the right sequence.
General Practice Commence a “general” Purna Yoga practice with - • Surya Namaskar (salute to the sun) sequence to warm and limber the body • Shoulder stretches – such as Gomukhasana (Cow Face Pose) arms. • Hip openers – such as Eka Pada Rajakapotasana (Pigeon Pose) and
Gomukhasana.
This will sufficiently prepare the body for the stronger postures, such as standing poses, for example - • Trikonasana (Triangle Pose). • Virabhadrasana I and II (Warrior postures). • Prasarita Padottanasana (Extended leg stretch).
Following the Standing postures, practitioners can safely move into inversions, for example – • Adho Mukha Vrksasana (Handstand). • Salamba Sirsasana (Headstand). • Setu Bandha Sarvangasana (Bridge Pose). • Salamba Sarvangāsana (Shoulder-stand).
Back-bends require additional postures to prepare the body, especially when practising stronger back-bends, such as Urdhva Danurasana (Inverted Bow Pose) or Natarajasana (Lord of the Dance Pose). Common postures to prepare for back-bends would be:- • Supta Virasana (Reclining Warrior Posture) or variations, for beginners or
students with knee injury. • Setu Bandha (Bridge Pose) – a gentle hip raise. This would be a suitable posture
to prepare the spine. Beginners should stay with this posture, whereas more advanced/intermediate students could move into stronger back-bends as Dhanurasana (Bow Pose).

© 2006 Byron Yoga Centre – Purna Yoga Level 1 v.31 42
Just as it is important to warm up for the practice, it is equally important to wind down by cooling and settling the central nervous system. This is achieved by practising counter-poses, such as a twist e.g. Ardha Matsyendransana III or forward bends such as Paschimottanasana following back-bends.
Additional postures to aid relaxation include: • Salamba Sarvangāsana (Shoulder-stand). • Most seated forward bends and twists. • Pranayama (breathing exercises) and meditation.
Finally, resting in Savāsana (Corpse Pose). This will relax the nervous system, further cool the body, calm the mind and help integrate the postures practised on a cellular level.
Specific sequencing postures for both beginner and intermediate levels will be further discussed in Teacher Training Level 2.
As a trainee and new teacher, start to collect and put together a portfolio of different types of sequences. These could then be grouped together to create and structure different types of yoga classes.
Sthirasukha Reflect upon the following story
The qualities of sthira, the steady alertness, and sukha, the lightness and comfort of being, are necessary for a good yoga practice. In the Yoga Sutras, reference is made to a beautiful image from Indian mythology to illustrate the concept of sthirasukha. The story tells of Ananta, the king of snakes, floating on the ocean, his long snake body coiled to form a comfortable couch on which Vishnu lies. The snake’s thousand heads reach up and out like a protective umbrella over Vishnu. On the umbrella rests our Earth. The snake’s body is soft and gentle enough (sukha) to serve as a couch for Vishnu and at the same time is firm and steady enough (sthira) to support the whole Earth. We should endeavour to bring those same qualities of gentleness and steadiness to our asana practice.

© 2006 Byron Yoga Centre – Purna Yoga Level 1 v.31 43
4 Adjustments and Corrections
Adjustments and Corrections are used to help the student deepen into a posture by exploring the principles of alignment.
Adjustments and modifications of postures are essential for students with injuries or specific health conditions.
Adjusting and correcting students is a skill that requires knowledge not only of the asana, but also of anatomy, physiology and the students’ individual needs and requirements. Many injuries in yoga are caused by inappropriate and unsafe adjustments.
We must also be aware of the difference between adjustments and corrections.
A “Correction” is used to correct a student’s misalignment by gently modifying a body part to illustrate correct alignment, either verbally or physically. For example in Trikonasana (Triangle Pose) you might verbally instruct the student to align the heel of the front right foot with the centre arch of the back left foot if it were misplaced. Usually verbal instructions are enough, occasionally touch may be needed. You may need to gently guide the student’s foot into position [a physical correction] if they did not understand the verbal correction.
Adjusting a student is usually stronger than a correction – the student is guided or altered into a deeper version of the asana. For example in Trikonasana to the right side, the student’s right chest may be assisted to be “moved” forward, while the left shoulder may be guided back, thus giving the student a deeper experience in opening and aligning the torso. It is not recommended to physically adjust a student unless you are familiar with their injuries and history.
Verbal Instruction
It is important for the teacher to ask new students if they have any injuries, enquire about their yoga history and any illnesses before commencement of a class. Are female students pregnant or menstruating? This will enable the teacher to modify postures for individual students when necessary.
However, not all students will share information about themselves so it is good practice when teaching to give general information – ‘blanket statements’ about the asanas such as common contra-indications as well as the benefits of the posture. Other points to remember:
• Verbally adjust the class and not just the new students. • Be encouraging to new students when giving feedback. For example let them
know when you observe changes happening in their practice. • Although you may sometimes feel that you are constantly repeating yourself,
repetition is a great tool which is necessary when teaching yoga. It may take beginner students some time to bond the mind/body connection as their awareness develops.
• If verbally correcting alignment with a particular student in an asana, and the instruction has been repeated 2-3 times, the student may not yet be ready for that much detail in the posture.
© 2006 Byron Yoga Centre – Purna Yoga Level 1 v.31 44
Physical Adjustments
Physical adjustments can be gentle, such as adjusting the wrist above the shoulder in Trikonasana. An example of a stronger physical adjustment is aligning the shoulders in Trikonasana as described above.
• Always be sensitive to student’s personal space and privacy. Never touch the
groin/breast areas. Always ask students if they would like an adjustment. • Always adjust away from spine and never place hands directly on spine. For
example, in Paschimottanasana (seated forward bend), place the hands either side of the spine and below the heart.
• Adjust less rather than more. Ask the student for feedback. • Remind the student to breathe. Observe the student’s breath in the posture. Allow
the student to lengthen with the inhalation and assist them to deepen and soften with the exhalation, such as when adjusting students in forward bends.
• You will gain awareness of muscle states through touch - such as a muscle being in a relaxed or in a tense state. Move gently and with awareness when giving all adjustments.
• If a student pushes back against the adjustment (resistance), this indicates they are not ready to go any deeper. Stay and work where the student is comfortable, observe breathing and ask for feedback.
• Use safe-lifting techniques when assisting with inversions. (See Section 5)
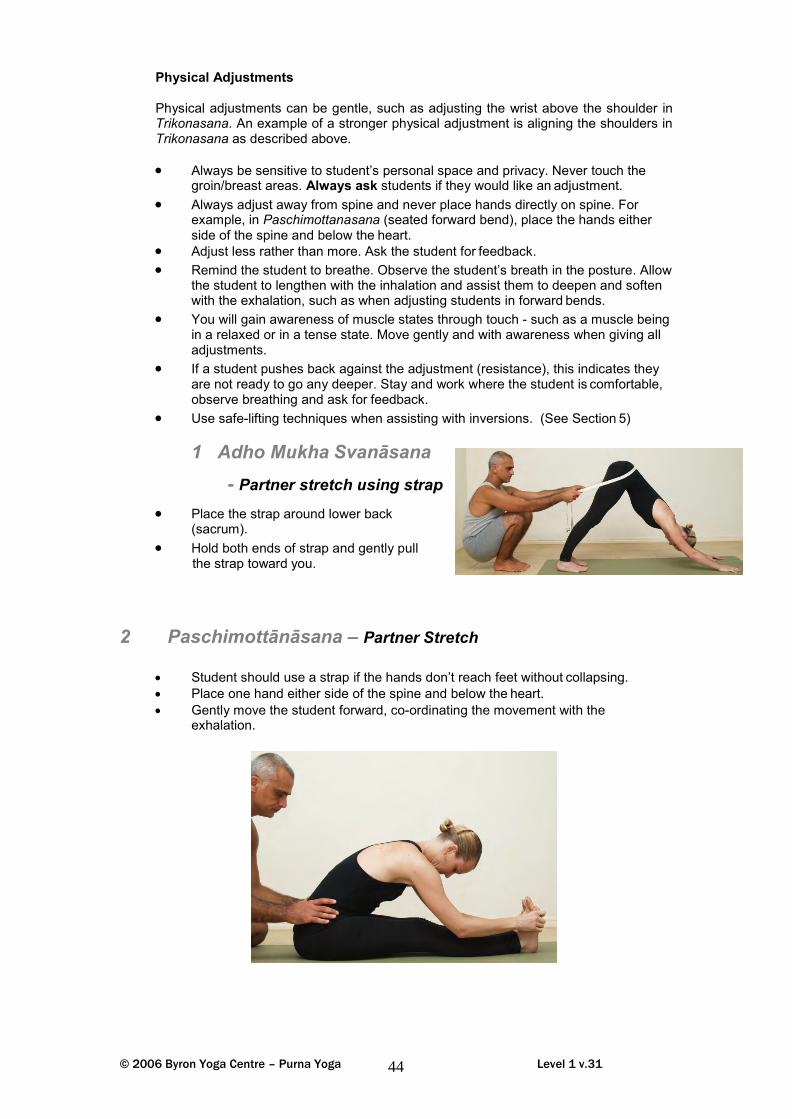
1 Adho Mukha Svanāsana - Partner stretch using strap
• Place the strap around lower back (sacrum).
• Hold both ends of strap and gently pull the strap toward you.
2 Paschimottānāsana – Partner Stretch
• Student should use a strap if the hands don’t reach feet without collapsing. • Place one hand either side of the spine and below the heart. • Gently move the student forward, co-ordinating the movement with the
exhalation.

© 2006 Byron Yoga Centre – Purna Yoga Level 1 v.31 45
Upavistha Konasana - Partner Stretch
• Sit in Upavistha Konasana. • Sit in front of partner and place strap around
sacrum as demonstrated. • Place your feet below the student’s knees. • The person giving the adjustment gently
assists the student to move legs wider. • Coordinate movement with the breath:
Inhale, lengthen the spine, Exhale, gently allow legs to widen.
4 Baddha Konasana - Partner Stretch
Sit in Baddha Konasana. • Sit in front of partner and place strap around sacrum as demonstrated. • Person giving the adjustment places legs onto partner’s thighs, close to torso.
Gently draw back on strap. • Person getting adjusted places hands on floor behind to help keep chest lifted. • If partner wants a stronger adjustment move legs away from torso and towards
knees. •
5 Adho Mukha Vrksasana Prep – Beginner’s Adjustment
Students chest too far forward
• Take a wide stance and bend your knees, keeping spine straight. • Place each hand below and onto the shoulders. • Ask the student to inhale and exhale. • On the exhalation gently move the chest back towards the wall. • Remind the student to -
a) broaden the upper back by drawing the shoulder blades apart; and b) relax the head and neck, c) continue to breathe normally.
• Another way is to hold the hips and guide the shoulders toward the wall with the knee or knees

© 2006 Byron Yoga Centre – Purna Yoga Level 1 v.31 46
6 Vrksasana
Incorrect Correct
• Verbally instruct the student to move the left hip over the line of the left ankle.
7 Balasana Adjustment
• Place one hand onto the upper left buttock/sacrum area (away from spine). • Place the other hand below the opposite shoulder blade as demonstrated. • When the student exhales, move the hands slightly apart in a diagonal direction.
Gently stretching the lower back. • Change sides and repeat.
8 Tadasana
A
• Verbally instruct student to draw shoulders away from ears as demonstrated in diagram ii).
•
ii) i)

© 2006 Byron Yoga Centre – Purna Yoga Level 1 v.31 47
5 Health & Safety in a Yoga Room
Advice and General Precautions
The following advice should be observed by all yoga practitioners and given to new students before they begin practising asanas. Though any person can start to practice asanas, they only become most beneficial when performed in the proper manner after correct preparation.
Emptying the bowels: Before starting the practice of asana, the bladder and bowels should preferably be empty.
Empty stomach: The stomach should be empty while practicing asana. To ensure this, one should not practice asana until at least three or four hours have elapsed after food. This is one reason why early morning practice is recommended.
Breathing: A practitioner should always breathe through the nose, unless specific contrary instructions are given. For beginner students it is only possible to concentrate on the breath after the technical aspect of the asana has been accomplished. Beginner students are advised to breathe normally and not to hold the breath during the practice. After the student is familiar with the postures they are taught to coordinate the breath when moving in the asana.
As a general rule: • Asanas which open and expand the chest/lungs or lengthen the spine are
performed on an inhalation. Examples of this include raising the arms in Urdhva Hastasana and moving into Bhujangasana (Cobra).
• Asanas which compress the chest/lungs are performed on an exhalation. Examples of this include Parsvottanasana and Paschimottanasana (forward bending).
Time of practice: Yoga can be practised any time of the day, except immediately after meals. However, the best time is between 4am and 6am. In Sanskrit this period of the day is known as brahmamuhurta. It is the time of day which is most conducive to the higher practices of yoga. The atmosphere is pure and quiet and Sattvic. The activities of the stomach and intestines have stopped. The mind has no deep impressions on the conscious level; it is relatively empty of thoughts in preparation for the day ahead.
Awareness of the body: When practicing asana one should always try to do it slowly and with full awareness of the body, and without exerting undue force or strain. If discomfort is felt, it is important not to react to it, but merely to be aware of the feeling. In this way powers of concentration and endurance will develop. If one experiences excessive pain in any part of the body, the asana should be immediately discontinued and advice sought if necessary. One should not stay in an asana if excessive discomfort is felt.

© 2006 Byron Yoga Centre – Purna Yoga Level 1 v.31 48
Relaxation: Savasana (Corpse Pose), can be performed before, during and after asana sessions, taking care to relax the body as much as possible. Savasana looks very easy, yet to do it properly with complete relaxation, is very difficult.
Diet: There are no special dietary rules for practitioners of asanas, though it is better to eat natural food in reasonable moderation. Contrary to popular opinion, yoga does not say you must become a vegetarian though in the higher stages a vegetarian diet is recommended. A Sattvic diet will support a Sattvic life. A yoga practitioner is advised to fill half the stomach with food, one quarter with water and to leave the remaining quarter empty; to eat enough to satisfy the hunger but not so much that one feels heavy and lazy. Eat to live, rather than live to eat.
Safe Practice When we teach Yoga, the priority and the emphasis should always be to avoid causing any injury or aggravating any pre-existing injuries of students.
A student should never be adjusted in a posture that is not familiar to the teacher, or the teacher has not been adjusted in many times before, by other experienced teachers.
Common ailments with particular postures to avoid -
1. Back Pain a) Back Bends including Bhujangasana (Cobra). b) Strong Forward Bends. c) Strong Spinal Twists. d) Inversions.
2. Neck Pain a) Salamba Sarvangāsana (Shoulder-stand). b) Looking upward. Eg. Look forward in Bhujangasana
(Cobra). c) Look forward or down in Standing Postures.
3. Knee Pain
a) All Padmasana (Lotus) variations. b) Supta Virasana (Reclining Warrior Posture) variations. c) Take extra care kneeling, use blankets where necessary.

© 2006 Byron Yoga Centre – Purna Yoga Level 1 v.31 49
Occupational Health and Safety The following section gives comprehensive advice on OH&S issues, which should be integrated into the teacher’s own yoga practice, and, most importantly, passed on to their students.
Restrictions: People who are suffering from any pre-existing medical condition should consult a doctor and advise their yoga teacher before commencing asana practice. Asanas may need to be modified or avoided, such as inversions for a student with high blood pressure. New students should be asked if they have any medical conditions or if they are pregnant. During class, general contraindications for asanas such as avoiding inversions when menstruating should be given.
Clothes: Light and comfortable clothing should be worn during asanas. Jewellery and glasses should be removed when practising more dynamic postures or inversions.
Mat: A non-slip yoga mat should be used to avoid slipping.
Place of practice: Asanas should be performed in a well-ventilated room where it is calm and quiet, or outdoors in a shady flat area. Yoga should not be practised in strong wind or extreme temperatures of hot or cold, in the vicinity of furniture, a fire or anything that prevents free fall to the ground, especially during inverted asanas such as headstand. Accidents can occur from falling against an object.
Other OH&S considerations:
Teachers are advised to: • Be familiar with the location of Fire Exits and Fire Extinguishers in the building. • Encourage students to store their shoes in a shoe rack provided to avoid a
tripping hazard. • Ensure any candles and incense are kept away from students and to extinguish
them after the class and before leaving the building. • Adhere to safe lifting techniques, such as bending the knees and keeping the
spine straight, when adjusting a student.
For someone unfamiliar to you: • Ask if they have practiced yoga before. • Ask if they have been to the school before. • Advise where exits and bathroom are. • Ask if they have any injuries, eg, back, neck or knees. • Advise them not to do anything they don't wish to do, not to worry if they get a
little confused. • Suggest they allow themselves to enjoy the experience.

© 2006 Byron Yoga Centre – Purna Yoga Level 1 v.31 50
General Do's and Don'ts for a Yoga Studio
YOGA STUDENTS -
• PLEASE do not wear any perfume or cologne to class, as some people are allergic to these substances.
• Do arrive on time, to the best of your ability. If you are late, try to enter class quietly.
• Do let the instructor know if you have injuries or conditions that might affect your practice that day.
• Keep food and drink (other than water bottles if needed) out of the studio. • Turn off your mobile phone before entering the studio. If you must have a mobile
phone or pager for work, please set it to 'vibrate'. • Do bring your own mat, blanket, or towel to class. The blankets in the studio are
for extra padding for sitting and certain yoga postures, not for putting over your mat.
• Do pick up and put away any props you use before leaving class. • Don't push your practice too far. Get to know your limits, which change over time.
Listen to your body so you can learn how to take care of it. • Also, the studio is a happy place where many people make and maintain
friendships. This is wonderful, but please try to keep conversations before and after class at a low volume, respecting the needs of others.
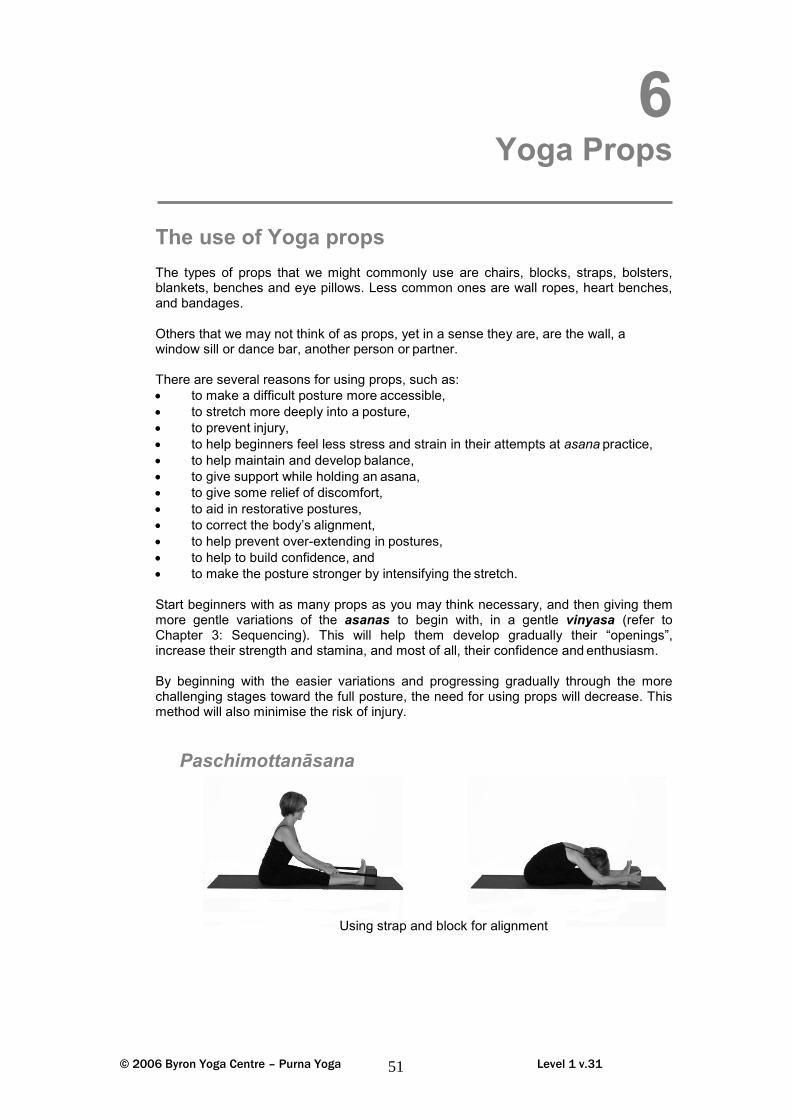
© 2006 Byron Yoga Centre – Purna Yoga Level 1 v.31 51
6 Yoga Props
The use of Yoga props The types of props that we might commonly use are chairs, blocks, straps, bolsters, blankets, benches and eye pillows. Less common ones are wall ropes, heart benches, and bandages.
Others that we may not think of as props, yet in a sense they are, are the wall, a window sill or dance bar, another person or partner.
There are several reasons for using props, such as: • to make a difficult posture more accessible, • to stretch more deeply into a posture, • to prevent injury, • to help beginners feel less stress and strain in their attempts at asana practice, • to help maintain and develop balance, • to give support while holding an asana, • to give some relief of discomfort, • to aid in restorative postures, • to correct the body’s alignment, • to help prevent over-extending in postures, • to help to build confidence, and • to make the posture stronger by intensifying the stretch.
Start beginners with as many props as you may think necessary, and then giving them more gentle variations of the asanas to begin with, in a gentle vinyasa (refer to Chapter 3: Sequencing). This will help them develop gradually their “openings”, increase their strength and stamina, and most of all, their confidence and enthusiasm.
By beginning with the easier variations and progressing gradually through the more challenging stages toward the full posture, the need for using props will decrease. This method will also minimise the risk of injury.
Paschimottanāsana
Using strap and block for alignment

© 2006 Byron Yoga Centre – Purna Yoga Level 1 v.31 52
7 Pranayama
“O Rama! For the motion of the chariot, which is the physical body, the mind and prana (vital breath) were created, without which the body cannot function. When the prana departs, the mechanism of the body ceases and when the mind works prana or vital breath moves. The relation between the mind and prana is like that between the driver and the chariot. Both exert motion one upon the other. Therefore, the wise should study regulation of prana or vital breath if they desire to suspend the restless activity of the mind and concentrate. The regulation of breath brings all happiness, material and spiritual, from the acquisition of Kingdoms to Supreme Bliss. Therefore, O Rama! Study the Science of Breath.”
The great sage Vasishta
Pranayama is concerned with the control and regulation of prana, or life-force, which circulates throughout the body through the nerves and channels called nadis. Hatha Yoga gives attention firstly to the physical body, which is the vehicle of the soul’s existence and activity. Hatha Yoga balances and increases the flow of prana in the body. Through the practice of asanas and Pranayama, the mind becomes one-pointed and the field of meditation can be entered into effortlessly.
Where there is concentration of the mind, the breathing becomes very slow and suspension of breath may even take place temporarily. In our daily experience of life, when we are absorbed in deep thinking or meditation, our breathing becomes slow. The suspension of mental activity increases in proportion to the slowness of breath. In cases of asphyxia, mental activity ceases altogether until respiration is revived. When the mind is affected by sorrow or anger, the breath becomes irregular and broken, the opposite of the slow, smooth flow of the breath when the mind is calm.
It is apparent, therefore that the mind and prana, or vital breath, are interdependent, each unable to act independently of the other.
Pranayama is included in the Level One course to help the trainee develop a regular practice, so they may experience firsthand the powerful effects of Pranayama and eventually be ready to teach and share the experience with others. As with asana, Pranayama and Meditation should be taught by teachers who have a regular practice.
To help promote a regular practice, part of the assessment process will be based on the trainees maintaining a daily Journal, recording details of their Pranayama experiences. In class we will train in two different techniques, Nadi Sodhana (alternate nostril breathing) and Viloma. The trainees are required, in their own private practice, to record their experiences of the Nadi Sodhana and Viloma techniques.
In Level Two, the trainee is looking to gain the skills and knowledge to teach Pranayama to others.

© 2006 Byron Yoga Centre – Purna Yoga Level 1 v.31 53
Pranayama is essentially a process by which prana is controlled by regulating the breathing voluntarily. It involves a temporary pause or interval in the movement of the breath. The Hatha Yoga Pradipika refers to Pranayama as a technique through which the quantity of prana (vital life force) in the body is activated to a higher frequency. Patanjali deals with Pranayama in five sutras (2:49-53) in 2:49 he states:- ‘Having established a firm, steady posture, one then regulates the life-force (prana) by natural voluntary suspension of the breath after inhalation and exhalation – this is Pranayama’. The Bhagavad Gita refers to Pranayama throughout its texts. Its first mention is at chapter 4 v 29 ‘Some offer their out-flowing breath into the breath that flows in; and the in-flowing breath into the breath that flows out: they aim at Pranayama, breath harmony, and the flow of their breath is in peace.’ The Hatha Yoga Pradipika states that Pranayama is practiced in order to understand and control the pranic process in the body. Breathing is a direct means of absorbing prana and the manner in which we breathe sets off pranic vibrations, which influence our entire being. Through Pranayama the mind can be brought under control. In many spiritual traditions, including Sufism, Buddhism and Yoga, it is known that by concentrating on the breath, you can still the mind, develop one-pointedness and gain entry into the deeper realms of the mind and consciousness. ‘Where the mind goes, the prana follows’ Thirumoolar (South Indian saint). Patanjali covers the aims and benefits of Pranayama in 2:52 where he states: ‘As its result, the veil over the inner light is destroyed’. We destroy the veil that covers the Inner Light. Prakasha, the light within, is covered by a veil of mental darkness and through Pranayama the mind becomes fit for concentration. In the Hatha Yoga Pradipika (ch. 2 v. 6) it states that during Pranayama practice the mind should be steady and aware and not moving from thought to thought. Then the whole system is receptive. The purpose of Pranayama is to remove blockages and to lift you out of the tamasic (inert) and rajasic (dynamism) states. When the mind is sattvic (steady and focussed) inner awareness grows and prana accumulates.
Precautions and prohibitions you should be aware of with Pranayama.
• Pranayama should not be practiced in haste. • Pranayama should not be practiced when the lungs are congested. • Pranayama should not be practiced immediately after meals. • During Pranayama the breath must not be forced or strained. • People with high blood pressure, lung, heart, eye or ear problems should
NOT hold after an IN breath or practice vigorous breathing exercises, cleansing or bellows breaths.
• People with low blood pressure should NOT hold after an OUT breath.
Note: the “Tidal Breath” is the normal breath when not practicing Pranayama. Just as the tide flows continually in and out, so does the breath, more like the tides than the crashing of the waves.
© 2006 Byron Yoga Centre – Purna Yoga Level 1 v.31 54
7.1 Nadi Sodhana Alternate Nostril Breathing
Nadi – energy channel, Sodhana – cleansing Contraindications and Cautions
• Difficulty breathing, or shortness of breath. • Tightness in the chest or behind the forehead. • If any of the above are experienced, discontinue the Pranayama exercises and
allow the breath to return to normal. • Avoid holding the breath. • Avoid over-breathing (hyper ventilation), keep to a normal size breath at all
times. • Do not practice Nadi Sodhana if you have a blocked nose.
Benefits
• Cleanses the energy channels throughout the body. • In this breathing exercise the left and right side of the nostrils are used
alternatively for both inhalations and exhalations. This activates the left and right sides of the brain and body revitalising and bringing both into harmony with each other.
Technique
• Place the hands into Gyan Mudra resting on the knees. • Place the tips of the index and middle fingers of the right hand to the
eyebrow centre, with the ring finger resting lightly on the left side of the nose and the thumb resting lightly on the right side.
• Start by exhaling from both sides, then inhale from both sides. • Gently close the left side with your ring finger, exhale with a slow exhalation
of the tidal breath through the right side. Brief pause. • The practice of Nadi Sodhana begins now by inhaling slowly through your
right side. Brief pause. • Open the left side first, then gently close the right side with your thumb, and
exhale slowly through your left side. Brief pause. • Gently inhale slowly through your left side. Brief pause. • Open the right side then gently close the left side with your ring finger and
exhale through the right side. Brief pause. • Note: these two breaths constitute one cycle. • Continue as instructed for as many breath cycles you are comfortable with. • Finish by exhaling through the right side then release the right hand into
Gyan Mudra (the same as the left) and allow the breath to return to normal. • Lie down for several minutes.
Common Mistakes
• Pressing too hard with fingers. • Collapsing in sitting position and / or allowing head turn or dropping to the right. • Over-breathing (hyper ventilating).
Please Note - Pranayama should never be forced – it should be relaxed and joyful. If the nose is blocked, only do the practice by visualization.

© 2006 Byron Yoga Centre – Purna Yoga Level 1 v.31 55
7.2 Viloma Stage 4 (Against the grain) Loma – means hair
Vi – denotes disjunction or negation Viloma means to go against the grain (as in the grain of wood) or against the natural order of things. The natural order of the breath is to flow continuously in, and then out in a continuous exhalation, but here in Viloma we introduce some pauses into the inhalation.
Contraindications and Cautions
• Difficulty breathing, or shortness of breath. • Any tightness in the chest or behind the forehead. • If any physical or emotional stress is experienced, discontinue the Pranayama
exercises and allow the breath to return to normal. • Avoid holding the breath for any extended period of time, the pauses are only
brief. • Avoid over-breathing (hyper ventilation), keep to a normal size breath at all
times. Benefits
• The practice should bring about a feeling of calmness or lightness within the body and mind.
Technique
• Place the hands into Gyan Mudra resting on the knees. • This Pranayama may be compared to climbing up three steps, with a
pause at each step, then descending a gentle slide. • Using visualisation to help with focus, inhale into the bottom of the lungs
as you count, (counting at a rate that is comfortable for you) 1,2,3 • Pause • Inhale middle, 2, 3 • Pause • Inhale top, 2, 3 • Pause • Exhale beginning at the top of the lungs as you count back from
9,8,7,6…to...1 • Pause (maintaining the same rate of counting throughout) • Repeat. • Practice 2 cycles of Viloma, rest for 2 normal breaths, then 2 Viloma,
then 2 normal breaths, etc. • Continue for as many breath cycles as you are comfortable with. • Finish on an exhalation and allow the breath to return to normal. • Lie down for several minutes.
Common Mistakes
• Collapsing in sitting position and / or allowing head to drop forward. • Over-breathing (hyper ventilating).

© 2006 Byron Yoga Centre – Purna Yoga Level 1 v.31 56
8 Theory and Philosophy
Mystical Aspects of Yoga and Philosophy
Yoga is thought to be the oldest known science of physical and mental self- development, caring for the body under the intelligent control of the mind. Thousands of years ago the Yogis recognized man’s basic need for discipline to counteract the physical and spiritual deterioration caused by the mere fight for survival. They were aware that when the positive and negative currents by which the human body is enlivened are in equilibrium one can enjoy perfect health. Through Hatha Yoga one can achieve absolute control over the whole body, thus improving the condition of every part and maintaining the body as a necessary and valuable tool of human evolution.
Hatha Yoga is one aspect of Kundalini Yoga and plays an important part in the development of the aspirant. The illustrative interpretation of the word Hatha expresses the polarity in which all beings function. Ha is said to be the positive or active principle of existence, symbolized by the sun, heat, light, and creativity. Tha is correspondingly the negative or reflective principle, symbolized by the moon, cold, darkness, and receptivity. The performance in slow motion of the gentle, graceful movements of Hatha Yoga and the reflective holding of various asanas allow body, mind, and spirit to come into harmony through the balance of these two basic energies. Constant disciplined practice of breathing exercises, postures, and relaxation subtly transforms the body into a vital spiritual tool through which levels of intuitive understanding are reached, and the mystical aspects of Hatha Yoga gradually unfold and reveal their secrets.
The four main topics to be covered in this section:
1. Ashtanga Yoga. 2. The Three Gunas. 3. The Atma. 4. Karma and Bhakti Yoga.
© 2006 Byron Yoga Centre – Purna Yoga Level 1 v.31 57
8.1 Ashtanga Yoga
The Yoga Sutras of Patanjali
Patanjali, who wrote the Yoga Sutras (the word sutra literally means thread) prescribed an experiential path also known as Raja Yoga; and the goal of the Path is Samadhi. The sutras are based on the science of mind control (Yoga Psychology). The sutras explain a systematised path called the "Eightfold Path" to realisation of the Divine known as Ashtanga Yoga (Ashta means eight, and anga means limbs). Patanjali names five obstacles that prevent us from experiencing Samadhi. These obstacles are called Kleshas and they hamper us today as much then they hampered Yogis thousands of years ago:
• Avidya: ignorance or unreal cognition • Raga: excessive attachment to pleasurable things • Dvesha; excessive aversion or hatred • Asmita: egoism • Abhinivesha: fear of death
One can say that all 5 Kleshas stem from the first, Avidya. To rid oneself of these Kleshas, Patanjali recommends an eight-limbed system of yoga called ASHTANGA, or Raja Yoga. Each limb of the tree of Raja Yoga represents a purifying yoga practice. The eight limbs follow:
1. YAMAS – Ethical and moral observations. Ahimsa: non-violence and non-harming in any form to any living creature. This creates compassionate living, as true non-violence is a state of mind and heart.
Satya: truthfulness in mind, word and action. This is considered to be the highest law of morality.
Asteya: non-stealing, to free ourselves from possessiveness and envy.
Brahmacharya: abstinence and the practice of moderation in all things.
Aparigraha: non-greed in order to simplify life by adopting an attitude of generosity and non-hoarding.
2. NIYAMAS – Restraints to create inner integrity. Saucha: purity and cleanliness of mind, body, heart and environment.
Santosha: cultivation of inner contentment, in order not to hold others responsible for our happiness.

© 2006 Byron Yoga Centre – Purna Yoga Level 1 v.31 58
Tapas: This refers to the activity of keeping the body fit, or to confront and control the inner urges. Literally it means to heat the body, and by so doing, to cleanse it. Behind the notion of tapas lies the idea we can direct our energy to engage fully in life, and achieve our ultimate goal of creating union with the Divine. Tapas helps us burn up all the desires that stand in our way of this goal. Another form of tapas is paying attention to what we eat, to body posture, to eating habits, to breathing patterns, and so on. Tapas can also be referred to as the performance of austerities
Svadhyaya: study, not only of an intellectual kind but also of oneself, to develop self-understanding of our inner nature.
Isvara-pranidhana: realization, devotion, dedication and surrender to the divine presence within all life.
3. ASANA - means “seat” and refers to the art and science of body postures that have evolved over many centuries. Apart from cultivating kanti (physical beauty) due to the enhanced pranic flow (life energy) through the body, asanas remove fickleness of mind to restore mental and physical health, strength, wellbeing and vitality. Asana practice also reflects the tendencies, strengths, weaknesses and actions in our life. The real importance of the Asanas is the way they train and discipline the mind.
4. PRANAYAMA - Breath regulation Prana is “vital energy”, which includes will power and ambition, while Ayama means “stretch, expansion, and extension.” Pranayama can be described as the “expansion and extension of energy and life-force,” therefore Pranayama is the practice whereby life energy is expanded through the regulation and control of the breath. Pranayama is the actual process of directing energy inward, making the mind fit for Pratyahara or the detachment of the senses, which evolves from Pranayama.
5. PRATYAHARA - Sensory withdrawal The Bhagavad-Gita, the Yoga Sutras and many other Yoga texts repeatedly suggest that the path to success requires withdrawal of the senses from the objects of desire. When the mind is released from the power of the senses, the mind in turn becomes passive. Then the mind turns inward and is set free from the tyranny of the senses. This is Pratyahara. By withdrawing our senses from external stimulation, we are able to connect to this inner well of contentment, rather than relying on outward sensory stimulus and grasping in order to fulfil our unquenchable desires. The process of introspection and Pratyahara also leads to self-understanding and acceptance.
6. DHARANA - Concentration The practice of Dharana, or single pointed concentration, can take many forms. Methods include being completely attentive to the flow of the breath in harmony with the movement of the body, or focusing on the glow of a candle flame. Whatever technique is used, the aim is the same – to focus and discipline the mind in order to move into a meditative state.

© 2006 Byron Yoga Centre – Purna Yoga Level 1 v.31 59
7. DHYANA - Meditation Through the practice of single pointed focus, or concentration, meditation will begin to follow naturally. It is where we can go beyond time, space, conditions and limitations, allowing our individual core of consciousness to expand and connect with the infinite universal consciousness. The ancient sages described meditation as yoking with nature, as they conceived the infinite universe to be part of the nature of life, death and beyond.
8. SAMADHI - State of union with the Divine. When one has mastered all the other limbs of yoga, then the eventual outcome is Samadhi or the feeling of pure consciousness. For some this experience may be felt only temporarily, but others may have this state constantly. There are even different levels of realisation. The final realisation of our true nature is sometimes called enlightenment, or Moksha. Samadhi is something that will happen of its own accord if one is patient and disciplined. Even after the experience of Samadhi, we continue on our path, observing the Yamas and Niyamas, and so the 8 limbs become a continuous life journey.

© 2006 Byron Yoga Centre – Purna Yoga Level 1 v.31 60
8.2 The Three Gunas
The Three Gunas (qualities)
While engaged in non-spiritual activities, all living entities act under the influence of three qualities, known as Gunas:
Sattva – sentient - goodness, purity, steady and focussed. Rajas – mutative - passion, activity, the process of change. Tamas – static - ignorance, darkness, inertia.
Once conciousness takes on a material form (body), one quality of the three usually predominates.
What are The Gunas? A Guna is a subtle material quality which binds the spiritual consciousness to the material body. The three Gunas are Sattva, Rajas and Tamas.
Tamas Tamas or inertia, binds the spiritual consciousness by laziness, ignorance and too much sleep. Tamas attaches you to ignorance by hiding knowledge from you. Tamas dominates by suppressing Rajas (activity) and Sattva (goodness). Ignorance, laziness, carelessness, and delusion arise when Tamas is predominant. If you do anything while Tamas is ruling in your life, the consequence will be ignorance. Negligence, delusion, and ignorance arise from Tamas. Tamasic persons, living in the lowest Guna, basically experience misery without fully realising it.
Example of a Tamasic Person A Tamasic person does not really do anything. They oversleep, usually wake up late, and often, take alcohol for the purpose of intoxication. This is a very generalized statement. They are lazy and ignorant. They are not interested in learning anything; people often have a hard time changing a Tamasic person's mind. They neglect their duties; do not care about other people much.
Rajas Rajas or selfish activity is seen in people that are chasing materialistic or egocentric dreams. Rajas is born by desires and the results of work, for example: unnecessary nice material trinkets and ego decorations. Rajas binds you to action\work. Rajas rules by suppressing Tamas and Sattva. Greed, activity, restlessness, passion, and the doing of selfish works arise when Rajas is ruling in your life. The consequence of Rajasic action (a selfish action) is suffering.
Example of a Rajasic Person We often meet people that work extremely hard, they cannot stop working. Most of the time they are rich by average standards (few people in the world own cars and brick houses and PCs), care too much about their cars or houses. They would do almost anything for money. They live selfish, greedy, restless and very active lives.

© 2006 Byron Yoga Centre – Purna Yoga Level 1 v.31 61
Sattva Sattva, or goodness, is calm and clear. If Sattva rules in a person, they always do the right thing. Sattva binds the spirit to the body with happiness and knowledge. Sattva rules by suppressing Rajas and Tamas. When goodness and wisdom are present in your whole being - then Sattva is ruling. The consequence of Sattvic action (a good action) is pure. Knowledge comes from Sattva. Those who are established in Sattva experience a more contented existence.
Example of a Sattvic Person A Sattvic person is sometimes hard to identify because they are so humble, they do not make it known that Sattva rules them.
The saints were Sattvic people, but some rise above Sattva, or transcend the Gunas to live a completely spiritual life (have reached full Samadhi). To be motivated to rise above Sattva there needs transcendental (spiritual) knowledge or a person often becomes “stuck” in Sattva.
How do you know if you have conquered the Gunas? When you are completely free from the Gunas, you are neither a Sattvic, or Rajasic or Tamasic person. When you can stand above the Gunas and see everything as one, for example: you treat everybody the same way, a clod of dirt, stone and gold are the same to you - one is not more precious than the other. When you do not become proud because people praise you, or angry when they disgrace you, you treat enemies and friends alike. When you have managed to do all these, it is said that you have overcome the Gunas.
Sattvic Food This is the purest diet, the most suitable one for any serious student of yoga. It nourishes the body and maintains it in a peaceful state. And it calms and purifies the mind, enabling it to function at its maximum potential. A Sattvic diet thus leads to true health: a peaceful mind in control of a fit body, with a balanced flow of energy between them. Sattvic foods include cereals, wholemeal bread, fresh fruit and vegetables, pure fruit juices, dairy, legumes, nuts, seeds, sprouted seeds, honey, and herb teas. Always eating in moderation.
Rajasic Food Foods that are very hot, bitter, sour, dry or salty are Rajasic. They destroy the mind-body equilibrium, feeding the body at the expense of the mind. Too much Rajasic food will over stimulate the body and excite the passions, making the mind restless and uncontrollable. Rajasic foods include hot substances, such as sharp spices or strong herbs, stimulants, like coffee and tea, fish, eggs, onions, garlic, salt and chocolate. Eating in a hurry is also considered Rajasic.
Tamasic Food A Tamasic diet benefits neither the mind nor the body. Prana, or energy, is withdrawn, powers of reasoning become clouded and a sense of inertia sets in. The body’s resistance to disease is destroyed and the mind filled with dark emotions, such as anger and greed. Tamasic items include meat, alcohol, tobacco, some fermented foods, most processed foods and stale or overripe substances. Overeating is also regarded as Tamasic.

© 2006 Byron Yoga Centre – Purna Yoga Level 1 v.31 62
8.3 The Atma
The Science of the Self
Part 1 Eight elements and two bodies In both Yoga and its sister science, the Ayurveda, the whole material world is said to be composed of eight basic elements - five gross material elements and three subtle material elements.
The five gross material elements are: earth, water, fire, air and ether. In modern terminology they could be described as: solid substances, liquids, radiating energy, gasses and all-pervading space.
All phenomena in this world that are perceivable by our senses are a combination of these five basic elements.
Within all living things that are made up of these five gross material elements are three subtle material elements: the mind, the intelligence and the personal identification. Although one cannot perceive them due to their more subtle nature, they are still material. Together they constitute the so-called subtle material body in which thinking, feeling and willing is manifested. This means that thoughts, feelings and desires correspond to the mind (manas) and the intelligence (buddhi).
The misidentification with the body is sometimes referred to as the "false identification" or ahankara.
The body is therefore composed of two bodies – a gross material body and a subtle material body.
In conclusion there are eight material elements:
i) bhumih - earth ii) apah - water iii) analah - fire iv) vayuh - air v) kham - ether vi) manah - mind vii) buddhi - intelligence viii) ahankara - false identification

© 2006 Byron Yoga Centre – Purna Yoga Level 1 v.31 63
Part 2 Soul (jiva) - Source of consciousness
Situated within the eight material elements, the five gross and the three subtle, is the consciousness, or the true “self”.
Instead of identifying as a passenger within this body, most people wrongly identify as being the body. This misidentification with the body is sometimes referred to as the "false identification" or ahankara. The word ahankara means illusion. This condition of misidentification with the body can form a bondage with material life, one that is very difficult to unravel.
In Samkhya philosophy, this consciousness is known as the jiva or the atma, or – the jivatma – or spirit soul. The embodied spirit soul is but a passenger within its gross and subtle material body. By interacting with the material body, a web of unlimited complex karmic reactions is created.
The path of yoga is a way of freeing one from those complex karmic reactions.
Samadhi is said to be a state of liberation, moksha, from the bondage of the material body. Yoga will liberate us from ahankara, the false identification that we are this body.
"For the soul there is neither birth nor death. It has not come into being, does not come into being, and will not come into being. It is unborn, eternal, ever-existing and primeval. It is not slain when the body is slain. As a person puts on new garments, giving up old ones, the soul similarly accepts new material bodies, giving up the old and useless ones. The soul can never be cut to pieces by any weapon, nor burned by fire, nor moistened by water, nor withered by the wind. This individual soul is unbreakable and insoluble, and can be neither burned nor dried. It is everlasting, present everywhere, unchangeable, immovable and eternally the same. It is said that the soul is invisible, inconceivable and immutable. Knowing this, you should not grieve for the body." Bhagavad-Gita (2.20-25)

© 2006 Byron Yoga Centre – Purna Yoga Level 1 v.31 64
8.4 Karma Yoga and Bhakti Yoga
Karma Yoga Karma yoga is one of the four main paths of yoga (the others being Bhakti, Raja and Jnana yoga). It is the yoga of action. The word karma is derived from the Sanskrit word kri, meaning to make or to do. The principles of karma teach that the life we have today has been determined by the actions of our previous lives and therefore the way we act today will affect the quality of our future lives. A person practising karma yoga acts in accordance with their duty (dharma), performing all activities without expectation of reward, personal gain or attachment to outcomes. Instead they act and think selflessly, in the spirit of service to others.
Karma Yoga, Bhakti Yoga and Seva Selfless Service is a commonly used term to denote a service which is performed without any expectation of result or award for the person performing it. The idea of selfless service is an important concept in Dharmic Religions and is known as Seva. Because Divinity is perceived as residing in the heart of others, serving other people is considered an essential devotional practice.
In Chapter 2 of the Bhagavad-Gita, Krishna tells Arjuna: “You have a right to perform your prescribed duty, but you are not entitled to the fruits of action. Never consider yourself the cause of the results of your activities.” In the following verse: “Perform your duty equipoised, O Arjuna, abandoning all attachment to success or failure. Such equanimity is called yoga.”
On karma yoga, the Hindu Saint Mata Amritanandamayi (Amma) says: “The beauty and charm of selfless love and service should not die away from the face of the earth. The world should know that a life of dedication is possible, that a life inspired by love and service to humanity is possible.
Meditation and studying the scriptures are like two sides of a coin. The engraving on that coin is selfless service, and that is what gives it its real value. Our compassion and acts of selflessness take us to the deeper truths. Through selfless action we can eradicate the misidentification that conceals the Self. Detached, selfless action leads to liberation. Such action is not just work; it is karma yoga”.

© 2006 Byron Yoga Centre – Purna Yoga Level 1 v.31 65
The average person is not aware of the flow of karma, but suffers and enjoys the fruits (reactions) of their work.
A person conscious of the flow of karma and tries to do good things is motivated by seeking the fruits (favourable reactions) of their work.
A Karma Yogi is a person who does the right thing simply because it’s the right thing to do, without any attachment to the result.
A Bhakti Yogi is a person who does the right thing out of love and devotion, seeing equality and the Divine in all, also without any attachment to the result.
Bhakti Yoga is considered to be the ripened fruit of the Karma Yoga tree. Ultimately all one’s activities, performed with the right attitude, become acts of Bhakti Yoga.
The Bhagavad-Gita Teachings on Karma yoga and Bhakti yoga are found within the Bhagavad-Gita which is a section of the vast epic poem, the Mahabharata.
The story takes place on the brink of a great battle between the Pandava army, led by the warrior Arjuna, and the Kaurava army. Arjuna surveys his opposition and expresses to Krishna, his charioteer and great friend, his reluctance to fight. In response to Arjuna’s dilemma, Krishna expounds upon various yoga philosophies and practices to provide the clarity for Arjuna to know that he has a duty in life and must fight the battle, or deal with challenges that life presents.
In Autobiography of a Yogi, Parahamsa Yogananda describes the Bhagavad-Gita as “India’s most beloved scripture.” The reasons being that “it contains the counsel of Lord Krishna to his disciple Arjuna: words of spiritual guidance that are timeless in their applicability by all truth seekers. The central message of the Gita is that man may win emancipation through love for the Divine, wisdom and performance of right actions in a spirit of non-attachment.”
Mahatma Gandhi wrote: “Those who will meditate on the Gita will derive fresh joy and new meanings from it every day. There is not a single spiritual tangle which the Gita cannot unravel.”
In Chapter twelve of the Bhagavad-Gita, it gives a description over several verses of someone who may be recognised as a true Bhakta: “He who is the same to foe and friend, and also in honour and dishonour, who is the same in cold and heat, and in pleasure and pain, who is free from attachment. He to whom censure and praise are equal, who is silent, content with anything, not attached to domestic life, of a steady mind, and full of devotion – that man is dear to me” (Gita chapter 12 verses 17-18)

© 2006 Byron Yoga Centre – Purna Yoga Level 1 v.31 66
9 Meditation
In this section the focus will be on three different meditation (Dhyana) techniques:
1. Japa Meditation
2. Yoga Nidra Meditation
3. Breath Awareness Meditation
Some might say that Yoga Nidra is more of a relaxation exercise than a meditation, although for our purposes we are looking to achieve similar outcomes.
The reason meditation is included in the Level One course is for the same reason as Pranayama has been, that is, to help the trainee at this point of their training to develop a regular practice, so that one day they will be ready to teach and share their experiences with others. As with Asana and Pranayama, Meditation should be taught by teachers who have a regular practice.
To help promote a regular practice, part of the assessment process will be based on the trainees maintaining a daily Journal, recording details of their Meditation experiences. In class we will train in three different techniques, Japa, Yoga Nidra and Breath Awareness. The trainees are required, in their own private practice, to record their experiences of the Japa, Yoga Nidra and Breath Awareness techniques.
In Level Two, the trainee is looking to gain the skills and knowledge to teach Meditation to others.
From Bhaktivedanta Swami Prabhupada, “Meditation means to absorb your mind on the Divine. That is meditation, real meditation. In all the standard scriptures and in yoga practice formula, the whole aim is to concentrate one’s mind on the Divine. That is called samadhi, ecstasy. So that ecstasy is immediately brought by this yoga process. The Bhakti yoga process is the top most yoga process to bring one to this platform of ecstasy.”

© 2006 Byron Yoga Centre – Purna Yoga Level 1 v.31 67
9.1 Japa Meditation
Mantras Sound is a form of energy made up of vibrations or wavelengths. Certain wavelengths have the power to heal, others are capable of shattering glass. Mantras are Sanskrit syllables, words or phrase which, when repeated in meditation, will bring the individual to a higher state of consciousness. Generally there are six qualities common to most mantras:
1. It was originally revealed to and handed on by a sage who attained self-realisation through it;
2. It has a certain metre or rhythm; 3. It has a presiding deity; 4. It has a “bija” or seed at its essence which invests it with special
power; 5. It has divine cosmic energy or shakti; and lastly 6. It has a key which must be unlocked through constant repetition
before pure consciousness is revealed.
Japa or mantra repetition not only provides a tangible point on which to focus the mind – it also releases the energy encased in that sound. Through japa, the energy literally manifests itself in a powerful way to change patterns of thought.
A mantra is a means to alter negative patterns and enhance the positive. By holding the mind on a mantra and by contemplating the aspects of the Divine associated with it, it is possible to be completely transformed. This process of developing one-pointedness can be again compared with practices of dharana (focus), dhyana (meditation) and ultimately samadhi (transcendence) in raja yoga. Although the process in Bhakti yoga is more colourfully dressed, and the emotions more engaged, a similar progression is able to take place.
OM Namo Bhagavate Vasudevaya is a twelve syllable mantra which has, according to the Vedic scriptures, enabled aspirants to attain realization of the Divine or samadhi.
Japa Meditation In the practice of Japa Yoga, a mala is used to assist in counting the repetitions of the name of a Divine aspect such as Visnu, Siva or Divine Mother. A mala is a string of 108 beads, usually made of sandalwood, Tulasi, neem or rudraksha seeds.
As you chant, observe the mind. You may be shocked at how easily the mind can be sidetracked and how quickly you get bored.

© 2006 Byron Yoga Centre – Purna Yoga Level 1 v.31 68
The mind is constantly moving, using energy unproductively because the “mental background noises” mostly concern past or future events. Life is a chain of cause and effect. The beads of the mala are also an endless chain and the endless thoughts are now given with each bead a specified, significant meaning relating to the particular Mantra. There is a special bead called Mount Meru bead where the mala is tied together. When the fingers reach this bead, the mala should be turned and the movement continued the other way. This bead symbolizes Divine-realization and each time you reach it you have a reminder that you do not have to continue the chain of cause and effect. Another reminder is given in holding the mala at heart level, signifying the devotional aspect of this practice, the attempt to transcend the lower levels of being.
The use of a mala gives the body some activity and thereby releases nervous energy or restlessness. The beads are moved between the middle finger and the thumb, never the first (index) finger and thumb, as the Mantra is repeated with each bead. Through use of the beads they take on some of the energy of the user and they become spiritualized. The mala made from the Tulasi or neem tree, can be a little rough at first, but the beads become smooth from the practice. Especially for a busy Western person the practice of the mala has therapeutic value because of its benefit of concentrating the mind, directing the emotions and focusing the body.
To get the greatest benefit from your Mantra practice, set a definite period of time aside each day and make a written commitment to yourself to continue the practice for a sufficient length of time that you can feel its effects. Three months is a good beginning. Begin small and build up – this develops enthusiasm and perseverance to handle greater things. Do not be over-ambitious, letting the ego convince you that you will be able to sustain a long period of chanting immediately.
The recommended time for Mantra practice is early in the morning because at that hour there are few troubling vibrations in the air. However, this may be difficult unless you are living in an Ashram or by yourself. As you become accustomed to the idea, increase the time of practice. You will become very conscious of time, how you spend it and how, perhaps, you waste it. Make a practice of writing down everything that you do. See where you waste time and learn to be efficient so that you can find the time you want for spiritual practice.
Before beginning to chant make sure that not only the large muscles of your body are relaxed, and the neck and shoulders, but also the muscles of the tongue, jaw, forehead and eyes.

© 2006 Byron Yoga Centre – Purna Yoga Level 1 v.31 69
9.2 Yoga Nidra Meditation
It is difficult to find a better treatise on modern Yoga Nidra than that found in ‘Yoga Nidra’ by Swami Satyananda Saraswati. An extract follows:
Introduction “Yoga Nidra, which is derived from the tantras, is a powerful technique in which you learn to relax consciously. In yoga Nidra, sleep is not regarded as relaxation. People feel that they are relaxing when they collapse in an easy chair with a cup of coffee, a drink or a cigarette, and read a newspaper or switch on the television. But this will never suffice as a scientific definition of relaxation. These are only sensory diversions. True relaxation is actually an experience far beyond all this. For absolute relaxation, you must remain aware. This is yoga Nidra, the state of dynamic sleep.
Yoga Nidra is a systematic method of inducing complete physical, mental and emotional relaxation. The term Yoga Nidra is derived from two Sanskrit words ‘yoga’ meaning union or one-pointed awareness, and ‘Nidra’ which means sleep. During the practice of Yoga Nidra, one appears to be asleep, but the consciousness is functioning at a deeper level of awareness. For this reason, Yoga Nidra is often referred to as psychic sleep or deep relaxation with inner awareness. In this threshold state between sleep and wakefulness contact with the subconscious and unconscious dimensions occurs spontaneously.
In Yoga Nidra, the state of relaxation is reached by turning inwards, away from outer experiences. If the consciousness can be separated from external awareness and from sleep, it becomes very powerful and can be applied in many ways, for example, to develop the memory, increase knowledge and creativity, or transform one’s nature.
In the Raja Yoga of Patanjali there is a state called pratyahara where the mind and mental awareness are dissociated from the sensory channels. Yoga Nidra is one aspect of pratyahara which leads to the higher states of concentration and Samadhi.

© 2006 Byron Yoga Centre – Purna Yoga Level 1 v.31 70
The hypnayogic state In Yoga Nidra, the consciousness is in a state between waking and sleep, but is subject to neither. In modern psychology, this has been termed ‘the hypnagogic state’ but I prefer to call it ‘the hypnayogic state’. But the best name of all is ‘Yoga Nidra’. In this state, the mind is exceptionally receptive. Languages and other subjects can be learned rapidly. Suggestions given at this time are successful in removing unwanted habits and tendencies. In fact, Yoga Nidra can be used for directing the mind to accomplish anything. This is the secret of the extraordinary accomplishments of great yogis and swamis.
The practice of Yoga Nidra enables one to receive intuitions from the unconscious mind. This state is the fount of artistic and poetic inspiration. It is also the source of the most creative scientific discoveries. Wolfgang von Goethe used the inspirations and intuitions from this state to solve problems arising in his work. In dreams occurring in this state, Kekule realized the circular molecular structure of genzene, Nobel laureate Niels Bohr saw the planetary structure of the atom, and Einstein accelerated his awareness to the speed of light in the famous ‘thought experiments’ which led to the theory of relativity.
The intuitions received in Yoga Nidra enable one to find within oneself the answers to all problems. One’s true nature and integrity manifest, enabling him to live a meaningful and peaceful life in any environment. This is the opening of the ‘third eye’, which takes the consciousness beyond the conditioned personality with its tensions, complexes and inhibitions. No longer emotionally identified with the mind and body, one’s entire being is pervaded with divine consciousness.”

© 2006 Byron Yoga Centre – Purna Yoga Level 1 v.31 71
9.3 Breath Awareness Meditation
Mastery of the Mind The mind is like a lake, its surface broken by ripples of thought. In order to see the Self which lies beneath, first you must learn to still the ripples, to become the master of your mind rather than its servant. For most of your waking hours the mind is tossed from one thought to another, pulled by desires and aversions, by emotions and memories, both pleasant and unpleasant. Of all the forces that agitate the mind it is the senses that most often disturb the concentration, giving rise to fantasies and desires. The mind is by nature constantly searching for happiness, vainly hoping to find satisfaction once it attains what it desires. On acquiring the desired object, the mind is temporarily silenced, but after a short while the whole pattern starts again, because the mind itself remains unchanged and the true desire unfulfilled. Yoga teaches us that we possess a source of joy and wisdom already inside us, a fund of tranquillity that we can perceive and draw nourishment from when the movement of the mind is still. If we can channel this desire for contentment inward instead of attaching it to external objects that are by nature ephemeral, we can discover how to live in peace.
Witnessing the Play of Thoughts During meditation you experience the mind as an instrument. Just by concentrating for a short period each day, you start to see how much movement exists in the mind, and how little you live in the present. From this brief encounter with a different mode of perception, you can learn to observe and thus leading to a change in the way of thinking. One of the most useful tools for controlling the mind is to stop associating with your emotions, thoughts and actions. Instead of identifying with them, you simply step back and assume the role of witness, as if you were watching someone else. By observing yourself dispassionately in this way, without judgment or praise, your thoughts and emotions lose their power over you – you start to see both mind and body as instruments that you can control. In detaching from the games of the mind, such as misidentification with the body, you learn to take responsibility for yourself.

© 2006 Byron Yoga Centre – Purna Yoga Level 1 v.31 72
Meditation in Daily Life You are unlikely to succeed in taming the mind in your brief session of meditation if you allow it free rein the rest of the time. The longer you spend with the mind concentrated, the sooner you will be able to focus when you sit down to meditate. There is much that you can do to keep your mind centred. While walking, for example, try to synchronize your breathing with your footsteps – inhale for three steps, exhale for three. Breathing slowly and with control quietens the mind down too. When reading a book, test your concentration by stopping at the end of a page to see how much you can remember. Most important of all, keep your thinking as positive as possible. On days where your peace of mind is shattered by anger or unhappiness, you can often calm yourself by focusing on the opposite emotion – countering feelings of hatred with love, for example, doubt with faith or hope. By using these simple techniques you will slowly accustom your mind to a state of concentration. You will begin to notice that external influences are having less effect on you. Whether you have a difficult week at the office or an enjoyable day out in the country, your mood remains the same, for your inner core is growing stronger. You gain the security of knowing that in the midst of the changes that are life’s essence, you can remain constant and assured.
The Principles of Meditation Meditation, like sleep, cannot be taught – it comes by itself, in its own time. But if you follow the right steps to begin with, you can speed up your progress considerably. To help people to understand the basic steps and stages of meditation, there have been Ten Principles formulated. The most essential thing is to establish meditation as a regular habit in your life, using the same place and time each day is very beneficial. This will train your mind to respond without delay once you sit down to meditate – much as your stomach is conditioned to expect food at mealtimes. After a few months of regular practice, your mind will begin to demand this quiet time of its own accord. Two of the most auspicious times of the day for meditation are at dawn and at dusk, when the atmosphere is charged with spiritual energy. But if neither of these times is possible, simply choose a time when you can be alone and undisturbed. You may want to wrap a blanket around yourself before you start so as to keep warm. It is most important that your sitting position is steady and relaxed, as your concentration will be disturbed if you are uncomfortable. Before beginning, instruct your mind to be silent and to forget all thoughts of the past, present or future. Now regulate your breathing – this will control the flow of prana which in turn will help to still the mind. As the breath slows, so does the mind. You should not attempt to combat the restlessness of your mind, as this will only generate more thought waves. Simply detach yourself from your thoughts and create a Dhristi (a single point of focus, such as the breath), this anchors the mind in the present moment.

© 2006 Byron Yoga Centre – Purna Yoga Level 1 v.31 73
Principles to help with Meditation 1. Set aside a special place for meditation – the atmosphere you build
up will help still the mind. 2. Choose a time when your mind is free of everyday concerns – dawn
and dusk are ideal. 3. Using the same time and place each day conditions the mind to
slow down more quickly. 4. Sit with your back, neck and head in a straight line, ideally facing
North or East. 5. Instruct your mind to remain quiet for the duration of your meditation
session. 6. Regulate your breathing – start with a few deep breaths, then slow it
down to a natural rhythm. 7. Let a rhythmic breathing pattern happen. 8. At first, let your mind wander – it will only grow more restless if you
force it to concentrate. 9. Applying your chosen technique, hold your object of concentration
at this focal point throughout your session. In the long tradition of meditation, there is a great variety of different techniques – some using the power of sound, others using visual symbols or breathing. But all have a common aim: to focus the scattered rays of the mind on a single point, so as to lead the meditator to a state of self-realization.
10. Meditation comes when you reach a state of being able to silently watch the fluctuation of your mind, when you can settle in the witness state of pure awareness.