
Content Matrix Organizer - Metalogix€¦ · Content Matrix Organizer User Guide Metalogix 4...
45
-
Upload
nguyentram -
Category
Documents
-
view
228 -
download
3
Transcript of Content Matrix Organizer - Metalogix€¦ · Content Matrix Organizer User Guide Metalogix 4...

© Metalogix GmbH, 2018All rights reserved. No part or section of the contents of this material may be reproduced or transmitted in any form or by any meanswithout the written permission of Metalogix International GmbH.
Content Matrix Organizer is a trademark of Metalogix GmbH.
Windows SharePoint Services is either a registered trademark or a trademark of Microsoft Corporation in the United States and/or othercountries. Other product and company names mentioned herein may be the trademarks of their respective owners.
www.metalogix.com [email protected] 202.609.9100
Content Matrix Organizer User Guide Metalogix
Technical Support
For information about Metalogix Technical support visit http://metalogix.com/support.
Technical support specialists can be reached by phone at +1-202-609-9100. The level of technical support provided depends upon thesupport package that you have purchased. Contact us to discuss your support requirements.
Copyright

Content Matrix Organizer User Guide Metalogix
www.metalogix.com [email protected] 202.609.9100
ContentsIntroduction ............................................................................................................................................... 4
Ribbon and Context Menus ........................................................................................................................ 5
Upload Items ....................................................................................................................................... 5
Copy Items ........................................................................................................................................... 8
Move Items ........................................................................................................................................ 12
Apply Metadata to Items .................................................................................................................... 18
Move-Copy Action History .................................................................................................................. 21
Reorganize ............................................................................................................................................... 23
Access ................................................................................................................................................ 23
Access for Site Owners ..................................................................................................................24
Browse to Location ........................................................................................................................25
Refresh .........................................................................................................................................25
Reorganize - Copy .........................................................................................................................25
Reorganize - Paste Special .............................................................................................................36
Paste Users ............................................................................................................................. 37
Paste Groups .......................................................................................................................... 37
Paste Content Types ............................................................................................................... 37
Paste Web Parts ..................................................................................................................... 37
Reorganize - Delete .......................................................................................................................38
Processing Page .................................................................................................................................. 38
Access ...........................................................................................................................................41
Job Summaries ..............................................................................................................................41
Removing Job Summaries ....................................................................................................... 42
Exporting Job Summaries ........................................................................................................ 43
Additional Information ............................................................................................................................. 44
Known Issues ..................................................................................................................................... 44

Content Matrix Organizer User Guide Metalogix
4
IntroductionContent Matrix Organizer is a tool that enables the upload, classification, move and copy of content within
a SharePoint farm. The basic interface is available to users with contribute or higher level access in a
Library or List. The Reorganize and Processing pages are available to Site Collection Administrators and
Farm Administrators. Read more about this in the Reorganize section.
The upload window in Content Matrix has a drag-and-drop capability, making it easier than ever to add
content to SharePoint libraries.
Content Matrix capitalizes on the functionality of Content Types and allows the added features of bulk
editing of metadata through the processes mentioned above. It allows a user with enough access to apply
new content types to a library or list, and it also allows metadata to be reused or mapped so that
information is retained on the item.
Lastly, Content Matrix records the actions that have been done on the content, so that the user may see
how the content came to be where and how it is.

Content Matrix Organizer User Guide Metalogix
5
Ribbon and Context MenusFrom within the SharePoint list or library screens, you will see a new tab at the top of your page which will
display a ribbon with selection-specific options available.
From within the context menu (drop down menu on Name field), you will see a new option as well, Manage
Item.
Upload ItemsContent Matrix allows an additional upload interface for SharePoint. It is very much like the upload option
in SharePoint, but with greater control of the metadata for the content.
Uploads can be done by selecting files using regular navigation, or clicking and dragging files.
1. Navigate to the Library where the content is to be uploaded.
2. Either:
§ Click the Content Matrix tab at the top of the page and click the Upload button.
OR
§ For SharePoint 2010, click the Documents tab at the top of the page, and from the Upload Document
dropdown, choose Upload and Apply Metadata to Multiple Documents.

Content Matrix Organizer User Guide Metalogix
6
A new window will open.
3. If files or folders are selected in an open windows explorer, either:
§ drag the files and/or folders to the window.
OR
§ click the Select button (or click the Browse for Files Instead link) and navigate to the location of the
files to be uploaded and select the files.
Note that Office 2010 users can upload an entire directory, and that directory will be created in
SharePoint.

Content Matrix Organizer User Guide Metalogix
7
4. Click the Fields tab to select a content type and edit the metadata for the files being uploaded.
Note that the values entered will apply to all files being uploaded.
5. To enter the data for the fields, click the Edit button to the right of the field. Enter the data and go
to the Options tab.
To clear a field and go back to the non-editing mode, click the Undo button to the right of the
field.
Content Matrix Organizer User Guide Metalogix
8
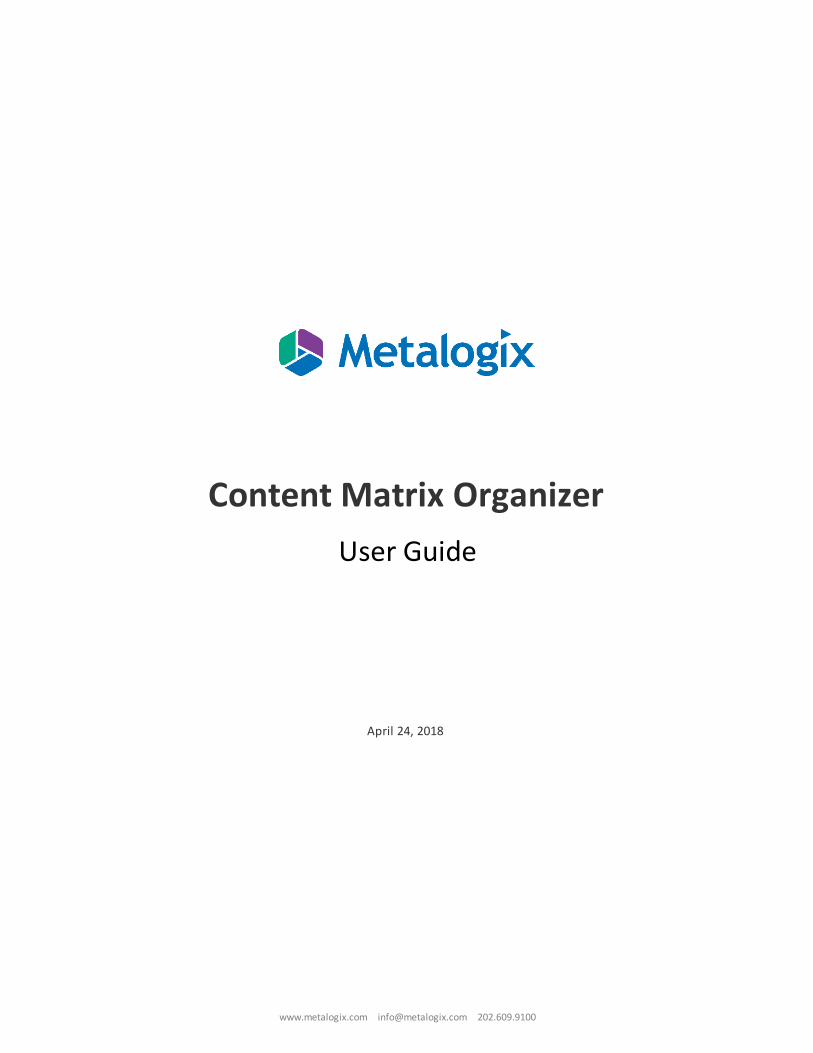
6. Click the Options tab to select the overwrite and check-in status options.
NOTE: Uploading a file that already exists, and selecting No to ‘Overwrite existing docs’, will present an
error.
§ Click UPLOAD to complete the Upload.
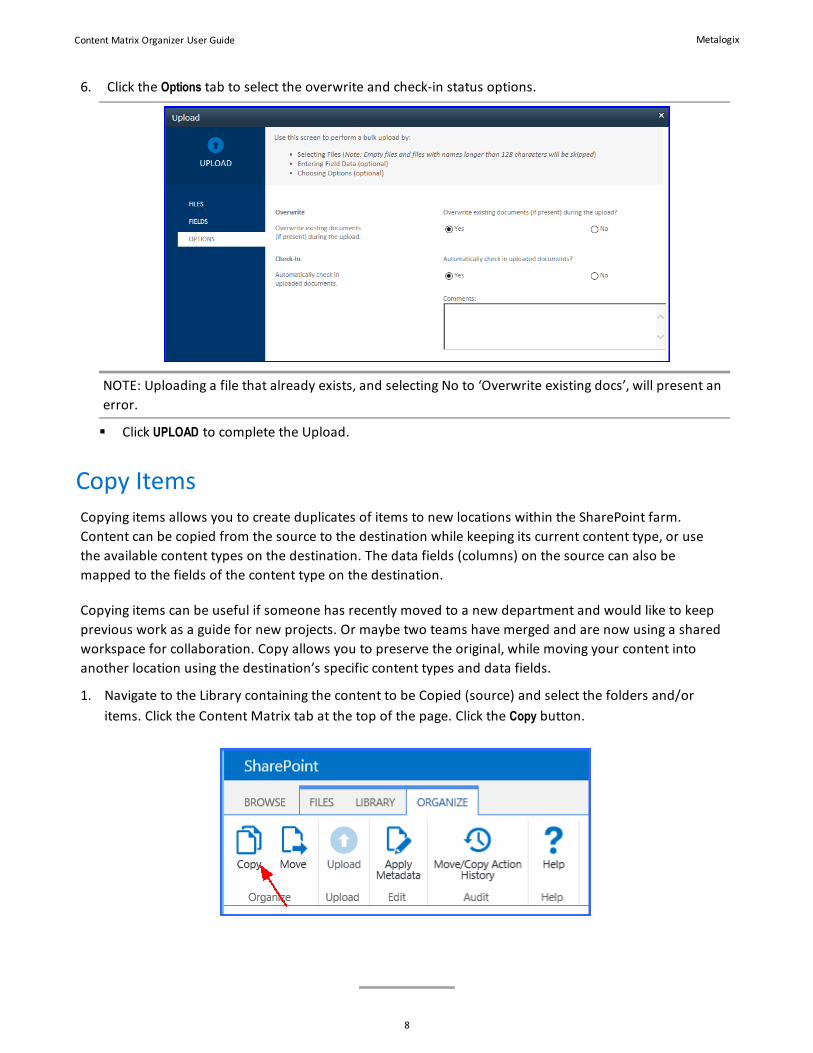
Copy ItemsCopying items allows you to create duplicates of items to new locations within the SharePoint farm.
Content can be copied from the source to the destination while keeping its current content type, or use
the available content types on the destination. The data fields (columns) on the source can also be
mapped to the fields of the content type on the destination.
Copying items can be useful if someone has recently moved to a new department and would like to keep
previous work as a guide for new projects. Or maybe two teams have merged and are now using a shared
workspace for collaboration. Copy allows you to preserve the original, while moving your content into
another location using the destination’s specific content types and data fields.
1. Navigate to the Library containing the content to be Copied (source) and select the folders and/or
items. Click the Content Matrix tab at the top of the page. Click the Copy button.

Content Matrix Organizer User Guide Metalogix
9
The context menu can also be used, even with multiple items selected, as long as the context menu
used is from one of the selected items.
A new window opens that may display the structure of the SharePoint farm. If the entire farm isn't
visible, it is because the Administrator has restricted the list to the current site collection, to allow the
page to load faster. Enter the URL of the destination site collection and click Add, if needed.
This shows the screen if the site collection list hasn't been restricted. The destinations available reflect
the security of the currently logged in user. Note that the last selected destination is displayed when
this window is opened. Navigate to the desired list or library (destination). Formatting has been
applied to show which destinations match exactly in columns (bold), which are allowable but with
different columns (italics) and the greyed out ones are not available.

Content Matrix Organizer User Guide Metalogix
10
2. If a destination is selected that does not have the custom fields that the selected content uses
(italicized), there will be a warning that data could be lost if not mapped
2. Using the Destination Content Type dropdown field, select:
· (PRESERVE EXISTING) to maintain the existing content type of the items being copied, or
· (DESTINATION DEFAULT) for these items to be copied using the default content type of the
destination, or
· (OTHER) a new content type from the list of available content types in the destination.
The selection will determine which fields become available for editing or mapping.
NOTE: You will not be able to select (Preserve Existing) if the content type doesn’t currently exist on the
destination, and you do not have enough access to apply content types in the destination. The content
will use the default content type.
Note that the values entered will apply to all files being copied.

Content Matrix Organizer User Guide Metalogix
11
To enter the data for the fields, click the Edit button to the right of the field.
To clear a field and go back to the non-editing mode, click the Undo button to the right of the
field.
To map fields, click the Map button to the far right of the field. From the drop down, select the
source column name that you would like mapped to destination field on the left.
Destination fields are on the left, and Source fields are in the dropdowns.
For example, in the screenshot above, Title is the name of the field on the destination. You can select
from the dropdown, one of the source columns you would like mapped to the Title column on the
destination.
3. Click the Options tab to select whether the content type should be applied to the destination.

Content Matrix Organizer User Guide Metalogix
12
Apply Content Types may be greyed out if you’ve chosen to Preserve Existing on the Fields tab, and
that requires that the content type be applied to the destination.
4. Click COPY to complete the copy.
Move ItemsMove Items allows content to be moved to another part of the SharePoint farm. When items are moved,
there is the option to make custom content types available in the destination as well.
Content Matrix Organizer User Guide Metalogix
13
Moving content can be used for situations like the merging of departments or websites. The team leaders
should be careful about what content types are preserved and/or created, and how this will impact
content that is moved into the new destination.
Moving will remove the content from the source. If users will still access this content on the source
location, consider using Copy instead of Move.
Moving content is a two-step process. A copy is created in the new destination, and the original is deleted.
Content that is checked out or in a workflow cannot be moved.
For moving large amounts of content (>100 items or whole Site Collections), consider using the Metalogix
Content Matrix Console.
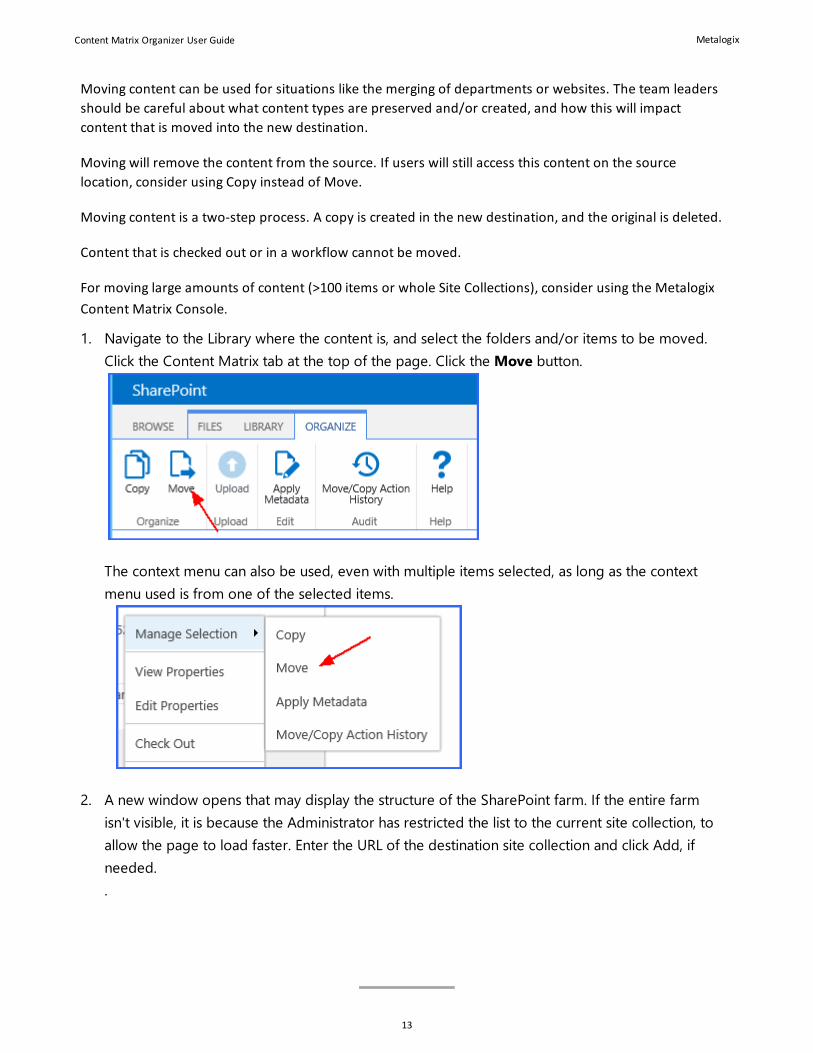
1. Navigate to the Library where the content is, and select the folders and/or items to be moved.
Click the Content Matrix tab at the top of the page. Click the Move button.
The context menu can also be used, even with multiple items selected, as long as the context
menu used is from one of the selected items.
2. A new window opens that may display the structure of the SharePoint farm. If the entire farm
isn't visible, it is because the Administrator has restricted the list to the current site collection, to
allow the page to load faster. Enter the URL of the destination site collection and click Add, if
needed.
.

Content Matrix Organizer User Guide Metalogix
14
This shows the screen if the site collection list hasn't been restricted. The destinations available
reflect the security of the currently logged in user. Note that the last selected destination is
displayed when this window is opened. Navigate to the desired list or library (destination).
Formatting has been applied to show which destinations match exactly in columns (bold), which
are allowable but with different columns (italics) and the greyed out ones are not available.

Content Matrix Organizer User Guide Metalogix
15
3. If a destination is selected that does not have the custom fields that the selected content uses
(italicized), there will be a warning that data could be lost if not mapped.
Content Matrix Organizer User Guide Metalogix
16
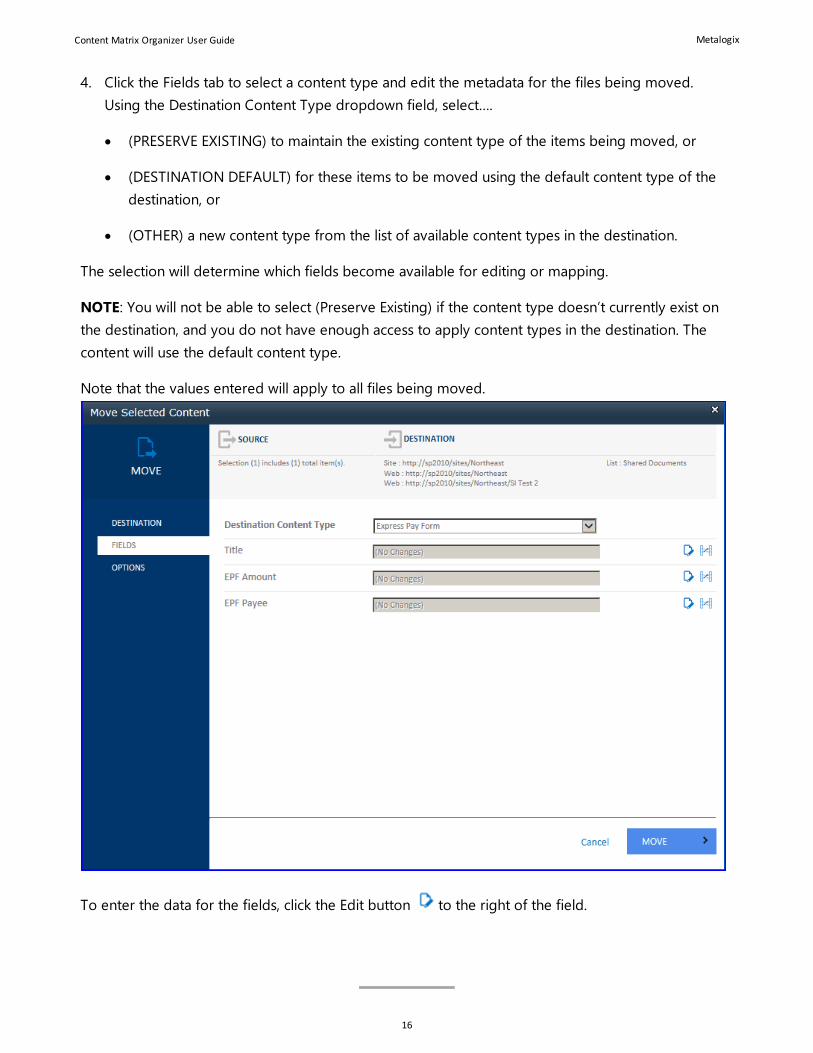
4. Click the Fields tab to select a content type and edit the metadata for the files being moved.
Using the Destination Content Type dropdown field, select….
· (PRESERVE EXISTING) to maintain the existing content type of the items being moved, or
· (DESTINATION DEFAULT) for these items to be moved using the default content type of the
destination, or
· (OTHER) a new content type from the list of available content types in the destination.
The selection will determine which fields become available for editing or mapping.
NOTE: You will not be able to select (Preserve Existing) if the content type doesn’t currently exist on
the destination, and you do not have enough access to apply content types in the destination. The
content will use the default content type.
Note that the values entered will apply to all files being moved.
To enter the data for the fields, click the Edit button to the right of the field.

Content Matrix Organizer User Guide Metalogix
17
To clear a field and go back to the non-editing mode, click the Undo button to the right of the
field.
To map fields, click the Map button to the far right of the field. From the drop down, select the
column name that you would like mapped to field name on the left.
Note that if more than one content type was selected to be moved, it is not possible to apply
changes to the data fields without first selecting a Destination content Type other than (Preserve
Existing).
Destination fields are on the left, and Source fields are in the dropdowns.
Mapping Fields allows the reuse of existing metadata in corresponding fields of the new content
type, if one is selected. For example, the source content type has a dropdown field labeled
‘Iteration’. The destination content type has a field labeled ‘Step’. You could choose to maintain the
content type, and keep ‘Iteration’ or you could use the destination content type and map the

Content Matrix Organizer User Guide Metalogix
18
metadata from ‘Iteration’ into the field called ‘Step’. In the first case you would select (Preserve
Existing) from the Destination Content Type dropdown, and no mapping is needed. In the second
scenario, you would select the content type that is used on the destination from the Destination
Content type dropdown, and select Iteration from the dropdown to the right of Step.
5. Click the Options tab to select whether to apply the content type to the destination.
Apply Content Types may be greyed out if you’ve chosen to Preserve Existing on the Fields tab,
and that requires that the content type be applied to the destination.
6. Click MOVE at the bottom of the page to complete the Move.
Apply Metadata to ItemsApplying Metadata to items allows the user to select a new content type and edit metadata that
corresponds with the new content type.
For example, there are multiple types of documents in your project folder from emails, to project plans.
Your team leader has created content types to better manage these. Apply Metadata allows the option of
applying these new content types to existing data. You can also map current metadata to custom fields
that the team leader has added for each new content type so that reentering the information is not
necessary, and no valuable information is lost.
1. Navigate to the library where the content is and select the folders and/or items. Click the Content
Matrix tab at the top of the page. Click the Apply Metadata button.

Content Matrix Organizer User Guide Metalogix
19
The context menu can also be used, even with multiple items selected, as long as the context menu used is
from one of the selected items.
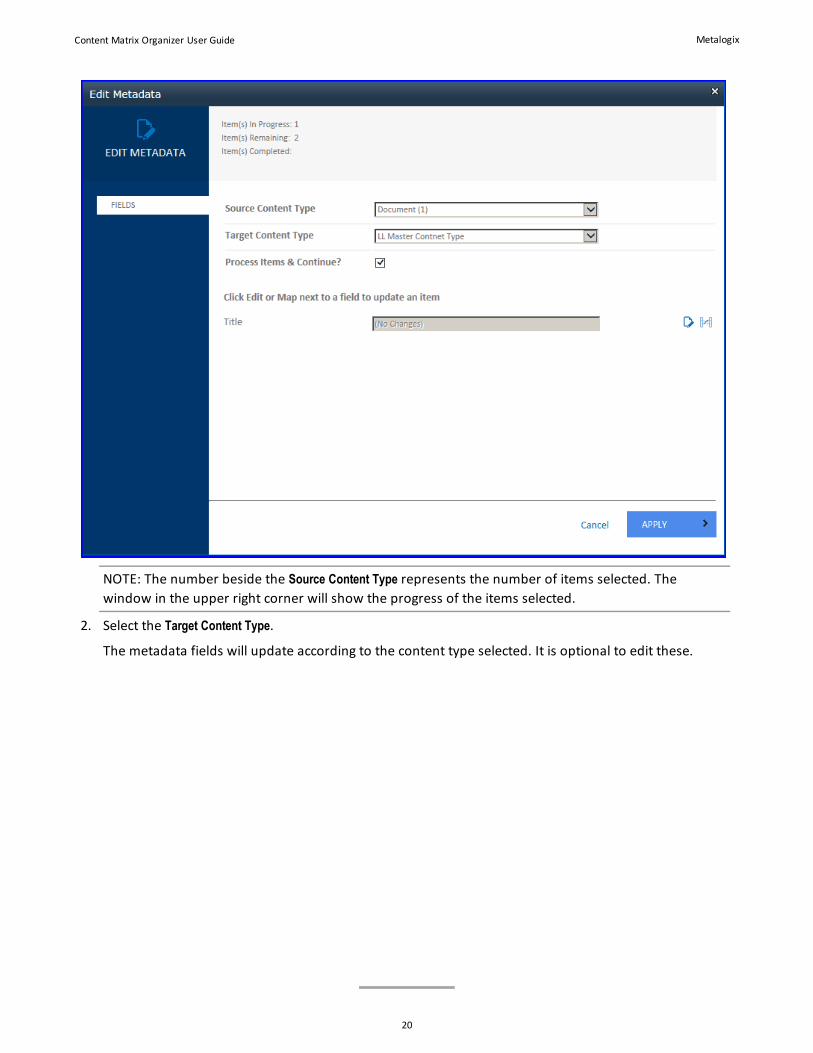
A new window opens. If items of more than one content type were selected, there will be an option to
process each content type incrementally. Click the Process Items & Continue checkbox and enter the
changes to the first content type group.
Content Matrix Organizer User Guide Metalogix
20
NOTE: The number beside the Source Content Type represents the number of items selected. The
window in the upper right corner will show the progress of the items selected.
2. Select the Target Content Type.
The metadata fields will update according to the content type selected. It is optional to edit these.

Content Matrix Organizer User Guide Metalogix
21
To enter the data for the fields, click the Edit button to the right of the field.
To clear a field and go back to the non-editing mode, click the Undo button to the right of the
field.
To map fields, click the Map button to the far right of the field. From the drop down, select the
column name that you would like mapped to field name on the left.
For example, in the screenshot above, Title is the name of the field on your destination. You can select
from the dropdown, one of the source fields you would like mapped to the field column on the
destination.
Mapping fields is a way to preserve current metadata when utilizing a new content type for the
document.
3. Click APPLY when all edits are completed.
4. If more than one content type was selected, repeat steps 2-4 as necessary.
Move-Copy Action HistoryYou will find a link on the ribbon to display the Content Matrix history for an item.
The History shows how Content Matrix has been used to change the item. Each time an item has metadata
applied, it will show in the history for that item.
The history is managed per SharePoint item. This means that if an item is copied, the copy is new, and
therefore the history for that item will start after the copy. The source item will record that the copy was
performed.

Content Matrix Organizer User Guide Metalogix
22
1. To view the history, select the item(s).
2. Click the Move/Copy Action History button.
The context menu can also be used, even with multiple items selected, as long as the context menu
used is from one of the selected items.
A new window opens that will show when and how an item was managed with Content Matrix. If you
selected multiple items, you will see all the history in the same window.

Content Matrix Organizer User Guide Metalogix
23
ReorganizeReorganize allows for the copy of content (Site Collections, Sites, Lists, Libraries or Folders) to other parts of
the SharePoint farm. Content can also be deleted with this application, effectively allowing the Moving of
content in two steps (Copy then Delete.)
A feature unique to this application is the promotion of folders to Lists or Libraries. An administrator or
site owner can copy a folder and paste it in a Site or Site Collection, and the Folder becomes a List or
Library. This is a good way to make frequently accessed content even more easily available and allows for
customizations that can only be done at the List or Library level.
When a copy is performed, content is merged with existing content, if the names are the same. For
example, if you copy a Shared Documents library, and pasted it into a site that already has a Shared
Documents library, the content of you source will be copied into the Shared Documents library on your
destination. However, you can rename folders, lists and sites during your copy operation. Also, your
source content is still available if corrections are needed.
AccessThis feature is found on the Site Actions menu as well as on the Application Management page.
There is a link in the upper right corner, My Work that opens the Processing Page.

Content Matrix Organizer User Guide Metalogix
24
The Help link on the Reorganize page opens the User Guide.
Access for Site OwnersThe menu option Reorganize Settings, found in Site Settings, allows the availability of the Reorganize page
to users who have Site Owner Access.
Grant Site Owners Access to Reorganize Feature

Content Matrix Organizer User Guide Metalogix
25
Selecting Yes to this setting will allow Site Owners access to the Reorganize page for the site to which they
have access. The Default is No, and this restricts the access to Site Collection Administrators and Farm
Administrators only.
Browse to LocationThe Browse to Location option in the right click menu opens the selected location in a new browser. You
can verify content before performing any actions, and you won’t have to navigate back to the Reorganize
page afterward.
RefreshThe right click menu option of Refresh will update the tree view with any changes since the Reorganize page
was opened. So for example, if you browsed to the site collection to verify content and made some
changes, when you come back to the Reorganize page, click Refresh and you will see those changes
immediately.
Reorganize - Copy1. Expand the hierarchy on the left until the content (Site Collection, Site, List, or Folder) you wish to copy
is visible.
2. Right click on the object, and select Copy.
Content Matrix Organizer User Guide Metalogix
26
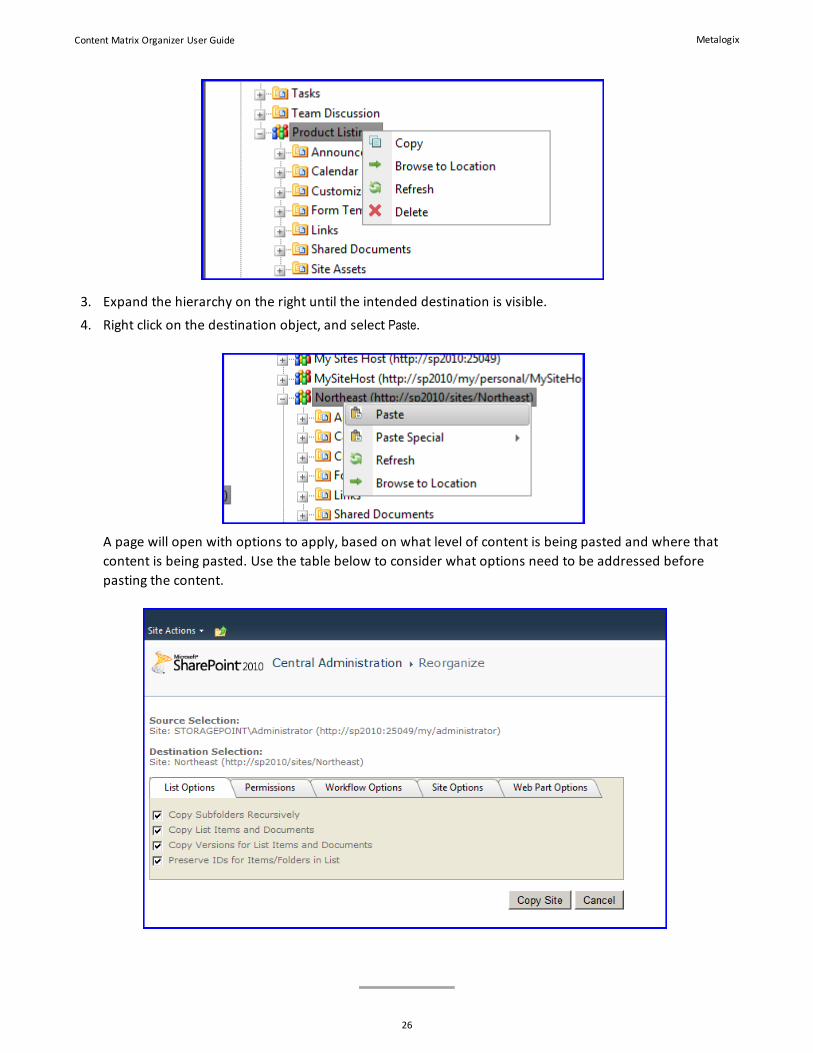
3. Expand the hierarchy on the right until the intended destination is visible.
4. Right click on the destination object, and select Paste.
A page will open with options to apply, based on what level of content is being pasted and where that
content is being pasted. Use the table below to consider what options need to be addressed before
pasting the content.
Content Matrix Organizer User Guide Metalogix
27
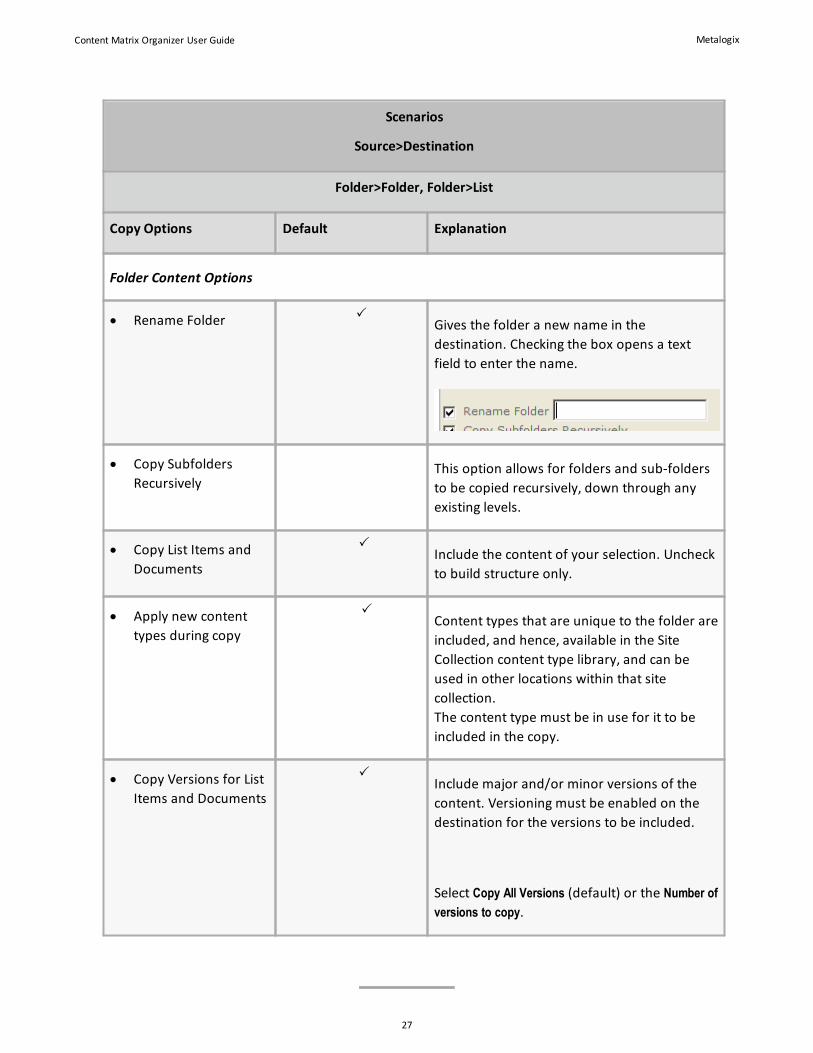
Scenarios
Source>Destination
Folder>Folder, Folder>List
Copy Options Default Explanation
Folder Content Options
· Rename Folder PGives the folder a new name in the
destination. Checking the box opens a text
field to enter the name.
· Copy Subfolders
RecursivelyThis option allows for folders and sub-folders
to be copied recursively, down through any
existing levels.
· Copy List Items and
Documents
PInclude the content of your selection. Uncheck
to build structure only.
· Apply new content
types during copy
PContent types that are unique to the folder are
included, and hence, available in the Site
Collection content type library, and can be
used in other locations within that site
collection.
The content type must be in use for it to be
included in the copy.
· Copy Versions for List
Items and Documents
PInclude major and/or minor versions of the
content. Versioning must be enabled on the
destination for the versions to be included.
Select Copy All Versions (default) or the Number of
versions to copy.

Content Matrix Organizer User Guide Metalogix
28
Scenarios
Source>Destination
Folder>Folder, Folder>List
Copy Options Default Explanation
· Preserve IDs for
Items/Folders in list
PWhen selected, this option will preserve IDs
for any folders and items in SharePoint Lists,
so each item and folder will have the same ID
on the target as the item does on the source. If
this option is not selected then SharePoint will
assign an item ID automatically.
Permissions Options
· Copy Folder
PermissionsPermissions unique to the folders being
copied.
· Copy Item
PermissionsPermissions unique to the specific list or library
items being copied.
Filtering
·Use the + (plus sign) to add conditions to the
filter or group of filters.
Use the () (parenthesis) button to add a filter
group.
Use the x to delete a condition or group.
· And/Or If the Or value is set, the filter will be added as
an alternative filter value. Default = Or

Content Matrix Organizer User Guide Metalogix
29
Scenarios
Source>Destination
Folder>Folder, Folder>List
Copy Options Default Explanation
· Grouping Use the parenthesis to create groups of filters.
This allows for multiple conditions to be
analyzed, the end result being an include or
exclude decision, that is further analyzed by
any previous conditions in the hierarchy.
· Field This determines what field the filter will be
applied to. Selecting the Field cell will open a
drop down list that allows users to select from
any field column from the source. The
available options in the Operator and Value
fields will be based on the Field value that is
selected. Default = Name
· Operator This determines the condition that the filter
will be applied to the content. The available
values are determined by the Field that the
filter is being applied to. Some of the possible
Operators are: Start with, Not Starts with,
GreaterThan, Equals, GreaterThanOrEquals, LessThan,
EndsWith, IsNull, Regex, etc. Default = EqualTo
· Value This is the value that the filter is searching for,
and trying to apply against the migrating
content. The type of value that can be entered
depends on the Field column. If a date/time
field was selected (for example, "Created")
then users can select the desired date/time
value from a calendar view. If a field was
selected that can only have number values (for
example, "ItemID"), then only number values
can be entered in the Value column. Default =
Blank

Content Matrix Organizer User Guide Metalogix
30
Scenarios
Source>Destination
Folder>Folder, Folder>List
Copy Options Default Explanation
Example:
If content was created by anyone other than detroitqa\administrator and the status is complete and
the title is project, it would be included if the created on or after 1/1/2013 or if it was modified on or
after 1/1/2014. So if nothing meets the criteria in the grouping, nothing would even make it to be
analyzed for the created or modified date.
Scenarios
Source>Destination
Folder>Site, Folder>Site Collection
Copy Options Default Explanation
Are you sure you want to
Copy and Promote this
Folder to a Library?
Folder>Folder/Folder>List copy options are implied.
The folder becomes a List on the destination.

Content Matrix Organizer User Guide Metalogix
31
Scenarios
Source>Destination
Site>Site, Site>Site Collection, Site Collection>Site, Site Collection > Site Collection
Copy Options Default Explanation
List Options
· Copy Subfolders
Recursively
PThis option allows for folders and sub-folders to be copied
recursively, down through any existing levels.
· Copy List Items
and Documents
PInclude the content of your selection. Uncheck to build structure
only.
· Copy Versions for
List Items and
Documents
PInclude major and/or minor versions of the content. Versioning
must be enabled on the destination for the versions to be
included.
Select Copy All Versions (default) or the Number of versions to copy.
· Preserve IDs for
Items/Folders in
list
PWhen selected, this option will preserve IDs for any folders and
items in SharePoint Lists, so each item and folder will have the
same ID on the target as the item does on the source. If this
option is not selected then SharePoint will assign an item ID
automatically.
Permissions
· Copy List
Permissions
Permissions unique to the lists being copied.
· Copy Folder
Permissions
Permissions unique to the folders being copied.
· Copy Item
Permissions
Permissions unique to the specific list or library items being
copied.

Content Matrix Organizer User Guide Metalogix
32
Scenarios
Source>Destination
Site>Site, Site>Site Collection, Site Collection>Site, Site Collection > Site Collection
Copy Options Default Explanation
Workflows
· Preserve ListWorkflowAssociations
Keep Workflow content types on the content being copied.
Site Options
· Change Template Uses a new site template on the destination. Checking the box
opens a drop down with available templates on the destination.
· Rename Site Gives the Site a new name in the destination. Checking the box
opens a text field to enter the name.
· Copy Child Site
Recursively
PThis option allows child Sites to be copied recursively, down
through any existing levels.
· Copy Navigation
and Tree View
Settings
PInclude navigation settings and structure for the global
navigation and quick launch navigation, as a part of a site copy.
· Copy Site Features PIncludes any site features on the source to be copied over and
activated on the destination, provided that these features exist
on the destination server.
Web Part Options
· Copy Web Parts on
Landing Pages
PCopies web parts on "Landing Pages" (i.e. "Default.aspx" pages).

Content Matrix Organizer User Guide Metalogix
33
Scenarios
Source>Destination
Site>Site, Site>Site Collection, Site Collection>Site, Site Collection > Site Collection
Copy Options Default Explanation
· Copy Closed Web
Parts
PThis check-box option allows for any web parts that are closed
to be copied. In some cases web parts can be closed on a page
without being removed. This option will allow for these web
parts to be copied with the page content.
Scenarios
Source>Destination
Site>Farm, Site Collection > Farm
Copy Options Default Explanation
Site Collection Options
· Web Application Select a web application from the dropdown.
· Language If more than one language is available, select the correct
one from the dropdown.
· Content Database After selecting the web application, this filed will populate
with available content databases.
· Site URL Enter a path and site name for the site collection
· Primary Admin Enter the name of the primary site collection administrator.
This will be verified upon paste.
· Secondary Admin Enter the name of the secondary site collection
administrator.

Content Matrix Organizer User Guide Metalogix
34
Scenarios
Source>Destination
Site>Farm, Site Collection > Farm
Copy Options Default Explanation
· Copy Site Quota The quota value from the source site will be used.
· Copy Audit Settings Retain the site collection audit settings from the source.
Site Options
· Change Template Select from the list of available templates to be applied to
the new site.
· Rename Site Give the copied site a new name.
· Copy Child Sites Recursively PInclude existing child sites in the copy and paste action.
· Copy Navigation and Tree
View Settings
PUse the same navigation and tree view settings on the
copied site collection.
· Copy Site Features PKeep the same features enabled or disabled on the copied
site collection.
List Options
· Copy Subfolders
Recursively
PThis option allows for folders and sub-folders to be copied
recursively, down through any existing levels.
· Copy List Items and
Documents
PInclude the content of your selection. Uncheck to build
structure only.
· Copy Versions for List
Items and Documents
PInclude major and/or minor versions of the content.
Versioning must be enabled on the destination for the
versions to be included.

Content Matrix Organizer User Guide Metalogix
35
Scenarios
Source>Destination
Site>Farm, Site Collection > Farm
Copy Options Default Explanation
Select Copy All Versions (default) or the Number of versions to
copy.
· Preserve IDs for
Items/Folders in list
PWhen selected, this option will preserve IDs for any folders
and items in SharePoint Lists, so each item and folder will
have the same ID on the target as the item does on the
source. If this option is not selected then SharePoint will
assign an item ID automatically.
· Preserve List Workflow
AssociationsKeep workflow associations within the site or site collection.
Permissions
· Copy List Permissions Permissions unique to the lists being copied.
· Copy Folder Permissions Permissions unique to the folders being copied.
· Copy Item Permissions Permissions unique to the specific list or library items being
copied.
Web Parts
· Copy Web Parts on Landing
Pages
PCopies web parts on "Landing Pages" (i.e. "Default.aspx"
pages).
· Copy Closed Web Parts PThis check-box option allows for any web parts that are
closed to be copied. In some cases web parts can be closed
on a page without being removed. This option will allow for
these web parts to be copied with the page content.
Master Pages

Content Matrix Organizer User Guide Metalogix
36
Scenarios
Source>Destination
Site>Farm, Site Collection > Farm
Copy Options Default Explanation
· Copy Master Page Gallery This option is only available if the source is a site collection.
· Copy Master Pages This check-box option will copy all the master pages listed in
the source site's Master Page Gallery.
· Copy Page Layouts This check-box option will copy all the page layouts listed in
the source site's Master Page Gallery.
· Copy Other Resources This check-box option will copy all items that are listed
(except Master Pages or Page Layouts) from the source
site's Master Page Gallery
· Correct Links on Master
PagesThis will correct any links to reflect the new location of the
master pages.
Also verify the Source and Destination at the top of the screen.
5. Click [Copy <Object>].
You will be redirected to the Processing page.
Reorganize - Paste SpecialThere are Paste Special operations that allow for specific actions to be completed on their own. These
options are automatically completed when pasting an entire site or site collection.

Content Matrix Organizer User Guide Metalogix
37
Paste Users
This option is generally used when trying to migrate a user account for a user that exists on the source, but
is no longer active or may not be in the Active Directory (AD). While the user may not exist, their data may
still need to be migrated to the target. However, that user account may not exist on the target side AD
since the user would not exist in the new environment and will likely not be required.
Paste Groups
This option allows groups that are unique to a site or site collection to be copied to another site or site
collection without copying content.
Paste Content Types
Content types can be applied the Site Collection gallery and made available to lists and libraries without
recreating them or copying the content using the content types.
Paste Web Parts
Web parts can be copied and pasted without pasting the entire site collection. This is useful if you want to
reuse web parts, but don’t need all the other content (lists, libraries) of a site or site collection.
Content Matrix Organizer User Guide Metalogix
38
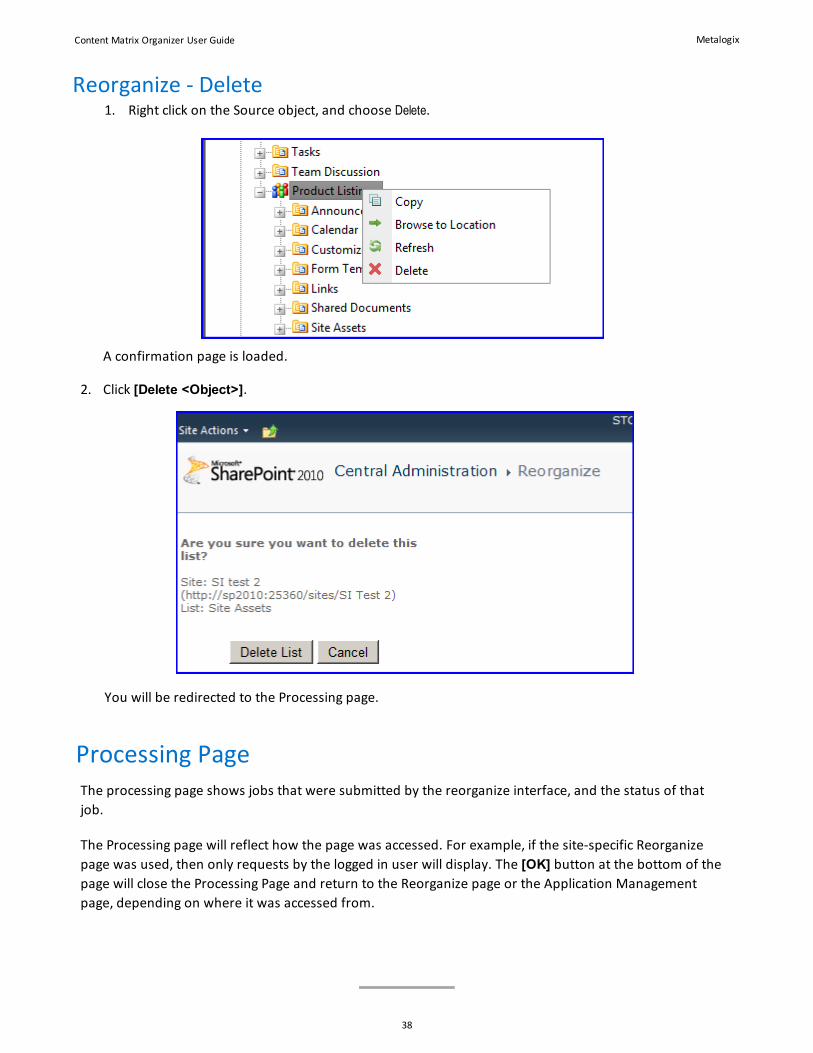
Reorganize - Delete1. Right click on the Source object, and choose Delete.
A confirmation page is loaded.
2. Click [Delete <Object>].
You will be redirected to the Processing page.
Processing PageThe processing page shows jobs that were submitted by the reorganize interface, and the status of that
job.
The Processing page will reflect how the page was accessed. For example, if the site-specific Reorganize
page was used, then only requests by the logged in user will display. The [OK] button at the bottom of the
page will close the Processing Page and return to the Reorganize page or the Application Management
page, depending on where it was accessed from.

Content Matrix Organizer User Guide Metalogix
39
The Processing page shows timer jobs that have been initiated by using the Reorganize tool. They are
categorized by where they are in the process – Pending, Active, Complete, or Failed.
The links in the From and To columns will open that location in a new browser.
The Queue Processing field shows the status of the timer job, whether it is scheduled to run, or running.
The Refresh button (green arrows) will refresh the list of jobs on the page. Note the As of: field that shows
the last time the page was refreshed.
To filter which jobs are viewed, use the dropdown in the center of the ribbon.
If the timer job was set to Continuous in General Settings, the jobs will be picked up automatically. If it is
scheduled, it will be completed the next time that the timer job runs. The Farm Administrator has the
option to run the request immediately.
To run a Pending job immediately, you can click the dropdown of the Action and choose Run Now.

Content Matrix Organizer User Guide Metalogix
40
NOTE: Move Up and Move Down are currently unavailable.
If the job is in Pending, click Process Pending to start all jobs in the Pending state, or select individual jobs in
the Pending state, and click the Run Now button.
NOTE: The Process Pending and Run Now buttons will not be available if the Processing page was accessed
from the Site Actions Menu of a Site Collection. They are only visible on the farm-wide Processing page
that shows all Content Matrix Reorganize jobs.
The Reorganize link in the top right corner will take you back to the Reorganize page. The Help link will
open this user guide.
Content Matrix Organizer User Guide Metalogix
41
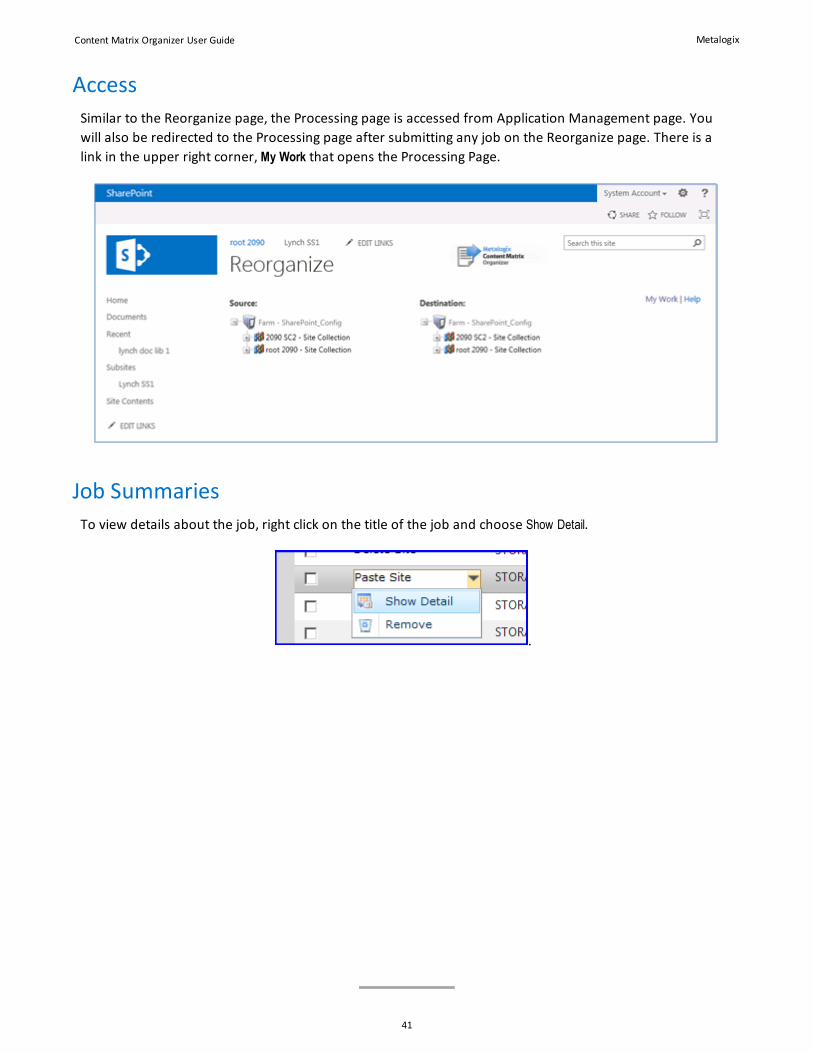
Access
Similar to the Reorganize page, the Processing page is accessed from Application Management page. You
will also be redirected to the Processing page after submitting any job on the Reorganize page. There is a
link in the upper right corner, My Work that opens the Processing Page.
Job Summaries
To view details about the job, right click on the title of the job and choose Show Detail.
.

Content Matrix Organizer User Guide Metalogix
42
Removing Job Summaries
Job summaries are kept indefinitely, but can be deleted:
· by selecting job summaries and clicking the Remove button at the top of the page.
OR

Content Matrix Organizer User Guide Metalogix
43
· by using the Remove link in the Action dropdown menu of an individual job summary.
Exporting Job Summaries
The job summaries can be exported into a Microsoft Excel sheet if needed. On the Completion Detail, use
the Export button in the top right of the window, and on the Processing page, use the Export button to the
left of the Refresh button.
Content Matrix Organizer User Guide Metalogix
44
Additional InformationDoc sets are a special content type that allows many documents to be grouped and use the same
metadata information. Users can upload docs into doc sets, and classify documents within a doc set. If a
doc set is moved or copied to a location that doesn’t support the content type, the doc set will be treated
as a folder, and the documents will be in that folder.
Libraries contain documents, while lists contain items that may or may not have documents attached.
Because of this difference, there are scenarios where a copy or move is not possible by the very nature of
the differences in content types. For example Team Discussions can’t be moved or copied to any other
location. The end user may see notifications if their move or copy was not successful.
Known IssuesOccasionally the provisioning job on the install may get hung up.
Workaround: Restarting the timer service resolves this issue.
If a site collection is deleted, it may not immediately refresh in the tree view.
Workaround: An iisreset will take care of this.
If a content type is added to a list or library as the result of copying or moving, (notably when the content
type has managed metadata fields), and the content type was not added successfully, there may be issues
trying to copy or move the content using this content type to other locations.
Workaround: Correct the content using the Apply Metadata feature in the ribbon.
If a field in a list has a unique value constraint, copying that content within the same list will present
errors. Moving that content will also present errors.
Workaround: Remove the unique value constraint or select another value before copy or move.
External Data that is selected during Apply Metadata or Upload is not retained.
Workaround: The content can be edited using the SharePoint interface.
Certain MySites users may not see the Content Matrix Organizer Ribbon on their document libraries and
the Reorganizer option from the Site Actions.
Workaround: The user can enable the ribbon through the Site Features and the Reorganizer option
from the Site Collection features page.
Unique list permissions (non-inherited) are overwritten if a site is pasted over previous copy of the site.
Workaround: Consider removing the previous site copy before pasting.
Copying or moving a document with a Managed Metadata column is failing if preserve existing option is
used.

Content Matrix Organizer User Guide Metalogix
45
Workaround: Pre-create the content type with the managed metadata column on the target site
before copying.
Copying or moving a document with a managed metadata column to a text field on the target list will
cause the managed metadata term name and the internal term id to appear in the text field.
Workaround: The internal term id can be edited out of the text field.
SharePoint 2010:
· The 'Automatically check in uploaded documents' option present in the Upload ribbon option is not
working OR
· 'Automatically check in uploaded documents' option present in Upload option is not working OR
· Documents are added with the default content type rather than the selected one in Upload option OR
· Fields are not saved while uploading a document using the Upload option
Workaround: Run the Content Matrix Organizer Configuration Wizard and do a Repair installation.
Switch to using the Silverlight uploader using the General Settings page in Central Admin.
If you are using Metalogix Content Matrix and Metalogix StoragePoint, AND your storage profiles use
asynchronous externalization, content that is copied or moved with Content Matrix will not be
externalized to the final endpoint. The content remains in the system cache.
Workaround: The farm administrator will need to run the Unused BLOB cleanup job for the storage
profile covering the destination, and then the Content Migrator job for the farm. This will externalize
the BLOBs to their final endpoints.
Administrators may not see all available Site Collections on the Reorganize page. Some SharePoint
topologies may have been configured so that WebApps run under a different AppPool account or identity.
This will isolate content between WebApps, and thus mean Content Matrix (by design) will security trim
that part of the hierarchy.
Workaround: The resolution is to use the same AppPool account/identity for all WebApps, or grant the
limited AppPool identity a login (with membership in the “db_owner” role) to any desired Content
Databases in SQL.
For Reorganize, content types may not be applied if the copy is a List or Library. They will apply to the
destination if the source is a folder, site or site collection.
Uploading a file that already exists, and selecting No to ‘Overwrite existing docs’, will present an error; it is
not possible to have two documents with the same name in SharePoint.