Content Management System (CMS) Training training.pdfEditing Existing Documents To edit an existing...
39
Content Management System (CMS) Training System Requirements Operating System: Mac, PC, Linux and most Internet connected devices Browser: Recent version of Firefox as you cannot use Chrome or Safari Recent version of Adobe Flash Player Login Information Web Address: http://www.famu.edu/cms/ If you do not have a login for the Content Management System and need access, please contact us at [email protected]
-
Upload
duongthien -
Category
Documents
-
view
220 -
download
4
Transcript of Content Management System (CMS) Training training.pdfEditing Existing Documents To edit an existing...

Content Management System (CMS) Training System Requirements
Operating System: Mac, PC, Linux and most Internet connected devices Browser: Recent version of Firefox as you cannot use Chrome or Safari Recent version of Adobe Flash Player
Login Information Web Address: http://www.famu.edu/cms/
If you do not have a login for the Content Management System and need access, please contact us at [email protected]

After you log-in you will view the below page from which you can select your office:

Then, you can click on Manage Address, Phone & Fax as the below picture shows, if you want to update the address, phone and fax numbers:

Manage Address, Phone & Fax
This Area allows you to edit the contact information for your unit. Once you enter in the desired information for your area and click Submit, it will be visible for the world on all the pages on your unit's web site.

Creating a New Document When you first open the Manage Content module, the page is ready for you to create a new document. You can also create a new document by clicking on the Create Document button. When you are ready to create your document you can:
1. Type the name of the page in the Link Label. Please be cognizant of what you type here as it will be the name of the page and link that users click on. Please ensure that you're not too wordy.
2. Type/paste your content in the white space below all of the icons.
There is a series of icons there that have a similar functionality like Microsoft Word. You can bold things, italicize, underline, add bullets, etc.
The CMS also allows for additional formatting with the use of:
Creating Links Adding Images Formatting content with Tables

Editing Existing Documents To edit an existing document/web page, click on Manage Content and then Edit Document. There will be a dialog box that that lists all of the existing web pages that you've already created. These would consist of saved and published pages.
Just click on the name of the file that you want to open and it will load in the form box. You can now make your desired changes to the page. There is a series of icons there that have a similar functionality like Microsoft Word that allow you to format your content. You can bold things, italicize, underline, add bullets etc.

Important** Don't forget to Save or Publish periodically to ensure your most recent changes are recorded. The CMS also allows for additional formatting with the use of:
Creating Links Adding Images Formatting content with Tables
Microsoft Word Alternatives If you are creating a web page using content that you already have developed in Microsoft Word....PLEASE DO NOT copy the information and paste it into the CMS! Copying and pasting directly from Microsoft Word will yield mixed results, most of which are unfavorable. When you copy from Microsoft word, you don't only copy the text, but you copy all of the code that is associated with the text styles, colors, formatting, and a lot of other things. So when you paste it into the CMS, it conflicts with the formatting that's already established to govern the design of the web site. Please consider using the following alternatives: PC Users: WordPad WordPad is, by default, present on every computer running a Microsoft operating system and is free. You can open it by navigating to: Start > All Programs > Accessories > WordPad Macintosh Users: Text Edit Text Edit is the default text editor on Apple Macintosh computers. You can get to it
by: Open a Finder Window > Applications > Text Edit If you open your Word Document in either of these programs, and then copy and paste from there, you will only copy the text, and not all of the formatting. The results are nice and clean without any problems. If you have already copied content from Microsoft Word and your page is too wide, looks odd with different colors, or will not publish, you may need to delete everything from the page, and start over.
Creating Links This page covers creating links from within your web page content. First, you want to highlight the text that you want the user to click on when they download your PDF or Word document. After that, you'll want to click on the insert/edit link icon on the tool bar that looks like a chain link.
This brings up a dialog box that allows you to do several things: Create a basic link to a web address/URL Create a link to an Email address Create a link to an Anchor Create a link to a file like a PDF or Word document Creating Basic Links to a Web Address or URL At this point, all you have to do is to type in the web address into the box indicated URL. If you want the link to come up in another tab or window, click on the Target tab, and then choose New Window (_blank). All links are opened up in the same window by default and thus requires no target.

<< Back to Top Creating a link to an E-mail Address If you want to create a link to an e-mail address such that, when the user clicks it, it opens their default email client, click on the Link Type, and choose Email. Now type the email address to which the email should be sent. If you desire, you can pre-populate the Subject and something simple in the Message Body.

Creating Links to another area in the Page (Anchor Links) When you need to link to certain parts of a web page, as is demonstrated with this particular page, you want to create an anchor link. This allows you to have a longer web page, but link to specific parts of the web page, making it easier for users to get the information they're looking for. There are two steps to creating anchor links, you want to establish the parts of the page you want to link to, and establish names for each section that users will click on to get to the sections. First, let us create the anchors.
1. Place the cursor at the beginning of the sentence of the section you want to link to 2. Locate the Anchor on the tool bar and click it 3. A dialog box comes up asking for a name 4. Type in the name that you would like to give that section (please be brief, not too wordy) and click ok 5. You should now see a little anchor next to the section on the web page
Do this for each section that you want users to link to. After you've created all of your anchors, now it's time to create the links for them. To create the links to the anchors you just created:

1. Go to the top of the page, and indicate where you want these links to appear. You may want to list them vertically or horizontally depending on how many links you have i.e. Link 1 | Link 2 | Link 3 | Link 4
2. Now, highlight the first link and click the link button located on the Icon bar which will bring up a dialog box 3. Change the Link Type to Link to an Anchor in the Text 4. Now, under Select an Anchor by Anchor Name, select the name of the Anchor that you created in the first step that corresponds to this
particular link 5. You've just created an anchor link
Repeat this process for the remaining links, and you're all done
As an useful feature for your users, you can create an anchor at the very beginning of your page content called Top, then create a link that says, << Back to Top at the bottom of each of your sections, so that users can go back to the top of the document after reading the particular section they were in.

Creating Links to Files like PDFs and MS-Word Documents This will probably be the most used feature of the CMS. Many users have documents they want to link to. First, highlight the text that you would like the users to click on to download your document and click on the insert/edit link icon on the tool bar.
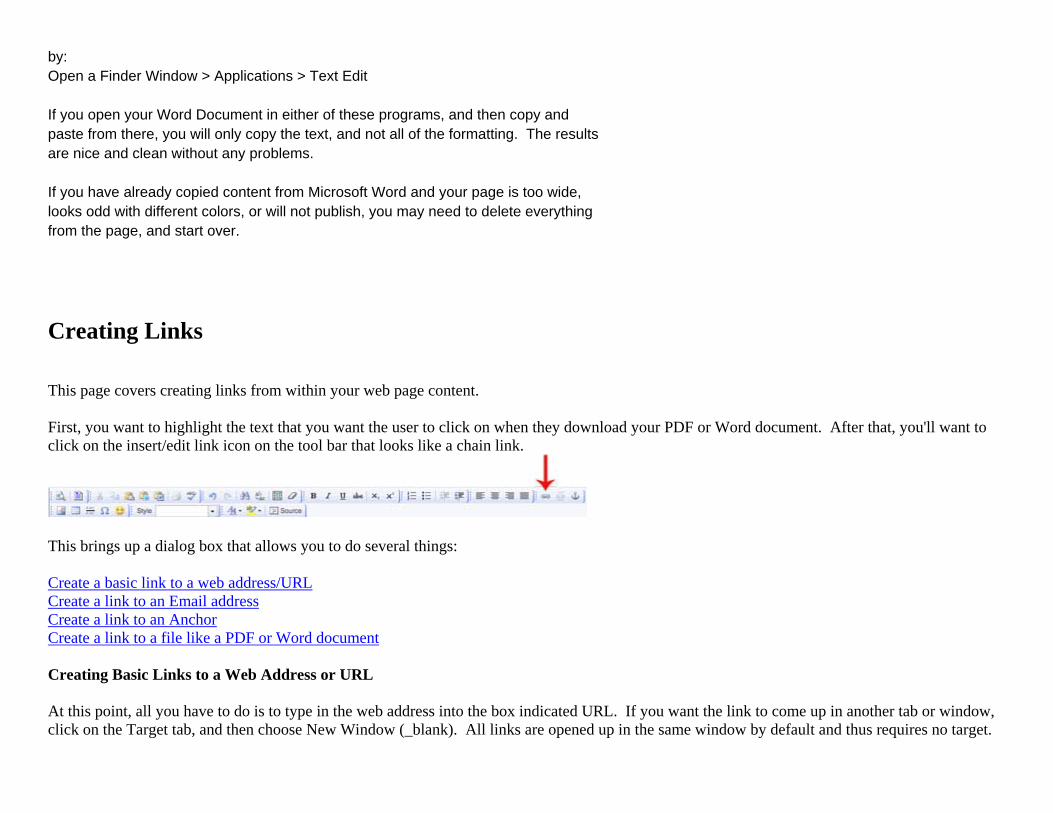
This will bring up a dialog box where you will click Browse Server. This brings up a dialog box which shows all of the files in your folder on the server. If you expand the images folder on the left, you'll see all of the files that is on the server for your unit. All of the files are listed alphabetically, so if you've already uploaded the file, just navigate to it in the listing of files, and click on the green plus icon on the right hand side.
That will close out that box and take you back to the previous one where the URL will be populated with the path to the file you just selected. You can click ok, and you've just made a link to that file. If your file is NOT on the server, and you need to upload it from your computer, then you would follow the same steps:
1. Highlight the text that you would like the users to click on to download your document, and click on the link icon on the tool bar. 2. Click on Browse Server
Now, when the dialog box comes up, click on the upload button in the lower right hand corner of the dialog box.

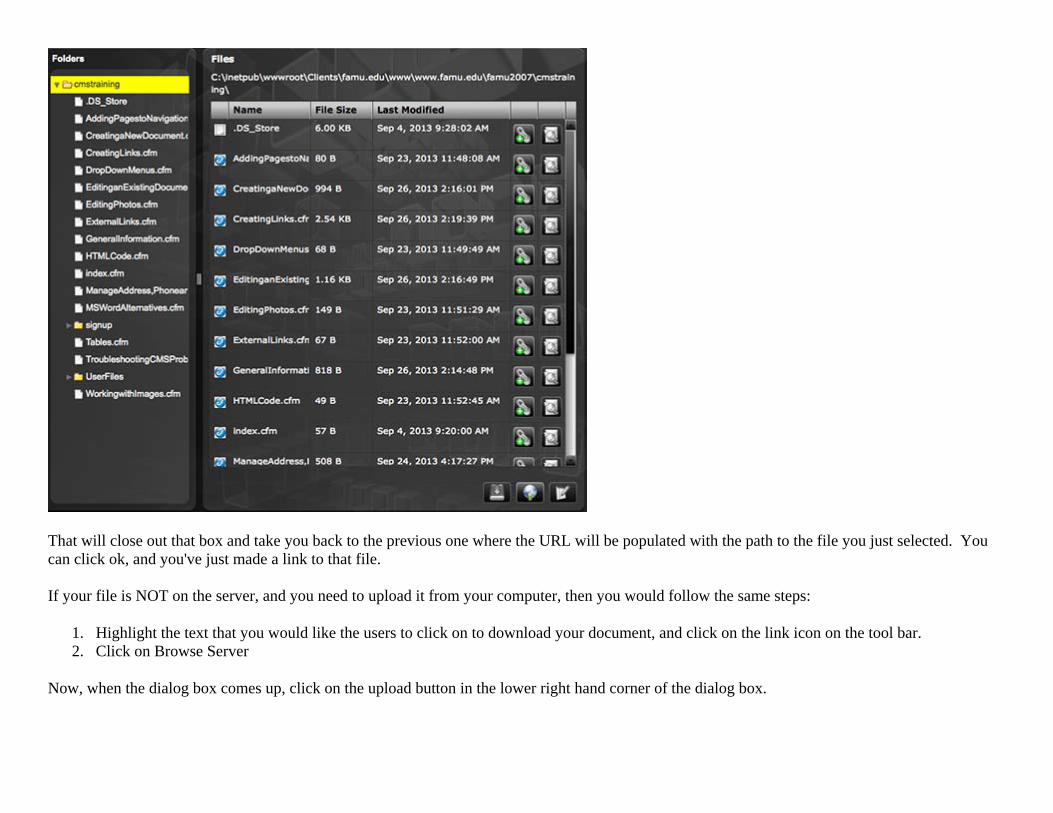
This brings up the File Queue. Click on the green icon along the bottom of the dialog box, and that will allow you to navigate to where the files are stored on your computer (just like attaching a file to an email).
After you've located your file, you will see it listed as an element to be uploaded. You can do this as many times as you need until you have loaded all of the files you wish to upload in the queue. Now you're ready to upload all of the files. Click on the upload button and you will see the indicators for each of the files. When they're done
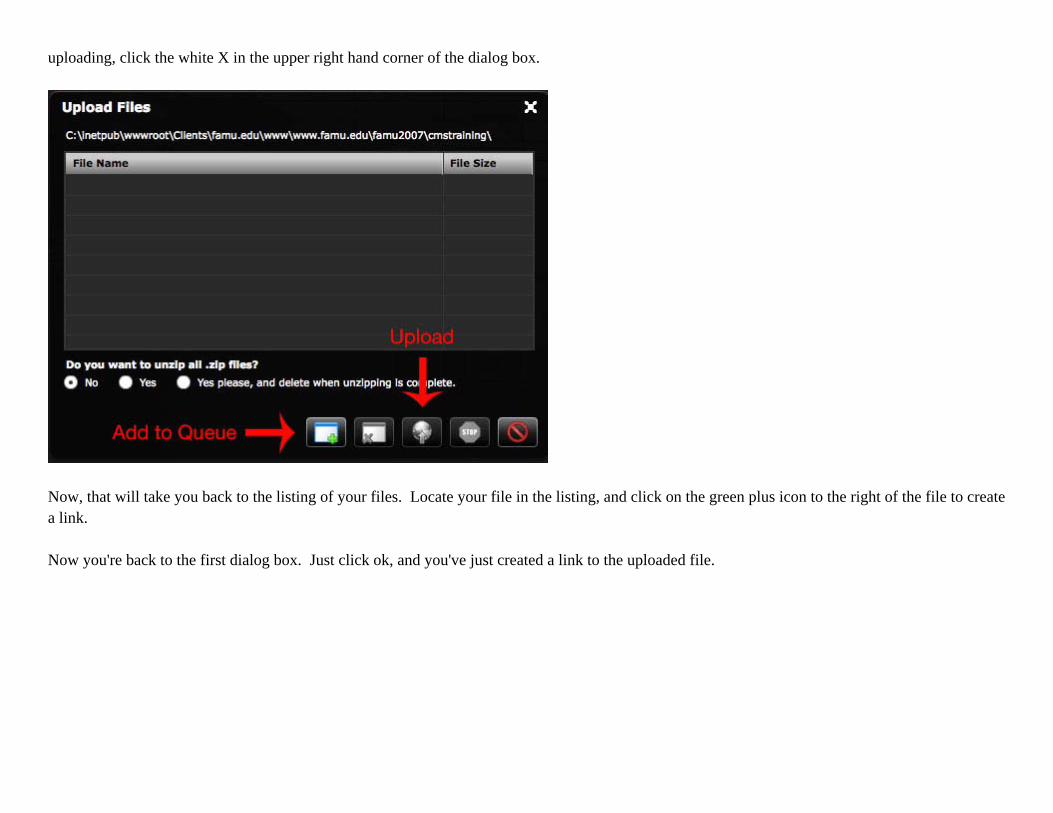
uploading, click the white X in the upper right hand corner of the dialog box.
Now, that will take you back to the listing of your files. Locate your file in the listing, and click on the green plus icon to the right of the file to create a link. Now you're back to the first dialog box. Just click ok, and you've just created a link to the uploaded file.

Working with Images To add an image to your web page, click on the insert/edit image icon that has a picture of little mountains.
This will bring up a dialog box where you can do a few things:
Enter the URL of a the path of an image that resides on another server Browse the server and either select a file from the server or upload a new one
Troubleshooting CMS Problems The following are solutions to common issues that may arise: Problems with the Manage Content Module I clicked on publish, but the indicator just keeps spinning and nothing is happening (it's been over 2 minutes) Something has gotten frozen in the publishing process, and it's stuck. We apologize, but your most recent changes may be lost if you haven't been publishing or saving throughout the process. You will need to refresh your browser and open the page again. Problems with the Manage Navigation Module I went to the navigation and some of my links have disappeared There are two possible solutions to this problem:
1. You may need to clear your web browser cache. You are seeing a previous state of the navigation, and not the most recent one that's live on the website. The Navigation module is Flash-based, and as such, it gets cached. Clearing your web browser cache and then logging in again will allow you to see the most recent version of the navigation. **NOTE** Please DO NOT save the navigation in this state as you will erase the actual links that are there.
2. If it's a sub navigation or external link, be sure to check the End-Publishing date and see if it's expired. If it's expired, you just need to set it sometime in the very distant future, remove the link that's in the navigation, and drag the updated link back over to the navigation and save it again.

Adding Published Pages to the Navigation Please click “Home”,

Then, you can click on “Manage Navigation” as shown below:

You will be taken to the next screen as illustrated below:

You can choose the web page you want to be added to your website navigation

You can drag the webpage to “Web Site Navigation” section
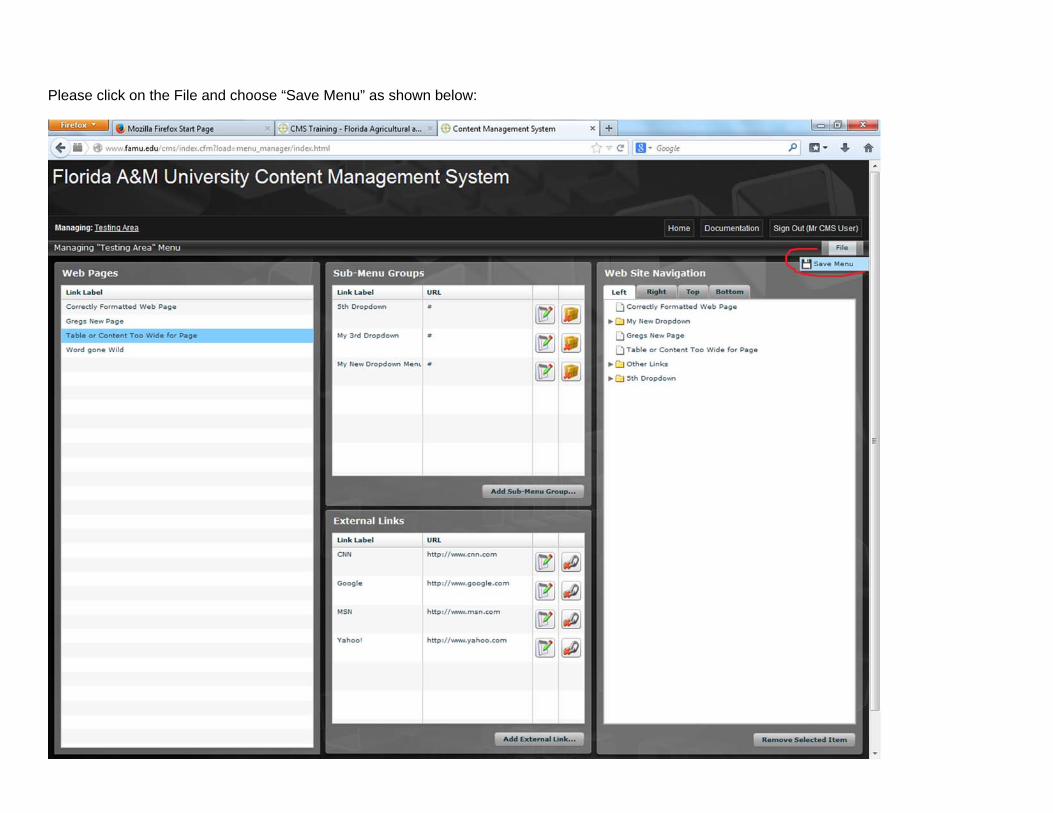
Please click on the File and choose “Save Menu” as shown below:

You will receive a message indicating that your changes were saved as shown in below picture:

Adding Drop Down Menus
Please click “Home”, as shown below:

Then, you can click on “Manage Navigation” as shown below:

Then, please click on the “Add Sub-Menu Group…” button as illustrated below:
A window for Sub Menu Group will open as shown below:
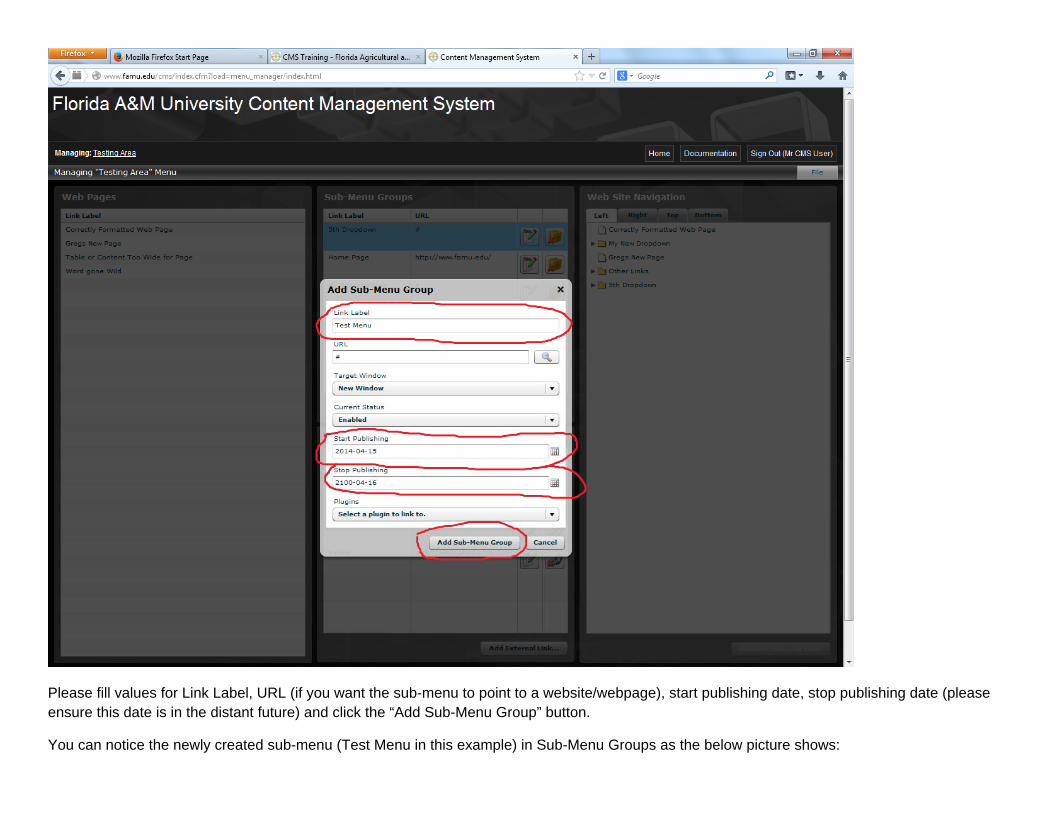
Please fill values for Link Label, URL (if you want the sub-menu to point to a website/webpage), start publishing date, stop publishing date (please ensure this date is in the distant future) and click the “Add Sub-Menu Group” button.
You can notice the newly created sub-menu (Test Menu in this example) in Sub-Menu Groups as the below picture shows:


You can drag and drop the sub-menu to Web Site Navigation as indicated below:

You can notice the newly created sub-menu (Test Menu in this example) in Web Site Navigation as the below picture shows:

Adding External Links
1. Please click "Home"

2. You can click on "Manage Navigation"

3. In External Links section, you can click on "Add External Link"

4. You can notice a new window as shown below. You can add the data for external link you want and click the "Add External Link" button.
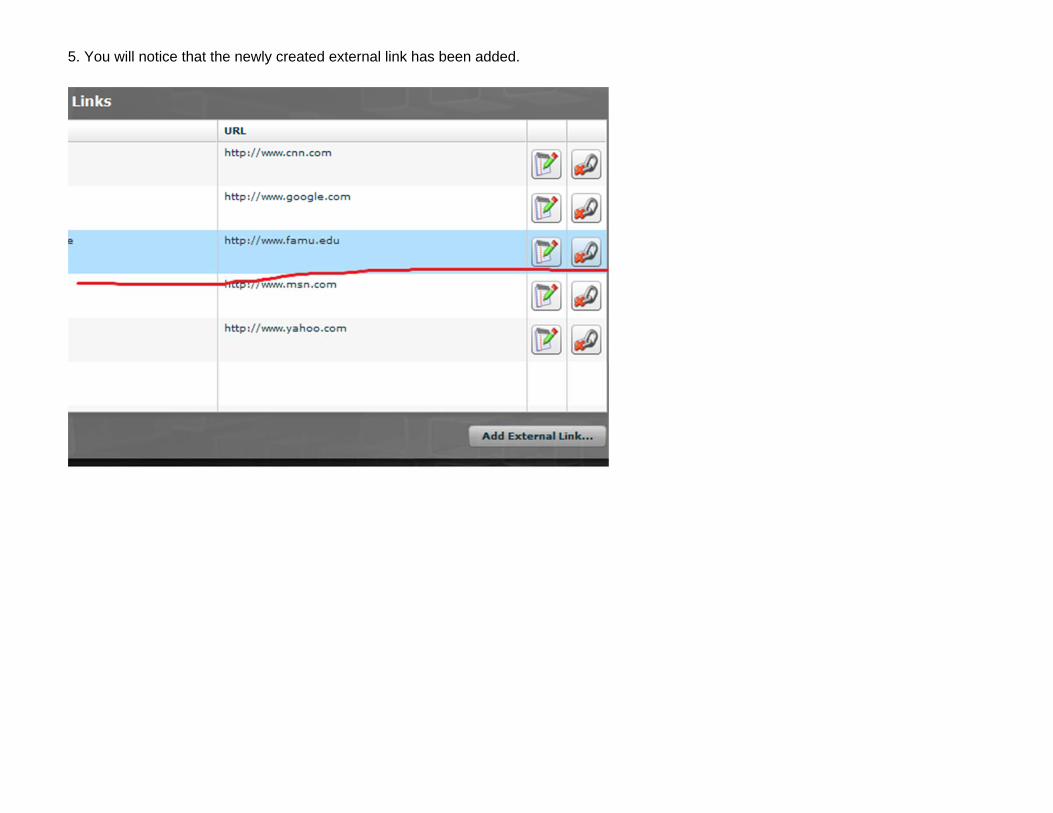
5. You will notice that the newly created external link has been added.

6. You can drag and drop the newly created external link to "Web Site Navigation" as shown below:

7. Please click on "Save Menu"

8. You will receive a message that your menus were successfully saved.
Contact Information:
EIT Web Team Division of Enterprise Information Technology
E-mail Address: [email protected] Phone Number: 850-599-3560