CONTACTS Whos GUIDE -...
24
OVERVIEW The Contact features in Who’s Up allow your sales teams to capture customer contact information, track the value of sales pipelines, manage follow-ups, and send both drip and ad-hoc email marketing. GETTING TO CONTACTS To get to the contact manager, tap the hamburger button (yep, that’s apparently what it’s called), to reveal the menu. Or, you can swipe from the left edge of the screen toward the right. Copyright 2015 - ZentrueTech LLC Page of 1 24 CONTACTS GUIDE Version 1.0 Whos
Transcript of CONTACTS Whos GUIDE -...

OVERVIEW The Contact features in Who’s Up allow your sales teams to capture customer contact information, track the value of sales pipelines, manage follow-ups, and send both drip and ad-hoc email marketing.
GETTING TO CONTACTS To get to the contact manager, tap the hamburger button (yep, that’s apparently what it’s called), to reveal the menu. Or, you can swipe from the left edge of the screen toward the right.
Copyright 2015 - ZentrueTech LLC Page ! of !1 24
CONTACTS GUIDE
Version 1.0
Whos

LAYOUT OF THE CONTACTS LIST On the menu bar, you’ll see the 1) hamburger icon on the left which takes you to the menu, and 2) the plus icon on the right that allows you to add a new contact. Below that you’ll see 3) list filters. “All” shows all of your contacts in the list, “Prospects” shows only the contacts that are not marked as sold, and “Sold” shows only the contacts that have marked as sold. 4) The search box allows you to type part of the contact name to find it quickly.
Copyright 2015 - ZentrueTech LLC Page ! of !2 24

CREATING CONTACTS Tap the plus icon (+) in the upper right hand corner. The first several fields on this form are going to be pretty self-explanatory. Enter the name, address, email, phone, etc.
Copyright 2015 - ZentrueTech LLC Page ! of !3 24
Note to Admins:
You can specify what fields are required by going to Settings -> System Options. The “Required Fields” section under “Contact Manager” let’s you define which fields must be entered before a contact can be saved. By default only the name and either an email or phone number is required.

Noting Interested in Merchandise is Easy with Tags
The “Interested In Merchandise” field is where things really start getting good. This field allows you to enter a list of merchandise that the customer is interested in quickly with just a few taps of the keyboard. This field uses what we call “tags”, which are pre-defined keywords representing brands, types of merchandise, or any other information you want to collect. When you start typing in the field, a drop-down list will appear with all the tags that match what you’ve typed so far. Tap one of the tag names in the list to add that tag. Repeat that process to add all the tags you want.
There are two great things about using tags. First, they allow you to enter a lot of information about what your contacts are looking for with just a few taps of the keyboard. Second, because all that information is in a standard format, you can run filters and searches in the web interface to get lists of customers interested in the same merchandise. Great for building special mailing lists.
Copyright 2015 - ZentrueTech LLC Page ! of !4 24
Note to Admins:
You can customize the tags that are available by going to Settings -> System Options and scroll down to the “Interested in Merchandise Tags” section. Also note that the “Contact Tags”, and “Follow-Up Task Tags” work the same way.

Scroll down and you’ll find fields for entering the projected sale amount and the probability to purchase. Not only do these fields give you an idea of the value of this potential sale. You can see the total potential value of your pipeline from the contact report screen in the web interface.
The free-form notes field also allows you to enter more unstructured notes about your contacts.
The “Passive” field allows you to enter contacts that you already have in a list, without including them in the drip marketing emails that would normally go out. The “Sold” assigns the contact to the “Sold” list rather than “Prospects”, making it easy for you to farm existing customers in the future.
Copyright 2015 - ZentrueTech LLC Page ! of !5 24

Saving a Contact
When you’re ready, scroll back to the top of the contact and tap “Save”.
Copyright 2015 - ZentrueTech LLC Page ! of !6 24

VIEWING AND WORKING WITH CONTACTS After saving a contact, you’ll be taken to the contact “View” screen. You’ll notice that both the phone number (if entered) and the email address (if entered) are hyperlinked in blue.
Calling Contacts
Tapping the phone number on a phone device will use the phone app to call that number.
Copyright 2015 - ZentrueTech LLC Page ! of !7 24

Emailing Contacts
Tapping the email address will display the “Send Email” screen. From here, you can compose a new email, select an existing email template to send to the contact, or create / edit email templates.
Copyright 2015 - ZentrueTech LLC Page ! of !8 24

Simple 1-Off Emails
To compose and send an email from scratch, tap the “Compose Email” button and enter the subject and message fields. Keep in mind that even though you are only entering the subject and message, that this will be inserted into the styled email template with your company’s branding and links.
Copyright 2015 - ZentrueTech LLC Page ! of !9 24

Creating and Using Personal Email Templates
A Sample Email Template is included to show what it looks like when you create your own. You can edit this template by tapping it. To create a new template, tap “New Template”.
Enter a description. In this example we shows what the email is and indicate that this is the casual tone as opposed to another template that uses a more formal tone. Enter the subject, and the message body. In the message body, you can include merge fields that will be replaced with the appropriate text when the email is sent. Tap “Merge Fields” to select and insert the a merge field.
Copyright 2015 - ZentrueTech LLC Page ! of !10 24

Tap the “Preview” button on the toolbar to preview the message with the merge fields replaced. Keep in mind that when this email is sent, it will be inserted into the standard company HTML email style template with colors, logo, and links to the company website.
Tap “Save” to save the new template to the list.
Copyright 2015 - ZentrueTech LLC Page ! of !11 24

To use a template in the list, just tap it. You’ll see a preview of the template. You can either tap the “Edit” button to edit the template, tap the “Send” button to send to your contact.
Copyright 2015 - ZentrueTech LLC Page ! of !12 24

HISTORY OF ACTIVITY & TASKS After sending an email, you will be taken back to the contact view screen. Scroll down to the “History – Activity & Sales” section, to see all emails that were sent along with any other activities as this contact has been worked.
Copyright 2015 - ZentrueTech LLC Page ! of !13 24

SCHEDULING FOLLOW-UP REMINDERS Schedule a follow-up reminder for a contact by scrolling down to the “Scheduled Tasks” section and tapping the plus (+) icon.
Enter a due date, and either a follow-up tag, notes about the task you want to be reminded of, or both. Tap “Save Task”.
Copyright 2015 - ZentrueTech LLC Page ! of !14 24

Scheduled follow-ups for a contact are listed in the “Scheduled Task” section of the contact view screen.
Tap the gear icon next to a scheduled task to mark it as complete and move it to the “History – Activity & Sales” section.
Copyright 2015 - ZentrueTech LLC Page ! of !15 24

PHOTO ATTACHMENTS Add a photo attachment to a contact by scrolling to the “Attachments” section and tapping the plus (+) icon.
Choose to either use the camera or to include an existing photo from your photo library or camera roll.
Copyright 2015 - ZentrueTech LLC Page ! of !16 24

Use your device’s camera interface to take the photo. Note that this will be slightly different between Apple iPhones, iPads, and Android devices.
Give it a description and tap “Save”
Copyright 2015 - ZentrueTech LLC Page ! of !17 24

Now it’s saved to the “Attachments” list in the contact record.
Copyright 2015 - ZentrueTech LLC Page ! of !18 24

WORKING FOLLOW-UPS & TASKS Tap the menu button and tap “Work Follow-Ups & Tasks” to see a list of all of your scheduled follow-ups.
You’ll see that they are organized into 3 groups (past due, due today, and upcoming). Tap on any of the follow-ups to be taken directly to that contact record.
Copyright 2015 - ZentrueTech LLC Page ! of !19 24
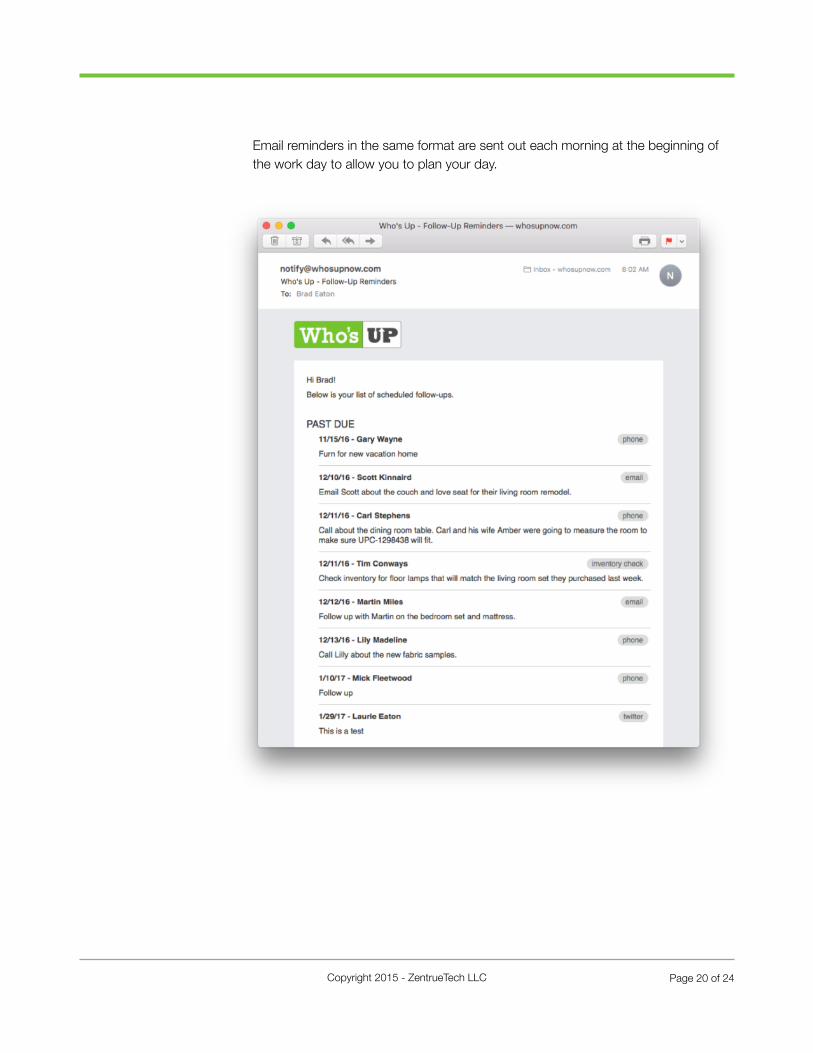
Email reminders in the same format are sent out each morning at the beginning of the work day to allow you to plan your day.
Copyright 2015 - ZentrueTech LLC Page ! of !20 24

Push notifications are sent as reminders each hour during normal store hours if any tasks are currently due or past due. Swipe the notification to be taken directly to the “Work Follow-Ups & Tasks” screen.
Copyright 2015 - ZentrueTech LLC Page ! of !21 24

WORKING WITH CONTACT LISTS
NOTE: Some of the features in this section are limitedto managers and admins.
You can enter and manage your contacts in the web interface also. But the real value of the web interface is getting lists of contacts that have been entered. You can export these lists to use for print or email marketing with other services.
Filtering the list of contacts Click the “Filters” button in the header to display the filter and sort screen.
Copyright 2015 - ZentrueTech LLC Page ! of !22 24
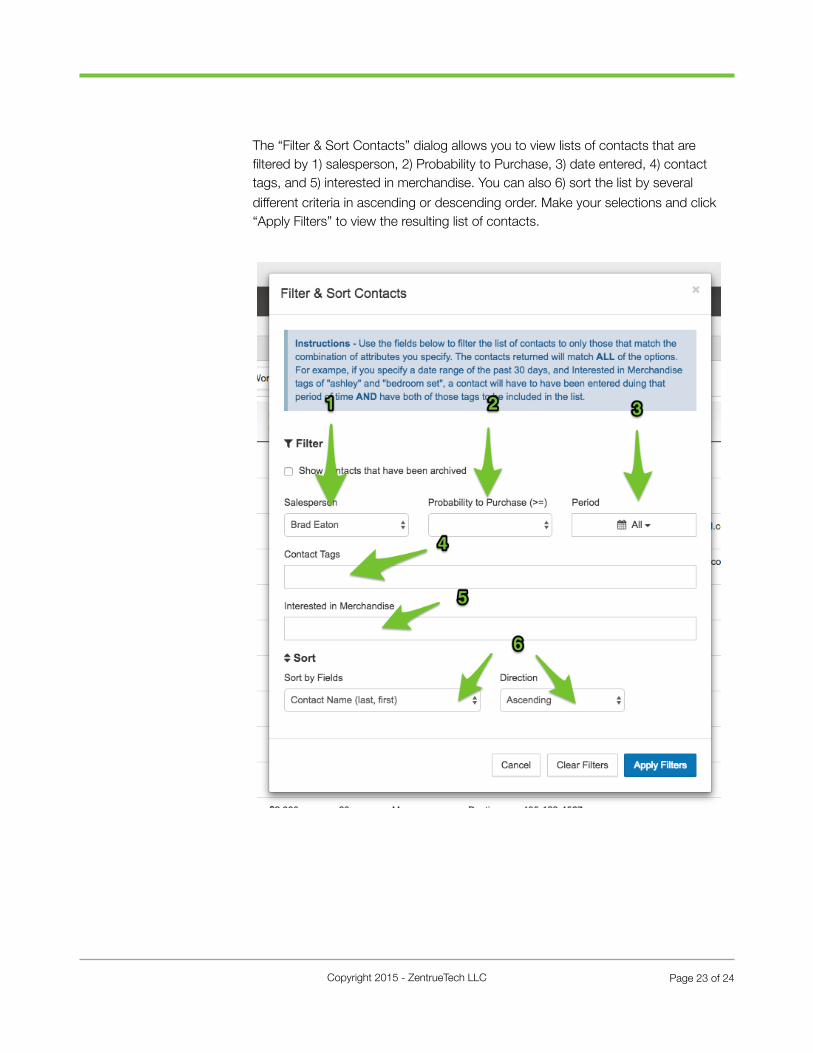
The “Filter & Sort Contacts” dialog allows you to view lists of contacts that are filtered by 1) salesperson, 2) Probability to Purchase, 3) date entered, 4) contact tags, and 5) interested in merchandise. You can also 6) sort the list by several different criteria in ascending or descending order. Make your selections and click “Apply Filters” to view the resulting list of contacts.
Copyright 2015 - ZentrueTech LLC Page ! of !23 24

If you don’t see the contacts you’re looking for, keep in mind that the resulting list is further filtered by 1) “Prospects” and “Sold”. Click one of these to toggle between them. You can export the resulting list of contacts by clicking 2) “Export CSV”
Copyright 2015 - ZentrueTech LLC Page ! of !24 24