Constellation-SNMP-activation-guide.pdf
5
SNMP Activation Procedure for Harris Constellation Radios Revision: R1 12 October 2010
Transcript of Constellation-SNMP-activation-guide.pdf

7/27/2019 Constellation-SNMP-activation-guide.pdf
http://slidepdf.com/reader/full/constellation-snmp-activation-guidepdf 1/5
SNMP Activation Procedurefor
Harris Constellation Radios
Revision: R112 October 2010

7/27/2019 Constellation-SNMP-activation-guide.pdf
http://slidepdf.com/reader/full/constellation-snmp-activation-guidepdf 2/5
Confidential 2 of 5
SNMP-BASED NETWORK MANAGEMENT
IntroductionThe Constellation radio has an embedded SNMP agent on board. It also has a 10BASE-TEthernet interface. This makes it easy to connect Constellation to the Kentrox Remote andOptima SNMP-based network management system. Constellation is typically configuredusing the keypad.
Constellation should have the latest software installed and running before completing thefollowing. As of October 1, 2010, this is version 7.4. Please take note that if you are toupgrade the firmware to 7.4, you will need to reboot the SPU, but this does NOT reset theentire radio system. If you upgrade the entire system software, this will require a completesystem reboot and MUST be done during the maintenance window.
Constellation Port DescriptionsThe ports on the customer access area of the Constellation backplane are shown in Figure7-1 below.
For the purpose of this document, we will focus on the Ethernet port (J31).
Figure 7-1: Constellation Customer Access Area
Physical interconnection is through the Ethernet port J31 on the radio. This, along with user configuration, enables the interface to transport SNMP traffic. Configuration details are givenbelow.

7/27/2019 Constellation-SNMP-activation-guide.pdf
http://slidepdf.com/reader/full/constellation-snmp-activation-guidepdf 3/5
Confidential 3 of 5
The AUX (J18) and ETHERNET (J31) por ts cann ot be u sed at the same time. However,
for every site wh ere the radio’s Ethernet port is enabled, the AUX port must also b e set
to Ethernet.
SNMP Connectivity Requirements
Some conditions must be met to set up the Constellation radio for SNMP connectivity:
• An 10BASE-T straight-thru cable is required to connect the Ethernet port J31 and anyavailable Ethernet port on the Kentrox Remote (see figure 7.2 below).
• A reboot of the SPU shelf is required after any change to IP connectivity informationto enable the changes (non-traffic-affecting).
Standard Configuration A standard configuration refers to a network where the only radio with the Ethernet port (J31)enabled is the radio connected to the Kentrox Remote.
Figure 7-2: Standard Configuration Example
This example is a very basic LAN setup, where no IP connections are dropped at the remote
sites.
7/27/2019 Constellation-SNMP-activation-guide.pdf
http://slidepdf.com/reader/full/constellation-snmp-activation-guidepdf 4/5
Confidential 4 of 5
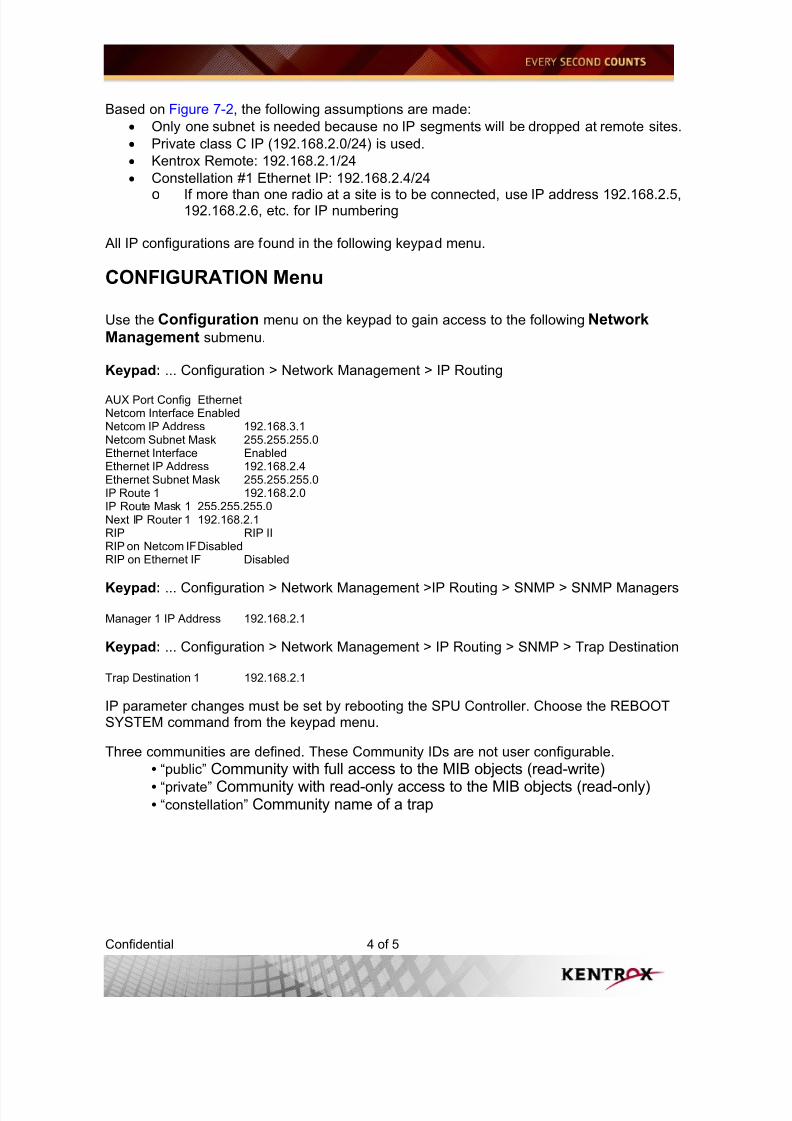
Based on Figure 7-2, the following assumptions are made:
• Only one subnet is needed because no IP segments will be dropped at remote sites.
• Private class C IP (192.168.2.0/24) is used.
• Kentrox Remote: 192.168.2.1/24
• Constellation #1 Ethernet IP: 192.168.2.4/24
o If more than one radio at a site is to be connected, use IP address 192.168.2.5,192.168.2.6, etc. for IP numbering
All IP configurations are found in the following keypad menu.
CONFIGURATION Menu
Use the Configuration menu on the keypad to gain access to the following NetworkManagement submenu.
Keypad: ... Configuration > Network Management > IP Routing
AUX Port Config EthernetNetcom Interface EnabledNetcom IP Address 192.168.3.1Netcom Subnet Mask 255.255.255.0Ethernet Interface EnabledEthernet IP Address 192.168.2.4Ethernet Subnet Mask 255.255.255.0IP Route 1 192.168.2.0IP Route Mask 1 255.255.255.0Next IP Router 1 192.168.2.1RIP RIP IIRIP on Netcom IF DisabledRIP on Ethernet IF Disabled
Keypad: ... Configuration > Network Management >IP Routing > SNMP > SNMP Managers
Manager 1 IP Address 192.168.2.1
Keypad: ... Configuration > Network Management > IP Routing > SNMP > Trap Destination
Trap Destination 1 192.168.2.1
IP parameter changes must be set by rebooting the SPU Controller. Choose the REBOOTSYSTEM command from the keypad menu.
Three communities are defined. These Community IDs are not user configurable.
• “public” Community with full access to the MIB objects (read-write)
• “private” Community with read-only access to the MIB objects (read-only)• “constellation” Community name of a trap

7/27/2019 Constellation-SNMP-activation-guide.pdf
http://slidepdf.com/reader/full/constellation-snmp-activation-guidepdf 5/5
Confidential 5 of 5
SNMP Trap Configuration ConfirmationBy default, all SNMP traps are enabled. Using the below illustration, please confirm that allSNMP Traps are enabled.
Kentrox and Optima are registered trademarks of Kentrox, Inc. All other product names are trademarks of their respective owners. Information is correct at time of printing and is subject to change without notice. Details usedin this guide were gathered from the radio manufacturer’s installation and configuration manuals. Kentrox is notliable if this information is incorrect or changed by the manufacturer.