Constellation - FreeSpirit Fabrics · PDF file makeitcoats.com 1 of 16 Constellation...
16
1 of 16 freespiritfabrics.com makeitcoats.com Constellation Collection: Splendor by Amy Butler Technique: Template Piecing Skill Level: Advanced Crafting Time: Longer Term* Finished Size: 74" x 74" (187.96cm x 187.96cm) *Crafting time based on Advanced skill level Featuring Splendor by Amy Butler Blazing Star blocks and Half-Star triangles create a vibrating constellation surrounding the large star in the center of this colorful quilt. The Splendor collection by Amy Butler creates a quilt that overflows with sparkling stars. Version 1.0
-
Upload
hoanghuong -
Category
Documents
-
view
217 -
download
0
Transcript of Constellation - FreeSpirit Fabrics · PDF file makeitcoats.com 1 of 16 Constellation...

1 of 16freespiritfabrics.com makeitcoats.com
Constellation
Collection: Splendor by Amy Butler
Technique: Template Piecing
Skill Level: Advanced
Crafting Time: Longer Term*
Finished Size: 74" x 74" (187.96cm x 187.96cm)
*Crafting time based on Advanced skill level
Featuring Splendor by Amy Butler
Blazing Star blocks and Half-Star triangles create a vibrating constellation surrounding the large star in the center of this colorful quilt. The Splendor collection by Amy Butler creates a quilt that overflows with sparkling stars.
Version 1.0

Constellation
2 of 16freespiritfabrics.com makeitcoats.comCopyright Coats © 2016 FS1093AB Version 1.0
Project designed by Susan Guzman
Fabric RequirementsDESIGN COLOR ARTICLE CODE YARDAGE
(A) Forest Friends Midnight PWAB165.MIDNI 11⁄2 yards (1.37m)(B) Forest Friends Sky PWAB165.SKYXX 21⁄8 yards (1.94m)(C) Native Folk Blush PWAB166.BLUSH 7⁄8 yard (80.01cm)(D) Simply Bold Floral River PWAB167.RIVER 7⁄8 yard (80.01cm)(E) Pincushion Flower Midnight PWAB168.MIDNI 11⁄2 yards (1.37m)(F) Positive Direction Cherry PWAB169.CHERR 11⁄4 yards (1.14m)(G) Positive Direction River PWAB169.RIVER 13⁄4 yards (1.60m)*(H) Mighty Corners Cherry PWAB170.CHERR 1 yard (.91m)(I) Mighty Corners Moon Glow PWAB170.MOONG 1⁄2 yard (45.72cm)(J) Mighty Corners Sage PWAB170.SAGEX 7⁄8 yard (80.01cm) * includes binding
Backing (Purchased Separately) 44” (111.76cm) Native Folk Sage PWAB166.SAGEX 45⁄8 yards (4.23m)OR108” (274.32cm) 23⁄8 yard (2.17m)
Additional Requirements• Coats Dual Duty XP® All-purpose thread in coordinating colors• 82” x 82” (208.28cm x 208.28cm) batting• Sewing machine• Rotary cutter/mat/ruler• Template plastic• Marking pencil with sharp point• Awl or large needle• Basic sewing and pressing supplies
Note: Due to the complexity of this pattern, be sure to read through the directions before starting this quilt.
(A) (B) (C) (D) (E)
(F) (G) (H) (I) (J)
Backing44”
(111.76cm)
Constellation
3 of 16freespiritfabrics.com makeitcoats.comCopyright Coats © 2016 FS1093AB Version 1.0
Note: Due to the complexity of this pattern, be sure to read through the directions before starting this quilt.
Making and Using the TemplatesNote: This quilt requires making accurate plastic template shapes as well as precise and careful stitching. This pattern also assumes that the advanced quiltmaker has experi-ence with sewing inset corners in quilt blocks. Following the template making and stitching directions explicitly will make it easy to inset the corner blocks and triangles at the outer edges and corners of the large central star.
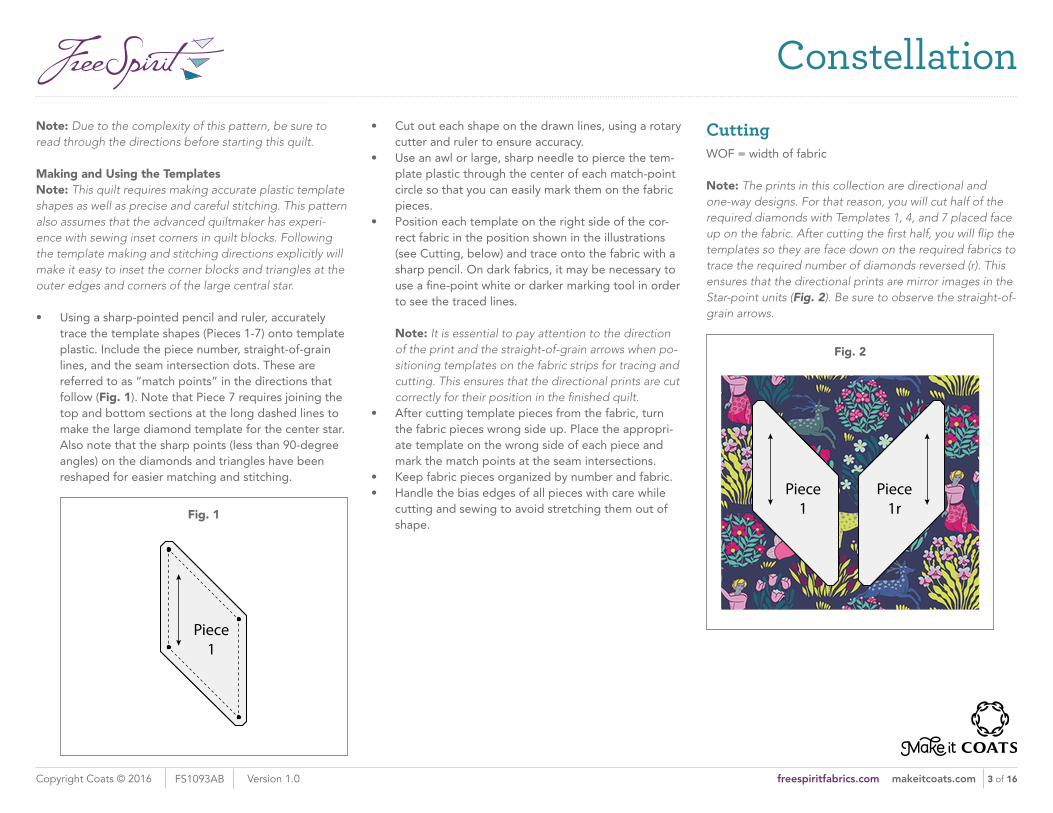
• Using a sharp-pointed pencil and ruler, accurately trace the template shapes (Pieces 1-7) onto template plastic. Include the piece number, straight-of-grain lines, and the seam intersection dots. These are referred to as “match points” in the directions that follow (Fig. 1). Note that Piece 7 requires joining the top and bottom sections at the long dashed lines to make the large diamond template for the center star. Also note that the sharp points (less than 90-degree angles) on the diamonds and triangles have been reshaped for easier matching and stitching.
Fig. 1 Fig. 1
Piece1
• Cut out each shape on the drawn lines, using a rotary cutter and ruler to ensure accuracy.
• Use an awl or large, sharp needle to pierce the tem-plate plastic through the center of each match-point circle so that you can easily mark them on the fabric pieces.
• Position each template on the right side of the cor-rect fabric in the position shown in the illustrations (see Cutting, below) and trace onto the fabric with a sharp pencil. On dark fabrics, it may be necessary to use a fine-point white or darker marking tool in order to see the traced lines. Note: It is essential to pay attention to the direction of the print and the straight-of-grain arrows when po-sitioning templates on the fabric strips for tracing and cutting. This ensures that the directional prints are cut correctly for their position in the finished quilt.
• After cutting template pieces from the fabric, turn the fabric pieces wrong side up. Place the appropri-ate template on the wrong side of each piece and mark the match points at the seam intersections.
• Keep fabric pieces organized by number and fabric. • Handle the bias edges of all pieces with care while
cutting and sewing to avoid stretching them out of shape.
CuttingWOF = width of fabric
Note: The prints in this collection are directional and one-way designs. For that reason, you will cut half of the required diamonds with Templates 1, 4, and 7 placed face up on the fabric. After cutting the first half, you will flip the templates so they are face down on the required fabrics to trace the required number of diamonds reversed (r). This ensures that the directional prints are mirror images in the Star-point units (Fig. 2). Be sure to observe the straight-of-grain arrows.
Fig. 2 Fig. 2
Piece1
Piece1r

Constellation
4 of 16freespiritfabrics.com makeitcoats.comCopyright Coats © 2016 FS1093AB Version 1.0
Fabric A, cut:(1) 57⁄8” x WOF (14.93cm x WOF); sub-cut (15) Piece 1(1) 57⁄8” x WOF (14.93cm x WOF); sub-cut (1) additional Piece 1 and (8) Piece 4(3) 125⁄8” x WOF (32.07cm x WOF) strips; sub-cut (12) Piece 7 and (4) Piece 7r
Fabric B, cut:(3) 65⁄8” x WOF (16.83cm x WOF); sub-cut (16) Piece 2(2) 55⁄8” x WOF (14.29cm x WOF). As shown in Figure 3, on page 5; sub-cut a total of (6) Piece 3a and (6) Piece 3d.(2) 91⁄2” x WOF (24.13cm x WOF). As shown in Figure 4, on page 5; sub-cut a total of (6) Piece 3b and (6) Piece 3c.(1) 91⁄2” x WOF (24.13cm x WOF); sub-cut (4) Piece 5 (Fig. 5 on page 5). Note that all four edges of these squares are on the bias and the pieces require careful handling to avoid stretching.(1) 7” x WOF (17.78cm x WOF); sub-cut (2) Piece 6a, (2) Piece 6b, (2) Piece 6c, and (2) Piece 6d (Fig. 6 on page 5). Be sure to reverse the template as shown so the direc-tional print will be correctly positioned.
Fabric C, cut:(2) 125⁄8” x WOF (32.07 x WOF); sub-cut (4) Piece 7 and (4) Piece 7r
Fabric D, cut:(2) 125⁄8” x WOF (32.07 x WOF); sub-cut (4) Piece 7 and (8) Piece 7r
Fabric E, cut:(2) 57⁄8” x WOF (14.93cm x WOF); sub-cut (16) Piece 1 and (14) Piece 1r
(2) 57⁄8” x WOF (14.93cm x WOF); sub-cut (2) additional Piece 1r, (8) Piece 4, and (8) Piece 4r(2) 125⁄8” x WOF (32.07 x WOF); sub-cut (4) Piece 7 and (4) Piece 7r
Fabric F, cut:(1) 57⁄8” “ x WOF (14.93cm x WOF); sub-cut (15) Piece 1r(1) 57⁄8” x WOF (14.93cm x WOF); sub-cut (1) additional Piece 1r and (8) Piece 4r(2) 125⁄8” x WOF (32.07 x WOF); sub-cut (4) Piece 7 and (8) Piece 7r
Fabric G, cut:(8) 11⁄2” x WOF (3.81cm x WOF), for border(8) 21⁄2” x WOF (6.35cm x WOF), for binding(2) 57⁄8”x WOF (14.93cm x WOF); sub-cut (16) Piece 1 and (14) Piece 1r(2) 57⁄8” x WOF (14.93cm x WOF); sub-cut (2) additional Piece 1r, (8) Piece 4, and (8) Piece 4r
Fabric H, cut:(1) 57⁄8” x WOF (14.92cm x WOF); sub-cut (15) Piece 1r(2) 125⁄8” x WOF (32.07 x WOF); from (1) strip, sub-cut (4) Piece 7 and (3) Piece 7r. From the second strip, sub-cut (1) additional Piece 7r, (16) Piece 1, and (1) additional Piece 1r (Fig. 7 on page 5).
Fabric I, cut:(2) 57⁄8” x WOF (14.93cm x WOF); sub-cut (8) Piece 4 and (8) Piece 4r
Fabric J, cut:(2) 125⁄8” x WOF (32.07cm x WOF); sub-cut (4) Piece 7 and (4) Piece 7r
Sewing InstructionsNote: Sew all pieces with right sides together (RST), using a precise 1⁄4”- wide (0.64cm) seam allowance and heeding the following suggestions to ensure precision piecing:
• Pin pieces together for seaming, taking care not to stretch the bias edges. Make sure raw edges are aligned and the match points align precisely.
• Stitch slowly to ensure accuracy. Piecing diamond de-signs requires sewing with accurate seam allowances to ensure a smooth and flat finished quilt.
• When sewing pieces together from match point to match point as directed below, place the needle down in the first match point. Lower the presser foot and take a few stitches, then backstitch to, but not past, the match point. Continue stitching, ending precisely at the second match point in the seam; backstitch a few stitches before clipping the threads and removing the pieces from the machine.
• Handle all fabric pieces gently to avoid stretching bias edges. Use a dry iron and press with care to avoid stretching or distorting the pieces.

Constellation
5 of 16freespiritfabrics.com makeitcoats.comCopyright Coats © 2016 FS1093AB Version 1.0
Fig. 3
55⁄8"(14.29cm)
WOF
3d3a
3d3a
3d3a
Fig. 3
Cut 6 from each strip.
Cut a total of 6 each of Pieces 3a and 3d.
Fig. 4
9½"(24.13cm)
3c 3b 3c 3b 3c 3b
WOFFig. 4
Cut 6 from each strip.
Cut a total of 6 each of Pieces 3b and 3c.
Fig. 5
9½"(24.13cm)
WOFFig. 5
5 5 5 5
Cut 4 of Piece 5.
Fig. 6
7"(17.78cm)
WOFFig. 6
6c
6a
6c
6a
6d
6b
6d
6b
Cut 2 each of Pieces 6a, 6b, 6c, and 6d.
Fig. 7
125⁄8"(32.07cm)
WOFFig. 7
Cut 1 Piece 7r, 16 Piece 1, and 1 Piece 1r.
Piece 7r
Piece1
Piece1r
Cut 1 Piece 7r, 16 Piece 1, and 1 Piece 1r.
Constellation
6 of 16freespiritfabrics.com makeitcoats.comCopyright Coats © 2016 FS1093AB Version 1.0
Make the Blazing Star Blocks
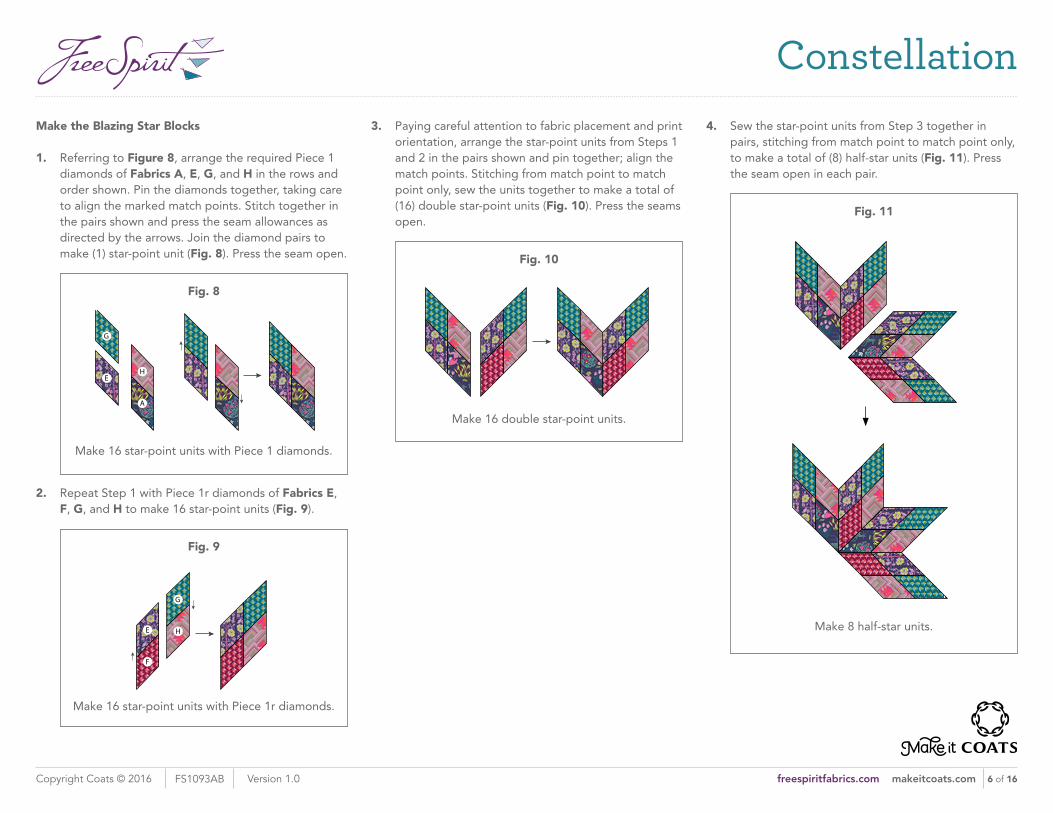
1. Referring to Figure 8, arrange the required Piece 1 diamonds of Fabrics A, E, G, and H in the rows and order shown. Pin the diamonds together, taking care to align the marked match points. Stitch together in the pairs shown and press the seam allowances as directed by the arrows. Join the diamond pairs to make (1) star-point unit (Fig. 8). Press the seam open.
Fig. 8
Fig. 8
Make 16 star-point unitswith Piece 1 diamonds.
G
EH
A
Make 16 star-point units with Piece 1 diamonds.
2. Repeat Step 1 with Piece 1r diamonds of Fabrics E, F, G, and H to make 16 star-point units (Fig. 9).
Fig. 9
Fig. 9
Make 16 star-point unitswith Piece 1 diamonds.
F
G
E
F
H
Make 16 star-point units with Piece 1r diamonds.
3. Paying careful attention to fabric placement and print orientation, arrange the star-point units from Steps 1 and 2 in the pairs shown and pin together; align the match points. Stitching from match point to match point only, sew the units together to make a total of (16) double star-point units (Fig. 10). Press the seams open.
Fig. 10
Make 16 double star-point units.
Fig. 10
Make 16 double star-point units.
4. Sew the star-point units from Step 3 together in pairs, stitching from match point to match point only, to make a total of (8) half-star units (Fig. 11). Press the seam open in each pair.
Fig. 11
Make 8 half-star units.
Fig. 11
Make 8 half-star units.
Fig. 11
Make 8 half-star units.

Constellation
7 of 16freespiritfabrics.com makeitcoats.comCopyright Coats © 2016 FS1093AB Version 1.0
5. Sew the half-star units from Step 4 together in pairs, stitching from match point to match point only, to make to make a total of (4) star units (Fig. 12 on page 7). Press the seam open in each unit.
Fig. 12 Fig. 12
Make 4 star units.
Fig. 12
Make 4 star units.
Make 4 star units.
6. Paying careful attention to fabric orientation, arrange a star unit with (4) Piece 2 of Fabric B and 1 each of Pieces 3a, 3b, 3c, and 3d. Using inset seams, sew all Piece 2 and 3 squares and triangles of Fabric B, to the star unit to complete a Blazing Star block (Fig. 13). Press the seam allowances open. Make a total of (4) Blazing Star blocks.
Fig. 13
Piece 2
Piece 3a
Piece 3d
Piece 3cPiece 3b
Piece 2
Piece 3a
Piece 3d
Piece 3cPiece 3b
Make 4 Blazing Star blocks.
Make the Half-Star Triangles7. Following Step 1 and referring to Figure 14, use
Fabrics A, I, E, and G Piece 4r diamonds to make a total of (8) Star-point units (Fig. 14).
Fig. 14 Fig. 14
Make 8 star-point unitswith Piece 4 diamonds.
G
E
A
I
Make 8 star-point units with Piece 4 diamonds.
Use Fabrics I, G, F, and E Piece 4 diamonds to make a total of (8) Star-point units and press as directed by the arrows (Fig. 15).
Fig. 15 Fig. 15
Make 8 star-point unitswith Piece 4r diamonds.
F
I
G
E
Make 8 star-point units with Piece 4r diamonds.

Constellation
8 of 16freespiritfabrics.com makeitcoats.comCopyright Coats © 2016 FS1093AB Version 1.0
8. Arrange the star-point units in pairs and sew together from match point to match point only. Press the seam open to make a double star-point unit (Fig. 16). Make a total of (8) double star-point units.
Fig. 16
Make 8 double star-point units.
Fig. 16
Make 8 double star-point units.
9. Sew the double star-point units from Step 9 together in pairs to make (4) half-star units (Fig. 17).
Fig. 17 Fig. 17
Make 4 half-star units.
Fig. 17
Make 4 half-star units.Make 4 half-star units.
10. Arrange the half-star units from Step 10 with Fabric B Pieces 3a, 3b, 3c, 3d, 5, 6a, 6b, 6c, and 6d as shown, paying careful attention to the print orientation (Fig. 18). Using inset seams, sew the pieces together to complete each of the (4) Half-Star triangles. Press the seams open.
Fig. 18
Half-Star Triangles Fig. 18
Upper Edge of Quilt
Lower Edge of Quilt
RightLeft Piece 5
Piece 5
Piece 5
Piece 3b
Piece 3b Piece 3c
Piece 3dPiece 3d
Piece 3c
Piece 6c
Piece 6c
Piece 6b
Piece 6d
Piece 6d
Piece 6a
Piece 3a Piece 3a
Piece 6a Piece 6b
Piece 5

Constellation
9 of 16freespiritfabrics.com makeitcoats.comCopyright Coats © 2016 FS1093AB Version 1.0
Make the Large Star11. Arrange (1) each of Fabrics F, C, H, D, E, and J with
(3) of Fabric A Piece 7 diamonds in the rows shown. Sew together in rows and press the seam allowances as directed by the arrows. Sew the rows together in the order shown to complete (1) large star-point unit (Fig. 19). Press the seams open. Repeat to make a total of (4) large star-point units of Piece 7 diamonds.
Fig. 19
D
E
C
A
F
H
A
J
A
Fig. 19
Make 4 large star-point unitswith Piece7 diamonds.
Make 4 large star-point units with Piece 7 diamonds.
12. Repeat Step 12 with (1) each of Fabrics A, C, E, H, and J and (2) each of Fabrics D and F Piece 7r diamonds. Sew together in the order and rows shown and press as directed. Join the rows to complete (4) large star-point units composed of Piece 7r diamonds (Fig. 20).
Fig. 20
A
J
H
D
F
C
D
E
F
Fig. 20
Make 4 large star-point units with Piece 7r diamonds.
13. Using the same piecing method as used for the Blazing Star blocks and stitching from match point to match point only, sew the units from Steps 12 and 13 together to make a total of (4) double star-point units (Fig. 21). Press the seams open.
Fig. 21
Make 4 large double star-point units.
14. Stitching from match point to match point only, sew the double star-point units together in pairs and press the seams open (Fig. 22).
Fig. 22 Fig. 22
Make 2 large half-star units.Make 2 large half-star units.
15. Join the resulting half-stars together to complete the large central star for the quilt top as shown in the Quilt Layout on page 11.

Constellation
10 of 16freespiritfabrics.com makeitcoats.comCopyright Coats © 2016 FS1093AB Version 1.0
Quilt Top Assembly16. Referring to the Quilt Layout (on page 11) and
noting the fabric-print orientation in each of the Blazing Star blocks and Half-Star triangles, arrange them around the large center star as shown.
17. Using inset seams, sew each Blazing Star block to a corner of the quilt top and add a Half-Star Triangle to each edge. Press the seam allowances open.
18. Sew the (8) 11⁄2” x WOF (3.81cm x WOF) Fabric G border strips together end-to-end using diagonal seams and press the seams open.
19. Press the quilt top, taking care not to stretch it and measure its length through the center and at each long edge. Average the measurements if necessary and cut (2) border strips from the pieced Fabric G strip. Sew (1) border strip to each side of the quilt top. Press the seam allowances toward the border strips.
20. Repeat Step 20 to measure and determine the correct cutting length for the top and bottom borders. Cut (2) strips from the remainder of the pieced Fabric G strip and sew one to the top and the other to the bottom of the quilt.
Finishing21. Sew together the (8) 2 1⁄2” x WOF (6.35cm x WOF)
Fabric G binding strips end to end using diagonal seams. Press the seams open. Press the binding strip in half wrong sides together.
22. Layer the backing (wrong side up), batting, and quilt top (right side up). Baste the layers together and quilt as desired. Trim excess batting and backing even with the top after quilting is completed.
23. Leaving an 8” (20.32cm) tail of binding, sew binding to top of quilt through all layers matching all raw edges. Miter corners. Stop approximately 12” (30.48cm) from where you started. Lay both loose ends of binding flat along quilt edge. Where these two loose ends meet, fold them back on themselves and press to form a crease. Using this crease as your stitching line, sew the two open ends of the binding together right sides together. Trim seam to 1⁄4” (.64cm) and press open. Finish sewing binding to quilt.
24. Turn the binding to the back of quilt and hand-stitch in place.

Constellation
11 of 16freespiritfabrics.com makeitcoats.comCopyright Coats © 2016 FS1093AB Version 1.0
Quilt Top AssemblyQuilt Layout

*** Measure templates before cutting to confirm printing at 100%***
This square should
measure 1" x 1"
(2.54cm x 2.54cm)
when printed.
ConstellationPiece 1/1r
Blazing Star Block
Straight of grain
ConstellationPiece 3
Blazing Star Block
Straight of grain Piece 3b and Piece 3c
Straignt of grain Piece 3a and Piece 3d

*** Measure templates before cutting to confirm printing at 100%***
This square should
measure 1" x 1"
(2.54cm x 2.54cm)
when printed.
ConstellationPiece 2
Blazing Star Block
Stra
ight
of g
rain

*** Measure templates before cutting to confirm printing at 100%***
This square should
measure 1" x 1"
(2.54cm x 2.54cm)
when printed.
ConstellationPiece 6/6r
Half-Star Triangle
Straight of grain
ConstellationPiece 4/4r
Half-Star Triangle
Straight of grain

*** Measure templates before cutting to confirm printing at 100%***
This square should
measure 1" x 1"
(2.54cm x 2.54cm)
when printed.
ConstellationPiece 5
Half-Star Triangle
Straight of grain

*** Measure templates before cutting to confirm printing at 100%***
This square should
measure 1" x 1"
(2.54cm x 2.54cm)
when printed.
ConstellationPiece 7/7r
Large Center StarBottom
half of diamond.
Join to top half.
Straight of grain
ConstellationPiece 7/7r
Large Center StarTop half of diam
ond.Join to bottom
half.