Connecting an IoT Gateway MQTT Client Agent to Amazon Web ... · connection with AWS and begin...
8
www.kepware.com 1 ©2018 PTC, Inc. All Rights Reserved Connectivity Guide Connecting an IoT Gateway MQTT Client Agent to Amazon Web Services IoT Platform (AWS IoT) June 2018 Ref. 1.00
Transcript of Connecting an IoT Gateway MQTT Client Agent to Amazon Web ... · connection with AWS and begin...
www.kepware.com 1 ©2018 PTC, Inc. All Rights Reserved
Connectivity Guide
Connecting an IoT Gateway MQTT
Client Agent to Amazon Web
Services IoT Platform (AWS IoT)
June 2018
Ref. 1.00
www.kepware.com 2 ©2018 PTC, Inc. All Rights Reserved
Table of Contents
1. One-Click Certificate Creation (Recommended) ...................................................3
2. Using Custom CA ............................................................................................................4
3. Importing a Client Certificate into KEPServerEX® ................................................5
www.kepware.com 3 ©2018 PTC, Inc. All Rights Reserved
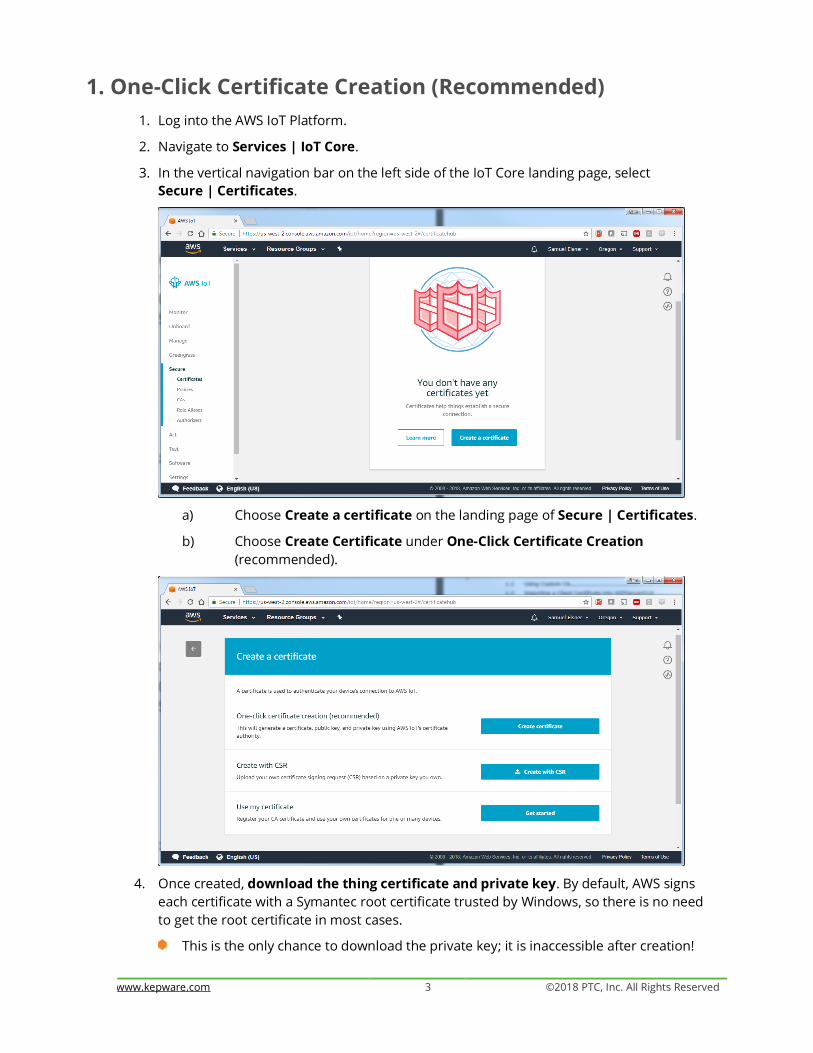
1. One-Click Certificate Creation (Recommended)
1. Log into the AWS IoT Platform.
2. Navigate to Services | IoT Core.
3. In the vertical navigation bar on the left side of the IoT Core landing page, select
Secure | Certificates.
a) Choose Create a certificate on the landing page of Secure | Certificates.
b) Choose Create Certificate under One-Click Certificate Creation
(recommended).
4. Once created, download the thing certificate and private key. By default, AWS signs
each certificate with a Symantec root certificate trusted by Windows, so there is no need
to get the root certificate in most cases.
This is the only chance to download the private key; it is inaccessible after creation!
www.kepware.com 4 ©2018 PTC, Inc. All Rights Reserved
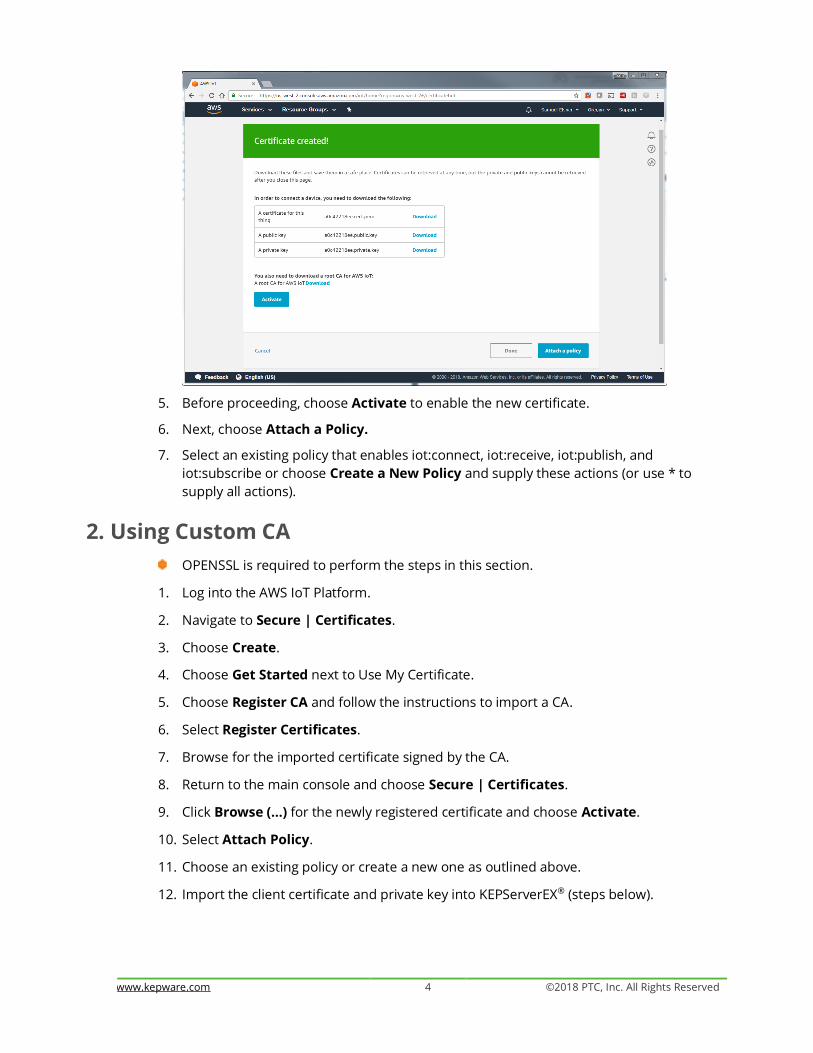
5. Before proceeding, choose Activate to enable the new certificate.
6. Next, choose Attach a Policy.
7. Select an existing policy that enables iot:connect, iot:receive, iot:publish, and
iot:subscribe or choose Create a New Policy and supply these actions (or use * to
supply all actions).
2. Using Custom CA
OPENSSL is required to perform the steps in this section.
1. Log into the AWS IoT Platform.
2. Navigate to Secure | Certificates.
3. Choose Create.
4. Choose Get Started next to Use My Certificate.
5. Choose Register CA and follow the instructions to import a CA.
6. Select Register Certificates.
7. Browse for the imported certificate signed by the CA.
8. Return to the main console and choose Secure | Certificates.
9. Click Browse (...) for the newly registered certificate and choose Activate.
10. Select Attach Policy.
11. Choose an existing policy or create a new one as outlined above.
12. Import the client certificate and private key into KEPServerEX® (steps below).
www.kepware.com 5 ©2018 PTC, Inc. All Rights Reserved
3. Importing a Client Certificate into KEPServerEX
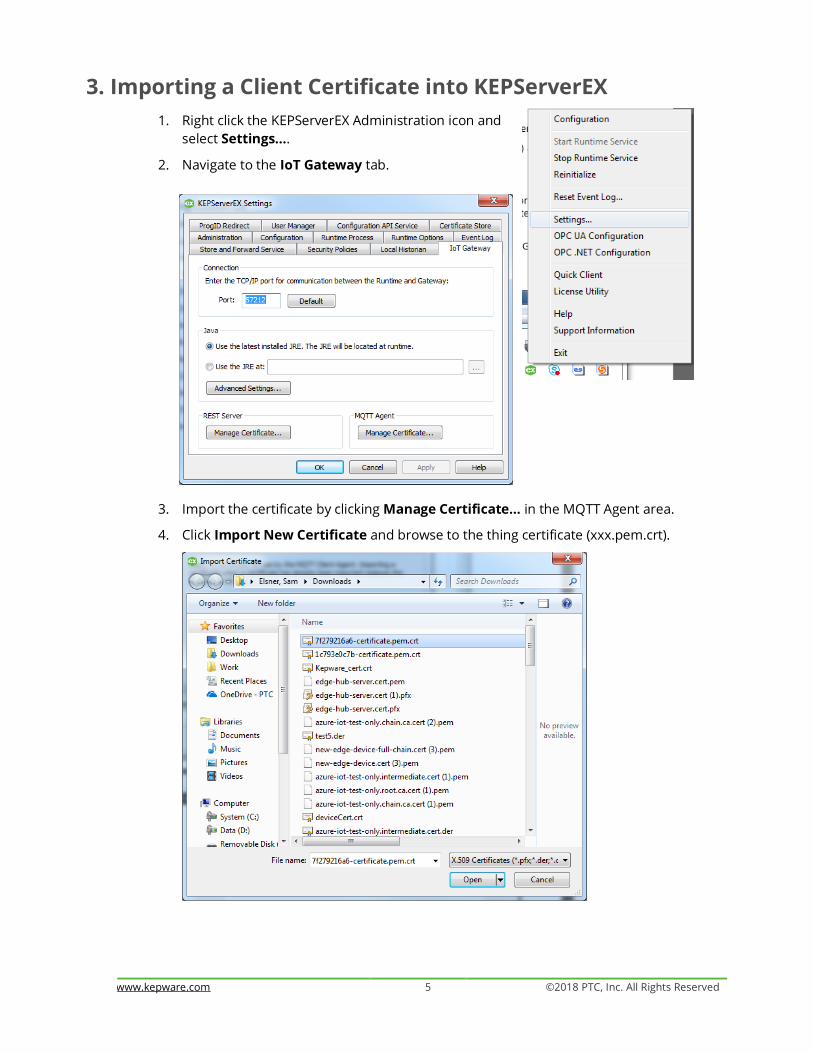
1. Right click the KEPServerEX Administration icon and
select Settings….
2. Navigate to the IoT Gateway tab.
3. Import the certificate by clicking Manage Certificate... in the MQTT Agent area.
4. Click Import New Certificate and browse to the thing certificate (xxx.pem.crt).
www.kepware.com 6 ©2018 PTC, Inc. All Rights Reserved
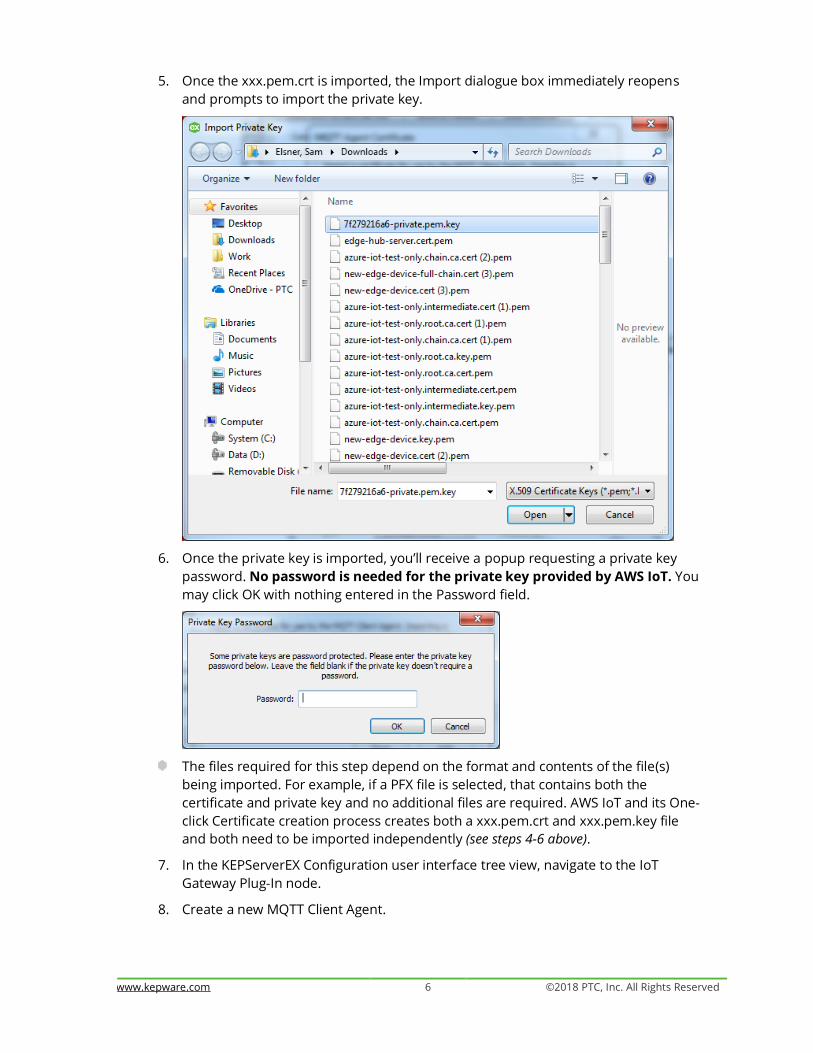
5. Once the xxx.pem.crt is imported, the Import dialogue box immediately reopens
and prompts to import the private key.
6. Once the private key is imported, you’ll receive a popup requesting a private key
password. No password is needed for the private key provided by AWS IoT. You
may click OK with nothing entered in the Password field.
The files required for this step depend on the format and contents of the file(s)
being imported. For example, if a PFX file is selected, that contains both the
certificate and private key and no additional files are required. AWS IoT and its One-
click Certificate creation process creates both a xxx.pem.crt and xxx.pem.key file
and both need to be imported independently (see steps 4-6 above).
7. In the KEPServerEX Configuration user interface tree view, navigate to the IoT
Gateway Plug-In node.
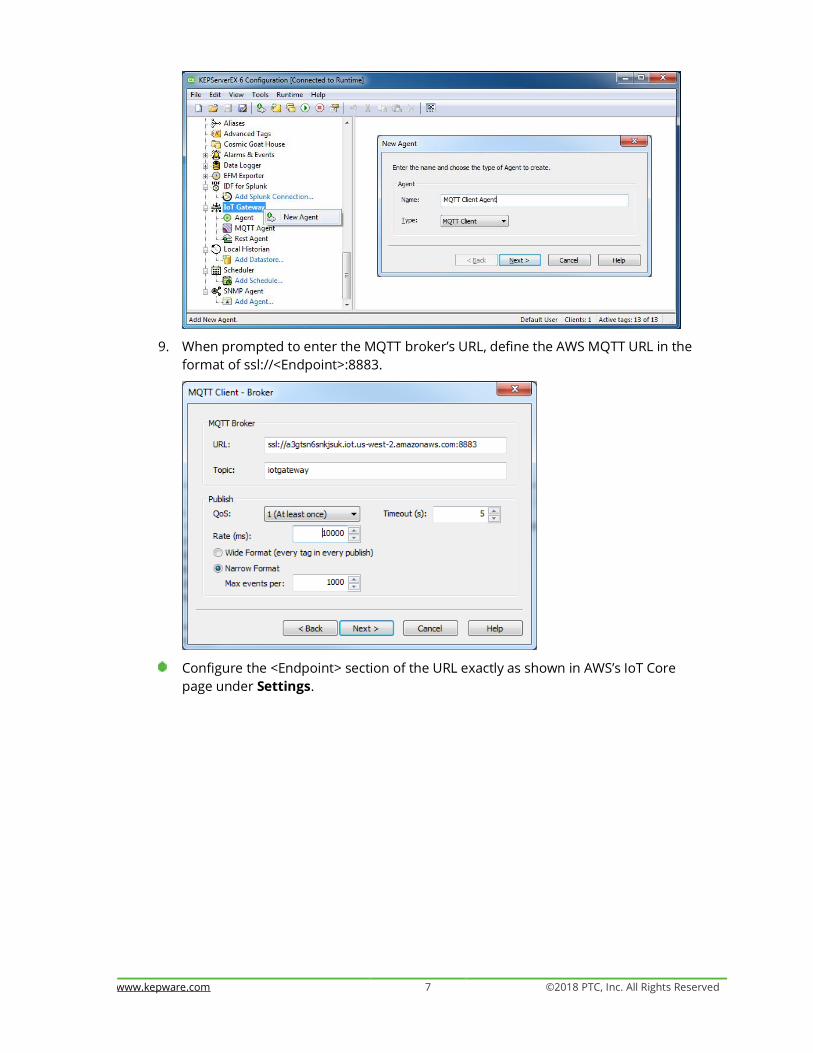
8. Create a new MQTT Client Agent.
www.kepware.com 7 ©2018 PTC, Inc. All Rights Reserved
9. When prompted to enter the MQTT broker’s URL, define the AWS MQTT URL in the
format of ssl://<Endpoint>:8883.
Configure the <Endpoint> section of the URL exactly as shown in AWS’s IoT Core
page under Settings.
www.kepware.com 8 ©2018 PTC, Inc. All Rights Reserved
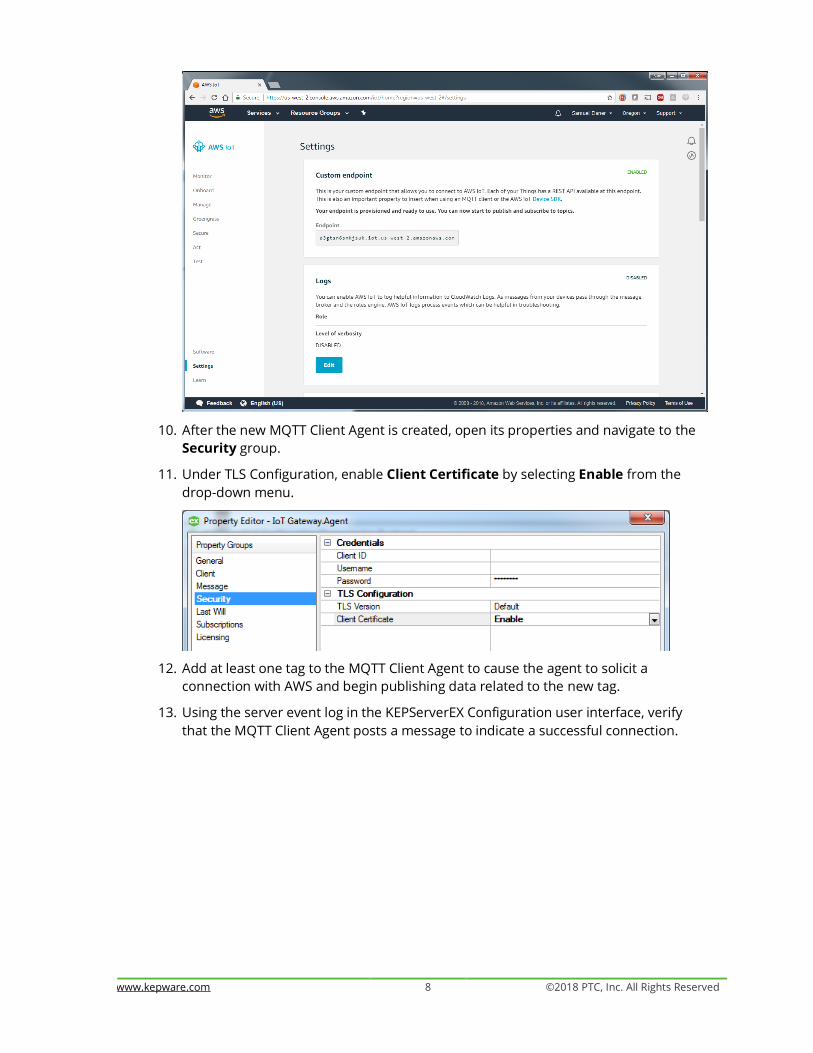
10. After the new MQTT Client Agent is created, open its properties and navigate to the
Security group.
11. Under TLS Configuration, enable Client Certificate by selecting Enable from the
drop-down menu.
12. Add at least one tag to the MQTT Client Agent to cause the agent to solicit a
connection with AWS and begin publishing data related to the new tag.
13. Using the server event log in the KEPServerEX Configuration user interface, verify
that the MQTT Client Agent posts a message to indicate a successful connection.