2013 Chevrolet Tahoe Brochure | South Jersey Chevrolet Dealer
INSIDE YOUR VEHICLEInstrument Panel . . . . . . . . . . . . . . . . . . . . . . . . .2Instrument Panel Cluster . . . . . . . . . . . . . . . . . .3Heated Front Seats . . . . . . . . . . . . . . . . . . . . . . .4Power Lumbar Front Seats . . . . . . . . . . . . . . . . .4Passenger Automatic Locking Restraint (ALR) .4Driver and Front Passenger Safety Belt Reminder . . . . . . . . . . . . . . . . . . . . .4Automatic Dimming Rearview Mirror withOnStar®, Compass and Temperature Display . .5Automatic Climate Control System . . . . . . . . . .5Manual Climate Control System . . . . . . . . . . . . .6Rear Climate Control System . . . . . . . . . . . . . . .6Entertainment Systems — Radio/CD . . . . . . . . .7Sunroof . . . . . . . . . . . . . . . . . . . . . . . . . . . . . . . .8HomeLink® Transmitter . . . . . . . . . . . . . . . . . . . .9
Adjustable Pedals . . . . . . . . . . . . . . . . . . . . . . . .9Steering Wheel Controls (OnStar®/Radio) . . . . .9
OUTSIDE YOUR VEHICLEPower Folding Mirrors . . . . . . . . . . . . . . . . . . .10Power Camper-Type Mirrors . . . . . . . . . . . . . . .10Automatic Headlamp Controls . . . . . . . . . . . . .10Daytime Running Lamps (DRL) . . . . . . . . . . . .11Content Theft-Deterrent System . . . . . . . . . . . .11Tire Pressure Monitor . . . . . . . . . . . . . . . . . . . .12
PERSONALIZING YOUR VEHICLEMemory Positions for Driver’s Seat, Mirrors,Pedals, Radio and Climate Controls . . . . . . . .12Memory Settings for Your Vehicle . . . . . . . . . .13Odometer/Trip Settings . . . . . . . . . . . . . . . . . . .14
VEHICLE SYMBOLS GLOSSARY . . . . . . . . . . . . . . . .15ROADSIDE ASSISTANCE PROGRAM, My GMLink . .16
Congratulations on your purchase of a Chevrolet Tahoe or Suburban. Please read this informationand your Owner Manual to ensure an outstanding ownership experience. Note that your vehicle may not include all the features described in this booklet. Place this booklet in your OwnerManual portfolio for easy reference.
A.D
ome
Lam
p O
verri
de B
utto
nB.
Lam
p C
ontro
lsC
.Air
Out
lets
D.A
utom
atic
Tra
nsfe
r Cas
e/St
abiliT
rak®
Mod
e Bu
tton
(AW
DVe
hicl
es)/T
ract
ion
Assi
st S
yste
m(T
AS)
E.Tu
rn S
igna
l/Mul
tifun
ctio
n Le
ver
F.In
stru
men
t Pan
el C
lust
er
G.S
hift
Leve
r H
.Tow
/Hau
l Sel
ecto
r But
ton
I.Au
dio
Syst
emJ.
Com
fort
Con
trol S
yste
mK.
Inst
rum
ent P
anel
Fus
e Bl
ock
L.H
ood
Rel
ease
M.S
teer
ing
Whe
el C
ontro
l But
tons
(if
equ
ippe
d)
N.C
ente
r Ins
trum
ent P
anel
Util
ity B
lock
O.T
ilt W
heel
Lev
erP.
Park
ing
Brak
e R
elea
seQ
.Lig
hter
and
Acc
esso
ry P
ower
Out
let
R.S
tora
ge A
rea
(if e
quip
ped)
S.As
htra
yT.
Glo
ve B
ox
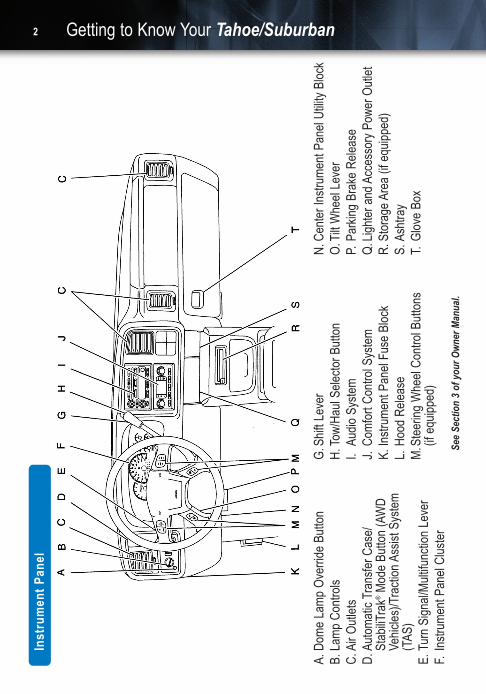
Getting to Know Your Tahoe/Suburban2In
stru
men
t P
anel
See
Sect
ion
3 of
you
r Ow
ner M
anua
l.
3
See
Sect
ion
3 of
you
r Ow
ner M
anua
l.
A
CD
E
BF
G
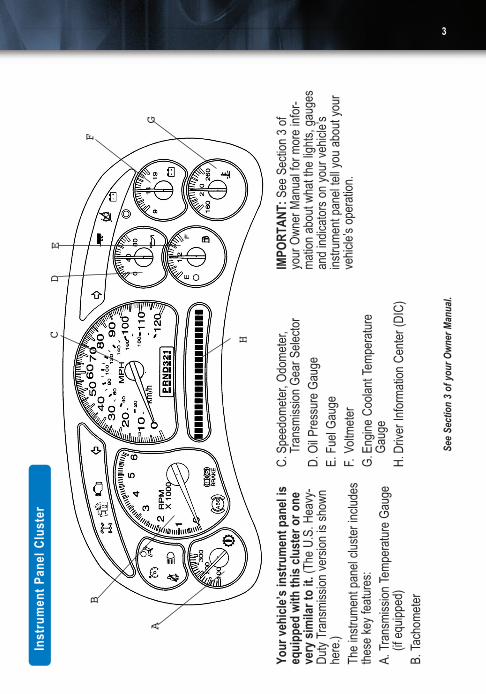
Inst
rum
ent
Pan
el C
lust
er
Your
veh
icle
’s in
stru
men
t pan
el is
equi
pped
with
this
clu
ster
or o
neve
ry s
imila
r to
it. (T
he U
.S. H
eavy
-D
uty
Tran
smis
sion
ver
sion
is s
how
nhe
re.)
The
inst
rum
ent p
anel
clu
ster
incl
udes
thes
e ke
y fe
atur
es:
A.Tr
ansm
issi
on T
empe
ratu
re G
auge
(if e
quip
ped)
B.Ta
chom
eter
C.S
peed
omet
er, O
dom
eter
,Tr
ansm
issi
on G
ear S
elec
tor
D.O
il Pr
essu
re G
auge
E.Fu
el G
auge
F.Vo
ltmet
erG
.Eng
ine
Coo
lant
Tem
pera
ture
Gau
geH
.Driv
er In
form
atio
n C
ente
r (D
IC)
IMPO
RTA
NT:
See
Sect
ion
3 of
yo
ur O
wne
r Man
ual f
or m
ore
info
r-m
atio
n ab
out w
hat t
he li
ghts
, gau
ges
and
indi
cato
rs o
n yo
ur v
ehic
le’s
inst
rum
ent p
anel
tell
you
abou
t you
rve
hicl
e’s
oper
atio
n.
H

Getting to Know Your Tahoe/Suburban4
Heated Front Seats (if equipped)
This feature allows you to heat the frontseatbacks and seat cushions simultane-ously or just the seatbacks. The controlsare located on the driver and front pas-senger door panels.Select a heat setting for both theseatback and seat cushion• Press and release the horizontal
button (“A” above) until the indicatorlight shows the desired setting.
Select a heat setting for the seatbackonly• Press and release the vertical button
(“B” above) until the indicator lightshows the desired setting.
See Section 1 of your Owner Manual.
Passenger Automatic LockingRestraint (ALR)
The safety belt is designed to lock during an accident, but it will also lock ifit is pulled out all the way during initialbuckling, and you may be unaware thatthis has happened. If the safety beltdoes lock, unbuckle it and allow it toretract fully, then pull it out and re-bucklethe belt.See Section 1 of your Owner Manual.
Power Lumbar Front Seats (if equipped)
A
B
Adjust lumbarsupport• Press the front
or rear of thecontrol locatedon the side ofthe seat cush-ion near the door. Release at the pre-ferred setting.
Adjust outer portion of lumbar seat-back area• Press the top or bottom of the lumbar
control. Release at the preferred setting.
See Section 1 of your Owner Manual.
If the ignition key is turned to RUN orSTART and the driver and/or front out-board passenger seatbelt is not buckledwithin five seconds, a chime will soundand the message “Buckle Seatbelt” (ifthe driver or driver and passenger arenot buckled) or “Buckle Passenger” (ifthe passenger only is not buckled) willflash in the Driver Information Center.The safety belt light ( ) will alsoappear for several seconds and flash forseveral more seconds. If at any timewhile the vehicle is running the front-seat belts are not buckled, the mes-sage(s) and chimes will repeat.
See Section 3 of your Owner Manual.
Note: The safety belt reminder chimecannot be deactivated.
Driver and Front PassengerSafety Belt Reminder (if equipped)
5
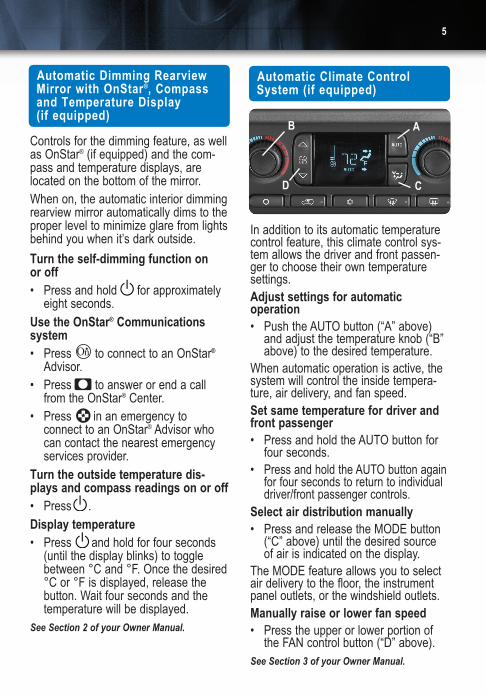
Automatic Dimming RearviewMirror with OnStar®, Compassand Temperature Display (if equipped)
Controls for the dimming feature, as wellas OnStar® (if equipped) and the com-pass and temperature displays, arelocated on the bottom of the mirror.When on, the automatic interior dimmingrearview mirror automatically dims to theproper level to minimize glare from lightsbehind you when it’s dark outside.
Turn the self-dimming function on or off• Press and hold for approximately
eight seconds. Use the OnStar® Communications system • Press to connect to an OnStar®
Advisor.• Press to answer or end a call
from the OnStar® Center.• Press in an emergency to
connect to an OnStar® Advisor whocan contact the nearest emergencyservices provider.
Turn the outside temperature dis-plays and compass readings on or off• Press .Display temperature• Press and hold for four seconds
(until the display blinks) to togglebetween °C and °F. Once the desired°C or °F is displayed, release thebutton. Wait four seconds and thetemperature will be displayed.
See Section 2 of your Owner Manual.
Automatic Climate ControlSystem (if equipped)
AB
CD
In addition to its automatic temperaturecontrol feature, this climate control sys-tem allows the driver and front passen-ger to choose their own temperaturesettings.Adjust settings for automatic operation• Push the AUTO button (“A” above)
and adjust the temperature knob (“B”above) to the desired temperature.
When automatic operation is active, thesystem will control the inside tempera-ture, air delivery, and fan speed. Set same temperature for driver andfront passenger • Press and hold the AUTO button for
four seconds.• Press and hold the AUTO button again
for four seconds to return to individualdriver/front passenger controls.
Select air distribution manually • Press and release the MODE button
(“C” above) until the desired sourceof air is indicated on the display.
The MODE feature allows you to selectair delivery to the floor, the instrumentpanel outlets, or the windshield outlets.Manually raise or lower fan speed• Press the upper or lower portion of
the FAN control button (“D” above).See Section 3 of your Owner Manual.
Getting to Know Your Tahoe/Suburban6
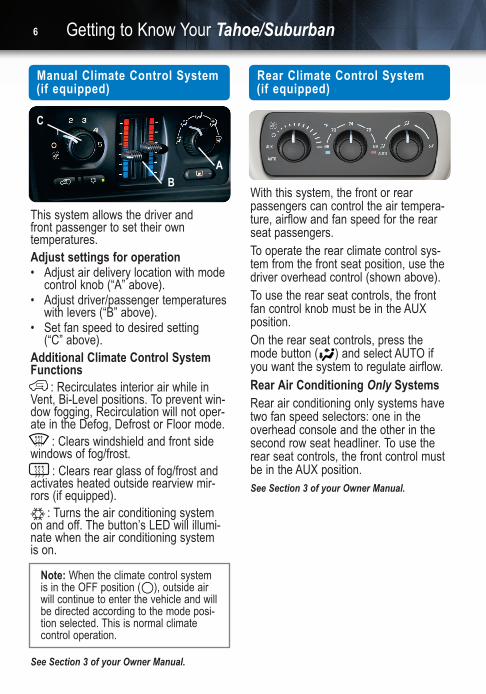
Manual Climate Control System (if equipped)
This system allows the driver and front passenger to set their own temperatures.Adjust settings for operation• Adjust air delivery location with mode
control knob (“A” above).• Adjust driver/passenger temperatures
with levers (“B” above).• Set fan speed to desired setting
(“C” above).Additional Climate Control SystemFunctions
: Recirculates interior air while inVent, Bi-Level positions. To prevent win-dow fogging, Recirculation will not oper-ate in the Defog, Defrost or Floor mode.
: Clears windshield and front sidewindows of fog/frost.
: Clears rear glass of fog/frost andactivates heated outside rearview mir-rors (if equipped).
: Turns the air conditioning systemon and off. The button’s LED will illumi-nate when the air conditioning system is on.
See Section 3 of your Owner Manual.
Note: When the climate control systemis in the OFF position ( ), outside airwill continue to enter the vehicle and willbe directed according to the mode posi-tion selected. This is normal climatecontrol operation.
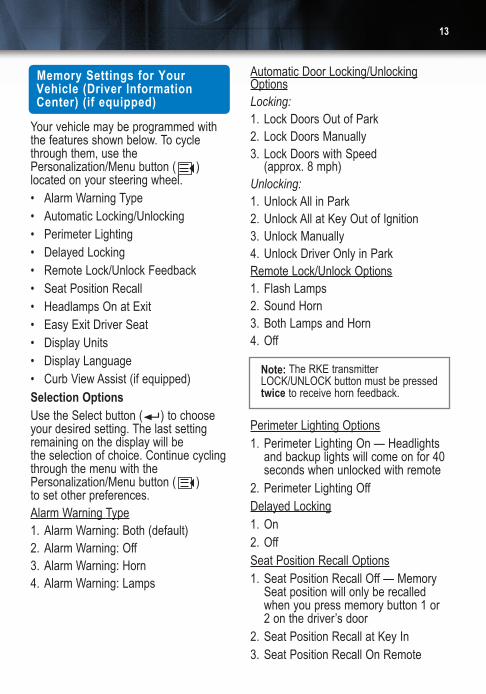
Rear Climate Control System (if equipped)
With this system, the front or rear passengers can control the air tempera-ture, airflow and fan speed for the rearseat passengers. To operate the rear climate control sys-tem from the front seat position, use thedriver overhead control (shown above).To use the rear seat controls, the frontfan control knob must be in the AUXposition. On the rear seat controls, press themode button ( ) and select AUTO ifyou want the system to regulate airflow.Rear Air Conditioning Only SystemsRear air conditioning only systems havetwo fan speed selectors: one in theoverhead console and the other in thesecond row seat headliner. To use therear seat controls, the front control mustbe in the AUX position.See Section 3 of your Owner Manual.
A
B
C

7
Entertainment Systems —Radio/CD
Set the time on radios without aRadio Data System (RDS)• Press and hold the HR or MIN arrow
for two seconds.• Press the HR (down) arrow until the
correct hour appears on the display.• Press and hold the MIN (up) arrow
until the correct minute appears onthe display.
Set the time on radios with a RadioData System (RDS)Your radio may have a button marked“H” or “HR” to represent hours and an“M” or “MIN” to represent minutes.• Press and hold the hour button until
the correct hour appears on the display.
• Press and hold the minute buttonuntil the correct minute appears onthe display.
Program radio station presets• Turn the radio on.
• Press BAND to select the band (AM,FM1/FM2/XM1/XM2).
• Use the seek or tune knob to tune inthe desired station.
• Press AUTO EQ or AUTO TONE (asapplicable to your radio) to select theequalization that best suits the type ofstation selected.
• Press and hold one of the six num-bered buttons until a beep sounds;release the button.
• Repeat these steps for each stationpreset, using a different numberedbutton for each station.
Access one of the two available XMSatellite Radio bands (if equipped) • Press the BAND button until XM1 or
XM2 appears on the display. (Note:Requires subscription to XM Radio.)
Note: The time may be set with theignition on or off.

Getting to Know Your Tahoe/Suburban8
• When loading more than one butfewer than six CDs, press the LOADbutton again to signal that loading iscomplete.
• When more than one disc is loaded,a number for each disc is displayed.
• To play a specific CD, press the CDAUX button and then the number ofthe CD you want to hear.
• A small bar appears under the CDnumber that is playing, and the tracknumber appears.
Navigation Radio (if equipped)See your Owner Manual or NavigationRadio Guide for operating instructions.See Section 3 of your Owner Manual.
Six-Disc CD Changer (if equipped)
Load 1 CD• With the ignition on, press and
release the LOAD side of the LOADCD button.
• Wait for the green indicator light atthe right side of the slot to turn green.
• Insert the disc partway into the slot,label side up; the player will pull thedisc in.
Load multiple CDs• With the ignition on, press and hold
the LOAD button for two seconds.The unit beeps and the light to theright of the slot begins to flash.
• When the light stops flashing andturns green, insert a disc partway,label side up.
• The indicator light will begin blinkingand turn steadily green. Load anotherdisc at this time.
Sunroof (if equipped)
The sunroof controls are located in theoverhead console.Open sunroof to fully opened position• Press the rear portion of the button
(“A”).Close the sunroof• Hold the front portion of the button
(“B”) down until the sunroof motorstops. The sunroof will tilt up slightlyto seal. This is normal.
Open sunroof to vent position• Press and hold the front portion of the
button (“B”) when the sunroof isclosed.
A
B

Steering Wheel Controls(OnStar®/Radio) (if equipped)
(OnStar/Voice Recognition)(if equipped): Thisbutton will activateOnStar® for use.(Note: If your vehicleis not equipped withthe OnStar® Communication System,pressing this button will mute the radioFor additional OnStar® features informa-tion, including Personal Calling andVirtual Advisor, see the OnStar® Systemsection of your Owner Manual.)PROG: This button will cycle throughthe radio presets.
: Selects AM, FM, XM SatelliteRadio (if equipped), cassette or CD
: Seeks radio stations: Adjusts radio volume
See Section 3 of your Owner Manual.
9
HomeLink® Transmitter (if equipped)
Program HomeLink1. Determine which of the three chan-
nels (buttons) you want to program:garage door opener, gate opener,entry door locks or other.
2. Press and hold the desired HomeLinkbutton through step 3.
3. When the HomeLink light blinks slow-ly (within 30 seconds), hold yourtransmitter/opener 1" to 3" away fromthe HomeLink buttons. Then holdyour transmitter button on until theHomeLink light flashes rapidly (up to90 seconds). The process is nowcomplete.
See Section 2 of your Owner Manual.
Note: If your transmitter has a “rollingcode” feature, the above process maynot work. Please refer to your OwnerManual or contact HomeLink at1-800-335-3515 (www.homelink.com).
Adjustable Pedals(if equipped)
The buttons used toadjust the pedals arelocated on the driver’sside door panel.• Press the button
closest to you to move the pedals closer to your body.
• Press the button farthest from you to move the pedals away from your body.
The vehicle must be in PARK (P) for thisfeature to operate.See Section 2 of your Owner Manual.

Getting to Know Your Tahoe/Suburban10
Automatic Headlamp Controls
Turn off Daytime Running Lamps(DRL) and automatic headlamps• Turn the exterior lamps knob (located
to the left of the steering wheel) toOFF ( ).
Activate the automatic headlamp system• Turn the exterior lamps knob to
AUTO. The automatic headlamp system will turn on the front and rearlamps.
Power Camper-Type Mirrors (if equipped)
Extend or retract mirrors• Move the selector switch located
above the mirror control to the centerposition (as shown under PowerFolding Mirrors above).
• Press the left side of the four-waycontrol pad to extend mirrors.
• Press the right side of the four-waycontrol pad to retract mirrors.
See Section 2 of your Owner Manual.
Power Folding Mirrors (if equipped)
Fold mirrors• Move the
selector switchlocated abovethe mirror con-trol (“A”above) to the centerposition.
• Press the rightside of thefour-way control pad (“B” above) to fold the mirrors in.
• Press the left side of the four-waycontrol pad to fold the mirrors out.
If the mirrors have been folded manual-ly, they must be moved through thepower folding cycle three times to resetthem in their tracks.See Section 2 of your Owner Manual.
A
B

11
Daytime Running Lamps (DRL)
Disable the DRL when Idling• Shift the vehicle into PARK, or• Set the parking brake.
See Section 3 of your Owner Manual.
Content Theft-Deterrent System(if equipped)
Arm the System• Lock the doors using the power door
lock switch or the Keyless EntrySystem transmitter. The alarm is activated when the symbol shownabove illuminates in the instrumentpanel cluster (approximately 30 seconds).
If your vehicle is equipped with a DriverInformation Center, you can program thealarm to the following:• Both Horn/Headlamps • Horn only• Lamps only• Off
See Section 2 of your Owner Manual.
Note: Your vehicle’s factory default setting is Horn and Lamps. See thePersonalizing Your Vehicle section ofthis booklet for more information.
Illuminate the parking lamps, side-marker lamps, taillamps, instrumentpanel/radio lights, license plate lampsand roof marker lamps (if equipped)• Turn the exterior lamps knob to the
parking lamp position ( ).Manually activate the headlamps, allexterior tail/marker lamps and theinstrument panel/radio lights• Turn the exterior lamps knob to this
position ( ).Turn the fog lamps (if equipped) on or off• Press the fog lamp button ( )
located on the left side of the instru-ment panel. An indicator lamp will illu-minate when the fog lamps are on.
See Section 3 of your Owner Manual.
Note: Your DRLs will re-engage at thenext key cycle.

Getting to Know Your Tahoe/Suburban12
Tire Pressure Monitor (if equipped)
This feature alerts you when a substantial reduction in pressure occursin one of your vehicle’s tires. If thisoccurs, a CHECK TIRE PRESSUREmessage will appear in the instrumentpanel cluster. This message will remainon until you reset the system.Reset the tire pressure monitor• To reset the tire pressure message,
you must fill the tires with the correctamount of air. The best time to checkyour tire pressure is when the tiresare cold.
• Pressing the cluster stem button onyour instrument panel cluster or theReset button ( ) on your steeringwheel (if equipped) will temporarilyeliminate the message. However, atthe next vehicle start-up, the mes-sage will reappear. The tire pressuremust be corrected to permanentlyeliminate the message.
See Section 5 of your Owner Manual.
Note: The Tire Pressure Monitor can alert you about low tire pressure,but it doesn’t replace normal tire maintenance.
Memory Positions for Driver’sSeat, Mirrors, Pedals, Radio andClimate Controls (if equipped)
Use the driver’sdoor mounted controls to:• Adjust driver
seat, includinglumbar adjustment
• Adjust gas andbrake pedals
• Adjust the outside rearview mirrors• Set the radio presets and climate
control temperature (the climate control temperature setting will revertto the last temperature setting used)
• Press and hold Memory 1 or 2 untiltwo chimes sound (about four seconds)
• To set up for another driver, repeatthe process with the other memorybutton
These settings will be remembered afterthey are programmed by pressing theMemory 1 or 2button on thedriver’s door(shown above).If you unlock thevehicle with theRemote KeylessEntry (RKE)transmitter, thevehicle memorysettings will correspond to the numberon the RKE transmitter: 1 or 2. See Section 2 of your Owner Manual.
13
Your vehicle may be programmed withthe features shown below. To cyclethrough them, use thePersonalization/Menu button ( )located on your steering wheel.• Alarm Warning Type• Automatic Locking/Unlocking• Perimeter Lighting• Delayed Locking• Remote Lock/Unlock Feedback• Seat Position Recall• Headlamps On at Exit• Easy Exit Driver Seat• Display Units• Display Language• Curb View Assist (if equipped)Selection Options Use the Select button ( ) to chooseyour desired setting. The last settingremaining on the display will be the selection of choice. Continue cyclingthrough the menu with thePersonalization/Menu button ( ) to set other preferences.Alarm Warning Type1. Alarm Warning: Both (default)2. Alarm Warning: Off3. Alarm Warning: Horn4. Alarm Warning: Lamps
Automatic Door Locking/UnlockingOptionsLocking:1. Lock Doors Out of Park2. Lock Doors Manually3. Lock Doors with Speed
(approx. 8 mph)Unlocking:1. Unlock All in Park2. Unlock All at Key Out of Ignition3. Unlock Manually4. Unlock Driver Only in ParkRemote Lock/Unlock Options1. Flash Lamps2. Sound Horn3. Both Lamps and Horn4. Off
Perimeter Lighting Options1. Perimeter Lighting On — Headlights
and backup lights will come on for 40seconds when unlocked with remote
2. Perimeter Lighting OffDelayed Locking1. On2. OffSeat Position Recall Options1. Seat Position Recall Off — Memory
Seat position will only be recalledwhen you press memory button 1 or2 on the driver’s door
2. Seat Position Recall at Key In3. Seat Position Recall On Remote
Memory Settings for Your Vehicle (Driver InformationCenter) (if equipped)
Note: The RKE transmitterLOCK/UNLOCK button must be pressedtwice to receive horn feedback.

Your vehicle’spersonal tripand businesstrip odometersoperate onlywhen they areturned on. Thecontrols are located on the steeringwheel.Enable the system• Press the Trip button ( ) until the
words “Personal Trip” appear. Thenpress to denote Personal TripON. Press the Trip button again tomonitor your mileage. (Note: Continueto press the Trip button to monitor thefeatures shown below.)
Use the above procedure to monitor thefollowing settings:• Personal/Business: Miles• Personal/Business: Gal.• Personal/Business: Avg. MPG• Personal/Business: MPH• Personal/Business: Annual % Usage• Business: Hourmeter (Total Engine
Run Time)• Business: Annual Log• Business: TimerReset trip information • Press and hold the Select button
( ) for two seconds while viewingany of the trip modes on the DriverInformation Center.
See Section 2 of your Owner Manual.
Getting to Know Your Tahoe/Suburban14
Easy Exit Driver Seat1. Adjust the seat to the desired
position.2. Press and hold the exit button ( )
on the driver’s door until two chimessound. (Note: Seat Exit must be “On”in your programmed settings.)
Headlamp On at Exit1. Headlamp Delay: 10 sec (default)2. Headlamp Delay: 20 sec3. Headlamp Delay: 40 sec4. Headlamp Delay: 60 sec5. Headlamp Delay: OffCurb View Assist Option (requiresSteering Wheel Controls)1. Curb View Off2. Curb View Passenger3. Curb View Driver4. Curb View BothThe Curb View Assist feature automati-cally tilts your outside mirrors downwardto allow you to see curbs when backing up.Set Curb View Assist position• Enable one of the four selections
above. • Adjust the mirrors while the vehicle is
in reverse. When the vehicle is shift-ed out of reverse, your selection issaved in Memory 1 or 2.
See Section 2 of your Owner Manual.
Note: Memory 1 or 2 is dependent onthe RKE transmitter being used and thekey being in the ignition during programming.
Odometer/Trip Settings (if equipped)
Note: Whether your vehicle is equippedwith a Driver Information Center or not,you can select and reset trip features byusing the Trip Odometer Reset Stemlocated on the instrument panel cluster.
15
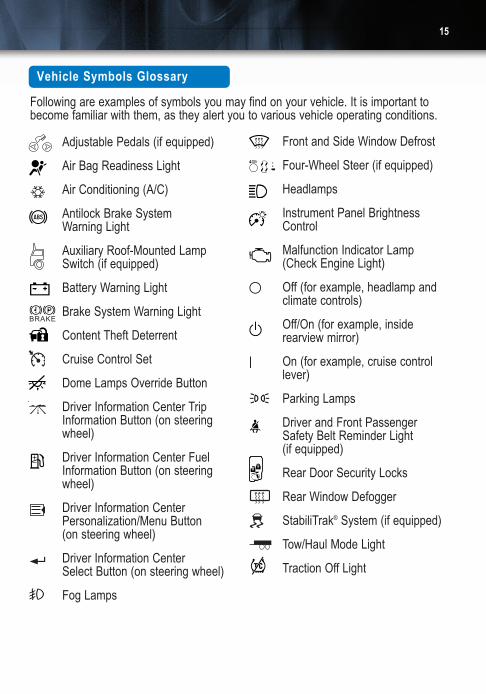
Vehicle Symbols Glossary
Adjustable Pedals (if equipped)
Air Bag Readiness Light
Air Conditioning (A/C)
Antilock Brake System Warning Light
Auxiliary Roof-Mounted Lamp Switch (if equipped)
Battery Warning Light
Brake System Warning Light
Content Theft Deterrent
Cruise Control Set
Dome Lamps Override Button
Driver Information Center Trip Information Button (on steering wheel)
Driver Information Center Fuel Information Button (on steering wheel)
Driver Information Center Personalization/Menu Button (on steering wheel)
Driver Information Center Select Button (on steering wheel)
Fog Lamps
Front and Side Window Defrost
Four-Wheel Steer (if equipped)
Headlamps
Instrument Panel Brightness Control
Malfunction Indicator Lamp (Check Engine Light)
Off (for example, headlamp and climate controls)
Off/On (for example, inside rearview mirror)
On (for example, cruise control lever)
Parking Lamps
Driver and Front Passenger Safety Belt Reminder Light (if equipped)
Rear Door Security Locks
Rear Window Defogger
StabiliTrak® System (if equipped)
Tow/Haul Mode Light
Traction Off Light
Following are examples of symbols you may find on your vehicle. It is important tobecome familiar with them, as they alert you to various vehicle operating conditions.

Getting to Know Your Tahoe/Suburban16
04TAHOQRG
Roadside Assistance Program
My GMLink
1-800-CHEV-USA(1-800-243-8872)TTY Users: 1-888-889-2438As the owner of a 2004 Chevrolet, member-ship in the Roadside Assistance Program is free.Roadside Assistance is available 24 hoursa day, 365 days a year by calling one of theabove numbers. An advisor will provide youwith over-the-phone roadside assistancewith minor mechanical problems. If theproblem can’t be resolved over the phone,our advisors have access to a nationwidenetwork of dealer-recommended serviceproviders. Roadside membership is free;however, some services may incur costs.Roadside offers two levels of service: Basic Care and Courtesy Care.
Roadside Basic Care provides:• Toll-free number (shown above)• Free towing for warranty repairs• Basic over-the-phone technical advice• Available dealer services at reasonable
costs (i.e., wrecker services,locksmith/key service, glass repair)
Roadside Courtesy Care provides:• Roadside Basic Care services
(as outlined previously)Plus:• FREE Non-Warranty Towing (to the
closest dealer from a legal roadway)
The Chevrolet Owner Center at MyGMLinkis a complimentary service for ChevroletOwners, a one-stop resource to enhanceyour Chevrolet ownership experience.Exclusive member benefits include onlineservice reminders, vehicle maintenance tips,online owner manual, special privileges andmore. Sign up today at www.mygmlink.com
• FREE Locksmith/Key Service (whenkeys are lost on the road or lockedinside)
• FREE Flat Tire Service (spare installedon the road)
• FREE Jump Start (at home or on theroad)
• FREE Fuel Delivery ($5 of fuel deliveredon the road)
Courtesy Care is available to retail andretail lease customers operating 2004 andnewer Chevrolet vehicles for a period of 3years/36,000 miles (60,000 km), whicheveroccurs first. For prompt and efficient assistance whencalling, please provide the following information to the advisor:• Vehicle Identification Number (VIN)• Vehicle license plate number• Vehicle color and mileage• Location of the vehicle• Telephone number where you can
be reached• Description of problem
Certain restrictions, precautions and safety procedures apply to your vehicle. Please read your OwnerManual for complete instructions. All information contained herein is based on information available atthe time of printing and is subject to change without notice. 2003 product shown on cover. Copyright 2003 by GM Corp. All rights reserved.