Configuring WCCPNote Settings for a particular WCCP service can be configured only after the WCCP...
40
CHAPTER 7-1 Cisco ECDS 2.6 Software Configuration Guide 7 Configuring WCCP The following sections describe the Web Cache Communication Protocol (WCCP) feature for Cisco Enterprise Content Delivery System (ECDS): • Configuring WCCP General Settings, page 7-1 • Configuring WCCP Services, page 7-3 • Managing WCCP Router Lists, page 7-12 • Managing WCCP Port Lists, page 7-15 • Configuring WCCP Transparent Routing Bypass Settings, page 7-18 • Creating WCCP Bypass List Entries, page 7-19 • Configuring HTTP IP Spoofing with WCCP, page 7-19 • WCCP Interception for Live Streaming, page 7-21 • Basic WCCP CLI Configuration Examples, page 7-31 • Where to Go Next, page 7-40 Configuring WCCP General Settings To use WCCP, the Service Engine must be properly configured. To use a WCCP-enabled router, an IP address must be configured on the router interface that is connected to the Internet, and this interface must be visible to the Service Engine on the network. To configure WCCP general settings: Step 1 Log into the ECDS administration GUI. Step 2 Choose Devices > Devices. A list of devices is displayed. Step 3 Click the Edit icon next to the Service Engine for which you want to configure WCCP service settings. The Device Home for Service Engine window displays. Step 4 Choose Request Routing > WCCP > General Settings. The WCCP Configuration Settings window displays (Figure 7-1). Table 7-1 describes the fields and provides CLI information. Step 5 Enable WCCP Version 2 by choosing 2 from the WCCP Version menu. Only WCCP Version 2 is supported with Cisco ECDS.
Transcript of Configuring WCCPNote Settings for a particular WCCP service can be configured only after the WCCP...

C H A P T E R 7
Configuring WCCPThe following sections describe the Web Cache Communication Protocol (WCCP) feature for Cisco Enterprise Content Delivery System (ECDS):
• Configuring WCCP General Settings, page 7-1
• Configuring WCCP Services, page 7-3
• Managing WCCP Router Lists, page 7-12
• Managing WCCP Port Lists, page 7-15
• Configuring WCCP Transparent Routing Bypass Settings, page 7-18
• Creating WCCP Bypass List Entries, page 7-19
• Configuring HTTP IP Spoofing with WCCP, page 7-19
• WCCP Interception for Live Streaming, page 7-21
• Basic WCCP CLI Configuration Examples, page 7-31
• Where to Go Next, page 7-40
Configuring WCCP General SettingsTo use WCCP, the Service Engine must be properly configured. To use a WCCP-enabled router, an IP address must be configured on the router interface that is connected to the Internet, and this interface must be visible to the Service Engine on the network.
To configure WCCP general settings:
Step 1 Log into the ECDS administration GUI.
Step 2 Choose Devices > Devices. A list of devices is displayed.
Step 3 Click the Edit icon next to the Service Engine for which you want to configure WCCP service settings. The Device Home for Service Engine window displays.
Step 4 Choose Request Routing > WCCP > General Settings. The WCCP Configuration Settings window displays (Figure 7-1). Table 7-1 describes the fields and provides CLI information.
Step 5 Enable WCCP Version 2 by choosing 2 from the WCCP Version menu. Only WCCP Version 2 is supported with Cisco ECDS.
7-1Cisco ECDS 2.6 Software Configuration Guide

Chapter 7 Configuring WCCPConfiguring WCCP General Settings
Figure 7-1 Configuring WCCP General Settings
Step 6 To keep the TCP flow intact, and to avoid overwhelming Service Engines when they come up or are reassigned new traffic, check the Enable Flow Redirection check box. This feature also has a slow start mechanism which enables a Service Engine to manage an amount of data that is appropriate for its capacity (see Step 7).
Use the wccp flow-redirect enable command.
Step 7 To enable the slow start capability on the Service Engine, check the Slow Start check box. For more information about the WCCP Slow Start feature, see the “Slow Start” section on page 2-33.
Use the wccp slow-start enable command.
Table 7-1 WCCP General Settings Commands
GUI Parameter Function CLI Command
WCCP Version Enables WCCP Version 2. To disable WCCP, use the no form of this command.
wccp version 2
Enable Flow Redirection
Keeps the TCP flow intact. wccp flow-redirect enable
Slow Start Enables slow start caching service on a Service Engine. To disable slow start capability, use the no form of this command.
wccp slow-start enable
Shutdown Delay Maximum amount of time (in seconds) the Service Engine waits to perform a clean shutdown of WCCP.
wccp shutdown max-wait seconds
7-2Cisco ECDS 2.6 Software Configuration Guide

Chapter 7 Configuring WCCPConfiguring WCCP Services
Step 8 In the Shutdown Delay field, specify the maximum amount of time (in seconds) the Service Engine waits to perform a clean shutdown of WCCP. For more information about WCCP shutdown delay, see the “Graceful (Clean) Shutdown” section on page 2-32.
Use the wccp shutdown max-wait command.
Step 9 Click Submit to save your settings.
Configuring WCCP ServicesSee the following sections:
• Configuring WCCP Service Settings, page 7-3
• Managing WCCP Service Masks, page 7-9
• Managing WCCP Router Lists, page 7-12
• Managing WCCP Port Lists, page 7-15
Configuring WCCP Service Settings
To configure WCCP service settings for the Service Engine:
Step 1 Choose Request Routing > WCCP > Services. The WCCP Service Settings for Service Engine window appears (Figure 7-2).
Note The Service Engine settings or its associated device group settings will be applied to this window depending on the choice that you have made in the WCCP General Settings window.
Figure 7-2 WCCP Service Settings
7-3Cisco ECDS 2.6 Software Configuration Guide
Chapter 7 Configuring WCCPConfiguring WCCP Services
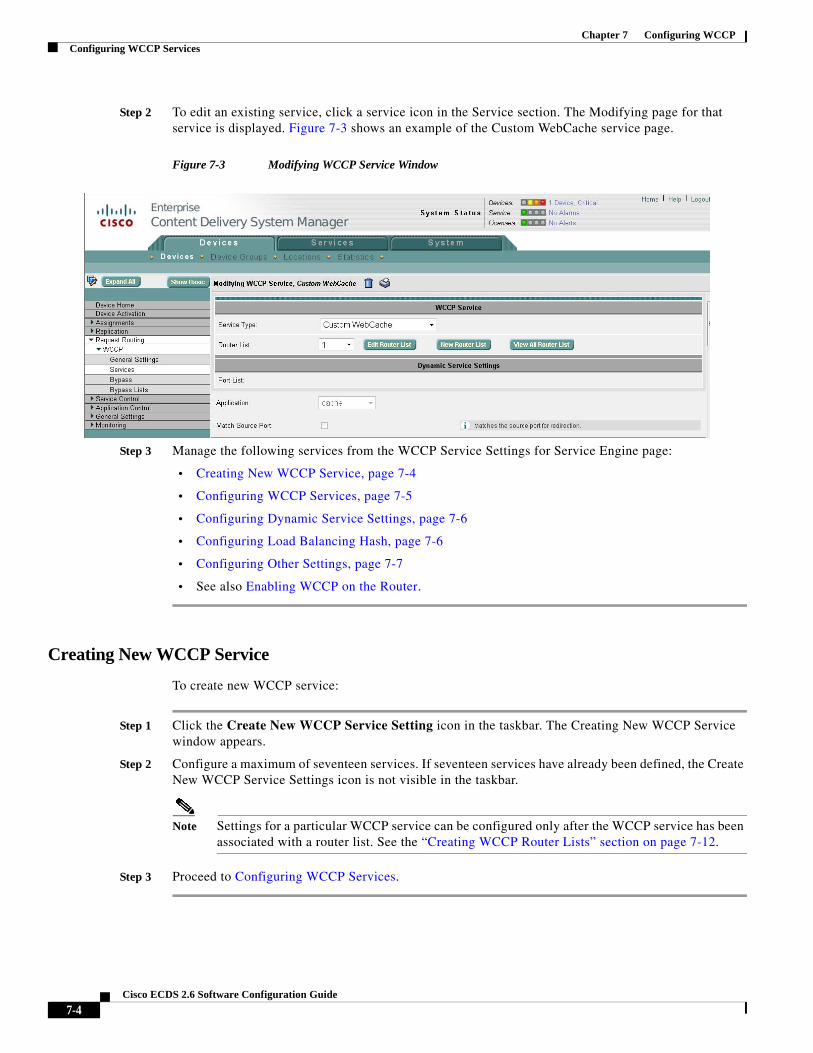
Step 2 To edit an existing service, click a service icon in the Service section. The Modifying page for that service is displayed. Figure 7-3 shows an example of the Custom WebCache service page.
Figure 7-3 Modifying WCCP Service Window
Step 3 Manage the following services from the WCCP Service Settings for Service Engine page:
• Creating New WCCP Service, page 7-4
• Configuring WCCP Services, page 7-5
• Configuring Dynamic Service Settings, page 7-6
• Configuring Load Balancing Hash, page 7-6
• Configuring Other Settings, page 7-7
• See also Enabling WCCP on the Router.
Creating New WCCP Service
To create new WCCP service:
Step 1 Click the Create New WCCP Service Setting icon in the taskbar. The Creating New WCCP Service window appears.
Step 2 Configure a maximum of seventeen services. If seventeen services have already been defined, the Create New WCCP Service Settings icon is not visible in the taskbar.
Note Settings for a particular WCCP service can be configured only after the WCCP service has been associated with a router list. See the “Creating WCCP Router Lists” section on page 7-12.
Step 3 Proceed to Configuring WCCP Services.
7-4Cisco ECDS 2.6 Software Configuration Guide
Chapter 7 Configuring WCCPConfiguring WCCP Services
Configuring WCCP Services
In the WCCP Service section:
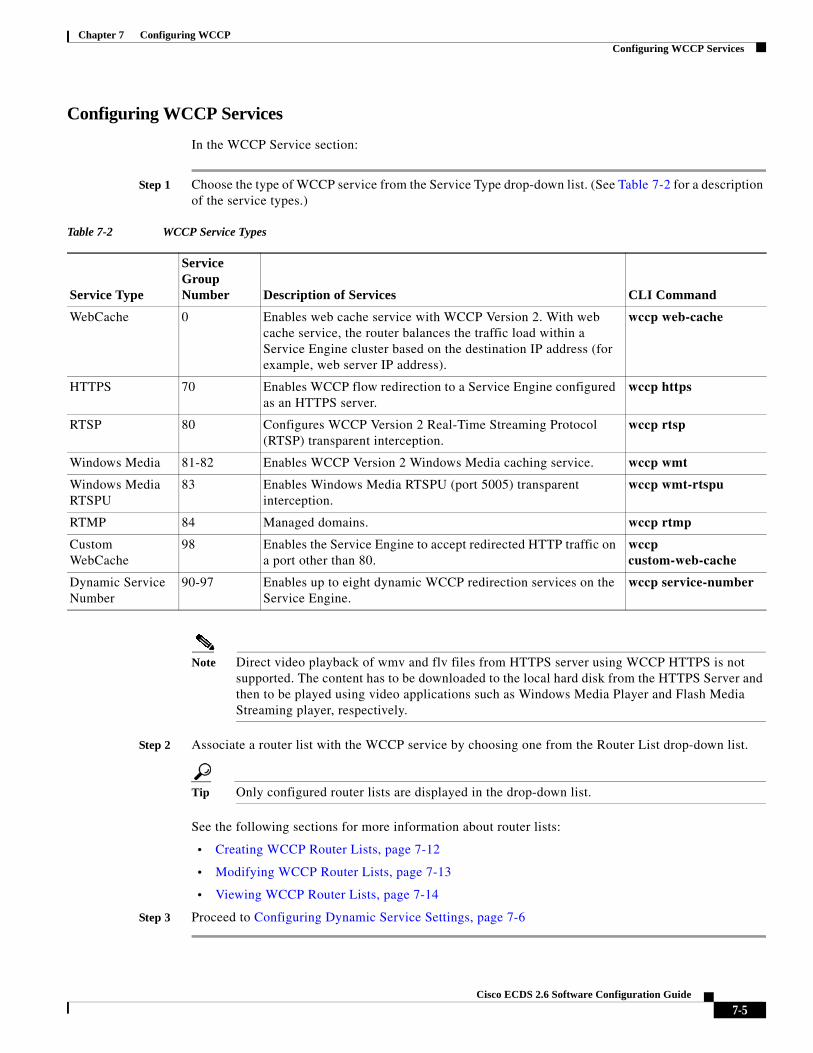
Step 1 Choose the type of WCCP service from the Service Type drop-down list. (See Table 7-2 for a description of the service types.)
Note Direct video playback of wmv and flv files from HTTPS server using WCCP HTTPS is not supported. The content has to be downloaded to the local hard disk from the HTTPS Server and then to be played using video applications such as Windows Media Player and Flash Media Streaming player, respectively.
Step 2 Associate a router list with the WCCP service by choosing one from the Router List drop-down list.
Tip Only configured router lists are displayed in the drop-down list.
See the following sections for more information about router lists:
• Creating WCCP Router Lists, page 7-12
• Modifying WCCP Router Lists, page 7-13
• Viewing WCCP Router Lists, page 7-14
Step 3 Proceed to Configuring Dynamic Service Settings, page 7-6
Table 7-2 WCCP Service Types
Service Type
Service Group Number Description of Services CLI Command
WebCache 0 Enables web cache service with WCCP Version 2. With web cache service, the router balances the traffic load within a Service Engine cluster based on the destination IP address (for example, web server IP address).
wccp web-cache
HTTPS 70 Enables WCCP flow redirection to a Service Engine configured as an HTTPS server.
wccp https
RTSP 80 Configures WCCP Version 2 Real-Time Streaming Protocol (RTSP) transparent interception.
wccp rtsp
Windows Media 81-82 Enables WCCP Version 2 Windows Media caching service. wccp wmt
Windows Media RTSPU
83 Enables Windows Media RTSPU (port 5005) transparent interception.
wccp wmt-rtspu
RTMP 84 Managed domains. wccp rtmp
Custom WebCache
98 Enables the Service Engine to accept redirected HTTP traffic on a port other than 80.
wccp custom-web-cache
Dynamic Service Number
90-97 Enables up to eight dynamic WCCP redirection services on the Service Engine.
wccp service-number
7-5Cisco ECDS 2.6 Software Configuration Guide

Chapter 7 Configuring WCCPConfiguring WCCP Services
Configuring Dynamic Service Settings
In the Dynamic Service Settings section:
Step 1 To associate ports with specific WCCP Version 2 dynamic services, choose the port list number from the Port List drop-down menu. Figure 7-4 shows the Dynamic Service Settings section of the Creating New WCCP Service page.
Figure 7-4 Dynamic Service Settings
All configured port lists are displayed here. You can only associate ports with user-configurable web cache services 90–97. For all other services, the Port List drop-down menu is disabled.
Tip To configure a port list for WCCP Version 2 dynamic services or if no port list already exists, see the “Configuring WCCP Port Lists” section on page 7-15.
Step 2 From the Application drop-down list, choose the application running on the Service Engine to which intercepted traffic must be redirected. Table 7-3 describes the available options.
Step 3 To match the source port for traffic redirection, select the Match Source Port check box.
Step 4 Proceed to Configuring Load Balancing Hash.
Configuring Load Balancing Hash
In the Load Balancing Hash section:
Step 1 To define the destination IP address load-balancing hash, check the Destination IP check box.
Use the wccp web-cache router-list-num 1 hash-destination-ip command.
Figure 7-5 shows the Load Balancing Hash section of the Creating New WCCP Service page.
Table 7-3 Application Redirect Options
Option Description
cache Redirects traffic to the caching application running on the Service Engine.
https-cache Redirects traffic to the HTTPS caching application running on the Service Engine.
streaming Redirects traffic to the streaming media application running on the Service Engine.
7-6Cisco ECDS 2.6 Software Configuration Guide

Chapter 7 Configuring WCCPConfiguring WCCP Services
Figure 7-5 Load Balancing Hash Settings
Step 2 To define the source IP address load-balancing hash, select the Source IP check box. This method is the default hash assignment for HTTPS cache service.
Use the wccp web-cache router-list-num 1 hash-source-ip command.
Step 3 To define destination port load-balancing hash, select the Destination Port check box.
Use the wccp web-cache router-list-num 1 hash-destination-port command.
Step 4 To define the source port load-balancing hash, select the Source Port check box.
Use the wccp web-cache router-list-num 1 hash-source-port command.
Tip For most WCCP services, the destination IP is used for the default hashing target. For HTTPS service, the source IP is used for the default hashing target.
Step 5 Proceed to Configuring Other Settings.
Tip For command examples, see the “Load Balancing Command Examples” section on page 7-33.
Configuring Other Settings
In the Other Settings section:
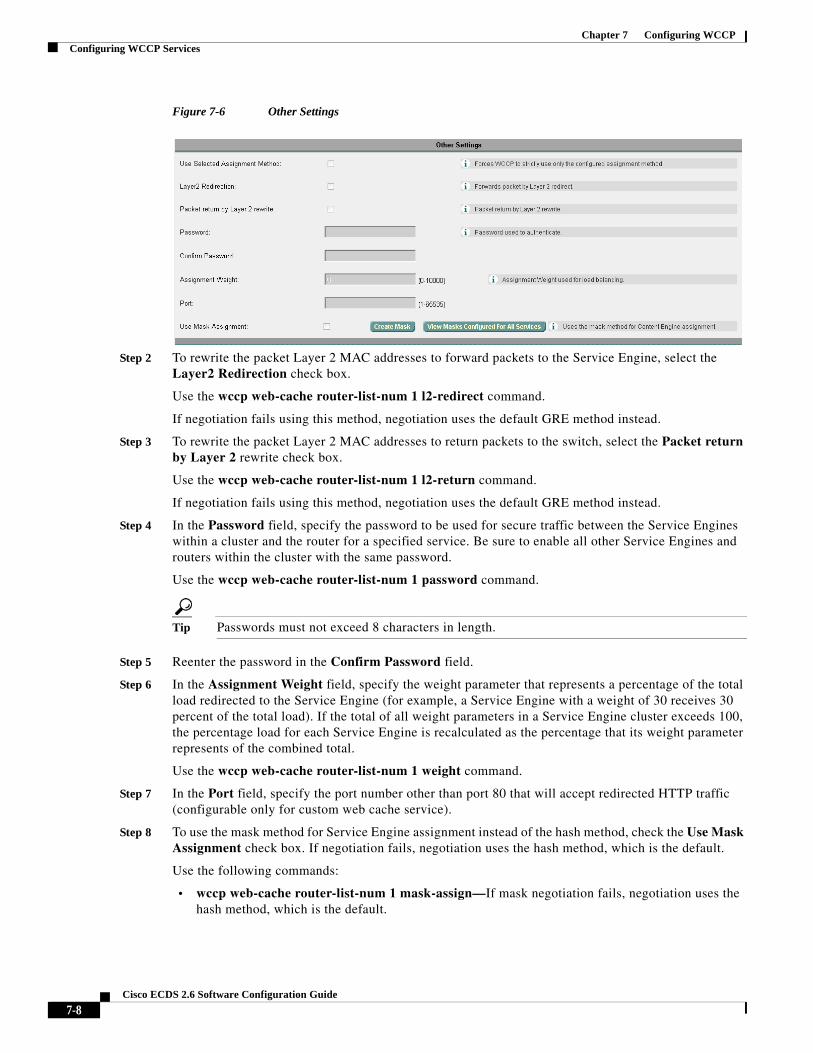
Step 1 To force WCCP to use the configured assignment method only, select the Use Selected Assignment Method check box. This setting can be configured only for HTTPS cache, custom web cache, web cache, and Windows Media services. When applied, both hash and mask assignment load balancing methods can be used.
Figure 7-6 shows the Other Settings section of the Creating New WCCP Service page.
7-7Cisco ECDS 2.6 Software Configuration Guide
Chapter 7 Configuring WCCPConfiguring WCCP Services
Figure 7-6 Other Settings
Step 2 To rewrite the packet Layer 2 MAC addresses to forward packets to the Service Engine, select the Layer2 Redirection check box.
Use the wccp web-cache router-list-num 1 l2-redirect command.
If negotiation fails using this method, negotiation uses the default GRE method instead.
Step 3 To rewrite the packet Layer 2 MAC addresses to return packets to the switch, select the Packet return by Layer 2 rewrite check box.
Use the wccp web-cache router-list-num 1 l2-return command.
If negotiation fails using this method, negotiation uses the default GRE method instead.
Step 4 In the Password field, specify the password to be used for secure traffic between the Service Engines within a cluster and the router for a specified service. Be sure to enable all other Service Engines and routers within the cluster with the same password.
Use the wccp web-cache router-list-num 1 password command.
Tip Passwords must not exceed 8 characters in length.
Step 5 Reenter the password in the Confirm Password field.
Step 6 In the Assignment Weight field, specify the weight parameter that represents a percentage of the total load redirected to the Service Engine (for example, a Service Engine with a weight of 30 receives 30 percent of the total load). If the total of all weight parameters in a Service Engine cluster exceeds 100, the percentage load for each Service Engine is recalculated as the percentage that its weight parameter represents of the combined total.
Use the wccp web-cache router-list-num 1 weight command.
Step 7 In the Port field, specify the port number other than port 80 that will accept redirected HTTP traffic (configurable only for custom web cache service).
Step 8 To use the mask method for Service Engine assignment instead of the hash method, check the Use Mask Assignment check box. If negotiation fails, negotiation uses the hash method, which is the default.
Use the following commands:
• wccp web-cache router-list-num 1 mask-assign—If mask negotiation fails, negotiation uses the hash method, which is the default.
7-8Cisco ECDS 2.6 Software Configuration Guide
Chapter 7 Configuring WCCPConfiguring WCCP Services
• wccp web-cache router-list-num 1 mask-assign assign-method-strict—Mask assignment only. Use assign-method-strict to establish WCCP service exclusively. If negotiation fails or the router does not support WCCP, no WCCP service is created. If mask-assign and assign-method-strict both appear in the command, the result will be either mask assignment or no WCCP service.
• wccp web-cache router-list-num 1 assign-method-strict—Hash assignment only. Use assign-method-strict to establish WCCP service exclusively. If negotiation fails, no WCCP service is created. If assign-method-strict is specified, and the WCCP router does not support hash assignment, then WCCP service will not be successfully configured. If only assign-method-strict appears in the command, the result will be hash assignment only or no WCCP service.
Step 9 Click Submit to save the settings on the WCCP Service page.
• To create a new WCCP service mask, click the Create Mask button. For more information about creating service masks, see the “Configuring WCCP Service Masks” section on page 7-9.
• To modify or delete a configured service mask, click the Edit Mask button. For more information about modifying service masks, see the “Modifying WCCP Service Masks” section on page 7-10.
• To view all configured service masks, click the View Masks Configured for All Services button. For more information about viewing service masks, see the “Viewing WCCP Service Masks” section on page 7-11.
Managing WCCP Service Masks
Use the information in this section to manage WCCP service masks:
• Configuring WCCP Service Masks, page 7-9
• Modifying WCCP Service Masks, page 7-10
• Viewing WCCP Service Masks, page 7-11
• Deleting a WCCP Service Mask, page 7-11
Configuring WCCP Service Masks
Bit masks are specified as hexadecimal numbers. All the specified bit masks together cannot have more than 7 bits set. For example, a correct way of using three masks is OxF (4 bits), Ox1 (1 bit), and Ox3 (2 bits) for a total of 7 bits. In this case, you cannot configure any additional mask other than 0x0. Otherwise, an error message is displayed.
An example of using four masks could be 0xA (2 bits), 0x7 (3 bits), 0x8 (1 bit), 0x1 (1 bit) for a total of 7 bits. You can configure up to 16 WCCP service masks.
To configure WCCP service masks on the Service Engine:
Step 1 Choose Devices > Devices. The Devices window appears, listing all the device types configured in the network.
Step 2 Click the Edit icon next to the Service Engine for which you want to configure WCCP service masks. The Device Home for Service Engine window appears.
Step 3 To display the entire table of contents, click the Show All button above the Contents pane.
Step 4 In the Contents pane, choose Request Routing > WCCP > Services. The WCCP Service Settings for Service Engine window appears.
7-9Cisco ECDS 2.6 Software Configuration Guide

Chapter 7 Configuring WCCPConfiguring WCCP Services
Step 5 Click the Create New WCCP Service Setting icon in the taskbar to configure router lists for a new service. The Creating New WCCP Service window appears.
Step 6 Alternatively, click the Edit WCCP Service Setting icon next to an existing WCCP service for which you want to configure router lists. The Modifying WCCP Service window appears.
Step 7 Under the WCCP Service section, choose a WCCP service from the Service Type drop-down list.
Step 8 Under the Other Settings section, click the Create Mask button next to the Use Mask Assignment check box to configure a service mask and associate it with a WCCP Version 2 service. The Creating New WCCP Service Mask window appears.
Step 9 Choose the type of WCCP service from the Service Type drop-down list. Table 7-2 describes these service types.
Step 10 In the Source IP Mask field, specify the IP address mask defined by a hexadecimal number (for example, 0xFE000000) used to match the packet source IP address. The range is 0x00000000–0xFE000000. The default is 0x00000000.
Step 11 In the Source Port Mask field, specify the port mask defined by a hexadecimal number (for example, 0xFE00) used to match the packet source port number. The port mask range is 0x00–0xFE. The default is 0x0.
Step 12 In the Destination IP Mask field, specify the IP address mask defined by a hexadecimal number (for example, 0xFE000000) used to match the packet destination IP address. The range is 0x0000000–0XFE000000. The default is 0x00001741.
Step 13 In the Destination Port Mask field, specify the port mask defined by a hexadecimal number (for example, 0xFE00) used to match the packet destination port number. The port mask range is 0x00–0xFE. The default is 0x0.
Step 14 To save the settings, click Submit. The Creating New WCCP Service window or the Modifying WCCP Service window appears, depending on the window from which you navigated.
Modifying WCCP Service Masks
To modify a WCCP service mask on the Service Engine:
Step 1 Choose Devices > Devices. The Devices window appears, listing all the device types configured in the ECDS network.
Step 2 Click the Edit icon next to the Service Engine for which you want to configure WCCP service masks. The Device Home for Service Engine window appears.
Step 3 To display the entire table of contents, click the Show All button above the Contents pane.
Step 4 In the Contents pane, choose Request Routing > WCCP > Services. The WCCP Service Settings for Service Engine window appears.
Step 5 Click the Create New WCCP Service Setting icon in the taskbar to configure router lists for a new service. The Creating New WCCP Service window appears.
Alternatively, click the Edit WCCP Service Setting icon next to an existing WCCP service for which you want to configure router lists. The Modifying WCCP Service window appears.
Step 6 Under the WCCP Service section, choose a WCCP service from the Service Type drop-down list.
Step 7 Under the Other Settings section, click the Edit Mask button next to the Use Mask Assignment check box to modify a service mask and associate it with a WCCP Version 2 service. The Modifying WCCP Service Mask window appears.
7-10Cisco ECDS 2.6 Software Configuration Guide

Chapter 7 Configuring WCCPConfiguring WCCP Services
Step 8 The Edit Mask button toggles with the Create Mask button if a service mask has already been configured for a WCCP service.
Step 9 Choose the type of WCCP service from the Service Type drop-down list. See Table 7-2 for a description of the service types.
Step 10 In the Source IP Mask field, specify the IP address mask defined by a hexadecimal number (for example, 0xFE000000) used to match the packet source IP address. The range is 0x00000000–0xFE000000. The default is 0x00000000.
Step 11 In the Source Port Mask field, specify the port mask defined by a hexadecimal number (for example, 0xFE00) used to match the packet source port number. The port mask range is 0x00–0xFE. The default is 0x0.
Step 12 In the Destination IP Mask field, specify the IP address mask defined by a hexadecimal number (for example, 0xFE000000) used to match the packet destination IP address. The range is 0x0000000–0xFE000000. The default is 0x00001741.
Step 13 In the Destination Port Mask field, specify the port mask defined by a hexadecimal number (for example, 0xFC00) used to match the packet destination port number. The port mask range is 0x0–0xFE. The default is 0x0.
Step 14 To save the settings, click Submit. The Creating New WCCP Service window or the Modifying WCCP Service window appears depending on the window from which you navigated.
Viewing WCCP Service Masks
To view all masks configured for a WCCP service:
Step 1 From the Creating New WCCP Service window or Modifying WCCP Service window, click the View Masks Configured for All Services button to view all configured service masks for WCCP services. The WCCP Service Mask Settings for Service Engine window appears. A list of all services for which masks have been configured to match the packet source IP address, source port number, destination IP address, or destination port number are displayed.
Step 2 To return to the Creating New WCCP Service or Modifying WCCP Service window, click the Back (left arrow) icon in the taskbar.
Step 3 To configure a new service mask, click the Create New WCCP Service Mask Setting icon in the taskbar. The Creating New WCCP Service Mask window appears.
Alternatively, click the Edit WCCP Service Mask Setting icon next to an existing WCCP service mask for which you want to change the mask settings. The Modifying WCCP Service Mask window appears.
Deleting a WCCP Service Mask
To delete a service mask on the Service Engine:
Step 1 From the WCCP Service Mask Settings for Service Engine window, click the Edit WCCP Service Mask Setting icon next to an existing WCCP service mask for which you want to change the mask settings. The Modifying WCCP Service Mask window appears.
7-11Cisco ECDS 2.6 Software Configuration Guide

Chapter 7 Configuring WCCPConfiguring WCCP Services
Step 2 Click the Delete WCCP Service Mask icon in the taskbar. The system displays a dialog box asking you to confirm whether you want to permanently delete the service mask configuration.
Step 3 Click OK to confirm. The WCCP Service Mask Settings for Service Engine window appears.
Managing WCCP Router Lists
Use the information in this section to manage router lists while configuring WCCP services in Devices > Request Routing > WCCP > Services. See “Configuring WCCP Services” section on page 7-5 for more information.
• Creating WCCP Router Lists, page 7-12
• Modifying WCCP Router Lists, page 7-13
• Viewing WCCP Router Lists, page 7-14
Creating WCCP Router Lists
You can create up to 8 different router lists with up to 32 IP addresses per list for use with WCCP Version 2 services. A router list must be contain at least one IP address.
To create WCCP router lists:
Step 1 Choose Request Routing > WCCP > Services.
Step 2 Click the New Router List button. The Creating New WCCP Router window appears (Figure 7-7).
Figure 7-7 WCCP New Router List
Step 3 In the Router IP Address field, specify the IP address of the router to be added to the list.
Tip You must enter at least one IP address and all IP addresses added must be unique within the router list.
7-12Cisco ECDS 2.6 Software Configuration Guide

Chapter 7 Configuring WCCPConfiguring WCCP Services
Step 4 To add an IP address to the list, click Add Router. This list represents the IP address of every router that will redirect traffic to this Service Engine for a particular service. If different routers will be used for different services, you must create more than one router list.
The window refreshes and the addresses are listed in numerical order. The order might not match the order in which IP addresses were entered. IP addresses will be displayed in red until settings are saved.
Step 5 To save the router list or to save any edits you have made to the router IP addresses, click Submit. You will be returned to the WCCP Service window.
Modifying WCCP Router Lists
To add or delete an IP address from a router list or to delete a router list:
Step 1 From the Creating New WCCP Service window or Modifying WCCP Service window, choose the router list number from the List Number drop-down list.
Step 2 Click the Edit Router List button. The Modifying WCCP Router List window appears (Figure 7-8).
Figure 7-8 Modifying a WCCP Router List
Step 3 To add a router to the router list, enter the router’s IP address in the Router IP Address field, and click the Add Router button.
Step 4 To remove a router from the router list, select the check box next to the router in the list and click the Remove Router button.
Step 5 To modify the router IP address, click the Edit IP Address icon next to the IP address that you want to modify (Figure 7-9).
7-13Cisco ECDS 2.6 Software Configuration Guide

Chapter 7 Configuring WCCPConfiguring WCCP Services
Figure 7-9 Edit Router List
Step 6 The IP address will be displayed in the Router IP Address field. Once you have changed the IP address, click the Edit button to add the modified IP address to the list. The window refreshes itself, and the changed IP address will be displayed in purple until settings are saved.
Tip The Edit button next to the Router IP Address field is displayed as Add Router to allow you to add any new IP address to the list. The Edit button toggles with the Add Router button.
Step 7 To save the settings, click Submit. The window refreshes itself, and the settings are saved.
Step 8 To delete a router list, follow these steps:
a. From the Modifying WCCP Router window, click the trash can icon (Delete WCCP Router List) in the taskbar. The system displays a dialog box asking you to confirm that you want to permanently delete the router list configuration.
Note When you delete a router list, the WCCP Version 2 services that have been configured to use this router list are also deleted. Make sure that the WCCP service is associated with a different router list, if required, before deleting the previously configured router list.
b. Click OK to confirm. The selected router list and the services with which it is associated are deleted.
Viewing WCCP Router Lists
To view all router lists configured for a WCCP Version 2 dynamic service:
Step 1 To view all configured router lists for WCCP Version 2, click the View All Router List button from the Creating New WCCP Service window or the Modifying WCCP Service window. The WCCP Router List Configurations for Service Engine window appears.
The List Number column displays all configured router list numbers. The Router IP Addresses column displays a list of IP addresses that were added to the router list. From this window you can perform the following actions:
7-14Cisco ECDS 2.6 Software Configuration Guide
Chapter 7 Configuring WCCPConfiguring WCCP Services
• Return to the previous window
• Edit an existing router list
• Create a new router list
Step 2 To return to the Creating New WCCP Service window, click the Back arrow in the GUI taskbar.
Step 3 To configure a new router list and add IP addresses from this window, click the Create New WCCP Router List Configuration icon in the taskbar. The Creating New WCCP Router List window appears.
Step 4 To edit an existing router list, click the Edit WCCP Router List Configuration icon next to the router list that you want to modify. The Modifying WCCP Router window appears. You can add, update, or delete IP addresses.
Tip For an example of the task bar icons, see the “Task Bar” section on page 3-9.
Managing WCCP Port Lists
Use the information in this section to manage WCCP port lists:
• Configuring WCCP Port Lists, page 7-15
• Modifying WCCP Port Lists, page 7-17
Configuring WCCP Port Lists
With eight custom services that use a maximum number of eight ports each, the maximum number of ports that can be specified for transparent redirection is 64.
The legacy custom web cache services (service number 98) can be configured with only one port. If only one legacy service is configured, the total maximum number of transparent redirection ports is 57. If both legacy services are configured, the maximum port total is 50.
All ports receiving HTTP that are configured as members of the same WCCP service share the following characteristics:
• They have the same hash or mask parameters as configured using the Creating New WCCP Service window.
• The service on individual ports cannot be stopped or started individually (WCCP Version 2 restriction).
With Service Engines in a farm, the following restrictions apply:
• All Service Engines that use the same WCCP service are required to configure the same list of ports and the same hash or mask parameters.
• A Service Engine that tries to join the farm with the same WCCP service using a different list of ports or different hash or mask parameters is rejected by the router.
• To change the port list for a particular WCCP service, WCCP service must be stopped on all involved Service Engines, and then all must be restarted with the new parameters.
Procedure
To configure WCCP ports:
7-15Cisco ECDS 2.6 Software Configuration Guide

Chapter 7 Configuring WCCPConfiguring WCCP Services
Step 1 Choose Devices > Devices. The Devices window appears, listing all the device types configured in the network.
Step 2 Click the Edit icon next to the Service Engine for which you want to configure WCCP port lists. The Device Home for Service Engine window appears.
Step 3 To display the entire table of contents, click the Show All button above the Contents pane.
Step 4 In the Contents pane, choose Request Routing > WCCP > Services. The WCCP Service Settings for Service Engine window appears.
Step 5 Click the Create New WCCP Service Setting icon in the taskbar to configure router lists for a new service. The Creating New WCCP Service window appears.
Step 6 Alternatively, click the Edit WCCP Service Setting icon next to an existing WCCP service for which you want to configure router lists. The Modifying WCCP Service window appears.
Step 7 In the WCCP Service section, choose a WCCP dynamic redirection service from the Service Type drop-down list.
Step 8 In the Dynamic Service Settings section, click the New Port List button to configure a port list number to associate ports for a WCCP Version 2 dynamic service (Figure 7-10).
Figure 7-10 New Port List Button
The WCCP Port List Settings window appears (Figure 7-11).
Figure 7-11 WCCP Port List Settings
7-16Cisco ECDS 2.6 Software Configuration Guide
Chapter 7 Configuring WCCPConfiguring WCCP Services
Step 9 Under the Ports column and against a port list number, specify the port number to be added to the list. You can configure a maximum of 8 port numbers per list.
Each port number added must be unique among all configured port lists. Otherwise, an error message is displayed on submit.
For a port list, port numbers need not necessarily be entered in successive fields under the Ports column. Blank fields in between will be removed on submit and all added port numbers will be reordered and displayed in ascending order when you visit the window the next time.
Step 10 Click Submit to save the settings. The Creating New WCCP Service window or Modifying WCCP Service window appears depending where you began.
Modifying WCCP Port Lists
To modify a port list:
Step 1 From the Creating New WCCP Service window or Modifying WCCP Service window, click the Edit Port List button to configure a port list for WCCP Version 2 dynamic services. The WCCP Port List Settings window appears.
Step 2 To modify port numbers in the port list:
a. Choose a port list number and edit any of the port numbers that you wish to change in the Ports column for that row.
b. Click Submit to save the settings. The Creating New WCCP Service window or Modifying WCCP Service window appears depending on the window from which you traversed.
Step 3 To delete a port list:
a. Check the Clear List check box next to the port list that you want to delete. All added port numbers will be removed from the port list.
b. Click Submit to save the settings. The Creating New WCCP Service window or Modifying WCCP Service window appears depending on the window from which you traversed.
To configure dynamic service on the port list, enter the following commands:
SE(config)# wccp port-list 1 5566
SE(config)# wccp service-number 91 router-list-num 1 port-list-num 1 application cache
This command example configures port 5566 on port list #1. At the same time dynamic service with service number 91 is created using preconfigured router-list-num 1 and using the cache application.
The following application types are supported:
cache Redirects incoming traffic to port 80—Standard port for the HTTP server.
https-cache Redirects incoming traffic to port 443—Standard port for the HTTPS server.
streaming Redirects incoming traffic to port 554—Standard port for the RTSP server.
7-17Cisco ECDS 2.6 Software Configuration Guide
Chapter 7 Configuring WCCPConfiguring WCCP Transparent Routing Bypass Settings
Configuring WCCP Transparent Routing Bypass SettingsTo configure WCCP bypass settings.
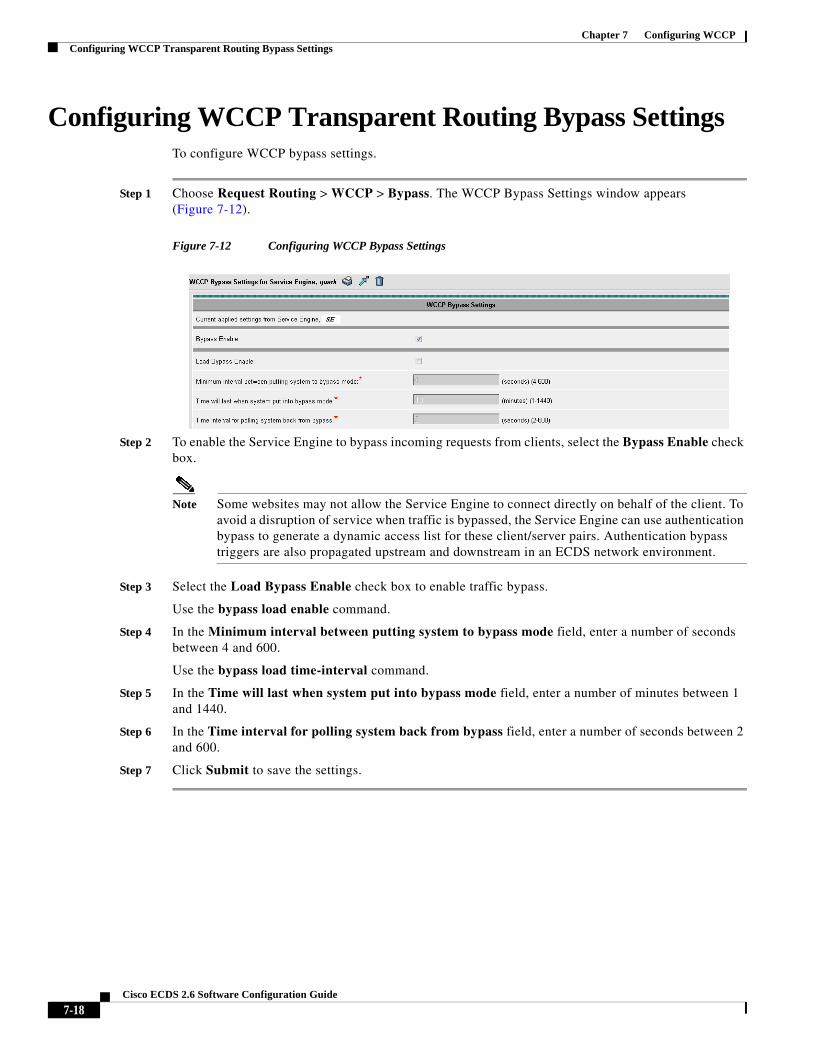
Step 1 Choose Request Routing > WCCP > Bypass. The WCCP Bypass Settings window appears (Figure 7-12).
Figure 7-12 Configuring WCCP Bypass Settings
Step 2 To enable the Service Engine to bypass incoming requests from clients, select the Bypass Enable check box.
Note Some websites may not allow the Service Engine to connect directly on behalf of the client. To avoid a disruption of service when traffic is bypassed, the Service Engine can use authentication bypass to generate a dynamic access list for these client/server pairs. Authentication bypass triggers are also propagated upstream and downstream in an ECDS network environment.
Step 3 Select the Load Bypass Enable check box to enable traffic bypass.
Use the bypass load enable command.
Step 4 In the Minimum interval between putting system to bypass mode field, enter a number of seconds between 4 and 600.
Use the bypass load time-interval command.
Step 5 In the Time will last when system put into bypass mode field, enter a number of minutes between 1 and 1440.
Step 6 In the Time interval for polling system back from bypass field, enter a number of seconds between 2 and 600.
Step 7 Click Submit to save the settings.
7-18Cisco ECDS 2.6 Software Configuration Guide

Chapter 7 Configuring WCCPCreating WCCP Bypass List Entries
Creating WCCP Bypass List EntriesTo create WCCP bypass list entries:
Step 1 Choose Devices > Devices > Request Routing > WCCP > Bypass List.
Step 2 Click the Create New WCCP Bypass List icon. The Creating new WCCP Bypass List window appears (Figure 7-13).
Figure 7-13 Configuring WCCP Bypass Lists
Step 3 Enter the IP address for the client in the Client Address field.
Step 4 Enter the IP address for the server in the Server Address field.
Step 5 Check Submit to save the settings.
Use the following commands:
• To create a WCCP bypass list:
bypass static {clientip [serverip | any-server] | any-client serverip}
• To bypass all except a specific server on a specific port:
bypass static port 80 except-server 1.1.1.1
The system bypasses all the traffic to this port, except the traffic that has a destination IP on the configured list.
Tip Each Service Engine can have up to 50 bypass list entries.
Configuring HTTP IP Spoofing with WCCP
Note You must configure WCCP before you can enable IP Spoofing. Disable the IP Spoofing feature by unchecking the Enable IP Spoofing check box in the ECDS GUI before configuring WCCP. See the “Configuring WCCP General Settings” section on page 7-1 to enable WCCP.
When configured for IP spoofing, the Service Engine connects to the origin server using the client IP address instead of its own IP address.
IP Spoofing does not support the following:
• Non-HTTP protocols
7-19Cisco ECDS 2.6 Software Configuration Guide
Chapter 7 Configuring WCCPConfiguring HTTP IP Spoofing with WCCP
• Multiple SEs
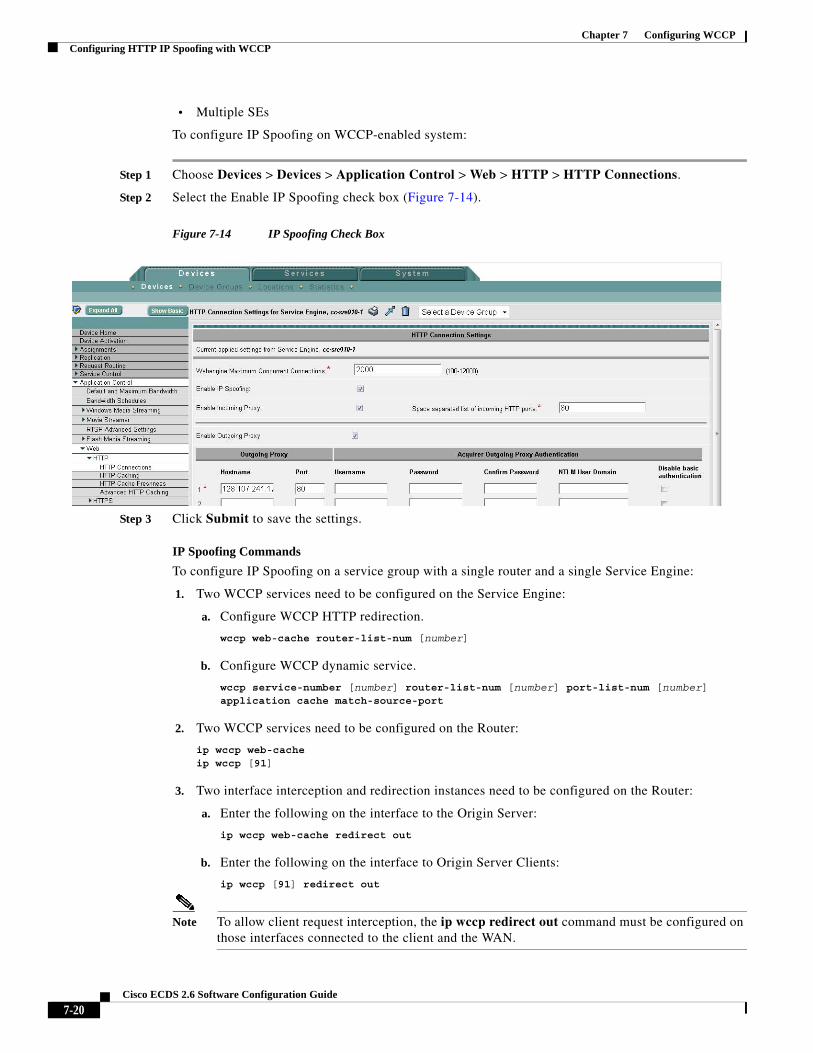
To configure IP Spoofing on WCCP-enabled system:
Step 1 Choose Devices > Devices > Application Control > Web > HTTP > HTTP Connections.
Step 2 Select the Enable IP Spoofing check box (Figure 7-14).
Figure 7-14 IP Spoofing Check Box
Step 3 Click Submit to save the settings.
IP Spoofing Commands
To configure IP Spoofing on a service group with a single router and a single Service Engine:
1. Two WCCP services need to be configured on the Service Engine:
a. Configure WCCP HTTP redirection.
wccp web-cache router-list-num [number]
b. Configure WCCP dynamic service.
wccp service-number [number] router-list-num [number] port-list-num [number] application cache match-source-port
2. Two WCCP services need to be configured on the Router:
ip wccp web-cacheip wccp [91]
3. Two interface interception and redirection instances need to be configured on the Router:
a. Enter the following on the interface to the Origin Server:
ip wccp web-cache redirect out
b. Enter the following on the interface to Origin Server Clients:
ip wccp [91] redirect out
Note To allow client request interception, the ip wccp redirect out command must be configured on those interfaces connected to the client and the WAN.
7-20Cisco ECDS 2.6 Software Configuration Guide
Chapter 7 Configuring WCCPWCCP Interception for Live Streaming
4. Enter the following on the interface to the Service Engine:
ip wccp redirect exclude in
Note The router cannot identify requests coming from the Service Engine because the source IP address of the request is not that of Service Engine. To prevent these Service Engine requests from being returned to the Service Engine unresolved, the ip wccp redirect exclude in command must be applied to the WCCP-enabled router interface to which the Service Engine is connecting. The ip wccp redirect exclude in command prevents the WCCP-enabled router from intercepting any requests coming in on this interface.
Caution If you are using IP Spoofing with multiple Service Engines, the traffic coming back from Origin Server must be redirected to the correct service engine or the flow will break. Because WCCP assignment cannot be controlled, IP Spoofing with multiple Service Engines is not recommended.
Use caution configuring multiple Service Engines to use HTTP proxy; the traffic destination IP will be different than expected.
WCCP Interception for Live StreamingFor WCCP Interception, there are no additional configurations required on the CDSM side for the Managed Live Programs.
The following configurations are to be done specific to WCCP:
1. WCCP Version 2 to be enabled in SE.
2. WCCP Services to be enabled in SE.
3. WCCP Service Group to be enabled in Router.
4. WCCP Router & WCCP enabled SE should be visible to each other.
Note On the Delivery Service configuration in CDSM , the Origin Server Qualified Domain Names must be resolvable.
Configuring WCCP for WMT Manage Live Streaming
To configure WCCP for WMT Manage Live Streaming:
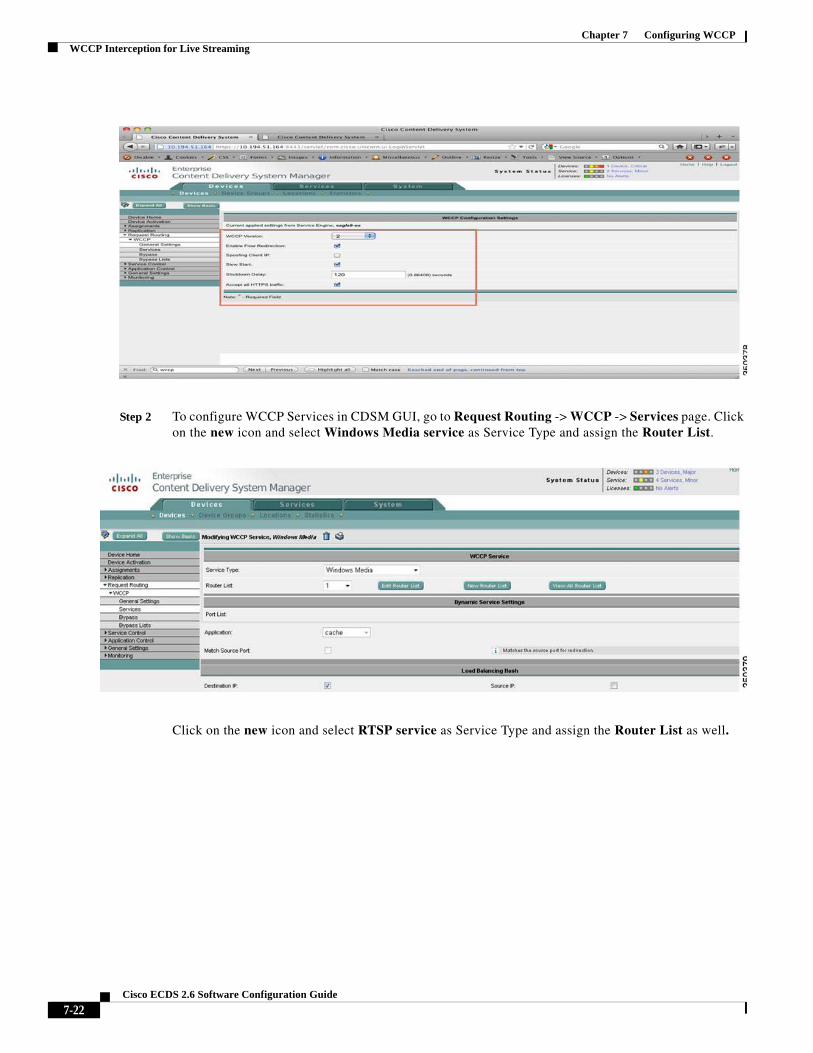
Step 1 Select Devices -> Request Routing -> WCCP -> General Settings.
7-21Cisco ECDS 2.6 Software Configuration Guide
Chapter 7 Configuring WCCPWCCP Interception for Live Streaming
Step 2 To configure WCCP Services in CDSM GUI, go to Request Routing -> WCCP -> Services page. Click on the new icon and select Windows Media service as Service Type and assign the Router List.
Click on the new icon and select RTSP service as Service Type and assign the Router List as well.
7-22Cisco ECDS 2.6 Software Configuration Guide

Chapter 7 Configuring WCCPWCCP Interception for Live Streaming
Example CLI:
wccp-se(config)# wccp version 2wccp-se(config)# wccp router-list 1 <router_ip>wccp-se(config)# wccp wmt router-list-num 1wccp-se(config)# wccp rtsp router-list-num 1
Step 3 On the routers running WCCP Version 2, turn WCCP on for the specified service groups used to redirect the WMT traffic to the Service Engine by entering the following commands:
Router(config)# ip wccp 80Router(config)# ip wccp 81Router(config)# ip wccp 82
Step 4 Configure the interfaces for WCCP redirection, in case if WMT RTSP traffic comes in on the Ethernet interface and needs to be redirected to SE, enable WCCP redirection to service groups 81 and 82 on the specified interface by entering the following commands:
Router(config)# interface Ethernet 0Router(interface)# ip wccp 80 redirect inRouter(interface)# ip wccp 81 redirect inRouter(interface)# ip wccp 82 redirect in
Step 5 Refer to Configuring Programs Section in Configure Services for Live Program configuration on CDSM.
Output Example:
Stream-SE#sh prog program-name wmt-live-videoCurrent Time : Feb 21 2008 @ 20:40:17 UTC (1203626417)Program ID : 992Program Name : wmt-live-videoDelivery Service ID : 998Delivery Service Name : wmt-liveType : WMT Managed Continuous Live
Forwarder List : 10.77.166.139 <- 10.77.166.157
Schedules :Schedule #1: Start Time (loc) : Always started End Time (loc) : N/A Duration : Forever
7-23Cisco ECDS 2.6 Software Configuration Guide
Chapter 7 Configuring WCCPWCCP Interception for Live Streaming
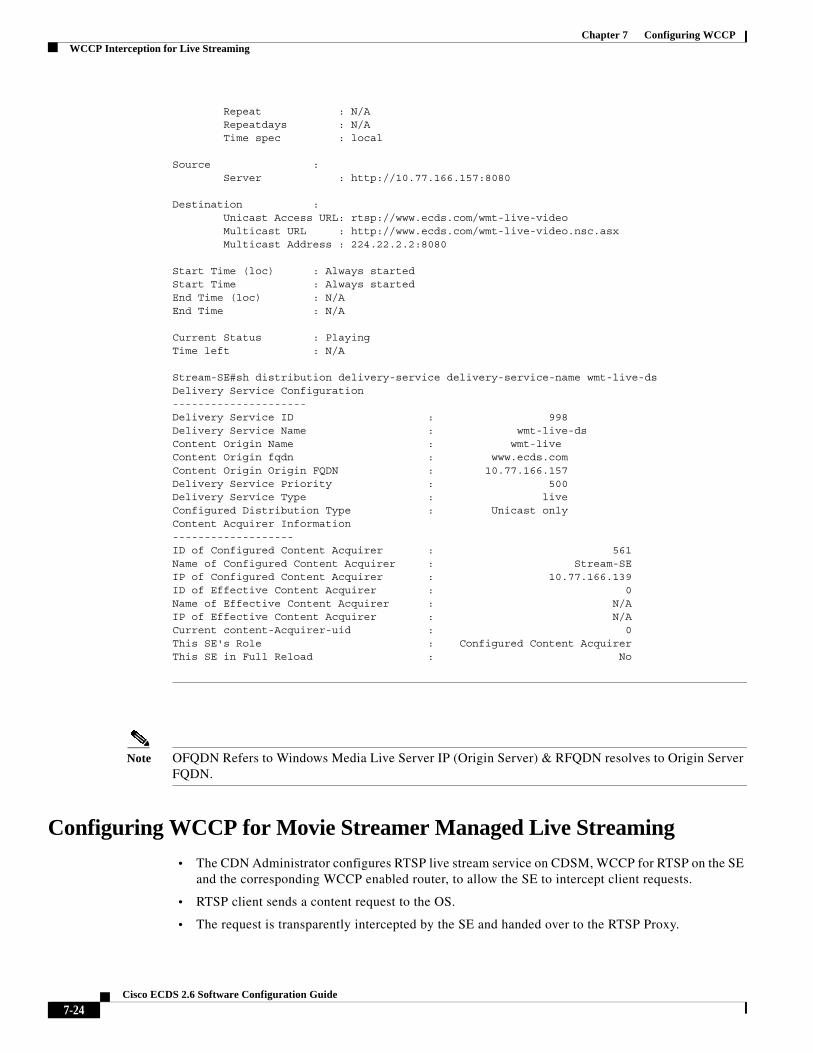
Repeat : N/A Repeatdays : N/A Time spec : local
Source : Server : http://10.77.166.157:8080
Destination : Unicast Access URL: rtsp://www.ecds.com/wmt-live-video Multicast URL : http://www.ecds.com/wmt-live-video.nsc.asx Multicast Address : 224.22.2.2:8080
Start Time (loc) : Always startedStart Time : Always startedEnd Time (loc) : N/AEnd Time : N/A
Current Status : PlayingTime left : N/A
Stream-SE#sh distribution delivery-service delivery-service-name wmt-live-dsDelivery Service Configuration---------------------Delivery Service ID : 998Delivery Service Name : wmt-live-dsContent Origin Name : wmt-liveContent Origin fqdn : www.ecds.comContent Origin Origin FQDN : 10.77.166.157Delivery Service Priority : 500Delivery Service Type : liveConfigured Distribution Type : Unicast onlyContent Acquirer Information-------------------ID of Configured Content Acquirer : 561Name of Configured Content Acquirer : Stream-SEIP of Configured Content Acquirer : 10.77.166.139ID of Effective Content Acquirer : 0Name of Effective Content Acquirer : N/AIP of Effective Content Acquirer : N/ACurrent content-Acquirer-uid : 0This SE's Role : Configured Content AcquirerThis SE in Full Reload : No
Note OFQDN Refers to Windows Media Live Server IP (Origin Server) & RFQDN resolves to Origin Server FQDN.
Configuring WCCP for Movie Streamer Managed Live Streaming
• The CDN Administrator configures RTSP live stream service on CDSM, WCCP for RTSP on the SE and the corresponding WCCP enabled router, to allow the SE to intercept client requests.
• RTSP client sends a content request to the OS.
• The request is transparently intercepted by the SE and handed over to the RTSP Proxy.
7-24Cisco ECDS 2.6 Software Configuration Guide

Chapter 7 Configuring WCCPWCCP Interception for Live Streaming
• The RTSP live request is relayed from the RTSP proxy to the OS. When the RTSP proxy gets the content from the OS, the live stream can then be fanned out to multiple downstream clients.
WCCP supports Movie Streamer RTSP live in a managed scenario.
To configure WCCP for Movie Streamer Managed Live Streaming:
Step 1 Select Devices -> Request Routing -> WCCP -> General Settings.
Step 2 To configure WCCP Services for WCCP in the CDSM GUI go to the Request Routing -> WCCP -> Services page. Click on the new icon and select RTSP service as Service Type and assign the Router List.
Example CLI:
wccp-se(config)# wccp version 2wccp-se(config)# wccp router-list 1 <router_ip>wccp-se(config)# wccp rtsp router-list-num 1WCCP configuration for RTSP succeeded. Please remember to config WCCP service 80 on the corresponding router.
7-25Cisco ECDS 2.6 Software Configuration Guide

Chapter 7 Configuring WCCPWCCP Interception for Live Streaming
Step 3 On the routers running WCCP Version 2, turn WCCP on for the specified service groups used to redirect RTSP traffic to the Service Engine by entering the following command:
Router(config)# ip wccp 80
Step 4 Configure the interfaces for WCCP redirection, in case of RTSP traffic that comes in on an Ethernet interface and needs to be redirected to SE, enable WCCP redirection to service group 80 on the specified interface by entering the following commands:
Router(config)# interface Ethernet 0Router(interface)# ip wccp 80 redirect in
Step 5 Refer to Configuring Programs Section in Configure Services for Live Program configuration on CDSM.
Output Example:Stream-SE#sh programs program-name ms-liveCurrent Time : Feb 21 2008 @ 19:48:43 UTC (1203623323)Program ID : 1422Program Name : ms-liveDelivery Service ID : 1421Delivery Service Name : ms-live-newType : MS Managed Continuous Live
Forwarder List : 10.77.166.139 <- 10.77.166.156
Schedules :Schedule #1: Start Time (loc) : Always started End Time (loc) : N/A Duration : Forever Repeat : N/A Repeatdays : N/A Time spec : local
Source : Primary Source URL : rtsp://10.77.166.156/wccp-test.sdp [serving]
Destination : Unicast Access URL: rtsp://ms.ecds.com/ms-live.sdp Unicast SR URL : rtsp://ms.ecds.com/ms-live.sdp Multicast URL : http://ms.ecds.com/ms-live.sdp Multicast Address : 224.20.20.20:8010 224.20.20.20:8012
Start Time (loc) : Always startedStart Time : Always startedEnd Time (loc) : N/AEnd Time : N/A
Current Status : PlayingTime left : N/A
Stream-SE#sh distribution delivery-service delivery-service-name ms-live-newDelivery Service Configuration---------------------Delivery Service ID : 1421Delivery Service Name : ms-live-newContent Origin Name : ms-liveContent Origin fqdn : ms.ecds.comContent Origin Origin FQDN : 10.77.166.156Delivery Service Priority : 500Delivery Service Type : live
7-26Cisco ECDS 2.6 Software Configuration Guide

Chapter 7 Configuring WCCPWCCP Interception for Live Streaming
Configured Distribution Type : Unicast onlyContent Acquirer Information-------------------ID of Configured Content Acquirer : 561Name of Configured Content Acquirer : Stream-SEIP of Configured Content Acquirer : 10.77.166.139ID of Effective Content Acquirer : 0Name of Effective Content Acquirer : N/AIP of Effective Content Acquirer : N/ACurrent content-Acquirer-uid : 0This SE's Role : Configured Content AcquirerThis SE in Full Reload : No
.
Note OFQDN Refers to Darwin Streaming Server IP (Origin Server) & RFQDN resolves to Origin Server FQDN.
Note RTSP live does not work when SE is behind NAT, this is a well known limitation due to the fact that when the RTSP negotiated video/audio data stream UDP ports are behind NAT, origin server can not reach the UDP ports.
Configuring WCCP for Flash Media Streaming
• To allow the service engine to intercept client requests, the CDN Administrator configures wccp for rtmp on the service engine and wccp for service group number 84 on the wccp enabled router.
• Flash client sends a flash content request to the OS.
• The request is transparently intercepted by SE and handed over to the FMS Proxy.
• The request is relayed from the edge proxy to the OS.
To configure WCCP for flash media streaming:
Step 1 Select Devices -> Request Routing -> WCCP -> General Settings.
7-27Cisco ECDS 2.6 Software Configuration Guide

Chapter 7 Configuring WCCPWCCP Interception for Live Streaming
Step 2 To configure WCCP Services in CDSM GUI, go to the Request Routing -> WCCP -> Services page. Click on the new icon and select RTMP Service as Service Type and assign the Router List.
Example CLI:
se(config)#wccp version 2se(config)#wccp router-list 1 <router_ip>se(config)#wccp rtmp router-list-num 1
Step 3 On the router side , enable WCCP service for the service Group 84 by executing the following command:
router(config)# ip wccp 84.
Step 4 Configure the interfaces for WCCP redirection, in case of RTMP traffic that comes in on the Ethernet interface and needs to be redirected to SE, enable WCCP redirection to service groups 84on the specified interface by entering the command:
Router(config)# interface Ethernet 0
7-28Cisco ECDS 2.6 Software Configuration Guide

Chapter 7 Configuring WCCPWCCP Interception for Live Streaming
Router(interface)# ip wccp 84 redirect in
Step 5 In order for the SE to actually handle the intercepted request (cache unmanaged vods/split unmanaged live streams) and not bypass the request directly to the origin, the following configuration must be entered on the desired SE:
SE (config)# bypass static port 1935 except-server <fms-orgin>
Step 6 Configure Delivery Service in CDSM with FMS Live Server as Origin Server. For more information refer to Configuring Delivery Services section.
No Program configuration is needed on CDSM for FMS Live Streaming. For more information refer to Live Streaming section.
Note WCCP RTMP Unmanaged Live stream splitting is not supported.
Example URL:
rtmp://<RFQDN>/live-ecds/<live-stream-name>
Output Example:
Stream-SE#sh distribution delivery-service delivery-service-name fms-dsDelivery Service Configuration---------------------Delivery Service ID : 459Delivery Service Name : fms-dsContent Origin Name : fms-osContent Origin fqdn : www.fms.comContent Origin Origin FQDN : 10.77.144.137Delivery Service Priority : 500Configured Distribution Type : Unicast only
Content Acquirer Information-------------------ID of Configured Content Acquirer : 561Name of Configured Content Acquirer : Stream-SEIP of Configured Content Acquirer : 10.77.166.139ID of Effective Content Acquirer : 561Current content-Acquirer-uid : 1203623846This SE's Role : Configured Content AcquirerThis SE in Full Reload : No
Note OFQDN Refers to FMS Media Server IP (Origin Server) & RFQDN resolves to Origin Server FQDN.
Troubleshooting WCCP Live Streaming
For troubleshooting WCCP Live Streaming setup refer the section below:
• Check for WCCP formation in Service Engine using the following command:
Stream-SE#sh wccp routersRouter Information for Service: RTMP cache Routers Configured and Seeing this Service Engine(1) Router Id Sent To Recv ID
7-29Cisco ECDS 2.6 Software Configuration Guide
Chapter 7 Configuring WCCPWCCP Interception for Live Streaming
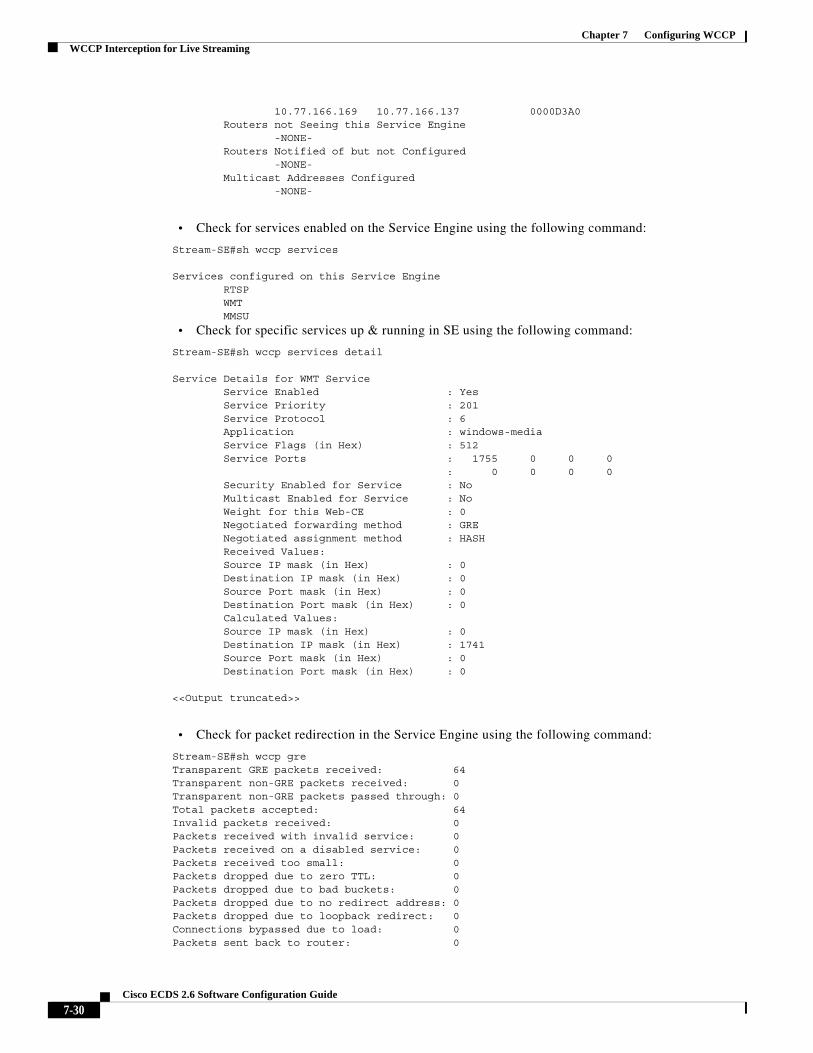
10.77.166.169 10.77.166.137 0000D3A0 Routers not Seeing this Service Engine -NONE- Routers Notified of but not Configured -NONE- Multicast Addresses Configured -NONE-
• Check for services enabled on the Service Engine using the following command:
Stream-SE#sh wccp services
Services configured on this Service Engine RTSP WMT MMSU
• Check for specific services up & running in SE using the following command:
Stream-SE#sh wccp services detail
Service Details for WMT Service Service Enabled : Yes Service Priority : 201 Service Protocol : 6 Application : windows-media Service Flags (in Hex) : 512 Service Ports : 1755 0 0 0 : 0 0 0 0 Security Enabled for Service : No Multicast Enabled for Service : No Weight for this Web-CE : 0 Negotiated forwarding method : GRE Negotiated assignment method : HASH Received Values: Source IP mask (in Hex) : 0 Destination IP mask (in Hex) : 0 Source Port mask (in Hex) : 0 Destination Port mask (in Hex) : 0 Calculated Values: Source IP mask (in Hex) : 0 Destination IP mask (in Hex) : 1741 Source Port mask (in Hex) : 0 Destination Port mask (in Hex) : 0
<<Output truncated>>
• Check for packet redirection in the Service Engine using the following command:
Stream-SE#sh wccp greTransparent GRE packets received: 64Transparent non-GRE packets received: 0Transparent non-GRE packets passed through: 0Total packets accepted: 64Invalid packets received: 0Packets received with invalid service: 0Packets received on a disabled service: 0Packets received too small: 0Packets dropped due to zero TTL: 0Packets dropped due to bad buckets: 0Packets dropped due to no redirect address: 0Packets dropped due to loopback redirect: 0Connections bypassed due to load: 0Packets sent back to router: 0
7-30Cisco ECDS 2.6 Software Configuration Guide
Chapter 7 Configuring WCCPBasic WCCP CLI Configuration Examples
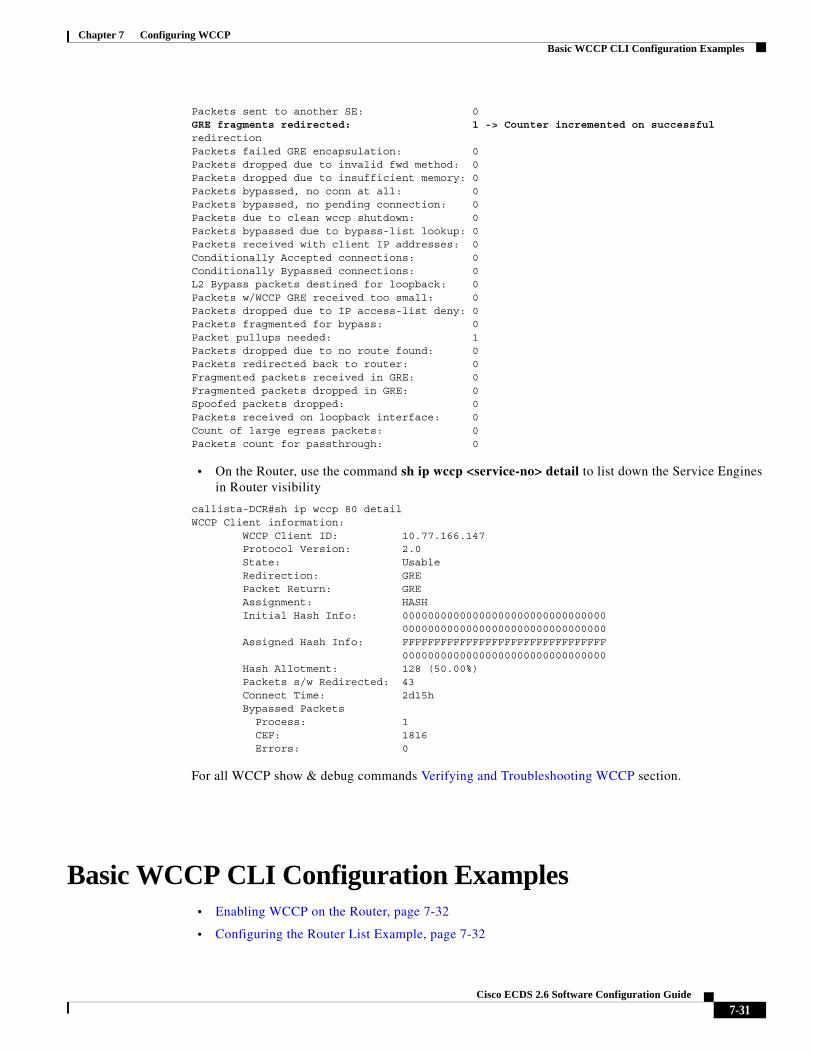
Packets sent to another SE: 0GRE fragments redirected: 1 -> Counter incremented on successful redirectionPackets failed GRE encapsulation: 0Packets dropped due to invalid fwd method: 0Packets dropped due to insufficient memory: 0Packets bypassed, no conn at all: 0Packets bypassed, no pending connection: 0Packets due to clean wccp shutdown: 0Packets bypassed due to bypass-list lookup: 0Packets received with client IP addresses: 0Conditionally Accepted connections: 0Conditionally Bypassed connections: 0L2 Bypass packets destined for loopback: 0Packets w/WCCP GRE received too small: 0Packets dropped due to IP access-list deny: 0Packets fragmented for bypass: 0Packet pullups needed: 1Packets dropped due to no route found: 0Packets redirected back to router: 0Fragmented packets received in GRE: 0Fragmented packets dropped in GRE: 0Spoofed packets dropped: 0Packets received on loopback interface: 0Count of large egress packets: 0Packets count for passthrough: 0
• On the Router, use the command sh ip wccp <service-no> detail to list down the Service Engines in Router visibility
callista-DCR#sh ip wccp 80 detailWCCP Client information: WCCP Client ID: 10.77.166.147 Protocol Version: 2.0 State: Usable Redirection: GRE Packet Return: GRE Assignment: HASH Initial Hash Info: 00000000000000000000000000000000 00000000000000000000000000000000 Assigned Hash Info: FFFFFFFFFFFFFFFFFFFFFFFFFFFFFFFF 00000000000000000000000000000000 Hash Allotment: 128 (50.00%) Packets s/w Redirected: 43 Connect Time: 2d15h Bypassed Packets Process: 1 CEF: 1816 Errors: 0
For all WCCP show & debug commands Verifying and Troubleshooting WCCP section.
Basic WCCP CLI Configuration Examples• Enabling WCCP on the Router, page 7-32
• Configuring the Router List Example, page 7-32
7-31Cisco ECDS 2.6 Software Configuration Guide
Chapter 7 Configuring WCCPBasic WCCP CLI Configuration Examples
• Configuring a Multiple Router/Multiple SE WCCP Service Example, page 7-32
• Load Balancing Command Examples, page 7-33
• Web Caching Command Examples, page 7-35
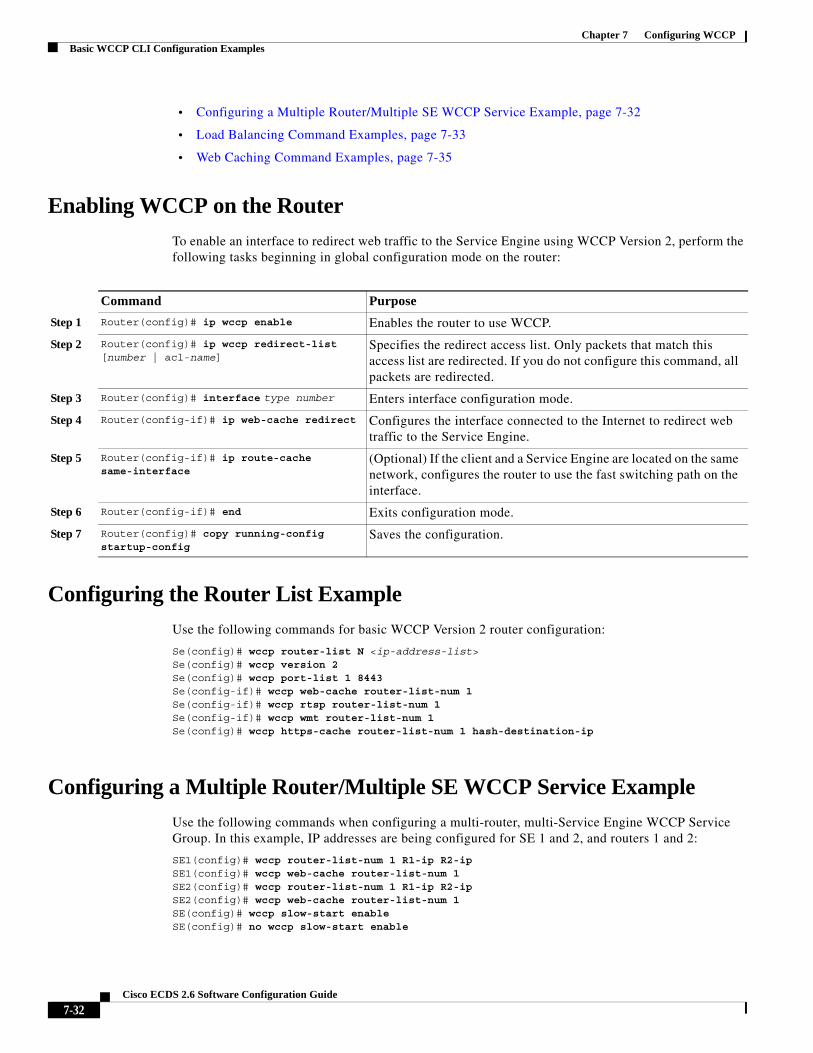
Enabling WCCP on the Router
To enable an interface to redirect web traffic to the Service Engine using WCCP Version 2, perform the following tasks beginning in global configuration mode on the router:
Configuring the Router List Example
Use the following commands for basic WCCP Version 2 router configuration:
Se(config)# wccp router-list N <ip-address-list>Se(config)# wccp version 2Se(config)# wccp port-list 1 8443Se(config-if)# wccp web-cache router-list-num 1Se(config-if)# wccp rtsp router-list-num 1Se(config-if)# wccp wmt router-list-num 1Se(config)# wccp https-cache router-list-num 1 hash-destination-ip
Configuring a Multiple Router/Multiple SE WCCP Service Example
Use the following commands when configuring a multi-router, multi-Service Engine WCCP Service Group. In this example, IP addresses are being configured for SE 1 and 2, and routers 1 and 2:
SE1(config)# wccp router-list-num 1 R1-ip R2-ipSE1(config)# wccp web-cache router-list-num 1SE2(config)# wccp router-list-num 1 R1-ip R2-ipSE2(config)# wccp web-cache router-list-num 1SE(config)# wccp slow-start enableSE(config)# no wccp slow-start enable
Command Purpose
Step 1 Router(config)# ip wccp enable Enables the router to use WCCP.
Step 2 Router(config)# ip wccp redirect-list [number | acl-name]
Specifies the redirect access list. Only packets that match this access list are redirected. If you do not configure this command, all packets are redirected.
Step 3 Router(config)# interface type number Enters interface configuration mode.
Step 4 Router(config-if)# ip web-cache redirect Configures the interface connected to the Internet to redirect web traffic to the Service Engine.
Step 5 Router(config-if)# ip route-cache same-interface
(Optional) If the client and a Service Engine are located on the same network, configures the router to use the fast switching path on the interface.
Step 6 Router(config-if)# end Exits configuration mode.
Step 7 Router(config)# copy running-config startup-config
Saves the configuration.
7-32Cisco ECDS 2.6 Software Configuration Guide

Chapter 7 Configuring WCCPBasic WCCP CLI Configuration Examples
Load Balancing Command Examples
• Hash Assignment Command Example, page 7-33
• Mask Assignment Command Example, page 7-33
• Weight Assignment Command Example, page 7-34
Hash Assignment Command Example
The following example configures RTSP service with the hash assignment method using the source IP:
SE1(config)# wccp rtsp router-list-num 1 hash-source-ip
Check your configuration using the following show command:
MF-3825#show ip wccp 80 detail
WCCP Client information: WCCP Client ID: 192.168.1.5 Protocol Version: 2.0 State: Usable Redirection: GRE Packet Return: GRE Assignment: HASH Initial Hash Info: 00000000000000000000000000000000 00000000000000000000000000000000 Assigned Hash Info: FFFFFFFFFFFFFFFFFFFFFFFFFFFFFFFF 00000000000000000000000000000000 Hash Allotment: 128 (50.00%) Packets s/w Redirected: 44 Connect Time: 06:11:51 Bypassed Packets Process: 0 CEF: 0 Errors: 0
WCCP Client ID: 192.168.1.54 Protocol Version: 2.0 State: Usable Redirection: GRE Packet Return: GRE Assignment: HASH Initial Hash Info: 00000000000000000000000000000000 00000000000000000000000000000000 Assigned Hash Info: 00000000000000000000000000000000 FFFFFFFFFFFFFFFFFFFFFFFFFFFFFFFF Hash Allotment: 128 (50.00%) Packets s/w Redirected: 0 Connect Time: 00:46:50 Bypassed Packets Process: 0 CEF: 0 Errors: 0
Mask Assignment Command Example
Mask assignment is configured correctly by using the following command:
SE(config)# wccp web-cache mask src-ip-mask 0x1SE(config)# wccp web-cache router-list-num 1 mask-assignSE(config)# wccp web-cache mask src-ip-mask 0x1
7-33Cisco ECDS 2.6 Software Configuration Guide

Chapter 7 Configuring WCCPBasic WCCP CLI Configuration Examples
SE(config)# wccp web-cache router-list-num 1 mask-assign
Check your configuration using the following show command:
router# show ip wccp web-cache detail
WCCP Client information: WCCP Client ID: 192.168.1.54 Protocol Version: 2.0 State: Usable Redirection: GRE Packet Return: GRE Packets Redirected: 0 Connect Time: 00:02:03 Assignment: MASK Mask SrcAddr DstAddr SrcPort DstPort ---- ------- ------- ------- ------- 0000: 0x00000001 0x00000000 0x0000 0x0000 Value SrcAddr DstAddr SrcPort DstPort SE-IP ----- ------- ------- ------- ------- ----- 0000: 0x00000000 0x00000000 0x0000 0x0000 0xC0A80136 (192.168.1.54)
WCCP Client ID: 192.168.1.5 Protocol Version: 2.0
State: Usable Redirection: GRE Packet Return: GRE Packets Redirected: 0 Connect Time: 00:02:03 Assignment: MASK Mask SrcAddr DstAddr SrcPort DstPort ---- ------- ------- ------- ------- 0000: 0x00000001 0x00000000 0x0000 0x0000 Value SrcAddr DstAddr SrcPort DstPort SE-IP ----- ------- ------- ------- ------- ----- 0001: 0x00000001 0x00000000 0x0000 0x0000 0xC0A80105 (192.168.1.5)
Weight Assignment Command Example
In the following example, SE 1 has better performing hardware than the SE 2. The administrator wants to have more buckets claimed by the SE 1. The following shows that a higher weight number is assigned to the service engine that has better equipment:
SE 1(config)# wccp service-number 91 router-list-num 1 port-list-num 1 application cache weight 1000
SE 2(config)# wccp service-number 91 router-list-num 1 port-list-num 1 application cache weight 9000
Check the results by entering the following show command:ServiceEngine# show ip wccp 91 detail
WCCP Client information: WCCP Client ID: 192.168.1.5 Protocol Version: 2.0 State: Usable Redirection: GRE Packet Return: GRE Assignment: HASH Initial Hash Info: 00000000000000000000000000000000 00000000000000000000000000000000
7-34Cisco ECDS 2.6 Software Configuration Guide

Chapter 7 Configuring WCCPBasic WCCP CLI Configuration Examples
Web Caching Command Examples
When WCCP support is enabled on the router and on the Service Engines, the devices can communicate and deliver the services for which they are configured. To suspend these services, you can disable WCCP support on the router rather than powering off or otherwise disabling individual Service Engines. (For instance, use the no ip wccp router command to disable WCCP support on the router.)
Many WCCP Version 2 services also require a configuration of the appropriate wccp global configuration command. Refer to the Cisco ECDS Command Reference.
See the following sections for more information:
• Web Cache Service Configuration with Clients and Service Engine on the Same Subnet, page 7-35
• Configuring the Service Engine for Web Cache Service—Clients and Service Engine on the Same Subnet, page 7-35
• Configuring the Router for Web Cache Service—Clients and Service Engine on the Same Subnet, page 7-36
• Configuration Examples—Web Cache Service with Clients and Service Engine on the Same Subnet, page 7-36
• Web Cache Service Configuration with Clients and Service Engine on Different Subnets, page 7-37
• Configuring the Service Engine for Web Cache Service—Clients and Service Engine on Different Subnets, page 7-37
• Configuring the Router for Web Cache Service—Clients and Service Engine on Different Subnets, page 7-38
• Configuration Examples—Web Cache Service with Clients and Service Engine on Different Subnets, page 7-39
Web Cache Service Configuration with Clients and Service Engine on the Same Subnet
In this scenario, the Service Engine and the requesting clients are on the same subnet A router running WCCP Version 2 transparently redirects client HTTP traffic bound for router interface s0/0 to the Service Engine. The web cache service redirects HTTP traffic on port 80 only.
Configuring the Service Engine for Web Cache Service—Clients and Service Engine on the Same Subnet
To configure the Service Engine for web cache service, perform the following steps while logged in to the ECDS software in global configuration mode:
Command Purpose
Step 1 ServiceEngine(config)# wccp version 2 Ensures that the Service Engine is running WCCP Version 2.
Step 2 ServiceEngine(config)# wccp router-list 1 10.10.10.1 Configures a router list.
Step 3 ServiceEngine(config)# wccp web-cache router-list-num 1
Informs the routers in the specified router list that the Service Engine is accepting web cache service.
7-35Cisco ECDS 2.6 Software Configuration Guide

Chapter 7 Configuring WCCPBasic WCCP CLI Configuration Examples
Configuring the Router for Web Cache Service—Clients and Service Engine on the Same Subnet
To configure the router for web cache service, perform the following steps while logged in to the router in global configuration mode:
Configuration Examples—Web Cache Service with Clients and Service Engine on the Same Subnet
This example shows a Service Engine and router configured for web cache service:
Service Engine
hostname Service_engine_2.5.5!clock timezone pst -8 0!ip domain-name cu.net!interface FastEthernet 0ip address 10.10.20.10 255.255.255.0no autosensebandwidth 100full-duplexexitinterface FastEthernet 1shutdown
Step 4 ServiceEngine(config)# exit Exits global configuration mode.
Step 5 ServiceEngine# copy running-config startup-config Writes running configurations to nonvolatile memory.
Command Purpose
Command Purpose
Step 1 Router(config)# ip wccp web-cache Instructs the router to run the web cache service.
Step 2 Router(config)# interface Ethernet0 Specifies which router interface to configure. In this scenario, Ethernet0 is the router interface to which the Service Engine and clients are connected.
Step 3 Router(config-if)# ip route-cache same-interface
Enables fast switching of redirected packets back through the interface on which they were received. Without this command, the router does not use the high-speed switching cache, and the packets are process-switched, a much slower method.
Step 4 Router(config)# interface Serial0 Specifies which router interface to configure. In this scenario, Serial0 is the router interface to the Internet.
Step 5 Router(config-if)# ip wccp web-cache redirect out
Instructs the router to redirect web cache traffic bound for the specified interface to Service Engines that accept web cache service. In this scenario there is only one router. Web cache traffic is defined as TCP port 80 traffic.
Step 6 Router(config-if)# exit Exits interface configuration mode.
7-36Cisco ECDS 2.6 Software Configuration Guide
Chapter 7 Configuring WCCPBasic WCCP CLI Configuration Examples
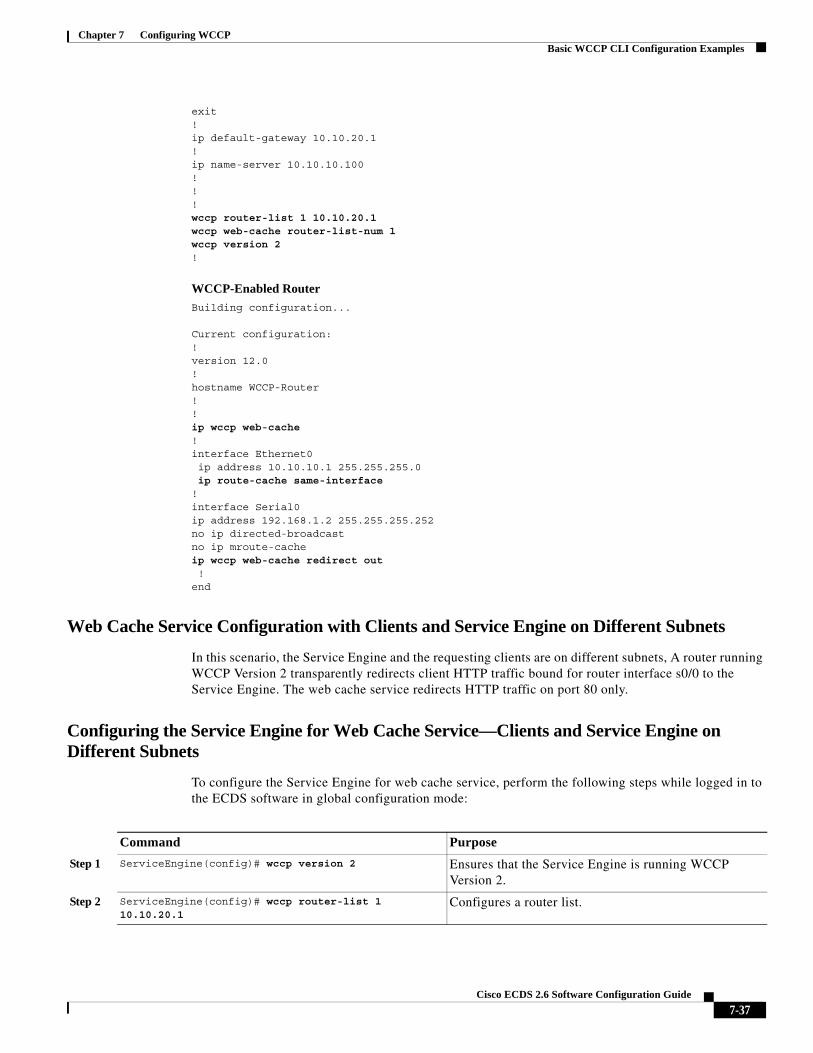
exit!ip default-gateway 10.10.20.1!ip name-server 10.10.10.100!!!wccp router-list 1 10.10.20.1wccp web-cache router-list-num 1wccp version 2!
WCCP-Enabled Router
Building configuration...
Current configuration:!version 12.0!hostname WCCP-Router!!ip wccp web-cache !interface Ethernet0 ip address 10.10.10.1 255.255.255.0 ip route-cache same-interface!interface Serial0ip address 192.168.1.2 255.255.255.252no ip directed-broadcastno ip mroute-cacheip wccp web-cache redirect out !end
Web Cache Service Configuration with Clients and Service Engine on Different Subnets
In this scenario, the Service Engine and the requesting clients are on different subnets, A router running WCCP Version 2 transparently redirects client HTTP traffic bound for router interface s0/0 to the Service Engine. The web cache service redirects HTTP traffic on port 80 only.
Configuring the Service Engine for Web Cache Service—Clients and Service Engine on Different Subnets
To configure the Service Engine for web cache service, perform the following steps while logged in to the ECDS software in global configuration mode:
Command Purpose
Step 1 ServiceEngine(config)# wccp version 2 Ensures that the Service Engine is running WCCP Version 2.
Step 2 ServiceEngine(config)# wccp router-list 1 10.10.20.1
Configures a router list.
7-37Cisco ECDS 2.6 Software Configuration Guide

Chapter 7 Configuring WCCPBasic WCCP CLI Configuration Examples
Configuring the Router for Web Cache Service—Clients and Service Engine on Different Subnets
To configure the router for web cache service, perform the following steps while logged in to the router in global configuration mode:
Step 3 ServiceEngine(config)# wccp web-cache router-list-num 1
Informs the routers in the specified router list that the Service Engine is accepting web cache service.
Step 4 ServiceEngine(config)# exit Exits global configuration mode.
Step 5 ServiceEngine# copy running-config startup-config Writes running configurations to nonvolatile memory.
Command Purpose
Step 1 Router(config)# ip wccp web-cache Instructs the router to run the web cache service.
Step 2 Router(config)# interface Serial0 Specifies which router interface to configure. In this scenario, Serial0 is the router interface to the Internet.
Step 3 Router(config-if)# ip wccp web-cache redirect out Instructs the router to redirect web cache traffic bound for the specified interface to Service Engines that accept web cache service. In this scenario there is only one router. Web cache traffic is defined as HTTP packets on port 80.
Step 4 Router(config-if)# exit Exits interface configuration mode.
7-38Cisco ECDS 2.6 Software Configuration Guide

Chapter 7 Configuring WCCPBasic WCCP CLI Configuration Examples
Configuration Examples—Web Cache Service with Clients and Service Engine on Different Subnets
This example shows a Service Engine and router configured for web cache service:
Service Engine Configuration
hostname Service_engine_2.5.5!clock timezone pst -8 0!ip domain-name cisco.com!exec-timeout 20!interface FastEthernet 0ip address 10.10.20.10 255.255.255.0no autosensebandwidth 100full-duplexexitinterface FastEthernet 1shutdownexit!ip default-gateway 10.10.20.1!ip name-server 10.10.10.100!!wccp router-list 1 10.10.20.1wccp web-cache router-list-num 1wccp version 2!!!...
WCCP-Enabled Router Configuration
Building configuration...
Current configuration:!hostname WCCP-Router!!ip subnet-zero!ip wccp web-cache !interface Ethernet0 ip address 10.10.10.1 255.255.255.0!interface Ethernet1 ip address 10.10.20.1 255.255.255.0!interface Serial0 ip address 192.168.1.2 255.255.255.252 no ip directed-broadcast no ip mroute-cacheip wccp web-cache redirect outend
7-39Cisco ECDS 2.6 Software Configuration Guide

Chapter 7 Configuring WCCPWhere to Go Next
Where to Go NextProceed to Chapter 8, “Configuring Services” for information about configuring ECDS delivery services and programs.
For more information about WCCP, see the following resources:
• Web Cache Communication Protocol v2
Tip For the most current information, refer to the Cisco ECDS 2.6 Software Administration Configuration Guide on Cisco.com.
7-40Cisco ECDS 2.6 Software Configuration Guide