
Configuring Red Hat Enterprise Linux 5 on VMware before Oracle 11gR2 installation.
41
Configuring Red Hat Enterprise Linux 5 on VMware before Oracle 11gR2 installation
-
Upload
marylou-brooks -
Category
Documents
-
view
246 -
download
3
Transcript of Configuring Red Hat Enterprise Linux 5 on VMware before Oracle 11gR2 installation.

Configuring Red Hat Enterprise Linux 5 on VMware
before Oracle 11gR2 installation
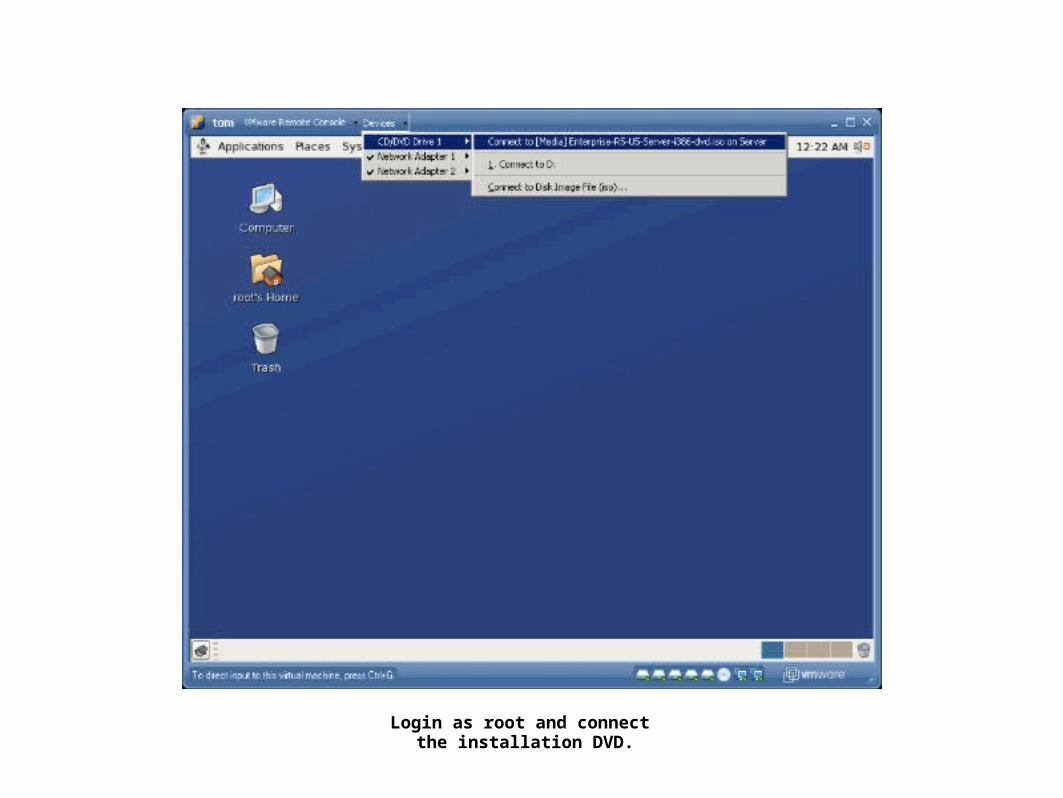
Login as root and connect the installation DVD.

Open a terminal window and install additional required packages.
[root@localhost ~]# cd “/media/Enterprise Linux dvd 20100405/Server”
[root@localhost Server]# rpm -Uvh binutils-2.*
[root@localhost Server]# rpm -Uvh compat-libstdc++-33*
[root@localhost Server]# rpm -Uvh elfutils-libelf-0*
[root@localhost Server]# rpm -Uvh elfutils-libelf-devel-*
[root@localhost Server]# rpm -Uvh elfutils-libelf-devel-static-*
[root@localhost Server]# rpm -Uvh gcc-4.*
[root@localhost Server]# rpm -Uvh gcc-c++*
[root@localhost Server]# rpm -Uvh glibc-2.*
[root@localhost Server]# rpm -Uvh glibc-common-2.*
[root@localhost Server]# rpm -Uvh glibc-devel-2.*
[root@localhost Server]# rpm -Uvh glibc-headers-2.*
[root@localhost Server]# rpm -Uvh unixODBC-devel-2.*
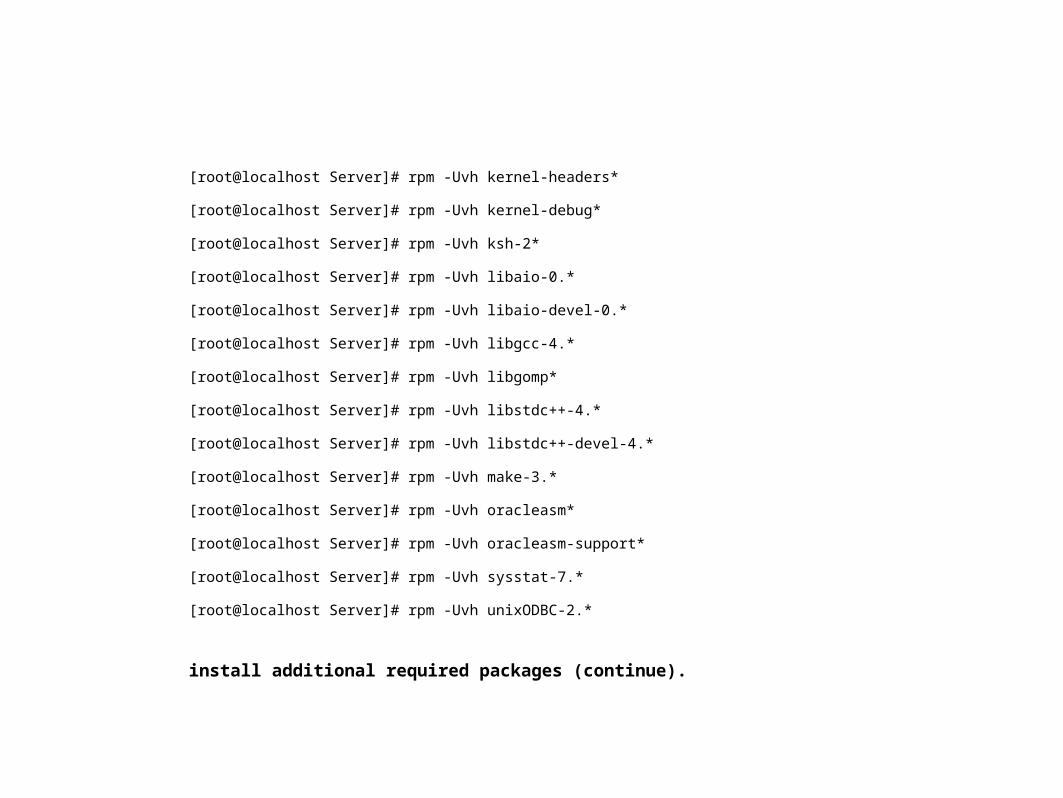
install additional required packages (continue).
[root@localhost Server]# rpm -Uvh kernel-headers*
[root@localhost Server]# rpm -Uvh kernel-debug*
[root@localhost Server]# rpm -Uvh ksh-2*
[root@localhost Server]# rpm -Uvh libaio-0.*
[root@localhost Server]# rpm -Uvh libaio-devel-0.*
[root@localhost Server]# rpm -Uvh libgcc-4.*
[root@localhost Server]# rpm -Uvh libgomp*
[root@localhost Server]# rpm -Uvh libstdc++-4.*
[root@localhost Server]# rpm -Uvh libstdc++-devel-4.*
[root@localhost Server]# rpm -Uvh make-3.*
[root@localhost Server]# rpm -Uvh oracleasm*
[root@localhost Server]# rpm -Uvh oracleasm-support*
[root@localhost Server]# rpm -Uvh sysstat-7.*
[root@localhost Server]# rpm -Uvh unixODBC-2.*

Modify /etc/xinetd.d/gssftp to allow ftp logins by root (remove -a option.)
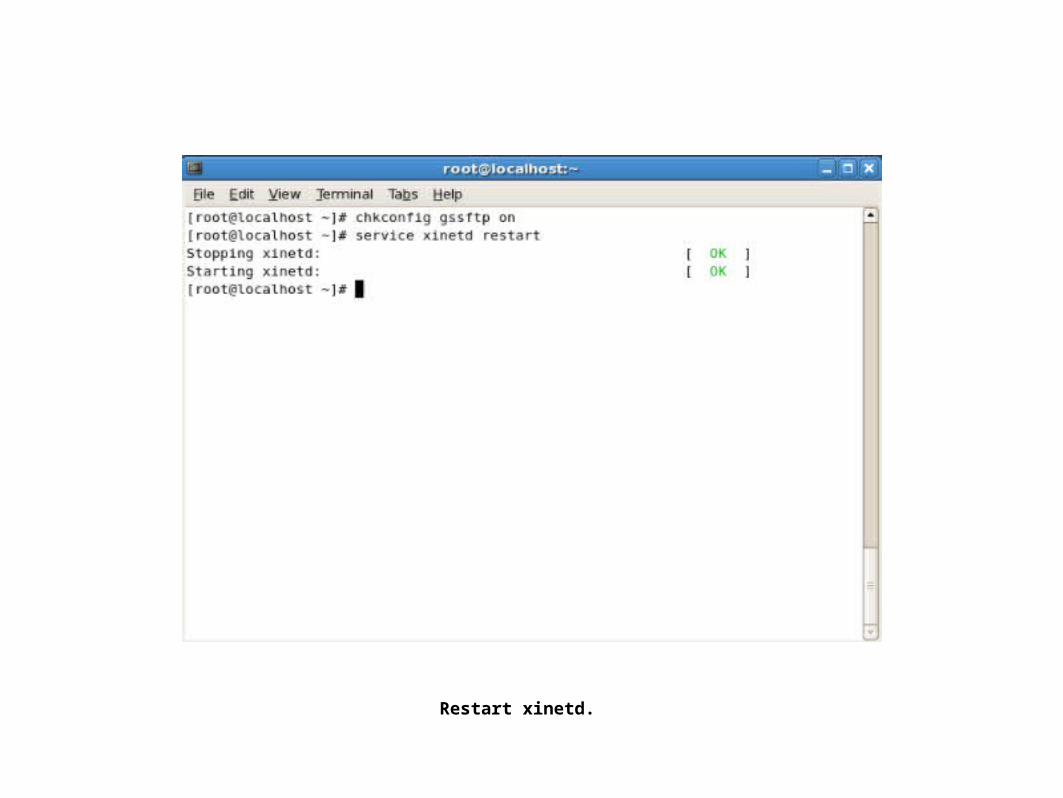
Restart xinetd.

Create /u01/staging directory, transfer oracleasmlib-2.0.4-1.el5.i386.rpm file there using FTP (or any other method), and install the package.
[root@localhost ~]# mkdir /u01/staging
[root@localhost ~]# chown grid:oinstall /u01/staging <FTP TRANSFER>
[root@localhost ~]# cd /u01/staging
[root@localhost staging]# ls ora*
oracleasmlib-2.0.4-1.el5.i386.rpm
[root@localhost staging]# rpm -Uvh oracleasmlib-2.0.4-1.el5.i386.rpm

Why install VMware tools?
• Improved video performance
• Mouse synchronization with host OS
• Improved mouse performance
• Copy and paste between host OS and guest OS
• Not required to be installed

Install VMware Tools.

Install VMware Tools (continue).

Run vmware-config-tools.pl script.

Create users and groups.
groupadd -g 501 oinstall
groupadd -g 502 dba
groupadd -g 503 oper
groupadd -g 504 asmadmin
groupadd -g 505 asmdba
groupadd -g 506 asmoper
useradd -m -d /home/oracle -u 501 -g oinstall -G dba,oper,asmdba -s /bin/bash -c "Oracle Software Owner" oracle
useradd -m -d /home/grid -u 502 -g oinstall -G asmadmin,asmdba,asmoper -s /bin/bash -c "Grid Infrastructure Owner" grid

Create filesystem directory structure; set proper ownerships and permissions. Set passwords for users grid and oracle.
mkdir -p /u01/app/oracle
mkdir -p /u01/app/oracle/product/11.2.0/db1
mkdir -p /u01/app/11.2.0/grid
mkdir -p /u01/app/grid
chown -R grid:oinstall /u01
chown -R oracle:oinstall /u01/app/oracle
chmod -R 775 /u01
passwd grid
passwd oracle

Increase shell limits for user oracle.
/etc/security/limits.conf:
oracle soft nproc 2047oracle hard nproc 16384oracle soft nofile 1024oracle hard nofile 65536grid soft nproc 2047grid hard nproc 16384grid soft nofile 1024grid hard nofile 65536
/etc/pam.d/login
session required /lib/security/pam_limits.so

Modify kernel parameters and activate changes at runtime.
/etc/sysctl.conf
fs.file-max = 6815744
fs.aio-max-nr = 1048576
kernel.shmmni = 4096
kernel.sem = 250 32000 100 128
net.ipv4.ip_local_port_range = 9000 65500
net.core.rmem_default = 262144
net.core.rmem_max = 4194304
net.core.wmem_default = 262144
net.core.wmem_max = 1048586
net.ipv4.tcp_wmem = 262144 262144 262144
net.ipv4.tcp_rmem = 4194304 4194304 4194304
Execute the following command: /sbin/sysctl -p

Configure hangcheck timer kernel module and activate changes at runtime.
/etc/modprobe.conf options hangcheck-timer hangcheck_tick=30 hangcheck_margin=600
/etc/rc.local
/sbin/modprobe hangcheck-timer
Execute the following command: /sbin/modprobe -v hangcheck-timer

Modify /etc/hosts. Replace the IP addresses to your IP addresses.
127.0.0.1 localhost.localdomain localhost
10.66.0.226 tom.localhost tom
10.66.0.228 tom-vip.localhost tom-vip
10.10.10.26 tom-priv.localhost tom-priv
10.66.0.227 jerry.localhost jerry
10.66.0.229 jerry-vip.localhost jerry-vip
10.10.10.27 jerry-priv.localhost jerry-priv
10.66.0.230 acme.localhost acme

Assign rules to control ownership and permission attributes on shared storage devices.
/etc/udev/rules.d/50-udev.rules KERNEL=="sdb1", OWNER="grid", GROUP="oinstall", MODE="0640"
KERNEL=="sdc1", OWNER="grid", GROUP="oinstall", MODE="0640"
KERNEL=="sdd1", OWNER="grid", GROUP="oinstall", MODE="0640"
KERNEL=="sde1", OWNER="grid", GROUP="oinstall", MODE="0640"
Activate the change at runtime by execuing: /sbin/start_udev

Increase user limits for users grid and oracle.
/etc/profile (and/or /etc/bashrc)
if [ \$USER = "oracle" ] || [ \$USER = "grid" ]; then
if [ \$SHELL = "/bin/ksh" ]; then
ulimit -p 16384
ulimit -n 65536
else
ulimit -u 16384 -n 65536
fi
fi

"Hack" nslookup to avoid installation errors.
1. Rename the original nslookup file to nslookup.orig:
mv /usr/bin/nslookup /usr/bin/nslookup.orig
2. Create the new nslookup file with the contents below:
#!/bin/bash
# Replace 10.66.0.114 with your primary DNS
# Replace 10.66.0.230 with your SCAN IP address
HOSTNAME=${1}
if [[ $HOSTNAME = "acme" ]]; then
echo "Server: 10.66.0.114"
echo "Address: 10.66.0.114#53"
echo "Non-authoritative answer:"
echo "Name: acme"
echo "Address: 10.66.0.230"
else
/usr/bin/nslookup.orig $HOSTNAME
fi
3. Change the privileges on the newly created file: chmod 755 /usr/bin/nslookup
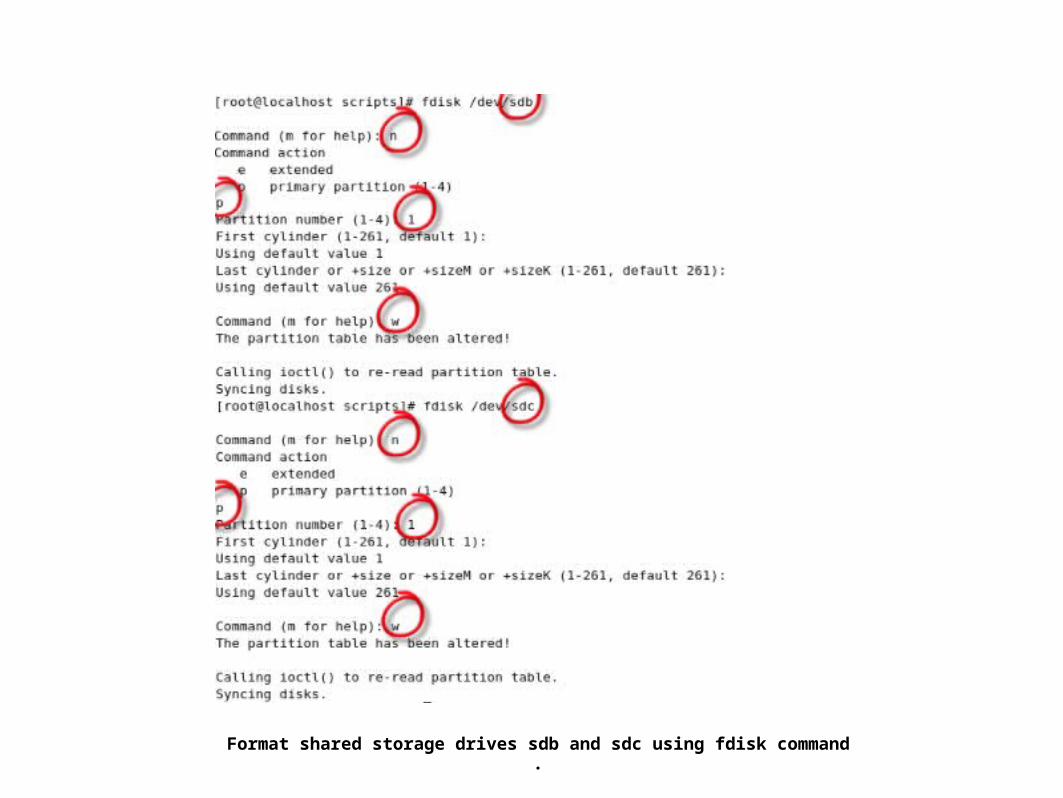
Format shared storage drives sdb and sdc using fdisk command.

Repeat for storage drives sdd and sde.

Deactivate the NTP service.
/sbin/service ntpd stop
chkconfig ntpd off
mv /etc/ntp.conf /etc/ntp.conf.original
rm /var/run/ntpd.pid
chkconfig --list ntpd

Create new virtual machine jerry as a copy of virtual machine tom.
• Shutdown virtual machine tom.
• Create Windows directory C:\Virtual Machines\jerry
• Copy all contents of C:\Virtual Machines\tom to C:\Virtual Machines\jerry
• Rename all files with names that contain string “tom” to replace it with “jerry”.
• Edit file C:\Virtual Machines\jerry\jerry.vmx and replace all occurrences of string “tom” with string “jerry”.
• Go to the VMware Server Home Page.
• Click on “Add Virtual Machine to Inventory” in the “Commands” section.
• Select "standard" -> "jerry" -> "jerry.vmx" and click "OK".
• Select “I _copied it” on the warning pane and click “OK”

Start newly created Virtual Machine "jerry". Login as root and open Network Configuration window.

Deactivate and delete entries for eth0.bak and eth1.bak.

Edit “eth0”. On the “Ceneral” tab enter the “Address” and “Subnet mask” to match the entries in /etc/hosts.

On the “Hardware Device” tab click on “Probe” button, then click “OK”.
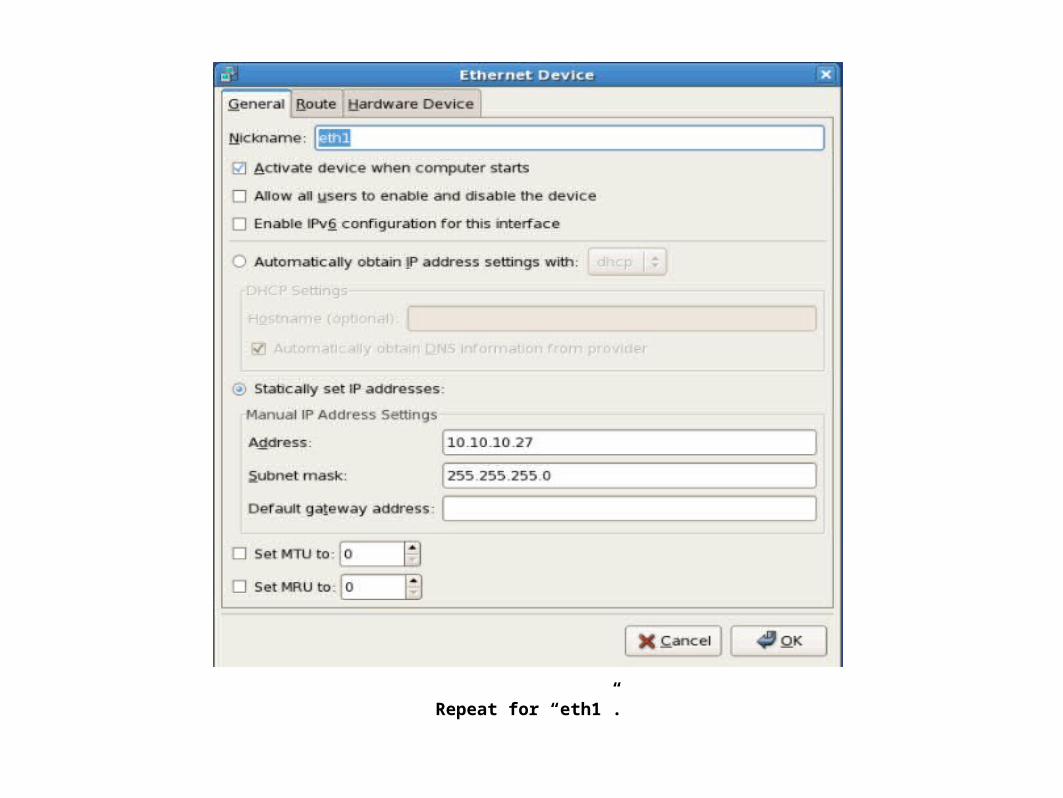
Repeat for “eth1”.

Repeat for “eth1” (continue).

On the DNS tab, specify “Hostname”, “DNS search path”, “Primary DNS”, “Secondary DNS”, and "DNS search path"
fields. The last 3 are optional.

Save network configuration and exit Network Configuration window. Restart the network.
1. <Ctl-S>; <Ctl-Q>
2. service network restart

Start tom, login as root, and run "oracleasm configure -i" command to configure the Oracle ASM library driver.

Run “oracleasm init” to load ASMLib kernel module and create/mount ASMlib filesystem.

Run "oracleasm createdisk" command to create 4 disks, CRS, DATA1, DATA2, and FRS1.

Restart "jerry" and repeat the first 2 steps Then run “oracleasm scandisks” to
recognize the new volumes.

Modify .bashrc for user grid on "tom".
user grid: export EDITOR=vi
export ORACLE_SID=+ASM1
export JAVA_HOME=/usr/bin/java
export ORACLE_BASE=/u01/app/grid
export ORACLE_HOME=/u01/app/11.2.0/grid
export LD_LIBRARY_PATH=$ORACLE_HOME/lib:/lib:/usr/lib
export ORACLE_HOSTNAME=tom.localhost
export PATH=.:$JAVA_HOME/bin:$ORACLE_HOME/bin:/bin:/usr/bin:/usr/sbin:/usr/local/bin:/usr/X11R6/bin
export TMP=/tmp
export TEMP=/tmp
export TMPDIR=/tmp
umask 022
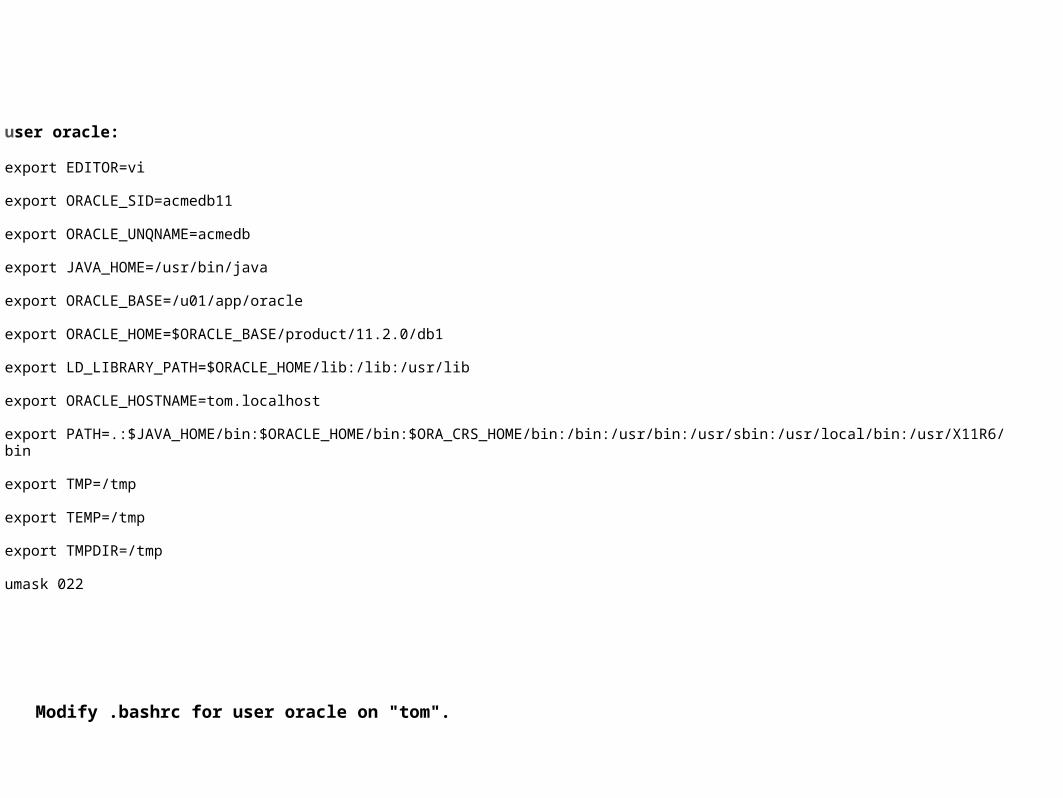
Modify .bashrc for user oracle on "tom".
user oracle: export EDITOR=vi
export ORACLE_SID=acmedb11
export ORACLE_UNQNAME=acmedb
export JAVA_HOME=/usr/bin/java
export ORACLE_BASE=/u01/app/oracle
export ORACLE_HOME=$ORACLE_BASE/product/11.2.0/db1
export LD_LIBRARY_PATH=$ORACLE_HOME/lib:/lib:/usr/lib
export ORACLE_HOSTNAME=tom.localhost
export PATH=.:$JAVA_HOME/bin:$ORACLE_HOME/bin:$ORA_CRS_HOME/bin:/bin:/usr/bin:/usr/sbin:/usr/local/bin:/usr/X11R6/bin
export TMP=/tmp
export TEMP=/tmp
export TMPDIR=/tmp
umask 022

Modify .bashrc for user grid "jerry".
user grid: export EDITOR=vi
export ORACLE_SID=+ASM2
export JAVA_HOME=/usr/bin/java
export ORACLE_BASE=/u01/app/grid
export ORACLE_HOME=/u01/app/11.2.0/grid
export LD_LIBRARY_PATH=$ORACLE_HOME/lib:/lib:/usr/lib
export ORACLE_HOSTNAME=tom.localhost
export PATH=.:$JAVA_HOME/bin:$ORACLE_HOME/bin:/bin:/usr/bin:/usr/sbin:/usr/local/bin:/usr/X11R6/bin
export TMP=/tmp
export TEMP=/tmp
export TMPDIR=/tmp
umask 022

Modify .bashrc for user oracle on "jerry".
user oracle: export EDITOR=vi
export ORACLE_SID=acmedb12
export ORACLE_UNQNAME=acmedb
export JAVA_HOME=/usr/bin/java
export ORACLE_BASE=/u01/app/oracle
export ORACLE_HOME=$ORACLE_BASE/product/11.2.0/db1
export LD_LIBRARY_PATH=$ORACLE_HOME/lib:/lib:/usr/lib
export ORACLE_HOSTNAME=tom.localhost
export PATH=.:$JAVA_HOME/bin:$ORACLE_HOME/bin:$ORA_CRS_HOME/bin:/bin:/usr/bin:/usr/sbin:/usr/local/bin:/usr/X11R6/bin
export TMP=/tmp
export TEMP=/tmp
export TMPDIR=/tmp
umask 022

The system is now ready for Oracle Grid 11gR2 installation!


![Install 11gR2 Software Upgrade to 11gR2[1]](https://static.fdocuments.us/doc/165x107/577d21641a28ab4e1e9520cb/install-11gr2-software-upgrade-to-11gr21.jpg)
