
Configuring and Managing WAAS Print Services - Cisco Systems, Inc
36
CHAPTER 13-1 Cisco Wide Area Application Services Configuration Guide OL-8921-01 13 Configuring and Managing WAAS Print Services This chapter describes how to configure and manage the WAAS print services feature that allows Edge WAEs to function as print servers in your branch offices. Note Throughout this chapter, the term WAAS device is used to refer collectively to the WAAS Central Managers and WAEs in your network. This chapter contains the following sections: • About WAAS Print Services, page 13-1 • Planning for Print Services, page 13-4 • Configuring Print Services, page 13-6 • Managing Print Services, page 13-26 • Troubleshooting Print Services, page 13-34 About WAAS Print Services The Cisco WAAS software includes print services that allow you to change an Edge WAE in to a print server. This functionality eliminates the need for a separate print server in the branch office. The WAAS print services feature is available for Windows clients and works with any IP-based network printer. The WAAS Central Manager GUI allows you to distribute print drivers to specific WAAS print servers on a per-device or a per-device group basis. You can also manage the print queue and monitor the status of a print job from the Print Services Administration GUI that you can open from the WAAS Central Manager GUI. This section contains the following topics: • Branch Office Printing Topology, page 13-2 • WAAS Print Services, page 13-3
Transcript of Configuring and Managing WAAS Print Services - Cisco Systems, Inc

Cisco Wide Area ApOL-8921-01
C H A P T E R 13
Configuring and Managing WAAS Print ServicesThis chapter describes how to configure and manage the WAAS print services feature that allows Edge WAEs to function as print servers in your branch offices.
Note Throughout this chapter, the term WAAS device is used to refer collectively to the WAAS Central Managers and WAEs in your network.
This chapter contains the following sections:
• About WAAS Print Services, page 13-1
• Planning for Print Services, page 13-4
• Configuring Print Services, page 13-6
• Managing Print Services, page 13-26
• Troubleshooting Print Services, page 13-34
About WAAS Print ServicesThe Cisco WAAS software includes print services that allow you to change an Edge WAE in to a print server. This functionality eliminates the need for a separate print server in the branch office. The WAAS print services feature is available for Windows clients and works with any IP-based network printer.
The WAAS Central Manager GUI allows you to distribute print drivers to specific WAAS print servers on a per-device or a per-device group basis. You can also manage the print queue and monitor the status of a print job from the Print Services Administration GUI that you can open from the WAAS Central Manager GUI.
This section contains the following topics:
• Branch Office Printing Topology, page 13-2
• WAAS Print Services, page 13-3
13-1plication Services Configuration Guide

Chapter 13 Configuring and Managing WAAS Print ServicesAbout WAAS Print Services
Branch Office Printing TopologyA typical print server topology in a branch office consists of several client desktops using a single print server to proxy for multiple printers. The WAAS print services solution allows you to host the print server on the Edge WAE along with the WAAS software. Figure 13-1 shows the WAAS print services topology for branch offices and data centers.
Figure 13-1 Branch Office WAAS Print Services Topology
In this configuration, the Edge WAE provides local print services to branch clients. Microsoft clients use the WAAS print server in the same way that they may currently be using a Microsoft print server:
• Clients can add or delete print queues to their local computers by using the Windows Wizard.
• Clients can spool print jobs to the WAAS print server.
• The WAAS print server communicates with the printer for print functions.
1 CIFS clients in the branch office 6 Cisco router in the data center
2 Networked printers in the branch office 7 File server in the data center
3 Local LAN in the branch office 8 Backup file server in the data center
4 Cisco router in the branch office 9 Core WAE in the data center
5 Edge WAE (WAAS print server) in the branch office
10 WAAS Central Manager in the data center
Data center
6 7
8
9
10
Branch office
1
2
3
5
4
WAN
1548
76
13-2Cisco Wide Area Application Services Configuration Guide
OL-8921-01
Chapter 13 Configuring and Managing WAAS Print ServicesAbout WAAS Print Services
WAAS Print ServicesThe WAAS print services solution on the Edge WAE consists of two major components:
• Samba—WAAS uses Samba to enable Microsoft clients to add and delete print queues, add and delete drivers, browse for print queues, and spool jobs to the WAAS print server.
• Common Unix Printing System (CUPS)—WAAS uses CUPS for print queue management and for sending the Microsoft clients’ spooled print jobs to the appropriate printers using TCP/IP.
Note the following:
• Printing is possible only when the Edge WAE is running.
• Only IP-based network printers are supported in WAAS. We recommend that printers directly attached to the WAAS print server use parallel, serial, or USB IP adapters, such as those available from HP or Linksys.
• WAAS supports Raw Queue so that all rendering of files occurs on the client machine using vendor-provided printer drivers, and the print server performs Win2003-style print queue management
• The Samba version used in the WAAS software does not support 64-bit print drivers.
For more information about the WAAS print services solution, see the following topics:
• Printer Clustering, page 13-3
• Print Services Users, page 13-3
• Feature Support, page 13-4
Printer Clustering
Printer clustering enables administrators to group several printers together to provide failover and load-balancing capabilities. You can include up to 12 printers in a printer cluster. Only printers of the same model and capabilities should be grouped together. Printers in a cluster should be geographically close to each other. The default spooling space for all printers (including the printer cluster) is 1 GB.
The printer cluster appears as a single print queue to Microsoft clients using the WAAS print server. The WAAS print server does not support the selection of a default printer within a cluster. When you send a print job to a printer in a printer cluster, the print job is automatically forwarded by the WAAS print server, which then sends it to the first available printer.
Print Services Users
The following types of users exist in the WAAS print services environment:
• Administrative User—A user who can add and modify printer information and membership in printer clusters.
• Print User—A user who can print a job from a printer, but who cannot make any additions or changes to the printer configuration. A print user can delete and pause their own print jobs.
Note Job owners can manage their own job in the Microsoft client and Print Services Administration GUI while the job is still spooling.
13-3Cisco Wide Area Application Services Configuration Guide
OL-8921-01

Chapter 13 Configuring and Managing WAAS Print ServicesPlanning for Print Services
Feature Support
Various print services features are handled by the various software components, such as Samba, CUPS, and the WAAS software. Table 13-1 shows which tool provides the capability for a specific print services feature.
Planning for Print ServicesThis section describes the information that you should collect before you begin configuring print services. You need the information outlined in this section whether you are setting up WAAS print services for the first time, or migrating from Microsoft print services. When planning for print services, these steps will help avoid configuration errors:
1. Plan for your printers’ network capabilities and driver support.
This information includes the printer type (Postscript, PCL, or other), the printer network protocol, and port (LPD, IPP, LPQ, LPR and port), and whether printers should be clustered together for failover. To obtain driver information, find either CDs or servers containing the printer drivers to be installed on the WAAS print server for support of point-and-print functionality.
2. Plan for print queue configuration.
This information includes the names and types of print queues to be created for a print server, and how they interact with the printers’ networking capabilities and ports.
Table 13-1 WAAS Print Services Feature Support
Function Software that Provides the Function
Add, modify, or delete printers CUPS
Add, modify, or delete printer cluster (called classes in CUPS)
CUPS
View and control print jobs CUPS, Windows printer queue console
Monitor status of individual printers CUPS
View list of printers attached to a WAAS print server, the drives associated with a specific printer, and the list of all distributed drivers
WAAS Central Manager GUI
Diagnostics and troubleshooting CUPS and Samba perform their diagnostics. The WAAS Central Manager GUI displays error messages relating to driver distribution.
Client printer driver installation from print server Samba1
1. The Samba version used in the WAAS software does not support 64-bit print drivers.
Print driver distribution to print servers WAAS Central Manager GUI
Advertising printer availability through Samba and Windows Active Directory
Samba
Log export Manual FTP using the CLI
Admin authentication WAAS Central Manager
Secure administration WAAS software
13-4Cisco Wide Area Application Services Configuration Guide
OL-8921-01
Chapter 13 Configuring and Managing WAAS Print ServicesPlanning for Print Services
The following sections provide more information on planning for print services:
• Identifying the Print Administration Users, page 13-5
• Obtaining Printer Information, page 13-5
• Planning Worksheets, page 13-5
Identifying the Print Administration UsersAll your branch office clients can use the print services on a WAAS print server, but only administrative users can perform printer management tasks such as managing print queues. These administrative users need to have admin accounts created on the Edge WAE and on the WAAS Central Manager device.
Identify the users that you want to have print administrator privileges for because you will need to create these users on the WAAS print server and on the WAAS Central Manager device.
Note We recommend limiting the number of admin users who have access to your printers. Each admin user who accesses a printer’s properties causes the printer object to be updated, which forces all clients to update their copy of the printer object on their next session. If admin users access printers on a regular basis, delays and increased traffic can result.
Obtaining Printer InformationBefore configuring print services, it is useful to obtain the following information about each of the printers on your network:
• Printer type
• Printer protocol
• Number and name of print queues
• Printer connectivity (direct network or using a print server gateway device)
• Printer drivers
Drivers may reside on a vendor-provided CD-ROM. Commonly used drivers are also bundled with the Windows operating system. To access these common drivers, open the Add Printer Wizard on a Windows system.
Planning WorksheetsYou can use the following tables as planning worksheets to help ensure a successful configuration of the WAAS print services.
Table 13-2 Security Model and Directory Services
Description Value
Print server IP
WINS server IP
13-5Cisco Wide Area Application Services Configuration Guide
OL-8921-01

Chapter 13 Configuring and Managing WAAS Print ServicesConfiguring Print Services
Configuring Print ServicesThis section describes how to configure print services in your WAAS network.
Configuration ChecklistTable 13-5 lists the configuration steps you must complete to set up print services in your WAAS network.
Print server NetBIOS name (optional)1
Print server admin workstation user name
1. If the NetBIOS name is not specified for the print server, the hostname is used instead. If the hostname is longer than fifteen characters, the hostname will be truncated to fifteen characters.
Table 13-3 Network Capabilities and Driver Support
Description Value
Printer type (PostScript, PCL, other)
Printer network protocol (LPD, IPP, LPQ, LPR)
Printer port
Printer cluster
Driver file location and name
Table 13-4 Print Queue Configuration
Description Value
Print queue name
Print queue type
Table 13-2 Security Model and Directory Services (continued)
Description Value
Table 13-5 Checklist for Configuring WAAS Print Services
Task Additional Information and Instructions1. Review the information in the planning
section.Before configuring print services in your WAAS network, see the “Planning for Print Services” section on page 13-4.
2. Prepare your WAE device and WAAS Central Manager device for print services
To prepare your WAAS system for print services, you need to specify the WINS server name and NetBIOS name for your WAE device and WAAS Central Manager device. In addition, you also need to enable edge services on the WAE device. For more information, see the “Preparing your WAE Device and Central Manager for Print Services” section on page 13-7
13-6Cisco Wide Area Application Services Configuration Guide
OL-8921-01

Chapter 13 Configuring and Managing WAAS Print ServicesConfiguring Print Services
Preparing your WAE Device and Central Manager for Print ServicesBefore you enable print services, you need to prepare your WAE device and Central Manager by specifying the WINS server name and the NetBIOS name. In addition, you also need to enable edge services on the WAE device. In some cases, these settings may already have been configured when the WAE device and Central Manager were first set up.
To prepare your WAE device and Central Manager for print services, follow these steps:
Step 1 (Optional) Specify the NetBIOS name of the WAE device by completing the following steps:
a. From the WAAS Central Manager GUI, choose Devices > Devices.
b. Click the Edit icon next to the WAE device on which you want to enable print services.
c. Click Show Advanced to display all menu items in the Contents pane.
3. Create accounts with print admin privileges on the WAE device and the WAAS Central Manager device.
To configure print services using the Print Services Administration GUI and to install drivers in the central repository on the WAAS Central Manager device, you need to create an accounts with print admin privileges on each of these devices. For more information, see the “Creating Accounts with Print Admin Privileges” section on page 13-9.
4. Enable print services. By default, the WAAS print services feature is disabled on all WAAS devices. To enable print services, see the “Enabling Print Services” section on page 13-9.
5. Add a printer to the WAAS print server. To add printers to your new WAAS print server, see the “Adding a Printer to the WAAS Print Server” section on page 13-10.
6. Create print clusters (optional). To provide failover functionality to print services, you can combine multiple printers into a print cluster. For more information, see the “Adding Printer Clusters” section on page 13-13.
7. Set up the WAAS Central Manager to be the central driver repository.
WAAS allows you to centrally manage all your print drivers from the WAAS Central Manager if it is set up as the main driver repository. For more information, see the “Setting Up the WAAS Central Manager as the Driver Repository” section on page 13-15.
8. Distribute drivers to the WAAS print servers.
After you have set up the WAAS Central Manager as the driver repository and have loaded drives into the repository, you can distribute the drivers to all the print servers in your WAAS network. For more information, see the “Distributing Drivers to the WAAS Print Servers” section on page 13-19.
9. Associate the print driver with your printer.
After you distribute a driver to a WAAS print server, you need to associate the driver with the correct printer on the WAAS print server. For more information, see the “Associating a Driver with your Printer” section on page 13-23.
10. Initialize each print driver on your WAAS print servers.
To prevent printing issues, you need to initialize each print driver before they ar installed and used by your branch office clients. For more information, see the “Initializing Print Drivers” section on page 13-24.
11. Add printers to your branch office clients. After the print services have been properly configured, your branch office clients need to add printers using the Microsoft Add Printers wizard. For more information, see the “Adding the WAAS Print Server to Your Branch Office Clients” section on page 13-24.
Table 13-5 Checklist for Configuring WAAS Print Services (continued)
Task Additional Information and Instructions
13-7Cisco Wide Area Application Services Configuration Guide
OL-8921-01

Chapter 13 Configuring and Managing WAAS Print ServicesConfiguring Print Services
d. From the Contents pane, choose Activation. The Device Activation window appears.
e. Enter the NetBIOS name of the WAE device in the NetBIOS name field.
f. Click Submit to save your changes.
Once you enable print services on this WAE device, the NetBIOS name is used as the Print Server name for the device. If you do not specify a NetBIOS name, the hostname of the device is used instead. The hostname of the device is specified on the Activation page, described in the “Modifying Device Properties” section on page 9-1.
To use the CLI to specify the NetBIOS name, use the windows-domain netbios-name global configuration command.
Step 2 Specify the NetBIOS name of WAAS Central Manager device by completing the following steps:
a. From the WAAS Central Manager GUI, choose Devices > Devices.
b. Click the Edit icon next to the WAAS Central Manager device.
c. Click Show Advanced to display all menu items in the Contents pane.
d. From the Contents pane, choose Activation. The Device Activation window appears.
e. Enter the NetBIOS name of the WAAS Central Manager in the NetBIOS name field.
f. Click Submit to save your changes.
Step 3 Specify the WINS server name of the WAE device:
a. From the WAAS Central Manager GUI, choose Devices > Devices.
b. Click the Edit icon next to the WAE device on which you want to enable print services.
a. From the Contents pane, choose General Settings > Network > Windows Name Services.
b. Enter the name of the WINS server in the WINS Server field.
c. Click Submit to save your changes.
To use the CLI to specify the NetBIOS name, use the windows-domain wins-server global configuration command.
Step 4 Specify the WINS server name of the WAAS Central Manager device by completing the following steps:
a. From the WAAS Central Manager GUI, choose Devices > Devices.
b. Click the Edit icon next to the WAAS Central Manager device.
a. From the Contents pane, choose General Settings > Network > Windows Name Services.
b. Enter the name of the WINS server in the WINS Server field.
c. Click Submit to save your changes.
Step 5 Enable edge services on the WAE device by completing the following steps:
a. From the WAAS Central Manager GUI, choose Devices > Devices.
b. Click the Edit icon next to the WAE device on which you want to enable print services.
a. From the Contents pane, choose File Services > Edge Configuration.
b. Check the Enable Edge Server check box. The CIFS and QoS configuration settings become enabled. For information on configuring these settings, see the “Configuring the Edge Devices” section on page 11-11.
c. Click Submit to save your changes.
13-8Cisco Wide Area Application Services Configuration Guide
OL-8921-01

Chapter 13 Configuring and Managing WAAS Print ServicesConfiguring Print Services
Note You must reboot or reload the device after enabling edge services.
Creating Accounts with Print Admin PrivilegesTo configure print services using the Print Services Administration GUI, you need to create an account with print admin privileges on the WAAS Central Manager device. This account also lets you upload drivers to the central repository.
To create an account with print admin privileges on the WAAS Central Manager device, follow these steps:
Step 1 From the WAAS Central Manager GUI, choose System > AAA > Users. The User Accounts window displays all the user accounts on the system.
Step 2 Click the Create New User Accounts icon. The Creating New User Account window appears.
Step 3 In the Username field, enter the user account name. User names are case-sensitive and support special characters.
Step 4 Check the Local User check box.
Step 5 In the Password field, enter a password for the local user account, and reenter the same password in the Confirm Password field. Passwords are case-sensitive.
Step 6 From the CLI Privilege Level drop-down list, choose either 0 (normal user) or 15 (super user).
Step 7 Check the Print Admin check box.
Step 8 (Optional) Fill in the fields in the User Information and Comments section.
Step 9 Click Submit to save your changes.
For more information about creating accounts on the WAAS Central Manager device, see the “Creating a New Account” section on page 7-3.
To create an account with print admin privileges (privilege level 15) from the CLI, you can use the username global configuration command.
Enabling Print Services You must use the WAE Device Manager GUI to enable print services on a WAE.
You can enable print services on any Edge WAE, but you cannot enable print services on a Core WAE or on the WAAS Central Manager. Once you enable print services, the Edge WAE becomes a WAAS print server and an anonymous FTP user account is created on the device. This FTP account is used to access print drivers on the WAAS Central Manager.
For information on configuring a WAE as an Edge device, see the “Configuring the Edge Devices” section on page 11-11.
13-9Cisco Wide Area Application Services Configuration Guide
OL-8921-01

Chapter 13 Configuring and Managing WAAS Print ServicesConfiguring Print Services
To enable print services on an Edge WAE, follow these steps:
Step 1 Log into the WAE Device Manager GUI by going to the following URL:
https://edge-wae-ip-address/mgr
edge-wae-ip-address is the IP address of the Edge WAE that you want to enable with print services.
Step 2 Choose Configuration from the WAFS Edge menu, and click the Print Services tab.
The Print Services window appears. (See Figure 13-2.)
Figure 13-2 Print Services Window
Step 3 Check the Print services enabled check box to enable print services.
Step 4 (Optional) Enter a comment in the Comment field.
This comment string is visible next to the print server when users are browsing in Windows Explorer.
Step 5 Click Save to restart print services.
Upon restart, the Open link for the Print Services Administration GUI is enabled. Once print services is enabled on the device, the device becomes a WAAS print server.
Note The Restart Print Server button is used when a change has been performed through the CLI and the print server must be restarted.
To enable print services from the CLI, you can use the print-services enable global configuration command.
Adding a Printer to the WAAS Print ServerAfter you enable print services, you must add one or more printers to the new WAAS print server. When you add a printer, a print queue is also added that is used by Windows print clients to spool their jobs to the WAAS print server.
13-10Cisco Wide Area Application Services Configuration Guide
OL-8921-01
Chapter 13 Configuring and Managing WAAS Print ServicesConfiguring Print Services
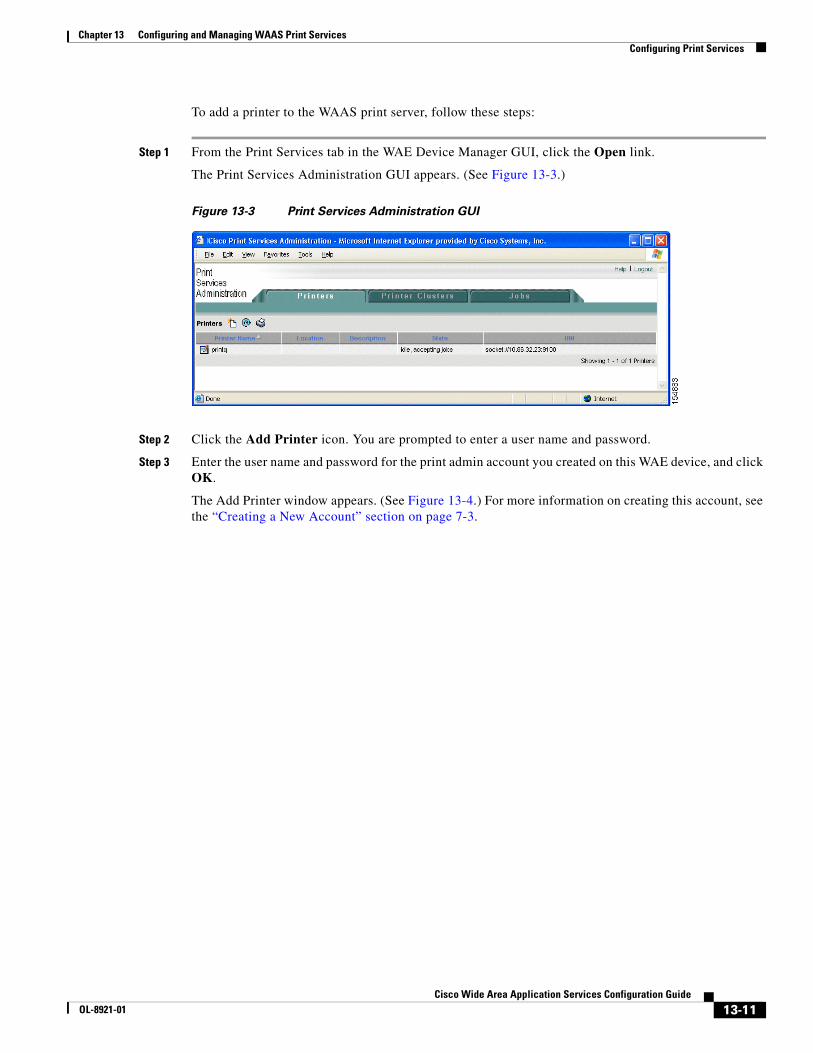
To add a printer to the WAAS print server, follow these steps:
Step 1 From the Print Services tab in the WAE Device Manager GUI, click the Open link.
The Print Services Administration GUI appears. (See Figure 13-3.)
Figure 13-3 Print Services Administration GUI
Step 2 Click the Add Printer icon. You are prompted to enter a user name and password.
Step 3 Enter the user name and password for the print admin account you created on this WAE device, and click OK.
The Add Printer window appears. (See Figure 13-4.) For more information on creating this account, see the “Creating a New Account” section on page 7-3.
13-11Cisco Wide Area Application Services Configuration Guide
OL-8921-01

Chapter 13 Configuring and Managing WAAS Print ServicesConfiguring Print Services
Figure 13-4 Adding a Printer to the WAAS Print Server
Step 4 Enter the following information in the provided fields:
• Printer name (required)—User-defined name of the printer (maximum of 127 characters) that can contain only letters, numbers, and underscore. No spaces are allowed and the name must be unique across the system. For example, you should not use the same name for different printers. If a printer with the same name exists, the new configuration will replace the old one. If a printer cluster with the same name exists, an error appears.
• Postscript printer—Check box that allows you to specify if the printer is a postscript-capable printer or not (default is nonpostscript). For postscript printers, the generic.ppd is used. For nonpostscript printers, the PPD is set to raw. Postscript printer configuration supports printing test page and banner pages. This check box is visible only when adding a new printer. If you are modifying a printer, you will not see this check box.
• Location—User-specified location of the printer (maximum 127 characters).
• Description—User-specified description of the printer (maximum 127 characters).
• Device URI (required)—The device URI is the address of the printer, in the following form:
protocol://server:port/queue
A maximum of 1024 characters are allowed. The only allowed protocols are lpd, socket, ipp, and http. Validation check on the protocol will be performed but there is no other check on the URI string. A list of example URIs appears to help you enter it properly. You can get the information (printer port, protocol) for your specific printer from the printer manufacturer’s manual from the test page of the printer, or from the printer’s front panel.
13-12Cisco Wide Area Application Services Configuration Guide
OL-8921-01

Chapter 13 Configuring and Managing WAAS Print ServicesConfiguring Print Services
Note Incorrectly specifying the protocol, port, or queue will lead to failure to print pages.
Step 5 Click Submit to save your changes.
Step 6 Repeat the process to add other printers to your WAAS print server.
Adding Printer ClustersPrinter clustering allows you to group several printers together. This clustering provides failover and load-balancing capabilities. You can include up to 12 printers in a printer cluster. Only printers of the same model and capabilities should be grouped together. Printers in a cluster should be geographically close to each other.
The printer cluster appears as a single print queue to Microsoft clients using the WAAS print server. The WAAS print server does not support the selection of a default printer within a cluster. When you send a print job to a printer in a printer cluster, the print job is automatically forwarded by the WAAS print server to the first available printer.
The default spooling space for all printers (including the printer cluster) is 1 GB.
To add a print cluster, follow these steps:
Step 1 Open the Print Services Administration GUI by doing either of the following:
• From the WAAS Central Manager GUI, choose Services > Print > Servers, click the Edit icon next to the name of the print server that you want to add to a cluster, and then click the Print Services Administration icon in the taskbar.
• From the WAE Device Manager GUI, choose Configuration from the WAFS Edge menu, click the Print Services tab, then click the Open link.
The Print Services Administration GUI opens.
Step 2 Click the Printer Cluster tab.
If you were not previously logged into the Print Services Administration GUI, you are prompted for the user name and password of the print admin account. Enter this information, then click OK.
The Printer Clusters window appears. (See Figure 13-5.)
13-13Cisco Wide Area Application Services Configuration Guide
OL-8921-01

Chapter 13 Configuring and Managing WAAS Print ServicesConfiguring Print Services
Figure 13-5 Print Services Administration Window—Printer Clusters Tab
Step 3 Click the Add Printer Cluster icon in the taskbar.
The Add Printer Cluster window appears. (See Figure 13-6.)
Figure 13-6 Adding New Printer Cluster
Step 4 Enter a name for the printer cluster.
The printer cluster name can contain letters and numbers, but the only special character that is supported is the underscore (no spaces allowed). The name cannot exceed 127 characters and must be unique across the system. For example, you must not use the same name for different printer clusters. If a printer cluster exists with the same name, the new configuration replaces the old one. If a printer with the same name exists, an error appears.
Step 5 Enter a name for the print cluster location (optional).
The location name cannot exceed 127 characters.
13-14Cisco Wide Area Application Services Configuration Guide
OL-8921-01

Chapter 13 Configuring and Managing WAAS Print ServicesConfiguring Print Services
Step 6 Enter a description for the Printer cluster (optional).
This description cannot exceed 127 characters.
Step 7 Choose the printers that you want to join this new cluster by doing one of the following:
• Click to choose all the available printers.
• Click next to each printer you want to join the cluster.
Step 8 Click Submit.
The configuration is saved.
Step 9 Restart your print server now or click Cancel if you want to restart the print server manually at a later time.
Setting Up the WAAS Central Manager as the Driver RepositoryYou can set up the WAAS Central Manager as a print driver repository that stores all the drivers you want to distribute to your WAAS print servers. Steps 1 through 4 in this section describe how to configure the WAAS Central Manager as the driver repository; steps 5 through 10 describe how to add drivers to the central repository using the Windows Add Printer Driver Wizard.
If you do not set up the WAAS Central Manager as a driver repository, you cannot centrally distribute print drivers to your WAAS print servers. In this case, you must manually install the drivers on each WAAS print server. For more information on installing drivers on an individual print server, see the “Installing Print Drivers on Individual WAAS Print Servers” section on page 13-17.
We recommend that you configure the WAAS Central Manager as a driver repository if you have more than one WAAS print server.
To configure the WAAS Central Manager as the print driver repository, follow these steps:
Step 1 Log into the WAAS Central Manager GUI using the print admin account you created in the “Creating Accounts with Print Admin Privileges” section on page 13-9.
Step 2 From the WAAS Central Manager GUI, choose Services > Print > Repository.
The Print Driver Repository Settings window appears. (See Figure 13-7.)
13-15Cisco Wide Area Application Services Configuration Guide
OL-8921-01

Chapter 13 Configuring and Managing WAAS Print ServicesConfiguring Print Services
Figure 13-7 Enabling the Central Manager as the Driver Repository
Step 3 Check the Enable CM as Repository check box.
Step 4 Click Submit to save your changes.
Step 5 Log into a Windows client and enter the following command to add drivers to the new central repository:
net use \\CM_netbios_name\print$ * /USER:username
The CM_netbios_name value is the NetBIOS name of the WAAS Central Manager device, and username is the same as the username you created in Step 1.
We recommend that you use postscript (PS) print drivers instead of PCL drivers because postscript drivers load much more quickly.
Step 6 From the Windows client, enter the following command in the Run window:
\\CM_netbios_name
The CM_netbios_name value is the NetBIOS name of the WAAS Central Manager device.
The Central Manager’s driver repository appears.
Step 7 Double-click the Printers icon.
The Printers on Device window appears.
Step 8 From the Printers on Device window, choose File > Server Properties.
The Print Server Properties window appears.
Step 9 Choose the Drivers tab, and click Add...
The Add Printer Driver Wizard opens.
Note If there is insufficient print share space to add drivers, you will see a Windows error message that indicates that a driver was unable to install because it is not compatible with Windows, or that Windows was unable to save all data due to a failure related to a computer hardware or network connection problem. If you see such a message, remove any drivers that may no longer be in use, then repeat the step to add the new drivers.
13-16Cisco Wide Area Application Services Configuration Guide
OL-8921-01

Chapter 13 Configuring and Managing WAAS Print ServicesConfiguring Print Services
Step 10 Proceed through the wizard and add the necessary drivers to the repository on the WAAS Central Manager.
Note To avoid a possible error condition when adding drivers to the repository, do not click the Update or Replace button in the Drivers tab of the Print Server Properties window.
Step 11 After completing the wizard, verify that the drivers were successfully added to the repository by choosing Services > Print > Drivers in the WAAS Central Manager GUI.
It may take up to five minutes for the list of drivers to appear. Verify that the drivers you just added appear in this list. You can configure the amount of time it takes the list to be updated by adjusting the System.datafeed.pollRate field described in the “Modifying the Default System Configuration Properties” section on page 9-10.
Note If an error message appears that indicates a driver was unable to install due to a lack of disk space, you will need to free up disk space by first removing any unused drivers from the repository, then repeating the steps to add the driver. Because Windows 95, 98, NT, and 2000 create an extra storage directory during the driver installation process, these operating systems require approximately twice the disk space to install a print driver (requiring that you free up disk space equivalent to at least twice the size of each driver to be installed). Additionally, in Windows 95, 98, and NT operating systems, you can also free up disk space by following the steps below to remove any temporary print driver directories that Windows has not removed. (Windows 2000 and XP automatically remove these temporary directories).
To remove temporary print driver directories:
a. From the CLI on the WAAS Central Manager, change to the directory where the temporary print driver directories are located using the cd command. For example:
cd spool/samba/printers/W32X86
b. List the directory contents using the ls command.
c. Identify the temporary print driver directories by locating directories designated as: "__SKIP__xxx"
d. Use the rmdir command to remove the temporary print driver directories.
Installing Print Drivers on Individual WAAS Print Servers
If you do not want to set up the WAAS Central Manager as a driver repository and centrally distribute drivers, you can use the Windows Add Driver Wizard to install the necessary drivers on an individual WAAS print server.
To install printer drivers on a WAAS print server, follow these steps:
Step 1 Log in to the windows client and enter the following command:
net use \\WAE_netbios_name\print$ * /USER:username
The WAE_netbios_name value is the NetBIOS of the WAAS print server, and username is the username you specified in the “Creating Accounts with Print Admin Privileges” section on page 13-9.
Step 2 Using Windows Network Neighborhood, find the Print Server share and click on it. Alternatively, you can open the Run window on the Windows system and enter \\wae_netbios_name.
13-17Cisco Wide Area Application Services Configuration Guide
OL-8921-01

Chapter 13 Configuring and Managing WAAS Print ServicesConfiguring Print Services
Step 3 View the printers configured in the WAAS Print Server.
Step 4 Choose the printer for which you want to upload a driver, right click on it, and choose Properties. (See Figure 13-8.)
Figure 13-8 Sample Printer Properties Sheet
Step 5 Locate the printer driver on the CD-ROM or server.
Step 6 Click the New Driver button to start the Add Driver wizard.
Step 7 Click Next.
The Printer Driver Selection window appears. (See Figure 13-9.)
Figure 13-9 Driver Selection Window
Step 8 If the necessary driver is not displayed in the Printer Driver Selection window, click Have Disk and browse for the location of the printer driver on the CD-ROM or server.
13-18Cisco Wide Area Application Services Configuration Guide
OL-8921-01
Chapter 13 Configuring and Managing WAAS Print ServicesConfiguring Print Services
Step 9 Click OK to finish installing the driver.
The driver has now been uploaded to the WAAS print server so that any user can download the driver to their client machine when printing.
Step 10 Initialize the driver as described in the “Initializing Print Drivers” section on page 13-24.
Distributing Drivers to the WAAS Print ServersAfter you have set up the WAAS Central Manager as the driver repository and installed the drivers in the central repository, you can distribute the drivers to your WAAS print servers.
You can distribute drivers to WAAS print servers using one of the following methods:
• Choose the driver first, then choose the print servers to which you want to distribute the driver. This is the recommended method for distributing a single driver to multiple WAAS print servers or device groups. See the “Distributing a Single Driver to Multiple Devices or Groups” section on page 13-19.
• Choose a print server or device group first, then choose the drivers that should be installed on the selected device. This is the recommended method for distributing multiple drivers to a single print server or device group. See the “Distributing Multiple Drivers to a Single Device or Group” section on page 13-21.
Note If you try to distribute a print driver to an Edge WAE that has not been enabled with print services, the driver is not distributed to the Edge WAE.
Distributing a Single Driver to Multiple Devices or Groups
To distribute a single driver to multiple devices or groups, follow these steps:
Step 1 From the WAAS Central Manager GUI, choose Services > Print > Drivers.
The Drivers in the Repository window appears. (See Figure 13-10.)
13-19Cisco Wide Area Application Services Configuration Guide
OL-8921-01

Chapter 13 Configuring and Managing WAAS Print ServicesConfiguring Print Services
Figure 13-10 Drivers in the Repository Page
Step 2 Click the Edit icon next to the driver that you want to distribute.
The driver’s home window appears. (See Figure 13-11.)
Figure 13-11 Driver Home Page
From this window you can perform the following tasks:
• Distribute the driver to print servers as described in the steps that follow.
• Delete the driver from the repository by clicking in the taskbar.
• View details about the driver.
13-20Cisco Wide Area Application Services Configuration Guide
OL-8921-01

Chapter 13 Configuring and Managing WAAS Print ServicesConfiguring Print Services
Step 3 To distribute this driver, click one of the following options in the Contents pane:
• Distribute to Print Server—Distributes the driver to an individual WAAS print server.
• Distribute to Device Group—Distributes the driver to a group of WAAS print servers that have been included in the same device group.
The Print Server assignments window (see Figure 13-12) or the Device Group assignments window appears depending on the selected option.
Figure 13-12 Print Server Assignments Page
Step 4 Choose the devices to which you want to distribute the WAAS print driver.
To choose the devices, use one of the following procedures:
• Click in the taskbar to distribute the driver to all available print servers or device groups.
• Click next to each print server or device group to distribute the driver to these specific devices. The icon changes to when selected.
Step 5 Click Submit.
The icon next to the selected devices changes to , and the driver is distributed to the specified devices.
Step 6 Verify that the print driver was successfully distributed (see the “Verifying Print Driver Distribution” section on page 13-22).
Distributing Multiple Drivers to a Single Device or Group
To distribute multiple drivers to a single device or group, follow these steps:
Step 1 From the WAAS Central Manager GUI, choose Devices > Devices or Devices > Device Groups.
Step 2 Click the Edit icon next to the device or device group to which you want to distribute the print drivers.
13-21Cisco Wide Area Application Services Configuration Guide
OL-8921-01

Chapter 13 Configuring and Managing WAAS Print ServicesConfiguring Print Services
The Device Home window or the Modifying Device Group window appears depending on the option you selected in the previous step.
Step 3 From the Contents pane, choose Print Services > Download Drivers.
The Drivers in the Repository window appears. (See Figure 13-13.)
Figure 13-13 Selecting the Print Drivers to Distribute
Step 4 Choose the drivers to distribute by doing either of the following:
• Click in the taskbar to choose all the drivers in the list.
• Click next to each driver to distribute. The icon changes to when selected.
Step 5 Click Submit.
The icon next to the selected drivers changes to and the selected edge device or device group downloads the specified drivers.
Step 6 Verify that the print drivers were successfully distributed (see the “Verifying Print Driver Distribution” section on page 13-22).
Verifying Print Driver Distribution
After you distribute a print driver to one or more WAAS print servers, you can use the WAAS Central Manager GUI to check for distribution errors and redistribute the drivers if necessary.
To verify that a print driver has been properly distributed to a WAAS print server, follow these steps:
Step 1 From the WAAS Central Manager GUI, choose Services > Print > Servers.
The Print Servers table appears. The Driver Distribution Status area of this table shows the number of completed and failed driver distribution attempts. This table also shows the number of drivers that are in the process of being downloaded by the print server.
Step 2 Check the Print Server Errors column and the Failed column for an error count.
13-22Cisco Wide Area Application Services Configuration Guide
OL-8921-01
Chapter 13 Configuring and Managing WAAS Print ServicesConfiguring Print Services
These columns show the number of errors reported on a WAAS print server. The Failed column shows the number of driver distribution errors, and the Print Server Errors column shows the number of system errors on the print server.
Step 3 If the Print Server Errors column or the Failed column contains a number other than 0 (for example, 1, 2 or 3), do the following:
a. Click the number in the column. A list of errors appears.
b. Use the error information to resolve the print server or driver distribution problem.
c. Redistribute the failed print drivers by clicking the Retry Downloading Failed Drivers icon, and then repeat the previous steps to check for errors.
The Retry Downloading Failed Drivers icon appears in the taskbar on the following pages in the WAAS Central Manager GUI:
– Go to Devices > Devices, click the Edit icon next to the appropriate print server, then choose Print Services > Drivers in the Contents pane.
– Go to Devices > Device Groups, click the Edit icon for the appropriate device group, then choose Print Services > Download Drivers in the Contents pane.
Step 4 If the Print Server Errors column and the Failed column for your WAAS print servers contains a 0 (no distribution errors), do the following:
a. Click the Edit icon next to one of the print servers to which you distributed the print driver.
b. From the Contents pane, choose Drivers.
A list of drivers installed on this device appears.
c. Verify that the Download Status column for the drivers that you just distributed shows Completed.
If the print driver does not appear in the list, wait up to 10 minutes and refresh the page. It can take up to 10 minutes for a newly distributed driver to appear in the list as Completed.
Associating a Driver with your PrinterAfter you distribute a driver to a WAAS print server, you need to associate the driver with the printer that you added in the “Adding a Printer to the WAAS Print Server” section on page 13-10.
To associate a distributed driver with a printer, follow these steps:
Step 1 Log in to a Windows client.
Step 2 Run the following command to set the print admin privilege level:
net use \\WAE_netbios_name\print$ * /USER:username
The WAE_netbios_name is the NetBIOS name of the WAAS print server containing the printer you added in the “Adding a Printer to the WAAS Print Server” section on page 13-10, and username is the username you specified in the “Creating Accounts with Print Admin Privileges” section on page 13-9.
Step 3 Enter the following command in the Run window on the Windows client:
\\wae_netbios_name
The printer share window appears.
Step 4 Double-click the printer icon to view a list of printers.
13-23Cisco Wide Area Application Services Configuration Guide
OL-8921-01
Chapter 13 Configuring and Managing WAAS Print ServicesConfiguring Print Services
Step 5 Right-click on the printer you added in the “Adding a Printer to the WAAS Print Server” section on page 13-10 and choose Properties.
Step 6 Click the Advanced tab, and in the Driver drop-down list choose the appropriate driver.
Step 7 Click Apply to save your changes, and then click OK to close the window.
Initializing Print DriversBefore you install a print driver on a client, you need to initialize the driver so that your branch office clients can successfully install the driver and be able to print from applications such as Microsoft Word and PowerPoint. Uninitialized drivers often do not install successfully and can cause errors when clients use them to print from Microsoft Word and PowerPoint.
Manual initialization of a driver is required because the WAAS print server cannot execute Windows driver code locally to automatically initialize the driver.
To manually initialize a print driver, follow these steps:
Step 1 From a Windows client, log in to the WAAS print server as an administrative user.
Step 2 Open the Printers and Faxes folder on the WAAS print server.
Step 3 Choose the shared printer.
Step 4 Right-click on the printer and choose Properties.
Step 5 From the General tab, choose Printing Preferences.
Step 6 Change the page orientation from Portrait to Landscape, click Apply, then click OK.
Step 7 Reset the page orientation from Landscape back to Portrait, click Apply, then click OK.
Changing the page orientation ensures that the setting is applied correctly.
Step 8 (Optional) Set the desired printing defaults, which are then applied to all future client driver installations.
Adding the WAAS Print Server to Your Branch Office ClientsWindows clients who will print using the WAAS print server and previously created print queues must run the Microsoft Add Printer Wizard.
To add a printer to a Windows client, follow these steps:
Step 1 From a Windows client, choose Printers and Faxes from the Start menu.
Step 2 Click Add a Printer.
The Add Printer Wizard opens.
Step 3 Click Next.
Step 4 Click the radio button to choose a network printer.
Step 5 Click Next.
13-24Cisco Wide Area Application Services Configuration Guide
OL-8921-01

Chapter 13 Configuring and Managing WAAS Print ServicesConfiguring Print Services
The Locating Your Printer window appears. (See Figure 13-14.)
Figure 13-14 Locating Your Printer
Step 6 Use one of the following methods to choose the printer, then click Next:
• Enter the printer name.
• Find the WAAS print server in the Active Directory (if the printer is published).
• Browse the domain for the WAAS print server.
Note Interoperability issues can occur when Windows browses for the WAAS Print Queue in the Add Printer Wizard. If they occur, you must explicitly type the printer name.
The printer appears in your list of printers. (See Figure 13-15.)
Figure 13-15 Printer Added Successfully
13-25Cisco Wide Area Application Services Configuration Guide
OL-8921-01
Chapter 13 Configuring and Managing WAAS Print ServicesManaging Print Services
Step 7 Once the printer is successfully added, you can begin printing.
Managing Print ServicesThis section contains the following topics:
• Viewing Print Server Details, page 13-26
• Configuring Aggregate Settings, page 13-27
• Using the Print Services Administration GUI, page 13-28
Viewing Print Server DetailsOnce you set up print services, you can use the WAAS Central Manager GUI to view details about print drivers and the WAAS print servers installed in your network.
Table 13-6 describes how to view print driver and print server details from the WAAS Central Manager GUI.
Table 13-6 Viewing Print Server Details from the WAAS Central Manager GUI
To view Go to
All drivers that reside in the repository on the WAAS Central Manager
Services > Print > Drivers
Detailed information about a driver Services > Print > Drivers, and click on the driver.
Drivers installed on a specific WAAS print server
Services > Print > Servers, and follow these steps:
1. Choose the WAAS print server.
2. From the Contents pane, choose Drivers.
A list of all the drivers distributed to this WAAS print server appears. For information on how to distribute drivers, see the “Distributing Drivers to the WAAS Print Servers” section on page 13-19.
Printers associated with a WAAS print server
Services > Print > Servers, and follow these steps:
1. Choose the WAAS print server.
2. From the Contents pane, choose Printers.
Or, go to Devices > Devices, and follow these steps:
1. Choose the WAAS print server for which you want to view the print queue.
2. From the Contents pane, choose Print Services > Printers.
A list of WAAS print servers in your network
Services > Print > Servers
13-26Cisco Wide Area Application Services Configuration Guide
OL-8921-01

Chapter 13 Configuring and Managing WAAS Print ServicesManaging Print Services
Configuring Aggregate SettingsAggregate settings allow you to configure a WAAS print server to automatically download drivers that are distributed to a device group to which it is a member. For example, if a WAAS print server belongs to device group DG1 and is configured with aggregate settings enabled, the print server will automatically download any driver that you distribute to the DG1 device group. However, if the same print server is configured with aggregate settings disabled, the print server will not download drivers that you distribute to the DG1 device group.
The WAAS Central Manager does not re-distribute drivers that already exist on a WAE device. For example, if a WAAS print server belongs to two device groups (DG1 and DG2) and the aggregate setting is enabled, the print server only downloads one instance of the driver in the event it is distributed to both device groups.
A list of WAAS print servers in a specific device group
Devices > Device Groups, then follow these steps:
1. Click the Edit icon next to the device group that contains the print servers you want to view.
2. From the Contents pane, choose Print Services > Print Servers.
A list of print servers associated with the selected device group appears.
Driver distribution errors Services > Print > Servers, then click on the number in the Failed column.
Print server errors Services > Print > Servers, then click on the number in the Print Server Errors column.
The status of your WAAS print server Services > Print > Servers, then follow these steps:
1. View the Time Stamp column, and make sure the time is not more than 5 minutes old.
Each WAAS print server sends a status report to the WAAS Central Manager on a regular interval specified by the System.monitoring.collectRate field (described in the “Modifying the Default System Configuration Properties” section on page 9-10). If a WAAS print server fails to send this report on time, the server is probably down.
2. If a WAAS print server has not sent a status report in the last five minutes, do the following:
a. Go to System > Logs > System Messages.
b. Search the message log for the reason the WAAS print server is not functioning correctly. You can use the Node Name column to quickly locate information for a specific WAAS print server.
Table 13-6 Viewing Print Server Details from the WAAS Central Manager GUI (continued)
To view Go to
13-27Cisco Wide Area Application Services Configuration Guide
OL-8921-01

Chapter 13 Configuring and Managing WAAS Print ServicesManaging Print Services
When you add a WAAS print server to a device group, the aggregate settings for the print server are enabled and the drivers belonging to the device group are automatically distributed to the print server. When you remove a print server from a device group when aggregate settings are enabled, all the drivers assigned to the device group are removed from the print server if the drivers are not being used by any printer.
To configure aggregate settings on a WAAS print server, follow these steps:
Step 1 From the WAAS Central Manager GUI, choose Devices > Devices.
The Devices window appears.
Step 2 Click the Edit icon next to the WAAS print server for which you want to configure aggregate settings.
The Device Home window appears.
Step 3 From the Contents pane, choose Print Services > Drivers.
A list of drivers installed on the WAAS print server appears. (See Figure 13-16.)
Figure 13-16 Configuring Aggregate Settings
Step 4 Click the Yes radio button to enable aggregate settings, or No to disable aggregate settings.
A dialog box asks if you want to continue.
Step 5 Click OK.
If you enabled aggregate settings, the WAAS print server begins downloading all the drivers that have been distributed to its device group.
Using the Print Services Administration GUIThe Print Services Administration GUI allows you to perform a variety of tasks for a specific WAAS print server. You can open the Print Services Administration GUI from the WAAS Central Manager GUI or from the WAE Device Manager GUI.
13-28Cisco Wide Area Application Services Configuration Guide
OL-8921-01

Chapter 13 Configuring and Managing WAAS Print ServicesManaging Print Services
Note After accessing the Print Services Administration GUI, you are prompted for the user name and password of the print admin account when you perform any task such as adding a printer. For information on creating a print admin account on a WAE device, see the “Creating a New Account” section on page 7-3.
This section contains the following topics:
• Opening the Print Services Administration GUI, page 13-29
• Adding a Printer, page 13-29
• Modifying Printer Configuration, page 13-30
• Enabling Print Banners, page 13-31
• Setting Up Print Clusters, page 13-32
• Viewing Print Jobs, page 13-32
Opening the Print Services Administration GUI
You can open the Print Services Administration GUI from either the WAE Device Manager GUI or from the WAAS Central Manager GUI.
To open the Print Services Administration GUI from the WAE Device Manager GUI, follow these steps:
Step 1 From the WAE Device Manager GUI, choose WAFS Edge > Configuration.
Step 2 Click the Print Services tab, and click the Open link. The Print Services Administration GUI opens.
To open the Print Services Administration GUI from the WAAS Central Manager GUI, follow these steps:
Step 1 From the WAAS Central Manager GUI, choose Services > Print > Servers.
A list of the WAAS print servers installed in your network appears.
Step 2 Click the Edit icon next to the WAAS print server that you want to manage.
Step 3 From the Contents pane, choose either Printers or Drivers.
Step 4 Click the Print Services Administration icon in the tool bar.
The Print Services Administration GUI appears.
Adding a Printer
For instructions on how to add a printer to a WAAS print server, see the “Adding a Printer to the WAAS Print Server” section on page 13-10.
13-29Cisco Wide Area Application Services Configuration Guide
OL-8921-01

Chapter 13 Configuring and Managing WAAS Print ServicesManaging Print Services
Modifying Printer Configuration
To modify the configuration of a an existing printer, follow these steps:
Step 1 From the Printers tab in the Print Services Administration GUI, choose the printer to modify.
The Modifying Printer window appears. (See Figure 13-17.)
Figure 13-17 Modifying Printer Configuration
Use this window to modify the location, description, and device URI settings. The name field cannot be modified. You can also perform the following tasks by clicking the corresponding icons:
• Print a test page (for Postscript printer only)—A test page is printed to the printer.
• Configure printer (for Postscript printer only)—Displays the Configure Printer window that can be used to set starting and ending banner page options. For more information, see the “Enabling Print Banners” section on page 13-31.
• Stop/Start the printer—Allows you to stop and start the printer. A warning appears to ask for user confirmation before stopping the printer.
• Accept/Reject Jobs—Allows you to determine if any job can be sent to this printer.
• Show Completed Jobs—Displays the Job Listing Page with only completed jobs for this printer. For more information, refer to the “Viewing Print Jobs” section on page 13-32.
13-30Cisco Wide Area Application Services Configuration Guide
OL-8921-01
Chapter 13 Configuring and Managing WAAS Print ServicesManaging Print Services
• Show Active Jobs—Displays the Job Listing Page with only active jobs for this printer. For more information, refer to the “Viewing Print Jobs” section on page 13-32.
• Delete this printer configuration—Allows you to delete this printer. If the printer belongs to a printer cluster, deleting the printer will remove that printer from the cluster. If the printer is the only printer in a cluster, the cluster itself is removed.
Step 2 Modify any of the following configuration settings:
• Location—User-specified location of the printer (maximum 127 characters).
• Description—User-specified description of the printer (maximum 127 characters).
• Device URI (required)—The device URI is the address of the printer, in the form:
protocol://server:port/queue
A maximum of 1024 characters are allowed. The only allowed protocols are lpd, socket, ipp, and http. Validation check on the protocol will be performed but there is no other check on the URI string. A list of example URIs appears to help you enter it properly. You can obtain the information (printer port, protocol) for your specific printer from the printer manufacturer’s manual, from the test page of the printer, or from the printer’s front panel.
Note You can only configure these fields if the printer is running. If the printer is stopped or is rejecting jobs, the fields are read-only and a message appears indicating the printer status.
Step 3 Click Submit to save your changes.
Step 4 Click OK to restart the print server now, or Cancel to manually restart server as described in the pop-up window.
Enabling Print Banners
To enable a starting or ending banner for each print job, follow these steps:
Step 1 From the Printers tab in the Print Services Administration GUI, choose the printer to modify.
The Modifying Printer window appears. (See Figure 13-17 on page 13-30.)
Step 2 Click the Configure button ( ) in the tool bar.
The Configuring Printer window appears. (See Figure 13-18.)
13-31Cisco Wide Area Application Services Configuration Guide
OL-8921-01

Chapter 13 Configuring and Managing WAAS Print ServicesManaging Print Services
Figure 13-18 Configuring the Starting and Ending Print Banners
Step 3 Check the check box next to the banner option that you want to enable:
• Starting Banner—Enables printing of a starting banner for each job.
• Ending Banner—Enables printing of an ending banner for each job.
The starting and ending banners print the same information. These options just allow you to choose the location of the banner on the page.
Step 4 Click Submit.
Note If you incorrectly specify a nonpostscript printer as a postscript printer and enable the banner page, the printer will print something similar to “%!PS-Adobe-3.0. %% …” then numerous blank pages. This message is an indication that the printer setup is incorrect. To print valid test page and banner pages, you must specify the printer postscript capability correctly.
Setting Up Print Clusters
For information on setting up print clusters, see the “Adding Printer Clusters” section on page 13-13.
Viewing Print Jobs
Use the Jobs tab in the Print Services Administration GUI to view a list of completed and active jobs.
The pages show the following job details:
• ID —Generated by concatenating the printer name with a sequence number.
• Name—The name of the job you selected to print.
• Size—The size of the job.
• Status—The reported status of the job; only available in Active Job Listing Page.
• Completion Time—The reported completion time of the job; only available in Completed Job Listing window.
13-32Cisco Wide Area Application Services Configuration Guide
OL-8921-01

Chapter 13 Configuring and Managing WAAS Print ServicesManaging Print Services
The Completed Job Listing window (see Figure 13-19) only shows jobs that are still in the spool area (/local/local1/spool/cups). The spool area retains the last 500 completed jobs and has a 1-GB size limitation. Once the completed job limit is reached, the oldest job is removed to make room for the latest completed job. When a job is removed from the spool area, it is no longer listed in the Completed Job Listing window.
Figure 13-19 Completed Job Listing Window
In the Active Job Listing window (see Figure 13-20), you can also perform the following tasks by clicking the corresponding icons next to the job:
• Stop Job—Stops the selected job.
• Delete Job—Deletes the selected job.
The Active Job Listing window shows all the print jobs that are not completed or cancelled.
Figure 13-20 Active Job Listing Window—Job Can Be Stopped or Deleted
13-33Cisco Wide Area Application Services Configuration Guide
OL-8921-01

Chapter 13 Configuring and Managing WAAS Print ServicesTroubleshooting Print Services
Troubleshooting Print ServicesTroubleshooting issues are documented in the following categories:
• General Known Issues, page 13-34
• Login and Access Problems, page 13-34
• Avoiding Print Problems, page 13-35
• Understanding Interactions Between the WAAS Central Manager and the WAAS CLI, page 13-36
General Known IssuesThe following are general known issues with WAAS print services:
• Linksys devices do not support IPP 1.1 printing; use the LPD protocol only.
• A Linksys URI should use L1/2/3 instead of P1/2/3 as specified in the Linksys user guide.
• In some cases the Windows Print Queue status may not refresh correctly on a Windows client. If this happens, press F5 to manually refresh.
• After adding a printer in the Print Services Administration GUI, it can take up to one minute for the printer to appear on a Window client system.
• In some cases the printer status and error messages are not displayed to the print client.
• The only printers that are supported are IP-based network printers. If you have directly attached printers, use Parallel/Serial/USB IP adapters.
• If you receive an “Access is denied” error when trying to load a driver to the central repository, make sure the driver file is marked as Read/Write and not Read Only.
• Print problems can be caused by corrupted TDB files. To verify these files, use the windows-domain diagnostics CLI command. See the Cisco Wide Area Application Services Command Reference for more information about this command.
Login and Access ProblemsThe following login and access issues can occur when using WAAS print services:
• Authentication information is contained in the syslog.txt file. You can raise the log level in this file by adding the relevant smb.conf directives using the smb-conf advanced command. Refer to the Cisco Wide Area Application Services Command Reference for more information.
• If you cannot access the WAAS print server from Windows, you should log out of Windows and enter the following command:
net use \\WAE_netbios_name\print$ * /USER:username
The WAE_netbios_name value is the NetBIOS name of the WAAS Central Manager device, and username is the username you specified in the “Creating Accounts with Print Admin Privileges” section on page 13-9.
13-34Cisco Wide Area Application Services Configuration Guide
OL-8921-01
Chapter 13 Configuring and Managing WAAS Print ServicesTroubleshooting Print Services
• If the Admin user cannot add a driver to a printer, the user should log out of Windows and enter the following command:
net use \\WAE_name\print$ * /USER:username
The WAE_name is the hostname or IP address of the WAAS Central Manager device, and username is the name of the account created in the “Installing Print Drivers on Individual WAAS Print Servers” section on page 13-17.
• To avoid issues with user names, follow these guidelines:
– The WAAS Central Manager checks for unique usernames in a case-insensitive manner (for example, “user1” is identical to “User1,” and you cannot add both).
– The CLI command for creating users is case-sensitive, you can add both user1 and User1 using the CLI.
Avoiding Print ProblemsTo avoid printing problems when using WAAS print services, follow these guidelines:
• When using a cluster, always use the cluster configuration window and do not configure the cluster members individually. This action may lead to inconsistent behavior, even when it is a cluster of one.
• Printer clusters should contain printers with similar capabilities. Failure to configure correctly may cause printing error. Deletion of a printer will also remove that printer from its associated clusters.
• Print test page and banner pages are only supported by PostScript printer. Nonpostscript printers will print unreadable output.
• If Point and Print does not work, make sure the drivers have been properly distributed to the WAAS print servers as described in the “Distributing Drivers to the WAAS Print Servers” section on page 13-19.
• Jobs are reprinted from the beginning. If WAAS print services are restarted due to configuration changes, in-process jobs will be reprinted.
• If jobs are not being printed, do the following:
– Make sure the printer is functional.
– Make sure the URI is set correctly.
– Make sure the printer is not stopped or rejecting jobs in the WAAS print services configuration.
– Make sure edge services on the print server is enabled and running
– Check if both smbd and cupsd processes are running.
– Check if the spool directories are full.
– Make sure the printer driver has been properly distributed. For more information, see the “Initializing Print Drivers” section on page 13-24.
• Minimize changes to the NetBIOS name of the WAAS print server. If you need to change NetBIOS name, make sure to the use either the WAAS Central Manager GUI or the windows-domain CLI command.
• If a PostScript job is sent to a nonpostscript printer, you will see a “%!PS-Adobe-3.0...” message. To fix this, configure the printer as nonpostscript, or send the print job to a PostScript printer.
• If you cannot check the check box for advanced features on a printer on the edge, it may be that “Enable advanced printing features” is allowing the client printer driver to communicate with the print server using Enhanced Metafile Spooling (EMF).
13-35Cisco Wide Area Application Services Configuration Guide
OL-8921-01

Chapter 13 Configuring and Managing WAAS Print ServicesTroubleshooting Print Services
WAAS print services supports only RAW spooling and not EMF because no rendering is done on the WAAS print server. The client renders the print job, and then submits it in a RAW format, as if the printer is going to receive that job.
Note No printer functionality is lost because of RAW spooling. The only functionality lost is the print rendering by the WAAS print server. In RAW spooling, the client is doing the rendering instead of having it done by the print server itself.
Understanding Interactions Between the WAAS Central Manager and the WAAS CLI
Because you can use the WAAS Central Manager or the WAAS CLI to configure print services, you should be aware of the following interactions between these tools:
Note Restarting CUPS may temporarily disrupt print jobs.
• If Print Services is not running, the Open link for Print Services Administration GUI is disabled in the WAAS Central Manager GUI. If you stop print services by entering the no print-services enable global configuration command in the CLI after the WAAS Central Manager is loaded, the message “The page cannot be displayed” appears after attempting to access print services.
• Some configuration changes made from the WAAS Central Manager GUI or the CLI require Samba and CUPS software to be restarted, temporarily interrupting print services availability and operation. User confirmation is required before configuration changes are made.
For more information about the print services CLI commands, refer to the Cisco Wide Area Application Services Command Reference.
13-36Cisco Wide Area Application Services Configuration Guide
OL-8921-01