Configuration Start-up guide for
37
Configuration Start-up guide for FSC3000 Fuel Site Controller TM Version 1.0 M00-052.00
Transcript of Configuration Start-up guide for

Configuration Start-up guide for FSC3000 Fuel Site Controller TM
Version 1.0
M00-052.00

Copyright © 2007 OPW Fuel Management Systems. All rights reserved.
OPW products must be used in compliance with applicable federal, provincial, and local laws and regulations. Product selection should be based on physical specifications and limitations and compatibility with environment and material to be handled. OPW makes no warranty o fitness for a particular use. All illustrations and specifications are subject to change at any time, and models may be discontinued at any time, in either case, without notice or obligation.
Standard Product Warranty:
OPW warrants that product sold by it are free from defects in materials and workmanship for a period of one year from the date of manufacture by OPW (EECO products two years from date of manufacture.) Proof of purchase may be required. As the exclusive remedy under this limited warranty, OPW will at is sole discretion, repair, replace, or issue credit for future orders on any product that may prove defective within the one year date of manufacture period. (Repairs, replacements, or credits may be subject to prorated warranty for the remainder of the original warranty period. Complete proper warranty claim documentation required.) This warranty shall not apply to any product that has been altered in any way, which has been repaired by any other than a service representative authorized by OPW, or when failure is due to misuse, or improper installation or maintenance. OPW shall have no liability whatsoever for special, incidental, or consequential damages to any party, and shall have no liability for the cost of labor, freight, excavation, clean-up, downtime, removal, reinstallation, loss of profit, or any other costs or charges.
THIS WARRANTY IS IN LIEU OF ALL OTHER WARRANTIES, EXPRESSED OR IMPLIED, AND SPECIFICALLY THE WARRANTIES OF MERCHNTIABILITY AND FITNESS FOR A PARTICULAR PURPOSE. THERE ARE NO WARRANTIES WHICH EXTEND BEYOND THE DESCRIPTION OF THE FACE HEREOF.
M00-052.00 2

M00-052.00 3

Table of Contents 1 .................................................................... 5 INTRODUCTION TO THE FSC3000
1.1 .................................................................... 5 POSITIVE CARD FILE MAINTENANCE1.2 ...................................................................................... 6 PHOENIX FOR WINDOWS1.3 ................................................................................... 6 CONFIGURATION UTILITY1.3 ..................................................................................................... 7 ON LINE MODE1.4 ............................................................................ 7 CONNECTING TO THE FSC3000
2 ........................................................................................ 7 SITE CONFIGURATION2.1 .......................................................................................................... 7 SITE SETUP2.2 ............................................................................................ 8 SAVE DATABASE AS2.3 ................................................................................................. 9 OPEN DATABASE2.4 ............................................................... 10 SET YOUR COMMUNICATION OPTIONS2.5 .............................................................................................. 11 PASSWORD SETUP2.6 ................................................................................. 11 PRINTER CONFIGURATION2.7 ............................................................................................. 12 SITE TANKS SETUP2.8 ........................................................................... 13 FSC3000 PORT INFORMATION2.9 ............................................................................................. 14 GLOBAL SETTINGS2.10 ...................................................................................... 14 FUELING UNIT LABELS2.11 ................................................................................................ 15 PRODUCT TYPES2.12 .................................................................................... 16 PRODUCT RESTRICTIONS2.13 .................................................................................. 17 QUANTITY RESTRICTIONS2.14 ...................................................................................... 18 DEFINE CARD RECORD2.15 ......................................................................... 20 DEFINE TRANSACTION RECORD
3 ........................................................................ 23 PUMP CONTROL TERMINALS3.1 PUMP CONTROLLER SETUP ...................................................................................... 23 3.2 ..................................................................................... 25 PUMP POSITIONS SET-UP3.3 .......................................................................... 27 DIRECT PUMP CONTROL (DPC)3.4 ............................................................. 27 UNIVERSAL PUMP CONTROLLER (UPC)
4 ............................................................................... 27 FUEL ISLAND TERMINALS4.1 ............................................................................................... 27 TERMINAL TYPES4.2 ........................................................................................... 30 SYSTEM MESSAGES4.3 ............................................................................. 31 RECEIPT HEADER MESSAGES4.4 ............................................................................ 33 RECEIPT TRAILER MESSAGES4.5 ............................................................................ 33 DEFAULT SYSTEM MESSAGES
5 ................................................................................... 35 HOST AUTHORIZATION5.1 ..................................................................................... 35 HOST CONFIGURATION
M00-052.00 4

1 Introduction to the FSC3000 The FSC3000 is a very powerful Fuel Site Controller that manages the operation of the Fuel Island Terminals and Pump controllers. It communicates to these devices as well as printers, modems and PCs via a serial port or Ethernet connection. The FSC3000 must be configured to tell it what devices are connected and how you want them to operate. You must also program the pump parameters, the display messages, the receipt format, etc. This is accomplished using a PC connected to the FSC3000. There are three ways to connect a PC to the FSC3000: 1) A direct serial connection from the FSC3000 to a serial port on the PC. 2) Via a LAN connected to the FSC3000’s Ethernet port. 3) Via a dial-up modem connection using the FSC3000’s optional internal (or external) modem. Once the connection method has been determined, there are three communications software packages that can be used to communicate with the FSC3000: 1) You can use the Windows communication utility Hyper-Terminal to issue configuration commands. The FSC3000 Command Line Configuration guide(M00-052.00) file, containing the complete list and description of the configuration commands is located on the disk supplied with the FSC3000. 2) You can use the Phoenix for windows terminal emulation mode in place of Hyper-Terminal. (See Phoenix for Windows below). 3) You can use the ARTWare configuration utility supplied with the FSC3000. This manual is a guide to use ARTWare.
1.1 Positive Card File maintenance The FSC3000 contains a positive card file that stores information about locally authorized cards. ARTWare was not designed to manage this card/account file. If you are using the positive card file feature, you can use the FSC3000 configuration guide (M00-052.00) commands or the Phoenix for Windows software.
M00-052.00

1.2 Phoenix for Windows Phoenix ™, Phoenix Plus™, and Phoenix Premiere™, are fuel management software packages that run on a Windows compatible PC. Phoenix Basic software features, back-up & restore, terminal emulation, on demand transaction polling and automatic transactions polling data export. Phoenix Plus software allows you to navigate between site, account, and card and transactions screens and features back-up and restore, terminal emulation, on-demand transaction polling and data export. Phoenix Plus also adds the ability to schedule automatic transaction polling and card updates for multiple locations. Phoenix Premiere has allof the Phoenix Plus features and adds the ability to poll tank gauge data and reconcile the inventory. Visit opwfms.com or contact your OPW Fuel management Systems distributor for more information.
1.3 Configuration Utility The configuration program runs on any Windows PC and allows online or offline configuration of the FSC3000. It has an intuitive user interface that eliminates using programming commands and maintains a global database of configuration settings that are common to multiple sites. Also maintains separate site databases for unique parameters, and automatically uploads any changes made to configuration settings when a connection is made to the FSC3000. Changes to global configurations settings are saved in and automatically loaded to other sites.
1.4 OFF line mode You can use it to create a database for site configuration without connecting to the FSC3000. Once the database is created, you can connect to the site and download the data.
M00-052.00 6

1.5 ON line mode You can be connected to the FSC3000 and make configuration changes in real time.
1.6 Connecting to the FSC3000 If you are connecting via a direct connect serial connection or a modem, the communication parameter in the FSFC3000 must match those of your PC’s serial port. The FSC3000 communicates with 7 data bits and even parity. The baud rate is selectable between 2400, 9600, 19200, and 38,400. Refer to the FSC3000 installation manual for more information. If you are connecting via a LAN (Ethernet) connection, you must configure the FSc3000’s Ethernet port. Refer to the FSC3000 installation manual for more information.
2 Site Configuration
2.1 Site Setup NOTE: A site short name must contain exactly 12 characters. Spaces can be used, but not as the first character.
M00-052.00 7

Click on the Site tab. Click on Add. The default site information is displayed. Click in the Site ID field and enter a three digit site ID. This must be a unique
number. Enter a 12 characters site short name in the Site Name field. Enter the site address in the Address field. Enter the site city in the city field. Enter the site state in the state field. Enter the site zip code in the zip code field. Enter the site phone number, in the Phone field. Click in the enable 2nd language box if you wish to enable a second language. Select the display type by clicking the drop-down menu in the display type field. To enable direct pump control, click in the check box next to Direct Pump
Control. If you enable direct pump control, set the pump type by clicking the drop down
menu next to Pump Type and selecting the pump type. Select the trans. delay by clicking the drop down arrow and selecting either
normal, short, shorter, or shortest. Enter the Site Connection Passwords, by typing a password in the Password 1 and
Password 2 fields. See the Passwords help page for detailed information about passwords.
Click Save to save the site information.
2.2 Save Database As You can create a new database, by saving any current database under a new name and modifying the information in the newly saved database. The functionality of the Save As button is to just copy the database; it is not made the "current database". This is only done by using File->Open. Follow the steps below to save a database under a new name:
Click on File>Save Database As. Click on the file you wish to modify.
M00-052.00 8

Type the new name of the database in the File name field, at the bottom of the window.
Click on Save. The new database is created and appears as one of the choices in the Database
folder. You can now open the new database and modify it.
2.3 Open Database
A database is specific for each customer. A customer can have multiple sites in one database. The Open Database option allows you to open the database for a specific customer. Follow the steps below to open a new database.
Click on File >Open Database. The Select FSC3000 Database window is opened. Click on any new database in the window, or search for the new database on your
computer. Click on open. The new database is opened by your system.
M00-052.00 9

2.4 Set your Communication Options This option is available to you in the drop-down box ion the Site Tab in the Communication Options area.
Click on the Site tab. Click on Add, or select the site. The default site information is displayed. Click on the drop-down menu next to the Communication Options field to select
the communication type. If your site connection type is through a modem, the FSC Phone Number field
will display. Enter the FSC Phone Number in the FSC Phone Number field.
M00-052.00 10

If your site connection type is TCP/IP the TCP/IP Networking field will display. Enter the Address and the Socket Port, and click on Save to save the communication options. Enter the network address using the standard "dotted quad" notation. For example, 10.0.0.165. The FSC3000's network port site is set to 2101 when it is manufactured, but might have been changed during the FSC3000's network setup. Match the port settings.
For direct and modem connections follow the steps below. Look at the Com Port Preferences box. Select the Port from the drop-down menu in the Port field. If modem is selected,
phone # entry required. Select a Baud Rate from the drop-down menu in the Baud Rate field. Match
FSC3000 Dip switch settings. Select Data Bits from the drop-down menu in the Data Bits field (7). Select Parity from the drop-down menu in the Parity field (EVEN). Select Stop Bits from the drop-down menu in the Stop Bits field (1). Click Save to save the communication port preferences.
2.5 Password Setup When setting up a site, you will enter site connection passwords. When the FSC3000 ships from the factory all passwords will be set as HELLO. Although we suggest you set your own passwords, the default passwords do not have to be changed for the FSC3000 to operate. This feature only changes the password that uses to access the FSC3000. Password 1 is the "modem" password, and Password 2 is the "privilege password".
Click on the Site tab. Click on Add. The default site information is displayed. Click in either the Password1 or Password2 field, located at the bottom left of the
screen. Type a new password. Click on save to save the new password(s).
2.6 Printer Configuration An external printer can be connected to the printer port # 3 on the back of the FSC3000 to make a hard copy of all transaction data, providing added protection against data loss. The journal printer records transaction, pump and product numbers, date and time, first card number, the product quantity and dollar total.
M00-052.00 11

Click on the Site tab. Click on the Printer button located on the right side of the screen. The Journal Printer Configuration screen is displayed. Click on the check box next to Enable Printer to enable and external printer. Under Printer Preferences, click in the check boxes next to Enable Auth on Error
and Line Skip Between transactions, if you wish to enable these preferences. Leave the check box empty next to any of these preferences you do not want to enable.
In the Print box you can specify what you would like printed. Enable any of the preferences by clicking in the checkbox.
If during the printer configuration you make an error, click on the Reset button to cancel all of your previously unsaved selections.
If you are satisfied with your printer configuration selections, click Apply to save your preferences.
Click OK, to exit from this window.
2.7 Site Tanks Setup On the Site Tanks screen you can see the following information for each programmed tank. Tank numbers, Fuel types, Current quantities, Low-level tank alarm quantities.
M00-052.00 12

Click on the Site tab. Click on the Tanks button, on the right side of the screen. The Site Tanks window is displayed. Click on the tank you would like to program, on the left side of the window. There is a default tank ID assigned to each tank. Click in the Tank ID field to
change the tank ID. To change the default fuel, click on the drop-down menu in the Fuel Name field,
and select a fuel. Click in the Quantity field and enter the current fuel quantity for the tank. Click in the Low Quantity field and enter the low tank alarm level. If you make an error and would like to erase all of your current unsaved
selections, click on the Reset button to start over. Click on Apply to save your Tank Preferences. Click on OK to close this window.
2.8 FSC3000 Port Information There are only two FSC3000 ports that allow edits to the parameters: Port 04 DPC Port 10 Petronet
M00-052.00 13

All other ports cannot be edited. They can only be viewed. The Send button is only enabled for the editable ports above.
Click on the Site tab. Click on the FSC Ports button, on the right side of the screen. The FSC3000 Port
Information window is displayed. The FSC Ports are listed on the left side of the window. To change Com Port Preferences for an FSC Port, click on the desired FSC Port
(either port 04, or 10). Click in the Port Name field and type in a new port name. Select a Baud Rate from the drop-down menu in the Baud Rate field. Select Parity from the drop-down menu in the Parity field. Select Data Bits from the drop-down menu in the Data Bits field. Select Stop Bits from the drop-down menu in the Stop Bits field. If you make an error and would like to erase all of your unsaved selections click
reset to start over. Click Send to save your new Com Port Preferences. Click OK exit from this window.
2.9 Global Settings Global Settings are settings that apply to all sites in the database. Products Restrictions, Odometer Reasonability, (Define) Card Records, (Define) Transaction Records, and Receipt Body.
2.10 Fueling Unit Labels You can associate one of three units of measure to your product types. These are labels. No conversion is done. The default labels are as follows: Unit One: Gallon Unit Two: Liter Unit Three: Quart
M00-052.00 14
Click on Global Settings on the task bar. Go to Products >Fueling Unit. The Fueling Unit window is displayed. Enter a label of up to 10 characters for the unit or units you wish to change. When you have changed all desired labels, click Apply. Click on OK to close out of the window.
2.11 Product Types You can define up to 32 products in. You can set each product's unit of measure, price per unit, and name. Each product has a code number. The code is assigned to a pump hose during PCT configuration.
M00-052.00 15

Click on Global Settings on the task bar. Go to Products >Product types. The Product Types window is displayed. Select the Product you wish to change from the Products Window. The Product Preferences fields and the Network Short Code fields will
automatically display the default information for the product you have selected. Click in any of the fields to change the information for the product type. When you are finished making your changes, click on apply. Click on OK to close the window.
2.12 Product Restrictions Restrictions let you control which products vehicles and/or users can dispense. Click on Global Settings on the task bar.
M00-052.00 16

Go to Restrictions>Product. The Product Restrictions window is displayed. The table in the Product Restrictions window defines codes for up to 15 sets of
product restrictions. Use restriction codes when configuring card files. They define which customers can use what type of fuel.
Select the product code(s) for each restriction code in the appropriate field. Click on Apply to save the settings. Click OK to close the window.
2.13 Quantity Restrictions Quantity restriction codes are used during card file configuration to specify how much product a particular customer can access. You can define up to 15 quantity restriction codes. Restrictions can be monetary or by volume (gallons, liters, or quarts).
Click on Global Settings on the task bar. Go to Restrictions>Quantity. The Quantity Restrictions window is displayed.
M00-052.00 17

The table in the Quantity Restrictions window defines the quantity limit in dollar amounts as the default.
To change a quantity restriction to another monetary value, uncheck the quantity restrictions in dollar box. If you chose another monetary value, this is applied to all quantity limit codes.
To change a quantity limit assigned for a specific code, go to that code and type in a new quantity limit.
Click on Apply, to apply the new quantity limit. Click on OK to exit the window.
2.14 Define Card Record Defining the card record allows you to enable or disable each of the following preferences for a card/account file: Account Number: This option allows you to assign a four digit account number to a card number. An account number can be used to group a set of cards to a specific department or company. Expiration Date: This option allows you to define a date when the account or card can no longer be used in the system. If you select this option all cards and accounts must have an expiration date set. Monthly Allocation: This option allows you to define a specific monetary amount a card and card account may pump for the month. This option is not recommended for system users with multiple sites. If you select is option all cards and accounts must have a Monthly Allocation set. Daily Allocation: This option allows you to define a specific monetary amount a card and card account can pump per day on a specific site. If you select his option, all cards and accounts must have a Daily Allocation set. Pin Number: This option allows you to assign PIN # (Personal Identification Number) to the single or driver cards. By enabling this option you are not required to have a PIN number assigned to a specific card. Card Invalid after 3 bad pin entries: This option allows you to configure the FSC to invalidate user's card when they enter their pin number incorrectly three times. Save odometer entries: This option allocates space in the card file for storing the last transaction odometer entry on a single or vehicle card. This option also needs to be selected when using odometer reasonability. This option should not be checked if the system user has multiple sites.
M00-052.00 18
Odometer Reasonability: This option checks the difference between two user-entered odometer readings, and determines if the difference is within a range you specified for that card. 15 ranges are available. Odometer Reasonability is only for single-site applications. For reasonability to work, you must program the FIT display to instruct customers to enter their current odometer value. Customer entered odometer readings are stored in the card/account file, and then compared to the next mileage entered by that user. The second entry is "reasonable" if the difference between the entries is within your specified range. Product Restriction: This option lets you control fuel distribution by checking miles traveled between fuelings, by limiting pumps that can be used by certain card, or through quantity limits. Quantity Restriction: This option allows a product limit per transaction (dollar or volume). Driver/Vehicle/Account Name: This option allows you to enter the name of the driver, vehicle or account using up to nine characters. Verify 1: Three of the card account prompts can be verified. If this option is enabled, you will be able to verify a prompt. Verify 2: Three of the card account prompts can be verified. If this option is enabled, you will be able to verify a prompt. Verify 3: Three of the card account prompts can be verified. If this option is enabled, you will be able to verify a prompt. Prompt in Sequence: This option allows you to capture and verify prompt information for cards stored in the card record file.
M00-052.00 19

Click on Global Settings on the task bar. Go to Define Card Record. The Definition of Card and Account window is displayed. The table in the Definition of Card and Account window allows you to enable or
disable the preferences shown above. Click on each box next to the preference to enable or disable the preference. Click Apply to save your preferences. Click OK to exit this window.
2.15 Define Transaction Record The Transaction Record can be printed or shown. It shows/prints all completed transactions stored in the FSC3000. Though all transactions are recorded, what you actually see is determined by the preferences you set in the Transaction Configuration window. The first three options in the Transaction Configuration window include: Wrap Around- If wrap around is enabled, and the transaction buffer is full, the FSC3000 overwrites (erases) the older transactions when new transactions are received. Do not enable wrap around unless you are certain that transaction data will not be accidentally destroyed. Write Over-The write over option allows you to enable or disable write-over of non-captured or failed transactions. This function is only available if you have wrap around enabled and are using one of the networks for card authorization. This does not apply to local card file transactions.
M00-052.00 20

Unauthorize Users: The unauthorize users option allows you to enable or disable whether the system processes an unauthorized attempt to use the system as a transaction and logs the event in the transaction buffer. Disabling the unauthorize users options causes the system to ignore any unauthorized user and events, and only cases where a pump was activated by the FSC3000 are recorded. For this reason, if you do not save unauthorized users you might see a gap in the transaction numbers. Display Fields include: Account, Driver, and Vehicle- check here if you want the transaction record to contain the account, driver, and vehicle name field data. Date and Time- check here if you want the transaction record to contain the date and time Host Capture Date/Time-check here if you want the transaction record to contain the host capture date and time Transaction Number- check here if you want the transaction record to contain the transaction number Card #1- check here if you want the transaction record to contain the first card number assigned to this account Card #2- check here if you want the transaction record to contain the second card number assigned to this account Product Type- check here if you want the transaction record to contain the product type Pump Number- check here if you want the transaction record to contain the pump number Hose Number- check here if you want the transaction record to contain the hose number Quantity- check here if you want the transaction record to contain the quantity dispensed 8 Digit Quantity- check here if you want the transaction record to contain an 8 digit quantity Price- check here if you want the transaction record to contain the price Total- check here if you want the transaction record to contain the total Odometer- check here if you want the transaction record to contain the odometer reading Distance Per Unit- check here if you want the transaction record to contain the distance per unit
M00-052.00 21
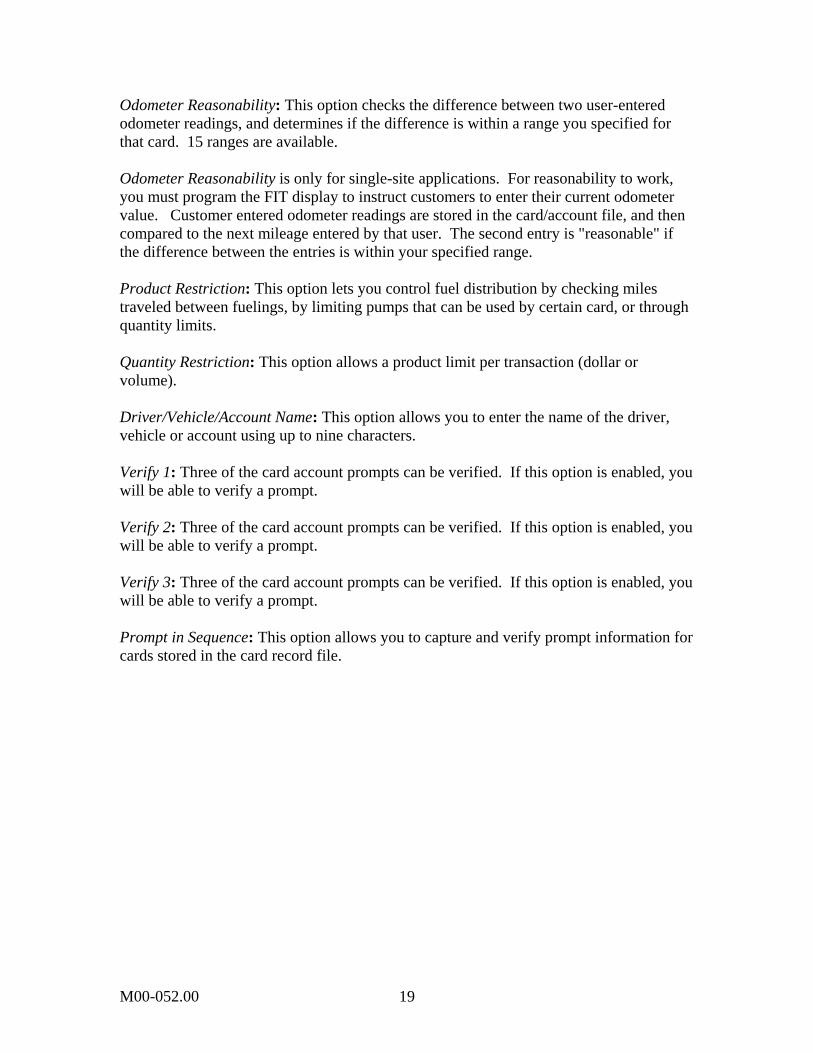
Miscellaneous- check here if you want the transaction record to contain previously defined miscellaneous information Receipt Status- check here if you want the transaction record to contain the receipt status Account Number- check here if you want the transaction record to contain the account number Prompt Entries-check here if you want the transaction record to contain the prompt entries There must be at least one transaction recorded in your system in order to show all the selected data fields.
Click on Global Settings > Define Transaction Record. The Transaction Configuration screen is displayed. Click on the boxes next to the options and display fields and computer format to
enable or disable transaction record preferences. Click Apply to save your preferences. Click Ok to exit the Transaction Configuration screen
M00-052.00 22

3 Pump Control Terminals Pump Control Terminal (PCT) for Mechanical Pumps—Current Sense PCM Pump Control Module Voltage Sense
3.1 Pump Controller Setup Each FSC3000 can have a pump controller board that controls pump operations. This board, in the FIT or in a remote cabinet, must be uniquely numbered. If the FSC3000 is equipped with UPC (Universal Pump Controller) software, it can authorize fueling transactions via a pump control console (such as used in a self service station). Pumps controlled by a UPC option do not require a pump controller board, but they do require the logical pump controller to be configured within the FSC. You must define your Pump Controller before you configure your pumps, because this is where you define the number of hoses for each fueling position being controlled by the UPC interface. The process for setting up Pump Controllers 5-8 is the same as it is for Pump Controllers 1-4, except that Pump Controllers 5-8 cannot be used for a UPC/DPC interface. Example tables for a Pump Controller with 8 hoses and for a Pump Controller with 1 hose from the Setup worksheet are shown below. The following parameters are defined for each pump controller: Unit Type: The choices for unit type are: PCT, K800 PCT, and PCM or UPC. Installed?: Place a check next to this box if the pump is currently installed. Allow Hose Restrictions?: Select YES here if you wish to enable hose restrictions. Pump Number: This is the pump number displayed for this PCT position. This number is only a label and does not have to match the PCT position number. A pump number can be assigned to more than one position on the same PCT. When the pump number is selected by a customer, all the associated positions are activated. For example, if pump number “2” is assigned to positions #1 and #2 a customer with a large saddle-tank equipped truck could speed his fueling by putting position 1’s pump into one of the tanks and the Position 2 pump into the other tank. Two separate transactions are recorded.
M00-052.00 23

Poll ID: The poll ID field is populated by default. Check to ensure that the Poll ID is correct. Only if you enable the DPC control. Max Quantity: This is the maximum fuel amount to be dispensed for any transaction using this pump. (The default is 10 units) Pulses Per Unit: This is the maximum pulses of fuel allowed per unit during a transaction. Use Sentry?: This option deactivates the pump if three “Zero Quantity” transaction appear in a row, indicating possible pump or pulser trouble. The default leaves this option disabled. Handle Timeout: This is the maximum time allowed (in seconds) between pump activation and pump handle retrieval. The default is 60 seconds. Enter “0” to deactivate. First Pulse Timeout: This is the maximum time allowed (in seconds) to detect the first fueling pulse from when the pump handle is first retrieved. Pump power is removed when the specified time is reached. Default is 60 seconds. Enter “0” to deactivate. Fueling Timeout: This is the limit (in minutes) given to the user to fuel. The default is 5 minutes. Time is measured from when the pump is first activated. Power is removed from the pump when Max Time is exceeded to deactivate this feature, enter ‘0”. Hose “x” product: This represents the type of fuel this position will dispense. Hose “x” Tank Number: This is the tank number from which the product will be pumped./ A PCT position with the same fuel type at eh tank form which product is drawn must be defined. Hose “x” totalizer: Set a number to match the totalizer counter on the pump face. This tracks the amounts of fuel actually dispensed by the pump. The default is “0”. For UPC-equipped systems, the last four prompts are repeated for up to 8 hoses.
M00-052.00 24

Click on the Pump Controller tab. Click on Add to add the controller. Place a check in the Installed check box to indicate that the Pump Controller is
installed. Click on the drop-down menu next to Controller ID and select the controller
(usually you will start with Pump Controller #1). Click on the drop-down menu next to Unit Type to select the type of unit. Click in the check box next to Allow Hose Restrictions if you wish to enable hose
restrictions. This option is only available if the Unit Type is UPC. UPC and DPC are mutually exclusive, you cannot have both types. DPC is only available if you have checked DPC on the Site Tab.
Click on the Save button to save the information for this Pump Controller.
3.2 Pump positions set-up
M00-052.00 25
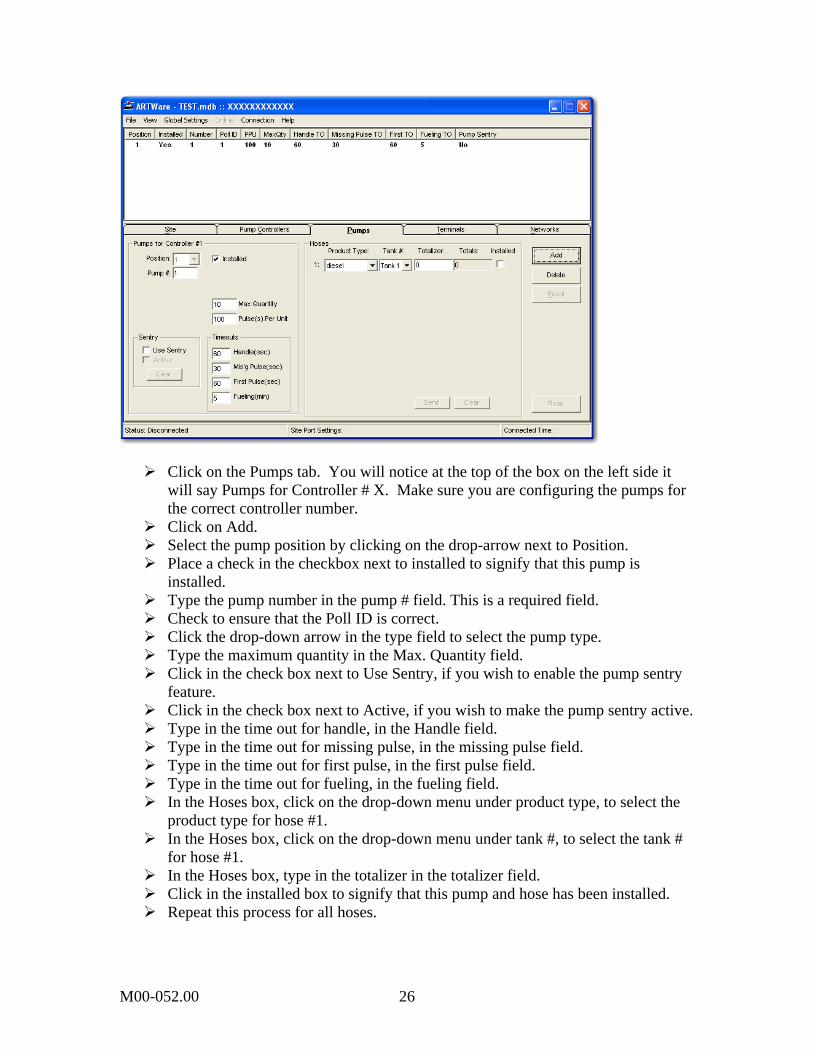
Click on the Pumps tab. You will notice at the top of the box on the left side it will say Pumps for Controller # X. Make sure you are configuring the pumps for the correct controller number.
Click on Add. Select the pump position by clicking on the drop-arrow next to Position. Place a check in the checkbox next to installed to signify that this pump is
installed. Type the pump number in the pump # field. This is a required field. Check to ensure that the Poll ID is correct. Click the drop-down arrow in the type field to select the pump type. Type the maximum quantity in the Max. Quantity field. Click in the check box next to Use Sentry, if you wish to enable the pump sentry
feature. Click in the check box next to Active, if you wish to make the pump sentry active. Type in the time out for handle, in the Handle field. Type in the time out for missing pulse, in the missing pulse field. Type in the time out for first pulse, in the first pulse field. Type in the time out for fueling, in the fueling field. In the Hoses box, click on the drop-down menu under product type, to select the
product type for hose #1. In the Hoses box, click on the drop-down menu under tank #, to select the tank #
for hose #1. In the Hoses box, type in the totalizer in the totalizer field. Click in the installed box to signify that this pump and hose has been installed. Repeat this process for all hoses.
M00-052.00 26

Click on Save to save this information, or click on Send to save the information and send it to the Pump Controller if you are connected.
3.3 Direct Pump control (DPC) The FSC3000 DPC can directly connect to Gilbarco, Wayne and Tokheim Electronic Pumps. The first step is to define the brand of electronic pumps that will be used and the communication parameters for them. The FSC3000 is designed to support up to 8 PCT devices, but DPC is limited to the first 4 PCTs. For configuration see the FSC3000 Command-Line Configuration guide.
3.4 Universal Pump Controller (UPC) The UPC is used when controlling electronic pumps in conjunction with a pump manufacturer’s console or controller. The UPC is limited to the first 4 PCT’s. For configuration see the FSC3000 Command-Line Configuration guide.
4 Fuel Island Terminals
4.1 Terminal Types There are 4 terminal choices for the FSC 3000: Fuel Island Terminal (FIT) 500 Commercial/Outdoor Payment Terminal (OPT) K800-Hybrid Systme2 FIT The FIT 500, the OPT, System2 FIT and the K800-Hybrid are the customer interfaces containing card readers, a keypad, and a display screen. Terminals can be equipped to handle magnetic stripe cards, and OPW Fuel Management Systems Chip Keys. The terminals have the following features:
M00-052.00 27

Up to 8 terminals can be address by one FSC Built-in receipt printers (Except for the K800-Hybrid) Text or graphic display (K800-Hybrid only allows text display) Multiple card reader options: Optical, ISO standard mag-card, OPW Fuel Management System2 mag-cards, some non-standard commercial fueling cards and Chip key reader Terminal Type: Enter the terminal type; FIT500, OPT, System2 FIT and K800-Hybrid Decline Timeout: This determines how long, in seconds, the Decline Authorization message remains on the FIT. Enter a value form 1-99, 15 is the default. Prompt Timeout: This represents the time that a prompt remains on the FIT display. The default is 25 seconds. Display Type: This represents the type of display. This is set in the site window for all Terminals. Keyboard Access : This determines if the user is allowed keyboard entries and determines the length of those entries. The length of the string you can enter is based on supported networks. Count the number of digits in the number on the card. If your system supports more than one network, enter a value equal to the length of the longest card number. Issue Receipts? : Enter YES to have the receipt printer issue a receipt. NO is the default. If you enter YES, you will be asked the number of days after a transaction that the customer can retrieve a receipt for that transaction. Limit Access to Pumps? : Enter YES to change which pumps can be activated by the specified FIT. If you select YES, enter the valid pumps. (This is a comma separated value; 1, 2, 3, etc.)
M00-052.00 28
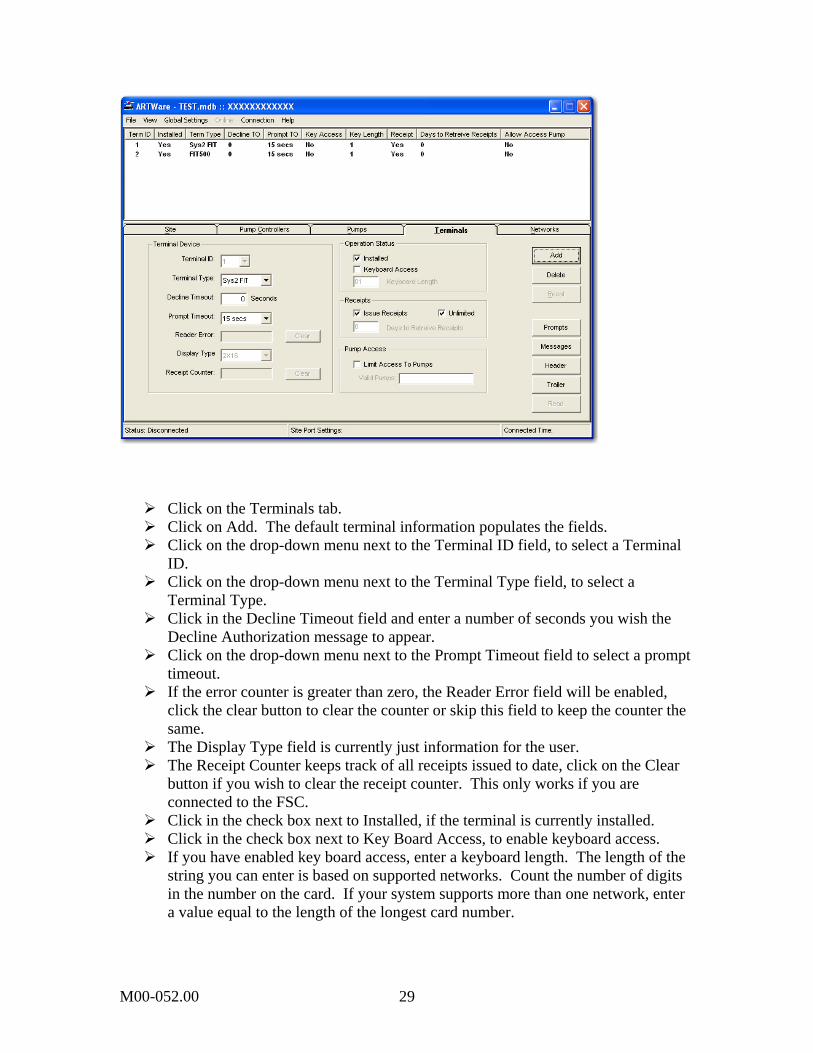
Click on the Terminals tab. Click on Add. The default terminal information populates the fields. Click on the drop-down menu next to the Terminal ID field, to select a Terminal
ID. Click on the drop-down menu next to the Terminal Type field, to select a
Terminal Type. Click in the Decline Timeout field and enter a number of seconds you wish the
Decline Authorization message to appear. Click on the drop-down menu next to the Prompt Timeout field to select a prompt
timeout. If the error counter is greater than zero, the Reader Error field will be enabled,
click the clear button to clear the counter or skip this field to keep the counter the same.
The Display Type field is currently just information for the user. The Receipt Counter keeps track of all receipts issued to date, click on the Clear
button if you wish to clear the receipt counter. This only works if you are connected to the FSC.
Click in the check box next to Installed, if the terminal is currently installed. Click in the check box next to Key Board Access, to enable keyboard access. If you have enabled key board access, enter a keyboard length. The length of the
string you can enter is based on supported networks. Count the number of digits in the number on the card. If your system supports more than one network, enter a value equal to the length of the longest card number.
M00-052.00 29

Click in the check box next to issue receipts to enable the printer to issue a receipt.
If you have enabled the issue receipts option, enter the number of days to retrieve receipts in the Days to Retrieve Receipts field.
Click in the check box next to Limit Access to Pumps in order to enable this preference.
If you have enabled the Limit Access to Pumps command enter the Valid Pumps for which you want limited access. This is a comma separated list of the pumps. (For example: 3,5,16, 15, 52.)
If you make an error before you save your preferences click Reset to clear the screen and start over.
Click Save to save all your Terminal Preferences.
4.2 System Messages The FIT display guides customers through the fueling process with a series of prompts. The FSC3000 is pre-programmed with default prompts for certain events. There are 60 display messages. If Dual Language is ON, prompts will automatically appear in the user defined 2nd language prompts. ARTWare does not know what messages are on your FSC3000 when a new site is created. For this reason, when you first add a site, a set of default messages will be created which may or may not match your hardware or needs. ARTWare will create a set of 2X16 non-graphics messages. You can load a complete default set of messages by selecting one of the sets from the drop-down box Default Message Sets and clicking the Load button. This will overwrite all the messages. Connect to the FSC3000 and click Read on this dialog box to get the messages. You can change any of the default messages, but only the text will change. You cannot change any function. For example, "Insert Card" can be changed to "Put in Card", but not to "Enter Current Time".
M00-052.00 30

Click on the Terminals tab. Click on the Messages button. Click on the Message you wish to change in the ID/ Message window. You may
need to use the scroll bar to scroll down to the message you are seeking. The message ID field automatically changes to the ID number for the message
you have selected. Click the arrow next to the drop-down Language field. Select either Language one or two. The lines of the message are displayed in the field below the ID/Message window. Click on the text that you wish to change. The text will be highlighted in blue.
This means that anything you type will over ride the current message. Type your new message. Select Read... The message will change in the ID/Message window. Click OK to exit from the Message Set window.
Many of the messages are explained in troubleshooting. For more information on the FSC3000 Display Messages, go to Troubleshooting> Default Display Messages.
4.3 Receipt Header Messages The receipt header is a message that prints at the top of each receipt.
M00-052.00 31

Click on the Terminals tab. Click on the Header button. The Receipt Header window displays. Click on the drop-down menu next to Language to select the language for which
you want a receipt header. Enter up to four lines for the receipt header. Each line holds up to 11 characters. Skip any of the four lines you do not wish to use. If you make an error and want to clear your unsaved changes click on Reset and
your changes will be cleared. Click Apply to save your changes. Click OK to close out of the Receipt Header window.
M00-052.00 32

4.4 Receipt Trailer Messages The receipt trailer is a message that prints at the bottom of each receipt.
Click on the Terminals tab. Click on the Trailer button. The Receipt Trailer window displays. Click on the drop-down menu next to Language to select the language for which
you want a receipt trailer. Enter up to four lines for the receipt trailer. Each line holds up to 11 characters. Skip any of the four lines you do not wish to use. If you make an error and want to clear your unsaved changes click on Reset and
your changes will be cleared. Click Apply to save your changes. Click OK to close out of the Receipt Trailer window.
4.5 Default System Messages 2x16 Display Graphics Display 1 SYSTEM OUT OF SERVICE ^:^T^F SYSTEM OUT OF^G SERVICE
M00-052.00 33

2 READING CARD ^T^K READING CARD 3 REMOVE CARD ^T^K REMOVE CARD 4 INCORRECT READING ^T^K INCORRECT READING 5 CHECK CARD ORIENTATION ^T^K CHECK CARD^L ORIENTATION 6 INSERT CARD FOR RECEIPT ^1^T^KINSERT CARD^LFOR RECEIPT 7 INSERT CARD FOR RECEIPT ^T^KINSERT CARD^LFOR RECEIPT 8 PETRO VEND SYSTEM 2 ^1^T^KPETRO VEND^L SYSTEM 2 9 INSERT CARD ^T^K INSERT CARD 10 SYSTEM CLOSED ^:^T^F SYSTEM CLOSED 11 PLEASE WAIT ^T^J PLEASE^K WAIT 12 PRINTING RECEIPT ^:^T^F PRINTING^G RECEIPT 13 TAKE RECEIPT ^8^T^F TAKE^G RECEIPT 14 PRINTER ERROR ^0^T^F PRINTER ERROR 15 ISSUE RECEIPT? : ^5^T^K ISSUE^L RECEIPT? : 16 ENTER PUMP #: ^7^T^K ENTER^L PUMP #: 17 IN USE, RE-ENTER: ^T^K IN USE,^L RE-ENTER: 18 INVALID, RE-ENTER: ^T^K INVALID,^L RE-ENTER: 19 PUMP HANDLE? RE-ENTER: ^T^K PUMP HANDLE?^L RE-ENTER: 20 FAULTY PUMP, RE-ENTER: ^T^K FAULTY PUMP,^L RE-ENTER: 21 UNAUTH'ZED, RE-ENTER: ^T^K UNAUTH'ZED,^L RE-ENTER: 22 RESTRICTED, RE-ENTER: ^T^K RESTRICTED,^L RE-ENTER: 23 USE PUMP # % ^T^K USE PUMP #^L % 24 INSERT 2nd CARD ^1^T^K INSERT^L 2ND CARD 25 INCORRECT CARD ^0^T^F INCORRECT CARD 26 ENTER CARD #: ^5^T^J ENTER^K CARD #: 27 ENTER PIN: ^5^T^K ENTER^L PIN: 28 ENTER ODOM: ^6^T^K ENTER^L ODOM: 29 ENTER MISC: ^5^T^K ENTER^L MISC: 30 ENTER 2nd CARD #: ^5^T^J ENTER 2ND^K CARD #: 31 RE-ENTER PIN: ^5^T^K RE-ENTER^L PIN: 32 RE-ENTER ODOM: ^6^T^K RE-ENTER^L ODOM: 33 SORRY! NETWORK SYSTEM OFF ^0^T^F SORRY! ^G POS SYSTEM OFF 34 PROCESSING... PLEASE WAIT ^9^T^IPROCESSING^KPLEASE WAIT 35 NOT A NETWORK CARD ^0^T^F NOT A NETWORK CARD 36 CARD EXPIRED ^0^T^F CARD EXPIRED 37 CARD RECORD EXPIRED ^0^T^F CARD RECORD^G EXPIRED 38 CARD INVALIDATED ^0^T^F CARD INVALIDATED 39 3 BAD ENTRIES ^0^T^F 3 BAD ENTRIES 40 ALLOCATION EXCEEDED ^0^T^F ALLOCATION^G EXCEEDED 41 UNABLE TO PROCESS: + ^0^T^F UNABLE^H TO PROCESS: + 42 variable pos messages variable pos messages 43 ACCOUNT EXPIRED ^0^T^F ACCOUNT EXPIRED 44 ACCOUNT INVALIDATED ^0^T^F ACCOUNT^G INVALIDATED 45 ACCOUNT #s DO NOT MATCH ^0^T^F ACCOUNT #s^G DO NOT MATCH 46 ACCOUNT RECORD NOT FOUND ^0^T^F ACCOUNT RECORD^G NOT FOUND 47 KEYBOARD ENTRY NOT ALLOWED ^0^T^F KEYBOARD ENTRY^G NOT ALLOWED 48 JOURNAL ERROR -GET MANAGER ^0^T^F JOURNAL ERROR^G -GET MANAGER 49 SYSTEM BUSY -BUFFER FULL ^0^T^F SYSTEM BUSY^G -BUFFER FULL 50 ENTER DESIRED QTY. (2-#): ^5^T^K ENTER DESIRED^L QTY. (2-#): 51 RE-ENTER QTY. (2-#): ^5^T^K RE-ENTER^L QTY. (2-#): 52 3 BAD PRESET QTY. ENTRIES ^0^T^F 3 BAD PRESET ^H QTY. ENTRIES 53 ENTER HOSE #: ^KENTER HOSE #: 54 INVALID HOSE RE-ENTER: ^KINVALI RE-ENTER: 55 DO YOU HAVE AN ASSIGNED PIN? ^5^T^KDO YOU HAVE^L AN ASSIGNED PIN? 56 RESERVED RESERVED 57 RESERVED RESERVED 58 RESERVED RESERVED 59 RESERVED RESERVED 60 RESERVED RESERVED
M00-052.00 34

5 Host Authorization
5.1 Host Configuration The Host Configuration dialog box allows you to configure how your FSC3000 connects to the network host(s). The FSC3000 can connect to two network hosts at the same time. The two tabs “Primary Host” and “Secondary Host” are identical, except that the Secondary Host tab has an additional checkbox to enable the secondary host processing. Each host can be connected to by either the device server/Satellite or through a dial-up modem. If modem you must select what kind of modem (if provided by OPW Fuel Management Systems) or you may provide an initialization string.
M00-052.00 35

Click on the Site tab. Click on the Host Config button located on the right side of the screen. The Host Configuration screen is displayed. Click on the check box next to Connects using Device Server/Satellite, or Use
Dial-out connect to host, depending on how you plan to connect to the primary host.
If you connect using a device server/satellite, click on CFN Host Only, Irving 24 Host Only, or Paymentech Host Only to specify the type of host.
If you connect using a dial-out connection, click on New OPW host modem, Old OPW host modem, or User Defined Initialization string to designate the modem configuration.
If you select User Defined Initialization String, enter the string in the field provided.
M00-052.00 36

Click in the check box next to Print price and total on receipt if you wish to enable this option.
Enter an amount for Force capture time. Configure your secondary host options in the same manner. Click in the checkbox next to Enable Secondary host for processing. If you are satisfied with your host configuration selections, click OK to save your
preferences.
M00-052.00 37


![OpenFlow Configuration Lab - start [APNIC TRAINING WIKI]](https://static.fdocuments.us/doc/165x107/61e686f20a811624b56dab03/openflow-configuration-lab-start-apnic-training-wiki.jpg)