Condition reporting - Te Papa · Te Papa Tongarewa This publication is ... Condition reporting is a...
24
Condition reporting He Rauemi Resource Guide 26 Jenny Sherman – Dunedin Public Art Gallery Care of collections and taonga
-
Upload
truongkien -
Category
Documents
-
view
213 -
download
0
Transcript of Condition reporting - Te Papa · Te Papa Tongarewa This publication is ... Condition reporting is a...

Condition reporting He Rauemi Resource Guide 26
Jenny Sherman – Dunedin Public Art Gallery
Care of collections and taonga

First published 2005 by National Services Te Paerangi, Museum of New Zealand Te Papa Tongarewa
Second edition 2010
PO Box 467, Wellington, New Zealand
Copyright © 2010 Museum of New Zealand Te Papa Tongarewa
This publication is copyright. Its contents may be photocopied for museum services for purposes of their own staff and volunteer training, but no portion of it may be reprinted for any other purpose without the written permission of the Chief Executive, Museum of New Zealand Te Papa Tongarewa.
ISSN 1175-6462

Content:Introduction 02
Systematic examination 03
Scope of the examination
Preparing for the examination
Checklist for examining items
Handling items 05
Paintings and framed material
Photographs
Books
Works on paper
Textiles
Furniture
Other objects
A framework for reporting 07
Making overlays to report damage
The structure of items
The structure of 3D objects
The structure of textiles
Identifying damage 10
Light
Temperature and relative humidity
Dust, dirt, and other pollutants
Micro-organisms and pests
Inherent instability
Mechanical damage
Restoration attempts
Making reports 12
Glossary 14
Further reading 16
Further training 16
Further resources 16
Acknowledgements 17
Condition reporting
Condition reporting is a valuable tool for managing collections. This guide offers a systematic
approach to reviewing the condition of items in your collection, as well as a consistent
framework, and a set of terms for making useful reports.
Condition reporting 01

Condition reports can:
• increase your organisation’s understanding of what
is in its collection
• provide useful information about potential
acquisitions. If an object is in poor condition,
requiring extensive treatment, this may infl uence
the decision to acquire
• capture important information at the time an item
comes into the collection, providing a valuable
reference point for any later changes in condition
• help you plan exhibitions by showing which objects
are in a stable condition and which need treatment
• help provide information for applications seeking
funding for conservation assistance
• help identify and remedy any problems with storage
or display practices
• help resolve disputes, should damage occur to an
object in your collection while on loan to another
organisation or during transportation
• help with insurance claims if an item goes missing
or is damaged. You may have problems making
insurance claims if you don’t have recent condition
reports about material in your collection.
Introduction
Condition reporting is a tool to help you better care for and manage your collections.
Condition reports are especially useful when objects are going into or out of your
organisation on loan, and they should always accompany objects in travelling exhibitions.
They also have other valuable uses.
Condition reporting02
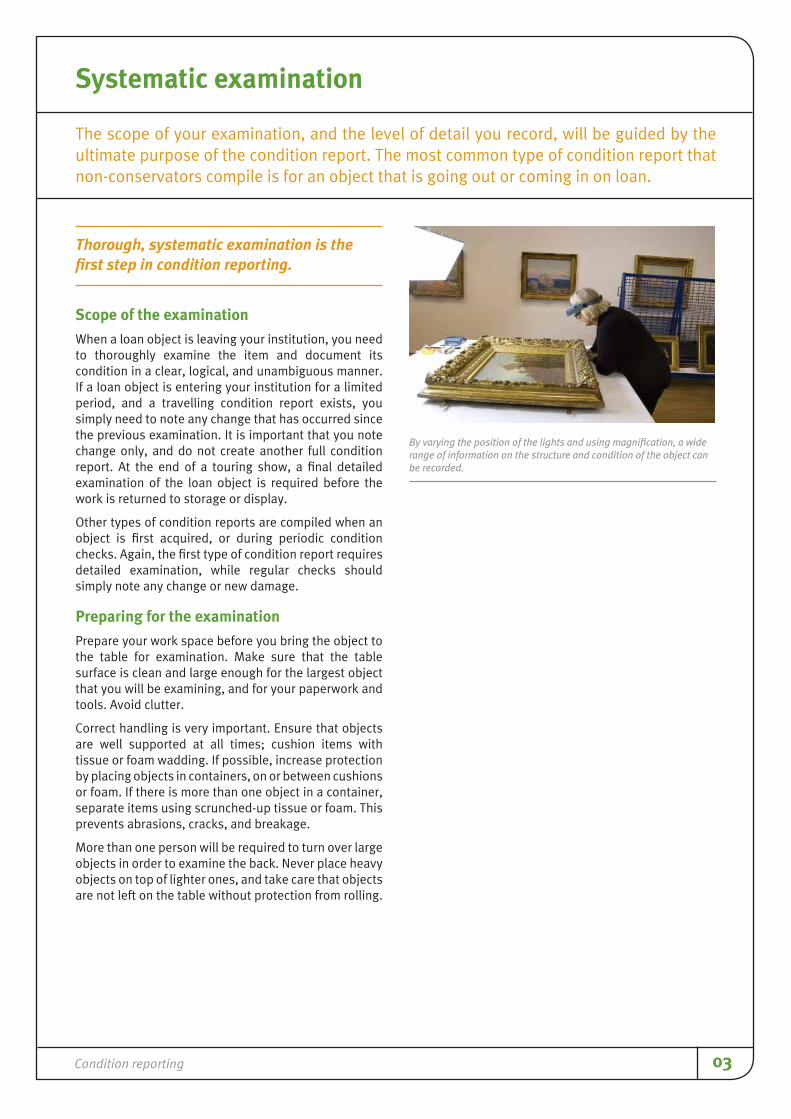
Systematic examination
Thorough, systematic examination is the
fi rst step in condition reporting.
Scope of the examination
When a loan object is leaving your institution, you need
to thoroughly examine the item and document its
condition in a clear, logical, and unambiguous manner.
If a loan object is entering your institution for a limited
period, and a travelling condition report exists, you
simply need to note any change that has occurred since
the previous examination. It is important that you note
change only, and do not create another full condition
report. At the end of a touring show, a fi nal detailed
examination of the loan object is required before the
work is returned to storage or display.
Other types of condition reports are compiled when an
object is fi rst acquired, or during periodic condition
checks. Again, the fi rst type of condition report requires
detailed examination, while regular checks should
simply note any change or new damage.
Preparing for the examination
Prepare your work space before you bring the object to
the table for examination. Make sure that the table
surface is clean and large enough for the largest object
that you will be examining, and for your paperwork and
tools. Avoid clutter.
Correct handling is very important. Ensure that objects
are well supported at all times; cushion items with
tissue or foam wadding. If possible, increase protection
by placing objects in containers, on or between cushions
or foam. If there is more than one object in a container,
separate items using scrunched-up tissue or foam. This
prevents abrasions, cracks, and breakage.
More than one person will be required to turn over large
objects in order to examine the back. Never place heavy
objects on top of lighter ones, and take care that objects
are not left on the table without protection from rolling.
The scope of your examination, and the level of detail you record, will be guided by the
ultimate purpose of the condition report. The most common type of condition report that
non-conservators compile is for an object that is going out or coming in on loan.
By varying the position of the lights and using magnifi cation, a wide range of information on the structure and condition of the object can be recorded.
Condition reporting 03

Checklist for examining items
During the examination, you will need:
• temperature and humidity levels similar to the usual
display or storage environment – although it may
be necessary for objects to gradually become
acclimatised
• good, even lighting that allows you to see details
clearly (objects should only be exposed to this
brighter light for short periods)
• additional lamps, torches, or light boxes that
provide:
– raking light shone from the side of the objects,
parallel to the surface – this emphasises surface
characteristics, such as creases in paper
– strong light shone directly onto the surface – this
emphasises details such as textures and coatings,
different ink qualities, and the presence of both
surface and ingrained dirt
– transmitted light shone through an object from
behind, such as a light table; this can reveal splits,
small tears, insect damage, and areas of weakness
that might not otherwise be seen in paper,
textiles, and paintings
• small magnifi ers, such as thread counters or
photographic magnifi ers
• white cotton or close-fi tting powder-free surgical
gloves to protect the object from oils, salts, and
sweat from your hands
• pencils (not pens) to record your fi ndings
• a fabric measuring tape (no sharp metal
components)
Raking light accentuates any relief or surface deformation. Photo courtesy of Dunedin Public Art Gallery.
Equipment for condition reporting: camera, brush, object, torch, pencil, magnifi er, pull-out measuring tape, cloth measuring tape, gloves, ruler and condition report form.
• a camera – a ruler, pencil, or similar object can be
useful to set alongside the object to provide a sense
of scale
• a fi ne palette knife or pair of tweezers (such as
stamp collectors use) for lifting delicate materials.
If you are working with other people on the
examination, agree before you start on the
terms you are going to use to describe the
objects in the report.
Condition reporting04

Handling objects
Paintings and framed material
Check the painting is secure in its frame. If you need to
put it face down to examine the back, always check fi rst
that the front is stable and that there is adequate
padding to protect the front of the frame. Foam blocks
or padded timber blocks will protect the frame.
Carry the painting with two hands, one on each side.
Keep it vertical and facing towards you. Don’t carry a
painting by the top edge as this will damage the frame.
Carry large unframed paintings by gripping the outside
edges of the stretcher. If this isn’t possible, carry from
the internal stretcher bars, ensuring you don’t insert
your fi ngers between the stretcher bar and the canvas.
Carry unstretched paintings rolled around a cardboard
cylinder, on a tray, or with a hanging bar. Note: not all
unstretched paintings are suitable for rolling. Contact a
conservator for advice when considering whether to roll
a painting.
Rest paintings on foam or padded blocks. This protects
the edges of the stretcher or frame, and makes it easier
to pick them up again.
If it is necessary to vertically stack framed paintings,
stack similar sizes together. Put them face to face and
back to back, inter-leaved with double-walled corrugated
cardboard. Ensure that weight is well distributed to
avoid putting stress on the painting.
Always hold the frame of a painting. Avoid touching the
painted surface or the back.
Ensure two or more people carry large or heavy
paintings. That way, the side and bottom edges can
be supported. Never carry more than one painting at
a time.
Never stack unframed works.
Photographs
Handle as little as possible; photographs are highly
susceptible to damage. Cotton or close-fi tting powder-
free surgical gloves should be worn.
Support old photographs at all times. See the section in
this guide on works on paper for more information.
To avoid scratching photographic emulsions, interleave
photographs with photographic storage paper or Mylar
(polyester fi lm) – not coated papers.
When labelling, write in pencil on a separate piece of
paper that is large enough to fold around the whole
photograph. Always avoid sticky tape or paper clips –
even for temporary labels.
Padded or foam blocks provide a cushioned support for frames and paintings; they can also be used to protect a painting resting horizontally on a table.
Paintings should be stacked parallel to each other with corrugated card placed between the paintings for protection.
Condition reporting 05

Books
When getting a book from a shelf, hold it fi rmly around
the spine, your fi ngers on one cover and your thumb on
the other. Taking a book down by pulling it by the top of
the spine risks causing damage.
Always wear gloves – cotton or surgical. Cotton gloves
should be worn when handling books with gold leaf
decorations.
Open the book gently without forcing it fl at.
Don’t stack books or carry them so that they rub against
each other.
Works on paper
Handle paper as little as possible.
Wear gloves. Cotton gloves are good, but can make it
hard to pick up individual sheets of paper. Close-fi tting
powder-free surgical gloves are a good alternative.
Support paper at all times – it may be brittle. To look at
it closely, place it on a sheet of cardboard or another
rigid support before picking it up. Large works should
be placed between two pieces of mount board and
carried by two people.
Works using chalk, pastel, watercolour, or pencil are
easily smudged or abraded.
Make sure that nothing rubs against works on paper – this
includes rough paper or board. Never stack them.
Keep works on paper away from printed paper –
especially newsprint – because the inks might come off
onto the artwork.
Avoid using sticky tape, rubber cement, wood glue, ink,
markers, rubber bands, or paper clips (even plastic
ones) near or on your works.
Textiles
Handle textiles as little as possible.
Remove any jewellery you are wearing – it could catch
on the fabric.
Use gloves to ensure acids and chemicals on your hands
are not absorbed by textiles.
Support textiles. Larger textiles should be rolled and
carried on the roller. Smaller textiles can be carried on a
box or on a tray. This is especially important for Mäori
textiles containing black dye, which makes them very
fragile.
Remember that certain areas of garments are more
fragile than others due to wear.
Remember you can damage a garment if you lift it by its
shoulders.
Furniture
Remember that any projecting part of a piece of furniture
is likely to have the least strength. So a chair, for example,
should be lifted by the seat, and a table by the legs.
Wear cotton or surgical gloves if you need to touch the
upholstered parts of furniture.
Three dimensional objects
Handle objects as little as possible.
Examine each object to fi nd the most stable part –
handle it there. When handling a metal, ceramic, or
glass object, don’t use the handle, rim, or other
projecting part to lift it.
When handling a multi-part object, lift only one part at a
time. For example, handle the lid of a teapot separately
from the pot itself.
Try to avoid painted surfaces. Use surgical rather than
cotton gloves for objects with fl aking or powdery
pigment surfaces, such as bark paintings – cotton gloves
may pick up the pigment.
Always wear cotton or surgical gloves (not latex) when
handling any metal item: the chloride and salts in the
perspiration on your hands can cause corrosion.
Lift chairs at their strongest point using both hands and wearing gloves.
Condition reporting06

Regardless of what kind of object you are reporting on
or what the condition report will be used for, the
following details need to be recorded:
• Type of object, e.g. watercolour, ceramic, textile,
book, painting on canvas, carving
• Title of object, if any
• Name of artist, maker, or author, if known
• Accession number
• Date and place of manufacture, if known
• Dimensions recorded in millimetres
– For 2D objects: height fi rst (an A4 size drawing is
recorded as 297mm x 210mm, or 297mm high by
210mm wide).
– For 3D objects: height x width x depth. There are
no rules for irregular-shaped objects. For a jug,
for instance, you might record the height,
circumference, and distance from the tip of the
spout to the furthest point of the handle, or you
might decide to record the maximum
dimensions.
• Number of parts that make up the item. This is
important when recording items such as a suit of
clothes, a set of tools, a sculpture, or a broken
object.
• Accessories, such as a frame or mount on a painting,
a cover for a telescope, or a strap for a suitcase.
Include any fi ttings, e.g. hanging hardware, glazing,
or backing.
• Structure in the case of paintings, works on paper, 3D
objects and textiles – see page 08-09 for further
information
• Materials or media the object is made from – these
can sometimes be diffi cult to determine. If you are
unsure, use phrases like ‘appears to be’, ‘typical of’.
Alternatively, you can enclose the information you
are doubtful about in square brackets – for example,
[synthetic fabric]. For more details on materials or
media commonly used in paintings and textiles, see
Further reading on page 16 for further information.
• Damage and deterioration. These can be caused by
many factors, including light, heat, mould, and
insects. These causes are explained more fully on
pages 10-11. The following table gives typical kinds
of damage to note on a condition report (see the
glossary at the end of this guide for defi nitions).
Kinds of damage to note on a condition report
insect damage tears mould
creases slack canvas splitting
discolourationyellowed
varnishbreakage
loss fading foxing
accretions stains cuts
holesfl aking paint or
inkrust stains
distortion crackscorrosion of
metals
abrasionyellowed sticky
tape embrittlement
cocklingprevious
repairsfrayed edges
graffi ti indentations delamination
gougesloose or
ingrained dirt
• The location of any damage. For a large object, it
might be suffi cient to note the general location, e.g.
‘top right corner’. Smaller objects may require a
more exact location, expressed in millimetres from
the nearest edges (e.g. ‘the crack is 250 mm from
right and 165 mm from bottom’).
A further approach is to supply a scale diagram with
the damage clearly marked. But perhaps best of all
is a good-sized photograph with a clear overlay
sheet on which you can mark the areas of damage
(see ‘Making overlays to record damage’ on page 08
for additional information).
• Details of the examination. Names of those who
examined the object, and the date on which the
examination took place.
A framework for reporting
Condition reporting 07

Photographic overlays can simplify a complicated job of descriptive writing, for example, in the case of a painting with numerous damages. Photo courtesy of Dunedin Public Art Gallery
Structure of items
The structure of paintings and works on paper
Paintings have several separate components, all with
different functions and physical and/or chemical
properties. Much variation can be found in a painting’s
structure but the two essential components are the
primary support and the paint.
• Auxiliary support
Paintings on canvas have a support to keep them
taut, called either a stretcher (if it is expandable) or
a strainer. Sometimes canvas paintings are adhered
to a rigid support, a process called maroufl age. An
unstretched canvas may be attached to a hanging
bar. Works on paper may have a secondary support
such as a backing and window matt.
• Primary support
This is the physical structure that holds or carries
the painting’s ground and paint fi lm. It might be
made of canvas or other fabrics, paper or cardboard,
plywood or hardboard.
Supports attract both mould and insects. They also
continually absorb and release water from the air,
which may cause them to stretch or warp and put
the painting under stress.
• Ground
The ground is the fi lm or layer that lies between the
support and the paint layers. It protects and seals
the support, and provides a texture and colour to
work on. A layer of glue size, followed by an oil
ground, used to be common in paintings on canvas.
Acrylic gessoes, applied directly to the canvas, are
more common today.
For works on paper, media are generally applied
directly to the support.
The ground is not always described in a condition
report because it can be hard to identify. A condition
report might note a complete absence of ground, or
poor adhesion between the ground and the paint.
• Paint layers
These form the painted image, and generally
comprise several layers. Paint is composed of
pigments mixed with a liquid medium. Examples
include acrylic paint, which has a synthetic resin
medium, and oil paint, which uses a drying oil as
the medium. It is appropriate to talk about the
artist’s technique in this section; for example, are
the paint layers thickly or thinly applied? Is there
any impasto? Refer to glossary on page 14.
• Surface coating
A varnish is often applied to paintings as a protective
layer that saturates the colours and protects the
painted surface against minor scratches and
abrasions.
Making overlays to record damage
Diagrams and photographs of the object being
examined can make helpful additions to the
condition report. Photographic overlays are even
more useful, allowing you to pinpoint the exact
location of any damage. They can be made from
Mylar (polyester fi lm) or OHP sheets as follows:
• Take a high resolution photograph of the
object you are examining and enlarge this to
A4 size either digitally or with a good quality
photocopier.
• Take a Mylar sheet bigger than the A4-size
image and fold it at the top.
• Attach the fold-over to the back of the image
with double-sided tape.
• Using permanent marker pens, note damage on
the overlay sheet. Provide a key to the symbols
you use: for example, you might use blue dotted
lines to indicate cracks, or red dots to show an
area of insect damage.
Condition reporting08

The structure of three dimensional objects
3D objects can be constructed from an enormous variety
of materials, using a range of fabrication techniques,
and have a variety of forms and functions.
• Support
The physical structure might be made from a variety
of materials such as wood, metal, basketwork, or
paper. These materials may have a secondary
support frame to keep them taut and rigid.
• Ground
The layer that lies between the support and media
layer.
• Media layer
This may comprise several application coatings,
such as pigment, varnish, or glazes.
The structure of textiles
Textiles can be made from natural or man made fi bres.
Woven fabric is constructed from weaving sets of yarns
that run lengthwise and crosswise (warp and weft).
Unwoven fabrics employ the processes of fi bres matted
together, such as beating, felting, tufting, and stitchbond
processes.
• See He Rauemi Resource Guides
– 18: ‘ Caring for Mäori textiles tiakitanga o te kahu
äku’
– 24: ‘Caring for textiles and clothing’
An example of woven fi bre. Whatu aho rua (double pair twining) and top edge of tāniko (border) on traditional kaitaka (cloak).
An example of beaten inner bark fi bre, generally known as tapa cloth.
Condition reporting 09

Light
Although obviously essential in museums and galleries,
light – both artifi cial and natural – is one of the most
damaging elements for collections. All forms of light,
including the sun, produce energy. This energy breaks
chemical bonds, causing object materials to deteriorate.
The two most damaging forms are ultraviolet or UV
radiation (short wave, high energy) and infrared
radiation (heat).
The damaging effects of light may not be fast or obvious,
but they can be devastating.
Depending on the item, signs to look for include:
• Textiles
Colours become pale and dull. Fabrics become
fragile and split readily. Nineteenth-century textiles
are especially susceptible: many contain aniline
dyes, which are very prone to fading, especially
purples, blues, and greens.
• Pigments in watercolours
Pigments derived from plants or animals are
especially sensitive to photochemical reactions.
Colours can fade and change markedly. Many of the
same pigments are found in oil paints, but
photochemical damage does not occur at the same
rate as for watercolours because the paint layer is
thicker and the oil medium protects the pigments.
• Paper
Cheap, mass-produced modern papers are made
from untreated wood pulp, which contains lignin.
Lignin is very prone to photochemical deterioration.
As it breaks down, it produces yellow-brown
substances (seen when a newspaper is left out in
the sun) and acids, which make the paper brittle.
This deterioration continues even when the paper is
no longer exposed to the light.
• Oil paintings, bone and horn objects, furniture
Although not as sensitive as those described above,
these items are still susceptible to light damage.
Damage, such as fading or cracking, can be serious
and cumulative.
Identifying damage
It is easier to identify and report on damage or deterioration if the likely causes are
understood. Different kinds of objects are more vulnerable to different kinds of damage,
but the following are some common causes.
Temperature and relative humidity
These can be very damaging for collections – especially
when the temperature and relative humidity fl uctuate
widely, or are extreme.
Relative humidity is a measurement of the amount of
moisture in the air, and is directly related to temperature.
As the temperature rises, the amount of moisture that
the air can hold will increase and the humidity level will
decrease. This can cause several kinds of damage:
• When there is high humidity (a lot of moisture in the
air), mould/mildew can grow on materials and
cause decay. Insects also thrive in these conditions.
Textiles and painting canvasses are particularly
affected.
• High humidity causes metals to corrode, dyes and
textiles to fade, organic materials – such as wood
and leather – to swell or change shape, and
emulsions and adhesives to become sticky.
• In low humidity, organic materials become
desiccated. They may become brittle, distort, or
split. Because thicker materials lose moisture more
quickly from their surface, they may warp. Adhesives
may dry out, crack, and fail.
• Constantly fl uctuating temperatures can cause
repeated expansion and contraction, leading to
stress on parts of the object. This can lead to
cracking, fl aking, shrinkage, and warping in
paintings, furniture and other wooden objects, and
bone and ivory. In textiles, the constant expansion
and contraction of fi bres can eventually cause them
to fray and fracture.
Dust, dirt, and other pollutants
These pollutants take two forms – either particulate or
gaseous. They come from three main sources: the
external environment (for example, salt-laden winds or
the hydrogen sulphide found in Rotorua); the
environment inside the museum or storage area; and
materials used to store or display objects.
Dust and dirt cause many kinds of damage. The following
are some examples.
• In textiles, dust lodged between fi bres can act like
tiny cutters, breaking or otherwise damaging
threads.
Condition reporting10

• Dirt may become ingrained on the surface of paint,
particularly on the softer surfaces of modern acrylic
paints. It can also become ingrained in porous
surfaces, such as paper or basketwork, and become
impossible to clean.
• A build-up of dirt between the stretcher bar and the
canvas of a painting can lead to distortion, causing
cracking and other damage.
• Dust particles containing chlorides (found, for
example, in salty air) can cause bronze disease (see
glossary on page 14).
• Pollutant gases, including sulphur dioxide and
sulphuric acid, can corrode certain metals. Sulphuric
acid also attacks protein-based materials, such as
leather bookbindings. Red rot caused by sulphuric
acid is a particular problem for old books.
• Efforts to clean dirt off objects may cause further
damage including abrasion and scratching.
Micro-organisms and pests
Objects are susceptible to damage from both moulds
and mildew, and insects and rodents. While they can be
controlled, this needs to be done carefully to avoid
exposing the collection to further risks.
Moulds grow when relative humidity is greater than
65% and there is little air movement. As they digest and
break down the materials they feed on, moulds can
cause several kinds of damage.
• Paper, textiles, and wood can become weak and
eventually crumble away. Pages of books may
become melded together and lose their strength.
• Objects made of stone and metal may be affected
by the acids produced by the mould’s digestive
enzymes.
• Stains and dull spots can appear on paintings
affected by mould, causing the canvas to weaken.
These are generally impossible to remove.
• Mould growth can produce bright stains on textiles,
wood, and paper. These can be virtually impossible
to remove without further damage to the object in
question.
• The enzymes in mould can attack photographic
gelatine, destroying the photographs.
Insects and rodents are highly destructive. Sometimes
the damage they cause can be hard to detect. Signs to
look for include:
• Holes and cavities left behind by beetles that chew
their way through a wide variety of plant and animal-
based materials. Borer can be identifi ed by the fi ne
dust they create as they tunnel.
• Holes in textiles and garments caused by moths
feeding on wool, fur, hair, silk, dead insects, horn,
and feathers.
• Surface marks caused by cockroaches regurgitating
whatever they have been eating (which includes
leather, hair, skins, paper, books, and more) or
gluing their egg cases onto objects.
• Booklice that feed mainly on mould growing on old
books, or on other dead insects.
• Holes and surface erosion in paper, fabric (especially
starched material, cotton, linen), photographs, and
book bindings caused by silverfi sh.
• Teeth marks and stains from rodents and their
excrement.
Inherent instability
Some materials are more unstable than others, and
prone to deterioration over time. Deterioration can
occur where certain incompatible materials are used
together. Examples include:
• Paper, fabric, and plastics that were once fl exible
can become brittle due to chemical deterioration.
• Adhesives, paint layers, varnishes, and coatings
may become less fl exible or tacky. Collages and
other items using a lot of adhesives may fall apart.
Paintings may fl ake due to poor adhesion between
layers.
• Colours in paintings and fabrics may fade or
discolour.
• Metal objects may corrode.
• Large sculptures may have a high centre of gravity
and distort over time.
Mechanical damage
Paintings are susceptible to damage through poor
handling, accidents, vibration, and neglect. Types of
damage include dents, bulges, cracks, tears, and paint
loss. Textiles can be prone to abrasion and fi bres
fraying. Objects may be prone to cracking, splitting, and
abrasion.
Restoration attempts
Efforts to fi x, restore, or clean an object may have
disastrous results – discolouration or blanching of a
painting; scratches on furniture; shrinkage or tearing of
fabric; and unsightly excess adhesive. Some of the
resulting damage can be irreparable.
Seek advice from a professional conservator
before attempting any restoration, repairs,
or cleaning. The New Zealand Conservators
of Cultural Materials (NZCCM) can supply
the names and contact details of qualifi ed
people in your area. Visit the NZCCM
website: www.nzccm.org.nz
Condition reporting 11

Be consistent in your terminology, especially if several
people are responsible for writing the report.
Use simple, straightforward language, although you will
need to use some technical terms for clarity. People using
the reports in future may not have the same technical,
historical, or cultural knowledge as its authors.
Be objective and specifi c. Vague subjective terms –
such as ‘good’ or ‘sound’ – should be avoided: always
try to qualify such terms with specifi cs. The glossary on
pages 14-15 contains terms commonly used in condition
reporting. These can help make your report more
accurate, unambiguous, and useful.
Use diagrams, drawings, and photographs wherever
possible to supplement your written report.
Different types of condition reports
Acquisition report
This is a condition report written when a work is being
considered for gift or purchase. In addition to the
general requirements listed on pages 07-09, an
acquisition report should also address:
• longevity and stability
• treatment requirements
• issues of originality – whether the object has been
retouched, repaired, or rebuilt
• storage and display issues.
See Museum-in-a-box on our website for an acquisition
report template.
Collection record
This is an active record of an object’s condition, and is
updated every time the work goes on display or is sent
out for loan. These records are essential for settling
insurance claims.
For organisations with permanent displays, it is
recommended that collection records are completed
regularly (six-monthly or yearly, depending on
resources). A collection record can be supplemented
with regular inspections or surveys every 6 or 12
months, or when an object goes on or off display.
See Museum-in-a-box on our website for a condition
reporting form template.
Making reports
Whatever the purpose of the condition report, follow these guidelines.
Inspection record
Like a collection record, this is a regular update of the
condition report. It may be undertaken any time an
object goes on display, is taken out of display, goes out
on loan, or is returned from loan.
Travelling (or loan-out) condition report
The travelling condition report records any changes in
the condition of an object as it travels from venue to
venue. It comprises the original condition report
prepared by the lender, with incoming and outgoing
comments added by each institution exhibiting the
object.
To ensure the travelling condition report does its job,
the lending institution must take responsibility for
supplying a full and accurate initial condition report. A
copy of this initial condition report should be retained
by the lender for the whole time the object is on loan.
The borrowing institution should always use this
travelling condition report, and not substitute an
alternative report. The borrower should also:
• avoid repeating information that is provided in the
initial report or in comments made subsequently by
other institutions
• treat the travelling report as a legal document,
making sure any comments are accurate, clear, and
precisely written
• follow any instruction given in the report and in the
exhibition/loan contract
• contact the lending institution within 24 hours if
there is any change in the condition of the object
• return the travelling report with the object.
See Museum-in-a-box on our website for a travelling
(loan-out) condition report template.
Loan-in condition report
This is a report prepared for objects that are borrowed
(for exhibition or other purposes) and do not have
accompanying condition reports. This report provides a
reference point if there are any concerns about the
condition of the object when it is returned to its owner.
Lenders should countersign the condition report at the
time of the loan.
Condition reporting12

Condition report as part of a treatment proposal
This is a more specialised form of report, usually written
by a conservator. The information it provides is used to
determine how an object should be treated. It may
include the results of research, and will provide more
historical information and detail – for example, about
the structure of a painting – than other kinds of condition
report.
See Museum-in-a-box on our website for a condition
report template as part of a treatment proposal.
Melanesian spear racks, Otago Museum. Photo courtesy of Otago Museum.
Condition reporting 13

Abrasion – a wearing away of the surface caused by
scraping, rubbing, grinding, or friction. Often
superfi cial.
Accretion – any external material deposited on a surface:
fl yspecks, accidental drips and splashes (see also
‘inclusion’).
Adhesive residue – may be from glue, paste, pressure-
sensitive tapes.
Bleeding – the suffusion of a colour into adjacent
materials, often caused by water or other solvents.
Blister – a separation between layers appearing as an
enclosed, bubbled area.
Bubbly areas – a type of deterioration found in cellulose
nitrate and acetate.
Buckling – a soft concave or convex random distortion.
Chip – a defect in the surface caused by material that
has been broken away.
Cleavage – a separation between the paint layers and
the support that can result in cupping (concave fl akes).
It is caused by the contraction of the support, forcing
the paint layer up off the surface.
Cockling – a soft concave or convex distortion
characterised by parallel, repeated ripples, usually
either horizontal or vertical.
Crack – a surface fracture or fi ssure across or through a
material, occurring either as a straight line or branching
in form: no loss is implied. A crack may be described as
blind when it stops part way; as hairline when it is a tiny
fi ssure; and as open when it is a large fi ssure.
Crease – a line of crushed or broken fi bres. Generally
made by folding. A dog-ear is a diagonal crease across
the corner of paper, parchment, etc.
Cupping – see cleavage.
Delamination – a separation of layers; splitting.
Dent – a defect in the surface caused by a blow; a simple
concavity.
Discolouration – a partial or overall change in colour
caused by ageing, light, and/or chemical agents. This
includes yellowing and darkening, bleaching, which is
the lightening of colour, and fading, which refers to a
loss of colour and/or change in hue.
Glossary of useful terms
This glossary of terms for condition reporting comes from The New Museum Registration Methods by R A Buch and J A Gilmore, 1998, published by the American Museums
Association and reproduced here by kind permission of the publishers.
Disjoin – a partial or complete separation of a join
between two members of an object, as distinct from a
crack, tear, or split.
Distortion – a warping or misshaping of the original
shape. Shrinkage may occur.
Draw – a local distortion at the corner of a painting,
marked by diagonal cockling from the corner toward the
centre of the mount.
Drumming – a type of matting where the support is
adhered on all edges to the window mat, causing
problems if the relative humidity becomes too low.
Dry rot – decay of seasoned timber caused by fungi that
consume the cellulose of wood, leaving a soft skeleton
that is readily reduced to powder.
Embrittlement – a loss of fl exibility causing the material
(e.g. paper, parchment, leather) to break or disintegrate
when bent or curled.
Ferrotyping – glossy patches found on the surface of
photos, resulting from lengthy contact with a smooth-
surfaced storage enclosure, such as polyester or
glass.
Fill – the material used to replace areas of loss; fi ll is
then inpainted.
Flaking – lifting and sometimes loss of fl at areas of the
surface layer.
Fold – a turning over of the support so that the front or
back surface is in contact with itself.
Foxing – small yellow, brown, or reddish-brown spots
on paper or canvas, caused by mould or oxidation of
iron particles in the paper.
Fraying – ravelled or worn spot indicated by the
separation of threads, especially on the edge of a
fabric.
Frilling – separation and lifting of the photographic
emulsion from the edges of the support.
Impasto – thickly applied paint, often with pronounced
brushwork.
Inclusion – particle accidentally bonded to the surface
of an object during manufacture (on support or paint
surface).
Inpainting – new areas of paint to restore design or
colour continuity. Restricted to areas of loss.
Condition reporting14

Iridescence – colour effect in glass due to the partial
decomposition of the surface and the formation of
innumerable thin scales, resulting in an uneven, fl aky
surface.
Loss – missing area or hole.
Mildew – see mould.
Missing element – loss of an integral component of, or
addition to, the material or appendage (e.g. clasp,
cover).
Mould – biological in nature, mould or mildew can be
found in the form of foxing; as a coloured, furry, or web-
like occurrence. It may have a musty odour.
Odour – smell of sulphur, camphor, vinegar, etc;
produced by the degradation of cellulose nitrate or
acetate products. Strong odour indicates severe
degradation.
Oozing – see sweating.
Overpainting – areas of repainting over existing original
surface.
Patina – a coloured surface layer, either applied or
naturally occurring.
Pest damage – surface loss (silverfi sh), tunnelling,
holes (borer), fl yspecks etc that are obviously caused
by insects or other pests.
Red rot – powdery red substance found upon vegetable-
tanned objects resulting from chemical reaction with
pollutants in the air.
Scratch – linear surface loss due to abrasion with a
sharp point.
Sheen – a polish produced by handling, often occurring
on frequently touched locations.
Silvering – shiny or mirror-like discolouration in the
shadow areas of a photographic image caused by the
ageing of excessive residual silver compounds.
Skinning – surface loss.
Soil – a general term denoting any material that dirties,
sullies, or smirches an object. Dust is loose soil generally
distributed on surfaces; grime is soil tenaciously held
on surfaces; a smear and a fi ngerprint are types of local
grime. A spatter, or run, is the result of dried droplets or
splashes of foreign material.
Stain – a colour change as a result of soiling, adhesive,
pest residue, food, oils, etc. A diffuse stain is without a
distinct boundary; a discrete stain has a distinct
boundary; a liquid stain has a discrete boundary or tide-
line that is darker than the general area of the stain; a
centred stain has a darker or more intensely coloured
centre within its general area.
Sweating – a clear or yellow oily liquid found on the
surface of a deteriorated cellulose nitrate or acetate
object.
Tear – a break in paper or fabric, or other sheet material,
as a result of tension or torsion.
Warp – the planar deformation of the support caused by
changes in relative humidity.
Wear – surface erosion, usually at edges, due to
repeated handling.
Weeping – occurs on glass as a reaction between water
and formic acid.
Condition reporting 15

Allen, E. Condition Reporting and Conservation Guidelines for Touring Exhibitions. Perth: National
Exhibitions Touring Structure for Western Australia,
1992
Coote, K (ed). Care of Collections. Sydney: Australian
Museum, 1998
Kelly, S. Travelling Exhibitions – A Practical Handbook for Non-State Metropolitan and Regional Galleries and Museums. Melbourne: National Exhibitions Touring
Support for Victoria, 1994
National Services Te Paerangi. ‘Preventive conservation’. He Rauemi Resource Guide (6). Wellington: Museum of
New Zealand Te Papa Tongarewa, 2001
National Services Te Paerangi ‘Caring for Mäori textiles’. He Rauemi Resource Guide (18). Wellington: Museum of
New Zealand Te Papa Tongarewa, 2003
National Services Te Paerangi. ‘Caring for textiles and clothing’. He Rauemi Resource Guide (24). Wellington:
Museum of New Zealand Te Papa Tongarewa, 2009
Art in Transit – Handbook for Packing and Transporting Paintings, eds R Mervin, M F Mecklenburg, R M Merrill.
Washington DC: National Gallery of Art, 1991
Stolow, N. Conservation and Exhibitions: Packing, Transport, Storage and Environmental Considerations.
London: Butterworths & Co., 1987
Thompson, J. Manual of Curatorship: A Guide to Museum Practice. London: Butterworths & Co., 1987, 1994
Artcare http://www.aucklandartgallery.govt.nz/
Canadian Conservation Institute
http://www.preservation.gc.ca
For a list to help with identifying materials, visit the
National Library of New Zealand website:
http://www.natlib.govt.nz
Collections, on the Collections Australia Network
website, has useful information on condition reporting
and many other aspects of the care of cultural items:
http://www.collectionsaustralia.net/
Further reading
Museum-in-a-box on the National Services Te Paerangi
website www.nationalservices.tepapa.govt.nz has
models including an ‘Acquisition report’; ‘Condition
reporting form’; ‘Travelling (or loan-out) condition
report form’; and ‘Condition report as part of a treatment
proposal’.
National Services Te Paerangi also has object receipt
form booklets available. Contact us to fi nd out more.
Further resources
Further training
To learn more about the subjects covered in this guide,
you may be able to attend a workshop about condition
reporting. Contact National Services Te Paerangi to fi nd
out about training opportunities in your area.
The following organisations can assist with advice
and training on condition reporting: National Services
Te Paerangi; New Zealand Conservators of Cultural
Materials.
Condition reporting16

National Services Te Paerangi thanks those whose
experience and expertise contributed to the development
of this resource, particularly Rose Evans, Sarah Hillary,
Katherine Campbell, Jenny Sherman and Te Papa
conservation staff.
He Rauemi Resource Guides are published by National
Services Te Paerangi (Te Papa) in support of its work
throughout New Zealand to enhance the museum services
offered within communities.
Unless otherwise stated, all images are owned by Museum
of New Zealand Te Papa Tongarewa.
This He Rauemi Resource Guide has been prepared by
National Services Te Paerangi (NSTP) and the Museum
of New Zealand Te Papa Tongarewa (Te Papa) for
information purposes only. Neither NSTP nor Te Papa
endorse, authorise or are affi liated in any way with the
companies and products listed within this Guide. Neither
NSTP nor Te Papa accepts any responsibility for, or makes
any representation or warranty about, the service, quality
or reliability of the products and companies listed.
Acknowledgements
Condition reporting 17

Notes
Condition reporting18

Notes
Condition reporting 19

Notes
Condition reporting20


National Services Te PaerangiMuseum of New Zealand Te Papa Tongarewa
Cable Street, PO Box 467, Wellington, New Zealand Freephone helpline: 0508 NSTP HELP (0508 678 743)
Email: [email protected]
Website: www.nationalservices.tepapa.govt.nz

![Waitangi Day activity book A5 - Te Papa · that adaption or collection to the public, the following attribution to Te Papa should be used: ‘This work is [based on/includes] the](https://static.fdocuments.us/doc/165x107/5f0872147e708231d4220c9e/waitangi-day-activity-book-a5-te-papa-that-adaption-or-collection-to-the-public.jpg)