Concord FaxAssist · The contents of this publication and the specifications of this application...
45
© Concord Technologies 2018 1 Table of Contents Concord FaxAssist Complete User Guide Version 3.0 Concord Technologies | concordfax.com | [email protected]
Transcript of Concord FaxAssist · The contents of this publication and the specifications of this application...

© Concord Technologies 2018
1
Table of Contents
Concord FaxAssist
Complete User Guide Version 3.0
Concord Technologies | concordfax.com | [email protected]

© Concord Technologies 2018
2
Copyright © 2018 CONCORD Technologies. All Rights Reserved.
The contents of this publication and the specifications of this application are subject to
change without notice.
The fax service who provided the software reserves the right to make changes without
notice to this publication. The fax service provider and software, shall not be responsible
for any damages, consequential or otherwise, caused by reliance on the materials
presented herein, including typographical errors.
More Information
Additional support can be provided through:
Email: [email protected]
Telephone: +1 (206) 441‐3346, option 2
Fax: +1 (206) 441‐7965
Address: Concord Technologies
101 Stewart Street - Suite 1000
Seattle, WA 98101 USA
Website: https://concordfax.com/faxassist/
Premium Support hours are Monday – Friday, 6:00am to 6:00pm (Pacific Time)

© Concord Technologies 2018
3
TABLE OF CONTENTS
Préface 4
Getting Started 5
System Requirements 5
Installation and Upgrade 6
License Agreement 12
Getting Familiar with the Interface 13
FaxAssist Account Configuration 16
IMAP Setup 17
Inbound Web Services Setup (InboundWS) 20
Routing Faxes 22
Advanced Options 25
Using the FaxAssist Service 35
Starting the FaxAssist Service 35
Stopping the FaxAssist Service 36
Refreshing the FaxAssist Service 36
Installation Verification 36
Troubleshooting / FAQs 37
Concord Support 41
Appendix A: DateTime Tokens 42
Appendix B: Metadata Customization 43

© Concord Technologies 2018
4
Préface
Welcome to Concord FaxAssist: a Windows utility that routes selected incoming fax
communications to printers (for automatic printing) or to specific folder(s) or document
management systems for storing.
For each account that is configured to retrieve faxes, the documents can be routed to
any of the following three options:
• Print to a local or network printer
• Store in one or more folders
• A combination of the above
Who this Guide is for
The Concord FaxAssist User Guide provides helpful information for any administrator
tasked with installation and/or the configuration of service utility applications.

© Concord Technologies 2018
5
Getting Started
This chapter provides information required to get started with the FaxAssist application.
The following topics are included:
▪ System Requirements
▪ Installation and Upgrade Procedures
▪ License Agreement
▪ Getting Familiar with the Interface
System Requirements
▪ To use Concord FaxAssist, you must have a Concord Fax account.
▪ Supported operating systems: Windows 2008, Windows 2008 x64,
Windows 2008 R2, Windows 2012, Windows 2016
▪ Concord FaxAssist requires at least 64 megabytes(MB) of RAM (128MB is
recommended).
▪ Concord FaxAssist requires at least 50 megabytes(MB) of available space
on the hard disk (more may be required based on the level of traffic to
handle).

© Concord Technologies 2018
6
Installation and Upgrade
If you are installing FaxAssist for the first time, please skip to the step-by-step
installation procedures. If you are upgrading FaxAssist to the latest version, please
follow the instructions directly below.
Upgrading an Existing Install
To upgrade FaxAssist, you will first need to uninstall the current version of the
application from your workstation. Note: You will have the ability to migrate current
settings to the new version, during the install.
The following screenshots will guide you to start this process:
➡ Go to Control Panel ‐> Add Remove Programs/ Programs and Features
➡ Right click on the Concord FaxAssist and click on Uninstall/Change to
remove the application from the work station.
➡ Click Uninstall.

© Concord Technologies 2018
7
➡ On the successful completion of the uninstall, the following window will be
displayed:
➡ Then follow the step‐by‐step instructions as discussed in Step‐by‐Step
Installation Procedure section above

© Concord Technologies 2018
8
Step-by-Step Installation Procedure
➡ Download the FaxAssist Installer
➡ Disable any anti-virus software before installing FaxAssist
➡ Run the install package by double clicking the FaxAssistInstall.msi file
➡ Click Next to initiate the install.
➡ Accept the default Destination Folder and click Next

© Concord Technologies 2018
9
Note: If preferred, you can change the installation location.
➡ Click Next to start the installation.
© Concord Technologies 2018
10
➡ A progress bar will display your installation progress
➡ Once finished, you will get the successful installation notification, click
Close to exit the installer

© Concord Technologies 2018
11
Windows Service Security Settings (optional)
If this application needs windows permissions to print or save files to disk, then you
must set the permissions for the Windows service using the username/password that
has access to the resources.
To set permission go to Start > Control Panel > Administrative Tools and open
Services. Find the service Concord FaxAssist as shown below.
Right click on the service and select Properties. Click on the Log On tab and change the
"Log on as" to "This account" and type in the windows account that is required to access
the remote resources such as printer or file storage. Note this is only required if the
remote resource requires windows permissions to access.

© Concord Technologies 2018
12
License Agreement
On the first launch of the FaxAssist application after installation, the software license
agreement will be displayed. Confirm acceptance by clicking on I AGREE.
Note: This is a one-time notification and will no longer appear after installation.

© Concord Technologies 2018
13
Getting Familiar with the Interface
As a first-time user, it is recommended to take a few minutes to get familiar with the
user interface.
The main screen is divided into 2 sections. On the left side of the screen you will see a
list of configured accounts. Below this list are controls for starting and stopping the
service. On the right side, will be the details associated with the account selected.
Above the account information you will see a few additional options: Add Account (A),
Setting (B), View Logs (C), and About (D).

© Concord Technologies 2018
14
Add Account
Click on the Add Account button, to bring up a new screen to configure a new account.
For more information about the account record please see the Account Configuration
section of this document.
View Logs
The View Logs button will display the log viewer which allows you to monitor FaxAssist
application activity, research problems or provide to technical support. For more
information about the logs, please see the Troubleshooting section of this document.

© Concord Technologies 2018
15
Settings
The Settings screen allows you to configure the interval in which you want to retrieve
your faxes. Choices include: 1, 5, 10, 15, 30 and 60 minutes.
About
For version and licensing information, as well as instructions for requesting technical
assistance, click on the ABOUT button.

© Concord Technologies 2018
16
FaxAssist Account Configuration
The Concord FaxAssist application is designed to retrieve faxes to be processed by one
of two methods. Either by checking an IMAP email account, or directly through your
Concord account which is setup with forwarding settings set to Inbound Web Services.
Not sure whether to use IMAP or InboundWS? Please refer to the FAQs for more
information on this topic.
The Account Info screen will display the necessary items for configuring an account
using the selected retrieval method (IMAP or InboundWS).
This chapter provides information on the FaxAssist Configuration Settings applicable for
each method, as well as the settings required for printing and/or storing the documents.

© Concord Technologies 2018
17
IMAP Setup
Selecting IMAP from the TYPE drop down list will set the FaxAssist Manager interface up
for retrieving faxes from your IMAP email address.
The Account Info window will look like the screenshot below. The information required
for retrieving faxes is contained in the first section of fields.
IMPORTANT!!! – Do not set up this service to check against email
accounts used by anything other than the FaxAssist service as all messages
that are processed are moved from the INBOX or deleted depending on
the setup

© Concord Technologies 2018
18
Account Name
The Account Name field (A) is used to identify the account profile you are creating. The
only requirement for this alphanumeric field is that it must be unique. Some sample
account names are the fax number, or the department associated with that fax account.
Username
Enter the Username (B) that will be used to login to the IMAP email account. If the
server resides on a Microsoft Exchange server use the format [email protected] in
which the domain specified represents your internal active directory domain. This is not
necessarily the same domain, you accept emails from. Or you can specify
netbiosdomain/username which again is a different format than your active directory
domain. Note: It is important if you choose the second format that you use a forward
slash.
Password
Enter the Password (C) that will be used to login to the IMAP account listed above.
Server Address
Enter the Server Address (D) that the IMAP account resides on.
IMAP Port
Leaving the IMAP Port field (E) blank will use the default ports for SSL or non-SSL based
on the Use SSL checkbox setting (993 or 143 respectively).
Note: If you use a non-standard port be sure to enter it here.
Use SSL
Checking this (F) will set FaxAssist to use SSL (Secure Socket Layer).
Enable Mailbox
Selecting the Enable Mailbox (G) checkbox will enable this account to retrieve messages.
You can add additional entries and selectively enable or disable each.
Auto Discover

© Concord Technologies 2018
19
FaxAssist can automatically detect the most secure settings supported by your IMAP
server. Fill in the Username, Password, and Server and then click Auto Discover (H).
An Auto Discover dialog will open and if permitted, it will automatically detect the
settings necessary and upon closing will populate the necessary settings.
Validate Mailbox
By clicking the Validate Mailbox (I) button, FaxAssist will validate the credentials,
confirming that it can access the email account. A pop-up window will appear
displaying the results of the validation.

© Concord Technologies 2018
20
Inbound Web Services Setup (InboundWS)
Selecting InboundWS from the TYPE drop down list will set the FaxAssist service up for
retrieving faxes from your Concord account using the Concord Inbound Web Services
Interface. The window will look like the screenshot below. The information required for
retrieving faxes is contained in the first section of fields.
Account Name
The Account Name field (A) is used to identify the account profile you are creating. The
only requirement for this alphanumeric field is that it must be unique. Some sample
account names are the fax number, or the department associated with that fax account.
Username
Enter your Concord Fax Online username (B) here. Example: mbx1234567

© Concord Technologies 2018
21
Password
Enter the Password (C) that will be used to login to the Concord Fax account listed
above.
Server Address
The Server Address (D) is pre-populated with the url to access Concords Inbound Web
Services.
Enable Mailbox
Selecting the Enable Mailbox (E) checkbox will enable this account to retrieve messages.
You can add additional entries and selectively enable or disable each.
Validate Mailbox
By clicking the Validate Mailbox button (F), FaxAssist will validate the credentials
entered, confirming that it can access your faxes stored on the Concord network. A
pop-up window will appear displaying the results of the validation.

© Concord Technologies 2018
22
Routing Faxes
The information required for routing faxes is contained in the lower section of fields and
applies to both retrieval methods (IMAP and InboundWS).
For each account that is configured for retrieving faxes, these documents can be routed
to any of the following three options:
• Print to a local or network printer
• Store in one or more folders
• A combination of the above
By default, FaxAssist when storing faxes in a folder location, will also store an
accompanying Metadata File. This file includes the metadata associated with the
incoming fax, such as Concord Message ID, Received Time, Duration of the fax call, Fax
Number, the CSID of the sending fax machine, etc. You can choose to disable the
storing of the metadata file or the metadata file can be customized to meet the needs of

© Concord Technologies 2018
23
your workflow. Please see Appendix B for more information about customizing the
Metadata File.
Notes: If you wish to have faxes both printed and placed in a storage location
you can simply define both a printer and a storage location. When both are
defined both actions will be performed for every fax processed.
Printer Name
The FaxAssist service can print TIFF documents to a printer defined in the Printer Name
field. Currently only TIFF attachments are supported so be sure that your Concord
accounts are setup to forward the attachments to your email account as a TIFF
attachment.
Note: If the Printer Name field is left empty then the print process will be
skipped.
Storage Location
The FaxAssist service can store documents in a folder location. If you wish to have
documents stored to a folder location be sure to define the Storage Location with a path
to a folder that the service running has permissions to write to.
To enter a location, you can simply click on the browse icon and browse to select the
desired location.

© Concord Technologies 2018
24
If you wish to enter multiple locations, you will need to manually type any additional
paths, separating each path with a semi-colon “;”.
This can be defined as a UNC path \\server\folder or as a local folder location c:\folder\.
Notes:
• If the field is left empty, the file storage process will be skipped.
• If you are saving to a Network Storage location you will need to use the
full UNC path (e.g. \\server\<user>\Faxes\FaxAssist)
Do not store Metadata File
If you are retrieving faxes via inbound web services, or if you have metadata enabled on
forwarded emails then you have the option to disable the storage of the received XML
file.
If you do not wish to have metadata files stored enable this feature.
Validate Output
The Validate Option feature will test to ensure it can access your configured
destination(s), whether that is a printer, or a folder location.

© Concord Technologies 2018
25
Advanced Options
There are additional advanced features that can be configured in FaxAssist, which are
accessible under the Options tab. As some of these features are specific to the retrieval
method chosen, they are documented separately.
IMAP Advanced Options
The following features only apply to IMAP retrieved faxes.
Archive Mailbox
Archiving moves emails to a secondary folder as they are processed. This allows you to
review faxes that have been processed in case of an error. To alleviate this folder from
filling up you can set the Purge Days setting to automatically clean up this folder of
messages older than the number of purge days.
Note: It is recommended that you set the archive folder so that processed emails
can be accessed should something not work correctly. If you do not configure an
Archive Mailbox, emails will be deleted after they are processed.
Failed Mailbox
By configuring a Failed Mailbox, emails that fail to be processed will be moved to a
secondary folder. This allows you to take the necessary action.

© Concord Technologies 2018
26
Auth Type
This setting allows you to override the default authentication type. This is typically only
required when you are pointing to a Microsoft Exchange server that requires NTLM
authentication. Valid values are LOGIN, NTLM, CRAM-MD5 and PLAIN.
The Default = LOGIN.
Purge Days
If the Archive Mailbox has been setup, then this setting will determine the number of
days that messages will remain in the Archive Mailbox folder before getting removed.
This will default to 7 days if left blank and Archive Mailbox is defined.
Domain
The Domain is only required if enabling NTLM authentication which is typically used by
Microsoft Exchange.

© Concord Technologies 2018
27
InboundWS Advanced Options
File Name Format
The following feature only applies to InboundWS retrieved faxes.
By specifying a File Name Format in the FaxAssist Manager you can enable a custom
filename to be saved on each account. The filename can contain text and/or values
based on the tokens chosen.
To enter tokens, start by entering a left curly bracket { and the list of available tokens
will be displayed.
If you are using a date token in the File Name Format, invalid folder/file
characters will be removed for you. Invalid characters are: \ / : * ? " < > |

© Concord Technologies 2018
28
Available Filename Tokens
Token Description Sample Value
{account} Concord Account ID assigned to
the receiving account
68985
{calledNumber} Number that received the fax call 12065772972
{callerNumber} Caller Identification of the calling
fax machine
12063745000
{completedTime} Date and Time the fax call ended 02/26/2018 8:00 AM
{currentPage} Current page being processed 1
{downloadedTime} Date and Time the fax was
processed by FaxAssist 02/26/2018 8:00 AM
{duration} Number of seconds it took to
receive the fax
15
{messageID} Unique Concord identifier of the
message
ct12065772972-
20180226112513028-321-1
{randomid} Random generated unique
identifier
TDIAA8QHUG
{receivedTime} Date and Time fax call started 02/26/2018 7:59 AM
{resolution} Resolution of the received fax 1
{senderCSID} CSID received from sending fax
machine
TESTCSID1
{speed} Speed the fax was received at 26400
{timeZoneOffset} Time Zone offset of received fax -07:00
{totalPages} Total number of pages in received
fax
9

© Concord Technologies 2018
29
Example File Name Format:
{messageID}_{receivedTime}_{callerNumber}_{calledNumber}_{totalPages}
Resulting file will be saved as:
d:\faxes\<account>\archived\ct12065772972-20180226112513028-321-
1_02262018 800 AM_12063745000_12065772972_1.tif
Note: The DateTime tokens used in the Header, Footer and File Format fields
have the ability of using the .Net DateTime formatting for customizing the output
of those tokens. Please see the Appendix A for more information.
Additional Advanced Options
The following features apply to both IMAP and InboundWS retrieved faxes.
Time Zone
The time zone field is a drop-down list of available time zones. By setting this value you
can control the time zone on all date-time stamps that are displayed within the
document header, document footer, document filename, and also within the XML file.

© Concord Technologies 2018
30
Max Message
This field sets the maximum number of messages that the service will process for each
mailbox at one time. If this field is left blank, the default value is 20 messages.
Note: If set to 0 this will force the application to retrieve all messages on every
poll. Not recommended for high volume accounts as the memory required can be
quite large.
Header Format
By specifying a Header Format, you can enable a custom header to be printed on each
document. The header can contain text and/or values based on the tokens chosen.
Note: The custom header only applies if the document type you are receiving is
a PDF or TIFF.
To enter tokens, start by entering a left curly bracket { and the list of available tokens
will be displayed

© Concord Technologies 2018
31
Available Header Tokens
Token Description Sample Value
{attachmentName} Name of fax file ct12065772972-
20180226112513028-321-
1.tif
{account} Concord Account ID assigned to
the receiving account
68985
{calledNumber} Number that received the fax call 12065772972
{callerNumber} Caller Identification of the calling
fax machine
12063745000
{completedTime} Date and Time the fax call ended 02/26/2018 8:00 AM
{currentPage} Current page being processed 1
{downloadedTime} Date and Time the fax was
processed by FaxAssist 02/26/2018 8:00 AM
{duration} Number of seconds it took to
receive the fax
15
{messageID} Unique Concord identifier of the
message
ct12065772972-
20180226112513028-321-1
{randomid} Random generated unique
identifier
TDIAA8QHUG
{receivedTime} Date and Time fax call started 02/26/2018 7:59 AM
{resolution} Resolution of the received fax 1
{senderCSID} CSID received from sending fax
machine
TESTCSID1
{speed} Speed the fax was received at 26400
{timeZoneOffset} Time Zone offset of received fax -07:00
{totalPages} Total number of pages in received
fax
9

© Concord Technologies 2018
32
Example Header Format:
Received {receivedTime} from {callerNumber} to {calledNumber} Pg {currentPage}
/ {totalPages}
Resulting Header will display as:
Received 02/26/2018 from 12063745000 to 12065772972 Pg 1/1
Note: The DateTime tokens used in the Header, Footer and File Format fields
have the ability of using the .Net DateTime formatting for customizing the output
of those tokens. Please see the Appendix A for more information.
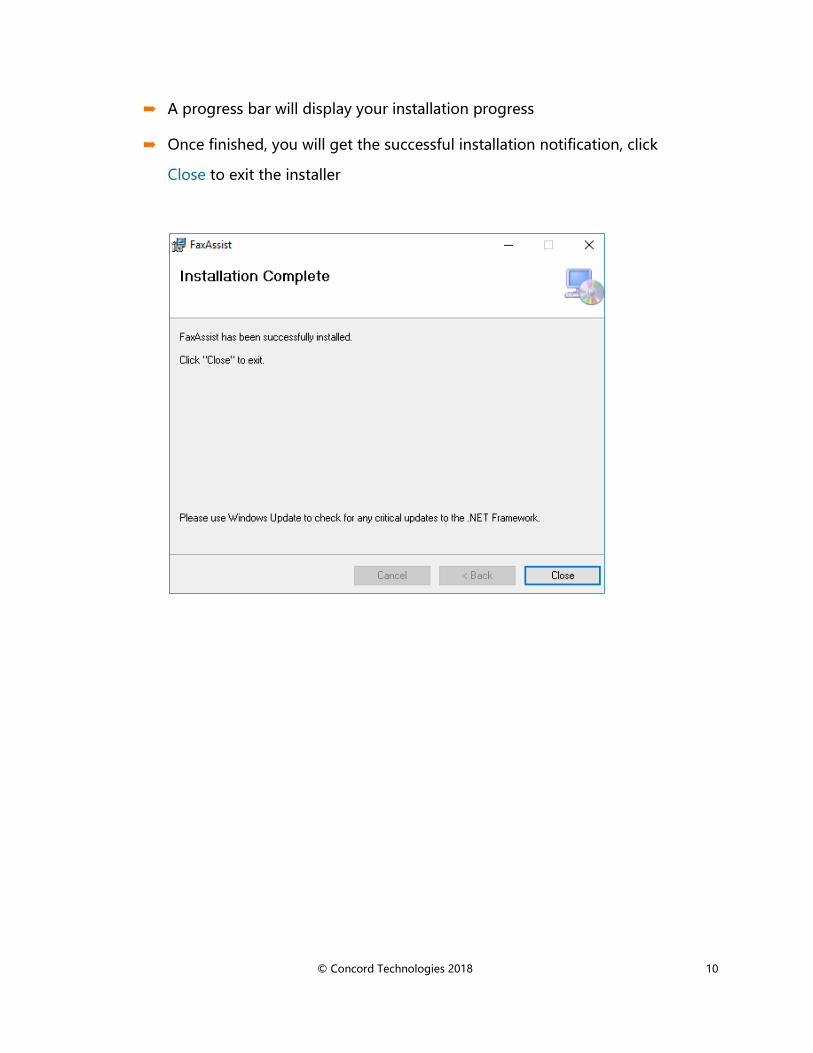
Footer Format
By specifying a Footer Format, you can enable a custom footer to be printed on each
document. The footer can contain text and/or values based on the tokens chosen.
Note: The custom footer only applies if the document type you are receiving is a
PDF or TIFF.
To enter tokens, start by entering a left curly bracket { and the list of available tokens
will be displayed.
© Concord Technologies 2018
33
Available Footer Tokens
Token Description Sample Value
{attachmentName} Name of file being printed or
stored
ct12065772972-
20180226112513028-321-
1.tif
{account} Concord Account ID assigned to
the receiving account
68985
{calledNumber} Number that received the fax call 12065772972
{callerNumber} Caller Identification of the calling
fax machine
12063745000
{completedTime} Date and Time the fax call ended 02/26/2018 8:00 AM
{currentPage} Current page being processed 1
{downloadedTime} Date and Time the fax was
processed by FaxAssist 02/26/2018 8:00 AM
{duration} Number of seconds it took to
receive the fax
15
{messageID} Unique Concord identifier of the
message
ct12065772972-
20180226112513028-321-1
{randomid} Random generated unique
identifier
TDIAA8QHUG
{receivedTime} Date and Time fax call started 02/26/2018 7:59 AM
{resolution} Resolution of the received fax 1
{senderCSID} CSID received from sending fax
machine
TESTCSID1
{speed} Speed the fax was received at 26400
{timeZoneOffset} Time Zone offset of received fax -07:00
{totalPages} Total number of pages in received
fax
9

© Concord Technologies 2018
34
Example Footer Format:
Received {receivedTime} from {callerNumber} to {calledNumber} Pg {currentPage}
/ {totalPages}
Resulting Header will display as:
Received 02/26/2018 from 12063745000 to 12065772972 Pg 1/1
Note: The DateTime tokens used in the Header, Footer and File Format fields
have the ability of using the .Net DateTime formatting for customizing the output
of those tokens. Please see the Appendix A for more information.

© Concord Technologies 2018 35
Using the FaxAssist Service
Controls for starting, stopping and refreshing the service are provided on the bottom
left corner of the interface.
Starting the FaxAssist Service
FaxAssist is intended to run as a service. Once you have configured your accounts, the
service should run continuously collecting and processing your inbound faxes. You can
configure FaxAssist to automatically start when your computer boots (see the FAQs
section for more information), or you can manually start the service.

© Concord Technologies 2018 36
To start the service manually, click on the Start button. You may see an in-progress
message, while the service is starting.
Once started, the status will turn green and display the service is running.
Stopping the FaxAssist Service
To stop the service, click on the Stop button, and the status will turn red and display that
the service is stopped.
Refreshing the FaxAssist Service
Click on the Refresh button to refresh the status of the FaxAssist service.
Installation Verification
The FaxAssist application keeps a log of all actions that are performed by the service.
This is a good starting point should things not appear to be working properly.
You can access the log files by clicking on the View Logs button in the upper right-hand
corner. Look for the word ERROR in the log file for any configuration issues or problems
in processing email accounts.
Note: The logs will not be generated until the service has been started.

© Concord Technologies 2018 37
Troubleshooting / FAQs
Question: I need help with Concord FaxAssist, what do I need when I contact you?
FaxAssist will create log files for all interactions, and any potential errors that may occur.
If you experience any problems using the application, the Concord Support team will
require these log files to troubleshoot the issue.
You can find these log files bundled in a zip file, by simply clicking on the Request
Technical Assistance link found in the About screen.

© Concord Technologies 2018 38
Question: Should I use IMAP or InboundWS?
The IMAP solution is intended for users who choose to have their inbound faxes
delivered to an email account and want to route them to a printer or storage location.
This approach provides an easy way to archive the faxes to an email archive folder. To
accomplish this, your inbound fax account must be configured on the Concord network
to Receive Faxes Using Email.
The InboundWS solution is a direct retrieval of inbound faxes from the Concord
network. This approach also supports routing faxes to multiple storage locations to
allow for both a workflow process and an archive directory. To accomplish this, your
inbound fax account must be configured on the Concord network to Use Inbound Web
Services for receiving faxes.

© Concord Technologies 2018 39
Question: How can I have FaxAssist Service start automatically when my
computer boots?
By default, the Fax Assist Service will be a manual start (meaning you will need to start
the service from the UI, or from the Services Manager). However, you can configure this
service to automatically start when the computer boots. To do so, go into the Services
Manager (type Windows+R keys to open the Run dialog, type services.msc and press
Enter), and right click on the Concord Fax Assist service, and select properties.
From the Startup Type dropdown, choose Automatic of Automatic (Delayed Start), and
save your settings. To note, Automatic will start during the boot process, while services
set to start as Delayed will start shortly after boot. Starting your service Delayed
improves the boot performance of your server and has some security benefits

© Concord Technologies 2018 40
Question: How can I have FaxAssist Manager start automatically when my
computer boots?
➡ If you do not already have a shortcut to FaxAssist, you will need to create
one, and drag it to the desktop.
➡ Next, open Run command box by simultaneously pressing Windows logo
and R keys (Windows logo + R). In the Run command field, type
shell:startup and then press Enter key to open Startup folder.
➡ Finally, copy and paste or cut and paste the app shortcut from the desktop
to this Startup folder to add the app to startup.
Question: My faxes aren't saving to my mapped drive, why?
If you are saving to a Network Storage location, you will need to use the full UNC path
(e.g. \\server\<user>\Faxes\FaxAssist) and will need to configure the FaxAssist service
with a set of domain credentials that have permissions to write to the directory.
Question: Can I print any document type from FaxAssist?
If you are setting up a Printer as the destination, the User Account in the Portal must be
configured to deliver TIFF files, other file types will not work at this time.

© Concord Technologies 2018 41
Concord Support
Should you need any assistance with FaxAssist or any other Concord product or service,
please contact our Premium Support Team.
▪ Email: [email protected]
▪ Telephone: +1 (206) 441-3346, option 2
▪ Fax: + 1 (206) 441-7965
Premium Support hours are Monday – Friday, 6:00am to 6:00pm (Pacific Time)

© Concord Technologies 2018 42
Appendix A: DateTime Tokens
The DateTime tokens used in the Header, Footer and File Format fields have the ability
of using the .Net DateTime formatting for customizing the output of those tokens.
If no DateTime formatting is used the output of the token will make use of the current
culture settings.
Please refer to the Microsoft documentation regarding DateTime formatting options:
Standard DateTime formatting or Custom DateTime formatting.
Note: If you are using a date token in File Format, invalid folder/file characters
will be removed for you. Invalid characters include: \ / : * ? " < > |
Valid date and time tokens:
▪ completedTime
▪ downloadedTime
▪ receivedTime
Examples using the date and time, 02/26/2018 8:17:23 AM:
Example Token Example Output
{receivedTime} 02/26/2018 8:17:23 AM
{receivedTime:yyyy-MM-dd hhmmss} 2018-02-26 081723
{receivedTime:yy-MMM-dd h:m:s t} 18-Feb-26 8:17:23 A
{receivedTime:dd-MMMM-yyy
hh:mm:ss tt} 26-February-2018 08:17:23 AM
{receivedTime:D} Thursday, February 26, 2018
{receivedTime:o} 2018-02-26T08:17:23.0000000-7:00

© Concord Technologies 2018 43
Appendix B: Metadata Customization
As stated above, when storing faxes in a folder location, FaxAssist will also store an
accompanying metadata file. This ONLY applies to faxes retrieved via InboundWS.
The MetadataTemplate.xml file found in the application folder for FaxAssist, can be
customized, and is used in the output of any metadata file that FaxAssist creates for a
fax document. The filename MetadataTemplate is required, however the contents of
the file and the file extension can be customized to better fit your work flow.
Below is the default MetadataTemplate.xml, which can be customized:
IMPORTANT!!! – Only 1 MetadataTemplate file should exist
in the application folder (regardless of the extension).

© Concord Technologies 2018 44
For example, if your work flow uses the INI file format, you could rename the
MetadataTemplate file to MetadataTemplate.ini and set the Tokens (as listed below) to
the fields your work flow expects.
Example of the MetadataTemplate as an INI file, MetadataTemplate.ini:
[Fax Details]
MessageId=%{MessageID}
MessageType=%{ContentType}
Contenttype=%{ContentSubType}
AttachmentName=%{FileName}
SenderCSID=%{RemoteCSID}
CallerNumber=%{CallerNumber}
CalledNumber=%{CalledNumber}
UserId=%{UserID}
ReceivedTime=%{ReceivedTime}
TimeZone=%{TimeZone}
NumPages=%{NumPages}
Duration=%{Duration}
Resolution=%{Resolution}
Speed=%{Speed}

© Concord Technologies 2018 45
Available Metadata Tokens
Token Description Sample Value
%{CalledNumber} Number that received the fax call 12065772972
%{CallerNumber} Caller Identification of the calling fax
machine
12063745000
%{CompletedTime} Date and Time the fax call ended 02/26/2018 8:00 AM
%{ContentSubType} The file format of the attachment image/tiff/TIFFG4
%{ContentType} Type of content Fax
%{Duration} Number of seconds it took to
receive the fax
15
%{FileName} Name of file being printed ct12065772972-
20180226112513028-321-
1.tif
%{MessageID} Unique Concord identifier of the
message
ct12065772972-
20180226112513028-321-1
%{NumPages} Total number of pages in received
fax
9
%{ReceivedTime} Date and Time fax call started 02/26/2018 7:59 AM
%{RemoteCSID} CSID received from sending fax
machine
TESTCSID1
%{Resolution} Resolution of the received fax
1 – Standard Resolution
2 – High Resolution
1
%{Speed} Speed the fax was received at 26400
%{TimeZone} Time Zone offset of received fax -07:00
%{UserID} Concord Account ID assigned to the
receiving account
68985