Advanced Computer Graphics Shadow Techniques CO2409 Computer Graphics Week 20.
Upload
corey-barrettCategory
view
234download
2
Computer GraphicsIntroducing DirectX
CO2409 Computer Graphics
Week 5-2

Today’s LectureToday’s Lecture
1. Terminology
2. A History
3. DirectX Components
4. DirectX 10 and 11
5. Overview of the Direct3D Pipeline
6. Programming Direct3D – First Steps

TerminologyTerminology
• DirectX is an SDK– Software Development Kit– Set of software tools, APIs and documentation to enable
development of specialist software
• DirectX contains a set of APIs– Application Program Interface– An API is a definition of how to interface with (i.e. use) some
other software or device– DirectX interfaces with the hardware drivers– These APIs take the form of libraries of functions and types
that can be used in C++, C# etc.– [Gamers: The TL-Engine is also an API]
DirectX – A HistoryDirectX – A History
• Conceived in 1994 • Intended to provide low-level access to
system resources within a high-level OS• First few iterations were fairly unusable• However, by DirectX 5 provided a
reasonable development platform• Later versions have been developed in
close collaboration with hardware vendors• Windows XP supports up to DirectX 9.0c• Windows Vista and 7 can use DirectX 11
– Vista needs an update for DX11
• DirectX is now part of the core Windows SDK rather than a stand-alone download

DirectX ComponentsDirectX Components
• DirectX contains many components– We are mainly interested in Direct3D:
• 2D and 3D graphics
• Low level control for performance
• Higher level “helper” classes and functions for ease of use
• DirectX also contains:– DirectInput
• For keyboard, mouse, joystick & other input devices.
• Replaced in part by the XInput API (Xbox related)
– GDI+, for drawing high quality text– A large number of deprecated components…

Older ComponentsOlder Components
• DirectX is generally backwards compatible with previous versions– So a DX9 program will work in DX11 for example
– Many out-of-date components are still usable:• DirectSound – Replaced by XAudio2 or XACT
• DirectDraw – 2D drawing, superseded
• DirectPlay – Network gaming, deprecated
• DirectShow – Video playback, superseded
• DirectMusic – Music playback, deprecated
– These components should be avoided• Ensure you read the latest documentation
• Avoid tutorials for older versions of DirectX
DirectX GraphicsDirectX Graphics
• The DirectX SDK provides:– An API: a set of functions and classes
• We will use this extensively (in C++)
– Full documentation, tutorials and samples• Very useful reference
– Development Tools, mainly regarding textures, and pixel, vertex & geometry shaders
• We will see a little of these
– To use the SDK you should• Get the last standalone version (June 2010)• Ensure your windows is up to date• Optionally get the Windows SDK for the latest tools / support• CM142 is ready for DirectX development

DirectX 10DirectX 10
• DirectX 10 is a major update over DirectX 9, compatible only with Windows Vista and above
• Key changes:– Refined architecture to suit Vista / Win 7
• The Windows GUI is now DirectX driven (Aero)
– Requires minimum specification for hardware• Less need for fall-back techniques on weaker hardware
– Adds geometry shaders• Manipulate/generate triangles at render-time
– Shaders can write back to GPU memory• Shaders can dynamically update geometry
• Reduce CPU work, e.g. particle system entirely on GPU

DirectX 11DirectX 11
• DirectX 11 is strict superset of DirectX 10– Far fewer changes than from DX9 to DX10– DX10 code works almost without change in DX11
• Supported on Windows 7 natively– Windows Vista needs an update– Officially released October 2000– DirectX 11.1 is supported by Windows 8 only
• Mainly improved multi-core / multi-threading support– Only minor changes regarding graphics
• Will use Direct3D 10 on Windows 7 in this module– D3D10 is different in many features/details to D3D9– DX11 contains only a few graphics changes which are not
important for this module

DirectX Graphics PipelineDirectX Graphics Pipeline
• The operation of D3D can be illustrated as a ‘pipeline’ of operations– From input 3D geometry to final
pixel rendering– This diagram is for DX10
• We will look at most stages over the next few weeks– Roughly in order
Reproduced from the DirectX SDK documentation

Pipeline: Input StagePipeline: Input Stage
• We first send 3D geometry to the input-assembler– The 3D elements in our scene– Artistic, technical or abstract,
whatever suits our application
• In any case the input is 3D meshes: vertices / polygons– 2D elements can be rendered by
using flat 3D geometry
• Usual to create/load geometry in CPU memory, then send to DX
This 3D geometry is in the form of “triangle strips”, a method of storing
geometry using less memory

Pipeline: Shaders IntroPipeline: Shaders Intro
• Most stages of the pipeline operate automatically with only some limited setup:– We set states that determine how that stage will work– E.g. We can set states to perform additive or multiplicative
blending in the final output stage
• However, 3 pipeline stages are programmable– The vertex, geometry and pixel stages
• We write programs to make these parts operate– These programs are called shaders– Written in a new language – we will use HLSL
• Shaders gives immense flexibility in exactly how the pipeline will operate

Pipeline: Vertex ShaderPipeline: Vertex Shader
• The vertex shader stage is primarily responsible for:– Positioning the geometry in the
overall 3D scene– Transforming 3D geometry into 2D
geometry ready to render– Other geometry processing
• E.g. animation, deformation Transformation from 3D
to 2D geometry
• Will need to introduce some maths concepts– Matrices and transformations– Plus the idea of a camera and 2D projection
• Will revisit the idea of different coordinate systems– E.g. World space, camera space

Geometry Shader & RasterisationGeometry Shader & Rasterisation
• The vertex shader just described works on vertices one-by-one
• Next the geometry shader works on entire triangles in a mesh– Used for special purposes– Will not see this stage in this module
• The rasterization stage processes each finalized triangle– Determine all the pixels that are inside– Calls the pixel shader for each– Automated stage (no shader)
Rasterization stage scans the 2D triangle geometry to
determine all the pixels within
The Pixel Shader stage is called for each one
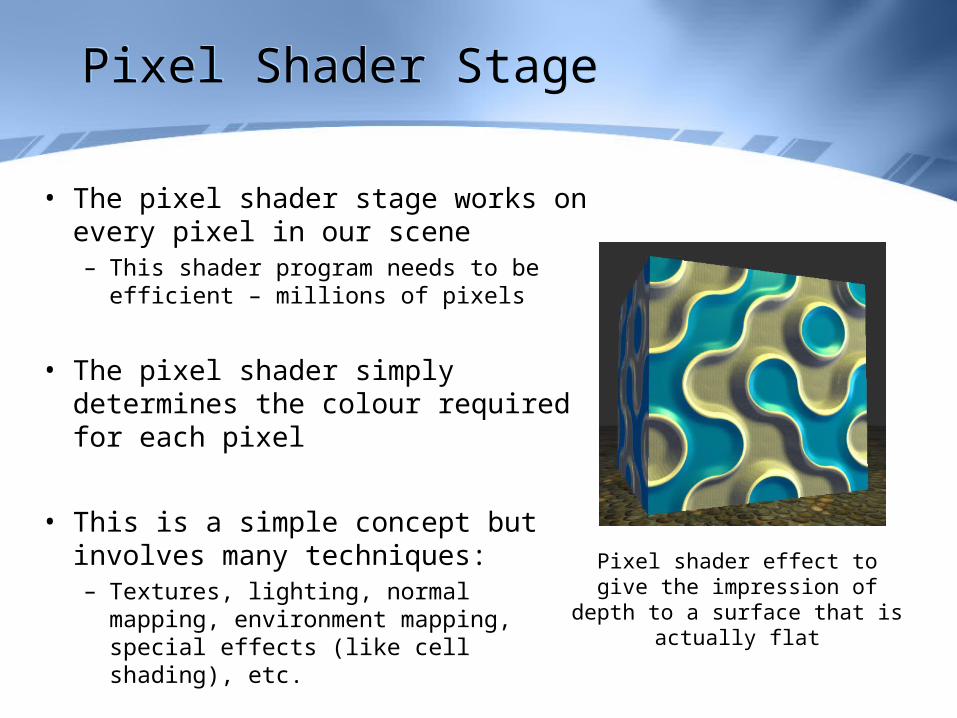
Pixel Shader StagePixel Shader Stage
• The pixel shader stage works on every pixel in our scene– This shader program needs to be
efficient – millions of pixels
• The pixel shader simply determines the colour required for each pixel
• This is a simple concept but involves many techniques:– Textures, lighting, normal mapping,
environment mapping, special effects (like cell shading), etc.
Pixel shader effect to give the impression of depth to a surface
that is actually flat

Pipeline: LightingPipeline: Lighting
• We can calculate lighting in one of the shader stages– Usually the pixel shader
• Three main kinds of lights– Directional lights– Point lights– Spot lights
• The effects are calculated with some simple vector mathematics
• Note that shadows are dealt with separately from lights– Shadows are much more complex and
require processing at several stages Light Types

Output StageOutput Stage
• The final stage outputs pixels onto the viewport• However, we may wish to blend the new pixel colours
with those already on the viewport – To create transparency effects– Same effects we saw when working with sprites
• E.g. Additive, multiplicative, alpha blending
• So this stage is actually called the output-merger stage
• This summary has covered all the pipeline stages– Except the Stream-Output stage, which we won’t use (it allows
the graphics pipeline to update the geometry it is working on)
• The overall process is similar for other graphics APIs

Direct3D Programming – First StepsDirect3D Programming – First Steps
• First create a bare minimum Windows application– Need a window to render into (even for a full screen app)
• Initialise DirectX and point it at our window– This stage is fairly standard for all DX applications
• Prepare some 3D geometry to render– Type in something simple (e.g. a single triangle or a cube)– Or load geometry from a file (involves parsing)
• Send the geometry to DirectX
• Set the minimum states to initialise the pipeline stages• Then render: a single call will now trigger the pipeline
and process / draw our geometry